#how to add a search box in windows 10
Explore tagged Tumblr posts
Visit Tumblr Blog
Explore Tumblr blogs with no restrictions, modern design and the best experience.
Last Seen Tumblr Blogs


Fun Fact
In 2020, Tumblr had 29.4 million users in the US.
Text
Move Deco Cars to the Transportation Category
Hello! When I was looking for the answer on how to make this happen, I couldn't find a straight forward tutorial. Instead, I found a couple bits and fucked around in S4S and pieced it together so, I wanted to put out a quick straightforward tutorial so others don't have to do the same.
You'll just need S4S for this. On the main screen, click "My Projects" and then select your deco car file.

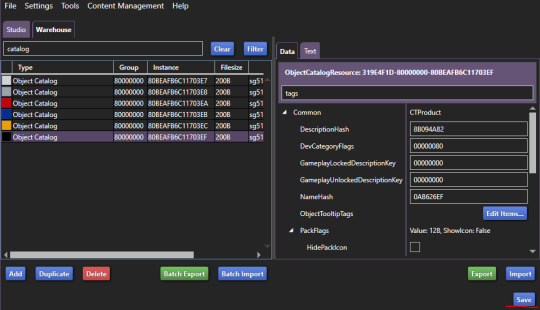
Now, go to the "Warehouse" tab. This is in the top left next to the Studio tab.

In the filter search bar type in "catalog" and then click "Filter." Then, click on the first one. On the right hand side, type "Tags" in the filter.

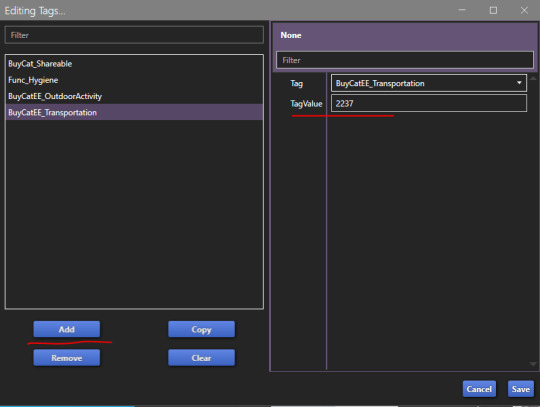
Scroll down on the right side and click the "Edit Items" button next to "Tags."

In the window that opens, click "Add" on the left hand side. Then, in the "TagValue" box on the right hand side, type in 2237, and then hit tab on your keyboard. Once you tab away, it will automatically update the "Tag" box directly above that to say "BuyCatEE_Transportation" Click the save button.
Now, you just need to repeat these steps for every "Object Catalog" entry your item has. There's one for each swatch. Make sure to save your package file when you're done!
Congrats, your deco car is in the transportation category in the build mode catalog now!

If they're currently showing in a category like Decor>Sculptures or Activites and Skills>Outdoors and you'd no longer like them to appear there now that they'll be in the transportation category, you can fix that quickly on the "Studio" tab.
While on the "Studio" tab, click the "Tags" tab on the right hand side. Uncheck any categories you no longer want the item to be in, and then click the "Apply To All Swatches" button. Again, don't forget to save when you're done.

That's it! It's actually really easy, it just gets a bit time consuming depending on how many swatches your deco car has, and how many deco cars you have. The build mode categories being nice and clean and not seeing items repeated across multiple sections is so nice though. 10 out of 10 Highly Recommend

74 notes
·
View notes
Text
Alright. I'm making this post because I was unpleasantly surprised to find Microsoft had forcibly downloaded an """"ai assistant"""" onto my computer (called Copilot), and because finding a site that actually told me how to kill it for good -- in clear, truly step-by-step terms -- was way harder than it needed to be.
Preface: this is only relevant if you're running Windows 11.
Here is your target:

If you see this logo on your taskbar -- or... have Edge installed on Windows 11 -- you've got Copilot. You can't delete it on its own, Microsoft has integrated it into the OS as best they can. The most you can do is disable it (instructions for which are at the very end of this post).
So... to REALLY get rid of it you need to uninstall Microsoft Edge, because it's a part of/reliant on Edge. A lot of bells and whistles of Windows are also reliant on Edge, like widgets, but I never use those. I use my PC almost exclusively for gaming, and I don't want this slimy "ai" shit on my computer. I use Firefox anyway. Edge can go die as far as I'm concerned.
Here's the actual steps, copy-pasted from a website that took me way too long to find. It also really makes my browser chug for some reason, which is why I'm copy-pasting the whole thing. If you still want to look at the site itself, put it in reader view as fast as you can (link to site).
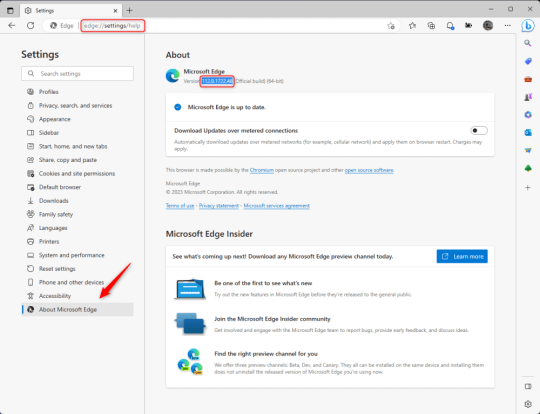
1.) Open Microsoft Edge, type "edge://settings/help" in the address bar, and then press Enter.
2.) Click "About Microsoft Edge" at the bottom of the left-hand pane. Copy the version number at the top of the screen, under Microsoft Edge.
3.) Press Windows Key + S to open Windows Search.
4.) Type "Command Prompt", right-click the result, and then select "Run as Administrator".
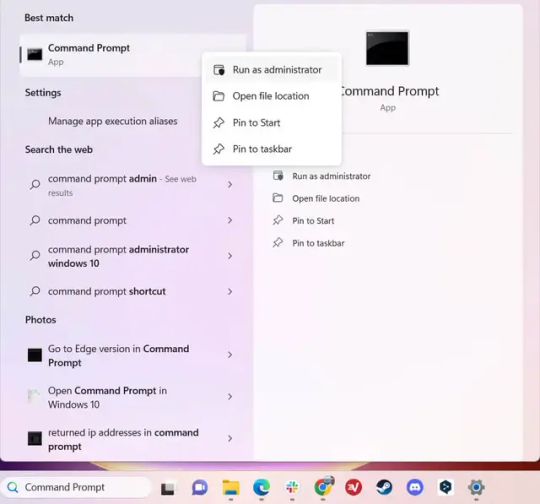
5.) The User Account Control (UAC) prompt will appear. Click "Yes".
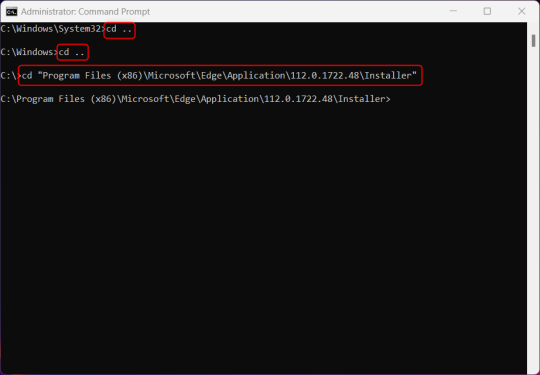
6.) Navigate to Edge’s “Installer” directory by using the cd command. Depending on which directory your Command Prompt opens in by default, you may need to use the "cd .." command to go back a level or two.
Once ready, run this command:
cd “Program Files (x86)\Microsoft\Edge\Application\Version Number\Installer”
Replace "Version Number" with your actual version number copied earlier.
7.) Next, run this command to uninstall Microsoft Edge:
setup –uninstall –force-uninstall –system-level
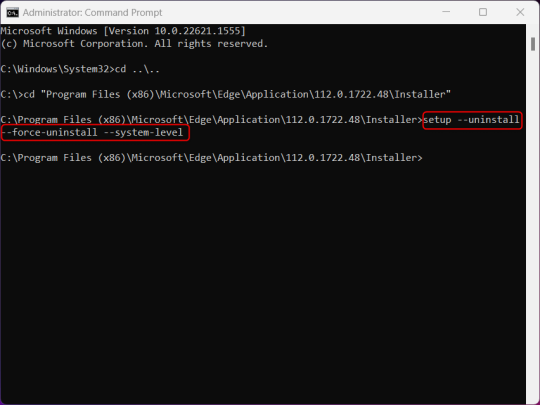
((It will look like nothing happened! Don't worry!))
8.) Restart your PC for the changes to take place.
((HOWEVER, Windows will try to reinstall it the next time your PC updates (or whenever it feels like it lol) so there's a second half to this))
1.) Press Windows Key + R to open Run.
2.) Type "regedit" in the text box and click OK to open the Registry Editor.
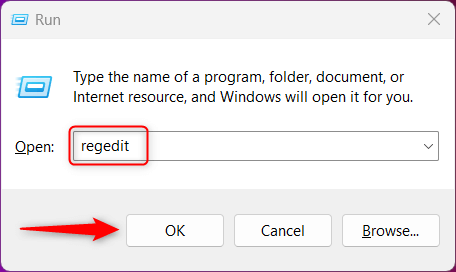
3.) The User Account Control (UAC) prompt will appear. Click "Yes".
4.) In the Registry Editor, navigate to HKEY_LOCAL_MACHINES\SOFTWARE\Microsoft.
5.) Right-click the "Microsoft" folder, hover your cursor over "New", and then select "Key".
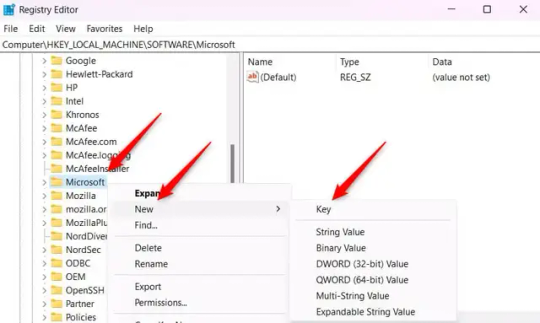
6.) Rename the new Key to "EdgeUpdate".
7.) Right-click EdgeUpdate, hover your cursor over "New", and then select "DWORD (32-bit) Value".

8.) Right-click the new value, which is currently named "New Value #1".
9.) Select "Rename" from the context menu.
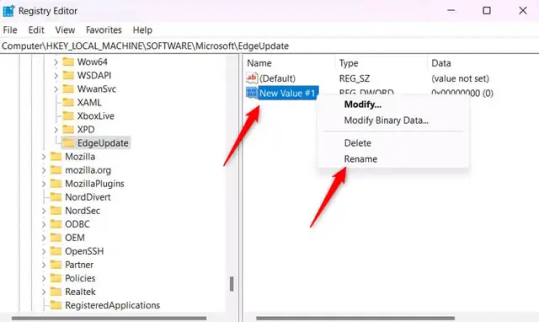
10.) Rename the value to "DoNotUpdateToEdgeWithChromium".
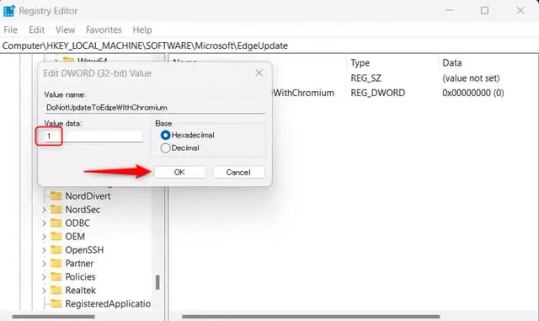
11.) Right-click the newly-named DoNotUpdateToEdgeWithChromium value and select "Modify" from the context menu.
12.) The Edit DWORD (32-bit) Value window will appear. Change the Value data to "1" and then click OK.
((You are now free. If you ever run into a really serious, unavoidable issue with your OS that's clearly a result of Edge being gone, you can redownload it like a regular app. But you should be fine.))
((And, if for some reason you want still want Edge around but just want the copilot thing gone, here's what you do:
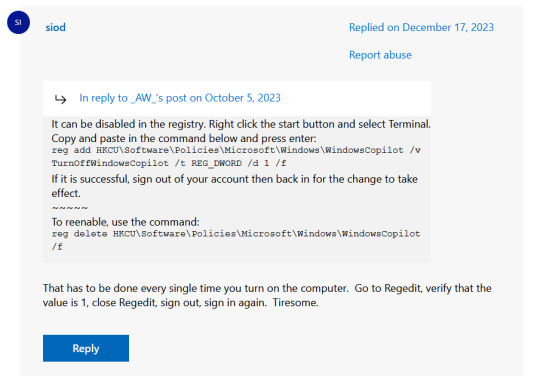
The command, for ease of copy-pasting: reg add HKCU\Software\Policies\Microsoft\Windows\WindowsCopilot /v TurnOffWindowsCopilot /t REG_DWORD /d 1 /f
You can't actually truly delete Copilot (without deleting Edge), only disable it. And as the reply says, you do have to do this every time you turn the computer on. I haven't tested that myself, but I believe it. I assume/hope that excludes just waking the computer up after it goes to sleep, but I don't know for sure.))
120 notes
·
View notes
Text
How to Connect Cricut Joy to Computer? (Full Guide)
Wants to Learn ‘how to connect Cricut machine and you want to connect it to a computer‘? You can do it effortlessly with the help of this article. This machine is more compact than other Cricut cutting machines. With a sleek appearance and amazing results, Cricut Joy is the choice for many crafters. As a Cricut user and a professional crafter, I’m here to guide you with it. Let’s learn how to connect Cricut Joy to computer.
When it comes to connecting Cricut Joy to a computer, this machine doesn’t support a USB connection. Therefore, you have only one option for connection – Bluetooth. So, I’ll tell you about the Bluetooth connection on your Windows and��Mac computers. Let’s get ready with the process.
Minimum System Requirements for Cricut Joy
Before you connect a machine to your computer, check whether your computer and machine are compatible. Why does this matter? You might know that Cricut runs a software called Design Space. This software has some minimum system requirements for a device that is added to it. So, let’s check out those requirements.
For Windows
For a Windows system, Design Space needs Windows 10 or 11 or the latest versions with an AMD processor or an equivalent one. It should also have a minimum of 2GB RAM, good free storage, and compatibility with Firefox, Microsoft Edge, and Google Chrome.
For Mac
For a Mac computer, Cricut Design Space needs a 14.x or newer operating system. Also, an Intel or equivalent processor. It should also have 2GB RAM and 300 MB storage. When you know the most important requirements, let’s dive into the steps involved in connecting your machine to a computer.
How to Connect Cricut Joy to Computer (Windows and Mac)
To connect your machine to your computer, you need to follow the steps given below. Here, you’ll see the steps for Windows and Mac computers.
For Windows
To connect your machine to a Windows computer, check out the given steps. As you already know, Cricut Joy doesn’t support USB, so we’ll stick to the Bluetooth connection.
To start, unpack your machine and collect all the accessories from the machine’s box.
Then, install your machine at least 10-15 feet away from the computer.
Now, connect the machine to a power source and turn it on.
After that, go to the Start menu and hit the Settings option.
Next, you should click on the Devices option.
In the next step, ensure that Bluetooth is ON.
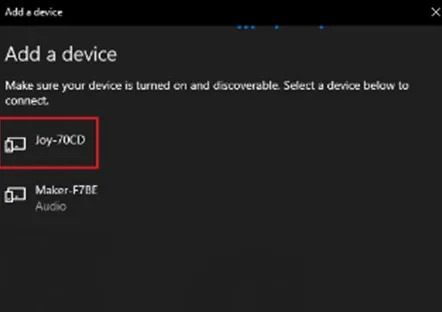
Moving forward, hit the “Add Bluetooth or other device” option.
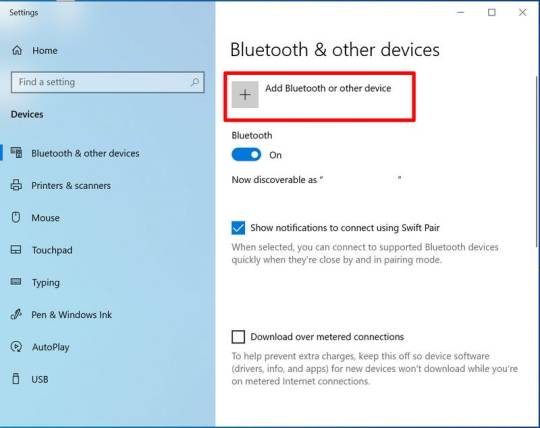
Also, tap on the Bluetooth and let the computer search for your machine model.
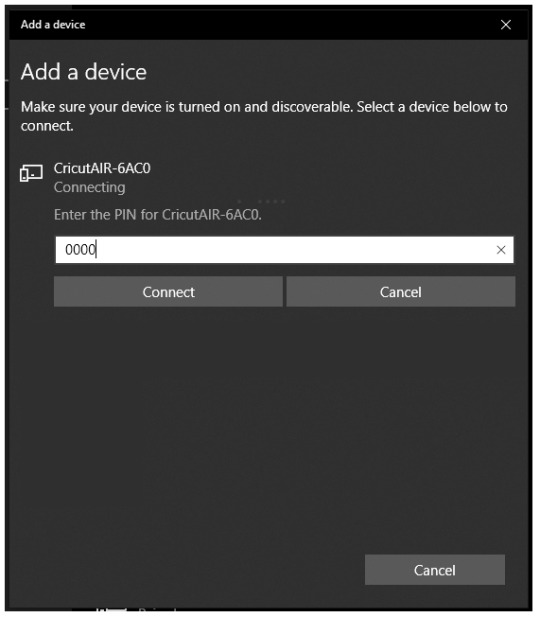
When the machine appears on the screen, select it and let it connect.
Lastly, your devices are paired with Bluetooth connection.
That’s how to connect Cricut Joy to computer. When you know everything, it’s time to try the connection for your devices.
For Mac
If you’re a Mactonish, below are the steps for connecting your crafting machine to your Mac.
To get started, connect your Mac to a power cord.
Then, install your machine on a flat surface and keep it at least 10-15 feet away from your Mac.
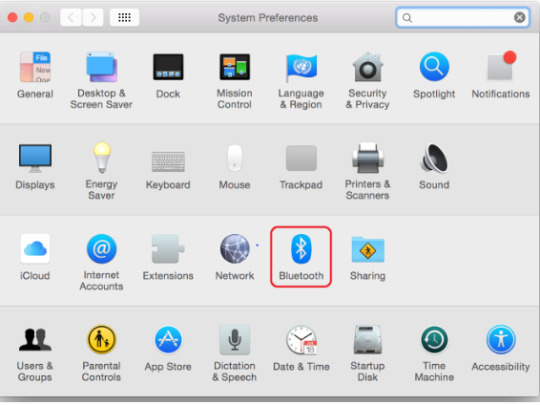
Now, go to your Apple menu and select System Preferences.
After that, locate the Bluetooth option on the Mac.
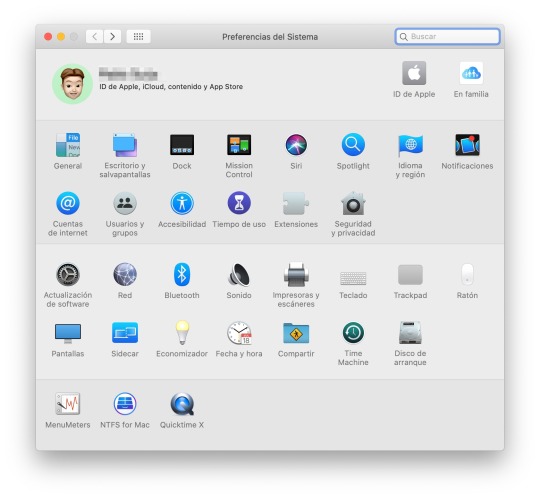
Also, check whether Bluetooth is ON.
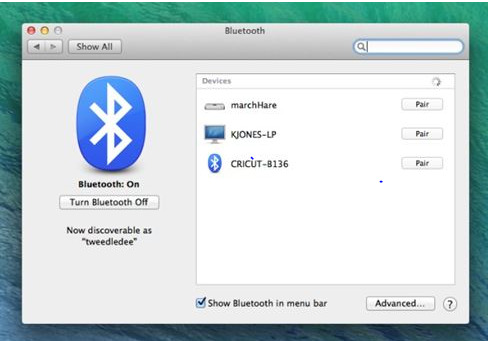
In the next step, choose your machine from the list of available devices.
Finally, your machine is paired with your Mac.
That’s how to connect your machine to a Mac computer. Finally, you can start creating projects with your brand-new machine. Now, let’s take a look at the steps for a Mac computer.
Conclusion
Finally, you know how to connect Cricut Joy to computer. Start creating your DIY projects quickly. This machine is excellent for beginners and for DIY pros. The only thing you need to care about is the minimum system requirements for the Design Space software. Besides that, this tiny tool is travel-friendly and works well for you. The crafting machine can become your companion when you need it.
FAQs
How to Download Cricut Design Space on Computer?
To get the Design Space software on a computer, follow these steps:
To start, launch a browser and navigate to https://cricut.com/setup.
Then, accept the Terms of Use and its Privacy Policy.
Now, hit the Download button on the screen.
After that, let the file download under the Downloads folder.
Next, visit the Downloads folder and find the app file.
Double-click on the folder to open it.
In the next step, run the installation and continue with the on-screen directions.
Finally, sign in to your account.
Can I Connect My Cricut Joy to Computer via USB?
No, you can’t use a USB to connect your machine to your computer. It doesn’t support USB. However, you can use a Bluetooth connection to set up a connection between your machine and your computer.
How to Connect Cricut Joy to Windows 11?
You can connect a machine to Windows 11 via a Bluetooth connection. Go to your laptop and search for Bluetooth and other devices. Then, turn on the Bluetooth option. Now, let your laptop locate your machine. Then, choose your machine’s name from the list of devices and let the pairing happen.
Source: How to Connect Cricut Joy to Computer
#how to connect Cricut Joy to computer#cricut design space download#cricut design space app#cricut design space software#cricut joy setup
2 notes
·
View notes
Text
How to download a hard copy of vimeo on demand purchase
Need: VLC
Recommended: ffmpeg (I'm just using this because I already have it)
ffmpeg installation: https://windowsloop.com/install-ffmpeg-windows-10/
Tried: yt-dlp, jdownloader, various extensions on chrome and firefox, inspecting source and searching for "vod" "progressive" "akamaized", etc. Results: FAILURE
This tutorial is working at the time it was made, which is currently: 1:20am, August 26, 2023.
Install Chrome Extension: Vimego Simple Video Downloader
Go to the video you've purchased on vimeo
On the video screen on the right hand side a list will appear with the options available to download. Click on the highest resolution to download, audio is not included, download audio separately.
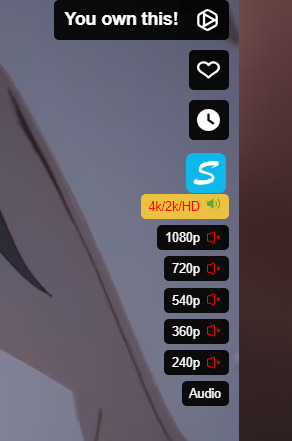
For the sake of making things with ffmpeg work smoothly, rename the files to something simple such as video.mp4 and audio.mp4 (the audio is downloaded as an mp4 but we'll convert this in the next step using ffmpeg!)
In the folder that the audio was downloaded to, right click, open command window, enter this code to run ffmpeg to convert the audio from mp4 to mp3: ffmpeg -i input.mp4 -map 0:a -vn -b:a 256k output.mp3
If you don't have ffmpeg then I suggest finding an online mp4 to mp3 converter.
To download subtitles, follow the guide outlined here: https://gist.github.com/pjmartorell/384aa1d019f919af6b84894038bf29aa?permalink_comment_id=2814547
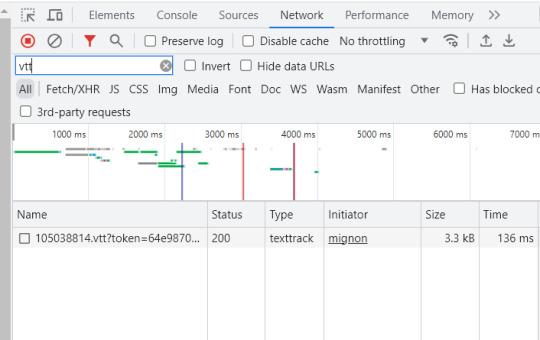
Simplified instructions from link above: In the video player on vimeo, click on the CC button and select your preferred language. Right click, select Inspect, go to the tab that says Network, in the Filter search bar, type in VTT, select this and right click to open in new tab.
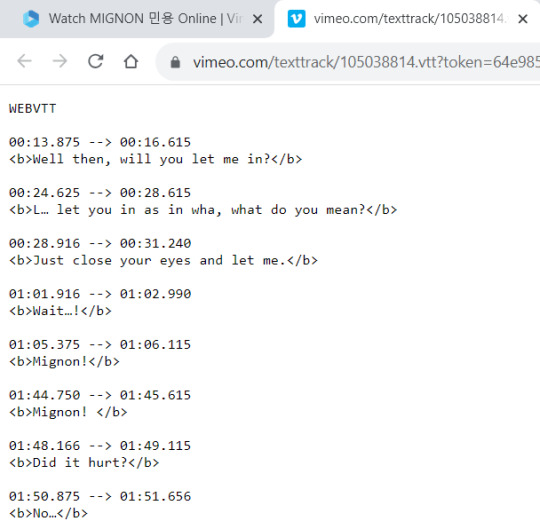
Right click on the tab that you just opened which, select save as. You can rename the file to whatever, such as subtitle.txt or sub.txt, etc. You don't have to save it as a VTT, just adding .txt to the end of the name will save it as a txt file.
Go to https://maestra.ai/tools/subtitle-converter/txt-to-srt and drag and drop your txt file to convert it.
After converting the srt file should look like this when you open it:
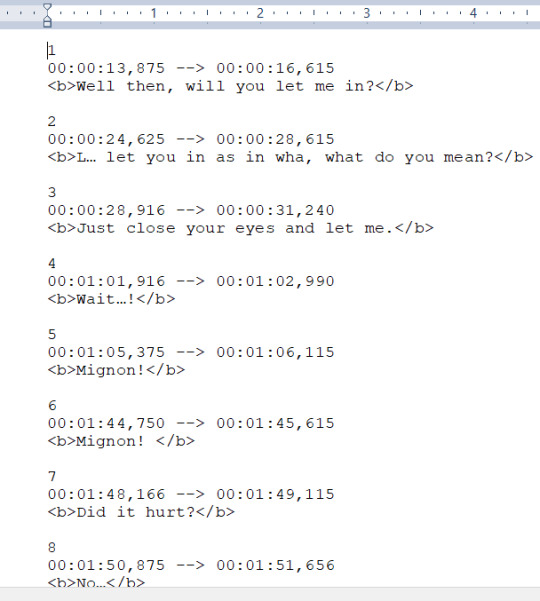
You now have the mp4, mp3, and srt file.
All that's left is to combine the video and audio using either of two methods: ffmpeg, or VLC. Ffmpeg takes a couple seconds, VLC will take a while, when I tried it took a few minutes.
Using ffmpeg, enter this code into the command prompt making sure to replace "video.mp4" etc. with what you named the files: ffmpeg -i video.mp4 -i audio.mp3 -c:v copy -c:a copy output.mp4
Done, if you don't have ffmpeg, but do have VLC, use the method below ->
Follow these steps from: https://moviemaker.minitool.com/moviemaker/add-audio-to-video-in-vlc.html
Step 1. Run VLC media player. Step 2. Go to Media > Open Multiple Files… Step 3. Load the video file by clicking the Add button. Step 4. Check the boxes Show more options and Play another media synchronously… Step 5. Click Browse, a new window will pop up, add the audio file and click Select. Now the window should look something like this:
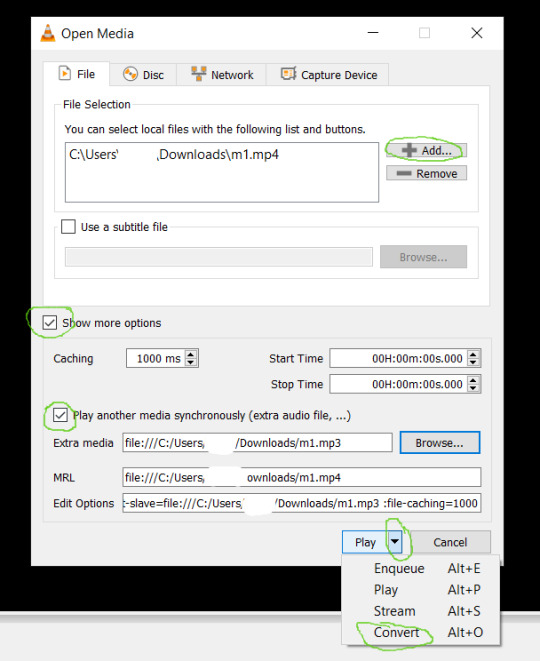
Step 6. Click the down arrow icon next to Play and select Convert. Step 7. In the Settings section, next to Profile, click the wrench icon. Then switch to the Audio Codec tab, check the options Audio and Keep original audio track. Click Save. Step 8. Click the Browse button to select a folder to save the converted video. Name the file as you like, then click Start.
Now you can open the new mp4 file in VLC and it will have audio. If VLC doesn't automatically add the subtitle file then go to the tab that says Subtitle > Add subtitle file > Select your srt file. Make sure the srt file is in the same folder as your mp4. VLC should automatically add it when you select your video, so if you follow these steps and it still doesn't work then your file may be corrupted.
If you want to overlay the subtitle to the mp4 so that way you can watch it on a device that doesn't have VLC... Here is a guide I just found using ffmpeg to convert, it works fine for me: https://www.bannerbear.com/blog/how-to-add-subtitles-to-a-video-file-using-ffmpeg/ The link above uses this code: ffmpeg -i input.mp4 -vf subtitles=subtitle.srt output_srt.mp4 (only replace bolded parts with your file names.) There may be other guides on how to add it without using ffmpeg but I haven't tried any of them. Good luck, and happy watching!
#i don't have any other video to use as an example other than mignon lol#vlc#ffmpeg#guide#tutorial#vimeo#save#ignore what the subtitles say pwease :3#tbh i don't know how tf i managed to do all this and not scream in agony the entire time#this is so time consuming
4 notes
·
View notes
Text
I use this software.
It's an easy way to turn off settings in windows that you'd normally have to put a bit of effort in to find. Settings like trackers and a bunch of other stuff.
It works for windows 10
Revo Uninstaller is a great program for force uninstalling programs you couldn't uninstall otherwise. Like Microsoft Edge.
If you use it to uninstall edge and its not finding the program when you search for it, you'll have to open edge, then use the target mode which allows you to select desired programs manually.
target the opened Microsoft edge window and it'll start the process.
The cool thing about this program is that is does a hard uninstall, completely wipes out everything related to the program and it's stuff in the registry.
might I add, if you uninstall Microsoft edge, it will remove copilot as well. I've done this and it's been a few months since then I think. I've updated my laptop a few times and it hasn't come back. though if you want to avoid edge from coming back with an update, here's a vid on the more indepth process of its removal.
Something I usually do is go into my app manager or program manager window and read through what all is installed. I delete anything I didn't install myself and doesn't have a purpose. If you're not tech savvy, have a web browser open to search for programs you don't recognize. if it looks necessary, leave it alone. Usually windows is pretty good about not letting you uninstall important programs but it's good to play it safe.
Doing this whenever you notice a sudden dip in pc performance is a great way to catch unwanted programs that may have slipped in with something you downloaded recently. Paired with a good anti malware program like Malwarebytes, youre pretty much golden.
last tip.
It's a pretty good practice to Optimize and Defrag your harddrive regularly. It basically does a clean sweep of your harddrive by deleting unnecessary files.
Here's a link to instructions on how to do that. When you set about this process, you should have an option of to what degree the clean up is done (meaning what files is targeted), how regularly this process happens.
It usually deletes residual files, stuff in your downloads folder, trash folder, and stuff like that. you'll get to see what all is there when you do it before you confirm the clean up.
After doing all that, you've got yourself a nice and clean pc that should work better than it did before.
All the programs I linked to are free and can be used without paying for them.
I've been super into computers since I was kid so these are pretty solid methods of pc maintainance on the virtual side. If you have a proper box pc, and I guess if you're feeling brave enough to open up your laptop, don't forget to clean use an air duster to clean out your consul.
I promise you, nothing will help more than a clean pc and cooling fans.
i thought my laptop was on its last leg because it was running at six billion degrees and using 100% disk space at all times and then i turned off shadows and some other windows effects and it was immediately cured. i just did the same to my roommate's computer and its performance issues were also immediately cured. okay. i guess.
so i guess if you have creaky freezy windows 10/11 try searching "advanced system settings", go to performance settings, and uncheck "show shadows under windows" and anything else you don't want. hope that helps someone else.
#its because the os is not properly optimized#you have to debloat it then strip it down to bare bones before doing anything#in regards to windows running like shit#you see#windows is an accordian of itself#its backwards compatibility isnt a simulator#its still got its old old code deep in there#im not sure how far back it is#but in windows 11 when it first came out#you could right click and back pedel in a sense to older option menues#meaning it just kept going into the code and you would get older option menu designs#backwards compatibility is good#but i feel like windows needs to be gutted and scrubbed clean#then new lighter software needs to be developed for backwards compatibility#i doubt it would happen but honestly windows is such a heavy and chunky os#mac and chrome os is relatively light by comparison#its because mac is office work targeting so theres not as much bloat going on there#someone correct me if im wrong though#this is in regards to windows running like shit#windows 10
227K notes
·
View notes
Text
How to Setup Cricut Machine? [Computer & Smartphone]
Do you want to learn how to set up a Cricut machine? Worry not—this blog covers all the necessary information you need to know.
Cricut machines are paving a new path for crafters around the world to make brand-like DIY projects at home. In addition, the Cricut machines are easy to use and come with advanced connectivity options to streamline the setup process. By following the instructions, crafters can complete the machine setup and start their crafting journey easily.
However, some users may find it difficult to complete the setup from scratch or face issues. As a result, it is necessary to have a proper understanding of the setup. So, let’s learn about the Cricut machine setup on PC and smartphone devices.
How to Set Up a Cricut Machine on a Computer?
Follow-up guides will help you complete your machine setup on a computer device using the Bluetooth connection and downloading the Design Space app. Follow the steps properly to establish a successful connection.
Step 1: Connect via Bluetooth
First, you need to unbox your machine, turn it on, and then place it within the 10-15 feet range of your computer.
On your PC, open the Settings window by going to the Start menu and then choose the Devices option.
On the next page, ensure that the Bluetooth toggle is on and then click on the “Add Bluetooth or other device” option.
Click on Bluetooth on the open page; it will start looking for your crafting machine.
You need to look for your machine name in the results and select it. (You can look for your machine’s Bluetooth device code, which is printed or engraved on your machine and is near the serial number.)
If asked to enter the password, then enter 0000 and then click on the Pair option.
Now, the Bluetooth pairing of your crafting machine will be complete with your PC.
After that, you can move to the next step of your Cricut machine set up.
Step 2: Download Cricut Design Space
At the start, browse the official Cricut support website Cricut.com/setup on your PC and type the name of your machine in the search section.
After that, you need to click on the checkbox next to the “I agree to Cricut Terms of Use and Privacy Policy” option, then select the Download button.
Now, the download process will start, and the screen will show a progress bar indicating the download status.
Wait for the download to complete; double-click on the Cricut Design Space setup file in your browser to begin the installation.
Open the downloaded file from the Downloads section on your device.
Once you launch the Cricut file, a prompt will ask if you trust this app. Select the right option to continue with the installation process.
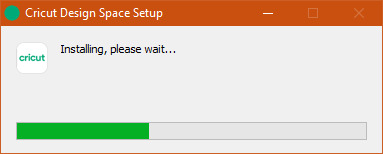
Now, the installation process will appear in a pop-up box.
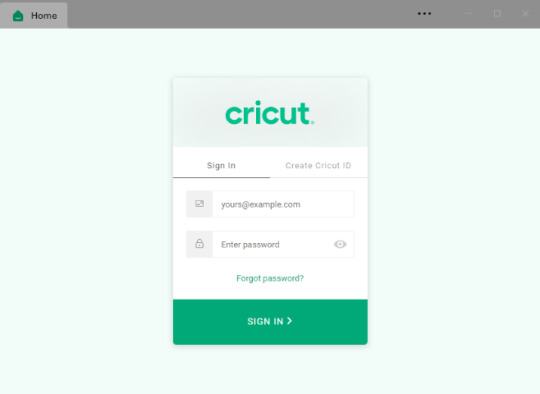
After the installation, you should complete the sign-in process using the Cricut account credentials. (If you are a new user, then click on “Cricut Cricut ID” to make a new account.)
Then, choose the option to set up your machine and then select it.
When the setup process is complete, you can continue with your first project.
How to Set Up a Cricut Machine on a Smartphone?
Carefully read the procedures below and use them if you want to set up your cutting machine on your smartphone.
Step 1: Establish the Bluetooth Connection
First, you need to turn on your machine and bring your smartphone near your machine.
From the homescreen, tap on Settings and then go to Bluetooth.
Now, you need to ensure that the Bluetooth toggle is on; if the toggle is off, then tap on it to turn it on.
Your device will search for all the available Bluetooth devices and show them on the screen.
From the list of devices, you need to tap on your machine. (If you see a prompt to type the PIN, then enter 0000 and then tap on Pair.)
Next, your device will be connected via Bluetooth.
Step 2: Download the Cricut App
Go to your smartphone device’s home screen and tap on the Google Play Store or Apple App Store icon.
Once the app opens, go to the search bar and enter ‘Cricut Design Space‘ to search for it.
From the list of results, tap on the Cricut green C icon and then choose the Install option to start the download.
Once the download is complete, open the app. (The app icon will also be added to your device’s home screen.)
Complete the sign process and tap on the Machine Setup option.
Click on your machine model number from the options, and then the setup will be complete.
Here you go! You can now create awesome crafts using the Cricut supplies and machines.
Final Words
With the help of the above-mentioned guides, you can complete your Cricut cutting machine setup on a PC or smartphone running various operating systems, such as Mac, iOS, Android, and Windows. Carefully use the specific method according to the device you are using, and start your crafting journey right away. However, if you are facing any problems or need more help with the setup, then it would be good to seek further help.
Frequently Asked Questions
How to set up my Cricut machine?
Below are the major steps you can follow to set up your machine with a device.
First, you should turn on the machine and keep it close to your PC or mobile phone.
After that, connect both devices using the USB cable or Bluetooth connectivity.
Next, you are required to download and install the Design Space app on your device.
Once the download is complete, complete the sign-in process. (Create a new account if needed.)
Then, choose the Machine Setup option to search for the machine.
Select the machine, and the setup will be successful; you can start using it.
Why can’t I connect my Cricut machine?
The process of setting up the machine is simple, but you can face many problems. Here are some major reasons you are unable to complete the setup.
The machine may not be compatible with your device if it does not meet the system requirements or lacks Bluetooth connectivity.
You are following the wrong method when setting up the machine.
You have downloaded a corrupt or outdated app.
The devices are not within the same network connection range.
Connection settings on computers or smartphones are not correct, and other issues.
Can I use Cricut machine without completing setup?
Cricut mainly offers heat press devices and cutting machines. If you want to use the heat press device, then there is no need to complete the setup. However, if you want to work with the cutting machine, then it is necessary to connect it to a desktop or smartphone device to use its functions. In addition, without completing the setup, you will not be able to use the machine. For the hassle-free setup of your machine, you need to have proper knowledge of the whole procedure.
Source: How to Setup Cricut Machine
#how to setup cricut machine#setup cricut machine#Cricut Setup#cricut machine setup#Cricut design space Software
1 note
·
View note
Text
How to Connect Cricut Wirelessly: A Guide for Beginners
Are you a Cricut enthusiast planning to start your crafting journey? Well, you have come to the right place! I am going to walk you through all the essential info you need to learn in order to connect Cricut wirelessly.
Cricut crafting machines come with Bluetooth and USB connectivity to provide the utmost comfort in setting up the device. Crafters familiar with the machine can easily get started with the machine. On the other hand, some new users can find it difficult to complete the setup. In this case, it is best to have a thorough understanding of the process beforehand. So, get through the whole blog and grasp all the vital details and steps to wirelessly set up heat presses and cutting machines.
How to Setup Cricut Cutting Machines Wirelessly?
You can wirelessly connect your cutting machine to both computer and smartphone devices. So, here you will find a quick guide to completing the setup on both devices.
Method 1: Connect Cricut Wirelessly to Your Computer
Begin by unboxing the cutting machine and placing it near your computer device. (Make sure both devices are within the 10-15 feet range.)
(If you are using the Explore One machine, then you should insert the Bluetooth toggle to establish the connection.)
Next, attach the machine plug to a power socket and turn it on by pressing the power button.
From the Settings window on your PC, choose the Devices option.
After that, go to “Bluetooth and other devices,” turn on the Bluetooth toggle, and select “+Add Bluetooth or other device.”
On the next open page, select the Bluetooth option and move forward.
Henceforth, the printer will start looking for the available printers within its range.
Once you see your cutting machine model number on the screen, click on it.
If a prompt comes on the screen to type a PIN, you need to enter 0000 to move forward.
Afterward, the wireless connection process will be complete.
In order to use the cutting machine, you need to complete the setup process through the Design Space app. In the next step, you will learn about the setup process.
Begin by visiting the Cricut official website on your PC.
From the screen, click on the Apps option, which will take you to the Design Space download page.
In the open window, you will see that the Download button is greyed out.
To enable the download button, move to the terms and conditions checkbox and click on it.
After that, you will see that the Download button is now green; click on the button to initiate the download process.
Wait for the design app download process to complete, and then open it after that. (Or you can access the file from the Downloads folder on your device to install it.)
Before the app installation process begins, it will ask if you trust this app and want to open it; click on the correct option to start the installation.
Afterward, a box will show up on the screen to indicate installation progress.
Once the installation process is complete, launch the software/app and complete the login process. (Or create a new account if necessary)
Then, choose the Machine Setup option to search for the cutting machine you are using.
From the result, click on your machine’s name, and the setup process will be complete.
Method 2: Connect Cricut to a Smartphone Wirelessly
The following method will allow you to get complete knowledge of how to connect Cricut wirelessly to a smartphone device.
For the first step, power on your cutting machine and bring the mobile device within its 10-15 feet range.
On the smartphone, tap on the Settings icon and then go to Bluetooth.
Now, turn on the Bluetooth toggle and tap on your machine name based on the result.
Follow the instructions to complete the machine’s Bluetooth connection process.
After completing the Bluetooth connection, the same as the computer device, you need to download the app on your mobile phone. Follow the below guide to do that.
First and foremost, launch the Apple App Store or Google Play Store app on your mobile phone device.
Next, type cricut design space in the search section by tapping on the search bar.
After that, tap on the Search option.
From the list of open results, tap on the correct app icon and then tap on Get to start the downloading. (You might need to type your iTunes password if you are downloading the app on your iOS device.)
Once the downloading is finished, the app icon will appear on your system home screen.
You can open the app from the home screen or from the application downloader you are in.
After opening the app, you are required to complete the account sign-in process. (If you are using the machine for the first time, you need to create a new account.)
On the app, you can tap on the Machine Setup option to search for your cutting machine.
Afterward, follow the on-display instructions, and your machine setup process will be complete.
Here you go! Your machine is ready to create beautiful and stunning DIY projects.
How to Set up Cricut Heat Press Wirelessly?
If you are planning to connect Cricut wirelessly to a heat press machine, then you can do it easily without using any app except EasyPress 3. The following guide will help you complete the process without any issues.
First of all, connect your heat press machine’s plug to a power outlet.
Afterward, go to the Bluetooth page on your phone and establish a wireless connection between both devices.
On your smartphone device, download the Cricut Heat app from the App or Play Store.
Once that process is complete, launch the heat app on your device.
Also, you need to tap on the Sign Up option to initiate the machine setup process.
From the heat press names open on the screen, select your machine’s name, and select Connect.
Now, the app will verify the heat press with your registered email address.
Moreover, select the Activate option after reading the terms and conditions.
Once the machine setup process is complete, a notification will show up on the screen.
Finally, you can use your machine to apply icon-on designs on various products.
Final Words
This piece of content shares all the need-to-know info about the machine setup. You can effortlessly complete the setup process of your device without any issues. However, before downloading the Design Space app, make sure to check the device compatibility and system criteria to avoid any complications. If everything is as required, you are good to go to start using the crafting devices. I wish you a happy crafting journey!
Frequently Asked Questions
Does Cricut Require Bluetooth?
All the newer models of the Cricut machines come with both USB and Bluetooth connectivity technology. However, if you are using the first model of the Explore series, then you need to use the Bluetooth adaptor to establish the wireless connection. All other devices come with built-in Bluetooth to set up the device to a smartphone and computer.
Why Can’t I Connect Cricut Machine Wirelessly?
There could be various reasons if you are unable to make a wireless connection to your machine. Some common ones are given below.
The machine is not compatible with your PC or mobile phone.
The OS of your device has not been updated.
Using the outdated or incompatible Design Space app.
Either of your devices is facing a technical problem.
You are not following the correct connection process.
If you are having these types of problems, then ensure that everything is required or seek help if the problem seems too complex.
Does My Cricut Need to Be Connected to Wi-Fi?
There is no need to connect your machine to Wi-Fi in order to use it. These devices have Bluetooth and USB connectivity options. However, you might need to connect your computer or smartphone to Wi-Fi while downloading the Design Space app to complete the setup.
Source :- https://cricuthelpcenter.wordpress.com/2024/08/29/how-to-connect-cricut-wirelessly-a-guide-for-beginners/
0 notes
Text
I'd like to add on a bit to the privacy discussion. I wholeheartedly agree its important to preserve computational insight and teach kids at least how to operate a desktop, or even better give them some basic ability to code, even if it's just 10 or 15 rudimentary commands in C; however, I also think somebody should be able to take a laptop right out of the box with no prior experience with computers and not be forced into the data-stealing hell hole that is Windows OS.
I personally run Linux on all my machines, but it's always been something which you need to manually install. People shouldn't be required to know the ins and outs of computing in order to avoid getting their shit stolen by corporate douche bags who use consumer's personal info to fund their umpteenth yacht.
While, I don't endorse it, I understand completely why people skip privacy policies, why they don't read through permissions, or why they just go with whatever OS and browser is on their machine upon startup. Even with my, albeit not great, but at least some idea of how computers work it's hard, and in some cases impossible to avoid the rampant data-mining in most digital services. You can't even buy a TV anymore that doesn't record audio and video of the entire room, sending transcripts to whatever company so they can get personal info from your private conversations to sell to advertisers (without any compensation to you, of course, because the world is a wonderfully fair and just place.)
This got longer than intended so sorry if my point was somewhat lost, moral of the story data-mining sucks ass and please install Linux and Firefox, with Duck Duck Go for your search engine. Also install uBlock Origin. And fuck google.
Me: oh yeah, if you think school photography is hard now, try imagining doing this with film.
The new girl: what’s film?
Me: … film. Like… film that goes in a film camera.
New girl: what’s that mean?
Me: … before cameras were digital.
New girl: how did you do it before digital?
Me:… with film? I haven’t had enough coffee for this conversation
114K notes
·
View notes
Text
How to Connect Cricut Joy to Laptop: A Comprehensive Guide
Have you got your brand-new Cricut Joy? That’s great! As a DIYer, I know what it feels like to have a new compact and functional machine like a Cricut Joy. I’ve used this crafting machine for many years now and have created hundreds of fun crafts with it. Being a professional crafter and Cricut expert, today, I will tell you how to connect Cricut Joy to laptop. So, if you have a Windows PC or a MacBook, welcome to my latest blog post.
Before getting started, let me tell you that the Cricut Joy machine doesn’t support a USB connection, unlike other Cricut machines. Hence, you’ll only have the Bluetooth connection to connect your machine to a laptop or computer. Wait! Do you know about the Cricut Design Space software? If not, let me give you a brief about it. So, let’s move forward with the blog and learn something new.
Cricut Design Space Download on Your Computer
Before starting to learn how to connect Cricut Joy to laptop, you’ll have to learn about Cricut’s software. This software is specialized for Cricut machines that offer various features such as designs, fonts, texts, templates, etc. Before you start with your Cricut, you’ll have to download and install this app on your PC or laptop. Let’s look at the steps to get it.
For Windows
If you have a Windows laptop, you can use the steps below to learn how to download and install the Cricut app on your laptop.
Initially, navigate to design.cricut.com on an internet browser.

Now, check the box for Cricut’s Terms and Conditions.
After that, click on the Download button to get the app.
Moving forward, go to the Downloads location on the laptop.
Next, find the Cricut software’s file and double-click on the file.
Let the file install on your laptop device.
Then, sign in to your Cricut using the Cricut login details.
Now, a Cricut Design Space icon will be added to your desktop screen.
You can pin it to your taskbar or simply drag it to the taskbar to create a shortcut.
Finally, you can enjoy your Cricut app to create your favorite projects. Now, you can check the steps for how to connect Cricut Joy to laptop.
For MacBook
If you have a MacBook, you can easily download and install the “Cricut Design Space“. Follow the instructions given below to learn more about installing the Cricut software on a MacBook.
Initially, navigate to cricut.com/setup on an internet browser and tick the box to agree to Cricut’s Terms and Conditions.

Now, hit the Download button.
After that, select a location to save your file.
Now, the Cricut software will start downloading.
Then, head to your Downloads folder and search for the Cricut app file.

When your app is installed, drag that icon to your Applications folder.
Now, your app will be added to the Application folder.
To open the app, move to the Applications folder and click on your app.
Now, click on the Open button to open the Cricut Design Space app.

Then, finish the installation by signing into your Cricut ID using Cricut login details.
Finally, your MacBook will install the Cricut Design app. Then, you can use your Cricut cutting machine for all the projects you’re going to make.
How to Connect Cricut Joy to Laptop?
When you understand how to install the Cricut Design app on your laptop, you’re ready to connect your Cricut machine to your laptop device using my steps.
For Windows
If you have a Windows laptop, you can check the steps given below to connect your Cricut Joy to it.
To start, unbox your Cricut product and check all the accessories inside the machine’s box.
Then, install your Cricut machine within 10-15 feet away from your laptop.
After that, click on the Start menu and select the Settings option.
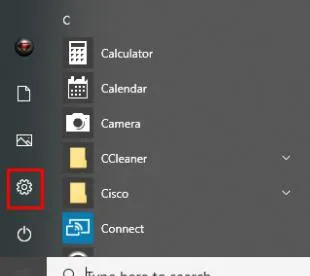
Now, tap on the Devices option.
Next, ensure that your Bluetooth is ON.
Thereafter, hit the “Add Bluetooth or other device” option.
Tap on the Bluetooth option and allow your laptop to search for your machine.
Once you see your machine in the list, click on it to connect it.
Lastly, you’ll see your devices connected.
Finally, you’ve learned how to connect Cricut Joy to laptop. Now, you can start creating anything of your choice.
For MacBook
When you have a MacBook, you can easily connect your Cricut product to it. Below are the steps you need to follow to connect Cricut to Mac.
Turn on your MacBook using the power button.
Then, install your Cricut product on a safe and flat surface within 10-15 feet away from the MacBook.
Now, head to the Apple menu > System Preferences.
After that, locate the Bluetooth option.

Next, check if the Bluetooth option is ON.

You’ll have to connect your Cricut model from the displayed list of devices.
Now, pair up your Cricut cutting machine with a Mac computer.
That’s it for connecting a Cricut Joy machine to a laptop. You’re ready to use your machine the way you want.
Conclusion
Overall, I have told you enough to learn how to connect Cricut Joy to a laptop. Hopefully, this guide has helped you in some way. Now, you must be ready to connect your Cricut machine to a device. Moreover, download and install the Cricut app from Cricut’s official website to complete the connection. As Cricut Joy doesn’t have USB connectivity, you have only the option for a Bluetooth connection. So, stick to that and connect your new Cricut machine to it.
FAQs
Why Is My Cricut Joy Not Connecting to My Laptop?
There could be a few reasons why your Cricut machine is not able to connect to your laptop. The most common reason can be that your laptop doesn’t meet the minimum system requirements set for the Cricut connection. Another reason can be that your devices are too far from each other.
How to Connect Cricut Joy to Computer Without Bluetooth?
No, you can’t connect your Cricut Joy to a computer without Bluetooth. To connect your Cricut machine, you can only use a Bluetooth connection. You can connect your Cricut to any device, including Windows, Mac, iOS, and Android. Moreover, you’ll have to download and install the latest version of the Cricut app to successfully connect your devices together.
How to Connect My Cricut Joy to Android?
To connect your Cricut cutting machine to an Android, follow these steps:
To start, make sure that your Cricut and the Android device are 10-15 feet apart.
Now, head to the Settings option and select the Bluetooth option.
After that, enable the Bluetooth option and head to the Available Devices option.
Then, select your Cricut model from the list of available devices.
Next, allow your devices to pair together.
1 note
·
View note
Text
How to Connect the Cricut Maker via Bluetooth: Steps Guide
Are you looking for the perfect answer to how to connect the Cricut Maker via Bluetooth? If yes, then dear reader, you have arrived at the right place. You will also agree that the Cricut Maker is an ultimate cutting machine that can cut 300+ materials, such as paper, cardstock, leather, fabric, etc. This model comes with in-built Bluetooth technology, allowing devices to connect without getting tangled in wires.
If you recently bought this Cricut machine and are looking forward to creating DIY projects, you must connect to a computer or mobile device. In addition, all DIYers need to download the Cricut software to help them make designs with various features. The paragraph below provides details about the installation and machine connection process.
How to Download Cricut Design Space on a Mobile Device?
Before grabbing the prominent info regarding how to connect the Cricut Maker via Bluetooth, you need to get the Cricut app on your respective mobile devices. Get the complete brief about the process by paying attention to the below paragraph:
Android
Kindly refer to the method below to get the Cricut Design app for free on your Android device:
Kick off the process by opening the Google Play Store and start looking for the Design Space app.
If you don’t find the app successfully, type Cricut Design Space inside the Search panel.
After that, press the Install option, and the Cricut app will download on your device.
Once the app is installed on your device, tick it, and it will open.
Next, choose Machine Setup or Sign In, appearing on the opening page.
Now, go through the guidelines that are visible to you to finish the setup process.
Conclude the process by starting to create new designs on the canvas.
iOS
Subsequently, all Mac users are invited to pay special attention to the below section to learn about installing Design Space on their devices:
First, click the App Store icon and type Cricut Design Space inside the Search box.
Now, press the Get button and confirm the installation by entering your iTunes password (If asked).
After the installation, close the App Store and open the Cricut software.
Next, you can choose Machine Setup or Sign In, depending on your preference.
Lastly, go through the instructions on the screen and draw your ideas on the Cricut app.
How to Connect the Cricut Maker via Bluetooth to Windows?
Most DIYers prefer to connect Cricut machines to their devices via Bluetooth. It is one of the easiest methods, allowing you to complete the connection process quickly. Pay special attention to the below pointers and know about the process:
You must start the process by verifying that your Cricut machine is on.
After checking that, place both devices at least 10-15 ft apart.
Now, open the Start menu and select the Settings option.
Next, tap the Devices option and enable your Windows Bluetooth.
If it is already on, tick the Add Bluetooth or other device button.
Following this, a window will appear on your screen; select the Bluetooth option.
Now, you must wait until your computer detects your Cricut machine.
After a while, click on your machine model name and wait.
At this point, your devices will successfully connect.
Conclude the process by returning to the Design Space New Setup page and starting to draw your designs.
How to Connect the Cricut Maker via Bluetooth to Android?
Being a smart cutting machine, you can easily connect the Cricut Maker to Android devices. Get to know about the process by referring to the steps given below:
Begin the process by checking that your Cricut machine is on and within the 10-15 ft range.
Now, open the Settings tab and click the Bluetooth given under the Wireless & Networks section.
Following this, enable your phone Bluetooth (if it isn’t, turn it on).
At this point, choose your model name from the Available Devices section.
After a while, both of your devices will get connected.
Conclude how to connect the Cricut Maker via Bluetooth on Android by creating new ideas on the canvas.
As a result of the blog, you must have realized how relevant it is to connect Cricut Maker with a computer or smartphone to make your favorite craft. Without the proper connection, you won’t be able to begin the cutting process.
Frequently Asked Questions (FAQs)
Question: How Can I Set up My Cricut Maker on PCs?
Answer: To set up your Cricut machine on PCs, you need to follow the steps given below:
First, plug in your Cricut cutting machine and turn it on.
After that, connect your devices using a USB cord or Bluetooth.
Next, download & install the Cricut Design app on your system and sign in.
Now, go through the on-screen instructions and start the setup process.
Put an end to the process by cutting the material to ensure that the machine is working correctly.
Question: How to Connect Cricut Maker to iOS Devices Wirelessly?
Answer: By referring to the below steps, you can easily connect your iOS device to the Cricut cutting machine via Bluetooth:
Check that both devices are on and placed between 10-15 ft range.
Now, go to Settings and enable your device’s Bluetooth feature.
Next, click the Cricut model from the list on your screen.
Finally, your wireless connection process will come to an end.
Question: How Do I Install Cricut Design Space on Windows?
Answer: Have a look at the below steps and get to know about the installing app on Windows:
Open your device search engine and visit the official Cricut Design Space portal.
After arriving there, click the Download option and let the file download.
Now, double-click the downloaded file and don’t close the window.
Open the app, sign in, and create your account when it is installed.
Read more: install cricut design space app
cricut.com/setup mac
Cricut Design Space
Cricut.com setup windows
Source: how to connect the Cricut Maker via Bluetooth
#how to connect the Cricut Maker via Bluetooth#Cricut.com setup windows#Cricut Design Space#ryan van kriedt#cricut design space login#cricut design space download
0 notes
Text
Complete HTML Tutorial from scratch | Web development course in Delhi
Creating and customizing websites is the process of web designing. Languages such as HTML for structure, CSS for display and JavaScript for interactivity are used. To build visually beautiful and user-friendly websites, designers prioritize layout, color schemes, graphics, and user experience. Additionally, they might use content management systems and consider device responsiveness. It includes a range of expertise and disciplines that come together to provide a useful and entertaining online experience.
In this article, you will get to learn complete HTML from scratch to expert level, prepared by one of the trainer from top web development institute in Delhi. Lets begin by setting up our system
HTML Complete tutorial

VS code setup, installation and first HTML Code
Here we are going to show you how you can install Visual Studio code on your Windows. So, let’s get started.
1) To start with, just open up the browser and search for Visual Studio code.
2) The first link appearing here is from “code dot visual studio.com”. We are going to click on this link and once this website is open straight away.
3) You will be able to see the blue download button for Windows. So, we are going to just click on this button which is going to download this executable file and click on download for window.
4) Now this executable file is downloaded. So I’m going to just click on this file and here appear a box where we have to first of all click on the Run button and then we will be going to just agree with the license terms and conditions.
5) Click on Next button and this will be the location where Visual Studio code will be installed on your operating system.
6) Just click on the next button and here are some options which you can choose according to you and here we are going to just check all the options and then going to click on the next button and install.
7) Visual Studio code will take few seconds to install. So we will wait for the installation to complete.
8) Now as you can see the Visual Studio code setup has been finished and here is the page that appears when we open VS code.
First HTML code
1) Let’s See, how to run html files using visual studio code. So we need to install a new extension called “open in browser” by clicking on this extensions button.
2) Click on this first extension and Install it. After the extension is being installed correctly, we can close this page.
3) To start writing your first code, you guys have to create a new html file.
4) Click on “file” and “open folder”.
5) Create a “new folder” I will call it HTML Tutorial.
6) Let’s select the folder and then create a new html file say “hello.html”.
7) Now write some html code, just type – exclamation mark and then hit enter. Here we obtain this template and we can change it accordingly like the title and also we can write some text in the body.
8) Save this file (ctrl + s)
9) To open it in the browse, make a right click on file name and then “open in default browser”.
10) We will obtain this page in the browser.
HTML tutorial using Notepad for beginners
Boilerplate in HTML
A boilerplate in HTML is a template you will add at the start of your project.
Let us say you are writing a code for your website and you do not want to write all the basic code by yourself.
1) For what you want to have some shortcut, and there’s a good news “VS CODE” has a shortcut for this boilerplate. First thing, you just need to start coding simply by pressing (shift+1) which will going to return exclamation mark on your screen on your code editor.
2) Here appear two options from which you have to select the very first and boom here you have your boilerplate ready in front of you.
Here Are Some Basic Components Of HTML BoilerPlate
1. <! DOCTYPE html>: It specifies the version of HTML being used. HTML 5 is the most recent and extensively supported version in instance.
2. <html>: An <HTML> is the base element of the page. Every other HTML element on the page is contained within it.
3. <head>: The head section has metadata about the document, including connections to style sheets, the title, character encoding, and other metadata. It doesn’t have any content that is seen on the webpage immediately.
4. <meta charset=”UTF-8″>: This meta tag indicates the document’s character encoding, which is usually set to UTF-8 to accommodate a large character set.
5. Using the meta name=”viewport” and content=”width=device-width, initial-scale=1.0″ This meta tag facilitates creating the webpage to various screen sizes, particularly on mobile devices.
6. <title>: This element sets the webpage’s title, which shows up in the title bar or tab of the browser.
7. <Body>: All of the material that will be shown on the webpage, including text, pictures, links, and other media, is contained in this area.
Heading in HTML
Let’s learn about some tags to the body and see what they look like. Beginning with our heading tags. We have our opening and closing heading tags numbered <h1> to <h6>. <h1> defines the most important heading. This should represent the main heading/subject for the whole page. Heading are a way to create emphasis and a sense of visual hierarchy of information.
<h6> defines the least important heading.
DO NOT SKIP the heading levels. You must write <h3> after <h2> and so on.
1) Let’s try writing by ourselves.
2) For output, we need to save the file in our code editor.
3) Right click on the file and tap “open in default browser”.
4) And this is how all the headings are printed on the screen.
<STRONG> TAG
Let’s see how strong tag works in html and how to use it properly. Before you decide to markup your text, you need to answer three questions.
Is the text super important? If yes then you must use strong tag. Is it super urgent? If yes then you must use strong tag as well is it very serious? If yes then you must use strong tag. Again now let’s write some code and learn how to use strong tag properly.
Here we will open up the html document we have created.
Using visual studio, I have a block of text and saying that “Believe in yourself and all that you are. Know that there is something inside you that is greater than any obstacle anddon’t wait for opportunity, create it.” As you want to make more emphasis on bolded sentence.
So we just mark up this part using html strong tag.
So, the opening strong tag looks like starting with left angle bracket (<) strong and right angle bracket (<strong>) and a closing strong tag looks like this starting with left angle bracket, forward slash strong and right angle bracket (</strong>).
Save the program and let’s try this up in the browser.
Text content i marked up using strong tag is rendered as a bold text. But that doesn’t mean you to make your text bold. Because you can only use strong tag if your content is super important or super urgent or super serious.
<EM> Tag
Try answering question before we actually get to know about the use of <em> tag. Is there any word or phrase you want to place great emphasis. If yes, then you must use <em> tag.
To wrap it up, now let’s write some code and learn how to use <em> tag properly.
I have written two sentences. 1) This is not a joke. If you paid close attention when i speak out the sentence, i stressed more emphasis on the word not compared to other words. So we can just wrap the word NOT with the <em> tag.
2) We have to leave now. Again, more emphasis will be on the word “now” compared to other words. Perform the same steps you did with earlier sentence.
Save your document and try this up in the browser.
Content we enclosed up using <em> tag is italicized. But it doesn’t mean that you can use <em> tag if you only want to make your text italic.
Paragraph Tag <p>
Almost all websites use text and one of the most common ways to organize text is with paragraphs. You can create paragraphs in html using the <p> tag.
You’ll need a start tag and an end tag by default. Each paragraph will have a little bit of margin above and below it to give it some space between other elements. It’s very common to use the <p> tag whenever you’re working with a large amount of text.
If you want to enable horizontal scroll, right click and click on command palette.
Search for toggle word wrap and the thing will be done.
Complete Web Development Online Certification Course
Learn Web Development Online with our Web Development certification course covering HTML, CSS, JavaScript and everything you need to create a new website.
Enroll Now
<INS> Tag
The <ins> tag in HTML is used to indicate that a section of text has been inserted into a document. This tag is typically used in conjunction with the <del> tag, which is used to indicate deleted or removed text.
Here’s a common scenario where the <ins> tag might be used: Let’s say you have a document or a webpage that is being collaboratively edited by multiple people.
If someone adds new content to the document, you can use the <ins> tag to highlight that added content.
In this example, the text “newly added” will be visually distinguished (often underlined by default) to indicate that it’s new content.
Super script and subscript
Superscript and subscript are typographical elements used to format text in a way that it appears above or below the regular text line. They have different use cases:
1) Superscript (<sup>):
Superscript is used for characters or numbers that are raised above the regular text line and which can be commonly used for Exponents in mathematical expressions ( x²), Ordinal numbers (1st, 2nd), Trademarks or copyrights (™, ©) and some others.
<p> Chemical formula of water is H<sub>2</sub>O</p>
2) Subscript (<sub>):
Subscript is used for characters or numbers that are lowered below the regular text line and commonly used for Chemical formulas (H₂O), Mathematical notations (CO₂), Footnote references in mathematical expressions (x₁, x₂).
<p>X <sup>4</sup>+ Y<sup>6</sup></p>
Save and document and right click to reflect it on the default browser.
The superscript will raise it up like an exponent and the subscript will lower it down below the regular text. You can also create fractions in the middle of text or equations or chemical formulas. Hopefully you’ll use this in your scientific webpages and mathematical webpages or just for fun maybe.
HTML Entities
HTML entities are what we would use to display reserved characters which the browser would otherwise interpret as being intended for writing code.
As an example: There would be the angled bracket that we use when making our tags. If we were using the (less than) angled bracket then the browser would interpret any text that follows as the name of some element’s opening tag. So to display these characters as a text we can replace these reserved characters that confuse the browser with a corresponding html entity. Here I have a table which shows available entities that we can use in html.
I am writing a paragraph and here I tried giving spaces like this will you expect? You will expect that all spaces should be printed. But look what happened here. The spaces are not printed. Why did this happen?
This happens because, by default HTML It chops of all spaces and it considers it as one. So what do you need to do over here?
If you want to use additional spaces, then you need to use Html entities.
How we can do that? So here, we will write “ ” for every extra space you want to add. nbsp is non-breaking space.
<p>This is my first           program</p>
You will save your document and you will look there that another one space is added.
You won’t use it that much in your websites. Nbsp website does not at all look good. Don’t use it at all to bring spaces, because we will use margin padding and CSS selectors and properties are there we will use all those things.
Now, look at one more scenario. Here suppose if I want to write <p> as text and this should come in written so look what happened? Look at this, Where is my <p>? I have written <p> also over here.
But I want to see this in my website. How should I bring this? If I write this, then it will consider it as a tag.
Here you write < for smaller than angular brackets and over here write > for greater than angular bracket and as you do this, <p> will be shown as text on browser. If you want to write this you can’t write it without this. And these are html entities.
<p>paragraph is written like <p>.</p>
Html entities are not just used for these. You can even use html entities to write such characters which are not even present in your keyboard or on your keyboard they are as special characters. Like we can write pound symbol (money) and many other things that we will show you with some examples.
Suppose here I have to write “pound”. So, here I will write something like “£” and here I will write pound is written like “£”. Now look over here pound has shown in browser. And don’t get confused at all.
<p>Pound is written like this £. </p>
Similarly, if I have to write something like some special characters we can make use of HTML entities with the help of the table given above.
<PRE> tag
The <pre> tag is used to define preformatted text. This means that the text is displayed in a fixed-width font (usually a mono-spaced font like Courier) and maintains both spaces and line breaks.
It’s commonly used for displaying code snippets, poetry, ASCII art, or any text where the spacing and line breaks are significant
If you write like the code shown below, then it will come as it is. Keeping all the spaces intact and all the new lines intact but here it is not that tag will show up. For tags we have to use entities only.
Save the document to show the
mages in HTML
Let’s talk about images; it’s very simple to insert it.
You have to write the img and as soon as you write the img and press enter, you will be going to get src=”” alt=””.
Here in “img scr=” You have to provide the source of the image i.e. where is your image, either it can be on the internet, or it can be in your local.
If you want to enter the “url” of an online image, perform this by right clicking on the image.
If it is in your local then what will you have to do is to enter the full path of image.
What is the meaning of “alt” that if this image is not loaded then what text to show? Here I have written “please check your internet connection.”
This is how the image is perfectly shown and the text “Please check you internet connection” because of that particular image doesn’t existed on the given path.
Row Span And Colspan In Table
To create table in our program we will use table tag.(<table> </table>)
There will be 2 things inside the table.
1) <thead>: It will come under the head of the table.
2) <tbody>: it will come under the body of the table.
There is no need to mug up, you guys will automatically going to get this easily. We start with a row with the help of a (<tr>) and inside the head by writing (<th>) under <tr>.
<table>
<thead >
<tr>
<th>Name</th>
<th>Employee Id</th>
<th>Employee role</th>
</tr>
</thead>
Ok, my <thead> done now you will add data here in the table.
Now, you Have to make a table row, and I will not write (<th>) inside it, this time I will write (<td>) i.e. table data.
Now, to add more columns, put another heading and keep adding data.
<tbody>
<tr>
<td> Rohan </td>
<td> xyz</td>
<td> Analyst</td>
</tr>
<tr>
<td> Mohan</td>
<td> abc</td>
<td> programer</td>
</tr>
<tr>
<td> Sam</td>
<td> pqr</td>
<td> HTML expert</td>
</tr>
</tbody>
Save your program> right click> open in default browser> output.
Colspan and rowspan are attributes used in HTML tables to control the spanning of cells:
Colspan (Column Span): To make a cell span over multiple columns, use the colspan attribute. The value of the colspan attribute represents the number of columns to span. Colspan allows a single cell to span multiple columns horizontally. It’s useful when you have a header or data cell that should cover more than one column.
If you want a header cell to span two columns, you would use colspan=”2″.
Rowspan (Row Span): To make a cell span over multiple rows, use the rowspan attribute. Rowspan allows a single cell to span multiple rows vertically. It’s useful when you have a header or data cell that should cover more than one row.
If you want a header cell to span two rows, you would use rowspan=”2″.
Conclusion
You now have enough knowledge to know use different elements, properties, and the structure of HTML pages to create creative websites. Recall that in order to improve your web development abilities, you should never stop learning and investigating increasingly complex aspects.
HTML is just a structure of your website or web app, you will also need to have hands on CSS, javascript, bootstrap for styling and functionality along with one server side language too. You can learn all of them together offline in Dwarka at Best Web Development institute in Delhi, from 4 different locations (including Dwarka MOr, Kakrola, Nangloi, Bahadurgarh)
#Computer Institute in Delhi#Best Computer Institute in Delhi#Graphic design course in delhi#Graphic design institute#graphic design institute in delhi#Web development institute in delhi
0 notes
Text
How to Use Cricut Machine? [A Comprehensive Guide]
Along with the craft plotter, the users also need to buy supplies & accessories to finish the project as per their choice. However, one thing that is common among them is the Design Space app. It is digital software that permits the DIYer to draw something creative and out of the box. Continue reading this blog to learn in detail about the Cricut cutting machine.
How to Setup Cricut Machine on a Computer?
Every crafter will agree that before starting the crafting process, it’s compulsory to set up the craft plotter. They can set up their cut-die machines with PCs as well as mobile devices very easily. However, it will be the user’s call to decide via which device they will be setting up their machine. Read the following steps to learn about setting up a Cricut craft machine with a Desktop.
First, start plug in your cut-die machine & power it on.
Next, connect both devices with each other via a USB cable or pair it up with Bluetooth.
Now, open the search engine and go to the Design Space setup page.
Following this, download and install the Cricut software on your system.
Next, sign in, create your Cricut ID, and start setting up your cutting machine.
Lastly, you will get to know about the setup that has come to an end when called for the test cut.
Further finishing up the Cricut cutter machine setup process with PCs, the crafter needs to connect their Cricut cut die machine with PCs using Bluetooth.
How to Connect Cricut Machine to a PC Wirelessly?
The user got the authority to cut the materials wirelessly with their electronic cutting machine. Have a look at the following steps and learn about connecting a Cricut machine with the Windows/Mac operating system:
For Windows
Ensure that your Cricut cut die machine is on and within 10–15 ft of your PC.
After that, press the Start menu and tick the Settings option (gear icon).
Now, click the Devices and then enable your device’s Bluetooth.
Next, press the Add Bluetooth or other devices and select Bluetooth.
Following this, choose your machine and start typing the PIN number.
After entering the PIN, select the Connect button given on the left side of the screen.
Finally, the connection process of your craft plotter with a Windows computer will come to an end.
Apart from Windows OS, the crafter can also connect their Cricut craft machine with Mac systems. For that, they need to read the section given below.
For Mac
First, cross-check that your Cricut machine is on and within 10–15 ft of your PC.
Next, choose the System Preferences given under the Apple tab.
Now, press the Bluetooth icon visible on the System Preferences page.
Afterward, a Bluetooth window will open and turn on the Bluetooth (if it isn’t on).
Next, select your Cricut model name from the list appearing and tick the Pair button.
Following this, fill in the PIN code and tick the Pair option appearing on the right side of the screen.
At last, both the devices will successfully get connected with each other.
With the wireless connection completion of the Cricut machine with PCs, the DIYer can now start by creating custom projects.
What Projects Can You Craft Out of Cricut Machine?
After learning so much about the Cricut cutting machine, the crafters become capable enough to craft different custom projects. You can create projects for personal as well as professional purposes. The DIYer can also use a Cricut craft machine and start their own business. Have a look at the list of popular projects that you can prepare out of the machine:
Greeting Cards
Custom T-Shirts, Mugs & Hats
Paper Lanterns
Personal Coasters
Cake Toppers
Custom Tumblers & Water Bottles
DIY Window Decal
Tote Bag.
Wood Sings
Doormats
Car Labels
Bookmarks
Earrings
Banner
Monograms
In brief to the post, we really hope that you were able to come across all the details regarding the Cricut machine.
Frequently Asked Question
Question: How Can I Connect My Cricut Machine to My iOS via Bluetooth?
Answer: Go through the following steps and learn about the wireless connection process:
First, enable your Cricut cut die machine & be within 10–15 ft of the smartphone.
Now, go to Settings and turn on your device’s Bluetooth.
After turning on the Bluetooth, select your machine name from the list.
Next, fill in the blank with PIN, i.e., 0000, and click the Pair option.
Finally, your wireless pairing process will come to an end.
Question: How Do I Setup My Cricut Machine on My Mobile Device?
Answer: Read the below steps to learn about the steps about cutting machine setup process:
Start the process by plugging in the machine and switching it on.
Next, pair up your mobile device with a Cricut machine with Bluetooth.
Now, install the Cricut Design Space app, launch it & create your Cricut ID.
After that, click the Menu tab and select the Machine Setup.
Choose your machine model and follow the on-screen.
You will know the setup is complete when called for a test cut.
Question: What Kind of Projects Can I Make With Cricut Machine?
Answer: There are tons of custom projects that the crafter can create out of their respective cutting machine. Read the following projects that can be crafted out of the cut-die machine:
Jar Labels
Bookmarks
DIY Mugs
Custom T-Shirts
Party Signs
Invitation Cards
Cupcake Toppers
Personal Banner
Bachelorette Party Props
Table Number Sign
Etch Glass
Custom Stickers
DIY Hats
Personal Wine Bag
Source: Cricut Machine
#Cricut Machine#CRICUT DESIGN SPACE LOGIN#HOW TO CONNECT CRICUT MACHINE TO LAPTOP#SETUP CRICUT DESIGN SPACE SETUP
1 note
·
View note
Text
How to Do Cricut Explore Air 2 Setup on PCs and Mobiles?

Also, this cut-die machine is compatible with Cricut Design Space when it comes to creating virtual projects. The app is available for free and supports PCs and mobile phones. Apart from that, all DIYers must finish the Explore Air 2 setup process properly in time. If you are the Explore Air 2 owner but don’t know how to set it up with desktops and smartphones, then examine this blog.
How to Install Cricut Design Space on Windows?
Before starting the Cricut Explore Air 2 setup process, it’s compulsory to install Cricut software on their desktop. Get Cricut software on your Windows by taking the help of the following steps:
First, turn on your PC and open a search engine (Google Chrome, Firefox, Opera).
Second, go to Cricut Design Space’s setup page and then press the Download box.

Third, when the download is complete, double-click the file in the browser or on your Downloads folder.
After that, tap the trust the application option appearing on the small pop-up window.
Next, you will get to see a window sharing the app installation progress.
Further, sign in with your Cricut ID and Password or create your account.
Following this, the Design Space icon will automatically get transferred to your desktop home screen.
Now, right-click the icon and tap the Pin to Taskbar option.
After this, move the app into the Taskbar to pin the shortcut for easy reach.
Finally, you are all ready to enjoy the Cricut app on your desktop.
After the installation of Design Space on your Windows, move forward and start the setup process of Cricut Explore Air 2.
How to Perform Cricut Explore Air 2 Setup on Your PC?
To set up your cut-die machine with Windows/Mac, follow the given below steps:
Begin the process by turning on your crafting machine and plugging it into the socket.
Now, connect your Explore Air 2 to your PC via a USB cable or pair it up with Bluetooth.
Next, download and install the Cricut app from its official page.
Following this, go through the on-screen instructions and sign in, create an account, and set up your new machine.
In the end, you will get to know the setup has come to an end when called for a test cut.
Apart from setting up the machine with PCs, you can smoothly set them up with smartphones, too.
How to Setup Explore Air 2 on Your Mobile Device?
Inside this section, you are going to learn about the Cricut Explore Air 2 setup with mobile devices (Android and iOS devices).
First, you’ve to plug in your machine and switch it on.
Next, pair up your mobile with the machine by enabling an in-built Bluetooth feature.
Now, go to the Play Store or App Store and install Design Space on your phone.
After installing the app, you’ve to launch it, sign in, and create your Cricut ID.
Further, click the Menu option and then the Machine Setup option.
Following this, choose your machine model and read the on-screen instructions.
Lastly, you will be called for a test cut when the setup process is finished.
After setting up the craft plotter wirelessly with smartphones, the DIYer can also pair it up with Windows. To complete it properly, continue reading the blog.
How to Pair Cricut Explore Air 2 via Bluetooth to Windows?
To finish the Cricut Explore Air 2 setup with Windows, all the users need to pair up their devices with Bluetooth. If you don’t have any idea about the pairing process, then have a look at the following steps:
Start the pairing process by ensuring that your cut-die machine is on and within 10–15 ft of your PC.
Now, click the Settings option visible under the Start menu bar.
After reaching the Windows Settings page, tap Devices and check that your Bluetooth is on.
Next, press the Add Bluetooth or other device > Bluetooth appearing on the left side of the box.
Now, you need to wait till your machine is exploring for your cut-die machine.
Following this, tap on your model name appearing on the screen inside the box.
Further, enter the PIN code inside the blank and select the Connect box.
At last, your Cricut Explore Air 2 will be paired with your Windows system.
Finally, the Cricut Explore Air 2 setup process on your computer and mobile device is complete.
Frequently Asked Question
Question: How Can I Pair My Cricut Explore Air 2 With iOS Devices?
Answer: To pair up your iOS device with Explore Air 2, go through the following steps:
First, you need to check that your machine is on & within 10–15 ft of your device.
Next, go to Settings > Bluetooth option and activate your device Bluetooth.
Now, select your machine and enter the password (0000).
Following this, choose the Pair button given on the top right side of the screen.
Finally, your pairing process will come to an end.
Question: What Projects Can I Create With Cricut Explore Air 2?
Answer: Once you are done setting and pairing up the machine with PCs or mobile devices, the crafter can create different projects. Some of the stunning projects that a beginner or an expert can create out of their Explore Air 2 machine are as follows:
● Watercolor Decal
● DIY throw pillow
● Wood serving tray
● Reusable stencils
● Photo magnet
● Custom necklace
● Leather earrings
● Greeting cards
● Party banner
● Cupcake topper
● Valentines pouch
Question: Is Buying the Explore Air 2 Worth the Money?
Answer: As compared to the rest of the cutting machines, Cricut Explore Air 2 is surely worth buying while making customized projects. The price of this craft plotter is less, making it simple for the learner to buy it. Apart from that, the Access member also gets a certain discount while buying the machine. It’s for sure that you won’t regret accessing the craft plotter during the crafting process.
Visit: Cricut Design Space
cricut.com/setup
cricut.com/setup mac
Source: cricut explore air 2 setup
#Cricut Design Space#cricut design space login#cricut design space download#cricut design space setup#cricut design space for mac#how to setup cricut explore#cricut.com sign in#cricut explore air 2#cricut.com/setup mac#cricut.com/create#cricut design space app#cricut explore air 2 setup
0 notes
Text
Complete Cricut Explore Setup Using USB Cable And Bluetooth
How thrilling that you've just brought home a new Cricut Explore machine from the shop. You can now open the box and find a perfect space for it in your crafting area. Before creating your first Cricut project, you must first set it up. But where do you begin? This blog post fills that need. It is a complete manual for getting your new Cricut out of the box and running so you can begin creating projects. Don't worry if you are a complete newbie. With detailed, step-by-step directions, this blog post will walk you through the whole process of Cricut Explore Setup using two methods. Let us begin:

Essential Things You'll Need To Get Started
Before you begin configuring your laptop, you must have a few items. They are listed below.
The Windows and Mac operating systems are compatible with Cricut models. As a result, you also need a power source for your Cricut device in addition to a MacBook or a Windows laptop.
A wired connection between the laptop and Cricut is only possible if you buy/have a Bluetooth adapter, as the Explore device doesn't have an in-built Bluetooth adapter.
For a wired connection, you need a USB cord.
You can also use a Bluetooth dongle if your laptop is not enabled. If you have all the mentioned items, continue with the next Cricut Explore Setup.
Setup Using a USB Cable
Cricut Explore devices come with a USB cable inside the box. Follow these instructions. It is the first way to connect your Cricut Explore to your Windows or MacBook.
Turning on your Cricut is the first step.
Now connect one end of the USB cable to the device and the other to the laptop. (It should match the relevant ports.)
The device and laptop turn on After the USB cable has been connected on both ends. Then, an installation prompt for USB drivers will show up. If you install the Driver, the Cricut device will connect to your system.
A request to install a USB driver will only show up if it still needs to be installed on your system. You must manually install the Driver to continue with the Cricut Explore Setup.
To do this, go to the Device Manager. You must choose your Cricut device from the drop-down menu from the list in the Device Manager window.
After finding your Cricut machine, move your cursor there and press the Right Button on the mouse. Then a list displays here. Selecting the driver software update option is recommended.
Next, use Windows Explorer and go to the C drive's AppData folder. Go to this one's Roaming folder as well. Choose CricutDesignSpace, Web, Driver, and then CricutDrivers after that.
Then click OK. Restarting the laptop would make it easier for the drivers to work.
A USB cable has been used for Cricut Explore Setup to your PC.

Setting Up With Bluetooth
One attractive aspect of Cricut products is their wireless connectivity. Therefore, the user's comfort depends on their wish and ability to operate the Cricut Explore.
First, Keep the Cricut device and Windows system within a 10–15-foot range.
The second step is to ensure Bluetooth is enabled.
Important to verify whether Bluetooth is enabled by going to the Device Manager. Please use the right button on your mouse when your pointer is on the Start Button. Now a list will appear; choose Device Manager from the list.

On the Device Manager window, if Bluetooth appears, you have verified that Bluetooth is working on your system.
The next step is to open the Devices menu from the System's Settings.

Then, you must ensure the Bluetooth is turned ON. After turning on the Bluetooth, select "Add Bluetooth or other Devices." It is usually present at the top.

a new window will appear, requesting you to select the type of device you want to add. So, select Bluetooth here.
The system will now start searching for nearby Bluetooth devices. And select your Cricut device when it comes to the search.

Only sometimes, but sometimes, prompt requests a PIN to pair. Here in the space, give "0000" as a pin.

Finally, your Cricut Explore Setup via Bluetooth is completed.
Installing Design Space for your Explore Machine
By pairing the System and Cricut machine, you can't give instructions to the latter for cutting. Here is where Design Space comes in, software used to send projects to the Cricut machine for cutting. Now, we will see the final method in Cricut Explore Setup for your system.
The initial step is to Open the official Cricut website or put this address into your Chrome browser: https://design.cricut.com.
After arriving at the Design Space website, choose the Windows download option.

After the download, you must either enter the Downloads folder or the Downloads tab in the Chrome browser (shortcut: Ctrl + J).
Subsequently, choose the file by pressing Enter or double-tap from the mouse after locating the setup file.
Now, the program installation then commences. A Progress bar will appear as the system installs the Cricut app.

The next Design Space icon will automatically appear on your desktop.
You should launch the newly installed app from the software's home screen using your Cricut ID login to the app.
Suppose it is your first time using the Design Space and Cricut device. Then you need to select the option to Create a Cricut ID.

After all this, you will enter the app, and it will ask if you want to take a test cut. Now you have completed the Cricut Explore Setup for your system.
Conclusion
To sum up, by helping you with working with the Cricut machine, this article focused on Cricut Explore Setup for a system. It's because connecting a computer to a Cricut machine takes only a few easy steps and is amazingly simple. Once you have completed the setup process on your system, you can give Cricut the instructions to cut designs of your choice.
Frequently Asked Questions
Does Cricut Explore require an internet connection?
Sometimes. You may still design and forward the projects to your machine without having an online connection. You only need an internet connection to use some features and functions, such as content synchronization and image uploads.
Can I use the Cricut Explore to cut Smart Materials?
Although Cricut Explore is not designed or optimized for Smart Materials, you can still cut Smart Materials by placing them on a machine mat.
What are the Dimensions of this machine?
The Height of this device is 15.01 cm, its Length is 56.31 cm, and its Width: 17.80 cm. The Explore weighs around 4.98 kg, so it is light and portable.
#Cricut Explore Setup#Cricut#cricut home decor#svg#cricut explore air 2#cricut.com/create#cricut crafts#cricut projects#cricut.com/setup#cricut design space#design.cricut.com/setup#cricut setup#www.cricut.com/setup
0 notes
Video
tumblr
How to add a search box in windows 10
0 notes
Text
New and Genuine Tumblr Update Proposals
Bring back the corner flap that opens the post's permalink in a new window
Add a badge that changes color depending on how many bots you've blocked. Blogs with a higher "tier" of badge get priority on whether their reporting is taken seriously, to reduce spam
Add a badge to new accounts that disappears after a month, both to combat bots and to allow users to more easily identify people that don't know how to use the site yet
Bring the green mutuals mark (visible on the followers page on the current version) to the dashboard beside a person's username, for easy reference if you're mutuals with someone you're about to reply to
Make desktop dashboard configuration HTML-configurable, in the same way blogs are (Ao3 skins are a good reference for how this would work)
Make the mobile dashboard color-customizable in the settings, allowing the user to pick the color of the background and text with a color wheel
Accessibility toggle: Takes ALT descriptions and makes them appear as text below the images they're attached to
Change the notes configuration from "comments and tags, tags," and "other reblogs" to a dropdown list of toggles: "show comments," "show tags," and "show other reblogs"
Add a "replied from [username]" message beside replies in notes, to be able to determine who a reply is aimed towards. Extending from this, make this message a link to the post in the reblog chain the reply was made from
Add a "show reblogs only from [username]" box to the notes, with the [username] portion a blank space to be filled in by the person looking
Add an option to the search function to exclude tags
Add an option to the dropdown search menu to sort by most additions
Add an option to the dropdown search menu, specifically for the type of posts, to filter by asks
Add an option to the search menu to "search text only" or "search tags only" to improve search functionality. For example, if I'm searching for "witcher," I have the option to choose to see things tagged only as "witcher," rather than getting every post that says something like "I'm done with the Witcher, now moving on to Skyrim"
Add an option to the report menu for "suspected bot activity"
Add an asker-side toggle for an ask to be replied to privately. Currently, this is on the side of the person asked, and the asker has to request "please reply privately" and hope it's respected
Inform a user who asked anonymously if their anonymous question has been answered
Add a "screenshot post" button that makes a copy of the post in png form and adds it to your clipboard
Divide tags into "indexed" and "non-indexed," configurable by a symbol. For example, #i am up too late would not be indexed and therefore hidden from searches, while #real coffee hours* would be indexed and able to be searched
Add the ability to include multiple tags for search in the archive page of a blog
Add the ability to exclude tags from the archive page of a blog
Change the sideblog list in the "account" menu on desktop to a list of icons along the left side of the dashboard, each one being that sideblog's profile picture, and toggle between dashboards when each sideblog is clicked
Change "post now" at the bottom of a post to "post to [username]," to help with accidental posts to the wrong sideblog. This can be a movement of the dropdown menu from the top of the post to the bottom
Add a toggle to the settings menu for "loop video after completion." The current default is to loop endlessly
With each algorithm tab, include an information button (a question mark, for example) that explains in plain terms where it gets its data. For example "based on your likes" would say "these posts were liked by 10 people you have also liked the posts of," or "in your orbit" would say "these are people that 10 of your mutuals follow"
Add a sorting function to both the "followers" and "following" tabs, for example: "sort by A-Z," "sort by order followed (descending/ascending)," and "sort by date last posted"
Add an option to "block this post" in the meatballs menu of a post, removing the post and subsequent reblogs from your dash and adding them to a blacklist that can be found in settings
Add a search box to both the drafts and queue page, allowing users with several posts in both of these to find and edit posts more easily
These are just off the top of my head. I've purposely stayed away from "remove function that everyone hates" in terms of updates, as I'm aware that some of those have certain criteria and/or are out of Tumblr coding staff's control. The single exception to this is the first point about the corner flap, because I believe its inclusion adds functionality and ease-of-access to the site.
If any of these look good, go ahead and code them in. No permission/credit required, I'm just invested in the future of the site.
@staff
#wishlist#honestly i really do want this site to function better and these are some things either i wish i had or i've seen other people wish for#long post#real coffee hours
153 notes
·
View notes