#how to change permalink structure in wordpress
Explore tagged Tumblr posts
Visit Tumblr Blog
Explore Tumblr blogs with no restrictions, modern design and the best experience.
Last Seen Tumblr Blogs


Fun Fact
BuzzFeed published a report claiming that Tumblr was utilized as a distribution channel for Russian agents to influence American voting habits during the 2016 presidential election in Feb 2018.
Text
Learn to change the permalink structure of your WordPress website with our comprehensive step-by-step guide. Let’s get started!
#wordpress change permalink structure#wordpress permalink change#change permalink structure wordpress#how to change permalink structure in wordpress#how to change permalink in wordpress from database
0 notes
Text
Boost Your Online Presence with a WordPress Site
WordPress is a leading content management system (CMS) used by businesses, bloggers, and creators worldwide. With its user-friendly interface, customization options, and extensive plugin library, WordPress enables website owners to create a visually appealing, functional site without needing advanced coding knowledge. In this article, we’ll explore the benefits of using a WordPress site and offer tips to enhance its SEO, ensuring you’re on track to increase your online visibility and reach.
Why Choose WordPress for Your Site?
Ease of Use WordPress is designed for all experience levels. Its intuitive dashboard lets users manage content, images, and plugins easily, making it simple to maintain and update. Plus, with thousands of themes and plugins available, users can tailor their site’s appearance and functionality to align with their brand and goals.
Flexibility and Customization WordPress offers a variety of themes and plugins to match any industry or style. Whether you’re launching a portfolio, eCommerce store, or blog, WordPress provides flexible design options. With plugins like WooCommerce, you can turn your WordPress site into an online store. For added customization, many themes support page builders like Elementor and Divi, which enable drag-and-drop editing without coding.
SEO-Friendly Features WordPress is inherently SEO-friendly, offering features such as customizable permalinks, mobile-responsive designs, and support for structured data. Optimizing these elements enhances your site’s discoverability on search engines. WordPress also makes it easy to manage SEO-related tasks, especially when paired with the right plugins.
How to Optimize Your WordPress Site for SEO
To fully leverage WordPress for SEO, follow these essential tips:
Use an SEO Plugin Plugins like Yoast SEO and Rank Math provide comprehensive tools to optimize meta tags, sitemaps, and content readability. They guide you in adding keywords, optimizing images, and creating a structured site map that helps search engines crawl and index your site more efficiently.
Optimize Page Speed Site speed is a crucial ranking factor. Optimize images using plugins like Smush or Imagify to reduce file sizes without compromising quality. Use a caching plugin, such as WP Rocket or W3 Total Cache, to improve load times by storing static versions of your pages. A faster site enhances user experience and ranks better on search engines.
Mobile Responsiveness With mobile searches outpacing desktop, having a mobile-friendly site is essential. Most WordPress themes are designed to be responsive, but always check how your site displays on mobile devices. Google’s Mobile-Friendly Test can help you ensure your site provides a seamless experience on all screens.
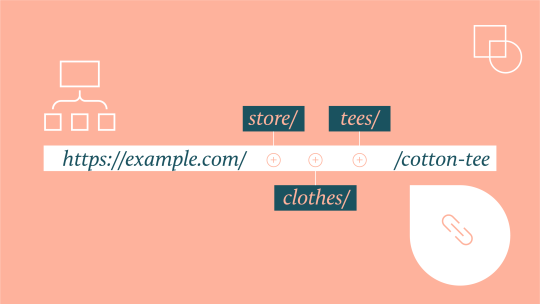
Optimize Permalinks and URLs By default, WordPress offers several permalink structures. Choose a structure that includes keywords and is easy to read, such as "Post name." For example, change URLs like “mysite.com/?p=123” to “mysite.com/wordpress-seo-tips” to improve clarity and relevance to search engines.
Use Internal and External Links Internal links guide users through your site, encouraging them to explore more content. They also help search engines understand your site's structure and content relationships. Additionally, linking to authoritative external sources can enhance your site’s credibility. Just ensure these links are relevant to your content.
Regularly Update Content Keeping your content fresh signals to search engines that your site is active and valuable. Update blog posts with recent information, check for broken links, and add new pages when relevant. Regular updates can boost your search engine ranking and engage returning visitors.
Focus on Quality Content Content is a major SEO factor. Create high-quality, valuable content targeting keywords relevant to your audience. Instead of keyword-stuffing, focus on naturally incorporating primary and secondary keywords to maintain readability and relevance.
Conclusion
A well-optimized WordPress site is a powerful tool to boost your online visibility. With easy-to-use plugins and a range of customization options, WordPress makes it simpler to maintain an SEO-friendly site. By following these best practices, you’ll improve search engine rankings, drive organic traffic, and strengthen your online presence. Whether you’re new to WordPress or a seasoned user, these tips will help you get the most out of your site.
2 notes
·
View notes
Text
How to Move Your WordPress Site from Localhost to a Live Server
Developing a WordPress site on localhost is a great way to build and test your website in a controlled environment. However, the real challenge arises when it's time to move the site from your local server to a live hosting environment. If not done correctly, you could encounter broken links, missing images, or even database errors.
In this blog, we'll guide you through a step-by-step process to successfully move your WordPress site from localhost to a live server.

Step 1: Choose the Right Hosting Provider
Your first step is to select a reliable web hosting provider that meets your website’s needs. Look for:
Server Speed: Fast servers for better performance.
Uptime Guarantee: At least 99.9% uptime to ensure availability.
Ease of Use: User-friendly dashboards and tools.
WordPress Support: Hosting optimized for WordPress websites.
Popular options include Bluehost, SiteGround, and WP Engine.
Step 2: Export Your Local WordPress Database
The database is the backbone of your WordPress site. To export it:
Open phpMyAdmin on your local server (e.g., XAMPP or WAMP).
Select your WordPress database.
Click on the Export tab and choose the Quick Export method.
Save the .sql file to your computer.
Step 3: Upload Your WordPress Files to the Live Server
To move your files:
Compress Your WordPress Folder: Zip your local WordPress installation folder.
Access Your Hosting Account: Use a file manager or an FTP client like FileZilla.
Upload the Files: Transfer the zipped folder to your hosting server's root directory (usually public_html).
Unzip the Folder: Extract the files once uploaded.
Step 4: Create a Database on the Live Server
Now, set up a new database on your live hosting server:
Log in to your hosting control panel (e.g., cPanel).
Navigate to the MySQL Databases section.
Create a new database, database user, and password.
Assign the user to the database with full privileges.
Step 5: Import the Database to the Live Server
Open phpMyAdmin in your hosting control panel.
Select the new database you created.
Click the Import tab.
Choose the .sql file you exported from your localhost.
Click Go to import the database.
Step 6: Update the wp-config.php File
To connect your site to the live database:
Locate the wp-config.php file in your WordPress installation.
Open the file in a text editor.
Update the following lines: define('DB_NAME', 'your_live_database_name'); define('DB_USER', 'your_live_database_user'); define('DB_PASSWORD', 'your_live_database_password'); define('DB_HOST', 'localhost'); // Keep this unless your host specifies otherwise.
Save the file and upload it to your server via FTP.
Step 7: Update URLs in the Database
Your localhost URLs need to be replaced with your live site URLs.
Use a tool like Search Replace DB or run SQL queries in phpMyAdmin.
In phpMyAdmin, run the following query: UPDATE wp_options SET option_value = 'http://your-live-site.com' WHERE option_name = 'siteurl'; UPDATE wp_options SET option_value = 'http://your-live-site.com' WHERE option_name = 'home';
Step 8: Test Your Live Website
Once everything is uploaded and configured, check your website by entering its URL in a browser. Test for:
Broken Links: Fix them using plugins like Broken Link Checker.
Missing Images: Ensure media files were uploaded correctly.
Functionality: Verify forms, buttons, and features work as expected.
Step 9: Set Up Permalinks
To ensure proper URL structure:
Log in to your WordPress admin dashboard on the live site.
Go to Settings > Permalinks.
Choose your preferred permalink structure and click Save Changes.
Step 10: Secure Your Live Website
After migrating, secure your site to prevent vulnerabilities:
Install an SSL Certificate: Most hosting providers offer free SSL certificates.
Update Plugins and Themes: Ensure everything is up to date.
Set Up Backups: Use plugins like UpdraftPlus for regular backups.
Conclusion
Moving your WordPress site from localhost to a live server may seem daunting, but by following these steps, you can ensure a smooth and error-free migration. A successful move allows you to showcase your site to the world, engage your audience, and achieve your goals.
Start today and take your WordPress project live with confidence!
0 notes
Text
WordPress SEO Services: Unlocking Your Website's Potential

If you're running a WordPress website, you've likely heard about SEO. But what exactly are WordPress SEO services in India, and how can they help your site reach its full potential? Let’s dive into everything you need to know, and discover how Media Monkss can guide you toward digital success.
What Are WordPress SEO Services?
WordPress SEO services involve optimizing your WordPress website to improve its visibility on search engines like Google. This includes everything from keyword research to technical fixes, ensuring your site ranks higher and attracts the right audience.
Why Is WordPress Perfect for SEO?
WordPress is a goldmine for SEO enthusiasts. Why? Its structure is inherently SEO-friendly, with features like customizable permalinks, easy-to-add metadata, and seamless integration with plugins. No wonder it powers over 40% of websites worldwide!
Key Features of WordPress SEO Services
1. Keyword Research and Optimization
The foundation of any good SEO strategy lies in finding the right keywords. WordPress SEO experts analyze what your audience is searching for and ensure those terms are strategically placed across your site.
2. On-Page SEO
This includes optimizing headlines, meta descriptions, and images. On-page SEO ensures every page on your site aligns with best practices.
3. Technical SEO
Behind-the-scenes tweaks like fixing broken links, improving page load speeds, and ensuring mobile responsiveness play a massive role in boosting your rankings.
4. Off-Page SEO
Building backlinks and increasing your site's credibility through external sources is a vital part of any WordPress SEO plan.
5. Content Optimization
Content is king, and for WordPress sites, this means blogs, landing pages, and even product descriptions are SEO-optimized to attract and engage users.
The Role of a WordPress SEO Expert
A WordPress SEO expert doesn’t just tweak a few settings. They analyze your site's data, study your competitors, and create a customized strategy to maximize your traffic and conversions. Their expertise can save you time and deliver measurable results.
Why Choose a WordPress SEO Agency?
When you hire a WordPress SEO agency like Media Monkss, you’re tapping into a pool of seasoned professionals. Agencies bring specialized knowledge, tools, and experience to the table, ensuring your website stands out in a crowded digital space.
Overcoming Challenges in WordPress SEO
Despite its user-friendly nature, WordPress SEO can still present hurdles. Slow site speeds, stiff competition, and frequent algorithm changes can be tough to handle without professional help.
The Power of Content in WordPress SEO
Content is the backbone of any WordPress SEO strategy. Blogs, how-to guides, and engaging articles not only improve rankings but also keep your audience hooked.
Best SEO Tools for WordPress
Plugins like Yoast SEO and Rank Math simplify the optimization process, offering real-time suggestions to improve your content. Analytics tools like Google Analytics help you track progress and refine strategies.
Why Choose WordPress SEO Services in India?
India is a hub for affordable and high-quality WordPress SEO services. With experienced professionals offering cost-effective solutions, it’s the perfect destination for businesses looking to optimize their websites.
How Media Monkss Excels in WordPress SEO
At Media Monkss, we specialize in tailored WordPress SEO services in India. Our proven track record of boosting traffic and rankings speaks for itself. We combine technical expertise with creative strategies to deliver results that matter.
Conclusion
SEO is the backbone of any successful WordPress website. Whether you’re a small business owner or a large enterprise, investing in WordPress SEO services can transform your online presence. With a trusted partner like Media Monkss, your journey to the top of search engine rankings becomes smoother and more effective.
0 notes
Text
Canonical Issues: Common Scenarios and Their Impact on SEO
Canonical issues arise when search engines encounter multiple versions of the same content across different URLs. This can lead to a variety of problems, such as diluted page authority, reduced search rankings, and inefficient crawling. Understanding different scenarios where canonical issues can occur is crucial for maintaining a healthy SEO strategy.
Canonical issue scenarios and how to solve it
1. WWW vs. Non-WWW URLs
Sometimes, a website is accessible both with and without the “www” prefix (e.g., http://www.example.com and http://example.com). To search engines, these are considered two separate URLs that could potentially host duplicate content. It’s important to choose one as the canonical (preferred) version and redirect the other to it or use a canonical tag to define it explicitly.
2. HTTP vs. HTTPS
Similar to the WWW issue, if a site is accessible through both HTTP and HTTPS protocols, it can create duplicate content issues. Since HTTPS is a secure protocol and is favored by search engines, it is usually best to set the HTTPS version as the canonical one and redirect all HTTP traffic to it.
3. URL Parameters
URLs with parameters (e.g., tracking or sorting parameters) often generate duplicate content. For instance, example.com/product and example.com/product?color=blue might show the same content but with different URL parameters. Using the canonical tag helps search engines understand which URL is the primary one.
4. Trailing Slash vs. Non-Trailing Slash
Whether a URL ends with a slash can affect how content is viewed by search engines. URLs http://example.com/about and http://example.com/about/ might be treated as separate pages. Consistently using one format and setting a canonical URL helps avoid these issues.
5. Indexed Pagination
Websites often have pagination (e.g., blog post lists or product categories), where content is split across multiple pages like example.com/blog?page=1. It’s important to use canonical tags to indicate whether each page stands alone or if there is a ‘view-all’ page that should be considered the canonical source.
6. Syndicated Content
If content is syndicated and published on multiple sites, canonical tags can be used to point back to the original content on the primary URL. This helps prevent dilution of ranking signals and ensures that the original publisher maintains SEO benefits.
7. Mobile and Desktop URLs
If a site has separate URLs for mobile and desktop versions (e.g., m.example.com and www.example.com), canonical tags can be used to guide search engines on how to treat these versions, typically pointing the mobile URLs back to the desktop version (or vice versa depending on the primary version).
8. Internationalization
For websites that have content in multiple languages or regional variants (using subdomains or subfolders like us.example.com or example.com/de), canonical tags should be correctly implemented to avoid duplicate content across language versions.
Handling Canonical Issues
To manage these canonical issues effectively:
Use 301 redirects to ensure all traffic from deprecated URLs (non-canonical) goes to the preferred (canonical) version.
Implement canonical tags across your site’s pages to explicitly tell search engines which version of a URL you want to index.
Ensure consistency in your internal and external linking structures to support the canonical URLs.
Monitor and update your canonical tags regularly as new content is added or as your site structure changes.
By addressing these scenarios with proper canonical strategies, you can enhance your site’s SEO performance and ensure that search engines index and rank your site accurately and efficiently.
Canonical Issue in WordPress with Trailing Slash
In WordPress, the trailing slash “/” at the end of URLs, including those for tag archives, is generally controlled by the permalink settings or by WordPress’ internal rewrite rules. Here’s how you can address the issue of removing the trailing slash from the URLs:
1. Check Permalink Settings
First, check your permalink settings in WordPress:
Go to your WordPress dashboard.
Navigate to Settings > Permalinks.
Review the common settings and the custom structure. If there’s a slash (“/”) at the end of the structure, you can try removing it. However, be cautious as this might affect all URLs across your site, not just the tag URLs.
2. Modify .htaccess File
If adjusting the permalink settings in the dashboard doesn’t work or if you need more targeted control, you might need to tweak the .htaccess file. This method allows you to specifically target URLs with ‘/tag/’ in them. Add the following rule to your .htaccess file:
RewriteEngine On RewriteBase / RewriteRule ^tag/(.*)/$ /tag/$1 [R=301,L]
This rule will permanently redirect URLs that have a trailing slash after a tag to the version without the slash. Ensure that you back up your .htaccess file before making changes.
3. Use a Plugin
If you’re not comfortable editing the .htaccess file, there are plugins available that can manage redirects or remove trailing slashes. Plugins like Redirection or Yoast SEO might help manage these aspects without directly editing files.
To remove the trailing slash from pagination links in WordPress
You can add a filter to modify the output of the paginate_links() function. You can place this filter in your theme’s functions.php file, specifically within the theme structure you shared. Here’s how you can add this filter to
/** * Remove trailing slashes from pagination links. * * @param string $link The URL of the pagination link. * @return string */ function remove_trailing_slashes_pagination($link) { return rtrim($link, '/'); } add_filter('paginate_links', 'remove_trailing_slashes_pagination');
Here’s where you can insert this function in the provided functions.php file structure:
Open the functions.php file in your WordPress theme directory.
Scroll to the end of the file or find a suitable place where custom functions are added.
Paste the code snippet above.
This function remove_trailing_slashes_pagination uses the rtrim() function to strip trailing slashes from the URL returned by the paginate_links() function. The add_filter line hooks this function into WordPress, specifically modifying the output of pagination links.

0 notes
Text
WordPress Invalid URL: Causes and Fixes
Introduction
WordPress is one of the most popular website-building platforms in the world. It's used by millions of people to create all kinds of websites, from simple blogs to complex e-commerce sites. But sometimes, users encounter a problem: they get an "Invalid URL" error. This error can be frustrating, especially if you don't know what causes it or how to fix it. In this blog, we'll explore the common causes of the WordPress Invalid URL error and provide simple steps to fix it. We'll use straightforward language so that even a fourth-grader can understand.

What is an Invalid URL?
Before we dive into the causes and fixes, let's understand what a URL is and what it means when it's invalid. URL stands for "Uniform Resource Locator." It's the address you type into your web browser to visit a website. For example, "https://www.example.com" is a URL.
An invalid URL means that the address you're trying to reach doesn't work. It's like dialing a phone number that no longer exists. When this happens in WordPress, it means that something is wrong with the address you're trying to use on your website.
Common Causes of Invalid URL Errors
There are several reasons why you might encounter an invalid URL error in WordPress. Let's look at the most common causes:
Incorrect URL Format: Sometimes, the URL you're trying to use is simply not formatted correctly. This can happen if you forget to include "http://" or "https://".
Typos and Mistakes: A simple typo in the URL can cause it to be invalid. Even a small mistake like missing a letter or adding an extra space can break the URL.
Broken Links: If a link on your website points to a page that no longer exists or has been moved, you'll get an invalid URL error. This often happens if you've changed the structure of your website or deleted some pages. Knowing how to find dead links is crucial to keeping your website error-free.
Incorrect Permalink Settings: WordPress uses permalinks to create URLs for your posts and pages. If your permalink settings are incorrect, you might end up with invalid URLs.
Plugin Conflicts: Sometimes, plugins can interfere with your URLs. A plugin might change how URLs are generated or cause a conflict that results in invalid URLs.
Theme Issues: Just like plugins, your WordPress theme can also affect your URLs. A poorly coded theme might cause invalid URL errors.
Server Issues: Sometimes, the problem is not with WordPress but with the server where your website is hosted. Server misconfigurations can lead to invalid URL errors.

How to Fix Invalid URL Errors
Now that we know what causes invalid URL errors, let's look at how to fix them. We'll go through each cause and provide simple, step-by-step solutions.
1. Correct the URL Format
The first thing to check is whether your URL is formatted correctly. Here's how:
Make sure your URL starts with "http://" or "https://". For example, "http://www.example.com" or "https://www.example.com".
Check for any extra spaces or characters that don't belong. A valid URL should not have spaces or special characters except for standard ones like "-" or "_".
2. Fix Typos and Mistakes
Double-check the URL for any typos or mistakes. Here's what to do:
Carefully read the URL and make sure all the letters and symbols are correct.
Compare the URL with the correct address if you have one. Sometimes, copying and pasting the URL from a reliable source can help.
3. Update Broken Links
If you have broken links on your website, you need to update them. Here's how to fix broken links:
Use a WordPress link checker tool to find all the broken links on your site. Many free tools are available online, such as Broken Link Checker or other WordPress find broken links plugins.
Once you've identified the broken links, update them with the correct URLs. If the page no longer exists, consider redirecting the link to a related page or your homepage.
Knowing how to fix broken links can save you a lot of time and improve your website's user experience.
4. Adjust Permalink Settings
Incorrect permalink settings can cause invalid URL errors. Here's how to fix this URL problem:
Go to your WordPress dashboard.
Navigate to Settings > Permalinks.
Choose a permalink structure that suits your site. The "Post name" option is a good choice for most websites.
Save the changes.
5. Resolve Plugin Conflicts
If a plugin is causing the invalid URL error, you'll need to identify and resolve the conflict. Here's how:
Deactivate all your plugins.
Check if the invalid URL error is resolved. If it is, reactivate your plugins one by one.
After activating each plugin, check if the error reappears. This will help you identify the problematic plugin.
Once you've found the conflicting plugin, consider replacing it with an alternative or contacting the plugin developer for support.
6. Fix Theme Issues
Your theme might be causing the invalid URL error. Here's what to do:
Switch to a default WordPress theme like "Twenty Twenty-One".
Check if the invalid URL error is resolved. If it is, the problem is with your theme.
Contact the theme developer for support or consider using a different theme.
7. Check Server Configuration
If the problem is with your server, you'll need to check the server configuration. Here's how:
Contact your hosting provider and explain the issue. They can help you check if there's a server misconfiguration.
Ensure that your server settings match the requirements for running WordPress. This includes having the correct PHP version, database settings, and file permissions.
Preventing Future Invalid URL Errors
To prevent invalid URL errors from happening in the future, follow these best practices:
Regularly Update WordPress: Keep your WordPress core, themes, and plugins updated to ensure compatibility and security.
Use Reliable Plugins and Themes: Only use plugins and themes from reputable sources. Check reviews and ratings before installing them.
Monitor Your Site for Broken Links: Use a WordPress link checker tool regularly to find and fix broken links.
Backup Your Site: Regular backups can help you restore your site quickly if something goes wrong. Use a reliable backup plugin or service.
Test Changes Before Going Live: If you're making significant changes to your site, test them on a staging site first. This can help you identify and fix issues before they affect your live site.
Conclusion
Invalid URL errors in WordPress can be frustrating, but they are usually easy to fix once you know what causes them. By following the steps outlined in this blog, you can quickly identify and resolve the most common causes of invalid URL errors. Remember to keep your WordPress site updated, use reliable plugins and themes, and monitor your site for broken links to prevent future issues. With these best practices, you can keep your WordPress site running smoothly and ensure that your visitors have a great experience.
If you found this guide helpful, please share it with others who might benefit from it. And if you have any questions or need further assistance, feel free to leave a comment below. Want to read about WordPress Themes and Plugins, Click Here
0 notes
Text
[A Step-by-Step Guide on] How to Duplicate an Entire Page in WordPress

Are you looking to replicate a page on your WordPress website with ease? Duplicating a page can save you time and effort, especially when you want to maintain a consistent layout or structure across multiple pages. In this guide, we'll walk you through the simple steps to duplicate a page in WordPress effortlessly.
Duplicating a page in WordPress is a straightforward process that can be achieved using either plugins or built-in features, depending on your preference and the complexity of your website. Here's how you can duplicate a page using both methods:
Method 1: Using a Plugin
Install and Activate a Page Duplication Plugin: Start by installing and activating a WordPress plugin designed for duplicating pages. There are several plugins available, such as Duplicate Page, Yoast Duplicate Post, and Duplicate Post. Once installed, activate the plugin from the Plugins menu in your WordPress dashboard.
Navigate to the Page You Want to Duplicate: Go to the Pages section in your WordPress dashboard and locate the page you wish to duplicate.
Duplicate the Page: Once you've found the page, hover your mouse over it, and you should see a "Duplicate" option appear. Click on this option, and the plugin will create an exact copy of the page for you.
Edit the Duplicate Page: After duplicating the page, you can edit the content, title, or any other elements as needed. Make sure to save your changes once you're done.
Method 2: Using Built-in Features
Create a New Page: Start by creating a new page in WordPress. You can do this by navigating to Pages > Add New in your dashboard.
Copy Content from Original Page: Open the page you want to duplicate in another tab or window. Select all the content on the page, right-click, and choose "Copy."
Paste Content into New Page: Switch back to the tab or window where you're creating a new page. Click inside the content area and right-click to select "Paste." This will transfer all the content from the original page to the new page.
Adjust Settings and Save: Customize the page settings, such as the permalink, featured image, and other options, to match your preferences. Once you're satisfied with the changes, click on the "Publish" button to save the duplicated page.
Conclusion
Duplicating a page in WordPress is a simple yet powerful technique that can streamline your website management process. Whether you prefer using plugins or built-in features, the steps outlined above will help you replicate pages effortlessly. By duplicating pages, you can maintain consistency in design, layout, and content across your website, saving you time and effort in the long run.
0 notes
Text
How to Set Up a WordPress Redirect for Better UX and SEO

Setting up redirects in WordPress is an essential task for any website owner. Whether you're changing your site structure, updating URLs, or switching domain names, redirects are required to avoid broken links and impacts to your search engine optimization. In this comprehensive guide, we'll cover everything you need to know about using redirects in WordPress: - What is a WordPress redirect? - What are the different types of redirects? - When should you use redirects for WordPress sites? - The benefits of redirects for UX and SEO. - Step-by-step instructions for setting up redirects in WordPress using plugins or manual .htaccess edits. - Tips for testing and troubleshooting your redirects. - Common redirect mistakes to avoid. We'll also include detailed examples, images, and videos to make the process easy to follow along. Our goal is to provide website owners, bloggers, agencies, and developers with a complete resource for implementing smart redirects that create the best possible experience for site visitors and search engines. Whether you're an SEO beginner or advanced user, you'll learn how to properly redirect URLs in WordPress to boost your site's user experience, organic traffic, and conversion rates. Let's get started! What is a WordPress redirect? A WordPress redirect is a function that routes visitors from one URL to a different URL on your WordPress site. When a user attempts to access a page using the original URL, WordPress will automatically redirect them to the new URL that has been specified. This is done seamlessly behind the scenes so that the visitor is redirected without seeing an error or broken page. Types of Redirects for WordPress Sites There are a few different types of redirects that can be implemented in WordPress: - 301 Redirect - The most common type of redirect is a 301 permanent redirect which tells search engines and visitors that a page has permanently moved to a new URL. 301s pass link equity and preserve search engine ranking. - 302 Redirect - A temporary redirect used when a page is temporarily moved or under maintenance. It's safer to say that 302s are less reliable for passing link equity than 301s. - 307 Redirect - Also a temporary redirect. 307s preserve the original request method on redirect while 302s change it to GET. - Meta Refresh Redirect - Uses a meta refresh tag to redirect visitors after a short time delay. Not recommended for SEO. - JavaScript Redirect - Uses JavaScript code to redirect users. Also not optimal for SEO. The majority of redirects you'll use in WordPress will likely be 301 permanent redirects when you change your site's structure or URLs. 301s are critical for maintaining search engine traffic and rankings. The key benefit of WordPress redirects is that they allow you to make changes to your site's content and URLs without breaking links or losing traffic and search visibility. Configuring proper redirects is crucial for any WordPress site owner. When to Use Redirects for Your WordPress Site Here are the most common cases where you'll need to set up a redirect in WordPress: - Changing permalinks - Moving pages - Switching domain names - Deleting pages - Updating site navigation - Fixing broken links Redirects should be used anytime a URL is changed or removed to prevent broken links, 404 errors, and negative impacts on user experience. Specifically, redirects should be implemented in the following cases to avoid potential issues: - When you change or update a post or page URL on your site, redirect the old URL to the new one. This prevents dead links if someone bookmarks or links to the old URL. - When you delete or remove a page from your site, redirect the URL to a relevant alternative page or your home page. Otherwise visitors may land on a 404 error if they try to access the deleted page. - If you change the overall permalink structure of your WordPress site, set up redirects from the old URLs to the new ones so existing external links continue to work. - When you migrate your site to a new domain name, redirects allow traffic from your old domain to be forwarded to the equivalent pages on the new domain. - If you restructure your site navigation or change the slug/path of pages, redirects ensure existing links aren't broken. Without proper redirects set up, any time a URL is changed or removed it could lead to broken links, dead ends, 404 errors, and a poor user experience. Redirects maintain continuity for site visitors and also preserve your search engine rankings when URLs need to be changed. The Benefits of Redirects for UX and SEO Setting up proper redirects offers two big benefits for your WordPress site: Enhanced User Experience Redirects ensure your visitors always land on a working page, even if a link they used is old or outdated. This prevents frustrating 404 "page not found" errors that result in dead ends for users. When visitors hit a 404, they are often left confused about where to go next. They may abandon your site altogether and head to a competitor instead. Redirects provide a seamless user experience by routing users to relevant content when URL changes occur. For example, if you remove a blog post, redirecting the old URL to your blog homepage keeps visitors from hitting a roadblock. Or if you change your domain name, redirects will forward traffic from the old domain to relevant pages on the new domain. Well-implemented redirects create a smooth user journey that avoids frustration when navigating your site. Visitors will appreciate being able to easily access the content they are looking for. Improved SEO Redirects also maintain your existing SEO equity when URLs change on your WordPress site. Without redirects, changing a URL would reset any authority that page had accrued. The search engine crawl will follow the 301 redirect from the old URL to the new URL, transferring that SEO juice. This prevents a dip in rankings and preserves search traffic. Redirects tell search engines like Google that a page has permanently moved, rather than been deleted. So all of the backlinks and authority are passed onto the new URL. For example, if you have a high-traffic blog post that ranks well, updating the URL via a 301 redirect will retain the post's search visibility. The search engines will index the new URL and pass on the existing rankings. Using proper redirects for any changed URLs is essential for maintaining search engine traffic and preventing a loss of rankings. How to Set Up Redirects in WordPress Now let's go through the step-by-step process for setting up redirects in WordPress. There are two main methods: - Using a Redirect Plugin (Easier) - Manually editing .htaccess file Method 1: Using a Redirect Plugin The easiest way to handle WordPress redirects is by using a dedicated redirect plugin. There are many great options to choose from, both free and paid. Some of the most popular redirect plugins include: - Redirection - Safe Redirect Manager - Simple 301 Redirects - All In One SEO In this example, we'll use the free Redirection plugin to set up a 301 redirect: Step 1. Install and activate the Redirection plugin in your WordPress admin.Step 2. In the admin menu, go to Tools > RedirectionStep 3. Click "Add New" to create a new redirect.Step 4. Enter the original URL in the "Source URL" field.Step 5. Enter the new URL in the "Target URL" field.Step 6. Click "Add Redirect" and the 301 redirect will be created! Here's a video tutorial showing the full process: https://youtu.be/SC63R5Y2qzs The benefit of using a dedicated redirect plugin is it makes managing, editing, and removing redirects much easier compared to editing .htaccess directly. Most include useful tools like redirect logs, 404 monitoring, bulk editing, and more. Method 2: Manually Editing .htaccess The more technical approach is to manually edit the .htaccess file on your WordPress site to create redirects. Here is the general process: Step 1. Login to your web server using an FTP client or admin dashboard.Step 2. Navigate to your WordPress site's root folder.Step 3. Open the .htaccess file in a text editor.Step 4. Add your redirect code at the end of the file, using this format: Redirect 301 /old-url /new-url Step 5. Save your changes and upload the updated .htaccess file.Step 6. Test the redirect by visiting your old URL. This method works well for simple site-wide redirects. However, managing a lot of individual URL redirects this way can quickly become complicated. Using a dedicated plugin is best for most users. Here is my favourite video tutorial for setting up WordPress redirects using the .htaccess file: https://youtu.be/gc1MhsJvuRg Testing and Troubleshooting WordPress Redirects It's important to test all of your redirects to make sure they are configured correctly. Here are some tips for testing and troubleshooting redirects in WordPress: - Test by visiting the old URL - you should be seamlessly redirected. - Check redirect plugins for broken redirects or 404 errors. - Review server logs to see redirect codes and errors. - Use a redirect checker tool for a detailed analysis. - If a redirect is broken, double check the old and new URL. - Make sure there are no spaces or typos in the redirect syntax. By thoroughly testing your WordPress redirects, you can identify and fix any issues so your site visitors always have a positive experience. Common Redirect Mistakes to Avoid There are some common mistakes that can lead to broken redirects in WordPress: - Typos in the old or new URL. - Accidentally creating duplicate redirects. - Using incorrect redirect code (e.g. 301 vs 302). - Not updating site links and sitemaps. - Redirecting to the wrong page or site. - Creating redirect loops. Being aware of these common errors can help you avoid any redirect problems from the start. You want your visitors to have the UX possible on your website! Implementing proper redirects is crucial for any WordPress website. Redirects create a seamless user experience and maintain your site's SEO when URLs change. This guide covers everything you need to know to add redirects in WordPress the right way. We looked at the different types of redirects, when to use them, the benefits they provide, and step-by-step setup instructions using plugins or manual .htaccess edits. Be sure to thoroughly test all of your WordPress redirects and avoid common mistakes. Well-configured redirects will keep your site running smoothly as you make changes and improvements over time. Does this expanded guide do a better job explaining WordPress redirects? Please let me know if you need any clarification or have additional questions! Read the full article
0 notes
Text
A Beginner's Guide: How to Create a Website on WordPress

Learn how to create a website on WordPress - the versatile and user-friendly platform for creating stunning online sites. Here Are the Following on how to create a website on WordPress: Step 1: Define Your Website's Purpose and GoalsBefore diving in, it's crucial to understand why you're creating a website. Is it a personal blog, an online portfolio, an e-commerce store, or something else? Clearly define your website's purpose and set achievable goals. Step 2: Choose a Domain Name and Hosting Your domain name is your website's address (e.g., www.yourwebsite.com). Select a domain name that reflects your brand or website's topic. Then, choose a reliable web hosting provider. Popular options include Bluehost, SiteGround, and HostGator. Many of them offer easy WordPress installation. Step 3: Install WordPress Most hosting providers offer a one-click WordPress installation. Log in to your hosting account, find the WordPress installer, and follow the on-screen instructions. You'll set up your admin username and password during this process. Step 4: Select a WordPress Theme WordPress offers a wide range of free and premium themes. Choose a theme that suits your website's style and objectives. You can customize it later to align with your branding. Step 5: Configure Essential Settings After installing WordPress, head to the dashboard. Here, you can configure important settings like site title, tagline, time zone, and permalink structure (URL format). Step 6: Install Essential Plugins Plugins enhance your website's functionality. Start with essential plugins like: - Yoast SEO: Helps with search engine optimization (SEO). - Akismet Anti-Spam: Protects your site from spam comments. - W3 Total Cache: Improves site speed and performance. - UpdraftPlus: Backs up your website regularly. Step 7: Create Key Pages Begin with fundamental pages: - Homepage: The front page of your website. - About Us: Tell visitors about your brand or yourself. - Contact Us: Provide contact information. - Blog: If you plan to blog, create this page. Step 8: Add Content Start adding content to your pages and blog posts. Use the WordPress editor, which is similar to a word processor, to format text, add images, and embed media. Step 9: Customize Your Website Use the WordPress Customizer to personalize your site's appearance. You can change colors, fonts, and other design elements. If your theme supports it, create a custom logo. Step 10: Optimize for SEO Optimize your content for search engines using the Yoast SEO plugin. Focus on keyword research, meta descriptions, and internal linking. Step 11: Set Up Analytics and Monitoring Connect your website to Google Analytics to track visitor data. Consider installing a security plugin like Wordfence to protect against threats. Step 12: Regularly Update and Back Up Your Website Keep your WordPress core, themes, and plugins up to date to ensure security and functionality. Regularly back up your website to prevent data loss. Step 13: Launch Your Website Once you're satisfied with your website's content and design, it's time to go live! Inform your audience through social media, email, or other communication channels. Step 14: Promote Your Website After launching, promote your website to attract visitors. Share your content on social media, engage with your audience, and consider other marketing strategies like email marketing and SEO. Creating a website on WordPress may seem daunting at first, but with these steps, you can build a professional and engaging online presence. Remember that practice makes perfect, and as you become more familiar with WordPress, you can explore advanced features to further enhance your site. Good luck on your web development journey! Read the full article
0 notes
Text
SEO Mastery with WordPress: Unveiling the Secrets to Success
In the vast digital landscape, where websites compete for attention, mastering SEO is like having a secret weapon in your arsenal. And when it comes to achieving SEO excellence, WordPress emerges as a champion's choice.
With the help of these below strategies and seeking help from Calgary SEO company that knows everything thing about everything about SEO would make your brand work!
Welcome to the world of SEO mastery with WordPress, where we'll uncover the strategies and secrets that can propel your website to the top of search engine rankings. So, grab your virtual magnifying glass as we explore the path to SEO success!
Understanding the WordPress Advantage
Before we dive into the depths of SEO, let's take a moment to appreciate the brilliance of WordPress. This versatile platform offers a range of tools and features that are inherently friendly to search engines. From clean code to customizable URLs, WordPress provides the perfect foundation for optimizing your website's visibility.
SEO Company: Your Partner in Success
If you're ready to take your SEO game to the next level, collaborating with a Calgary SEO company could be your game-changer. SEO experts are well-versed in the intricacies of both WordPress and search engine optimization, helping you navigate the ever-evolving landscape of digital marketing.
1. Content is King: Crafting SEO-Friendly Posts
At the heart of SEO mastery lies content. And in WordPress, creating SEO-friendly content is a breeze. Here's how:
- Quality Matters: Invest in well-researched, valuable content that addresses your audience's needs.
- Keyword Magic: Strategically incorporate relevant keywords into your content, headers, and meta descriptions.
- Engaging Headlines: Craft attention-grabbing headlines that entice readers and incorporate your target keywords.
- Internal Linking: Link to other relevant posts within your website to improve user navigation and boost SEO.
2. The Power of Plugins: Enhancing SEO
WordPress's array of plugins can transform your SEO efforts. Here are some essential plugins that can make a substantial impact:
- Yoast SEO: A game-changing plugin that guides you through optimizing each piece of content for search engines.
- WP Super Cache: Speed matters in SEO. This plugin improves your website's loading time, positively impacting rankings.
- Smush: Images are crucial, but they shouldn't slow down your site. Smush optimizes images for better performance.

3. Mobile Optimization: A Must for SEO Success
With mobile usage skyrocketing, Google's algorithms prioritize mobile-friendly websites. WordPress makes mobile optimization achievable:
- Responsive Themes: Choose a responsive theme that adapts seamlessly to various devices and screen sizes.
- Mobile-Friendly Plugins: Utilize plugins that enhance the mobile experience, ensuring your website looks great on all devices.
4. Technical Tweaks: Behind-the-Scenes Optimization
While your content shines, don't forget the technical side of SEO. WordPress allows you to optimize behind the scenes:
- Permalink Structure: Customize your URL structure to include keywords for better search engine understanding.
- XML Sitemap: Generate a sitemap that helps search engines index your website's pages effectively.
- Page Speed: Ensure your website loads quickly by optimizing images, minimizing code, and using caching plugins.
5. Engagement Matters: User Experience and SEO
The user experience directly impacts your SEO ranking. With WordPress, you can enhance engagement:
- User-Friendly Design: Opt for a clean, intuitive design that encourages visitors to explore and stay on your website.
- Clear Navigation: Organize your content logically, making it easy for users to find what they're looking for.
Conclusion
As you embark on your journey to SEO mastery with WordPress, remember that success isn't instantaneous. It's a culmination of thoughtful strategies, consistent efforts, and staying up-to-date with the latest trends. And if you're ready to amplify your SEO journey, don't hesitate to seek support from a reputable Calgary SEO Company for growth.
Embrace the power of WordPress, capitalize on its features, and employ proven SEO tactics to elevate your website's visibility. With dedication and the right tools, you'll be well on your way to unveiling the secrets of SEO success and carving your path to the top of the digital realm.
1 note
·
View note
Text
How to change permalink in WordPress - Guide
Change your permalinks in WordPress to boost your traffic!
For WordPress beginners, they are often confused about WordPress permalinks. Even ask if it is possible to create your own custom permalink or page URL structure in WordPress. In this article, we will show you how to change permalink in WordPress to boost your SEO and make your website more friendly and accessible. What is a custom permalink in WordPress? Permalinks are fixed URLs for articles,…

View On WordPress
1 note
·
View note
Text
Technical SEO: Every Thing You Need to Understand
Technical SEO could be the procedure of making certain that how well a search engine spider crawls a site and indicator articles. In order to improve organic research ranking, the technical sides of your website should meet the prerequisites of modern search motors. A few of the most important elements of Technical search engine optimisation comprise running, indexing, making, site design, site rate, and so on.
What's technical search engine optimisation important?
The principal aim of technical SEO will be always to improve the infrastructure of an internet site. With technical search engine optimisation, you also can simply help search motors access, crawl, interpret, and indicator your own internet site without any hassle.
Which exactly are definitely the most significant components of specialized search engine optimisation?
Technical SEO plays a significant part in impacting your organic and natural search rank. That's why it is considered a foundational section of search engine optimisation. In this section, I'm going to be covering all those elements of technical SEO that helps to improve web site visibility at an internet search engine.
Make an XML Site Maps
Building XML sitemaps in WordPress
Basically, a site is a XML file that contains all the critical pages of the website. A easy analogy may possibly be your resident street connected from your most important road. If someone likes to go to the home they simply will need to follow the path created from this source. Sitemaps is essentially a pathway for crawlers to find all those webpages of one's website.
Even more, a site informs a crawler that pages and files which you think are important inside your site, and also provides invaluable info about those records: for example, once the page was last updated, how frequently the page has been shifted, and some other alternate language variants of your typical page.
Before generating a sitemap You Need to Be Mindful of:
Settle on which pages in your site should be crawled by Google, and determine exactly the approximate variant of every webpage.
Decide which sitemap format you would like to use. XML site is suggested for web crawler where as HTML site is to get user navigation.
Create your sitemap available to Google by adding it to your robots.txt document or directly publishing it to Hunt Console.
How to create a site?
If you are a WordPress user, you most likely have found on the Yoast SEO plug in. Yoast automatically generates a site of your website. Just like all of the additional SEO plugins, they can do it mechanically.
You can easily view a sitemap from Yoast simply by clicking on (Search Engine Optimisation >Standard >Characteristics >XML Sitemap)
https://lh5.googleusercontent.com/jQ29mGfH53u7t1hJ1MoFEJfxayqA2hva5rNGYIDrXwhP39hQkMvkGXsAUhgFgbTSNgvbnSTnwqGRMK_hxc7SW6JP6XO1J7I-IU1Gm4azDBaCi_ApAC9jdPkVKSgxqB-ahf3WiwzR
You might even produce a site-map manually using third-party tools such as screaming frog and online with a sitemap .
Assess for robots.txt
Robots.txt file lives from the origin of one's site. It educates web spiders commonly called search engine spiders just how to crawl webpages in their websites.
Robots.txt guides the webcrawler which pages to access and index also then pages never to. As an instance, disallowing admin login path into your Robots.txt. Keeping the search engines from accessing certain pages in your website is critical for the the solitude of your website and for your own search engine optimisation. Learn much more on optimizing robots.txt to get SEO.
For those who haven't established robots.txt, then you can certainly do this easily with Yoast, if you're a WordPress user. Only go to (SEO>Applications >File editor). After clicking to document editor, then the robots.txt file will be generated automatically.
An optimized robots.txt
You are able to also only develop a robots.txt manually. Simply produce a notepad file with. Txt expansion along side valid principles on it. Then upload it right back to some servers.
Generating robots.txt manually in server
Installation Google-analytics
Establishing google analytics
Google analytics is just a web analytics agency which on average used for tracking and reporting traffic. Setting up google analytics is the very first stage of SEO where you are able to interpret data like traffic supply, and even page speed. Interestingly, additionally, it functions as an search engine marketing tool to ensure google punishment or standing modification simply assessing traffic history.
If you're simply beginning , kindly visit this particular guide on establishing analytics up.
Installation Google Hunt Console
Google Lookup Console can be a free tool offered by Google which makes it possible to to track, preserve, and troubleshoot your site's existence in Google Search benefits.
Google-search console error report example
That you never need to sign up for Search Console to become contained in Google Search results, but the Lookup Console helps you recognize and enhance the way that Google sees your internet site. The principal cause to work with the tools because it will allow visitors to check indexing standing and optimize visibility of their sites.
If you're new to GSC, please follow these steps before setting up an account.
Decide on a preferred Domain version of your site
You need to check that just one single variant of your site is browseable. Technically using numerous URLs for the very same pages contributes to replicate content concerns and negatively influences your search engine optimisation functionality.
For instance,
http://example.com
http://www.example.com
https://example.com
https://www.example.com
From the aforementioned example, there's a chance that anybody can sort any URL from the address bar. Be certain that you maintain just one searchable variant of URLs (as an instance https://example.com) along with the rest must be redirected (301) or must employ canonical URL pointed into a preferred variant.
Make Your Site Connection Secure (through HTTPS)
An internet site having an implemented SSL certificate
Before, Google was not significantly concerned about HTTPS in every website. In 2014 Google declared that they wished to see 'HTTPS anyplace', and that safe HTTPS sites will be given preference on non-secure kinds in hunt effects. From right here Google indirectly wishes to express having SSL may be Ranking sign. Utilizing SSL doesn't mean you might be optimizing for Google, it ensures you are focusing on users info solitude also, and your internet site stability.
So, if you're still employing an unencrypted variant of the URL(HTTP), it is the right time for you to switch to https. This can be accomplished by setting up a SSL certificate on your own internet site.
Learn more on configuring SSL certificates for your site.
Internet site Structure
Site framework or architecture tells the manner in which to arrange your website contents. It is much better to have a solid understanding of a design site prior to working on it. Site construction ought to reply the query just like:
How internet site articles is sprinkled?
Just how are they associated?
Just how is it obtained?
Proper site architecture improves user experience and ultimately boosts a site's natural search rank. Google hates internet sites which are poorly managed. What's more, keeping an easy SEO friendly blog design helps spider to crawl entire content without difficulty.
As Google stated in their official website" Our first duty is to coordinate the world's information and make it universally accessible and useful." Google rewards web sites which are well preserved.
Utilize Bread Crumb Menus & Navigation
Now a breadcrumb menu is a set of connections at the very top or underside of the page which lets users navigate into a desired pages which may be homepages or group webpages.
A Bread Crumb menu serves 2 Chief functions:
Easier navigation to some particular page without needing to press the back button on their browsers.
It will help search engines to comprehend the arrangement of a website.
Implementing breadcrumbs is outstanding in search engine optimisation because they're exceptionally suggested by Google.
In the event you do not curently have bread crumbs permitted, make sure that they are enabled. If you are a WordPress user, then you can add Breadcrumb Navigation using bread-crumb NavXT Plugin. Here's a fast manual on configuring bread crumbs.
In case in the event that you are looking for for an internet advertising agency that delivers a broad array of SEO services, then Orka Socials is very happy to help you.
Utilize the Right URL Framework
The following item on your technical search engine optimisation list is to help keep the search engine optimisation friendly URL structure of your website. From URL arrangement we suggest that the format of your URLs.
Very best Search Engine Optimization clinics dictate the subsequent about URLs:
Use Lower Case characters
Use dashes (--) to different words from the URL
Avoid having unneeded personality like underline(_) at URL slug
Make them brief and descriptive
Use your target key words in the URL with out key word stuffing.
If you are a WordPress user, you will make it SEO helpful by browsing (Setting>Permalinks) and choose URL structure by name.
Generally, as soon as you define the structure of one's permanent link arrangement, the only thing you'll need to do is always to optimize your URLs when publishing content that is new.
Boost Your Site
Google clearly stated that site speed is just one of those standing things. Google is mentioning the value of rate at their SEO recommendations and studies make sure faster websites perform better compared to slower web sites. Google likes to observe websites which provide a excellent user knowledge.
Bookmarking site rate is actually a specialized matter and it requires making changes to your site and infrastructure to find fantastic outcomes.
The Very First things will be to Identify your site rate Working with the very popular instruments:
Google Web Page Rate In-Sight
Gtmetrix
Web-page Test
Pingdom
The aforementioned tools will provide you some recommendations on what you need to change to advance your speed but since I mentioned previously it's really a technical dilemma, also you also may have to hire a programmer to assist you to.
Image Supply: CrazyEGG
Generally Speaking, below are Some Suggestions on optimizing site rank:
Improve your own server to use 64 bits operating system
Upgrade to the latest version of PHP
Maximize the dimensions of your images. You can find programs to help you do so without even losing quality.
Minimize usage of plugins that are unnecessary
Update WordPress along with all plugins for the Hottest versions
Use Minimalist/Lightweight WordPress Concept. Better to invest in habit made subject.
Boost and minify your CSS and JS Data Files
Leverage an Internet Browser caching plugin
Avoid adding a lot of scripts in the of One's Site
Utilize asynchronous Java Script loading
Do an safety audit and repair loopholes
Mobile Friendliness
Possessing a mobile-friendly website is compulsory. Most probably the majority of the users are around mobile sufficient reason for the coming of the mobile-first index by Google, if you have no an easy, mobile-friendly website your positions will likely sufferfrom
Mobile-friendliness a section of technical search engine optimisation simply because after you get a mobile-friendly motif, that's precisely configured, so you really do not need to address this again.
First matter to do is to check the mobile-friendliness of your website working with the Google Mobile-Friendly examination. If your site will not pass the test, you own lots of job todo along with this should be your first concern. Also should it pass the evaluation, there certainly are a number of issues you will need to know about portable and also SEO.
Your cellular internet site needs to have precisely the same articles as your desktop computer site. Using the debut of the mobile-first indicator, Google will try and position mobile websites predicated on their own cellular content hence that any content you have about your desktop should also be accessible on mobile.
Think about Using AMP
Image Source: Relevance
Accelerated Mobile webpages can be really a comparatively new concept introduced with Google in its own attempt to produce the cell website faster.
Essentially, using AMP you will find a edition of your website utilizing AMP HTML that's an optimized version of normal HTML.
The moment you make AMP webpages for your web site that these are stored and served to consumers by way of a unique Google cache that loads more quickly (almost immediately ) than mobile-friendly pages.
AMP pages will be simply reachable as a result of the Google Mobile results or by way of other AMP services such as Twitter.
There was a long debate in the search engine optimisation community concerning if you should embrace AMP webpages, there are both advantages and disadvantages to applying this particular approach.
Eradicate Dead Hyperlinks
A 404 mistake or useless connections implies that a webpage may not be obtained. That is normally caused by links that are broken. These errors prevent people and internet search engine robots by accessing your own pages , and may adversely impact both user expertise and search-engine crawlability.
This may subsequently result in a decline in traffic driven to your site. If a web page returns a error, get rid of all links resulting in the malfunction web page or substitute it with a different resource using 301 redirection.
Use Rel=Canonical on Duplicate Webpages
With canonical label example
Webpages are regarded as copies if their content is 85% indistinguishable. Obtaining duplicate articles could significantly affect your search engine optimization efficiency.
Google will typically show only 1 copy page, filtering other instances from its indicator and look for outcome, and also this particular page might well not function as precisely the main one that you wish to position.
Add a rel="canonical" link to a few your repeat pages to inform search engines which webpage to reveal in search success. Make use of a rel="next" as well as also a rel="prev" url attribute to repair pagination duplicates.
More, educate GoogleBot to manage URL parameters otherwise with Google Search Console. Generally in e commerce websites, donating URLs parameter can be a daunting task together side navigation. Within this instance, you can readily ensure it is seofriendly constituting some URLs parameter out of Google Hunt Console.
https://lh5.googleusercontent.com/WqiRncQRb5kcMHVLvQ8i0Il_xh-EHMEMF-dVTvS5tSkFkmEkTTG_FW9cPWLaSOR_bZ6Ya2kS_3zrrwxMyZJKCpqu6fMpgrmrUoJGunmJZ7P7rZlYNFSFJtE8EwrvE4Z5SCErhvIG
Use Hreflang For Indices Websites
Hreflang is an HTML attribute used to define the language and geographical targeting of a webpage. In the event you've got several variants of the same page in different languages, then you may make use of the hreflang label to share with search engines such as Google on those variations. This permits them to function the proper version for your own users.
Correct implementation of hreflang for multipurpose website
Image Source: Moz
Implement Structured Information Markup
Structured data or Schema mark up is increasingly gaining increasingly more essential within the last couple of years. Lately it's been greatly used by research workers comparing into this past.
Essentially, structured info is code you are able to increase your online pages which is visible to search engine crawlers and also helps them understand the context of one's own content. It's an easy method to spell out your data to search engines at a language they could know.
It's a little technical and also regarded being an facet of technical SEO since you have to simply add a code snippet so it could be reflected in research effects.
If you a WordPress user, you can easily execute even without schema markup plugins.
What is the benefit of utilizing ordered info?
This can help you boost the look of one's listings from the SERPS either through featured snippets, knowledge chart entrances, etc, and boost your click-through-rate (CTR).
Final Thought
Technical search engine optimisation covers a extensive array of locations that have to be optimized to ensure search engine spiders will crawl, render, and index your content together with relaxation. In the majority of the situations when it's done properly depending on SEO tips that you have no a problem through the comprehensive web site audit.
The phrase"technological" is based that you want to have a solid understanding of specialized features for example robots.txt optimization, page speed optimization, AMP, Structured data, etc. Thus be mindful at some time of execution.
Have you got some questions regarding technical search engine optimisation? Don't hesitate to inquire over the remark below.
Happy Reading
Source : OrkaSocials
1 note
·
View note
Text
How To SEO WordPress - A Few Simple And Free Techniques
One of the huge components why WordPress is so mainstream as a writing for a blog stage is that it's generally internet searcher cordial right from the word go. In any case, there are consistently things you can do to improve it and get yourself some higher rankings.

Prior to you even consider getting into SEO however, ensure you're zeroing in your posts and pages on the correct catchphrases and expressions. This means picking words that aren't excessively broad. Keyphrases comprising of a couple of words will be hard to rank for, so go 'long tail' and discover phrases which have lowish rivalry comparable to the quantity of searches.
I suggest you a ShoutRank to learn a good SEO Tactics. Proceeding onward to the reasonable items of how to SEO WordPress, the main thing is to login to your WordPress dashboard and change permalinks settings.
The default produces a post URL which is comprised of a number string, and it doesn't uncover to the web crawlers what the topic of your post is about. What's required is for the URL to be in the yoursite/postname design.
Along these lines, click 'Settings' in the lefthand menu, at that point 'Permalinks,' and under the 'Normal Settings' going, select 'Custom Structure' and type in/%postname%/. Finally, remember to click 'Spare Changes'.
There are various free modules you can use to improve your blog SEO, and one of the most well known is the 'Across the board SEO Pack.' To get it, click on 'Add New' under 'Modules' in the dashboard menu. At that point, you can either type in 'Across the board SEO Pack' in the pursuit box or snap on 'Mainstream' and it should be right up there in the top returns.
Additionally, I firmly suggest getting the 'Google XML Sitemaps' module, which will help the internet searcher arachnids see the total structure of your website and file it all the more without any problem.
1 note
·
View note
Text
Simplifying Your WordPress URLs: How to Remove a Category from the URL
Are you tired of those long and cluttered URLs on your WordPress website? Perhaps you've been wondering how to streamline them by removing unnecessary categories. Well, you're in luck! In this post, we'll walk you through the process of removing a category from a WordPress URL.
WordPress offers a user-friendly platform for website creation and management. However, its default URL structure may not always meet your preferences or SEO goals. Removing a category from your URL can make it more concise and relevant to your content, potentially improving your site's search engine ranking.
So, let's dive into the steps to declutter your WordPress URLs:
Access Your WordPress Dashboard
First things first, log in to your WordPress admin dashboard. This is where all the magic happens!
Navigate to Permalinks Settings
Once logged in, locate the "Settings" option on the left-hand side menu. Hover over it, and then click on "Permalinks". This is where you can customize your URL structure.
Choose Custom Structure
Scroll down until you see the "Common Settings" section. By default, WordPress offers several permalink options such as Plain, Day and name, Month and name, Numeric, and Post name. However, to remove a category from your URL, you'll need a custom structure.
Modify the Custom Structure
In the "Custom Structure" field, you'll see a placeholder like "/%category%/%postname%/". This structure includes the category in the URL. To remove it, simply delete "%category%". Your new custom structure should look something like "/%postname%/". This change tells WordPress to exclude the category from your URLs.
Save Changes
Don't forget to save your new permalink structure! Scroll down to the bottom of the page and click on the "Save Changes" button. WordPress will now update your URL structure site-wide.
And voila! You've successfully removed the category from your WordPress URLs. Now, whenever you publish a new post, the category won't be included in the URL.
But wait, there's more! If you want to further optimize your URLs for SEO, consider the following tips:
Use Keywords in Permalinks: Incorporate relevant keywords into your URLs to improve their search engine visibility.
Keep URLs Short and Sweet: Long URLs can be cumbersome and less user-friendly. Aim for concise and descriptive URLs.
Avoid Stop Words: Remove unnecessary words like "and", "but", "of", etc., from your URLs to keep them clean and focused.
By following these best practices, you can create SEO-friendly URLs that enhance your website's overall performance.
In conclusion, simplifying your WordPress URLs by removing categories is a straightforward process that can have a positive impact on your site's SEO and user experience. So why wait? Declutter your URLs today and watch your website soar to new heights! Easy Ways to Remove category from WordPress URL
0 notes
Text
How do WordPress Websites help to rank higher on Google?
Ranking your page on Google is a matter of effort. You need to take SEO seriously and put considerable effort into managing all the technicalities of SEO. Your website development software has much to do with SEO. Search engine optimization services are about taking care of Google’s guidelines; there are many more factors that can facilitate the work of an SEO agency in Delhi.
Fortunately, WordPress is an SEO-friendly CMS software that not only provides a seamless solution for your website development; it also influences SERP. When it comes to SEO or affiliate marketing, undoubtedly, the most adopted CMS is WordPress. It doesn’t indicate WordPress is SEO; you cannot expect your brand new WordPress site to spot rank one overnight. Search engine optimization services take care of the nitty-gritty of SEO.
Over 455 million websites are built on WordPress; it suggests a vast community base to assist in your development process. If you are wondering which factors of WordPress complement SEO, the following part will guide you.
With WordPress SEO Plugins WordPress already has excellent SEO features. However, if you want to improve more, WordPress’s SEO plugins can take you to the next level. The best SEO plugin is Yoast SEO; most SEO agencies in Delhi use the plugin for their own. You can optimize each page and add your chosen keywords. It involves an analysis based on the updated algorithms. You can generate an XML sitemap and also add schema markup for your website.
Keyword Research Keyword research allows you to create targeted content, better understand the market, and generate valuable traffic. With various tools like KWFinder, Google keyword planner, and SEMRush, SEO agency in Delhi, accomplish their keyword research. Turn on Search engine visibility With a built-in option within WordPress, you can increase search engine visibility. For all Search engine optimization services, this option is very helpful.
Adjust permalink structure When the developers first install WordPress, the site’s posts and pages have a peculiar default URL structure. This default structure is not at all suitable for SEO. By switching your URL permalink structure in the setting, you can get a new structure. You can also include a blog post or page titles; moreover, add the keyword in the URL. You can also change your existing URL structure through a plugin like Change permalink Helper.
Integrate Google analytics To manage SEO technicalities, an SEO agency in Delhi focuses on Google analytics. It will show how well the WordPress SEO strategy is working. It gives you an in-depth breakdown of your website’s traffic. Here, one can install Insert Header and Footer plugin to add Google analytics tracking code. You can view real-time statistics.
Bottom line It is not easy to crack SEO in one go; it needs a strategic approach and proper execution. For an emerging business, SEO is a great way to get potential customers. SEO agency in Delhi can enhance your SERP and get you more customers. Start from today!
1 note
·
View note