#how to delete multiple rows using checkbox
Explore tagged Tumblr posts
Visit Tumblr Blog
Explore Tumblr blogs with no restrictions, modern design and the best experience.
Last Seen Tumblr Blogs


Fun Fact
Tumblr’s reach among the 26-to-35-year-olds in the US is 11%.
Photo

Ajax Multiple Delete Records using Checkbox in Laravel How to delete multiple records using checkbox with Ajax in Laravel. Delete Multiple Data using Checkbox in Laravel using Ajax.
#delete bulk laravel#delete multiple records with checkbox in Laravel#how to delete multiple rows using checkbox#how to delete multiple rows using checkbox in laravel#Laravel#laravel delete multiple rows#laravel multiple delete#laravel multiple delete checkbox#laravel multiple delete using checkbox#multiple delete laravel#multiple delete using checkbox in laravel
0 notes
Photo


Red, White, and Maple
[ UNLIMITED MULTI-SALE W/ SET PACKAGES ]
A labour of love, Red, White, and Maple was a July 2020 Skinathon skin - Canadian themed to honour the start date of July 1st, which was shared with Canada Day! That said, the accent color and icon can be changed easily. This skin is “self-contained” within the frame, as seen, and even the post rows have a maximum height on them. The templates have been designed to fit in with this and sit at the maximum height for the post content space (save the comms template, which is a little shorter). This skin will have unlimited sales, making it cheaper, however, there are four different package options available at different price points. Pricing details are below the cut!
Features:
All HTML templates designed exclusively for the skin
Static user bar, navigation controls, etc
Three posting templates: general posting, tabs, and communications
Styled checkboxes (the maple leaves for topics, and a box that matches the function buttons - like edit, delete, etc - for posts)
Avatar hover which will scroll for multiple/any height mini profile fields
Colors, font families, body font sizes, and icon set in variables for easier changes
Tabbed profile available
Filtering member list available
Vertical forums; will not wrap to a new line, but widths will adjust depending on how many exist in the row
Category descriptions!! Also set in variables for easier editing
Installed and auto-updated to the latest version FontAwesome 5 Pro icon set (Yes, I installed my kit with all icons on this. Yes, this is reflected in the price.)
If you want to purchase this skin, please contact me through Discord only. My Tumblr messages do not get pushed to my phone and I’m not on desktop Tumblr often enough to notice them there. My Discord handle is lux#5069. If this will not work for you, then you may reach out on Tumblr for my email - but expect a delay. I apologize for any inconvenience this may cause, but Android has decided that I don’t deserve Tumblr notifications at all, so I have to work within that.
Package A: $35 USD
Basic package
Includes the non-tabbed profile and non-filtered member list HTML
Includes the CSS for the above implementations and most script
Can include the final script for +$5 USD
Good if you want to save, don’t need a lot, and/or are comfortable enough with code to analyze mine and add those features yourself
Instructions on how to use the different profile fields in the main profile and in the post row / mini profile
Instructions on how to change / add category descriptions
Total Sales Made: 0
Package B: $45 USD
Tabbed profile package
Includes the base package, but with the tabbed profile HTML instead of the basic profile HTML
Can include the missing filtered members list for +$5 USD
Good for profile application based sites
Instructions for how to add / subtract / change tabs
Total Sales Made: 0
Package C: $50 USD
Filtered members package
Includes the base package, but with the filtered member list HTML instead of the basic member list HTML as well as the script which is missing from the base package
Good for sites which want a quick and easy peek at plotting
Instructions for how to add / change filter groups and filter labels
Total Sales Made: 0
Package D: $55 USD
Full package
Includes the base package and both features unique to packages B and C - that is, it includes everything
Good for sites that want profile applications, a quick and easy peek at plotting with their member list, and are not comfortable figuring out how to add those features themselves
Total Sales Made: 1
Available Add-ons:
Additional posting templates [ +$10 - $30 USD for set ]
Webpage template(s) [ +$15 - 30 USD per template ]
Group color changing profiles [ +$5 USD for 5 groups, +$1 USD per additional group ]
Group color changing skin [ +$10 USD for 5 groups, +$2 USD per additional group ]
Modal box additions [ +$10 - 20 USD per box ]
Skin installation [ +$15 ]
31 notes
·
View notes
Text
Version 378
youtube
windows
zip
exe
macOS
app
linux
tar.gz
source
tar.gz
I had a great, simple week. Searches are less likely to be very slow, and system:limit searches now sort.
all misc this week
I identified a database access routine that was sometimes not taking an optimal route. Normally it was fine, but with certain sizes or types of query, it could take a very long time to complete. This mostly affected multi-predicate searches that included certain tags or system:duration and system:known urls, but the routine was used in about 60 different places across the program, including tag and duplicate files processing. I have rewritten this access routine to work in a more 'flat' way that will ensure it is not so 'spiky'.
Also in searching, I managed to push all the 'simple' file sorts down to file searches that have 'system:limit'. If you search with system:limit=256 and are sorting by 'largest files first', you will now see the 256 largest files in the search! Previously, it would give a random sample. All the simple sorts are supported: import time, filesize, duration, width, height, resolution ratio, media views, media viewtime, num pixels, approx bitrate, and modified time. If you want something fun, do a search for just 'system:limit=64' (and maybe system:filetype) and try some different sorts with F5--you can now see the oldest, smallest, longest, widest, whateverest files in your collection much easier.
There are also some fixes: if you had sessions not appearing in the 'pages' menu, they should be back; if you have had trouble with ipfs directory downloads, I think I have the file-selection UI working again; 'remove files when trashed' should work more reliably in downloader pages; and several tag and selection lists should size themselves a bit better.
full list
if a search has system:limit, the current sort is now sent down to the database. if the sort is simple, results are now sorted before system:limit is applied, meaning you will now get the largest/longest/whateverest sample of the search! supported sorts are: import time, filesize, duration, width, height, resolution ratio, media views, media viewtime, num pixels, approx bitrate, and modified time. this does not apply to searches in the 'all known files' file domain.
after identifying a sometimes-unoptimal db access routine, wrote a new more reliable one and replaced the 60-odd places it is used in both client and server. a variety of functions will now have less 'spiky' job time, including certain combinations of regular tag and system search predicates. some jobs will have slightly higher average job time, some will be much faster in all common situations
added additional database analysis to some complicated duplicate file system jobs that adds some overhead but should reduce extreme spikes in job time for very large databases
converted some legacy db code to new access methods
fixed a bug in the new menu generation code that was not showing sessions in the 'pages' menu if there were no backups for these sessions (i.e. they have only been saved once, or are old enough to have been last saved before the backup system was added)
fixed the 'click window close button should back out, not choose the red no button' bug in the yes/no confirmation dialogs for analyze, vacuum, clear orphan, and gallery log button url import
fixed some checkbox select and data retrieval logic in the checkbox tree control and completely cleared out the buggy ipfs directory download workflow. I apologise for the delay
fixed some inelegant multihash->urls resolution in the ipfs service code that would often mean a large folder would lock the client while parsing was proceeding
when the multihash->urls resolution is going on, the popup now exposes the underlying network control. cancelling the whole job mid-parse/download is now also quicker and prettier
when a 'downloader multiple urls' popup is working, it will publish its ongoing presented files to a files button as it works, rather than just once the job is finished
improved some unusual taglist height calculations that were turning up
improved how taglists set their minimum height--the 'selection tags' list should now always have at least 15 rows, even when bunched up in a tall gallery panel
if the system clock is rewound, new objects that are saved in the backup system (atm, gui sessions) will now detect that existing backups are from the future and increase their save time to ensure they count as the newest object
short version: 'remove files from view when trashed' now works on downloader thumbs that are loaded in from a session. long version: downloader thumb pages now force 'my files' file domain for now (previously it was 'all local files')
the downloader/thread watcher right-click menus for 'show all downloaders xxx files' now has a new 'all files and trash' entry. this will show absolutely everything still in your db, for quick access to accidental deletes
the 'select a downloader' list dialog _should_ size itself better, with no double scrollbars, when there are many many downloaders and/or very long-named downloaders. if this layout works, I'll replicated it in other areas
if an unrenderable key enters a shortcut, the shortcut will now display an 'unknown key: blah' statement instead of throwing an error. this affected both the manage shortcuts dialog and the media viewer(!)
SIGTERM is now caught in non-windows systems and will initiate a fast forced shutdown
unified and played with some border styles around the program
added a user-written guide to updating to the 'getting started - installing' help page
misc small code cleanup
next week
I am going to take a few days off for the holiday and make the next release in two weeks, for New Year's Day. I expect to do some small jobs, push more on the database optimisation, continue improving the UI layout code, and perhaps put some time into some space-clearing database maintenance.
𝕸𝖊𝖗𝖗𝖞 𝕮𝖍𝖗𝖎𝖘𝖙𝖒𝖆𝖘!
1 note
·
View note
Text
Monthly menu calendar

MONTHLY MENU CALENDAR HOW TO
Ask for suggestions from your family for meals they want to eat for the month. That way you don’t spend all of your prep time searching for that fabulous recipe. When you create your planner, spend some time collecting the recipes or write down the page numbers. The purpose of a meal plan is to make the dinner decision time less agonizing and to help you with your grocery shopping. If you don't feel like making Hamburgers, switch them with another night. If you order pizza, move the planned meal to the first week of the next month. Save it on your desktop or print it out and put it on the fridge or the inside of a cupboard. Put your menu plan where you will see it.I am constantly printing or tearing out pages of new recipes, but if I don't put them on my meal plan, I never make them. Add recipes that you want to try to your planner.You can serve Lemon Chicken twice, but the second time, serve it with potatoes instead of rice pilaf. Or Meatballs can be used for Sweet and Sour and then later in the week for Hoagies. For example, BBQ chicken on Wednesday can become BBQ chicken pizza on Friday. You can vary the sides or the appearance, but left-overs save time and money. I like this method, because then I can incorporate seasonal foods and my menus for July are distinctly different from the ones for December. Then, you can bring it out a year later and have something to work from. Or, at the end of the month or week, file the planner away until the next year. You can make three months worth of planners and then rotate them throughout the year. Your meal plan can be reused from month to month or week to week.The planner gives you a starter list that you can add to or amend to fit your needs. This will give you a start on your list of meals and you can add to it when you find new things. Make a list of everything you like to cook or everything you have eaten in the last month.
MONTHLY MENU CALENDAR HOW TO
My wife has graciously provided the following tips meal planning tips, including ideas for how to use the meal and menu planners. Click on the little filter arrow and uncheck the "-" option to temporarily hide the unneeded rows. Go to Data > Filter to add a filter on this column. Here's how: First, select the Qty column, beginning with the label "Qty" and ending with the last line of the list. Printing a Grocery List: When using the "Menu Planner with Grocery List" template, instead of printing all 3+ pages in the List worksheet, if you want to print a grocery list containing only the items you need, use the Filter feature. Doing so will mess up the formula used to create the dynamic named range which populates the drop-down lists. You can delete and remove rows, sort, and do pretty much whatever you want as long as you don't delete cell A1. I designed the lists to be as easy to edit. Right-click on the Planner tab and select "Move or Copy" and select the "Create a Copy" checkbox. That will let you store multiple weekly or monthly meal plans within the same file. The items in the list like are used to make it easy to see the different categories as you are scrolling through the list.Įxcept for the version with the grocery list, you can make copies of the worksheet.
0 notes
Text
How to Lock Cells in Microsoft Excel
When you’re working on a spreadsheet in Microsoft Excel, locking your cells is crucial to protecting data, preventing mistakes, and more. Today, we’ll show you how to do it.
Why Lock Cells in a Spreadsheet?
If you collaborate with others on a workbook, you might want to protect a cell by locking—especially if you want to make any changes or adjustments later. Locked cells can’t be reformatted, altered, or deleted. Locking cells works in conjunction with protecting the workbook. To change data within the cells, they need to be unlocked, and the sheet must be unprotected.
Locking Cells in an Excel Spreadsheet
You can lock individual cells or multiple cells using this method. Here’s how to do it with multiple cells.
In a new or existing Microsoft Excel document, select the cell or cell range you wish to lock. The cells you selected appear slightly shaded, indicating they’re going to be locked.
In the “Home” tab on the ribbon, select “Format.”
In the “Format” menu, select “Lock Cell.” Doing so will lock any of the cells you selected.
An alternative way to lock cells is to select your cells, then right-click them to bring up a menu. In that menu, select “Format Cells.” In the “Format Cells” box, click the “Protection” tab.
In the “Protection” tab, click the checkbox that says “Locked” to enable cell locking. This performs the exact same function as locking cells in the format tab.
After that, your cells are locked. If you ever need to unlock them, perform the steps above in reverse. Once you’ve finished locking your cells, you need to protect your workbook.
Protecting the Sheet
After you lock the cell, you’ll notice that it still lets you change the text or delete content. That’s because, in order for locking cells to work, you must also protect your sheet or workbook. Here’s how. In the Excel ribbon toolbar, click “Review.”
In the ribbon under the “Review” tab, select “Protect Sheet.”
In the “Protect Sheet” menu, you can create a password to protect the sheet and select a number of different parameters. For now, check the box marked “Protect worksheet and contents of locked cells.” Make any other adjustments you wish and click “OK” to protect the sheet.
Among the other options on the list, you can prevent other users from deleting/inserting rows and columns, altering the formatting, or generally messing with the document by clicking on them in the protection menu. Once the sheet is fully protected, no one can access the locked cells without using a password to unlock them first.
If you need to unlock the worksheet later, revisit the Review > Protect Sheet menu and uncheck “Protect worksheet and contents of locked cells.” Now that you know how to lock cells, you can sleep safely knowing your spreadsheets and workbooks won’t be altered without being unlocked first. Happy locking!
RELATED: How to Protect Workbooks, Worksheets, and Cells From Editing in Microsoft Excel
setTimeout(function(){ !function(f,b,e,v,n,t,s) {if(f.fbq)return;n=f.fbq=function(){n.callMethod? n.callMethod.apply(n,arguments):n.queue.push(arguments)}; if(!f._fbq)f._fbq=n;n.push=n;n.loaded=!0;n.version='2.0'; n.queue=[];t=b.createElement(e);t.async=!0; t.src=v;s=b.getElementsByTagName(e)[0]; s.parentNode.insertBefore(t,s) } (window, document,'script', 'https://connect.facebook.net/en_US/fbevents.js'); fbq('init', '335401813750447'); fbq('track', 'PageView'); },3000); Source link
from WordPress https://ift.tt/3EpmpOT via IFTTT
0 notes
Text
0 notes
Text
Join Two Tables In Power Bi
Introduce theory about model relationships in Power BI Desktop. It's not possible to relate a column to a different column in the same table.This is sometimes confused with the ability to define a relational database foreign key constraint that is table self-referencing. #PowerBI #MicrosoftPowerBI #DataVisualization #Analytics Power BI is the data visualization tool by Microsoft. This will help you to do your data analysis an. Power BI: Ultimate Guide to Joining Tables 1) Joining With the Relationships Page The easiest way to join tables is to simply use the Relationships page in Power. 2) Joining With Power Query You may want to join a table in the data prep stages before it hits the data model. 3) Joining With DAX.
Power Bi Create Table From Another Table
Inner Join Two Tables In Power Bi
Link Tables In Power Bi
Cross Join Two Tables In Power Bi
-->

Learn how to quickly merge and append tables using the query editior in Power BI. Build models with multiple data sources.Contact me on LinkedIn:www.linkedin. The easiest way to join tables is to simply use the Relationships page in Power BI. If your table ID's have the same name across tables, the relationships will automatically be picked up. If Power BI didn't pick up on the relationships, you can easily create one. To do so, click and drag the column name from one table over to the other table. To edit any relationship, double-click on the relationship line. A new window will app.
With Power BI Desktop, you can connect to many different types of data sources, then shape the data to meet your needs, enabling you to create visual reports to share with others. Shaping data means transforming the data: renaming columns or tables, changing text to numbers, removing rows, setting the first row as headers, and so on. Combining data means connecting to two or more data sources, shaping them as needed, then consolidating them into a useful query.
In this tutorial, you'll learn how to:
Shape data by using Power Query Editor.
Connect to different data sources.
Combine those data sources, and create a data model to use in reports.
This tutorial demonstrates how to shape a query by using Power BI Desktop, highlighting the most common tasks. The query used here is described in more detail, including how to create the query from scratch, in Getting Started with Power BI Desktop.
Power Query Editor in Power BI Desktop makes ample use of right-click menus, as well as the Transform ribbon. Most of what you can select in the ribbon is also available by right-clicking an item, such as a column, and choosing from the menu that appears.
Shape data
When you shape data in Power Query Editor, you provide step-by-step instructions for Power Query Editor to carry out for you to adjust the data as it loads and presents it. The original data source isn't affected; only this particular view of the data is adjusted, or shaped.
The steps you specify (such as rename a table, transform a data type, or delete a column) are recorded by Power Query Editor. Each time this query connects to the data source, Power Query Editor carries out those steps so that the data is always shaped the way you specify. This process occurs whenever you use Power Query Editor, or for anyone who uses your shared query, such as on the Power BI service. Those steps are captured, sequentially, in the Query Settings pane, under Applied Steps. We’ll go through each of those steps in the next few paragraphs.
From Getting Started with Power BI Desktop, let's use the retirement data, which we found by connecting to a web data source, to shape that data to fit our needs. We'll add a custom column to calculate rank based on all data being equal factors, and compare this column to the existing column, Rank.
From the Add Column ribbon, select Custom Column, which lets you add a custom column.
In the Custom Column window, in New column name, enter New Rank. In Custom column formula, enter the following data:
Make sure the status message is No syntax errors have been detected, and select OK.
To keep column data consistent, transform the new column values to whole numbers. To change them, right-click the column header, and then select Change Type > Whole Number.
If you need to choose more than one column, select a column, hold down SHIFT, select additional adjacent columns, and then right-click a column header. You can also use the CTRL key to choose non-adjacent columns.
To transform column data types, in which you transform the current data type to another, select Data Type Text from the Transform ribbon.
In Query Settings, the Applied Steps list reflects any shaping steps applied to the data. To remove a step from the shaping process, select the X to the left of the step.
In the following image, the Applied Steps list reflects the added steps so far:
Source: Connecting to the website.
Extracted Table from Html: Selecting the table.
Changed Type: Changing text-based number columns from Text to Whole Number.
Added Custom: Adding a custom column.
Changed Type1: The last applied step.
Adjust data
Before we can work with this query, we need to make a few changes to adjust its data:
Adjust the rankings by removing a column.
We've decided Cost of living is a non-factor in our results. After removing this column, we find that the data remains unchanged.
Fix a few errors.
Because we removed a column, we need to readjust our calculations in the New Rank column, which involves changing a formula.
Sort the data.
Sort the data based on the New Rank and Rank columns.
Replace the data.
We'll highlight how to replace a specific value and the need of inserting an Applied Step.
Change the table name.
Because Table 0 isn't a useful descriptor for the table, we'll change its name.
To remove the Cost of living column, select the column, choose the Home tab from the ribbon, and then select Remove Columns.
Notice the New Rank values haven't changed, due to the ordering of the steps. Because Power Query Editor records the steps sequentially, yet independently, of each other, you can move each Applied Step up or down in the sequence.
Right-click a step. Power Query Editor provides a menu that lets you do the following tasks:
Rename; Rename the step.
Delete: Delete the step.
DeleteUntil End: Remove the current step, and all subsequent steps.
Move before: Move the step up in the list.
Move after: Move the step down in the list.
Move up the last step, Removed Columns, to just above the Added Custom step.
Select the Added Custom step.
Notice the data now shows Error, which we'll need to address.
There are a few ways to get more information about each error. If you select the cell without clicking on the word Error, Power Query Editor displays the error information.
If you select the word Error directly, Power Query Editor creates an Applied Step in the Query Settings pane and displays information about the error.
Because we don't need to display information about the errors, select Cancel.
To fix the errors, select the New Rank column, then display the column's data formula by selecting the Formula Bar checkbox from the View tab.
Remove the Cost of living parameter and decrement the divisor, by changing the formula as follows:
Select the green checkmark to the left of the formula box or press Enter.
Power Query Editor replaces the data with the revised values and the Added Custom step completes with no errors. Triangle sigil.
Note
You can also select Remove Errors, by using the ribbon or the right-click menu, which removes any rows that have errors. However, we didn't want to do so in this tutorial because we wanted to preserve the data in the table.
Sort the data based on the New Rank column. First, select the last applied step, Changed Type1 to display the most recent data. Then, select the drop-down located next to the New Rank column header and select Sort Ascending.
The data is now sorted according to New Rank. However, if you look at the Rank column, you'll notice the data isn't sorted properly in cases where the New Rank value is a tie. We'll fix it in the next step.
To fix the data sorting issue, select the New Rank column and change the formula in the Formula Bar to the following formula:
Select the green checkmark to the left of the formula box or press Enter.
The rows are now ordered in accordance with both New Rank and Rank. In addition, you can select an Applied Step anywhere in the list, and continue shaping the data at that point in the sequence. Power Query Editor automatically inserts a new step directly after the currently selected Applied Step.
In Applied Step, select the step preceding the custom column, which is the Removed Columns step. Here we'll replace the value of the Weather ranking in Arizona. Right-click the appropriate cell that contains Arizona's Weather ranking, and then select Replace Values. Note which Applied Step is currently selected.
Select Insert.
Because we're inserting a step, Power Query Editor warns us about the danger of doing so; subsequent steps could cause the query to break.
Change the data value to 51.
Power Query Editor replaces the data for Arizona. When you create a new Applied Step, Power Query Editor names it based on the action; in this case, Replaced Value. If you have more than one step with the same name in your query, Power Query Editor adds a number (in sequence) to each subsequent Applied Step to differentiate between them.
Select the last Applied Step, Sorted Rows.
Notice the data has changed regarding Arizona's new ranking. This change occurs because we inserted the Replaced Value step in the correct location, before the Added Custom step.
Lastly, we want to change the name of that table to something descriptive. In the Query Settings pane, under Properties, enter the new name of the table, and then select Enter. Name this table RetirementStats.
When we start creating reports, it’s useful to have descriptive table names, especially when we connect to multiple data sources, which are listed in the Fields pane of the Report view.
We’ve now shaped our data to the extent we need to. Next let’s connect to another data source, and combine data.
Combine data
The data about various states is interesting, and will be useful for building additional analysis efforts and queries. But there’s one problem: most data out there uses a two-letter abbreviation for state codes, not the full name of the state. We need a way to associate state names with their abbreviations.
We’re in luck; there’s another public data source that does just that, but it needs a fair amount of shaping before we can connect it to our retirement table. TO shape the data, follow these steps:
From the Home ribbon in Power Query Editor, select New Source > Web.
Enter the address of the website for state abbreviations, https://en.wikipedia.org/wiki/List_of_U.S._state_abbreviations, and then select Connect.
The Navigator displays the content of the website.
Select Codes and abbreviations.
Tip
It will take quite a bit of shaping to pare this table’s data down to what we want. Is there a faster or easier way to accomplish the steps below? Yes, we could create a relationship between the two tables, and shape the data based on that relationship. The following steps are still good to learn for working with tables; however, relationships can help you quickly use data from multiple tables.
To get the data into shape, follow these steps:
Remove the top row. Because it's a result of the way that the web page’s table was created, we don’t need it. From the Home ribbon, select Remove Rows > Remove Top Rows.
The Remove Top Rows window appears, letting you specify how many rows you want to remove.
Note
If Power BI accidentally imports the table headers as a row in your data table, you can select Use First Row As Headers from the Home tab, or from the Transform tab in the ribbon, to fix your table.
Remove the bottom 26 rows. These rows are U.S. territories, which we don’t need to include. From the Home ribbon, select Remove Rows > Remove Bottom Rows.
Because the RetirementStats table doesn't have information for Washington DC, we need to filter it from our list. Select the Region Status drop-down, then clear the checkbox beside Federal district.
Remove a few unneeded columns. Because we need only the mapping of each state to its official two-letter abbreviation, we can remove several columns. First select a column, then hold down the CTRL key and select each of the other columns to be removed. From the Home tab on the ribbon, select Remove Columns > Remove Columns.
Note
This is a good time to point out that the sequence of applied steps in Power Query Editor is important, and can affect how the data is shaped. It’s also important to consider how one step may impact another subsequent step; if you remove a step from the Applied Steps, subsequent steps may not behave as originally intended, because of the impact of the query’s sequence of steps.
Note
When you resize the Power Query Editor window to make the width smaller, some ribbon items are condensed to make the best use of visible space. When you increase the width of the Power Query Editor window, the ribbon items expand to make the most use of the increased ribbon area.
Rename the columns and the table. There are a few ways to rename a column: First, select the column, then either select Rename from the Transform tab on the ribbon, or right-click and select Rename. The following image has arrows pointing to both options; you only need to choose one.
Rename the columns to State Name and State Code. To rename the table, enter the Name in the Query Settings pane. Name this table StateCodes.

Combine queries
Now that we’ve shaped the StateCodes table the way we want, let’s combine these two tables, or queries, into one. Because the tables we now have are a result of the queries we applied to the data, they’re often referred to as queries.
Power Bi Create Table From Another Table
There are two primary ways of combining queries: merging and appending.
When you have one or more columns that you’d like to add to another query, you merge the queries.
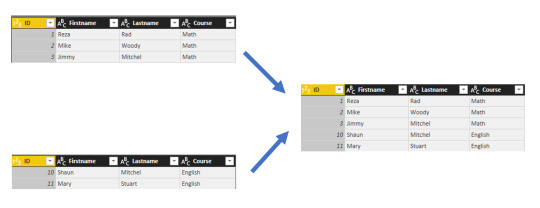
When you have additional rows of data that you’d like to add to an existing query, you append the query.
Inner Join Two Tables In Power Bi
In this case, we want to merge the queries. To do so, follow these steps:
Link Tables In Power Bi
From the left pane of Power Query Editor, select the query into which you want the other query to merge. In this case, it's RetirementStats.
Select Merge Queries > Merge Queries from the Home tab on the ribbon.
You may be prompted to set the privacy levels, to ensure the data is combined without including or transferring data you don't want transferred.
The Merge window appears. It prompts you to select which table you'd like merged into the selected table, and the matching columns to use for the merge.
Select State from the RetirementStats table, then select the StateCodes query.
When you select the correct matching columns, the OK button is enabled.
Select OK.
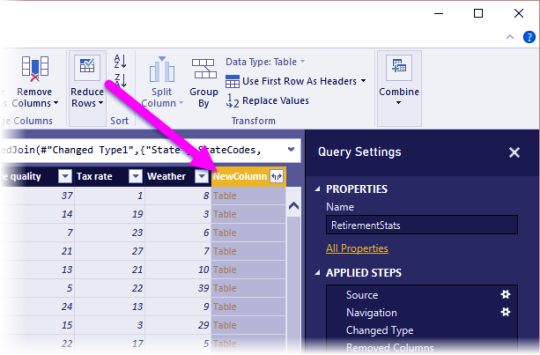
Power Query Editor creates a new column at the end of the query, which contains the contents of the table (query) that was merged with the existing query. All columns from the merged query are condensed into the column, but you can Expand the table and include whichever columns you want.
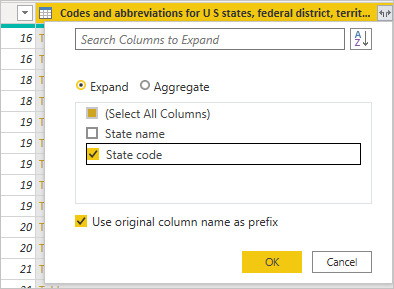
To expand the merged table, and select which columns to include, select the expand icon ().
The Expand window appears.
In this case, we want only the State Code column. Select that column, clear Use original column name as prefix, and then select OK.
From your Web browser, go to the Google Drive File Stream home page. On the Google Drive Help page, click on Download for Windows. In the following pop-up window, click Save File. If you’re prompted to enter a location in which to save the installer file, titled googledrivefilestream.exe, save the file. Access all of your Google Drive content directly from your Mac or PC, without using up disk space. Learn more Download Backup and Sync for Mac Download Backup and Sync for Windows. Download google drive stream pc. At the bottom right (Windows) or top right (Mac), click Drive for desktop Open Google Drive. When you install Drive for desktop on your computer, it creates a drive in My Computer or a location in.
If we had left the checkbox selected for Use original column name as prefix, the merged column would be named NewColumn.State Code.
Note
Want to explore how to bring in the NewColumn table? You can experiment a bit, and if you don’t like the results, just delete that step from the Applied Steps list in the Query Settings pane; your query returns to the state prior to applying that Expand step. You can do this as many times as you like until the expand process looks the way you want it.
We now have a single query (table) that combines two data sources, each of which has been shaped to meet our needs. This query can serve as a basis for many additional and interesting data connections, such as housing cost statistics, demographics, or job opportunities in any state.
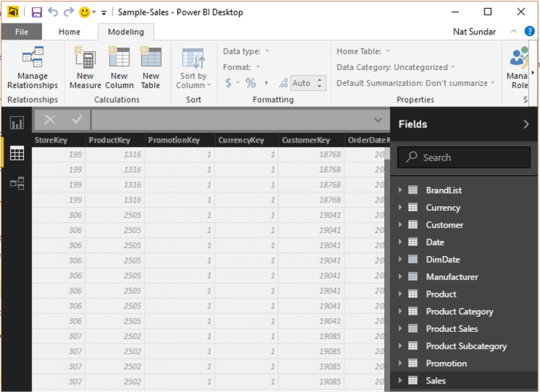
To apply your changes and close Power Query Editor, select Close & Apply from the Home ribbon tab.
The transformed dataset appears in Power BI Desktop, ready to be used for creating reports.
Cross Join Two Tables In Power Bi
Next steps
For more information on Power BI Desktop and its capabilities, see the following resources:
0 notes
Text
Combining Tables In Power Bi

Combining / Stacking / Appending Tables This is truly the easiest part, now all you need to do is find the button that reads Append Queries and then a new window will appear where you can combine all the queries that you want.
Combine Tables In Power Bi Dax
Power Bi Merge Multiple Tables
Combining Tables In Power Bi Software
Append Tables In Power Bi
Learn how to quickly merge and append tables using the query editior in Power BI. Build models with multiple data sources.Contact me on LinkedIn:www.linkedin.
I have done a few videos on YouTube explaining how to join tables using Power Query or DAX. If you follow the channel, you probably have seen the videos and this blog post will serve as a compilation of all the material. However, if you are new, this will serve as a tutorial for beginners on how to joins in Power BI.
How to join tables in power bi desktop: a practical example Combining data. When it comes to combining data in tables, it can be done in two ways. One is you may need to increase. The data set I have used for demonstration purpose is on India’s state-wise crop production collected.

-->
With Power BI Desktop, you can connect to many different types of data sources, then shape the data to meet your needs, enabling you to create visual reports to share with others. Shaping data means transforming the data: renaming columns or tables, changing text to numbers, removing rows, setting the first row as headers, and so on. Combining data means connecting to two or more data sources, shaping them as needed, then consolidating them into a useful query.
In this tutorial, you'll learn how to:
Shape data by using Power Query Editor.
Connect to different data sources.
Combine those data sources, and create a data model to use in reports.
This tutorial demonstrates how to shape a query by using Power BI Desktop, highlighting the most common tasks. The query used here is described in more detail, including how to create the query from scratch, in Getting Started with Power BI Desktop.
Power Query Editor in Power BI Desktop makes ample use of right-click menus, as well as the Transform ribbon. Most of what you can select in the ribbon is also available by right-clicking an item, such as a column, and choosing from the menu that appears.
Shape data
When you shape data in Power Query Editor, you provide step-by-step instructions for Power Query Editor to carry out for you to adjust the data as it loads and presents it. The original data source isn't affected; only this particular view of the data is adjusted, or shaped.
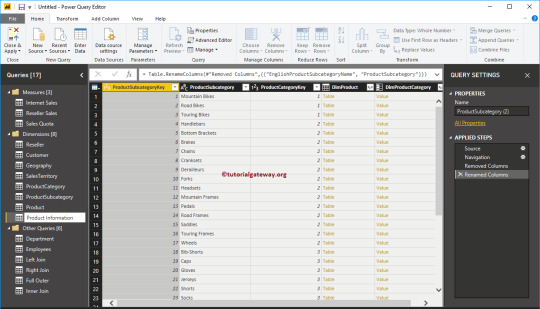
The steps you specify (such as rename a table, transform a data type, or delete a column) are recorded by Power Query Editor. Each time this query connects to the data source, Power Query Editor carries out those steps so that the data is always shaped the way you specify. This process occurs whenever you use Power Query Editor, or for anyone who uses your shared query, such as on the Power BI service. Those steps are captured, sequentially, in the Query Settings pane, under Applied Steps. We’ll go through each of those steps in the next few paragraphs.
From Getting Started with Power BI Desktop, let's use the retirement data, which we found by connecting to a web data source, to shape that data to fit our needs. We'll add a custom column to calculate rank based on all data being equal factors, and compare this column to the existing column, Rank.
From the Add Column ribbon, select Custom Column, which lets you add a custom column.
In the Custom Column window, in New column name, enter New Rank. In Custom column formula, enter the following data:
Make sure the status message is No syntax errors have been detected, and select OK.
To keep column data consistent, transform the new column values to whole numbers. To change them, right-click the column header, and then select Change Type > Whole Number.
If you need to choose more than one column, select a column, hold down SHIFT, select additional adjacent columns, and then right-click a column header. You can also use the CTRL key to choose non-adjacent columns.
To transform column data types, in which you transform the current data type to another, select Data Type Text from the Transform ribbon.
In Query Settings, the Applied Steps list reflects any shaping steps applied to the data. To remove a step from the shaping process, select the X to the left of the step.
In the following image, the Applied Steps list reflects the added steps so far:
Source: Connecting to the website.
Extracted Table from Html: Selecting the table.
Changed Type: Changing text-based number columns from Text to Whole Number.
Added Custom: Adding a custom column.
Changed Type1: The last applied step.
Adjust data
Before we can work with this query, we need to make a few changes to adjust its data:
Adjust the rankings by removing a column.
We've decided Cost of living is a non-factor in our results. After removing this column, we find that the data remains unchanged.
Fix a few errors.
Because we removed a column, we need to readjust our calculations in the New Rank column, which involves changing a formula.
Sort the data.
Sort the data based on the New Rank and Rank columns.
Replace the data.
We'll highlight how to replace a specific value and the need of inserting an Applied Step.
Change the table name.
Because Table 0 isn't a useful descriptor for the table, we'll change its name.
To remove the Cost of living column, select the column, choose the Home tab from the ribbon, and then select Remove Columns.
Notice the New Rank values haven't changed, due to the ordering of the steps. Because Power Query Editor records the steps sequentially, yet independently, of each other, you can move each Applied Step up or down in the sequence.
Right-click a step. Power Query Editor provides a menu that lets you do the following tasks:
Rename; Rename the step.
Delete: Delete the step.
DeleteUntil End: Remove the current step, and all subsequent steps.
Move before: Move the step up in the list.
Move after: Move the step down in the list.
Move up the last step, Removed Columns, to just above the Added Custom step.
Select the Added Custom step.
Notice the data now shows Error, which we'll need to address.
There are a few ways to get more information about each error. If you select the cell without clicking on the word Error, Power Query Editor displays the error information.
If you select the word Error directly, Power Query Editor creates an Applied Step in the Query Settings pane and displays information about the error.
Because we don't need to display information about the errors, select Cancel.
To fix the errors, select the New Rank column, then display the column's data formula by selecting the Formula Bar checkbox from the View Skype for business eol. tab.
Remove the Cost of living parameter and decrement the divisor, by changing the formula as follows:
Select the green checkmark to the left of the formula box or press Enter.
Power Query Editor replaces the data with the revised values and the Added Custom step completes with no errors.
Note
You can also select Remove Errors, by using the ribbon or the right-click menu, which removes any rows that have errors. However, we didn't want to do so in this tutorial because we wanted to preserve the data in the table.
Sort the data based on the New Rank column. First, select the last applied step, Changed Type1 to display the most recent data. Then, select the drop-down located next to the New Rank column header and select Sort Ascending.
The data is now sorted according to New Rank. However, if you look at the Rank column, you'll notice the data isn't sorted properly in cases where the New Rank value is a tie. We'll fix it in the next step.
To fix the data sorting issue, select the New Rank column and change the formula in the Formula Bar to the following formula:
Select the green checkmark to the left of the formula box or press Enter.
The rows are now ordered in accordance with both New Rank and Rank. In addition, you can select an Applied Step anywhere in the list, and continue shaping the data at that point in the sequence. Power Query Editor automatically inserts a new step directly after the currently selected Applied Step.
In Applied Step, select the step preceding the custom column, which is the Removed Columns step. Here we'll replace the value of the Weather ranking in Arizona. Right-click the appropriate cell that contains Arizona's Weather ranking, and then select Replace Values. Note which Applied Step is currently selected.
Select Insert.
Because we're inserting a step, Power Query Editor warns us about the danger of doing so; subsequent steps could cause the query to break.
Change the data value to 51.
Power Query Editor replaces the data for Arizona. When you create a new Applied Step, Power Query Editor names it based on the action; in this case, Replaced Value. If you have more than one step with the same name in your query, Power Query Editor adds a number (in sequence) to each subsequent Applied Step to differentiate between them.
Select the last Applied Step, Sorted Rows.
Notice the data has changed regarding Arizona's new ranking. This change occurs because we inserted the Replaced Value step in the correct location, before the Added Custom step.
Lastly, we want to change the name of that table to something descriptive. In the Query Settings pane, under Properties, enter the new name of the table, and then select Enter. Name this table RetirementStats.
When we start creating reports, it’s useful to have descriptive table names, especially when we connect to multiple data sources, which are listed in the Fields pane of the Report view.
We’ve now shaped our data to the extent we need to. Next let’s connect to another data source, and combine data.
Combine data
The data about various states is interesting, and will be useful for building additional analysis efforts and queries. But there’s one problem: most data out there uses a two-letter abbreviation for state codes, not the full name of the state. We need a way to associate state names with their abbreviations.
Combine Tables In Power Bi Dax
We’re in luck; there’s another public data source that does just that, but it needs a fair amount of shaping before we can connect it to our retirement table. TO shape the data, follow these steps:
From the Home ribbon in Power Query Editor, select New Source > Web.
Enter the address of the website for state abbreviations, https://en.wikipedia.org/wiki/List_of_U.S._state_abbreviations, and then select Connect.
The Navigator displays the content of the website.
Select Codes and abbreviations. Home alone on netflix streaming.
Tip
It will take quite a bit of shaping to pare this table’s data down to what we want. Is there a faster or easier way to accomplish the steps below? Yes, we could create a relationship between the two tables, and shape the data based on that relationship. The following steps are still good to learn for working with tables; however, relationships can help you quickly use data from multiple tables.
To get the data into shape, follow these steps:
Power Bi Merge Multiple Tables
Remove the top row. Because it's a result of the way that the web page’s table was created, we don’t need it. From the Home ribbon, select Remove Rows > Remove Top Rows.
The Remove Top Rows window appears, letting you specify how many rows you want to remove.
Note
If Power BI accidentally imports the table headers as a row in your data table, you can select Use First Row As Headers from the Home tab, or from the Transform tab in the ribbon, to fix your table.
Remove the bottom 26 rows. These rows are U.S. territories, which we don’t need to include. From the Home ribbon, select Remove Rows > Remove Bottom Rows.
Because the RetirementStats table doesn't have information for Washington DC, we need to filter it from our list. Select the Region Status drop-down, then clear the checkbox beside Federal district.
Remove a few unneeded columns. Because we need only the mapping of each state to its official two-letter abbreviation, we can remove several columns. First select a column, then hold down the CTRL key and select each of the other columns to be removed. From the Home tab on the ribbon, select Remove Columns > Remove Columns.
Note
This is a good time to point out that the sequence of applied steps in Power Query Editor is important, and can affect how the data is shaped. It’s also important to consider how one step may impact another subsequent step; if you remove a step from the Applied Steps, subsequent steps may not behave as originally intended, because of the impact of the query’s sequence of steps.
Note
When you resize the Power Query Editor window to make the width smaller, some ribbon items are condensed to make the best use of visible space. When you increase the width of the Power Query Editor window, the ribbon items expand to make the most use of the increased ribbon area.
Rename the columns and the table. There are a few ways to rename a column: First, select the column, then either select Rename from the Transform tab on the ribbon, or right-click and select Rename. The following image has arrows pointing to both options; you only need to choose one.
Rename the columns to State Name and State Code. To rename the table, enter the Name in the Query Settings pane. Name this table StateCodes.
Combine queries
Now that we’ve shaped the StateCodes table the way we want, let’s combine these two tables, or queries, into one. Because the tables we now have are a result of the queries we applied to the data, they’re often referred to as queries.
There are two primary ways of combining queries: merging and appending.
When you have one or more columns that you’d like to add to another query, you merge the queries.
When you have additional rows of data that you’d like to add to an existing query, you append the query.
In this case, we want to merge the queries. To do so, follow these steps:
From the left pane of Power Query Editor, select the query into which you want the other query to merge. In this case, it's RetirementStats.
Select Merge Queries > Merge Queries from the Home tab on the ribbon.
You may be prompted to set the privacy levels, to ensure the data is combined without including or transferring data you don't want transferred.
The Merge window appears. It prompts you to select which table you'd like merged into the selected table, and the matching columns to use for the merge.
Select State from the RetirementStats table, then select the StateCodes query.
When you select the correct matching columns, the OK button is enabled.
Select OK.
Power Query Editor creates a new column at the end of the query, which contains the contents of the table (query) that was merged with the existing query. All columns from the merged query are condensed into the column, but you can Expand the table and include whichever columns you want.
To expand the merged table, and select which columns to include, select the expand icon ().
The Expand window appears.
In this case, we want only the State Code column. Select that column, clear Use original column name as prefix, and then select OK.
If we had left the checkbox selected for Use original column name as prefix, the merged column would be named NewColumn.State Code.
Note
Want to explore how to bring in the NewColumn table? You can experiment a bit, and if you don’t like the results, just delete that step from the Applied Steps list in the Query Settings pane; your query returns to the state prior to applying that Expand step. You can do this as many times as you like until the expand process looks the way you want it.
We now have a single query (table) that combines two data sources, each of which has been shaped to meet our needs. This query can serve as a basis for many additional and interesting data connections, such as housing cost statistics, demographics, or job opportunities in any state.
To apply your changes and close Power Query Editor, select Close & Apply from the Home ribbon tab.
The transformed dataset appears in Power BI Desktop, ready to be used for creating reports.
Combining Tables In Power Bi Software
Next steps
Append Tables In Power Bi
For more information on Power BI Desktop and its capabilities, see the following resources:
0 notes
Text
New Post has been published on Strange Hoot - How To’s, Reviews, Comparisons, Top 10s, & Tech Guide
New Post has been published on https://strangehoot.com/how-to-forward-multiple-emails-in-gmail/
How to Forward Multiple Emails in Gmail
Forward Multiple Emails in Gmail is hardly known to the daily users. Most of the time people struggle for doing a specific action in the apps they daily use. We are all part of that.
In Gmail, there are endless features available that can be utilized in our daily activities at work. Also, the same can be applied to personal mails if there is some kind of security and privacy is required.
One of the most used email features is Forward Emails to Gmail. If we are using Outlook or Apple email clients, we set a rule to forward emails to our Gmail account. Why do so? The reason is – we are so comfortable using Gmail. Things are easy with Gmail.
Google has released more than 25 apps out of which at least 10 apps are used by the smartphone users on a daily basis. To name some of the apps –
Google Maps
Google Meet
Gmail
Google Drive
Google Hangouts
Google Calendar
Google Contacts
Photos
News and the most important
Google Search
You can sign up with gmail and get associated with all the apps above. Interestingly, you do not have to do registration on all the apps. One Gmail account for all apps. Hassle free and time saving activity to create only one account and use it for all.
Today, we are going to see some Gmail features that you can use on a daily basis. Your email management task becomes easy.
Gmail Forward Feature
Forwarding an email is to do with the mail you have received in your mailbox or any incoming message of your inbox can be forwarded.
Your sent email to one recipient can also be forwarded to another recipient.
You can forward email to gmail using your other account registered with Outlook or Apple email clients.
You can also add your message on the top of incoming messages and forward emails.
Most of the email programs or clients offer the forward email feature for a single email. To forward multiple incoming emails to a recipient works differently in different email clients.
Let us see how to forward emails to Gmail.
Open your Outlook account. (We have taken an example of an Outlook email program.)
Select the message(s) one by one. Select the message and click the right-arrow shown on the top right corner. (Alternatively click the 3-dots to show the More Actions menu.
Click the Forward option. Enter the recipient as your gmail address and click send.
You have successfully forwarded the email to gmail.
Gmail – Other Features
You can do better email management with Gmail than any other email client. Signing up with a gmail account is a quick and easy process.
Working with templates –
While drafting an email, you can create a template that can be reused for frequent use. The saved template is helpful to draft an email faster and you do not have to remember what message you have to type. The messages with the same context can be saved as templates.
Working with Confidential mode –
Whenever you are sending an email, you can turn on the Confidential mode. This sent message will not allow the recipient to copy, forward or download the mail. You can also set expiry to keep this mode ON.
Easy-to-use Interface – All of the below functionality, you can achieve with a single click.
You can move your emails by dragging from one tab to another smoothly.
You can use the Select All option to Archive your emails.
You can search for emails and select searched emails and delete them.
You can start chatting with your contact from the mail listing window itself.
You can start Google Meet from the same email listing window.
You can select the message(s) and report them as spam in a single click.
Print – You can directly print the document from the email you have received. No headache of downloading the document and then printing the same.
Differentiate your incoming messages with different flags
You can mark the message as unread, Add Star or mark it as Important. All from one place.
Task Management tool
Gmail also works as a task management tool. You can add your incoming email message to task. You can mark it as in progress and complete once you are done with the task. You can set reminders, add notes and delete the tasks.
There are many more features that are worth exploring on Gmail. You can do email management faster and easier.
One of the features that Gmail does not provide directly, but you can surely do that. You can forward multiple emails in Gmail at one shot. You do not have to select the mails one by one and forward it.
Now, let us see what is required to do so.
Install Google Chrome extension
You will need to install a chrome extension to use this feature. To install, follow the step-by-step instructions as below.
Open Google Chrome browser window.
Type https://chrome.google.com/.
Search for the Multi Forward for Gmail extension. You will see the extension below.
Click the Add to Chrome button. The extension is added to your extension list.
You will see the extension as shown below.
We have seen how you have added the chrome extension. The next step is to use this extension and forward multiple emails in Gmail.
Forward Multiple Emails in Gmail [Step-by-step Guide]
Open your Gmail account. (Login with your username and password.)
You will see the Multiple Forward icon on the toolbar.
You can select all the mails that you want to forward as one shot. Click the Multiple Forward icon. You will see the pop up below if you are using this for the first time.
Click the Sign-In button. You will see the login window.
Enter your gmail username and click the Next button.
Enter the password and login. Now, you will see the options for Multiple Forward.
You have a list of options to send these selected messages.
Forward selected emails individually – you will need to enter recipient email individually
Forward selected emails in one email (merged in body) – you will need to enter the recipient address once and all the selected emails will go as one email to the recipient. Click the Forward Emails button.
Forward selected emails in one email as EML attachments – All the selected emails will be sent with the EML file format as attachments. The recipient can open this email in Outlook or Apple email client.
Forward selected emails in one email as PDF attachment – All the selected emails will be merged into a PDF document and attached. The recipient can open the PDF attachment for viewing all the emails.
You have successfully sent multiple emails to recipients using different ways.
Another way to forward multiple emails in Gmail without using Chrome extension. It is very much possible. Let us see the steps to forward multiple emails without using the Multiple Forward extension.
Open your Gmail mailbox.
Select the email messages you want to forward. To do so:
Click the checkbox prior to the message row.
Click the More icon (3-vertical dots icon). You will see a menu with a list of options.
Select the Forward as attachment option. You will see all the selected messages are attached in the compose new message window.
You can enter one more recipient to send all these emails.
Enter the subject and message in the body.
Once an email is drafted, click the Send button.
If you do not want to send the message right away, you can schedule the send action.
Select the Schedule send option. You will see the list of options as below.
Select the readily available option or click Select date and time to schedule it for a specific time.
Once it is scheduled, the message with forwarded attachments will be sent to the recipients.
You have successfully forwarded the multiple email messages as attachment in a go.
Let’s come back to Gmail
We have seen quite interesting and easy to use features in Gmail. As we daily work with Gmail, it is good to have knowledge on how to perform certain actions as per our daily requirements. Let’s say you are receiving your work task in Gmail and you need to track them. You can use task management.
If you are getting a monthly bank statement from your bank, you can filter these messages so quickly. If you are getting advertisement related / unwanted emails, you can remove them easily. If you want to speak to your colleague, Google meet is available in your gmail only. No need to go anywhere else. You can use multiple gmail accounts using a single window and switch between accounts to check your mail boxes. No need to navigate between the mailboxes. Quick and easy.
Nowadays, corporates have started using G Suite (business solution) for email management for employees. It gives a lot more convenient features for email management. Though you have thousands of emails in your gmail box, you will never find performance issues. Gmail works seamlessly and smoothly without any glitch or difficulty.
Read: How to use GMass Chrome Extension?
0 notes
Text
Going Jamstack with React, Serverless, and Airtable
The best way to learn is to build. Let’s learn about this hot new buzzword, Jamstack, by building a site with React, Netlify (Serverless) Functions, and Airtable. One of the ingredients of Jamstack is static hosting, but that doesn’t mean everything on the site has to be static. In fact, we’re going to build an app with full-on CRUD capability, just like a tutorial for any web technology with more traditional server-side access might.
youtube
Why these technologies, you ask?
You might already know this, but the “JAM” in Jamstack stands for JavaScript, APIs, and Markup. These technologies individually are not new, so the Jamstack is really just a new and creative way to combine them. You can read more about it over at the Jamstack site.
One of the most important benefits of Jamstack is ease of deployment and hosting, which heavily influence the technologies we are using. By incorporating Netlify Functions (for backend CRUD operations with Airtable), we will be able to deploy our full-stack application to Netlify. The simplicity of this process is the beauty of the Jamstack.
As far as the database, I chose Airtable because I wanted something that was easy to get started with. I also didn’t want to get bogged down in technical database details, so Airtable fits perfectly. Here’s a few of the benefits of Airtable:
You don’t have to deploy or host a database yourself
It comes with an Excel-like GUI for viewing and editing data
There’s a nice JavaScript SDK
What we’re building
For context going forward, we are going to build an app where you can use to track online courses that you want to take. Personally, I take lots of online courses, and sometimes it’s hard to keep up with the ones in my backlog. This app will let track those courses, similar to a Netflix queue.

Source Code
One of the reasons I take lots of online courses is because I make courses. In fact, I have a new one available where you can learn how to build secure and production-ready Jamstack applications using React and Netlify (Serverless) Functions. We’ll cover authentication, data storage in Airtable, Styled Components, Continuous Integration with Netlify, and more! Check it out →
Airtable setup
Let me start by clarifying that Airtable calls their databases “bases.” So, to get started with Airtable, we’ll need to do a couple of things.
Sign up for a free account
Create a new “base”
Define a new table for storing courses
Next, let’s create a new database. We’ll log into Airtable, click on “Add a Base” and choose the “Start From Scratch” option. I named my new base “JAMstack Demos” so that I can use it for different projects in the future.

Next, let’s click on the base to open it.

You’ll notice that this looks very similar to an Excel or Google Sheets document. This is really nice for being able tower with data right inside of the dashboard. There are few columns already created, but we add our own. Here are the columns we need and their types:
name (single line text)
link (single line text)
tags (multiple select)
purchased (checkbox)
We should add a few tags to the tags column while we’re at it. I added “node,” “react,” “jamstack,” and “javascript” as a start. Feel free to add any tags that make sense for the types of classes you might be interested in.
I also added a few rows of data in the name column based on my favorite online courses:
Build 20 React Apps
Advanced React Security Patterns
React and Serverless
The last thing to do is rename the table itself. It’s called “Table 1” by default. I renamed it to “courses” instead.
Locating Airtable credentials
Before we get into writing code, there are a couple of pieces of information we need to get from Airtable. The first is your API Key. The easiest way to get this is to go your account page and look in the “Overview” section.
Next, we need the ID of the base we just created. I would recommend heading to the Airtable API page because you’ll see a list of your bases. Click on the base you just created, and you should see the base ID listed. The documentation for the Airtable API is really handy and has more detailed instructions for find the ID of a base.
Lastly, we need the table’s name. Again, I named mine “courses” but use whatever you named yours if it’s different.
Project setup
To help speed things along, I’ve created a starter project for us in the main repository. You’ll need to do a few things to follow along from here:
Fork the repository by clicking the fork button
Clone the new repository locally
Check out the starter branch with git checkout starter
There are lots of files already there. The majority of the files come from a standard create-react-app application with a few exceptions. There is also a functions directory which will host all of our serverless functions. Lastly, there’s a netlify.toml configuration file that tells Netlify where our serverless functions live. Also in this config is a redirect that simplifies the path we use to call our functions. More on this soon.
The last piece of the setup is to incorporate environment variables that we can use in our serverless functions. To do this install the dotenv package.
npm install dotenv
Then, create a .env file in the root of the repository with the following. Make sure to use your own API key, base ID, and table name that you found earlier.
AIRTABLE_API_KEY=<YOUR_API_KEY> AIRTABLE_BASE_ID=<YOUR_BASE_ID> AIRTABLE_TABLE_NAME=<YOUR_TABLE_NAME>
Now let’s write some code!
Setting up serverless functions
To create serverless functions with Netlify, we need to create a JavaScript file inside of our /functions directory. There are already some files included in this starter directory. Let’s look in the courses.js file first.
const formattedReturn = require('./formattedReturn'); const getCourses = require('./getCourses'); const createCourse = require('./createCourse'); const deleteCourse = require('./deleteCourse'); const updateCourse = require('./updateCourse'); exports.handler = async (event) => { return formattedReturn(200, 'Hello World'); };
The core part of a serverless function is the exports.handler function. This is where we handle the incoming request and respond to it. In this case, we are accepting an event parameter which we will use in just a moment.
We are returning a call inside the handler to the formattedReturn function, which makes it a bit simpler to return a status and body data. Here’s what that function looks like for reference.
module.exports = (statusCode, body) => { return { statusCode, body: JSON.stringify(body), }; };
Notice also that we are importing several helper functions to handle the interaction with Airtable. We can decide which one of these to call based on the HTTP method of the incoming request.
HTTP GET → getCourses
HTTP POST → createCourse
HTTP PUT → updateCourse
HTTP DELETE → deleteCourse
Let’s update this function to call the appropriate helper function based on the HTTP method in the event parameter. If the request doesn’t match one of the methods we are expecting, we can return a 405 status code (method not allowed).
exports.handler = async (event) => { if (event.httpMethod === 'GET') { return await getCourses(event); } else if (event.httpMethod === 'POST') { return await createCourse(event); } else if (event.httpMethod === 'PUT') { return await updateCourse(event); } else if (event.httpMethod === 'DELETE') { return await deleteCourse(event); } else { return formattedReturn(405, {}); } };
Updating the Airtable configuration file
Since we are going to be interacting with Airtable in each of the different helper files, let’s configure it once and reuse it. Open the airtable.js file.
In this file, we want to get a reference to the courses table we created earlier. To do that, we create a reference to our Airtable base using the API key and the base ID. Then, we use the base to get a reference to the table and export it.
require('dotenv').config(); var Airtable = require('airtable'); var base = new Airtable({ apiKey: process.env.AIRTABLE_API_KEY }).base( process.env.AIRTABLE_BASE_ID ); const table = base(process.env.AIRTABLE_TABLE_NAME); module.exports = { table };
Getting courses
With the Airtable config in place, we can now open up the getCourses.js file and retrieve courses from our table by calling table.select().firstPage(). The Airtable API uses pagination so, in this case, we are specifying that we want the first page of records (which is 20 records by default).
const courses = await table.select().firstPage(); return formattedReturn(200, courses);
Just like with any async/await call, we need to handle errors. Let’s surround this snippet with a try/catch.
try { const courses = await table.select().firstPage(); return formattedReturn(200, courses); } catch (err) { console.error(err); return formattedReturn(500, {}); }
Airtable returns back a lot of extra information in its records. I prefer to simplify these records with only the record ID and the values for each of the table columns we created above. These values are found in the fields property. To do this, I used the an Array map to format the data the way I want.
const { table } = require('./airtable'); const formattedReturn = require('./formattedReturn'); module.exports = async (event) => { try { const courses = await table.select().firstPage(); const formattedCourses = courses.map((course) => ({ id: course.id, ...course.fields, })); return formattedReturn(200, formattedCourses); } catch (err) { console.error(err); return formattedReturn(500, {}); } };
How do we test this out? Well, the netlify-cli provides us a netlify dev command to run our serverless functions (and our front-end) locally. First, install the CLI:
npm install -g netlify-cli
Then, run the netlify dev command inside of the directory.
This beautiful command does a few things for us:
Runs the serverless functions
Runs a web server for your site
Creates a proxy for front end and serverless functions to talk to each other on Port 8888.
Let’s open up the following URL to see if this works:
We are able to use /api/* for our API because of the redirect configuration in the netlify.toml file.
If successful, we should see our data displayed in the browser.

Creating courses
Let’s add the functionality to create a course by opening up the createCourse.js file. We need to grab the properties from the incoming POST body and use them to create a new record by calling table.create().
The incoming event.body comes in a regular string which means we need to parse it to get a JavaScript object.
const fields = JSON.parse(event.body);
Then, we use those fields to create a new course. Notice that the create() function accepts an array which allows us to create multiple records at once.
const createdCourse = await table.create([{ fields }]);
Then, we can return the createdCourse:
return formattedReturn(200, createdCourse);
And, of course, we should wrap things with a try/catch:
const { table } = require('./airtable'); const formattedReturn = require('./formattedReturn'); module.exports = async (event) => { const fields = JSON.parse(event.body); try { const createdCourse = await table.create([{ fields }]); return formattedReturn(200, createdCourse); } catch (err) { console.error(err); return formattedReturn(500, {}); } };
Since we can’t perform a POST, PUT, or DELETE directly in the browser web address (like we did for the GET), we need to use a separate tool for testing our endpoints from now on. I prefer Postman, but I’ve heard good things about Insomnia as well.
Inside of Postman, I need the following configuration.
url: localhost:8888/api/courses
method: POST
body: JSON object with name, link, and tags
After running the request, we should see the new course record is returned.

We can also check the Airtable GUI to see the new record.

Tip: Copy and paste the ID from the new record to use in the next two functions.
Updating courses
Now, let’s turn to updating an existing course. From the incoming request body, we need the id of the record as well as the other field values.
We can specifically grab the id value using object destructuring, like so:
const {id} = JSON.parse(event.body);
Then, we can use the spread operator to grab the rest of the values and assign it to a variable called fields:
const {id, ...fields} = JSON.parse(event.body);
From there, we call the update() function which takes an array of objects (each with an id and fields property) to be updated:
const updatedCourse = await table.update([{id, fields}]);
Here’s the full file with all that together:
const { table } = require('./airtable'); const formattedReturn = require('./formattedReturn'); module.exports = async (event) => { const { id, ...fields } = JSON.parse(event.body); try { const updatedCourse = await table.update([{ id, fields }]); return formattedReturn(200, updatedCourse); } catch (err) { console.error(err); return formattedReturn(500, {}); } };
To test this out, we’ll turn back to Postman for the PUT request:
url: localhost:8888/api/courses
method: PUT
body: JSON object with id (the id from the course we just created) and the fields we want to update (name, link, and tags)
I decided to append “Updated!!!” to the name of a course once it’s been updated.

We can also see the change in the Airtable GUI.
Deleting courses
Lastly, we need to add delete functionality. Open the deleteCourse.js file. We will need to get the id from the request body and use it to call the destroy() function.
const { id } = JSON.parse(event.body); const deletedCourse = await table.destroy(id);
The final file looks like this:
const { table } = require('./airtable'); const formattedReturn = require('./formattedReturn'); module.exports = async (event) => { const { id } = JSON.parse(event.body); try { const deletedCourse = await table.destroy(id); return formattedReturn(200, deletedCourse); } catch (err) { console.error(err); return formattedReturn(500, {}); } };
Here’s the configuration for the Delete request in Postman.
url: localhost:8888/api/courses
method: PUT
body: JSON object with an id (the same id from the course we just updated)

And, of course, we can double-check that the record was removed by looking at the Airtable GUI.
Displaying a list of courses in React
Whew, we have built our entire back end! Now, let’s move on to the front end. The majority of the code is already written. We just need to write the parts that interact with our serverless functions. Let’s start by displaying a list of courses.
Open the App.js file and find the loadCourses function. Inside, we need to make a call to our serverless function to retrieve the list of courses. For this app, we are going to make an HTTP request using fetch, which is built right in.
Thanks to the netlify dev command, we can make our request using a relative path to the endpoint. The beautiful thing is that this means we don’t need to make any changes after deploying our application!
const res = await fetch('/api/courses'); const courses = await res.json();
Then, store the list of courses in the courses state variable.
setCourses(courses)
Put it all together and wrap it with a try/catch:
const loadCourses = async () => { try { const res = await fetch('/api/courses'); const courses = await res.json(); setCourses(courses); } catch (error) { console.error(error); } };
Open up localhost:8888 in the browser and we should our list of courses.

Adding courses in React
Now that we have the ability to view our courses, we need the functionality to create new courses. Open up the CourseForm.js file and look for the submitCourse function. Here, we’ll need to make a POST request to the API and send the inputs from the form in the body.
The JavaScript Fetch API makes GET requests by default, so to send a POST, we need to pass a configuration object with the request. This options object will have these two properties.
method → POST
body → a stringified version of the input data
await fetch('/api/courses', { method: 'POST', body: JSON.stringify({ name, link, tags, }), });
Then, surround the call with try/catch and the entire function looks like this:
const submitCourse = async (e) => { e.preventDefault(); try { await fetch('/api/courses', { method: 'POST', body: JSON.stringify({ name, link, tags, }), }); resetForm(); courseAdded(); } catch (err) { console.error(err); } };
Test this out in the browser. Fill in the form and submit it.

After submitting the form, the form should be reset, and the list of courses should update with the newly added course.
Updating purchased courses in React
The list of courses is split into two different sections: one with courses that have been purchased and one with courses that haven’t been purchased. We can add the functionality to mark a course “purchased” so it appears in the right section. To do this, we’ll send a PUT request to the API.
Open the Course.js file and look for the markCoursePurchased function. In here, we’ll make the PUT request and include both the id of the course as well as the properties of the course with the purchased property set to true. We can do this by passing in all of the properties of the course with the spread operator and then overriding the purchased property to be true.
const markCoursePurchased = async () => { try { await fetch('/api/courses', { method: 'PUT', body: JSON.stringify({ ...course, purchased: true }), }); refreshCourses(); } catch (err) { console.error(err); } };
To test this out, click the button to mark one of the courses as purchased and the list of courses should update to display the course in the purchased section.

Deleting courses in React
And, following with our CRUD model, we will add the ability to delete courses. To do this, locate the deleteCourse function in the Course.js file we just edited. We will need to make a DELETE request to the API and pass along the id of the course we want to delete.
const deleteCourse = async () => { try { await fetch('/api/courses', { method: 'DELETE', body: JSON.stringify({ id: course.id }), }); refreshCourses(); } catch (err) { console.error(err); } };
To test this out, click the “Delete” button next to the course and the course should disappear from the list. We can also verify it is gone completely by checking the Airtable dashboard.
Deploying to Netlify
Now, that we have all of the CRUD functionality we need on the front and back end, it’s time to deploy this thing to Netlify. Hopefully, you’re as excited as I am about now easy this is. Just make sure everything is pushed up to GitHub before we move into deployment.
If you don’t have a Netlify, account, you’ll need to create one (like Airtable, it’s free). Then, in the dashboard, click the “New site from Git” option. Select GitHub, authenticate it, then select the project repo.

Next, we need to tell Netlify which branch to deploy from. We have two options here.
Use the starter branch that we’ve been working in
Choose the master branch with the final version of the code
For now, I would choose the starter branch to ensure that the code works. Then, we need to choose a command that builds the app and the publish directory that serves it.
Build command: npm run build
Publish directory: build
Netlify recently shipped an update that treats React warnings as errors during the build proces. which may cause the build to fail. I have updated the build command to CI = npm run build to account for this.

Lastly, click on the “Show Advanced” button, and add the environment variables. These should be exactly as they were in the local .env that we created.
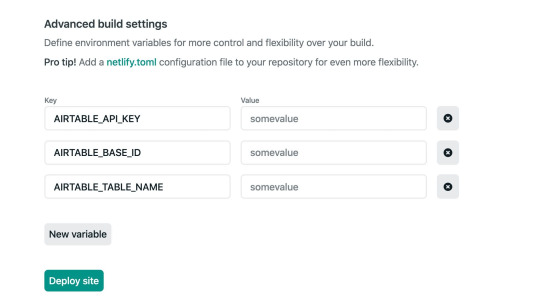
The site should automatically start building.

We can click on the “Deploys” tab in Netlify tab and track the build progress, although it does go pretty fast. When it is complete, our shiny new app is deployed for the world can see!

Welcome to the Jamstack!
The Jamstack is a fun new place to be. I love it because it makes building and hosting fully-functional, full-stack applications like this pretty trivial. I love that Jamstack makes us mighty, all-powerful front-end developers!
I hope you see the same power and ease with the combination of technology we used here. Again, Jamstack doesn’t require that we use Airtable, React or Netlify, but we can, and they’re all freely available and easy to set up. Check out Chris’ serverless site for a whole slew of other services, resources, and ideas for working in the Jamstack. And feel free to drop questions and feedback in the comments here!
The post Going Jamstack with React, Serverless, and Airtable appeared first on CSS-Tricks.
You can support CSS-Tricks by being an MVP Supporter.
Going Jamstack with React, Serverless, and Airtable published first on https://deskbysnafu.tumblr.com/
0 notes
Link
0 notes
Text
400+ TOP PEGA Interview Questions and Answers
PEGA Interview Questions for freshers experienced :-
1. In Pega 8.1 what are the new components added for application development? From app dev point of view, couple of new features added in 8.1 We can use role based workspaces Developers now has the capability to review complete project highlights on a single page Effective management of resuable component 2. What do you mean by work-space or studio? It is an environment that provides specific tools and features 3. What are the various workspace supported in the latest release? There are four types App Studio, Dev Studio Admin Studio Prediction Studio 4. Can you use Pega Express in 8.1? The App Studio is nothing but former Pega Express 5. A system admin complained that he is not able to access the admin studio? What could be the potential reason? To access Admin Studio, one should have the following Privileges SysAdmin4 PegaRULES:SysOpsAdministrator PegaRULES:SysOpsObserver 6. Like we used to switch portal, similarly, is there any way to switch studio as such? Yes. In the header of the workspace, we need to click the Switch Studio menu. 7. How can you show the relevant record? We can show it by right clicking the relevant record management tab for a specific class in the App Explorer. 8. What is Prediction studio? It is the studio thru which one can build machine-learning models for adaptive, predictive, and text analytics. 9. How many types of portals does PRPC can provide? Where will you specify the portals that u have created? Composite portals, Fixed portals, Custom portals, mobile portals After creating a portal it will specified in the Access group Settings tab, then it will access to the particular user. 10. Explain Different types of harness that u have used ? We have number of standard harness will be available in pega, but most commonly used are new, perform, review, conform, Tabbed, perform screen flow, Tree Navigation

Pega Interview Questions 11. If I want to restrict a user to perform on a particular flow action, how can I achieve it? we can specify the privileges or when conditions in Security tab of the flow action 12. How can u expose a property ? What is a linked property ? By using the modified Data base schema or optimise for reporting option Modifying database Schema- Select Data base Select Table-à View Columns Select Columns Give Database username& password and the Click Generate Optimise reporting means right click on the property and select the optimise for reporting 13. Mention about the flow types ? Process flows, Screen flows, Subflow’s, Straight through process flows. 14. In my screen flow I have 4 assignments. When I am at 3rd assignment, I want to route it to a different user. How can it be done ? No it is not possible to route the assignment in the middle of the screen flow…Suppose if you want to route the entire Screen flow will be route to different user.. u can give the router in Start shape of the screen flow 15. Use of entry checkbox in screen flow ? Suppose u can specify the entry point checkbox in the assignment that shape allows as a start point in the flow.. means for which assignment shapes u can check this checkbox that assignments only display in the output, then u can use the breadcrumbs and navigate any screen. 16. What are all the different types of scope that declare scope provide ? Node, Thread, Requestor 17. Advantages and limitations of declare page ? The main Advantage of the Declare pages is, It prevents the multiple DB hits , Suppose is there multiple requestors in that node when ever first user login into the application then load activity will be fired and create a declare page and then loaded the data in that page, requestors who can on that node will show this declare page and use the data on that page. The Disadvantages are its read only to the requestors, and can not add the additional data and can't delete the specific data. 18. Diff b/w declare page and regular pages ? Declare pages are created through declarative rules, Declare_ keyword must be specified while creating a declare page, Declare pages are read-only pages, These pages Cant delete ,update directly. User pages are created through page new method in an activity, these pages can be updated, deleted directly, these pages automatically deleted once logout from the system. 19. Diff types of declarative rules present? Declare Expressions, Declare Constraints, Declare On change, Declare trigger, Declare Index. 20. How do u specify if expression triggers f/w or b/w chaining ? In the Chain tracking tab. 21. How b/w chaining process works in Pega ? (Goal Seek) It will searches the first on dependency network After checking the dependency the execution Starts from Lower expression to higher expression. In Activity u can use goal-seek-property to find the missing value of the property. 22. What type of Reporting features are provided by Pega? A. List View and Summary View 23. What is the difference between List View and Summary View ? A summary view rule defines a two-level report display, presenting summary counts, totals or averages to be displayed initially, and allowing users to click a row to drill down to supporting detail for that row. Summary view rules support interactive charts, trend reports, and the use of AJAX for pop-up Smart Info windows. A summary view rule is an instance of the Rule-Obj-Summary View rule type. This rule type is part of the Reports category. A list view rule, an instance of the Rule-Obj-List View rule type, defines a report. Users can personalize list view reports easily and interact with them. Use the Report wizard to define list view reports and link them to our portal. 24. How to call a list view from an Activity? In an activity, the Obj-List-View can execute a list view rule. 25. What is Paging in a list view? To divide the List View in to different pages and set the number of records to be displayed in a page. 26. What is exposing a property? Exposing a property means to make a property as a separate independent column so that it can be used in sql queries and as a criteria in reporting. Steps are as follows, 27. How to expose a single value property? Process Commander stores the values of all aggregate properties and some Single Value properties in a BLOB column (the Storage Stream) usually in a compressed form. Such properties cannot support selection in list view and summary view reports, and can slow retrieval and processing in other operations Select Tools > Database > Modify Database Schema. A list of databases identified in Database data instances appears. Select a database and click Next . A list of tables in the selected database appears from Database Table instances. Select a table. Click Explore Columns . The resulting List of Classes window displays the number of rows in the table, the number of columns in the table and a list of the classes assigned to that table. The Properties Set to Be Visible value counts the properties for which the Column Inclusion value is Required or Recommended. This Column Inclusion value is advisory, and does not indicate whether the property is exposed — corresponds to a column. The Count column shows the total count of properties in this class plus those its parent classes. To see the columns currently defined in this table, click the numeric link labeled Number of columns in this table. The List of Database Columns window shows the column name, column data type, and column width in bytes for each column in the table. 28. How to expose aggregate property? Declare Index rule is a better approach:- Create a concrete class derived from the Index- base class. Create Single Value properties in the new class to hold values of the embedded values. Create a Declare Index rule with the appropriate embedded Page Context value that copies the embedded values into a new Index- instance. Save the Declare Index rule. It executes immediately, adding and deleting instances of the new class. Expose database columns corresponding to the Index- class. Reference the Index- properties in the list view rule. 29. Can we refer the property without exposing in Reports? We can refer the properties in Display tab without exposing. But we can’t refer the property without exposing in Criteria fields of the Content tab. 30. What is the activity responsible for getting the data in List View? getContent Activity 31. What the class of getContent Activity? Embed-ListParams class. 32. Can or have you customize the getContent Activity? Yes 33. How to customize the getContent Activity? Step1: Create Activity in Our Class and create the New page Step2: write a query and store in variable. Step3: call the listview as Call Rule-Obj-ListView Step4: Write the another activity in Embed-ListParams Step5: create the parameter. This parameter get the sql query from previous activity Step6: write Java method The java code in this method is Get the page from pyContentPage if page already exists. If page is not available it creates the new ContentPage. In this code get the sql query from the above parameter and pass this query and above created ContentPage as parameters to this tools.getDatabase().executeRDB(query, pagename) method. 34. How do we get the data from the two different tables? Using Join tab in Reports 35. How do we fetch the data from two different tables with out using two different tables? Write a database View. In this view logically combine the Two different tables. Create class for this logically combined Table. Write the List View. Applies to class is class of the Combined table. So we can refer the properties of both the tables in list view. 36. What is the use of HTML property in ListView? HTML Property rules appear in list view and summary view rules to define the appearance of values in reports. 37. Consider this scenario: I need to generate a list view report of all the work objects created on a particular date and then I need to include this list view in a section. How this can be done? Select .px Create Date Time ( an exposed property ) under criteria and give the value you are looking for. To include it in a section, check the embedded check box and customize the HTML of the section. In that we need to access the list view in a JSP tag or In section Property is Display As ListView. 38. What is the difference between List View and Obj-List? List view is generally used for complex queries where sorting is required and also we can retrieve less information using Paging. 39. Explain in brief the configuration of a list view? List view (an instance of Rule-Obj-ListView ) is used to define a custom report or personal version of a report. A list view can be configured as follows:- Applies to class of list view will be taken as the database table map for the search criteria. Display fields tab is used to depict the fields that are displayed along with category and to enable/disable sorting Content tab is used to depict the criteria, fields to be retrieved, key of each row (if selected) and Report source (Page name where the values should be saved and the activity to be called) In organize tab we specify to enable/disable paging, page size, mode, alignment etc. We can also configure additional buttons and their fragments here. Format tab is used to depict the formatting of the list (like even/odd coloring) and details on single click etc. List view can be accessed from an activity or html as follows:- Call Rule-Obj-ListView.ShowView activity with class name and list view name as parameters A list view can be used for complex retrievals from database by not specifying the display, format and Organize tabl. PyAction in that case would perform instead of refresh. 40. Explain in brief about the configuration of a summary view? Summary views are used to create reports which are grouped by certain criteria and can be later drilled down. A Summary view can be configured as follows: Applies to class of summary view will be taken as the database table map for the search criteria Category is used to know under which tab the report should come. Criteria is used in the where class (this can be asked to user by enabling prompt user) Group by and field functions (like count) are used for initial display. If we have more than one group by it is Displayed one after another on clicking + Drill down fields are used to display the fields when we click on the assignment. Format is used to tell how to format the display and charts can also be used. Summary view can be accessed from an activity or html as follows: Call Rule-Obj-ListView.ShowView activity with class name and summary view name as parameters 41. Diff b/w list Obj-list-view results and obj-browse ? We can retrieve instances from multiple classes by using the obj-list-view, In obj-browse we can retrieve only Single Class Instances. 1) Diff types of log files available in PRPC? 2) Log level settings? 3) How do you track and analyse all your warnings? Application Pre-flight tool 42. What is an Agent? An agent is an internal background process operating on the server that runs activities on a periodic basis. Agents route work according to the rules in our application. Agents also perform system tasks such as sending e-mail notifications about assignments and outgoing correspondence, generating updated indexes for the full-text search feature, synchronizing caches across nodes in a multiple node system, and so on. 43. How do we create an Agent? New a SysAdmin a Agents Rule Set name is the Agent name Agent is instance of Rule-Agent-Quiee. 44. Do we need to create Agent Schedule? No. Agent schedules cannot be created manually. The Agent Manager on our Process Commander system generate at least one agent schedule instance for each agents rule. By default, the Agent Manager checks for new or updated agents rule once every ten minutes. After we create an agents rule, the Agent Manager generates one Agent Schedule instance for each node running on your Process Commander system the next time it checks for new agents rules. 45. Do we need to migrate Agent Schedule to other environment? No 46. What are the Agent running time intervals? Each agent activity runs individually on its own interval schedule, as a separate requestor thread. Periodic — The agent runs the activity and then “sleeps” for the number of seconds entered in the Interval column. Recurring — The agent runs the activity based on a specified calendar schedule (for example, every Monday at 5:00 P.M.). 47. What are the Agent Running modes? Queue mode indicates whether the agent uses the agent queue capability to process items from the agent queue. This feature allows the agent to temporarily skip over items that fail — for example, because a needed resource is locked — and try again later to process the item later. Standard — Specifies that this agent processes items from an agent queue and that it relies on the system to provide object locking and other transactional support. Advanced — Specifies that this agent uses custom queuing Legacy — specifies that this is an agent that was created in a version prior to V5.4 and has not yet been updated. This option is not available for agents created in V5.4 or later. 48. What is the use of referring Access Group in Agents? Agent activity calls another activity. This called activity may not appear in agent rule set. So setup of the Rule set list and Roles by providing Access group in security Tab. Select the access group to use for the legacy and advanced agents listed in this rule. This field is ignored for agents with a type of Standard. 49. How do we Troubleshoot or Trace an Agent? 1. Verify above tag in prconfig file. Value of the above tag is true or false. 2. In Agent Schedule, schedule tab verify the check box Enable this agent is Checked or Not. And also verify the Enabled? Check box is checked or Not. 3. Same thing also check in Agents Rule. In Tracer we can trace the particular operator or particular Agent. In prsysmgmt portal, In Agent Management select the particular Agent and Delay the Agent and then run the Tracer. We can use the Agent Management link in the System Management Application to monitor and control agent processing. Agent runs on different nodes, select the particular node and run the Tracer. 50. What are the Agents for SLA and Correspondence? The agents in the Pega-ProCom RuleSet process e-mail, service level rules, and assignments, archive work objects, and so on. The agents in this rule provide the following types of processing: Processing service level events and escalation Applying a flow action to assignments in bulk Sending out e-mail correspondence Archiving and purging work objects, attachments, and history Retrieving PDF files from the PegaDISTRIBUTION Manager Running tests defined through the optional Automatic Testing facility Checking incoming e-mail The activity System-Queue-ServiceLevel.ProcessEvents supports service level processing for both assignments and work objects. The activity Data-Corr-.Send supports outgoing e-mail if your system contains one or more Email Account data instances with a second key part of Notify. 51. Who will create Data-Agent-Queue? The Agent Manager is a master agent that gathers and caches the agent configuration information set for our system when Process Commander starts. Then, at a regularly scheduled interval, it determines whether any new agents rules were created during the last period. If there are new agents rules, the Agent Manager adds them to its list of agents and generates agent schedule data instances for them for each node. 52. What are the Standard Agents? our system includes three standard agents rules. Because these agents rules are in locked RuleSets, we cannot modify them. To change the configuration settings for the agents listed in these rules, update the agent schedules generated from the agents rule. Pega-IntSvcs, Five agents in the Pega-IntSvcs RuleSet process queued service and connector requests and perform maintenance for PegaDISTRIBUTION MANAGER (formerly called Correspondence Output Server, or COS). The agents in the Pega-ProCom RuleSet process e-mail, service level rules, and assignments, archive work objects, and so on. The agents in this rule provide the following types of processing: Processing service level events and escalation Applying a flow action to assignments in bulk Sending out e-mail correspondence Archiving and purging work objects, attachments, and history Retrieving PDF files from the PegaDISTRIBUTION Manager Checking incoming e-mail (deprecated in V5.3) Pega-RULES The agents in the Pega-RULES RuleSet perform general system housecleaning and periodic processing. The agents in this rule provide the following processing: System Cleaner System Pulse Rule Usage Snapshot Static Content Cleaner System Work Indexer 53. What is the use of Data-Agent-Queue? When you need to modify the behavior of an agent listed in an agents rule in a locked RuleSet (any of the standard Process Commander agents rules, for example) you do so by editing one or more of the generated A service level rule is an instance of the Rule-Obj-ServiceLevel type. Each service level rule defines one to three time intervals, known as goals, deadlines, and late intervals, that indicate the expected or targeted turnaround time for the assignment, or time-to-resolve for the work object. The goal time is the smallest time interval, the deadline time is a longer interval, and the late interval defines post-deadline times. Each time interval is in days, hours, minutes, and seconds. 54. What are the types of SLA? Where they can be defined? Service level rules can be associated with a work object or an assignment. For assignments, the service level rule is referenced in the Assignment Properties panel of the assignment task. For the overall work object, the service level rule is identified in the standard property .pySLAName, typically set up through a model for the class. (The default value is the Default service level.) 55. How do we do Escalation? Escalation refers to any processing within a Process Commander application that causes high-priority work objects to become visible to users and managers and to be processed sooner rather than later. The numeric property known as urgency determines the order that assignments for that work object appear on worklists. Escalation recalculates the urgency value to reflect its age, impending due date, or explicit management inputs. Escalation can occur through a service level rule associated with the flow and through background processing by the Pega-ProCom agent. 56. What are SLA’s, how are they different from Agents? A service level rule is an instance of the Rule-Obj-ServiceLevel type. The service level can define a goal and a deadline times for processing an assignment, and can execute activities if the goal or the deadline is not met. This assignment-level service level is distinct from any service level associated with the entire flow. At runtime, an internal countdown clock (measuring the completion of the assignment against the goal and deadline times computed from the service level rule) starts when the assignment task is created. An agent is a background internal requestor operating on the server. These requestors can periodically monitor conditions and perform processing as necessary. Most agents are defined by an Agent Queue rule (Rule-Agent-Queue), which includes a list of the activities they perform. 57. How to implement SLA’s? Is is possible to define a SLA for the entire work object? If yes, how? SLA’s are always associated with an assignment. Just drag a SLA shape and provide an instance of Rule-Obj-ServiceLevel. Yes, SLA can be defined for the entire workobject by defining it in the model. The property for this is pySLAName. 58. How to restrict a flow to particular users? By using privileges and when conditions under process tab of the flow instance. 1. What are the types of Flow Actions? A flow action rule controls how users interact with work object forms to complete assignments. Each flow action is defined by an instance of the Rule-Obj-FlowAction rule type. Flow actions are of two types: Connector flow actions appear as lines on Visio presentation in the Diagram tab of a flow rule. A line exits from an assignment shape and ends at the next task in the flow. At runtime, users choose a connector flow action, complete the assignment, and advances the work object along the connector to the next task. A local flow action, when selected at runtime, causes the assignment to remain open and on the current user’s work list. Local flow actions are recorded in the Assignment Properties panel and are not visible on the Visio flow diagram. A local flow action permits users at runtime to update, but not complete, an assignment. Local flow actions always are optional. Users may perform none, one, or multiple local flow actions, or repeat a local flow action multiple times. At runtime, users choose a connector flow action, complete the assignment, and advances the work object along the connector to the next task. 59. Explain about Pre Activity? At runtime, the system runs this activity before it does other processing for this flow action. This activity is not visible on the Visio flow diagram. This activity executes only once, the first time a user selects this flow action for this assignment. 60. Explain about Post Activity? Activity to run after other successful processing of this flow action. For screen flow rules By default, when this flow action appears as a step in a screen flow rule, and the user at runtime clicks away to a different step in the screen flow rule, this activity rule does not run. To cause this activity to execute when the user clicks away to a different step, select the Post Action on Click Away? check box on the Assignment shape properties panel. 61. Explain about Local Flow Action? A local flow action permits users at runtime to update, but not complete, an assignment. Like connector flow actions, local flow actions are referenced inside an assignment task in a flow. At runtime, users can select local flow actions to update assignment or work object properties, change the assignee, and so on but do not complete the assignment. If a service level rule is associated with the assignment, the service level continues to run. Local flow actions always are optional. Users may perform none, one, or multiple local flow actions, or repeat a local flow action multiple times. On the Action tab of the Flow Action form, we can mark a flow action rule as local, or connector, or both. 62. How Rule-Edit-Validate is different from Rule-Obj-Validate? Edit Validate is to validate a single property at a time but obj validate rules are used to validate all the properties in a single go. Obj-Validate method is used for this purpose. 63. How one single property can be represented in different forms on a screen? By using HTML Properties at the section level, not at the property level. 64. Consider this scenario : I have a property of type decimal, I need to restrict it to two decimal places only. How easily this can be done? By using a qualifier “pyDecimal Precision” under Qualifiers tab. 65. How to implement dynamic select and smart prompt? What’s the major difference between them? Implementation of Dynamic Select: In properties panel select Display As is DynamicSelect. Write Activity for generating Dynamic Select. By using Show-Page method display the data in XML format. Dynamic Select is a drop down from which we can only select a value. Smart prompts acts both as a text box and a drop down. Smart prompts are implemented by using ISNS_FIELDTYPE, ISNS_CLASS, ISNS_DATANODE. 66. What is the difference b/w Page and Page List property, how are they Implemented? Page property refers to a particular class and is used to access the property of that class. Page List Property also refers to a particular class, but it’s a collection of individual pages of the same class which can be accessed through numeric indexes. 67. What is HTML Property? HTML Property rules are instances of the Rule-HTML-Property class. They are part of the Property category. Use HTML Property rules to control how properties appear on work object forms, correspondence, and other HTML forms, for both display and for accepting user input. For properties of mode Single Value an HTML Property rule may be identified in the Display Property field of the Property rule form. HTML Property rules also may appear in list view and summary view rules to define the appearance of values in reports, and in harness, section, and flow action rules that define work object forms. 68. Explain about Special Properties? Standard properties means all the properties in the Pega-RULES, Pega-IntSvcs, Pega-WB, and Pega-ProCom RuleSets have names start with px, py, or pz. These three prefixes are reserved. We cannot create new properties with such names. We can override these standard properties with a custom property of the same name (without changing the mode or Type). Px: Identifies properties that are special, meaning that the values cannot be input by user input on an HTML form. Py: Properties with names that start with py are not special, meaning that values can be input by users on an HTML form. Pz: Properties with names that start with pz support internal system processing. Users cannot directly manipulate pz properties. our application may examine these values, but do not set them. The meaning of values may change with new product releases. Interview Questions On VALIDATIONS In PEGA : Validation rule is used to validate the value against the some other value. Once the validation fails the system add error message to that field in clipboard. 69. What types of validations are there? Client Side Validations Server Side Validations 70. Define what are the Methods we have used for validations? Obj-Validate--we can referred this method in Activities and in flow actions at Validate Rule field. Edit-Validate---- we can refer this in property form at edit-validate field and in activities through property-validate method. Note: I think Obj-Validate is used for Server Side Validation and Edit-Validate is used for Client Side Validation. 71. How do you add custom message to the Property when it fails the Validation. For this we have to use theProperty.addMessage(“your message”) tag. 72. Message is set to the property and the checked in the clipboard also , the messages got set successfully. But the message is not displayed beside the field in the screen. Why..? If the property has a html property, the tag tag must be include 73. Define the operation of Activity-End method? Use the Activity-End method to cause the system to End the current activity and all calling activities. Ex:if Alpha calls Beta, which calls Gamma, which calls Delta, which performs the Activity-End method, all four activities are ended. 74. Define about Exit-Activity method? The Exit-Activity method ends the current activity and returns control to the calling activity. 75. Define about Page-Copy method? Page-Copy method is used to copy the contents of a source clipboard page to a new or previously created destination clipboard page. The source page is not altered. After this method completes, the destination page contains properties copied from the source page, and can contain additional properties from a model. 76. Define about Page-New method? The Page-New method is used to create a page on the clipboard. The new page may be a top-level page or an embedded page. We can identify a model to initialize the newly created page. The model can set values for one or more properties. 77. Define about Page-Remove method? Page-Remove method is used to delete one or more pages from the clipboard. The contents of the database are not affected. 78. Define about Page-Set-Messages method? Use the Page-Set-Messages method to add a message to a clipboard page. Like a message associated with a property, a message associated with a page normally prevents the page from being saved into the database. 79. Define about Property-Set-Message? Property-Set-Message method is used to associate a text message with a property or a step page. The system reads the appropriate property and adds the message to the page. We can provide the entire literal text of the message, or reference a message rule key that in turn contains message text. (Rule-Message rule type). 80. Define about Property-Map-DecisionTable method? Use the Property-Map-DecisionTable method to evaluate a decision table rule and save the result as the value of a property. 81. Define about Property-Map-DecisionTree method? The Property-Map-DecisionTree method is used to evaluate a decision tree rule (Rule-Declare-DecisionTree rule type) and store the result as the value of a property. 82. Define about Property-Map-Value? The Property-Map-Value method evaluates a one-dimensional map value (Rule-Obj-MapValue rule type) defined in the parameter. The method sets the result as a value for a Single Value property. The related method Property-Map-ValuePair works similarly for two-dimensional map values. 83. Define about Property-Remove method? Property-Remove method is used to delete a property or properties and its associated value from the step page or another specified page. This does not affect the property rule, its definition. 84. Define about Property-Set method? Property-Set method is used to set the value of one or more specified properties. 85. Define about Show-HTML method? The Show-HTML method is used to cause the activity to process an HTML rule and send the resulting HTML to a user for display by Internet Explorer. This may involve the interpretation of JSP tags (or the older directives), which can access the clipboard to obtain property values, or can insert other HTML rules, and so on. 86. Define about Show-Page method? The Show-Page method is used to send an XML representation of the step page to a user's Internet Explorer browser session, as an aid to debugging. Note: Use Show-Page and Show-Property only for debugging. 87. Define what is the difference between Call and Branch? The Call instruction calls the another specified activity and execute it. When that activity completes, control returns to the calling activity. Use the Branch instruction to find another specified activity and branch to it without a return. When the system executes a Branch step, control transfers to another activity found through rule resolution. Execution of the original activity pauses. When the branched activity ends, processing of the current activity also ends. No steps after the Branch step are executed. 88. Define about Obj-List Method? Obj-List method is used to retrieve data to the clipboard as an array of embedded pages. This method creates one embedded page for each instance retrieved. The Obj-List-View method often produce more efficient SQL statements and provide better performance than the Obj-List method. 89. Define about Obj-Browse method? Obj-Browse method is used to search instances of one class and copy the entire instances, or specified properties, to the clipboard as an array of embedded pages. Only properties exposed as columns can be used as selection criteria. However, values of properties that are not exposed as columns, including embedded properties, can be returned. 90. Define about Obj-List-View method? Obj-List-View method is used to execute the retrieval and sorting operations, but not the formatting and display processing, of a list view rule. The system uses rule resolution to find the list view rule and executes it, but does not produce any HTML output display. 91. Define about Obj-Open method? Obj-Open method is used to open an instance stored in the PegaRULES database or in an external database linked to an external class, and save it as a clipboard page. The system uses the specified class and key fields to find and open the object and place its data into the specified step page. The system searches up the class hierarchy as appropriate to find the instance. If it finds the specified step page, the system clears any data that is on it and reuses the page. If no existing page has a name matching the specified step page, the system creates a new page. 92. Define about Obj-Open-By-Handle method? Use the Obj-Open-By-Handle method only if we can determine the unique handle that permanently identifies which instance to open. Otherwise, use the Obj-Open method. 93. Define about Obj-Delete method? Obj-Delete method is used to delete a database instance corresponding to a clipboard page and optionally to delete the clipboard page too. We can cause the deletion to occur immediately, or until execution of a Commit method. This method can operate on objects of both internal classes (corresponding to rows in a table in the PegaRULES database) and external classes (corresponding to rows in an external relational database). The Obj-Delete method uses the class of the page to obtain the appropriate Rule-Obj-Class instance. It uses the table name, key fields, and other aspects of the class rule to mark the instance for deletion. We can reverse or cancel a previously executed Obj-Delete method by using the Obj-Save-Cancel method. 94. Define about Obj-Save method? Obj-Save method is used to save a clipboard page to the PegaRULES database or if the page belongs to an external class save a clipboard page to an external database. The Obj-Save method uses properties on the page to derive the internal key under which it will be saved. This method can create a new database instance or overwrite a previous instance with that key. We cannot save a page that is locked by another requestor. We cannot save a page that our session does not hold a lock on (if the page belongs to a lockable class), unless the object is new, never yet saved. We cannot save pages of any class derived from the Code- base class or the Embed- base class. Such pages exist only on the clipboard. 95. Define about Commit method? Commit method is used to commit all uncommitted database changes. This method writes all the instances specified by one or more earlier Obj-Save methods to the PegaRULES database (for internal classes) and to external databases (for external classes). 96. Define about Obj-Validate method? Obj-Validate method is used to apply a validate rule (Rule-Obj-Validate rule type) for the object identified on the primary page or step page. A validate rule (Rule-Obj-Validate rule type) can call edit validate rules (Rule-Edit-Validate rule type). 97. Define about Obj-Sort method? Obj-Sort method is used to sort the clipboard pages that are the values of a property of mode Page List. We can specify one or more properties to sort on, and whether the sort sequence is ascending or descending for each sort level. Use Connect SQL rules and RDB methods only with an external database. Do not use Connect SQL rules or RDB methods for the PegaRULES database(s). Because not all properties in the PegaRULES databases are distinct database columns, use the Obj-Open and Obj-Save methods, not the RDB- methods, with the PegaRULES database to prevent loss of data. 98. Define about RDB-List method? RDB-List method is used to retrieve rows from an external relational database and place the results as embedded pages in a specified step page of classCode-Pega-List. This method references a Connect SQL rule instance, and executes SQL statements stored in the Browse tab of that rule instance. The search can do anything we can specify in a SQL statement, such as a SELECT WHEREstatement. Any constraints on the returned data are in the SQL. 99. Define about RDB-Open method? RDB-Open method is used to retrieve a single row (record) of data from an external relational database and add the retrieved data into a specified clipboard page as property names and values. Use this method in conjunction with a Connect SQL rule that contains SQLSELECT or EXECUTE statements in the Open tab. Define the SQL statements so that the database returns exactly one row. 100. Define about RDB-Save method? RDB-Save method is used to save the contents of a clipboard page into a row of a relational database. The system saves the properties on the specified step page to the specified table in the database. This method operates in conjunction with a Connect SQL rule that contains SQL statements such as INSERT, UPDATE, and CREATE statements on the Save tab. 101. Do we need to migrate Agent Schedule to other environment? No 102. Do we need to create Agent Schedule? No. Agent schedules cannot be created manually. The Agent Manager on our Process Commander system generate at least one agent schedule instance for each agents rule. By default, the Agent Manager checks for new or updated agents rule once every ten minutes. After we create an agents rule, the Agent Manager generates one Agent Schedule instance for each node running on your Process Commander system the next time it checks for new agents rules. 103. Who will create Data-Agent-Queue? The Agent Manager is a master agent that gathers and caches the agent configuration information set for our system when Process Commander starts. Then, at a regularly scheduled interval, it determines whether any new agents rules were created during the last period. If there are new agents rules, the Agent Manager adds them to its list of agents and generates agent schedule data instances for them for each node. 104. What is the use of Data-Agent-Queue? When you need to modify the behavior of an agent listed in an agents rule in a locked RuleSet (any of the standard Process Commander agents rules, for example) you do so by editing one or more of the generated A service level rule is an instance of the Rule-Obj-ServiceLevel type. Each service level rule defines one to three time intervals, known as goals, deadlines, and late intervals, that indicate the expected or targeted turnaround time for the assignment, or time-to-resolve for the work object. The goal time is the smallest time interval, the deadline time is a longer interval, and the late interval defines post-deadline times. Each time interval is in days, hours, minutes, and seconds. 105. What are the types of SLA? Where they can be defined? Service level rules can be associated with a work object or an assignment. For assignments, the service level rule is referenced in the Assignment Properties panel of the assignment task. For the overall work object, the service level rule is identified in the standard property .pySLAName, typically set up through a model for the class. (The default value is the Default service level.) 106. How do we do Escalation? Escalation refers to any processing within a Process Commander application that causes high-priority work objects to become visible to users and managers and to be processed sooner rather than later. The numeric property known as urgency determines the order that assignments for that work object appear on worklists. Escalation recalculates the urgency value to reflect its age, impending due date, or explicit management inputs. Escalation can occur through a service level rule associated with the flow and through background processing by the Pega-ProCom agent. 107. What are SLA’s, how are they different from Agents? A service level rule is an instance of the Rule-Obj-ServiceLevel type. The service level can define a goal and a deadline times for processing an assignment, and can execute activities if the goal or the deadline is not met. This assignment-level service level is distinct from any service level associated with the entire flow. At runtime, an internal countdown clock (measuring the completion of the assignment against the goal and deadline times computed from the service level rule) starts when the assignment task is created. An agent is a background internal requestor operating on the server. These requestors can periodically monitor conditions and perform processing as necessary. Most agents are defined by an Agent Queue rule (Rule-Agent-Queue), which includes a list of the activities they perform. 108. How to implement SLA’s? Is is possible to define a SLA for the entire work object? If yes, how? SLA’s are always associated with an assignment. Just drag a SLA shape and provide an instance of Rule-Obj-ServiceLevel. Yes, SLA can be defined for the entire workobject by defining it in the model. The property for this is pySLAName. 109. How to restrict a flow to particular users? By using privileges and when conditions under process tab of the flow instance. 110. Explain about Pre Activity? At runtime, the system runs this activity before it does other processing for this flow action. This activity is not visible on the Visio flow diagram. This activity executes only once, the first time a user selects this flow action for this assignment. 111. Explain about Post Activity? Activity to run after other successful processing of this flow action. For screen flow rules By default, when this flow action appears as a step in a screen flow rule, and the user at runtime clicks away to a different step in the screen flow rule, this activity rule does not run. To cause this activity to execute when the user clicks away to a different step, select the Post Action on Click Away? check box on the Assignment shape properties panel. 112. Explain about Local Flow Action? A local flow action permits users at runtime to update, but not complete, an assignment. Like connector flow actions, local flow actions are referenced inside an assignment task in a flow. At runtime, users can select local flow actions to update assignment or work object properties, change the assignee, and so on but do not complete the assignment. If a service level rule is associated with the assignment, the service level continues to run. Local flow actions always are optional. Users may perform none, one, or multiple local flow actions, or repeat a local flow action multiple times. On the Action tab of the Flow Action form, we can mark a flow action rule as local, or connector, or both. 113. How Rule-Edit-Validate is different from Rule-Obj-Validate? Edit Validate is to validate a single property at a time but obj validate rules are used to validate all the properties in a single go. Obj-Validate method is used for this purpose. 114. How one single property can be represented in different forms on a screen? By using HTML Properties at the section level, not at the property level. 115. Consider this scenario : I have a property of type decimal, I need to restrict it to two decimal places only. How easily this can be done? By using a qualifier “pyDecimal Precision” under Qualifiers tab. 116. How to implement dynamic select and smart prompt? What’s the major difference between them? Implementation of Dynamic Select: In properties panel select Display As is DynamicSelect. Write Activity for generating Dynamic Select. By using Show-Page method display the data in XML format. Dynamic Select is a drop down from which we can only select a value. Smart prompts acts both as a text box and a drop down. Smart prompts are implemented by using ISNS_FIELDTYPE, ISNS_CLASS, ISNS_DATANODE. 117. What is the difference b/w Page and Page List property, how are they Implemented? Page property refers to a particular class and is used to access the property of that class. Page List Property also refers to a particular class, but it’s a collection of individual pages of the same class which can be accessed through numeric indexes. 118. What is HTML Property? HTML Property rules are instances of the Rule-HTML-Property class. They are part of the Property category. Use HTML Property rules to control how properties appear on work object forms, correspondence, and other HTML forms, for both display and for accepting user input. For properties of mode Single Value an HTML Property rule may be identified in the Display Property field of the Property rule form. HTML Property rules also may appear in list view and summary view rules to define the appearance of values in reports, and in harness, section, and flow action rules that define work object forms. 119. Explain about Special Properties? Standard properties means all the properties in the Pega-RULES, Pega-IntSvcs, Pega-WB, and Pega-ProCom RuleSets have names start with px, py, or pz. These three prefixes are reserved. We cannot create new properties with such names. We can override these standard properties with a custom property of the same name (without changing the mode or Type). Px: Identifies properties that are special, meaning that the values cannot be input by user input on an HTML form. Py: Properties with names that start with py are not special, meaning that values can be input by users on an HTML form. Pz: Properties with names that start with pz support internal system processing. Users cannot directly manipulate pz properties. our application may examine these values, but do not set them. The meaning of values may change with new product releases. Interview Questions On VALIDATIONS In PEGA Validation rule is used to validate the value against the some other value. Once the validation fails the system add error message to that field in clipboard. 120. What types of validations are there? a. Client Side Validations b. Server Side Validations 121. What are the types of Flow Actions? A flow action rule controls how users interact with work object forms to complete assignments. Each flow action is defined by an instance of the Rule-Obj-FlowAction rule type. Flow actions are of two types: Connector flow actions appear as lines on Visio presentation in the Diagram tab of a flow rule. A line exits from an assignment shape and ends at the next task in the flow. At runtime, users choose a connector flow action, complete the assignment, and advances the work object along the connector to the next task. A local flow action, when selected at runtime, causes the assignment to remain open and on the current user’s work list. Local flow actions are recorded in the Assignment Properties panel and are not visible on the Visio flow diagram. A local flow action permits users at runtime to update, but not complete, an assignment. Local flow actions always are optional. Users may perform none, one, or multiple local flow actions, or repeat a local flow action multiple times. At runtime, users choose a connector flow action, complete the assignment, and advances the work object along the connector to the next task. 122. Operator ID instances are normally stored in the PegaRULES database as rows of the pr_operators table. 123. What is volatile variable? The volatile keyword is a type qualifier used to declare that an object can be modified in the program by something such as the operating system, the hardware, or a concurrently executing thread. This means every time the variable is requested inside the program, each time the value is read from the source memory location(hard drive,devices.etc). normal variables are stored in virtual memory of the processor. They are synced with source memory location only twice. Once during first read and second termination write. This is useful when the variable is used as a control condition in multi threaded or RT applications applications. 124. How many access groups can be associated to an operator at once ? Only one access group at a time , but one operator will have multiple access group in their operator id instance. 125. Can u explain abot rule set types ? We have Different types of rule sets are available in Pega 126. What is a production rule set ? How will it be helpful ? In the production rulesets area we can provide rulesets, rules in this rulesets will be unlocked in production, the end users directly will change these rules as per requirement, this is called rule delegation. 127. What is the default access role used by developers ? Pega rules SysAdmin4 128. Different types of classes that PRPC support? Ans – We have different types of Standard Classes will be avaliable which are, @baseclass is Ultimate base class, And Its Child Classes are work-, Data-, Rule-, Assign-, History-, etc. Pega always Support 2 types of classe which are Abstract Classes And Concrete Classes Abstract Classes are ends with ‘-‘ and abstract Classes cannot create any work object instances Concrete Classes will Does not ends with -, And Abstract Classes will create Workobject instances 129. Rule Resolution ? Inheritance ? 7 steps Defer load means, suppose u can use any tabbed Section in that situation u want to load the data on each tab u can write one activity to retrieving data, then large amount of data will be loaded in clipboard, Its an performance hit load the more data in clipboard, So in that situation we can use Defer load option it will prevent performance because while u Check the Defer load option it will ask some activity on each tab Cell properties, so when ever the particular tab is opened then relevant activity only will be fired and load the related data…So it will Avoid the performance Yes we can load the values in drop down PEGA Questions pdf free download :: 1. Define what is the difference between Page-Validate and Property-Validate methods? 2. What is difference between cs? 3. Where assignments will be stored in pega rules database? 4. Where work objects will be stored ? 5. If I have 3 different work objects in my application, how to store them in three different tables? 6. Define what is StepStatusGood, StepStatusFail rules? 7. How to make any rule as a favorite to your manager 8. Where can i see the parameter values in the clipboard ( values ..) i am passing one activity to other . 9. How to import rules using pzinskey 10. Difference between activity and utility 11. Difference between obj-open and obj-open-by-handled 12. Inheritance concept in the pega (rules, class) 13. Performance of our work in the pega is measured using? 14. How to connect to different pega applications? 15. How to store the instance of the class in a specific database 16. Difference between obj-list, rdb-list? 17. How to see values of the local variables of the activity. 18. How can i store the instance of the class in the data base 19. default data table where the instance of the class are store (how it will search ) pc_work 20. In Routing activity Define what is the default property used to route the object 21. In routing activity if i use workbasket name instead of work list name .. when can i know it is wrong (run time, complile time) 22. Notify 23. ticket: Define any senarion u used 24. table used for add note 25. Default activity used to create work object 26. Different type of flows. Define in scenario based where u used and worked 27. work object ID.. how to create.. activites ued to create, or methods Work ID: 28. how to send multiple correspondences at a time 29. How to call an Activity from Java Script? 30. How to end the work object in the activity ( method used to kill the work object) 31. How to call an activity from the java, java script 32. How to pass parameters to the activity using the java, JavaScript? 33. How can I pass page as the parameter to the activity using java, JavaScript? 34. How to call an Activity from Java step? 35. How to get a property value from clipboard using Java step? 36. How to restrict the harness, section to particular user 37. List different functions used to call an activity from java script. 38. How a user’s ruleset list is formed ( the logic )? 39. How to connect external java application without using connect-java 40. Spinoff // split join Define 41. Privileges usage… 42. Decision / fork usage… Scenarios Decision: 43. How to expose the column in the blob… of the database 44. Define The various standard attachments PRPC supports are 45. Define Some of the important property streams are 46. Define How does the user validation works for properties in PRPC 47. Define what are the different parsing mechanisms are available in PRPC? 48. Concentrate on required fields of every rule (Rule that you are familiar with ) 49. Tell me about inheritance In PRPC? 50. How to create pz, px, py properties? Semantric Space : 1.Define what are the fields in the properties panel of an assignment shape? 2.Where can we call the activities in a flow action? 3.Define what is Class structure of your Project? Define about the project Flow? 4.Define what is the Rule availability? 5.Define what is the Final availability and how can change availability of Rule? 6.Can you Override Final rule? 7.Define what is the rule resolution Algorithm and can you tell me how it works or search? 8.How it works in the while in Inheritance rule? 9.Can you tell me the direct inheritance and Pattern inheritance? 10.Define what is the Work object? 11.Where is the work object stored? 12.Can you change the Work object table? 13.Define what are the standard properties? Wipro : 2.Differentiate Obj-Open Vs Obj-Browse 3.How do you handle exceptions 4.Differentiate the usage of Assignment Shape and Router shape 5.Where do you define default values 6.Define what is the primary key of pc_assign_worklist TCS : 1.Difference between Java and Pega 2.Guardrails of Pega 3.Define what do you mean by Build for Change 4.Difference between page and pagelist 5.why we use connect-soap and can we use it to connect external database 6.why we use connect-sql 7.how many shapes you know in pega. 8.Define what do you mean by calculate and edit declaratively not procedurally 9.Define what are tickets give scenario where you used tickets 10.Define what are the 6 R’s IBM : 1) Define what is the Flow Action? Define about the FlowAction? 2) Define what is the Activity? 3) Define Obj-open, Obj-Save? 4) Define what is the Model? 5) Define what is the Harness? Section? 6) Define what is Split-Join? 7) Types of inheritance? 8) Define what is the use of property-set Method? 9) Diff b/w Decision Table and Decision tree? 10) Declare expression and Declare constraints? Accenture : 1) How do you expose a property? 2) Define what is the need of exposing a property? 3) About obj-open,obj-save? 4) Difference obj-list, Obj-browse? 5) rdb-open, rdb-save? 6) Define what is a screen flow? 7) Difference between screen flow and process flow? 8) What is Split-ForEach? 9) Difference between page and page list? 10) What is the work object?Where it is Stored?Can We Change The Table? 11) What is a class group? PEGA MCQs Read the full article
0 notes
Text
Version 473
youtube
windows
zip
exe
macOS
app
linux
tar.gz
I had a mixed week. Unfortunately some IRL reduced my work time. There's a neat new widget to play with though!
command palette
A user has written a cool widget that helps you navigate the program by keyboard. I have integrated the first version and am interested in feedback. If you have nothing on Ctrl+P for your 'main window' shortcut set, you should get it mapped to that on update.
So, hit Ctrl+P and you'll get a palette where you can type and press up/down and enter to quickly navigate to any of the pages currently open. If you are an advanced mode user, you will also search all of the menubar actions and also the current thumbnail selection menu. This latter part is unfiltered at the moment--you'll just see everything--so be careful. The system needs more polish, including filtering out these more advanced database routines, and proper display for checkbox items 'check' status, and so on.
I can do a lot more with this widget, so give it a go and let me know what you think. I think some of the labels can probably be improved, and I am sure some would like to customise it a little. If you don't like Ctrl+P, just hit up file->shortcuts->the main window and re-map it!
full list
misc:
fixed the recent problem with drag and dropping thumbnails to a level below the top row of pages. sorry for the trouble!
fixed a bug where the client would not load results sorting by 'import time' when the search file domain was a single deleted file domain
fixed a list display bug in the edit page parser dialog when a subsidiary page parser has two complicated string-match based content parsers
collections now sort by modified time, using the largest known modified time in their collection
added sqlite3.exe console back into the windows build--sorry, it was missing since the github build changeover!
added a note to the help about backing up when tight on space, which I will repeat here: the sqlite database files are very compressible (70GB->17GB on default 7zip settings!), so if you need more space on your backup drive, this is a good way to reclaim it
.
command palette:
a user has written a cool 'command palette' for the program! it brings up a type-and-search interface to navigate to pages or menu entries.
I have integrated his first version and set the default shortcut to Ctrl+P. users who update will get this shortcut if they have nothing else on Ctrl+P on 'main window' set. if you prefer Ctrl+K or anything else, you can change it under _file->shortcuts->the main window_
regular users will get a page list they can search and select, advanced users will also get the (potentially dangerous) full scan of the menubar and current thumbnail right-click menu. I will be polishing this latter feature in future to filter out big maintenance jobs and show checkbox status and similar, so if you are advanced, please be careful for now
try it out, and let me know how it goes. the underlying widget is neat, and I can change its behaviour and extend it significantly
.
(mostly advanced) deleted file improvements:
files that have been deleted from a local file domain are now aware of their file deletion reason. this is visible in the right-click menu of thumb or media canvas
the advanced file deletion dialog now initialises using this stored reason. if all pending deletees have the same existing reason stored, it will display it, and if they are all set but differ, this will be noted and an option to not alter them is also available. this will come up later in niche advanced situations with mutiple file services
reversing a recent change, local file deletion reasons are no longer cleared on undelete or (re)import. they'll now hang around invisibly and initialise any future advanced file deletion dialog
updated the thumbnail and canvas undelete mechanism to handle multiple services. now, if the files are deleted in more than one domain, you will be asked to multiple-select which you wish to undelete for. if there is only one eligible undelete service, the process remains unchanged--you'll just get a yes/no confirmation if the 'confirm trash' option is set
misc multiple local file services code conversion work
next week
I had some success working on clever trash this week, but there's a bit more to do, and a lot of general cleanup/refactoring. An old 'my files' static reference is still used in about two hundred places, and almost all have to be updated. So I'll grind at that. I also have a whole ton of little work that has piled up. Fingers crossed, my current IRL problems clear up in a few days.
0 notes
Text
Creating a box office member lookup app with Glide using data from Salesforce
It's a pretty cool feeling when you're looking to build something very specific and you find a platform that does that specific thing really well. I recently had that experience and as a result have become a fast fan of Glide Apps.
The use case at hand is for box office staff working at the American Craft Show to look up and check in members from our database. Free admission to the show is a benefit of membership in the American Craft Council, and a decent chunk of those member tickets are claimed on site the day of the show.
There's a longer backstory to how this evolved, but the pertinent part is that we have a relatively new Salesforce CRM database that we're now able to leverage to build systems on top of to make tasks like this more efficient. The first iteration of this app was built on a platform which enabled querying on the last name field to pull contact records into a grid, from which box office staff could then double tap a small edit button next to any one of them, which opened a modal window where they check a box and then the Update button to send that data back to the CRM.
It was a good first effort, but had some pretty glaring shortcomings. In particular we faced adoption challenges with box office staff, who had been used to a different vendor platform for years that required them to click through multiple screens to verify membership and then offered no way to check them in. We succeeded at provisioning an interface that made the lookup portion more efficient, but staff weren't used to checking people in and the mechanism for that was just too clunky. Four taps may not seem like much, but it's a big deal in a fast-paced environment with customers lined up, and especially when the edit button is too small and requires a quick double tap on just the right spot to work.
So I went back to the drawing board, and at a point in that process it occurred to me that I might be better off moving the data out of Salesforce to broaden the pool of potential options. That led me think of the Google Sheets Data connector for Salesforce, followed by a brief flirtation with building something native in there using Google Apps Script, followed quickly by the revelation that's beyond my technical depth and I'm not up for the learning curve right now, but hey maybe there's something else out there which can help leverage this.
Enter Glide Apps. They're a pretty new startup that promises the ability to create a code-free app from a Google Sheet in 5 minutes. And even better, Soliudeen Ogunsola wrote this tutorial on Creating an Event Check-in App with Glide. It was a magic "this looks perfect" moment, and sure enough after having spent hours trying a few things that didn't work I gave this a shot and within a half hour had a functional prototype of something that worked perfectly.
Some of the things that I learned while building this out and getting it ready to use in production:
It's important for both consistency and efficiency's sake to make the data refresh process as easy and repeatable as possible. With that in mind, it's really important to consider that the Salesforce Data Connector deletes and reloads all data in the spreadsheet whenever it's refreshed. On the up side though, as long as the column headings remain consistent then the mappings set up in Glide Apps continue working seamlessly after the spreadsheet data is refreshed.
Because of that, I created a custom checkbox field on the Contact object for ticket pickup which is set to FALSE by default. That enabled it to be included in the query rather than added manually each time the data is refreshed.
Glide allows only two fields to be displayed in the List layout. In our case I wanted to display the member's full name as the title, then their City, State, and ZIP Code as the subtitle. I initially concatenated those fields in the Google Sheet, but to make it more easily repeatable I subsequently created a formula field on the Contact object in Salesforce that did the same concatenation and then included that field in the Data Connector query.
Adding a Switch to the Details layout in Glide enables the user to edit only that data point. The allow editing option can remain off so they can't change any other details on the contact record - the only interactive element on screen is the button to check them in.
I attempted to build a connection back into Salesforce to record the ticket pickup on their record via Zapier. However, when I tested checking one person in it triggered thousands of Zapier tasks. Something in the architecture is causing Zapier to think lots of rows were updated when I think they maybe had just been crawled. Point is that didn't work and thank goodness Zapier automatically holds tasks when it detects too high a volume all at once.
The volume of records that we're dealing with (in the tens of thousands) causes the Glide App to take a couple minutes to load when it's first opened. It requires coaching a little patience up front, but the good news is that's a one time deal when the app is initially opened. From that point forward everything works instantaneously. It's ultimately an improvement over the previous iteration, which would load quickly but then took several seconds to bring contact data into the grid on every member lookup.
I'm not on site at our San Francisco show, but can see that on day one of the show there are dozens of members recorded in the spreadsheet as having checked in, and I haven't gotten any frantic phone calls about it not working, so at this point I'm going to assume that means it's a success. But then I was pretty confident it would work. When it's just this simple to use, the odds seem good:


0 notes
Text
Django Highlights: Models, Admin, And Harnessing The Relational Database (Part 3)
About The Author
Philip Kiely is a developer, writer, and entrepreneur. He is an undergraduate at Grinnell College (class of 2020). More about Philip Kiely …
The admin panel is one of the most powerful, flexible features that the Django web framework provides, combining instant off-the-shelf functionality with infinite customization. Using an example project based on a library inventory system, we’ll use the admin panel to learn about creating models and interacting with relational databases in Django.
Before we get started, I want to note that Django’s built-in administrative capabilities, even after customization, are not meant for end-users. The admin panel exists as a developer, operator, and administrator tool for creating and maintaining software. It is not intended to be used to give end-users moderation capabilities or any other administrator abilities over the platform you develop.
This article is based on a hypothesis in two parts:
The Django admin panel is so intuitive that you basically already know how to use it.
The Django admin panel is so powerful that we can use it as a tool for learning about representing data in a relational database using a Django model.
I offer these ideas with the caveat that we will still need to write some configuration code to activate the admin panel’s more powerful abilities, and we will still need to use Django’s models-based ORM (object-relational mapping) to specify the representation of data in our system.
Setting Up
We’re going to be working with a sample project in this article. The project models some data that a library would store about its books and patrons. The example should be fairly applicable to many types of systems that manage users and/or inventory. Here’s a sneak peek of what the data looks like:
Data Model. (Large preview)
Please complete the following steps to get the example code running on your local machine.
1. Installing Packages
With Python 3.6 or higher installed, create a directory and virtual environment. Then, install the following packages:
pip install django django-grappelli
Django is the web framework that we’re working with in this article. (django-grappelli is an admin panel theme that we’ll briefly cover.)
2. Getting The Project
With the previous packages installed, download the example code from GitHub. Run:
git clone https://github.com/philipkiely/library_records.git cd library_records/library
3. Creating a Superuser
Using the following commands, set up your database and create a superuser. The command-line interface will walk you through the process of creating a superuser. Your superuser account will be how you access the admin panel in a moment, so be sure to remember the password you set. Use:
python manage.py migrate python manage.py createsuperuser
4. Loading the Data
For our exploration, I created a dataset called a fixture that you can load into the database (more on how to create a fixture at the end of the article). Use the fixture to populate your database before exploring it in the admin panel. Run:
python manage.py loaddata ../fixture.json
5. Running The Example Project
Finally, you’re ready to run the example code. To run the server, use the following command:
python manage.py runserver
Open your browser to http://127.0.0.1:8000 to view the project. Note that you are automatically redirected to the admin panel at /admin/. I accomplished that with the following configuration in library/urls.py:
from django.contrib import admin from django.urls import path from records import views urlpatterns = [ path('admin/', admin.site.urls), path('', views.index), ]
combined with the following simple redirect in records/views.py:
from django.http import HttpResponseRedirect def index(request): return HttpResponseRedirect('/admin/')
Using The Admin Panel
We’ve made it! When you load your page, you should see something like the following:
Django Admin Panel Main Page. (Large preview)
This view is accomplished with the following boilerplate code in records/admin.py:
from django.contrib import admin from .models import Book, Patron, Copy admin.site.register(Book) admin.site.register(Copy) admin.site.register(Patron)
This view should give you an initial understanding of the data that the system stores. I’ll remove some of the mystery: Groups and Users are defined by Django and store information and permissions for accounts on the system. You can read more about the User model in an earlier article in this series. Books, Copys, and Patrons are tables in the database that we created when running migrations and populated by loading the fixture. Note that Django naively pluralizes model names by appending an “s,” even in cases like “copys” where it is incorrect spelling.
Data Model. (Large preview)
In our project, a Book is a record with a title, author, publication date, and ISBN (International Standard Book Number). The library maintains a Copy of each Book, or possibly multiple. Each Copy can be checked out by a Patron, or could currently be checked in. A Patron is an extension of the User that records their address and date of birth.
Create, Read, Update, Destroy
One standard capability of the admin panel is adding instances of each model. Click on “books” to get to the model’s page, and click the “Add Book” button in the upper-right corner. Doing so will pull up a form, which you can fill out and save to create a book.
Create a Book (Large preview)
Creating a Patron reveals another built-in capability of the admin’s create form: you can create the connected model directly from the same form. The screenshot below shows the pop-up that is triggered by the green plus sign to the right of the User drop-down. Thus, you can create both models on the same admin page.
Create a Patron. (Large preview)
You can create a COPY via the same mechanism.
For each record, you can click the row to edit it using the same form. You can also delete records using an admin action.
Admin Actions
While the built-in capabilities of the admin panel are widely useful, you can create your own tools using admin actions. We’ll create two: one for creating copies of books and one for checking in books that have been returned to the library.
To create a Copy of a Book, go to the URL /admin/records/book/ and use the “Action” dropdown menu to select “Add a copy of book(s)” and then use the checkboxes on the left-hand column of the table to select which book or books to add a copy of to the inventory.
Create Copy Action. (Large preview)
Creating this relies on a model method we’ll cover later. We can call it as an admin action by creating a ModelAdmin class for the Profile model as follows in records/admin.py:
from django.contrib import admin from .models import Book, Patron, Copy class BookAdmin(admin.ModelAdmin): list_display = ("title", "author", "published") actions = ["make_copys"] def make_copys(self, request, queryset): for q in queryset: q.make_copy() self.message_user(request, "copy(s) created") make_copys.short_description = "Add a copy of book(s)" admin.site.register(Book, BookAdmin)
The list_display property denotes which fields are used to represent the model in the model’s overview page. The actions property lists admin actions. Our admin action is defined as a function within BookAdmin and takes three arguments: the admin object itself, the request (the actual HTTP request sent by the client), and the queryset (the list of objects whose boxes were checked). We perform the same action on each item in the queryset, then notify the user that the actions have been completed. Every admin action requires a short description so that it can be properly identified in the drop-down menu. Finally, we now add BookAdmin when registering the model.
Writing admin actions for setting properties in bulk is pretty repetitive. Here’s the code for checking in a Copy, note its near equivalence to the previous action.
from django.contrib import admin from .models import Book, Patron, Copy class CopyAdmin(admin.ModelAdmin): actions = ["check_in_copys"] def check_in_copys(self, request, queryset): for q in queryset: q.check_in() self.message_user(request, "copy(s) checked in") check_in_copys.short_description = "Check in copy(s)" admin.site.register(Copy, CopyAdmin)
Admin Theme
By default, Django provides fairly simple styles for the admin panel. You can create your own theme or use a third-party theme to give the admin panel a new look. One popular open-source theme is grappelli, which we installed earlier in the article. You can check out the documentation for its full capabilities.
Installing the theme is pretty straightforward, it only requires two lines. First, add grappelli to INSTALLED_APPS as follows in library/settings.py:
INSTALLED_APPS = [ 'grappelli', 'django.contrib.admin', 'django.contrib.auth', 'django.contrib.contenttypes', 'django.contrib.sessions', 'django.contrib.messages', 'django.contrib.staticfiles', 'records', ]
Then, adjust library/urls.py:
from django.contrib import admin from django.urls import path, include from records import views urlpatterns = [ path('grappelli/', include('grappelli.urls')), path('admin/', admin.site.urls), path('', views.index), ]
With those changes in place, the admin panel should look like the following:
Admin Panel with Theme. (Large preview)
There are a number of other themes out there, and again you can develop your own. I’ll be sticking with the default look for the rest of this article.
Understanding Models
Now that you’re comfortable with the admin panel and using it to navigate the data, let’s take a look at the models that define our database structure. Each model represents one table in a relational database.
A relational database stores data in one or more tables. Each of these tables has a specified column structure, including a primary key (a unique identifier for each element) and one or more columns of values, which are of various types like strings, integers, and dates. Each object stored in the database is represented as a single row. The “relational” part of the name comes from what is arguably the technology’s most important feature: creating relationships between tables. An object (row) can have a one-to-one, one-to-many (foreign key), or many-to-many mapping to rows in other tables. We’ll discuss this further in the examples.
Django, by default, uses SQLite3 for development. SQLite3 is a simple relational database engine and your database is automatically created as db.sqlite3 the first time you run python manage.py migrate. We’ll continue with SQLite3 for this article, but it is not suitable for production use, primarily because overwrites are possible with concurrent users. In production, or when writing a system that you one day intend to deploy, use PostgreSQL or MySQL.
Django uses models to interface with the database. Using part of Django’s ORM, the records/models.py file includes multiple models, which allows for specifying fields, properties, and methods for each object. When creating models, we strive for a “Fat Model” architecture, within reason. That means that as much of the data validation, parsing, processing, business logic, exception handling, edge case resolution, and similar tasks as possible should be handled in the specification of the model itself. Under the hood, Django models are very complex, featureful objects with widely useful default behavior. This makes the “Fat Model” architecture easy to achieve even without writing a substantial amount of code.
Let’s walk through the three models in our sample application. We can’t cover everything, as this is supposed to be an introductory article, not the Django framework’s complete documentation, but I’ll highlight the most important choices I made in constructing these simple models.
The Book class is the most straightforward of the models. Here it is from records/models.py:
from django.db import models class Book(models.Model): title = models.CharField(max_length=300) author = models.CharField(max_length=150) published = models.DateField() isbn = models.IntegerField(unique=True) def __str__(self): return self.title + " by " + self.author def make_copy(self): Copy.objects.create(book=self)
All CharField fields require a specified max_length attribute. The conventional length is 150 characters, which I doubled for title in case of very long titles. Of course, there still is an arbitrary limit, which could be exceeded. For unbounded text length, use a TextField. The published field is a DateField. The time the book was published doesn’t matter, but if it did I would use a DateTimeField. Finally, the ISBN is an integer (ISBNs are 10 or 13 digits and thus all fit within the integer’s max value) and we use unique=True as no two books can have the same ISBN, which is then enforced at the database level.
All objects have a method __str__(self) that defines their string representation. We override the default implementation provided by the models.Model class and instead represent books as “title by author” in all places where the model would be represented as a string. Recall that previously we used list_display in Book’s admin object to determine what fields would be shown in the admin panel’s list. If that list_display is not present, the admin list instead shows the string representation of the model, as it does for both Patron and Copy.
Finally, we have a method on Book that we called in its admin action that we wrote earlier. This function creates a Copy that is related to a given instance of a Book in the database.
Moving on to Patron, this model introduces the concept of a one-to-one relationship, in this case with the built-in User model. Check it out from records/models.py:
from django.db import models from django.contrib.auth.models import User class Patron(models.Model): user = models.OneToOneField(User, on_delete=models.CASCADE) address = models.CharField(max_length=150) dob = models.DateField() def __str__(self): return self.user.username
The user field is not exactly a bijective function. There CAN be a User instance without an associated Patron instance. However, a User CAN NOT be associated with more than one Patron instance, and a Patron cannot exist without exactly one relation to a user. This is enforced at the database level, and is guaranteed by the on_delete=models.CASCADE specification: if a User instance is deleted, an associated Profile will be deleted.
The other fields and __str__(self) function we’ve seen before. It’s worth noting that you can reach through a one-to-one relation to get attributes, in this case user.username, in a model’s functions.
To expand on the usefulness of database relations, let’s turn our attention to Copy from records/models.py:
from django.db import models class Copy(models.Model): book = models.ForeignKey(Book, on_delete=models.CASCADE) out_to = models.ForeignKey(Patron, blank=True, null=True, on_delete=models.SET_NULL) def __str__(self): has_copy = "checked in" if self.out_to: has_copy = self.out_to.user.username return self.book.title + " -> " + has_copy def check_out(self, p): self.out_to = p self.save() def check_in(self): self.out_to = None self.save()
Again, we’ve seen most of this before, so let’s focus on the new stuff: models.ForeignKey. A Copy must be of a single Book, but the library may have multiple Copys of each Book. A Book can exist in the database without the library having a Copy in its catalog, but a Copy cannot exist without an underlying Book.
This complex relationship is expressed with the following line:
book = models.ForeignKey(Book, on_delete=models.CASCADE)
The deletion behavior is the same as Patron’s in reference to User.
The relationship between a Copy and a Patron is slightly different. A Copy may be checked out to up to one Patrons, but each Patron can check out as many Copys as the library lets them. However, this is not a permanent relationship, the Copy is sometimes not checked out. Patrons and Copys exist independently from one another in the database; deleting an instance of one should not delete any instance of the other.
This relationship is still a use case for the foreign key, but with different arguments:
out_to = models.ForeignKey(Patron, blank=True, null=True, on_delete=models.SET_NULL)
Here, having blank=True allows for forms to accept None as the value for the relation and null=True allows for the column for the Patron relation in Copy’s table in the database accept null as a value. The delete behavior, which would be triggered on a Copy if a Patron instance was deleted while they had that Copy checked out, is to sever the relation while leaving the Copy intact by setting the Patron field to null.
The same field type, models.ForeignKey, can express very different relationships between objects. The one relation that I could not cleanly fit in the example is a many-to-many field, which is like a one-to-one field, except that, as suggested by its name, each instance can be related to many other instances and every other and each of those can be related back to many others, like how a book could have multiple authors, each of whom have written multiple books.
Migrations
You might be wondering how the database knows what is expressed in the model. In my experience, migrations are one of those things that are pretty straightforward until they aren’t, and then they eat your face. Here’s how to keep your mug intact, for beginners: learn about migrations and how to interact with them, but try to avoid making manual edits to the migration files. If you already know what you’re doing, skip this section and keep up what works for you.
Either way, check out the official documentation for a complete treatment of the subject.
Migrations translate changes in a model to changes in database schema. You don’t have to write them yourself, Django creates them with the python manage.py makemigrations command. You should run this command when you create a new model or edit the fields of an existing model, but there is no need to do so when creating or editing model methods. It’s important to note that migrations exist as a chain, each one references the previous one so that it can make error-free edits to the database schema. Thus, if you’re collaborating on a project, it’s important to keep a single consistent migration history in version control. When there are unapplied migrations, run python manage.py migrate to apply them before running the server.
The example project is distributed with a single migration, records/migrations/0001_initial.py. Again, this is automatically generated code that you shouldn’t have to edit, so I won’t copy it in here, but if you want to get a sense of what’s going on behind the scenes go ahead and take a look at it.
Fixtures
Unlike migrations, fixtures are not a common aspect of Django development. I use them to distribute sample data with articles, and have never used them otherwise. However, because we used one earlier, I feel compelled to introduce the topic.
For once, the official documentation is a little slim on the topic. Overall, what you should know is that fixtures are a way of importing and exporting data from your database in a variety of formats, including JSON, which is what I use. This feature mostly exists to help with things like automated testing, and is not a backup system or way to edit data in a live database. Furthermore, fixtures are not updated with migrations, and if you try to apply a fixture to a database with an incompatible schema it will fail.
To generate a fixture for the entire database, run:
python manage.py dumpdata --format json > fixture.json
To load a fixture, run:
python manage.py loaddata fixture.json
Conclusion
Writing models in Django is a huge topic, and using the admin panel is another. In 3,000 words, I’ve only managed to introduce each. Hopefully, using the admin panel has given you a better interface to explore how models work and relate to each other, leaving you with the confidence to experiment and develop your own relational representations of data.
If you’re looking for an easy place to start, try adding a Librarian model that inherits from User like Profile does. For more of a challenge, try implementing a checkout history for each Copy and/or Patron (there are several ways of accomplishing this one).
Django Highlights is a series introducing important concepts of web development in Django. Each article is written as a stand-alone guide to a facet of Django development intended to help front-end developers and designers reach a deeper understanding of “the other half” of the codebase. These articles are mostly constructed to help you gain an understanding of theory and convention, but contain some code samples which are written in Django 3.0.
Further Reading
You may be interested in the following articles and documentation.
(dm, yk, il)
Website Design & SEO Delray Beach by DBL07.co
Delray Beach SEO
source http://www.scpie.org/django-highlights-models-admin-and-harnessing-the-relational-database-part-3/ source https://scpie.tumblr.com/post/615584791068278784
0 notes
Text
Django Highlights: Models Admin And Harnessing The Relational Database (Part 3)
About The Author
Philip Kiely is a developer, writer, and entrepreneur. He is an undergraduate at Grinnell College (class of 2020). More about Philip Kiely …
The admin panel is one of the most powerful, flexible features that the Django web framework provides, combining instant off-the-shelf functionality with infinite customization. Using an example project based on a library inventory system, we’ll use the admin panel to learn about creating models and interacting with relational databases in Django.
Before we get started, I want to note that Django’s built-in administrative capabilities, even after customization, are not meant for end-users. The admin panel exists as a developer, operator, and administrator tool for creating and maintaining software. It is not intended to be used to give end-users moderation capabilities or any other administrator abilities over the platform you develop.
This article is based on a hypothesis in two parts:
The Django admin panel is so intuitive that you basically already know how to use it.
The Django admin panel is so powerful that we can use it as a tool for learning about representing data in a relational database using a Django model.
I offer these ideas with the caveat that we will still need to write some configuration code to activate the admin panel’s more powerful abilities, and we will still need to use Django’s models-based ORM (object-relational mapping) to specify the representation of data in our system.
Setting Up
We’re going to be working with a sample project in this article. The project models some data that a library would store about its books and patrons. The example should be fairly applicable to many types of systems that manage users and/or inventory. Here’s a sneak peek of what the data looks like:
Data Model. (Large preview)
Please complete the following steps to get the example code running on your local machine.
1. Installing Packages
With Python 3.6 or higher installed, create a directory and virtual environment. Then, install the following packages:
pip install django django-grappelli
Django is the web framework that we’re working with in this article. (django-grappelli is an admin panel theme that we’ll briefly cover.)
2. Getting The Project
With the previous packages installed, download the example code from GitHub. Run:
git clone https://github.com/philipkiely/library_records.gitcd library_records/library
3. Creating a Superuser
Using the following commands, set up your database and create a superuser. The command-line interface will walk you through the process of creating a superuser. Your superuser account will be how you access the admin panel in a moment, so be sure to remember the password you set. Use:
python manage.py migratepython manage.py createsuperuser
4. Loading the Data
For our exploration, I created a dataset called a fixture that you can load into the database (more on how to create a fixture at the end of the article). Use the fixture to populate your database before exploring it in the admin panel. Run:
python manage.py loaddata ../fixture.json
5. Running The Example Project
Finally, you’re ready to run the example code. To run the server, use the following command:
python manage.py runserver
Open your browser to http://127.0.0.1:8000 to view the project. Note that you are automatically redirected to the admin panel at /admin/. I accomplished that with the following configuration in library/urls.py:
from django.contrib import adminfrom django.urls import pathfrom records import views urlpatterns = [ path('admin/', admin.site.urls), path('', views.index),]
combined with the following simple redirect in records/views.py:
from django.http import HttpResponseRedirect def index(request): return HttpResponseRedirect('/admin/')
Using The Admin Panel
We’ve made it! When you load your page, you should see something like the following:
Django Admin Panel Main Page. (Large preview)
This view is accomplished with the following boilerplate code in records/admin.py:
from django.contrib import adminfrom .models import Book, Patron, Copy admin.site.register(Book)admin.site.register(Copy)admin.site.register(Patron)
This view should give you an initial understanding of the data that the system stores. I’ll remove some of the mystery: Groups and Users are defined by Django and store information and permissions for accounts on the system. You can read more about the User model in an earlier article in this series. Books, Copys, and Patrons are tables in the database that we created when running migrations and populated by loading the fixture. Note that Django naively pluralizes model names by appending an “s,” even in cases like “copys” where it is incorrect spelling.
Data Model. (Large preview)
In our project, a Book is a record with a title, author, publication date, and ISBN (International Standard Book Number). The library maintains a Copy of each Book, or possibly multiple. Each Copy can be checked out by a Patron, or could currently be checked in. A Patron is an extension of the User that records their address and date of birth.
Create, Read, Update, Destroy
One standard capability of the admin panel is adding instances of each model. Click on “books” to get to the model’s page, and click the “Add Book” button in the upper-right corner. Doing so will pull up a form, which you can fill out and save to create a book.
Create a Book (Large preview)
Creating a Patron reveals another built-in capability of the admin’s create form: you can create the connected model directly from the same form. The screenshot below shows the pop-up that is triggered by the green plus sign to the right of the User drop-down. Thus, you can create both models on the same admin page.
Create a Patron. (Large preview)
You can create a COPY via the same mechanism.
For each record, you can click the row to edit it using the same form. You can also delete records using an admin action.
Admin Actions
While the built-in capabilities of the admin panel are widely useful, you can create your own tools using admin actions. We’ll create two: one for creating copies of books and one for checking in books that have been returned to the library.
To create a Copy of a Book, go to the URL /admin/records/book/ and use the “Action” dropdown menu to select “Add a copy of book(s)” and then use the checkboxes on the left-hand column of the table to select which book or books to add a copy of to the inventory.
Create Copy Action. (Large preview)
Creating this relies on a model method we’ll cover later. We can call it as an admin action by creating a ModelAdmin class for the Profile model as follows in records/admin.py:
from django.contrib import adminfrom .models import Book, Patron, Copy class BookAdmin(admin.ModelAdmin): list_display = ("title", "author", "published") actions = ["make_copys"] def make_copys(self, request, queryset): for q in queryset: q.make_copy() self.message_user(request, "copy(s) created") make_copys.short_description = "Add a copy of book(s)" admin.site.register(Book, BookAdmin)
The list_display property denotes which fields are used to represent the model in the model’s overview page. The actions property lists admin actions. Our admin action is defined as a function within BookAdmin and takes three arguments: the admin object itself, the request (the actual HTTP request sent by the client), and the queryset (the list of objects whose boxes were checked). We perform the same action on each item in the queryset, then notify the user that the actions have been completed. Every admin action requires a short description so that it can be properly identified in the drop-down menu. Finally, we now add BookAdmin when registering the model.
Writing admin actions for setting properties in bulk is pretty repetitive. Here’s the code for checking in a Copy, note its near equivalence to the previous action.
from django.contrib import adminfrom .models import Book, Patron, Copy class CopyAdmin(admin.ModelAdmin): actions = ["check_in_copys"] def check_in_copys(self, request, queryset): for q in queryset: q.check_in() self.message_user(request, "copy(s) checked in") check_in_copys.short_description = "Check in copy(s)" admin.site.register(Copy, CopyAdmin)
Admin Theme
By default, Django provides fairly simple styles for the admin panel. You can create your own theme or use a third-party theme to give the admin panel a new look. One popular open-source theme is grappelli, which we installed earlier in the article. You can check out the documentation for its full capabilities.
Installing the theme is pretty straightforward, it only requires two lines. First, add grappelli to INSTALLED_APPS as follows in library/settings.py:
INSTALLED_APPS = [ 'grappelli', 'django.contrib.admin', 'django.contrib.auth', 'django.contrib.contenttypes', 'django.contrib.sessions', 'django.contrib.messages', 'django.contrib.staticfiles', 'records',]
Then, adjust library/urls.py:
from django.contrib import adminfrom django.urls import path, includefrom records import views urlpatterns = [ path('grappelli/', include('grappelli.urls')), path('admin/', admin.site.urls), path('', views.index),]
With those changes in place, the admin panel should look like the following:
Admin Panel with Theme. (Large preview)
There are a number of other themes out there, and again you can develop your own. I’ll be sticking with the default look for the rest of this article.
Understanding Models
Now that you’re comfortable with the admin panel and using it to navigate the data, let’s take a look at the models that define our database structure. Each model represents one table in a relational database.
A relational database stores data in one or more tables. Each of these tables has a specified column structure, including a primary key (a unique identifier for each element) and one or more columns of values, which are of various types like strings, integers, and dates. Each object stored in the database is represented as a single row. The “relational” part of the name comes from what is arguably the technology’s most important feature: creating relationships between tables. An object (row) can have a one-to-one, one-to-many (foreign key), or many-to-many mapping to rows in other tables. We’ll discuss this further in the examples.
Django, by default, uses SQLite3 for development. SQLite3 is a simple relational database engine and your database is automatically created as db.sqlite3 the first time you run python manage.py migrate. We’ll continue with SQLite3 for this article, but it is not suitable for production use, primarily because overwrites are possible with concurrent users. In production, or when writing a system that you one day intend to deploy, use PostgreSQL or MySQL.
Django uses models to interface with the database. Using part of Django’s ORM, the records/models.py file includes multiple models, which allows for specifying fields, properties, and methods for each object. When creating models, we strive for a “Fat Model” architecture, within reason. That means that as much of the data validation, parsing, processing, business logic, exception handling, edge case resolution, and similar tasks as possible should be handled in the specification of the model itself. Under the hood, Django models are very complex, featureful objects with widely useful default behavior. This makes the “Fat Model” architecture easy to achieve even without writing a substantial amount of code.
Let’s walk through the three models in our sample application. We can’t cover everything, as this is supposed to be an introductory article, not the Django framework’s complete documentation, but I’ll highlight the most important choices I made in constructing these simple models.
The Book class is the most straightforward of the models. Here it is from records/models.py:
from django.db import models class Book(models.Model): title = models.CharField(max_length=300) author = models.CharField(max_length=150) published = models.DateField() isbn = models.IntegerField(unique=True) def __str__(self): return self.title + " by " + self.author def make_copy(self): Copy.objects.create(book=self)
All CharField fields require a specified max_length attribute. The conventional length is 150 characters, which I doubled for title in case of very long titles. Of course, there still is an arbitrary limit, which could be exceeded. For unbounded text length, use a TextField. The published field is a DateField. The time the book was published doesn’t matter, but if it did I would use a DateTimeField. Finally, the ISBN is an integer (ISBNs are 10 or 13 digits and thus all fit within the integer’s max value) and we use unique=True as no two books can have the same ISBN, which is then enforced at the database level.
All objects have a method __str__(self) that defines their string representation. We override the default implementation provided by the models.Model class and instead represent books as “title by author” in all places where the model would be represented as a string. Recall that previously we used list_display in Book’s admin object to determine what fields would be shown in the admin panel’s list. If that list_display is not present, the admin list instead shows the string representation of the model, as it does for both Patron and Copy.
Finally, we have a method on Book that we called in its admin action that we wrote earlier. This function creates a Copy that is related to a given instance of a Book in the database.
Moving on to Patron, this model introduces the concept of a one-to-one relationship, in this case with the built-in User model. Check it out from records/models.py:
from django.db import modelsfrom django.contrib.auth.models import User class Patron(models.Model): user = models.OneToOneField(User, on_delete=models.CASCADE) address = models.CharField(max_length=150) dob = models.DateField() def __str__(self): return self.user.username
The user field is not exactly a bijective function. There CAN be a User instance without an associated Patron instance. However, a User CAN NOT be associated with more than one Patron instance, and a Patron cannot exist without exactly one relation to a user. This is enforced at the database level, and is guaranteed by the on_delete=models.CASCADE specification: if a User instance is deleted, an associated Profile will be deleted.
The other fields and __str__(self) function we’ve seen before. It’s worth noting that you can reach through a one-to-one relation to get attributes, in this case user.username, in a model’s functions.
To expand on the usefulness of database relations, let’s turn our attention to Copy from records/models.py:
from django.db import models class Copy(models.Model): book = models.ForeignKey(Book, on_delete=models.CASCADE) out_to = models.ForeignKey(Patron, blank=True, null=True, on_delete=models.SET_NULL) def __str__(self): has_copy = "checked in" if self.out_to: has_copy = self.out_to.user.username return self.book.title + " -> " + has_copy def check_out(self, p): self.out_to = p self.save() def check_in(self): self.out_to = None self.save()
Again, we’ve seen most of this before, so let’s focus on the new stuff: models.ForeignKey. A Copy must be of a single Book, but the library may have multiple Copys of each Book. A Book can exist in the database without the library having a Copy in its catalog, but a Copy cannot exist without an underlying Book.
This complex relationship is expressed with the following line:
book = models.ForeignKey(Book, on_delete=models.CASCADE)
The deletion behavior is the same as Patron’s in reference to User.
The relationship between a Copy and a Patron is slightly different. A Copy may be checked out to up to one Patrons, but each Patron can check out as many Copys as the library lets them. However, this is not a permanent relationship, the Copy is sometimes not checked out. Patrons and Copys exist independently from one another in the database; deleting an instance of one should not delete any instance of the other.
This relationship is still a use case for the foreign key, but with different arguments:
out_to = models.ForeignKey(Patron, blank=True, null=True, on_delete=models.SET_NULL)
Here, having blank=True allows for forms to accept None as the value for the relation and null=True allows for the column for the Patron relation in Copy’s table in the database accept null as a value. The delete behavior, which would be triggered on a Copy if a Patron instance was deleted while they had that Copy checked out, is to sever the relation while leaving the Copy intact by setting the Patron field to null.
The same field type, models.ForeignKey, can express very different relationships between objects. The one relation that I could not cleanly fit in the example is a many-to-many field, which is like a one-to-one field, except that, as suggested by its name, each instance can be related to many other instances and every other and each of those can be related back to many others, like how a book could have multiple authors, each of whom have written multiple books.
Migrations
You might be wondering how the database knows what is expressed in the model. In my experience, migrations are one of those things that are pretty straightforward until they aren’t, and then they eat your face. Here’s how to keep your mug intact, for beginners: learn about migrations and how to interact with them, but try to avoid making manual edits to the migration files. If you already know what you’re doing, skip this section and keep up what works for you.
Either way, check out the official documentation for a complete treatment of the subject.
Migrations translate changes in a model to changes in database schema. You don’t have to write them yourself, Django creates them with the python manage.py makemigrations command. You should run this command when you create a new model or edit the fields of an existing model, but there is no need to do so when creating or editing model methods. It’s important to note that migrations exist as a chain, each one references the previous one so that it can make error-free edits to the database schema. Thus, if you’re collaborating on a project, it’s important to keep a single consistent migration history in version control. When there are unapplied migrations, run python manage.py migrate to apply them before running the server.
The example project is distributed with a single migration, records/migrations/0001_initial.py. Again, this is automatically generated code that you shouldn’t have to edit, so I won’t copy it in here, but if you want to get a sense of what’s going on behind the scenes go ahead and take a look at it.
Fixtures
Unlike migrations, fixtures are not a common aspect of Django development. I use them to distribute sample data with articles, and have never used them otherwise. However, because we used one earlier, I feel compelled to introduce the topic.
For once, the official documentation is a little slim on the topic. Overall, what you should know is that fixtures are a way of importing and exporting data from your database in a variety of formats, including JSON, which is what I use. This feature mostly exists to help with things like automated testing, and is not a backup system or way to edit data in a live database. Furthermore, fixtures are not updated with migrations, and if you try to apply a fixture to a database with an incompatible schema it will fail.
To generate a fixture for the entire database, run:
python manage.py dumpdata --format json > fixture.json
To load a fixture, run:
python manage.py loaddata fixture.json
Conclusion
Writing models in Django is a huge topic, and using the admin panel is another. In 3,000 words, I’ve only managed to introduce each. Hopefully, using the admin panel has given you a better interface to explore how models work and relate to each other, leaving you with the confidence to experiment and develop your own relational representations of data.
If you’re looking for an easy place to start, try adding a Librarian model that inherits from User like Profile does. For more of a challenge, try implementing a checkout history for each Copy and/or Patron (there are several ways of accomplishing this one).
Django Highlights is a series introducing important concepts of web development in Django. Each article is written as a stand-alone guide to a facet of Django development intended to help front-end developers and designers reach a deeper understanding of “the other half” of the codebase. These articles are mostly constructed to help you gain an understanding of theory and convention, but contain some code samples which are written in Django 3.0.
Further Reading
You may be interested in the following articles and documentation.
(dm, yk, il)
Website Design & SEO Delray Beach by DBL07.co
Delray Beach SEO
Via http://www.scpie.org/django-highlights-models-admin-and-harnessing-the-relational-database-part-3/
source https://scpie.weebly.com/blog/django-highlights-models-admin-and-harnessing-the-relational-database-part-3
0 notes