#how to drop duplicate rows in data
Explore tagged Tumblr posts
Visit Tumblr Blog
Explore Tumblr blogs with no restrictions, modern design and the best experience.
Last Seen Tumblr Blogs


Fun Fact
Tumblr.com is the 103rd most visited website in the world.
Text
tally hall data

Hello hi
Here is what ive been up to in the past few days
Warning! It's a bit laggy
This is a spreadsheet of all the lyrics spoken/sang by each tally hall member in the album Marvin's Marvelous Mechanical Museum. This took me 5 days-ish and has around 1000 rows of words
here is a drop down if you want more details + process (if ya wanna make one yourself :D):
How many words the tallies said in my list:
5540 (there are duplicates cause they do duets and groups)
Most used words in the album:
you
the
to
and
i
who sings/speaks the most to least:
Joe (1971), Rob (1746), Zubin (1218) , Andrew (380), Ross (225)
each member's top word + graph of when they say it in the album
Andrew: and

Joe: you

Rob: you

Ross: ba

Zubin: I

Everyone's top 5 words and graphs are in the spreadsheet if u want more numbers
If you need specific data like how many times they say a certain word it's in the spreadsheet, there you will find graphs (there's a huge one on the right most side), a pie chart and numbers. If you need a graph that isn't on there lmk and i'll put it there
Now for the process
This was made with a list organizer cause im pretty bad at counting lyrics when theyre apart so this will help speed up the process. Hums are not counted cause i used the HITS lyrics which did not include them in most songs which have humming. 13 and Dream are not in the list due to them not having lyrics. All songs use the HITS lyrics but i edited some of good day cause the members sing different parts in the 1st verse which was not noted.
Lmk if i got some lyrics wrong so i can correct the excel
step 1
I put all the lyrics into a google doc and put each song in the word sorter in groups of 5. I deleted the duplicates to get one of every word then combined the 3 groups of 5 into 1 long list consisting of around 1000 words.
step 2
Typed out each word into excel which i probably should have looked into more cause this seems inefficient but i was lazy.
step 3
Then separated every line spoken by each member to sort their lyrics, count them, and input them into the excel. This took me the longest
step 4
make all the major graphs and equations which are mostly "=SUM" (addition) and "=LARGE" (ranking)
sites used:
#tally hall#silly#rob cantor#zubin sedghi#joe hawley#ross federman#andrew horowitz#excel#marvin's marvelous mechanical museum
12 notes
·
View notes
Text
Unveiling Market Insights: Exploring the Sampling Distribution, Standard Deviation, and Standard Error of NIFTY50 Volumes in Stock Analysis
Introduction:
In the dynamic realm of stock analysis, exploring the sampling distribution, standard deviation, and standard error of NIFTY50 volumes is significant. Providing useful tools for investors, these statistical insights go beyond abstraction. When there is market volatility, standard deviation directs risk evaluation. Forecasting accuracy is improved by the sample distribution, which functions similarly to a navigational aid. Reliability of estimates is guaranteed by standard error. These are not only stock-specific insights; they also impact portfolio construction and enable quick adjustments to market developments. A data-driven strategy powered by these statistical measurements enables investors to operate confidently and resiliently in the financial world, where choices are what determine success.
NIFTY-50 is the tracker of Indian Economy, the index is frequently evaluated and re-equalizing to make sure it correctly affects the shifting aspects of the economic landscape in India. Extensively pursued index, this portrays an important role in accomplishing, investment approach ways and market analyses.
Methodology
The data was collected from Kaggle, with the (dimension of 2400+ rows and 8 rows, which are: date, open, close, high, low, volume, stock split, dividend. After retrieving data from the data source, we cleaned the null values and unnecessary columns from the set using Python Programming. We removed all the 0 values from the dataset and dropped all the columns which are less correlated.
After completing all the pre-processing techniques, we imported our cleaned values into RStudio for further analysis of our dataset.
Findings:
Our aim lies in finding how the samples are truly representing the volume. So, for acquiring our aim, we first took a set of samples of sizes 100 and 200 respectively. Then we performed some calculations separately on both of the samples for finding the mean, standard deviation, sampling distribution and standard error. At last we compared both of the samples and found that the mean and the standard deviation of the second sample which is having the size of 200 is more closely related to the volume.

From the above table, the mean of the sample-2 which has a size of 200 entity is 291642.5 and the mean of the sample-1 is 270745. From this result, it is clear that sample-2 is better representative of the volume as compared to sample-1
Similarly, when we take a look at the standard error, sample-2 is lesser as compared to sample-1. Which means that the sample-2 is more likely to be closer to the volume.
Population Distribution.
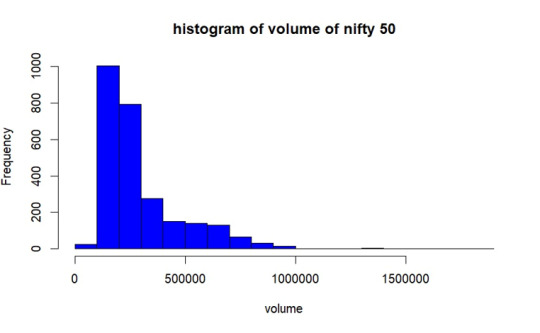
As per the graph, In most of the days from the year 2017 to 2023 December volume of trading of NIFTY50 was between 1lakh- 2.8lakhs.
Sample Selection
We are taking 2 sample set having 100 and 200 of size respectively without replacement. Then we obtained mean, standard deviation and standard error of both of the samples.
Sampling Distribution of Sample- 1
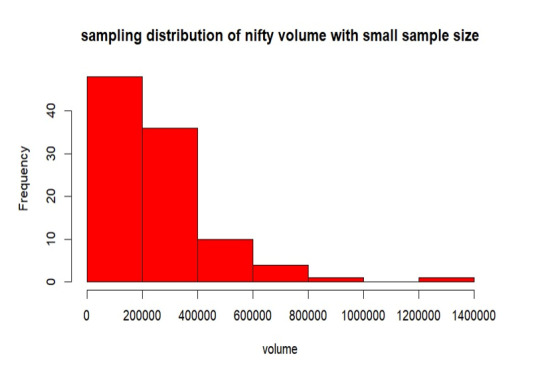
From the above graph, the samples are mostly between 0 to 2 lakhs of volume. Also, the samples are less distributed throughout the population. The mean is 270745, standard deviation is 195270.5 and the standard error of sampling is 19527.01.
Sampling Distribution of Sample- 2
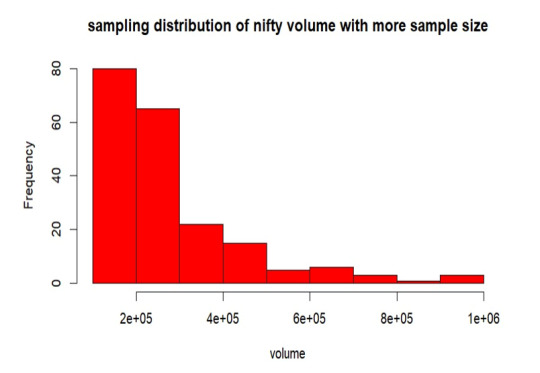
From the above graph, the samples are mostly between 0 to 2 lakhs of volume. Also, the samples are more distributed than the sample-1 throughout the volume. The mean is 291642.5, standard deviation is 186162.3 and the standard error of sampling is 13163.66.
Replication of Sample- 1
Here, we are duplicating the mean of every sample combination while taking into account every conceivable sample set from our volume. This suggests that the sample size is growing in this instance since the sample means follow the normal distribution according to the central limit theorem.
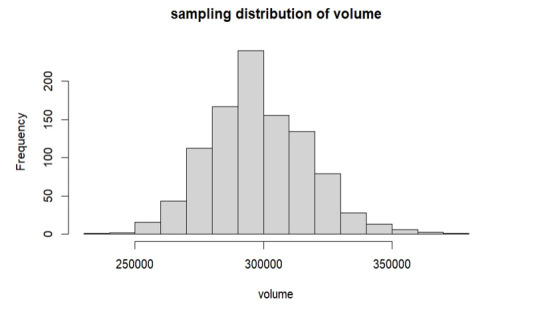
As per the above graph, it is clear that means of sample sets which we have replicated follows the normal distribution, from the graph the mean is around 3 lakhs which is approximately equals to our true volume mean 297456 which we have already calculated.
Conclusion
In the observed trading volume range of 2 lakhs to 3 lakhs, increasing the sample size led to a decrease in standard error. The sample mean converges to the true volume mean as sample size increases, according to this trend. Interestingly, the resulting sample distribution closely resembles the population when the sample mean is duplicated. The mean produced by this replication process is significantly more similar to the population mean, confirming the central limit theorem's validity in describing the real features of the trade volume.
2 notes
·
View notes
Text
Pandas DataFrame Cleanup: Master the Art of Dropping Columns Data cleaning and preprocessing are crucial steps in any data analysis project. When working with pandas DataFrames in Python, you'll often encounter situations where you need to remove unnecessary columns to streamline your dataset. In this comprehensive guide, we'll explore various methods to drop columns in pandas, complete with practical examples and best practices. Understanding the Basics of Column Dropping Before diving into the methods, let's understand why we might need to drop columns: Remove irrelevant features that don't contribute to analysis Eliminate duplicate or redundant information Clean up data before model training Reduce memory usage for large datasets Method 1: Using drop() - The Most Common Approach The drop() method is the most straightforward way to remove columns from a DataFrame. Here's how to use it: pythonCopyimport pandas as pd # Create a sample DataFrame df = pd.DataFrame( 'name': ['John', 'Alice', 'Bob'], 'age': [25, 30, 35], 'city': ['New York', 'London', 'Paris'], 'temp_col': [1, 2, 3] ) # Drop a single column df = df.drop('temp_col', axis=1) # Drop multiple columns df = df.drop(['city', 'age'], axis=1) The axis=1 parameter indicates we're dropping columns (not rows). Remember that drop() returns a new DataFrame by default, so we need to reassign it or use inplace=True. Method 2: Using del Statement - The Quick Solution For quick, permanent column removal, you can use Python's del statement: pythonCopy# Delete a column using del del df['temp_col'] Note that this method modifies the DataFrame directly and cannot be undone. Use it with caution! Method 3: Drop Columns Using pop() - Remove and Return The pop() method removes a column and returns it, which can be useful when you want to store the removed column: pythonCopy# Remove and store a column removed_column = df.pop('temp_col') Advanced Column Dropping Techniques Dropping Multiple Columns with Pattern Matching Sometimes you need to drop columns based on patterns in their names: pythonCopy# Drop columns that start with 'temp_' df = df.drop(columns=df.filter(regex='^temp_').columns) # Drop columns that contain certain text df = df.drop(columns=df.filter(like='unused').columns) Conditional Column Dropping You might want to drop columns based on certain conditions: pythonCopy# Drop columns with more than 50% missing values threshold = len(df) * 0.5 df = df.dropna(axis=1, thresh=threshold) # Drop columns of specific data types df = df.select_dtypes(exclude=['object']) Best Practices for Dropping Columns Make a Copy First pythonCopydf_clean = df.copy() df_clean = df_clean.drop('column_name', axis=1) Use Column Lists for Multiple Drops pythonCopycolumns_to_drop = ['col1', 'col2', 'col3'] df = df.drop(columns=columns_to_drop) Error Handling pythonCopytry: df = df.drop('non_existent_column', axis=1) except KeyError: print("Column not found in DataFrame") Performance Considerations When working with large datasets, consider these performance tips: Use inplace=True to avoid creating copies: pythonCopydf.drop('column_name', axis=1, inplace=True) Drop multiple columns at once rather than one by one: pythonCopy# More efficient df.drop(['col1', 'col2', 'col3'], axis=1, inplace=True) # Less efficient df.drop('col1', axis=1, inplace=True) df.drop('col2', axis=1, inplace=True) df.drop('col3', axis=1, inplace=True) Common Pitfalls and Solutions Dropping Non-existent Columns pythonCopy# Use errors='ignore' to skip non-existent columns df = df.drop('missing_column', axis=1, errors='ignore') Chain Operations Safely pythonCopy# Use method chaining carefully df = (df.drop('col1', axis=1) .drop('col2', axis=1) .reset_index(drop=True)) Real-World Applications Let's look at a practical example of cleaning a dataset: pythonCopy# Load a messy dataset df = pd.read_csv('raw_data.csv')
# Clean up the DataFrame df_clean = (df.drop(columns=['unnamed_column', 'duplicate_info']) # Remove unnecessary columns .drop(columns=df.filter(regex='^temp_').columns) # Remove temporary columns .drop(columns=df.columns[df.isna().sum() > len(df)*0.5]) # Remove columns with >50% missing values ) Integration with Data Science Workflows When preparing data for machine learning: pythonCopy# Drop target variable from features X = df.drop('target_variable', axis=1) y = df['target_variable'] # Drop non-numeric columns for certain algorithms X = X.select_dtypes(include=['float64', 'int64']) Conclusion Mastering column dropping in pandas is essential for effective data preprocessing. Whether you're using the simple drop() method or implementing more complex pattern-based dropping, understanding these techniques will make your data cleaning process more efficient and reliable. Remember to always consider your specific use case when choosing a method, and don't forget to make backups of important data before making permanent changes to your DataFrame. Now you're equipped with all the knowledge needed to effectively manage columns in your pandas DataFrames. Happy data cleaning!
0 notes
Text
Mastering Excel Data Analysis & Dashboard Reporting

In today’s fast-paced, data-driven world, mastering data analysis is no longer optional; it’s essential for both individuals and businesses alike. One of the best tools to help you with this is Excel, which has proven itself as a powerful tool for transforming raw data into meaningful insights. Whether you’re working in finance, marketing, operations, or any industry that deals with data, learning Mastering Excel Data Analysis & Dashboard Reporting will significantly enhance your skills. This blog will walk you through the importance of mastering these techniques and how it can elevate your data reporting skills to the next level.
Why Mastering Excel Matters
Excel is more than just a spreadsheet; it’s an incredibly versatile tool for performing data analysis, creating compelling dashboards, and generating detailed reports. With Excel, you can sort, filter, and analyze data using various functions, making it the go-to tool for both beginners and experts alike. Whether you're handling small data sets or large databases, mastering Excel Data Analysis equips you with the ability to extract actionable insights quickly.
Excel is widely used across all industries, which makes this skill highly marketable. Learning to create Excel Dashboards is particularly valuable, as it allows you to present data in an organized and interactive format. Dashboards are visually appealing and provide decision-makers with quick access to key metrics.
Getting Started with Excel Data Analysis
Before diving into dashboard creation, it's crucial to understand the fundamentals of data analysis in Excel. Here are some of the essential steps to get you started:
Data Cleaning: This is the first and most important step in data analysis. Ensuring your data is free of errors, missing values, and duplicates is key. Functions like TRIM, CLEAN, and REMOVE DUPLICATES can be your best friends here.
Data Filtering & Sorting: Excel provides powerful tools for filtering and sorting data, allowing you to focus on the most important information. You can use filters to narrow down data, and sorting helps in organizing the data in a meaningful way.
Pivot Tables: Pivot tables are one of the most powerful tools in Excel. They allow you to summarize large sets of data and present them in an organized manner. Pivot tables can break down complex data sets into manageable insights.
Data Visualization: Excel offers various chart types, such as bar charts, line charts, and pie charts, to visualize your data. Visuals make the data more digestible and are a critical component of dashboard reporting.
Excel Formulas for Analysis: Mastering Excel formulas such as VLOOKUP, HLOOKUP, INDEX, MATCH, and SUMIFS can provide powerful ways to analyze your data and gain deeper insights. Learning these formulas will significantly speed up your data processing and make your analyses more accurate.
Creating Impactful Dashboards
Once you're comfortable with the basic elements of Excel Data Analysis, you can move on to building dashboards. A well-designed dashboard tells a compelling story, allowing stakeholders to make data-driven decisions without sifting through endless rows of data. Here’s how you can create effective dashboards in Excel:
Know Your Audience: The first step in creating any dashboard is understanding who will use it. Tailor your dashboard to your audience's needs by focusing on the metrics that matter to them.
Choose the Right Visuals: The key to a great dashboard is choosing the appropriate charts and graphs to display your data. Use bar charts for comparisons, pie charts for proportions, and line graphs for trends.
Interactive Elements: Excel allows you to create interactive dashboards with features like slicers and drop-down menus, which enable users to explore the data in different ways. This makes the dashboard more dynamic and user-friendly.
Conditional Formatting: Make your data pop by using conditional formatting. This feature allows you to highlight key data points or trends, making it easier for viewers to spot important information.
Focus on Simplicity: Don’t overwhelm your audience with too many visuals or data points. The goal of the dashboard is to convey the most important information quickly and efficiently.
Free AI Tools for Data Analysis
You might be wondering how artificial intelligence (AI) plays a role in Mastering Excel Data Analysis & Dashboard Reporting. Free AI tools are now available to assist with data analysis, automating tasks like data cleaning, analysis, and even forecasting. AI tools can process large sets of data far more quickly and accurately than manual methods. Tools like OpenAI and ChatGPT can provide predictive analytics and automate repetitive tasks. Integrating AI into your Excel workflow can give you a significant advantage in both speed and accuracy.
Trending Excel Features You Should Master
To stay ahead in the game of data analysis and reporting, it’s essential to master the latest and most popular features in Excel. Below are some trending Excel features that are currently in demand:
Power Query: This is a powerful feature for data extraction and transformation. With Power Query, you can pull data from multiple sources and automate the cleaning and reshaping processes. It’s perfect for handling large sets of data.
Power Pivot: This feature allows you to create data models and connect multiple tables of data. Power Pivot is essential for anyone working with relational databases or performing complex calculations.
Data Tables: These provide a quick way to explore different scenarios. By changing the variables in a data table, you can easily see how the results of formulas change.
What-If Analysis: Excel’s What-If Analysis tools, such as Goal Seek and Scenario Manager, are great for running hypothetical scenarios. These tools are particularly helpful for decision-making and forecasting.
Excel Macros: Automating repetitive tasks in Excel using macros can save you a ton of time. With Excel’s built-in macro recorder, you can automate complex processes without needing to learn programming.
XLOOKUP: A newer and more advanced version of VLOOKUP, XLOOKUP provides more flexibility and can search for data both vertically and horizontally. This formula is rapidly becoming a favorite for many data analysts.
How to Leverage Dashboards for Business Success
Excel dashboards are incredibly valuable for businesses. They help managers and stakeholders monitor performance, track KPIs, and visualize trends over time. Dashboards provide a bird’s-eye view of critical data, enabling quick decision-making. Whether you’re in finance, sales, HR, or marketing, Mastering Excel Data Analysis & Dashboard Reporting gives you a competitive edge in your field.
Sales Teams: Dashboards can track sales performance, forecast future revenue, and identify key opportunities.
Marketing Departments: They can measure campaign performance and calculate ROI with ease.
HR Teams: Dashboards can monitor employee performance, turnover rates, and hiring metrics.
Excel & Collaboration
Collaboration in Excel has never been easier, thanks to Excel Online and cloud-based services like OneDrive and SharePoint. These tools allow multiple users to work on the same Excel file in real-time, making collaboration seamless. With everyone having access to the latest version of the document, decision-making becomes faster and more accurate.
Conclusion
Mastering Excel Data Analysis & Dashboard Reporting is an essential skill for anyone looking to work effectively with data. Excel’s versatility, combined with its powerful data analysis and dashboard tools, makes it an invaluable asset in any professional setting. By learning the ins and outs of data analysis and creating impactful dashboards, you’ll not only enhance your skill set but also become a critical asset to any organization.
Whether you’re a beginner or someone looking to sharpen your skills, Excel offers something for everyone. From simple data entry to complex dashboard reporting, mastering these skills can significantly boost your career.
So, start your journey toward Mastering Excel Data Analysis & Dashboard Reporting today and unlock the potential to transform data into actionable insights that drive success.
0 notes
Text
Excel Mastery Unleashed: Unlocking the Secrets of Efficient Data Management
In the fast-paced world of data-driven decision-making, mastering MS Excel is not just a skill but a strategic advantage. Excel, with its powerful features and functionalities, serves as a dynamic tool for individuals and businesses alike to manage and analyze data efficiently. In this blog post, we'll explore the secrets to excel in Excel, unlocking its full potential for efficient data management.
1. Organizing Your Workspace:
One of the first steps to MS Excel mastery is organizing your workspace. Efficient data management starts with a well-structured spreadsheet. Utilize sheets, columns, and rows judiciously to create a clean and intuitive layout. Consider using color coding and cell formatting to enhance visual clarity. This not only makes it easier for you to navigate but also facilitates seamless collaboration with others.
2. Mastering Formulas and Functions:
Excel's true power lies in its formulas and functions. Whether it's basic arithmetic operations or complex statistical analysis, mastering the right formulas can significantly boost your efficiency. Dive into functions like VLOOKUP, INDEX-MATCH, and SUMIFS to manipulate and analyze data effortlessly. Understanding how to use these functions can turn hours of work into mere minutes.
3. Pivot Tables for Data Analysis:
Unlock the potential of your data with pivot tables. This powerful feature allows you to summarize and analyze large datasets with just a few clicks. Pivot tables enable you to create insightful reports and visualize trends, making complex data more digestible. Learn to slice and dice your data to extract meaningful insights that can inform strategic decision-making.
4. Data Validation and Cleaning Techniques:
Excel mastery involves not just inputting data but ensuring its accuracy and consistency. Explore data validation tools to create drop-down lists, set date ranges, and enforce data integrity. Additionally, discover effective techniques for data cleaning, such as identifying and handling duplicates, removing errors, and transforming data into a more usable format.
5. Automation with Macros and VBA:
Take your efficiency to the next level by embracing automation. Excel's Macro and VBA (Visual Basic for Applications) capabilities allow you to automate repetitive tasks and streamline complex processes. Learn to record macros and delve into VBA programming to customize Excel according to your specific needs. Automation not only saves time but also reduces the risk of errors in your data.
6. Collaboration and Version Control:
Efficient data management often involves collaboration with team members. MS Excel offers features for seamless collaboration, such as shared workbooks and real-time editing. Understand how to track changes, resolve conflicts, and maintain version control to ensure that everyone is working with the most up-to-date information.
Conclusion:
In conclusion, mastering MS Excel is a journey that can significantly enhance your ability to manage and analyze data efficiently. By organizing your workspace, mastering formulas, leveraging pivot tables, validating and cleaning data, automating tasks with macros and VBA, and collaborating effectively, you can unlock the secrets of Excel mastery. Whether you're a seasoned professional or just starting, investing time in honing your Excel skills is an investment in your productivity and success in the data-driven world. Excel mastery is not just a skill; it's a key to unlocking a world of possibilities in efficient data management.
0 notes
Text
Dealing with Duplicate Rows in Big-Data
#Shiva#how to remove duplicate rows#pandas duplicate records delete#how to deal with duplicate records#how to drop duplicate rows in data#how to check duplicate rows records in data#pandas duplicate rows removal#pandas duplicate rows deletion#5:37 NOW PLAYING Watch later Add to queue How to Remove Duplicate Rows in Pandas Dataframe? |#How do I find and remove duplicate rows in pandas?#drop duplicates#drop_duplicates()#data science#delete duplicate rows in python#python
0 notes
Text
VI a. UV_0
(Previous: V. Adding missing body parts / Frankenmeshing / Finishing touches)
As promised, I'll finally talk about uv maps today. About time! Sorry it took so long; I hope at least you'll feel that it was worth the wait.
Generally speaking, uv maps are 2D representations of a 3D mesh. A mesh cut into pieces and made flat. TS4 meshes use two of them, called – very originally – uv_0 and uv_1. You can see them listed if you click the little triangular symbol in the panel on the very right (if you hover over the triangle, it says 'Data').

Why are there two? Because they serve very different purposes. To put it simply, uv_0 is responsible for the texture of your mesh, while uv_1 makes the mesh move with body sliders. Therefore we'll need to discuss them separately. Let's start with uv_0.
As you can see, uv_0 is the one selected by default. If you switch the mesh shading to 'Material' or 'Texture', you're going to immediately see any changes you make to it. The map itself is located in the window on the left – the one which we haven't used so far at all. Let's go into edit mode and then make that window bigger, so that we could see all the icons at the bottom.
Right now nothing is happening there. But let's just try selecting a random part of the mesh...
Important: when you use shortkeys, pay attention to your cursor's position! E.g. if you press b with your cursor in the uv map area, it'll activate the selection tool for the map, not for the 3D mesh.

You can see that a bunch of little dots appeared on the map! Those are your selected vertices.
Now, I don't know why this is the default option for Blender – your vertices being invisible on the uv map unless selected – but you can easily change it, so that you could always see them. You just have to click one of those tiny icons at the bottom. If you hover over it, it says 'Keep UV and edit mode mesh selection in sync'.
I find it way easier to work with this way: you can see all the vertices, and the ones which you selected are highlighted now, just like in case of the 3D model.
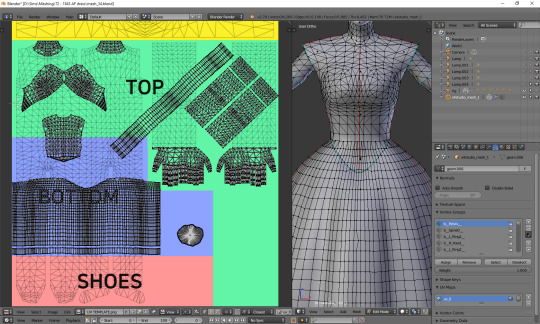
Then there's another important tiny button, right between 'UVs' and 'New'. If you click it, you'll see a list of all texture files associated with your mesh. In my case it's only two basic files: the body texture and the texture of the top I used as a base, but if you're frankenmeshing, that list can get much longer. Let's choose the original diffuse map.

You can see that the map reflects perfectly whatever is going on with the 3D mesh. The parts not covered by any texture use the skin texture instead. Not the whole texture of the top is used, because at the very beginning I cut off the bottom part of the mesh. There's also an abundance of vertices in the waist area, because I extruded the lowest row of vertices to make a skirt; and, as I didn't make any changes to the uv map yet, the new vertices appeared right on top of the original ones. In fact, if you select that lowest line on the uv map, you'll see that the whole skirt gets selected.
UV maps can also be useful for detecting weird stuff happening to your mesh. I can see that there's some line going across the top. I switched to edge select, selected it and found out it really is some completely useless edge going through my 3D mesh. No idea how it got there, but thanks to the uv map I could spot and delete it.
Just a couple of other tiny icons before we proceed to fixing our uv_0 map. Firstly, there's the little pin, which let's you – unsurprisingly – pin the currently used texture, so that Blender wouldn't switch to any other ones (yep, it likes doing it). Just click it and you're safe.
And then, right next to it, there's a little cross. Remember what I said about the list of used textures getting super long if you're frankenmeshing? It can get annoying if you don't need 80% of them, but have to scroll through them all whenever you want to switch from texture A to texture B. If you're sure you don't need a certain texture, select it and then shift-click that little cross. That'll tell Blender that this texture is not used, so it doesn't have to load it. You'll need to save your mesh, close Blender and reopen it for the changes to be applied!
OK. Now that you have an idea what's what, we can finally talk about editing the uv_0.
In case of TS4 diffuse maps, it's very important where you put your texture. Each category has its designated part on the map. It looks like this:
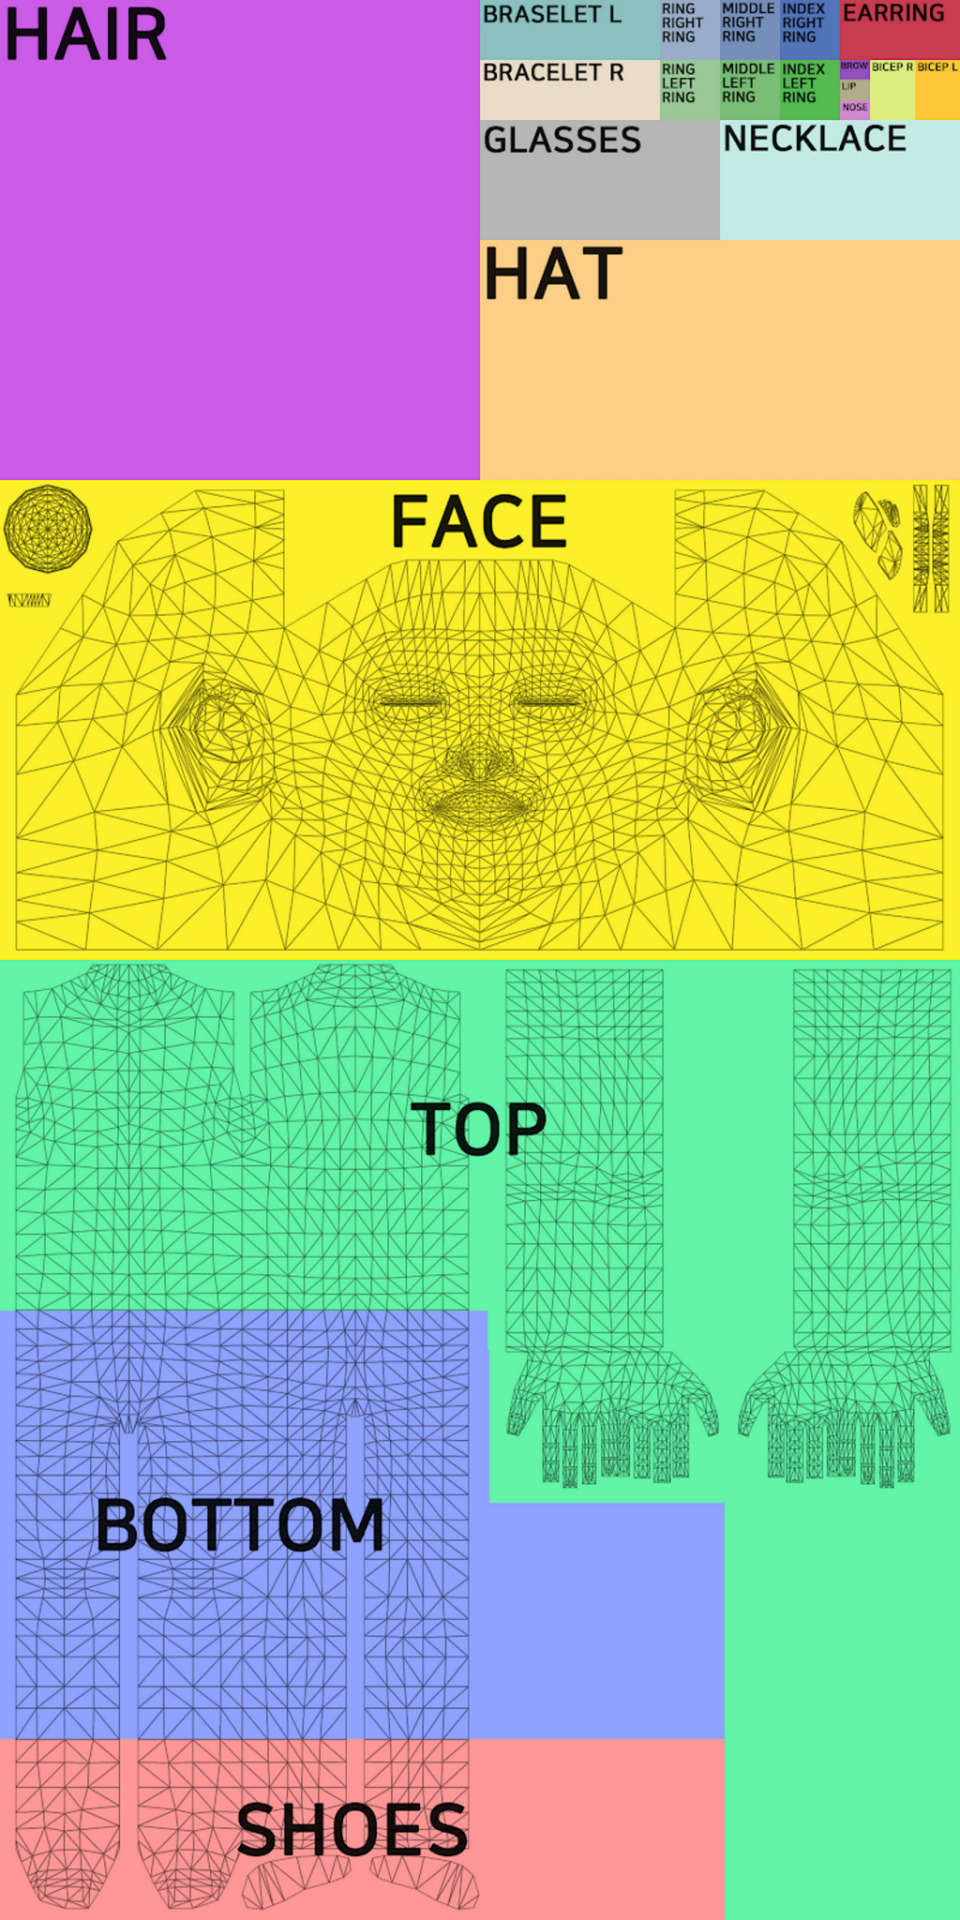
You can download the template in default, EA size (1024x2048) HERE, and a twice bigger one (2048x4096) HERE. In my own creations I always use the 2048x4096 format – it lets me fit in way more details without stuff getting badly pixelated – but that's obviously not a must. Now, at the bottom of the uv window, click 'Image' and then 'Open image'. Find the template you just downloaded and double-click it (or choose 'Open image').
Whatever you do with your uv map, there are two basic rules you have to follow. One, fit the vertices only in the place meant for the category you're working on. If you're making a dress, you can ignore the top/bottom division (although be aware that if you do ignore it, you won't be able to split your dress into separates), but that's the only exception. Don't let your vertices go into the shoes or face area. If you're making a skirt, stick to the area marked as bottom. If you're making a top, fit them all in the area marked as top. It seems obvious, but I've seen sooo many CC pieces which are incompatible with each other, because their textures overlap. Some of them are beautiful and even made by really well-known, established creators. So I think it doesn't hurt to overstress this point a bit. Please pay attention to it!
And two: don't move anything which is supposed to be bare skin. Or half-transparent texture printed on top of the skin (not 3D). It's an absolute no-no. Terrible stuff will happen if you do it. If you accidentally did it, then... Oh boy. You may try to move it back into the right position, but maybe it'd be easier to just delete those parts altogether and just append them anew (as explained in the previous part).
As for the parts which you intend to texture – so, in this case, your dress – you can theoretically put them anywhere you want (that is, as long as you stay in the top/bottom area and don't overlap the bare skin parts). Your map doesn't necessarily have to look like the ones made by EA. However, I think not following the EA style (top on the left, bottom underneath, sleeves on the right, any extra deco in the free slots) may result in your clothing being sunbathing-incompatible. I can't say for sure, as I don't have Island Living, so my sims don't tan, but I suspect the tan lines depend exactly on your uv_0 map. I don't think it makes any difference in case of Victorian dresses, but if you're making something more modern, which could leave some visible tan lines, you probably shouldn't go too wild while making your uv_0 map.
Let's go back to our dress. Because we used the top as a base, half of the work is already done. We only need to 'unwrap' the skirt (and any decorations, if you added them). There are 4 ways in which I usually approach it:
1) Selecting the rows in 3D view and moving them manually (g, y) on the uv map
It's not very practical now, when the skirt is already full of those horizontal lines, but at an earlier stage it would have been very quick and easy. The important thing is, you should do it before adding 'fillers' (i.e. those lines which you don't move, scale or whatever, but just add them and leave them as is). Depending on the size of your dress, you probably achieved the desired shape with 3-5 lines. Move them on the uv map, make sure the proportions look correct (you can always try to open some patterned image for a second, to see if everything looks ok – see part VI b) and only then add the fillers. They'll automatically appear in the right places on the map.
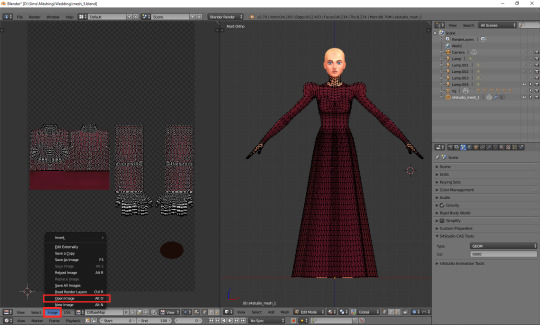
2) Cylinder projection
You can also decide to unwrap the skirt. Select it, either in the 3D mesh or uv map window. Now, with your cursor in the 3D mesh window, press t to unhide the panel on the left and go to the 3rd category: 'Shading/UVs'. In the UVs section you'll see a button called 'Unwrap'. If you click it, a drop-down menu will appear, with different unwrapping styles/options. Choose 'Cylinder projection'. Watch out: your viewpoint matters! Before you unwrap, go to the right side view (num 3).
I took the screenshot from the wrong side, please pretend you didn't notice (-.-)
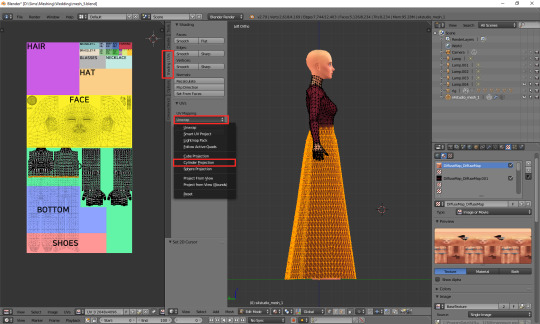
A whole bunch of new vertices should appear on your uv map – in a completely wrong place. We'll have to move them under the top. You'll notice, however, that if you try to move, scale or do whatever else with your skirt, it affects the lowest line of your top as well. That's because the top line of the skirt and the bottom line of the top are actually the same vertices, just duplicated on the uv map. You could select only that one line and edge split it (ctrl + e, in the 3D view), but an easier way around it is simply switching from vertex select to face select. Face select has some special powers when it comes to uv maps: it lets you not only move stuff separately, but also select parts of the mesh with L (multiple select with shift + L). Neither of those things works when in vertex or edge select mode.
Now you can simply scale the selection down and put it under the top. Adjust it in any way necessary, so that it'd align with the top nicely. Make sure that the faces are in the right places! Select the bottom-left face of the top and then, in the 3D view window (left side view, ctrl + num 3), click the face right underneath it. Is it the top-left one of the skirt on the uv map? If so, perfect! If not, you've got some manual moving to do. Just select any faces which are in the wrong place and move them along the x axis (g, x) till they are placed properly.
It should look fine by default though. That's exactly why we went to the right-side view before unwrapping.
If your skirt goes into the shoes area, scale it down along the y axis! (g, y)
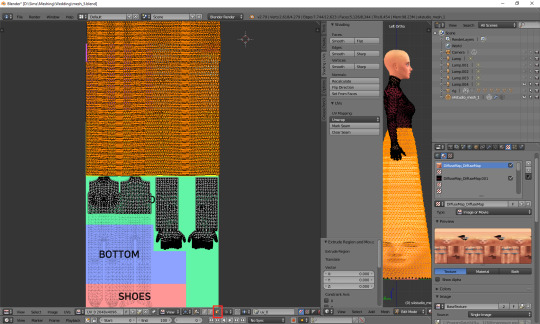
Now the only thing left to do is to weld the vertices and get rid of the gap between the skirt and the top. Go back to vertex select and select the second vertex from the left. You'll see that – just as before – a vertex of the top gets highlighted too. Press W and, from the drop-down menu, choose 'Weld'.
Do the same for all the vertices in that line, except for the first and last one.
What about the first and last one? The problem is, they are all actually the same vertex. If you select any of them, you'll see that the other one gets highlighted as well. Welding them would make them meet in the middle, and that's not something you want to happen. So what can you do? This time there's no other way around it than splitting. Select the whole vertical line (either the left or right one), move the cursor to the 3D view area, press ctrl + e and choose 'edge split'.
Now you should be able to weld each of those vertices separately. When you're done, select all (a) and (in 3D view) remove doubles (w).
And that's basically it. Of course, if you want to, you can dedicate some more time to your uv map, making sure everything looks absolutely perfect. You can, for example, edit certain lines – or all – and make them perfectly straight. Just select a line, press w and choose 'Align x/y'. It's especially useful for deco parts – you'll see what I mean once you get to texturing.
3) Professional tailoring (marking seams)
This method is quite crazy, but can be very useful in some cases – e.g. if you're making a patterned dress with a huuuuge skirt and want the pattern to look even. To use it, you have to imagine for a second that you're a tailor/seamstress and that your mesh is a real dress, made from real pieces of material. Where would this material be cut and sewn together?
Once you know where the seams would be, go to edge select mode and, well, select those edges. Then press ctrl + e and choose 'Mark seam'. Make sure you really mark all the seams which would be there in case of a real dress!
Once you're done, select your whole dress (or whatever it is that you're making). Do not select body parts! Once again go the panel on the left (if it's not there, unhide it with t) and this time simply select 'Unwrap'.
And now just go to face select, scale down the results of your unwrapping and put them anywhere (but in the right category :P). If something looks wrong, that most probably means you forgot to mark some seam. You'll have to go on a search for it. I'll be honest: I have zero idea of sewing, so using this method is quite tricky for me and I'm struggling myself with marking all the right edges as seams. I used it only twice so far, in my last 2 projects. Here's how my 1843 dress looks like after unwrapping:
As you can see, the uv map is plain crazy and, as mentioned before, definitely not tanning-compatible, but thanks to it later I didn't have to adjust the pattern to each part of the mesh individually – I could just fill the whole texture with pattern and only had to erase it from the parts which were supposed to be uncovered. It does make your life easier if you make 66 swatches :P.
4) Projecting from view
Yet another unwrapping option, useful mostly for smaller, decorative elements. Or in general: for stuff which you can see properly. I use it mostly for bottoms (I mean... That thing 'closing' the dress at the bottom). Go to the bottom view (ctrl + 7), select the whole bottom part (might be easier to do on the uv map, now that you've unwrapped the skirt!) and, from the unwrap drop-down menu, select 'Project from view'.
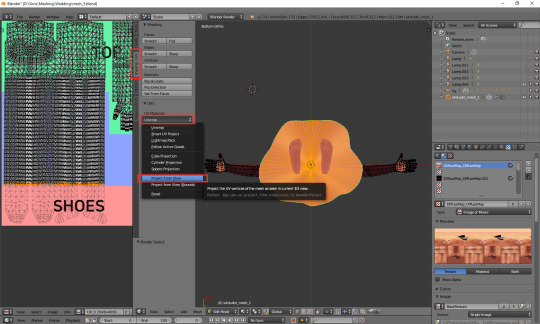
Go to face select, scale the thing down and put it somewhere in the area for decorative elements. For example here:
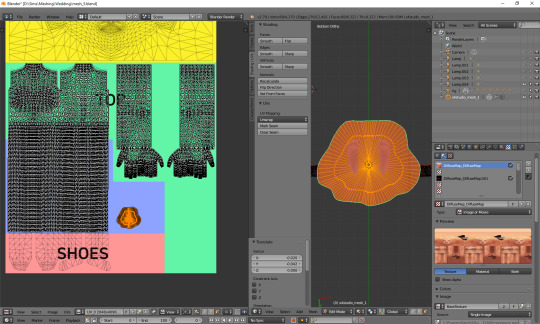
Done!
***
Here's also a small general tip: it's always better to separate clothing parts from body parts on the uv_0 map. I'm thinking especially of the neckline. It's the only way to get a sharp, clear line; if you just paint the neckline in your graphic editor, it'll become blurry in game. It seems that the devs realised it at some point too, as at least some pieces from later DLCs have a gap in the uv_0 between the neck and the collar. Just select the whole top-bottom area, deselect the neck and move the part which should be textured a bit down.
***
Whichever method you chose, your dress has a ready uv_0 map. Now there's only one thing left to do: you should export the uv layout, so that you'll know where to put your texture. At the bottom of the uv map area, click 'UVs' and then choose 'Export UV Layout'.
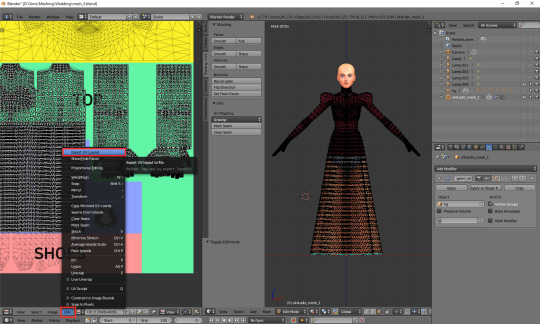
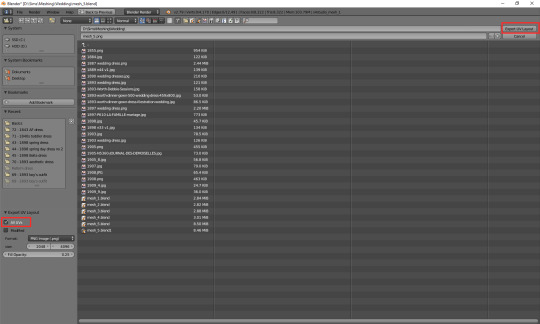
A new window will appear. Save it wherever you want, under whichever name. The only important thing is, you must tick that little box on the left saying 'All UVs'. Then just click the 'Export UV Layout' button.
And that's all. Congratulations! You're fully done with your uv_0 map.
(Next: VI b. Changing the texture displayed in Blender)
82 notes
·
View notes
Text
Language learning survey - results
A huge thanks again to everyone who sent me answers in such a short time. I think getting almost 50 reponses is great, even if it might not be a lot. But I hope it will be good for something, at the very least, providing us with some numbers! :)
As promised, I’ll share some of my findings and crazy statistics.
Background to the project: my task for a job interview is to get some data (I was supposed to use some official statistics, but own data is good too) and make various stats, charts, etc, imagining a business scenario. So I made up a situation where a software developer company wants to create a new language learning app, and showing how to use this data to help them decide how to start building the app.
I didn’t have a lot of data, and having text responses had its difficulties, but here are some results for everyone’s benefit if you’re interested :D
You can look at the original responses here, I also added calculations per language for each category, and a summary of the 10 most popular languages by native speakers. (It’s open for sharing again, but I disabled editing in case I will need this on the interview)
https://docs.google.com/spreadsheets/d/1jBCFr2YZSOzpcTfcrm2qPmT7DySwr2VF62R3Bevgsag/edit?usp=sharing
Overall numbers
I had 49 responses (my fail, I realized only later than the first row is the header, so technically I would’ve needed one more)
45 of 49 people are actively learning a language (some of the reponders aren’t, but they answered the other categories)
The number of actively learnt languages is 30 (out of 53 languages mentioned overall)
Most learners (31 out of 49) are learning more than one language actively.
These are the most popular languages. Since I had a small group of people to work with, I mostly used percentages in the other example, as it looks kinda better than saying 3 people are learning a language :’D
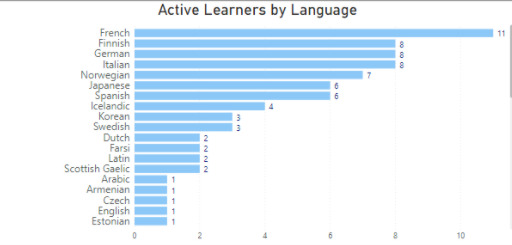
Overall French is the most learnt language, by over 24% of learners.
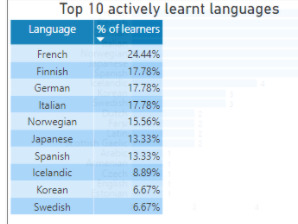
I also looked at the top 10 separately and how many people are learning them. (I guess my data is influenced a lot by e.g. the fact that possibly more Finnish learners participated, but let’s say it’s real data for the sake of the exercise :’D)
I think this kinda represents what I know about langblr these days, but of course it depends on which people answered.
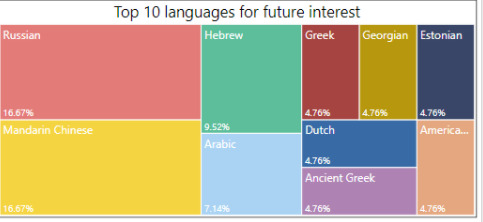
Next I looked at how the interest in languages increases, based on the responses about future language learning plans.

A lot of languages not in the above Top 10 seem to have a high interest in the future. I guess it’s good to see we have some variety. :)
Then I also looked at the changes between past and present.

Seems like most of the popular languages had a big change compared to the past numbers (but the question was specifically languages you’re no longer learning, so not sure it’s the best comparison) - especially e.g. Finnish or Norwegian.

Looking at the other side, I compared which languages’ interest has decreased from the past. I also brought in the future numbers here - for this chart specifically I thought it made more sense if the future numbers showed the sum of future and present, assuming people currently learning the language will be interested in the future too.
In general, it shows that even if the interest has decreased in certain languages, many people still want to learn them in the future.
After playing around with the languages a bit, I also wanted to use my other data to see what else we can compare.

I looked at which native speakers are learning the top 5 languages. Of course English is mostly dominating - I had a lot of responses from the US and the UK. (Also I think I actually summarized not just native, but fluent languages - and almost all responders are fluent in English)
But also German, French and Spanish speakers are in majority, which is probably not too surprising. I think it’s interesting to look at the other languages - again, Finnish and Hungarian might be special in this case.
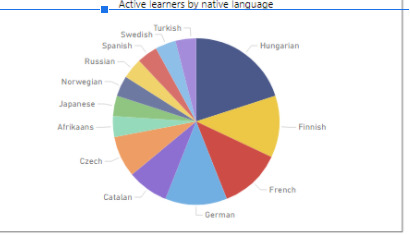
Native language (excluding English) of learners (looking at all languages)
Finally I also looked at where people are from, this was a bit more challenging to put together since I had 3 columns of data for all responses.
I had some technical challenges here so this possibly includes a few duplicates.
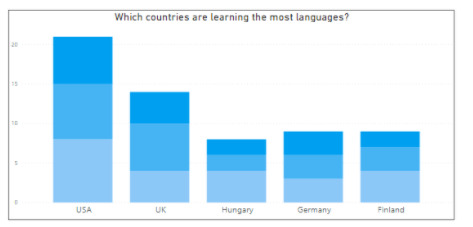
Doing a quick count from the original table:
US - 16
UK - 12
Germany - 8
Finland - 7
Hungary - 4
So the result is the same even if the numbers are wrong :’D
Of course most responses came from Europe (outside the US). There were also responses from Canada, Japan and South Africa.
This would have been nice to summarize on a map but for some reason it didn’t look too good so I dropped that idea.
At the end I also made some cute charts to show what languages have most interest in the future (excluding the current top ones):
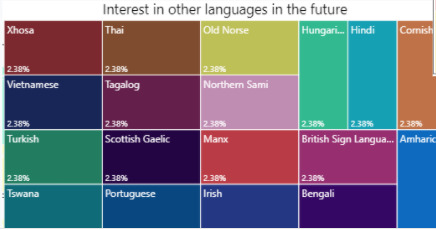
And the bottom ones, since it’s interesting to see what other languages people want to learn. Maybe these will have a bigger interest in the future.
I hope this makes some sense! Let me know if you wanna know anything else I might be able to dig out from the responses.
And I hope this won’t look too stupid on my interview lol! I guess at least they will appreciate I did some extra work on it and the topic I chose... maybe being crazy enough to learn Finnish will benefit me here?
Let me know if you need any explanation or further numbers! :)
13 notes
·
View notes
Text
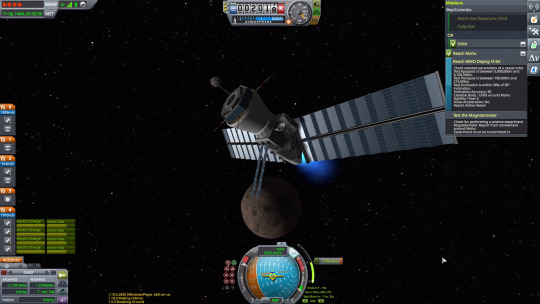
Kerbal Space Program 1.10: “Shared Horizons” is now available!

Hello everyone!
The European Space Agency (ESA) and Kerbal Space Program have come together to bring you brand new content, including the ESA space-suit texture, new parts and variants, and two of their most iconic and groundbreaking missions into the game. Gear up, fuel up and prepare to share horizons with ESA and KSP!
Kerbal Space Program 1.10: Shared Horizons is the game’s latest major update aimed to continue with our efforts to enrich the KSP experience. Build a kerbalized version of the renowned and powerful Ariane 5 heavy launch vehicle, visit comets and push the limits of space exploration with a host of new additions to the game that not only will give you more things to do, but also make the game look and perform better with a bunch of bug fixes and quality of life improvements.
Let’s go through some of the update’s highlights below:
ESA Missions
Thanks to our collaboration with ESA, put yourself to the test and carry out KSP versions of the historic BepiColombo and Rosetta missions! Drop a lander module on the surface of a comet and visit the innermost planet of the solar system to study its magnetosphere and surface characteristics, all in the name of science. Best of all, the Making History and Breaking Ground expansions are not required to play these missions!
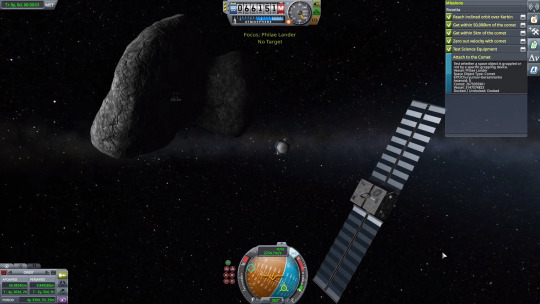
Comets
In order to make the Rosetta mission possible, comets now roam the Kerbal Solar System. With beautiful tails and larger dimensions than regular asteroids, comets appear in all game modes and you can take on new career mode contracts to detect and visit them. Be vigilant, because you might even see one that is passing through from interstellar space!

New Parts and Variants
Kerbal Space Program 1.10: Shared Horizons includes several new parts and variants to match ESA’s style! Decorate your vehicles with a variety of flag parts that can be attached to your liking, take the brand new Magnetometer Boom along with the MTO and MPO to carry out scientific experiments on Moho or beyond, or capture asteroids and comets with the Advanced Grabbing Unit Jr., a smaller and versatile version of the “Klaw”. Additionally, there are also new variants of some tanks, SRBs, the “Poodle” Liquid Fuel Engine, and decouplers; plus, fairings have not only new variants, but some updated functionality as well.
Jool and Laythe Visual Improvements
The legendary green gas giant and it’s innermost satellite have new high-quality texture maps & graphic shaders, and now look sharper and more realistic than ever! Find a nice beach on Laythe and enjoy the view of Jool’s newly animated clouds. Beautiful!
youtube
youtube
To learn more you can read the full Changelog here:
======================= v1.10===========================
1.10.0 Changelog - BaseGame ONLY (see below for Making History and Breaking Ground changelog)
+++ Improvements
* Added the ability to fine tune fairings or use the existing, snap mode. This behavior reacts to the editor's angle snap. * Added ESA missions tutorial. * Adjusted the Remove Row button in KAL to only delete the row when clicking on the red cross, not the whole segment. * Fuel cells can be set started in the VAB or SPH for launch. * Drag cube debug information now available in VAB/SPH when show aero data in PAW debug option is on. * Improve drag cube system to handle Part Variants and Shrouds on the same part. * Add additional drag cube information to Debug Aero info in PAWs. * Persist Aero GUI UI debug window setting and Debug Aero info in PAWs setting between game sessions. * Performance improvements for engine module. * Performance and memory improvements for launching a vessel from the space centre. * Performance and memory improvements for part action windows by caching them. * Performance and memory improvements for reading and writing config nodes, so better performance for loading and saving. * Performance and memory improvements for undo and redo in VAB/SPH by caching stage manager icons. * Intended duplicated group-actions have a marker to distinguish the part side. * Converter actions now indicate resource type to differentiate them. * Performance and memory improvements for loading vessels. * Preview and select suits for Kerbals via the suit selector icon (coat hanger). * Performance and Memory improvements for game, craft and mission load dialogues. * Performance and Memory improvements for vessel loading. * Performance and Memory improvements for ModuleJettison in VAB/SPH. * The KSC's grass now changes according to the currently set terrain shader quality. * Revamped Jool, giving it a new animated shader and high resolution textures. * Laythe planet textures revamp. Low, medium and high quality terrain shaders. * ESA Collaboration missions implemented for base game. * Added EVA button to the crew transfer dialog. Functions the same as the crew hatch dialog EVA button. * Added the ability to have open-ended/uncapped fairings. * Sliders now display units in the Part Action Window where appropriate. * Optimized fairing mesh construction and exploded view heuristic by caching mouse position. * Reduced GC and unnecessary calculations performed for variants on fairings. * Reduced number of meshes and colliders for fairings to improve draw calls and standarize at 24-32 sides. * Added Marquee scrolling to a few PAW items for when the text is super long. Text is ellipsis in this case and on mouse over will move left then right. * Performance improvements in flight mode by caching variables in ThermalIntegrationPass and PartBuoyancy. * Hide UI elements that aren't being used and avoid unnecessary updates in flight mode. * Performance and memory improvements for DeltaV simulations. * Speed up craft loading and use less memory in VAB/SPH. * The PAW starts towards the outside of the screen instead of over the center of the rocket/screen. * The camera will not position itself at an appropriate distance when switching vessels to prevent the camera starting inside vessels. * KSP now has Comets! * Added two new contracts for comets. * Added surface sample science experiment for comets. * Comets can explode into smaller fragments while entering a CB's atmosphere. * Fairings can now be set to not auto-expand in SPH/VAB via a new PAW option. * Improve performance of splash FX in water by using combination aof close splashes and limiting how many occur in close proximity * Adjusted the "dark" them color to be more visible in the variant selector.
+++ Localization
* Changed Japanese translation of "Polar Crater" based on community feedback. * Stock vessel name and description translations. * Fix science done at Dessert not showing localized name. * Fix Service Module parts displaying unlocalized text for Shroud. * Fix Command parts displaying unlocalized text for Cutaway. * Fixed a localization issue on the Strategies occurring on FR, IT and PT * Fix unlocalized label for facility level during missions. * Fix grammar issue in From the Moon tutorial. * Updated SC-9001 Science Jr. perform science button so it now matches the new part name. * Fixes translation error in FTE-1 part in Japanese. * Fix missing character in KSP Merchandise link in main menu in simplified Chinese. * Improved phrasing for landing label in Russian. * Fix localized string when debugging aero details. * Fix localization issues with tab headings in Tracking Station. * Fix KSPedia - Numbers on Resources/Conversion Management page alignment in Russian and Chinese. * Fix KSPedia 'app launcher' text box on the Manual/Flight Interface page alignment in Portuguese. * Fix KSPedia text on Rocketry/Basics/Centered page spacing in Japanese. * Fix KSPedia text on Manual/Management page spacing in Portuguese. * Fix KSPedia unlocalized text for measurements is displayed in the 'Effective Range Table'. * Fix KSPedia Japanese Incorrect break line in Control. * Fix numerous part description texts. * Fix a couple of messages in tutorials. * Fix action sets override explanation tooltip text. * Fix Localization of Vessel Naming Group and vessel name in PAWs. * Removed line breaks in the Orbit's Ejection field tooltip in English.
+++ Parts
* Add fuel line ESA variant. * Add Thoroughbred ESA variant. * Added Rockomax X200-32 ESA variant. * Revamped R-11 'Baguette' External Tank and added silver variant. * Revamped R-4 'Dumpling' External Tank and added silver variant. * Revamped R-12 'Doughnut' External Tank and added silver variant. * Added new variants to the fairings size 1, 2 and 3. Now we have them in white, black and white, orange, silver and gold. * Revamped Struts and added white variant. * New Moho Planetary Observer (MPO) Probe. * New Moho Transfer Module (MTM). * Fix Mainsail's Center Of Thrust. * Fix LV-N engine FX particle offset. * Added the ESA variant to the Rockomax X200-16 Fuel Tank. * New Flag parts, these new parts can be placed on fairings by holding the Mod key or by setting the Fairing Expansion = Off setting in the fairings PAW. * Parts with Flag Decals on them can now have their decal set to mirrored. * New Magnetometer Boom science experiment.* Advanced Grabbing Unit textures revamped and added a Dark variant. * New Advanced Grabbing Unit Jr. With 2 variants * Fix for LV-N engine not stacking correctly at the bottom. * Added a white and yellow variant to all TD decouplers and TS separators.
+++ Bugfixes
* Fix Action Groups app position. * Fix mesh scale on short compoundparts causing reentry FX issues. * Fixed Interstage fairings holding onto the payload in certain use cases. * Fix dV calcs for stages drawing resources across decouplers with crossfeed enabled. * Fix unable to timewarp after using Set Position and then Set Orbit cheat. * Fix autostrut being incorrectly reset on parts attached to dynamic nodes if the part is the parent. * Fix drag cubes on J-90 Goliath, 48-7S Spark, LV-909 Terrier, RE-M3 Mainsail, RE-L10 Poodle RE-I5 Skipper, and numerous other parts. * Fix craft browser selecting wrong tab when player switches between VAB/SPH. * Fix the highlight and navigation colors not being set on game start when the settings file did not exist. * Fixed a bug that stopped the player from progressing in the Basic Science Tutorial. * Fix Action Groups app header in flight. * Fix Lights toggle image not showing all rays properly in Altimiter UI. * Fix comm link not displaying correct strength when focusing on a relay satellite. * Fix node icons being rendered on top of other Flight scene UI elements. * Fix broken off solar panels, fairings and shroud parts left on the surface causing vessels to remain in landed state after they take off. * Fix Dont Show Again not working for Delete all Messages functionality. * Fix LV-T45 config by removing duplicate definition of testmodule. * Fixed veteran kerbals dissappearing when being dismissed. * Fix Navball render issue when Maneuver mode is enabled. * Fix resources not being displayed in tracking station in Prospecting Eeloo Scenario. * Fix asteroids having incorrect mass when docking. * Fix bug causing kerbals to not respawn in Space Center. * Fix bug causing difficulty settings to revert when reverting flight. * Fix maneuver node label not showing when switching selected node. * Fix an issue where Maneuver Mode's Maneuver Editor's Gizmos can enlarge or shrink when clicked extremely fast. * Fix 3.75m decoupler and separator drag cubes creating too much drag. * Fix issue where some vessels were not being reset to the terrain when loading them in a save game where the game terrain detail settings had been changed since it was last saved. * Fix a different tone of white in the white fairing variant. * Fix Launch platform selector getting stuck when opening dialogs while it is already open. * Fix Portrait Gallery when EVAing and all gallery pictures have been hidden. * Fix lighting on specular shaded part icons. * Fix 3D object masking in Editor and RnD scenes for Windows platform and openGL forced. * Pinned PAW stays open in the editor on click events and on part selection. * Add some clarity in the strategies that have no-duration (Bail-out and Sell-out) so players dont expect them to remain active over time. * Fix Z-100 battery light showing white in toolbar and tooltip icons sometimes. * Fix fuel overlay becoming offset when dragging the root part by hiding the overlay during that drag. * Remove Jettison event for Jettison parts that are fairings as they cannot be jettisoned manually. * Fix hitching in the main menu. * Fix visual artefacts of atmosphere planets in map view at high timewarp rates. * Interior lights of ship cockpits and passenger modules are linked to the toggle lights action group. * Fixed bug causing empty stages not to be deleted. * Fix label overlap that was happening in some languages. * Part Action Windows will always close when its part is destroyed. * Fixed bug where drain valve values were being defaulted to true. * Fixed bug which caused some building lights to remain on during the day. * Fix camera out of frustum error when reloading flight scene in some scenarios. * Fix inertial tensor errors when reloading flight scene in some scenarios. * Fix log messages when running missions with test experiment node and node is set to any experiment. * Maneuver mode UI negative handles don't flip functionality anymore after adjusting the tool sensitivity. * Docking Port Actions now fire docking ports on same vessel. * The technology path lines don't disappear anymore. * Fix tutorial 'orbit 101' getting stuck when trying to get to the inclination value of 10 degrees. * Correctly handle engines burning across stages for dV calcs. * Fix decoupler handling when no parts attached to decoupler for dV calcs. * Fix stage UI dV display fluctuating up and down whilst burning engines. * Fixed NRE when changing the variant of a surface-attached LV-1 'Ant'. * Fix not copying resource amounts when copying parts in VAB/SPH. * Fix contract part naming to use real part names and not 'research lab' or 'materials bay'. * Fix for some keybindings activating when typing in toolbox part search in VAB/SPH. * Fix camera shake issues in the SPH when using shift and hovering over UI elements. * Fixed disappearing mode toggle button in KerbNet dialog. * Fix for Shadow Projection Settings resetting. * Fix PAW group headers being cut off in some languages. * Fixed an issue where the UT field in Precision Maneuver Editor wasn't able to display Universal Time in the 'y * Fix 'Cannot deploy while stowed.' bug for service bays. * Fix manuever node handles changing value incorrectly when dragging 'anti' handles. * Fix randomization error in Sentinel causing short lifetimes of discovered asteroids. * Fix Exception storm when inflatable heat shield destroyed by overheat in some situations. * Fix incorrect Line Break - Tracking Station - The string 'Last seen * PAW title now matches the new name of an asteroid after being renamed. * Maneuver node no longer moves along the planned trajectory instead of the current one when moving it ahead in time using the Maneuver Mode UI input field. * Fix crew assignment being blocked after loading second ship. * Fix the vesselSituation on unloaded space objects being Flying instead of Orbiting. * Fix flickering Celestial body self-shadow issues with DX11 platform. * Fix icons in map view not rescaling properly when UI scale changes. * Fix the EVA 'Board' button prompt not disappearing when the target vessel is destroyed. * Fix unlocalized label for mk1-3 pod lights. * Fixed the Island runway textures. * Fix camera behavior when camera mode is activated multiple times in flight mode. * Fix loading of Modders KSPedia slides. * Fix beginner tutorials being locked out after pressing Save or Load game buttons. * Fix NRE flood when creating or selecting a maneuver node with the Maneuver Mode UI Intercept tab open. * Fix Set Orbit cheat to allow rendezvous with vessels in an escaping sphere of influence situation. * Fairing panels now display the proper texture you see in the editor instead of pure white. * Fix incorrect drag cube and class size on Asteroids after they have been grappled and subsequently ungrappled or reloaded via scene change or save game load.
+++ Mods
* Add IPartMassModifier to ModuleJettison. Allows mods to implement mass change on jettison. * Fix application of mass to resource ratios in ModuleResourceConverter recipes. * Renamed a duplicated shader "KSP/Particles/Alpha Blended" to now have one named that and another named "KSP/Particles/Alpha Blended Scenery".
===================== Making History 1.10.0====================
+++ Improvements
* Tracking of vessels now works for creator defined vessels that undock and get created during a mission from another vessel. Mission creators can now assign parts that have had vessel rename and priority set to test against in mission nodes. * Moved localization files to base game. * Add checkbox to FlyThrough Test Node to allow the map marker to be hidden * Added a new icon for Test Grapple node in Mission Builder. * Add setting (MISSION_NAVIGATION_GHOSTING) to show nav marker ghosting when the target is behind you. Defaulted to on for all mission games (including ESA). * Added a new Grapple test node to verify if a grabbing unit took hold of a space object. * Space Objects can now be selected in the Distance to node. * Test vessel velocity can now be compared relative to vessels, kerbals, and space objects instead of just the orbited CB. * Nodes in Making History support comets the same as asteroids.
+++ Localization
* Fixed wrong localization for asteroid nodes in mission builder. * Fix descriptions for Shrimp and SWM-94 parts.
+++ Parts
* Kickback booster revamp and ESA variant. * Added new variants to the fairings size 1.5 and 3. Now we have them in white, black and white, orange, silver and gold. * Added a white and yellow variant to the size 1.5 and size 4 TD decouplers and size 1.5 and size 4 TS separators.
+++ Bugfixes
* Fix scenario loading in Mission Builder scene causing Mission Issues. * Fix Vessel/Part tracking on Nodes for Dock/Undock/Decouple/Couple events during a mission. * Added Create Comet node to be used on the Mission Editor. Under the Spawnables section. * Fixed minor typo in Intermediate Tutorial for Missions * Fixed label size to better suit other languages in SpawnAsteroid, mission builder. * Fix label displaying incorrect experiment for collected science data when prompted to overwrite. * Fix incorrect orbit around The Sun for asteroids spawning in missions. * Fix lighting brightness on displayed Kerbals and Vessels in the GAP. * Fix bug that impeded time warping after finishing a mission. * Fix Dawn of Space Age mission failing inmediately after lift off in some cases. * Fix drag cubes for the 3.75m Structural Tubes. * Fixed mirror symmetry placement for structural panels. * Fix GAP vessel filter ribbon disappearing when selecting alternate vessel/part selector in the SAP. * Fix #autoLOC_8005448 showing in Mission builder test distance validation report. * Fix bug causing unlocked servos to be locked when launching * Fix missing line break in node description. * Fix log messages when running missions with test experiment node and node is set to any experiment. * Fix log messages about Gene Kerman's animations being legacy when using him in message nodes in a mission. * Fix misnamed FL-TX440 Tank variants so they are consistent. * Fix a number of typos in the 'Dawn of the Space Age' mission. * Fix wrong size category for FL-R5 RCS Fuel Tank and the Heat Shield (1.875m) parts. * Fix stutter and error in planet viewer transition. * Fix button text issues on Play mission dialog for non-English text.
+++ Bugfix
* Fixed erratic positioning of Dessert Airfield windmills.
==================== Breaking Ground 1.5.0=====================
+++ Improvements
* Solar Panel and RTG now displays the power units produced based on Experience trait settings in the Part extended tooltip. * Added action groups for the fan blades for toggling the Roll, Yaw and Pitch controls independently and also Turn them all ON or OFF.
+++ Localization
* Localized Blades Control Rotations.
+++ Parts
* Fan Shrouds now have a node stack on top.
+++ Bugfixes
* Fix an issue where the Track Editor would remain open after switching vessels. * Fix for localization overlapping bug for all languages in graphics settings. * Fix spelling errors in robot scanner arm parts. * Fix tooltip not appearing for max limit axis. * Fixed bug when a KAL controlling another KAL's parameters play position stopped. * Fix issue with motors engaging on launch when they have been set to disengaged in editor. * Fixed mirror symmetry placement for propellers, blades, alligator hinges and rotational servos. * Fix Autostrut on Robotic Parts being cancelled (set to off) in some use cases. * Fix Autostrut debug visualization on Robotic Parts when locked/unlocked. * Fix the FTE-1 Drain Valve releasing particles when switching between VAB and SPH. * Fix non-cargo parts being able to be stored in a cargo container. * Fix Hinges and Pistons sometimes returning to build angle when locked. *Fix lock/unlock of robotic parts not working when fired from an action group.
Kerbal Space Program 1.10: Shared Horizons is now available on Steam and will soon be available on GOG and other third-party resellers. You will also be able to download it from the KSP Store if you already own the game.
Happy Launchings!
#Kerbal Space Program#shared horizons#ESA#Update#annoucnement#Update 1.10#changelog#available now#comets
21 notes
·
View notes
Link
When preparing your data for analysis there are severeal tasks that you might need to do. It can be anything from dropping columns/variables that you don't need to removing missing values. In this post, however, you will learn how to remove duplicate data from R's data frame. Hope you enjoy it!
1 note
·
View note
Text
Convert MP3 To Video Online For Free!
Generally, you want to convert your video and simply hold the audio and reserve it as an MP3. Start Wondershare Video Converter Final after the installation, and select the Convert part on the high of the principle interface. Now you may either drag and drop the recordsdata into the program window, or click the Add Information button so as to add files from your computer. In the event you love watching video streaming dwell and love to have yourself a duplicate at hand, the Wondershare Video Converter Final helps record video utilizing 3 choices at hand. Add MP4 videos you want to encode as MP3 music. You can convert your MP4 recordsdata to MP3 shortly one by one or mp4 change to mp3 online add all of them collectively. Merely drag and drop the clips into the tool or add them through the +Video" button. Open iTunes then choose the Mp4 Change To Mp3 Online file you want to convert in your music library. MP4 Converter is spyware and adware and virus free! Secure to install and use. Your original files will not be affected. PowerISO will start converting the flac recordsdata to MP3 format. You can see the detailed progress info when converting. iTunes is the resident media player of Apple. It lets you convert cda recordsdata to mp3 totally free. No changes will probably be made to the file specs, permitting you to transform recordsdata without being ripped. Audio Converter Extractor Max means that you can convert and extract audio from video recordsdata to varied audio codecs like: cda, wav, wma, mp1, mp2, mp3, mp4, ogg, aac, alac, flac, ac3, spx, mpc, tta, ape, ofr, midi, adx, mod and mo3. Whilst you can set iTunes to burn multiple CDs in a row, solely one among many CDs will retain artist and monitor data. Concepts: The video to mp3 Converter permits setting utterly totally different output codecs in response to totally completely different information. The tables with software program cda2mp4 on line actions are an excellent pointer for what a sure program does with various file kinds and infrequently might give customers a superb hint tips on how one can perform sure file conversion, for example the above-talked about cda to mp4. Command line is a superb factor to run your converter from inside totally different applications. On-line Converter is a simple-to-use online video converter that even allows you to convert videos from a URL. 1. We improved the mov to mp4 conversion stability. Thirdly, you may benefit from an internet MP4 to MP3 converter to convert MP4 to MP3 for Mac, similar to CloudConvert , which is ready to to convert any audio (M4A, WMA, WAV…) or video (MP4, AVI…) to MP3 without installing any software! CloudConvert does this conversion for you with highest high quality. Take a look at the next guide to extract MP3 audio file from MP4 video file. Convert any CDA to WAV, MP3 for taking part in CDA on pc or other devices that support WAV or MP3. Optimized for the Mac atmosphere and designed to work flawlessly with native and third-celebration plug-ins, SOUND FORGE Professional Mac offers the features and processing power you could create good audio master information on macOS. CDA to MP3 Converter supports batch conversion. You may add bulk of information or a folder, or drag and drop files and folders onto essential window of the converter; it's going to search all supported information and add them to conversion checklist. When you click on Convert, all files can be transformed in batch. Easily upload transformed videos on to cloud storage to save lots of area. Kiss DejaVu Enc is a video converter that is one of many simpler ones to function. Though the first screen may seem confusing, all the mandatory settings are out entrance and never hard to search out. A: It's easy! Simply click the CDA to MP3 Converter obtain button at the web page. Clicking this link will begin the installer to download CDA to MP3 Converter free for Home windows. Click on Rip CD. It's a tab on the prime of the Windows Media Participant web page. Home home windows Media Player will begin ripping your CD's data. Half three: Convert CDA recordsdata to MP3 with FreeRIP MP3 Converter If you happen to wish to extract audio tracks from an Audio CD and convert CDA info to MP3, then FreeRIP might be your sensible choice. This FreeRIP may very well be a CD Burner and audio converter which has fundamental model and pro mannequin. After loaded the information, then it would pop a Please choose the format to be converted to" window which allows you to select varied output formats, here we are going to choose AUDIO File" after which click mp3" button. This app allows you to download the video recordsdata from the YouTube and save them in numerous audio codecs, together with within the MP3 format. This straightforward-to-use conversion software will make your conversion job quickly, as nicely. The well-designed interface of the conversion software makes it more fashionable amid those that want to convert their video files into a wide range of audio codecs. Step 1 Obtain E.M. Complete Video Converter. I'm a new user (was beforehand using the trial model) and I can't appear to be able to load my projects as an mp4 file. There's solely an possibility to save it on-line and to put it aside as ascribe file. - You should utilize Video Converter for Android to convert the video to codecs Android assist. into Start, then click on Windows Media Participant at the high of the Start window when it seems. After recording, for those who're recording a track, you could possibly right click on recorded MP3 audio after which click "Edit" option to enter the Music Tag Edit interface to edit Title, Artist, Album, Year, Genre and Cover.
So what can you do if you have recordsdata in certainly one of these formats and want to add them to iTunes? There are a number of programs that may convert audio files from one format to a different. tmkk's free XLD is my software of choice, because it manages every audio file format I've ever come across, together with some I've never heard of, and even supports cue recordsdata. Stephen Sales space's free Max is another instrument that converts many audio file codecs. And in case you have Roxio's Toast eleven Titanium (and some earlier variations), you may convert from FLAC or Ogg Vorbis to iTunes-friendly formats. And then, switch to tab "Common", verify choice "Use DTS to decode CDA recordsdata". Wish to watch your native videos in your cellular gadgets? KeepVid Pro helps to solve the format compatibility by changing them to the format you need in seconds. If you are Apple Music subscriber and also need to take pleasure in Apple Music on MP3 gamers or other HD units without restrictions. Sidify Apple Music Converter ought to be the best choice, which allows you to convert Apple Music tracks and iTunes M4P music to plain MP3 , AAC , FLAC and WAV format losslessly at as much as 20X pace, while maintaining original audio high quality and all of the ID tags.
1 note
·
View note
Text
Wscube Tech-Training program
Introduction :-wscube is a company in jodhpur that located in address First Floor, Laxmi Tower, Bhaskar Circle, Ratanada, Jodhpur, Rajasthan 342001.wscube tech one of leading web design and web development company in jodhpur ,india. wscube provide many services/ training for 100% job placement and live project.
About us:-:WsCube Tech was established in the year 2010 with an aim to become the fastest emerging Offshore Outsourcing Company which will aid its clientele to grow high with rapid pace. wscube give positive responsible result for the last five year.
Wscube work on same factor
1>We listen to you
2>we plan your work
3>we design creatively
4>we execute publish and maintain
Trainings:-
1>PHP Training:-For us our students is our top priority.this highly interactive course introduces you to fundamental programming concepts in PHP,one of the most popular languages in the world.It begins with a simple hello world program and proceeds on to cover common concepts such as conditional statements ,loop statements and logic in php.
Session 1:Introduction To PHP
Basic Knowledge of websites
Introduction of Dynamic Website
Introduction to PHP
Why and scope of php
XAMPP and WAMP Installation
Session 2:PHP programming Basi
syntax of php
Embedding PHP in HTML
Embedding HTML in PHP
Introduction to PHP variable
Understanding Data Types
using operators
Writing Statements and Comments
Using Conditional statements
If(), else if() and else if condition Statement
Switch() Statements
Using the while() Loop
Using the for() Loop
Session 3: PHP Functions
PHP Functions
Creating an Array
Modifying Array Elements
Processing Arrays with Loops
Grouping Form Selections with Arrays
Using Array Functions
Using Predefined PHP Functions
Creating User-Defined Functions
Session 4: PHP Advanced Concepts
Reading and Writing Files
Reading Data from a File
Managing Sessions and Using Session Variables
Creating a Session and Registering Session Variables
Destroying a Session
Storing Data in Cookies
Setting Cookies
Dealing with Dates and Times
Executing External Programs
Session 5: Introduction to Database - MySQL Databas
Understanding a Relational Database
Introduction to MySQL Database
Understanding Tables, Records and Fields
Understanding Primary and Foreign Keys
Understanding SQL and SQL Queries
Understanding Database Normalization
Dealing with Dates and Times
Executing External Programs
Session 6: Working with MySQL Database & Tables
Creating MySQL Databases
Creating Tables
Selecting the Most Appropriate Data Type
Adding Field Modifiers and Keys
Selecting a Table Type
Understanding Database Normalization
Altering Table and Field Names
Altering Field Properties
Backing Up and Restoring Databases and Tables
Dropping Databases and Table Viewing Database, Table, and Field Information
Session 7: SQL and Performing Queries
Inserting Records
Editing and Deleting Records
Performing Queries
Retrieving Specific Columns
Filtering Records with a WHERE Clause
Using Operators
Sorting Records and Eliminating Duplicates
Limiting Results
Using Built-In Functions
Grouping Records
Joining Tables
Using Table and Column Aliases
Session 8: Working with PHP & MySQL
Managing Database Connections
Processing Result Sets
Queries Which Return Data
Queries That Alter Data
Handling Errors
Session 9: Java Script
Introduction to Javascript
Variables, operators, loops
Using Objects, Events
Common javascript functions
Javascript Validations
Session 10: Live PHP Project
Project Discussion
Requirements analysis of Project
Project code Execution
Project Testing
=>Html & Css Training:-
HTML,or Hypertext markup language,is a code that's used to write and structure every page on the internet .CSS(cascading style sheets),is an accompanying code that describes how to display HTML.both codes are hugely important in today's internet-focused world.
Session 1: Introduction to a Web Page
What is HTML?
Setting Up the Dreamweaver to Create XHTML
Creating Your First HTML page
Formatting and Adding Tags & Previewing in a Browser
Choosing an Editor
Project Management
Session 2: Working with Images
Image Formats
Introducing the IMG Tag
Inserting & Aligning Images on a Web Page
Detailing with Alt, Width & Height Attributes
Session 3: Designing with Tables
Creating Tables on a Web Page
Altering Tables and Spanning Rows & Columns
Placing Images & Graphics into Tables
Aligning Text & Graphics in Tables
Adding a Background Color
Building Pages over Tracer Images
Tweaking Layouts to Create Perfect Pages
Session 4: Creating Online Forms
Setting Up an Online Form
Adding Radio Buttons & List Menus
Creating Text Fields & Areas
Setting Properties for Form Submission
Session 5: Creating HTML Documents
Understanding Tags, Elements & Attributes
Defining the Basic Structure with HTML, HEAD & BODY
Using Paragraph Tag to assign a Title
Setting Fonts for a Web Page
Creating Unordered & Ordered and Definition Lists
Detailing Tags with Attributes
Using Heading Tags
Adding Bold & Italics
Understanding How a Browser Reads HTML
Session 6: Anchors and Hyperlink
Creating Hyperlinks to Outside Webs
Creating Hyperlinks Between Documents
Creating a link for Email Addresses
Creating a link for a Specific Part of a Webpage
Creating a link for a image
Session 7: Creating Layouts
Adding a Side Content Div to Your Layout
Applying Absolute Positioning
Applying Relative Positioning
Using the Float & Clear Properties
Understanding Overflow
Creating Auto-Centering Content
Using Fixed Positioning
Session 8: Introduction to CSS
What is CSS?
Internal Style Sheets, Selectors, Properties & Values
Building & Applying Class Selectors
Creating Comments in Your Code
Understanding Class and ID
Using Div Tags & IDs to Format Layout
Understanding the Cascade & Avoiding Conflicts
Session 9: Creative artwork and CSS
Using images in CSS
Applying texture
Graduated fills
Round corners
Transparency and semi-transparency
Stretchy boxes
Creative typography
Session 10: Building layout with CSS
A centered container
2 column layout
3 column layout
The box model
The Div Tag
Child Divs
Width & Height
Margin
Padding
Borders
Floating & Clearing Content
Using Floats in Layouts
Tips for Creating & Applying Styles
Session 11: CSS based navigation
Mark up structures for navigation
Styling links with pseudo classes
Building a horizontal navigation bar
Building a vertical navigation bar
Transparency and semi-transparency
CSS drop down navigation systems
Session 12: Common CSS problems
Browser support issues
Float clearing issues
Validating your CSS
Common validation errors
Session 13: Some basic CSS properties
Block vs inline elements
Divs and spans
Border properties
Width, height and max, min
The auto property
Inlining Styles
Arranging Layers Using the Z Index
Session 14: Layout principles with CSS
Document flow
Absolute positioning
Relative positioning
Static positioning
Floating elements
Session 15: Formatting Text
Why Text Formatting is Important
Choosing Fonts and Font Size
Browser-Safe Fonts
Applying Styles to Text
Setting Line Height
Letter Spacing (Kerning)
Other Font Properties
Tips for Improving Text Legibility
Session 16: Creating a CSS styled form
Form markup
Associating labels with inputs
Grouping form elements together
Form based selectors
Changing properties of form elements
Formatting text in forms
Formatting inputs
Formatting form areas
Changing the appearance of buttons
Laying out forms
Session 17: Styling a data table
Basic table markup
Adding row and column headers
Simplifying table structure
Styling row and column headings
Adding borders
Formatting text in tables
Laying out and positioning tables
=>Wordpress Training:-
Our course in wordpress has been designed from a beginners perspective to provide a step by step guide from ground up to going live with your wordpress website.is not only covers the conceptual framework of a wordpress based system but also covers the practical aspects of building a modern website or a blog.
Session 1: WordPress Hosting and installation options
CMS Introduction
Setting up Web Hosting
Introduction to PHP
Registering a Domain Name
Downloading and Installing WordPress on your Web Space
Session 2: WordPress Templates
Adding a pre-existing site template to WordPress
Creating and adding your own site template to WordPress
Note - this is an overview of templates - for in-depth coverage we offer an Advanced WordPress Course
Session 3: Configuring WordPress Setup Options
When and How to Upgrade Wordpress
Managing User Roles and Permissions
Managing Spam with Akismet
Session 4: Adding WordPress Plugins
Downloading and Installing plugins
Activating Plugins
Guide to the most useful WordPress plugins
Session 5: Adding Content
Posts vs Pages
Adding Content to Posts & Pages
Using Categories
Using Tags
Managing User Comments
Session 6: Managing Media in WordPress
Uploading Images
Basic and Advanced Image Formatting
Adding Video
Adding Audio
Managing the Media Library
Session 7: Live Wordpress Project
Project Discussion
Requirements analysis of Project
Project code Execution
Project Testing
2>IPHONE TRAINING:-
Learn iphone app development using mac systems,Xcode 4.2,iphone device 4/4S/ipad, ios 5 for high quality incredible results.with us, you can get on your path to success as an app developer and transform from a student into a professional.
Iphone app app development has made online marketing a breeze .with one touch,you can access millions of apps available in the market. The demand for iphones is continually rising to new heights - thanks to its wonderful features. And these features are amplified by adding apps to the online apple store.
The apple store provides third party services the opportunity to produce innovative application to cater to the testes and inclinations of their customers and get them into a live iphone app in market.
Session 1: Introduction to Mac OS X / iPhone IOS Technology overview
Iphone OS architecture
Cocoa touch layer
Iphone OS developer tool
Iphone OS frameworks
Iphone SDK(installation,tools,use)
Session 2: Introduction to Objective – C 2.0 Programming language / Objective C2.0 Runtime Programming
Foundation framework
Objects,class,messaging,properties
Allocating and initializing objects,selectors
Exception handling,threading,remote messaging
Protocols ,categories and extensions
Runtime versions and platforms/interacting with runtime
Dynamic method resolution,Message forwarding,type encodings
Memory management
Session 3: Cocoa Framework fundamentals
About cocoa objects
Design pattern
Communication with objects
Cocoa and application architecture on Mac OS X
Session 4: Iphone development quick start
Overview of native application
Configuring application/running applications
Using iphone simulator/managing devices
Session 5: View and navigation controllers
Adding and implementing the view controller/Nib file
Configuring the view
Table views
Navigation and interface building
AlertViews
Session 6: Advanced Modules
SQLite
User input
Performance enhancement and debugging
Multi touch functions,touch events
Core Data
Map Integration
Social Network Integration (Facebook, Twitter , Mail)
Session 7: Submitting App to App Store
Creating and Downloading Certificates and Provisioning Profiles
Creating .ipa using certificates and provisioning profiles
Uploading App to AppStore
3>Android training:- The training programme and curriculum has designed in such a smart way that the student could familiar with industrial professionalism since the beginning of the training and till the completion of the curriculum.
Session 1: Android Smartphone Introduction
Session 2: ADLC(Android Development Lifecycle)
Session 3: Android Setup and Installation
Session 4: Basic Android Application
Session 5: Android Fundamentals
Android Definition
Android Architecture
Internal working of Android Applications on underlying OS
Session 6: Activity
Activity Lifecycle
Fragments
Loaders
Tasks and Back Stack
Session 7: Android Application Manifest File
Session 8: Intent Filters
Session 9: User Interface
View Hierarchy
Layout Managers
Buttons
Text Fields
Checkboxes
Radio Buttons
Toggle Buttons
Spinners
Pickers
Adapters
ListView
GridView
Gallery
Tabs
Dialogs
Notifications
Menu
WebView
Styles and Themes
Search
Drag and Drop
Custom Components
Session 10: Android Design
Session 11: Handling Configuration
Session 12: Resource Types
Session 13: Android Animation
View Animation
Tween Animation
Frame animation
Property Animation
Session 14: Persistent data Storage
Shared Preference
Preference Screen
Sqlite Database
Session 15: Managing Long Running Processes
UI Thread
Handlers and Loopers
Causes of ANR issue and its solution
Session 16: Services
Service Lifecycle
Unbound Service
Bound Service
Session 17: Broadcast Receivers
Session 18: Content Providers
Session 19: Web Services
Http Networking
Json Parsing
Xml Parsing
Session 20: Google Maps
Session 21: Android Tools
Session 22: Publishing your App on Google market
4> java training:-We provide best java training in jodhpur, wscube tech one of the best result oriented java training company in jodhpur ,its offers best practically, experimental knowledge by 5+ year experience in real time project.we provide basic and advance level of java training with live project with 100%job placement assistance with top industries.
Session 1 : JAVA INTRODUCTION
WHAT IS JAVA
HISTORY OF JAVA
FEATURES OF JAVA
HELLO JAVA PROGRAM
PROGRAM INTERNAL
JDK
JRE AND JVM INTERNAL DETAILS OF JVM
VARIABLE AND DATA TYPE UNICODE SYSTEM
OPERATORS
JAVA PROGRAMS
Session 2 : JAVA OOPS CONCEPT
ADVANTAGE OF OOPS,OBJECT AND CLASS
METHOD OVERLOADING
CONSTRUCTOR
STATIC KEYWORD
THIS KEYWORD
INHERITANCE METHOD
OVERRIDING
COVARIANT RETURN TYPE
SUPER KEYWORD INSTANCE INITIALIZER BLOCK
FINAL KEYWORD
RUNTIME POLYMORPHISM
DYNAMIC BINDING
INSTANCE OF OPERATOR ABSTRACT CLASS
INTERFACE ABSTRACT VS INTERFACE PACKAGE ACCESS ODIFIERS
ENCAPSULATION
OBJECT CLASS
JAVA ARRAY
Session 3 : JAVA STRING
WHAT IS STRING
IMMUTABLE STRING
STRING COMPARISON
STRING CONCATENATION
SUBSTRING METHODS OF STRING CLASS
STRINGBUFFER CLASS
STRINGBUILDER CLASS
STRING VS STRINGBUFFER
STRINGBUFFER VS BUILDER
CREATING IMMUTABLE CLASS
TOSTRING METHOD STRINGTOKENIZER CLASS
Session 4 : EXCEPTION HANDLING
WHAT IS EXCEPTION
TRY AND CATCH BLOCK
MULTIPLE CATCH BLOCK
NESTED TRY
FINALLY BLOCK
THROW KEYWORD
EXCEPTION PROPAGATION
THROWS KEYWORD
THROW VS THROWS
FINAL VS FINALLY VS FINALIZE
EXCEPTION HANDLING WITH METHOD OVERRIDING
Session 5 : JAVA INNER CLASS
WHAT IS INNER CLASS
MEMBER INNER CLASS
ANONYMOUS INNER CLASS
LOCAL INNER CLASS
STATIC NESTED CLASS
NESTED INTERFACE
Session 6 : JAVA MULTITHREADING
WHAT IS MULTITHREADING
LIFE CYCLE OF A THREAD
CREATING THREAD
THREAD SCHEDULER
SLEEPING A THREAD
START A THREAD TWICE
CALLING RUN() METHOD JOINING A THREAD
NAMING A THREAD
THREAD PRIORITY
DAEMON THREAD
THREAD POOL
THREAD GROUP
SHUTDOWNHOOK PERFORMING MULTIPLE TASK
GARBAGE COLLECTION
RUNTIME CLASS
Session 7 : JAVA SYNCHRONIZATION
SYNCHRONIZATION IN JAVA
SYNCHRONIZED BLOCK
STATIC SYNCHRONIZATION
DEADLOCK IN JAVA
INTER-THREAD COMMUNICATION
INTERRUPTING THREAD
Session 8 : JAVA APPLET
APPLET BASICS
GRAPHICS IN APPLET
DISPLAYING IMAGE IN APPLET
ANIMATION IN APPLET
EVENT HANDLING IN APPLET
JAPPLET CLASS
PAINTING IN APPLET
DIGITAL CLOCK IN APPLET
ANALOG CLOCK IN APPLET
PARAMETER IN APPLET
APPLET COMMUNICATION
JAVA AWT BASICS
EVENT HANDLING
Session 9 : JAVA I/O
INPUT AND OUTPUT
FILE OUTPUT & INPUT
BYTEARRAYOUTPUTSTREAM
SEQUENCEINPUTSTREAM
BUFFERED OUTPUT & INPUT
FILEWRITER & FILEREADER
CHARARRAYWRITER
INPUT BY BUFFEREDREADER
INPUT BY CONSOLE
INPUT BY SCANNER
PRINTSTREAM CLASS
COMPRESS UNCOMPRESS FILE
PIPED INPUT & OUTPUT
Session 10 : JAVA SWING
BASICS OF SWING
JBUTTON CLASS
JRADIOBUTTON CLASS
JTEXTAREA CLASS
JCOMBOBOX CLASS
JTABLE CLASS
JCOLORCHOOSER CLASS
JPROGRESSBAR CLASS
JSLIDER CLASS
DIGITAL WATCH GRAPHICS IN SWING
DISPLAYING IMAGE
EDIT MENU FOR NOTEPAD
OPEN DIALOG BOX
JAVA LAYOUTMANAGER
Session 11 : JAVA JDBC and Online XML Data Parsing
Database Management System
Database Manipulations
Sqlite Database integration in Java Project
XML Parsing Online
Session 12 : Java Projects
NOTEPAD
PUZZLE GAME
PIC PUZZLE GAME
TIC TAC TOE GAME
Crystal App
Age Puzzle
BMI Calculator
KBC Game Tourist App
Meditation App
Contact App
Weather App
POI App
Currency Convertor
5>Python training:Wscube tech provides python training in jodhpur .we train the students from basic level to advanced concepts with a real-time environment.we are the best python training company in jodhpur.
Session 1 : Introduction
About Python
Installation Process
Python 2 vs Python 3
Basic program run
Compiler
IDLE User Interface
Other IDLE for Python
Session 2: Types and Operations
Python Object Types
Session 3 : Numeric Type
Numeric Basic Type
Numbers in action
Other Numeric Types
Session 4 : String Fundamentals
Unicode
String in Action
String Basic
String Methods
String Formatting Expressions
String Formatting Methods Calls
Session 5 : List and Dictionaries
List
Dictionaries
Session 6 : Tuples, Files, and Everything Else
Tuples
Files
Session 7 : Introduction Python Statements
Python’s Statements
Session 8 : Assignments, Expression, and Prints
Assignments Statements
Expression Statements
Print Operation
Session 9 : If Tests and Syntax Rules
If-statements
Python Syntax Revisited
Truth Values and Boolean Tests
The If/else ternary Expression
The if/else Ternary Expression
Session 10 : while and for loops
while Loops
break, continue, pass , and the Loop else
for Loops
Loop Coding Techniques
Session 11 : Function and Generators
Function Basic
Scopes
Arguments
Modules
Package
Session 12 : Classes and OOP
OOP: The Big Picture
Class Coding Basics
Session 13 : File Handling
Open file in python
Close file in python
Write file in python
Renaming and deleting file in python
Python file object method
Package
Session 14 : Function Basic
Why use Function?
Coding function
A First Example: Definitions and Calls
A Second Example : Intersecting Sequences
Session 15 :Linear List Manipulation
Understand data structures
Learn Searching Techniques in a list
Learn Sorting a list
Understand a stack and a queue
Perform Insertion and Deletion operations on stacks and queues
6>wordpress training:We will start with wordpress building blocks and installation and follow it with the theory of content management.we will then learn the major building blocks of the wordpress admin panel.the next unit will teach you about posts,pages and forums.and in last we done about themes which makes your site looks professional and give it the design you like.
Session 1: WordPress Hosting and installation options
CMS Introduction
Setting up Web Hosting
Introduction to PHP
Registering a Domain Name
Downloading and Installing WordPress on your Web Space
Session 2: WordPress Templates
Adding a pre-existing site template to WordPress
Creating and adding your own site template to WordPress
Note - this is an overview of templates - for in-depth coverage we offer an Advanced WordPress Course
Session 3: Configuring WordPress Setup Opt
When and How to Upgrade Wordpress
Managing User Roles and Permissions
Managing Spam with Akismet
Session 4: Adding WordPress Plugins
Downloading and Installing plugins
Activating Plugins
Guide to the most useful WordPress plugins
Session 5: Adding Content
Posts vs Pages
Adding Content to Posts & Pages
Using Categories
Using Tags
Managing User Comments
Session 6: Managing Media in WordPress
Uploading Images
Basic and Advanced Image Formatting
Adding Video
Adding Audio
Managing the Media Library
Session 7: Live Wordpress Project
Project Discussion
Requirements analysis of Project
Project code Execution
Project Testing
7>laravel training:Wscube tech jodhpur provide popular and most important MVC frameworks ,laravel using laravel training you can create web application with speed and easily.and before start training we done the basic introduction on framework.
Session 1 : Introduction
Overview of laravel
Download and Install laravel
Application Structure of laravel
Session 2 : Laravel Basics
Basic Routing in laravel
Basic Response in laravel
Understanding Views in laravel
Static Website in laravel
Session 3 : Laravel Functions
Defining A Layout
Extending A Layout
Components & Slots
Displaying Data
Session 4: Control Structures
If Statements
Loops
The Loop Variable
Comments
Session 5: Laravel Advanced Concepts
Intallation Packages
Routing
Middelware
Controllers
Forms Creating by laravel
Managing Sessions And Using Session Variables
Creating A Session And Registering Session Variables
Destroying A Session
Laravel - Working With Database
Session 6: SQL And Performing Queries
Inserting Records
Editing And Deleting Records
Retrieving Specific Columns
Filtering Records With A WHERE Clause
Sorting Records And Eliminating Duplicates
Limiting Results
Ajax
Sending Emails
Social Media Login
Session 7: Live Project
8>industrial automation engineer training :Automation is all about reducing human intervention .sometime it is employed to reduce human drudgery (e.g. crane,domestic,washing machine),sometime for better quality & production (e.g. CNC machine).some products can not be manufactured without automated machine (e.g. toothbrush,plastic,bucket,plastic pipe etc).
To replace a human being ,an automation system also needs to have a brain,hands,legs,muscles,eyes,nose.
Session 1:Introduction to Automaton
What is Automation
Components of Automation
Typical Structure of Automation
History & Need of Industrial Automation
Hardware & Software of Automation
Leading Manufacturers
Areas of Application
Role of Automation Engineer
Career & Scope in Industrial Automation
Session 2: PLC (Programmable Logic Controller)
Digital Electronics Basics
What is Control?
How does Information Flow
What is Logic?
Which Logic Control System and Why?
What is PLC (Programmable Logic Controller)
History of PLC
Types of PLC
Basic PLC Parts
Optional Interfaces
Architecture of PLC
Application and Advantage of PLCs
Introduction of PLC Networking (RS-232,485,422 & DH 485, Ethernet etc)
Sourcing and Sinking concept
Introduction of Various Field Devices
Wiring Different Field Devices to PLC
Programming Language of a PLC
PLC memory Organization
Data, Memory & Addressing
Data files in PLC Programming
PLC Scan Cycle
Description of a Logic Gates
Communication between PLC & PC
Monitoring Programs & Uploading, Downloading
Introduction of Instructions
Introduction to Ladder Programming
Session 3: Programming Of PLC (Ladder Logics)
How to use Gates, Relay Logic in ladder logic
Addressing of Inputs/Outputs & Memory bit
Math’s Instruction ADD, SUB, MUL, DIV etc.
Logical Gates AND, ANI, OR, ORI, EXOR, NOT etc.
MOV, SET, RST, CMP, INC, DEC, MVM, BSR, BSL etc.
How to Programming using Timer & Counter
SQC, SQO, SQL, etc.
Session 4:Advance Instruction in PLC
Jump and label instruction.
SBR and JSR instruction.
What is Forcing of I/O
Monitoring & Modifying Data table values
Programming on real time applications
How to troubleshoot & Fault detection in PLC
Interfacing many type sensors with PLC
Interfacing with RLC for switching
PLC & Excel communication
Session 5: SCADA
Introduction to SCADA Software
How to Create new SCADA Project
Industrial SCADA Designing
What is Tag & how to use
Dynamic Process Mimic
Real Time & Historical Trend
Various type of related properties
Summary & Historical Alarms
How to create Alarms & Event
Security and Recipe Management
How to use properties like Sizing, Blinking, Filling, Analog Entry, Movement of Objects, Visibility etc.
What is DDE Communication
Scripts like Window, Key, Condition & Application
Developing Various SCADA Applications
SCADA – Excel Communication
PLC – SCADA Communication
Session 6:Electrical and Panel Design
Concept of earthling, grounding & neutral
Study and use of Digital Multimeter
Concept of voltmeter & Ammeter connection
Definition of panel
Different Types of panel
Relay & contactor wiring
SMPS(Switch mode power supply)
Different type protection for panel
Application MCB/MCCB
Different Instruments used in panel (Pushbuttons, indicators, hooters etc)
Different type of symbols using in panel
Maintains & Troubleshooting of panel
Study of live distribution panel
Session 7: Industrial Instrumentation
Definition of Instrumentation.
Different Types of instruments
What is Sensors & Types
What is Transducers & Types
Transmitter & Receivers circuits
Analog I/O & Digital I/O
Different type sensors wiring with PLC
Industrial Application of Instrumentation
Flow Sensors & meters
Different type of Valves wiring
Proximate / IR Sensors
Inductive /Metal detector
Session 8: Study of Project Documentation
Review of Piping & Instrumentation Diagram (P&ID)
Preparation of I/O list
Preparation of Bill Of Material (BOM)
Design the Functional Design Specification (FDS)
Preparing Operational Manuals (O & M)
Preparing SAT form
Preparing Panel Layout, Panel wiring and Module wiring in AutoCAD.
9> digital marketing training: The digital marketing training course designed to help you master the essential disciplines in digital marketing ,including search engine optimization,social media,pay-per-click,conversion optimization,web analytics,content marketing,email and mobile marketing.
Session 1: Introduction To Digital Marketing
What Is Marketing?
How We Do Marketing?
What Is Digital Marketing?
Benefits Of Digital Marketing
Comparing Digital And Traditional Marketing
Defining Marketing Goals
Session 2: Search Engine Optimization (SEO)
Introduction To Search Engine
What Is SEO?
Keyword Analysis
On-Page Optimization
Off-Page Optimization
Search Engine Algorithms
SEO Reporting
Session 3: Search Engine Marketing (SEM
Introduction To Paid Ad
Display Advertising
Google Shopping Ads
Remarketing In AdWords
Session 4: Social Media Optimization (SMO)
Role Of Social Media In Digital Marketing
Which Social Media Platform To Use?
Social Media Platforms – Facebook, Twitter, LinkedIn, Instagram, YouTube And Google+
Audit Tools Of Social Media
Use Of Social Media Management Tools
Session 5: Social Media Marketing (SMM)
What Are Social Media Ads?
Difference Between Social Media And Search Engine Ads.
Displaying Ads- Facebook, Twitter, LinkedIn, Instagram & YouTube
Effective Ads To Lead Generation
Session 6: Web Analytics
What Is Analysis?
Pre-Analysis Report
Content Analysis
Site Audit Tools
Site Analysis Tools
Social Media Analysis Tool
Session 7: Email Marketing
What Is Email Marketing
Why EMail Marketing Is Necessary?G
How Email Works?
Popular Email Marketing Software
Email Marketing Goals
Best Ways To Target Audience And Generate Leads
Introduction To Mail Chimp
Email Marketing Strategy
Improving ROI With A/B Testing
Session 8: Online Reputation Management (ORM)
What Is ORM?
Why ORM Is Important?
Understanding ORM Scenario
Different Ways To Create Positive Brand Image Online
Understanding Tools For Monitoring Online Reputation
Step By Step Guide To Overcome Negative Online Reputation
Session 9: Lead Generation
What Is Lead Generation
Lead Generations Steps
Best Way To Generate Lead
How To Generate Leads From – LinkedIn, Facebook, Twitter, Direct Mail, Blogs, Videos, Infographics, Webinar, Strong Branding, Media
Tips To Convert Leads To Business
Measure And Optimize
Session 10: Lead Generation
What Is Affiliate Marketing
How Affiliate Marketing Works
How To Find Affiliate Niche
Different Ways To Do Affiliate Marketing
Top Affiliate Marketing Networks
Methods To Generate And Convert Leads
Session 11: Content Marketing
What Is Content Marketing?
Introduction To Content Marketing
Objective Of Content Marketing
Content Marketing Strategy
How To Write Great Compelling Content
Keyword Research For Content Ideas
Unique Ways To Write Magnetic Headlines
Tools To Help Content Creation
How To Market The Same Content On Different Platforms
Session 12: Mobile App Optimization
App store optimization (App name, App description, logo, screenshots)
Searched position of app
Reviews and downloads
Organic promotions of app
Paid Promotion
Session 13: Google AdSense
What is Google AdSense
How it Work?
AdSense Guidelines
AdSense setup
AdSense insights
Website ideas for online earning
10> robotics training:The lectures will guide you to write your very own software for robotics and test it on a free state of the art cross-platform robot simulator.the first few course cover the very core topics that will be beneficial for building your foundational skills before moving onto more advanced topics.End the journey on a high note with the final project and loss of confidence in skills you earned throughout the journey.
Session 1: Robotics Introduction
Introduction
Definition
History
Robotics Terminology
Laws of Robotics
Why is Robotics needed
Robot control loop
Robotics Technology
Types of Robots
Advantage & Disadvantage
ples of Robot
Session 2: Basic Electronics for Robotics
LED
Resistor
Ohm’s Law
Capacitor
Transistor
Bread board
DC Motor
DPDT switch
Rainbow Wire & Power Switch
Integrated Circuit
IC holder & Static Precaution
555 Timer & LM 385
L293D
LM 7805 & Soldering kit
Soldering kit Description
Soldering Tips
Soldering Steps
Projects
Session 3: Electronic Projects
a. Manual Robotic Car
Basic LED glow Circuit
LED glow using push button
Fading an LED using potentiometer
Darkness activation system using LDR
Light Activation system using LDR
Transistor as a NOT gate
Transistor as a touch switch
LED blinking using 555 timer
Designing IR sensor on Breadboard
Designing Motor Driver on Breadboard
Designing IR sensor on Zero PCB
Designing Motor Driver on Zero PCB
Line Follower Robot
Session 4: Sensors
Introduction to sensors
Infrared & PIR Senso
TSOP & LDR
Ultrasonic & Motion Sensors
Session 5: Arduino
a. What is Arduino
Different Arduino Boards
Arduino Shield
Introduction to Roboduino
Giving Power to your board
Arduino Software
Installing FTDI Drivers
Board & Port Selection
Port Identification – Windows
Your First Program
Steps to Remember
Session 6: Getting Practical
Robot Assembly
Connecting Wires & Motor cable
Battery Jack & USB cable
DC motor & Battery arrangement
Session 7: Programming
Basic Structure of program
Syntax for programming
Declaring Input & Output
Digital Read & Write
Sending High & Low Signals
Introducing Time Delay
Session 8: Arduino Projects
Introduction to basic shield
Multiple LED blinking
LED blinking using push button
Motor Control Using Push Button
Motor Control Using IR Sensor
Line Follower Robot
LED control using cell phone
Cell Phone Controlled Robot
Display text on LCD Display
Seven Segment Display
Session 8: Arduino Projects
Introduction to basic shield
Multiple LED blinking
LED blinking using push button
Motor Control Using Push Button
Motor Control Using IR Sensor
Line Follower Robot
LED control using cell phone
Cell Phone Controlled Robot
Display text on LCD Display
Seven Segment Display
11>SEO Training:SEO Search Engine Optimization helps search engines like google to find your site rank it better that million other sites uploaded on the web in answer to a query.with several permutation and combination related to the crawlers analyzing your site and ever changing terms and conditions of search engine in ranking a site,this program teaches you the tool and techniques to direct & increase the traffic of your website from search engines.
Session 1: Search engine Basics
Search Engines
Search Engines V/s Directories
Major Search Engines and Directories
How Search Engine Works
What is Search Engine Optimization
Page rank
Website Architecture
Website Designing Basics
Domain
Hosting
Session 2: Keyword Research and Analysis
Keyword Research
Competitor analysis
Finding appropriate Keywords
Target Segmentation
Session 3: On Page Optimization
Title
Description
Keywords
Anchor Texts
Header / Footer
Headings
Creating Robots File
Creating Sitemaps
Content Optimization
URL Renaming
HTML and CSS Validation
Canonical error Implementation
Keyword Density
Google Webmaster Tools
Google analytics and Tracking
Search Engine Submission
White Hat SEO
Black Hat SEO
Grey Hat SEO
Session 4: Off Page Optimization
Directory
Blogs
Bookmarking
Articles
Video Submissions
Press Releases
Classifieds
Forums
Link Building
DMOZ Listing
Google Maps
Favicons
QnA
Guest Postings
Session 5: Latest Seo Techniques & Tools
Uploading and website management
Seo Tools
Social media and Link Building
Panda Update
Penguin Update
EMD Update
Seo after panda , Penguin and EMD Update
Contact detail :-
a> WsCube Tech
First Floor, Laxmi Tower, Bhaskar Circle, Ratanada
Jodhpur - Rajasthan - India (342001)
b>Branch Office
303, WZ-10, Bal Udhyan Road,
Uttam Nagar, New-Delhi-59
c>Contact Details
Mobile : +91-92696-98122 , 85610-89567
E-mail : [email protected]
1 note
·
View note
Text
V. Adding missing body parts / Frankenmeshing / Finishing touches
(Previous: IV. The most useful meshing tools in Blender)
I know I promised to finally talk about uv maps, but I realised I forgot to cover some tiny, but important meshing-related details. Originally I hoped I could mention them in the parts dedicated to uvs or clones, but somehow they didn't properly fit into any of those topics, so I decided it'd be better to make a separate post about them. I probably will have to re-mention some of this stuff later though, so sorry in advance for anything being redundant!
1) Adding missing body parts
I mentioned a long time ago that my dress, being made from a top, comes without legs. It's not a problem, as it's supposed to be floor-length anyway – but what if it wasn't? What if it reached e.g. only until knees? Or what if you accidentally (or not) deleted/messed up some other body parts, like hands or neck, and wanted to replace them?
To fix this, first of all we need to get the right body meshes from S4S.
It's almost the same steps as in the very beginning, when we were getting the top which we used as a base for the dress. Open S4S, choose 'Create 3D mesh' under CAS and then click the CAS button. Just as back then, you'll see a list of all EA CAS assets existing in your game.
To find meshes of different body parts, type 'nude' in the box in the top right corner. No worries, it's The Sims, everything is safe for work (a.k.a. Barbie-style).
Now you have to select whatever it is that you need. Let's stick to the idea of a knee-length dress in need of some legs. Click the female naked bottom (if you're not sure which one is which, hover over the picture; it'll tell you if it's yf – young female – or ym - young male) and then hit 'Next'.
You'll be asked to name your package, but – just like in case of the top – it completely doesn't matter. It's only the mesh we want – once it's extracted, we can delete the package file.
Now that the package is created, you can access its data. Again, just like in case of the top: go to 'Meshes' and click the 'Export mesh' button. Make sure NOT to change the LOD!

You can close S4S now – that was all we needed from it.
Before we go back to our mesh, I suggest we open the newly extracted legs' mesh, select all the vertices (a) and remove doubles (w, choose from the list). By default each mesh coming straight from S4S is cut in certain places (I guess wherever there are cuts in the uv-1?) - and in case of a naked body such cuts are most definitely not needed.
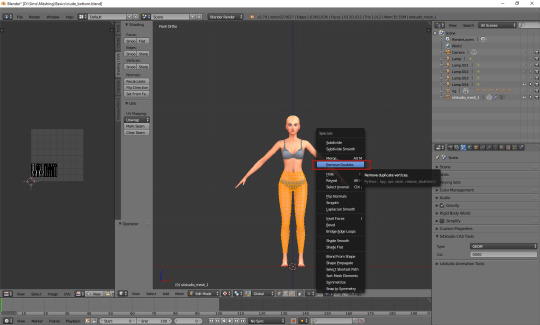
Save and close.
Now, open the mesh which needs the legs. For this tutorial, I cut off the bottom part of the dress I was making. As you can see, it's very legless.

Go to Object Mode (tab), open the 'File' menu and choose 'Append'.
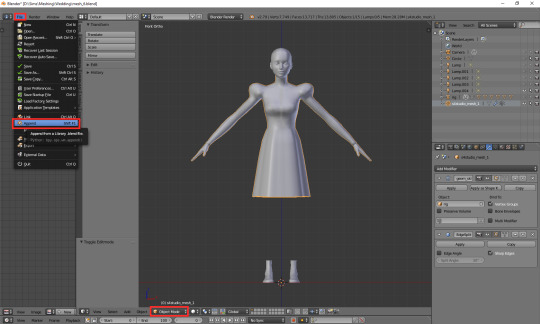
Now you have to find your extracted legs' mesh. However, you'll notice that just selecting the right blend file isn't enough – when you click it, it opens like a normal folder, making you choose from more specific contents of the blend file/package. Here comes the tricky and very important part: the mesh data sits in the 'Object' folder, NOT in 'Mesh'. When you open the 'Object' folder, you'll find inside the file you're looking for: s4studio_mesh_1. Select it and click 'Append from Library'.
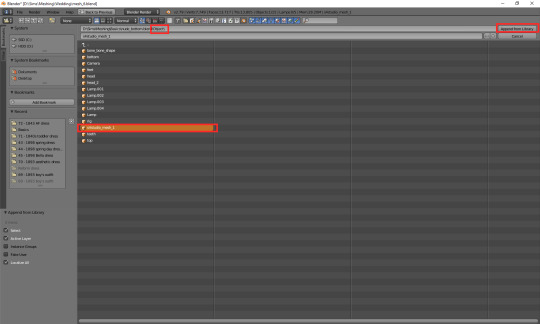
Kaboom!
As you're going to join the legs with your mesh anyway, you can safely delete the bone_shape.001 and rig.001. You don't need them and they'll just be making your blend file bigger. It's only the mesh that's necessary.
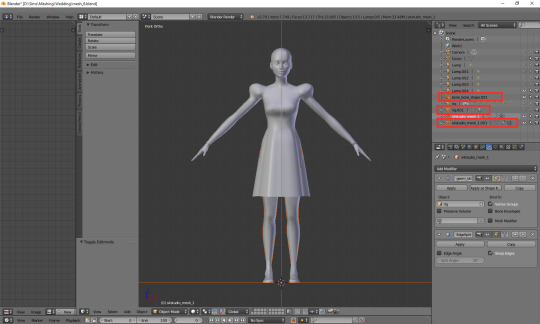
Now we need to edit the appended legs by deleting the parts which we don't need. Select the legs' mesh, go to edit mode, turn on the x-ray and select (b) everything which will be hidden underneath the skirt. Leave some margin though!

Delete (x) the selected vertices and go back to object mode.
As you can see, right now your dress and the legs are separate from each other – in other words, they are separate cuts. And while some (...many...) EA meshes include several cuts, they are never cut in this way. We need to join them.
Select the legs' mesh on the right and, while holding shift, the dress' mesh. Then simply press ctrl+j. That's all! The legs are where they're supposed to be.

In case you're interested, if you want to do the opposite – turn a part of your mesh into a new cut – select that part, press p and choose 'selection' from the drop-down menu.

Of course, appending isn't limited to saving your dresses from leglessness. As mentioned, the same principle can be used for adding any other body parts... Or even clothes.
2) Frankenmeshing
There's not much I can say to it right now, without going into cuts, weights and uv maps, but if you want to try it, that's your starting point. You extract a couple of meshes from S4S, open one of them and then append the other ones. Depending on what it is that you're frankenmeshing, it might take some time to clean the meshes (i.e. delete the unwanted vertices). In most cases it's also very important to connect the vertices of the separate parts once you join the cuts! If you combine top A with sleeves B, or top C with skirt D, you have to merge the vertices where those parts connect – otherwise it'll at the very least look weird, and that's only a best case scenario.
3) Closing the mesh
I kind of mentioned this one last time, but I guess it won't hurt to explain it once again, this time properly. Whether your dress is short or super long, if you look at it from the bottom, you'll see that it's... Empty. Transparent. Unfinished. The legs – or feet – are ending apruptly, as if cut by a saw. We don't want to see it. That's why we need to close it.

(I remember when I was just learning to mesh I found this part super weird. I thought I'd rather not cut the legs, but duplicate the skirt and flip direction, to make it have both sides, just like in real life. While this idea is not completely ridiculous and can even be useful in certain cases (e.g. when you're making a half-transparent skirt – if it's see-through, you do need the legs to actually be underneath), there are two big reasons why you shouldn't do it: one, it might be very hard to get rid of any clipping, and two, the polycount could potentially kill you. Just in case you're having similar thoughts right now :) )
Select the lowest row of vertices. It might be a bit tricky now that the legs are appended – you might want to separate them into a new cut for a second, just so that they wouldn't be getting in your way. Or just hide them with h. Another easy method is selecting the row on the uv map, but we haven't covered this one yet, so let's stick to separating legs for now. Turn the x-ray on and, while in front view, select the row.
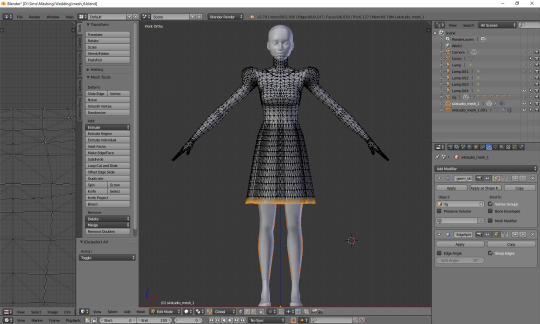
As mentioned last time, this lowest row is supposed to be a sharp edge, so before you proceed, mark it as sharp (ctrl+e)!
Turn the camera a bit to see what's going on underneath. Now extrude the vertices (e) and scale them (s). Click wherever.
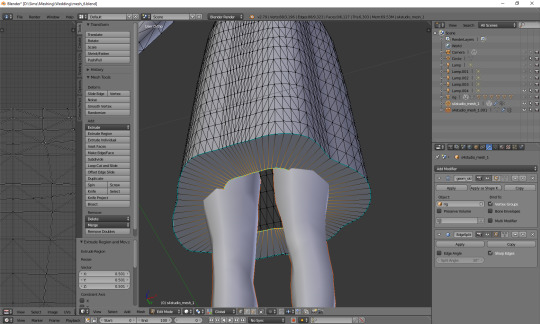
As you can see, the new, extruded circle is selected now. Press alt + m to merge those vertices and, from the drop-down menu, select 'at center'.
Personally I don't like it when the bottom of a dress is so completely flat, so I move that middle point a bit higher, along the z axis (g, z). That's also one of the reasons why I left that leg margin earlier. I guess you don't have to do it, but I think it makes it look a bit more natural.

If you separated the legs, you can once again adjoin them to the main mesh now.
It's very important to close any open ends your mesh might have. The bottom of your dress/skirt, cuffs, necklines, sleeves if they're short – everything must be closed, otherwise you'll notice it in the game, sooner or later. It's fine if you don't do it now – you might want to wait until you're done with uvs and weights – but eventually you have to do it. Just for a little crack, here's a screenshot I took while testing one of my dresses. It's floor-length, so it shouldn't matter if it's closed or not, right?

That’s how it ends.
***
The long-awaited uvs tutorial will follow very soon, unless I suddenly get some urgent project to work on. I know how badly it's needed, so it's scheduled now, like any normal job-related stuff. And as hard as it might be to believe, I'm actually quite good at meeting deadlines if they're set in stone – I might not enjoy it, but I get stuff done on time. Stay tuned!
(Next: VI a. UV_0)
55 notes
·
View notes
Text
Using Excel's Conditional Formatting and Data Validation Tool
Data is important. Locating specific data is important. Being sure that the correct data is being input is critical. Thanks to Conditional Formatting, you can highlight all information that is important to you (the highest or lowest values, duplicate values, values that are larger or smaller than a certain value). This will provide you with the necessary information to make important business decisions. Conditional formatting is one of the major strengths of Excel!
Why Should You Attend
To be sure that the data is entered accurately, use Data Validation to restrict the input type of a value based on a specific set of criteria. Trying to enter data that does not meet the criteria will generate an error message.
Create a drop-down list of items in a cell with data validation. This will make data entry easier, and reduce input errors and typing mistakes.
Both of these tools give you greater control over the data you are working with.
With Conditional Formatting, we’ll show you how massive amounts of data can be analyzed to visually emphasize relationships, find exceptions, and spot trends.
Conditional formatting can change the format of cells based on their values in multiple ways including font style, underline style, font color, fill color and more.
Adding your own formula to a conditional formatting rule gives it a power boost to help you do things the built-in rules can’t do.
Data bars can be used to show the value of a cell relative to other cells. Data bars can be modified multiple ways.
Color scales shows data distribution and variation. Shades of color represent high, middle and low values. A variety of color combinations are available.
Icon sets allow annotation and classification of data into three to five categories using icons. It is possible to customize icon sets.
To be sure that the data is entered accurately, use Data Validation to restrict the input type of a value based on a specific set of criteria. Trying to enter data that does not meet the criteria will generate an error message.
Settings include value type, such as decimal, date, and time. Ranges can be set here. Input messages can be generated to give the user a description of the data allowed in the cell. Error messages can be customized to describe the error a user encounters when invalid data is entered.
Create a drop-down list of items in a cell with data validation. This will make data entry easier, and reduce input errors and typing mistakes.
Invalid data can automatically be highlighted in a worksheet.
Areas Covered in the Session How to use conditional formatting in Excel » Types of conditional formats » Highlighting cells rules » Applying data bars, color scales and icon sets » Removing conditional formatting » Modifying conditional formatting » Using the conditional formatting rules manager » Creating conditional formatting based on a formula
Using Data Validation » Using the data validation dialog box » Creating data validation criteria » Modifying and removing data validation » Creating an input message » Modifying the error message » How to create drop down list in Excel for data entry » Copying a drop-down list to multiple columns or rows
Who Will Benefit » Business Owners » CEO's / CFO's / CTO's » Managers » Accountants » CPA's » Financial Consultants » IT Professionals » Auditors » Human Resource Personnel » Bookkeepers » Marketers » Anybody with large amounts of Data » Anybody who uses Microsoft Excel on a regular basis, and wants to be more efficient and productive To Register (or) for more details please click on this below link: https://bit.ly/3f96lts/a> Email: [email protected] Tel: (989)341-8773

0 notes
Text
Function insert current date in excel

#Function insert current date in excel how to
#Function insert current date in excel series
These are volatile functions, which means any change in the Excel workbook will cause them to recalculate. FunctionsĮxcel has two functions that will give us the date and time. This shortcut also works while in edit mode and will allow us to insert a hardcoded date into our formulas. Pressing Ctrl + Shift + will enter the current time into the active cell Pressing Ctrl + will enter the current date into the active cell. The dates and times created will be current when they are entered, but they are static and won’t update. These are both quick and easy ways to enter the current date or time into our Excel workbooks. Video TutorialĮxcel has two great keyboard shortcuts we can use to get either the date or time. In this post, we’re going to look at 5 ways to get either the current date or current time into our workbook. The great news is there a lot of ways to get this information into Excel. Excel displays a context menu and selects the appropriate option.The current date and time is a very common piece of data needed in a lot of Excel solutions. Another way to enter your first date will be to right-click the fill handle and drag and release the fill handle through the cells you automatically want to fill with dates.Click the AutoFill Options icon and choose the option you want when the range is populated by sequential dates. You can use the above-mentioned Excel AutoFill options.There are two ways of automatically adding weekdays, months, or years to the selected range of cells. Click the first date on your cell and then drag the fill handle to or from the cells you want Excel to add dates.Enter the original date in the first cell.It is a common way to automatically fill a column or row.
#Function insert current date in excel series
To autofill a series of dates in which one day is incremented, you can use the Excel AutoFill function.
The functions take the current system clock date and time.
The date and the time returned will not be refreshed on an ongoing basis, but only when the chain is reopened or re-calculated.
Please remember that when using the Excel date functions:
Excel Dynamic Chart Linked with a Drop-down List.
#Function insert current date in excel how to
How to calculate Sum and Average of numbers using formulas in MS Excel?.How to Apply Conditional Formatting Based On VLookup in Excel?.How to Find the Slope of a Line on an Excel Graph?.COUNTIF Function in Excel with Examples.Stacked Column Chart with Stacked Trendlines in Excel.How to Calculate Euclidean Distance in Excel?.How to Format Chart Axis to Percentage in Excel?.How to Calculate Mean Absolute Percentage Error in Excel?.How to Calculate Root Mean Square Error in Excel?.Statistical Functions in Excel With Examples.How to Create Pie of Pie Chart in Excel?.How to Calculate the Interquartile Range in Excel?.How to Enable and Disable Macros in Excel?.Positive and Negative Trend Arrows in Excel.Plot Multiple Data Sets on the Same Chart in Excel.How to Find Correlation Coefficient in Excel?.How to Automatically Insert Date and Timestamp in Excel?.How to Remove Pivot Table But Keep Data in Excel?.How to Find Duplicate Values in Excel Using VLOOKUP?.How to Show Percentage in Pie Chart in Excel?.Highlight Rows Based on a Cell Value in Excel.How to Remove Time from Date/Timestamp in Excel?.ISRO CS Syllabus for Scientist/Engineer Exam.ISRO CS Original Papers and Official Keys.GATE CS Original Papers and Official Keys.
0 notes
Text
Mac excel keyboard shortcut new line

Mac excel keyboard shortcut new line how to#
Mac excel keyboard shortcut new line pdf#
Mac excel keyboard shortcut new line mac#
Mac excel keyboard shortcut new line how to#
Here we discuss the working of Excel Keyboard Shortcuts, how to access them and how to use Excel Keyboard Shortcuts to save your time. This is a guide to Excel Keyboard Shortcuts. Move to the edge of the current data region in a worksheet. Move one screen to the left in a worksheet. Move one screen to the right in a worksheet. Move to the previous sheet in a workbook. Excel Keyboard Shortcuts also helps out or reduces the usage of the mouse & and its number of clicks.Īpart from these, the most commonly used shortcut keys are:.Excel Keyboard Shortcuts helps you to provide an easier and usually quicker method of directing and finishing commands.Things to Remember About Excel Keyboard Shortcuts It Activates the Microsoft Script Editor window.Ĩ. ALT + Letter Keys Shortcut Shortcut Keyĭisplays the Remove Duplicates dialog boxįormat Cells dialog box with the Number tab selected.įormat Cells dialog box with the Font tab selected.įormat number with a thousand’s comma (,) separatorĮxpand the Insert Form Controls and ActiveX Controls drop-down menuĪdd or Remove the vertical interior border. It Displays the drop-down menu for the corresponding smart tag. This will start a new line in your cell, and you can continue to type the rest of the text. While your cursor is still in the cell where you were typing, press Alt+Enter (Windows) or Option+Enter (Mac). First, open your spreadsheet and type your text until you need a new line. Inserts a new worksheet into the active workbook RELATED: All the Best Microsoft Excel Keyboard Shortcuts. Insert Chart (It Creates a chart of the data in the current range)ħ. ALT + SHIFT + Function Keys Shortcut Shortcut Key Maximize or restore currently selected workbook windowĥ. SHIFT + Function Keys Shortcut Shortcut Keyĭisplays formula box to Paste function into the formulaĦ. ALT + Function Keys Shortcut Shortcut Key Minimize currently selected workbook window It will Unhide the rows in the current selectionĤ. CTRL + Function Keys Shortcut Shortcut Keyĭisplay Print Preview area on Print tab of Backstage ViewĪlternate between the currently active workbook window and the next workbook windowĪpply Move command on the active workbook windowĪpply Resize command on the active workbook window It Selects the current region (associated by blank rows and columns) It Enters the value from the cell directly above into the active cell
Mac excel keyboard shortcut new line pdf#
Also, download a printable cheat sheet in PDF about keyboard shortcuts.
Mac excel keyboard shortcut new line mac#
It Unhides the columns in the current selection. Excel shortcuts for Windows and Mac This page contains a list of over 300+ Excel shortcuts for the Windows and Mac versions of Excel to speed up your work and productivity. It is also used to switch between absolute/relative refs
0 notes