#how to generate jwt token in python
Explore tagged Tumblr posts
Visit Tumblr Blog
Explore Tumblr blogs with no restrictions, modern design and the best experience.
Last Seen Tumblr Blogs


Fun Fact
Tumblr.com rank in the US is 25.
Text
How To Generate JWT Token
Welcome To the Article About How To Generate JWT Token (JSON Web Token)! In this article, we will discuss the concept of the JWT token, the benefits of using it, how to generate it, and the security considerations that come with it. We will also explore how to use JWT token authentication in your applications. By the end of this blog, you will have a better understanding of JWT token and how to…

View On WordPress
#generate a JSON Web Token#Generate jwt Token#How to generate a JSON Web Token#How To Generate jwt Token#how to generate jwt token in python#how to generate jwt token online
0 notes
Text
Understanding Authentication: Cookies, Sessions, and JWT
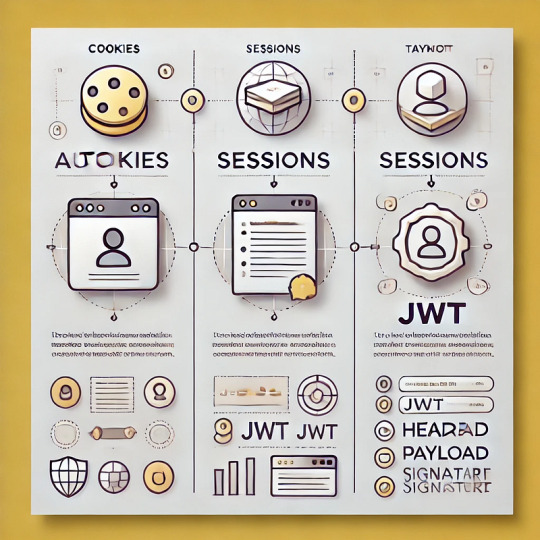
Understanding Authentication: Cookies, Sessions, and JWT
Authentication is a cornerstone of web security, ensuring that users can access only the resources they are authorized for. Different methods like cookies, sessions, and JSON Web Tokens (JWT) are commonly used to implement authentication. Here’s a breakdown of each method, their key features, and use cases.
1. Cookies
Cookies are small data files stored on a user’s browser and sent with every request to the server. They are often used to persist user authentication data across sessions.
Key Features:
Stored on the client side.
Can include attributes like HttpOnly, Secure, and SameSite to improve security.
Frequently used for tracking user sessions or preferences.
How It Works:
The server creates a cookie when the user logs in.
The cookie is sent to the user’s browser.
With every subsequent request, the browser sends the cookie back to the server.
Example (HTTP):http Set-Cookie: sessionId=abc123; HttpOnly; Secure; Path=/;
Use Case: Persistent login, especially for websites with session-based authentication.
2. Sessions
Sessions store user-specific data on the server. When a user logs in, the server creates a session and assigns a unique session ID. This ID is shared with the client, typically through a cookie.
Key Features:
Data is stored server-side, reducing the risk of client-side tampering.
Session data can include user-specific state, preferences, or permissions.
Requires server resources to manage.
How It Works:
User logs in, and the server creates a session.
A session ID is sent to the client (via a cookie or request).
The server retrieves session data using the session ID.
Example (Python Flask):python from flask import session# Set session data session['user_id'] = user.id# Get session data user_id = session.get('user_id')
Use Case: Suitable for server-rendered web applications requiring state management.
3. JSON Web Tokens (JWT)
JWTs are self-contained, compact tokens encoded in a URL-safe format. They consist of three parts: Header, Payload, and Signature. The payload often contains claims (e.g., user ID, roles, expiration time).
Key Features:
Stateless: No server-side storage needed.
Can be signed and optionally encrypted for security.
Suitable for distributed systems like microservices.
How It Works:
The server generates a JWT upon user login.
The JWT is sent to the client and stored (e.g., in local storage or cookies).
The client sends the JWT with each request (commonly in the Authorization header).
The server validates the JWT using its signature.
Example (Python):pythonimport jwt# Create a token payload = {"user_id": 123, "exp": 1672531199} secret = "my_secret_key" token = jwt.encode(payload, secret, algorithm="HS256")# Decode a token decoded = jwt.decode(token, secret, algorithms=["HS256"])
Use Case: Best for stateless authentication in APIs and microservices.
Choosing the Right Approach
MethodBest ForDrawbackCookiesPersistent client-side state managementVulnerable to client-side risksSessionsServer-side state managementScales with server resourcesJWTStateless, distributed systemsLarger token size
Conclusion
Cookies, sessions, and JWTs each have their strengths and trade-offs. The choice depends on your application’s architecture and requirements:
Cookies and sessions are ideal for traditional server-side web apps.
JWTs excel in stateless, distributed systems like APIs or microservices.
Understanding these mechanisms empowers you to design secure, scalable, and efficient authentication systems for your applications.

0 notes
Text
I wrote something in Python recently to take images from my Instagram account and post them to a blog running Ghost CMS.
You'd be right to ask 'why bother', when perfectly good Zapier integrations purport to do this already but the answer is that those automations are not perfect.
Instagram changed their API to make this more difficult. The result is that now if you use the Zapier integrations to post images to Ghost CMS, after a wee while you'll find those images expired.
The solution I went for, which definitely breaks the terms of service, is to copy them off Instagram the moment they get posted and upload them to Ghost where they can also live forever independantly. No expiry.
Getting them from instagram was reasonably simple, by heading to facebook and generating a user-access-token for myself, then writing something that uses requests to fetch them.
Getting them uploaded to Ghost turned out to be another matter.
```
{'errors': [{'message': 'Please select an image.', 'context': None, 'type': 'ValidationError', 'details': None, 'property': None, 'help': None, 'code': None, 'id': 'f433410-d8d3-11eb-888d-0367eed631f9'}] }
12345678910Dear Lord, please accept my offer of a jpeg {'errors': [{'message': 'Please select a valid image.', 'context': None, 'type': 'UnsupportedMediaTypeError', 'details': None, 'property': None, 'help': None, 'code': None, 'id': '513cb280-d8d8-11eb-558d-8e8a896fff43'}] }
```
12345678910Forgive me Lord, for my unsupported offering of a jpeg.
The file would upload but would then be rejected as invalid or unsupported.
The Ghost Admin API docs offer just a single CURL command as an example, which also failed with these message. The docs also states you need so send a purpose with your request so that Ghost can decide where to store it, but it turns out you don't need to do this.��
Here are the relevant upload bits, that worked for me.
ghost_key=putyourkey:inhere blgo_url='my.blog.com' def upload_image(local_file): token = generate_token() headers = { 'Authorization': f"Ghost {token}", } files = { 'file': (local_file, open(local_file, 'rb'), 'image/jpeg') } response = requests.post(f"https://{blog_url}/ghost/api/v3/admin/images/upload/", headers=headers, files=files) def generate_token(): ghost_id, ghost_secret = ghost_key.split(':') iat = int(date.now().timestamp()) header = {'alg': 'HS256', 'typ': 'JWT', 'kid': ghost_id} payload = { 'iat': iat, 'exp': iat + 5 * 60, 'aud': '/v3/admin/' } token = jwt.encode(payload, bytes.fromhex(ghost_secret), algorithm='HS256', headers=header) print(token) return(token)
12345678910111213141516171819202122232425262728293031323334
Ensure you use files in your request. Make sure the value of file is a tuple containing the file-name, the opened binary file and then the content-type. Don't try to specify a purpose field.
Easy when you know how eh.
0 notes
Text
PyJWT or a Flask Extension?
In our last blog post on JWT, we saw code examples based on the PyJWT library. A quick Google search also revealed a couple of Flask-specific libraries. What do we use?
We can implement the functionality with PyJWT. It will allow us fine-grained control. We would be able to customize every aspect of how the authentication process works. On the other hand, if we use Flask extensions, we would need to do less since these libraries or extensions already provide some sort of integrations with Flask itself. Also personally, I tend to choose my framework-specific libraries for a task. They reduce the number of tasks required to get things going.
In this blog post, we would be using the Flask-JWT package.

Getting Started
Before we can begin, we have to install the package using pip.
pip install Flask-JWT
We also need an API endpoint that we want to secure. We can refer to the initial code we wrote for our HTTP Auth tutorial.
from flask import Flask
from flask_restful import Resource, Api
app = Flask(__name__)
api = Api(app, prefix=”/api/v1")
class PrivateResource(Resource):
def get(self):
return {“meaning_of_life”: 42}
api.add_resource(PrivateResource, ‘/private’)
if __name__ == ‘__main__’:
app.run(debug=True)
Now we work on securing it.
Flask JWT Conventions
Flask JWT has the following convention:
There need to be two functions — one for authenticating the user, this would be quite similar to the verify the function. The second function’s job is to identify the user from a token. Let’s call this function identity.
The authentication function must return an object instance that has an attribute named id.
To secure an endpoint, we use the @jwt_required decorator.
An API endpoint is set up at /auth that accepts username and password via JSON payload and returns access_token which is the JSON Web Token we can use.
We must pass the token as part of the Authorization header, like — JWT <token>.
Authentication and Identity
First, let’s write the function that will authenticate the user. The function will take in username and password and return an object instance that has the attribute. In general, we would use the database and the id would be the user id. But for this example, we would just create an object with an id of our choice.
USER_DATA = {
“masnun”: “abc123”
}
class User(object):
def __init__(self, id):
self.id = id
def __str__(self):
return “User(id=’%s’)” % self.id
def verify(username, password):
if not (username and password):
return False
if USER_DATA.get(username) == password:
return User(id=123)
We are storing the user details in a dictionary-like before. We have created a user class with id attributes so we can fulfill the requirement of having an id attribute. In our function, we compare the username and password and if it matches, we return an instance with the being 123. We will use this function to verify user logins.
Next, we need the identity function that will give us user details for a logged-in user.
def identity(payload):
user_id = payload[‘identity’]
return {“user_id”: user_id}
The identity the function will receive the decoded JWT.
An example would be like:
{‘exp’: 1494589408, ‘iat’: 1494589108, ‘nbf’: 1494589108, ‘identity’: 123}
Note the identity key in the dictionary. It’s the value we set in the id attribute of the object returned from the verify function. We should load the user details based on this value. But since we are not using the database, we are just constructing a simple dictionary with the user id.
Securing Endpoint
Now that we have a function to authenticate and another function to identify the user, we can start integrating Flask JWT with our REST API. First the imports:
from flask_jwt import JWT, jwt_required
Then we construct the jwt instance:
jwt = JWT(app, verify, identity)
We pass the flask app instance, the authentication function and the identity function to the JWT class.
Then in the resource, we use the @jwt_required decorator to enforce authentication.
class PrivateResource(Resource):
@jwt_required()
def get(self):
return {“meaning_of_life”: 42}
Please note the jwt_required decorator takes a parameter (realm) which has a default value of None. Since it takes the parameter, we must use the parentheses to call the function first — @jwt_required() and not just @jwt_required. If this doesn’t make sense right away, don’t worry, please do some study on how decorators work in Python and it will come to you.
Here’s the full code:
from flask import Flask
from flask_restful import Resource, Api
from flask_jwt import JWT, jwt_required
app = Flask(__name__)
app.config[‘SECRET_KEY’] = ‘super-secret’
api = Api(app, prefix=”/api/v1")
USER_DATA = {
“masnun”: “abc123”
}
class User(object):
def __init__(self, id):
self.id = id
def __str__(self):
return “User(id=’%s’)” % self.id
def verify(username, password):
if not (username and password):
return False
if USER_DATA.get(username) == password:
return User(id=123)
def identity(payload):
user_id = payload[‘identity’]
return {“user_id”: user_id}
jwt = JWT(app, verify, identity)
class PrivateResource(Resource):
@jwt_required()
def get(self):
return {“meaning_of_life”: 42}
api.add_resource(PrivateResource, ‘/private’)
if __name__ == ‘__main__’:
app.run(debug=True)
Let’s try it out.
Trying It Out
Run the app and try to access the secured resource:
$ curl -X GET http://localhost:5000/api/v1/private
{
“description”: “Request does not contain an access token”,
“error”: “Authorization Required”,
“status_code”: 401
}
Makes sense. The endpoint now requires an authorization token. But we don’t have one, yet!
Let’s get one — we must send a POST request to /auth with a JSON payload containing username and password. Please note, the API prefix is not used, that is the URL for the auth endpoint is not /api/v1/auth. But it is just /auth.
$ curl -H “Content-Type: application/json” -X POST -d ‘{“username”:”masnun”,”password”:”abc123"}’ http://localhost:5000/auth
{
“access_token”: “eyJ0eXAiOiJKV1QiLCJhbGciOiJIUzI1NiJ9.eyJleHAiOjE0OTQ1OTE4MjcsIml
hdCI6MTQ5NDU5MTUyNywibmJmIjoxNDk0NTkxNTI3LCJpZGVudGl0eSI6MTIzfQ.q0p02opL0OxL7EGD7
wiLbXbdfP8xQ7rXf7–3Iggqdi4"
}
Yes, we got it. Now let’s use it to access the resource.
curl -X GET http://localhost:5000/api/v1/private -H “Authorization: JWT eyJ0eXAiOi
JKV1QiLCJhbGciOiJIUzI1NiJ9.eyJleHAiOjE0OTQ1OTE4MjcsImlhdCI6MTQ5NDU5MTUyNywibmJmIjo
xNDk0NTkxNTI3LCJpZGVudGl0eSI6MTIzfQ.q0p02opL0OxL7EGD7wiLbXbdfP8xQ7rXf7–3Iggqdi4"
{
“meaning_of_life”: 42
}
Yes, it worked! Now our JWT authentication is working.
Getting the Authenticated User
Once our JWT authentication is functional, we can get the currently authenticated user by using the current_identity object.
Let’s add the import:
from flask_jwt import JWT, jwt_required, current_identity
And then let’s update our resource to return the logged in user identity.
class PrivateResource(Resource):
@jwt_required()
def get(self):
return dict(current_identity)
The current_identity the object is a LocalProxy instance that can’t be directly JSON serialized. But if we pass it to a dict() call, we can get a dictionary representation.
Now let’s try it out:
$ curl -X GET http://localhost:5000/api/v1/private -H “Authorization: JWT eyJ0eXAi
OiJKV1QiLCJhbGciOiJIUzI1NiJ9.eyJleHAiOjE0OTQ1OTE4MjcsImlhdCI6MTQ5NDU5MTUyNywibmJmI
joxNDk0NTkxNTI3LCJpZGVudGl0eSI6MTIzfQ.q0p02opL0OxL7EGD7wiLbXbdfP8xQ7rXf7–3Iggqdi4"
{
“user_id”: 123
}
As we can see the current_identity the object returns the exact same data our identity the function returns because Flask JWT uses that function to load the user identity.
Do share your feedback with us. We hope you enjoyed this post.
To know more about our services please visit: https://www.loginworks.com/web-scraping-services
0 notes
Link
The best part of any idea is when it's fresh and new, and you don't yet know the limitations and restrictions. It can be almost magical! Oh, the customers you'll help and the money you'll make! All you have to do first is... write a lot of code.
How much code? Well, obviously that depends on your idea and what business you're planning on setting up. But there's a huge amount of code you'll need and want for any SaaS business, and a lot of it you'll have to write before you can write even line one of your business logic.
Where did I come by this list? Well, I've spent quite a few years working on SaaS businesses at a variety of stages of maturity, and I keep my ear to the ground by listening to good SaaS podcasts. I noticed that there are a lot of common tasks necessary to launch a new SaaS product, and I decided to help fix that problem by taking it all and packing it into a SaaS starter kit to help cut down on the code you need to write (and the time you need to spend) to launch your business.
Let's explore that huge list of code.
Stuff You're Gonna Need
The basics
Okay, first you're gonna need something to start from. Unless you plan on writing everything from scratch, you'll need to set up some common frameworks to enable a modern web app to run. On the front-end, that's something like:
A bundler/build system. Examples: Webpack, Parcel, Gulp, Grunt.
Babel, if you want to use modern JavaScript features on older browsers.
A UI library. Examples: React, Vue, Angular, Elm.
A CSS framework. Examples: Bootstrap, TailwindCSS, Semantic, Bulma.
An HTTP requests library, if your framework doesn't come with one. Examples: Superagent, Axios, got.
A testing library. Examples: Jest, Mocha, Jasmine, Ava.
Getting all these various tools set up to work together will take some time as well. Just searching "configuring webpack for X" reveals a minefield of blog posts written for various versions of webpack and X. Some will help, some won't, and sometimes only experimentation will reveal which is which.
Thankfully, there are tools that make a lot of this easier. Next.js for React and Nuxt.js for Vue are just two examples, but there are many flavours of UI frameworks that can significantly reduce the setup time for the above. Of course, now you have to learn how your UI framework works as well as your UI library, but generally that trade-off is worthwhile.
Moving on to the back-end, you're going to want a web framework. This will largely depend on the language you're working with, but you have plenty to choose from:
Node.js: Fastify, Koa, and Express.
PHP: Laravel, Symfony, and CakePHP.
Python: Django, Pylons, and Zope.
Go: Gin, Beego, Martini.
Ruby: Sinatra, Hanami, and of course Rails.
This list is by no means extensive - just tracking down all the available frameworks for a single language would be an article in it's own. But it does display the variety of choices available. Each language and framework has its own capabilities and trade-offs, and that's something you'll have to take into account before you make your choice. (Or after! It's just harder to change your mind at that point.)
Development build system
Actually, let's take a step back for a second. Sure, those are the basics, but you still need someplace to run all that code, and in a way that speeds up your evaluation of code changes.
You could run everything on your local machine, but that's rarely ideal. For starters, your local environment is highly unlikely to resemble your production environment, and you don't want seemingly-minor differences causing problems when you deploy. Plus, it's very hard (comparatively) to automate local environment setup, so adding anyone else to the project is bound to cause conflict, especially if they want to use an entirely different OS from you.
You have a lot of options for this, but the two easiest/most-common are:
1) Use a Virtual Machine
Virtual Machines have the advantage of being very simple to understand and work with. If you know how to navigate your own system, you'll know how to navigate a virtual one just fine. They're easily automated with something like Ansible, and easy to use for development with something like Vagrant. Plus, you'll likely only need to modify a bit of your Ansible scripts or variables to turn your development deploy script into a production deploy script.
But they can be a bit heavy, as they are emulating an entire other machine. There are good solutions to this (enabling CPU optimizations, using AMIs or other machine images to reduce deploy time, etc), but there's also an alternative.
2) Use docker
Docker containers are crazy lightweight. Essentially, they just run the bits of the system required to run your code, as dictated by you. Plus, a great many CI systems accept dockerfiles as input to automatically run tests and deploys of your code. A well-built docker setup is a thing of beauty.
However, docker can be a bit confusing. It requires learning a different mindset and tooling from working directly on a machine or virtual machine, and can lead you naturally towards more-complex solutions where a simpler one would otherwise work better for your use case. (Hello, microservices!)
Reducing your development cycle time with watchers
A small thing that can save you a lot of time is setting watchers on your code. These are programs that keep an eye out for changes in your code, then re-compile and restart servers so that the latest version of your code is always running when you refresh your browser. Many of the tools you'll use will come with built-in watchers (webpack, for example), but for others, you'll need to install your own (nodemon to watch your Node.js server).
And like with anything else, there's configuration you have to do to make sure that each watcher is only watching the correct directories, that files are shared between your host system and VM/docker container in a fast method that won't trip up your watchers, etc.
Application template & UI architecture
With any luck, you'll have a design already to work with, but you still need to translate that design into an application template and common UI components and architecture. A good CSS framework can really help here, allowing you to set up common colours and sizes that you can use across the entire project, and using component-based development can allow you to, say, create a TextInput element once, then use it across your project multiple times. You'll also need to set up some form of menu infrastructure that allows you to enable/disable or hide/show certain menus based on user access or page location.
Logging
Proper logging can give you more and more-useful information than a slapdash setup can. You'll want to log requests and request data, useful checkpoint information, and the usual stuff - errors, stack traces, etc. But you also want to make sure not to log too much. For example, you'll obviously want to omit passwords, but you should also in general omit headers, especially headers containing authentication tokens, for obvious security reasons.
Database migrations
Database schemas are part of your app as well, and that means they need to be represented as code somewhere and checked into version control. Manually updating your production database to match your development database is amateur-hour.
So in addition to your back-end frameworks and your front-end frameworks, you'll need a database migration framework, and you'll need to write migrations for it.
Users
Users are the fundamental primitive of a SaaS application, and there's a common set of interactions you'll require: sign-up, login, logout, edit profile, etc. But sitting underneath all that is a bit of a contentious topic: user authentication.
There are a bunch of ways to do user authentication, but most of them are wrong and will end up leaving you with security vulnerabilities. JWTs are popular and can be secured, but you need to follow some best practices:
Don't store JWTs in localStorage, since any JS that runs on your page can access them, and if you get hit with a cross-site scripting attack, they can export your tokens en masse.
Store JWTs in secure, HTTPS-only cookies.
Include a global version code in your JWTs so that you can instantly invalidate all JWTs every issued.
Include a user version code in your JWTs so that a user can instantly invalidate all JWTs ever issued for them specifically. This is useful to include a "log out all devices" option for users who may have lost a device or had their account compromised.
Send a Cross-Site Request Forgery token with every request as a javascript-injected header, and make sure that token matches one you've stored for the user on login.
You'll notice a lot of these practices are "in case of a security breach", and you'd hope that if you did everything correctly, they'd be unnecessary. However, that's a fantasy and should be treated as such. No site is 100% secure and bug-free, and yours won't be either. Instead, you need to work in layers, so that if any one layer of security fails, there are still other layers and countermeasures in place.
Form validation
When users sign up, log in, and really all throughout your app, they'll be filling out and submitting forms. These forms will need to be validated for the appropriate data, preferably on both the front-end (before the data is sent to the server, to provide the best experience to the user) and the back-end (to ensure no junk data is saved to the database). If your back-end isn't in JavaScript, you'll need validation libraries for both languages that have the same semantics.
Transactional email
Transactional email is the email you send when certain events happen for your users. These can be lifecycle events, like welcome emails, "trial about to expire" emails, etc, or service-related emails like email address confirmation emails, password reset emails, notifications about your service, etc.
You'll need to find and configure a decent mailer module, and usually perform some DNS configuration at your mail service host's instruction. Some mailer modules will come with template capabilities built-in, while others will leave you to install your own.
Subscriptions/Payments
Getting paid is why most people are going to start a SaaS in the first place, so processing payments and subscriptions is mightily important. Choosing and setting up an account with a payments provider is up to individual preference, but Stripe offers probably the best API and developer experience out there, while PayPal is usually the most-requested provider of choice from users. It's likely that you'll want to offer multiple ways to pay through multiple providers, just to ensure that no potential customer is left behind.
If you offer subscriptions, you'll want to allow users to choose between a monthly billing cycle and an annual one. Annual billing is a great way for dedicated users to save money, while also offering you the benefits of higher LTV and getting you the money up-front, increasing your liquidity.
If you have multiple levels of plans, you'll need to implement the ability for users to change between those levels, usually offering a prorated fee for the month of transition.
Though it's definitely not the "happy path", you'll need to offer users the ability to cancel subscriptions. You shouldn't add extra friction to this, since some users will just be cancelling temporarily, and you want to leave a good impression on them, but it's important to try to capture the reason they're leaving, so you can improve your service.
Production deploy system
Once you've fully-developed your fancy new SaaS, you're going to need to put it up on the web for people to interact with, and for that, you're going to need a deploy system. Even if that system is largely manual, you're going to want defined, repeatable, documented steps that ensure that deploys go off without incident.
You're going to want to cover the following bases, at a minimum:
Ensure server is reachable
Ensure server is set up correctly (correct runtime libraries installed, etc.)
Update code
Run DB migrations
Ensure front-end UI code is not cached in user's browser (update ETags, etc)
There are a whole lot more things you can do to ensure a safe and clean deploy, but this list is at least a good starting place.
Production backups
Much like how we discussed security in layers above, backups of production data are another layer of defence in case something goes wrong. If you're still using manual processes to alter user data, it can be very easy for a slip of the keys to accidentally alter or delete the wrong user's data. And if you're using automated processes, it's usually a lot harder to make those simple mistakes, but more complex mistakes can make it very easy to edit or delete huge swathes of user data. Proper backups will one day save your bacon, bet on it.
What makes a proper backup, then? That's a whole topic on its own, but you should start with:
Complete: Don't just backup the database - if the user uploads files, those should be backed up as well.
Regular: Backups should happen on a schedule, ideally daily or more, for more-volatile data.
Retained: You'll want to keep your backups around for a while, though you might want to set up a schedule for longer-retained backups. (i.e. Daily backups retained for 30 days, weekly backups retained for 3 months, monthly backups retained for 1 year.)
Secure: Your backups should be kept with the same level of security as your data. If your data is encrypted at rest, your backups should be as well. Make sure to keep your encryption keys secure. If you lose those keys, you lose the backup.
Tested: A backup that hasn't been tested is not a backup. You don't want to find out that your backup process doesn't work (or stopped working) when you need to restore critical data. There should be an automated test process that runs after backups are created.
If you're lucky, your hosting platform will offer some level of database backup as a service, which will save you a lot of time and effort setting up. It likely won't cover 100% of your needs, but it will get you a lot closer than starting from scratch.
Stuff You're Gonna Want
Okay! That'll get you off the ground, but once you start seeing any success at all, you're going to start wanting something a little more... robust. Eventually, manually editing the database is going to get tedious (not to mention dangerous), and users will start asking the same questions over and over. You're going to have to slow down on development related to your core business and implement a bunch more supporting features.
Admin console
You can edit and delete users directly from the database, sure, but all it takes is one time forgetting to add a WHERE or LIMIT clause to a statement to make you long for a proper administration console. (And backups. You set up backups, right?)
An admin console is also a great place for dashboards, user statistics, summaries, metrics, etc. Your admin console can become your one-stop-shop for running your SaaS.
Documentation
Documentation can serve multiple purposes. Primarily, it's for user education, but conveniently, this is user education you don't have to do manually. Think about it like automated customer support - a user that answer their question from your documentation is a user that doesn't email you.
If your documentation is publicly available, it can also help users make purchasing decisions. By answering questions about your service openly and up-front, you can let users more-easily determine if your service will work for them, as well as reassure them about your transparency.
Public documentation also helps with SEO, since your keywords will likely naturally come up frequently on your documentation pages.
Billing history
Once you have a sufficient number or sufficiently large customers, you'll likely start getting requests around tax time for their billing history. Your payment system will keep track of payments for you, and many of them will be able to generate invoices from their web interface that you can send to customers who request it.
That might hold you for a while, but eventually, you'll want this functionality built into your system, so clients can self-serve, and your customer support team can focus on more-important issues.
Stuff That's Gonna Make Your Life A Lot Easier
Making the right decisions early on and as your service grows can have compounding benefits, but frequently, it's difficult to find time to devote to tasks that aren't seen as critical. Still, if you can make the time to invest in them, it can pay off for you and your users as well.
Pause subscriptions & credit
Especially now, when people are trying to cut costs in both their lives and businesses, the ability to pause a subscription instead of cancel it outright can mean the difference between saving a customer and losing them. Similarly, the ability to credit customers some free time or usage on your service can aid in retention, especially if something goes wrong and you want to make it up to them.
User ID obfuscation
When displaying publicly-visible auto-incrementing IDs (such as user IDs), it can be a good idea to obfuscate what that number actually is. This prevents competitors and skittish customers from identifying how much usage your service has seen so far. A great library for this is Hashids, which has many compatible implementations across many languages.
Limited number of development languages
The fewer languages your app uses, the less common code that you'll have to duplicate between the various services and projects you require. Some are going to be unavoidable, such as JavaScript if you have a web app with any serious browser interactions, Swift for iOS, and Java/Kotlin for Android. Web apps, however, offer a truly terrifying number of languages you can choose for server code: PHP, Ruby, JavaScript, Typescript, Go, Rust, Java, Python, Perl, Scala, Erlang, and even C# and C++. In a microservices environment, it can be tempting to use a variety of languages for your different services, but that means redeveloping and maintaining common libraries for every new language you want to include.
In extreme situations, you can limit yourself to just one language, even across multiple disparate platforms. JavaScript can do front-end and back-end web development, desktop development through Electron, and mobile development through Cordova. There are definite trade-offs for going this route, but for a smaller studio, this opens up a multi-platform strategy on a limited budget.
Linters
Linters like ESLint, RuboCop, and Flake8 can make a marked improvement in your code. They can catch stylistic errors long before they make it into production, and many stylistic errors are really just shortcomings of your chosen language, where hard-to-find bugs breed and propagate.
Monorepo
Monorepos are great! They're especially great if you're just starting your SaaS, as they're far simpler than trying to work with multiple repositories when managing dependencies, figuring out code re-use, and ensuring that all the correct code is committed before deploys go out.
Everyone's situation is different, of course, and it may make sense in your case to go with multiple repositories, or even one day switch to such a strategy, but when you're starting out, you want to limit the complexity of your project as much as you can, and the monorepo strategy will definitely pay off in this regard.
User impersonation
Being able to log in as your users from your Admin Console can help immensely when trying to sort out customer service issues. Instead of having several back-and-forth "what do you see now?" emails, you can just log in as them and find out. There are a lot of things to consider when writing a user impersonation feature, however: Do you require special access to impersonate users? Do you require the user's permission to impersonate them? Are actions taken while impersonated logged? Can you even take actions when impersonating, or view only? How do you indicate that you are impersonating a user (vs. logged in under your own account)?
These aren't the only considerations, but ideally it's enough to make the point that there's a lot more to user impersonation than simply changing a token ID.
Improved production deployments
Once you start getting enough customers with sufficient expectations, you'll have to make modifications to your deploy process for increased reliability and flexibility:
Updating in-place won't work forever. Eventually, switching to blue/green deploys or even something as simple as displaying a maintenance mode page while you update will be necessary to keep people from interacting with the system while performing significant changes.
If you have a complex SPA, you'll want to be able to inform users when you've made an update that requires reloading that code. Tracking version numbers both in your UI code and on the server will allow you to pop up a notification, allowing the user to save their work and then reload.
Ideally, you should be using a bug tracking service. If you also send your source maps to them when performing a deploy, they can provide even better error messages when UI errors occur.
Serving your UI JavaScript from your server is simple and easy, but users appreciate fast, and your job is to do the hard work so that users have a good time. A relatively easy way to speed up your user's experience is to upload your UI JavaScript on release to a CDN. This is a one-time change you need to make that pays dividends for your users going forwards.
You'll likely be manually checking that releases go as expected, but automated smoke tests that run on every deploy are a better way to catch issues that might otherwise slip by you when you're tired, distracted, or in a hurry.
What's the alternative?
If you don't want to start from an empty folder and write all this code yourself, you should consider using a SaaS starter kit, and it just so happens that you're reading the blog for one right now! With Nodewood, you can get started writing business logic today, saving weeks or even months of development time.
Nodewood starts you off with a full working web app, with a Vue front-end and Express back-end, built entirely from JavaScript. Form validation, testing, user authentication and management, subscription/billing are all built-in, alongside a sleek and customizable application theme with an easy-to-extend admin console.
0 notes
Text
[Udemy] Learning MEAN Stack By Building Real World Application
Learn how to build Full-Stack Web Application with Nodejs, Express, MongoDB, Angular5/6, Angular Material, and Passport What Will I Learn? Integrate Any Angular Application with Nodejs CURD(Create,Read,Update,Delete) Operation with Nodejs, Express and Mongoose CURD(Create,Read,Update,Delete) Operation with Nodejs, Express and Mongoose JSON Web Token Authentication with PassportJs in MEAN Stack Social(Twitter, Github, Google) Authentication with PassportJs in MEAN Stack Send Email in Nodejs Requirements Basic NodeJS/Express and Angular Experience is required Basic knowledge of HTML, CSS, and Javascript is required Description Today many enterprise leaders are struggling to use the diverse options available to create web development projects. With technological advancements taking place every few months, it becomes difficult to keep pace unless you are a fast learner. Just when the web development community was getting comfortable with LAMP, MEAN stack made its entry and boy it has completely redefined how web developers work. MEAN Stack is an acronym for MongoDB, Express, Angular and Node.js – whereby all these four are integrated to form solution-built full-stack JavaScript applications. Almost, every web development player in the market is trying to become a MEAN stack app developer. Why MEAN Stack App Development is such a great choice? Using the same programming language in both the front and back ends of the application has multiple benefits. For one thing, it makes data communication between server and client simpler and faster. It makes modifications to either end easier. It also promotes reusing code across the multiple technologies that in turn helps keep the application secure and stable. 1)Time Saver – as all the JavaScript libraries are combined together, it saves a lot of time for the developers as they can access all the libraries at one go. The time saved here can be used to advance the project further. 2) Speedy data storage and retrieval – MongoDB does not require any predefined regulation to establish field relations unlike MySQL database that cannot operate without predefined database schemas and rules. Moreover, addition or deletion of records is very easy in MongoDB – all thanks to the dynamic schemas that it relies on. All this ensures that the system becomes efficient and more speedy regular functions can be performed. 3) Uniform Programming Language – what works in favor of MEAN stack is that one can control both the front end and back end activities because of JSON which is compatible with MongoDB database, Express and Node.js server and Angular. As such the need for any other programming languages like PYTHON or PHP. Furthermore, node.js framework reduces the page load time making it a hot favorite for web based applications. 4) OS Compatibility – MEAN stack is compatible with MS Windows, MAC OS and Linux. You still have doubts about the feasibility of MEAN stack? 5) Agility and Quality of Apps – the basic architecture of MEAN is set up to support automated testing; as such developers can easily make corrections as and when the situation arises. Hence one can expect agile and quality app development with MEAN stack. 6) MEAN stack supports the MVC architecture –The single programming language and flexible database of MEAN stack allows it to handle the complex procedures of MVC framework. This ensures that development work does not become tedious or less productive. You will learn how to: Create Nodejs server with Express.js Use ES6 with Nodejs Create Restful APIS with Nodejs, Express and Mongoose Secure Restful APIS with Passport and JWT Social(Twitter, Google, Github) Authentication in Nodejs CRUD(Create, Read, Update, Delete) Operation in Angular Build Angular App with Angular Material, Material Data Table, and Material Dialog Learn how to use Angular Material Components in Real world Application JSON Web Token Authentication in Angular Social(Twitter, Google, Github) Authentication in Angular Generate PDF File in Nodejs Download PDF File in Angular Document RESTFUL APIS with Swagger Send Email in Nodejs Who is the target audience? Intermediate Angular Developer who want to learn full-stack web developement Nodejs Developer who want to learn full-stack web development source https://ttorial.com/learning-mean-stack-building-real-world-application
source https://ttorialcom.tumblr.com/post/177492200658
0 notes
Text
[Udemy] Learning MEAN Stack By Building Real World Application
Learn how to build Full-Stack Web Application with Nodejs, Express, MongoDB, Angular5/6, Angular Material, and Passport What Will I Learn? Integrate Any Angular Application with Nodejs CURD(Create,Read,Update,Delete) Operation with Nodejs, Express and Mongoose CURD(Create,Read,Update,Delete) Operation with Nodejs, Express and Mongoose JSON Web Token Authentication with PassportJs in MEAN Stack Social(Twitter, Github, Google) Authentication with PassportJs in MEAN Stack Send Email in Nodejs Requirements Basic NodeJS/Express and Angular Experience is required Basic knowledge of HTML, CSS, and Javascript is required Description Today many enterprise leaders are struggling to use the diverse options available to create web development projects. With technological advancements taking place every few months, it becomes difficult to keep pace unless you are a fast learner. Just when the web development community was getting comfortable with LAMP, MEAN stack made its entry and boy it has completely redefined how web developers work. MEAN Stack is an acronym for MongoDB, Express, Angular and Node.js – whereby all these four are integrated to form solution-built full-stack JavaScript applications. Almost, every web development player in the market is trying to become a MEAN stack app developer. Why MEAN Stack App Development is such a great choice? Using the same programming language in both the front and back ends of the application has multiple benefits. For one thing, it makes data communication between server and client simpler and faster. It makes modifications to either end easier. It also promotes reusing code across the multiple technologies that in turn helps keep the application secure and stable. 1)Time Saver – as all the JavaScript libraries are combined together, it saves a lot of time for the developers as they can access all the libraries at one go. The time saved here can be used to advance the project further. 2) Speedy data storage and retrieval – MongoDB does not require any predefined regulation to establish field relations unlike MySQL database that cannot operate without predefined database schemas and rules. Moreover, addition or deletion of records is very easy in MongoDB – all thanks to the dynamic schemas that it relies on. All this ensures that the system becomes efficient and more speedy regular functions can be performed. 3) Uniform Programming Language – what works in favor of MEAN stack is that one can control both the front end and back end activities because of JSON which is compatible with MongoDB database, Express and Node.js server and Angular. As such the need for any other programming languages like PYTHON or PHP. Furthermore, node.js framework reduces the page load time making it a hot favorite for web based applications. 4) OS Compatibility – MEAN stack is compatible with MS Windows, MAC OS and Linux. You still have doubts about the feasibility of MEAN stack? 5) Agility and Quality of Apps – the basic architecture of MEAN is set up to support automated testing; as such developers can easily make corrections as and when the situation arises. Hence one can expect agile and quality app development with MEAN stack. 6) MEAN stack supports the MVC architecture –The single programming language and flexible database of MEAN stack allows it to handle the complex procedures of MVC framework. This ensures that development work does not become tedious or less productive. You will learn how to: Create Nodejs server with Express.js Use ES6 with Nodejs Create Restful APIS with Nodejs, Express and Mongoose Secure Restful APIS with Passport and JWT Social(Twitter, Google, Github) Authentication in Nodejs CRUD(Create, Read, Update, Delete) Operation in Angular Build Angular App with Angular Material, Material Data Table, and Material Dialog Learn how to use Angular Material Components in Real world Application JSON Web Token Authentication in Angular Social(Twitter, Google, Github) Authentication in Angular Generate PDF File in Nodejs Download PDF File in Angular Document RESTFUL APIS with Swagger Send Email in Nodejs Who is the target audience? Intermediate Angular Developer who want to learn full-stack web developement Nodejs Developer who want to learn full-stack web development source https://ttorial.com/learning-mean-stack-building-real-world-application
0 notes
Text
Pipeline API Tokens in Screwdriver
Creating Tokens
If you go to Screwdriver’s updated pipeline Secrets page, you can find a list of all your pipeline access tokens along with the option to modify, refresh, or revoke them. At the bottom of the list is a form to generate a new token.

Enter a name and optional description, then click Add. Your new pipeline token value will be displayed at the top of the Access Tokens section, but it will only be displayed once, so make sure you save it somewhere safe! This token provides admin-level access to your specific pipeline, so treat it as you would a password.
Using Tokens to Authenticate
To authenticate with your pipeline’s newly-created token, make a GET request to https://${API_URL}/v4/auth/token?api_token=${YOUR_PIPELINE_TOKEN_VALUE}. This returns a JSON object with a token field. The value of this field will be a JSON Web Token, which you can use in an Authorization header to make further requests to the Screwdriver API. This JWT will be valid for 2 hours, after which you must re-authenticate.
Example: Starting a Specific Pipeline
You can use a pipeline token similar to how you would a user token. Here’s a short example written in Python showing how you can use a Pipeline API token to start a pipeline. This script will directly call the Screwdriver API.
# Authenticate with token auth_request = get('https://api.screwdriver.cd/v4/auth/token?api_token=%s' % environ['SD_KEY']) jwt = auth_request.json()['token'] # Set headers headers = { 'Authorization': 'Bearer %s' % jwt } # Get the jobs in the pipeline jobs_request = get('https://api.screwdriver.cd/v4/pipelines/%s/jobs' % pipeline_id, headers=headers) jobId = jobs_request.json()[0]['id'] # Start the first job start_request = post('https://api.screwdriver.cd/v4/builds', headers=headers, data=dict(jobId=jobId))
Compatibility List
For pipeline tokens to work, you will need these minimum versions:
screwdrivercd/screwdriver: v0.5.389
screwdrivercd/ui: v1.0.290
Contributors
Thanks to the following people for making this feature possible:
kumada626 (from Yahoo! JAPAN)
petey
s-yoshika (from Yahoo! JAPAN)
Screwdriver is an open-source build automation platform designed for Continuous Delivery. It is built (and used) by Yahoo. Don’t hesitate to reach out if you have questions or would like to contribute: http://docs.screwdriver.cd/about/support.
0 notes
Text
API Tokens in Screwdriver
This week, we released Screwdriver API Tokens, which enable you to authenticate sessions without OAuth. This allows for some exciting new possibilities, like writing scripts to interact with Screwdriver!
Creating Tokens
If you go to Screwdriver’s new User Settings page, you can find a list of all of your tokens along with the option to modify, refresh, or revoke them. At the bottom of the list is a form you can use to generate a new token.

Enter a name and optional description, then click Add. Your new token value will be displayed at the top of the page, but it will only be displayed once, so make sure to save it somewhere safe! This token provides access to your account, so you should treat it as you would a password.
Using Tokens to Authenticate
To authenticate with your newly created token, make a GET request to https://${API_URL}/v4/auth/token?api_token=${YOUR_TOKEN_VALUE}. This returns a JSON object with a token field. The value of this field will be a JSON Web Token, which you can use in an Authorization header to make further requests to the Screwdriver API. This JWT will be valid for 12 hours, after which you must re-authenticate.
Example: Starting a Pipeline
Here’s a short example written in Python showing how you can use an API token to start a pipeline. This script will directly call the Screwdriver API.
# Authenticate with token auth_request = get('https://api.screwdriver.cd/v4/auth/token?api_token=%s' % environ['SD_KEY']) jwt = auth_request.json()['token'] # Set headers headers = { 'Authorization': 'Bearer %s' % jwt } # Get the jobs in the pipeline jobs_request = get('https://api.screwdriver.cd/v4/pipelines/%s/jobs' % pipeline_id, headers=headers) jobId = jobs_request.json()[0]['id'] # Start the first job start_request = post('https://api.screwdriver.cd/v4/builds', headers=headers, data=dict(jobId=jobId))
Design Decisions
Initially, we implemented tokens as signed JWTs as we were already using those to authenticate requests to the API. This turned out to be a mistake for a few reasons:
JWTs were designed with timed expiry, which is not a feature we wanted in API tokens
JWTs are validated by signing them with a private key when they are issued, and then checking against the associated public key. This would mean that whenever we need to rotate the key, we would invariably have to invalidate every token that had been generated.
Fortunately, it was fairly easy to iterate on this design, since most of the infrastructure we had built around creating and storing tokens was agnostic towards how the tokens were actually verified. The solution was to have tokens be random strings and create an endpoint where users could exchange their tokens for a signed JWT (as if they had logged in through OAuth). This method allows us to efficiently validate requests to the API by continuing to use JWTs while avoiding the pitfalls of using them as long-term tokens.
The question then became how to store and retrieve the tokens. We use Iron to store sensitive data in a secure fashion, so this seemed like a good starting point. Originally, the plan was that when a token was generated, we used Iron to encrypt it and store it in a database along with the ID of the user that created it. Then, when a user wanted to authenticate, they’d send in their token, we’d encrypt it with Iron, search the database for that value, and return a JWT for the associated user.
Unfortunately, Iron turned out to be non-deterministic, so if you used it to encrypt the same value twice, you wouldn’t necessarily get the same ciphertext. From that point, there were two directions we could go: add another random string to act as an ID and have the user send both values in (using the ID to find the ciphertext in the database and then unencrypting it and comparing values) or using a different encryption algorithm to secure the token. We elected to go with the latter, as our desired functionality involved only needing the users to submit one piece of information.
The penultimate iteration involved using SHA256 to hash the values, as with 2256 possible passwords, we figured it’d be fairly secure. However after taking an OWASP training workshop, we elected to use the same flow with a modification of using PBKDF2 to encrypt the tokens instead of SHA256. This would allow us to keep the same interface while also being much more secure.
Compatibility List
For tokens to work, you will need these minimum versions:
API: 0.4.279
UI: 1.0.158
NOTE: Until this bug is fixed, if you already have an existing Screwdriver cluster, you will need to manually add a text column called annotations to your pipelines database table.
Contributors
Thanks to ian-fox for making this feature (and blog post) possible.
Screwdriver is an open-source build automation platform designed for Continuous Delivery. It is built (and used) by Yahoo. Don’t hesitate to reach out if you have questions or would like to contribute: http://docs.screwdriver.cd/about/support.
0 notes