#How to generate a JSON Web Token
Explore tagged Tumblr posts
Visit Tumblr Blog
Explore Tumblr blogs with no restrictions, modern design and the best experience.
Last Seen Tumblr Blogs


Fun Fact
The “We are the 99%” Tumblr blog became the slogan for the Occupy Wall Street movement.
Text
How To Generate JWT Token
Welcome To the Article About How To Generate JWT Token (JSON Web Token)! In this article, we will discuss the concept of the JWT token, the benefits of using it, how to generate it, and the security considerations that come with it. We will also explore how to use JWT token authentication in your applications. By the end of this blog, you will have a better understanding of JWT token and how to…

View On WordPress
#generate a JSON Web Token#Generate jwt Token#How to generate a JSON Web Token#How To Generate jwt Token#how to generate jwt token in python#how to generate jwt token online
0 notes
Text
How to archive a Discord channel
I'm going to say this way ahead of time: this is going to be waaaaaaay more of an annoying process than it should be. Discord should allow exporting the channel history to server owners, without the need of doing all this. I won't blame you if you give up.
Get the DiscordChatExporter application to download the chat history
This program has two versions
one that has a graphical interface, but works on Windows only
one that has a command line interface, but works on Windows, Linux and macOS
This guide covers the first. The second one maybe next time, in another post. The second version also makes it easier to download every channel on the server.
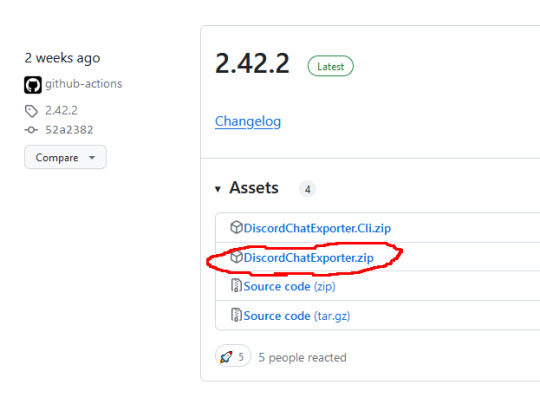
Step 1: Go to here, and download the latest version in the zip file named DiscordChatExporter.zip
Step 2: Unpack the zip file
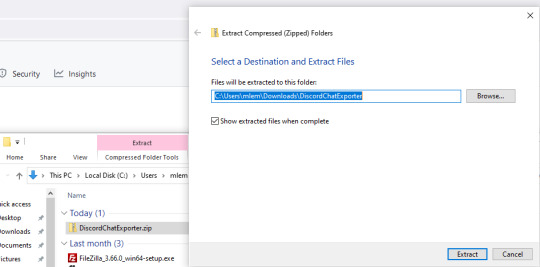
Step 3: Run DiscordChatExporter.exe

Step 4: Dismiss the scary looking warning as this will show up for any program that which developer can't afford paying $629 a year.

Step 5: Close the welcoming message and you'll see the application interface:
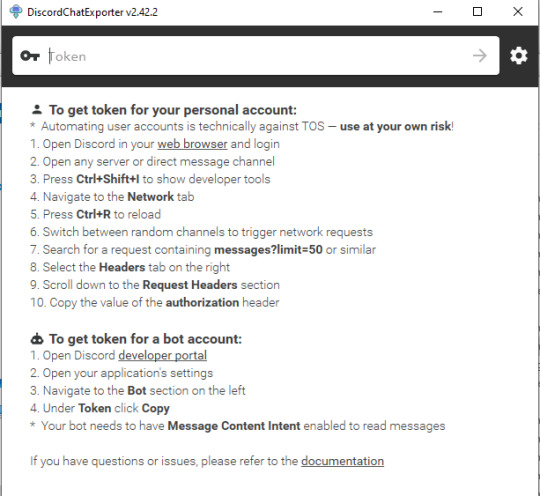
Prepare an access token. Do not share it to anyone else - treat it the same way as you treat your password.
There are two ways to do it:
Approach 1: use your own access token, will work with any channel you're able to access, including Direct Messages, but it is a violation of Discord Terms of Service, and therefore your Discord account could get banned for it. Use at your own risk.
Follow the instructions here, which are fairly detailed step-by-step instructions for Chrome, Firefox, and also the desktop app. I'm gonna expand more on approach 2 as I had to figure it out myself, and the current instructions for approach 2 are not really adequate enough. If you go with approach 1, skip down the entire section below, until the "Paste the token in the Token textbox and click the arrow button" section.
Approach 2: create a bot account, invite it to your server, and use its access token. This process assumes you have enough privileges to invite bots to the server ("Manage Server" permission), and therefore, but is also 100% okay as far as Discord's Terms of Service are concerned. It is also generally safer, as accidental leaking of the token will not risk you losing your user account.
Step 1: Go to the Discord developer portal.
Step 2: Create a new application by clicking the "New Application" button

Step 3: Name it however you want, I personally named it "mlemgrab". Agree to the scary sounding long ass terms of service.

Step 4: Go to the Bot section, scroll down to the "Privileged Gateway Intents"

Step 5: Enable the "Message Content Intent". We don't have to worry about the "if your bot is in more than 100 servers" part because our bot will never be in this many servers.
Step 6: Save changes by pressing the green button "Save Changes"

Step 7: Go to "OAuth2" followed by "URL Generator"
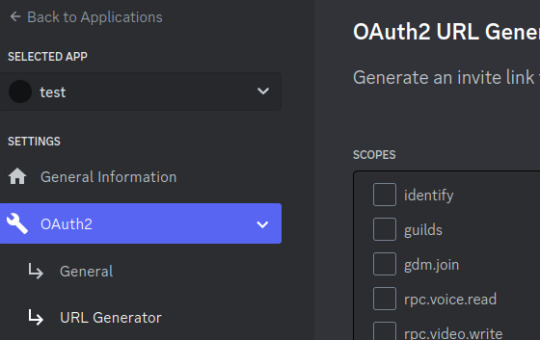
Step 8: Select the "bot" scope and then "Read Messages/View Channels" and "Read Message History" permissions

Step 9: Copy the link at the bottom and visit it:

Step 10: Press "Continue", and approve the required permissions by clicking Authorize. Once you do it, the bot account is on the server.
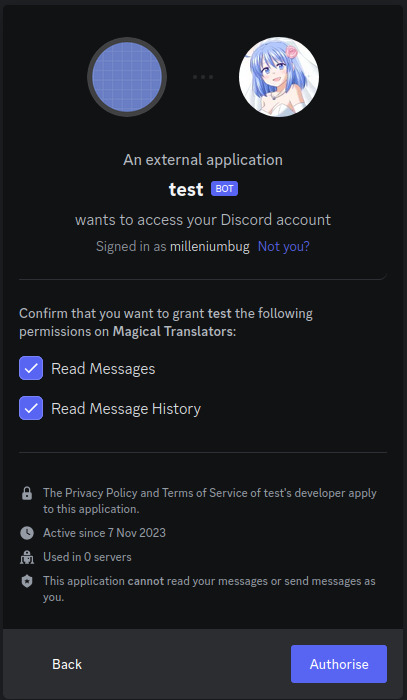
Step 11: Go to "Bot" and click the "Reset Token" button to get the token that will allow you to act (in our case, getting all the messages) using the bot user. If you lose that token, you can click reset again to get a new one.

Paste the token in the Token textbox and click the arrow button

Select the server, and then the channel you want to archive

Click the download button on the bottom right

Select where you want to save it, and the format. HTML is good for easy browsing and preview in a web browser, JSON is good for further processing (let's say someone else later writes a program for importing the conversation elsewhere).
For archivization purposes I recommend saving in both HTML and JSON.
Click "More" for more options.

By default the program will not download any message attachments nor avatars or emotes. If you want that, select "Download assets" option. Preferably while also selecting the "Reuse assets" option and selecting a single directory for assets if you want to archive multiple channels.
You can also select the specific time range and using the partition limit - split the archive into several files each containing N messages.
Press Export. Wait. The progress bar will move very slowly.

Once it is done, you should be able to open the HTML file with your web browser.
Treat anything on Discord as media that will be lost
Do not use Discord to host your files. Do not rely on Discord to preserve your text. DO NOT RELY ON DISCORD FOR ANY KIND OF PRESERVATION OR HOSTING!!
It CAN be lost, it WILL be lost! You must consider Discord as a part of the Core Internet, controlled by one company that hosts the servers.
I thought it was impressive at first that it replaced IRC, but now I am horrified. If the company behind Discord went under today, how many friends would you lose?
How many relationships? How much writing?
You may think this won't happen, but I remember when AIM went down and along with it, entire novels worth of interaction with my oldest friend.
IT CAN HAPPEN TO YOU. IT WILL HAPPEN AGAIN. NO COMPANY IS INFALLIBLE.
Back up your files! Download anything you've saved to Discord NOW, before the API changes go into effect! And DO NOT RELY ON THEM FOR HOLDING IMPORTANT FILES!
52K notes
·
View notes
Text
API Vulnerabilities in Symfony: Common Risks & Fixes
Symfony is one of the most robust PHP frameworks used by enterprises and developers to build scalable and secure web applications. However, like any powerful framework, it’s not immune to security issues—especially when it comes to APIs. In this blog, we’ll explore common API vulnerabilities in Symfony, show real coding examples, and explain how to secure them effectively.

We'll also demonstrate how our Free Website Security Scanner helps identify these vulnerabilities before attackers do.
🚨 Common API Vulnerabilities in Symfony
Let’s dive into the key API vulnerabilities developers often overlook:
1. Improper Input Validation
Failure to sanitize input can lead to injection attacks.
❌ Vulnerable Code:
// src/Controller/ApiController.php public function getUser(Request $request) { $id = $request->query->get('id'); $user = $this->getDoctrine() ->getRepository(User::class) ->find("SELECT * FROM users WHERE id = $id"); return new JsonResponse($user); }
✅ Secure Code with Param Binding:
public function getUser(Request $request) { $id = (int)$request->query->get('id'); $user = $this->getDoctrine() ->getRepository(User::class) ->find($id); return new JsonResponse($user); }
Always validate and sanitize user input, especially IDs and query parameters.
2. Broken Authentication
APIs that don’t properly verify tokens or allow session hijacking are easy targets.
❌ Insecure Token Check:
if ($request->headers->get('Authorization') !== 'Bearer SECRET123') { throw new AccessDeniedHttpException('Unauthorized'); }
✅ Use Symfony’s Built-in Security:
# config/packages/security.yaml firewalls: api: pattern: ^/api/ stateless: true jwt: ~
Implement token validation using LexikJWTAuthenticationBundle to avoid manual and error-prone token checking.
3. Overexposed Data in JSON Responses
Sometimes API responses contain too much information, leading to data leakage.
❌ Unfiltered Response:
return $this->json($user); // Might include password hash or sensitive metadata
✅ Use Serialization Groups:
// src/Entity/User.php use Symfony\Component\Serializer\Annotation\Groups; class User { /** * @Groups("public") */ private $email; /** * @Groups("internal") */ private $password; } // In controller return $this->json($user, 200, [], ['groups' => 'public']);
Serialization groups help you filter sensitive fields based on context.
🛠️ How to Detect Symfony API Vulnerabilities for Free
📸 Screenshot of the Website Vulnerability Scanner tool homepage

Screenshot of the free tools webpage where you can access security assessment tools.
Manual code audits are helpful but time-consuming. You can use our free Website Security Checker to automatically scan for common security flaws including:
Open API endpoints
Broken authentication
Injection flaws
Insecure HTTP headers
🔎 Try it now: https://free.pentesttesting.com/
📸 Screenshot of an actual vulnerability report generated using the tool to check Website Vulnerability

An Example of a vulnerability assessment report generated with our free tool, providing insights into possible vulnerabilities.
✅ Our Web App Penetration Testing Services
For production apps and high-value APIs, we recommend deep testing beyond automated scans.
Our professional Web App Penetration Testing Services at Pentest Testing Corp. include:
Business logic testing
OWASP API Top 10 analysis
Manual exploitation & proof-of-concept
Detailed PDF reports
💼 Learn more: https://www.pentesttesting.com/web-app-penetration-testing-services/
📚 More Articles from Pentest Testing Corp.
For in-depth cybersecurity tips and tutorials, check out our main blog:
🔗 https://www.pentesttesting.com/blog/
Recent articles:
Laravel API Security Best Practices
XSS Mitigation in React Apps
Threat Modeling for SaaS Platforms
📬 Stay Updated: Subscribe to Our Newsletter
Join cybersecurity enthusiasts and professionals who subscribe to our weekly threat updates, tools, and exclusive research:
🔔 Subscribe on LinkedIn: https://www.linkedin.com/build-relation/newsletter-follow?entityUrn=7327563980778995713
💬 Final Thoughts
Symfony is powerful, but with great power comes great responsibility. Developers must understand API security vulnerabilities and patch them proactively. Use automated tools like ours for Website Security check, adopt secure coding practices, and consider penetration testing for maximum protection.
Happy Coding—and stay safe out there!
#cyber security#cybersecurity#data security#pentesting#security#coding#symfony#the security breach show#php#api
1 note
·
View note
Text
Understanding Authentication: Cookies, Sessions, and JWT

Understanding Authentication: Cookies, Sessions, and JWT
Authentication is a cornerstone of web security, ensuring that users can access only the resources they are authorized for. Different methods like cookies, sessions, and JSON Web Tokens (JWT) are commonly used to implement authentication. Here’s a breakdown of each method, their key features, and use cases.
1. Cookies
Cookies are small data files stored on a user’s browser and sent with every request to the server. They are often used to persist user authentication data across sessions.
Key Features:
Stored on the client side.
Can include attributes like HttpOnly, Secure, and SameSite to improve security.
Frequently used for tracking user sessions or preferences.
How It Works:
The server creates a cookie when the user logs in.
The cookie is sent to the user’s browser.
With every subsequent request, the browser sends the cookie back to the server.
Example (HTTP):http Set-Cookie: sessionId=abc123; HttpOnly; Secure; Path=/;
Use Case: Persistent login, especially for websites with session-based authentication.
2. Sessions
Sessions store user-specific data on the server. When a user logs in, the server creates a session and assigns a unique session ID. This ID is shared with the client, typically through a cookie.
Key Features:
Data is stored server-side, reducing the risk of client-side tampering.
Session data can include user-specific state, preferences, or permissions.
Requires server resources to manage.
How It Works:
User logs in, and the server creates a session.
A session ID is sent to the client (via a cookie or request).
The server retrieves session data using the session ID.
Example (Python Flask):python from flask import session# Set session data session['user_id'] = user.id# Get session data user_id = session.get('user_id')
Use Case: Suitable for server-rendered web applications requiring state management.
3. JSON Web Tokens (JWT)
JWTs are self-contained, compact tokens encoded in a URL-safe format. They consist of three parts: Header, Payload, and Signature. The payload often contains claims (e.g., user ID, roles, expiration time).
Key Features:
Stateless: No server-side storage needed.
Can be signed and optionally encrypted for security.
Suitable for distributed systems like microservices.
How It Works:
The server generates a JWT upon user login.
The JWT is sent to the client and stored (e.g., in local storage or cookies).
The client sends the JWT with each request (commonly in the Authorization header).
The server validates the JWT using its signature.
Example (Python):pythonimport jwt# Create a token payload = {"user_id": 123, "exp": 1672531199} secret = "my_secret_key" token = jwt.encode(payload, secret, algorithm="HS256")# Decode a token decoded = jwt.decode(token, secret, algorithms=["HS256"])
Use Case: Best for stateless authentication in APIs and microservices.
Choosing the Right Approach
MethodBest ForDrawbackCookiesPersistent client-side state managementVulnerable to client-side risksSessionsServer-side state managementScales with server resourcesJWTStateless, distributed systemsLarger token size
Conclusion
Cookies, sessions, and JWTs each have their strengths and trade-offs. The choice depends on your application’s architecture and requirements:
Cookies and sessions are ideal for traditional server-side web apps.
JWTs excel in stateless, distributed systems like APIs or microservices.
Understanding these mechanisms empowers you to design secure, scalable, and efficient authentication systems for your applications.

0 notes
Text
Mastering JWT Auth in Express with Practical Examples and Code
Mastering JWT Auth in Express with Real-World Examples Introduction JSON Web Token (JWT) authentication is a popular mechanism for securing web applications. It involves generating a token upon login, which can be used to verify the user’s identity on subsequent requests. In this tutorial, you’ll learn how to implement JWT auth in an Express.js application with real-world…
0 notes
Text
6 Amazing Tips for Headless WordPress Development | Island Wizards

Headless WordPress development is a new and exciting way to create flexible, fast, and modern websites. By separating WordPress as a content management system (CMS) from the front-end display, you can have total freedom to use powerful frameworks like React, Vue.js, or Next.js. But how do you get the most out of this setup? Here are six amazing tips from Island Wizards to help you succeed!
1. Choose the Right API for Your Needs
Explanation: In headless WordPress, communication happens through APIs. You can use either the REST API or GraphQL to connect your content to the front end.
Tip: GraphQL can be more flexible, allowing you to fetch only the data you need, making your site faster. At Island Wizards, we often use GraphQL for projects with complex data requirements to keep things simple and efficient.
2. Focus on Performance Optimization
Explanation: The speed of your site matters—a lot. Since headless sites depend on API calls, making them fast is crucial.
Tip: Reduce data transfer by optimizing API requests and using caching. Island Wizards recommends static site generation (SSG) whenever possible, which makes pages load lightning-fast by pre-generating content.
3. Structure Your Content Wisely
Explanation: Good content structure is the backbone of headless WordPress development. Think about how your content types, taxonomies, and fields are set up.
Tip: Use plugins like Advanced Custom Fields (ACF) to create flexible data models. This makes it easier to pull the right content for your front end. Island Wizards always starts projects by carefully planning how content should be organized.
4. Use a Reliable Front-End Framework
Explanation: Choosing the right front-end framework can make all the difference. Popular options include React, Vue.js, and Next.js.
Tip: Consider using Next.js for its server-side rendering (SSR) and static generation capabilities, which make your site faster and improve SEO. Island Wizards uses these frameworks to create responsive and user-friendly experiences.
5. Prioritize Security
Explanation: Headless WordPress setups have unique security challenges since the front end and backend are separate.
Tip: Secure API endpoints with robust authentication methods like JSON Web Tokens (JWT). Island Wizards takes security seriously, ensuring every endpoint is protected and regularly tested to prevent breaches.
6. Test and Optimize Your APIs
Explanation: Regular testing ensures that your API calls work smoothly. Slow or broken APIs can frustrate users and hurt your site's performance.
Tip: Use tools like Postman for testing API calls and integrate automated testing into your workflow. Island Wizards suggests continuous testing to catch issues early and keep everything running smoothly.
Why Island Wizards for Your Headless WordPress Development?
At Island Wizards, we specialize in creating modern, high-performance headless WordPress websites. Island Wizards team blends innovative front-end solutions with powerful WordPress backends to deliver unmatched speed, flexibility, and security. By choosing Island Wizards, you can transform your web presence and stand out from the competition.
Explore more about our service… https://islandwizards.com/blogs/difference-between-webflow-and-wordpre.. https://islandwizards.com/blogs/how-shopify-sections-can-help-you-boos..
#white label agency solution#best white label agency in uk#headless wordpress solution#best it company#shopify#wordpress#island wizards#headless wordpress development services#seo#island wizards uk'#shopify partner program#wizards island#white label agency
1 note
·
View note
Text
How to Use JWT Authentication in Slimphp Slim Skeleton API
In this tutorial, we’ll explore how to use JWT (JSON Web Tokens) in a Slimphp Slim Skeleton API. We’ll walk through the steps for implementing JWT authentication to secure your API endpoints. Additionally, we’ll cover how to generate and validate tokens efficiently. By the end, you’ll have a comprehensive understanding of how to integrate JWT into your Slimphp Slim Skeleton API to enhance…

View On WordPress
0 notes
Text
WordPress Plugin: Contact Form To Any API
Introduction
In today's web development landscape, integrating forms with APIs (Application Programming Interfaces) is a common requirement. Whether you're building a contact form, a registration form, or any other type of form, the ability to send data to a server or a third-party service is crucial. In this blog post, we'll explore how to connect a form to any API, covering the fundamental concepts and providing practical examples.

Understanding APIs
An API is a set of rules and protocols that define how different software components should interact and communicate with each other. APIs act as intermediaries, allowing applications to access and exchange data with other systems or services over the internet or within a network.
APIs can be divided into two main categories:
1. Web APIs: These APIs are designed to be accessed over the internet using standard protocols like HTTP(S). They are commonly used for integrating web applications with external services, such as social media platforms, payment gateways, or cloud storage providers.
2. Internal APIs: These APIs are used within an organization or a specific application ecosystem. They facilitate communication between different components or modules of an application, enabling data sharing and functionality integration.
Connecting a Form to an API
To connect a form to an API, you'll need to handle the form submission event and send the form data to the API endpoint using an appropriate method (e.g., GET, POST, PUT, DELETE) defined by the API's documentation. Here are the general steps involved:
1. Setting up the Form
Create an HTML form with input fields for the data you want to send to the API. Ensure that each input field has a unique `name` attribute, as this will be used to identify the data when sending it to the API.
2. Handling Form Submission
Use JavaScript to listen for the form submission event. When the form is submitted, you'll need to prevent the default behavior (which would typically cause a page refresh) and capture the form data.
3. Preparing the Data
Depending on the API's requirements, you may need to format the form data in a specific way. Common formats include JSON (JavaScript Object Notation), URL-encoded data, or multipart/form-data.
4. Sending the Request
Use JavaScript's `fetch` function or a library like Axios or jQuery to send an HTTP request to the API endpoint with the formatted form data. The request method (GET, POST, PUT, DELETE) and any additional headers or parameters will depend on the API's specifications.
5. Handling the Response
Once the API responds, you'll need to handle the response data appropriately. This may involve displaying a success message, updating the user interface, or performing additional actions based on the API's response.
Handling Different API Requirements
Different APIs may have varying requirements for data formatting and authentication. Here are some common scenarios:
1. JSON Data
Some APIs expect data in JSON format. In this case, you'll need to convert the form data to a JSON object before sending the request.
2. API Key Authentication
Some APIs require an API key for authentication. In this case, you'll need to include the API key in the request headers.
3. OAuth Authentication
For APIs that use OAuth authentication, you'll typically need to follow a multi-step process involving user authorization and obtaining an access token. This process may involve redirecting the user to the API's authentication page and handling the callback URL.
Example: Connecting a Contact Form to an API
Let's consider an example of connecting a simple contact form to an API. You'll need to create an HTML form with input fields for name, email, and message. Then, use JavaScript to listen for the form submission event and prevent the default behavior.
Next, you'll need to capture the form data and prepare it according to the API's requirements. This may involve converting the data to JSON format or formatting it as URL-encoded data.
Once the data is prepared, you can use JavaScript's `fetch` function or a library like Axios or jQuery to send an HTTP request to the API endpoint. The request method (e.g., POST, PUT) and any additional headers or parameters will depend on the API's specifications.
After sending the request, you'll need to handle the API's response. If the response is successful, you can display a success message, reset the form, or perform any other necessary actions. If there's an error, you should handle it appropriately by displaying an error message, logging the error for debugging purposes, or attempting to retry the request.
Example: Connecting a Form to an Internal API
In some cases, you may need to connect a form to an internal API within your application ecosystem. The general approach is similar to connecting to a web API, but the specific implementation details, such as authentication methods and endpoint URLs, may differ based on your application's architecture and requirements.
For example, if you're building a single-page application (SPA) with a separate backend API, you can use JavaScript to send form data to your internal API endpoints. This might involve authenticating the request with JSON Web Tokens (JWT) or other authentication mechanisms specific to your application.
Conclusion
Connecting forms to APIs is a common requirement in modern web development, enabling data exchange between applications and various services. By understanding APIs and following the steps outlined in this blog post, you can successfully integrate your forms with any API, whether it's a web API or an internal API.
Remember to consult the API's documentation for specific requirements, such as data formatting, authentication methods, and endpoint URLs. Additionally, ensure that you handle errors and provide appropriate feedback to users, enhancing the overall user experience of your application.
FAQs
Q: What is the difference between a web API and an internal API?
A: A web API is designed to be accessed over the internet using standard protocols like HTTP(S), allowing web applications to integrate with external services. An internal API, on the other hand, is used for communication between different components or modules within an organization or a specific application ecosystem.
Q: Can I use a library like Axios or jQuery instead of the `fetch` function?
A: Yes, you can use libraries like Axios or jQuery to send HTTP requests to APIs. These libraries often provide a more user-friendly API and additional features compared to the native `fetch` function.
Q: How do I handle authentication with APIs?
A: Authentication methods vary depending on the API. Common methods include API keys (included in request headers), OAuth (multi-step process involving user authorization and access tokens), and basic authentication (sending credentials with each request).
Q: What should I do if the API response is not successful?
A: If the API response is not successful (e.g., `response.ok` is false), you should handle the error appropriately. This may involve displaying an error message to the user, logging the error for debugging purposes, or attempting to retry the request.
Q: Can I use the same approach to connect a form to an internal API within my application?
A: Yes, the general approach of handling form submissions, preparing the data, and sending an HTTP request to the API endpoint remains the same, regardless of whether it's a web API or an internal API. However, the specific implementation details, such as authentication methods and endpoint URLs, may differ based on your application's architecture and requirements.
0 notes
Text
Compilator: Week in Review #1

Web development
New way to create modals using HTML only
Which open-source monospaced font is best for coding?
Drawing a star with DOMMatrix
The State of HTML 2023 survey is now open!
What are JWTs/Jots/JSON Web Tokens?
From WebGL to WebGPU
Ultimate solution for generating placeholder images
Productivity
What Causes Bad CLS and How to Fix it?
Get All That Network Activity Under Control with Priority Hints
Css
The Path To Awesome CSS Easing With The linear() Function
A (more) Modern CSS Reset
CSS Findings From The Threads App: Part 2
Responsive type scales with composable CSS utilities
JavaScript
Speeding up the JavaScript ecosystem - Polyfills gone rogue
How to Code Dark Mode for Google Sheets with Apps Script and JavaScript
Understanding the JavaScript Modulo Operator
The Origins of TypeScript: A Documentary
React
Optimizing Provider Context Usage in React
Build Your Own ChatGPT Clone with React and the OpenAI API
How to Build an Accordion Component with React.js
v0: “AI tool from Vercel that works like Midjourney for React, that is, it issues code snippets based on your requests (prompts)
Bootstrap a React app with smol developer
Understanding Props in React — A Comprehensive Guide
Vue
Clean Layout Architecture for Vue Applications
Optimizing Vue.js apps with web workers
7 Quick Tips about Vue Styles You (Might) Didn’t Know
Svelte
Introducing runes
Exploring Astro and Svelte vs. SvelteKit: A comparative guide
How to Build an Etch-A-Sketch App with Svelte
Libs & Plugins
Benchmarks for JS minifiers: babel-minify, esbuild, terser, uglify-js, swc, google closure compiler, tdewolff/minify
MouseMove - JavaScript mouse cursor behavior automation for web presentation
Browser
Nue JS is an extremely small (2.3kb) JavaScript library for creating web interfaces. This is the core of the future Nue ecosystem. It is similar to Vue.js, React.js or Svelte, but without hooks, effects, props, portals, watchers, providers, injects, suspension and other unusual abstractions in your way!
swup 4 - a universal library for creating transitions between pages. It manages the full page load life cycle and seamlessly adds animation between the current and next pages.
What's new in DevTools (Chrome 118)
WebKit features in Safari 17.0
---------
Image by vectorpocket on Freepik
0 notes
Text
This Week in Rust 463
Hello and welcome to another issue of This Week in Rust! Rust is a programming language empowering everyone to build reliable and efficient software. This is a weekly summary of its progress and community. Want something mentioned? Tweet us at @ThisWeekInRust or send us a pull request. Want to get involved? We love contributions.
This Week in Rust is openly developed on GitHub. If you find any errors in this week's issue, please submit a PR.
Updates from Rust Community
Official
Announcing the Rust Style Team
Foundation
Rust Foundation Project Grants are open for applications
Project/Tooling Updates
cargo careful: run your Rust code with extra careful debug checking
Async UI: a Rust UI Library where Everything is a Future
rust-analyzer changelog #149
Observations/Thoughts
How (and why) nextest uses tokio, part 1
in-place constructors
Quirks of Rust’s token representation
Brute forcing protected ZIP archives in Rust
This week in Fluvio #47: The programmable streaming platform
Rust Walkthroughs
How to call a C function from Rust (A simple FFI tutorial)
Rewriting the Modern Web in Rust
Implementing truly safe semaphores in rust
Model an ALU in Rust
6 things you can do with the Cow 🐄 in Rust 🦀
Platform Agnostic Drivers in Rust: MAX7219 Naive Code Refactoring
Last mile DynamoDB: Deno Deploy edition
Miscellaneous
The Initial Rust Infrastructure Has Been Merged Into Linux 6.1
Crate of the Week
This week's crate is humansize, a size formatting crate. Now in version 2.0, with an updated API.
Thanks, Leopold Arkham for the suggestion!
Please submit your suggestions and votes for next week!
Call for Participation
Always wanted to contribute to open-source projects but didn't know where to start? Every week we highlight some tasks from the Rust community for you to pick and get started!
Some of these tasks may also have mentors available, visit the task page for more information.
AeroRust website - Add an aerospace related crate #Hacktoberfest
nmea - Supporting additional sentences #Hacktoberfest
AeroRust website - Request for content
zerocopy - test_new_error fails on i686
zerocopy - test_as_bytes_methods fails on powerpc
zerocopy - Miri can't run tests for wasm32-wasi target
Ockam - Prototype UDP NAT hole punching
Ockam - Refactor ockam secure-channel listener create command to use rpc
Ockam - Split CBOR / Messaging API schema.cddl
If you are a Rust project owner and are looking for contributors, please submit tasks here.
Updates from the Rust Project
367 pull requests were merged in the last week
libc: add major/minor/makedev on apple OSes
miri: Add flag to specify the number of cpus
cargo: Iteratively construct target cfg
rustdoc-Json: List impls for primitives
clippy: Implement manual_clamp lint
clippy: Silence [question_mark] in const context
clippy: [manual_assert]: Preserve comments in the suggestion
clippy: [unnecessary_lazy_evaluations] Do not suggest switching to early evaluation when type has custom Drop
clippy: add box-default lint
clippy: fix [needless_borrow], [explicit_auto_deref] FPs on unions
clippy: let upper_case_acronyms check the enum name
clippy: let unnecessary_cast work for trivial non_literal expressions
clippy: lint nested patterns and slice patterns in needless_borrowed_reference
clippy: new implicit_saturating_add lint
rust-analyzer: Add proc-macro dependency to rustc crates
rust-analyzer: Fix PackageInformation having the crate name instead of package name
rust-analyzer: Fix annotations not resolving when lens location is set to whole item
rust-analyzer: Fix find_path using the wrong module for visibility calculations
rust-analyzer: Fix move_format_string_arg being tokentree unaware
rust-analyzer: Fix requests not being retried anymore
rust-analyzer: Fix trait impl item completions using macro file text ranges
rust-analyzer: Fix type alias hovers not rendering generic parameters
rust-analyzer: Use cfg(any()) instead of cfg(FALSE) for disabling proc-macro test
ci: Replace volta-cli/action with builtin functionality from actions/setup-node
docs.rs: new cache-policy & cache middleware structure to support full page caching
add #[rustc_safe_intrinsic]
add a niche to Duration, unix SystemTime, and non-apple Instant
add diagnostic struct for const eval error in rustc_middle
add negation methods for signed non-zero integers
added more const_closure functionality
adjust the s390x data layout for LLVM 16
compute lint levels by definition
fix #[derive(Default)] on a generic #[default] enum adding unnecessary Default bounds
fix format_args capture for macro expanded format strings
fix associated type bindings with anon const in GAT position
fix integer overflow in format!("{:.0?}", Duration::MAX)
generate synthetic region from impl even in closure body within an associated fn
get rid of exclude-list for Windows-only tests
serialize return-position impl Trait in trait hidden values in foreign libraries
stabilize #![feature(mixed_integer_ops)]
stabilize bench_black_box
use let-chaining in WhileTrue::check_expr
introduce {char, u8}::is_ascii_octdigit
macros: diagnostic derive on enums
add a filter for try commits in graphs, compare page and triage
codegen_gcc: Implement llvm.prefetch
codegen_gcc: simd: enable simd_as intrinsic
codegen_gcc: simd: implement float math intrinsics
allow users to debug their processes
Rust Compiler Performance Triage
A great week, with 170 primary benchmark scenarios seeing improvement. Every PR flagged by perf provided at least some wins, and perhaps more impressive: No rollup PR's were flagged by perf this week! Furthermore, cjgillot fixed an issue where incremental compilation was being unnecessarily hindered by our span and lint system. Great work everyone!
Triage done by @pnkfelix. Revision range: d9297d22..02cd79af
Full report here
Call for Testing
An important step for RFC implementation is for people to experiment with the implementation and give feedback, especially before stabilization. The following RFCs would benefit from user testing before moving forward:
No RFCs issued a call for testing this week.
If you are a feature implementer and would like your RFC to appear on the above list, add the new call-for-testing label to your RFC along with a comment providing testing instructions and/or guidance on which aspect(s) of the feature need testing.
Approved RFCs
Changes to Rust follow the Rust RFC (request for comments) process. These are the RFCs that were approved for implementation this week:
No RFCs were approved this week.
Final Comment Period
Every week, the team announces the 'final comment period' for RFCs and key PRs which are reaching a decision. Express your opinions now.
RFCs
No RFCs entered Final Comment Period this week.
Tracking Issues & PRs
[disposition: merge] make const_err a hard error
[disposition: merge] Elaborate supertrait bounds when triggering unused_must_use on impl Trait
[disposition: merge] Stabilize proc_macro Span::source_text
[disposition: merge] const-stablilize NonNull::as_ref
[disposition: merge] Add documentation about the memory layout of UnsafeCell<T>
[disposition: merge] Handle projections as uncovered types during coherence check
[disposition: merge] Never panic in thread::park and thread::park_timeout
[disposition: merge] Stabilize nonzero_bits
[disposition: merge] EscapeAscii is not an ExactSizeIterator
[disposition: merge] Change default level of INVALID_HTML_TAGS to warning and stabilize it
[disposition: merge] Add Box<[T; N]>: TryFrom<Vec<T>>
[disposition: merge] add no_compile doctest attribute
New and Updated RFCs
No New or Updated RFCs were created this week.
Upcoming Events
Rusty Events between 2022-10-05 - 2022-11-02 🦀
Virtual
2022-10-05 | Virtual (Indianapolis, IN, US) | Indy Rust
Indy.rs - with Social Distancing
2022-10-05 | Virtual (Stuttgart, DE) | Rust Community Stuttgart
Rust-Meetup
2022-10-06 | Virtual (Nürnberg, DE) | Rust Nuremberg
Rust Nürnberg online #18
2022-10-08 | Virtual | Rust GameDev
Rust GameDev Monthly Meetup
2022-10-11 | Virtual (Berlin, DE) | Open TechSchool Berlin
Rust Hack and Learn
2022-10-11 | Virtual (Dallas, TX, US) | Dallas Rust
Second Tuesday
2022-10-11 | Virtual (Saarbrücken, DE) | Rust-Saar
Meetup: 23u16
2022-10-11 | Virtual (Weiden, DE) | Digital Craftsmanship Nordoberpfalz
Woher kommt der Hype? Rust in 45 Minuten
2022-10-12 | Virtual (Boulder, CO, US) | Boulder Elixir and Rust
Monthly Meetup
2022-10-12 | Virtual (Erlangen, DE) | Rust Franken
Rust Franken Meetup #4
2022-10-12 | Virtual (San Francisco, CA, US / Redmond, WA, US / London, UK) | Microsoft Reactor San Francisco
Getting Started with Rust: Building Rust Projects | Redmond Reactor Mirror Event | London Reactor Mirror Event
2022-10-13 | Virtual (Berlin, DE) | EuroRust
EuroRust (Oct 13-14)
2022-10-15 | Virtual (Nürnberg, DE) | Rust Nuremberg
Deep Dive Session 2 (CuteCopter): Reverse Engineering a tiny drone
2022-10-18 | Virtual (Washington, DC, US) | Rust DC
Mid-month Rustful—Impractical Rust: The HATETRIS World Record
2022-10-19 | Virtual (Vancouver, BC, CA) | Vancouver Rust
Rapid Prototyping in Rust: Write fast like Python; Run fast like C
2022-10-20 | Virtual (Stuttgart, DE) | Rust Community Stuttgart
Rust-Meetup
2022-10-25 | Virtual (Dallas, TX, US) | Dallas Rust
Last Tuesday
2022-10-26 | Virtual (Redmond, WA, US) | Microsoft Reactor Redmond
Your First Rust Project: Rust Basics
2022-10-27 | Virtual (Charlottesville, VA, US) | Charlottesville Rust Meetup
Using Applicative Functors to parse command line options
2022-11-01 | Virtual (Buffalo, NY, US) | Buffalo Rust Meetup
Buffalo Rust User Group, First Tuesdays
2022-11-02 | Virtual (Indianapolis, IN, US) | Indy Rust
Indy.rs - with Social Distancing
2022-11-02 | Virtual (Redmond, WA, US / San Francisco, SF, US) | Microsoft Reactor Redmond
Getting Started with Rust: From Java Dev to Rust Developer | San Francisco Reactor Mirror Event | London Reactor Mirror Event
Asia
2022-10-11 | Tokyo, JP | Tokyo Rust Meetup
Cost-Efficient Rust in Practice
Europe
2022-10-06 | Wrocław, PL | Rust Wrocław
Rust Wrocław Meetup #29
2022-10-12 | Berlin, DE | Rust Berlin
Rust and Tell - EuroRust B-Sides
2022-10-13 | Berlin, DE + Virtual | EuroRust
EuroRust (Oct 13-14)
2022-10-25 | Paris, FR | Rust Paris
Rust Paris meetup #53
North America
2022-10-13 | Columbus, OH, US | Columbus Rust Society
Monthly Meeting
2022-10-18 | San Francisco, CA, US | San Francisco Rust Study Group
Rust Hacking in Person
2022-10-20 | New York, NY, US | Rust NYC
Anyhow ? Turbofish ::<> / HTTP calls and errors in Rust.
2022-10-20 | New York, NY, US | Cloud Native New York
Cloud-native Search Engine for Log Management and Analytics.
2022-10-25 | Toronto, ON, CA | Rust Toronto
Rust DHCP
2022-10-27 | Lehi, UT, US | Utah Rust
Bevy Crash Course with Nathan and Food!
Oceania
2022-10-10 | Sydney, NSW, AU | Rust Sydney
Rust Lightning Talks
2022-10-20 | Wellington, NZ + Virtual | Rust Wellington
Tune Up Edition: software engineering management
If you are running a Rust event please add it to the calendar to get it mentioned here. Please remember to add a link to the event too. Email the Rust Community Team for access.
Jobs
Please see the latest Who's Hiring thread on r/rust
Quote of the Week
BurntSushi is a super experienced programmer who always seems to know what’s right
Shepmaster occasionally pops up to keep things level, and provides definitive answers and edits to all stackoverflow questions
Epage is the ecosystem guy thanklessly maintaining the things that make the magic of cargo possible
Dtolnay is an AI written in rust with the sole purpose of improving rust.
– trevg_123 on r/rust
Thanks to musicmatze for the suggestion!
Please submit quotes and vote for next week!
This Week in Rust is edited by: nellshamrell, llogiq, cdmistman, ericseppanen, extrawurst, andrewpollack, U007D, kolharsam, joelmarcey, mariannegoldin, bennyvasquez.
Email list hosting is sponsored by The Rust Foundation
Discuss on r/rust
0 notes
Text
JSON Web Tokens: What They Are and How to Use Them
JSON Web Tokens (JWTs) are a popular way to authenticate and authorize users in modern web applications. In this post, we'll explore what JWTs are, how they work, and how to use them in your own applications.
What are JSON Web Tokens?
A JSON Web Token (JWT) is a standard for representing claims securely between two parties. The token is a string that contains a set of encoded claims that can be used to authenticate and authorize users.
The token consists of three parts: a header, a payload, and a signature. The header contains metadata about the token, such as the algorithm used to sign it. The payload contains the claims, which are statements about an entity (typically, the user) and additional data. The signature is used to verify that the token has not been tampered with.
How do JWTs work?
When a user logs in to your application, you can generate a JWT for them and send it back to the client. The client can then include the token in subsequent requests to the server to authenticate and authorize the user.
When the server receives a request with a JWT, it first verifies the signature to ensure that the token has not been tampered with. If the signature is valid, the server decodes the payload to retrieve the claims. The claims can include information such as the user ID, roles, and permissions.
The server can then use the claims to authenticate and authorize the user. For example, the server can check if the user has the necessary permissions to access a particular resource.
How to use JWTs in your application
To use JWTs in your application, you'll need to implement a JWT library or use a pre-existing one. Most modern web frameworks, such as Node.js and Ruby on Rails, have built-in support for JWTs.
Here's an example of how to generate a JWT using the jsonwebtoken library in Node.js:
javascriptCopy codeconst jwt = require('jsonwebtoken'); const payload = { user_id: 123 }; const secret = 'mysecret'; const token = jwt.sign(payload, secret, { expiresIn: '1h' }); console.log(token);
In this example, we're generating a JWT with a payload that contains a user ID. We're using a secret key to sign the token, which ensures that only our server can generate and verify the token. We're also setting an expiration time of 1 hour, after which the token will no longer be valid.
To verify a JWT, we can use the jsonwebtoken library again:
javascriptCopy codeconst jwt = require('jsonwebtoken'); const token = 'eyJhbGciOiJIUzI1NiIsInR5cCI6IkpXVCJ9.eyJ1c2VyX2lkIjoxMjMsImlhdCI6MTYyMDc1MjA1NywiZXhwIjoxNjIwNzU1NjU3fQ.RptPRRLq3En4g4onixvpItxozZJjpr0YDN1smArRgzw'; const secret = 'mysecret'; const decoded = jwt.verify(token, secret); console.log(decoded);
In this example, we're verifying a JWT that we received from a client. We're using the same secret key that we used to sign the token to verify the signature. If the signature is valid, the verify() method will return the decoded payload.
Conclusion
JSON Web Tokens (JWTs) are a powerful and flexible way to authenticate and authorize users in modern web applications. By using JWTs, you can create stateless, scalable, and secure applications that can handle a large number of users. In this post, we've covered what JWTs are, how they work, and how to use them in your own applications. With this knowledge, you can implement JWT-based authentication and authorization in your own projects.As with any security mechanism, it's important to use JWTs correctly and securely. You should always use a secure secret key to sign your tokens, and you should never include sensitive data in the payload. You should also consider using short expiration times for your tokens to minimize the risk of unauthorized access. Overall, JWTs are a valuable tool in modern web development, and their popularity is only growing. By understanding how JWTs work and how to use them effectively, you can create secure and scalable applications that can handle the demands of today's users.
2 notes
·
View notes
Text
NFT’s Are Stupider Than You Think
tl;dr if you want the full-res, 21,000 x 21,000 pixel, 300 MB image from the 69 million dollar Beeple NFT, skip to the bottom for the download link. It’s not piracy or hackery, it’s just a feature of how NFT’s work.

[Image ID: The low-resolution preview image for Beeple’s Everydays: The First 5000 Days, as posted on the Christie’s auction website]
Okay so we’ve all know that NFT’s—and crypto mining in general—are an environmental nightmare, in terms of ridiculous energy costs. Also, most people are aware that the digital asset itself (often artwork) that corresponds to the NFT isn’t stored on the blockchain. But there are a few more issues that aren’t as widely understood, judging by the reporting I’m seeing.
Let’s use the 69 million dollar Beeple NFT as an example. Before anything else, here’s the auction house where Beeple sold it. (I’m using bare URL’s in this post, to make it more clear where each link leads)
https://onlineonly.christies.com/s/beeple-first-5000-days/beeple-b-1981-1/112924

This is a screenshot from that page. I’ve highlighted the smart contract address, 0x2a46f2ffd99e19a89476e2f62270e0a35bbf0756. That’s the address of the NFT itself on the Ethereum blockchain. Also note the Token ID, 40913. Without listing these data so you can verify what you’re buying, the auction is meaningless. This appears to be an older token protocol, I think? Usually you can just get the Token ID from the smart contract without having to list it separately. I’m not an expert, idk.
Also, a very very quick primer: A blockchain (in this case, the Ethereum blockchain) is basically a verifiable, unforgeable, secure, publicly-viewable ledger, where you provably say “I have sole control over this piece of data.”
Anyway, the typical way to interact with the Ethereum blockchain is a website like etherscan.io, like so:
https://etherscan.io/address/0x2a46f2ffd99e19a89476e2f62270e0a35bbf0756
That’s the Beeple’s Everydays smart contract. Remember all this for later. Let’s move on to the stupidity. First...
The artwork isn’t stored on the blockchain. But neither is the metadata you own.
Most people are aware of this, to some extent. The artwork itself isn’t on the blockchain, just a piece of metadata, right?
Well, no, it’s actually stupider. The metadata isn’t on the blockchain. The only thing that’s actually stored on the blockchain is a URI (Uniform Resource Identifier), which in practice is almost always either a URL (web address) or an IPFS hash (InterPlanetary File System address), but it could be any kind of address. Hell, it could literally be GPS coordinates, if you want. Usually it’s an IPFS hash, though.
Here’s the URI that’s stored in the Beeple NFT. You can get it from that etherscan.io link by going to the “contract” tab and entering “40913″ into the tokenURI query.
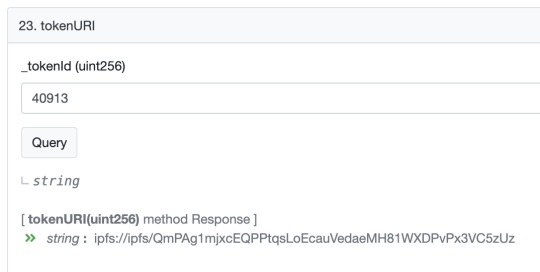
ipfs://ipfs/QmPAg1mjxcEQPPtqsLoEcauVedaeMH81WXDPvPx3VC5zUz
For most NFT’s it’s easier than that, you can get the TokenID from the contract? Again, I’m not an expert, but I think this is an outdated token protocol called “Erc20.”
Since this is an IPFS hash, not a url, you can’t quite just type it into a typical web browser. First you should turn it into a web address by using an IPFS gateway, such as ipfs.io:
https://ipfs.io/ipfs/QmPAg1mjxcEQPPtqsLoEcauVedaeMH81WXDPvPx3VC5zUz
If you’re on tumblr mobile and clicking links is annoying, here’s a screenshot of what you’ll find at that address.
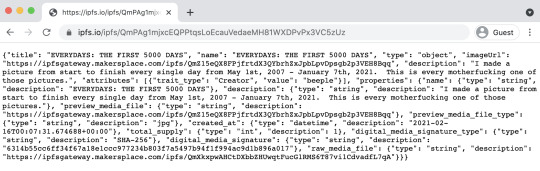
[Image ID: A screenshot of the JSON text file linked by the expensive Beeple NFT. It lists metadata for the artwork.]
The URI you own can die at any time
The point of storing things on a blockchain is that they are immutable, and verifiable, and can’t be forged. "ipfs://ipfs/QmPAg1... etc.” isn’t going anywhere, and is provably yours.
However, the text file that lives at that URI? That screenshot? That’s not stored on the blockchain, and it can disappear. You own the GPS coordinates of a storage locker full of paintings, but that doesn’t help you if the metaphorical storage facility burns down. Or if whoever has the key to the storage locker (often the original artist, and/or the auction website) comes in and replaces everything with pictures of rugs.

[Image ID: A tweet where an artist explains that they replaced their NFT artwork with pictures of carpets, “pulling the rug” on their auctions.]
Both of these things are already happening. A lot of NFT’s are already “abandoned,” asserting ownership over a dead URI. IPFS storage is supposed to take care of that, but in practice it’s poorly implemented, and even when done right it isn’t as failsafe as they’d have you believe. IPFS peer-to-peer storage is slightly less fragile that just storing a file on a website, but not by much. If the IPFS node goes down, the file is lost.
Does this sound like it wildly defeats the purpose of using decentralized blockchain storage in the first place? You’re right! It does.
If the auction website you bought your NFT on goes out of business, you will almost certainly lose the NFT you bought. And we all know how stable web startups are lol. Anyway, next up...
You don’t have exclusive access to anything
A lot of people think of owning an NFT like they own a painting. They have the artwork. They can keep it to themselves, or they can display it in a gallery with their name next to it, but everybody knows it’s theirs! NFT startups use this as a selling point. They say anybody can have a print of the Mona Lisa, but only you own the original.
This is dumb, because in the case of digital art, the print and the original are identical in every way. Every single 1 and 0 is the same, and if URI goes down, who cares who bought it? The NFT says you just own a URI that points to a text file. And by design, that URI is public. This isn’t a hack, or a bug. This is the entire point. But the people who run auction sites can be hella disingenuous about that.
Here’s that text file again. Notice this bit I just highlighted at the bottom?
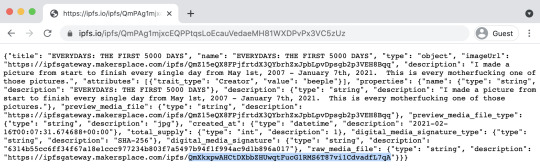
That’s a separate IPFS hash for the actual image file. MakersPlace wrote this NFT incorrectly by using their own makersplace.com IPFS gateway instead of just posting the highlighted bit on its own—if MakersPlace goes out of business, that link will die—so instead I’ll link to that hash through the ipfs.io gateway, which is probably less likely to break any time soon.
But if it does, there are plenty more... until the MakersPlace IPFS node goes down, in which case it’s just gone forever no matter what lol.
So, without further ado...
WARNING: THIS IS A DIRECT LINK TO A 319 MEGABYTE JPEG. IF YOU’RE ON MOBILE, THAT MIGHT MAKE YOUR PHONE SAD IDK.
https://ipfs.io/ipfs/QmXkxpwAHCtDXbbZHUwqtFucG1RMS6T87vi1CdvadfL7qA
You’re welcome.
330 notes
·
View notes
Text
Man-in-the-Middle (MitM) Attacks in Laravel: Prevention Guide
Man-in-the-middle (MitM) attacks are among the most serious threats web developers face. These attacks allow malicious actors to intercept, alter, or steal sensitive information during communication between two parties. As Laravel is a popular PHP framework for building web applications, securing it against such vulnerabilities is critical.

In this blog, we’ll explore what MitM attacks are, how they can exploit Laravel-based applications, and steps to secure your Laravel projects with examples.
What Are Man-in-the-Middle (MitM) Attacks?
MitM attacks occur when an attacker secretly intercepts and potentially alters communication between two parties without their knowledge. This can lead to:
Data theft: Intercepted credentials, session tokens, or personal data.
Session hijacking: Taking control of a user’s session.
Identity spoofing: Posing as one of the communicating parties.
How MitM Attacks Target Laravel Applications
Laravel, while secure, may be vulnerable if developers overlook:
Unencrypted HTTP requests.
Weak session handling mechanisms.
Misconfigured API endpoints.
Example of a Vulnerable Laravel Application
Imagine a Laravel app that sends sensitive user data over plain HTTP:
Route::post('/login', function(Request $request) { $username = $request->input('username'); $password = $request->input('password'); // Authenticate user logic here });
If the app doesn't enforce HTTPS, this communication can be intercepted, exposing the username and password.
Preventing MitM Attacks in Laravel
1. Enforce HTTPS in Your Application
Laravel makes it easy to enforce HTTPS. Use the AppServiceProvider to redirect HTTP traffic to HTTPS:
public function boot() { if (env('APP_ENV') === 'production') { \URL::forceScheme('https'); } }
2. Secure Session Management
Laravel’s session configuration should prioritize security. Update the config/session.php file:
'secure' => env('SESSION_SECURE_COOKIE', true), // Ensures cookies are only sent over HTTPS. 'same_site' => 'strict', // Prevents cross-site request forgery (CSRF).
3. Utilize SSL/TLS Certificates
Always install and configure an SSL/TLS certificate for your Laravel application. Use tools like Let’s Encrypt for free SSL certificates.
4. Implement Content Security Policy (CSP)
CSP can reduce MitM attack risks by controlling the sources your application trusts. You can use Laravel middleware like spatie/laravel-csp. Example middleware:
public function buildContentSecurityPolicy() { return CSP::addDirective('default-src', 'self') ->addDirective('script-src', 'self cdn.example.com'); }
5. Test Your Website Security
A proactive way to ensure your Laravel application is secure is by using a website security checker tool. Take advantage of our Free Website Security Checker tool.

Screenshot of the tool’s interface to show how easy it is to scan your website.
Use this tool to check vulnerabilities, including issues related to MitM attacks, and get a detailed report.

Example of a vulnerability assessment report generated by the tool.
6. Secure Your API Calls
Use Laravel's built-in encrypt method to secure sensitive data in API responses:
use Illuminate\Support\Facades\Crypt; $data = ['message' => 'Sensitive data']; $encrypted = Crypt::encrypt($data); return response()->json(['data' => $encrypted]);
And on the client side:
$decrypted = Crypt::decrypt($encryptedData);
Conclusion
MitM attacks pose a significant risk to web applications, but with the right practices, Laravel developers can mitigate these threats. From enforcing HTTPS to securing session data and using security tools like ours to test website security free, you can build robust defenses.
Stay vigilant, secure your Laravel apps, and keep user data safe. Happy coding! 🚀
#cyber security#cybersecurity#data security#pentesting#security#the security breach show#laravel#mitm
1 note
·
View note
Text
Web Hacking 101 CH6: Cross Site Request Forgery
What is it?
A cross site request forgery is a type of attack where the attacker can use a HTTP request to access a user's information from another website and using this information, act on the user's behalf. In general, this relies on the victim being previously authenticated on the target website where the action is submitted.
How can this be used?
Basic example:
Jazz logs into his banking website to check his low balance
After doing this, he checks his protonmail (but doesn’t log out of his banking website)
Jazz has an email linking him to a blog post about who snitched on him and he clicks on it to see where it leads
When loaded, the site instructs Jazz's browser to make a HTTP request to his banking website which transfers money from his account to the attackers.
(obviously there is much more to this but this is an example of what happens)
Cookies
These are files that are created by websites that are stored on the user's computer, typically websites requiring authentication will create and store a cookie in your browser. They can be used for various purposes including storing information about the user's preferences and to do so, cookies have some attributes. Cookies are useful because HTTP is considered stateless, so with every HTTP request a website doesn’t know who a user is and would have to re-authenticate them for every request.
Relating this back to our example with Jazz, when he logs into his banking website, the bank will respond to his HTTP request with a HTTP response which includes a cookie identifying him. Then when he visits the malicious website, it exploits the banking website through GET or POST requests depending on how it is set up.
CSRF with GET requests:
If the banking website accepts GET requests, the malicious site will send the HTTP request with a hidden form or an <img> tag. GET is normally wrapped in an <img> tag such that when the browser loads an image, we would need to load the src of the image. Here, we can modify the src UL to be a HTTP GET request such as:
<img src="https://www.bank.com/transfer?from=bob&to=joe&amount=500">
CSRF with POST requests:
POST requests are much more complicated. These require the attacker to identify what content-type to POST to the server (e.g. plain text or JSON etc.). Having done that, they wrap an HTML form in a hidden element and then run a script to submit the form:
iframe style="display:none" name="csrf-frame"></iframe> <form method='POST' action='http://bank.com/transfer.php' target="csrf-frame" id="cs\ rf-form"> <input type='hidden' name='from' value='Jazz'> <input type='hidden' name='to' value='Joe'> <input type='hidden' name='amount' value='500'> <input type='submit' value='submit'> </form> <script>document.getElementById("csrf-form").submit()</script>
Case studies:
Shopify Twitter Disconnect (reported 2016):
Shopify is integrated with Twitter to allow shop owners to tweet about their products. There is also functionality to disconnect a Twitter account from a connected shop. The URL to disconnect a Twitter account is:
https://www.twitter-commerce.shopifyapps.com/auth/twitter/disconnect/
An attacker realised Shopify wasn’t validating the legitimacy of the GET requests sent to it, making the URL vulnerable to CSRF.
This is an example of a vulnerable request to the site.

Badoo Full Account Takeover (reported 2016):
A hacker noticed that the website used CSRF tokens to protect against CSRF attacks. They recognised that this token existed but wasn't able to access it due to CORs enablement, however, the token is stored in one of the JavaScript files and thus all an attacker needs to do is to redirect a user to a malicious page that would access the JS file. The unique token which was meant to be protected by CORS would then be able to be accessed. Having obtained the unique token, POST requests can then be sent with the token and the server would think it's a legitimate request.
In this case, the hacker then used this to link the badoo account with the hacker's own gmail account and thus by this proxy, gain access to the account.
Takeaways
HTTP GET requests should never perform any back-end data modifying requests like transferring money.
CSRF Tokens is a way to defend against CSRF with POST requests
Cross Origin recourse sharing, another way to defend against POST requests.
Origin Checking
The best way is to check the origin of a request, if it originates from an unrecognised domain then we can reject it.
Conclusion
CSRF vulnerabilities represent an attack that can be executed without a victim knowing about it and finding these take some ingenuity and a desire to test everything. This however does rely on the user being tricked into clicking a malicious link so if you are aware and alert, a user can avoid this type of attack.
2 notes
·
View notes
Text
How to Use a Web Print API
Web Print API is a powerful solution that can be used to connect your print on demand shop with the manufacturing infrastructure of some of the world’s most popular online retail print services. It’s secure & based on pragmatic RESTful principles making it easy to use in a wide variety of programming environments. It gives you direct connectivity enabling you to place orders, get live status of order (including delivery & tracking info) and send your customers branded email notifications.

There are many reasons that small, medium and large-scale businesses can benefit from a web to print api integration. For example, it can help them set up a superior order approval workflow that’s based on specific rules. This will ultimately enable them to alert the relevant stakeholders and review the request. It can also streamline payment gateways and customer relationship management.
The PrintNode API uses HTTPS for all communication and is only accessible by authenticated users. All requests must be made using a valid PrintNode API key, which is assigned to all new accounts by default. This key can be generated in the Control Panel or by using the PrintNode API /api/key/generate function.
This function allows you to generate a new key and to obtain an access token and device ID for the current computer. It will also return a JSON object that contains the details of all PrintNode jobs currently in the submission or completion state.
youtube
If your PrintNode Client can access the printed document from a local network or web server, it may be faster to use the pdf_uri or raw_uri options. These methods will not upload the content to the PrintNode server, which can save on storage costs, reduce bandwidth requirements and improve website operation.
SITES WE SUPPORT
Check Mail Printing – Blogger
0 notes
Text
How To Build An Insurance Application In 2023?
To build an insurance application in 2023, you can follow these general steps:
Define Requirements: Begin by identifying the specific requirements and features of your insurance application. Consider aspects such as user authentication, policy management, claims processing, payment integration, document management, customer support, and any other functionalities relevant to your application.
Plan and Design: Create a detailed plan and design for your insurance application. This includes designing the user interface (UI), user experience (UX), database structure, and system architecture. Consider the technologies and frameworks you will use, such as Angular for the front-end, Node.js or Java for the back-end, and a suitable database solution like MySQL or MongoDB.
Develop the Back-End: Start by developing the back-end of your application. This involves setting up the server, creating APIs, implementing business logic, and integrating with external services if required. Implement features like user management, policy management, claims processing, and database connectivity. Choose a secure approach for handling sensitive data, implementing encryption, and following best practices for data protection.
Build the Front-End: Develop the front-end of your insurance application using a framework like Angular. Implement the UI/UX design, integrate with the back-end APIs, and ensure responsiveness across different devices and screen sizes. Create user-friendly forms for data entry, incorporate validation and error handling, and provide a smooth user experience throughout the application.
Implement Authentication and Security: Implement a secure authentication mechanism for user login and registration. Consider using industry-standard practices like OAuth 2.0 or JSON Web Tokens (JWT) for authentication and authorization. Implement role-based access control to ensure appropriate user permissions and protect sensitive data. Regularly update security patches and follow security best practices to safeguard user and application data.
Integrate Third-Party Services: Integrate third-party services as needed. This may include payment gateways for premium payments, document management systems for policy documentation, notification services for alerts and updates, and analytics tools for tracking user behavior and application performance. Ensure proper integration, testing, and error handling for these services.
Test and Debug: Conduct thorough testing of your insurance application to identify and fix any bugs or issues. Perform unit testing, integration testing, and user acceptance testing (UAT) to ensure the application works as intended. Consider automated testing frameworks and tools to streamline the testing process and ensure a high level of application quality.
Deploy and Monitor: Deploy your insurance application to a production environment. Set up a scalable hosting infrastructure that can handle the expected user load. Monitor the application's performance, security, and uptime using monitoring tools and error tracking mechanisms. Continuously monitor user feedback and analytics data to identify areas for improvement and future enhancements.
Provide Ongoing Support and Maintenance: After the application launch, provide ongoing support and maintenance to address user inquiries, fix bugs, and release updates. Stay updated with the latest industry standards and regulatory requirements to ensure compliance and data security. Regularly evaluate user feedback and analytics data to make informed decisions for future enhancements and improvements.
Also read : php app development Company
0 notes