#how to use microsoft access tutorial
Explore tagged Tumblr posts
Visit Tumblr Blog
Explore Tumblr blogs with no restrictions, modern design and the best experience.
Last Seen Tumblr Blogs


Fun Fact
In 2020, 27% of US Tumblr users had an annual household income of over $100,000.
Text
so, you wanted to start bookbinding?
so @princetofbone mentioned on my post for "factory settings" about wanting to know more about the binding style that i used for it. so i thought i might make a post about it.
i was as terrible as i always am for taking in progress shots, but i can link you to the resources i used in order to make my book. i would also like to point out that "factory settings" is my 120th bind, and i have been doing bookbinding as a hobby for just over 3 years now. unfortunately this means some of the methods that i used for that bind aren't particularly beginner friendly, just in terms of the tools and methods i have used, but i would love to point you in the right direction when it comes to resources. i dont say this to sound pretentious which i fear i might come across, just so that youre fully informed. getting into this hobby is fun and rewarding, but it can definitely be intimidating.
with that caveat, heres a list of links and resources that i have used for bookbinding in general, with additional links to methods i used specifically in regards to this bind.
ASH's how to make a book document. it gives you a great introduction into typesetting fics (where you format the text of fics to look like a traditionally published books) and then turning them into a case-bound book (the style i used for "factory settings"). it is comprehensive, and explains how to use microsoft word to do your bidding. it was invaluable to me when i was just starting out! currently i use affinity publisher to typeset/format my fics for printing, but i only bought and learned how to use that after i had been binding books for a year and a half. i made some beautiful typesets with word, and some of my close friends use it still and design stuff that i never would be able to in my wildest dreams (basically anything by @no-name-publishing)
DAS Bookbinding's Square Back Bradel Binding. a great style to do your first bind in! this method requires, when making the case, to attach the cover board and the spine board to a connecting piece of paper, which makes it so much easier to match the size of the case to the size of the text block (your printed out and sewn fic). using this method is what allowed me to get much more accurately fitting cases, and made me much more confident with the construction of the books i was making. a well-made book is something that is so wonderful to hold in your hands!
DAS Bookbinding's Rounded and Backed Cased Book. This is the specific method that i used to create my bind for "factory settings"! even before i could back my books, i found that watching DAS's videos in particular helped me see how books were traditionally made, and i was able to see different tips and tricks about how to make nicer books.
Book Edge Trimming Without... i trim the edges of my text block using my finishing press and a chisel i have sharpened using a whetstone and leather strop with buffing compound on it. i follow the method for trimming shown in this video!
Made Endpapers. i follow this method for my endpapers, as i used handmade lokta endpapers, and they can be quite thin, but they look beautiful! i used "tipped on" endpapers (where you have your endpaper and then put a thin strip of glue on the edge and attach it to your text block) i used for a very long time before this, but these feel like they are much more stable, as they are sewn with your text block.
Edge Sprinkling. this is the method that i used for decorating the edges of my text block. but the principle is basically clamping your text block tight and then sprinkling the edges. i do not believe you need to trim the edges in order to do sprinkles on the edges, and that's what makes it accessible! i personally just use really cheap acrylic paint that i water down and then flick it onto the edges with my thumb and a paint brush.
Double-Core Endbands. i sew my own endbands, which i followed this tutorial for. that being said, it's kind of confusing, and this video is a bit easier to follow, but it is a slightly different type of endband.
Case decoration. i used my silhouette cameo 4 to cut out my design for "factory settings" in htv (heat transfer vinyl). i also used my cameo 4 to cut out the oval of marbled paper on the front, as i honestly didn't want to try my hand at cutting an oval lol. i also glued some 300 gsm card with an oval cut out of the centre of it onto the cover before covering it with bookcloth, to get a kind of recess on the cover. i then glued the oval of marbled paper onto the top of the recessed area once it was covered with bookcloth, so that it was protected. the images i used were sourced from a mix of rawpixel, canva and pixabay. a more accessible way to get into cover decoration is by painting on a design for your cover as described in @a-gay-old-time's tutorial just here. or even doing paper labels, which look classy imo.
physical materials. sourcing these will depend on your country. i am located in australia, and have compiled a list with some other aussie bookbinders of places to buy from. here is a great post describing beginning materials for getting started binding.
@renegadepublishing. this tumblr is great! its what got me started bookbinding, and being in the discord has been inspiring, motivating, and honestly just one of the best online experiences i have ever had. it is full of resources, and most people in there are amateur bookbinders, with a couple of professionals thrown in. the discord is 18+, and anyone can join!
i'm sorry this post got so long, but i hope that this has a lot of information for you if you would like to get started bookbinding. its one of the best hobbies ive ever had, and i genuinely believe i will have it for the rest of my life.
4K notes
·
View notes
Text
I have a lot of feelings about the use of AI in Everything These Days, but they're not particularly strong feelings, like I've got other shit going on. That said, when I use a desktop computer, every single file I use in Google Drive now has a constant irritating popup on the right-hand side asking me how Gemini AI Can Help Me. You can't, Gemini. You are in the way. I'm not even mad there's an AI there, I'm mad there's a constantly recurring popup taking up space and attention on my screen.
Here's the problem, however: even Gemini doesn't know how to disable Gemini. I did my own research and then finally, with a deep appreciation of the irony of this, I asked it how to turn it off. It said in any google drive file go to Help > Gemini and there will be an option to turn it off. Guess what isn't a menu item under Help?
I've had a look around at web tutorials for removing or blocking it, but they are either out of date or for the Gemini personal assistant, which I already don't have, and thus cannot turn off. Gemini for Drive is an integrated "service" within Google Drive, which I guess means I'm going to have to look into moving off Google Drive.
So, does anyone have references for a service as seamless and accessible as Google Drive? I need document, spreadsheet, slideshow, and storage, but I don't have any fancy widgets installed or anything. I do technically own Microsoft Office so I suppose I could use that but I've never found its cloud function to actually, uh, function. I could use OneNote for documents if things get desperate but OneNote is very limited overall. I want to be able to open and edit files, including on an Android phone, and I'd prefer if I didn't have to receive a security code in my text messages every time I log in. I also will likely need to be able to give non-users access, but I suppose I could kludge that in Drive as long as I only have to deal with it short-term.
Any thoughts, friends? If I find a good functional replacement I'm happy to post about it once I've tested it.
Also, saying this because I love you guys but if I don't spell it out I will get a bunch of comments about it: If you yourself have managed to banish Gemini from your Drive account including from popping up in individual files, I'm interested! Please share. If you have not actually implemented a solution yourself, rest assured, anything you find I have already tried and it does not work.
1K notes
·
View notes
Note
Should I learn emacs I've been coding in nano
@perl-official
I always recommend emacs. But depending on your use case you might want to learn something else first.
If you hop between different servers a lot and can't expect to have access to your favourite editor on there, I recommend learning the basics of vi/vim since that is preinstalled pretty much everywhere. Also, most bigger IDEs you might use in the future have a setting or extension to use vim-keybinds.
If you just want to program on your own machine, I recommend trying out a few different text-editors and then decide on one.
To learn emacs, I recommend using the built in tutorial. You can access it using C-h t (thats CTRL-h followed by t) while beeing in emacs.
To learn vim, you can use the vimtutor. I think it is automatically installed with vim on most distros, but may have to be installed separately on some. Also neovim/nvim is way better in term of extensibillity to regular vim
Other Editors you could try:
- VS Codium (Visual Studio Code fork that removed most Microsoft Stuff)
- helix - a Vim like Editor
- zed - way too fucused on AI features for my taste but I heard it has some other nice features
If you want some more infos on why emacs is great: here two semi serious posts I made in the past:
Pingin some people who also might have something to say:
@vim-official @helix-editor @emacs-evil-mode
25 notes
·
View notes
Note
Hey I just gotta say your bind of OTNWAS is GORGEOUS! Do you mind explaining how you formatted the pages? <3
hello, thank u sm <3!! and yes ofc i can :)
i used Adobe InDesign to do all my typesetting! the document i have has a total of 948 pages (475 spreads) which all include: title page, contents page, chapters, and a few customized + blank pages.
starting with document size first — mine is in A5 (so that i can print A4 spreads) you can play around with the margins, i recommend having at least 3mm added on to it if you’re going to trim it (the bleedline basically). my margins are 15mm left, 20mm right, 15mm top, 20mm bottom.
i had 2 chapter templates - one for short titles (i.e. jack flies) and one for long titles (i.e. jack and jamie uncover the hidden dangers of hide and seek). if you look at the pictures i posted, i added a snowflake as part of that template as an indicator of whose pov the chapter starts in. i designed one for hiccup and jamie too so i change it accordingly! i also use it as dinkuses whenever there’s a pov change within the chapter.
my body text size was 10pt with a 12.5 leading (justified + hyphenated) but honestly that also depends on the font you choose and your personal preference in terms of how spaced out you want your body text to be. i suggest doing test prints so you can adjust !! standard book fonts are: caslon, garamond, minion and palatino.
here’s a silly diagram i made for my friends of my exact settings 📖
in terms of actually formatting the fic— i copy-pasted chapter by chapter from ao3 because for some reason InDesign doesn’t recognize italics automatically so i had to do that manually LOL.
what else .. uhhhh i’m pretty sure i’m forgetting something… i’ll just add on when i remember but crossing my fingers this helps!! i know InDesign isn’t what’s the most accessible to people (i have it bc of my job), but there are lots of tutorials out there on how to do it on microsoft word or even google docs!
hope your binding goes well ⭐️
#local-dragon-haunt#jackshiccup ask#otnwas#IF U NEED ANYTHING CLARIFIED LMK#im pretty bad at explaining#ndbdjsbdd#also if anyone would like to copy my format/typesetting design you can go ahead!#a credit would be nice tho maybe dkdnnddbnxbx#but please design your own book covers !!!#that’s like the most fun part tbh#go crazy go stuuuuupid
47 notes
·
View notes
Note
Good news about google drive: many people do not know what it is or how to use it. I work with a lot of people like this. They have been working for a long time and they are brilliant- just not great with technology.
Google drive is cloud storage. If you have ever saved files to your computer, moved them from the default downloads folder, and renamed them, then you have the basic idea of how to work google drive. The big difference is that files on your computer are stored on Your Harddrive inside your computer and that files saved to google drive or any cloud-based storage option are stored remotely on a bank of servers Somewhere Else. But in theory even if something happens to your computer, your files on google drive are perfectly fine.
Also you can access them from anywhere.
The thing that people in businesses like google drive for (aside from being able to work on files from anywhere) is that you can share files with other people while still maintaining ownership of the file.
You can decide what level of permission people have. So you can let people view a file, or comment, or edit it.
Dont give other people manager access to your files. Your drive is like your personal filing cabinet. Nobody else needs a key to your filing cabinet but you.
If you need to use a "shared" drive its just the digital equivalent of a filing cabinet everyone has access to. Multiple people can have keys and get in - even if you arent the one letting them in.
We use shared drives at work so that multiple employees can upload, rename, and delete files, and so that they can add data to the documents inside without making a whole new copy.
Anyway i hope i dont sound super condescending- i just have a lot of experience with it and those explainations have helped a few folks at work understand.
If you have use google docs and google sheets, those are just google's version of a word processor and a spreadsheet/accounting software. So microsoft word and microsoft excel.
Google actually has some courses that can walk you through some of the functionality and there are definitely some video tutorials on youtube if thats more your thing.
Hopefully that helps?
Anyway my original point was: dont even worry about not knowing how to use google drive or what it is. You're definitely not the only one and if you are so inclined, there are thinga that can help you learn.
Can I have it on my phone though? Because I genuinely don't own a computer at the moment...
19 notes
·
View notes
Note
Man, this stuff is crazy. Amazing how you create these.
What AI program do you use?
I have been experimenting with DreamStudio for my art reference, it does a pretty good job but I don't think it can create anything like what you have done.
Following you. Awesome :)
I use Dall-E 3, which is accessible for free via Bing's Image Creator and Microsoft's Designer. They both have advantages and disadvantages. Bing gives up to four results per prompts, lets you save results to a collection it keeps for you, and keeps a history of your last 15 generations. Microsoft Designer only gives one result per prompt, and the minute you make a new one the old one is lost forever unless you saved it to your device. However, Bing is a little touchier about what it considers NSFW; Microsoft Designer is more permissive in what words and phrases it lets you use and in what results it lets you see (with the added side effect - and this could be good or bad depending on you - that it lets more weird, freaky, anatomically impossible things through. Like two-headed men and such). Creating prompts takes a bit of inventive poetry. I've made a few posts about it on here, under the tag #ai tutorial and #ai muscle tutorial (I've also tagged this post with them), but please be aware that all of them but the most recent are a little out of date. The AI is evolving and what worked two months ago may not work today. The AI remembers your activities and it's possible to be too much of a naughty boy, and it will freeze up and become almost unusable eventually. Mix things up by generating innocent SFW things (I do pics of my TTRPG characters). If that doesn't work, get a new account - you just need a new email address, but throwaways from free services work just fine.
18 notes
·
View notes
Text
cant sleep on account of i was reminded again of the utter disappointment of robotnik's ring racers
Like fuck me the presentation is immaculate and the amount of content is staggering and it's all dashed by dogshit design decisions.
a resource you NEED to spend to get up steep hills, that you can't spend if you're holding an item, under all of which lies a parry mechanic destined to rot because A) it sucks ass compared to any item and B) you can't use it if you have any of the resource on hand
then there's the tutorial situation, a 40-minute escapade full of both the old shit you probably already know having played SRB2K or any other contemporary kart racer as well as five or six new mechanics that feel like they've been included less for the sake of innovating the genre / making the game more enjoyable and more for the sake of.. having new mechanics. And there's a good argument to be made that, of all the new mechanics introduced, the tutorial doesn't even cover the most meaningful ones, like tethering or the rival system!
also of note is shit like modding and online multiplayer being unlockables rather than there from the get-go. Particularly fucked is one of the passwords for unlocking add-ons instantly being "McDonald's", which is either in reference to the infamous patent illustration from Sony or Microsoft or whomever, or simply an allusion to children screaming for fast food. The game's download page proudly states that drrr isn't a pick-up-and-play game, but the password gives that statement an exclusionary and infantilizing context bordering on hostile -- which is really fucking weird considering that SRB2K's entire goddamned draw was how accessible and moddable it was.
it doesn't help that, by merit of being the team's newest project, it's receiving a ton of modding attention, none of which is going to be backported to its more enjoyable predecessor.
I don't know. There are people who are enjoying this game. I think it's an elitist, hypermaximalist, self-indulgent wankfest that's more concerned with raising the skill floor with conflicted and self-defeating design than with being an enjoyable experience.
If you want your kart racer to be competitive melee and you want to spurn anyone who doesn't, go nuts with it. It's drained my enthusiasm for itself and for SRB2K, frankly
5 notes
·
View notes
Text
gif making tutorial for the inimitable @snowysobsessions
disclaimer: this is exactly how i do it, but im basically just winging it tbh. there may be other methods that are quicker and/or look way better. this is just the way to which i have become accustomed. i am not a fancy ass gif maker who does colouring and sharpening or uses photoshop whatever, those folks are the real pros. i just like to get the job done :) if you wanna make really fancy gifs other tutorials may be more appropriate. ok lets get into it under the cut!
step 1:
select your source. for the purposes of this tutorial im going to stay on-brand and use this video of weird al on 30 rock (aka the original Milf Weird Al).
youtube
step 2:
either download the video (i dont have a good recommendation for a website for that unfortunately, they all seem virus-ridden these days) or screen-record the part of the video you want to turn into a gif. for me, thats the part with al in it.
my computer runs windows something - 11 maybe? and it comes with screen recording software built in that saves into a folder called "captures" in the video folder, which can be activated with the keyboard shortcut Windows Key + Alt + R. most phones also have screen recording functions, you could record it on your phone and transfer it to your computer? (for the record the website i use works on mobile too, but its very slow and annoying so i much prefer to use my laptop.)
step 3:
use video editing software of your choice to cut the clip down to just the part you want giffed. i use microsoft clipchamp because thats whats on my computer. it can also be used to crop away any black bars around any video clip, which is useful, because a properly cropped gif will probably be better quality. export the clip in as high quality as possible.
tip: try to keep the gif 3 seconds or under. this keeps the filesize down. tumblr gif size limit is 10MB, but i keep all my gifs 5MB or below because otherwise the loading time/storage burden is painful, and like i said, im not making fancy ones here, i dont mind them being a bit lower quality.
here is my clip. i saved it muted because its filesize is smaller that way.
step 4:
go to https://ezgif.com/video-to-gif which looks like this.
note that ezgif has tools for cutting, cropping and resizing videos if you dont have access to any video editing tool. its quicker if you do it in advance, though, i find.
upload your video and you will see this type of screen appear.
if youre uploading it to tumblr, the 540xAUTO size option is the one i go for by default, but it also has the following size options.
smaller size = smaller filesize, and you want the filesize as small as possible within reason. i sometimes make a gif smaller in dimensions if i'm really struggling to get the filesize below 5MB.
next is the frame rate: i set it to 25 because thats closest to the oriignal frame rate of most recorded video, but in order to make savings on filesize, it can be selected to 20FPS or 12FPS. i wouldnt recommend lower than that unless you want it to look weird and choppy, in which case, go ahead, and i wouldn't recommend higher unless you literally need the animation to be smooth as silk - for making it slowmo, for example.
i don't mess with the "method" drop down bc idk what it means.
the "Optimise for static background" tickbox is useful for if someone is doing something on a totally still background, because it reduces filesize by not animating every single bit of background in every frame. it could be helpful here as our background is not moving at all, just our heroine Alfina. i'm going to tick it.
now you can click "Convert to GIF". you should see something like this - itll be animated of course, this is just a screenshot.
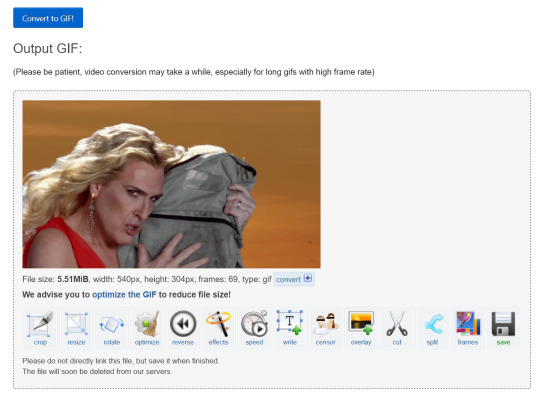
our gif looks crispy fresh (and has 69 frames - NICE), but its filesize is 5.51MB which is more than id like it to be, but first we're gonna look at Effects, so I'm not going to click the "Optimise" option yet.
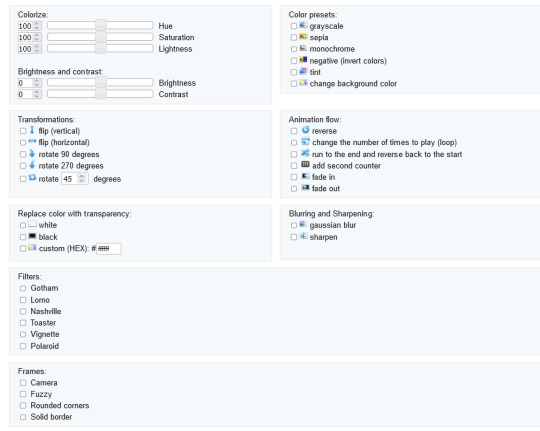
step 5:
clicking effects will provide the following options
if the video was sort of dark and hard to see, for example if it was live footage, it can be helpful to increase the brightness. changing the brightness and contrast makes our gif look like this, and makes it pop a little more.
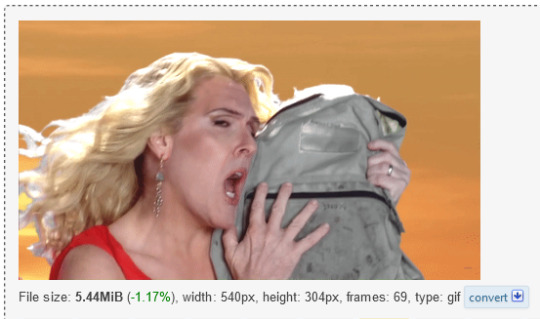
you can keep playing with the settings and clicking "Apply selected" until it looks about right to you, or not add any effects at all - it's up to you. I hit the back button in my browser to go back to the gif before i added the effects, then I went to Optimise.
step 6:
the Optimise screen is like this
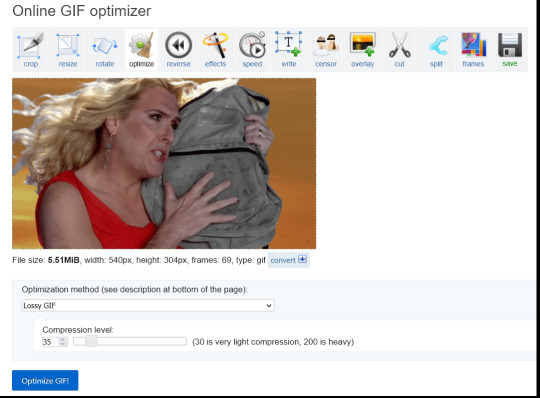
i tend to stick with the Lossy GIf optimization method. I put the compression level down to 30, and press Optimise GIF and see what happens.
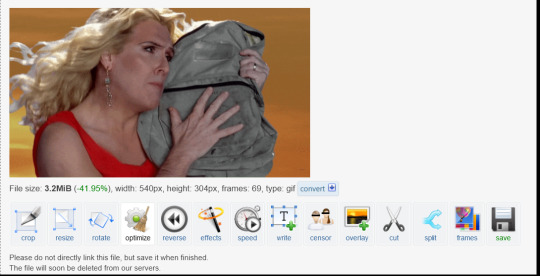
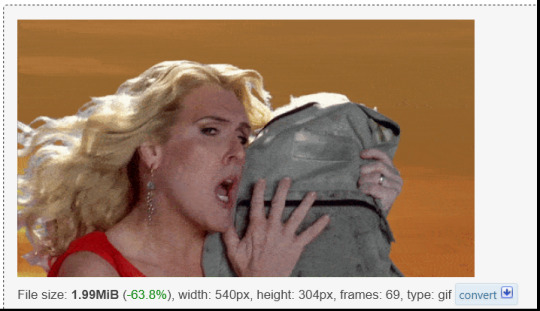
as you can see, the filesize has been reduced by 41.95% to 3.2MB without a super noticeable drop in quality.
if you set the compression level to 200, this is what it looks like
much more pixely, and not much further reduced in size, so i stick to the lower end of the compression scale.
this is our finished gif! isnt she beautiful. i just right-clicked and hit save on it on the webpage after generating - on mobile, i guess you'd long-press on it to download it.

hope that helps!!! lmk if you need help with any other aspect like changing speed or overlays or anything but honestly it's pretty intuitive once you know how to do these bits.
17 notes
·
View notes
Text
Intel VTune Profiler For Data Parallel Python Applications

Intel VTune Profiler tutorial
This brief tutorial will show you how to use Intel VTune Profiler to profile the performance of a Python application using the NumPy and Numba example applications.
Analysing Performance in Applications and Systems
For HPC, cloud, IoT, media, storage, and other applications, Intel VTune Profiler optimises system performance, application performance, and system configuration.
Optimise the performance of the entire application not just the accelerated part using the CPU, GPU, and FPGA.
Profile SYCL, C, C++, C#, Fortran, OpenCL code, Python, Google Go, Java,.NET, Assembly, or any combination of languages can be multilingual.
Application or System: Obtain detailed results mapped to source code or coarse-grained system data for a longer time period.
Power: Maximise efficiency without resorting to thermal or power-related throttling.
VTune platform profiler
It has following Features.
Optimisation of Algorithms
Find your code’s “hot spots,” or the sections that take the longest.
Use Flame Graph to see hot code routes and the amount of time spent in each function and with its callees.
Bottlenecks in Microarchitecture and Memory
Use microarchitecture exploration analysis to pinpoint the major hardware problems affecting your application’s performance.
Identify memory-access-related concerns, such as cache misses and difficulty with high bandwidth.
Inductors and XPUs
Improve data transfers and GPU offload schema for SYCL, OpenCL, Microsoft DirectX, or OpenMP offload code. Determine which GPU kernels take the longest to optimise further.
Examine GPU-bound programs for inefficient kernel algorithms or microarchitectural restrictions that may be causing performance problems.
Examine FPGA utilisation and the interactions between CPU and FPGA.
Technical summary: Determine the most time-consuming operations that are executing on the neural processing unit (NPU) and learn how much data is exchanged between the NPU and DDR memory.
In parallelism
Check the threading efficiency of the code. Determine which threading problems are affecting performance.
Examine compute-intensive or throughput HPC programs to determine how well they utilise memory, vectorisation, and the CPU.
Interface and Platform
Find the points in I/O-intensive applications where performance is stalled. Examine the hardware’s ability to handle I/O traffic produced by integrated accelerators or external PCIe devices.
Use System Overview to get a detailed overview of short-term workloads.
Multiple Nodes
Describe the performance characteristics of workloads involving OpenMP and large-scale message passing interfaces (MPI).
Determine any scalability problems and receive suggestions for a thorough investigation.
Intel VTune Profiler
To improve Python performance while using Intel systems, install and utilise the Intel Distribution for Python and Data Parallel Extensions for Python with your applications.
Configure your Python-using VTune Profiler setup.
To find performance issues and areas for improvement, profile three distinct Python application implementations. The pairwise distance calculation algorithm commonly used in machine learning and data analytics will be demonstrated in this article using the NumPy example.
The following packages are used by the three distinct implementations.
Numpy Optimised for Intel
NumPy’s Data Parallel Extension
Extensions for Numba on GPU with Data Parallelism
Python’s NumPy and Data Parallel Extension
By providing optimised heterogeneous computing, Intel Distribution for Python and Intel Data Parallel Extension for Python offer a fantastic and straightforward approach to develop high-performance machine learning (ML) and scientific applications.
Added to the Python Intel Distribution is:
Scalability on PCs, powerful servers, and laptops utilising every CPU core available.
Assistance with the most recent Intel CPU instruction sets.
Accelerating core numerical and machine learning packages with libraries such as the Intel oneAPI Math Kernel Library (oneMKL) and Intel oneAPI Data Analytics Library (oneDAL) allows for near-native performance.
Tools for optimising Python code into instructions with more productivity.
Important Python bindings to help your Python project integrate Intel native tools more easily.
Three core packages make up the Data Parallel Extensions for Python:
The NumPy Data Parallel Extensions (dpnp)
Data Parallel Extensions for Numba, aka numba_dpex
Tensor data structure support, device selection, data allocation on devices, and user-defined data parallel extensions for Python are all provided by the dpctl (Data Parallel Control library).
It is best to obtain insights with comprehensive source code level analysis into compute and memory bottlenecks in order to promptly identify and resolve unanticipated performance difficulties in Machine Learning (ML), Artificial Intelligence ( AI), and other scientific workloads. This may be done with Python-based ML and AI programs as well as C/C++ code using Intel VTune Profiler. The methods for profiling these kinds of Python apps are the main topic of this paper.
Using highly optimised Intel Optimised Numpy and Data Parallel Extension for Python libraries, developers can replace the source lines causing performance loss with the help of Intel VTune Profiler, a sophisticated tool.
Setting up and Installing
1. Install Intel Distribution for Python
2. Create a Python Virtual Environment
python -m venv pyenv
pyenv\Scripts\activate
3. Install Python packages
pip install numpy
pip install dpnp
pip install numba
pip install numba-dpex
pip install pyitt
Make Use of Reference Configuration
The hardware and software components used for the reference example code we use are:
Software Components:
dpnp 0.14.0+189.gfcddad2474
mkl-fft 1.3.8
mkl-random 1.2.4
mkl-service 2.4.0
mkl-umath 0.1.1
numba 0.59.0
numba-dpex 0.21.4
numpy 1.26.4
pyitt 1.1.0
Operating System:
Linux, Ubuntu 22.04.3 LTS
CPU:
Intel Xeon Platinum 8480+
GPU:
Intel Data Center GPU Max 1550
The Example Application for NumPy
Intel will demonstrate how to use Intel VTune Profiler and its Intel Instrumentation and Tracing Technology (ITT) API to optimise a NumPy application step-by-step. The pairwise distance application, a well-liked approach in fields including biology, high performance computing (HPC), machine learning, and geographic data analytics, will be used in this article.
Summary
The three stages of optimisation that we will discuss in this post are summarised as follows:
Step 1: Examining the Intel Optimised Numpy Pairwise Distance Implementation: Here, we’ll attempt to comprehend the obstacles affecting the NumPy implementation’s performance.
Step 2: Profiling Data Parallel Extension for Pairwise Distance NumPy Implementation: We intend to examine the implementation and see whether there is a performance disparity.
Step 3: Profiling Data Parallel Extension for Pairwise Distance Implementation on Numba GPU: Analysing the numba-dpex implementation’s GPU performance
Boost Your Python NumPy Application
Intel has shown how to quickly discover compute and memory bottlenecks in a Python application using Intel VTune Profiler.
Intel VTune Profiler aids in identifying bottlenecks’ root causes and strategies for enhancing application performance.
It can assist in mapping the main bottleneck jobs to the source code/assembly level and displaying the related CPU/GPU time.
Even more comprehensive, developer-friendly profiling results can be obtained by using the Instrumentation and Tracing API (ITT APIs).
Read more on govindhtech.com
#Intel#IntelVTuneProfiler#Python#CPU#GPU#FPGA#Intelsystems#machinelearning#oneMKL#news#technews#technology#technologynews#technologytrends#govindhtech
2 notes
·
View notes
Note
Hi i just want to say I saw the post of the fics you bound and they look amazing!! I was wondering if you would share the type facing or any tips on how to do that? They are amazing and exactly how I pictured in my head. I’m just starting out on bookbinding.
Omg hiiii! My first ever ask 🥹 also thank you for the kind words!
I do share a lot of my typesets, but it depends on the authors policies (so one’s like Just Lovers I made just for myself).
For typesetting: I use a macro made by @black_book_bindery (on insta) which saves me so much time. You plug it into your Microsoft word doc and it takes like 5 min to format your doc for printing. Then I just use canva to add decorative aspects to the typeset.
I’m happy to share my typesets with you—there’s a link down below gives you access though you may need to open on a computer rather than mobile, I just ask they’re used for personal binds only. There’s also a ton of talented binders who give access to theirs in the community. There’s also tutorials on TikTok that helped me when I first started out (I have a few as well that are pinned).
So so exciting that you’re taking on this hobby! Can’t wait to see your binds 🤩
10 notes
·
View notes
Text
Mastering Excel: Grayson Garelick Shares Essential Tips and Tricks for Beginners
In today's data-driven world, proficiency in Microsoft Excel is a valuable skill that can open doors to countless opportunities in various industries. Whether you're a student, a professional, or an entrepreneur, mastering Excel can significantly enhance your productivity, efficiency, and decision-making capabilities. To help beginners embark on their journey to Excel mastery, seasoned Excel expert Grayson Garelick shares some essential tips and tricks that lay the foundation for success.
Get Comfortable with the Basics: Before diving into advanced features, it's crucial to familiarize yourself with the basics of Excel. Learn how to navigate the interface, enter data, and perform simple calculations using formulas like SUM, AVERAGE, and COUNT. Understanding these foundational concepts will set you up for success as you progress to more complex tasks.
Explore Keyboard Shortcuts: Excel offers a plethora of keyboard shortcuts that can save you time and streamline your workflow. Take the time to learn commonly used shortcuts for tasks like copying and pasting, formatting cells, and navigating between worksheets. Memorizing these shortcuts will make you more efficient and productive in Excel.
Practice Regularly: Like any skill, proficiency in Excel comes with practice. Dedicate time each day to practice using Excel and experimenting with different features and functions. The more you practice, the more comfortable and confident you'll become in navigating Excel and performing various tasks.
Utilize Online Resources: Take advantage of the wealth of online resources available to learn Excel. Websites like Microsoft's official Excel help center, YouTube tutorials, and online courses offer valuable insights and guidance for beginners. Additionally, forums and communities like Stack Overflow and Reddit can be excellent places to ask questions and seek advice from experienced Excel users.
Master Essential Formulas and Functions: Formulas and functions are the backbone of Excel's functionality, allowing you to perform calculations, manipulate data, and analyze trends. Start by mastering essential formulas like VLOOKUP, SUMIF, and IFERROR, which are commonly used in data analysis and reporting. As you become more comfortable with these formulas, you can explore more advanced functions to expand your skill set further.
Learn Data Visualization Techniques: Excel offers powerful tools for visualizing data, such as charts, graphs, and pivot tables. Learning how to create visually compelling and informative visualizations can help you communicate insights effectively and make informed decisions based on your data. Experiment with different chart types and formatting options to find the best visualization for your data.
Stay Organized: Keeping your Excel workbooks organized is essential for efficiency and productivity. Use descriptive file names and folder structures to easily locate and access your files. Within your workbooks, use clear and consistent naming conventions for sheets, ranges, and cells. Additionally, consider using color coding and formatting techniques to visually distinguish different types of data.
Stay Updated: Excel is continuously evolving, with new features and updates released regularly. Stay informed about the latest developments by subscribing to Excel-related blogs, newsletters, and forums. Keeping up-to-date with the latest features and best practices will ensure that you're maximizing Excel's potential and staying ahead of the curve.
By following these tips and tricks shared by Excel expert Grayson Garelick, beginners can lay a solid foundation for mastering Excel and unlocking its full potential. With dedication, practice, and a willingness to learn, anyone can become proficient in Excel and leverage its powerful capabilities to excel in their personal and professional endeavors.
2 notes
·
View notes
Text
The Battle of the Note-taking Apps - Who Will Come Out Victorious?
Review article by Mariz Lorraine | Edited 27 September 2023
Has the wave of digital notes have officially engulfed you and now you are stranded in the middle of a sea of note-taking apps? You convince yourself to do some research but take 2 scrolls on any social media app and you will then be recommended to choose either the free and Microsoft-based OneNote or the holy grail Goodnotes 5. As a loyal Goodnotes 5 user (buyer, let’s be frank) for 1 year now, I have some tea to spill about this blue app.
Key features
I, like many others, move to digital notes for a plethora of reasons, however nothing ever beats the feel of writing with pen and paper. Goodnotes 5 offers 4 types of pen styles that users can easily change with one tap of a button: Fountain pen, ball pen, brush pen, and highlighter. Organizing notebooks and pages in Goodnotes 5 can also be done easily with folders and page outlines so that your math notes are easily distinguishable from your english notes. Notability, Goodnotes 5’s main competitor, on the other hand, has a revolutionary feature called “study tape” that allows you to cover certain key terms on your notes that can be opened with a tap so that you can easily revise them. Truthfully, you can do this in Goodnotes 5 with a highlighter and the eraser but it is not as convenient as Notability’s study tape.
User-friendly
Just like most iOS apps, Goodnotes 5 is renowned for its user-friendliness. The easy-on-the-eye user interface combined with the easily tapped “New Notebook” or “Trash” buttons make the app superior to Microsoft OneNote’s hidden side tabs and dimmed pen options. Goodnotes 5 also offers tutorials and guides on how to maneuver the app when you just download it.
Customizability
Despite being as plain as a sheet of paper when it comes to user interface, Goodnotes 5 is completely customizable when it comes to note-taking. A new notebook’s cover can be changed either by choosing between pre-made notebook covers or by uploading your own covers. For decoration aficionados, Goodnotes 5 allows you to import sticker packs and custom page templates. I utilize these stickers to avoid drawing benzene structures in chemistry and to add cute characters around my boring calculus notes. Yet Goodnotes 5’s customizability is still inferior to its younger sibling, Goodnotes 6. Goodnotes 6 offers full customizability of folder icons and colors on top of the customizability offerings of Goodnotes 5. However, if the default blue folder icon is fine for you, Goodnotes 5 is still the better option.
Price
Unlimited access to Goodnotes 5 is priced at Rp.169,000 as a one-time cost for users. However, limited access to the app is free for all but users can only make up to 3 notebooks. Unlike Notability which is a subscription-based payment of Rp 89,000 monthly, Goodnotes 5’s one-time payment is better for users that want to test the waters first.
Importing files
My personal favorite feature offered by Goodnotes 5 is the importing PDFs feature as it allows me to easily annotate my digital coursebooks and do past papers. Importing PDFs and annotating them in Goodnotes 5 is not just eco-friendly since you won’t have to print pages and pages of paper, but it is also much more convenient since you can easily erase, highlight, and move elements around.
Exporting files
If you can share paper notes with your friends, you definitely can do so with digital notes as well. Users can easily share their notebooks to other Goodnotes 5 users to make it collaborative by sending them a short URL link or by sending an invitation to their email. But how about non-Goodnotes 5 users? Unfortunately you cannot have collaborative notebooks with non-Goodnotes 5 users but you can share PDF or JPEG versions through emails or messages. If you are like me and you are afraid of suddenly losing your files, Goodnotes 5 reassures us with the option to automatically backup your files to your preferred cloud between Google Drive, OneDrive and iCloud.
Technological advancements
Shifting to digital notes is a sign that the world is becoming more tech-reliant and softwares like Goodnotes 5 have to keep on advancing to follow the status quo. Optical Character Recognition (or more known as OCR) was added to Goodnotes 5 in 2019, allowing people’s messy handwriting to be identifiable by the app when you look for a certain term. As recent as January of this year, Goodnotes 5 added the voice recording feature so you can easily take notes as well as record your teacher’s voice to listen back to when revising. This feature is shared by both Notability and Goodnotes 5 however OCR is a Goodnotes 5 exclusive, so if you are looking for the app with the nerdiest feature out there, Goodnotes 5 is for you.
Conclusion
If you are confused about which note-taking app to use and are just looking for something easy-to-use and simple, Goodnotes 5 is definitely the best option for you. Its many pen types, countless premade page templates, unlimited storage, and the ability to import and annotate PDFs are the key points for beginners in the digital note space. Its similarity to physical note-taking with the many pen types and page sizes also make the shift from pen-and-paper notes to screen-and-stylus notes a lot easier.
4 notes
·
View notes
Text
For search results free of AI you can use startpage.com (which gives you Google results without sharing your data with Google and omits the AI answer at the top). You can also go into your internet settings and make startpage your "default search engine" so that you don't use Google.
Alteratively, you can install Firefox and then open the Firefox settings (top right of your screen opens a menu, go to "Add-ons and themes" and in the search bar type "uBlock origin". Ublock not only stops data tracking, it also has a feature that lets you block any field on a website you don't like permanently. That includes removing the AI results from Google (or from DuckDuckGo, who unfortunately are now giving AI results. AI results that I hide with uBlock).
---
When it comes to art, you will have to either find websites that block AI art (filter it out) like artstation or try your luck with tutorials online that teach you how to remove AI from your search results. Although again, if you are using Google Chrome, I recommend switching to Firefox and installing uBlock because Google harvests all your data and from that data they can learn how to circumvent your attempts at excising AI from your life.
---
When it comes to a desire not to train AI models, I assume you have 1 (or maybe 2?) accounts with Microsoft through which you access Word, Excel, PowerPoint, that kind of software. If you don't want to switch to alternatives (like LibreOffice, which can replace Word for some people), you can go to the top left corner of Word/Excel/PowerPoint and click "File" > then "Options" at the bottom > "Trust Center" (also at the bottom left) > "Trust Center Settings" > Privacy Options > Privacy Settings > make sure there is NO checkmark in "Turn on optional connected experiences" (this is what trains Microsoft's AI models with your data) > now click the "OK" button at the bottom until you close all the open windows.
Now restart any Office programs you might have open and it will permanently(!) apply that policy to your Microsoft account across all programs (although you may want to check it every time you reinstall the software or use it on a different computer, just in case and you definitely have to do it for every account you have with Microsoft).
Once you have Firefox, uBlock and Startpage (or DuckDuckGo), you can also look up guides for how to disable Microsoft Copilot using PowerShell. This will not only disable that AI permanently on your computer, but it also prevents Microsoft from making a copy of every moment you spend on your PC (including when your banking passwords are visible on screen).
---
As for job applications being screened via AI, the reality is that I can't fix that. I am unfortunately not an all-powerful deity. I guess we can organize protests and political pressure to stop businesses from doing this, but barring that I have nothing.
---
Hope this has been helpful in detoxifying your web experience and feel free to ask questions if something's unclear. All the best. :3 <3
I wish there was a way to completely OPT OUT of AI. Like you could set your ENTIRE Internet browser to NOT shove it down your throat.
When social media was getting big, you could just NOT get a Facebook or a Twitter. It was simple as that. You can't do that with AI.
Trying to find a job? It goes straight to an AI filter. Trying to look at art? Here's 100+ ai shit. Trying to look up who was in what movie from the 1980s? GOOGLE GEMINI IS HERE WITH THE COMPLETELY WRONG ANSWER!
Someone PLEASE create a way to allow people to get AI the FUCK OUT of our lives if we DO NOT WANT IT!
60K notes
·
View notes
Video
youtube
How To Enable Or Disable Microphone Access In The Microsoft Edge Web Browser
In this quick and easy tutorial, learn how to enable or disable microphone access in the Microsoft Edge web browser using your PC. Whether you're concerned about privacy or need to allow microphone use for web apps, this step-by-step guide will walk you through the exact settings you need to change. Perfect for Windows users looking to manage site permissions in Edge.🎙️ Control site microphone access 🛡️ Improve privacy and security 💡 Simple steps for quick results 💡 Like, subscribe, and hit the bell icon for more browser and tech tutorials!Simple Steps 1. Open the Microsoft Edge Web Browser. 2. Click on the 3 dot hamburger menu in the upper right corner and choose "Settings". 3. Select "Privacy, Search And Services" from the left side pane. 4. In the center pane, click on "Site Permissions". 5. Click on "All Permissions". 6. Click on "Microphone". 7. Toggle on or off "Ask Before Accessing".
0 notes
Text
How to Empower Your Remote Workforce with the Right Technology
Remote work is no longer a trend—it’s a fundamental shift in how modern businesses operate. But success in this digital-first world depends on more than flexible schedules. It requires smart investments in the right technologies that empower remote teams to perform at their best, no matter where they are. At OfficeSolution, we believe that equipping your remote workforce with purpose-driven tech is key to boosting productivity, collaboration, and employee satisfaction.
1. Unified Communication Tools
The cornerstone of an empowered remote workforce is seamless communication. Employees need tools that allow for real-time messaging, video conferencing, file sharing, and quick decision-making. Platforms like Microsoft Teams, Zoom, and Slack can centralize these functions, helping teams stay connected and avoid silos. With integrated calendars, task management, and chat threads, communication becomes fluid—even across time zones.
2. Cloud-Based Collaboration Platforms
Remote work thrives on collaboration tools that provide secure, cloud-based access to shared documents and projects. Solutions like Microsoft 365 and Google Workspace enable multiple users to work on files simultaneously, track changes in real time, and ensure version control. This drastically reduces delays in project execution and promotes a culture of transparency and accountability.
3. Project Management Software
Without physical office check-ins, remote teams rely on digital systems to keep tasks organized. Tools like Asana, Trello, and Monday.com offer structured ways to assign responsibilities, set deadlines, and visualize progress. These platforms provide visibility to both team members and managers, ensuring everyone is aligned and empowered to meet their goals.
4. Cybersecurity Solutions
With employees working from various locations, cybersecurity becomes a top priority. Empowering a remote workforce also means protecting them—and your data—with robust security measures. Deploying VPNs, two-factor authentication, endpoint protection, and secure file-sharing protocols ensures sensitive company information stays safe, regardless of where it's accessed.
5. Virtual Desktop Infrastructure (VDI)
For businesses requiring tighter control over their computing environments, VDI offers a secure and scalable solution. It allows remote employees to access a virtual desktop that mirrors their in-office setup. This minimizes tech challenges, ensures consistency in performance, and simplifies IT management—all while safeguarding critical data.
6. Employee Support & Digital Training Tools
Technology isn’t empowering if employees don’t know how to use it. Providing remote staff with access to digital learning platforms and real-time IT support is essential. Tools like interactive knowledge bases, video tutorials, and chatbot-driven help desks ensure employees can solve tech issues quickly and keep moving forward.
Final Thoughts
Empowering your remote workforce is about more than just sending laptops home. It’s about building a digital ecosystem that connects, protects, and supports your people. By investing in the right mix of communication, collaboration, security, and support tools, businesses can unlock the full potential of remote work.
To learn more about building a future-ready remote workforce, visit https://innovationalofficesolution.com/.
0 notes
Text
Digital Resources - Minecraft
I installed and played Minecraft, which is a sandbox survival-based video game developed for PC and consoles like Xbox, and is aimed at children and young adults, though people of all ages play and enjoy the game. The main goal is to gather resources and build an armoury to find and defeat the Ender Dragon, though there is no linear plot as such, so players can explore the various biomes, encounter enemies, build a home and gather animals for farming and/or to keep as pets, or many players will enter “Creative Mode” and let their creativity thrive by building things like ships, castles that can then be posted online for sharing (see: Richlarrousse on YouTube).
With the recent popularity of the Minecraft film, and with how popular the game has been over the past few years with social media content creators dedicating many hours of their time to recording and sharing themselves playing the game either by themselves or with friends (see: Dr Gluon on YouTube), I felt as though it was a good thing for me to have at least a basic understanding of some of the elements of the franchise (such as the icon which is the face of an enemy known as a Creeper), so that I can better help children and young adults who come into the library asking for Minecraft related things.
Prior to installing and playing the game for myself I had very little idea what the point of Minecraft was - the way my brain works I generally need structure and a guided plotline in games I play so I have a sense of direction - but upon both watching some other people play it, and ultimately playing it myself, it now feels like when I used to play with Lego as a child - blocks of different colours and shapes that can be put together to create almost anything, or you could play the survival mode and gather resources to defeat the Ender Dragon, providing a goal to achieve. I feel as though there is still a lot in Minecraft for me to learn so that I can engage with and support children and young adults who come into the library and ask about Minecraft, and that in itself is honestly quite exciting.
Minecraft can be played either single player or multiplayer (both local and on dedicated multiplayer servers that can be hosted and shared worldwide and can be accessed at any time as long as there is a working internet connection), and there are very few physical means by which to install the game (i.e. the game only has physical cartridges for Nintendo Switch, and the launcher must be downloaded for PC and other consoles). This means that at any time, Microsoft (or each respective console’s online storefront) can remove the Minecraft launcher from their store, and it would no longer be available for download on new devices - similar to how streaming services are reportedly removing content, rendering it completely unavailable (Sun, 2023). Similarly, if players access a multiplayer server hosted by someone they don’t know, the host has the ability to reset the world at any time, thus removing any buildings, resources and achievements gained previously. There is very little security in a nearly completely digital resource such as this game, and that is disheartening for those who can spend hundreds if not thousands of hours building something, only to never be able to access it again.
References
Sun, M. (2023). Why are movies and TV shows disappearing from streaming services?. The Guardian. https://www.theguardian.com/tv-and-radio/2023/jun/28/why-are-movies-and-tv-shows-disappearing-from-streaming-services
0 notes