#html drop down menu
Explore tagged Tumblr posts
Visit Tumblr Blog
Explore Tumblr blogs with no restrictions, modern design and the best experience.
Last Seen Tumblr Blogs


Fun Fact
Mobile Tumblr US users spend an average of 4.04 minutes per session on the app.
Text
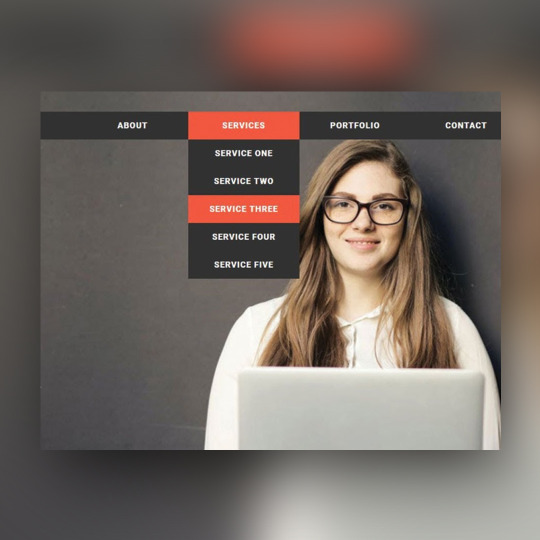
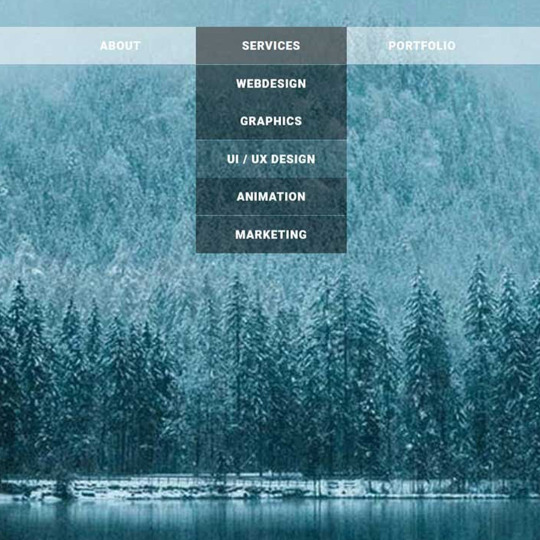
CSS Drop down Menu
#drop down menu html#codenewbies#html css#html5 css3#css#css menu#drop down html#css drop down menu#html drop down menu#webdesign#frontenddevelopment
1 note
·
View note
Text

Drop Down Menu On Hover
#dropdown menu on hover#html css dropdown menu#html css#divinectorweb#css#html#frontenddevelopment#css3#html5#css dropdown menu#drop down menu css#dropdown list#pure css dropdown menu#webdesign#learn to code#css snippets
5 notes
·
View notes
Text

Drop Down Menu HTML CSS
#pure css dropdown menu#dropdown menu#codingflicks#html css#frontend#css#html#css3#code#frontenddevelopment#webdesign#html css menu#css menu#drop down menu
14 notes
·
View notes
Text
updating fics list (not completely lmao) and probably it would be a good idea to compile all the oneshots i wrote directly on tumblr and port them to my ext harddrive. just in case
#feel like i have said this before#also aaaaa realization that i could link all the one-off drabbles ive done#but i would want another drop-down menu to keep the list short#and when i did that for tags page i had to make the page not live anymore which is so hard to update now#smth abt tumblr not supporting the html bla bla but i dont want every page to be static!!#maybe i will jus keep as is then#when my meds wear off im sure i wont do anything anymore n will forget anyway#but uhhhh generic hey if you ever a certain fic of mine and cant find it#pls send an ask and i will dig it out for you!!!
1 note
·
View note
Note
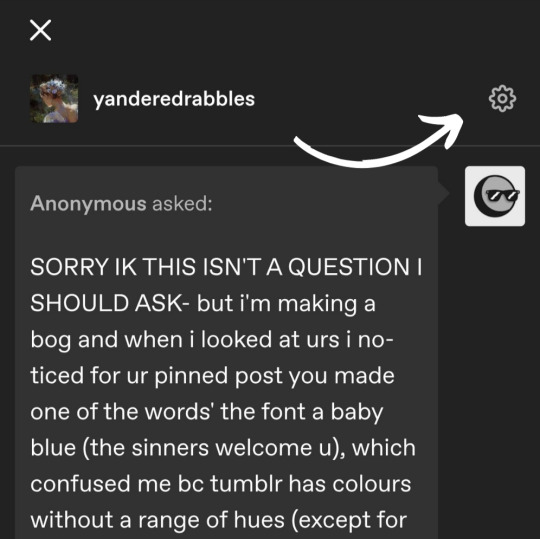
SORRY IK THIS ISN'T A QUESTION I SHOULD ASK- but i'm making a bog and when i looked at urs i noticed for ur pinned post you made one of the words' the font a baby blue (the sinners welcome u), which confused me bc tumblr has colours without a range of hues (except for the blog title). So I was curious...how did you do it?
I can defo tell this is not a question you would have expected in ur inbox bae
it's super easy!
The method I use is mostly applicable to the mobile website, but I'm sure you can use it on desktop and the app as well.
First, type out whatever you want in your tumblr post.
Next, head to this website.
Type or paste your text into the upper bar and choose your colours. To get the text all baby blue, I chose solid colour from the drop down menu.

Next, copy the HTML code it generates.
On your tumblr post, you're going to press the little setting button in the upper corner. Where it says rich text, you're going to change it to HTML.
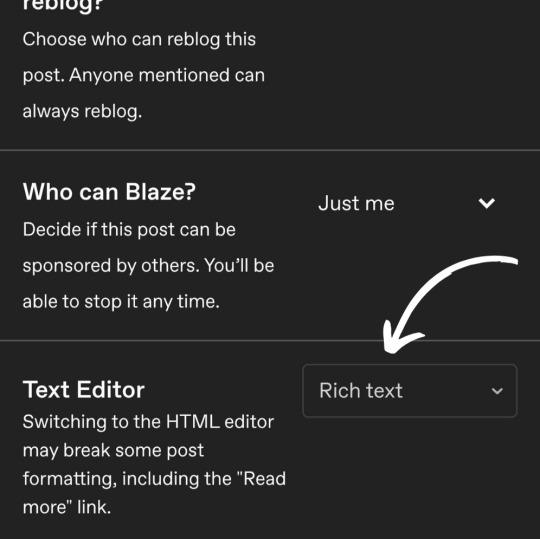
Your post is going to look really scary but don't worry! You're going to select the text you want and then replace it with the code you copied.

Once you've done that, press the preview button and you'll be able to edit like normal! This is particularly fun if you want to use gradient text or if you just want more fun colours
171 notes
·
View notes
Text
How To Embed An Image In An Ao3 Comment
Sometimes, an image is worth a thousand words. You've read a fic, and the only way to respond to it is with a picture. Maybe this is a scribble you drew in the notes app on your phone, maybe it's art you drew with actual artistic talent, maybe it's a meme you just looked up, maybe it's a meme you just made. But you have your image, and you want to put it in someone's comments. How do you do that?
Ao3 comments support HTML, so to embed an image you need an image link to where the image is hosted somewhere on the web, and you need a bit of HTML code. First thing, the image.
You can use a site like Imgur to host your image, or a private tumblr post, or a fandom image host like Squidge Image Hosting. The important thing is that you want the actual image URL, and not the link to the page that the image is hosted on. Let's say you put your image in a private tumblr post, it would look something like this to get the image link.

You want to right-click (or control-click, whatever works on your screen) to get this dropdown menu, and go down to Copy Image Address. That drops the URL into your clipboard. And then you copy this code:
<img src="YOUR IMAGE URL" alt="DESCRIPTION OF YOUR IMAGE" border="0" width="Max-width 95%" />
In order that's the code that tells the HTML which image to pull off the web, a description that will work for screen readers, telling it that it doesn't need a border, and a bit of code that will keep the image from running off the screen if you grabbed a big image. You put your image URL in that bit of code and write a fast description, and then bingo, you're ready to post your image!
Oh god though, you're on mobile, that all looks awful: quick tip! If you host your image on images.squidge.org, they will do the html for you. It's free fandom image hosting as long as you're over 18. Upload your image, and then scroll down on the page, and there's a convenient button with the HTML just done for you already.
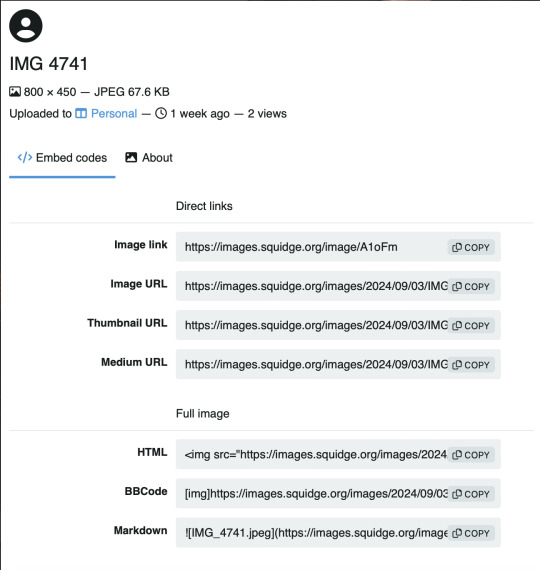
Scroll down to HTML and hit the copy button, and then just paste that into the Ao3 comment box, update the image description (cause it'll just have the title there) and you're good to go!
Go forth and decorate the world with images!

131 notes
·
View notes
Text
I can understand some people being new around here and trying to get the hang of posting and rebloging. I get it.
But after a while, you start to get to know your reblog and like buttons and how to comment, how to handle your blog and even try some html coding to make it look neat and pretty. Tumblr has it's faults, but what I love about it is that it's very easy to grasp and start blogging.
Now, I've seen some people around the tags still being unsure of how to post stuff or reblog, so let me just say this.
Don't just copy/save gifs or art and then repost them on your own blog, and add under it "I dunno which person this gif this belongs too" or "Neat art". I've seen gifs from other gif makers and art from other artist getting reposted around here without even getting credited. I can recognize almost all the gif makers around here, especially when it comes to the #tropedit tag, by their unique colorings and ways to make beautiful gifsets. And when I see reposts getting more notes than their own original post...This is how this site looses it's gif makers and artists.
Right, so instead of going off and rant, I'm gonna turn this into a little tutorial.
Okay, so you see some cool gifs around here, and it's in a set. And you go "Aahh, I want this by its self for my mood board" or "This will fit my fanfic soooo nicely". Instead of going copy/save and then repost the same gif on your blog, here a cool little feature:

You click on that little blue button called GIF and a drop down menu pops up, featuring gajillion gifs that are all on this site.
"But, how do I find the gif that I want?" Have you noticed that every gifset or art that gets posted here, all have unique tags that are relevant to that artist or gifmaker? For example, here's one of my unique tags:
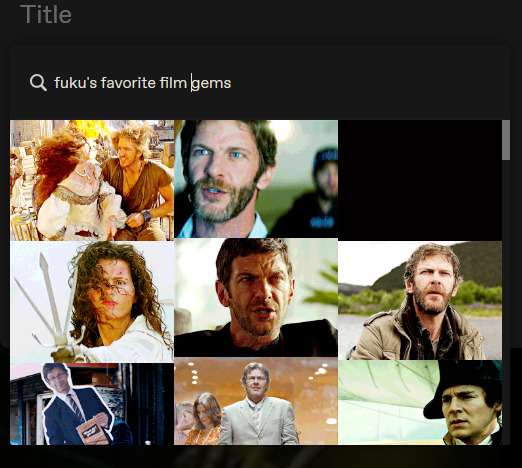
Now, you just need to scroll down and find the one that you've been looking for. OR from that gif, notice some other tags and you search for something else that you like.
Once you find it, you just click it and it does this:
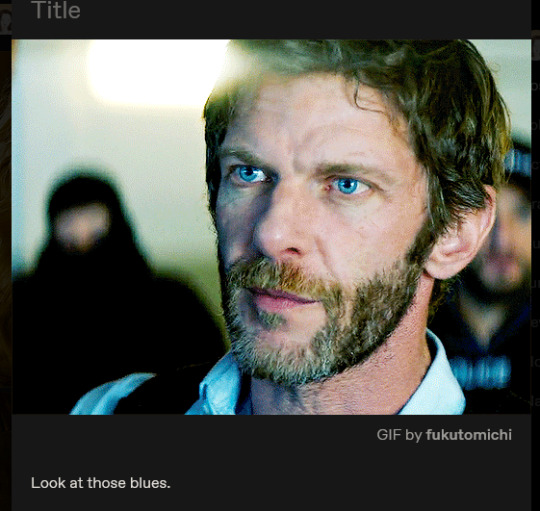
Voilà! Now, you can start writing, you can start adding other gifs! But, you do notice what's under the gif, right? It's you giving credit! No need for @, no need for asking around which gif this belong to. It's just does it's thing automatically, I get a notification that someone liked it a lot and used it in their post.
That's it! Nothing complicated.
Now, when it comes to art...Just reblog from the artist, please. Share the art around by rebloging directly from them, not doing the old copy/save/repost or @. Just reblog it from them. It's that simple!
Hopefully, this was helpful for any new people coming here and being too shy to ask about these things! Have fun posting!
#not being mad or anything i just wanted to share some helpful tips and explain some things#shut it fuku#the rings of power#rings of power#trop#rop
51 notes
·
View notes
Text
for any of the writers here, there’s a new site that i use for my writing. they have pretty strong stances on ai and say they’ll never weave generative ai into their site and they believe that ai generated content should not overtake human voices
you can connect your ao3 to it and it’ll have a drop down menu with all your existing works, so you can directly add a chapter or make a new work. it copies the html and takes you straight to ao3. it has many other handy features regarding the actual writing portion, formatting, spell check, find and replace, etc
i’ve been using it for a little while and love it but i haven’t seen many people chatting about it so, :)) it’s called ellipsus <3
#❥ writing prompts#not really but still#fuck all the other writing applications for adding ai into their shit lmao#ellipsus#writing#writing help#writing resources#writing research#writing tips#writing utensils#writing services#writing stuff#writing community
28 notes
·
View notes
Note
hi!! i was wondering how you got your text to have a gradient color effect? I love it so much!
hi there!
so this is the website i use to get the gradient effect!
this website is also useful if you want to use some different fonts that are tumblr compatible that you can’t get in the app itself.
𝔱𝔥𝔦𝔰 𝔦𝔰 𝔞𝔫 𝔢𝔵𝔞𝔪𝔭𝔩𝔢. <- for this you only have to copy and paste the font you want into the post and it should work just fine. no fancy html work required.
in order to change the color however, you will have to copy the html code and paste it into the post. you have to either do this on a laptop or i use safari mode on my phone to do it. if you copy and paste the words into a post on the app it won’t keep the gradient formatting for some reason.
you can choose from a few different kinds of gradients and you can choose any colors as long as you have the hex code for it. so it’s completely customizable which is super nice.
but i’ll include a little tutorial under the cut for you to use for reference ♥️
so first you are going to want to type in the text, choose the gradient style and the colors you want.
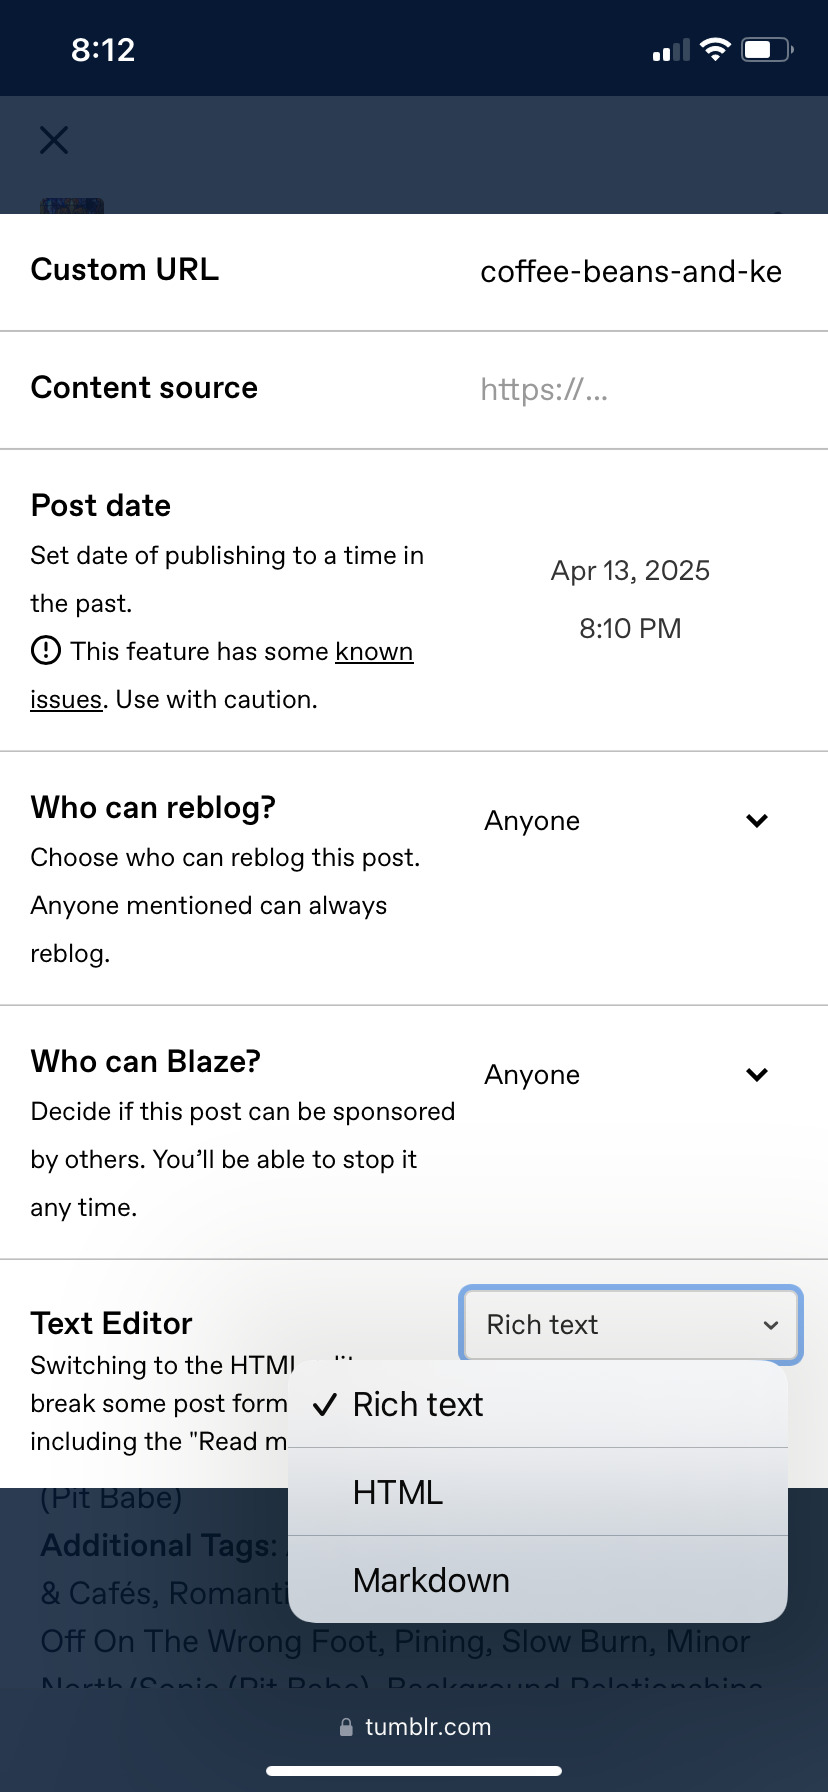
then you will want to either create a new post or edit an existing one in a web browser mode. hit the settings button in the top right corner of the post.


there will be a menu that pops up and you’ll want to scroll down until you see text editor. click on the drop down menu where it says rich text. select html then click somewhere on the screen to close the settings section.


it should show you are in html mode, so then go ahead and paste the code that the website gave you. you can click the preview button to see if you like how it looks, but if you like everything you can either just save it right away or go back to the settings menu and switch back into rich text mode.


then there you go! gradient text! i hope this helps 🥰
30 notes
·
View notes
Note
How old does your blog have to be to see the desktop blog view thing?
You can just make it happen whenever you want!
In your browser, set it to desktop mode (available in the dropdown dots menu) and then just type in a user's name first, then tumblr.com
Example:
Fangirltothefullest.tumblr.com
If they have set up a desktop version it'll show
Users older than when mobile became a thing will have desktop versions as they are more customizable. You could even add music if you had the html code for a player.
If you wsnt one yourself, you have to enable custom themes.
Log into tumblr on your browser either on desktop or on mobile. I suggest logging in through desktop mode on your phone's web browser and opening the log in in a new tab so it stops trying to pop up the app.
Once logged in you can disable desktop mode in your browsers drop down to see things easier.
It'll probably up like this otherwise and be a formating nightmare.
Now.... once it's OFF desktop mode,
Go to the blog you want and hit blog settings in the drop down.
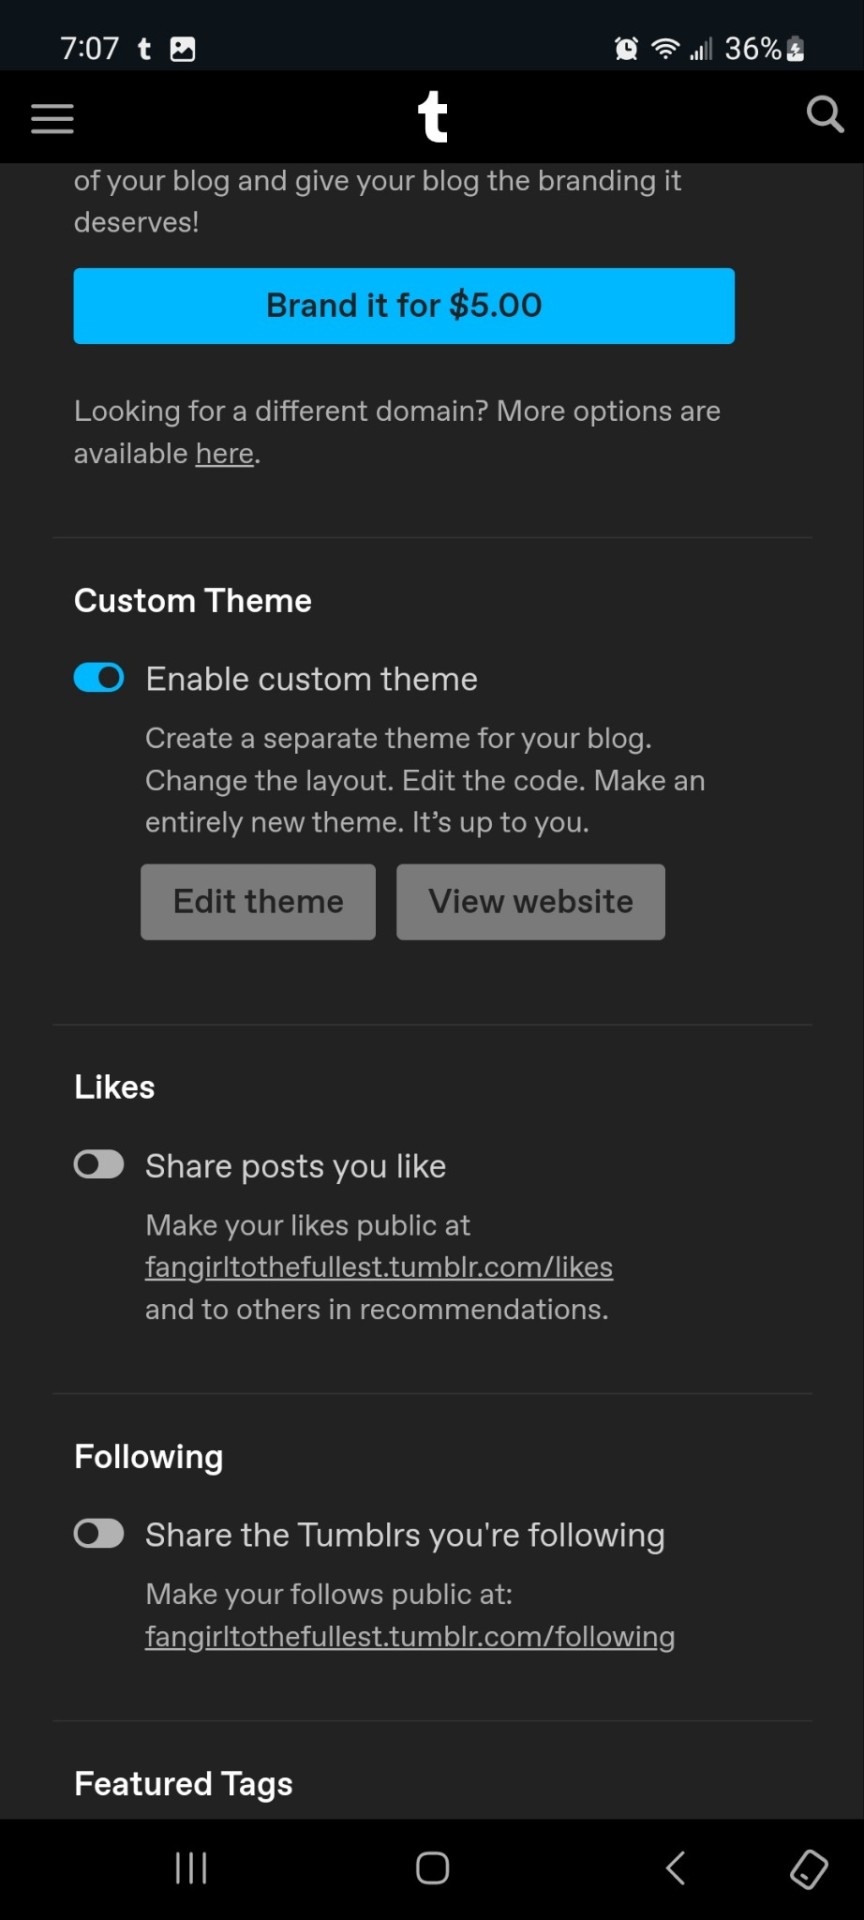
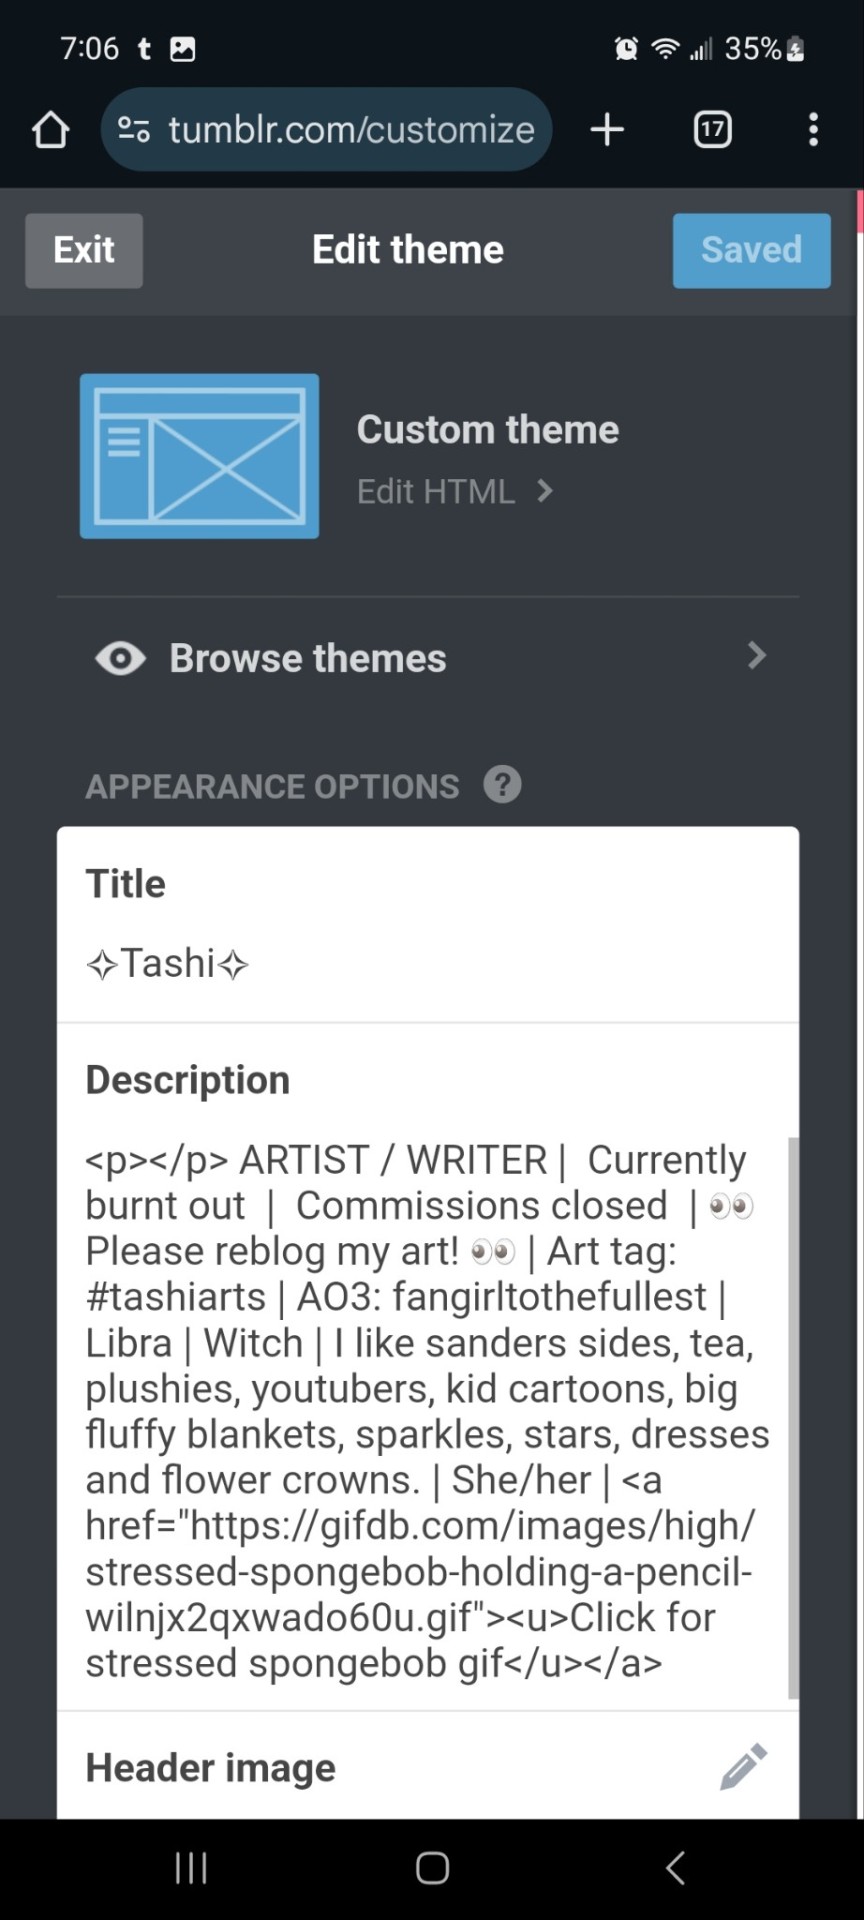
Enable the custom theme and hit the edit theme button. You'll be taken to a place that looks likethis:
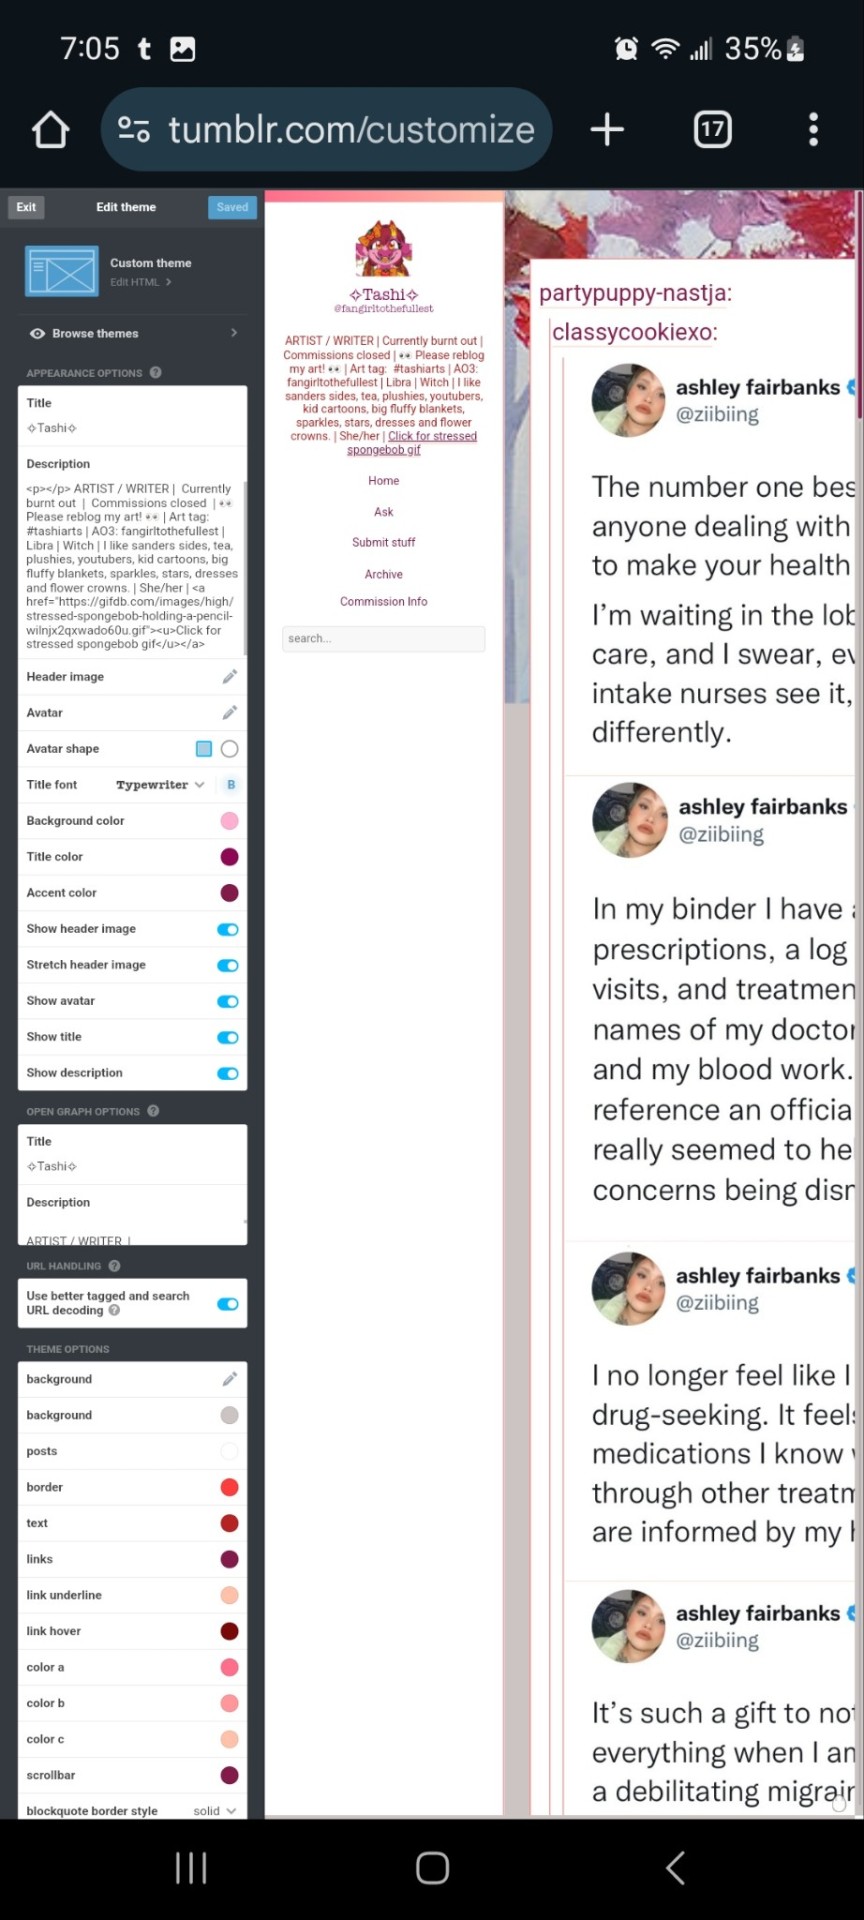
You can zoom in to hit the browse themes button:
It'll bring you here:
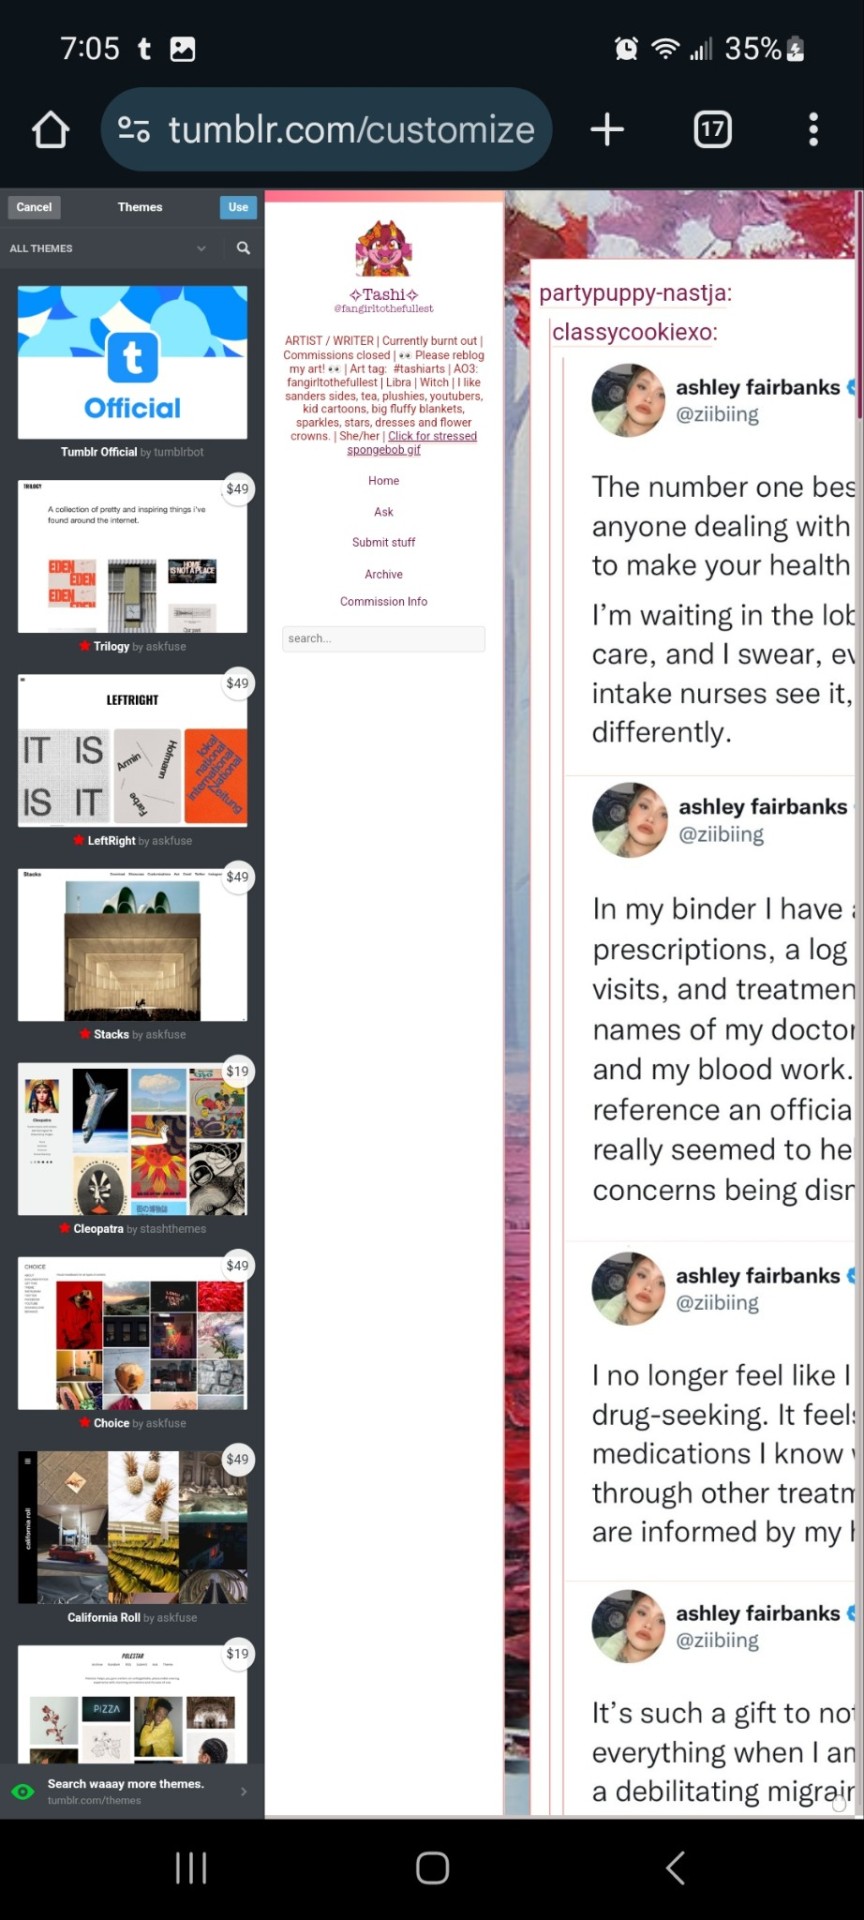
And you can choose what style you want! Hit save and you'll notice it gives you options to play around- choose a background, colour scheme. Fonts etc. Play with the html!
On a regular desktop this is easier to see so I suggest doing this on a laptop or pc.
Also fun fact you can hide secret messages in the html coding and if someone pops open the page source they'll see the surprise message in the code. XD just a fun thing if anyone wants to... say... make their own arg or send out secrets etc.
You CAN create whole pages with this feature too but they are unreliable and after this long it might be broken? So... yeah.
NOW REMEMBER: TO ACCESS THE DESKTOP PAGES YOU HAVE TO CHANGE THE LINK!
Forfeature. As a said above, my desktop link is fangirltothefullest.tumblr.com
I believe the mobile version has it as tumblr.com/fangirltothefullest.
Only people who have made a desktop version will have their blog show up if you'd like to test this festure.
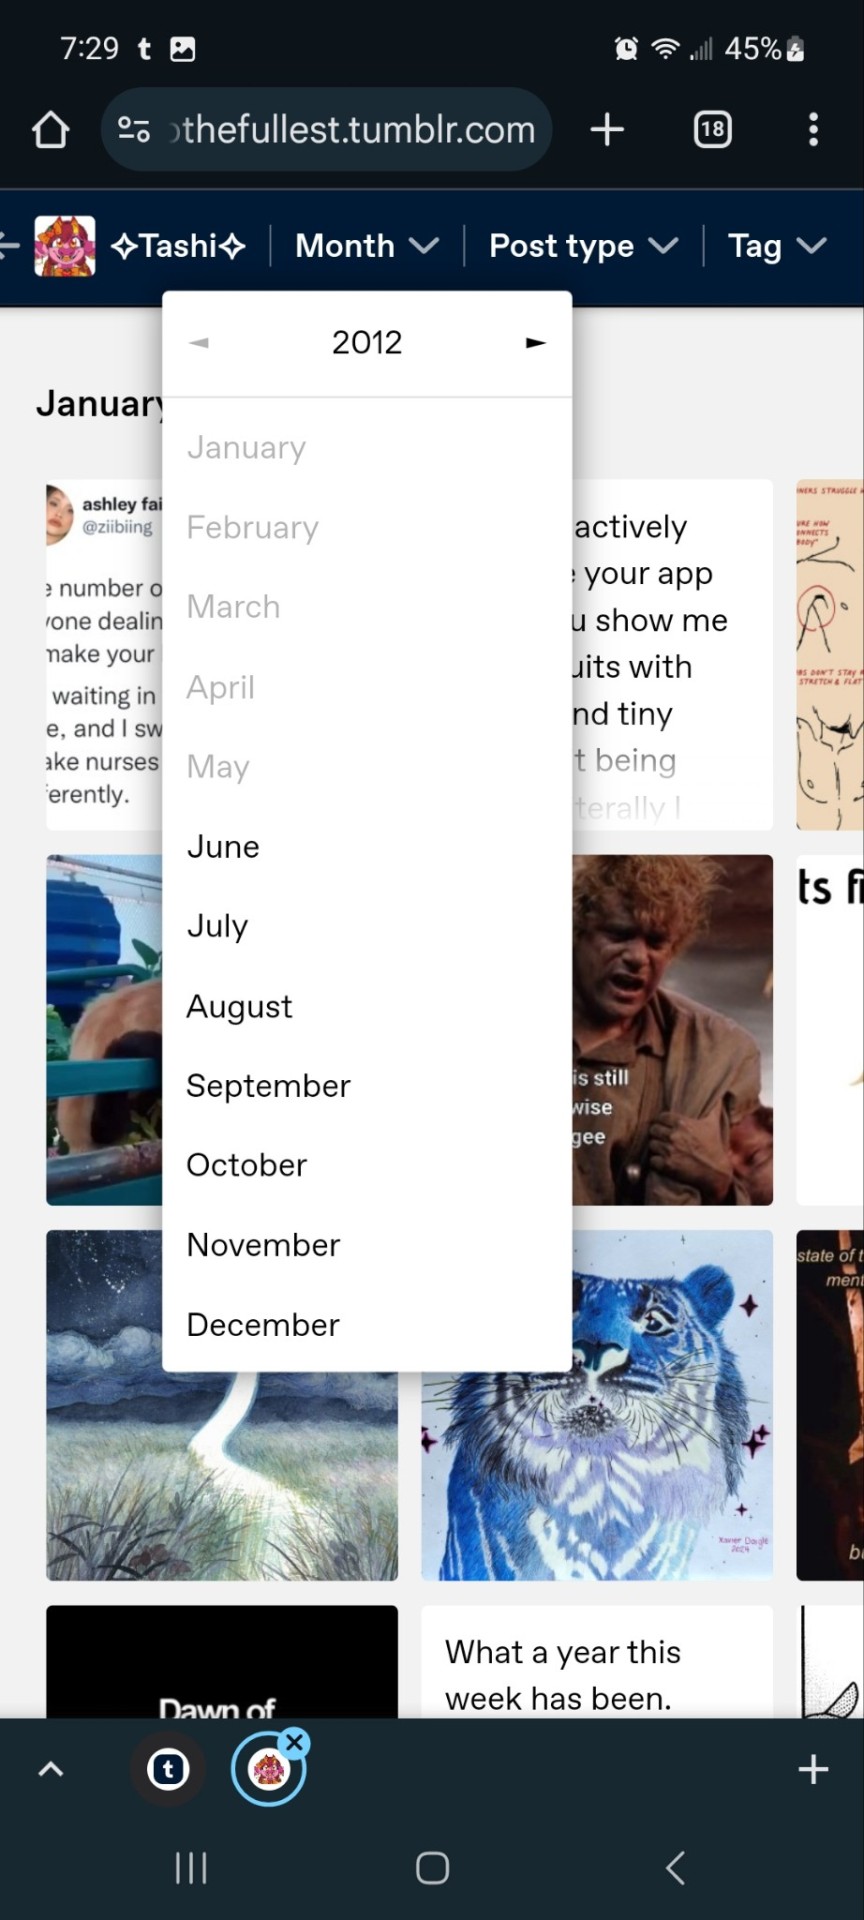
Also this is how you access everyone's blog archive! Because blog archives exist!
Mine would be:
Fangirltothefullest.tumblr.com/archive and you can't open it in mobile or it'll just pop up the mobile version which doesn't exist.
You wsnt this page which let's you find the earliest things a blog has posted. So I created this blog in june 2012 lol.
It works for tags too to show you ONLY the contents of that specific tag
Fangirltothefullest.tumblr.com/tagged/tashiarts/
And if you want a tag in order you add /chrono to the end to get it chronologically sorted from the earliest posts in the tag.
Fangirltothefullest.tumblr.com/tagged/tashiarts/chrono
I hope this helps!
NOW EVERYOE GO HAVE FUN MAKING COOL DESKTOP VERSIONS OF YOUR BLOGS!
32 notes
·
View notes
Text

Animated Drop down Menu
#animated dropdown menu#drop down menu#html drop down menu#css drop down menu#codenewbies#html css#frontenddevelopment#css animation examples#css#html5 css3#pure css animation
0 notes
Text

Dropdown Navigation Menu
#css dropdown menu#drop down menu css#dropdown menu#css menu#learn to code#html css#frontenddevelopment#css#html#css3#divinectorweb#code#divinector
0 notes
Text
Transparent Dropdown Menu
#transparent drop down menu#pure css dropdown menu#css dropdown menu#dropdown menu html css#html css#frontend#webdesign#learn to code#css#html#css3#frontenddevelopment#css menu#html css menu#dropdown menu hover animation
3 notes
·
View notes
Text
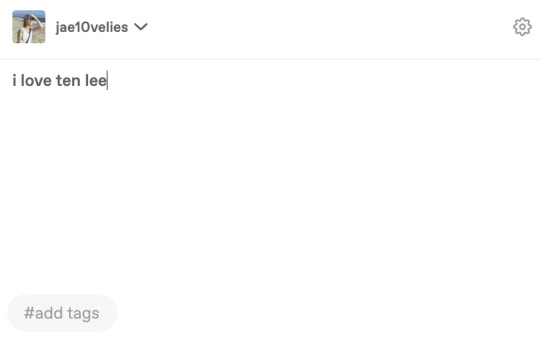
for @yoshit-he-dinosaur and anyone else struggling w this:
here's how to use custom text colors in your posts!
this is the guide i've been using, i'll be showing the method outlined here
i highly recommend doing this on desktop, as it will be easier to switch between tabs and access the html editor this way (also there is probably an easier way to edit text colors via html, but this is the way i know best and i'm not a huge computer girlie!)
so let's say i have this text here and i wanna make it pink
first make any font edits (bold, italic, size, etc) to your text
open this link in a separate tab
we are gonna work w this portion of the site here:
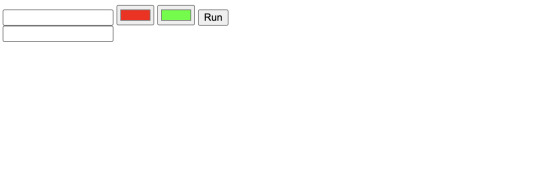
copy and paste your text into the top box and select your desired text color from the two colored text boxes next to it (hex code, rgb, whatever's easiest for you!)
for a solid color, make the two color selectors the same color. for a gradient, the first selector is the beginning color and the second selector is the end color
here is my selector after making my color choices:
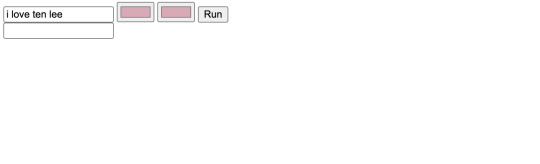
press run and you should get a string of html code in the bottom box like this:
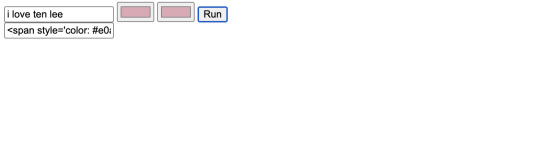
copy this html code
now you're going to return to your tumblr text post and click the settings icon in the top right (circled)
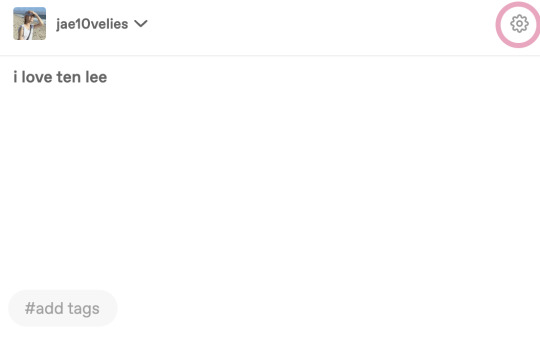
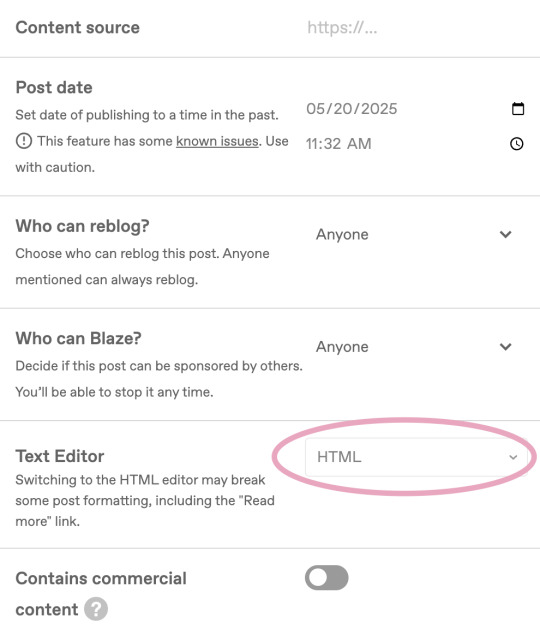
navigate to the text editor selector and choose html from the drop-down menu (circled)
your text post should now be open in the html editor w the option to switch back and forth between html and text preview like this:
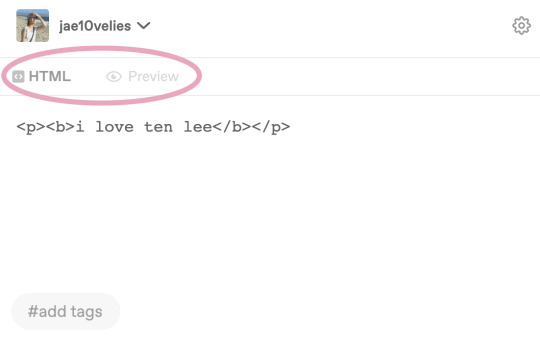
on the html editor locate your desired text and select it like so:

paste the html code from the color selector and it should replace the selected text like this:
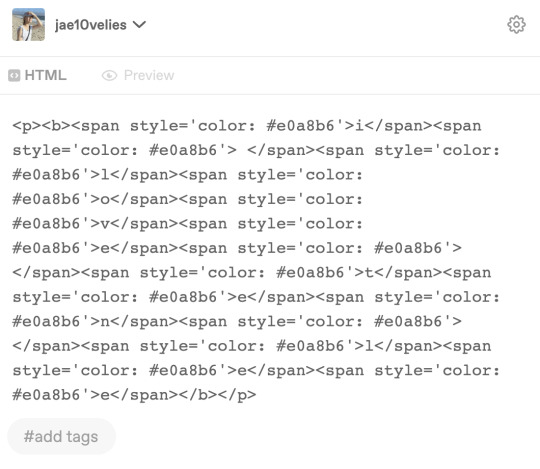
if done properly, your text should be colored once you return to the text preview!
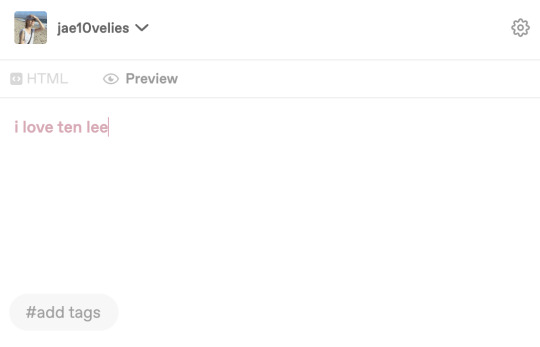
hope this was helpful! if you have any questions about the process don't hesitate to ask <3
#jae10velies#tumblr tutorial#custom text#text colors#this took me forever to figure out at first let me save u guys some pain and struggle 😭
13 notes
·
View notes
Text
Quick guide on how to get big tumblr link in your posts
idk if it’s been like this for everyone, but I know the Link button in tumblr posts has been broken for some ppl for a while.
Basically, what’s happening when you click the button is that it doesn’t insert any html into the post, so links get added as simple plain text. You can get around it by adding in the html yourself, it’s pretty easy (tho not as easy as clicking a button, tumblr 😒), so this guide is mostly for ppl who aren’t used to looking at html.
I prefer to do this on desktop, but it’s easier to edit caps on mobile—the process is the same anyways.
What I tend to do is pull up an old post with a link and copy the html code from that post. You don’t have to fiddle with the code itself, you just need to replace the urls and the display text.
To get to the html editor, click the gear icon on the top right, then click the drop down menu next to Text Editor and select HTML

This will pull up the html code, as seen below. What you need to copy is everything from the open < p tag to the close p > tag. (This is easier to find in a post where the link is the first thing)

After you’ve copied the code, then you pull up your new post and past it into the html editor. Next you will need to replace the old url with the new link that you want to put in your new post. This needs to be done in the three locations highlighted below. Then you just need to replace the display text in two locations.

It occurs to me I’ve only highlighted the part of the display text that I actually replace, since I only ever do this for fic updates and only for the same fandom 🤷♂️ Hopefully the principle is easy enough to understand, though.
Maybe this will be fixed eventually, but, well… maybe not :|
#sorry for putting this in the pit babe tag but i’ve noticed several ppl struggling with links 🙏#idk what other fandoms are dealing with this i only care about the pit babe tag lmao#pit babe the series#tumblr things#em post
9 notes
·
View notes
Note
//hi mod! how do you color your text like that?
888: https://roleplayformatter.carrd.co -> get the source code, then when making a post, go to the post settings and scroll down to "text editor." open drop down menu, select html, paste source code.
7 notes
·
View notes