#animated dropdown menu
Explore tagged Tumblr posts
Visit Tumblr Blog
Explore Tumblr blogs with no restrictions, modern design and the best experience.
Last Seen Tumblr Blogs


Fun Fact
In Q3 of 2020, 31% of US users access the Tumblr app daily.
Text

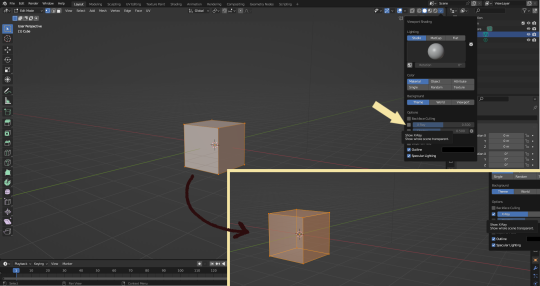
Animated Dropdown Menu
#animated dropdown menu#css dropdown menu#html css#divinector#frontenddevelopment#webdesign#html#css3#css#learn css animation#css animation examples#css animation tutorial#css navigation
3 notes
·
View notes
Text

Animated Dropdown Menu
#animated dropdown menu#css menu#css navigation menu#navigation menu#menu html css#navigation menu html css#css animation#css tricks#css effects#codenewbies#html5 css3#html css#pure css animation#css animation examples
3 notes
·
View notes
Text
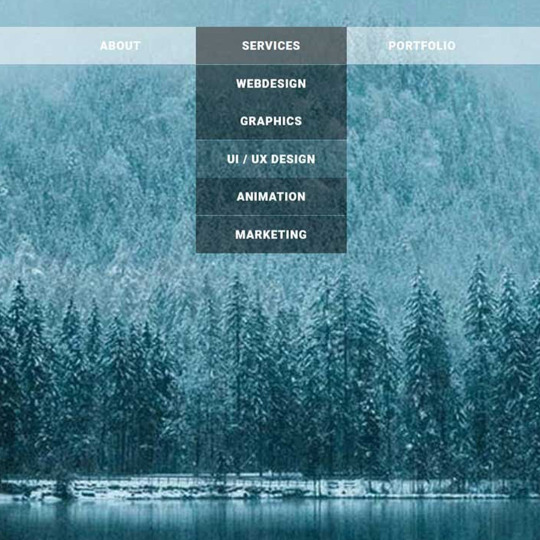
Transparent Dropdown Menu
#transparent drop down menu#pure css dropdown menu#css dropdown menu#dropdown menu html css#html css#frontend#webdesign#learn to code#css#html#css3#frontenddevelopment#css menu#html css menu#dropdown menu hover animation
3 notes
·
View notes
Text

This is a replacement for various TS2 cutscene camera animation resources without bloom, grain, vignette and letterbox /OR with less of those/
NOTE: This mod is NOT an improvement of cutscene animations. It allows clean /or cleaner/ screenshots and that's it.
Less post effects in cutscenes
Download: SFS | BOX
updated 24.01.2025: first kiss scenes were all blurry, I've replaced those.
06.02.2025: Move in animation cutscene was black, I've replaced it.
This mod is still a work in progress! Some effects might switch on and off, also - At the end of the cutscenes anims tend to look glitchy, Sims rapidly changing position etc. That wonkiness is normally hidden by letterbox blackout.
Seems like EA removed sfx from cutscenes in Legacy version. No, actually the sfx is still there, at least for some of you. So it wasn't a feature, only a bug.
More under the cut:

The ugliest of the effects IMO, the filmgrain (especially in dark/night scenery), luckily takes up a few frames at most and was the easiest to get rid of. Well, not always easy to remove, because in some cutscenes effects depend on other effects, like the filmgrain is added with vignette, not filmgrain (???) and vignette creates a mask for the blur effect so if you remove it blur becomes worse - but you can't remove blur cuz it makes entire scene black. It's f*cked up.
Even EA has failed to do that in their Legacy edit which has (some) sfx removed from cutscenes, but not all of it. OK, that's not true, apparently it wasn't a feature only a bug - sfx is still there.
Not all animations have all effects removed. To remove these, you need to click on each effect ('Joint') frame in cAnimResourceConst tab, Sub mesh: (dropdown menu) / Postprocessingmaterial and set parameters to zero.
Usually that's one, or a few more frames, but for some anims it's 60, 80 or even 289 frames (letterbox, enter college without parent anim) - so I've skipped most of those.
Replacement contains resources:
o-cineCam-alienAbduction_anim o-cineCam-proposeReject_anim o-cineCam-graduationParty02_anim o-cineCam-cinematic-EnterCollege-withParent-2_anim o-cineCam-firstKissTeen_anim o-cineCam-alienBirth-2_anim o-cineCam-homeBirth_anim o-cineCam-hotTubPlayInF2M-2_anim o-cineCam-hotTubPlayInF2M-1_anim o-cineCam-firstKiss_anim o-cineCam-cinematic-EnterCollege-withParent-1_anim o-cineCam-weddingReject_anim o-cineCam-graduationParty01_anim o-cineCam-moveIn_anim o-cineCam-alienBirth-1_anim o-cineCam-hotTubPlayIn-1_anim o-cineCam-weddingAccept_anim o-cineCam-a-cinematic-enterCollege-noParent_anim o-cineCam-ProposeAccept_anim o-cineCam-hotTubPlayIn-2_anim o-cineCam-returnFromAbduction_anim o-cineCam-ProposeMaleAccept_anim o-cineCam-playInBed_anim
In case of some effects, if they take up many frames - usually letterbox - it's not enough to zero frame parameters, you gotta go to raw view and zero leftover parameters in there too.

Also, as mentioned above, removing one effect can mess up another.
461 notes
·
View notes
Note
Hi, I love your works!! I was wondering where you find the original, unedited pictures you use for your art? Do you take them yourself or find them online?
Hey there! I get them from many different sources! Whenever I can I use my own, and sometimes my followers send me cool pics to use (or put them up in the Sacrificial Altar channel in my Discord), but I find most of what I use through public domain sources online!
For the online part, I put this little list together with some of the common resources I use! Feel free to share it around and copy it:
For an easier experience, I'll copy the relevant part below:
STOCK SITES
- Unsplash: Usually the best quality out of the free stock sites. They’ll try to sell you a subscription plan but you can ignore that.
- Adobe Stock: Select “Free” on the dropdown menu next to the search bar. The free image selection here is big and high-quality, though they feel more like stock pictures than natural photos. Note: They limit how many pictures you can download per account per day, but you can make several accounts to circumvent this if you use it a lot.
- Texturelabs: lots of free, very high-quality textures!
- Pexels: Similar to Unsplash, but it has more pictures with people. If you need a photo with models, this is usually the best place.
- Pixabay: Widest selection, but worst quality control. Go here if you haven’t found anything in other sites and don’t mind sifting through a bunch of garbage pics and occasional AI images.
PUBLIC DOMAIN SOURCES
- Wikimedia Commons: an enormous selection of CC and public domain pictures. Super useful, especially for the really specific images that you'd expect to find on a Wikipedia article. Always check the copyright conditions! To filter by license, search something and then click on the License dropdown under the search bar. Select “No restrictions” for public domain images.
- Picryl: A repository of public domain sources, ranging from ancient historical books and artifacts to fairly modern pictures. If you're looking for something old/historical, chances are it's here! This website is probably one of the most complicated ones to use, so here are three important tips before you use it:
This site added a paywall that appears after the 3rd page of search results. To remove it, install uBlock Origin, go to the “My Filters” page (clicking on the gear icon after opening the extension), and paste this filter: picryl.com##._9oJ0c2
After searching, use the timeline on the top right to narrow down the result by year.
It won’t let you download the full picture without paying, but it always has a link to the source site below the description. Click on that, then copy-paste the image’s name to find it in the original source. That way you can get it for free, and often in better quality than Picryl offers.
National Archives Catalog, The Library of Congress, NASA, and Europeana have wide selections, but they are included in Picryl so it’s usually better to search there and then download them in the source as mentioned above!
- Flickr Search: a ton of usable pictures with a generally more amateur feel, just remember to filter by license using the “Any license” dropdown menu. When you find an image, make sure to check its specific license (you can find it below the image, on the right side).
- Openverse: The official Creative Commons archive, has many sources! Includes other sites on this list, but has a lot of clutter if you don’t filter.
- iNaturalist: a repository of user-submitted images of animals, plants, and fungi. Look for a genus or species, then navigate to the photo list and filter by license.
MUSEUM COLLECTIONS
- The Met: An amazing selection of artifacts from all over the world, with top quality photographs of most of them (usually with several angles for each). You can filter images by material, location, and era.
- Getty Museum: Another smaller selection of museum pieces, but this one includes old photos as well as artifacts. You can also filter by dates, materials and cultures. Make sure you include the “Open Content” filter to only see public domain things!
- Smithsonian: Big selection of around 5 million museum pieces, with some 3D scans of museum pieces. Most pieces just have a single picture that can sometimes be low quality, but pieces with 3D models sometimes also include a lot of high quality photos from multiple angles. This collection also includes things from museums of natural history, so you can also use it to search for bones and specimens.
- Artvee: public domain classical art. They make you pay to download high-quality images.
If you guys got any others, please let me know and I'll add them to the collection!
197 notes
·
View notes
Note
How did you record the mspaint story telling series of pieces? I think it’s a really interesting form of animation and I’d like to try it for myself, if you don’t mind!
I use OBS to record it! (the ms paint im drawing on is squashed down to the smallest size) and then I use DaVinci Resolve to crop it because thats the program Im used to put u can use anything u want ( I change the resolution to be 1300 X 1080 and zoom into the ms paint part of the recording ) I cut it and export it so that it loops well and I use handbrake to make sure the file size is as low as possible and then I convert it into a gif using ezgif and I choose the 800px option from the dropdown menu
140 notes
·
View notes
Text
KotLC Fairy Tale AU Exchange
Schedule (in CDT)
May 29: Discord server opens. Tag nominations open.
June 12: Tag nominations close. Sign-ups open.
June 26: Sign-ups close.
June 29: Assignments are out.
July 27: Assignments are due.
August 3: Works are revealed, with all creators anonymous.
August 10: Creators are revealed.
August 14 (approximately): Discord server closes.
Glossary
Assignment: The person you are assigned to make a gift for. You will receive a list of their requests and pick one to make.
Canon Tag: A tag that has been used enough that AO3's volunteers have organized into the tag list. These are the ones that appear on the dropdown menu when you're entering tags.
DNW: "Do Not Want," a list of things you do not want included in a gift for you. Everyone is encouraged to have one of these, and it must be followed by your gifter. DNWs must be reasonable, clear, and polite, but they can be petty ("none of this popular ship").
Exchange: A "gift exchange," where everyone receives a gift of a fan creation, and everyone makes a gift of a fan creation.
Match: When you offer something someone else requests, or you request something someone else offers, you "match" with them! You will need to at least have one offer that matches someone else's request in order to participate.
Offer: When you sign up, you will make a list of things you "offer" to create.
Pinch hitter: Someone who makes an emergency gift for someone whose gifter dropped out. You are welcome to participate only as a pinch hitter.
Request: When you sign up, you will make a list of things you "request" other people create.
Tag nominations: A period of time where people can nominate the relationships and AUs they want involved in the exchange. These will be the ONLY relationships and AUs permitted, so you want to nominate tags!
Treat: An extra gift you make with no expectation of a gift in return! You can make them for anyone in the exchange, whether or not you're assigned to them. It's just a fun and nice thing to do!
Gift Minimums:
Fic: 1000 words, with an ending
Art: A drawing completed to a level you would normally post as "finished"
Rules for Participating:
You must join the Discord server and follow all rules listed there.
You must be 13 or older.
You must have an AO3 account, sign up through AO3, and post your gift on AO3. AO3 accepts fan creations of all types.
You must do your best to make a gift that meets the minimum requirements, and that you think your recipient will like, within the time of the event.
You must contact a moderator as soon as possible if you think you will not finish your gift in time.
You must keep your gift and recipient anonymous until creator reveals.
More information to come! I hope to see you all soon!
FAQ
What counts as a fairy tale?
I am using a broad definition! Any story that contains fairy tale elements: enchantments, curses, witches, wizards, warlocks, magic, talking animals, fairies, fae, trickery, etc... is allowed in the exchange! This could include a classic fairy tale, like Hansel and Gretel; an adaptation like Tangled, Ella Enchanted, or Land of Stories; or even an original fairy tale!
During tag nominations, people will "nominate" the specific AUs (fairy tales) they want included. These will be the only ones eligible for the exchange, so get an AO3 account and participate in tag nominations if you want to make sure something is included!
What if I don't match with anyone?
If no one wants to receive what you offer to make: We will give you an opportunity to offer more things. If you do not want to, unfortunately, you will not be able to participate in the exchange.
If no one offers to make what you want to receive: You can still participate. We will put you up as a pinch hit, meaning people can offer to make a gift for you without being assigned to.
What if I don't get a gift?
We will not reveal the works until everyone has a gift. If no one picks up a pinch hit, the exchange will remain closed until someone does. Everyone who participates will receive a gift.
What isn't allowed in the exchange?
For the comfort of the most number of participants: noncon, incest, bestiality, romantic relationships between characters who are canonically adults (over 18) and characters who are canonically minors (under 18), and NSFW are not permitted.
Considering the series, graphic violence and major character death are allowed, but only if the recipient says they're okay with receiving them.
My recipient requested ten things! How many do I have to make?
Only one! You can choose any of your recipient's requests to make, even ones you didn't originally offer.
Can I make more than one gift?
If you have more than one AO3 account, you may sign up multiple times. But please only do this if you're sure you can finish both gifts in time!
You can also be a pinch hitter, filling in for people who drop out, or make "treats"--extra gifts just for fun. But you won't receive extra gifts for either of these things.
55 notes
·
View notes
Note
Hey I know you’ve recommended OSC creators use spreadsheets to stay on top of production in the past, how do you like to arrange your spreadsheets?
INCOMING: HUGE POST ABOUT SPREADSHEETS
Like this! Here's the spreadsheet from episode 15:
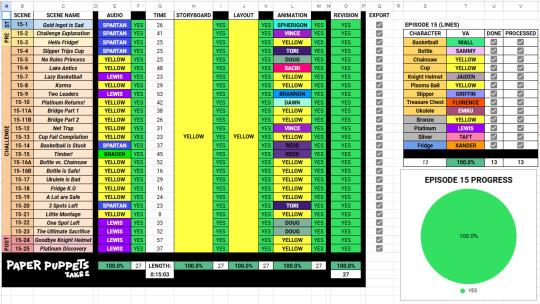
Some things to note about what makes a good spreadsheet and my choices.
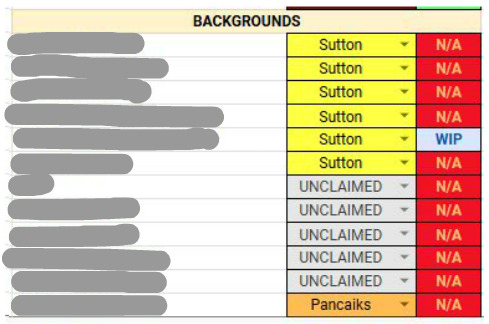
Using dropdown menus
It's easier than writing things over and over. I have a dropdown menu for each crew member, and another for task status (DONE, N/A, WIP, REV). Plus, its fun giving each crew member a hex code colour (provided by the person)!
Learn/use the functions of spreadsheets
I think this is the most important thing people should learn about spreadsheets. Functions makes things SO MUCH EASIER for production. They're pretty much shortcuts to do calculations and automate updating parts of the spreadsheet for you, which I think helps push production along.
For example, this function I wrote below helps me indicate when a scene is ready to audio edit automatically.

It takes a bit to set up manually, but the pay off is worth it. All I do is check off when a characters lines have completed audio clean up and the audio tab will update to the 'ABLE' tag!
Add a time column
Small part, but for me, it's helpful seeing how long the episode is projected to be. You can see which scenes are longer and short to give out to animators without having to look in your files.
Label scenes
Another small feature! When I have over 20 scenes, it can be easy to forget which scene is which! Labeling them helps you remember without having to check files or the script.
Connect it all to one graph
Another reason why functions are useful! My pie graph tells me how much the episode is complete visually, which adds another motivator for me to make the graph all green! The graph I have automatically updates when I change the status update on tasks!
Make it easy and fun for YOU!
The whole point of a production spreadsheet is to help you stay organized with a project as big as an episode with so many moving parts. So format it however you want! As long as it's understandable for you and keeps you on track with production, that's what matters!
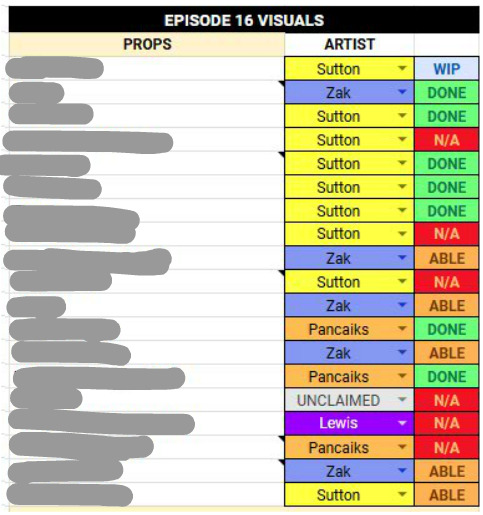
That's pretty much it! However, there's always room for improvment or additions! For example, I finally added a 'visuals' column on the episode 16 spreadsheet (which connects to the main graph too, so its a more accurate progress tracker). I never did this until now because it was always me doing all the visuals, but now I have others helping me!
I'm always finding ways to automate my spreadsheet! It's fun learning different functions which I wasn't expecting. Can you tell I love spreadsheets?
35 notes
·
View notes
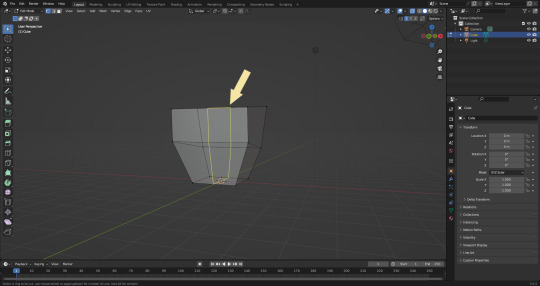
Text
Blender: Which Buttons Do I press? (Part 1)
There are a lot of tutorials where you already need to know how to "do the basics" like "maneuver the camera." So this tutorial is focusing on the Buttons- not on the sculpt or the object, just on the buttons and shortcuts that I personally use in Blender.
Note: You will need a mouse with 3 buttons / scroll wheel for this.
Before we start, I'm going to explain which shortcuts I use in this, but, not to make myself redundant, there's a shortcut for seeing shortcuts: Press Spacebar + Shift to see all available shortcuts in each mode.
I'm using Blender 3.6 for this tutorial. I recommend you use the same. It's completely free and has a lot of great features! For this tutorial though, 3.4 will likely work as well.
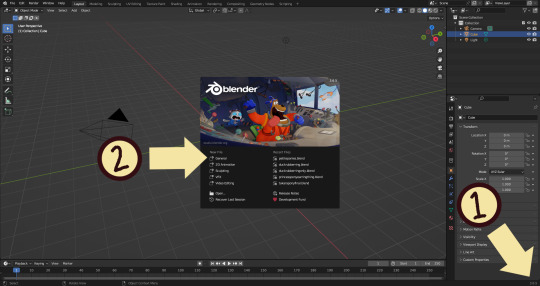
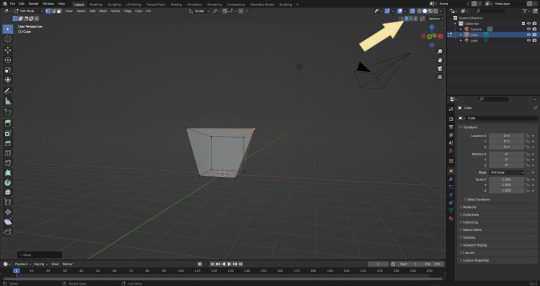
Click "General" under New File.
Your screen should look like this. There are 3 default objects in the file: Camera, Cube, and Light source.
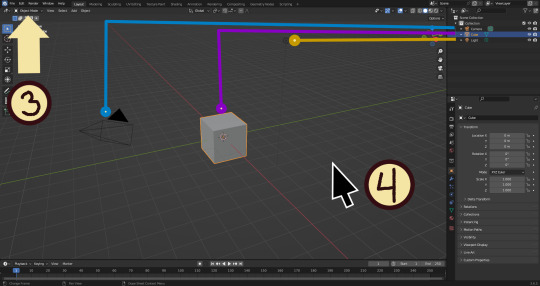
3. This bar indicates that you are in Object mode. This menu will allow you to go into other modes depending on the object you have selected.
4. Lets talk about shortcuts. You can zoom, rotate, and move the screen using buttons at the top right, but I haven't marked those because I will teach you a better way. Feel free to click them all and see what they do, but I assume you're here because you don't want to explore every button in this godforsaken program the hard way.
Below, the Left and Right buttons are marked as a reminder as well as the Middle button which is also the scroll wheel (press down to click it)
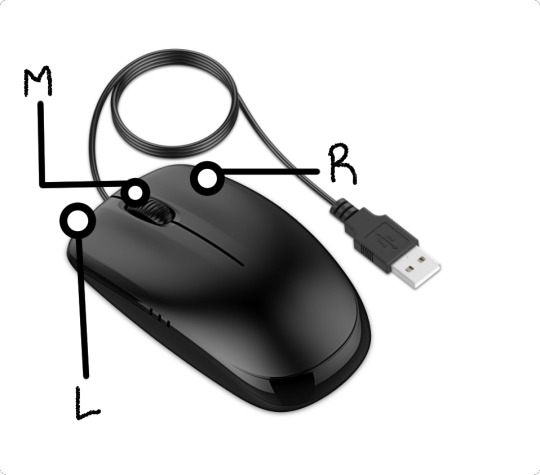
Left click: Select an Object Left click and drag: Selects multiple objects Scroll Wheel: Zoom in and out Middle Click and drag: Rotate your view Shift + Middle Click and drag: Move your view Right click: Brings up a menu that won't be relevant here. Shift + Right Click: Moves the 3D cursor. Not important for this tutorial, but I do it on accident a lot. Hit Shift + C to reset the cursor and also to reset the viewer position to see all objects at once.
Move the viewer around as practice! You're gonna need to do it a lot while modeling. If you have a keyboard with a Numpad (the calculator-looking thing on the right side, says Num at the top) you can use Numpad 1-9 to automatically adjust the view to front, left, right, backwards, and different angles. If not, test out the rotate tool at the top right which does something similar.
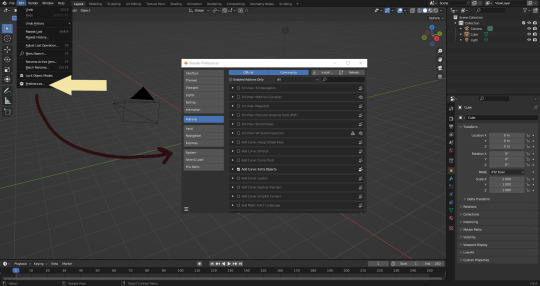
There's a helpful menu I use to switch between Modes (if you hit the dropdown menu where it says "Object Mode" you can do this without the shortcut); click Preferences to enable it.
Hop over to the Keymap section and check "Tab for Pie Menu"

And then close the window. No "Save" button is needed.
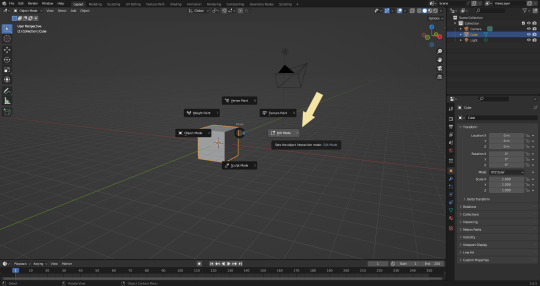
Now that you have the shortcut enabled, select your box with Left Click, hit Tab and Left click "Edit Mode"
And yes, this is just like the Animal Crossing tool ring:
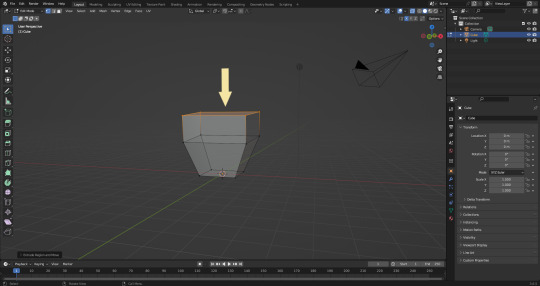
Now that you're in Edit Mode (You can swap back anytime by hitting Tab -> Object Mode), click arrow at the top right to open a menu where you can check the "X-ray" box. You'll be able to see through your cube. As a reminder, Spacebar + Shift will show you the available shortcuts in this mode, but I'll go over the important once momentarily.
What is a 3D object made out of?
This box is made out of vertices, and each face of the cube has four vertices at each corner- a triangle with three vertices also works, but we'll stick with squares for this tutorial. Moving the vertices will change the shape of the box, like a piece of stretchy fabric over a wire frame.
From now on, I'll be calling the vertices dots, because I hate reading and typing the word vertices over and over again.

5. By all means you can fiddle with the buttons over here but I'm gonna show you the shortcuts I use and the buttons you'll actually need. Don't get intimidated by the amount of buttons. Also press the T key and the toolbar will go away!
(Seriously, though, feel free to play around in this section as much as you want to, but we'll go over the shortcuts a few at a time with examples. at the end of this section will be a summarized list.)
6. Left Click one of the dots and press the G key. You'll see below a whole bunch of additional shortcuts show up at the button. Here are the ones I use:
G key: Grab and move around the dots
R key: Rotate two or more dots*
S key: Size two or more dots*; if two dots are selected, the distance between the dots will change but the angle between them will stay the same.
*Left Click and drag to select multiple dots!
CTRL + Z to Undo edits.
When you move a dot with the G key, imagine that the dot is against a piece of glass at a fixed point ahead of your viewer. The dot will not move farther or nearer to you, but will instead move parallel to your view.
As an example, if you press Numpad 1 and view the object from the front (The -Y green circle will be at front and center in the rotate tool), the dot will only move left and right (X axis) and up and down (Z axis). It will not move farther or nearer on the Y axis by default.
Play around with the G, R, and S tools before moving on.
This little X button at the top right will turn on symmetry. You don't need to use this, but it can be useful.
Left Click and drag so that an entire face (flat square) is highlighted and then press the E key to extrude. Extruding will add another set of dots that are automatically connected to the first set.
Ctrl + R adds a loop cut. This will divide the existing faces into two and add more dots. You can also drag loops to slide them to different positions.

The 3 key (not on the Numpad) will switch your Select Mode to Face Select. This is useful for extruding. Essentially it is simply selecting all the dots at the corners of the squares.
The 1 key will switch back to Vertex Select (or Dot Select) mode and the 2 key will switch to Edge Select (the least useful of the three, to me)
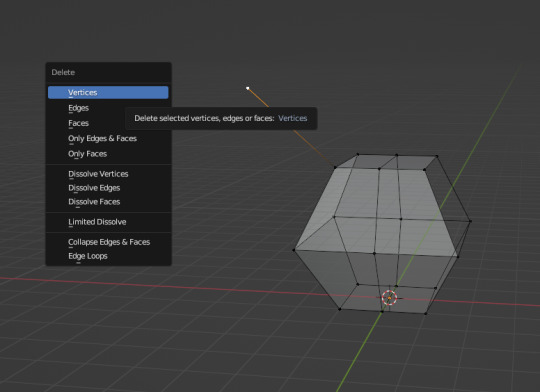
Before we go wild, there are a couple of additional things to know. For the tutorial, focus on working with faces, not vertices. If you accidentally pull a single vertex, select it and press the X key to delete it.

If you want to add shapes, I recommend sticking to cubes for now. Ctrl + A will open the Add Mesh menu and you can add a cube. Feel free to have complete cubes overlap for this tutorial.
Double Left Click will select a series of dots connected in a loop, and can be helpful for selecting areas all at once.
Ctrl + B is the bevel tool, and when a loop is selected it can turn it into two.
Here is a summary of all of the Edit Mode shortcuts:
G key: Grab and move around the dots R key: Rotate two or more dots* S key: Size two or more dots* *Left Click and drag to select multiple dots Double Left Click will select a series of dots CTRL + Z to Undo E key to extrude faces Ctrl + R adds a loop of dots Ctrl + B splits one loop into two X key -> Vertices to delete dots (vertices) 1, 2, 3 keys to switch Select mode Numpad 1-9 to move viewer automatically Ctrl + A to add a shape
Go play with them. See you back here in a while.
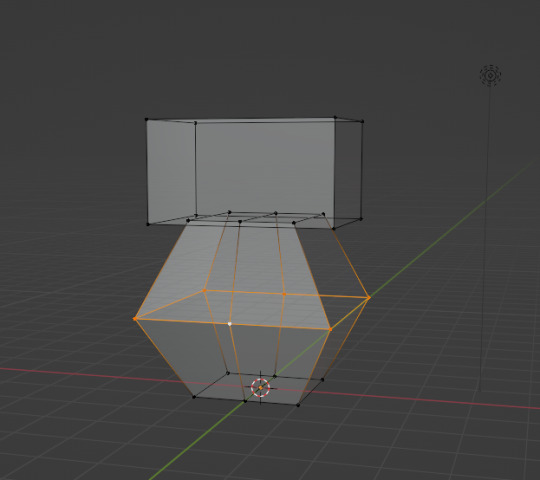
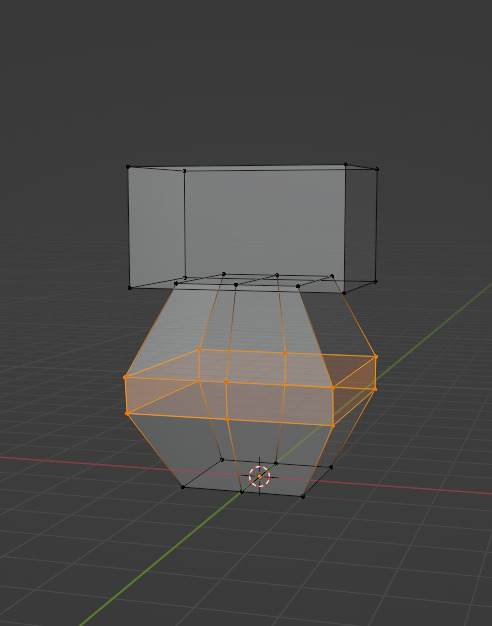
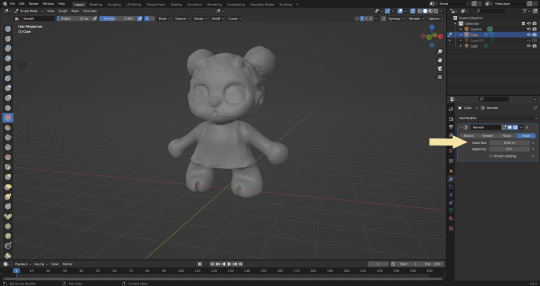
7. I used a single cube to make this figure. It's still very blocky, but that's fine. Loop cuts created additional faces which were extruded to create arms, legs, and a neck. Definition to the face was added by selecting individual dots. Remember, Ctrl + Z (undo) is your friend!
Once satisfied with the shape you made - a boxy figure or object is fine- continue on.
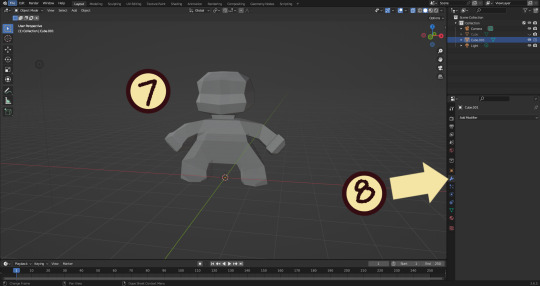
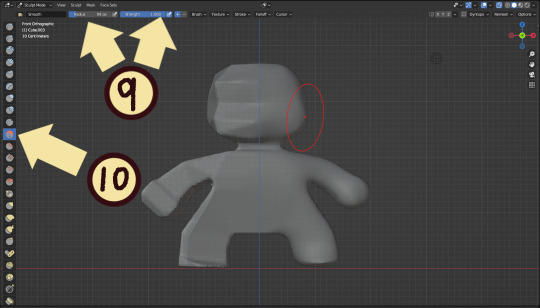
8. Press Tab -> Object Mode. Turn your attention to the right hand bar and make sure the Wrench button is selected. Note the Add Modifier Button.
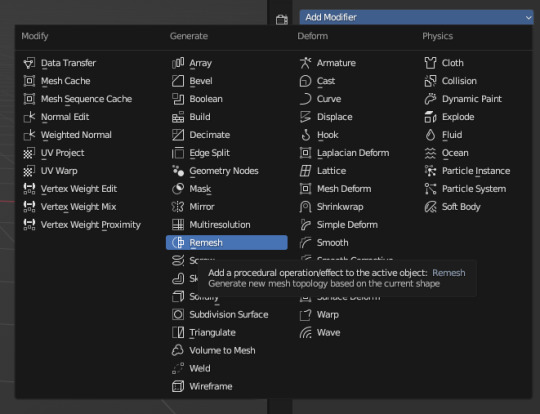
There are a heck of a lot of buttons here that you don't have to worry about- just select Remesh.
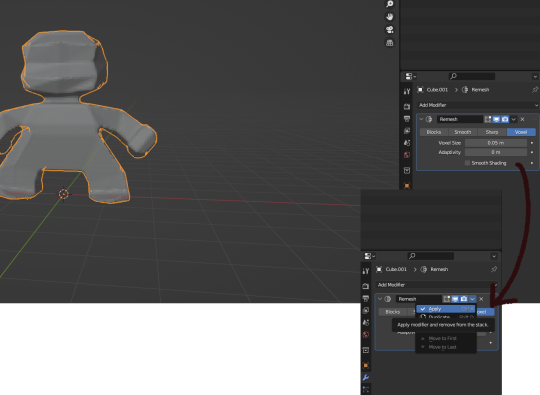
Change the number under Voxel Size to .05m by Left Clicking and typing it (there is a slider, but I find this causes lag). Then, apply the remesh by clicking the down arrow and selecting Apply.
Your figure should be shaped similar to before, but have a slight "graininess". If you have added multiple cubes, it will seamlessly merge them into one. The smaller the Voxel Size you put, the more dots will make up your object. However, I suggest starting with something in the .03-.06 range. We will refine this later.
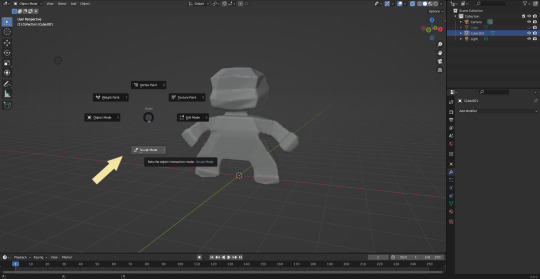
Press Tab and select Sculpt Mode.
This is a mode where I actually use the tool bar for modifying my sculpt, as there are a lot of brushes . The icons show roughly what the brushes do using small icons (note on adjusting this below)
9. Observe the Radius and Strength bars, which will adjust the... well, the size and radius. Note that although the "brush" looks like a flat circle, the affected area is actually a sphere. Select a brush with Left Click and Left Click and drag on the sculpture.
10. This is the smooth tool. I have smoothed out the right side of this figure. Note that I turned off symmetry to do this, but i usually have X-axis symmetry selected.

Although I am used to the small buttons, there is a way to change them. Hover near the toolbar to Left Click + Drag so you can see the names. Hold Ctrl + Middle Mouse button and drag to resize. You will be able to make the size of the menu much larger. This goes for many of the menus in Blender.
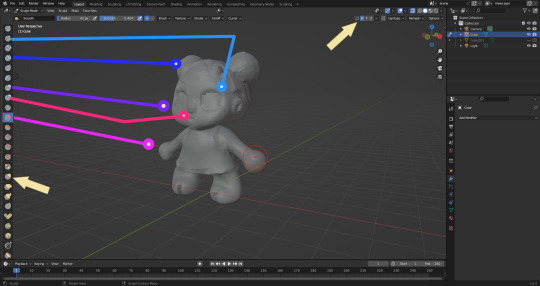
The above arrows point to the symmetry button (Top right) and Grab brush (bottom left). The Grab brush uses the shortcut G Key.
The lines point to which tools were used for each part of the sculpt. The Draw Sharp tool was used to mark out eyes. Clay strips made the hair texture. Round cheeks were added using the Inflate tool and a nose (and buns) were added using the Blob tool. The aforementioned Smooth and Flatten tools were used judiciously to remove sharp edges.
I don't have a shortcut list for you here, but here are all the tools I use the most:
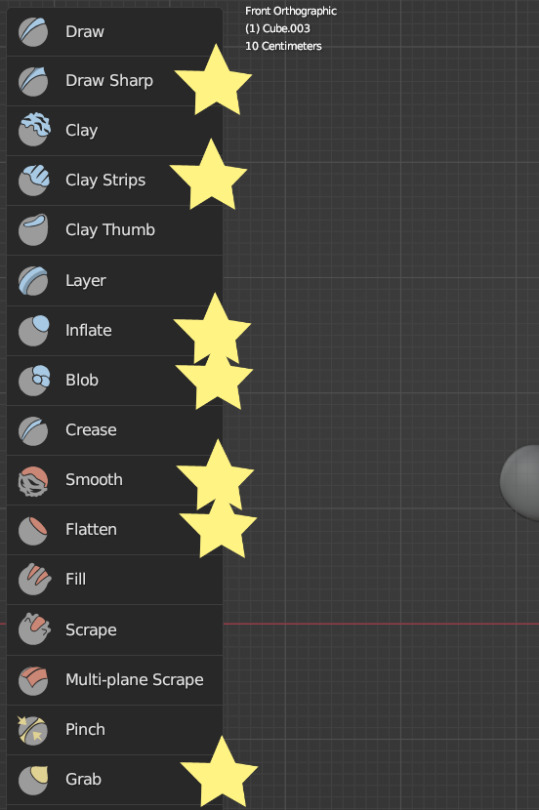
You can hold the Ctrl key while using the brush to reverse its effects. For example, if you hold the Ctrl key while using the Inflate brush, it will deflate the shape instead, creating a concave shape.
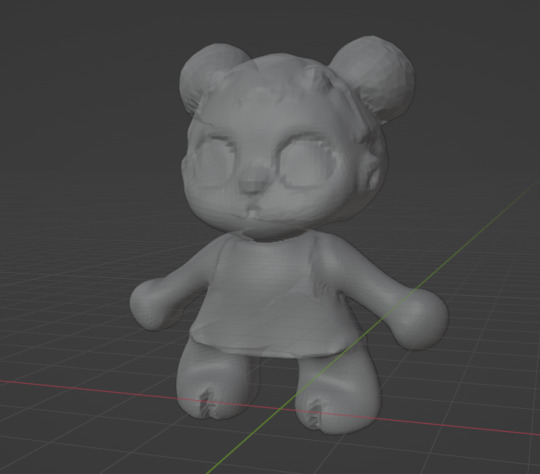
As you can see, my figure is getting a little grainy. So, we're going to remesh this model again and add more dots and therefore detail.
This time, we're putting the Voxel Size to .01m. Apply the remesh as before. Now we have more dots to work with and we're just repeating the process, smoothing, and sharpening the lines.
I was going to add a bit about how to take a photo of your sculpt, but I ran out of photo space. I will add a reblog with this information.
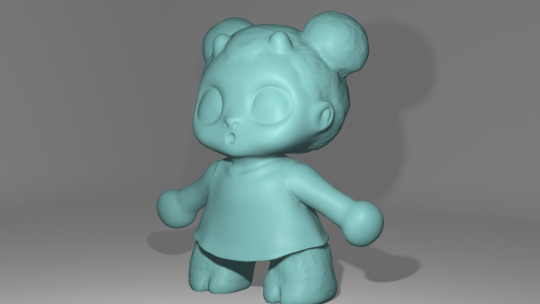
I came up with this little lamb character on the spot because the clay strips created a nice texture. She's by no means perfect, but she did turn out pretty cute so i might make a cleaner version later on.
64 notes
·
View notes
Text
Handy book of tips and tricks for using Krita (by a user thats used krita for a while)
HI! So i'm a krita user, and i figure since i know fellow artists that are moving to krita, i might as well make a handy guide to some of the tricks i use to snazzy up my art and basic howtos. This will be splitup into three sections: Tools, Layers, Filters. I'll also be interspersing how i used them in my art as examples!! Thisll be a two parter so hold on tight.
Shortcut keys: P = colourpick E = eraser B = brush
Tools:
Obviously try using all of the brushes and seeing which ones you like. Krita has a myriad of handy and good brushes, and you can even make your own if you feel like it. I personally like to modify the rectangle eraser to a normal brush and using it, before i modified it a little more to be my own brush.
You can change the settings of the brush youre using on any layer by clicking this little dropdown menu in the top left of your screen. That little three dot button by the left side also goes into more detail about the brushes in case you want to fine tune a brush to your liking.

Personally, these are the custom brush edits ive used to make my art just that bit crunchier. As you can see, theres a lot more options you can tick and mess around with if you feel like it too.
The pin button is the reference tool. If you copy paste an image into krita while the pin tool is selected, it will appear as its own image above all layers that can be moved around using the pin tool to use as a reference. Real handy so you dont waste layers on ref images.
Layer styles
Ok, you probably know the basics of how to change layers, (its this little dropdown menu here) but did you know that krita has a cool thing called LAYER PROPERTIES??

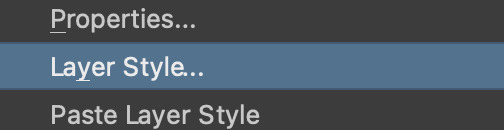
If you right click a layer and click this little button here..it should bring you to this handy menu with styles! These are really useful
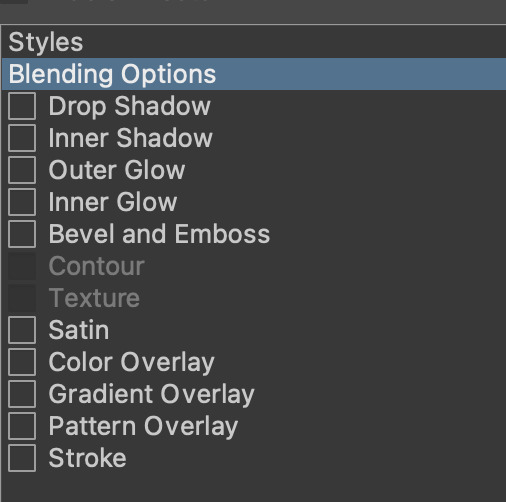
Now, i used to usually use outer glow set to these parameters to give the illusion of lines (and this is how anime artists usually line their very delicate pieces of hair and stuff), but i found an even better way!!
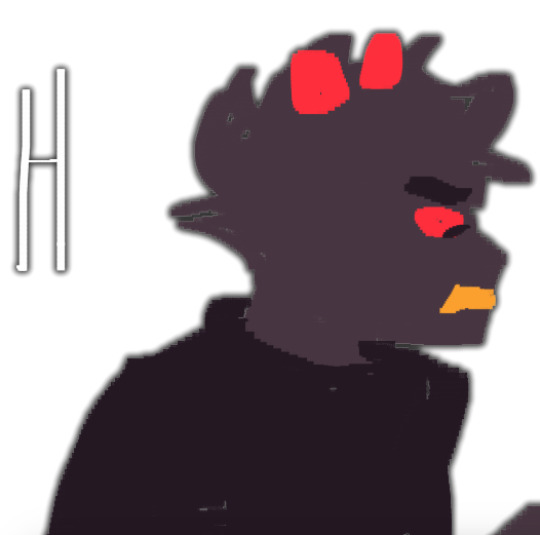
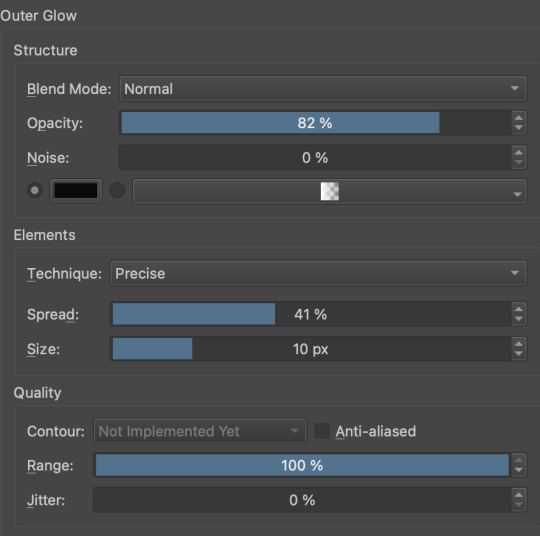
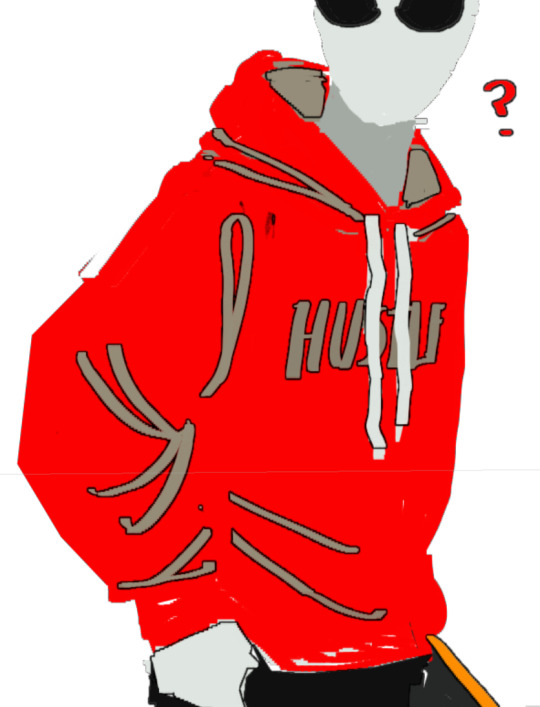
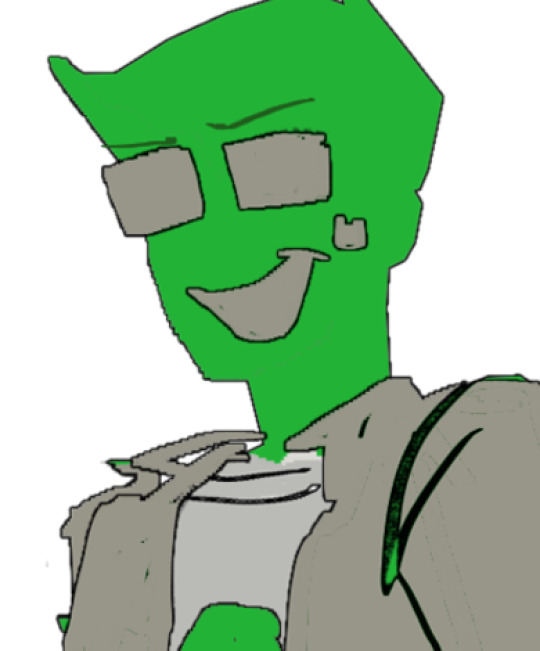
Its called stroke, and you can just modify it to be as thin or thick as you like. I recently used it for these two pieces, because its more precise, and used across multiple layers makes your work look cool and like you gave a damn about lineart. This is especially helpful if youre a stubborn son of a bitch that isnt going to to take the time to line your lineless work, or if you want to line really small items like string on shoelaces and not have it look messy (just set the colour to white and draw as usual.)
PART TWO
68 notes
·
View notes
Text

Animated Drop down Menu
#animated dropdown menu#drop down menu#html drop down menu#css drop down menu#codenewbies#html css#frontenddevelopment#css animation examples#css#html5 css3#pure css animation
0 notes
Text
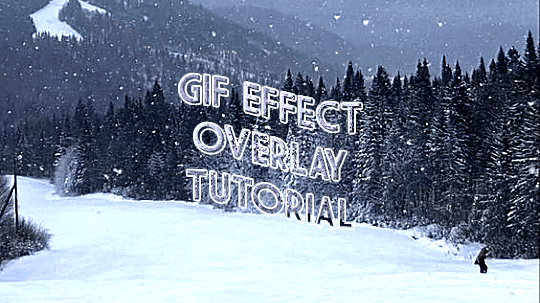

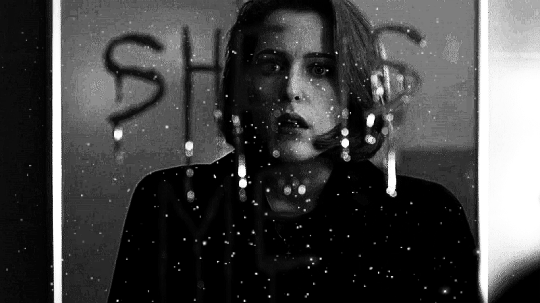
ages and ages ago @jaeyxns asked for a tutorial of how to overlay gif effects onto edits, so i am finally here! thank you so much for your patience. from the bottom of my heart, my bad.
we're going to look at two very similar scenarios here: overlaying a gif effect onto a still image and then onto another gif.
onwards!
as mentioned in this great tutorial for the same effect on photoshop by @camwritesbooks, your first step in either case is going to be to find your overlay gif. you can do that by searching for the effect you want (smoke, snow, etc) on google or youtube- in this case, you may have to make your own gif- or searching for overlay gifs on tumblr. i got my falling snow gif from here. for the purposes of this tutorial, your overlay gif will work best if it includes a dark background (black is best) with light effects.
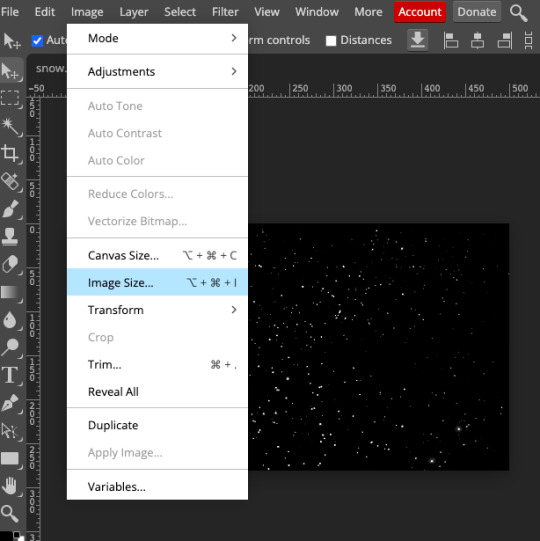
next you want to upload your gif(s) and, if relevant, image(s) to photopea. crop/resize as needed so that they're the same size by going to image in the master menu, then "image size" and plugging in the desired dimensions:
(to crop, you use the crop tool in the editor menu on the left!)
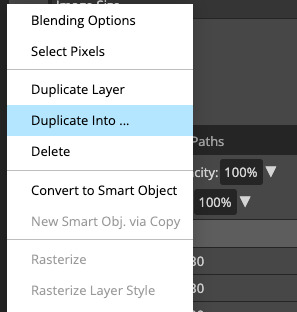
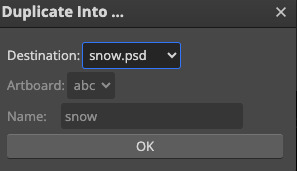
next, duplicate your overlay gif onto your base image/gif. you can do this by right-clicking on the folder in the workbar to the right, then selecting "duplicate into" and choosing your base from the dropdown:
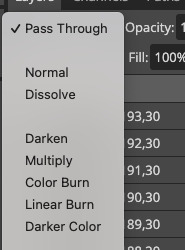
now go into your base gif. you should just see the overlay gif on top of it. to rectify this, select the folder of the overlay gif in the workbar, then go to the blending mode dropdown just above it (it will likely say "pass through") and change the blending mode to screen.
(if your overlay gif has a light background with dark effects, i THINK you can get the same effect if you choose darken instead, but i'm not completely sure.)
if your base is a still image, you're all done! you can go to file in the master menu and export as a gif.

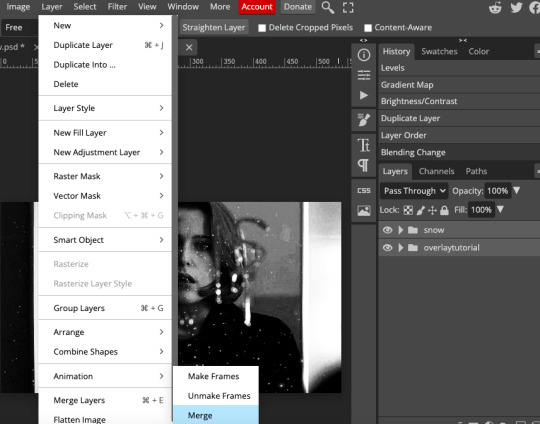
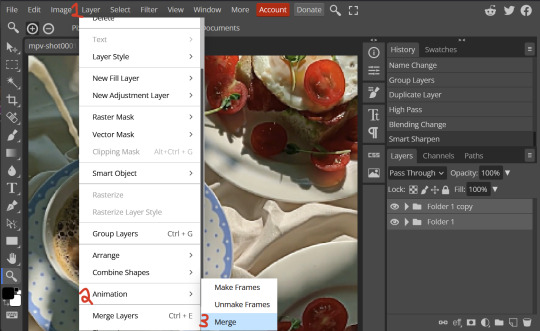
if your base is another gif, you've got one more step. you need to merge your gifs. i cover how to do that in this tutorial, but if you need a refresher, your first step here is to select the folders of both the base and overlay gifs at the same time. then, go to layer in the master menu, scroll down to "animation," and select "merge". DO NOT select "merge layers."
now you should be good to export your gif! if your base and overlay gifs weren't the same number of frames or the same framerate, it might look a little clunky at first, but you should be able to easily adjust the speed in the export window to make it look cleaner. i ended up speeding scully up to around 120%. there's a way you can completely fix the problem but it's really time-consuming and involves a lot of math, so i won't get into it here. if you'd like me to explain it in more detail, let me know!
as ever, let me know if you have any questions!!!
#arwen.text#tutorials#resources#completeresources#allresources#dailyresources#gif tutorial#photopea tutorial#photopea#overlay gifs
211 notes
·
View notes
Text
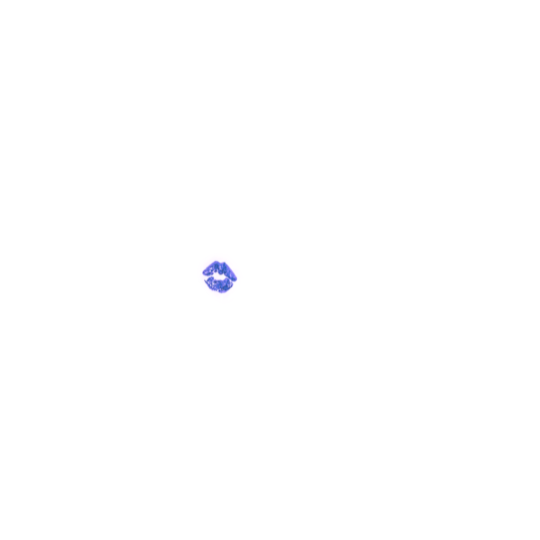
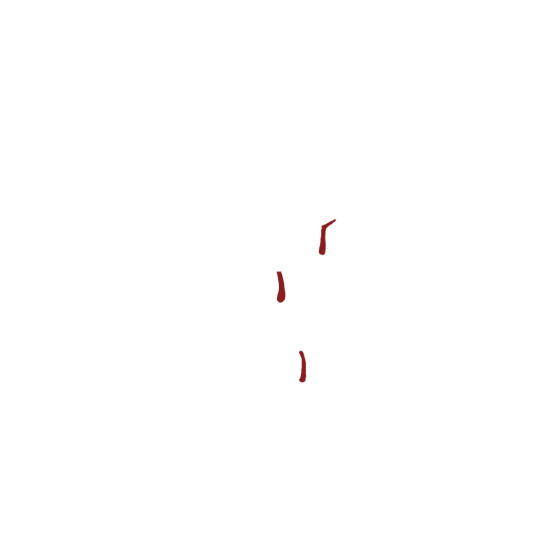
Blender Guide: Editing TF2 Merc Textures with Transitions
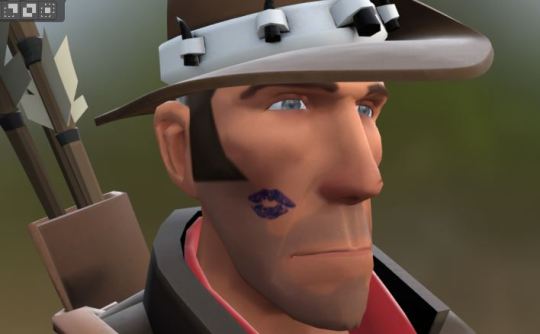


This is a guide on adding edits to the mercs' textures in such a way that the edit can fade in (for animation shots where a merc is given an injury, or blushes, gets marked by paint, etc). We'll be working on the face as an example, but this methodology can be applied to the clothes and other textures.
Making an edited texture
First, we need to make the textures.
Since we're editing the head textures, we'll want to save a copy of the head texture. Select the merc's face mesh. In the Material Properties tab, select the material slot for the merc's face texture you want to edit (example: sniper_head_red). Switch to the Shading tab at the top to see the Shader Editor. In the Shader Editor, select the Image Texture node for the merc's head (in this case, sniper_head.png). It should now appear in the Image Editor panel (if it isn't, you can select the png from the dropdown button at the top of the Image Editor). In this panel, select the three line menu button > Image > Save a Copy… In the new window, save the image.
Open an image editing program (example: GIMP is a free art program). Open the saved image. In a new layer, create the texture you want to place over the merc's face.
For bruises, I recommend using the TF2 cosmetic Beaten and Bruised (style 2) as reference: https://wiki.teamfortress.com/wiki/Beaten_and_Bruised You can grab its texture by spawning it in Blender using the TF2 Trifecta Blender addon and saving the texture as a png the same way you did for the merc texture.
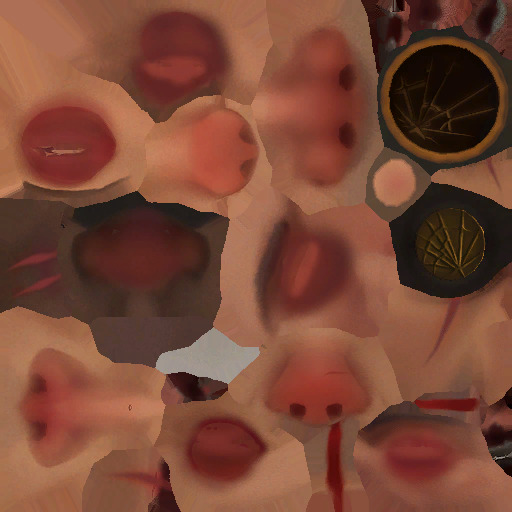
Once you have it the way you want it, hide the merc's head texture and save the resulting image as a png. If you made your texture so that it's meant to be blended over the merc's head (examples: multiply or soft light), don't worry, there's a way to apply the blend mode in Blender.
Edit the Shader Material
In Blender, select the merc's face mesh. In the Shader Editor, select Add > Texture > Image Texture. In the newly added node, press the Open button and select the texture you made. Then add another node with Add > Color > Mix Color, adding a Mix Color node. Add in another Mix Color node so you have two.
Plug the Image node's Color to the Mix node's B. Plug the Image node's Alpha to the Mix node's Factor. Plug the Mix node's Result to the second Mix node's B. Set the node's Factor to 1.0.
Find the Image node for sniper_head.png already in the shader and plug in its Color output to both Mix nodes' A. Then plug the rightmost Mix node's Result to the Facemix group node's Color1 plug, replacing sniper_head.png's connection to it. You should now see the merc with the texture changes.

Depending on the texture you made, you may need to include some more steps here:
If your texture is meant to be given a blend mode (meaning, you used a blend mode in the art editing program earlier), you can left-most Mix node (the Mix node directly connected to the Image node) and change the Mix property to the blend mode you want (Multiply, Soft Light, etc.) in the drop-down menu.


If the texture still looks too dark/light, you can add a Gamma node (Add > Color > Gamma) and another Mix node between the first and second Mix nodes you already have. Then adjust the Gamma's value until the texture looks right.

Animating the texture
The rightmost Mix node's Factor can be keyframed on and off (with 0.0 being 0% off). To do so, hover your cursor over the number value and press your Add Keyframe hotkey (or right-clicking the value and selecting Insert Keyframe). The value should now be yellow. Yellow means the value had a keyframe on the frame you are currently on. Green means the value has a keyframe somewhere else on the timeline. Adding two keyframes of different values creates the transition.

Depending on your needs, you can make the transition instant (a merc getting kissed with a lipstick mark), or gradual over multiple frames (a merc blushing from embarrassment).
I am also including the pngs of the four example textures I used. Feel free to use them.


10 notes
·
View notes
Text
How to animate in MS paint
Animation in MS paint sounds really hard, but it isnt, it's just tedious is all.
i'm going to do a person waving, though you can do whatever you want.
First you are going to want to pick a canvas size. I just picked one at random.
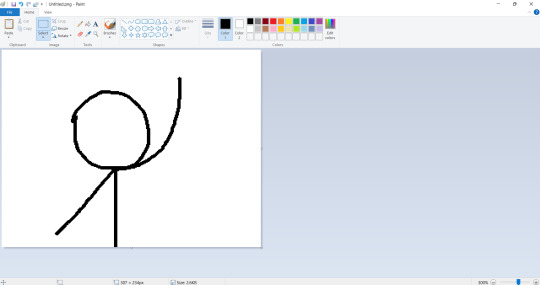
Then, you want to draw your first frame. you're going to want to save this. Usually I save it as "frame1"
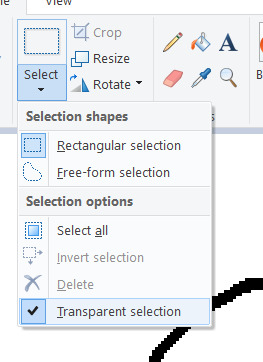
Go up to the select dropdown on the menu and select "Transparent selection"

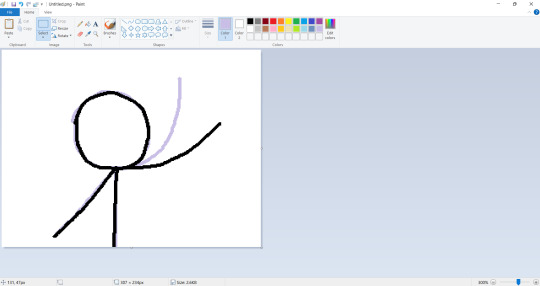
Bucket-tool the lineart to be a different color, I tend to pick purple. Ctrl+A your canvas and then Ctrl+C.
then, draw your next frame!

use the bucket tool to erase the onion skin on the previous frame, and then save the frame as "Frame2" Repeat this process for as many frames as you want if you're doing straight-ahead animation.
But, if you're doing keyframes like i am, then it gets a little bit more interesting.
First you'll want to open up two instances of MS Paint, I personally like to put them side-by-side. Each instance should have a different keyframe opened on it.
Bucket tool the lineart like so.
Remember the "transparent selection" I made you do? well, this is where it comes in handy! Copy one of the two frames from one instance and paste it over to the other.
You should now see something like this on one of the instances. Feel free to close the other instance that you're not working on without saving, as you're pretty much finished with it.
then, all you'll want to do is to draw the inbetween. Once you're finished with the in-between, repeat the process of getting rid of the onion skins, so that it looks like this. Save it as "Frame3" or "Frame1.5" or whatever you'd like
Once you have all of your frames, you're going to want to go to put them all together in a sequence. Personally I like to go with Ezgif.com, though any option is fine, really.
Input your frames and play around with the settings to your liking, and once you're done, save it as a .gif to your PC.
(If you want it as a .mov or .mp3, i suggest using windows movie maker instead.)
And you're finished! you just made an animation in MS paint! good job!
#ms paint and you#sillies#textpost#art tutorial#Bugtoast#Think i'll only make one of these tutorials per-day#since i don't wanna flood my blog with ms paint tutorials lol
14 notes
·
View notes
Text
stim gifs in photopea
[PT: Stim gifs in photopea /End PT]
Hello! This is my (lengthy) tutorial for how I make GIFs for stimblr using Photopea. It's not going to be as extensive as how I make for shows, celebrities, etc, because I have different processes for both, however I'm still aiming to cover everything I think necessary!
It'll be split into multiple sections with headers, so feel free to skip whatever you want if you don't find it necessary :•] Reblogs appreciated if you found it useful, but no pressure obviously!
Sections:
Getting your video
Importing into Photopea
Making the GIF
Sharpening the GIF
Coloring
Exporting & Optimization (in EZGIF)
End results, and misc tips and comments
1. Getting your video
[PT: 1. Getting your video /End PT]
Short section! These are the ways I download and source videos for use
Youtube - yt-dlp (installation instructions)
Instagram
Tiktok (Allows without watermark)
Pexels
For yt-dlp, check out this basic list of commands I made solely for downloading material to GIF! If you have further questions, either send me an ask or refer to the github page.
2. Importing into Photopea
[PT: 2. Importing into Photopea /End PT]
There are two ways to import into Photopea, the first is importing footage directly, and the second is screencapping (which I won't cover in detail, but this tutorial is for installing the program I use on mac & how to use it, and this is for installing on windows)
Option 1: Importing footage directly (see end for comments)
On the home page of Photopea, you'll want to click "Open from computer", and select your clip, upon selecting you'll be presented with a popup like below

All that really matters here is where you see "30 FPS", that's the videos native frame rate. I always put whatever that number is as my frame rate because I find it to be the best, but you can use different presets (Like ezgif, which gives you 12, 20, etc). The less frames you have, the chopper it will be. If you plan to slow it down later, I'd also recommend having more frames so it looks smoother after slowing.
Now you just have to wait for it to load all the frames, then you're set!
Option 2: Importing screencaps
This is my personal way of doing things, so this is assuming you've installed a screencapping program and already have your frames ready.
For this, when you click "open from computer", select the first frame and open it by itself. Once that's loaded, look in the top left at the "File" tab, select "Open & Place", then ctrl + shift to select the rest of your frames. Once they've all loaded in, you can either rasterize them now, or wait until after cropping and resizing (goes faster then).
What's important though, is use the shift key to select all your layers, in the top left open the "Layer" tab, hover over "Animation" at the bottom to expand it, and select "Make frames". With your frames still selected, hit the folder button in the bottom left.

Without this, Photopea won't recognize this as an animation, therefore you'll be unable to export it as a GIF.
3. Making the GIF
[PT: 3. Making the GIF /End PT]
3A. Cropping
To begin with cropping, select the crop tool, which is the fifth one down on the left bar (if you hover over, it will say the name), or the "C" key on the keyboard.
Along the top now, you should have some new options. The dropdown menu that says "Free" is going to be how you select an aspect ratio or fixed size, and I always set to 1:1 since most people on stimblr use square GIFs, but you can do whatever works for you! Make sure to leave "Delete uncropped pixels" unchecked, because that lets you move stuff around later without having to recrop.
Crop your animation down as you see fit, then either hit the enter key, or the check button along the top bar. If you're unhappy with the placement, you can undo it OR, select all your layers, then use the move tool (First icon on the left, or the "V" key) and drag it around as you see fit.
3B. Resizing
With all your layers selected still, open the "Image" tab in the top left, towards the bottom select "Image Size", then select what you want to resize to.
Tumblr's exact GIF sizing
1 per row: 540px
2 per row: 268px
3 per row: 177px
HOWEVER. For stim GIFs, I find the quality difference so negligible, you can resize to what you want. It's also better for it to be bigger and scale down, then smaller and scale up. For this reason, I typically do 268px no matter what, or 300px.
As far as resampling goes, leave it turned on, and I personally leave it on bilinear, but the different options vary slightly, so experiment and see what works for you!
If you're happy at this step, go ahead and skip down to exporting! But when doing this way, I do recommend sharpening for better quality at smaller size.
4. Sharpening the GIF
[PT: 4. Sharpening the GIF /End PT]
The fun thing about this section is you get to experiment and find what works for you! I'll give you my personal method, but you can play around, add and remove bits, etc until you get something you're happy with!
4A. High pass
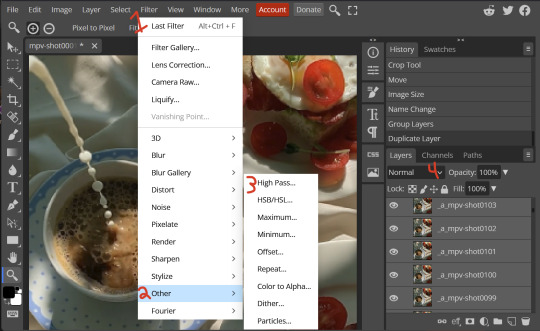
High pass is my personal favorite way to sharpen GIFs, and for stim GIFs I'll often use only this.
(Steps 1-3 in image) To do, start by right clicking the *Folder* all your frames are in, and select "Duplicate Layer". Select all the frames in Only the folder on top, then go to the "Filter" tab along the top left, hover over "Other", and select "High Pass". The grey look is entirely normal! I normally set my high pass at 2-4, but play around with this step and find something you like!
Select the *Folder* all your high pass frames are in, and change the blending mode (fourth step in image) to "Soft Light", it should be on "Pass Through" initially. With that done, you've used high pass on your GIFs! If you're content here, skip the next section about smart sharpening, and see about merging animation folders under it.
4B. Smart Sharpen
Note: I recommend testing your sharpening settings on one layer BEFORE applying them to all layers, as it will be easier on your computer.
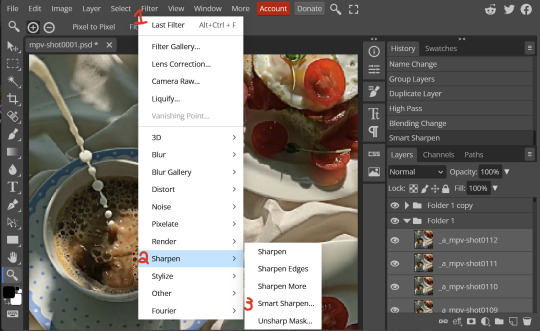
I utilize this in addition to high pass usually, but you can do it all by itself as well! To begin, select all the frames in your folder (if you used high pass, select the frames in the *Bottom* folder). Open the "Filter" tab on the top left, hover over "Sharpen", and select "Smart Sharpen". Now find what you like!
For stim GIFs, if I used high pass, I'll go for 75-110% amount, and a .1 radius. I personally don't like the look of an over sharpened GIF, so I only use smart sharpen if I want to enhance some small details high pass didn't touch enough, which is why I use so little. If you don't like high pass, you might use more here!
4C. Combining animation folders
If you used high pass, you'll notice you have two animation folders. To fix this, select both folders using ctrl + shift, open the "Layer" tab, hover over "Animation", and select "Merge". It will give you a popup to confirm, and you can go ahead and accept!
If you don't merge these, Photopea will think they're two GIFs in one document, rather than only one, which is why this step is so important.
As a note, once you merge these folders, you can no longer shift the frames around to change where they are in the crop like you could earlier.
5. Coloring (Image Heavy)
[PT: 5. Coloring (Image Heavy) /End PT]
This section is going to be less of a tutorial and more a basic rundown of the adjustment layers and what they do. Coloring will change from GIF to GIF, and you can do light or intense coloring, so this is just a guide to begin with, but really just play around and find what you like!
To access the adjustment layer menu, in the bottom right where "New Folder" was, the one directly next to it that looks like a circle made of two half-circles, will bring up your adjustment layers.
As a note, I always group my adjustment layers in a folder above my animation, for ease of hiding to compare with and without.
5A. Levels
Levels is one I almost *Always* use on a GIF because it makes it look cleaner to me. In the first box, sliding the black square on the left *increases* the blacks, sliding the white square on the right *increases* the whites, and the one in the center changes the general brightness up or down.
Sliding the black box on the bottom bar *decreases* the blacks, sliding the white box *decreases* the whites.
If you change the channel from RGB to another option, you can change the balance of reds/cyans, greens/magentas, or blue/yellows, I personally don't touch this for stim GIFs. In the RGB channel, I set the top black box at ~10, and the top white box at ~245 usually.

5B. Curves
This is another way of adjusting brightness, blacks and whites, or color balance. By adjusting the dot in the bottom corner you adjust blacks, the top corner adjusts whites, and if you make a dot in the center, it adjusts general brightness! You can also make multiple dots to separately adjust some values. By changing the channels, you adjust color channels rather than white/black.

5C. Exposure
This is another way of adjusting the lights and darks of the GIF. Sliding the exposure up and down will add/take away light from the lighter parts of your images. Adjusting the gamma correction up and down will add/take away shadow from the darker parts of your image. Offset increases/decreases the brightness of the whole thing but I almost never use it.

5D. Vibrance
Vibrance is what I like to think of as a "softer" way to increase intensity of colors, instead of using a Hue/Saturation layer. It affects warmer colours more intensely than cooler colours, whether you use the vibrance or saturation slider. The saturation slider here is more intense than the vibrance one, but less intense than saturation in a Hue/Saturation layer.

5E. Hue/Saturation
This one is simple! Sliding the hue slider changes the colour, sliding the saturation slider increases/decreases saturation, and sliding the lightness is basically like directly adding black/white to a color. I use lightness only sparingly.
What's cool here, is you can adjust the range to target a specific batch of colours! If you find your reds are too bright compared to everything else, you can target the saturation of them specifically.

5F. Color balance
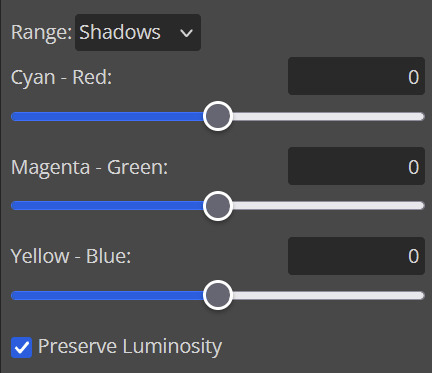
This is a simple way to adjust the base colors of an image, by changing it to be more cyan or red, magenta or green, or yellow and blue. This can be useful for making a GIF appear warmer or cooler!
I almost only touch the shadows & midtones, and highlights sparingly. "Preserve Luminosity" preserves the highlights and shadows of the image, so by unchecking it, you can achieve some more intense results.
5G. Black & White
The black and white layer is useful because you can change exactly how light or dark a color appears after making it black and white. For that reason, I prefer it over a gradient map if I need to make something black and white.
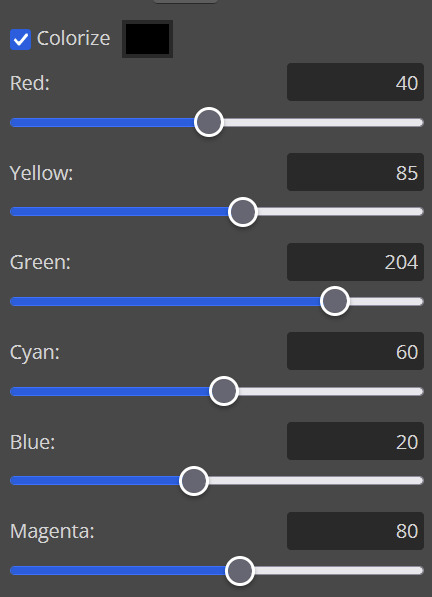
5H. Photo filter
Photo filter is a simple way to add a color filter over the entire image, and adjust how strong or weak it is. "Preserve luminosity" once again just keeps the darks and whites of the original GIF.

5I. Channel mixer
I couldn’t even begin to cover channel mixer here, but this is for very intense color edits (I typically use it when I'm trying to make a GIF fit a board). However, here's another tutorial solely about channel mixer if you're interested in taking a crack at it!
5J. Selective color
Finally, selective color allows you to adjust the amounts of color or lightness/darkness of a specific batch of color.
By changing the color channel, you can affect different batches of color. The cyan slider controls cyan/red, the magenta slider controls magenta/green, the yellow slider controls yellow/blue, and the black slider controls black/white.
Checking the "absolute" is essentially like "Preserve Luminosity" in the other layers. With absolute, it's like shifting the color one way or the other, and without absolute, it's like adding to the pre-existing color.

6. Exporting and Optimization
[PT: Exporting and Optimization /End PT]
6A. Exporting
With all that done, we're ready to finish it up! To finish your GIF, open the "File" tab in the top left, go to "Export As", and select GIF!
Here you can rename, adjust the size (WILL ruin the sharpening you did), the quality (I leave at 100%), and the speed.
Another important thing to note is the "Dither". If you leave dither off, you can potentially encounter color banding, which is where (typically gradients) with look like strips of color, rather than smooth. This is because GIFs only have 256 colors they can render, so if something has too many, it bands.
By checking dither, it can get rid of color banding, at the cost of dots on the image (around where the worst color banding is usually). Sometimes the dots aren't noticeable and this is the better option, however it will Also increase your file size. It's up to you if you want to use it!

6B. Optimization
This is technically an optional step, as tumblr's GIF size limit is 10mb, so as long as you're under that, you can post, however, smaller GIFs load faster and I personally find are better for use in stimboards where you're loading a lot of GIFs! So to help this, let's head on over to the optimize section of ezgif. My personal goal is UNDER 4.5MB, ideally under 4MB.
The two main things I recommend are Lossy GIF, or removing frames, and I always start with Lossy GIF. I do anywhere from 5-15, and usually this will bring down GIFs a lot if you made them in Photopea! My example GIF was 6.7 MB to begin with, and afterwards it was 4.2MB.
However if you find that to be not enough, you can remove frames. When you remove frames, it speeds the GIF up, so I also recommend slowing it down (this is why I set my frames high in the beginning as well). I typically do "Remove every 4th frame" and slow it down to 75%-85%.
7. End results, and misc tips and comments
[PT: 7. End results, and misc tips and comments /End PT]
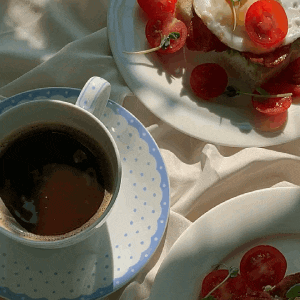


(source) The first GIF is without sharpening/colouring, the second is with sharpening but no colouring, and the third is with sharpening and colouring. I didn't color it much besides making it slightly warmer, but I hardly ever do much anyways!
As for misc comments:
In firefox, when you import footage directly, sometimes it glitches and tries to load 4000 blank frames, which is extremely resource intensive on a computer. The solution is import the footage in chrome, save as PSD, then open the PSD in firefox. (Or work in chrome but why do that /half silly). The other solution is screencap which I do since I do this often, but both work fine.
In firefox, sometimes you're unable to slow the GIF down upon export and it will export faster than it actually is. Slowing the video down to 50% restores it to native speed I've found, and you can do this in ezgif before other optimization.
When colouring, my number one tip is slide something all the way up first, then adjust down! By seeing it at max, you have a better idea of what's getting adjusted.
If you have any questions, drop me an ask :•]
And that concludes our tutorial! My apologies for the length, but I wanted to cover every possible thing here. It definitely seems like a lot, much more than working in ezgif, but when you get used to what you're doing, it goes extremely fast (even if you spend extra time screencapping). I personally find it worth it for the ability to sharpen GIFs alone, but as well as more detailed coloring opportunities.
Thank you for reading, I hope this has been useful!
#i did it :•]#not stim#stimblr#gif tutorial#photopea#big thanks to talos for proofreading this :3 🖤💚🖤💚🖤💚🖤
78 notes
·
View notes
Text
Tutorial Photoshop Gif Editing ; Adjusting Speed & Remove Flashes

This tutorial is intended to help you edit gifs that have flashing lights and might be uncomfortable to look at because of it. I'll also show you how to adjust the speed of a gif to make it look more natural.
Please always check with the creators first to ensure this kind of editing is okay with them!
This will work with any version of Photoshop, but in older versions, the menu might look somewhat different.
The flashing light method will only work if it’s an occasional flash and not constant in the gif.
I. Remove Flashing Lights
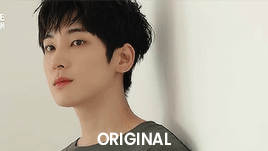
Step 01 ; open the Timeline: Open your gif of choice in Photoshop. I'll be using the one above for this. The first thing to do is open your Timeline. All steps will be done exclusively in the Timeline, and you won't have to touch the layers.
To access the Timeline do the following: Menus on top of Photoshop: Window > select "Timeline"
Now, the Timeline will open at the bottom of your window, and you can see every frame from the layers. Make sure not to accidentally move any of them, or the gif will be messed up.

Step 02 ; Find affected images: The next step can be a little tricky, depending on the gif. It's usually easier to spot with darker backgrounds. I suggest going through the frames a few times to locate them all. To prevent accidentally switching the order, use the navigation at the bottom.

The Play Button lets you play the entire gif, while the left and right arrows allow you to move through frames individually, making it easier to find the right one. The selected frame will always be displayed in the gif above.
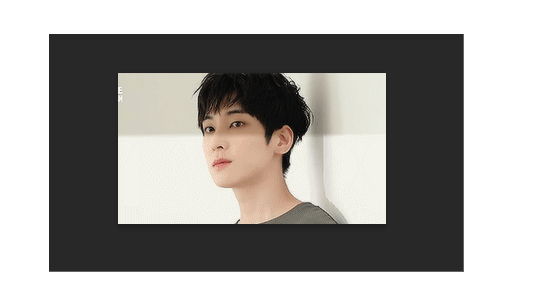
While some flashes are easy to spot because they fill most of the image, others might only appear in small parts & need some searching. In my example, it covers half of the screen.
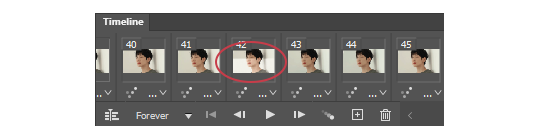
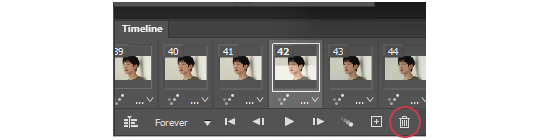
Step 03 ; Delete the affected frames : Once you've found it, click on the frame. Then, simply click the little trashcan icon below the Timeline to remove the frame. Now the selected frame is gone.
Note: If you have a very short gif (for example, only 35 layers) or a flash spans two frames, removing them can make the gif look slightly off. However, most of the time, there’s only one frame at a time, and the removal will be barely noticeable, if at all.
Step 04; Save: Now all you have to do is save the gif.
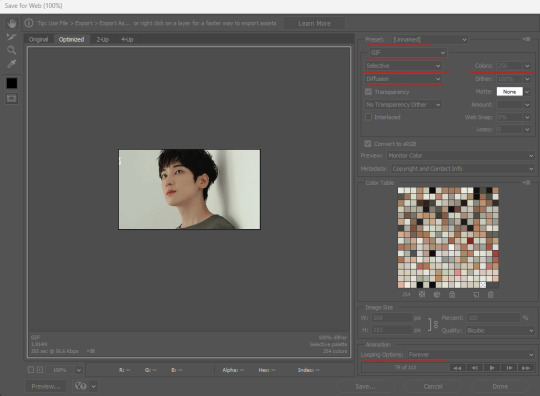
To access the 'Save' Menu Files > select "Export" > Save for Web (the name here can slightly differ based on your version)
Now, a new window will open. It’s important to select "Preset > Gif 128 Dithered" and choose the highest number of colors, which should be 256. For the options on the left, every creator uses different presets, but I recommend selecting "Selective" or "Adaptive" and choosing "Diffusion." Since you’re only updating the gif, the changes should be minor. Look at the original gif in your image view to compare it if wanted.
In the Animation Section, make sure the Looping Option is set to 'Forever' so that the gif repeats itself endlessly.
Now click 'save...' and replace the original gif or name it as you wish. And that concludes the obvious flash removing. It's a little time-consuming but can be worth it for gifs you like a lot otherwise.
II. ADJUSTING THE SPEED
This step is optional, as most creators already adjust the speed, but they might overlook one or two gifs. For gifs made from YouTube videos, unadjusted ones can sometimes appear a bit "too fast."
Open your gif and follow "Step 01" to access the Timeline. The menu and names may vary slightly depending on your Photoshop version. In my version, look at the top right of the Timeline, where you'll find three lines.
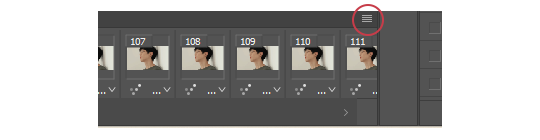
Look for an option that says something like "Select All Frames." Once selected, all frames will have a lighter grey background, indicating they are selected. For the next step, it doesn’t matter which frame you choose.
Click on the three dots with the dropdown arrow, and a selection of times will appear. Choose the option "Other."

A new window will pop up, allowing you to choose how long each frame will be displayed. The number shown represents the current speed. This value entirely depends on your preferences.

My default for gifs from YouTube videos (interviews, behind-the-scenes, etc.) is 0.06, but I also use 0.08 if the gif doesn’t have too many layers. Just experiment with it, and make sure all frames are selected.
The best way to view the gif speed is in the Save window from Step 04. You'll find similar play options just below the Looping Options selection. Once done, you just have to save it.
And that's it! I’m sorry this is a bit long, but I hope it’s easy to follow. If you have any questions, feel free to ask. Happy Editing 💜
9 notes
·
View notes