#html method attribute
Explore tagged Tumblr posts
Visit Tumblr Blog
Explore Tumblr blogs with no restrictions, modern design and the best experience.
Last Seen Tumblr Blogs


Fun Fact
Tumblr Inc. is using 66 technologies for its website.
Text
Creating an Auto-Closing Notification With an HTML Popover
New Post has been published on https://thedigitalinsider.com/creating-an-auto-closing-notification-with-an-html-popover/
Creating an Auto-Closing Notification With an HTML Popover

The HTML popover attribute transforms elements into top-layer elements that can be opened and closed with a button or JavaScript. Most popovers can be light-dismissed, closing when the user clicks or taps outside the popup. Currently, HTML popover lacks built-in auto-close functionality, but it’s easy to add. Auto closing popups are useful for user interfaces like banner notifications — the new-message alerts in phones, for instance.
A picture demo, is worth a thousand words, right? Click on the “Add to my bookmarks” button in the following example. It triggers a notification that dismisses itself after a set amount of time.
Let’s start with the popover
The HTML popover attribute is remarkably trivial to use. Slap it on a div, specify the type of popover you need, and you’re done.
<div popover="manual" id="pop">Bookmarked!</div>
A manual popover simply means it cannot be light-dismissed by clicking outside the element. As a result, we have to hide, show, or toggle the popover’s visibility ourselves explicitly with either buttons or JavaScript. Let’s use a semantic HTML button.
<button popovertarget="pop" popovertargetaction="show"> Add to my bookmarks </button> <div popover="manual" id="pop">Bookmarked!</div>
The popovertarget and popovertargetaction attributes are the final two ingredients, where popovertarget links the button to the popover element and popovertargetaction ensures that the popover is show-n when the button is clicked.
Hiding the popover with a CSS transition
OK, so the challenge is that we have a popover that is shown when a certain button is clicked, but it cannot be dismissed. The button is only wired up to show the popover, but it does not hide or toggle the popover (since we are not explicitly declaring it). We want the popover to show when the button is clicked, then dismiss itself after a certain amount of time.
The HTML popover can’t be closed with CSS, but it can be hidden from the page. Adding animation to that creates a visual effect. In our example, we will hide the popover by eliminating its CSS height property. You’ll learn in a moment why we’re using height, and that there are other ways you can go about it.
We can indeed select the popover attribute using an attribute selector:
[popover] height: 0; transition: height cubic-bezier(0.6, -0.28, 0.735, 0.045) .3s .6s; @starting-style height: 1lh;
When the popover is triggered by the button, its height value is the one declared in the @starting-style ruleset (1lh). After the transition-delay (which is .6s in the example), the height goes from 1lh to 0 in .3s, effectively hiding the popover.
Once again, this is only hiding the popover, not closing it properly. That’s the next challenge and we’ll need JavaScript for that level of interaction.
Closing the popover with JavaScript
We can start by setting a variable that selects the popover:
const POPOVER = document.querySelector('[popover]');
Next, we can establish a ResizeObserver that monitors the popover’s size:
const POPOVER = document.querySelector('[popover]'); const OBSERVER = new ResizeObserver((entries) => if(entries[0].contentBoxSize[0].blockSize == 0) OBSERVER.unobserve((POPOVER.hidePopover(), POPOVER)); );
And we can fire that off starting when the button to show the popover is clicked:
const POPOVER = document.querySelector('[popover]'); const OBSERVER = new ResizeObserver((entries) => if(entries[0].contentBoxSize[0].blockSize == 0) OBSERVER.unobserve((POPOVER.hidePopover(), POPOVER)); ); document.querySelector('button').onclick = () => OBSERVER.observe(POPOVER);
The observer will know when the popover’s CSS height reaches zero at the end of the transition, and, at that point, the popover is closed with hidePopover(). From there, the observer is stopped with unobserve().
In our example, height and ResizeObserver are used to auto-close the notification. You can try any other CSS property and JavaScript observer combination that might work with your preference. Learning about ResizeObserver and MutationObserver can help you find some options.
Setting an HTML fallback
When JavaScript is disabled in the browser, if the popover type is set to any of the light-dismissible types, it acts as a fallback. Keep the popover visible by overriding the style rules that hide it. The user can dismiss it by clicking or tapping anywhere outside the element.
If the popover needs to be light-dismissible only when JavaScript is disabled, then include that popover inside a <noscript> element before the manual popover. It’s the same process as before, where you override CSS styles as needed.
<noscript> <div popover="auto" id="pop">Bookmarked!</div> </noscript> <div popover="manual" id="pop">Bookmarked!</div> <!-- goes where <head> element's descendants go --> <noscript> <style> [popover] transition: none; height: 1lh; </style> </noscript>
When to use this method?
Another way to implement all of this would be to use setTimeout() to create a delay before closing the popover in JavaScript when the button is clicked, then adding a class to the popover element to trigger the transition effect. That way, no observer is needed.
With the method covered in this post, the delay can be set and triggered in CSS itself, thanks to @starting-style and transition-delay — no extra class required! If you prefer to implement the delay through CSS itself, then this method works best. The JavaScript will catch up to the change CSS makes at the time CSS defines, not the other way around.
#ADD#alerts#animation#Articles#attributes#browser#buttons#challenge#change#CSS#Delay#easy#HTML#indeed#interaction#it#JavaScript#Learn#learning#Light#links#message#Method#Moment#monitors#notifications#One#Other#phones#picture
0 notes
Text
How to Download (Almost) Any Audio File from Tumblr
Use this method at your own discretion. Proper credit and attribution is key to a healthy online ecosystem. Just be cool. I was inspired to make this how-to because the Wikihow article on this subject doesn't work (at least for me).
Step 1:
Find the post containing the audio file you want to download. It doesn't matter if this is on your own blog, in a tag, on your dash, or whatever.
Step 2:
Right click/Control+click on the audio player and select "Inspect." The Inspector panel will contain the programming for the audio link.
Step 3:
Orient yourself in the Inspect panel. Look at the ribbon at the top of the panel and make sure you're in the "Inspector" tab or the "Elements" tab (this depends on your browser, i think). This tab is open by default and contains the code for different elements of the site (like the audio player).
Just below the tab ribbon, on the left-hand side of the panel, there should be a search bar.
Step 4:
Use the search bar to search for the audio source in the html code. The quickest way to find the audio file is to type "audio-source". Hit Enter when you're done typing.
The code panel should highlight an inner line that goes something like this: source class="audio source" src=https://64.media.tumblr.com/a bunch of gobbledygook.mp3
That link is what you want.
Step 5:
Right click the highlighted line, and Open Link in New Tab. This should open up a black page containing nothing but a basic audio player (which will probably autoplay depending on your browser settings).
Step 6:
Right click on the audio player from the previous step, and Save Audio As...
This allows you to save the audio to your computer as a .mp3 file. The Save As window will probably say you're saving it as an MPEG file (mp3 is a type of MPEG; don't worry about it). Give the file a name that is easy to find/sort and save it to whichever folder you want.
Step 7:
Enjoy! You can play that .mp3 file on your computer's native audio player or do whatever.
(Anyone who's more knowledgeable is welcome to jump in with tips or corrections. I've only done this on a Windows PC on Firefox, and the process might look different on a different browser or OS.)
9 notes
·
View notes
Text
Day 30 — 35/ 100 Days of Code
I learned how to handle JavaScript features (default parameters, spread, rest, and destructuring).
And I finally reached the DOM chapeter, 'The Document Object' which contains representations of all the content on a page. I'm still discovering its methods and properties.
So far, I've learned about the most useful ones: getElementById(), querySelector, changing styles, manipulating attributes, and the append method.
I'm doing some silly practice exercises just to get more familiar with the DOM methods. The more I progress in my course, the more fun things seem to get. I'm really excited to start building stuff with code and combining HTML, CSS, and JS all together.
#100 days of code journal#learning#coding#webdevelopment#codeblr#studyblr#growing#imporving#self improvement#cs#computer science#programming#codenewbie#tech#learn to code#frontend#100daysofcode#coding blog#htlm#css#JavaScript#The DOM
66 notes
·
View notes
Note
Hello! I ran into your skin Fading echoes and was curious if you had any tips for coding a main forum that is hover/tabbed for the rp section like that? I've been searching everywhere for something similar, or even tips on how to start that style. I saw one waaaaaay back in the day and fell in love. I'm an amateur skinner with big dreams, so if you have any advice or sources that would help learn to make a main forum body like that, I'd love to have them!
Sure! I can't claim that the method I used for Fading Echoes was the most efficient, since it was my one of my first attempts actually getting tabbed forums to work - on a skin I planned to sell, no less - but hey. If it works, it works.
I would like to also mention in advance before I explain these convoluted methods that Niobe & FizzyElf have a script resource for tabbing forums and categories. I didn't come across this until MUCH later, after I'd already sold Fading Echoes, which may be a better and more efficient method than the ones I'm about to explain.
The "Style" of Skin
First things first: typically, when you're making a skin for a Jcink forum using HTML Templates, you're expected to only put one type of markup/structure per template and the system then repeats it for every instance where that structure is meant to occur - i.e. you only write a single forum row structure, and that structure is repeated for every forum, etc.
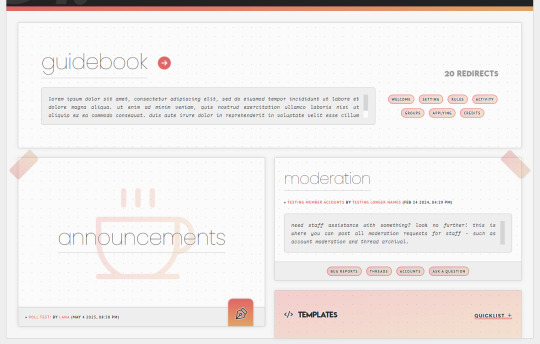
For example, we have my WIP "Kingdom of Calamity" skin, which has the same forum row style in every category, each of them identical to the last and the next:
(Where you can see all the structures are identical when viewed from the index, and there's only one set of markup in the Forum Row template for the skin.)
When you mention skins "of that style" in your ask, I'm assuming that you mean skins with a highly customized index like Fading Echoes, where every category has a different layout for their forums. In these instances - a custom index where forums in certain categories are going to have a drastically different structures from one another, and isn't something manageable with CSS - I give each of them their own markup.
This means that you'll have multiple sets of markup for each different structure you want, for each different template. This is less important for the Category Headers, and more important for the Forum Rows.
As an example in this case, take my WIP "Garden of Dreams" skin: it has a different layout for its forums in each category, and even the layout of each forum per category wildly varies from one another-
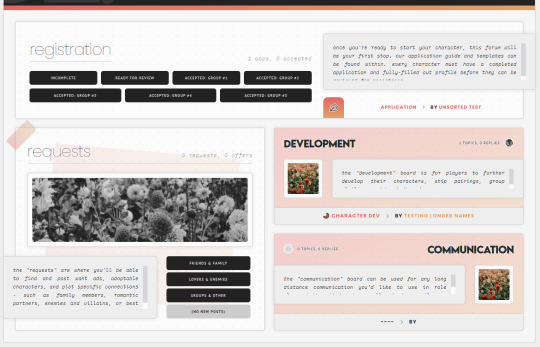
If you look under the hood of the skin inside of the HTML Templates - specifically, the Forum Rows - you'll see that I have a lot more markup here than a normal skin calls for:
This is because for each different forum that's going to have a different structure or layout, I'm writing completely new markup for it.
That's the general "gist" behind skins with custom indexes or ones done in this style: we're not using a single markup style with hard-coded elements (though that can also be done) but customizing each category and each forum to its exact placement on the index and in the skin.
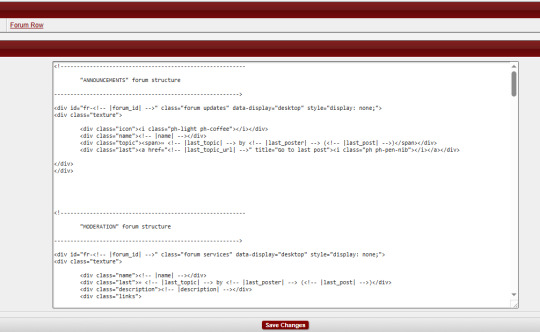
To do this, I do two things:
First, slap IDs on fucking everything, and I mean everything. You can see in my screenshot the first few forums (for "announcements" and "moderation" respectively) that the first attribute on those containers is an ID for "fr-(ID variable)". I also have IDs on the category for "cat-(ID variable)". I've started to make it a habit in my newer skins to put an ID variable on anything and everything I can get my grubby little raccoon mitts on in the skin, up to and including even the body element and anything within that such as categories, forums, post containers, profiles, etc.
That sets you up for the second thing, which is setting all forum/custom containers to "display: none" with a style attribute. I do this to prohibit any and all structures from displaying by default in every category, and potentially mucking stuff up when their styles, size, or formatting isn't compatible with the new/other/different category and surrounding forums.
These two steps, when combined, make it so you can selectively chokehold any elements on your index and wrestle them into submission with CSS - making sure they're visible where they need to be, and hidden where they don't need to be.
(And please, for God's sake, make sure your ID's are unique to only that container/element. That's a mistake I made often in my earlier skins that could have saved me a lot of grief: CLASSES are for repetition and grouping. ID's are not.)
Tabs on the Index
So, I can admit that I've never experimented with a hover on the forums before - mostly, because I still consider complex hovers and transitions to be my arch nemesis (although, it is on my list of things to eventually master) and I can't imagine that hovers are so different that the information provided above wouldn't be helpful in some manner. So, do as you will with that.
Tabs, however, can be accomplished in a variety of ways. In general, I consider there to be two separate ways to get tabs on something:
Using Javascript/jQuery/some type of script to trigger events for clicking.
Using radio button inputs and CSS to control display, also for a click or selection event.
They're both means to the same end, in some regard: you click on something, usually a button. That button controls what shows or hides. It's just the inside stuff that changes.
Funny enough, using a script of some sort is going to be what I consider the more "beginner friendly" option, and it's what I used for the tabs in Fading Echoes. In fact, I used this script in specific, which is a tutorial one from W3 Schools, and I just modified it to use the forum stuff instead of city names. It's important to keep in mind that for Fading Echoes, I also had unique Category Headers (new markup) for every single category, as well as unique Forum Rows like discussed above. I put the "tablinks" (the buttons/labels used as tabs) inside of the category markup, and I just created a new forum layout for the IC/RP forum containers as the "tabcontent". That make it so the tabs only displayed in that category, and specifically only worked for the forums with a corresponding ID number.
There are also other scripting methods of doing this, like Noire's script that I mentioned at the start of this. And that one, if memory serves, wouldn't force you to make multiple different category types like Fading Echoes did.
The method of radio buttons/inputs is also possible to use, though it does require you to have a good working understanding of using radio buttons for toggles - because if you don't understand what's going on with :checked attributes, you may not understand how to write your CSS in order to select the correct forum to display. I've done this method only once, on my vaguely "House of Night" themed skin that I'm still working on, and while it's a little buggy in some regards, it's also very much functional!

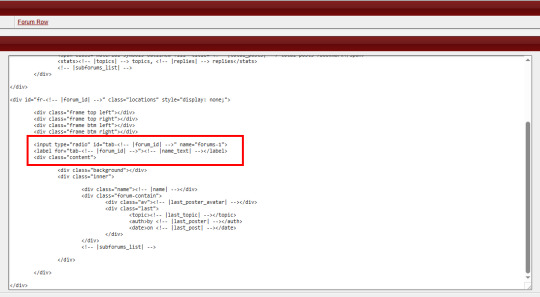
Here, I just made a second forum row structure (the other forums all use the same type of structure) and put the input/radio button inside of the forum, along with it's label, and corresponding elements for the forum. Then, the toggle - or which forum is displayed when you click on the tab - is controlled via CSS, as is the case with most input-based tabs like this.
Full disclaimer, the "little buggy" part I mentioned is that I had to use jQuery to get the correct tab to select when the page first loads, before a user clicks on any tabs. Otherwise, it was trying to select the first radio button/label combo on the page, which was technically in another category for a forum that had that "display: none" property set on it. (Remember, each forum structure you put in your "Forum Rows" HTML Template will get used for every forum being displayed. By putting IDs on them, we're just hiding them from showing with CSS, but they still very much exist on the page.)
If you've never worked with CSS tabs before, I have a few versions on my portfolio site that are considered "base" templates you can play around with:
Basic HTML & CSS Tabs
Basic HTML & CSS Accordion
Basic HTML & CSS Checkbox Toggle
I'd highly recommend getting used to them as a template for a post, to make sure you're really grasping how they work and the CSS selectors at play, before you try putting them into a skin.
I hope that helps, and as always, I'm willing to answer any coding questions people might have - not just stuff related to my work, but also general "how does [X] work" or "how do you do [Y]" - provided that I know the answer. I'll be the first to admit that I'm very much self-taught, and not a professional. I don't know everything, but I'm a Google search away from learning at least one new thing.
6 notes
·
View notes
Text
Let's understand HTML

Cover these topics to complete your HTML journey.
HTML (HyperText Markup Language) is the standard language used to create web pages. Here's a comprehensive list of key topics in HTML:
1. Basics of HTML
Introduction to HTML
HTML Document Structure
HTML Tags and Elements
HTML Attributes
HTML Comments
HTML Doctype
2. HTML Text Formatting
Headings (<h1> to <h6>)
Paragraphs (<p>)
Line Breaks (<br>)
Horizontal Lines (<hr>)
Bold Text (<b>, <strong>)
Italic Text (<i>, <em>)
Underlined Text (<u>)
Superscript (<sup>) and Subscript (<sub>)
3. HTML Links
Hyperlinks (<a>)
Target Attribute
Creating Email Links
4. HTML Lists
Ordered Lists (<ol>)
Unordered Lists (<ul>)
Description Lists (<dl>)
Nesting Lists
5. HTML Tables
Table (<table>)
Table Rows (<tr>)
Table Data (<td>)
Table Headings (<th>)
Table Caption (<caption>)
Merging Cells (rowspan, colspan)
Table Borders and Styling
6. HTML Forms
Form (<form>)
Input Types (<input>)
Text Fields (<input type="text">)
Password Fields (<input type="password">)
Radio Buttons (<input type="radio">)
Checkboxes (<input type="checkbox">)
Drop-down Lists (<select>)
Textarea (<textarea>)
Buttons (<button>, <input type="submit">)
Labels (<label>)
Form Action and Method Attributes
7. HTML Media
Images (<img>)
Image Maps
Audio (<audio>)
Video (<video>)
Embedding Media (<embed>)
Object Element (<object>)
Iframes (<iframe>)
8. HTML Semantic Elements
Header (<header>)
Footer (<footer>)
Article (<article>)
Section (<section>)
Aside (<aside>)
Nav (<nav>)
Main (<main>)
Figure (<figure>), Figcaption (<figcaption>)
9. HTML5 New Elements
Canvas (<canvas>)
SVG (<svg>)
Data Attributes
Output Element (<output>)
Progress (<progress>)
Meter (<meter>)
Details (<details>)
Summary (<summary>)
10. HTML Graphics
Scalable Vector Graphics (SVG)
Canvas
Inline SVG
Path Element
11. HTML APIs
Geolocation API
Drag and Drop API
Web Storage API (localStorage and sessionStorage)
Web Workers
History API
12. HTML Entities
Character Entities
Symbol Entities
13. HTML Meta Information
Meta Tags (<meta>)
Setting Character Set (<meta charset="UTF-8">)
Responsive Web Design Meta Tag
SEO-related Meta Tags
14. HTML Best Practices
Accessibility (ARIA roles and attributes)
Semantic HTML
SEO (Search Engine Optimization) Basics
Mobile-Friendly HTML
15. HTML Integration with CSS and JavaScript
Linking CSS (<link>, <style>)
Adding JavaScript (<script>)
Inline CSS and JavaScript
External CSS and JavaScript Files
16. Advanced HTML Concepts
HTML Templates (<template>)
Custom Data Attributes (data-*)
HTML Imports (Deprecated in favor of JavaScript modules)
Web Components
These topics cover the breadth of HTML and will give you a strong foundation for web development.
Full course link for free: https://shorturl.at/igVyr
2 notes
·
View notes
Text
How Web Scraping TripAdvisor Reviews Data Boosts Your Business Growth
Are you one of the 94% of buyers who rely on online reviews to make the final decision? This means that most people today explore reviews before taking action, whether booking hotels, visiting a place, buying a book, or something else.
We understand the stress of booking the right place, especially when visiting somewhere new. Finding the balance between a perfect spot, services, and budget is challenging. Many of you consider TripAdvisor reviews a go-to solution for closely getting to know the place.
Here comes the accurate game-changing method—scrape TripAdvisor reviews data. But wait, is it legal and ethical? Yes, as long as you respect the website's terms of service, don't overload its servers, and use the data for personal or non-commercial purposes. What? How? Why?
Do not stress. We will help you understand why many hotel, restaurant, and attraction place owners invest in web scraping TripAdvisor reviews or other platform information. This powerful tool empowers you to understand your performance and competitors' strategies, enabling you to make informed business changes. What next?
Let's dive in and give you a complete tour of the process of web scraping TripAdvisor review data!
What Is Scraping TripAdvisor Reviews Data?
Extracting customer reviews and other relevant information from the TripAdvisor platform through different web scraping methods. This process works by accessing publicly available website data and storing it in a structured format to analyze or monitor.
Various methods and tools available in the market have unique features that allow you to extract TripAdvisor hotel review data hassle-free. Here are the different types of data you can scrape from a TripAdvisor review scraper:
Hotels
Ratings
Awards
Location
Pricing
Number of reviews
Review date
Reviewer's Name
Restaurants
Images
You may want other information per your business plan, which can be easily added to your requirements.
What Are The Ways To Scrape TripAdvisor Reviews Data?
TripAdvisor uses different web scraping methods to review data, depending on available resources and expertise. Let us look at them:
Scrape TripAdvisor Reviews Data Using Web Scraping API
An API helps to connect various programs to gather data without revealing the code used to execute the process. The scrape TripAdvisor Reviews is a standard JSON format that does not require technical knowledge, CAPTCHAs, or maintenance.
Now let us look at the complete process:
First, check if you need to install the software on your device or if it's browser-based and does not need anything. Then, download and install the desired software you will be using for restaurant, location, or hotel review scraping. The process is straightforward and user-friendly, ensuring your confidence in using these tools.
Now redirect to the web page you want to scrape data from and copy the URL to paste it into the program.
Make updates in the HTML output per your requirements and the information you want to scrape from TripAdvisor reviews.
Most tools start by extracting different HTML elements, especially the text. You can then select the categories that need to be extracted, such as Inner HTML, href attribute, class attribute, and more.
Export the data in SPSS, Graphpad, or XLSTAT format per your requirements for further analysis.
Scrape TripAdvisor Reviews Using Python
TripAdvisor review information is analyzed to understand the experience of hotels, locations, or restaurants. Now let us help you to scrape TripAdvisor reviews using Python:
Continue reading https://www.reviewgators.com/how-web-scraping-tripadvisor-reviews-data-boosts-your-business-growth.php
#review scraping#Scraping TripAdvisor Reviews#web scraping TripAdvisor reviews#TripAdvisor review scraper
2 notes
·
View notes
Text
Demystifying Image Optimization: Tips and Tricks for Optimal Results
In today’s visually driven digital landscape, the importance of image optimization cannot be overstated. Images are crucial in attracting and engaging users, whether it’s a website, social media platform, or online store.
However, optimizing images for optimal results can often seem mysterious. We have compiled this guide to demystify image optimization and provide practical tips and tricks to achieve outstanding results.
From reducing file sizes without sacrificing quality to improving load times and enhancing user experience, this article will equip you with the knowledge and techniques necessary to master the art of image optimization.
What Is Image SEO?

Image SEO, or image search engine optimization, means making pictures on a website better so that they appear higher in search engines when people look for things. It is about using different tricks and methods to help search engines find images easily. This way, the website gets more visitors from people who search for things online.
Here are a few key factors to consider:
1. File Names
Giving descriptive names to image files is crucial. Using relevant keywords in the file name helps search engines understand the image’s content.
2. Alt Tags
Alt tags (alternative text) are HTML attributes that provide text descriptions of images. They are essential for accessibility and help search engines comprehend the image content. Including descriptive and relevant alt tags with appropriate keywords can improve image SEO.
3. Image Size and Format
Optimizing the size and format of images is important for both user experience and SEO. When images are too big, they can make websites load slowly, which can make the website rank lower in search results. Compressing images and using appropriate file formats, such as JPEG or PNG, can help improve loading times and overall SEO performance.
4. Image Captions and Surrounding Text
Including captions and relevant textual content near the image can provide additional context to search engines. This helps them understand the image more easily, which makes it more likely to show up in search results that match what the image is about.
5. Image Sitemaps
Including images in the website’s sitemap helps search engines discover and index them more efficiently. This can enhance the visibility of images in search results.
What Does Image Optimization Mean?

Image optimization refers to reducing an image’s file size without significantly compromising its visual quality. Image optimization aims to create images that load quickly and efficiently on web pages or other digital platforms, leading to improved website performance, reduced bandwidth usage, and a better user experience.
There are several techniques used in image optimization, including:
1. Compression
This involves reducing the file size by removing unnecessary data from the image file. Lossless compression methods preserve all image data, while lossy compression methods discard some less visually important data.
2. Resizing
Scaling down the dimensions of an image can significantly reduce its file size. This is especially useful when displaying images on mobile devices or in responsive web design.
3. Format Selection
Choosing the appropriate file format for an image can contribute to optimization. Common image formats include JPEG, PNG, and GIF, each with strengths and best use cases. JPEG is typically used for photographs, while PNG is better suited for transparent graphics and images.
4. Caching and CDN
Using caching and content delivery networks (CDNs) can load images on a website faster. They do this by storing the images in different places and sending them from the closest server to the person looking at the website. This way, the images load quickly, and people don’t have to wait too long.
Why Is Image Optimization Important?

Image optimization is important for several reasons:
1. Improved Website Performance
Images on a website can be quite big and slow down how quickly the site loads. But if we make the images smaller without making them look worse, it can make the website faster and better for users. Faster loading times also contribute to better search engine rankings.
2. Bandwidth Optimization
Optimized images consume less bandwidth, crucial for users with limited data plans or slow internet connections. When you make images smaller, your website will load faster for everyone, no matter how fast or slow their internet is.
3. Search Engine Optimization (SEO)
Search engines consider page load speed a ranking factor. Optimizing images contributes to faster page load times, positively affecting your website’s SEO. Additionally, optimized images often include descriptive alt tags and relevant file names, which can improve the visibility and accessibility of your content in image search results.
4. Mobile Optimization
As people use mobile devices to use the internet, it’s important to make sure images look good and load quickly on mobile screens. By reducing file sizes, you can minimize the data users need to download, resulting in faster loading times and a better mobile browsing experience.
5. Social Media Sharing
When users share your content on social media platforms, the image associated with the post can impact engagement. Optimized images load quickly, making users more likely to interact with and share your content.
What Is the Best Image Format for SEO?

The best image format for SEO (Search Engine Optimization) purposes is the JPEG format (Joint Photographic Experts Group). JPEG is widely supported and recognized by web browsers and search engines, making it an ideal choice for optimizing images for the web.
Here are a few reasons why JPEG is considered the best image format for SEO:
1. File Size
JPEG images can be compressed significantly while retaining good image quality. Smaller file sizes help improve website loading times, which is crucial for SEO since search engines favor fast-loading websites.
2. Compatibility
JPEG is compatible with all major web browsers and devices, ensuring your images will be accessible to a wide audience. It is a universally accepted format supported by nearly all platforms and devices.
3. SEO Metadata
JPEG supports embedding metadata such as alt text and image descriptions. This information about the image (metadata) is crucial for image SEO. It helps search engines figure out what the image is about and show it in the right search results.
While other image formats are available, such as PNG (Portable Network Graphics) and GIF (Graphics Interchange Format), there may be better choices for SEO. PNG files, for example, tend to have larger file sizes, which can negatively impact website loading times. GIF is more suitable for animated images rather than static ones.
How Does Image SEO Work?

Image SEO, or search engine optimization for images, refers to making images on a website better for search engines to be shown higher in search results and more people can find them. While search engines primarily rely on text-based content to understand web pages, they consider images important in determining relevance and user experience. Here’s a brief explanation of how image SEO works:
1. Image Relevance
Choosing relevant images that align with the web page’s content is crucial. The image should accurately represent the subject matter and provide value to the users.
2. Image Optimization
This involves optimizing the image file itself to improve loading speed without compromising its quality. It includes compressing the image file size, choosing the appropriate format (JPEG, PNG, etc.), and resizing the image to fit the intended display size.
3. File Naming
Giving descriptive and relevant names to image files can improve search engine understanding. Using keywords that describe the image content in the file name can be helpful for search engines to associate the image with the web page’s topic.
4. Alt Text
Whenever you add alt text to an image, it provides important details to search engines and helps people who can’t see the image (visually impaired users) understand what the image represents when they use special tools called screen readers. The alt text should be concise, descriptive and include relevant keyword research to represent the image’s content accurately.
5. Captions and Surrounding Text
Including captions and relevant textual content near the image helps search engines understand its context. Captions should be informative and contribute to the overall relevance of the page.
6. Image Sitemaps
Creating an image sitemap and submitting it to search engines can ensure that the images on your website are discovered and indexed properly. An image sitemap provides search engines with additional information about the images, such as their location, caption, and license information.
7. Page Load Speed
Making sure that your webpage loads quickly is really important for both users and search engine rankings. This involves making images smaller and optimizing the page’s HTML, CSS, and JavaScript.
8. Image Hosting and CDN
To make images load faster and be available in many places around the world, you should use a good image hosting service and also a content delivery network (CDN). These help ensure your images are quick to load and can be accessed from various locations.
How To Optimise Images for Web and Performance?

Optimizing images for the web and performance involves reducing their file size while maintaining acceptable quality. This is important because large image files can slow website loading times, negatively impacting the user experience and search engine rankings. Here are some key steps to optimize images for the web:
1. Resize Images
Start by resizing your images to the desired dimensions before uploading them to your website. You can use any editing software for images or online tools to change the image size by adjusting its width and height. Ensure the dimensions match the display size on your web page to avoid wasting file space.
2. Compress Image Files
Image compression reduces file size without significantly losing quality. You can use compression tools such as Adobe Photoshop, GIMP, or online services like TinyPNG or JPEGmini to compress your images. These tools use techniques to remove unnecessary data and reduce file size, such as removing metadata, optimizing color palettes, or applying lossy compression.
3. Choose the Right File Format
Selecting the right file format can make a big difference in how big the file is. For photographs or images with complex color gradients, use JPEG format. For images with fewer colors or transparent backgrounds, use PNG format. Consider using SVG (Scalable Vector Graphics) format for simple graphics or icons, which provides excellent quality at a minimal file size.
4. Optimise Image Resolution and Quality
When saving your images, adjust the resolution and quality settings. Usually, a resolution of 72 pixels per inch (PPI) is enough to use web images. As for quality, find a balance between file size and visual clarity. Preview your images to ensure they still appear sharp and clear after compression.
5. Leverage Responsive Images
With the HTML ‘srcset’ attribute, you can provide different image sizes depending on the device’s screen size. This ensures smaller screens receive smaller image files, improving loading times and user experience.
6. Implement Lazy Loading
Lazy loading delays the speed of loading of images until needed. This technique improves initial page load times by only loading images visible to the user, while other images are loaded as the user scrolls down. Numerous JavaScript libraries and frameworks provide easy-to-implement lazy loading functionalities.
7. Consider content delivery networks (CDNs)
Utilise CDNs to deliver your images. CDNs store and serve your image files from multiple locations worldwide, reducing latency and improving loading speeds for users across different geographic regions.
Image Optimization Methods

Image optimization is reducing an image’s file size without significantly compromising its quality or visual appearance. This is important for various reasons, such as improving website loading times, reducing bandwidth usage, and optimizing user experience.
There are several methods commonly used for image optimization:
1. Compression
Compression techniques reduce the file size of an image by removing unnecessary data or by encoding the image in a more efficient format. Lossless compression preserves all image data without any loss in quality, while lossy compression sacrifices some details to achieve a smaller file size.
2. Resizing
Resizing an image involves adjusting its dimensions by reducing its width and height or by scaling it down proportionally. This reduces the overall file size as fewer pixels need to be stored.
3. Format Selection
Choosing the appropriate image file format can significantly impact file size. Common formats include JPEG, PNG, and GIF, each with its advantages and best use cases. JPEG suits photographs and complex images, while PNG is better for images with transparency or limited colors. GIF is typically used for simple animations.
4. Image Optimization Tools
Various software tools and online services automatically optimize images. These tools often employ compression algorithms, resizing options, and format selection techniques to achieve optimal results.
5. Lazy Loading
It is a technique where images are loaded only when needed, such as when a user scrolls to a particular webpage section. This approach reduces the initial page load time and improves a website’s performance.
6. Image Caching
Caching involves storing image files locally on a user’s device after they have been initially loaded. This way, subsequent visits or page reloads can retrieve the images from the cache instead of re-downloading them, resulting in faster loading times.
Image Optimization Plugins You Can Use

There are several image optimization plugins available that can help to optimize the images on your website. Here are a few popular ones:
1. Smush
Smush is a widely used WordPress plugin that optimizes images by reducing their file size without compromising quality. It automatically compresses images upon upload and offers features like lazy loading, bulk optimization, and integration with popular page builders.
2. EWWW Image Optimizer
EWWW Image Optimizer is another WordPress plugin that optimizes images by automatically reducing their file size. It supports various image formats and offers lossless and lossy compression options. It can optimize newly uploaded and existing images in your media library.
3. ShortPixel
ShortPixel is an image optimization plugin available for multiple platforms, including WordPress, Magento, and Shopify. It uses advanced compression algorithms to reduce image file sizes without significant quality loss. It also supports WebP conversion and lazy loading and offers a bulk optimization feature.
4. Optimole
Optimole is a cloud-based image optimization service that works as a plugin for platforms like WordPress. It optimizes images in real time and delivers them via a global CDN (Content Delivery Network). Optimole automatically compresses and resizes images based on the visitor’s device, ensuring optimal performance.
5. Kraken.io
Kraken.io is an image optimization service that offers a WordPress plugin for easy integration. It utilizes lossless and intelligent lossy compression techniques to reduce image file sizes. Kraken.io also supports image resizing and WebP conversion and provides a user-friendly dashboard to manage optimization settings.
7 Tips for Image Optimization

Here are seven tips for image optimization, along with brief explanations for each:
1. Choose the Right File Format
Choosing the appropriate format can significantly impact image size and quality. JPEG is best for photographs, PNG for images with transparency or crisp graphics, and SVG for vector-based graphics.
2. Compress Images
Decrease the file size of your images without sacrificing too much quality. There are many online tools and software available that help you compress your images efficiently.
3. Resize Images
Scale your images to the appropriate dimensions required for your website or application. Large images can slow down the page loading times, so resizing them to the necessary dimensions can improve performance.
4. Optimise Alt Text
Alt text provides alternative text descriptions for images, making them accessible to visually impaired users and improving SEO. Use concise and accurate descriptions that convey the image’s content or purpose.
5. Utilise Descriptive File Names
Give your image files descriptive names that reflect their content. This not only helps with the organization but also assists search engines in understanding the context of the image.
6. Optimize Image Metadata
Fill in relevant metadata fields such as title, caption, and tags. This information can enhance the searchability and understanding of your images by search engines and users.
7. Implement Lazy Loading
Lazy loading is a technique where images are loaded only when they appear in the user’s viewport rather than all images simultaneously. This can significantly improve page loading times, particularly for pages with many images.
Conclusion
Understanding and implementing effective image optimization techniques can greatly enhance a website or digital platform’s overall performance and user experience. This article aimed to demystify the process and provide valuable tips and tricks for achieving optimal results.
By following the recommendations discussed, such as using appropriate file formats, compressing images, and optimizing alt tags and descriptions, website owners can significantly improve page load times, reduce bandwidth consumption, and increase accessibility.
It is very important to stay updated with the latest image optimization practices to adapt to evolving technologies and deliver visually appealing and high-performing web experiences to users.
Source Link: Demystifying Image Optimization: Tips and Tricks for Optimal Results
2 notes
·
View notes
Text
How to check whether the background image is loaded or not using JavaScript ?

In this article, we will check whether the background image is loaded or not using JavaScript. In JavaScript, onload event is used to check whether a window is loaded or not. Similarly, we can use that event to check whether a particular element has loaded or not. There are two ways in which we can check whether a background image has loaded or not. We can do this in three ways: Using HTML Using the onload attribute in Javascript Using addEventListener() method Using HTML: Syntax: Example: This example checks whether the background image is loaded or not using […]
0 notes
Text
Mobile-First Indexing: What You Need to Know
Mobile evaluation Google's evaluation of websites is significantly impacted by the first sequencing. In the past, the search engine primarily evaluates, indexes, and ranks the desktop version of a website. The mobile version is now Google's primary index reference. This strategy makes sure search results match the majority user experience as mobile usage continues to outpace desktop.

Why It Matters
Mobile devices now account for over half of all web traffic. The majority of people use this online, so it's not just a fad. Google will continue to display the poor quality mobile version of your website, which will hurt its ranking, even if it looks great on your computer but not on your mobile device.
The Timeline of Mobile‑First Indexing
Google’s shift unfolded gradually:
November 2016: Announcement of mobile‑first indexing
March 2018: Initial rollout
July 2019: Default for new domains
September 2020: Applied to most existing sites By May 2023, even remaining holdouts were migrated . Today, desktop versions without mobile equivalents are unlikely to be indexed.
Mobile‑First vs. Responsive Design
There are three main approaches for mobile: overwhelming websites:
Responsible design: The same URL and HTML for all devices; The display adapters for the screen size. Recommended method for Google
Dynamic serving: Different HTML based on the same URL, but the device is carefully requiring HTTP header
Separate URL: Mobile pages live on separate URL (eg m.example.com)
Regardless of the layout, the material and metadata must be similar to appropriate sequencing and versions for the ranking.
Best Practices for Mobile‑First SEO
Ensure equivalent content Match desktop and mobile content including text, headings, images, videos, and structured data. Differences, especially missing images or markup on mobile, can hurt visibility.
Allow crawl access Don’t block resources like CSS, JavaScript, or images via robots.txt on mobile—Google needs them to render and understand your site
Avoid lazy‑loading essential content Primary content shouldn't be loaded only through user interaction. If Googlebot can’t access it, it won’t be indexed.
Use responsive images and metadata Shared image URLs and alt‑tags across mobile and desktop prevent indexing delays and help Google correctly attribute assets.
Configure canonical and hreflang links For separate mobile URLs, properly link mobile and desktop via rel="canonical" and rel="alternate"; mirror hreflang for international content
Monitor via Search Console Google signals when your site is switched to mobile‑first. The “URL Inspection” tool lets you see the mobile user‑agent crawl status
Troubleshooting Common Issues
Missing structured data, images, or metadata on mobile could reduce rich result eligibility.
Blocked resources in robots.txt may prevent rendering or indexing .
Duplicate or error‑serving mobile URLs can cause missing pages in the index.
The Bottom Line
Modern web usage is reflected in mobile-first indexing. Even if your desktop site is performing well, if your mobile site is not performing up to par, your search results will suffer. Ensure that your mobile site is complete, has the right structure, loads quickly, and has technical equity across URLs. By 2025, mobile will be the only face Google sees of the website; it won't be an option.
1 note
·
View note
Text
HTML Interview Questions: Crack Your Web Developer Interview

HTML (HyperText Markup Language) is the foundation of every website you see on the internet. Whether you're a fresher stepping into the tech world or an experienced developer preparing for a job switch, mastering HTML interview questions is crucial for clearing any web developer interview.
In this guide, we’ll explore the most commonly asked HTML interview questions, along with clear explanations and examples. These questions are ideal for both beginners and intermediate developers aiming to showcase their front-end knowledge.
Why HTML is Important in Web Development Interviews
HTML is the standard markup language used to create the structure of web pages. It forms the base upon which CSS and JavaScript work. Employers test HTML skills in interviews to evaluate a candidate’s understanding of webpage structure, semantic elements, accessibility, and proper coding practices.
Basic HTML Interview Questions and Answers
1. What is HTML?
Answer: HTML stands for HyperText Markup Language. It is used to structure content on the web using elements like headings, paragraphs, links, lists, and images.
2. What are HTML tags and elements?
Answer: HTML tags are the building blocks used to create HTML elements. Tags are enclosed in angle brackets, like <p> for paragraphs. An element includes the start tag, content, and end tag, e.g., <p>This is a paragraph</p>.
3. What is the difference between HTML and HTML5?
Answer:
HTML5 is the latest version of HTML.
HTML5 supports semantic elements like <article>, <section>, and <nav>.
It introduces multimedia tags like <audio> and <video>.
HTML5 supports APIs for geolocation, local storage, and canvas graphics.
4. What is a semantic HTML element?
Answer: Semantic HTML elements clearly describe their meaning to both the browser and developer. Examples include <header>, <footer>, <article>, and <aside>. These improve SEO and accessibility.
5. What is the difference between <div> and <span>?
Answer:
<div> is a block-level element used for grouping content.
<span> is an inline element used for styling small pieces of text or elements.
Intermediate HTML Interview Questions
6. How do you create a hyperlink in HTML?
Answer: Use the <a> tag with the href attribute. Example: <a href="https://example.com">Visit Example</a>
7. How can you insert an image in HTML?
Answer: Use the <img> tag with the src and alt attributes. Example: <img src="image.jpg" alt="Description of image">
8. What is the purpose of the alt attribute in images?
Answer: The alt attribute provides alternative text if the image can't load and improves accessibility for screen readers.
9. What is the use of the <meta> tag?
Answer: <meta> provides metadata about the HTML document such as character encoding, page description, keywords, and author. It is placed inside the <head> tag.
10. What are void (self-closing) elements in HTML?
Answer: Void elements do not require a closing tag. Examples include <img>, <br>, <hr>, <input>, and <meta>.
Advanced HTML Interview Questions
11. What is the difference between id and class attributes in HTML?
Answer:
id is unique and used to target one specific element.
class can be used on multiple elements for grouping and styling.
12. How do you create a form in HTML?
Answer:<form action="/submit" method="post"> <input type="text" name="username"> <input type="password" name="password"> <input type="submit" value="Login"> </form>
This creates a form that takes input and submits data to a server.
13. What are some new input types in HTML5?
Answer: HTML5 introduced new input types such as:
email
date
time
number
range
color These enhance validation and user experience.
14. What is the use of <iframe> in HTML?
Answer: <iframe> is used to embed another HTML page or external content (like YouTube videos) within a current webpage.
Example:<iframe src="https://example.com" width="600" height="400"></iframe>
15. How does HTML handle accessibility?
Answer: HTML supports accessibility through:
Semantic tags
alt attributes for images
ARIA (Accessible Rich Internet Applications) roles
Proper use of forms and labels
These features make content more usable for screen readers and assistive technologies.
Bonus Tips to Crack HTML Interviews
Practice Real Code: Use platforms like CodePen or JSFiddle to experiment with HTML structures.
Understand Semantic HTML: Many companies focus on code that is SEO- and accessibility-friendly.
Be Clear with Fundamentals: Interviewers often focus on basic but important questions.
Combine with CSS & JavaScript: Know how HTML works in combination with styling and scripting.
Ask Clarifying Questions: If you're given a coding task, ask questions before you begin coding.
Final Thoughts
Cracking a web developer interview starts with having a strong grip on the basics, and HTML is at the core of front-end development. This guide — “HTML Interview Questions: Crack Your Web Developer Interview” — has walked you through a range of frequently asked questions from beginner to advanced levels.
By preparing these questions and practicing real-world HTML code, you’ll be well-equipped to confidently answer your interviewer and demonstrate your understanding of webpage structure, elements, and best practices.
So, keep coding, stay curious, and crack that web developer interview!
0 notes
Text
Website To Text
Website To Text Converter: Extract Clean Text Fast What is a Website To Text Converter? A Website To Text converter is an essential online tool that extracts clean, readable text from any webpage by removing HTML tags, scripts, and formatting elements. This powerful utility transforms complex website content into plain text format, making it easier to analyze, copy, or repurpose webpage text for various applications. Whether you're a content creator, researcher, or digital marketer, converting website text has become crucial for content analysis and data extraction tasks. How Website To Text Conversion Works The conversion process involves several technical steps that happen instantly: • HTML Parsing: The tool analyzes the webpage's HTML structure • Content Extraction: Pure text content is identified and separated • Format Removal: HTML tags, CSS styles, and JavaScript are stripped away • Clean Output: Plain text is delivered without formatting elements This streamlined process ensures you get clean, usable text from any website source. Key Benefits of Using a Website Text Converter Time-Saving Efficiency Converting webpage text manually would require extensive copying and cleaning. Our automated tool processes entire web pages in seconds, eliminating tedious manual work. Content Analysis Made Simple Researchers and analysts can quickly extract website text for: Keyword density analysis Content auditing Competitive research Academic citations Multiple Format Support Modern website to text converters handle various web technologies, including: Static HTML pages Dynamic JavaScript content WordPress sites E-commerce platforms Common Use Cases for Website Text Extraction Use Case Description Benefit Content Research Extract text for analysis Quick data gathering SEO Auditing Analyze competitor content Competitive insights Academic Work Cite web sources properly Clean citations Content Repurposing Transform web content New content creation Step-by-Step Guide to Convert Website Text Method 1: Direct URL Conversion Copy the target webpage URL Paste it into the converter tool Click "Convert" to process Download or copy the extracted text Method 2: HTML Code Conversion Sometimes you might need to convert HTML code directly: Paste HTML source code Run the conversion process Receive clean text output Advanced Features in Modern Text Converters Professional website text conversion tools offer enhanced capabilities: • Batch Processing: Convert multiple URLs simultaneously • Format Preservation: Maintain paragraph structures • Language Detection: Identify content language automatically • Custom Filters: Remove specific elements like ads or navigation These features make webpage text extraction more precise and user-friendly. Integration with Other Text Tools Website to text conversion works seamlessly with other text processing utilities. After extracting content, you might need additional tools like Convert Case for text formatting, Delimiter Tool for data separation, or Word Counter for content analysis. For creative projects, extracted text can be enhanced using Cursive Text Generator or manipulated with Reverse Letters tools to create unique content variations. Best Practices for Website Text Conversion Quality Assurance Tips Verify extracted content accuracy Check for missing paragraphs or sections Ensure proper character encoding Review for formatting issues Legal Considerations Always respect copyright laws and website terms of service when extracting content. Use converted text responsibly and provide proper attribution when required. Troubleshooting Common Issues Sometimes website text conversion encounters challenges: JavaScript-heavy sites: May require advanced processing Password-protected content: Cannot be accessed Large websites: May need processing time Special characters: Might need encoding adjustment A reliable Website To Text converter streamlines
content extraction from any webpage, saving time and effort while providing clean, usable text output. Whether for research, analysis, or content creation, this tool has become indispensable for professionals working with web content. Transform your workflow today by utilizing efficient website text conversion tools that deliver accurate results instantly.
0 notes
Text
What Are Breadcrumbs in SEO and How to Add Them to Your Website for Better SEO!
In the world of SEO, even small improvements to your website can make a big difference. One such small — but powerful — feature is Breadcrumbs. If you’ve ever seen a trail like Home > Blog > SEO Tips > Breadcrumbs in SEO, that’s a breadcrumb trail.
Breadcrumbs contribute to better search engine optimization in addition to making it easier for users to traverse your website.
In this article, you’ll learn:
What breadcrumbs are in SEO
Why they matter for user experience and SEO
The different types of breadcrumbs
How to add breadcrumbs to your website
Best practices for maximum SEO benefit
Whether you're managing SEO in-house or through an agency offering Affordable SEO Services in Delhi, this guide will help you implement breadcrumbs the right way.

What Are Breadcrumbs in SEO?
A supplementary navigation method used in SEO, breadcrumbs assist consumers in understanding where they are in a website's hierarchy. Think of breadcrumbs like a GPS route — they tell both users and search engines the path taken to reach a specific page.
Example:
Home > Blog > Digital Marketing > What Are Breadcrumbs in SEO
With only one click, consumers can return to a more comprehensive category thanks to breadcrumbs, which show up close to the top of a webpage.
Why Are Breadcrumbs Important for SEO?
Breadcrumbs aren’t just for user navigation — they’re also SEO assets. Here's how they help:
1. Improved User Experience
Breadcrumbs provide an intuitive way for users to move through a website. This leads to:
Lower bounce rates
More time spent on your site
Higher engagement rates
2. Better Site Structure
Search engines like Google love organized websites. Breadcrumbs create a Logical Internal Linking Structure, making it easier for bots to crawl and index your site.
3. Enhanced Search Snippets
When implemented correctly, Google Can Display Breadcrumbs in Search Results, replacing the URL path. This improves the look and clickability of your listing.
Example in Google:example.com > SEO > Breadcrumbs Guide
4. Lower Bounce Rates
By offering an easy way to navigate back to previous pages, users are less likely to exit your site if they don't find what they’re looking for on a specific page.
Types of Breadcrumbs
There are three common types of breadcrumbs:
1. Hierarchy-Based (Location)
These show the position of a page in the site structure.
Home > Services > SEO Services > Local SEO
2. Attribute-Based
Common in eCommerce sites, these show product attributes.
Home > Shoes > Men’s Shoes > Size 10 > Black
3. History-Based (Path)
These reflect the actual path the user took to arrive at the current page.
Home > Last Visited Page > Product Page
For SEO purposes, Hierarchy-Based Breadcrumbs are the most commonly used and most beneficial.
How to Add Breadcrumbs to Your Website
Adding breadcrumbs can be technical, but there are easy ways depending on the platform you're using.
For WordPress Users
If you're using WordPress, you have several options:
1. Using Yoast SEO Plugin
Yoast makes it easy to add breadcrumbs with just a few steps:
Install and activate the Yoast SEO plugin
Go to SEO > Search Appearance > Breadcrumbs
Enable breadcrumbs and copy the given code
Paste the code into your theme’s single.php, page.php, or header.php
Yoast also automatically adds Schema Markup, which is great for SEO.
2. Using Elementor or Page Builders
If you use Elementor, you can:
Use a Breadcrumb Widget (available in Pro)
Place the widget on the page where you require breadcrumbs.
For Custom HTML Websites
You’ll need to:
Create breadcrumb HTML manually
Add CSS for styling
Use structured data to help Google understand your breadcrumbs
Here’s a simple HTML example:
html
CopyEdit
<nav aria-label="Breadcrumb">
<ol>
<li><a href="/">Home</a></li>
<li><a href="/blog/">Blog</a></li>
<li>Breadcrumbs in SEO</li>
</ol>
</nav>
Then, add BreadcrumbList schema markup using JSON-LD:
json
CopyEdit
<script type="application/ld+json">
{
"@context": "https://schema.org",
"@type": "BreadcrumbList",
"itemListElement": [{
"@type": "ListItem",
"position": 1,
"name": "Home",
"item": "https://example.com"
},{
"@type": "ListItem",
"position": 2,
"name": "Blog",
"item": "https://example.com/blog"
},{
"@type": "ListItem",
"position": 3,
"name": "Breadcrumbs in SEO",
"item": "https://example.com/blog/breadcrumbs-in-seo"
}]
}
</script>
Best Practices for SEO-Friendly Breadcrumbs
To make the most out of breadcrumbs, follow these tips:
1. Keep It Consistent
Use the same breadcrumb format across your entire site.
2. Place Above the Page Title
Users expect breadcrumbs near the top — don’t hide them below the fold.
3. Use Schema Markup
Add BreadcrumbList schema so search engines can show them in search results.
4. Keep Links Crawlable
Each step in your breadcrumb trail should be a clickable, crawlable link.
5. Make Mobile Friendly
Ensure breadcrumbs are responsive and don't break on smaller screens.
Final Thoughts
Breadcrumbs are more than just a convenience feature — they’re an essential part of Complete SEO Services. They guide your users, help search engines understand your site structure, and even make your listings more attractive in search results.
If you haven’t implemented breadcrumbs yet, now is the perfect time. Whether you’re managing SEO in-house or outsourcing, adding breadcrumbs is a low-effort, high-impact optimization that supports both user experience and search visibility.
Need help with structured SEO improvements like breadcrumbs, schema, and content strategy? Explore our Affordable SEO Services in Delhi tailored to businesses that want real results without the guesswork.
#AffordableSEOServicesinDelhi, #CompleteSEOServices,
0 notes
Text
Why I Love Get By Text
I have a confession: I've been writing browser tests lately, and my preferred approach to locators is becoming get by text or get by label.
I am aware that some of you might want to throw some full wine bottles at me now. But I stand by it.
Over the course of my career as a test automation specialist, I've worked with a bunch of web applications for which I automated browser tests. One of the most critical aspects of writing browser tests is finding good locators to hook into in order to drive the application. Naturally, since there are plenty of options there are also plenty of opinions on what kind of locator strategies to use. Typically these follow some kind pattern like this;
Use id attributes that are permanent, if you can. If you can't, then
Use data-testid or other custom attributes specifically for automation if you can. If this isn't an option then
Use class attributes, which tend to be stable. If you can't do this, then
Use CSS properties to specify elements. And if all the above aren't options, then
Use text or xpath locators or something and hope for the best.
Generally patterns like this are a good heuristic for identifying locators. However, the nature of front-end web applications has gradually changed over the past decade. Most front-ends are now generated through frameworks and not through hand-written HTML, CSS and JS. A result of such frameworks is that elements aren't always able to be directly manipulated by developers, and you need to rely on the capabilities of the framework. Browsers (and computers more generally) have gotten faster and more efficient. And lastly, tooling has evolved greatly for browser automation. Selenium WebDriver is a web standard now, and there's lots of other tools that can be used.
Based on all this progress, one would imagine that there's been progress on how to choose or use locators well with modern and maybe less-modern web apps and pages. One would be, I think, disappointed to find out there hasn't been much progress here. Finding and maintaining locators is pretty similar to how things looked many years ago. Front-end developers still hesitate to add custom attributes for testing sometimes. Newer web frameworks dynamically create elements, so id attributes are either not present or not reliable enough for automation. No one understands CSS, still.
What to do based on this state of affairs? I've been using Playwright lately for browser automation, and Playwright provides a getByText() method for finding elements. I started using it out of convenience at first and, well, I'm convinced it's a good approach. Why? Because - frankly - it works well.
The thing about text in web applications, whether that be labels next to inputs or placeholder text, is that it's actually fairly stable. Most buttons with the text Submit will continue to have the text Submit for a long time. And if the text does change on an element it is straightforward and obvious to update your tests. Plus, text doesn't tend to go away: moving from Angular to React to Vue to Svelte still means your Name field has a label of "Name" that end users will see.
One big objection to using text is localization internationalization, which can be a valid point. However, if your web app has five options for language, does that mean the logic and workflows change as well? They might, but if they don't, you can likely test one language and still feel confident in the test results. If you can't use text-based locators, then you'll have to evalutate your strategy anyway.
I am a big fan of the adage "What's the simplest thing that could possibly work". When it comes to finding elements by text, this advice seems to hold true.
0 notes
Text
Overcoming Bot Detection While Scraping Menu Data from UberEats, DoorDash, and Just Eat
Introduction
In industries where menu data collection is concerned, web scraping would serve very well for us: UberEats, DoorDash, and Just Eat are the some examples. However, websites use very elaborate bot detection methods to stop the automated collection of information. In overcoming these factors, advanced scraping techniques would apply with huge relevance: rotating IPs, headless browsing, CAPTCHA solving, and AI methodology.
This guide will discuss how to bypass bot detection during menu data scraping and all challenges with the best practices for seamless and ethical data extraction.
Understanding Bot Detection on Food Delivery Platforms
1. Common Bot Detection Techniques
Food delivery platforms use various methods to block automated scrapers:
IP Blocking – Detects repeated requests from the same IP and blocks access.
User-Agent Tracking – Identifies and blocks non-human browsing patterns.
CAPTCHA Challenges – Requires solving puzzles to verify human presence.
JavaScript Challenges – Uses scripts to detect bots attempting to load pages without interaction.
Behavioral Analysis – Tracks mouse movements, scrolling, and keystrokes to differentiate bots from humans.
2. Rate Limiting and Request Patterns
Platforms monitor the frequency of requests coming from a specific IP or user session. If a scraper makes too many requests within a short time frame, it triggers rate limiting, causing the scraper to receive 403 Forbidden or 429 Too Many Requests errors.
3. Device Fingerprinting
Many websites use sophisticated techniques to detect unique attributes of a browser and device. This includes screen resolution, installed plugins, and system fonts. If a scraper runs on a known bot signature, it gets flagged.
Techniques to Overcome Bot Detection
1. IP Rotation and Proxy Management
Using a pool of rotating IPs helps avoid detection and blocking.
Use residential proxies instead of data center IPs.
Rotate IPs with each request to simulate different users.
Leverage proxy providers like Bright Data, ScraperAPI, and Smartproxy.
Implement session-based IP switching to maintain persistence.
2. Mimic Human Browsing Behavior
To appear more human-like, scrapers should:
Introduce random time delays between requests.
Use headless browsers like Puppeteer or Playwright to simulate real interactions.
Scroll pages and click elements programmatically to mimic real user behavior.
Randomize mouse movements and keyboard inputs.
Avoid loading pages at robotic speeds; introduce a natural browsing flow.
3. Bypassing CAPTCHA Challenges
Implement automated CAPTCHA-solving services like 2Captcha, Anti-Captcha, or DeathByCaptcha.
Use machine learning models to recognize and solve simple CAPTCHAs.
Avoid triggering CAPTCHAs by limiting request frequency and mimicking human navigation.
Employ AI-based CAPTCHA solvers that use pattern recognition to bypass common challenges.
4. Handling JavaScript-Rendered Content
Use Selenium, Puppeteer, or Playwright to interact with JavaScript-heavy pages.
Extract data directly from network requests instead of parsing the rendered HTML.
Load pages dynamically to prevent detection through static scrapers.
Emulate browser interactions by executing JavaScript code as real users would.
Cache previously scraped data to minimize redundant requests.
5. API-Based Extraction (Where Possible)
Some food delivery platforms offer APIs to access menu data. If available:
Check the official API documentation for pricing and access conditions.
Use API keys responsibly and avoid exceeding rate limits.
Combine API-based and web scraping approaches for optimal efficiency.
6. Using AI for Advanced Scraping
Machine learning models can help scrapers adapt to evolving anti-bot measures by:
Detecting and avoiding honeypots designed to catch bots.
Using natural language processing (NLP) to extract and categorize menu data efficiently.
Predicting changes in website structure to maintain scraper functionality.
Best Practices for Ethical Web Scraping
While overcoming bot detection is necessary, ethical web scraping ensures compliance with legal and industry standards:
Respect Robots.txt – Follow site policies on data access.
Avoid Excessive Requests – Scrape efficiently to prevent server overload.
Use Data Responsibly – Extracted data should be used for legitimate business insights only.
Maintain Transparency – If possible, obtain permission before scraping sensitive data.
Ensure Data Accuracy – Validate extracted data to avoid misleading information.
Challenges and Solutions for Long-Term Scraping Success
1. Managing Dynamic Website Changes
Food delivery platforms frequently update their website structure. Strategies to mitigate this include:
Monitoring website changes with automated UI tests.
Using XPath selectors instead of fixed HTML elements.
Implementing fallback scraping techniques in case of site modifications.
2. Avoiding Account Bans and Detection
If scraping requires logging into an account, prevent bans by:
Using multiple accounts to distribute request loads.
Avoiding excessive logins from the same device or IP.
Randomizing browser fingerprints using tools like Multilogin.
3. Cost Considerations for Large-Scale Scraping
Maintaining an advanced scraping infrastructure can be expensive. Cost optimization strategies include:
Using serverless functions to run scrapers on demand.
Choosing affordable proxy providers that balance performance and cost.
Optimizing scraper efficiency to reduce unnecessary requests.
Future Trends in Web Scraping for Food Delivery Data
As web scraping evolves, new advancements are shaping how businesses collect menu data:
AI-Powered Scrapers – Machine learning models will adapt more efficiently to website changes.
Increased Use of APIs – Companies will increasingly rely on API access instead of web scraping.
Stronger Anti-Scraping Technologies – Platforms will develop more advanced security measures.
Ethical Scraping Frameworks – Legal guidelines and compliance measures will become more standardized.
Conclusion
Uber Eats, DoorDash, and Just Eat represent great challenges for menu data scraping, mainly due to their advanced bot detection systems. Nevertheless, if IP rotation, headless browsing, solutions to CAPTCHA, and JavaScript execution methodologies, augmented with AI tools, are applied, businesses can easily scrape valuable data without incurring the wrath of anti-scraping measures.
If you are an automated and reliable web scraper, CrawlXpert is the solution for you, which specializes in tools and services to extract menu data with efficiency while staying legally and ethically compliant. The right techniques, along with updates on recent trends in web scrapping, will keep the food delivery data collection effort successful long into the foreseeable future.
Know More : https://www.crawlxpert.com/blog/scraping-menu-data-from-ubereats-doordash-and-just-eat
#ScrapingMenuDatafromUberEats#ScrapingMenuDatafromDoorDash#ScrapingMenuDatafromJustEat#ScrapingforFoodDeliveryData
0 notes
Text
Backbone.js $ (jQuery) View

The $(jQuery) is a method in backbone.js view that is used to run queries scoped within the limits of the view element. when we use the jQuery method, we do not need to use model id’s within our query to fetch a specific element from a list. So we can totally rely on HTML class attributes which are equivalent to using view.$el.find(selector) Syntax: view.$(selector) Parameter description: View: It is a class that is part of the backbone.js library. it specifies how our data looks like and also handles input events from users and bind events, render, and provides user interaction. […]
0 notes
Text
How to Become a Successful On-Page SEO Specialist
In the digital marketing world, SEO is a high-demand skill, and among its various branches, On-Page SEO stands out as a foundation for visibility, engagement, and long-term growth. On-Page SEO focuses on optimizing individual web pages to rank higher and earn more relevant traffic in search engines. As an On Page SEO specialist, your role isn’t just about keywords—it's about understanding user intent, creating optimized structures, and enhancing user experience across every element of a webpage.

Becoming an On-Page SEO expert requires a unique blend of technical knowledge, content strategy, and analytical thinking. From mastering metadata and keyword usage to improving site architecture and content quality, each step plays a critical role in a successful SEO strategy. This guide outlines the key steps and skills required to become a successful On-Page SEO specialist.
Understand the Fundamentals of SEO
Before you dive into On-Page SEO, you need a strong understanding of general SEO principles. Learn how search engines like Google crawl, index, and rank content. Study how algorithms evaluate relevance and quality. Key concepts such as keyword intent, domain authority, ranking factors, and indexing methods are essential. You don’t need to be a technical developer, but knowing how search engines interpret HTML and content structure gives you a significant edge.
Invest time in learning about SEO terminology, updates (like Google’s core updates), and the role of white-hat versus black-hat techniques. Free resources like Google’s Search Essentials (formerly Webmaster Guidelines), Moz, and Ahrefs offer reliable educational content. Grasping the basics ensures that as you grow your on-page skills, you’re aligning them with the broader SEO ecosystem, making your strategies more effective and compliant with best practices.
Master Keyword Research and Intent
Keywords are the building blocks of SEO, and understanding how to choose and apply them is critical. Start by learning how to use tools like Google Keyword Planner, Ahrefs, Semrush, or Ubersuggest to find relevant search terms. Beyond volume, focus on search intent—what the user is actually trying to achieve. Are they looking to buy, learn, or find a service? Aligning content with intent leads to better rankings and conversions.
Once you identify keywords, integrate them naturally into page titles, meta descriptions, headers (H1, H2, etc.), and throughout the content. Avoid keyword stuffing and prioritize readability. Understanding the balance between keyword optimization and user experience is what separates a beginner from a professional. Regularly update your keyword strategy based on search trends, seasonal changes, and performance metrics for long-term success.
Learn HTML Basics and On-Page Elements
While you don’t need to be a coder, understanding basic HTML is vital for On-Page SEO. Elements like title tags, meta descriptions, header tags (H1-H6), image alt attributes, and canonical tags play an important role in how search engines interpret your page. Learning how to view and edit these tags, either through a CMS like WordPress or directly in code, empowers you to optimize pages more effectively.
You should also understand how to properly structure a webpage. This includes organizing content in a logical flow, using proper header hierarchy, and ensuring your pages have a clear and concise topic focus. Implementing schema markup (structured data) is another advanced skill that helps enhance how search engines display your content in rich snippets. Mastery of on-page elements ensures both search engines and users have a clear understanding of your content’s value.
Focus on Content Quality and Optimization
At the heart of On-Page SEO is content. Google prioritizes content that is helpful, relevant, and trustworthy. To excel, you need to develop the ability to write or evaluate content with both humans and search engines in mind. Your goal should be to create valuable pages that answer specific questions, solve problems, and guide the user through a clear journey.
Optimized content should include targeted keywords, but it must also be engaging, well-structured, and rich in relevant information. Break up long paragraphs, use bullet points, and integrate multimedia like images or videos when appropriate. Update content regularly to reflect current trends or information. Great content keeps users on the page longer, reduces bounce rates, and boosts SEO performance—a key metric of success for any On-Page SEO specialist.
Improve Site Structure and Internal Linking
A well-structured website helps users and search engines navigate easily. Learn how to create an effective site architecture where important pages are easily reachable within a few clicks from the homepage. Proper use of categories, tags, and breadcrumbs not only improves usability but also helps Google understand the relationships between your pages.
Internal linking is another powerful yet often overlooked SEO tool. Use descriptive anchor text to link to related articles or service pages, guiding both users and bots to high-value content. This improves crawlability and distributes link equity (ranking power) across your site. As an On-Page SEO specialist, designing a user-friendly and search-friendly structure is one of your most impactful contributions to long-term SEO success.
Analyze Performance and Use SEO Tools
Effective On-Page SEO requires ongoing analysis and refinement. Learn to use tools like Google Analytics, Google Search Console, and third-party platforms such as Screaming Frog, Ahrefs, or Semrush to track your progress. These tools provide insights into keyword rankings, page performance, crawl errors, and user behavior.
Use this data to optimize underperforming pages. Are users bouncing quickly? Is a high-ranking page under-delivering on conversions? Data helps you identify where your efforts are working and where they’re not. A good On-Page SEO specialist doesn't just optimize and forget—they continuously iterate, test, and improve. Understanding analytics and using them to guide your strategy is what makes you indispensable in any SEO team.
Stay Updated and Keep Practicing
SEO is constantly evolving. Algorithm updates, changes in search behavior, and new technologies mean that what works today might not work tomorrow. Follow trusted SEO blogs (like Moz, Search Engine Journal, and Google's official blog), join SEO communities, and consider attending webinars or conferences to stay current.
Beyond consuming content, practice is key. Start your own blog, volunteer for small projects, or freelance to build hands-on experience. As you apply your knowledge, you’ll develop problem-solving skills, spot optimization opportunities faster, and gain confidence. The more you practice, the sharper your instincts become. Staying updated and practicing regularly is the only way to keep your skills relevant in the fast-moving world of digital marketing.
Conclusion: Turning Knowledge into Career Growth
Becoming a successful On-Page SEO specialist doesn’t happen overnight—it’s a blend of learning, applying, and constantly refining your skills. From understanding the core principles and mastering content strategy to analyzing performance and staying ahead of trends, each step builds toward SEO mastery.
youtube
The demand for skilled On-Page SEO professionals continues to grow as businesses invest more in digital visibility. By focusing on what you can control—your page content, structure, and optimization—you position yourself as a key player in any SEO strategy. With dedication, curiosity, and real-world application, you can carve out a rewarding and impactful career in SEO.
0 notes