#html tables tutorial
Explore tagged Tumblr posts
Visit Tumblr Blog
Explore Tumblr blogs with no restrictions, modern design and the best experience.
Last Seen Tumblr Blogs


Fun Fact
US Tumblr user growth rate is estimated to slow down to 4.1%.
Text

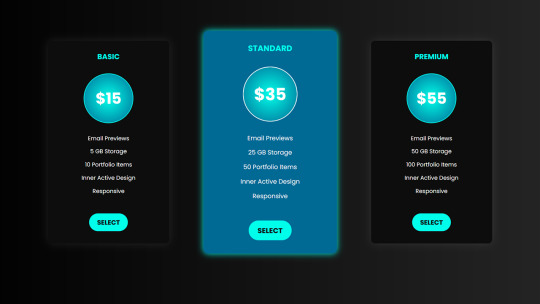
Responsive Price Plan Design
#responsive pricing table#responsive price plan#html css#divinector#learn to code#css#frontenddevelopment#webdesign#html#css3#html css tutorial#css tutorial#responsive web design
3 notes
·
View notes
Text
Responsive Price Plan Design
#responsive price plan#pricing table#html css#codenewbies#html5 css3#css#responsive price table#code#frontenddevelopment#css tutorial#html css tutorial
1 note
·
View note
Text
🃏Simple Pricing Card Table in HTML & CSS
youtube
#pricing#pricing card#youtube#htmlcss#tutorials#webdesign#pricing table#pricing cards#html#css#Youtube
0 notes
Text
Needle Lace Resources
This is a very long post, so I'm including a cut.
Tutorial-like Things, Others' Work
An overview of the stages of needle lace (specifically learning from Alençon, I believe. They link to a documentary type of video on Alençon lace): https://www.taixtile.com/needle-lace-first-steps/. This blog has links to other resources (one link is broken, if I recall correctly).
A very approachable first project, I think. From a lace maker who has done very cool illustrations with lace, Maggie Hensel-Brown: https://youtu.be/OLuRpJ96p4Q?si=gqBWqYxa755gFozr
This channel has videos of the stages of needle lace making. They specifically demonstrate Irish lace, I believe. But the stages are very similar to or the same as the stages in Alençon lace. https://youtu.be/dZVagIFCnLc?si=d8lRnPsmz5iTM0Z_
Pierre Fouché has a video about making dense filling stitches and even doing short rows to makes curves (something I tried but did not yet succeed at): https://youtu.be/DK5cMQND3b8?si=qySmT9yaoTcpsUV9 He also does really cool bobbin lace illustrations by constructing patterns in cell-like units.
An embroiderer tries needle lace in two videos. In one of them she tries different styles from different places: https://youtu.be/eTO7dA4oyl4?si=VInx35kql115bIIo https://www.youtube.com/watch?v=A9Wa6-Qf5xw
Example of a different style of needle lace. Unsure what it is exactly. Some sort of cut work or reticella, idk: https://youtube.com/shorts/7DFogWC3tDI?si=uju74sPFbRj3_wrn
Sampler directions: https://youtu.be/oDKBfjDYBnU?si=shQYvaT4kAZD7BgV
Again, a more geometric style of needle lace. I don’t know the particulars of this style (styles?), since I’ve mostly been looking into styles similar to Alençon because I’m aiming for more illustration-like lace. This channel has multiple videos demoing and explaining that process: https://youtu.be/gJd6mkrsUCQ?si=AfVIiwljHvfismrX https://www.youtube.com/watch?v=R6dk721UwW4
Not so much instructions but video of a very skilled lacemaker working on a project: https://youtu.be/01H2GdEXLrs?si=2suFHSG4Kwa6Yl2m
Another lacemaker's work on their blog. I don’t know if they do as much lace making as they do other needle arts https://www.robesdecoeur.com/blog/needlelace-my-work-so-far
A lacemaker's work... the site is older and kind of tricky to navigate. Like. there's no home button, as far as I can tell. Album of their work: https://www.lacemakerslace.oddquine.co.uk/album/index.html Home page, I think: https://www.lacemakerslace.oddquine.co.uk/
Useful/Interesting Things to Know
Alençon lace -- specific French style from the Alençon region, which has a history of point lace and a current institution dedicated to preserving the skills and producing lace. This is the style that I was looking at examples of to try and learn from.
Search terms like different styles of lace that I’m not qualified to talk about but you can look into and do research on: Battenburg, point de gaze (very very fine work, like gauze)… More to be added as I learn about them.
The terms "needle lace" and "point lace" are both used to refer to lace made with a needle. I'm unclear on if there are subtle distinctions between them or if it's simply a matter of location. But having versions of a search query for both terms should help find more results than just using one.
Encyclopedia of Needlework by Therese De Dillmont is an excellent resource to learn how to do different stitches. It seems these stitches mostly come from Irish lace, according to the book. HTML copy of book available on Project Gutenberg here: https://www.gutenberg.org/files/20776/20776-h/20776-h.htm I recommend using ctrl+f to search for "lace stitch" on the page. The end of each chapter in the HTML version seems to have a link to the Table of Contents that is at the end of the entire document. It has chapters for plenty of other needle arts, so it's a good resource all around.
If you want to find examples of needle lace, look on Wikimedia Commons! Using a variety of search terms will help you find more material for inspiration/observation than otherwise
If you want to design your own needle lace depicting objects, it might be worth looking at stained glass to see how larger shapes are broken up into smaller shapes that still feel complete.
You can use multiple colors! Let yourself use multiple colors, like stained glass!
Thoughts from the Learning Process So Far (some terminology used here, look them up so you know what the actual definitions are, but I’ll define what I mean by them)
Tacking vs Couching... I'm unsure about the actual definitions so I may be using them wrong here. In the videos I’ve seen tacking seems to be making a stitch that runs along the way the cordonnet will run. Couching seems to be just when the thread that secures the cordonnet comes up through the backing and goes down through the backing at the same point. With these definitions… Tacking went faster for me than doing couching, but it feels a lot less secure and precise for the form of lace I’m making. Unless I made the tacking stitches perpendicular to the cordonnet's path, the outline cord moved too much due to tension. If it's perpendicular and not a very short stitch, it might get in the way of your filling stitches or binding off stitches. Which might be fine, since you pull them out anyways. But it would also mean more holes in the backing, and at some point the holes are too close together and might tear the backing and pattern. I don't like that. Couching—much, MUCH more tedious for me because I’m not practiced at making the needle come up in exactly the right spot. but it feels more secure to me. The outline seems to be less affected by tension as you work. And I took some shortcuts for couching that helped. I don’t couch the doubled cord, instead I whip stitch back over the already-secured cord. I might make a post to demonstrate what I mean. It kind of messes with the shape/placement of my cordonnet, but for the sake of my impatience I’m willing to sacrifice the precise shape.
Backing material... To use fabric in backing like the instructions usually say, or not? Idk. For me, it’s hard to find the right hole for the couching stitches when I can't see my pattern from the back. It took a lot of trial and error until I got a feel for how to predict where my needle would come up. I don't like the way the poke-and-check method of stitching the cordonnet down tends to rip the pattern up (at least, with my easy-to-access materials. Probably better with better materials and more practice. Using my thumb to find approximately the right spot helped, but not enough). So I just used a sandwich of tape/paper/tape as my backing. If you're willing to fuss around with fabric in your backing, it might make it easier to remove the couching threads after you're done, and when I tried. The directions I've seen usually say to use a backing of doubled-up fabric, clay paper (I'm unsure what this is. might be a thicker paper than cardstock, or it might be paper made to contain clay particles. Probably more like the first option), and contact paper. My last attempt at making a backing used notebook paper (or other type of paper) with packaging tape on both sides to provide a smooth surface and structure. I think it worked fairly well, and I didn't have to figure out where to buy contact paper (or figure out exactly what contact paper was).
#lace making#fiber arts#needle lace#instructions#tutorials#information#resources#my post#i will make this cleaner/easier to read later
125 notes
·
View notes
Text
Sugary Scribbles | #8
Saturday 6th January 2024
IT'S BASICALLY WORKING (on larger screens)! My never-ending war on website responsiveness continues! I have a large screen and I stupidly only took into account of MY screen size. What I did do though is created a message for phone-table sizes because it just wouldn't make sense it working on really small devices - in my opinion~! But for now I will put this on hold because I am excited about my other project idea I came up with yesterday oops~!
This is my first project of the year and it's super adorable in my opinion! It paints, it erases, it deletes and it saves your artwork! Ticks all the boxes I made at the beginning of the project! Turned a simple 'Make a HTML painting webpage' into something more cuter and cool! Job well done! 😩🙌🏾💗
You can try it out (if you have a larger screen size), all that happens is the painting will be off the mouse direction a bit, sorry!
link to the Sugary-Scribbles web app! 🍡

Lastly, here is a cool drawing I made as I was testing the site~! I'm a better artist than this I swear, just not good using a mouse...

List of resources I used during the project
Figma - to plan the webpage
Canva: to make the header
Photopea: for further photo editing
RedKetchup: to colour pick quickly
CSS Animations: to add the zoom-in-n-out animation
MDN Canvas: to know what the element does properly
YouTube Tutorial: to get inspiration and extra help
Flaticon: for the icons and cursors
Html2canvas API: to turn the drawing into an image (tutorial)
That's all, have a nice day/night and happy coding! 🖤
#xc: project logs#sugary scribbles project#codeblr#coding#programming#progblr#studying#studyblr#dev logs#comp sci#computer science#programmer#devlogs#html css#javascript#tech#cute#adorable
104 notes
·
View notes
Text
There is something very weird about the relatively short nature of the culture surrounding website creation. As in, like, internet-user-created websites have been around for like 30-31 years at this point, and the culture surrounding them has changed so very much.
People used to create websites left and right for their own needs, their little shops and their little blogs about what they liked. Some websites of course housing horrible content since their dawn, and some being as mundane but as unique as the person behind its code. I have seen older sites, archived, that promoted creating your own site, and that was interesting to see. That culture of creating your own website and of sharing that knowledge on a still-growing facet of communication.
And then at some point social media appeared, and that was interesting, because now everyone was able to quickly present themselves without the need of a website, but that didn't mean people stopped making websites. I mean, hell, Geocities died in 2009, so a lot of people were creating their own websites for free before that time, no need to pay for domain names or hosting. And even without Geocities, there were other website hosting things that yes, while not as customizable, were still a resource for people to work with them. There's still a website floating around that I made when I was a kid using one of these services. Cool stuff.
All this to say that I do feel a weird sense of dread looking back and cross-referencing with the present and seeing things like "website creator powered by AI" and shit like that, because just ?? How did it go plummeting so quickly. There is a weird feeling of having lost a developing culture to corporations making quick access to posting things that, as corporations' nature dictates, are used to sell data or to train models or what have you. Similarly, we get pretty same-y looking pages because of the need to be slick or whatever with designs that just leaves everything looking the same. ALSO, the loss of spaces for kids, or just the gradual lowering of them in favor of cocomelons and whatever else the devil's machine has spawned is like watching an apple decay before having ripened. I do feel like there is this phenomenon in which how to make a site has been lost in the notion of "making a website falls into the realm of evil and scary coding and I could never be a programmer, plus who would look at it, plus we have tools to make them," etc etc etc. Here is a little secret: website creation is not exactly hard to pick up at all. You might say it's very similar to using a rich text editor like Word or a notes app or whatever you use. Similarly, have you used markdown for things like messages or D iscord messages, you know, with the asterisks for bold text and the likes? Markdown is based on html's structures. And truly, you do not have to even learn to code using Javascript if you don't want to, you can just go full html + css and structure your things as you go, adding your little images and your updates. Because guess what !! Html and css are not programming languages, they're a markup language and a stylesheet language respectively, which is a fancy way to say "you make the structure of your page with the first one and make it pretty with the second one". This includes cool stuff like tables, lists, grids, colors, transitions, etc. All of that without any programming. (That being said, if you are interested in programming, Javascript isn't too bad to pick up. The language itself *is* kind of evil, but using it in conjunction with html is not too difficult). I do have to say though, I am glad that there is a push to making your own websites and things, especially with Neocities sprawling a huge community of avid website creators, as well as the huge amount of tutorials and stuff making the push forward with making sites and online spaces and experiences more widely available. Hopefully this becomes a trend that keeps going up, considering the state of seemingly every single social media that has existed since the 2000s- 2010s.
#web#website#old web#dog discourse#ramblings#internet#computer#tech#but for real what the fuck#it's very bizarre to see this just pop in and out
7 notes
·
View notes
Note
Hellu))
I looked at your neocities thingy, and I just wondered how you did that with the text boxes and the background and stuff. If you are willing to share, if you aren't, then sorry for wasting ur time)
I'm very new to coding (I suck) and "Penelope the cat" doesn't really help much T-T
Hi! Don't worry about asking, I'm always happy to help and give info on anything I know to the best I can! (Though to be completely honest, I too don't know much of HTML so... lol)
I used a <table> tag and the other tags that come with it. I also used boarder, boarder style, and background color, which would be in the CSS part of the code. Makes the boarder that's around it, The style that boarder will be in, and the background color of that table.Here's a website that explains it better then I can and also helps me out A LOT.
I heavily recommend this site, it's a life saver and will explain everything.
Also here is some CSS to help with the boarder and background!
Some other extra tips I'll throw in here:
I recommend using "Visual Studios". It's a free program and you can get a plug-in that allows you to see how your website looks without having to edit, go to the website, refresh, over and over. It also helps with coding as well, overall I'm loving it!
Now, by no means am I saying you should copy somebody else code and steal it. That's wrong. However, if you see something you like and want to know how it works, inspect the page and look at the code! I've learned a lot from doing this and it's help me figure out how things work too. Once again, do not straight up steal lines of somebody else's code. By that point you're not coding, you're copying, pasting, and stealing.
I also think you should learn the basics of HTML, and if you really want to make things then I say take the time to learn HTML. Personally for me, I love the look of broken ugly websites. Just some basic CSS will do for me! But if you're not like me, then yes, I think you should learn more then just the basics.
I'm sure there's some HTML nerds that can explain this way better then what I can so like I always say when it comes to learning stuff, look it up! The internet has unlimited free information, somebody 12 years ago on reddit probably asked the same question you did and the answer will be in the comments of that post. Always search for things!
9 notes
·
View notes
Note
Eu sofro procurando aprender BBCode. Você pode me dizer como conseguiu aprender todos os códigos secretos? Eu não encontro em lugar nenhum.
Olá! BBCode usa os mesmos códigos CSS que os templates normais para personalizar, mas em vez das tags normais de HTML, usa tabelas de BBCode ( [table] para a tabela, [tr] para as linhas, e [td] para as colunas). Então, a estrutura é toda feita com tabelas, por isso é preciso saber como funcionam também as tabelas (se precisar de aprender aconselho a ver um tutorial, tipo esse: https://www.homehost.com.br/blog/criar-sites/tabela-html/).
Para fazer os códigos bonitos, esses BBCodes podem ser personalizados com CSS, por exemplo, se quiser criar uma tabela com largura de 500px ficaria [table style="width: 500px;"]
Espero ter ajudado!
3 notes
·
View notes
Text
Prompt Examples for Learning Web Development

Coding is both an art and a science. It’s about creatively solving problems, bringing ideas to life, and constantly learning and adapting.
Because technology advances at such a rapid pace, it is essential to be fluent in a variety of languages, tools, and domains.
Sometimes it’s difficult to pick up the right resources from the ocean of tutorials, demos, and resources.
And on top of that, sometimes we have to learn and apply so fast due to tight deadlines of the projects. In this case, we need a friend who can help us learn and work faster and better. And thanks to AI by this, our learning becomes faster and more fun.
Today, we’ll look at how learning prompts that AI drives can change the way you learn web development.
How you can craft prompt engineering for web development, the difference between a generic prompt and a bit tweaked prompt can eventually change your desired results and make your learning journey more smooth and more enjoyable.
You can also use this knowledge to learn other fields more quickly and interactively.
Table of Contents
Learning Prompts
HTML Prompt Examples
CSS Prompt Examples
Debugging Prompts
Testing Prompts
Crafting Better Prompts
Further Reading and Resources
🎯Learning Prompts
Prompts are at the heart of AI-powered learning. Prompts are questions or commands that guide AI models like GPT-3 or GPT-4 to generate the desired responses. They act as a springboard for the AI to dive into the knowledge it’s been trained on and come up with relevant outputs.
You can use AI’s capabilities in a variety of scenarios in web development, including debugging, code generation, and even learning new web development concepts.
Now, we’ll go through some basic prompts and their outputs, as well as a little tweaking of the prompt commands to see how the output is becoming more result oriented, giving you a sense of how you may build your prompt commands for better results.
Prompt Commands for Learning HTML Basics
Learning the basics of web development involves understanding the structure and syntax of HTML, CSS, and JavaScript. Here are some prompt examples you can use:
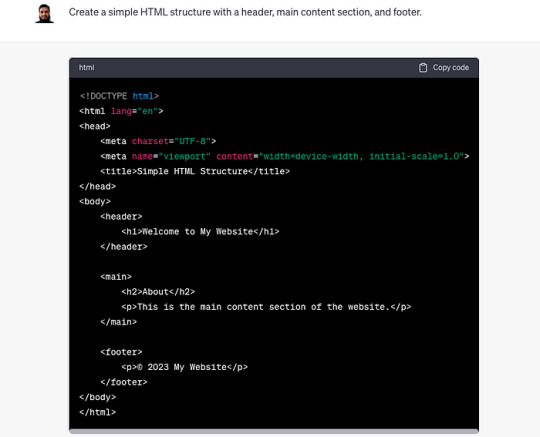
Create a simple HTML structure with a header, main content section, and footer.
This prompt returns a simple HTML skeleton. But if you want a more detailed structure, you could modify the prompt to include specific HTML elements. For example:
Create a simple HTML structure with a header containing a navigation bar, a main content section with a paragraph and an image, and a footer with copyright information.
Curious to know more? Visit our blog for the complete post and dive deeper into Learning Web Development with AI Prompts.
3 notes
·
View notes
Text
This has been my favorite website to use basic html and tables and css for my fics on ao3!
I don't know who needs to hear this
But if you go into the comments section on AO3
And type

Then replace image url (keep the " marks) with the url of a picture
You can leave fan art in the comments of a fic
36K notes
·
View notes
Text

Animated Responsive Pricing Table Design
#responsive pricing table#responsive price plan design#responsive web design#html css#divinector#css#frontenddevelopment#webdesign#html#css3#responsive web development#css animation tutorial#css animation examples#html css animation#pure css animation
3 notes
·
View notes
Text
Complete PHP Tutorial: Learn PHP from Scratch in 7 Days
Are you looking to learn backend web development and build dynamic websites with real functionality? You’re in the right place. Welcome to the Complete PHP Tutorial: Learn PHP from Scratch in 7 Days — a practical, beginner-friendly guide designed to help you master the fundamentals of PHP in just one week.
PHP, or Hypertext Preprocessor, is one of the most widely used server-side scripting languages on the web. It powers everything from small blogs to large-scale websites like Facebook and WordPress. Learning PHP opens up the door to back-end development, content management systems, and full-stack programming. Whether you're a complete beginner or have some experience with HTML/CSS, this tutorial is structured to help you learn PHP step by step with real-world examples.
Why Learn PHP?
Before diving into the tutorial, let’s understand why PHP is still relevant and worth learning in 2025:
Beginner-friendly: Easy syntax and wide support.
Open-source: Free to use with strong community support.
Cross-platform: Runs on Windows, macOS, Linux, and integrates with most servers.
Database integration: Works seamlessly with MySQL and other databases.
In-demand: Still heavily used in CMS platforms like WordPress, Joomla, and Drupal.
If you want to build contact forms, login systems, e-commerce platforms, or data-driven applications, PHP is a great place to start.
Day-by-Day Breakdown: Learn PHP from Scratch in 7 Days
Day 1: Introduction to PHP & Setup
Start by setting up your environment:
Install XAMPP or MAMP to create a local server.
Create your first .php file.
Learn how to embed PHP inside HTML.
Example:
<?php echo "Hello, PHP!"; ?>
What you’ll learn:
How PHP works on the server
Running PHP in your browser
Basic syntax and echo statement
Day 2: Variables, Data Types & Constants
Dive into PHP variables and data types:
$name = "John"; $age = 25; $is_student = true;
Key concepts:
Variable declaration and naming
Data types: String, Integer, Float, Boolean, Array
Constants and predefined variables ($_SERVER, $_GET, $_POST)
Day 3: Operators, Conditions & Control Flow
Learn how to make decisions in PHP:
if ($age > 18) { echo "You are an adult."; } else { echo "You are underage."; }
Topics covered:
Arithmetic, comparison, and logical operators
If-else, switch-case
Nesting conditions and best practices
Day 4: Loops and Arrays
Understand loops to perform repetitive tasks:
$fruits = ["Apple", "Banana", "Cherry"]; foreach ($fruits as $fruit) { echo $fruit. "<br>"; }
Learn about:
for, while, do...while, and foreach loops
Arrays: indexed, associative, and multidimensional
Array functions (count(), array_push(), etc.)
Day 5: Functions & Form Handling
Start writing reusable code and learn how to process user input from forms:
function greet($name) { return "Hello, $name!"; }
Skills you gain:
Defining and calling functions
Passing parameters and returning values
Handling HTML form data with $_POST and $_GET
Form validation and basic security tips
Day 6: Working with Files & Sessions
Build applications that remember users and work with files:
session_start(); $_SESSION["username"] = "admin";
Topics included:
File handling (fopen, fwrite, fread, etc.)
Reading and writing text files
Sessions and cookies
Login system basics using session variables
Day 7: PHP & MySQL – Database Connectivity
On the final day, you’ll connect PHP to a database and build a mini CRUD app:
$conn = new mysqli("localhost", "root", "", "mydatabase");
Learn how to:
Connect PHP to a MySQL database
Create and execute SQL queries
Insert, read, update, and delete (CRUD operations)
Display database data in HTML tables
Bonus Tips for Mastering PHP
Practice by building mini-projects (login form, guest book, blog)
Read official documentation at php.net
Use tools like phpMyAdmin to manage databases visually
Try MVC frameworks like Laravel or CodeIgniter once you're confident with core PHP
What You’ll Be Able to Build After This PHP Tutorial
After following this 7-day PHP tutorial, you’ll be able to:
Create dynamic web pages
Handle form submissions
Work with databases
Manage sessions and users
Understand the logic behind content management systems (CMS)
This gives you the foundation to become a full-stack developer, or even specialize in backend development using PHP and MySQL.
Final Thoughts
Learning PHP doesn’t have to be difficult or time-consuming. With the Complete PHP Tutorial: Learn PHP from Scratch in 7 Days, you’re taking a focused, structured path toward web development success. You’ll learn all the core concepts through clear explanations and hands-on examples that prepare you for real-world projects.
Whether you’re a student, freelancer, or aspiring developer, PHP remains a powerful and valuable skill to add to your web development toolkit.
So open up your code editor, start typing your first <?php ... ?> block, and begin your journey to building dynamic, powerful web applications — one day at a time.

0 notes
Text
Want to learn PHP programming? You can come to the biggest resource page on the Internet for PHP learning. PHP has become one of the most widely used programming languages which can easily be used with different platforms, such as, Linux, Windows, and Unix. Regardless of whether you are working on a big official project or are into internet marketing, PHP is used everywhere. This language is easy to understand and work with, dynamic in nature and can merge with different kinds of RDMS. Experienced PHP programmers may want to also check out the most common libraries in PHP that can make you supercharged PHP developer. If you wish to learn the PHP programming language, you can do so with the help of the following web resources: Best Free Beginners Tutorials On PHP First thing first, these are the best beginners tutorials for learning PHP. PHP 5 Tutorial PHP Tutorial PHP: A simple tutorial - Manual Introduction to PHP | Codecademy PHP Tutorial for Beginners | WIRED PHP 101: PHP For the Absolute Beginner - Zend Developer Zone PHP Tutorials: Beginners PHP Tutorials PHP Tutorial - Introduction PHP Tutorial - Part 1 PHP Tutorials for beginners - w3resource Learn PHP - Free Interactive PHP Tutorial Step-by-Step PHP Tutorials for Beginners - Creating your PHP program FROM SCRATCH: Basic Authentication, Membership and CRUD functionalities - CodeProject Object Oriented PHP for Beginners – KillerPHP.com PHP Tutorial for the Absolute Beginner Best Free Websites About PHP Tutorials One of the best ways to get started with PHP programming language us through an online website which you can access for free. There are free websites for both beginners as well as advanced users and explain all the concepts in great details. The complete PHP 5 tutorial - PHP5 tutorial PHP 5 Tutorial - An Ultimate Guide for Beginners PHP Tutorials : Learn in 7 Days PHP Tutorial | SoloLearn: Learn to code for FREE! PHP Tutorial - javatpoint PHP Tutorial Tutorials | PHP | Google Cloud Platform PHP Tutorials - Tutorialized PHP Tutorial - Table of contentsentutorial - HTML.net PHP Tutorial - PHP programming Reference Free PHP tutorials. Learn PHP, JavaScript, MySQL and how to use phpDesigner 8 MySQL PHP tutorial - MySQL programming with PHP Getting Started with PHP Regular Expressions - noupe Simple Banner Rotator With PHP, jQuery & MySQL | Tutorialzine Build a CMS in an Afternoon with PHP and MySQL PHP and HTML5 Learning Trail - NetBeans IDE Tutorials, Guides and Articles PHP | Tutorials | Webucator PHP Devs Center | Jelastic Dev Docs PHP tutorials, scripts and features from HTMLGoodiesPHP tutorials, scripts and features from HTMLGoodiesPHP tutorials, scripts and features from HTMLGoodiesPHP tutorials, scripts and features from HTMLGoodies PHP Tutorial – Learn PHP for beginners and advanced level | Tutorials Collection php pdf tutorial Convert HTML To PDF in PHP The Easy Way PHP MySQL Tutorial List files and directories in PHP Best Free PHP Video Tutorials The free video tutorials are the best way to get abreast with the language if you are more of a visual learner. You will get to learn from PHP experts and professionals, who will take you through a visual presentation and working of the language. PHP Programming Tutorials For Beginners - YouTube PHP Tutorials - Free Computer-Science Video Lectures PHP Tutorials Playlist - YouTube PHP - YouTube OOP PHP - YouTube PHP Tutorial - YouTube PHP Video Tutorial - YouTube PHP Security - YouTube PHP Tutorial for Beginners (For Absolute Beginners) - YouTube PHP Tutorials - YouTube PHP Tutorials - YouTube PHP Complete Series - YouTube PHP GD Image Processing Video Textbook Programming Tutorials - YouTube Ecommerce Website Tutorial PHP MySQL Tutorial PayPal IPN - YouTube How to Build Custom CMS Website Software Using PHP and MySQL - YouTube PHP Beginner Complete Tutorials - YouTube Bucky's Beginner PHP Programming Tutorial Series - YouTube
PHP MYSQL tutorials In Hindi for beginners (Core PHP) - YouTube PHP Tutorial for Beginners - 01 - Introduction - YouTube PHP Tutorial in Filipino - YouTube PHP Fundamentals Tutorial (Bangla) - YouTube Tutorial PHP MySQL Web Development - YouTube Curso de PHP - YouTube PHP & MySQL tutorials in Urdu/Hindi - YouTube PHP Tutorial In Tamil - YouTube Advanced OOP PHP tutorial - YouTube Core PHP complete/full tutorial series for beginners - YouTube PHP OOP Tutorials - YouTube WebDevlopment|PHP by Manideep - YouTube Best Free PHP ebooks and PDF Tutorials There are many free ebooks which will help you learn the language in the most appropriate manner and can be easily downloaded from the internet. Some of the books require you to have some programming background but most of them explain everything from scratch. PHP Tutorial PDF - Phptpoint.com ePub ebook PHP Reference: Beginner to Intermediate PHP5 PHP-Tutorial(w3schools).pdf Php Http Cookie PDF format tutorial for PHP MySQL PHP Api documentation PHP Tutorial From beginner to master Learn Object Oriented Programming (OOP) in PHP Programming PHP by Oreilly PHP Beginners Guide PHP Reference: Beginner to Intermediate PHP PHP Introduction to Server-Side Programming Creating dynamic Web sites with PHP and MySQL : IBM PHP 5 Power Programming PHP Manual CakePHP Cookbook Documentation Linux, Apache, MySQL, Perl/PHP/Python (LAMP) How To Build a LAMP Server Best PHP Blogs From Expert PHP Programmers and More PHP has a vibrant community of highly skilled programmers. This is the reason you will find many excellent blogs on PHP and related technology. PHP: Hypertext Preprocessor Tutorials | PHP | HTML | CSS | JavaScript | PHPJabbers PHP Tutorials for Beginners and Programmers | Codementor nikic's Blog blog.phpdev David Walsh Blog - JavaScript Consultant Roshan Bhattarai's Blog - A blog about PHP, Ajax, JavaScript, CSS, Web 2.0 and Web Development Chris Shiflett Paul M. Jones | There are no solutions, only tradeoffs. PHP – There and Back Again Stuart on PHP - Web Development Blog Programming, Books, Tutorials | FromDev: Search results for php PHP Tutorials Blog on Sitepoint Schlitt Blog About Tutorials on PHP Best Free PHP Forums and Massage Boards to Ask Questions The PHP web forums allow you to gain easy access to free and open source communities. These will help you become a part of the online virtual community wherein you can interact, share items and discuss. phpBB - Free and Open Source Forum Software Newest 'php' Questions - Stack Overflow PHPBuilder.com PHP Freaks PHP forum, your PHP coding community - Index page PHP PHP- Webdeveloper.com PHP - The SitePoint Forums Best Free Cheat Sheets for PHP Quick Reference These PHP cheat sheets enable you to take a quick look at the various important concepts of the language, without undertaking any in-depth study. PHP is used in almost all the popular platforms like Facebook, WordPress, Wikipedia, Joomla and Drupal. So, even if you are not looking forward to develop a similar platform, you will still require to learn the language if you wish to customize or integrate with any of the applications. BlueShoes: PHP Cheat Sheet PHP 5.4 - Dzone Refcardz PHP Refcard Available - Download Now - DZone PHP Cheat Sheet | OverAPI.com PHP Cheatsheets PHP Cheat Sheet by DaveChild PHP Cheatsheet By Expression Engine PHP Cheatsheet by Digilife PHP Cheatsheet by DreaminCode PHP Ref Card PHP Cheatsheet
0 notes
Text
Html Programming Course
Learn the building blocks of the web with our HTML Programming Course at www.mwcedu.com. Start from scratch and gain confidence in writing clean, structured HTML code. Create webpages using headings, lists, images, links, tables, and forms. Understand the role of semantic HTML in accessibility and modern web standards. Interactive tutorials and mini-projects make learning engaging and practical. Track your progress with quizzes and earn a certificate you can showcase. Study anytime, anywhere with full lifetime access to all course content. Ideal for beginners ready to step into the world of web development.

#html coding basics#html programming course#html courses online#html coding course#learn html online#html course for beginners
0 notes
Text
Smart Documentation
I’ve made the decision to tightly integrate documentation into SavageGardens. I hesitated to talk about this aspect of SavageGardens because programmers don’t think of documentation as a language. Still, the goal for SavageGardens is to extend our ability to manage massively complex projects. Documentation is important for large projects, therefore I am including it.

It is a somewhat controversial decision to include documentation as part of the source code. It makes SavageGardens a rather complex application in itself. I am actually asking to integrate a wiki data and discussion forum data inside the source code. It changes the face of SavageGardens but, so be it. I see it as the future. A future which I first saw in StarTrek the Next Generation. That TV Show has several scenes where Geordi La Forge documents his work and accesses documentation. That is the goal. That is the dream.

In SavageGardens, Sub-Layer 0 or the ground level is designated for this purpose. Everything on this layer is strictly for human consumption. Human-to-Human communication. None of its constructs will translate to actual code that the machine will see. Never the less documentation will be tightly integrated into the source code, because part of my design goals is to facilitate in code comprehension and code navigation.
How is documentation related to code comprehension is pretty straight forward. Most of use make use of tutorials before we start using a new library or platform. Why not allow the designer of those libraries to include a tutorial as part of his source code. Let the senior developer include a couple of diagrams as to how the data structures or APIs are structured.
Using documentation for code navigation is new and revolutionary. Most of us navigate code by opening a file manager, going thru the directories, opening and closing source files trying to find a lead or a clue that will help us. Some of us are bit more clever and use grep to do the searching. I find that approach archaic. The future I want to live in is one where you open the source code and you find diagrams that visually outline how the source code is organized. Then you click on parts of these diagrams to navigate different aspects of the source code until you find what you want. Hollywood style.
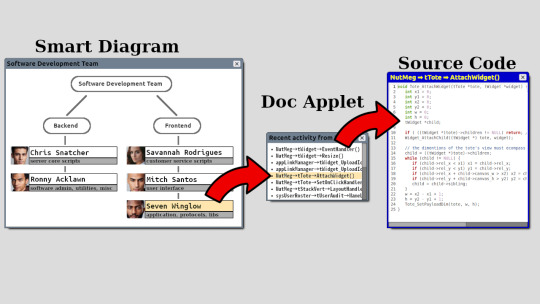
In the diagram above, its a case use for a team manager. Lets say you are a team manager and you want to audit someone's work. You pull up the smart-diagram of your team. You click on the person you want to audit. It runs a script that pulls up everything he worked on recently. Then you click on what you want to audit. That is code navigation like few of us have seen before.
The following are a set of constructs I am considering. I am borrowing some ideas from the web. I am not importing technologies from the web thou. I see it done all around me and I don’t like it. Apps these days are pretty much integrated web-browsers.
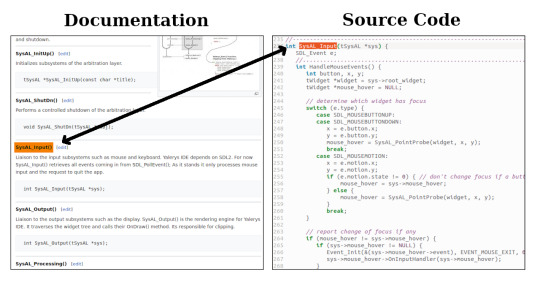
1) Hyper text: The idea to click on text and it brings up source code. Or vice versa. Clicking on a function call and it brings up related documentation. Rather then HTML, I will probably adopt a simpler format like markdown.
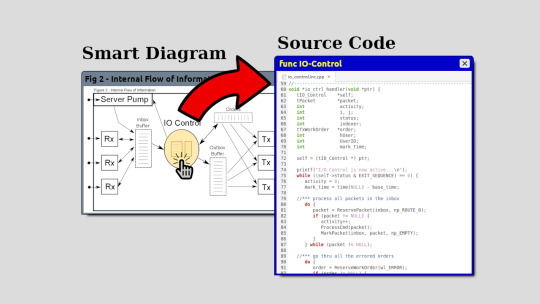
2) Smart Diagrams: This idea is the same as image maps in HTML. You have a picture or diagram and certain areas are clickable. This is how you would navigate source code.
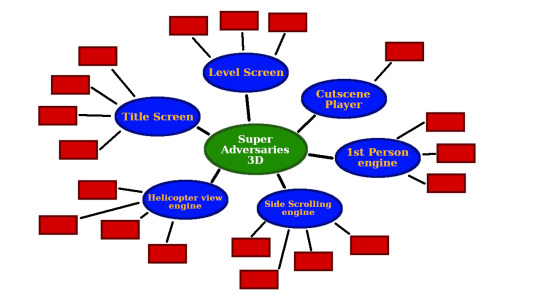
3) Mind-Maps: This is to allow developers to brain storm and keep track of themselves and they proceed with their project. Also used to navigate code.
4) Document side scripting: serves a purpose similar to PHP, it allows for dynamic documentation. Documentation that updates itself as changes are made.
NOTE: constructs from lower layers will cooperate in creating self updating documentation. For example every time you create a variable or function, an entry is made in an internal database that keeps track of them. Depending on the changes certain documents will be automatically created and updated. Quick examples of this is a table of contents, an index table and a quick reference guide.
0 notes
Text
How to Build an Instagram Clone App and Website using PHP and MySQL

This comprehensive blog post serves as a step-by-step guide to building an Instagram-style social networking platform using PHP and MySQL. It emphasizes not just replicating Instagram’s core functionality but also understanding and customizing it for your unique project or brand vision. Aimed at developers eager to expand their full-stack skills, the tutorial walks through creating a complete backend system while allowing room for front-end creativity.
An Instagram clone, as defined in the blog, replicates basic features such as user registration, photo uploads, comments, likes, and feeds. While it doesn’t match the full scale of the original app, building a clone provides a strong foundation in web development and architecture. The main advantage lies in saving time and resources - developers don’t have to code core functionalities from scratch, which makes for a faster launch and more room for custom features.
The blog outlines 10 essential steps to building the app:
Development Environment – Set up using tools like XAMPP or WAMP.
Database Creation – Design scalable tables for users, posts, likes, and comments.
User Authentication – Build secure login and registration forms with password hashing.
User Profile System – Enable photo uploads, bio edits, and privacy controls.
Post & Feed System – Implement photo uploads and display them in a dynamic feed.
Interaction Features – Add comment and like capabilities.
Front-End Design – Use HTML, CSS, and JavaScript to build a responsive UI.
Search and Tagging – Add hashtag and user search functionality.
Testing & Debugging – Use PHP tools to fix bugs before launch.
Deployment – Host the app on a scalable live server.
For those wanting faster results, the blog also recommends using ready-made Instagram clone scripts, particularly highlighting SocialEngine and phpFox. SocialEngine stands out as a scalable, professional solution with rich customization options, mobile plugins, SEO optimization, and robust API support.
Key benefits of using SocialEngine include:
Insta Clone Theme for a sleek UI
Cross-platform mobile support with Android and iOS plugins
SEO-friendly architecture for better visibility
Developer-friendly modular framework
Built-in analytics to monitor engagement
Third-party API integrations for added functionality
In conclusion, whether building from scratch or using a script like SocialEngine, creating an Instagram clone is an excellent real-world project for mastering social app development. It equips developers with critical skills in both back-end infrastructure and front-end design. The guide encourages experimentation and growth, and it also recommends exploring additional tutorials like building LinkedIn or Twitter clones using similar technology stacks.
For more details, kindly visit:- How to Build an Instagram Clone App and Website using PHP and MySQL
Mail us at [email protected] to schedule a quote and become the owner of your Insta Clone app and website.
0 notes