#http servlet request and response example
Explore tagged Tumblr posts
Visit Tumblr Blog
Explore Tumblr blogs with no restrictions, modern design and the best experience.
Last Seen Tumblr Blogs


Fun Fact
Total funding amounts to $125.3M.
Text
Fixing Tomcat Connection Timeout Errors: Practical Solutions
Tomcat Connection Timeout Tomcat is an open-source web server and servlet container developed by the Apache Software Foundation. It is widely used to serve Java-based web applications. However, sometimes users may encounter a “Tomcat connection timeout” error when trying to access an application running on Tomcat. In this article, we will discuss what causes this error and how to fix it.
Understanding Connection Timeout Before diving into the solution, let’s first understand what a connection timeout means. When a client, such as a web browser, sends a request to a server, it expects to receive a response within a certain period. This period is known as the connection timeout. If the server fails to respond within this time frame, a connection timeout error occurs. This concept is crucial in the context of pharma gross to net calculations, where timely data retrieval and processing are essential for accurate financial analysis and decision-making.
Common Causes of Tomcat Connection Timeout Error There can be several reasons why the Tomcat server fails to respond within the connection timeout period. Some of the common causes include:
1. Heavy load on the server: If the server is under heavy load, it may take longer to process incoming requests, resulting in connection timeouts.
2. Long-running requests: If there are requests that take a significant amount of time to process, it may lead to connection timeouts for subsequent requests.
3. Misconfiguration of connection timeout settings: The default connection timeout settings in Tomcat might not be suitable for the specific use case, leading to timeout errors.
4. Network issues: Network problems, such as high latency or packet loss, can cause delays in the communication between the client and server, resulting in connection timeouts.
Solutions to Tomcat Connection Timeout Error Here are some solutions to resolve the Tomcat connection timeout error:
1. Adjust Connection Timeout Settings:
– Open the Tomcat server’s configuration file (server.xml).
– Locate the connector element that corresponds to the protocol (e.g., HTTP or HTTPS) you are using.
– Add the `connectionTimeout` attribute with an appropriate value in milliseconds. For example, `connectionTimeout=”30000″` sets the timeout to 30 seconds.
– Save the changes and restart the Tomcat server.
Example:
2. Increase Thread Pool Size:
– Open the Tomcat server’s configuration file (server.xml).
– Locate the connector element that corresponds to the protocol you are using.
– Increase the `maxThreads` attribute value to allow more simultaneous connections to be processed.
– Save the changes and restart the Tomcat server.
Example:
3. Optimize Long-Running Requests:
– Identify requests that take a long time to process.
– Evaluate if any optimizations can be done to reduce the processing time.
– If possible, offload time-consuming tasks to background threads or utilize asynchronous processing mechanisms.
4. Monitor Server Load and Network Performance:
– Monitor the server’s resource utilization, such as CPU, memory, and disk I/O.
– Identify any bottlenecks or performance issues that could be causing connection timeouts.
– Monitor network performance using tools like ping and traceroute to identify any network problems.
5. Implement Load Balancing:
– If the server is under heavy load, consider implementing a load balancing solution.
– Load balancing distributes incoming requests across multiple server instances, reducing the load on each server.
Conclusion Tomcat connection timeout errors can occur due to various reasons, including heavy server load, long-running requests, misconfiguration, or network issues. By adjusting the connection timeout settings, increasing the thread pool size, optimizing long-running requests, monitoring server load and network performance, or implementing load balancing, you can effectively resolve these errors and ensure smooth operation of your Tomcat-based applications. It is important to choose the appropriate solution based on the specific requirements and characteristics of your application.
0 notes
Text
What is servlet ? Explain GET and POST methods of servlet.
What is servlet ? Explain GET and POST methods of servlet.
A servlet is a class of Java programming language used to extend the capabilities of servers that host applications accessed via a request-response programming model.
���र्वलेट जावा प्रोग्रामिंग भाषा का एक वर्ग है जिसे सर्वर की क्षमताओं का विस्तार करने के लिए उपयोग किया जाता है, जो कि अनुरोध-प्रतिक्रिया प्रोग्रामिंग मॉडल के माध्यम से होस्ट अनुप्रयोगों को होस्ट करता है।
Although servlets can respond…
View On WordPress
#difference between get and post in java#difference between get and post method in servlet with example#doget method in servlet example#dopost method in servlet#get and post method in servlet with example#how to send form data to servlet#http servlet request and response example#java servlet form example#What is servlet ? Explain GET and POST methods of servlet.
0 notes
Text
Can We Make Website Using Java?
Can We Make Website Using Java? If you are interested in creating a dynamic website, you can try Java. This language allows you to embed HTML code into the code, making it easier to create dynamic pages. However, you will need a Servlet Container to run Java classes. The Apache Software Foundation offers a free version called Tomcat. Servlets Servlets are a type of web application that uses the Java language to process data. These applications are very secure and provide a robust way to display and post data. However, before you can use Servlets on your website, you need to understand the underlying concepts. A good way to learn Servlets is to start with a pet project. These projects will help you develop your skills in the area. Servlets are implemented using the Servlet interface. The most common type of servlet is HttpServlet, which is a subclass of GenericServlet. These servlets implement the Servlet interface and are typically managed by methods such as init(), service(), and destroy(). Once a servlet is loaded into the Servlet container, the container invokes the init() method, which runs only once. This method is used to initialize any costly resources and read persistent configuration data. JSP pages Java is a language used for creating web applications and serving them. However, this technology is not appropriate for creating a website itself. Some examples of websites made using Java include JSP (Java Server Pages) which is quickly becoming outdated. Instead, most web developers opt for a JavaScript framework to build the front-end, and Java on the back-end. This approach is known as REST. Java is a cross-platform programming language and is object-oriented. This means that it runs on almost any operating system. This is one of the reasons why java developers recommend building a website using it. Moreover, java codes are portable and can run on any device. Therefore, you don't need to spend time or money developing for different platforms or devices. Servlet container A Servlet container is a component of a web server that provides a runtime environment for JavaEE applications. It also provides input reading capability. It is a component of Tomcat and JBoss web servers. Essentially, a servlet is a Java class that is registered with the web container. The container invokes the init() method to create the servlet object, and then directs incoming requests to its service() method. The servlet then destructs itself when it has completed processing. Servlets are server-side components that are shared by multiple requests. Servlet containers are multi-threaded, meaning that multiple threads can use the same instance. If each request made to a single Servlet is made on the same thread, it would be incredibly expensive to create new instances of the servlet container. Thus, if a servlet container is used to make a website using java, it will reduce the need for creating many instances of the Servlet class. Servlet code If you want to make a website using java, you can use Servlet code for making it. It will automatically compile your JSP file into a Servlet class. You can see how this works below: The browser sends a request to the server and the servlet responds with a page that contains the HTML form. A servlet uses the HTTP protocol to communicate with the browser. A client sends a request message to a servlet, which then sends a response back to the browser. A servlet has a header, which provides information about the request. Each header contains name-value pairs. You can access these values with methods like getRequestURI(), getQueryString(), and so on. You can also pass an object of type HttpServletResponse, which encapsulates a response message. JSF code The JSF framework can be used to build a website. It uses the JavaServer Pages Standard Tag Library (JSTL). The web container must provide the JAR files for JSTL. There are several ways to use the JSTL. Here are a few examples. The JSF component architecture provides a means for developers to create complex UI components on the web. It creates a component tree, which holds instances of UIComponents. The JSF framework uses these components to handle the application request and generate a rendered response. The framework provides an extensible architecture that enables developers to add other functionalities and customize component behaviors. The JSF standard defines numerous tags and advanced operations. One namespace, named h, provides replacements for common html tags. These tags are used to display data, which may be relational data. Can We Make Website Using Java? Read the full article
0 notes
Text
Basic Mikrotik Hotspot Page Template

Download Template Hotspot Login Mikrotik Gratis Untuk Voucheran - Jika kalian masih menggunakan template hotspot login bawaan mikrotik mungkin kalian harus mencoba template hotspot login mikrotik dibawah ini yang bisa membuat halaman login mikrotik kalian menjadi lebih keren, cool, responsive, unik dan tentunya menarik.
Search for jobs related to Mikrotik hotspot login page template responsive free download or hire on the world's largest freelancing marketplace with 19m+ jobs. It's free to sign up and bid on jobs.
Halaman login hotspot mikrotik secara default sangatlah sederhana. Maka dari itu kita perlu mengubah tampilan agar lebih menarik. Dari pada Anda ribet untuk mengedit template bawaan mikrotik, kali ini saya akan membagikan kumpulan Template mikrotik terbaik menurut blog Renovasi Otak untuk Anda download secara gratis.
Mikrotik Hotspot Logout
Template Mikhmon
Mikrotik Hotspot Page Template
Basic Mikrotik Hotspot Page Template Downloads
Basic Mikrotik Hotspot Page Templates
Mikrotik Hotspot Login Page v0.1. Responsive Mikrotik Hotspot Login Page. If you would like to have nice login page for your hotspot user when using Mikrotik Hotspot you can use this project as your base. Simply download zip and load it into your router Files folder. How to Create Hotspots Mikrotik. Setting basic Hotspot Mikrotik Mikrotik Router is a router that has full features. One feature that is quite popular and widely used of Mikrotik Router itself is Hotspot. Do you know the difference regular sharing internet with Hotspot? Perhaps you often find wifi internet signal in the password using WPA or WEP.
Applies to RouterOS: v3, v4, v5+
1HTML customizations
1.4Variables
1.8Examples
2Firewall customizations
HTML customizations
Summary
You can create a completely different set of servlet pages for each HotSpot server you have, specifying the directory in 'html-override-directory' property of a HotSpot server profile /ip hotspot profile. The default servlet pages are copied in the directory 'hotspot' directory right after you create server profile. This directory can be accessed by connecting to the router with an FTP client. You can copy this directory and modify the pages as you like using the information from this section of the manual. Note that it is suggested to edit the files manually, as automated HTML editing tools may corrupt the pages by removing variables or other vital parts. After you are finished with content modification you need to upload this modified content to some custom directory on hotspot router and point previously mentioned property 'html-override-directory' value as path to this new custom HTML directory.
Note: If 'html-override-directory' value path is missing or empty then hotspot server will revert back to default HTML files.
Available Pages
Main HTML servlet pages, which are shown to user:
redirect.html - redirects user to another url (for example, to login page)
login.html - login page shown to a user to ask for username and password. This page may take the following parameters:
username - username
password - either plain-text password (in case of PAP authentication) or MD5 hash of chap-id variable, password and CHAP challenge (in case of CHAP authentication). This value is used as e-mail address for trial users
dst - original URL requested before the redirect. This will be opened on successfull login
popup - whether to pop-up a status window on successfull login
radius<id> - send the attribute identified with <id> in text string form to the RADIUS server (in case RADIUS authentication is used; lost otherwise)
radius<id>u - send the attribute identified with <id> in unsigned integer form to the RADIUS server (in case RADIUS authentication is used; lost otherwise)
radius<id>-<vnd-id> - send the attribute identified with <id> and vendor ID <vnd-id> in text string form to the RADIUS server (in case RADIUS authentication is used; lost otherwise)
radius<id>-<vnd-id>u - send the attribute identified with <id> and vendor ID <vnd-id> in unsigned integer form to the RADIUS server (in case RADIUS authentication is used; lost otherwise)
md5.js - JavaScript for MD5 password hashing. Used together with http-chap login method
alogin.html - page shown after client has logged in. It pops-up status page and redirects browser to originally requested page (before he/she was redirected to the HotSpot login page)
status.html - status page, shows statistics for the client. It is also able to display advertisements automatically
logout.html - logout page, shown after user is logged out. Shows final statistics about the finished session. This page may take the following additional parameters:
erase-cookie - whether to erase cookies from the HotSpot server on logout (makes impossible to log in with cookie next time from the same browser, might be useful in multiuser environments)
error.html - error page, shown on fatal errors only
Some other pages are available as well, if more control is needed:
rlogin.html - page, which redirects client from some other URL to the login page, if authorization of the client is required to access that URL
rstatus.html - similarly to rlogin.html, only in case if the client is already logged in and the original URL is not known
radvert.html - redirects client to the scheduled advertisement link
flogin.html - shown instead of login.html, if some error has happened (invalid username or password, for example)
fstatus.html - shown instead of redirect, if status page is requested, but client is not logged in
flogout.html - shown instead of redirect, if logout page is requested, but client is not logged in
Serving Servlet Pages
The HotSpot servlet recognizes 5 different request types:
request for a remote host
if user is logged in and advertisement is due to be displayed, radvert.html is displayed. This page makes redirect to the scheduled advertisment page
if user is logged in and advertisement is not scheduled for this user, the requested page is served
if user is not logged in, but the destination host is allowed by walled garden, then the request is also served
if user is not logged in, and the destination host is disallowed by walled garden, rlogin.html is displayed; if rlogin.html is not found, redirect.html is used to redirect to the login page
request for '/' on the HotSpot host
if user is logged in, rstatus.html is displayed; if rstatus.html is not found, redirect.html is used to redirect to the status page
if user is not logged in, rlogin.html is displayed; if rlogin.html is not found, redirect.html is used to redirect to the login page
request for '/login' page
if user has successfully logged in (or is already logged in), alogin.html is displayed; if alogin.html is not found, redirect.html is used to redirect to the originally requested page or the status page (in case, original destination page was not given)
if user is not logged in (username was not supplied, no error message appeared), login.html is showed
if login procedure has failed (error message is supplied), flogin.html is displayed; if flogin.html is not found, login.html is used
in case of fatal errors, error.html is showed
request for '/status' page
if user is logged in, status.html is displayed
if user is not logged in, fstatus.html is displayed; if fstatus.html is not found, redirect.html is used to redirect to the login page
request for '/logout' page
if user is logged in, logout.html is displayed
if user is not logged in, flogout.html is displayed; if flogout.html is not found, redirect.html is used to redirect to the login page
Note: If it is not possible to meet a request using the pages stored on the router's FTP server, Error 404 is displayed
There are many possibilities to customize what the HotSpot authentication pages look like:
The pages are easily modifiable. They are stored on the router's FTP server in the directory you choose for the respective HotSpot server profile.
By changing the variables, which client sends to the HotSpot servlet, it is possible to reduce keyword count to one (username or password; for example, the client's MAC address may be used as the other value) or even to zero (License Agreement; some predefined values general for all users or client's MAC address may be used as username and password)
Registration may occur on a different server (for example, on a server that is able to charge Credit Cards). Client's MAC address may be passed to it, so that this information need not be written in manually. After the registration, the server should change RADIUS database enabling client to log in for some amount of time.
To insert variable in some place in HTML file, the $(var_name) syntax is used, where the 'var_name' is the name of the variable (without quotes). This construction may be used in any HotSpot HTML file accessed as '/', '/login', '/status' or '/logout', as well as any text or HTML (.txt, .htm or .html) file stored on the HotSpot server (with the exception of traffic counters, which are available in status page only, and error, error-orig, chap-id, chap-challenge and popup variables, which are available in login page only). For example, to show a link to the login page, following construction can be used:
Variables
All of the Servlet HTML pages use variables to show user specific values. Variable names appear only in the HTML source of the servlet pages - they are automatically replaced with the respective values by the HotSpot Servlet. For most variables there is an example of their possible value included in brackets. All the described variables are valid in all servlet pages, but some of them just might be empty at the time they are accesses (for example, there is no uptime before a user has logged in).
List of available variables
Note: Some of the variables use hard coded http URL, if you are using https, you can construct the link in some other way, for example for $link-status, you can use https://$(hostname)/$(target-dir)status
Common server variables:
hostname - DNS name or IP address (if DNS name is not given) of the HotSpot Servlet ('hotspot.example.net')
identity - RouterOS identity name ('MikroTik')
login-by - authentication method used by user
plain-passwd - a 'yes/no' representation of whether HTTP-PAP login method is allowed ('no')
server-address - HotSpot server address ('10.5.50.1:80')
ssl-login - a 'yes/no' representation of whether HTTPS method was used to access that servlet page ('no')
server-name - HotSpot server name (set in the /ip hotspot menu, as the name property)
Links:
link-login - link to login page including original URL requested ('http://10.5.50.1/login?dst=http://www.example.com/')
link-login-only - link to login page, not including original URL requested ('http://10.5.50.1/login')
link-logout - link to logout page ('http://10.5.50.1/logout')
link-status - link to status page ('http://10.5.50.1/status')
link-orig - original URL requested ('http://www.example.com/')
General client information:
domain - domain name of the user ('example.com')
interface-name - physical HotSpot interface name (in case of bridged interfaces, this will return the actual bridge port name)
ip - IP address of the client ('10.5.50.2')
logged-in - 'yes' if the user is logged in, otherwise - 'no' ('yes')
mac - MAC address of the user ('01:23:45:67:89:AB')
trial - a 'yes/no' representation of whether the user has access to trial time. If users trial time has expired, the value is 'no'
username - the name of the user ('John')
host-ip - client IP address from /ip hotspot host table
vlan-id - Represents ID of a VLAN interface from which client is connected
User status information:
idle-timeout - idle timeout ('20m' or ' if none)
idle-timeout-secs - idle timeout in seconds ('88' or '0' if there is such timeout)
limit-bytes-in - byte limit for send ('1000000' or '---' if there is no limit)
limit-bytes-out - byte limit for receive ('1000000' or '---' if there is no limit)
refresh-timeout - status page refresh timeout ('1m30s' or ' if none)
refresh-timeout-secs - status page refresh timeout in seconds ('90s' or '0' if none)
session-timeout - session time left for the user ('5h' or ' if none)
session-timeout-secs - session time left for the user, in seconds ('3475' or '0' if there is such timeout)
session-time-left - session time left for the user ('5h' or ' if none)
session-time-left-secs - session time left for the user, in seconds ('3475' or '0' if there is such timeout)
uptime - current session uptime ('10h2m33s')
uptime-secs - current session uptime in seconds ('125')
Traffic counters, which are available only in the status page:
bytes-in - number of bytes received from the user ('15423')
bytes-in-nice - user-friendly form of number of bytes received from the user ('15423')
bytes-out - number of bytes sent to the user ('11352')
bytes-out-nice - user-friendly form of number of bytes sent to the user ('11352')
packets-in - number of packets received from the user ('251')
packets-out - number of packets sent to the user ('211')
remain-bytes-in - remaining bytes until limit-bytes-in will be reached ('337465' or '---' if there is no limit)
remain-bytes-out - remaining bytes until limit-bytes-out will be reached ('124455' or '---' if there is no limit)
Miscellaneous variables:
session-id - value of 'session-id' parameter in the last request
var - value of 'var' parameter in the last request
error - error message, if something failed ('invalid username or password')
error-orig - original error message (without translations retrieved from errors.txt), if something failed ('invalid username or password')
chap-id - value of chap ID ('371')
chap-challenge - value of chap challenge ('357015330013021234145245303253142246133175375316')
popup - whether to pop-up checkbox ('true' or 'false')
advert-pending - whether an advertisement is pending to be displayed ('yes' or 'no')
http-status - allows the setting of the http status code and message
http-header - allows the setting of the http header
RADIUS-related variables:
radius<id> - show the attribute identified with <id> in text string form (in case RADIUS authentication was used; ' otherwise)
radius<id>u - show the attribute identified with <id> in unsigned integer form (in case RADIUS authentication was used; '0' otherwise)
radius<id>-<vnd-id> - show the attribute identified with <id> and vendor ID <vnd-id> in text string form (in case RADIUS authentication was used; ' otherwise)
radius<id>-<vnd-id>u - show the attribute identified with <id> and vendor ID <vnd-id> in unsigned integer form (in case RADIUS authentication was used; '0' otherwise)
Working with variables
$(if <var_name>) statements can be used in theses pages. Following content will be included, if value of <var_name> will not be an empty string. It is an equivalent to $(if <var_name> != ') It is possible to compare on equivalence as well: $(if <var_name> <value>) These statements have effect until $(elif <var_name>), $(else) or $(endif). In general case it looks like this:
Only one of those expressions will be shown. Which one - depends on values of those variables for each client.
Redirects and custom Headers
Starting from RouterOS 5.12 there are 2 new hotspot html page variables:
http-status - allows the setting of the http status code and message
http-header - allows the setting of the http header message
Example:
Note: Although the above appears to use the conditional expression 'if' it is in fact setting the 'http-status' to '302' not testing for it. Also the same for the variable 'http-header'. Once again, even though it uses an 'if' it is in fact setting the variable to 'Location' followed by the url set from the variable 'link-redirect'.
E.g. in the case where $(link-redirect) evaluates to 'http://192.168.88.1/login', then the HTTP response returned to the client will be changed to:
http-status syntax:
XYZ - The status code you wish to return. Should be 3 decimal digits, first one must not be 0
HTTP_STATUS_MESSAGE - any text you wish to return to the client which will follow the above status code in the HTTP reply
In any HTTP response it will be on the first line and will be as follows:
http-header syntax:
HTTP_HEADER_NAME - name of the HTTP header to be sent in the response
HTTP_HEADER_VALUE - value of the HTTP header with name HTTP_HEADER_NAME to be sent in the response
The HTTP response will appear as:
All variables and conditional expressions within HTTP_HEADER_VALUE and HTTP_STATUS_MESSAGE are processed as usual.
In case multiple headers with the same name are added, then only the last one will be used (previous ones will be discarded). It allows the system to override regular HTTP headers (for example, Content-Type and Cache-Control).
Customizing Error Messages
All error messages are stored in the errors.txt file within the respective HotSpot servlet directory. You can change and translate all these messages to your native language. To do so, edit the errors.txt file. You can also use variables in the messages. All instructions are given in that file.
Multiple Versions of HotSpot Pages
Multiple HotSpot page sets for the same HotSpot server are supported. They can be chosen by user (to select language) or automatically by JavaScript (to select PDA/regular version of HTML pages).
To utilize this feature, create subdirectories in HotSpot HTML directory, and place those HTML files, which are different, in that subdirectory. For example, to translate everything in Latvian, subdirectory 'lv' can be created with login.html, logout.html, status.html, alogin.html, radvert.html and errors.txt files, which are translated into Latvian. If the requested HTML page can not be found in the requested subdirectory, the corresponding HTML file from the main directory will be used. Then main login.html file would contain link to '/lv/login?dst=$(link-orig-esc)', which then displays Latvian version of login page: <a href='/lv/login?dst=$(link-orig-esc)'>Latviski</a> . And Latvian version would contain link to English version: <a href='/login?dst=$(link-orig-esc)'>English</a>
Another way of referencing directories is to specify 'target' variable:
After preferred directory has been selected (for example, 'lv'), all links to local HotSpot pages will contain that path (for example, $(link-status) = 'http://hotspot.mt.lv/lv/status'). So, if all HotSpot pages reference links using '$(link-xxx)' variables, then no more changes are to be made - each client will stay within the selected directory all the time.
Misc
If you want to use HTTP-CHAP authentication method it is supposed that you include the doLogin() function (which references to the md5.js which must be already loaded) before the Submit action of the login form. Otherwise, CHAP login will fail.
The resulting password to be sent to the HotSpot gateway in case of HTTP-CHAP method, is formed MD5-hashing the concatenation of the following: chap-id, the password of the user and chap-challenge (in the given order)
In case variables are to be used in link directly, then they must be escaped accordingly. For example, in login page, <a href='https://login.example.com/login?mac=$(mac)&user=$(username)'>link</a> will not work as intended, if username will be '123&456=1 2'. In this case instead of $(user), its escaped version must be used: $(user-esc): <a href='https://login.server.serv/login?mac=$(mac-esc)&user=$(user-esc)'>link</a>. Now the same username will be converted to '123%26456%3D1+2', which is the valid representation of '123&456=1 2' in URL. This trick may be used with any variables, not only with $(username).
There is a boolean parameter 'erase-cookie' to the logout page, which may be either 'on' or 'true' to delete user cookie on logout (so that the user would not be automatically logged on when he/she opens a browser next time.
Examples
With basic HTML language knowledge and the examples below it should be easy to implement the ideas described above.
To provide predefined value as username, in login.html change:
to this line:
Mikrotik Hotspot Logout
(where hsuser is the username you are providing)
To provide predefined value as password, in login.html change:
to this line:
(where hspass is the password you are providing)
To send client's MAC address to a registration server in form of:
https://www.example.com/register.html?mac=XX:XX:XX:XX:XX:XX
change the Login button link in login.html to:
(you should correct the link to point to your server)
To show a banner after user login, in alogin.html after
$(if popup 'true')add the following line:
(you should correct the link to point to the page you want to show)
To choose different page shown after login, in login.html change:
to this line:
(you should correct the link to point to your server)
To erase the cookie on logoff, in the page containing link to the logout (for example, in status.html) change:
to this:
or alternatively add this line:
before this one:
External authentication
Another example is making HotSpot to authenticate on a remote server (which may, for example, perform creditcard charging):
Allow direct access to the external server in walled-garden (either HTTP-based, or IP-based)
Modify login page of the HotSpot servlet to redirect to the external authentication server. The external server should modify RADIUS database as needed
Here is an example of such a login page to put on the HotSpot router (it is redirecting to https://auth.example.com/login.php, replace with the actual address of an external authentication server):
The external server can log in a HotSpot client by redirecting it back to the original HotSpot servlet login page, specifying the correct username and password
Here is an example of such a page (it is redirecting to https://hotspot.example.com/login, replace with the actual address of a HotSpot router; also, it is displaying www.mikrotik.com after successful login, replace with what needed):
Hotspot will ask RADIUS server whether to allow the login or not. If allowed, alogin.html page will be displayed (it can be modified to do anything). If not allowed, flogin.html (or login.html) page will be displayed, which will redirect client back to the external authentication server.
Note: as shown in these examples, HTTPS protocol and POST method can be used to secure communications.
HTTP header detection
The Hotspot login pages have access to HTTP headers by using $(http-header-name);
For example, there exists an ability to check the user agent (or browser), and will return any other content instead of the regular login page, if so desired. This can be used to disable automatic popups in phones, for example.
For example, to output 'SUCCESS' for users of a specific Firefox mobile version, instead of the login page, you can these lines on the top of the rlogin.html page in your hotspot directory:
This will DISABLE the login popup for Android Firefox 40 users.
One click login
It is possible to create modified captive portal for quick one click login for scenarios where no user or password is required.
What you need to do is:
Create user for this purpose. In example it is 'notsosecretuser' with password 'notsosecretpass'
Assign this user to user profile that allows specific/unlimited amount of simultaneous active users.
Copy original hotspot directory that is already generated in routers file menu on root level.
Modify contents of this copy directory contents.
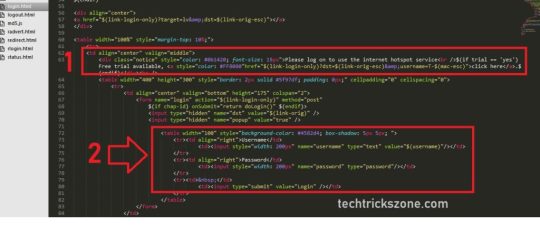
Only one file requires modifications for this to work, the 'login.html'.
Original:
Modified:
What changed:
User and Password '<tr>' fields are hidden.
Both User and Password field values contain predefined values.
Changed 'OK' button value(name) to something more fitting.
Now upload this new hotspot folder back to router, preferably with different name.
Change settings in hotspot server profile to use this new html directory.
Firewall customizations
Summary
Apart from the obvious dynamic entries in the /ip hotspot submenu itself (like hosts and active users), some additional rules are added in the firewall tables when activating a HotSpot service. Unlike RouterOS version 2.8, there are relatively few firewall rules added in the firewall as the main job is made by the one-to-one NAT algorithm.
NAT
From /ip firewall nat print dynamic command, you can get something like this (comments follow after each of the rules):
Putting all HotSpot-related tasks for packets from all HotSpot clients into a separate chain.
Any actions that should be done before HotSpot rules apply, should be put in the pre-hotspot chain. This chain is under full administrator control and does not contain any rules set by the system, hence the invalid jump rule (as the chain does not have any rules by default).
Redirect all DNS requests to the HotSpot service. The 64872 port provides DNS service for all HotSpot users. If you want HotSpot server to listen also to another port, add rules here the same way, changing dst-port property.
Template Mikhmon
Redirect all HTTP login requests to the HTTP login servlet. The 64873 is HotSpot HTTP servlet port.
Redirect all HTTPS login requests to the HTTPS login servlet. The 64875 is HotSpot HTTPS servlet port.
All other packets except DNS and login requests from unauthorized clients should pass through the hs-unauth chain.
And packets from the authorized clients - through the hs-auth chain.
First in the hs-unauth chain is put everything that affects TCP protocol in the /ip hotspot walled-garden ip submenu (i.e., everything where either protocol is not set, or set to TCP). Here we are excluding www.mikrotik.com from being redirected to the login page.
All other HTTP requests are redirected to the Walled Garden proxy server which listens the 64874 port. If there is an allow entry in the /ip hotspot walled-garden menu for an HTTP request, it is being forwarded to the destination. Otherwise, the request will be automatically redirected to the HotSpot login servlet (port 64873).
HotSpot by default assumes that only these ports may be used for HTTP proxy requests. These two entries are used to 'catch' client requests to unknown proxies (you can add more rules here for other ports). I.e., to make it possible for the clients with unknown proxy settings to work with the HotSpot system. This feature is called 'Universal Proxy'. If it is detected that a client is using some proxy server, the system will automatically mark that packets with the http hotspot mark to work around the unknown proxy problem, as we will see later on. Note that the port used (64874) is the same as for HTTP requests in the rule #9 (so both HTTP and HTTP proxy requests are processed by the same code).
HTTPS proxy is listening on the 64875 port.
Redirect for SMTP protocol may also be defined in the HotSpot configuration. In case it is, a redirect rule will be put in the hs-smtp chain. This is done so that users with unknown SMTP configuration would be able to send their mail through the service provider's (your) SMTP server instead of going to the (possibly unavailable outside their network of origin) SMTP server users have configured on their computers. The chain is empty by default, hence the invalid jump rule.
Providing HTTP proxy service for authorized users. Authenticated user requests may need to be subject to transparent proxying (the 'Universal Proxy' technique and advertisement feature). This http mark is put automatically on the HTTP proxy requests to the servers detected by the HotSpot HTTP proxy (the one that is listening on the 64874 port) as HTTP proxy requests for unknown proxy servers. This is done so that users that have some proxy settings would use the HotSpot gateway instead of the (possibly unavailable outside their network of origin) proxy server users have configured in their computers. This mark is also applied when advertisement is due to be shown to the user, as well as on any HTTP requests done form the users whose profile is configured to transparently proxy their requests.
Providing SMTP proxy for authorized users (the same as in rule #13).
Packet Filtering
From /ip firewall filter print dynamic command, you can get something like this (comments follow after each of the rules):
Any packet that traverse the router from an unauthorized client will be sent to the hs-unauth chain. The hs-unauth implements the IP-based Walled Garden filter.
Everything that comes to clients through the router, gets redirected to another chain, called hs-unauth-to. This chain should reject unauthorized requests to the clients.
Everything that comes from clients to the router itself, gets to yet another chain, called hs-input.
Before proceeding with (predefined) dynamic rules, the packet gets to the administratively controlled pre-hs-input chain, which is empty by default, hence the invalid state of the jump rule.
Allow client access to the local authentication and proxy services (as described earlier).
All other traffic from unauthorized clients to the router itself will be treated the same way as the traffic traversing the routers.
Unlike NAT table where only TCP-protocol related Walled Garden entries were added, in the packet filter hs-unauth chain is added everything you have set in the /ip hotspot walled-garden ip menu. That is why although you have seen only one entry in the NAT table, there are two rules here.
Everything else that has not been while-listed by the Walled Garden will be rejected. Note usage of TCP Reset for rejecting TCP connections.
Same action as in rules #7 and #8 is performed for the packets destined to the clients (chain hs-unauth-to) as well.
Reject all packets to the clients with ICMP reject message.
(Top | Back to Content)
Retrieved from 'https://wiki.mikrotik.com/index.php?title=Manual:Customizing_Hotspot&oldid=34366'
Mikrotik Hotspot Quick Setup Guide + Tips n Tricks for Hotspot !
Mikrotik Hotspot Page Template
A HOTSPOT is way to provide internet access to subscribers by means of an easy to use login interface as it does not require any client software/driver/dialer at user end. To log in, users may use almost any web browser , so they are not required to install additional software.It is also possible to allow users to access some web pages without authentication using Walled Garden feature.
In my personnel opinion, Hotspot is best suited for ad hoc situations, where you cannot control how the client has their machines configured. This is generally useful in Conference Rooms, Hotels, Cafe’s , Restaurants and likewise since people will come and go and you have few permanent users.
One big advantage of using hotspot is that HotSpot does not require any client software/driver/dialer. One disadvantage of using HotSpot is that its usually requires your client to open up his browser to log in before he can use your service . So users wanting to connect to your service using a router or some kind usually have a problem (as routers usually don’t support logging in via HTTP).
Following is a quick setup guide (CLI version) on how-to setup HOTSPOT server in Mikrotik using command interface.
This guide will help you in setting up . . .
# HOTSPOT server,
It will also configure DHCP to assign users IP Address from 172.16.0.1-172.16.0.255 ip pool . Change it accordingly.
I will add two Speed / Rate Limit Profiles, 256k and 512k, it will add a new user ‘zaib‘ password=test with 512k profile and user ‘test‘ Password=test with 256k Limit.
It will Add Default Route to internet which is DSL router ip 192.168.2.2 , Change it accordingly.
In this examples, Mikrotik have two interface cards.
Ether1 LAN = 172.16.0.1 / Connected with LAN/Hotspot users
Ether2 WAN = 192.168.2.1 / Connected with DSL router
DSL Router = 192.168.2.2
COPY PASTE SCRIPT. MAKE SURE YOUR MIKROTIK HAVE NO CONFIG , IT SHOULD BE EMPTY
Script Starts Below.
Basic Mikrotik Hotspot Page Template Downloads
TESTING CLIENT
Basic HOSTPOT is now configured. Now goto client pc, Upon booting, it will automatically receive ip from hotspot dhcp server, Open your browser and try to open any web site, You will see Hotspot Login page asking for credentials.
OR you can customize the hotspot login page to show your logo look like something
You can also make configuration changes via GUI. Please read the following guide for easy n step by step guide on HOTSPOT setup. http://wiki.mikrotik.com/wiki/Hotspot_server_setup
HOWTO CUSTOMIZE HOTSPOT LOGIN PAGE
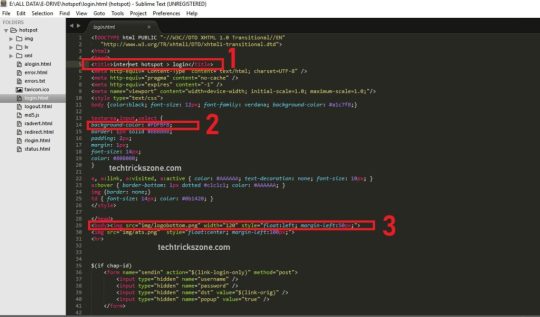
You can use some fancy good looking login page. To customize the login page, Open Winbox , Goto Files , here you will see various files, look at hotspot/login.html , Drag n Drop this file to Desktop. See the attached picture.
Now open it using any html editor, I always prefer FRONTPAGE for editing HTML pages due to its easy interface. Customize it according to your need, You must have some prior knowledge of some website / html editing. You can insert your logo , advertisement and lot more in this page. After you are done, simply Upload the file back from where you downloaded it. use drag n drop feature. For beginners, I recommend you not to change any default variable, just ad your logo n text , After you are familiarized with the structure, you can build your own fully customized login page. – zaib
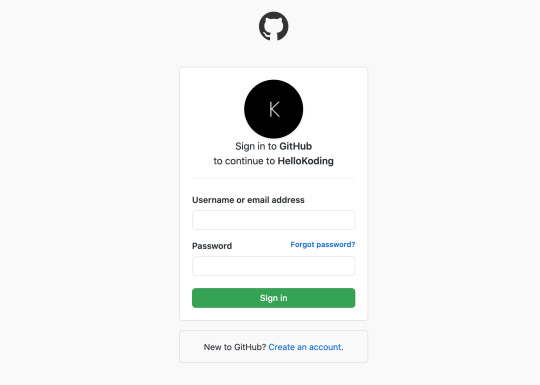
Good examples of hotspot login page can be found at following link.
Howto Redirect User to your selected site after successful Login
If you want that after successful login to hotspot , user must be redirected to your advertisement web site / any other web, then You will need to replace a variable on the hotspot/login.html document on the mikrotik router. You must replace $(link-orig) with the url of the website you want them to get after login.
There are two links that you have to replace, and both look like this:
Change them to
Now after successful login, user will automatically redirected to yoursite.com, you can also create your customized page showing users details using the variables available.
Howto Allow URL for some destinations for non authenticated Users
Sometimes it is required to allow access to some destinations / URLs for non authenticated users, for example if you have a web / radius server and you want that user can access it without login to hotspot, then you can add its ip address in walled garden.
HOTSPOT users can’t communicate with each other on LAN or PROXY-ARP issue
If you face hotspot broadcast issue / arp-poisoning , problem, Remove the address pool from the Hotspot to turn off Universal NAT,
As showed in the image below …
Howto Bypass authentication for Few Clients
This bypasses the hotspot by mac address.
(change xx:xx:xx:xx:xx:xx with your user’s mac address. You can also use the ip address to bypass.
You can also use mac-login or cookies features introduced in newer version to let auto login client.
HOTSPOT FLAGS,
HOTSPOT FLAGS, S – static, If you have the lease set as a static dhcp lease (assigns same ip every time device requests one) it shows as static. That is in “/ip dhcp-server lease” using “make-static”.
H – DHCP,
D – Dynamic,
A – If someone connects to the hotspot, they show up in the Hosts tab but are not yet authorized. Once they log in, they show up in the Active tab and are now authorized.
P – bypassed > Go to IP > Hotspot > IP Bindings > and add a new item. One of the “type” options is bypassed, which simply means they don’t have to login. From the wiki, “bypassed – performs the translation, but excludes client from login to the HotSpot”
Some more flags for ROUTE
X – Disabled, not active A – Active, in use C – Connected, a directly connected host route S – Static, added manually R – RIP route, received from the routing information protocol B – BGP, received from the border gateway protocol O – Received from the open shortest path first protocol M – Received from the mesh made easy protocol B – Blackhole route, packets are silently discarded U – Unreachable, discards the packets and sends an ICMP unreachable messages P – Prohibit, discards packet and sends an ICMP communication administratively prohibited message
Change Default ADMIN password for USERMAN
By default , there is no password for admin id for user-man. you can login by entering admin id and no password. this is dangerous.
Make sure you set password
/tool user-manager customer print
Basic Mikrotik Hotspot Page Templates
and note the number of admin id
Now change the password
/tool user-manager customer set password=zaib1234 numbers=0
Hotspot idle-timeout vs keep-alive-timeout (added 22-March-2019)
‘idle-timeout’ is used to detect, if client is not using Router networks, reaching timeout user will be logged out.
‘keep-alive-timeout’ used to detect, if is available and reachable, if check fails client will be dropped out, etc.
in other words,
idle timeout checks traffic. if user is online but is just not sending./receiving anything, he may reach its idle timeout.
keepalive timeout checks availability. keepalive timeout may only be reached if client is physically disconnected or turned off.
Regard’s SYED JAHANZAIB
0 notes
Text
Spring Security Session Timeout Redirect Login Page

Hi, I am tried to redirect the web page to login Page after session timeout in MVC 5, my web.config is as below: timeout='1' co. Sign in Join.NET. If he clicks the browser it shoud re-direct to index page. The above secnario needs to be handled using interceptors without using Spring security & servlet filters. Interceptor is configred but it is not recognizing web.xml changes. I didnt redirect to index page after session expired.
Spring Security Redirect To Login Page After Session Timeout Example
Spring Security Session Time Out Redirect Login Page Aspx
Spring Security Session Time Out Redirect Login Page Clickbank
in Free community support
I am loading datatable while clicking button , The button click function calls the datatable function to load . So during session timeout if i click the button ,it returns error message 'Invalid JSON response' . This is because the session was timed out . How to handle this error and redirect to login page ? is there any option to check response data before loading to datatable ? Please help me in this issue.
Thanks.
Answers
Any luck on this one...I have the same problem. How do you redirect with ajax when session has timed out? My datatable keeps spinning when I tried redirecting from the server side.
In ASP.Net 2.0 applications there's a special event handler called 'Session_End' that exists in Global.asax. It is fired when the Session Timeout occurs. I use this event handler to write key Session variables (all DataTables at the moment) out to a special holding area within the associated database. The next time the user logs in, these same Session variables are restored with the previous data. In this way the user is protected from losing valuable work if they step away from their computer for a moment. I did some testing and was a little surprised to discover that when such a timeout occurs, the browser just stays on the page it was before. This is clearly a problem, both for security reasons (an unattended corporate app should log itself off) and because the Session variables were now all null. Eventually I heard from a bright developer from New England named Mike Banavige who succinctly explained the situation this way:
Spring Security Redirect To Login Page After Session Timeout Example
Session end does not occur in the context of an http request. It is simply a timeout that occurs on the server. Since there is no request involved in the timeout, there is nothing to redirect.
Put another way, the Session_End event is occurring strictly on the server - the client doesn't know a thing about it. Makes perfect sense - why didn't I think of that!
So what to do with the predicament of the web app remaining on the same page, even though the Session has timed out? Well, more research revealed the answer. Within the Page_Load event handler of my master page codefile, I added this:
Spring Security Session Time Out Redirect Login Page Aspx
Response.AddHeader('Refresh', Convert.ToString((Session.Timeout * 60) + 5)); if (Session.IsNewSession) Tools.PageRedirect('~/Login/login');
Spring Security Session Time Out Redirect Login Page Clickbank
Since every web page in my app utilizes the master page, this Refresh meta tag is inserted into each of them. And because it's in the Page_Load event handler, it gets updated (moved forward) every time a postback occurs. With a typical 5 or 10 minute session timeout, it's highly unlikely that the user would be working on something that long without a postback occurring. It thus serves as an effective way to implement a Logout due to User Inactivity feature.
0 notes
Text
Week 8
Web Systems and Technologies
-Three core languages that make up the World Wide Web:
-JavaScript
-CSS
-HTML
-Web Technology- term referring to the many languages and multimedia packages that are used in conjunction with one another, to produce dynamic web sites such as this one.
Components of Web Technology:
1. Browsers- request information and then they show us in the way we can understand. Some popular browsers:
-Google Chrome
-Safari
-Firefox
-Internet Explorer
2. HTML & CSS -HTML should be learned first. The web browsers translated the elements so that reader understand. To learn more HTML you should learn about CSS.
-HTML is used for creating the basic structure of a website. HTML consists of different elements preceded by an opening tag, <tag>, and a closing tag, </tag>. - DHTML (Dynamic HTML) adds dynamic, moving or changing content to HTML pages. Think of it as a more advanced version of HTML, although DTHML is in fact not a programming language in itself. DHTML is a broad term used to describe a group of applications like Javascript, CSS,
-Document Object Model(DOM)-allows the designer to access any element in a HTML page, such as an image, layer or table using the unique ID.
-CSS stands for Cascading Style Sheets and it describes how HTML elements are to be displayed on the screen. If you browse enough tutorials, you’ll soon create CSS text effects, page transitions, image hover effects, and more.
3. Web Development Frameworks web development frameworks are a starting point of items that a developer can use to avoid doing the simple or mundane tasks, and instead get right to work.
-designed specifically for developing dynamic web applications.
-With this framework, you can easily create front-end based applications without needing to use other frameworks or plugins.
-features include well-made templates, MVC architecture, code generation, code splitting etc.
4. Programming Languages-computers don’t use languages that are anything like human languages, they need a different way to communicate. Here are some of the most popular programming languages:
-Javascript
-CoffeeScript
-Python
-Ruby
-PHP
-Go
-Swift
- Java
5. Protocols- the instructions for how to pass information back and forth between computers and devices are commonly known as protocols.
- HTTP The protocol requests the website from Google’s server and then receives a response with the HTML, CSS, and JavaScript of the website.
-DDP Uses websockets to create a consistent connection between the client and the server. As a result of that, you get website updates in real-time without having to refresh the browser.
- REST Used mostly for API’s, this protocol has standard methods like GET, POST, and PUT that let information be exchanged between applications
6. API (application programming interface) allows other developers to use some of the app’s functionality without sharing the code. The endpoints are exposed by the developers while the API can control access with an API key. Examples of well-made APIs are those created by Facebook, Twitter, and Google for their web services.
7. Data formats data is stored in the structure called a data format.
- JSON JavaScript Object Notation is a syntax for storing and exchanging data (just like XML).
-XML Predominantly used by Microsoft systems
-CSV is data formatted by commas
- The Backend: CGI, Perl, PHP, Java (Servlet) is concerned with the working parts of your web site, which may include hit counters, form processors or web statistics tools.
- The Future: SVG and XML The W3C sets down guidelines for browser developers such as Netscape and Microsoft to follow in a continuing bid to increase crossbrowser support for future technologies
- XML (Extensible Mark-up Language) is a language that allows you to create your own 'mark-up' languages.
0 notes
Text
SpringMVC Digging Road 2 - DispatcherServler + Controller
###Role of DispatcherServlet
DispatcherServlet is the implementation of the front-end controller design pattern, which provides the centralized access point of SpringWebMVC, is responsible for the assignment of responsibilities, and can be seamlessly integrated with SpringIoC container, so as to obtain all the capabilities of Spring.
DispatcherServlet is mainly used for duty scheduling, and it is mainly used for process control. Its main duties are as follows:
```
1:File upload resolution, if the request type is multipart, file upload resolution will be performed through MultipartResolver
2:Map the request to the processor through HandlerMapping (return a HandlerExecutionChain, which includes a processor and multiple HandlerInterceptor interceptors)
3:Many types of processors (processors in HandlerExecutionChain) are supported through HandlerAdapter
4:Resolve the logical view name to the concrete view implementation through ViewResolver
5:Localization analysis
6:Render a specific view
7:If an exception is encountered during execution, it will be handed over to HandlerExceptionResolver for resolution
```
###DispatcherServler Configure
DispatcherServlet can also configure its own initialization parameters, that is, <init-param> can be configured in servlet configuration.

###The relationship of context
The general context configuration of SpringWeb project is as follows:
<listener>
<listener-class>
org.springframework.web.context.ContextLoaderListener
</listener-class>
</listener>
<context-param>
<param-name>contextConfigLocation</param-name>
<param-value>classpath:applicationContext.xml</param-value>
</context-param>
```
contextConfigLocation : Represents the configuration file path used to load Bean;
contextClass : Represents the ApplicationContext implementation class used to load Bean, the default WebApplicationContext```
###Initialization order of DispatcherServlet
```
1:HttpServletBean inherits HttpServlet, so its init method will be called when the Web container starts
2:FrameworkServlet inherits HttpServletBean, initialize the Web context through initServletBean ()
3:DispatcherServlet inherits FrameworkServlet, and implemented onRefresh () method to provide some front-end controller related configurations
```
>In the DispatcherServlet of SpringMVC framework, around line 470:
/**
* This implementation calls {@link #initStrategies}.
*/
@Override
protected void onRefresh(ApplicationContext context) {
initStrategies(context);
}
/**
* Initialize the strategy objects that this servlet uses.
* <p>May be overridden in subclasses in order to initialize further strategy objects.
*/
protected void initStrategies(ApplicationContext context) {
initMultipartResolver(context);
initLocaleResolver(context);
initThemeResolver(context);
initHandlerMappings(context);
initHandlerAdapters(context);
initHandlerExceptionResolvers(context);
initRequestToViewNameTranslator(context);
initViewResolvers(context);
initFlashMapManager(context);
}
**The whole DispatcherServler initialization process mainly does two things:**
> * Initialize the Web context used by SpringMVC, and possibly specify the parent container (ContextLoaderListener loads the root context)
> * Initialize the policy used by DispatcherServlet, such as HandlerMapping、HandlerAdapter
###DispatcherServler Default Configure:
The default configuration of DispatcherServlet is in DispatcherServlet.properties (under the same package as DispatcherServlet class), and it is the default policy used when no configuration is specified in Spring configuration file.
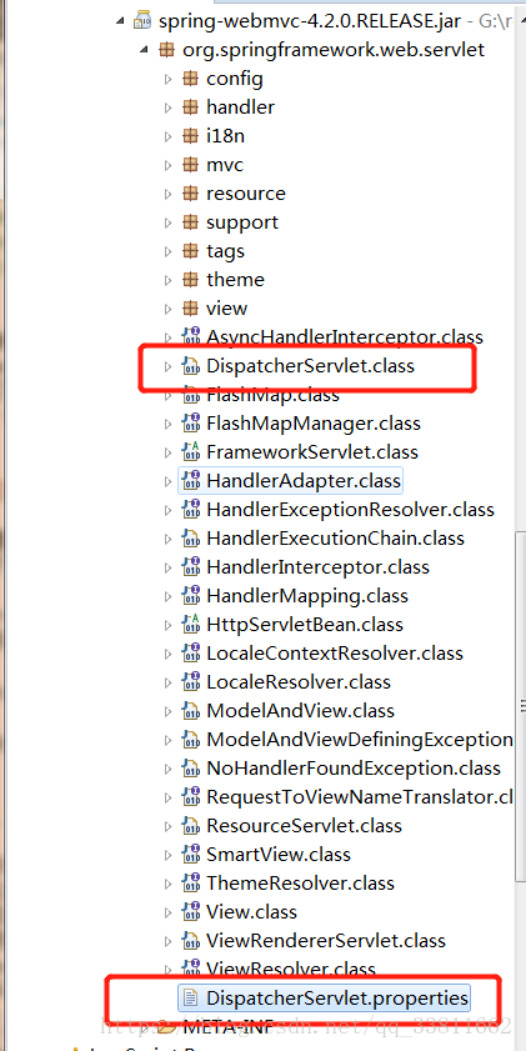
It can be seen from the configuration that the DispatcherServlet will automatically register these special Bean when it starts, so we don't need to register. If we register, the default will not be registered.
###The special Bean which in DispatcherServlet
DispatcherServlet uses WebApplicationContext as the context by default, and there are some Bean in this context as follows:
####Controller
Processor/page controller, doing C in MVC, but the control logic is transferred to the front-end controller for processing requests;
####HandlerMapping
The mapping from processor is requested, and if the mapping is successful, a HandlerExecutionChain object (including a Handler processor (page processor) object and multiple HandlerInterceptor interceptors) is returned; For example, BeanNameUrlHandlerMapping maps URL and Bean name, and the Bean that is successfully mapped is the processor here;
####HandlerAdapter:
HandlerAdapter will package the processor as an adapter, thus supporting many types of processors, that is, the application of adapter design pattern, thus easily supporting many types of processors; For example, SimpleControllerHandlerAdapter will adapt the Bean that implements the Controller interface and call the handleRequest method of the processor for functional processing;
####ViewResolver
The ViewResolver will resolve the logical View name into a concrete view, for example, the InternalResourceViewResoulver will map the logical view name into a jsp view;
####LocalResolver
Localized parsing, because Spring supports internationalization, the LocaleResolver parses the Locale information of the client to facilitate internationalization;
####ThemeResolver
Theme analysis, through which multiple styles of a page can be realized, that is, the common effect similar to software skin;
####MultipartResolver
File upload analysis, used to support file upload;
####HandlerExceptionResolver
Processor exception resolution, which can map exceptions to the corresponding agreed error interface, so as to display a user-friendly interface (instead of showing users specific error information);
####RequestToViewNameTranslator
Automatically mapping the request URL to the logical view name when the processor does not return the relevant information such as the logical view name;
####FlashMapManager
It is used to manage the policy interface of FlashMap, which is used to store the output of one request, and when entering another request, it is used as the input of the request, which is usually used to redirect the scene.
###Controller brief introduction
Controller, which is the part C in MVC, is mainly responsible for the function processing part
```
1、Collect, validate and bind request parameters to command objects
2、Give the command object to the business object, and the business object will process and return the model data
3、Return ModelAndView(Model model part is the model data returned by the business object, and the view part is the logical view name)
```
###DisaptcherServler + Controller
DispatcherServlet is responsible for entrusting the request to the Controller for processing, and then selecting a specific view for rendering according to the logical view name returned by the Controller (and passing in the model data)
**The complete C (including logic control and function processing) in MVC consists of (DispatcherServlet+Controller)
###Controllerannotation
Before Spring2.5, we all defined our processor class by implementing the Controller interface or its implementation class (which is no longer recommended).
Spring2.5 introduces annotated processor support, and defines processor classes through @Controller and @RequestMapping annotations. And provides a powerful set of annotations:
> * @Controller
> * @RequestMapping
> * @RequestParam
> * @ModelAttribute
> * @SessionAttributes
> * @InitBinder
Spring3.0 introduces Restful architecture style support (supported by @PathVariable annotation and some other features), and introduces more annotation support
> * @CookieValue
> * @RequestHeader
> * @RequestBody
> * @ResponseStatus
> * @ExceptionHandler
> * @PathVariable
Spring3.1 use new HandlerMapping and HandlerAdapter to support @Controller and @RequestMapping annotation processors, Use the combination of processor mapping RequestMappingHandlerMapping and processor adapter RequestMappingHandlerAdapter to replace the processor mapping defaultannotationhandlermapping and processor adapter AnnotationMethodHandlerAdapter started in Spring2.5.
###Annotation implementation Controller
The configure of HandlerMapping and HandlerAdapter
> * Previous versions of Spring3.1:
DefaultAnnotationHandlerMapping and AnnotationMethodHandlerAdapter
> * The version starting with Spring3.1:
RequestMappingHandlerMapping and RequestMappingHandlerAdapter
###Example code:
Code structure reference:
https://blog.csdn.net/qq_33811662/article/details/80658813
Modify the content of spring-mvc.xml as follows:
<?xml version="1.0" encoding="UTF-8"?>
<beans xmlns="http://www.springframework.org/schema/beans"
xmlns:xsi="http://www.w3.org/2001/XMLSchema-instance"
xmlns:mvc="http://www.springframework.org/schema/mvc"
xmlns:context="http://www.springframework.org/schema/context"
xsi:schemaLocation="http://www.springframework.org/schema/beans
http://www.springframework.org/schema/beans/spring-beans-4.2.xsd
http://www.springframework.org/schema/mvc
http://www.springframework.org/schema/mvc/spring-mvc-4.2.xsd
http://www.springframework.org/schema/context
http://www.springframework.org/schema/context/spring-context-4.2.xsd">
<context:component-scan base-package="mvc1"></context:component-scan>
<mvc:annotation-driven></mvc:annotation-driven>
</beans>
Modify the contents of HelloController as follows:
package mvc1;
import javax.servlet.http.HttpServletRequest;
import javax.servlet.http.HttpServletResponse;
import org.springframework.stereotype.Controller;
import org.springframework.web.bind.annotation.RequestMapping;
import org.springframework.web.servlet.ModelAndView;
@Controller
public class HelloController {
@RequestMapping("/hello")
public ModelAndView handleRequest(HttpServletRequest request, HttpServletResponse response) throws Exception {
System.out.println("进入后台控制器");
ModelAndView mv = new ModelAndView();
mv.addObject("content", "SpringMVC 初体验");
mv.setViewName("/WEB-INF/jsp/hello.jsp");
return mv;
}
}
Run the Server, enter the URL:
0 notes
Text
SkillPractical Spring DIY Projects
Spring Boot is an open-source Java-based framework. Spring Boot is a utility for setting up an application quickly by automating the configuration procedures and speed up the process of building and deploying Spring Boot applications. It is easy to create production-ready applications using Spring Boot through embedded server(tomcat).
Spring is widely used for creating scalable applications. For web applications Spring provides Spring MVC which is a widely used module of spring that is used to create scalable web applications. But the main disadvantage of spring projects is that configuration is really time-consuming and can be a bit overwhelming for the new developers. Making the application production-ready takes some time if you are new to the spring.
Here in this project, we will discuss how to create a basic RESTful web service which displays the list of student details and details of individual student depending upon the id provided through the REST call i.e.., depending upon the input provided through the REST call.
Prerequisites:
Basic understanding of how to create a Maven project in IntelliJ IDE.
Basic understanding of RESTful web services.
Basic understanding of HTTP Methods i.e., GET, PUT, POST, DELETE etc..
Advantages of RESTful Web services:
The separation between the client and the server: The REST protocol totally separates the user interface from the server and the data storage. This has some advantages when making developments. For example, it improves the portability of the interface to other types of platforms, it increases the scalability of the projects and allows the different components of the developments to be evolved independently.
Visibility, reliability, and scalability: The separation between client and server has one evident advantage, and that is that each development team can scale the product without too much problem. They can migrate to other servers or make all kinds of changes in the database, provided the data from each request is sent correctly. The separation makes it easier to have the front and the back on different servers, and this makes the apps more flexible to work with.
The REST API is always independent of the type of platform or languages: The REST API always adapts to the type of syntax or platforms being used, which gives considerable freedom when changing or testing new environments within the development. With a REST API, you can have PHP, Java, Python or Node.js servers. The only thing is that it is indispensable that the responses to the requests should always take place in the language used for the information exchange, normally XML or JSON.
The steps that we covered in this project are:
1. Create a maven project and ass dependencies 2. Create a minimal set of classes and launch the application 3. Add at least one controller with respective Services, Entity and DAO (Data Access Object)
The steps that we covered in this project are:
1. Create a maven project and ass dependencies 2. Create a minimal set of classes and launch the application 3. Add at least one controller with respective Services, Entity and DAO (Data Access Object)
The projects that we covered in the SkillPractical Spring are:
1. SpringBoot Getting Started 2. Create your SpringBoot App with Servlet/JSP/JDBC 3. Creating Your First RESTful Web Service with Java/SpringBoot 4. Developing Microservices with Spring Boot & Spring Cloud - Part 1 5. Developing Microservices with Spring Boot & Spring Cloud - Part 2 and etc..
For more details on Spring DIY Projects please visit our website.
SkillPractical has Spring learning path that helps the user to learn the Java from scratch. If user have any questions on Java Spring while attempting tests, he can post a question in SkillPractical community. They will get an answer from our expert consultants.

0 notes
Link
こんにちは、エムスリー エンジニアリンググループ マルチデバイスチームの藤原です。 昨年末に医師向けのスマホアプリを新たにリリースしました。 スマホアプリ向けの BFF(Backends For Frontends) も新規に開発したのですが、そこには SpringBoot + Kotlin + GraphQL なアプリケーションを採用しています。 GraphQL はチームでの採用は初めてで、私もこのプロジェクトで初めて触りました。 そのような状況だったので GraphQL 周りについては試行錯誤を重ねることとなったのですが、今回はその開発の中で見えてきた プラクティス をいくつか紹介したいと思います。 これから SpringBoot + Kotlin + GraphQL な開発をされる方の参考になれば幸いです。 ボネリークマタカ(某GraphQLの入門書*1の表紙にもこの鳥が描かれている) (Godbolemandar [CC BY-SA 4.0], ウィキメディア・コモンズより) スカラー型の入力チェックは Custom Scalar を使おう 認証結果は GraphQLContext に保存しよう ユーザ情報のフィールドにするべきものとそうじゃないもの 認証が必要であることは Directive で表現しよう エラーハンドリング フィールドで Nullable or Non-null を迷うようなら Nullable フィールドの引数で Nullable or Non-null を迷うよう��ら Non-null 要素追加の可能性がある Enum を使うときは細心の注意を 解決策1. unknown だった場合にどうするか決める 解決策2. フィールドを変える 解決策3. Enum を使わない 先人の知恵を借りる We are hiring ※ この記事に登場する graphql-java 依存のクラス等は以下のライブラリとバージョンを元にしています。 graphql-java 13.0 *2 graphql-java-servlet 8.0.0 *3 graphql-java-tools 5.6.1 *4 graphql-spring-boot-starter 5.10.0 *5 スカラー型の入力チェックは Custom Scalar を使おう GraphQL スキーマのフィールドには引数を渡すことができますが、実行時に入力チェックをしたい場合があります。 GraphQL クエリを発行すると対応するリゾルバーが実行されるので、愚直にやるとリゾルバーで入力チェックのロジックを実装することになります。 以下はメッセージ一覧をページネーションで取得するスキーマとリゾルバーの例です。 type Query { # メッセージ一覧を取得する messages( # 取得件数 first: Int! # 指定した文字列が表すメッセージ以降を取得する after: String ): [Message!] } class QueryResolver : GraphQLQueryResolver { fun messages(first: Int { // first に100以上の数値が指定されたらエラーにしたい if 100) throw IllegalArgumentException() ... } } リゾルバーで取得件数の上限チェックを行なっていますが、他のリゾルバーでも同じような入力チェックを何回も実装しないといけなくなるかもしれず、あまりよくない匂いがします。 GraphQL では独自に任意のスカラー型を定義することができ、スカラー型に入力チェックを実装することでリゾルバーで入力チェックをする必要がなくなります。 スカラー型で入力チェックするようにした場合、スキーマとリゾルバーの実装は以下のようになります。 # ページネーション用の量指定型(1から99の数値) scalar PaginationAmount type Query { # メッセージ一覧を取得する messages( # 取得件数 first: PaginationAmount! # 指定した文字列が表すメッセージ以降を取得する after: String ): [Message!] } typealias PaginationAmount = Int // エイリアスでスキーマ上と型名を合わせると味がいい class QueryResolver : GraphQLQueryResolver { fun { // この処理が実行される時点で first が 100未満であることは保証される ... } } 独自のスカラー型を作成する方法は以下の2ステップです。 Coercing インタフェースを実装したクラスを作成する 作成した Coercing を元に GraphQLScalarType を作成し、Bean に登録する class PaginationAmountCoercing : Coercing<Int, Int { override fun parseLiteral(input: Any): Int? { // 入力チェックを失敗させる場合は CoercingParseLiteralException を throw する ... } ... } @Bean val PaginationAmount = GraphQLScalarType.newScalar() .name("PaginationAmount") .description("A positive integer with an upper bound") .coercing(PaginationAmountCoercing()) .build()!! 認証結果は GraphQLContext に保存しよう SpringBoot をベースにアプリケーションを作っていると認証結果のユーザ情報はリクエストスコープの Bean に保存するような形になりそうですが、 GraphQL には同一リクエストで使いまわすことができるコンテキストの仕組みが用意されています。 AuthContext という独自のクラスに User を持たせる例は以下のようになります。 GraphQLContext インタフェースを実装した AuthContext クラスを作成 build メソッドで AuthContext のインスタンスを返すような GraphQLContextBuilder を作成し Bean に登録 class AuthContext(val user: User?) : GraphQLContext { ... } @Bean fun authContextBuilder(): GraphQLContextBuilder = object : DefaultGraphQLContextBuilder() { override fun build( request: HttpServletRequest, response: HttpServletResponse ): GraphQLContext { // ユーザの情報を取得 val user = ... return AuthContext(user) } } AuthContext の生成はリクエストごとに1回実行されて、結果はリゾルバーで取得することができます。 class QueryResolver : GraphQLQueryResolver { fun messages( first: PaginationAmount, after: String?, environment: DataFetchingEnvironment // 引数に指定することで、ここからコンテキストの取得もできる { val() val user = authContext.user ... } } ユーザ情報のフィールドにするべきものとそうじゃないもの 認証済みユーザ専用の「おすすめコンテンツ」をスキーマで表現しようとすると、ユーザ情報の型におすすめコンテンツのフィールドを追加する形が考えられます。 type Query { # 現在のユーザ(未認証の場合は null) currentUser: User } # ユーザ情報 type User { # 会員の名前 name: String! ... # おすすめコンテンツ一覧 recommendedContents: [RecommendedContent] } ユーザ情報とおすすめコンテンツを取得するクエリは以下のようになります。 query { currentUser { name recommendedContents { ... } } } facebook が提供している GraphQL のサンプル*6と同じ設計方針となっていて一見自然な対応に見えますが、 今後の機能追加の方向によっては問題になってくる可能性があります。 例えば、未認証のユーザに対してもおすすめコンテンツを返さなければならなくなるかもしれません。 おすすめコンテンツ一覧を会員情報のフィールドとしていると、会員ではないユーザについてはそのフィールドにアクセスすることができなくなってしまいます。 このような場合は、会員情報とおすすめコンテンツのリレーションを断つのがシンプルです。 スキーマ定義の一部を修正したものは以下のようになります。 type Query { # 現在のユーザ currentUser: User # おすすめコンテンツ一覧 recommendedContents: [RecommendedContent] } ユーザ情報のフィールドにするものは ユーザを構成している要素である(e.g. メールアドレスなどの登録情報) ユーザの状態を表す要素である(e.g. 保有ポイント数) 他のユーザからも関連が見える必要がある(e.g. SNSの友達一覧) のいずれかの条件を満たすものにするのが良いでしょう。 認証が必要であることは Directive で表現しよう 未認証の場合に結果を返さないフィールド、もしくは型であることを示したいことがあります。 そのような時は Directive という機能を使えば宣言的に情報を付加することができます。 # 認証済みの場合のみアクセス可能 directive @auth on OBJECT | FIELD_DEFINITION type User @auth { name: String! } 実行時の振る舞いを変えるような Directive の実装方法は以下の2ステップです。 SchemaDirectiveWiring インタフェースを実装したクラスを作成する SchemaDirective として Bean に登録する 認証が必要なことを示す Directive の実装は以下のようになります。 class AuthDirective : SchemaDirectiveWiring { override fun): GraphQLFieldDefinition { val originalDataFetcher = environment.fieldDataFetcher val authDataFetcher = DataFetcher<Any { dataFetchingEnvironment val() if (authContext.user != null) { // 認証済みの場合。元のリゾルバーを呼び出す originalDataFetcher.get(dataFetchingEnvironment) } else { // 未認証の場合。 ... } } return environment.setFieldDataFetcher(authDataFetcher) } } @Bean fun = listOf( SchemaDirective("auth", AuthDirective()) ) エラーハンドリング graphql-java でのエラーハンドリングの方法はいくつかありますが、 GraphQLErrorHandler をカスタマイズする方法を紹介します。 デフォルトでは DefaultGraphQLErrorHandler が使われるようになっていて、リゾルバーからスローされた例外は "Internal Server Error(s) while executing query" というメッセージの1つのエラーに集約されてしまい詳細不明となってしまいますが、自由にカスタマイズすることが可能です。 実装方法は GraphQLErrorHandler インタフェースを実装したクラスを作成し、Bean に登録するのみです。 @Component class CustomGraphQLErrorHandler : GraphQLErrorHandler { override fun { // エラーハンドリングを実装する ... } } GraphQLErrorHandler をカスタマイズする以外の方法では、 SpringBoot の @ExceptionHandler アノテーションを使う方法*7 GraphQLError インタフェースを実装した例外をスローする方法 などがありますが、それらと比べると GrphQL の標準的なエラー表現である path や locations の情報がデフォルトで設定されている(他の方法では独自実装が必要) バリデーションエラーについてもカスタマイズ可能 エラーの数もカスタマイズ可能(レスポンスJSONの errors フィールドに任意の要素数で格納できる) などのメリットがあります。どこまでカスタマイズしたいか次第なところもありますが、おそらく一番自由度が高いカスタマイズ方法です。 フィールドで Nullable or Non-null を迷うようなら Nullable Non-null である必要がないフィールドを Non-null で定義してしまうと、取得できたはずのデータを返せなくなる可能性があります。 先ほども例に出したスキーマを例にして説明します。 # Schema type Query { # 現在のユーザ currentUser: User # おすすめコンテンツ一覧 recommendedContents: [RecommendedContent] } # Query query { currentUser { name } recommendedContents { title } } 上記のようなクエリを発行した際に���かしらエラーが発生し、おすすめコンテンツの情報が取得できず以下のような JSON を取得できたとします。 { "data": { "currentUser" : { "name": "エムスリー 太郎" }, "recommendedContents": null }, "errors": [ { "message": "failed to get recommended contents title", "path": ["recommendedContents"] } ] } この時、もし recommendedContents の型が [RecommendedContent]! のように Non-null だった場合、null になるはずだったフィールドの親のオブジェクトが null になります。つまりこの場合は data が null になり、取得できていたはずの currentUser のデータさえもクライアントに返らなくなります。 { "data": null, "errors": [ { "message": "failed to get recommended contents title", "path": ["recommendedContents"] } ] } (data フィールドは最上位のフィールドで Nullable です。) 上記のようなケースが考えられるため、 Nullable か Non-null か迷った時は Nullable とするのが良いと思われます。 また、複数のクエリが同時に問い合わせされた時のことを考えると、Query および Mutation 配下のフィールドは Nullable にしておくのが無難なのかもしれません。 Null可否についての考察はこちらの記事*8がとても参考になりました。 エラーとなった場合を例に出して少し詳しく見てみましたが、互換性の観点でも Nullable の方が望ましいです。 GraphQLをスマホアプリのAPIとして動かしつつスキーマ定義を変更することを考えます。その時、すでにリリースされているバージョンのアプリの互換性を保ちつつ変更する必要が出てきます。 サーバから null が返ってくるとクラッシュする可能性があるので危険! サーバが null を返さなくなっても問題ないので安全 フィールドの引数で Nullable or Non-null を迷うようなら Non-null 前のセクションではサーバからのレスポンスについては迷うようなら Nullable ということを述べましたが、 クライアントから送られる値については逆のことが言えます。つまり「Nullable or Non-null を迷うようなら Non-null」です。 互換性の観点で再び整理すると以下のようになるためです。 サーバが null を受け取れるようになっても問題ないので安全 サーバが null を受け取れなくなるとクエリ実行できない可能性があるので危険! 要素追加の可能性がある Enum を使うときは細心の注意を Enum の要素追加はサーバとクライアントで非互換になる可能性があります。 サーバ側は新しい Enum 要素を実装したバージョンをリリースすればいいですが、クライアント側(スマホアプリ)は、新しい Enum 要素を解釈できるバージョンのアプリをリリースし、ユーザの端末に新しいバージョンのアプリをダウンロードしてもらうところまでが必要になります。 Enum をクエリの結果として使う場合、要素追加される前のスキーマ定義を元にコードを生成した旧バージョンのアプリではサーバから返された新しい Enum 要素が解釈できないためです。 アプリの強制アップデート機能によって解消するという手段もありますが、エンジニアの都合でそれをやるのは避けたいです。 4つ目の要素が追加されようとしている Enum を例にして、いくつか解決策をあげます。 enum UserStatus { # 医師 DOCTOR # 医学生 MEDICAL_STUDENT # 薬剤師 PHARMACIST # 薬学生(これから追加される. 古いバージョンのアプリはこの値を知らない) # PHARMACY_STUDENT } 解決策1. unknown だった場合にどうするか決める Appoloクライアントの場合、未定義の Enum が返ってきたときにクラッシュさせないように unknown という状態にできます。 unknown なときにどうするか決めることができれば特に問題にはならないかもしれません。 解決策2. フィールドを変える 要素追加があるごとにフィールドを変えるという対策が取れます。 type User { # 薬学生を含まないステータス status: UserStatus! # 薬学生を含む新しいステータス(しかしフィールド名のネーミングはとても悪い...) newStatus: UserStatus! } フィールド名は拡張可能な形にしておく必要がありますが、命名はとても難しくなることが予想されます。 また、フィールドが増え続けるようなら、それはそれでアンチパターンにハマってしまっていると思われます。。 この方法を取る場合、サポートするクライアントのバージョンがわかっているようならコメント等で残しておくと良いでしょう。 そのバージョンの利用者がいなくなった時にフィールドを削除するのに使えます。 解決策3. Enum を使わない 上記の例であれば Enum にせずに同等の情報を返すフィールドを作る方法も取れます。 type User { # 学生かどうか isStudent: Boolean! # 薬学系ステータスかどうか isPharmacyStatus: Boolean! } 今後拡張の可能性が高いものは Enum として表現するよりも、それ以外のフィールドとして返してクライアント側で決定する方法の方が安全だと思われます。 先人の知恵を借りる 冒頭で述べました通り、GraphQL についてのナレッジがチームにはなかったため悩みどころは多かったです。 特にスキーマ設計についてはサーバサイド、クライアントサイドのエンジニアを交えて議論を重ねました。 スキーマ設計についての指針が欲しいと思っていたところで参考になったドキュメント・書籍を紹介します。 Relay Server Specification*9 Relay Server Specificationは GraphQL の拡張仕様です。スキーマ設計についていくつかの規約を定めています。 Relay に準拠した実装のライブラリも少なくないため、合わせておいて損はないでしょう。 GraphQL 公式サイト*10 GraphQL の一通りの機能についてドキュメントがあり、完全に理解した気分にさせてくれます。機能の説明となっているため使い所などわかりにくいところもありますが、やはり公式ドキュメントは読むべきです。 GraphQL スキーマ設計ガイド*11 あまり日本語化されていない GraphQL の設計周りについて書いてあります。 この書籍が配布された頃にちょうど悩んでいるところだったエラーハンドリングについて特に参考にさせていただきました。 We are hiring 今回は新規アプリのBFFにまつわる話をさせていただきました。 マルチデバイスチームではリリースされたばかりのアプリを成長させるべく一緒に開発に参加してくれる仲間を募集中です。 もちろんサーバサイドに限らず iOS / Android アプリのエンジニアも募集しています。 お気軽にお問い合わせください。 jobs.m3.com *1:初めてのGraphQL, Eve Porcello Alex Banks 著, 尾崎 沙耶 あんどうやすし 訳 *2:https://github.com/graphql-java/graphql-java *3:https://github.com/graphql-java-kickstart/graphql-java-servlet *4:https://github.com/graphql-java-kickstart/graphql-java-tools *5:https://github.com/graphql-java-kickstart/graphql-spring-boot *6:https://github.com/relayjs/relay-examples/tree/master/todo *7:graphql-spring-boot-starterのExceptionハンドリングがめっちゃ便利になってた https://shiraji.hatenablog.com/entry/2019/04/24/080000 *8:When To Use GraphQL Non-Null Fields https://medium.com/@calebmer/when-to-use-graphql-non-null-fields-4059337f6fc8 *9:Relay Server Specification https://relay.dev/docs/en/graphql-server-specification.html *10:https://graphql.org/ *11:GraphQLスキーマ設計ガイド https://github.com/vvakame/graphql-schema-guide
0 notes
Text
300+ TOP JSP Interview Questions and Answers
JSP Interview Questions for freshers experienced :-
1. What is a JSP and what is it used for? Java Server Pages (JSP) is a platform independent presentation layer technology that comes with SUN s J2EE platform. JSPs are normal HTML pages with Java code pieces embedded in them. JSP pages are saved to *.jsp files. A JSP compiler is used in the background to generate a Servlet from the JSP page. 2. What are the two kinds of comments in Jsp and what's the difference between them ? 3. What is Jsp technology? Java Server Page is a standard Java extension that is defined on top of the servlet Extensions. The goal of JSP is the simplified creation and management of dynamic Web pages. JSPs are secure, platform-independent, and best of all, make use of Java as a server-side scripting language. 4. What Is Jsp Page? A JSP page is a text-based document that contains two types of text: static template data, which can be expressed in any text-based format such as HTML, SVG, WML, and XML, and JSP elements, which construct dynamic content. 6. What are the implicit objects? Implicit objects are objects that are created by the web container and contain information related to a particular request, page, or application. They are: request response pageContext session application out config page exception 6. How many Jsp Scripting Elements and what are they? There are three scripting language elements: declarations scriptlets expressions 7. Why Are Jsp Pages The Preferred Api For Creating A Web-based Client Program? Because no plug-ins or security policy files are needed on the client systems(applet does). Also, JSP pages enable cleaner and more module application design because they provide a way to separate applications programming from web page design. This means personnel involved in web page design do not need to understand Java programming language syntax to do their jobs. 8. Is Jsp technology extensible? YES. JSP technology is extensible through the development of custom actions, or tags, which are encapsulated in tag libraries. 9. Can We Use The Constructor, Instead Of Init(), To Initialize Servlet? Yes , of course you can use the constructor instead of init(). There’s nothing to stop you. But you shouldn’t. The original reason for init() was that ancient versions of Java couldn’t dynamically invoke constructors with arguments, so there was no way to give the constructur a ServletConfig. That no longer applies, but servlet containers still will only call your no-arg constructor. So you won’t have access to a ServletConfig or Servlet Context. 10. How Can A Servlet Refresh Automatically If Some New Data Has Entered The Database? You can use a client-side Refresh or Server Push.

JSP Interview Questions 11. The Code In A Finally Clause Will Never Fail To Execute, Right? Using System.exit(1); in try block will not allow finally code to execute. 12. How Many Messaging Models Do Jms Provide For and What Are They? JMS provide for two messaging models, publish-and-subscribe and point-to-point queuing. 13. What Information Is Needed To Create A Tcp Socket? The Local Systems IP Address and Port Number. And the Remote System’s IPAddress and Port Number. 14. What Class.forname Will Do While Loading Drivers? It is used to create an instance of a driver and register it with the DriverManager. When you have loaded a driver, it is available for making a connection with a DBMS. 15. How To retrieve warnings? SQLWarning objects are a subclass of SQLException that deal with database access warnings. Warnings do not stop the execution of an application, as exceptions do; they simply alert the user that something did not happen as planned. A warning can be reported on a Connection object, a Statement object (including PreparedStatement and CallableStatement objects), or a ResultSet object. Each of these classes has a getWarnings method, which you must invoke in order to see the first warning reported on the calling object . SQLWarning warning = stmt.getWarnings(); if (warning != null) { while (warning != null) { System.out.println(\"Message: \" + warning.getMessage()); System.out.println(\"SQLState: \" + warning.getSQLState()); System.out.print(\"Vendor error code: \"); System.out.println(warning.getErrorCode()); warning = warning.getNextWarning(); } } 16. How Many Jsp Scripting Elements are there and what are they? There are three scripting language elements: declarations, scriptlets, expressions. 17. In The Servlet 2.4 Specification Singlethreadmodel has Been Deprecated, Why? Because it is not practical to have such model. Whether you set isThreadSafe to true or false, you should take care of concurrent client requests to the JSP page by synchronizing access to any shared objects defined at the page level. 18. What Are Stored Procedures? How Is It Useful? A stored procedure is a set of statements/commands which reside in the database. The stored procedure is pre-compiled and saves the database the effort of parsing and compiling sql statements every time a query is run. Each database has its own stored procedure language, usually a variant of C with a SQL preproceesor. Newer versions of db’s support writing stored procedures in Java and Perl too. Before the advent of 3-tier/n-tier architecture it was pretty common for stored procs to implement the business logic( A lot of systems still do it). The biggest advantage is of course speed. Also certain kind of data manipulations are not achieved in SQL. Stored procs provide a mechanism to do these manipulations. Stored procs are also useful when you want to do Batch updates/exports/houseKeeping kind of stuff on the db. The overhead of a JDBC Connection may be significant in these cases. 19. How Do I Include Static Files Within A Jsp Page? Static resources should always be included using the JSP include directive. This way, the inclusion is performed just once during the translation phase. Do note that you should always supply a relative URL for the file attribute. Although you can also include static resources using the action, this is not advisable as the inclusion is then performed for each and every request. 20. Why Does Jcomponent have add() And remove() Methods But Component does not? Because JComponent is a subclass of Container, and can contain other components and jcomponents. How can I implement a thread-safe JSP page? - You can make your JSPs thread-safe by having them implement the SingleThreadModel interface. This is done by adding the directive within your JSP page. 21. How Do I Prevent The Output Of My Jsp Or Servlet Pages From Being Cached By The Browser? You will need to set the appropriate HTTP header attributes to prevent the dynamic content output by the JSP page from being cached by the browser. Just execute the following scriptlet at the beginning of your JSP pages to prevent them from being cached at the browser. You need both the statements to take care of some of the older browser versions. 22. How Do You Restrict Page Errors Display In The Jsp Page? You first set "Errorpage" attribute of PAGE directory to the name of the error page (ie Errorpage= "error.jsp")in your jsp page .Then in the error jsp page set "isErrorpage=TRUE". When an error occur in your jsp page it will automatically call the error page. 23. What Jsp Lifecycle Methods Can I Override? You cannot override the _jspService() method within a JSP page. You can however, override the jspInit() and jspDestroy() methods within a JSP page. jspInit() can be useful for allocating resources like database connections, network connections, and so forth for the JSP page. It is good programming practice to free any allocated resources within jspDestroy(). The jspInit() and jspDestroy() methods are each executed just once during the lifecycle of a JSP page and are typically declared as JSP declarations: 24. How Do I Perform Browser Redirection From A Jsp Page? You can use the response implicit object to redirect the browser to a different resource, as: response. send Redirect ; You can also physically alter the Location HTTP header attribute, as shown below: You can also use the: Also note that you can only use this before any output has been sent to the client. I beleve this is the case with the response.sendRedirect() method as well. If you want to pass any paramateres then you can pass using. 25. How Does Jsp Handle Run-time Exceptions? You can use the errorPage attribute of the page directive to have uncaught runtime exceptions automatically forwarded to an error processing page. For example: redirects the browser to the JSP page error.jsp if an uncaught exception is encountered during request processing. Within error.jsp, if you indicate that it is an error-processing page, via the directive: the Throwable object describing the exception may be accessed within the error page via the exception implicit object. 26. How Do I Use Comments Within A Jsp Page? You can use "JSP-style" comments to selectively block out code while debugging or simply to comment your scriptlets. JSP comments are not visible at the client. For example: --%> You can also use HTML-style comments anywhere within your JSP page. These comments are visible at the client. For example: Of course, you can also use comments supported by your JSP scripting language within your scriptlets. 27. Is It Possible To Share An Httpsession Between A Jsp And Ejb? What Happens When I Change A Value In The Httpsession From Inside An Ejb? You can pass the HttpSession as parameter to an EJB method, only if all objects in session are serializable. This has to be consider as "passed-by-value", that means that it's read-only in the EJB. If anything is altered from inside the EJB, it won't be reflected back to the HttpSession of the Servlet Container. The "pass-byreference" can be used between EJBs Remote Interfaces, as they are remote references. While it IS possible to pass an HttpSession as a parameter to an EJB object, it is considered to be "bad practice" in terms of object oriented design. This is because you are creating an unnecessary coupling between back-end objects (ejbs) and front-end objects (HttpSession). Create a higher-level of abstraction for your ejb's api. Rather than passing the whole, fat, HttpSession (which carries with it a bunch of http semantics), create a class that acts as a value object (or structure) that holds all the data you need to pass back and forth between front-end/back-end. Consider the case where your ejb needs to support a non-http-based client. This higher level of abstraction will be flexible enough to support it. 28. How Can I Implement A Thread-safe Jsp Page? You can make your JSPs thread-safe by having them implement the SingleThreadModel interface. This is done by adding the directive within your JSP page. 29. How Can I Declare Methods Within My Jsp Page? You can declare methods for use within your JSP page as declarations. The methods can then be invoked within any other methods you declare, or within JSP scriptlets and expressions. Do note that you do not have direct access to any of the JSP implicit objects like request, response, session and so forth from within JSP methods. However, you should be able to pass any of the implicit JSP variables as parameters to the methods you declare. For example: Another Example: file1.jsp: file2.jsp 30. Can I Stop Jsp Execution While In The Midst Of Processing A Request? Yes. Preemptive termination of request processing on an error condition is a good way to maximize the throughput of a high-volume JSP engine. The trick (assuming Java is your scripting language) is to use the return statement when you want to terminate further processing. 31. Can A Jsp Page Process Html Form Data? Yes. However, unlike Servlet, you are not required to implement HTTP-protocol specific methods like doGet() or doPost() within your JSP page. You can obtain the data for the FORM input elements via the request implicit object within a scriptlet or expression as. 32. Is there a way To reference the "this" variable within a Jsp Page? Yes, there is. Under JSP 1.0, the page implicit object is equivalent to "this", and returns a reference to the Servlet generated by the JSP page. 33. Is There A Way I Can Set The Inactivity Lease Period On A Per-session Basis? Typically, a default inactivity lease period for all sessions is set within your JSPengine admin screen or associated properties file. However, if your JSP engine supports the Servlet 2.1 API, you can manage the inactivity lease period on a per-session basis. This is done by invoking the HttpSession.setMaxInactiveInterval() method, right after the session has been created. 34. How Does A Servlet Communicate With A Jsp Page? The following code snippet shows how a servlet instantiates a bean and initializes it with FORM data posted by a browser. The bean is then placed into the request, and the call is then forwarded to the JSP page, Bean1.jsp, by means of a request dispatcher for downstream processing. public void doPost (HttpServletRequest request, HttpServletResponse response) { try { govi.FormBean f = new govi.FormBean(); String id = request.getParameter("id"); f.setName(request.getParameter("name")); f.setAddr(request.getParameter("addr")); f.setAge(request.getParameter("age")); //use the id to compute //additional bean properties like info //maybe perform a db query, etc. // . . . f.setPersonalizationInfo(info); request.setAttribute("fBean",f); getServletConfig().getServletContext().getRequestDispatcher ("/jsp/Bean1.jsp").forward(request, response); } catch (Exception ex) { . . . } } The JSP page Bean1.jsp can then process fBean, a fter first extracting it from the default request scope via the useBean action. jsp:useBean id="fBean" class="govi.FormBean" scope="request"/ jsp:getProperty name="fBean" property="name" / jsp:getProperty name="fBean" property="addr" / jsp:getProperty name="fBean" property="age" / jsp:getProperty name="fBean" property="personalizationInfo" / 35. Can You Make Use Of A Servletoutputstream Object From Within A Jsp Page? No. You are supposed to make use of only a JSPWriter object (given to you in the form of the implicit object out) for replying to clients. A JSPWriter can be viewed as a buffered version of the stream object returned by response.getWriter(), although from an implementational perspective, it is not. 36. Can A Jsp Page Instantiate A Serialized Bean? No problem! The use Bean action specifies the beanName attribute, which can be used for indicating a serialized bean. For example: A couple of important points to note. Although you would have to name your serialized file "filename.ser", you only indicate "filename" as the value for the beanName attribute. Also, you will have to place your serialized file within the WEB-INFjspbeans directory for it to be located by the JSP engine. 37. What Is Jsp? Let's consider the answer to that from two different perspectives: that of an HTML designer and that of a Java programmer. If you are an HTML designer, you can look at JSP technology as extending HTML to provide you with the ability to seamlessly embed snippets of Java code within your HTML pages. These bits of Java code generate dynamic content, which is embedded within the other HTML/XML content you author. Even better, JSP technology provides the means by which programmers can create new HTML/XML tags and JavaBeans components, which provide new features for HTML designers without those designers needing to learn how to program. Note: A common misconception is that Java code embedded in a JSP page is transmitted with the HTML and executed by the user agent (such as a browser). This is not the case. A JSP page is translated into a Java servlet and executed on the server. JSP statements embedded in the JSP page become part of the servlet generated from the JSP page. The resulting servlet is executed on the server. It is never visible to the user agent. If you are a Java programmer, you can look at JSP technology as a new, higher-level means to writing servlets. Instead of directly writing servlet classes and then emitting HTML from your servlets, you write HTML pages with Java code embedded in them. The JSP environment takes your page and dynamically compiles it. Whenever a user agent requests that page from the Web server, the servlet that was generated from your JSP code is executed, and the results are returned to the user. 38. How Do I Mix Jsp And Ssi #include? What Is The Difference Between Include Directive & Jsp:include Action? If you're just including raw HTML, use the #include directive as usual inside your .jsp file. But it's a little trickier if you want the server to evaluate any JSP code that's inside the included file. If your data.inc file contains jsp code you will have to use The is used for including non-JSP files. include directive - - as is the case with all other directives in a JSP page, this include directive is also processed at the time when the JSP page is translated into its equivalent servlet. This directive simply causes the contents of the specified file to be pasted into the JSP page at the place where the page contains this directive. Irrespective of whether the included resource is a static resource or a JSP page - only the contents of the file are pasted (and not the processed results). This directive is normally used for including static resources only - like, banner, header, footer, etc. for the obvious reason. include action - this include action is executed at run time and the specified 'page' is first executed and then the result of that 'page' is appended to the response object of the calling JSP at the point where the tag occurs. Obviously if the specified page is a static resource then the contents of it are included as there won't be an executed result in that case. This action allows additional parameters to be passed via child element of this include action element. 39. How Do You Prevent The Creation Of A Session In A Jsp Page And Why? What Is The Difference Between Include Directive & Jsp:include Action? By default, a JSP page will automatically create a session for the request if one does not exist. However, sessions consume resources and if it is not necessary to maintain a session, one should not be created. For example, a marketing campaign may suggest the reader visit a web page for more information. If it is anticipated that a lot of traffic will hit that page, you may want to optimize the load on the machine by not creating useless sessions. 40. How Can I Set A Cookie And Delete A Cookie From Within A Jsp Page? A cookie, mycookie, can be deleted using the following scriptlet: 41. How Do You Connect To The Database From Jsp? A Connection to a database can be established from a jsp page by writing the code to establish a connection using a jsp scriptlets. Further then you can use the resultset object "res" to read data in the following way. 42. What Is The Page Directive Is Used To Prevent A Jsp Page From Automatically Creating A Session? 43. How Do You Delete A Cookie Within A Jsp? Cookie mycook = new Cookie("name","value"); response.addCookie(mycook); Cookie killmycook = new Cookie("mycook","value"); killmycook.setMaxAge(0); killmycook.setPath("/"); killmycook.addCookie(killmycook); 44. Can We Implement An Interface In A Jsp? No 45. What Is The Difference Between Servletcontext And Pagecontext? ServletContext: Gives the information about the container PageContext: Gives the information about the Request. 46. What Is The Difference In Using Request.getrequestdispatcher() And Context.getrequestdispatcher()? request.getRequestDispatcher(path): In order to create it we need to give the relative path of the resource context.getRequestDispatcher(path): In order to create it we need to give the absolute path of the resource. 47. How To Pass Information From Jsp To Included Jsp? Using tag. 48. How Is Jsp Include Directive Different From Jsp Include Action. ? When a JSP include directive is used, the included file's code is added into the added JSP page at page translation time, this happens before the JSP page is translated into a servlet. While if any page is included using action tag, the page's output is returned back to the added page. This happens at runtime. 49. Can We Override The Jspinit(), _jspservice() And Jspdestroy() Methods? We can override jspinit() and jspDestroy() methods but not _jspService(). 50. Why Is _jspservice() Method Starting With An '_' While Other Life Cycle Methods Do Not? _jspService() method will be written by the container hence any methods which are not to be overridden by the end user are typically written starting with an '_'. This is the reason why we don't override _jspService() method in any JSP page. 51. What Happens When A Page Is Statically Included In Another Jsp Page? An include directive tells the JSP engine to include the contents of another file (HTML, JSP, etc.) in the current page. This process of including a file is also called as static include. 52. A Jsp Page, Include.jsp, Has A Instance Variable "int A", Now This Page Is Statically Included In Another Jsp Page, Index.jsp, Which Has A Instance Variable "int A" Declared. What Happens When The Index.jsp Page Is Requested By The Client? Compilation error, as two variables with same name can't be declared. This happens because, when a page is included statically, entire code of included page becomes part of the new page. at this time there are two declarations of variable 'a'. Hence compilation error. 53. Can You Override Jspinit() Method? If Yes, In Which Cases? yes, we can. We do it usually when we need to initialize any members which are to be available for a servlet/ JSP throughout its lifetime. 54. What Is The Difference Between Directive Include And Jsp Include? include directive : The file gets included at the compile time. it is static in nature.output comes with jsp page but whole file contains is included in jsp then compilation is done. action tag : The file gets included at the run time. This is faster. it is dynamic in nature.output of yhe file willbe included in the jsp file. 55. What Is The Difference Between Requestdispatcher And Sendredirect? RequestDispatcher: server-side redirect with request and response objects. sendRedirect : Client-side redirect with new request and response objects. 56. How Does Jsp Handle Runtime Exceptions? Using errorPage attribute of page directive and also we need to specify isErrorPage=true if the current page is intended to URL redirecting of a JSP. 57. How Can My Application Get To Know When A Httpsession Is Removed? Define a Class HttpSessionNotifier which implements HttpSessionBindingListener and implement the functionality what you need in valueUnbound() method. Create an instance of that class and put that instance in HttpSession. 58. What Is A Output Comment? A comment that is sent to the client in the viewable page source.The JSP engine handles an output comment as uninterpreted HTML text, returning the comment in the HTML output sent to the client. You can see the comment by viewing the page source from your Web browser. JSP Syntax Example 1 Displays in the page source: 59. What Is A Hidden Comment? A comments that documents the JSP page but is not sent to the client. The JSP engine ignores a hidden comment, and does not process any code within hidden comment tags. A hidden comment is not sent to the client, either in the displayed JSP page or the HTML page source. The hidden comment is useful when you want to hide or "comment out" part of your JSP page. You can use any characters in the body of the comment except the closing --%> combination. If you need to use --%> in your comment, you can escape it by typing --%\>. JSP Syntax Examples 60. What Is A Expression? An expression tag contains a scripting language expression that is evaluated, converted to a String, and inserted where the expression appears in the JSP file. Because the value of an expression is converted to a String, you can use an expression within text in a JSP file. Like You cannot use a semicolon to end an expression. 61. What Is A Declaration? A declaration declares one or more variables or methods for use later in the JSP source file. A declaration must contain at least one complete declarative statement. You can declare any number of variables or methods within one declaration tag, as long as they are separated by semicolons. The declaration must be valid in the scripting language used in the JSP file. 62. What Is A Scriptlet? A scriptlet can contain any number of language statements, variable or method declarations, or expressions that are valid in the page scripting language.Within scriptlet tags, you can Declare variables or methods to use later in the file (see also Declaration). Write expressions valid in the page scripting language (see also Expression). Use any of the JSP implicit objects or any object declared with a tag. You must write plain text, HTML-encoded text, or other JSP tags outside the scriptlet. Scriptlets are executed at request time, when the JSP engine processes the client request. If the scriptlet produces output, the output is stored in the out object, from which you can display it. 63. What Are Implicit Objects? List Them? Certain objects that are available for the use in JSP documents without being declared first. These objects are parsed by the JSP engine and inserted into the generated servlet. The implicit objects re listed below request response pageContext session application out config page exception. 64. Difference Between Forward And Sendredirect? When you invoke a forward request, the request is sent to another resource ohe server, without the client being informed that a different resource is going to process the request. This process occurs completly with in the web container. When a sendRedirtect method is invoked, it causes the web container to return to the browser indicating that a new URL should be requested. Because the browser issues a completly new request any object that are stored as request attributes before the redirect occurs will be lost. This extra round trip a redirect is slower than forward. 65. What Are The Different Scope Valiues For The ? The different scope values for are 1. page 2. request 3.session 4.application. 66. Explain The Life-cycle Mehtods In Jsp? The generated servlet class for a JSP page implements the HttpJspPage interface of the javax.servlet.jsp package. Hte HttpJspPage interface extends the JspPage interface which inturn extends the Servlet interface of the javax.servlet package. the generated servlet class thus implements all the methods of the these three interfaces. The JspPage interface declares only two mehtods - jspInit() and jspDestroy() that must be implemented by all JSP page regardless of the client-server protocol. However the JSP specification has provided the HttpJspPage interfaec specifically for the JSp pages serving HTTP requests. This interface declares one method_jspService(). The jspInit()- The container calls the jspInit() to initialize te servlet instance.It is called before any other method, and is called only once for a servlet instance. The _jspservice()- The container calls the _jspservice() for each request, passing it the request and the response objects. The jspDestroy()- The container calls this when it decides take the instance out of service. It is the last method called n the servlet instance. 67. What's A Better Approach For Enabling Thread-safe Servlets And Jsps? Singlethreadmodel Interface Or Synchronization? Although the SingleThreadModel technique is easy to use, and works well for low volume sites, it does not scale well. If you anticipate your users to increase in the future, you may be better off implementing explicit synchronization for your shared data. The key however, is to effectively minimize the amount of code that is synchronzied so that you take maximum advantage of multithreading. Also, note that SingleThreadModel is pretty resource intensive from the server\'s perspective. The most serious issue however is when the number of concurrent requests exhaust the servlet instance pool. In that case, all the unserviced requests are queued until something becomes free - which results in poor performance. Since the usage is non-deterministic, it may not help much even if you did add more memory and increased the size of the instance pool. 68. What Is The Difference Between Jsp And Servlets ? JSP is used mainly for presentation only. A JSP can only be HttpServlet that means the only supported protocol in JSP is HTTP. But a servlet can support any protocol like HTTP, FTP, SMTP etc. 69. What Is Difference Between Custom Jsp Tags And Beans? Custom JSP tag is a tag you defined. You define how a tag, its attributes and its body are interpreted, and then group your tags into collections called tag libraries that can be used in any number of JSP files. To use custom JSP tags, you need to define three separate components: the tag handler class that defines the tag's behavior ,the tag library descriptor file that maps the XML element names to the tag implementations and the JSP file that uses the tag library. JavaBeans are Java utility classes you defined. Beans have a standard format for Java classes. You use tags . Custom tags and beans accomplish the same goals -- encapsulating complex behavior into simple and accessible forms. There are several differences. Custom tags can manipulate JSP content; beans cannot. Complex operations can be reduced to a significantly simpler form with custom tags than with beans. Custom tags require quite a bit more work to set up than do beans. Custom tags usually define relatively self-contained behavior, whereas beans are often defined in one servlet and used in a different servlet or JSP page. Custom tags are available only in JSP 1.1 and later, but beans can be used in all JSP 1.x versions. 70. What Are The Different Ways For Session Tracking? Cookies, URL rewriting, HttpSession, Hidden form fields. 71. What Mechanisms Are Used By A Servlet Container To Maintain Session Information? Cookies, URL rewriting, and HTTPS protocol information are used to maintain session information. 72. Difference Between Get And Post? In GET your entire form submission can be encapsulated in one URL, like a hyperlink. query length is limited to 255 characters, not secure, faster, quick and easy. The data is submitted as part of URL. In POST data is submitted inside body of the HTTP request. The data is not visible on the URL and it is more secure. 73. What Is Session? The session is an object used by a servlet to track a user's interaction with a Web application across multiple HTTP requests. The session is stored on the server. 74. What Is Servlet Mapping? The servlet mapping defines an association between a URL pattern and a servlet. The mapping is used to map requests to Servlets. 75. What Is Servlet Context ? The servlet context is an object that contains a information about the Web application and container. Using the context, a servlet can log events, obtain URL references to resources, and set and store attributes that other servlets in the context can use. 76. What Is A Servlet ? servlet is a java program that runs inside a web container. 77. How Is Scripting Disabled? Scripting is disabled by setting the scripting-invalid element of the deployment descriptor to true. It is a sub element of jsp-property-group. Its valid values are true and false. The syntax for disabling scripting is as follows: *.jsp true 78. What Is A Jsp Expression? A JSP expression is used to write an output without using the out.print statement. It can be said as a shorthand representation for scriptlets. An expression is written between the tags. It is not required to end the expression with a semicolon, as it implicitly adds a semicolon to all the expressions within the expression tags. 79. What Are Jsp Declarations? As the name implies, JSP declarations are used to declare class variables and methods in a JSP page. They are initialized when the class is initialized. Anything defined in a declaration is available for the whole JSP page. A declaration block is enclosed between the tags. A declaration is not included in theservice() method when a JSP is translated to a servlet. 80. What Is The Jsp:plugin Action ? This action lets you insert the browser-specific OBJECT or EMBED element needed to specify that the browser run an applet using the Java plugin. 81. What Are Scripting Elements? JSP scripting elements let you insert Java code into the servlet that will be generated from the current JSP page. There are three forms: Expressionsof the form that are evaluated and inserted into the output, Scriptletsof the form that are inserted into the servlet's service method, Declarationsof the form that are inserted into the body of the servlet class, outside of any existing methods. 82. What Is The Standard Action? The standard action is used with or to pass parameter names and values to the target resource. The syntax of the standard action is as follows: 83. What Is The Jsp:getproperty Action? The action is used to access the properties of a bean that was set using the action. The container converts the property to a String as follows: If it is an object, it uses the toString() method to convert it to a String. If it is a primitive, it converts it directly to a String using the valueOf() method of the corresponding Wrapper class. The syntax of the method is: Here, name is the id of the bean from which the property was set. The property attribute is the property to get. A user must create or locate a bean using the action before using the action. 84. Differentiate Between Pagecontext.include And Jsp:include? The standard action and thepageContext.include() method are both used to include resources at runtime. However, thepageContext.include() method always flushes the output of the current page before including the other components, whereas flushes the output of the current page only if the value = of flush is explicitly set to true as follows: 85. What Is The Standard Action? The standard action enables the current JSP page to include a static or a dynamic resource at runtime. In contrast to the include directive, the include action is used for resources that change frequently. The resource to be included must be in the same context.The syntax of the standard action is as follows: Here, targetPage is the page to be included in the current JSP. 86. What Is The Standard Action? The standard action is used to locate an existing JavaBean or to create a JavaBean if it does not exist. It has attributes to identify the object instance, to specify the lifetime of the bean, and to specify the fully qualified classpath and type. 87. What Are The Standard Actions Available In Jsp? The standard actions available in JSP are as follows: It includes a response from a servlet or a JSP page into the current page.It differs from an include directive in that it includes a resource at request processing time, whereas the include directive includes a resource at translation time. It forwards a response from a servlet or a JSP page to another page. It makes a JavaBean available to a page and instantiates the bean. It sets the properties for a JavaBean. It gets the value of a property from a JavaBean component and adds it to the response. It is used in conjunction with ;, ; to add a parameter to a request. These parameters are provided using the name-value pairs. It is used to include a Java applet or a JavaBean in the current JSP page. 88. What Are The Jsp Standard Actions? The JSP standard actions affect the overall runtime behavior of a JSP page and also the response sent back to the client. They can be used to include a file at the request time, to find or instantiate a JavaBean, to forward a request to a new page, to generate a browser-specific code, etc. Ex: include, forward, useBean,etc. 89. What Is The Include Directive? There are thirteen attributes defined for a page directive of which the importantattributes are as follows: The include directive is used to statically insert the contents of a resource into the current JSP. This enables a user to reuse the code without duplicating it, and includes the contents of the specified file at the translation time. The syntax of the include directive is as follows: This directive has only one attribute called file that specifies the name of the file to be included. 90. What Are The Attributes Of Page Directive? There are thirteen attributes defined for a page directive of which the important attributes are as follows: import: It specifies the packages that are to be imported. session: It specifies whether a session data is available to the JSP page. contentType: It allows a user to set the content-type for a page. isELIgnored: It specifies whether the EL expressions are ignored when a JSP is translated to a servlet. 91. What Is Page Directive? A page directive is to inform the JSP engine about the headers or facilities that page should get from the environment. Typically, the page directive is found at the top of almost all of our JSP pages. There can be any number of page directives within a JSP page (although the attribute – value pair must be unique). The syntax of the include directive is: Example: 92. What Are Jsp Directives? • JSP directives are messages for the JSP engine. i.e., JSP directives serve as a message from a JSP page to the JSP container and control the processing of the entire page. • They are used to set global values such as a class declaration, method implementation, output content type, etc. • They do not produce any output to the client. • Directives are always enclosed within tag. • Ex: page directive, include directive, etc. 93. What Are Advantages Of Jsp whenever there is a change in the code, we dont have to recompile the jsp. it automatically does the compilation. by using custom tags and tag libraries the length of the java code is reduced. 94. How Do I Use A Scriptlet To Initialize A Newly Instantiated Bean? A jsp:useBean action may optionally have a body. If the body is specified, its contents will be automatically invoked when the specified bean is instantiated. Typically, the body will contain scriptlets or jsp:setProperty tags to initialize the newly instantiated bean, although you are not restricted to using those alone. The following example shows the "today" property of the Foo bean initialized to the current date when it is instantiated. Note that here, we make use of a JSP expression within the jsp:setProperty action. value=""/ > 95. What Is The Page Directive Is Used To Prevent A Jsp Page From Automatically Creating A Session: 96. What Are The Steps Required In Adding A Jsp Tag Libraries? Create a TLD file and configure the required class Information. Create the Java Implementation Source extending the JSP Tag Lib Class (TagSupport). Compile and package it as loosed class file or as a jar under lib folder in Web Archive File for Class loading. Place the TLD file under the WEB-INF folder. Add reference to the tag library in the web.xml file. 97. Outline The Major Difference Between The Session And Cookie? Sessions are always stored in the server side whereas cookies are always stored in the client side. 98. How Method Is Declared Within Jsp Page? Methods can be declared for use within JSP page as declaration and this method can be invoked within any other method which is declared or within JSP scriptlets or expressions. Direct access to the JSP implicit objects like request, response, session etc is forbidden within JSP methods but implicit Java server page variable is allowed to pass as parameters to the method which is declared. 99. Is It Possible By A Jsp Page To Process Html Form Data? Yes it is possible by simply obtaining the data from the FORM input via the request implicit object which lies with a scriptlet or expression but it doesn't require to implement any HTTP – Protocol methods like goGet() or doPost() within the JSP page. 100. How Cookies Is Deleted In Jsp? There are two ways by which the cookies can be deleted in JSP. Firstly, by setting the setMaxAge() of the cookie class to zero. And secondly by setting a timer in the header file that is response. setHeader(expires {Mention the time} attribute), which will delete the cookies after that prescribed time. 101. What Are Custom Tags And Why It Is Needed? JSP tags are extended by creating a custom set of tags which is called as tag library (taglib). The page which uses custom tags declares taglib and uniquely names, defines and associates a tag prefix to differentiate the usage of those tags. 102. Outline The Difference Between Java Server Page Forward And Servlet Forward Method? The only minor difference between both the methods is that Java Server page forward method can’t forward to another JSP page in another web application or container whereas servlet forward method can do so. 103. State The Difference Between The Expression And Scriptlet? JSP, Expressions is used to display the values of variable or to return the values by invoking the getter methods. However, JSP expressions begins with and does not have semicolon at the end of the expression. Scriptlet can contain variable, method or expressions that are valid within the page scripting language. Within the scripting tags and page scripting language any valid operations can be performed. 104. How A Run - Time Application Is Handled In Jsp? In JSP the errorpage attribute of the page is used as a directive to have uncaught run – time exceptions and which is automatically forwarded to an page which processes the error. If an uncaught exception is encountered while processing the request, then the browser redirects to the JSP error page. 105. What Is Declaration In Jsp? In Java Server pages Declaration is used to declare and define variables and methods that can be used in the Java Server Pages. The variable which is declared is initialized once and it retain its value for every subsequent client request. 106. How To Override The Lifecycle Methods Of Jsp? Lifecycle method jspService() cannot be overridden within a JSP page however methods like jspInit() and jspDestroy() can be overridden within a JSP page. Method jspInit() is used for allocating resource while method jspDestroy() is used to free allocated resource. But it should be kept in mind that during the lifecycle of a Java Server Page both the method jsplnit() and jspDestroy() is executed once and are declared as JSP declarations. 107. How Jsp Calls A Stored Procedure? Java Server Pages possess all the characteristics of java and to call and have similar syntax to call a function. Functions and stored procedures of a database can be called by using the statement callable. Another way to call the stored procedure is by writing the JDBC code in between the tag of scriptlet tab.write. 108. What Are The Implicit Objects In Jsp? There are all total 9 implicit objects in JSP. Application interface refers to the web application’s interface whereas Session interface refers to the user’s session. Request interface refers to the page which is currently requested whereas Response interface refers to the response which is currently made by the user. Config interface refers to the servlet configuration. Class like out, page, page Context and exception refers to the output stream of the page, servlet instance of the page, environment of the page, error handling respectively. 109. How Servlet Differ From Jsp? Both Servlet and Java Server Pages are API which generate dynamic web content. A servlet is nothing but a java class which implements the interface to run within a web and on the other hand Java server pages is a bit complicated thing which contain a mixture of Java scripts, Java directives, Java elements and HTML. The main difference among both servlet and Java server pages is that JSP is document oriented and servlet on the other hand act likes a program. 110. What Is Jsp? Describe Its Concept? JSP is a technology that combines HTML/XML markup languages and elements of Java programming Language to return dynamic content to the Web client, It is normally used to handle Presentation logic of a web application, although it may have business logic. 111. What Are The Lifecycle Phases Of A Jsp? JSP page looks like a HTML page but is a servlet. When presented with JSP page the JSP engine does the following 7 phases. Page translation: -page is parsed, and a java file which is a servlet is created. Page compilation: page is compiled into a class file Page loading : This class file is loaded. Create an instance :- Instance of servlet is created jspInit() method is called _jspService is called to handle service calls _jspDestroy is called to destroy it when the servlet is not required. 112. What Is A Translation Unit? JSP page can include the contents of other HTML pages or other JSP files. This is done by using the include directive. When the JSP engine is presented with such a JSP page it is converted to one servlet class and this is called a translation unit, Things to remember in a translation unit is that page directives affect the whole unit, one variable declaration cannot occur in the same unit more than once, the standard action jsp:useBean cannot declare the same bean twice in one unit. 113. How Is Jsp Used In The Mvc Model JSP is usually used for presentation in the MVC pattern (Model View Controller ) i.e. it plays the role of the view. The controller deals with calling the model and the business classes which in turn get the data, this data is then presented to the JSP for rendering on to the client. 114. What Are Context Initialization Parameters Context initialization parameters are specified by the in the web.xml file, these are initialization parameter for the whole application and not specific to any servlet or JSP. 115. What's The Difference Between Forward And Sendredirect? When you invoke a forward request, the request is sent to another resource on the server, without the client being informed that a different resource is going to process the request. This process occurs completely with in the web container And then returns to the calling method. When a sendRedirect method is invoked, it causes the web container to return to the browser indicating that a new URL should be requested. Because the browser issues a completely new request any object that are stored as request attributes before the redirect occurs will be lost. This extra round trip a redirect is slower than forward. 116. How Can You Store International / Unicode Characters Into A Cookie? One way is, before storing the cookie URLEncode it. URLEnocder.encoder(str); And use URLDecoder.decode(str) when you get the stored cookie. 117. In The Servlet 2.4 Specification Singlethreadmodel Has Been Deprecates, Why? Because it is not practical to have such model. Whether you set isThreadSafe to true or false, you should take care of concurrent client requests to the JSP page by synchronizing access to any shared objects defined at the page level. JSP Questions and Answers Pdf Download Read the full article
0 notes
Text
What is MVC in JSP? tririd.com
MVC is a software architecture - the structure of the system - that separates the following parts:
Model, View, Controller

MVC is common for all Language. It is actually a design Pattern to develop Application. Application develop by using this pattern has 3 component model views and controller.
Model
The Model is responsible for managing the data at backend side.
View
View is responsible for displaying all the database records to the user .A view request the information from the model.
Controller:
Controller handles the user interaction .Controller is a software code that controls the interaction between the model and view.
MVC in jsp:
Controller acts as an interface between View and Model. Controller intercepts all the incoming requests. Example: Servlets act as controller in a java.
Model represents the state of the application i.e. data. It can also have business logic. Example: Entity classes/POJO/ Model classes act as model in java.
View represents the presentation layer i.e. UI (User Interface). Example: JSP pages, HTML pages act as View in java.
To learn more about join us @ TRIIRD.
Call us @ 8980010210
Visit us @ http://www.tririd.com/technology/
#Tririd Technologies Pvt Ltd#software company#online computer coaching#engineering project training#corporate training
0 notes
Text
14 Open Source API Testing Tools For REST & SOAP Services
I wanted to share this great post from Joe Colantonio because he put together a great mashup of API testing tools that is quite extensive and exhaustive. This area of testing is becoming a bigger and bigger part of test automation and needs to be continue to be refined as the demand for API testing continues to grow.
One thing that I will be focussing on as we post more and more on this blog is not only good information about testing tools but how they can be applied for different scenerios. Check out Joe’s top 14 API testing tools below.
As we move towards more Agile shift-left software development processes like continuous integration and delivery, the need to quickly give test feedback to our developers is increasing.
One downfall to UI tests is they are slow, making them a poor choice for letting developers know quickly if their code has broken the latest build or not. API tests, on the other hand, tend to be faster and run more reliably than GUI tests.
Before we take a closer look at the api testing tools, let’s make sure we’re all on the same page with what an API actually is.
What is an API?
Application Programming Interfaces (API) is a specification that acts as an interface for software components.
While most functional testing involves testing a user interface like a web page or a dot net form, API testing involves bypassing a user interface and communicating directly with an application by making calls to its APIs.
API testing allows you to test headless technologies like JMS HTTP, databases and Web services.
API testing is sometimes called “headless” testing. Most headless testing consists of bypassing the UI and sending a request directly to an application’s backend or service and receiving a response, while validating the response to ensure things are working as we expect them to.
This simple example is often referred to as a client/server relationship. A client makes a request by asking for a resource; the request then goes out and finds a server that can fill that request. The server locates the desired resource and sends a response back to the client.
What API Testing Tools Can I Use to Automate API Testing?
Since Selenium is just for browser based testing, you may be wondering which tool to use for Rest and Soap web service-based testing.
Here are some of the top API testing tools that can be used for Rest and Soap Web Service Testing.
Postman
Postman is a rest client that started off as a Chrome browser plugin but recently came out with native versions for both Mac and Windows.
At a high level, you can use it to send a post request to your web server and it gives you the response back. It allows you to set up all the headers and cookies your API expects, and then check the response when it comes back.
Can be used for both automated and exploratory testing
Can be run on Mac, Windows, Linux &Chrome Apps
Has a bunch of integrations like support for Swagger & RAML formats
Has Run, Test, Document and Monitoring Features
Doesn’t require learning a new language
Karate DSL
Karate allows you to create a test that can sequence calls to any kind of web-service and assert that the responses are as expected.
Build on top of Cucumber-JVM
Can run test and generate reports like any standard Java project
Test can be written without any Java knowledge required
Tests are easy to write even for non-programmers
Check out a quick example on how to get started using Karate with BDD.
SoapUI
SoapUI is a headless functional testing tool from SmartBear software. It comes in two flavors: Free open source version and Pro Version. Since the free version is open-source, you can actually gain access to the full source code and modify as needed. The pro version is user-friendlier, and has additional functionality including a form editor, an assertion wizard for Xpath, and SQL query builder. The free version lets you:
Can easily create custom code using Groovy
Drag and Drop Test Creating
Can create complex scenarios
Asynchronous Testing
SoapUI’s Mock Service lets you mimic web services before they are implemented
HttpMaster Express
HttpMaster describes itself as a web development and test tool to automate testing of web sites and services. It can be used to test RESTful web services and API applications. HttpMaster also allows you to and monitor API responses.
HttpsMaster project offers global options to customize your API request
Parameter capabilities enable you to include dynamic data with your request
You can use request chaining to leverage request items to include some data from previous request with the next request
Rest- Assured
Rest-Assured is an open-source Java Domain-specific language (DSL) that makes testing REST service simple. It simplifies things by eliminating the need to use boiler-plate code to test and validate complex responses. It also supports XML and JSON Request/Responses.
Removes need to create boilerplate code required to interact with a rest service
Support BDD Given/When/Then syntax
Integrated seamlessly with Java projects
RestSharp
RestSharp is a simple REST and HTTP API Client for .NET
Supports .NET 3.5+, Silverlight 5, Windows Phone 8, Mono, MonoTouch, Mono for Android
Easy installation using NuGet for most .NET flavors
GET, POST, PUT, PATCH, HEAD, OPTIONS, DELETE supported
Rest Console
HTTP Client and Request Visualizer and Constructor tool, helps developers build, debug and test RESTful APIs. Rest Console is a HTTP Request Visualizer and Constructor tool, helps developers build, debug and test RESTful APIs.
Easy query parameters creation
Syntax highlighting
Authentication support: Plain, Basic, OAuth + Custom
RoboHydra Server
RoboHydra is a testing tool for HTTP-based clients (ie. software that makes HTTP requests). The idea is, instead of connecting your clients-under-test to the real server, you connect them to RoboHydra and make RoboHydra respond with whatever you need for each request.
You can test many different kinds of clients
Written in Javascript, runs under Node
Hippie-Swagger
hippie-swagger is a tool for testing RESTful APIs. It’s also an API testing tool with automatic swagger assertions. In addition to validating API behavior, it will fail tests when swagger documentation is missing or inaccurate.
Can validate All aspects of swagger file validated; parameters, request/response body, paths, etc.
Accurate, human readable assertion messages
WebInject
WebInject is an open source solution for automated testing of web applications and web services. It can be used to test individual system components that have HTTP interfaces (JSP, ASP, CGI, PHP, AJAX, Servlets, HTML Forms, XML/SOAP Web Services, REST, etc).
Is a command line tool
Written in Perl can be installed on MS Windows, GNU/Linux, BSD, Solaris, MAC OS
Pyresttest
PyRestTest is a python based REST testing and API microbenchmarking tool
You can write your tests in basic YAML or JSON config files, no code needed
Returns exit codes on failure
Only works on Mac and Linux
Airborne
Airborne is an open source Ruby based RSpec driven API testing framework.
Works with Rack application like Sinatra and Grape
Works with APIs written in Rails
Unirest
Recommended by Unmesh Gundecha Unirest is a lightweight HTTP request client libraries.
Can be combined with xUnit, BDD runner to make it a test tool
Mockbin
Mockbin was recommended by Augusto Marietti. Mockbin allows you to generate custom endpoints to test, mock, and track HTTP requests & responses between libraries, sockets and APIs.
Mock Custom Endpoints
Create Custom HTTP Methods
Log and inspect incoming calls to your custom endpoints
Api Testing Tools Recap
These are the top API testing tools I’ve come across, but there are tons of API testing tools popping up everywhere, so I’ll definitely be adding to this list as time goes on.
If one of your favorite API test tools is not listed, please let me know and I’ll add it.
Initially shared on Joe’s Blog
Over time I will be adding additional comments on API Testing tools for sure. Be sure to be notified of future posts.
from WordPress http://ift.tt/2h186KA
1 note
·
View note
Text
Spring Basic (English)
1.Why should you use Spring?
Lightweight: Spring is lightweight when it comes to size and transparency.
Inversion of control (IOC): Objects give their dependencies instead of creating or looking for dependent objects.
Aspect oriented (AOP): Spring supports Aspect oriented programming and enables cohesive development by separating application business logic from system services.
Container: Spring contains and manages the life cycle and configuration of application objects.
MVC Framework: Provides a great alternative to other web frameworks such as Struts.
Transaction Management: Spring provides a consistent transaction management interface that can scale down to a local and scale up to global.
Exception Handling: Spring translate technology-specific exceptions into consistent, unchecked exceptions.
2. Modules
Core,
Bean,
Context,
Expression Language,
JDBC,
ORM,
OXM,
JMS,
Transaction,
Web,
Web-Servlet,
Web-Struts,
Web-Portlet
3. Inversion of Control (IOC)
This concept says that you do not create your objects but describe how they should be created. Dependency Injection is an example of it (spring injects dependencies into your attributes with @Autowire).
Containers - Bean Factory : Container providing basic support. - Spring ApplicationContext: adds more enterprise-specific functionality.
Types - Constructor-based: The container invokes a class constructor with a number of arguments. - Setter-based: Calling setter methods on your beans after invoking a no-argument constructor.
4. Scopes
Types instances that should be returned from Spring container:
Singleton: Bean definition to a single instance, it's the default.
Prototype: Single bean definition to have any number of object instances.
Request: A bean definition to an HTTP request
Session: A bean definition to an HTTP session
Global-session: A bean definition to a global HTTP session
5. Aspect-oriented programming (AOP)
It is a programming technique that allows programmers to modularize crosscutting concerns, or behavior.
Concern: It may be defined as a functionality we want to implement.
Cross-cutting concern: It's a concern which is applicable throughout the application and it affects the entire application.
Advice: This is the actual action to be taken either before or after the method execution. - Before: Run advice before a method execution. - After: Run advice after a method execution regardless of its outcome. - After-returning: Run advice after a method execution only if method completes successfully. - After-throwing: Run advice after a method execution only if method exits by throwing an exception. - Around: Run advice before and after the advised method is invoked.
Join: This represents a point in your application where you can plug-in AOP aspect.
Pointcut : This is a set of one or more join points where an advice should be executed.
6. Annotations
@Required: Indicates that the affected bean property must be populated at configuration time.
@Autowired: It can be used to autowire bean on the setter method, constructor, a property or methods with arbitrary names and/or multiple arguments.
@Qualifier: You can use @Qualifier annotation along with @Autowired to remove the confusion by specifying which exact bean will be wired, in case of more than one bean.
@Configuration: Indicates that the class can be used by the Spring IoC container as a source of bean definitions.
@Bean: It tells Spring that a method will return an object that should be registered as a bean.
@WebApplicationContext (@ApplicationContext): It defines a class as the main class in the project.
@Controller: Indicates that a class serves the role of a controller.
@RequestMapping: It is used to map a URL to either an entire class or a particular handler method.
@PostConstruct: This annotation can be used as an alternate of initialization callback.
@PreDestroy: This annotation can be used as an alternate of destruction callback.
@Resource: It takes a 'name' attribute which will be interpreted as the bean name to be injected.
@ResponseBody: Indicates that the return type should be written straight to the HTTP response.
@RequestBody: Indicate that a method parameter should be bound to the body of the HTTP request.
1 note
·
View note
Link

Why Spring Boot?
So why should you as Java developer care about Spring Boot? Well there are many good reasons! 😊 First of all Spring is open source, meaning it is continuously maintained and tested by community and it is free or charge. Second, according to Hotframeworks, it is the most widely used Java web framework of 2019. Third, there’s an excellent way to get your Spring application up and running quickly, which is where Spring Boot comes into play: Thanks to Spring Boot, you don’t need to worry about a lot of the boiler plate code and configuration. Spring Boot automatically sets a lot of config defaults for you, but you can always overwrite those if needed. For that purpose, Spring Boot is opinionated, meaning the people in the Spring team chose some configs for you, but those are well accepted by the community. Btw, why should we care about web frameworks at all? Well there are many items which are used over and over in typical web services, such as answering to HTTP request, spanning new threads for each incoming request, security mechanisms like HTTPS and OAUTH2 and so forth. We do not want to reinvent the wheel every time we create a new web service, and for that purpose we can use web frameworks with all those common mechanisms provided. Additional features from web frameworks include data base access, scheduling of tasks, inversion of control etc. All these nice features are included in Spring Boot and thus you have more time for other stuff like drinking a good cappuccino☕ As a final introductory remark, let me mention that Spring is not only compatible with Java, but also with Kotlin, a language very popular for Android apps.
Prerequisites
We will now create a hello-world web service. All necessary code is given here, and the final solution is also available on my Github repo. Requisites to follow all the steps:
Maven
Java JDK 8 or higher
Command line
For this blog, we will do all the work from the command line. Alternatively, you can use an IDE like IntelliJ. In fact, I will soon release a post on IntelliJ and cover introductory topics like code completion, searching for a given code snippet in your project, compilation, debugging etc.
Using the Spring initializr
We use Maven as build tool, and Spring Boot offers a great way to create your POM file: Head over to https://start.spring.io/ and enter all the details of our app like below:

You can use a newer version of Spring Boot and Java – of course - if you prefer to. Anyways, remember to add “Spring Web” as a starter dependency – we will use it for our REST endpoints. Once you have filled in all details, use the “GENERATE” button. This will download a ZIP file with the initial Java project structure, and most importantly, the initial pom.xml file. Let us have a closer look at the generated POM file. At the top of the POM, you can see we inherit from spring-boot-starter-parent, which contains all necessities for a Spring-Boot app.
<parent> <groupId>org.springframework.boot</groupId> <artifactId>spring-boot-starter-parent</artifactId> <version>2.2.6.RELEASE</version> <relativePath/> <!-- lookup parent from repository --> </parent>
Further down in the POM, under dependencies, you can see we will use spring-boot-starter-web:
<dependency> <groupId>org.springframework.boot</groupId> <artifactId>spring-boot-starter-web</artifactId> </dependency>
You can find a nice description of this dependency on mvnrepository.com:
Starter for building web, including RESTful, applications using Spring MVC. Uses Tomcat as the default embedded container.
Anyways, so far, we have only looked at one important file: the pom.xml file. Next let us focus on the Main Class, which you can find under src/main/java/com/example/springbootexample/SpringBootExampleApplication.java:
@SpringBootApplication public class SpringBootExampleApplication { public static void main(final String[] args) { SpringApplication.run(SpringBootExampleApplication.class, args); } }
What is interesting here is just the annotation at the top: @SpringBootApplication. Among several things, this annotation makes sure our Spring Boot app gets configured with the default Spring Boot properties (like timeouts for HTTP requests and many, many other things).
Hello-World REST endpoint
Since we want to create a REST endpoint later on, we need our Main class to search for Servlets, and therefore we need to add one more annotation to our Main class: @ServletComponentScan (again, if today is your lazy day and you don’t want to do any coding, you can look at the completed code in my Github repo). Next, let us create a REST endpoint. For this purpose, we create a new Java class and call it PingRestController.java (you can use the same folder as for the Main class). The content of PingRestController.java should look like so:
package com.example.springbootexample; import org.springframework.http.ResponseEntity; import org.springframework.web.bind.annotation.RequestMapping; import org.springframework.web.bind.annotation.RequestMethod; import org.springframework.web.bind.annotation.RestController; @RestController public class PingRestController { @RequestMapping(method = RequestMethod.GET, path = "/api/ping") public ResponseEntity<String> getPing() { return ResponseEntity.ok("pong"); } }
The annotation @RestController signifies that this class contains REST endpoints. Each REST endpoint is a method annotated with @RequestMapping. In this particular case, we have only one such method: getPing. This method is executed every time the corresponding REST call arrives at our server. Let us look more in detail at the @RequestMapping annotation: We specify a method and a path variable. These two variables specify that we want to capture HTTP GET request to the URI “/api/ping”. Also, note the return type of our getPing method: A ResponseEntity wraps the HTTP answer, and the HTTP body should be just a String. Thus, the response to the HTTP call will always looks as follows:
Headers: Status: 200, ContentType: text/plain;charset=UTF-8 Body: "pong"
With the modified Main class and the PingRestController class, we have all pieces ready to run our service. In the terminal, type:
mvn clean install java -jar target/spring-boot-example-0.0.1-SNAPSHOT.jar
Now, in your favorite web browser, type:
localhost:8080/api/ping
You should see the “pong” response! What happens in the background is that your browser fires a HTTP GET request to localhost, which is handled by your Spring Boot app and responded to with the String “pong”.
Integration Test
A great way to make sure our REST endpoint really works, is by writing an integration test. This test will run every time we build our application. Why do we use integration tests? First, because we developers want to automate everything and do not like testing manually. Second, because this adds stability to future development: As our web service will be extended, this test will still run with every build, and we can be sure this feature still works. What is an integration test? Contrary to unit tests which only look at one class, an integration test is for our app as a whole, where all components get integrated together. We typically mock third party systems like data bases, so we can test independent of (sometimes unreliable) surrounding systems. In our case, we want to really boot up our web service, but if we had a data base, then we would just simulate it. We implement our integration test in src/test/java/com/example/springbootexample/PingIntegrationTest.java:
package com.example.springbootexample; import org.junit.jupiter.api.Test; import org.junit.jupiter.api.extension.ExtendWith; import org.springframework.beans.factory.annotation.Autowired; import org.springframework.boot.test.autoconfigure.web.servlet.AutoConfigureMockMvc; import org.springframework.boot.test.context.SpringBootTest; import org.springframework.test.context.junit.jupiter.SpringExtension; import org.springframework.test.web.servlet.MockMvc; import static org.junit.jupiter.api.Assertions.assertEquals; import static org.springframework.test.web.servlet.request.MockMvcRequestBuilders.get; @ExtendWith(SpringExtension.class) @SpringBootTest @AutoConfigureMockMvc public class PingIntegrationTest { @Autowired private MockMvc mvc; @Test public void testHelloWorldEndpoint() throws Exception { String response = mvc .perform(get("/api/ping")) .andReturn().getResponse().getContentAsString(); assertEquals("Hello world", response); } }
As you can see, testing a REST endpoint takes slightly more code. For now, let us just focus on the interesting bits, and I will leave it to you to understand every single line of code. So here are the important points:
@SpringBootTest: Start the web server locally and have it ready to answer to test REST calls
private MockMvc mvc: A MockMvc object allows us to fire test HTTP calls to our web server
@Test: Just as with Junit-Tests, each test is implemented in a method annotated with @@test .
mvc.perform(get(“api/ping”)): Here we trigger an HTTP GET request
You can run the test with the following command:
mvn -Dtest=PingIntegrationTest test
Aaaaand... the integration test fails🙈 What happened? Well no need to worry, there is just a tiny error in the above test case. I will leave it up to you to find the error cause and fix it!
Spring Configuration
Spring Boot automatically configures many properties of your service. For example, when we pinged our own service, we had to use port 8080. Now we did not define this anywhere… this is just a Spring Boot default. All those default properties can be found in the official docu here. To change this default behavior, all we need to do is create an application.properties file and overwrite the appropriate value. So, go ahead and modify src/main/resources/application.properties:
server: port: 8082
Now, when you recompile and restart the service, the REST endpoint will be available on port 8082.
Conclusion
We have covered all code necessary to create a simple REST service. Using Spring Boot, we just needed a total of 23 lines of Java code to create a working REST endpoint! Moreover, there was zero XML configuration needed. Pretty cool!
0 notes
Text
Java Technologies for Web Applications
You can find web applications everywhere on the Internet. Many of these web applications are used to process online forms, tally voting polls, take orders within online stores, allow users to book a flight for their next business trip, or simply to display the user's login name. Which Java technologies do you need to create a web application and which packages do you need to import? The answer depends on what kind of application you're building and what it does.
This article provides an overview of the Java technologies involved in creating various types of web applications, tells you when you might decide to use them, and provides links to get you started. Future articles will cover how to use these technologies in building web applications. To use the technologies described in this article, download Java Development Kit (JDK) 5.0 Update 9 with Java Platform, Enterprise Edition (Java EE) or later and install it on your computer.
Before you begin coding, you need to understand what a web application is, what Java technologies are available for use, and what development tools can save you time and make creating applications easier.
Contents
What Is a Web Application?
Java Technologies to Use in Web Applications
Other Technologies to Consider
Development Tools
What Is a Web Application?
Web applications are by nature distributed applications, meaning that they are programs that run on more than one computer and communicate through a network or server. Specifically, web applications are accessed with a web browser and are popular because of the ease of using the browser as a user client. For the enterprise, the ability to update and maintain web applications without deploying and installing software on potentially thousands of client computers is a key reason for their popularity. Web applications are used for web mail, online retail sales, discussion boards, weblogs, online banking, and more. One web application can be accessed and used by millions of people.
Like desktop applications, web applications are made up of many parts and often contain miniprograms, some of which have user interfaces, and some of which do not require a graphical user interface (GUI) at all. In addition, web applications frequently require an additional markup or scripting language, such as HTML, CSS, or JavaScript programming language. Also, many applications use only the Java programming language, which is ideal because of its versatility.
A web application can be as simple as a page that shows the current date and time or as complex as a set of pages on which you can look up and book the most convenient flight, hotels, and car rentals for your next vacation.
The Java technologies you'll use to create web applications are a part of the Java EE platform, in addition to many of the Java Platform, Standard Edition (Java SE) classes and packages. In order for many of these technologies to work on a server, the server must have a container, or web server, installed that recognizes and runs the classes you create. For development and testing of these technologies, you can use the tools detailed in this article, but when you deploy, make sure that the server has Java server software installed to run Java technology-based web applications. If you don't have access to this information, ask the server administrator.
Java Technologies to Use in Web Applications
There are too many Java technologies to list in one article, so this article will describe only the ones most frequently used. The number of technologies listed here can appear overwhelming. Keep in mind that you will not need to use them all. In fact, a web application often consists of nothing more than one page created with the JavaServer Pages (JSP) technology. Sometimes you will combine three or more such technologies. No matter how many you end up using, it's good to know what is available to you and how you can use each one in a web application.
Java Servlet API
The Java Servlet API lets you define HTTP-specific classes. A servlet class extends the capabilities of servers that host applications that are accessed by way of a request-response programming model. Although servlets can respond to any type of request, they are commonly used to extend the applications hosted by web servers. For instance, you might use a servlet to get the text input from an online form and print it back to the screen in an HTML page and format, or you might use a different servlet to write the data to a file or database instead. A servlet runs on the server side -- without an application GUI or HTML user interface (UI) of its own. Java Servlet extensions make many web applications possible.
Figure 1 shows clients talking to Java Servlet extensions. Clients may range in complexity from simple HTML forms to sophisticated Java technology-based applets.
The javax.servlet and javax.servlet.http packages provide the classes and interfaces to define servlets. HTML servlet classes extend the javax.servlet.http.HttpServlet abstract class, which provides a framework for handling HTTP protocol. Learn more about Java Servlet extensions and navigating with servlets.
JavaServer Pages Technology
JavaServer Pages (JSP) technology provides a simplified, fast way to create dynamic web content. JSP technology enables rapid development of web-based applications that are server- and platform-independent. JSP technology lets you add snippets of servlet code directly into a text-based document. Typically, a JSP page is a text-based document that contains two types of text:
Static data, which can be expressed in any text-based format, such as HTML, Wireless Markup Language (WML), or XML
JSP technology elements, which determine how the page constructs dynamic contentThe packages involved in creating JSP pages are javax.el, javax.servlet.jsp, javax.servlet.jsp.el, and javax.servlet.jsp.tagext, though you will rarely have to import these directly. A JSP page can be as simple as a bit of HTML with one snippet of JSP code and the .jsp extension of the page name.
For instance, you can create a web site of JSP technology pages that use one snippet of code to include the header.html file, which contains the site navigation. This way, when you change a link to a button in the navigation, you make the change in only one file, and that file loads into all the pages on the site that have this code snippet:
<%@ include file="header.html" %>
That line of code works very much like a server-side include, if you are familiar with those. Because this web page is now a JSP page, you could also go on to add more Java technology code to create dynamic web content, such as polls, forms, ways to enter or retrieve data from a database, and so forth.
Take a look at two helpful documents about creating JSP pages:
JavaServer Pages (JSP) v2.0 Syntax Reference
JavaServer Pages Technology -- Frequently Asked Questions
JavaServer Pages Standard Tag Library
The JavaServer Pages Standard Tag Library (JSTL) encapsulates core functionality common to many JSP technology-based applications. Instead of mixing tags from numerous vendors in your applications, you employ a single standard set of tags. This standardization allows you to deploy your applications on any JSP container that supports JSTL and makes it more likely that the implementation of the tags is optimized.
JSTL has iterator and conditional tags for handling flow control, tags for manipulating XML documents, internationalization tags, tags for accessing databases using SQL, and tags for commonly used functions.
The packages you can access for using JSTL are javax.servlet.jsp.jstl.core , javax.servlet.jsp.jstl.fmt , javax.servlet.jsp.jstl.sql , and javax.servlet.jsp.jstl.tlv .
Learn more about JSTL.
JavaServer Faces Technology
JavaServer Faces technology is a UI framework for building web applications. The main components of JavaServer Faces technology involve a GUI component framework, a flexible model for rendering components in various markup languages and technologies, and a standard RenderKit for generating HTML markup.
This functionality is available through standard Java APIs and XML-based configuration files. In addition, Sun Java Studio Creator IDE leverages JavaServer Faces technology in its drag-and-drop GUI tools, allowing you to use the technology without having to write or understand the underlying code. See also " Getting Started With Sun Java Studio Creator."
Java Message Service API
Messaging is a method of communication between software components or applications. A messaging system is a peer-to-peer facility. In other words, a messaging client can send messages to and receive messages from any other client. Each client connects to a messaging agent that provides facilities for creating, sending, receiving, and reading messages. By combining Java technology with enterprise messaging, the Java Message Service (JMS) API provides a powerful tool for solving enterprise computing problems.
Enterprise messaging provides a reliable, flexible service for the exchange of business data throughout an enterprise. The JMS API adds to this a common API and provider framework that enables the development of portable message-based applications in the Java programming language. An example of how JMS might be used is an application that keeps track of inventory for an auto manufacturer.The inventory component can send a message to the factory component when the inventory level for a product goes below a certain level, so the factory can make more cars. The factory component can send a message to the parts components so that the factory can assemble the parts it needs.The parts components in turn can send messages to their own inventory and order components to update their inventories and to order new parts from suppliers and so forth.
The JMS API improves programmer productivity by defining a common set of messaging concepts and programming strategies that all JMS technology-compliant messaging systems will support.
Learn more about the JMS API.
JavaMail API and the JavaBeans Activation Framework
Web applications can use the JavaMail API to send email notifications. The API has two parts: an application-level interface that the application components use to send email and a service provider interface. Service providers implement particular email protocols, such as SMTP. Several service providers are included with the JavaMail API package, and others are available separately. The Java EE platform includes the JavaMail extension with a service provider that allows application components to send email.
In conjunction with the JavaMail extension, you might use the JavaBeans Activation Framework (JAF) API. This API provides standard services to determine the type of an arbitrary piece of data, encapsulate access to it, discover the operations available on it, and create the appropriate component based on JavaBeans component architecture (JavaBeans component) to perform those operations.
The JavaMail API is now open source. See the GlassFish Project -- JavaMail home page.
Learn more about the JavaMail API and the JAF.
Java API for XML Processing
The Java API for XML Processing (JAXP), part of the Java SE platform, supports the processing of XML documents using the Document Object Model (DOM), the Simple API for XML (SAX), and Extensible Stylesheet Language Transformations (XSLT). JAXP enables applications to parse and transform XML documents independent of a particular XML-processing implementation.
JAXP also provides namespace support, which lets you work with schemas that might otherwise have naming conflicts. Designed to be flexible, JAXP lets you use any XML-compliant parser or XSL processor from within your application and supports the W3C schema.
Learn more about JAXP.
The Java API for XML Web Services (JAX-WS) is now an open-source project at java.net and is also a key part of the GlassFish project. See also Introducing JAX-WS 2.0 With the Java SE 6 Platform, Part 1.
JDBC API
The JDBC API allows you invoke database SQL commands from Java programming language methods. You can use the JDBC API in a servlet, JSP technology page, or an enterprise bean when you need to access the database.
The JDBC API has two parts: an application-level interface that application components use to access a database and a service provider interface to attach a JDBC driver to the Java EE platform.
The left side of Figure 2 shows how a client makes a direct call to the application server, usually through a servlet or JSP page, and that data is then sent to the database management system (DBMS) server. The right side of Figure 2 shows how a driver translates JDBC calls into the middleware vendor's protocol.
Learn more about the JDBC API.
Java Persistence API
The Java Persistence API is a Java technology standards-based solution for persistence. Persistence uses an object-relational mapping approach to bridge the gap between an object-oriented model and a relational database. Java technology persistence consists of three areas:
The Java Persistence API
The query language
Object-relational mapping metadata
Read the Java Persistence API FAQ.
Java Naming and Directory Interface
The Java Naming and Directory Interface (JNDI) provides naming and directory functionality, enabling applications to access multiple naming and directory services. It provides applications with methods for performing standard directory operations, such as associating attributes with objects and searching for objects using their attributes. Using JNDI, a web application can store and retrieve any type of named Java technology object, allowing applications to coexist with many legacy applications and systems.
Naming services provide application clients, enterprise beans, and web components with access to a JNDI naming environment. A naming environment allows the developer to customize a component without having to access or change the component's source code. A container implements the component's environment and provides it to the component as a JNDI naming context.
Learn more about JNDI.
Other Technologies to Consider
You might want to consider using the following other technologies in your web application, depending on the application's complexity:
J2EE Connector Architecture: Tools vendors and system integrators use this architecture to create resource adapters that support access to enterprise information systems that can be plugged in to any Java EE technology-based product.
Java Authentication and Authorization Service (JAAS): JAAS provides a way for a Java EE technology-based application to authenticate and authorize a specific user or group of users to run it.
Java API for XML Registries (JAXR): JAXR lets you access business and general-purpose registries over the web.
Java Architecture for XML Binding (JAXB): JAXB provides a convenient way to bind an XML schema to a representation in applications written in the Java programming language.
SOAP with Attachments API for Java (SAAJ): SAAJ is a low-level API on which JAX-WS and JAXR depend.
Java Transaction API (JTA): JTA provides a standard interface for demarcating transactions.
Development Tools
Integrated development environments (IDEs) can speed the process of developing and testing web applications. It's no wonder that developers move to an IDE, but which one is right for you? Which features do you need? Sun Microsystems supports three IDEs for the Java platform: NetBeans IDE, Sun Java Studio Creator IDE, and Sun Java Studio Enterprise IDE.
NetBeans IDE
NetBeans IDE is free and open source. This IDE is written in the Java programming language and provides the services common to desktop applications, such as window and menu management, settings storage, and so forth. It is also the first IDE to fully support JDK 5.0 features. In addition, it supports web tools, including the NetBeans IDE Enterprise Pack, which adds everything you need to immediately start writing, testing, and debugging Java technology-based web applications.
The pack provides visual design tools for Unified Modeling Language (UML) modeling, XML schema creation, modification, and visualization, as well as development of secure, identity-enabled web services.
Sun Java Studio Creator IDE
Sun Java Studio Creator IDE is great for quick and easy web application development. In addition, this IDE is built on the NetBeans IDE, starting with a subset of the functionality and extending it.
Sun Java Studio Creator IDE allows you to build applications visually. The programming part is cleanly separated from the UI. With Sun Java Studio Creator IDE, the IDE takes care of a lot of the repetitive coding behind the UI.
The rapid visual drag-and-drop features are based on JavaServer Faces technology, which is a framework for building UIs for web applications. A GUI is used for manipulating JavaServer Faces components, as well as visually defining page flow. There's also graphical support for easily working with databases and web services.
Sun Java Studio Enterprise IDE
Sun Java Studio Enterprise IDE is a powerful set of tools that provides an integrated framework for enterprise-grade, rapid web application development. It offers enhanced debugging and development support for web services and for development of Java EE technology-based applications.
Sun Java Studio Enterprise IDE is built on and extends the NetBeans IDE. It also enables smart code editing, such as completing your code for you, with refactoring, renaming objects throughout an application. It also enables performance tuning -- ensuring better use of memory and so forth -- of applications with an optimal end- user experience.
Sun Java Studio Enterprise IDE provides a model-driven analysis, design, and development environment that leverages UML. This integrated feature reduces complexity and increases visual clarity across software development projects, ensuring that a sound architecture is established and communicated throughout the enterprise.
Now that you are familiar with the many Java technologies that you use in web applications, you are ready to develop your own application. In an upcoming series of articles, you will learn to create web applications using Sun Java Studio Creator IDE, which you can download for free, and learn how to use the Java technologies mentioned in this article. You will first create small simple applications, then work up to more complex programs. In the meantime, follow the links in this article to learn more about the Java technologies discussed in this article.[Source]-https://www.oracle.com/technetwork/articles/java/webapps-1-138794.html
We provide best java classes in vashi, navi mumbai. We have industry experienced trainers and provide hands on practice. Basic to advanced modules are covered in training sessions.
0 notes
Text
Tute 5
Web Service
W3C (World Wide Web Consortium) describes web service as a system of software allowing different machines to interact with each other through network. Web services achieve this task with the help of XML, SOAP, WSDL and UDDI open standards.
XML: The full form of XML is ‘Extensible Markup Language’ which is used to share data on the web and in universal format.
SOAP: Standing for ‘Simple Object Access Protocol’ which is an application communication protocol that sends and receives messages through XML format. It is one of the best ways to communicate between applications over HTTP which is supported by all browsers and servers.
WSDL: Written in XML, WSDL stands for Web Services Description Language and is used to describe web service. WSDL comprises three parts such as Definitions (usually expressed in XML including both data type definitions), Operations and Service bindings. Operations denote actions for the messages supported by a Web service.
There are three types of operations:
One way
Request response
Notification
Service bindings: Service bindings is a connecting to the port.
UDDI: Universal Description, Discovery, and Integration (UDDI) provides the description of a set of services supporting the depiction and discovery of businesses, organizations, and other Web Services providers. It is based on common set of industry standards, including HTTP, XML, XML Schema, and SOAP.
Web Application
An application that the users access over the internet is called a web application. Generally, any software that is accessed through a client web browser could be called a web application.
What is client?
So what is a client? A ‘client’ can be referred to the program that the person use to run the application in the client-server environment. The client-server environment refers to multiple computers sharing information such as entering info into a database. Here the “client” is the application that is used to enter the info, while the “server” is the application that is used to store the information.
Web Services vs Web Applications
Web Services can be used to transfer data between Web Applications.
Web Services can be accessed from any languages or platform.
A Web Application is meant for humans to read, while a Web Service is meant for computers to read.
Web Application is a complete Application with a Graphical User Interface (GUI), however, web services do not necessarily have a user interface since it is used as a component in an application.
Web Application can be access through browsers.
Our expertise lies in our in-depth knowledge, vast experience and exposure in automating business processes, offering effective web services and web applications solutions to transform them into your business objectives. We have an adept team with best of breed technologies to change the growth story of your business.
Carmatec brings together multifaceted skill-set from the areas of design, behavioral science, usability, analytics, marketing and brand creation to provide businesses with holistic solutions for Web Design, Web & Mobile Development,
Remote IT infrastructure management, Software Development, Managed IT services, Cloud Consulting, Internet Marketing and Branding.
WSDL
WSDL stands for Web Services Description Language. It is the standard format for describing a web service. WSDL was developed jointly by Microsoft and IBM.
Features of WSDL
WSDL is an XML-based protocol for information exchange in decentralized and distributed environments.
WSDL definitions describe how to access a web service and what operations it will perform.
WSDL is a language for describing how to interface with XML-based services.
WSDL is an integral part of Universal Description, Discovery, and Integration (UDDI), an XML-based worldwide business
registry.
WSDL is the language that UDDI uses.
WSDL is pronounced as 'wiz-dull' and spelled out as 'W-S-D-L'.
WSDL Usage
WSDL is often used in combination with SOAP and XML Schema to provide web services over the Internet. A client program connecting to a web service can read the WSDL to determine what functions are available on the server. Any special datatypes used are embedded in the WSDL file in the form of XML Schema. The client can then use SOAP to actually call one of the functions listed in the WSDL.
History of WSDL
WSDL 1.1 was submitted as a W3C Note by Ariba, IBM, and Microsoft for describing services for the W3C XML Activity on XML Protocols in March 2001. WSDL 1.1 has not been endorsed by the World Wide Web Consortium (W3C), however it has just released a draft for version 2.0 that will be a recommendation (an official standard), and thus endorsed by the W3C.
WSDL Elements
The WSDL file contains the following main parts
The <types> tag is used to define all the complex datatypes, which will be used in the message exchanged between the client application and the web service. This is an important aspect of the client application, because if the web service works with a complex data type, then the client application should know how to process the complex data type. Data types such as float, numbers, and strings are all simple data types, but there could be structured data types which may be provided by the web service.
For example, there could be a data type called EmployeeDataType which could have 2 elements called "EmployeeName" of type string and "EmployeeID" of type number or integer. Together they form a data structure which then becomes a complex data type.
The <message> tag is used to define the message which is exchanged between the client application and the web server. These messages will explain the input and output operations which can be performed by the web service. An example of a message can be a message which accepts the EmployeeID of an employee, and the output message can be the name of the employee based on the EmpoyeeID provided.
The <portType> tag is used to encapsulate every input and output message into one logical operation. So there could be an operation called "GetEmployee" which combines the input message of accepting the EmployeeID from a client application and then sending the EmployeeName as the output message.
The <binding> tag is used to bind the operation to the particular port type. This is so that when the client application calls the relevant port type, it will then be able to access the operations which are bound to this port type. Port types are just like interfaces. So if a client application needs to use a web service they need to use the binding information to ensure that they can connect to the interface provided by that web service.
The <service> tag is a name given to the web service itself. Initially, when a client application makes a call to the web service, it will do by calling the name of the web service. For example, a web service can be located at an address. The service tag will actually have the URL which will actually tell the client application that there is a web service available at this location.
SOAP
SOAP is a messaging protocol and in a nutshell is just another XML language. Its purpose is the data exchange over networks. Its concern is the encapsulation of these data and the rules for transmitting and receiving them.
HTTP is an application protocol and SOAP messages are placed as the HTTP payload. Although there is the overhead of HTTP, it has the advantage that it is a protocol that is open to firewalls, well-understood and widely-supported. Thus, web services can be accessed and exposed via technology already in-place.
SOAP messages are usually exchanged via HTTP. Although it is possible to use other (application) protocols, e.g. SMTP or FTP, the non-HTTP bindings are not specified by SOAP specs and are not supported by WS-BP (interoperability spec). You could exchange SOAP messages over raw TCP but then you would have web services that are not interoperable (not compliant to WS-BP).
Nowadays the debate is why have the SOAP overhead at all and not send data over HTTP (RESTful WS).
Why use HTTP for SOAP?
I will try to address in more detail the question in the OP, asking why use HTTP for SOAP:
First of all SOAP defines a data encapsulation format and that's that. Now the majority of traffic in the web is via HTTP. HTTP is literary EVERYWHERE and supported by a well-established infrastructure of servers and clients(namely browsers). Additionally it is a very well understood protocol.
The people who created SOAP wanted to use this ready infrastructure and SOAP messages were designed so that they can be tunneled over HTTP In the specs they do not refer to any other non-HTTP binding but specifically refer to HTTP as an example for transfer. The tunneling over HTTP would and did help in it's rapid adoption. Because the infrastructure of HTTP is already in-place, companies would not have to spend extra money for another kind of implementation. Instead they can expose and access web services using technology already deployed.
Specifically in Java a web service can be deployed either as a servlet endpoint or as an EJB endpoint. So all the underlying network sockets, threads, streams, HTTP transactions etc. are handled by the container and the developer focuses only on the XML payload. So a company has Tomcat or JBoss running in port 80 and the web service is deployed and accessible as well. There is no effort to do programming at the transport layer and the robust container handles everything else. Finally the fact that firewalls are configured not to restrict HTTP traffic is a third reason to prefer HTTP.
Since HTTP traffic is usually allowed, the communication of clients/servers is much easier and web services can function without network security blockers issues as a result of the HTTP tunneling.
SOAP is XML=plain text so firewalls could inspect the content of HTTP body and block accordingly. But in this case they could also be enhanced to reject or accept SOAP depending on the contents.This part which seems to trouble you is not related to web services or SOAP, and perhaps you should start a new thread concerning how firewalls work.
Having said that, the fact that HTTP traffic is unrestricted often causes security issues since firewalls are essentially by-passed, and that is why application-gateways come in. But this is not related to this post.
Summary
So to sum up the reasons for using HTTP:
HTTP is popular and successful.
HTTP infrastructure is in place so no extra cost to deploy web services.
HTTP traffic is open to firewalls, so there are no problems during web service functioning as a result of network security.
0 notes