#i need a better software than pencil2d
Text
spent like an hour on this, didn't wanna do any more

#my art#furry art#furry#art#furry oc#sylphrena holligale#animation#furry animation#2d animation#this is like my 3rd or 4th animation ever#so i think it looks alright#i need a better software than pencil2d#lol
7 notes
·
View notes
Photo
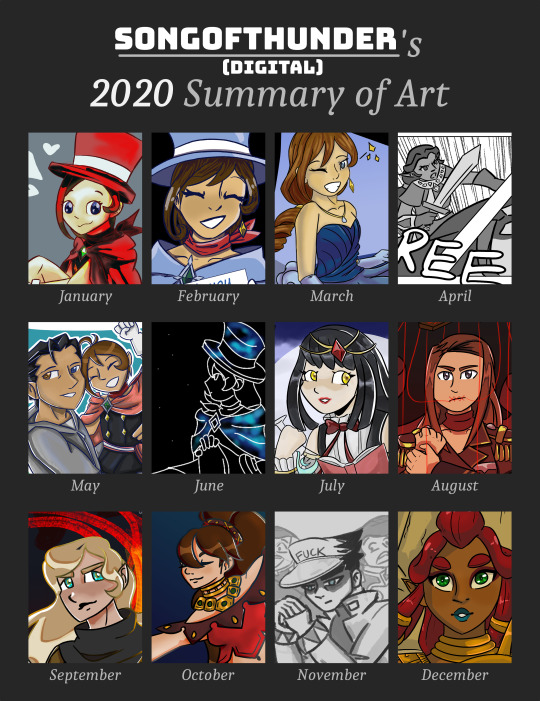
I'm still standing and still going and it looks like it's only uphill from here! I didn't even miss a month this year! That's already better than I thought I would!
Full summary under the cut!
January. I had a bit of a struggle on subjects of drawing around this time. Ace Attorney hyperfocus was still in full swing, and while doodling Trucy during a software test of Pencil2D, I suddenly realized that I'd been drawing Trucy when I couldn't think of anything to draw for ages already. Daily character blogs were already blogs I greatly admired, and I decided that I might as well put my obsession with drawing Trucy to good use. (Check out @daily-trucy!)
February. I continued Trucy while figuring out online learning. I don't have much to add here.
March. More Trucy.
April. My memory gets a little fuzzy, but I think around the first week of this month was when spring break began, and physical schooling ended indefinitely.
May. I don't remember much of May. I think it was alright? I seemed to be doing okay with daily-trucy, at least.
June. Most of this month was Artfight prep.
July. ArtFight popped in! I made a grand total of two attacks this year, beating my previous record of one!
August. Definitely my most prolific month in terms of art that was not Trucy, with at least three finished pieces (possibly more, if I can find them). This was mainly due to me applying for a zine on Twitter. The zine, sadly, never started, and applications were never responded to (which is understandable, I guess). But I liked the pieces!
September. As usual, August and September were my best months. Probably because of the free time.
October. At this point I finally listened to my friends' adamant recommendations that I watch JoJo's Bizarre Adventure. And... oh, dear Lord, I'm done for, it was actually interesting and actually funny, I'm never going to hear the end of it. I couldn't bear to go back to Trucy, not yet, not with how badly I'd failed the blog with finals, but JoJo was something that started featuring more and more in my doodles. It was fun. The characters in Stardust Crusaders, especially, reminded me of the dynamic I'd had with my friends before quarantine. It was kind of... calming. I didn't expect that from a show about beating up vampires with magic sunlight and ghosts you can summon with your mind. Who would???
November. Distance learning was not good to me, and I'd known that, but this was the point that it started hitting home. It's one thing to know the plane is nosediving, but it's quite another to see the ground rushing towards you at the speed of light. I threw my tablet to the side and only picked it up to doodle as a stress relief, pulling from the JoJo doodles from before. This was possibly the most stressful month of my life, and while I got a lot of schoolwork done, it's only thanks to those stress-relief doodles that I have anything to post at all. I am never doing that again if I can help it.
December. With finals fast approaching, my grades becoming set, and free time practically nonexistent, I needed a quick way of entertainment that didn't take too long. Books would get me too engrossed, TV took too much time to watch, and I didn't really have the energy to read or watch anything with loose ends, anyways, so I started bingereading finished webcomics and webtoons. It's at this point that I found a comic called Sword Interval, by Benjamin Fleuter, which had recently concluded. Sword Interval has a coloring and lining style that's scarily close to what I've been trying to emulate (i.e. no painting if I can help it, and a blend of linework and cell-shaded color). But more importantly, the artist made two coloring tutorials (first one here, second one here!). Sword Interval's shading works by reversing my usual shading process, and erasing shadow to create light, rather than adding shadow to create light. This was an immediate improvement and so much easier for me. For the majority of December, my tablet lay to the side, disregarded. But for the two finished pieces I posted, the immediate difference in the shading made my artstyle look even better. I think this is definitely a method I'll continue to use in the future.
4 notes
·
View notes
Text
Rendering animation in krita (Windows)
One of the most asked questions I see about krita is how to export animation as a video or gif. Krita has a documentation but I feel like it could use some images to make things easier to understand.
I also encourage you to read this post to this end for reasons why you shouldn't render video in krita and some useful tips.
Krita version at the time of this tutorial was made was 4.2.8
Downloading FFmpeg
Krita uses ffmpeg to render video just like many other programs but it doesn't come bundled with it. You need to download it separately.
Windows users will need to download the zeranoe build. The website is very straight forward you need to choose your version, your system architecture and the type of linking.

The problem I see the most is people downloading the wrong version. These are the steps for downloading:
For version you will want to download the stable version ( 4.2.1 at the time I took the screenshot).
Select your operating system (if in doubt select Windows-64 bit).
Linking needs to be static for it to work.
After selecting all these press the Download Build button.
If you download the build with something selected wrong it will not work in krita.
After downloading it unzip it anywhere in your PC. Now you need to copy the path to the ffmpeg.exe file. Inside the folder you unzipped, go to the \bin folder.
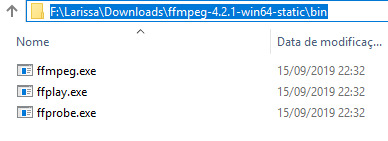
Copy the full path to this folder, now we need to get inside krita.
Setting up FFmpeg
For some weird reason, the path to ffmpeg is set inside the the dialog to render animation, this is under File> Render Animation...

The problem with this, is that this option will be disabled unless you have at least one frame set up, so just create a frame with anything in it like I did so you can access the render animation dialog box.
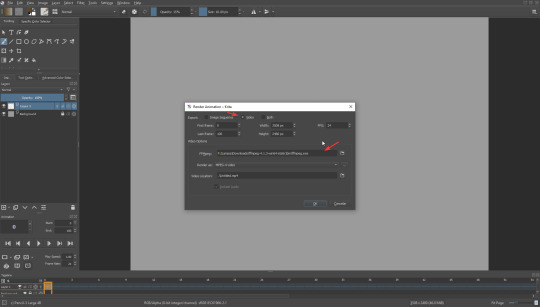
Here make sure you have the video option on the top selected, and paste the path you copied, making sure to add \ffmpeg.exe at the end of it. Or click in the folder icon to search for where is your unzipped folder in your system and select ffmpeg.exe. Both will work I just find copying and pasting faster.
After this you are ready to render animations to video and gif. Once you have set the path you don't need to do this again.
Render in Krita
Krita gives you 2 different modes to export your animation, video or image sequence, it also gives you the option to export both at the same time.
Video/GIF
Important: Krita doesn't support transparency in videos and gif format. If you try to export a file with transparency it will fill it with a color.
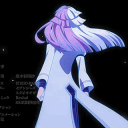
Under the video export option, you have the Render asdrop down there you can choose the different possible formats you can export to.

Depending on the format you choose you will be able to access more export options pressing ... button.
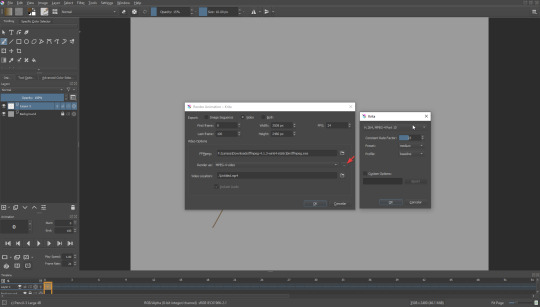
If these doesn't make sense to you, the defaults work fine. That being said, an actual video editor might be better to change these options.
Settings
There are many settings in this dialog box, and while some seem intuitive like FPS I wanted to give a quick view over them.
Frame First/Last
Sets the range of the frames that will be exported, if any frame is out of this range it will not be exported.
Height/Width
I can't seem to find information about this in the documentation but I can only assume it will change the resolution of the exported file to the one set here, by default it has the size of the canvas.
Video Location
The location the video will be exported to, by default it is set to .\<filename>.extension the .\means it will be in the same folder as the .kra file.
Playing your animation
At the time of this publication, animations exported in krita do not work with Windows Player, they display a black screen, but the animation is exported fine. I suggest using another player like VLC to see the exported animations, or export in a video editor.
Image sequence
You don't need FFmpeg to export as an image sequence
It will export the each frame as an image, keep in mind layers will be flattened for this.

Settings
Just like video, there are some settings I want to give a quick explanation.
Base Name
The default is frame meaning all the exported images will have the same name, this will be suffixed with the frame number so the file name will end as frame0000.png
Starting number
By default the frames start at 0, but some programs have trouble with this. So you can set a start number that will be increased at each frame.
Image Location
Same as video location, but keep in mind you will end up with many images so its good to create a new folder to put them in.
Some tips for rendering animation
If I sum up all the tips I have in one sentence it would be "Be aware of your file size." Once your file size reaches over 2GB krita will start struggling to open it, going over that krita might crash trying to load your file leaving you with a unusable file. So these are my tips:
Resolution
Unless you plan on printing your frames, use 72 dpi. If you have a high dpi your file size will increase fast depending on the number of frames you have, if it gets too big krita may not open your file anymore. 72 dpi is more than enough for digital work. This is also true for canvas size huge canvas will increase the file size.
Do not do everything in just one file
Once again if your file gets to big krita will struggle to open it. Krita is not toonboon or opentoonz where you have everything in one project file, its just not made with this workflow in mind. Krita works much better with a traditional animation workflow.
Separate your animation in scenes
Once again the problem is the file size. Keeping your scenes as different files will help you a lot if you have a huge animation.
Put audio or music using a video editor
Audio in krita is an unfinished feature made only to help in lip syncing, other than helping during the animation process, should not be used .
Dont use krita to render full animations
Please, DO NOT try to do this. I don't even recommend it for small animations. I have seen people trying to compose their whole animation using krita timeline putting background, tweening, sound and struggling to export. It never ends well, use a video editor for that or opentoonz.
Do you really need to render your animation inside krita?
Short answer is no. Unless you want to preview an animation or show an animation test to someone you shouldn't use krita to render your animation. I recommend exporting your animation as a image sequence and using a video editor to assemble your frames. this will give you much more control over your animation and will allow you to add some effects easier. There are many free video editors like Kdenlive, HitFilm, Blender, OpenShot and so on.. they are very easy to find online too.
There are many reasons to why I think rendering in krita is a bad idea, but the major one is the program is not made for this. Its better to use more than one program and having a better control over the whole process than insisting on using one for everything and struggle during the process, if you really just want to use one tool I recommend using opentoonz or Pencil2D.
Conclusion
Although I am teaching how to render in krita, I don't really recommend relying on it to render animations other than showing animation tests or wips.
Krita is an amazing software but it has its limitations. I believe krita is amazing for animations in a traditional sense. For an idea of how to work with animation on krita, I suggest looking at Ed tadeo videos.
youtube
0 notes
Last Seen Blogs
probably-haven
That Queer You Met Last Week in The Nutella Isle

zbetgreen
ZBET

rahmanurhasanah
Full of surprises


elkebitter
elkebitter