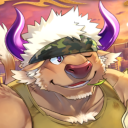
#i used some model refs
Text
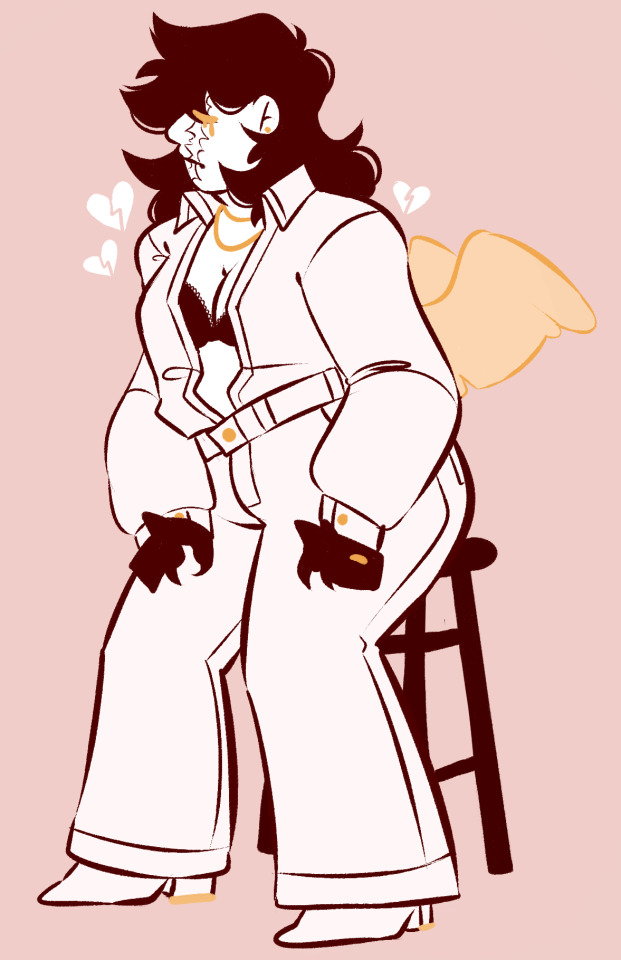
say yes, say yes, not maybe <;/3
have this c!q i never posted for some reason as a treat, crybaby
#my art#c!quackity#i think i posted it and deleted it for some reason#the ref i used was a model just sittin on a chair so#asdfsag
105 notes
·
View notes
Text

“One of you is playing truant!”
#hows a good old fashioned redraw for 9/10?#I forgot how much I loved drawing them#used some refs of real life 652s because I love adding details of the irl basises#that were omitted from the models#ttte#thomas the tank engine#art#ttte donald#ttte douglas#ttte donald and douglas#ttte the fat controller#ttte sir topham hatt#ttte redraw#kips art
243 notes
·
View notes
Text
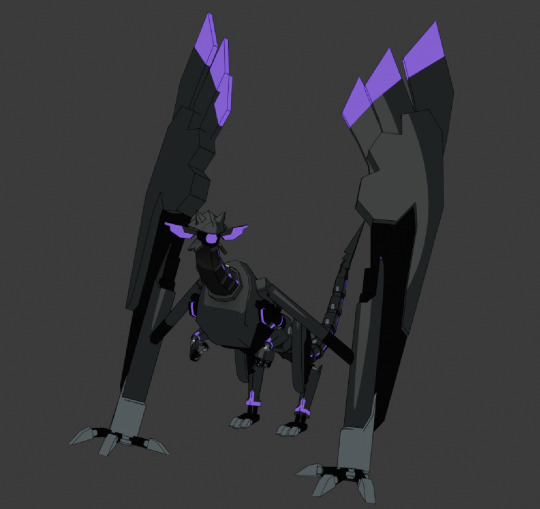
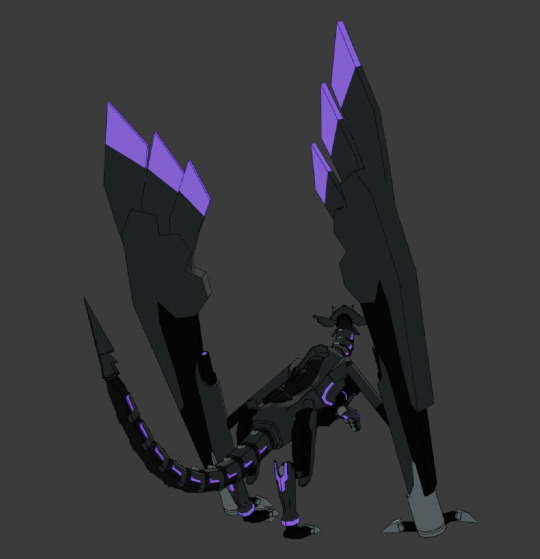
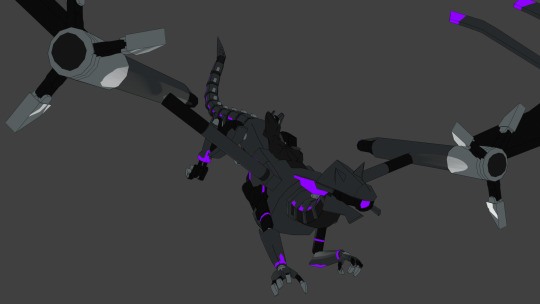
my beautiful son version 2.0
#used a class an excuse to finally finish a fucking model of him#real ones remember the blockbench one from like. a year ago#steelheart redux#blender#3d#my art#my ocs#zarian#i had to rig this Twice because the first time i didnt know what bone roll was. and hes a robot. you may wince#additional things i still have to do: overlay hand-drawn lineart over the textures (i know how to do this)#make an eye rig (i do not know how to do this)#hook the wingtips up to some kind of bone track so they can slide in and out and i dont have to clunkily hand place them (no idea)#but we endure#hes mostly for art ref anyway
44 notes
·
View notes
Text
There was a promise in our stride
But we changed courses, headfirst into the unknown
#yellowjackets#yellowjackets spoilers#shauna shipman#jackie taylor#shaunajackie#fanart#doodl#thar she blows! the shaunajackie pieta!#and ill go ahead and put all the little deets in the tags so yall can skip m if ya want#SO#title from ep 10#shauna is on the mary position cuz mary is the dramatic one here but also randomly pregnant(at first)#and jackie on jesus cuz they Eat The Body#you could i guess also draw some comparisons between jackie's death and the crucifixion but idk that needs more unpacking#related to that im sure yall will say that jackie has the crown of thorns but noooo! i modelled it after her doomcoming headpiece >:)#which conveniently looked like it#the ref I used was bouguereau's pieta#which has an angel at the top and i tried to put laura lee there but perspective aaaaaaa#so laura lee bird is all you will get unfortunately#otherwise the placement is pretty random#mari was gonna be there but she didnt make the cut
212 notes
·
View notes
Text
Me neither, Unsuur. Me neither.
[In case you can't read my handwriting:]

#yes the perspective and the proportions are borked but shhhhh thats part of the joke#and bc i used the in game models as refs#unsuur is way harder to draw for some reason#i think it's the shapes#my time at sandrock#mtas#mtas unsuur#mtas justice#mtas fanart#shady learns 2 art
13 notes
·
View notes
Text
Hey! I finished up another little resource I've been slowly putting together.
I've put together a turnaround reference of every character in the game, with every alternate appearance, both full bodies and profile views.
The full body views include a hatless young Graham for scale. There is a bit of an issue regarding characters with armor- I'm not very savvy with blender admittedly, and all of the metal comes out really dark. It isn't too bad, save for Manny, who doesn't even have his green feather. I'd like to fix those once I can. Also, capes are omitted. I think that only applies to Graham and Whisper though.
I'll be finishing up doing the same for the animals at some point, and I'm planning on making a few references for certain character's weapons, or other interesting items.
Also- along with the profile views, I included some of Graham's head at every angle by 10 degrees, from head on, lower, and upper angles. Thought it would be helpful to see how his hat works from any direction. The images are huge, here's a gif of them all together.
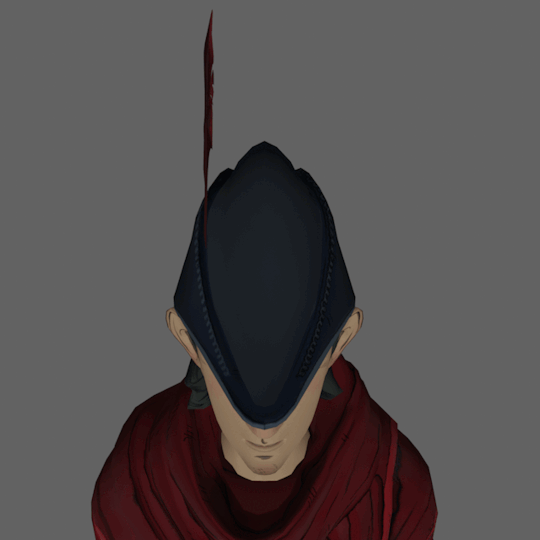
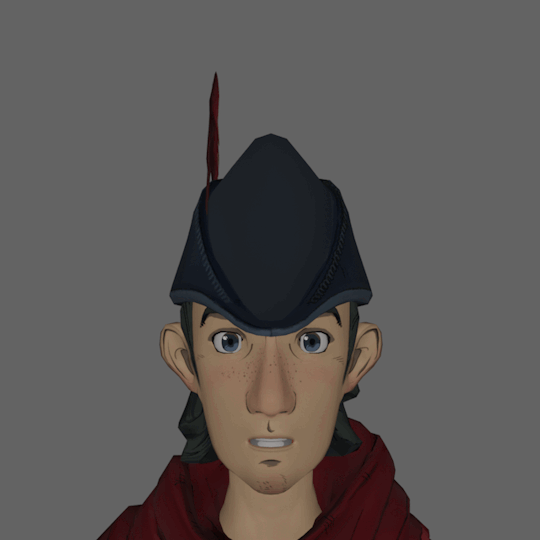

Hope these will come of use! I've been working on it for a while.
#kings quest#king's quest#king’s quest#kq2015#kq#the only metal object i successfully fiddled with was the crown. because it looked horrid if i didnt#also chester and hagatha have an extra angle in their profile views bc they are hunched over with long noses#so at a 45 degree angle it didnt have the view i wanted and i just threw in an extra#only them tho and only from the front not from behind#also theres only 4 goblin profiles and 8 different goblins in full body bc they have the same heads. 4 heads and 2 body types#ive been actively doing this for over a year just not constantly... its easy work but its a time sink#ive been WANTING to do it since 2017 ever since i could access the models in a modelling program#since then we've found more references from the artists but still lack all of them. like graham's >:(#im gonna take a break before getting to the animals and items. there are a few animals already done though#ps these are great refs for art but i wouldnt colorpick from these images due to how blender adds some shading to the models#just use them to pick colors from the color wheel or find the character's texture in the extracted textures and pick from that if you must#anyway thats all my commentary here. have fun go nuts i really hope you guys find this useful
27 notes
·
View notes
Text

success
#idk why snakes shirt is light grey but i should be able to fix it#i have....... so many t posing blorbos now.#i wanted to find the injured raiden model with his arm ripped off for a drawing ref but i figured i might as well get otacon and sunny too#anyway. fambly#i didnt bother making them posable because im just using them for detail + colour refs BUT#would be fun to make some 3d fanart eventually#throws otacon into rex for funsies#ada speaks#untagged
42 notes
·
View notes
Text

Got into a new series and these two are my favorite boys.
Do not tag this as "ship" please.
#Fox's Art#Lego Ninjago#Hello Ninjago fandom#Ninjago#Cole Brookstone#Jay Walker#I worked on this on and off bc I wasn't very confident in how it would turn out.#I tried drawing them as lego people but they didn't look right so I started over and drew them as humans instead#Which I'm. still not great at but they still came out alright atleast.#Also trying to colorpick from 3D models is not fun.#I had to try getting the colors close to what I had in the refs I used which also wasn't too fun.#So if the colors look off I apologize.#I might do the other Ninja at some point but it might be awhile.
7 notes
·
View notes
Photo
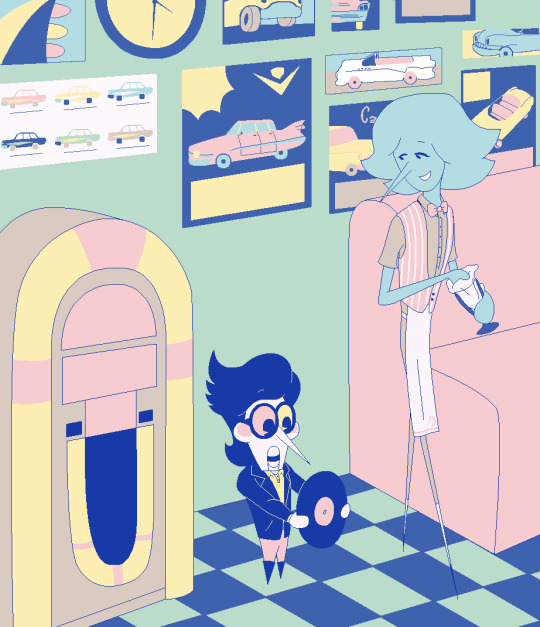
i found this palette and used its colors for a pic. Inspired from this as well
#o#do you see now? how much i wasnt kidding every time i said Blue loves cars#i used various refs for the car pics in the bg- from my American cars of the 1950s book. some models are from the late 50s#but let's just say. That in this 50s au. Certain things aren't the same to say the least (besides the mosquito people pictured above).#and that includes making car models come out earlier bc i need them and they are cool. The end#this is the most pastel thing i drew in like. years. But love them 50s specific colors#also first time im drawing spamt's 8^O face#from toby's doodles. it's so weird to me that he can- in fact- do the O mouth. but it's funny#blue addison#spamton#spamton g spamton#dltr#ua s05
29 notes
·
View notes
Text
I have asks left to answer and stuff left to get done but I guess I’ll show off the start of a bit of a ‘project’ with no context for the funny—
Basically; how I see Maloney have I have no idea what bird he is: most birds with black feathers actually have iridescent feathers that get a sheen of color in sunlight. So I gave that to maloney.

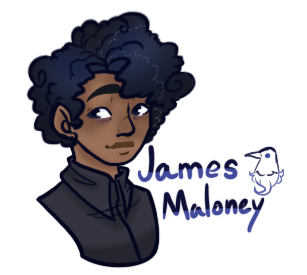
Here we have the standard all-black corvids; common crow and raven
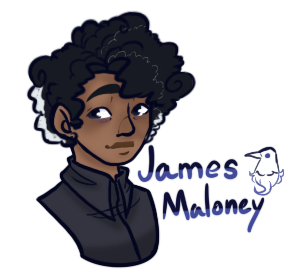
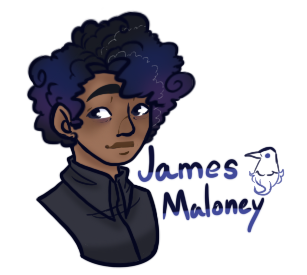
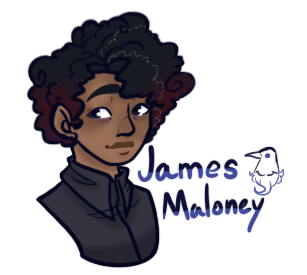
And now we have the less-common grab-bag; Magpie, Rook, Blackbird. (Magpie is the biggest exception cuz that’s not iridescence that’s poliosis)
Goodnight all, I’ll answer the asks in the morning ^^
#srsly the rook ref I used was basically blue.#i wanted him to look a lot like his cousin (Sally) and his adopted brother so I basically discarded the model#SPEAKING OF HIS ADOPTED BROTHER. MASSIVE CHARACTER REWORKS.#like I’m pretty sure there’s a reason I’ve never heard anyone else talk about him#but he gives me consistency so expect a Completely different character with some similar character beats#anyways back to maloney—#idk if I’m keeping the curly hair but my favorite picture of him I did b4 I had the rest of the design made the curls look fun so idk :(#taleblr#james maloney#taleblr character design#thank you for your astonishing patience I am easily encumbered#… cuz finals week is next week…#wish me luck
8 notes
·
View notes
Text
God the hardest part of glados to draw is….the hinge….
????? I cannot wrap my head around these shapes
#it does not help that my 3d model file won’t open anymore for some reason so im stuck using old refs#the visibility on ingame screenshots is limited too#so I usually improvise something
9 notes
·
View notes
Text
The joy of a getting a new comic idea and the pain of realizing you have to draw it
#It's always the backgrounds man they always make me not wanna#Just gonna do the absolute bare minimum as per usual lol#I REALLY need to get a laptop and figure out sketch up or some other 3d modelling program#So I can start making my own bg refs#Personal#You knows what's an untapped market? Commissioning people to make 3d assets of bgs for others to use#Maybe when I actually have money for a laptop I'll just do it for free for people as practice
6 notes
·
View notes
Text
Mamoru is especially a hard one cus he does NOT have a shinsoban or kanzenban era design that's worth using as a ref
seriously Mamoru so far has been drawn once in Naoko's recent stuff! how can one be accurate if there's no reference to be accurate to?
#unless hes been redrawn in the pages but i have to look#like the new stuff is only a side profile no front view#either way we kinda have a different take on him all together cus of this issue#if we use nakayoshi tankobon hed be too chiseled in the face (or too sharp in later arcs) and not match our style frfr#hed also look much older than he is (15-17) compared to the girls#i think we managed to get something but its kinda hard without a shinsoban or Kanzenban reference to use#funny enough we used some off model crystal screenshots as a ref too cus he looked lioe a legit teen when off model lol#he's not in Sakou's style or anything though
4 notes
·
View notes
Text
hiii
#cool posts#i forgot i hadnt posted in days#i made some oc art and the lineart nd lighting is delicious but the design is suuuuper off model cause i didnt use any refs so#might post that alongside other art maybe
2 notes
·
View notes
Text
Can't afford art school?
After seeing post like this 👇

And this gem 👇
As well as countless of others from the AI generator community. Just talking about how "inaccessible art" is, I decided why not show how wrong these guys are while also helping anyone who actually wants to learn.
Here is the first one ART TEACHERS! There are plenty online and in places like youtube.
📺Here is my list:
Proko (Free, mostly teaches anatomy and how to draw people. But does have art talks and teaches the basics.)
Marc Brunet (Free but he does have other classes for a cheap price. Use to work for Blizzard and teaches you everything)
Aaron Rutten (free, tips about art, talks about art programs and the best products for digital art)
BoroCG (free, teaches a verity of art mediums from 3D modeling to digital painting. As well as some tips that can be used across styles)
Jesse J. Jones (free, talks about animating)
Jesus Conde (free, teaches digital painting and has classes in Spanish)
Mohammed Agbadi (free, he gives some advice in some videos and talks about art)
Ross Draws (free, he does have other classes for a good price. Mostly teaching character designs and simple backgrounds.)
SamDoesArts (free, gives good advice and critiques)
Drawfee Show (free, they do give some good advice and great inspiration)
The Art of Aaron Blaise ( useful tips for digital art and animation. Was an animator for Disney. Mostly nature art)
Bobby Chiu ( useful tips and interviews with artist who are in the industry or making a living as artist)
Sinix Design (has some tips on drawing people)
Winged canvas (art school for free on a verity of mediums)
Bob Ross (just a good time, learn how to paint, as well as how too relax when doing art. "there are no mistakes only happy accidents", this channel also provides tips from another artist)
Scott Christian Sava (Inspiration and provides tips and advice)
Pikat (art advice and critiques)
Drawbox (a suggested cheap online art school, made of a community of artist)
Skillshare (A cheap learning site that has art classes ranging from traditional to digital. As well as Animation and tutorials on art programs. All under one price, in the USA it's around $34 a month)
Human anatomy for artist (not a video or teacher but the site is full of awesome refs to practice and get better at anatomy)
Second part BOOKS, I have collected some books that have helped me and might help others.
📚Here is my list:
The "how to draw manga" series produced by Graphic-sha. These are for manga artist but they give great advice and information.
"Creating characters with personality" by Tom Bancroft. A great book that can help not just people who draw cartoons but also realistic ones. As it helps you with facial ques and how to make a character interesting.
"Albinus on anatomy" by Robert Beverly Hale and Terence Coyle. Great book to help someone learn basic anatomy.
"Artistic Anatomy" by Dr. Paul Richer and Robert Beverly Hale. A good book if you want to go further in-depth with anatomy.
"Directing the story" by Francis Glebas. A good book if you want to Story board or make comics.
"Animal Anatomy for Artists" by Eliot Goldfinger. A good book for if you want to draw animals or creatures.
"Constructive Anatomy: with almost 500 illustrations" by George B. Bridgman. A great book to help you block out shadows in your figures and see them in a more 3 diamantine way.
"Dynamic Anatomy: Revised and expand" by Burne Hogarth. A book that shows how to block out shapes and easily understand what you are looking out. When it comes to human subjects.
"An Atlas of animal anatomy for artist" by W. Ellenberger and H. Dittrich and H. Baum. This is another good one for people who want to draw animals or creatures.
Etherington Brothers, they make books and have a free blog with art tips.
📝As for Supplies, I recommend starting out cheap, buying Pencils and art paper at dollar tree or 5 below. If you want to go fancy Michaels is always a good place for traditional supplies. They also get in some good sales and discounts. For digital art, I recommend not starting with a screen art drawing tablet as they are usually more expensive.
For the Best art Tablet I recommend either Xp-pen, Bamboo or Huion. Some can range from about 40$ to the thousands.
💻As for art programs here is a list of Free to pay.
Clip Studio paint ( you can choose to pay once or sub and get updates. Galaxy, Windows, macOS, iPad, iPhone, Android, or Chromebook device. )
Procreate ( pay once for $9.99 usd, IPAD & IPHONE ONLY)
Blender (for 3D modules/sculpting, animation and more. Free)
PaintTool SAI (pay but has a 31 day free trail)
Krita (Free)
mypaint (free)
FireAlpaca (free)
Aseprite ($19.99 usd but has a free trail, for pixel art Windows & macOS)
Drawpile (free and for if you want to draw with others)
IbisPaint (free, phone app ONLY)
Medibang (free, IPAD, Android and PC)
NOTE: Some of these can work on almost any computer like Clip and Sai but others will require a bit stronger computer like Blender. Please check their sites for if your computer is compatible.
So do with this information as you will but as you can tell there are ways to learn how to become an artist, without breaking the bank. The only thing that might be stopping YOU from using any of these things, is YOU.
I have made time to learn to draw and many artist have too. Either in-between working two jobs or taking care of your family and a job or regular school and chores. YOU just have to take the time or use some time management, it really doesn't take long to practice for like an hour or less. YOU also don't have to do it every day, just once or three times a week is fine.
Hope this was helpful and have a great day.
"also apologies for any spelling or grammar errors, I have Dyslexia and it makes my brain go XP when it comes to speech or writing"
43K notes
·
View notes
Text
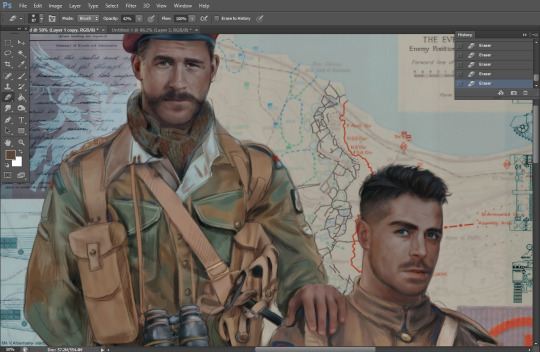
Ok! I've finally decided to put together a (somewhat) comprehensive tutorial on my latest art~
Please enjoy this little step-by-step ��♀️
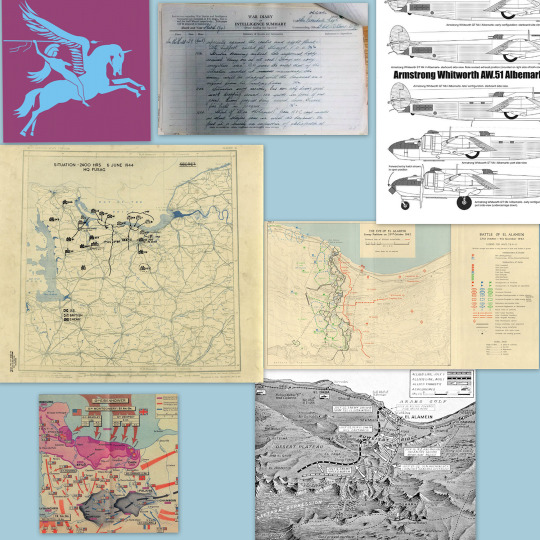
First things first--references!
Now I'm not saying you have to go overboard, but I always find that this is a crucial starting point in any art piece I intend on making. Especially if you're a detail freak like me and want to make it as realistic as possible 🙃
As such, your web browser should look like this at any given point:

Since this is a historical piece, it means hours upon hours of meaningless research just to see what color the socks are, but...again. that isn't, strictly, necessary 😅
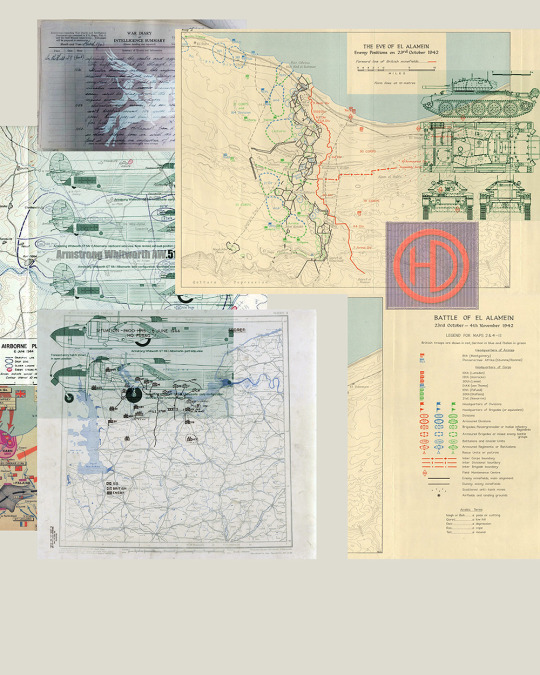
Once I've compiled all my lovely ref pics, I usually dump them into a big-ass collage ⬇️
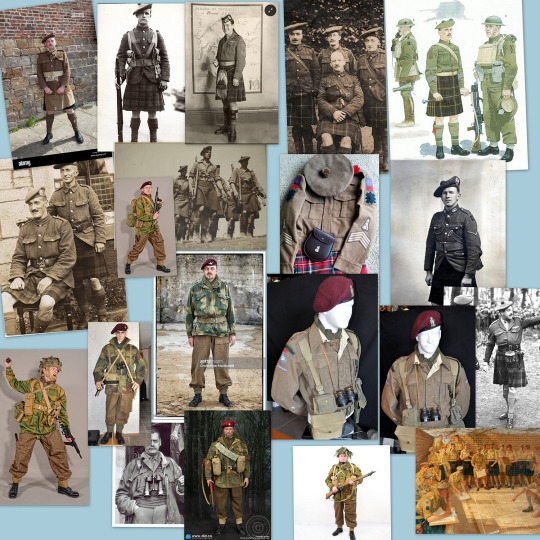
(I will end up not using half of these, alas :'D)
Another reference search for background material, and getting to showcase our models of choice for this occasion~
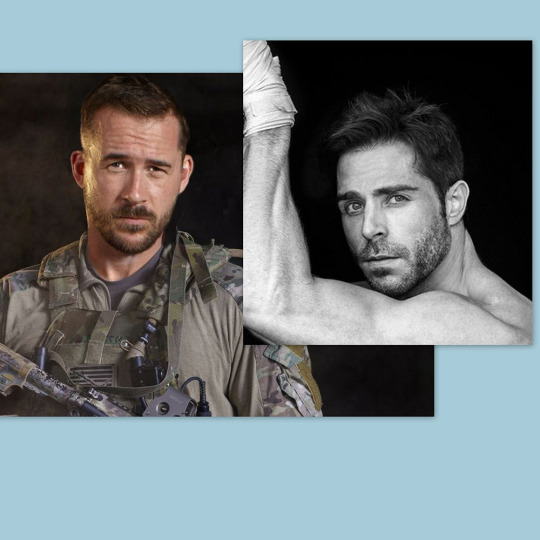
When picking a reference for an actor or model, the main thing I keep in mind (besides prettiness 🤭) is lighting and orientation. Because I already kinda know what pose I'm gonna go with for this piece, I can look for specific angles that might fit the criteria. I should mention that I am a reference hound, and my current COD actor ref folder looks like this:

Also keep in mind, if you're using a ref that you need to flip, make sure you adjust accordingly. This especially applies to clothing, as certain things like pants zippers and belt buckles can be quite specific ☝️
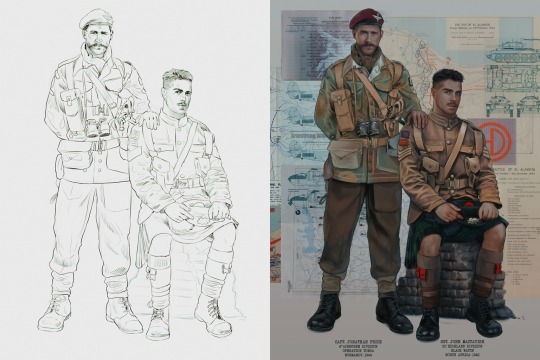
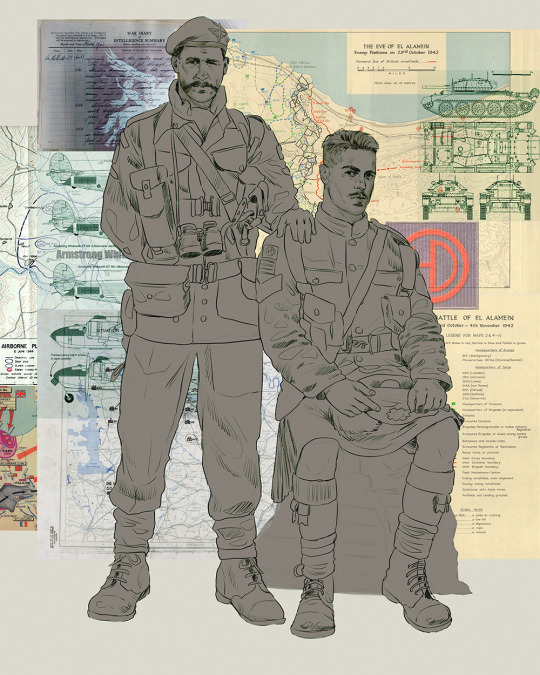
Now that we've spent countless hours googling, it's time to start with a rough sketch:
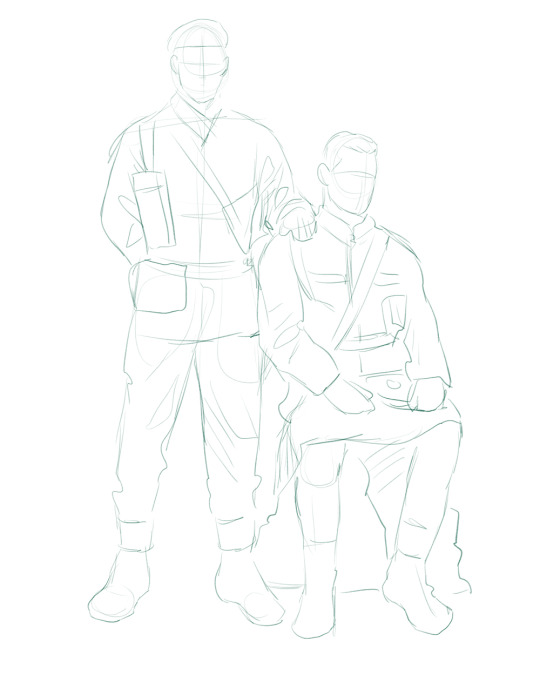
It doesn't have to be pretty, folks, just a basic guideline of where you want the figures to be.
The next step is to define it more, and I know this looks like that 'how to draw an owl' meme, but I promise--getting from the loose sketch above to below is not that difficult.
Things to keep in mind are--don't go too in-depth with the details, because things are still subject to change at this point. In terms of making a suitable anatomically-correct sketch, I would suggest lots of studying. This doesn't even have to be things like figure drawing, I genuinely look at people around me for inspiration all the time. Familiarize yourself with the human form, and things like weight, proportions, posing will seem a little more feasible.
It's also important at this stage to consider your composition. Remember to flip the canvas frequently to make sure you're not leaning to one side too often. I'm sure something can be said for the spiral fibonacci stuff, which I don't really try to do on purpose, but I think keeping things like symmetry and balance in mind is a good start ✌️

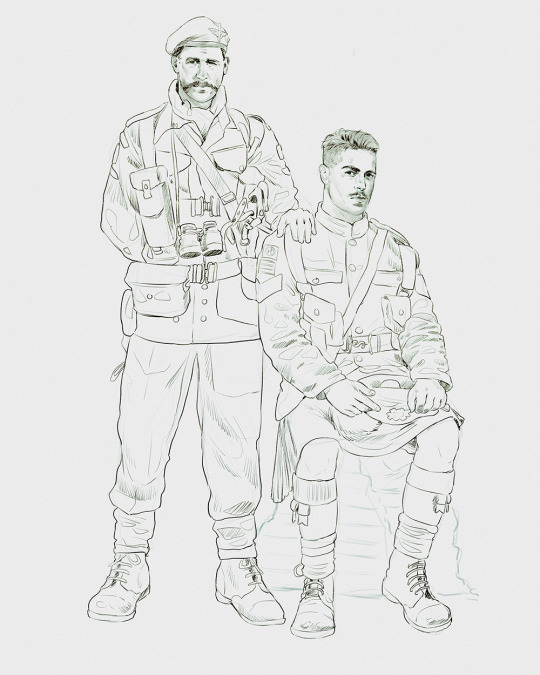
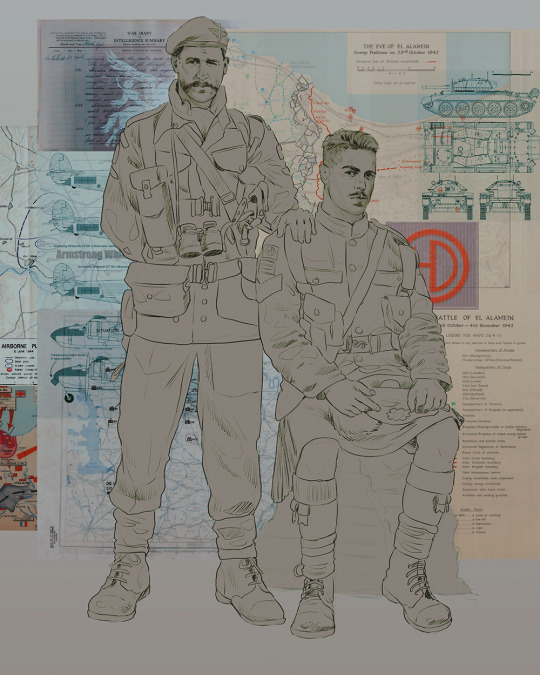
Next step is just blocking in the figures. Standard. No fuss 👍
Now onto the background!
It's frankly hilarious how many people thought I was *hand-drawing* these maps and stuff 😂😂 I cannot even begin to comprehend how insanely difficult that would be. So yeah, we're just taking the lazy copy and paste way out 🤙
I almost always prepare my backgrounds first, and this is mostly to get a general color scheme off the bat. For collage work, it's really just a matter of trial and error, sticking this here, slapping this there, etc. I like to futz around with different overlay options until I've found a nice arrangement. Advice for this is just--go nuts 🤷♀️
Next, I add a few color adjustments. I tend to make at least 2 colors pop in an art piece, and low and behold, they usually tend to be red and blue ❤️💙There's something about warm/cool vibes, idk man..
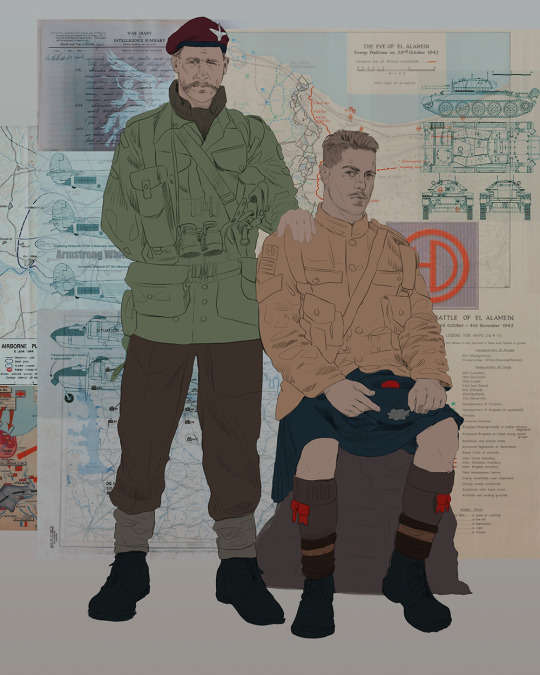
Now we move on to coloring the figures. This is just a basic block and fill, not really defining any of the details yet.
Next, we add some cursory values. Sloppy airbrush works fine, it'll look better soon I promise 🙏
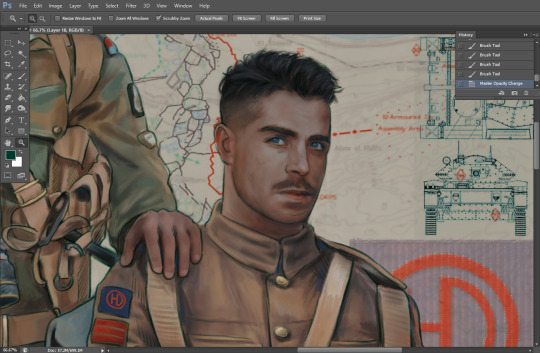
And now--rendering!
I know a lot of beginner artists are intimidated by rendering, and I can totally understand why. It's just one of those things you have to commit to 💪
I've decided to show a brief process of rendering our dear Johnny's face here:
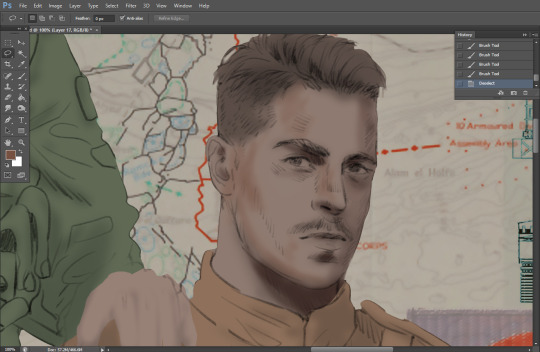
Starting off, I usually rely on the trusty airbrush just to get some color values going. Note--I've kept my sketch layer on top, but feel free to turn it on and off as you work, so as to not be too bound to the sketch. For now, it's just a guideline.
This next stage may look like a huge jump, but it's really just adding more to the foundation. I try to think of it like putting on make-up in a way~ Adding contours, accentuating highlights. This is also where I start adding in more saturation, especially around areas such as ears, nose and lips. Still a bit fuzzy at this point, but that's why we keep adding to it 💪
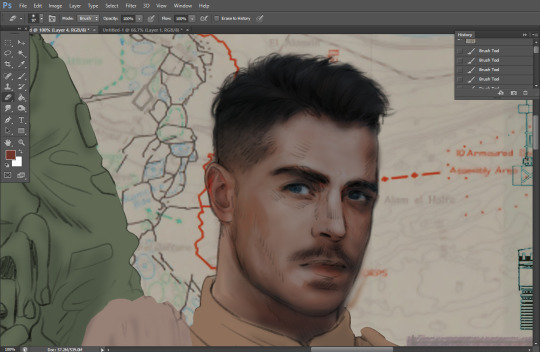
A boy has appeared! See--now I've removed most of the line layer, and it holds up on its own. I'll admit that in order to achieve this realistic style, you'll need lots and lots of practice and skill, which shouldn't be discouraging! Just motivate yourself with the prospect of getting to look at pretty men for countless hours 🙆♀️
I'll probably do a more in-depth explanation about rendering at some point, but let's keep this rolling~

Moving forward is just a process of adding to the figures bit by bit. I do lean towards filling in each section from top to bottom, but you can feel free to pop around to certain parts that appeal to you more. I almost always do the faces first though, because if they end up sucking, I feel less guilty about scrapping it 😂 But no--I think he's pretty enough to proceed 😚
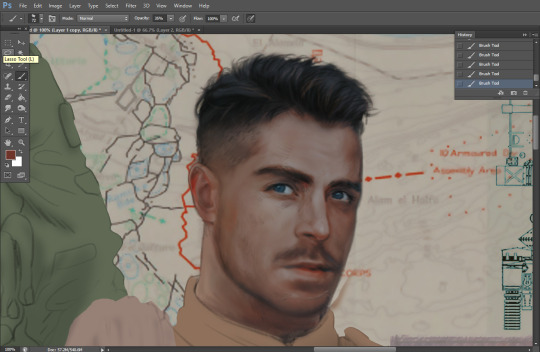
They're coming together now 🙆♀️ Another helpful tip--make sure you reuse color. By that, I mean--try to incorporate various colors throughout your piece, using the eyedropper tool to keep a consistent palette. I try to put in bits of red and blue where I can
Here they are fully rendered! Notice I've made a few subtle changes from the sketch, like adjusting the belt buckles because I made a mistake 😬 Hence why you shouldn't put too much stock in your initial sketch~
The next step is more of a stylistic choice, but I usually go over everything with an outline, typically in a bright color like green. Occasionally, I can just use my initial line layer, but for this, I've made a brand new, cleaner line 👍
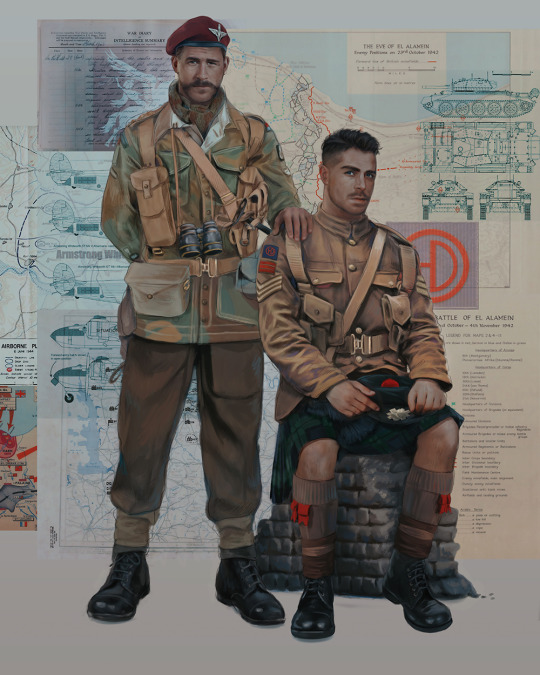
And the final step is adjusting the color and adding some text:
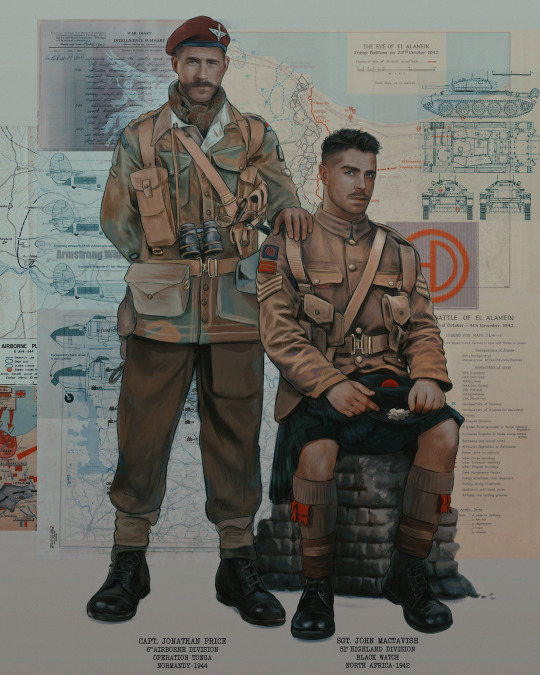
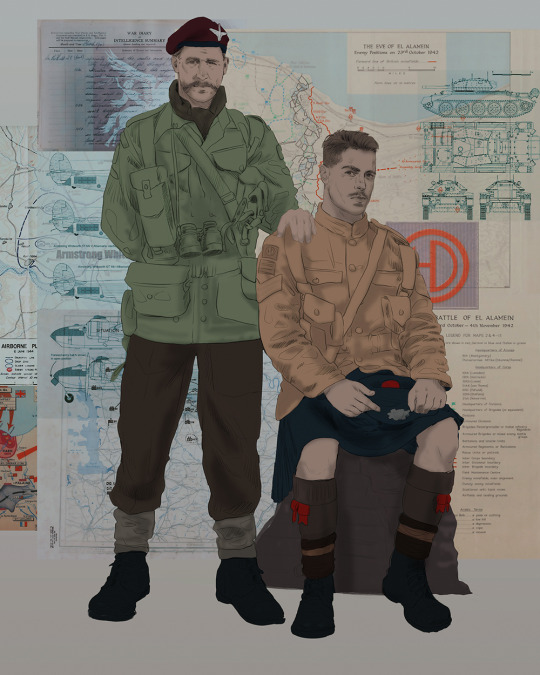
Tada!! It's done!
All in all, this took me the better part of a week, but I have a lot of free time, so yeah ✌️
I hope you appreciated that little walkthrough~ I know people have been asking me how I do my art, but the truth is--I usually have no clue how to explain myself 😅 So have this half-assed tutorial~
As a bonus, here is a cute (cursed) image of Johnny without his mustache:
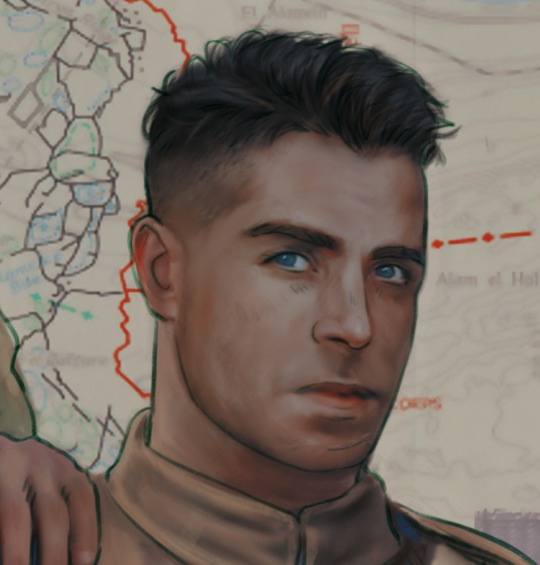
A baby, a literal infant child !!! who put this wee bairn on the front lines ??! 😭
Anyway! peace out ✌️
#tutorial#my art#art tutorial#since people have been asking#I remembered to save my process from this latest work~#enjoy 🙆♀️
1K notes
·
View notes
Last Seen Blogs

coordinator-dreams
Untitled
storm-inmymind
Let Me Be Free
zoyawon
Holiday Accomodation Australia
flyinunderwater
flyinunderwater
kairunatic
Too lazy to come up with anything