#i’ll make a small beading tutorial for the leaves in the future
Text

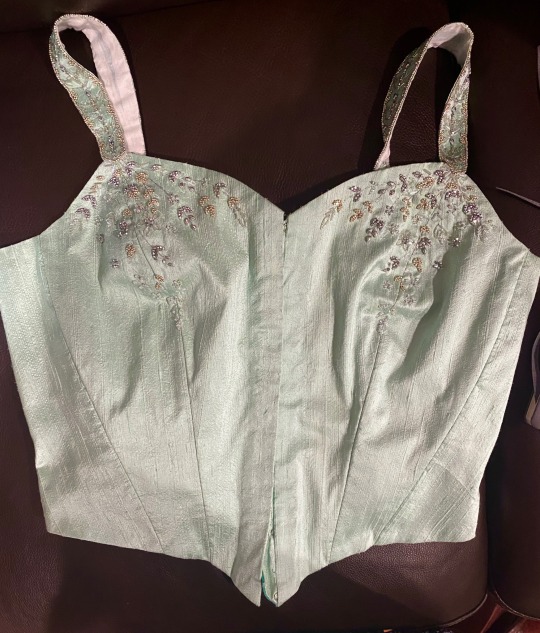
Bodice embellishment is 95% done, and the Glass Gown is starting to live up to its name! I’m finishing up the silver embroidery right now, using a very long chain stitch for most of it. I found that to have the best impact and fluidity for the long stems.
The silver embroidery thread is Sajou ‘Fil au Chinois’ in metallic silver. The beading thread is Kinkame 50wt silk in color #10.
The beads are:
2mm Czech fire-polished in Crystal AB, Crystal w/ Silver AB, and Silver.
mini Gem-duo beads in silver
3mm and 6mm Miyuki smooth bugle beads in Crystal AB
6mm Dyna-mites twist bugle beads in opaque ceylon rainbow white
15/0 Toho “3-cut” seed beads in silver (these have a very warm, nearly gold tone but this added some nice variety).
I actually bought so many other beads for this project but none of them ended up working out. This combo ended up giving me the texture and color variety I wanted while remaining cohesive and restrained. I especially love working with the fire-polished beads. The facets give them so much sparkle and texture while not being chunky or tacky. I will definitely be getting more in more colors for future projects (and also these colors again because they’re so versatile).
#pancake makes the glass gown#pancake talks textiles#the fun thing with ‘crystal’ beads is that they take on a lot of ambient color due to their transparency#the bugle beads look almost ivory in their container but with the blue thread and fabric they look like an icy seafoam#i’ll make a small beading tutorial for the leaves in the future#they’re super simple but really effective#and they have that wonderful victwardian feel
35 notes
·
View notes
Text
Take it Slow - Part Sixty-One
a/n: okay this is my first shot at a harry:y/n fic, and it will be multiple parts. y/n had a bad experience with an ex over a year ago, and finally accepts her coworker and good friend Niall’s invitation to go on a blind date with his friend Harry.
Warnings: Fluff and Smut.
a/n: i’m baaaaaccckkkk. mama came home from vacation. she’s still tired, but she missed her babies too much to stay away. niall and sarah did a great job babysitting. let’s gooooooooooo
Masterpost (all previous parts can be found in the masterpost)
…a week or so later…
Harry was sleeping peacefully on his back with you resting your head on his chest. One of your legs was over his and you had an arm draped over his lower stomach. He woke up to the feeling of something wet on his thigh. It took him a second, but he swore he could feel you moving back and forth on him. He looked down to see your eyes screwed shut and teeth gritted. There were beads of sweat on your brow-line.
You were dreaming. You were having a steamy dream of you and Harry. You were riding him out in an open field of sunflowers. Your hair was flowing in the wind, and he wouldn’t stop telling you how beautiful you were.
When you gasp, Harry fully wakes up. He didn’t want to wake you, but he did want to have some fun with you. He raises his thigh slightly to add a little more pressure for you. He wanted to give you a little more friction. He wiggles his thigh from side to side as you continue to grind on him in your sleep.
“Harry.” You moan. He always wondered if you dreamt about him. He always had a hunch, but the small bit of confirmation was delightful.
His cock grows harder as you move faster on him. Your hand moves to grip at his throat and you squeeze it, causing him to choke slightly.
“Jesus.” He coughs, and you wake up immediately.
“Wh, what’s happening?!” You spring up and feel the wetness from your center stick against him. “Ew, oh my god, I’m so sorry, what was I doing?”
“You were…” He coughs again, you really grabbed his throat hard. “Grindin’ against my thigh. I was tryin’ to help yeh along, but you grabbed my throat and started choakin’ me. What were you dreamin’ about?”
“I was…um…riding you.” You rub your eyes.
“And did you choke me in your dream?”
“I…don’t remember.”
“Liar.” He smirks. “It’s okay, wanna choke me?”
“Harry, stop.”
“You’ve gripped my throat before, wanna do it a little harder? S’okay, if you do.”
“Harry, it’s like two in the morning.”
“Yeah?” He reaches between your legs to collect some of your wetness, and brings it up to his face. “Seems like you’re a little riled up. Let’s fix that, hm?” He sucks his fingers into his mouth then pulls you on top of him. “Got hard while you were goin’ to town on me.”
“We ran out of condoms.”
“Take your pill yesterday?”
“Yeah.”
“Gonna take it in a few hours?”
“Yeah.”
“Alright then baby girl, nothin’ to worry about.” He kisses you tenderly.
“Fuck it, okay.”
You raise your hips and slide down on him.
“Holy shit!” Both of your eye brows raise at his exclamation. Harry would moan and groan, but in the almost eight months you had been together you had never heard him yell in such pleasure. “Haven’t fully felt yeh in so long.” You smirk at him.
You raise and lower yourself on him and his hands move to your hips to help you get a rhythm that suits the both of you. The way you were grinding on him brought you right back o the euphoric state you had while dreaming.
“Go ahead, angel, wrap that pretty little hand around me.”
You kiss him first and then slide your hand up to his throat. Did Harry like being choked, or did he just like that you wanted to do it to him? Your thumb brushes over his adam’s apple, and then you apply a little more pressure. He groans as he thrusts up into you, and your head rolls back. It felt so good to feel him without the barrier of the condom.
You weren’t grabbing him as hard as you had grabbed him while you were sleeping, he figured you just felt shy now and he wasn’t going to push you. But he’d be lying if he said he didn’t love when you were a little more dominant. His sweet baby girl liked to be rough, and it drove him crazy.
One of his hands dips between the two of you to rub your clit and that’s when you’re your grip tightens around him. You didn’t stop to think your fingers might leave lsting bruises, you were so far gone you couldn’t think about anything. He nearly gasps from the pressure on his throat, but he can handle it. He’d do anything to be able to see you the way you are now. Totally lost in pure ecstasy.
“Harry.” You groan. He feels you pulsate around him and he knows you’re close.
Another sharp thrust up into you and you come undone. You moan loudly and your voice cracks as he continues rubbing your clit as you get through your orgasm. Your grip on his throat loosens and you tuck your head into the crook of his neck.
“Will you, will you come on back?”
“Course.”
You lift off him and get on your stomach, lifting your ass in the air for him. He gives himself a few pumps before you feel his warmth all of over back and bum. You hear a few curse words leave his lips and then he sighs. He leans down to give you a kiss.
“Lemme get a rag, hang tight.”
Harry comes back a moment later with a warm rag to clean you up. You get up shortly after to use the toilet and then you return to him, spooning him and getting cozy.
“I didn’t hurt you did I?” You whisper to him.
“Not at all, felt good. Do it anytime yeh want.”
You knew you’d be exhausted when you got up in a few hours for work, but this one of the many things you loved about having a boyfriend like Harry. You could wake up incredibly horny in the middle of the night, and he’d be right there to help take care of you.
//
Today was the first day you’d be starting your video chats with Mark to work on your big project. You weren’t looking forward to it in the slightest, but at least in another week or so you’d be in Aruba. Harry’s mum and sister decided to stay in the U.K. for Easter since they knew Harry would be really busy with work while you were gone. That just meant he’d be spending three weeks over there during the summer instead of two, not a big deal.
You were dreading the call with him. You made sure to wear a shirt with a high neckline so he’d have nothing to look at but your face. Niall came into your office with a deep frown.
“What’s up?”
“You’ll never who’s here…”
“No.”
“The three of ‘em…CEO is putting them up in a hotel so we can all work together in person. Said it would be more productive. They’re taking over the conference room as a shared office for the foreseeable future.”
“No!” You whine.
“We have to meet with them in ten minutes. Could be worse, at least you don’t have to share your office with him.”
“True.” You stand up and grab your laptop. “Can’t fucking wait for this all to be over and it hasn’t even started yet. Now I’m almost nervous about my vacation.”
“Don’t be, you’re leadin’ what you’re workin’ on. Leave a list of to do’s with me and I’ll make sure that’s all he does.”
“Thank you.”
You both walk out to the conference room. You see three men setting their things up. You wondered how they’d get anything done working in an open space, but you certainly weren’t going to question it. Your supervisor comes in and gives you all the run down for how things were going to work, when it’s over it’s around lunch, and Mark follows you down the hall to your office.
“Hey, I was thinking maybe we could grab a bite? It’ll give us more time to go over things, and –“ You both stop short when you see Harry standing in your office.
“Sorry, I already have lunch plans.” You close the door in his face. It was unprofessional, and a little rude, but you didn’t care.
“What’s he doin’ here?” He asks, wrapping his arms around you.
“They’re here for the foreseeable future. CEO thought it would be more efficient this way.” You roll your eyes. You look at him and kiss him. “Can we go for a walk or something, I need to clear my head.”
“Sure.” He smiles and kisses you again.
You go over to your desk and reach underneath for your sneakers and change your shoes. You give him a thumbs up and grab his hand as you leave the office. Niall shoots you both a smile and wave as you walk out.
“Were you tired this mornin’?”
“A little yeah…” You say blushing.
“Me too.” He walks with his arm over your shoulders, pulling you into him. “But it’s the best kind of tired, you know?”
“Mhm.” You kiss him on the cheek.
“So you’re gonna have to spend a lot of time with that guy?”
“Unfortunately.” You groan. “At least I leave soon so it’ll break it up.”
“I know Niall’s there, hell, I know you can take care of yourself, but I’m a phone call or text away if you need me.”
“Thanks doll.” You give the hand on your shoulder a little squeeze, and continue your walk.
//
That afternoon Mark was in your office for hours. You were both going over different techniques you used while editing.
“Well, I use Vegas so…”
“Well, you’re going to learn Premiere because that’s what I use.” You tell him. “In fact, you’re supposed to use the Adobe products here since they’re paid for already. It’s really easy to learn. There’s tons of tutorials online. I’m sure someone as smart as you can pick it up.” You say smugly.
“Okay.”
“I think we should put a schedule or some type of calendar together for this. We’re going to be sent certain clips each day, so we need to get them into the sequence ready to go.”
“Makes sense to me.” He looks over his notes. “Can I ask you something?”
“Sure.”
“Does your boyfriend always visit for lunch?”
“That’s not really an appropriate question to ask me.”
“Come off it will you, we’re not robots.” You roll your eyes at him.
“Yes, he visits often, and sometimes I go to his work for lunch.”
“Right, he’s at Plant Geo?”
“Yes.” You look down then back to him. “Why do you care so much what I do with my personal time? We’re given an hour or so for lunch, and I’m allowed to do what I want during that time.”
“Never said you weren’t, I was just curious. Couple of the guys have girlfriends and they never see them during lunch. Usually too busy.”
“I use my time wisely during the work day. Plus, working through lunch is stupid, and doesn’t make you look better. It just shows poor time management if anything.”
“No, I just meant like they see them at home, ya know?”
“I see him at home too, we live together.”
“And you still visit during lunch?”
“Yes.”
“Why?”
“Because he, we miss each other during the day. And sometimes we both have late nights…we don’t meet up every day. When I don’t eat with him I eat with Niall.”
“Your ex?”
“I never dated him! I just told you I did because I wanted you to quit asking me to dance.”
“I was drunk.”
“No excuse. When someone tells you no, they should listen. You’re a good looking guy Mark, but you radiate douche-bag energy, and I’m just not here for it. So, while we’re working together I really would appreciate it if we didn’t talk about personal things. My goal at the end of this is to not have gained a new friend, okay?” His mouth was hanging open. No one had ever really talked to him like that before.
“Okay.”
That was that, and you get back to work. You notice the way he steals glances of you while you both work on your own computers, but you choose to ignore it. When you get home later Harry gives a relaxing back massage, knowing that you were stressed.
“You have magic hands, you know that?” You say as his thumbs press into your lower back as you both sit on the couch.
“I live to serve.” He jokes and you both laugh. “You’re so tense babe, full of knots. Maybe it’s time we get another massage together.”
“God that sounds amazing.” You sigh happily. “You know what would be relaxing too? Forever ago we talked about doing one of those wine and paint nights. That could be a really fun group date with everyone, don’t you think?”
“Yeah! Why don’t we see what everyone’s up to Friday night?”
“I’ll text in the group chat.”
Yes, the six of you had a group chat. Mariah was officially Rachel’s girlfriend now, and none of you saw her going anywhere anytime soon.
“Rachel should just teach the bloody class.” Harry chuckles. Your head rolls back as he works out a particular knot in your neck.
“Fuck.” You say. “Right there.” Your eyes screw shut as he applies a little more pressure.
“Poor thing.” He coos. “I should really buy some oil, give you a proper massage.”
“And get our things all gross?” You laugh. “This works just fine.”
//
Friday night rolls around and you couldn’t wait to hang out with all your friends. They had all agreed the wine and paint night would be fun, and to go to a late dinner afterwards.
You and Harry split and uber with Niall and Sarah.
“I’m begging the two of you, when we come home later, please don’t hump each other in the back of the car again.” Sarah says. “It was disgusting.” She says giggling. Before you can answer, Harry speaks.
“Can’t make any promises, sorry.” He winks at her.
“Make an effort then.” She sticks her tongue at him and he sticks it right back. You shake your head at the two of them with a smile.
You meet Rachel and Mariah at the place and you all head in. You each pick out the wine you want, and are given aprons to wear over your clothes. Harry helps you ties yours and you help him with his. Everyone else just sort of tied their own. Were the two of you cute or co-dependent? It was hard to tell from time to time.
You grab a stool and listen to the presenter who shows you what you’ll be painting. You all giggle and take sips of your wine. You’d be painting a lighthouse by the water. Not terribly difficult. Since you were left handed you had to be a little more careful than the others so you wouldn’t smudge anything. Harry watched as you took your first strokes. You always did everything with precision.
“Everyone look over here.” Sarah says. She had her phone up to take a group selfie. You all smile.
The painting was a lot of fun, and super relaxing. Of course Rachel’s painting looked the best. Yours was okay. Harry’s came out beautifully.
“Looks great, love.” He says, admiring your work.
“You’re just saying that.”
“No! I mean it, your shadows look good.” You give him a kiss on the cheek.
You’re told that the paintings will be stored to dry, and that you could come pick them up during the week if you wanted. The six of you head out to a pub for dinner. There were more drinks and lots of bar food. Harry kept his arm around you as he always did. He was more relaxed than usual. He liked having Mariah around. Someone else to talk to when Niall would join in on the girl talk.
“Y/N, are we still going to the mall tomorrow?” Sarah asks.
“Yup, was thinking we could leave around eleven.”
“Sounds good.”
“What are yeh shoppin’ for?”
“Just need to pick up some things. Rach, you’re still coming?”
“Yup, I’m gonna meet you two there.”
“You’ll be busy at an engagement shoot tomorrow anyways, right?”
“Yeah.”
“Mariah, do you a lot of freelance work?” Niall asks her.
“A little here and there, not as much as H though.”
“Okay, I need to ask.” Sarah starts. “What is with H? How does that nickname get started?”
“I’ve been wondering the same thing actually.” You say.
“I don’t know when it started. S’not like I said call me H or anythin’.” He shrugs.
“I feel like I heard someone call you H and it just stuck.” Mariah explains.
“More formal.” He says. “Niall never calls me H.”
“Nope, always Harry.”
You lean into him, feeling slightly tipsy. You decide to switch to water for the rest of the time at the pub. This time in the uber home, Sarah and Niall take the way back seat, but it didn’t stop Harry from nibbling on your neck and whispering in your ear to make you giggle. It was a great night.
“Night guys, see you tomorrow Sarah.” Harry has it arms wrapped around you to hold you from behind.
“Night, just text me before it’s time to go.” She says and nod.
You and Harry head up to your apartment, and practically race off to the bedroom. He couldn’t wait to get his hands on you, all over you. His hands cup your cheeks and he brings you in for a deep kiss. He walks you into the bedroom and presses you up against the wall next to the door. Your tongues mold together, and you’re in pure bliss.
His hands move to the hem of your shirt, breaking your kiss only for a moment to lift it off of you. He unhooks your bra with ease, and lets it fall to the floor. He takes his won shirt off and pulls you close to him so your breasts are pressed tightly to his chest. He kisses your jawline and moves to the skin just under your ear, sucking it in between his teeth and biting down.
“Oh god.” You moan, hands flying up to his hair.
“Need to taste you tonight.”
He picks you up and puts you on the bed, yanking your jeans and panties off. You giggle as he spreads your legs apart. He kisses down your chest, stomach, and hips. He kisses your inner thigh and leaves a few love bites behind as his tongue trails to your center. He licks a flat stripe up to your clit, and starts to suck on you. Your head slams back into the mattress. He’s done this to you more times than you can count, but it always felt like the first time. A vast amount of pleasure sweeps over you, and you gasp when you feel two of his fingers plunge up inside you, curling right away. Harry knew where your sweetest spot was. His mouth continues on your clit as his fingers pumped in and out of you.
“Harry.” You whimper.
He pumps faster, and flicks his tongue back and forth on your clit. He feels you clench around him, he knows your close. Your stomach tightens, and your back arches as you come undone. He takes his fingers out and laps up everything while you come, only adding to the wonderful sensation.
You catch your breath as he moves to hover over you. He takes one of your nipples between his lips, and sucks on it.
“Wanna, ngh, return the favor.”
“Later, need to be inside you now.”
He spreads you back apart and lines himself up with you. He slowly pushes inside. You gasp as his throbbing cock enter you. You pull him down close to you as be begins to move, rocking his hips against yours. You wrap your legs around his waist, and cross them at your ankles.
“Fuck, you feel so good.” He groans in your ear.
“Keep talking, love when you do this.” Your nails scratch at his back.
“You like havin’ my cock inside you?”
“Yes, it’s so big.”
“Yeh like the way I stretch you out?”
“God, yes.” One of his hands moves between where you’re connected to rub your clit. “You know my body so well.” You moan. “Always give me just what I need.”
“That’s right, always here to take care of you.” He moves to make eye contact with you as he pinches your clit and feels the beginning of your orgasm take over.
Your mouth parts as you look at him. He wants to watch every emotion you go through as you come, and you intend to show him. You nails sink further into his back and he knows he’s almost done for.
“Want you to come on my tits Harry, will you do that?” You say as you come down from your high.
He pulls out of you, and you squish your boobs together to give him a better target. That was all he needed before he released on you. You moan when you feel the heat of him on your skin. He collapses next to you and tries to catch his breath.
“Look at me babe.” You turn your head to face him. He was laying on his side. “I’ll clean yeh up in a second, but…”
“What baby?”
“Are yeh havin’ me come on you so much because you’re still afraid of me comin’ inside? I’m not complainin’ cause it’s so fuckin’ hot, but…”
“It’s just that we never do it is all…and yeah I’m still a little nervous, but at least I’m over using condoms right? Small steps.” You smile and he kisses you.
“I do like the way you look with my jizz all over you.” He smirks and gets up to grab a rag. He comes back over and cleans you up.
“Yeah, you like it when I’m dirty, huh?”
“Now, I have to go to sleep so I can get up on time, so none of that.” He gives your bum a little smack as you roll over after he’s done cleaning you up. He gets in with you and faces you.
“Oh, so I can’t be your dirty girl?” You giggle.
“You’re gonna be the death of me.”
//
Harry got up early, as much as he just wanted to lay in the warm bed with you, put on a nice outfit, and headed to the engagement shoot that was an hour or so away. You got up shortly after, showered, and texted Sarah. She met you down at your car.
“Thanks again for coming with, definitely need your opinions on what I want to buy.”
“No problem! You know I’ll never turn down a shopping trip. What do you need to get?”
“I’ll tell you once we’re with Rach.”
You both meet Rachel outside the main entrance of the mall, and walk in together. You lead them to a lingerie store.
“So…” You start blushing. “While Harry was in Florida a while ago, I found these pictures he had taken of himself…they were intimate.” You cough nervously as they nod. “He had mentioned he wanted to take pictures of me like that sometime, so since I’m leaving at the end of next week, I thought I would surprise him and let him take picture of me before I go.”
“Hot!” Rachel says.
“But I need your help picking out some outfits. I want to look sexy, but…I don’t know…elegant? I want it to feel like one of his professional shoots, only I’ll be wearing minimal clothing.”
“We’re on the case.” Sarah says. “Everyone, divide and conquer, we’ve got some work to do.”
#take it slow#harry styles#harry styles imagine#harry styles x reader#harry styles y/n#harry styles x y/n#harry styles smut#harry styles fluff#harry styles fluff fic#harry styles smut fic#harry styles fic#fluff#smut#hope yall enjoyed!#hope it was worth the wait#im already excited for part 62 its soooo good#i feel excited about them again#come hang out in my ask box
243 notes
·
View notes
Text
Sebastian X Reader: Going into Labour. Part I
Description: You go into labour
Warnings: Amature writing & not edited

A pang erupts into your lower back startling you awake. A sudden rush of awareness floods through you causing your stomach to drop. Sitting up in bed you sit there for a few seconds braving the waves of pain that are slowly intensifying.
Shifting to find some sort of comfort you feel something sticky. Sweat has soaked through your PJs and into your sheets. Cringing you slowly shuffle out of the pool you created in your own sleep.
The internal battle to wake Seb rages inside of you. The sight of sleepy Sebastian almost makes you giddy. His legs are entangled with yours, his hair messy as he shelters into his pillow. His breath is even while light snores fill the silence of the night. Deciding to give him a few more minutes of sleep you anxiously pick at your nails.
People usually time their contractions, at least that’s what you see in movies.
Reaching for the phone you time your contractions. Are 10 minutes close or far apart? Confusion clouds your mind as you try to recall your prenatal classes.
Seb would know. He was always so intrigued and attentive at the classes. He had read over a dozen books and always watches a tutorial before bed on different techniques.
You’d been timing them for about an hour, and slowly but surely they were getting closer together. Deciding he would want to be awake for this, you give in to your internal battle ignoring the guilt.
“Seb.” You whisper gently nudging him while rubbing soothing circles on his arm. You earn a light mumble from him as he tries to pull you closer.
“Sebastian.” You say a little louder prying him from his slumber. His eyes gently flutter open adjusting to the bedside lamp illuminating your bedroom. You kick yourself for not turning off the light before you woke him up.
“Hey.” He smiles with his eyes half-open. His raspy morning voice brings comfort to your rapid heartbeat.
You’re greeted with his gorgeous blue eyes as he inlaces his fingers in yours.
“Are you okay, beautiful?” He mumbles while lazily sitting up. Seb is shirtless, and even though you are currently in labour, you figure there is always time to admire your husband.
“I think I’m in labour.” You nervously smile while twisting your wedding ring. “My contractions started out 20 minutes apart, and have slowly dwindled down to 10.”
“Baby, how long have you been awake?” Sebastian sits up turning on his lamp.
“Only an hour.” You assure him. Pain flares into your lower back, sparking sharpness to run down your spine. Letting out a groan you squeeze Seb's hand.
You and Sebastian hadn’t planned on getting pregnant, in fact, you two were unsure if kids were going to be in your future. Your plan was to enjoy marriage and support Sebastian’s career. Seb had always been worried that he wouldn’t have enough time for you, let alone a kid. It’s an understatement to say that both of you were shocked when the flu turned out to be a baby.
“Y/N.” He sighs, “You should have woken me up.” He quickly gets up and heads to the bathroom, moments later returning with a wet washcloth. Seb gently sits next to you tending to your sweaty forehead. Humming in relief, you lean closer into his body.
“Are you mad?” You whisper trying to ignore the pain that is slowly spreading all over your body.
“No.” He smiles, “I suspected you would pull something like this, it’s in your nature to put others first.” He says as he continues to wipe the beads of sweat dripping down your forehead.
“How are you so calm right now?” You ask letting out a small whimper, “Because I’m freaking out a little bit.” You groan as a wave of anxiety hits your body.
“Sweetheart, as soon as I get you dressed, we will get you to the hospital. We are prepared.” He says while tucking a strand of hair behind your ear. “I love you.”
“Can you go to the hospital shirtless? It would make me feel better.” You half-joke.
“Y/N.” He chuckles, “Just rest here while I get dressed and get our bags. I’ll call our driver as well.” He passes you one of his oversized sweaters and helps you shuffle out of your sweat-stained pyjama shirt. Seb quickly gets dressed ignoring your pouts of protest.
A searing pain causes you to cry out. Squeezing your eyes shut you hold your breath as any sort of relief is a distant memory.
“Y/N. I need you to breathe.” He rushes to your side, “Everything is going to be okay.” He coos while squeezing your hand. The pain subsides, as you take in a shaky breath.
“Let me know when you're ready to move, I’ll help carry you down.” You nod while holding in your tears.
“Please don’t leave me alone, not even for two seconds.” You murmur into his neck.
“I won’t. I’m right here.” He shoots you a smile while rubbing soothing circles into you back.
-------------------
To be continued? If anyone wants more let me know.
- sorry for the crap writing, it’s my first one this year after a very stressful time here in Australia with the fires going on.
Tag List:
@daybreak96
@bbmommy0902
@thummbelina
#Sebastian Stan#sebastian x reader#sebastian one shot#sebastian stan fanfiction#sebastian stan imagines#sebastian stan fluff#sebastian stan fandom
147 notes
·
View notes
Text
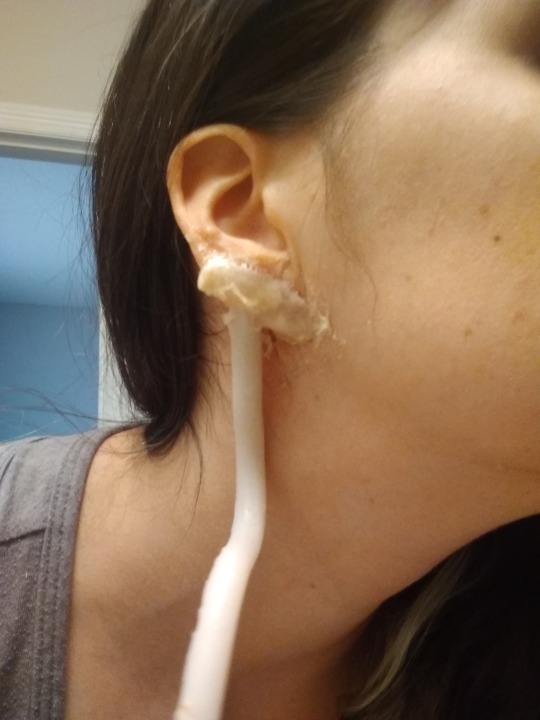
How to Make Jirou’s Earjacks
I figured I’d make a tutorial for those who want to make realistic earjacks that can be flimsy enough to twirl (1st image) and firm enough to bend for posing (2nd image). This was my first time experimenting with silicone and latex, so if you have any tips for me, let me know! Unfortunately I don’t have a ton of pictures because this stuff works quickly and I was in a time crunch for a convention, so i’ll tried to be detailed when needed (these images were a test run, the final result is on my Instagram at Sakine-cosplay).


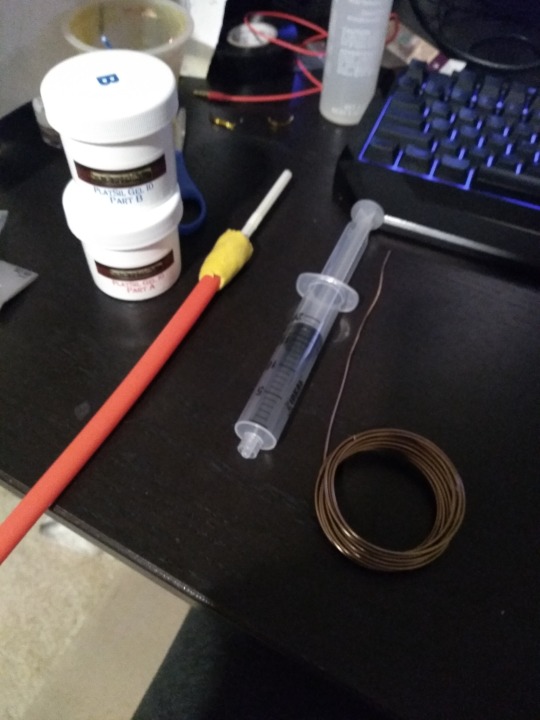
Materials (with apprx cost):
1. Platsil Gel 10 silicone ($17) https://www.ebay.com/itm/M00511-150-MOREZMORE-Try-PlatSil-Gel-10-Pourable-Silicone-Rubber-Liquid-150-g/142987077241?hash=item214ab1a679:g:-FgAAOSw2JxboBja
2. Flesh colored pigment ($5) https://www.ebay.com/itm/Concentrated-Silicone-Pigment-Flesh-Peach-Platsil-Gel/372628136273?hash=item56c25e2151:g:G38AAOSwyedbIBG8 (If you’re skin tone is darker than this, I’d suggest searching for brown pigment, I couldn’t find a skin tone set to share, but just a little goes a long way so i’d suggest one of the two)
3. Mold release spray ($11) (I bought my Castin Craft spray at Hobby Lobby. Look for coupons online!)
4. Rubber straw ($4 for a set at Target)
5. Regular straw (free at many fast food restaurants)
6. Wire ($3 optional but necessary for posing) https://www.hobbylobby.com/Beads-Jewelry/Bead-Stringing-Chains/Beading-Wire/Aluminum-Wire---22-Gauge/p/JL85073 (I threw out the package, so i forget exactly which size it is. I want to guess size 20 or 22. Go to Hobby Lobby or your craft store and feel the difference. It should be easy to bend, but strong enough to hold its shape)
7. Amazing Mold Putty kit ($8-$20) You don’t need a lot, but they only sell one size for about $20. It’s good if you plan on using more in the future, however, I’m including a link I found that gives you 4oz for $8. If used wisely it should be enough. https://www.etsy.com/listing/594123659/make-your-own-silicone-mold-food-safe?gpla=1&gao=1&utm_campaign=shopping_us_ClayPaperScissors_sfc_osa&utm_medium=cpc&utm_source=google&utm_custom1=0&utm_content=16561831&gclid=CjwKCAjw67XpBRBqEiwA5RCocd4_HioObmZud-27R8H16b_djgqcI3uObN-7GqEf1Vq5AqGV_6hDexoC7REQAvD_BwE
8. Liquid Latex ($8 at Walmart)
9. Earring studs ($3-$5) (if your ears are pierced, it helps with support, if not, only use latex. WARNING: make sure the back of the studs are not super tight on the posts. Try sliding them back and forth and see if it glides. Loosen the backs manually if they are very tight by gently pulling it apart)
10. Earphone/Aux jacks (x2) ($1-$5 each) (I used two headphones jacks as long as they aren’t the L shape)
11. Wire cutters ($2-$5) or see if you can borrow them from someone
12. Tape and scissors (look at a dollar store, I used electrical tape for flexibility)
13. Small mixing cups (x3)
14. Popsicle sticks or something similar to stir
15. Sandwich baggies (2-3)
16. Very small disposable measuring cups (x2) (check dollar store)
17. Piece of carboard/plastic/newspaper to work on top of (it’s gonna get messy, a thicker material is best if you have it)
18. Q-tips (preferably the pointy ones they use on nails)
19. Vaseline (travel size should be cheap)
20. Hair dryer
(you can ignore the syringe in the picture. The amount of pressure it created inside didn’t allow me to use it with the material because of how thick it was, I replaced it with a baggy as a piping bag)
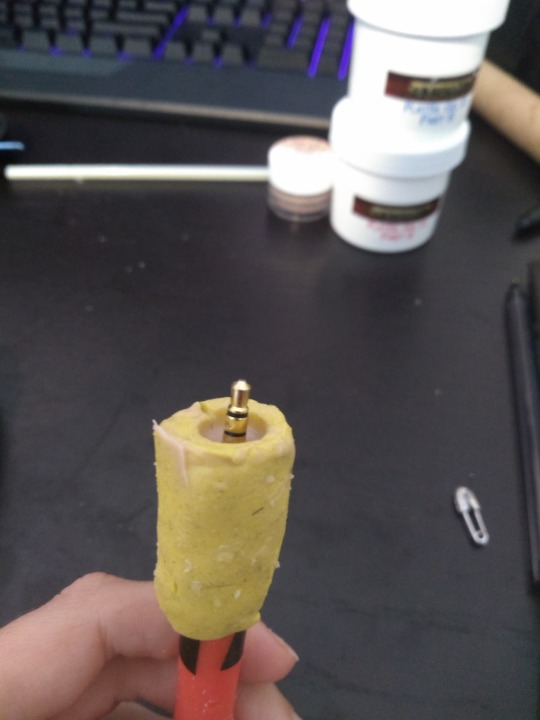
Step 1: Use the mold putty to create the earjack shape.
Since we are using a rubber straw (tube) to create the extended lobes, we need to enlarge the nub at the end (that yellow bit in the above image). If you look at your headphones/aux cord you’ll see the nub that that connects the wire to the plug is larger, so we need to make that so we can attach it.
-Take a small amount of your molding putty in a 1:1 ratio (equal amounts) and use your hands to mush them together and blend it until its a light yellow.
-Once evenly mixed, flatten it until its about 1.5″ (inches) wide (measure it out, you may under estimate how small an inch is) and then pull it until its long enough to fully wrap around the rubber tube. You don’t want it to be too thin, make sure it’s about 1/8″.
-Wrap it around the edge like shown in the above image. Smooth out the end that is covering the body, as if blending it into the tube (not where the tube ends, other side), that way its less likely any silicone will leak through later.
-Wait about 30 minutes or so until it hardens to a rubber like texture (try lightly pinching it towards the bottom and see if it tries to return to its shape)
- Once it’s done, you’re gonna have a bit of a difficult time wiggling the tube out of it. Be patient, just squish and pull it until its out (it should look similar to the one a couple images down).
Step 2: Align the wire to the center of the tube.
This part depends on how bendable you want them to be. For mine, I used wire that went down one fully for posing, and the other about a 3rd of the way so it could be adjusted by the ear if necessary and 2/3rds of it flimsy and flesh-like. You can also opt to not use wire at all, but you wont be able to pose it (although without wire will make it a lot easier to apply to your ears due to the lack of weight. Even for the flimsy one, I still use a little bit of wire just in case, but its not necessary). If you don’t want it to pose, skip step 2 and step 5.
-Using the wire cutters, either cut about 4″ of wire for a partial pose, or cut enough to match the same length of the tube for full pose.
-Find a small flat surface that you can tape one end of the tube to (small square of cardboard works well. You can probably use one of the containers your materials came in). Take the cut wire and tape it so it is standing vertically on the flat square as straight as possible (I’m sorry I dont have a picture of this). Try not to have the tape too far up the wire since it will be poured over with silicone. Try bunching layers of it at the bottom to reinforce it instead.

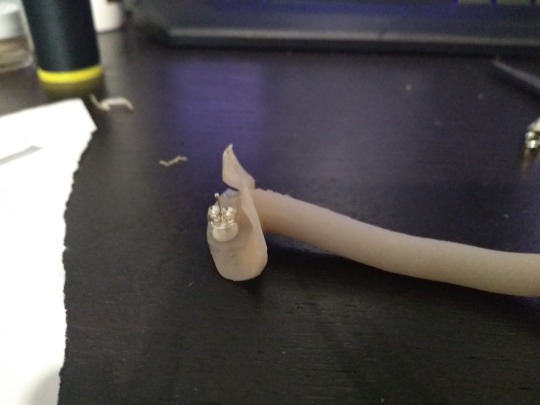
Step 3: Cut the tube
-Take the yellow jack nub you created and slide it over one end of the tube. Make sure there’s at least one full inch that hangs over the tube edge, that’s the part that will be filled in (so only 1/2″ should actually be covering the tube).
-With the yellow nub attached, take scissors and make a straight cut through the yellow nub and the tube all the way towards the end, but leave about 1/2″ at the end uncut. This will help make sure the tube closes evenly since it’s still intact (nubless cut tube shown above). Now you can easily take the nub off, but I suggest leaving it on whenever you can so the seams from the cut stay aligned.
Step 4: Apply mold release and liquid latex
This next process is what takes the most time to do.
-Following the instructions on the bottle, shake the mold release well and then spray a couple inches of the inside of the tube, covering the center and edges completely. I find it easier to do sections at a time and keep it held open under a fan until it dries since its hard to keep the entire tube spread open.
-Shake, spray, and let dry until you have the entire tube coated. Make sure to spray enough at the end that isn’t cut so the bottom doesnt stick.
-Repeat this at least one more time (3 times total to be safe). The silicone doesn’t let go of the rubber very easily and sometimes will prefer to rip off if there’s not enough mold release applied, so if you are patient enough, spray multiple layers along the center and edges of the inside.
- Once 2-3+ coatings are applied, make sure the inside seams and the top seam is also covered.
Unfortunately silicone doesn’t like to separate from the mold putty, even with the mold release, so we’re going to use a layer of liquid latex to cover the inside of the yellow nub. This is IMPORTANT because without a full coat, the putty will attach to the silicone and you will need to cut it off, which we don’t want. I usually went back and forth between adding layers of latex and spraying mold release depending on when they dried so they can be worked on at the same time.
- Take the nub off the tube. I recommend using the small mixer tool they include with the silicone to apply the liquid latex. Dip the tool into the latex and only add a thick stripe starting at one side (starting from one end of the seam to the other end on the inside of the tube). You don’t want to coat the entire thing in one go because its round and the latex will spread out and bunch in the center. Also, when applying, be quick about it since it starts to dry relatively quickly. If you’re smoothing it out as it dries, it can begin sticking to the spreader and mess up the coat. The latex on the spreader will dry, make sure to remove it before each coating.
-Once the first portion is dried, slowly make your way coating (and drying) until there’s an even coat all inside the nub. It doesnt need to be a thick layer as long as the entire surface is covered. If you add too much thickness if could dry unevenly and make it look lumpy, so try to keep it smooth.
-Apply a layer of latex to the top of the nub and along the seam (save the inside of the seam for last). Once the inside is done, the outside edges are done, then we can apply a coat to the seam area where the nub was actually cut. We save this for last because if the two seams touch (even when dry), they’ll want to stick, and we don’t want that yet. All of these areas are being coated because its going to get messy and its better to have everything covered so there’s no accidental sticking. The only spots we aren’t covering are the outside center and bottom of the nub since silicone shouldn’t reach there (although its still good to add a little to the bottom just in case)
-Once the seams have their layers dry, make sure to keep them spread apart, if they touch you may need to peel that portion off and redo it.
-Add a spritz of the demold spray to the inside.
Step 5: Attach wire and tube
- Take the uncut end of the tube and place it over the standing wire and feed it through until the end meets the taped stand (you can tape the tube closed if it makes it easier). Now the wire is inside the tube and the bottom should be as close to the cardboard as possible.
-Look through the top of the tube down the tub to see where the wire is. You can gently move the tube around until you see the wire is in the center (if the wire isn’t straight enough, bend it until it is), if the wire is leaning against the side, then it will puncture through the silicone since it wont be coated properly.
-Once you think its centered enough, tape the tube to the flat surface the wire is attached to. Make sure the bottom of the tube is as flat as it can be so silicone doesnt seep through. Tape around it thoroughly.
-With your tube sprayed down and the nub coated, wrap the nub back over the tube (1/2″ covering the tube, 1″ hanging over) and align the seams, BUT DONT press the seams together yet, keep the nub open. You can tape the bottom of the nub to the straw so it doesnt move around.
Step 6: Mold your ear
-Using the mold putty again, make another small 1:1 mixture. Depending how much you have left from the nub, use about half each to mix together.
-Once blended- flatten it a bit, choose an ear, and wrap it around the earlobe (If you are not doing earrings, this step is optional). You dont need to cover a lot of the ear, just make sure to get it around the base of the ear, and the front and back of the lobe. If you make it too tall/big, we can always cut it down a bit.
-Hold/press it to your earlobe for at least 30 minutes while it sets. The finished product are the yellow pieces in the image below (one for each ear, make sure to label them with a marker RF-Right Front and LF-Left Front for later)
- These are also made out of the putty so they also need coats of latex within the entire mold (thats why they look shiny).

Step 6: Prepare your station
Now that the tube itself is prepped, we need to get the rest of the station prepped because once you mix the silicone it begins to dry quickly, so we don’t want any mistakes.
-Make several precut tape stripes (10 to be safe) and have them ready nearby (about the length of your thumb)
-Lay out your newspaper/cardboard for your work area
-Take the cords/earbuds you’re using for the plug tips and cut it as close to the tip as possible (most likely need to cut where the nub starts, so you have a nub and a tip).
-Cut just over an inch off from the regular straw and set the larger amount aside
- Have your baggy, regular straw (inch), mixing cups (3), measuring cups (2), and mixing materials nearby.
- Mark each of your mixing cups/measuring cups as A, B, and C (no C for measuring cups). Do the same if you’re using Popsicle sticks, otherwise make sure you keep the mixing items separated).
-Lay down the tube so the open seam is facing upwards. You will fill it like this and tape it closed as you work.
Step 7: Mix the Silicone/pigment
We don’t have a lot of silicone, so we need to be careful with how much we use at a time. I actually had to buy a second batch since i was new to it.
-Using your measuring cups and separate mixing sticks, pour about a third of the corresponding container into it (Part A to A cup, Part B to B cup.
-Open your pigment container. A little goes a long way, so start with just a small dot at a time and mix it into the Part A cup. Your ears tend to be darker than you might think since it has red mixed in it (feel free to buy some red pigment flecks if you want, but i think its unnecessary for this since the silicone wont blend well anyway when applying it)
-Once you think you have your skin tone, add a bit more until its a tone darker. Mixing it with Part B will lighten it up again. It doesnt have to be a perfect match, but make sure its not too light or you’ll see a big difference (compare my skin to the test i made in the first image).
-Add half of A and half of B into the corresponding mixing cups. Now we have 1/2 in the mixing cups and 1/2 in the measuring cups. Since it tends to dry quickly, and you dont want to work too fast, we’ll use half of the mixture at a time. Once you finish the first half, you can quickly mix up the second premade half and finish it. But make sure to keep some off to the side, we’re filling the tube and nub separately. It will be the same color so there should be no blending issues.
-It can be done by yourself, but if you have an extra pair of hands, I highly recommend getting help.
Step 8: Mixing and filling the tube
Before taking these steps, I highly suggest reading through them first to get familiar with what you will need to do so you don’t waste time.
-Pour the Parts A and B from the mixing cups into the C mixing cup and use the C mixing stick to stir it.
-Stir quickly and thoroughly to make sure its blended. If you still think you need a bit more pigment, carefully add a bit more, but try not to do this so we keep both mixtures the same tone. It’s harder to do that when you add extra color separately.
-Once it’s mixed, carefully take the mixing cup and pour it into a sandwich baggy as close to the corner as possible using your mixing stick. Make sure to push all the mix to the corner so it’s tightly packed and can be used as a piping bag.
-Cut a very small hole at the corner of the baggy (small enough to fit within a regular straw opening. Which is very small. This way the mix won’t overflow out of it from a large opening). If you have a friend available, have them hold open the tube and be in charge of closing it as you pipe in the silicone. If it is only you, use one hand to hold open the tube while the other pipes it in. It will be messy.
-Starting from the bottom of the tube (taped), you’re going to open the nearest seam and insert the piping bag into it as far as you can and squeeze the mixture towards the end until it fills up. Basically squeeze until you see it coming towards the seam.
-Continue slow piping underneath the wire until it begins to fill to the top.
-As you pipe, let the seams close as evenly as they can and take a piece of tape and throw it over the seam to keep it in place. You can go over it with more tape after you finish. As you close the seam along the way, it will seep through the seam. That’s fine, you’d rather have too much mix instead of air bubbles from not being filled enough.Just try to smooth out the top of the seam from the mix so its only a thin layer of silicone instead of a gob. the tape will stick better and you can try to push the mix into the tube.
- As you pipe and tape up the tube, keep the wire in mind and make sure you’re piping under it so it’s not touching the tube itself.
-It’s likely you’ll run out midway. Now you can take an equal portion of A and B of the the premade mixture into cup C (Don’t use all of it, just enough to fill the tube, not the nub.). While that mixes, if you have a friend, have them fix up the tape and make sure the seams are smooth.
-Once the next batch it mixed, add it to the piping bag. If you noticed the old mix beginning to harden already, use the other corner of the baggy to pipe. Remember, cut a very small hole.
-Only fill up to the other end of the tube where the nub starts. Once you get to that point, you can tape that up as well as the press the nub seams together (make sure it’s pressed evenly for a seamless seam). Now that the tube is full of silicone mix, feel free to tape the nub together and add more tape to secure the seam.
-Once everything is taped up, let the tube stand vertically and lean it against something where it won’t fall over (I had a cardboard tube that fit over it to keep it straight while it leaned lightly against my monitor. Try to have items surround it to keep it standing straight).
- After about a half hour, it should be firm enough that liquid wont spill out (check any leftovers in the C cup and see how firm it is, it should be similiar), so you can now mix the remaining mixture and add it to a new piping bag (or a clean corner).
-Cut a very small hole. This time you will use the inch long straw to help pipe the mix through the nub from the top.
- With the hole cut, place the straw into the nub (make sure there's still enough sticking out so you can hold it.) and place the baggy tip (with its tiny hole) over the top of it. You will be filling it vertically from the nub opening.
-Pipe the mix into the straw and slowly bring it up as it fills. By using the straw, it ensures no air bubbles from where you left off. If you run low of mix in the bag, remember to squeeze out the mix trapped in the straw.
- DO NOT fill it to the top of the nub, stop short.
Step 9: Insert the jack tip
- Once it is 85% full, while still holding it vertically, take the jack tip you cut off earlier and slowly insert it into the middle of the mix from the top until only the metal it showing (image above). If you get some mix on the metal, you can peel it off, but try to keep it clean.
- Hold the jack tip steady so as much metal is showing while hiding the nub attached to it. This requires patience, you cannot let it move until it hardens after a few minutes. If you let it go, it will sink down. If you tilt it to the side to make it straight, make sure to check all the sides. It’s best to hold it by the tip if possible to ensure it stays int he middle and doesnt move.
Step 10: Opening the tube and touch ups
After about a half hour, you can check the top of the nub to check the firmness (remember, check the C cup to check the firmness without touching the actual pieve first).
-Once it is done setting, you can remove all the tape.
-Carefully and slowly begin to pry open the nub seam. You may need to cut it a little if its resistant.
- As you open the nub, the latex should peel off with the silicone. peel the latex off once detached.
-Very delicately, wedge open the seam for the tube. Depending on how even and how much it was sprayed will decide how easily it comes off. sometimes there are tough spots that want to stick, you need to slowly pull at it and use your finger to jab at the stuck silicone to nudge it off. If you pull too much it may rip, so pull and nudge. Take your time if needed, it will be a waste if you rush this part.
-As you gently make your way down, you can undo the tape securing the tube to the flat surface to free it along with the wire.
-Once it’s all freed, snip off the end to make it flat (use wire cutters to snip excess wire).
-As long as everything came out okay, you can use scissors to cut the seam excess. Boom, main body is done
(If you have bubbles, tears, or other issues, it’s possible to make a small of amount of mix, recoat the tube in spray, pipe a thin line down the center, and use that as a layer to cover up imperfections, but you need to make sure the skin tone matches up, so make sure you have references to match it. This isn’t recommended because it makes the earjacks thicker and only complicates it more, but when trying to cover imperfections in other ways, it didnt turn out smooth and it came out shiny which was noticeable. Use only if needed.)
Step 11: Add the earlobes
-Now that the main body is done, use the same process for the ear molds. Make sure they are properly coated with latex, spray the demold in it.
-Make small batches for the ear and apply thin layers, one side at a time. If its too thick, it will build up and make it thick along the bottom instead.
-Continue on the front, back, and bottom of the ear until if has a decent thickness to it from several layers.
-Once done setting, remove it along with the latex.
-Take the main body and the lobe, and see how they should line up in the mirror for where you should attach them.
- Cut out a slit on the top of the end of the body where the lobe will be attached. This way it will sit in a small slit comfortably instead of on top of it.
- Mix more silicone to use as glue. You shouldn’t need that much. Add some in the sit before placing the lobe there, and around both of them to help blend the lobe of body together. Once done, it will look like the image above (minus the earring).
Step 12: Add the earring studs
-Go back to the mirror and see approximately where the stud should go on the inside of the lobe where it fits in your ear. If you don’t have earrings, skip this step.
WARNING: make sure the back of the studs are not super tight on the posts. Try sliding them back and forth and see if it glides. Loosen the backs manually if they are very tight by gently pulling it apart. It will be impossible to take them off if they are super tight, please check and adjust them before testing them out. Once they slide easily on the posts with minimal friction, then you can try them on and go from there.
-Make another very small batch of silicone and place the stud where it belongs on the inside of the front of the lobe. Use the silicone as glue to attach the stud all around it (make sure the stud is attached to the front so the pole can go through your ear and to the back). It should look like the image above when dried.
Step 13: Attaching the earjack to your ear
I know it doesnt look pretty, but your wig should cover it anyway. This also takes a long time (about an hour each ear from my experience)
-Pull your hair up away from your ears (wig cap is best)
-Generously apply Vaseline all over your ear (front, back, sides and bottom) and an inch or so around it by your jaw and hair line. This is the only way you will get the latex to come off without absolutely ripping all your facial hair off.
-Align the correct earjack to the correct ear.
-With a Q-tip (preferably the pointed ones they use on nails), take a bit of latex and apply it inside the edges of the lobe on both sides of the earring stud. Make sure not to get any on the earring itself, only the edges of the lobe
-With the wet latex, insert your ear to fit within the piece properly and push the earring through and secure it with the backing.
-With one hand, hold the lobe in place so the edges are as close to your ear as possible for the best seamless fit. Let it dry for ten or so minutes.
-Once the inside dried a little bit, take the Q-tip and apply a layer of latex around the seam on the lobe and on your ear. MAKE SURE to not add latex to the earring! otherwise you’re gluing it to yourself. You want the latex and your earring always separate.
-Let it dry using the hairdryer on cool. It’s best to wait until its completely dry before adding a new layer.
-Keep adding thin layers and letting them dry. Add latex along the seams in the front, along the bottom, and along the top where the lobe is suppose to blend in. You can add a little bit to the back as long as it does not touch your earring, you might want help with this part (If you’re not wearing earrings, just slather the latex on everywhere, but still in layers).
After layers upon layers, it’s done! Just repeat the process for the second one. Be careful though, latex will fall off after awhile if it moves around too much. The more layers and the more ear it’s attached to, the better, but I still had issues when using them. It’s not comfortable when they start coming off and hard to fix on your own if you’re at a con. When taking it off, just start peeling off the latex and take off the earring. It’s still probably gonna hurt a bit, but not nearly as much if you didn’t use the Vaseline. It’s not gonna be blend in very nicely, and make up didn’t work well for me, but rely on the wig to cover that and try to take front facing pictures.
For the flimsy ones, it’s a little easier. Full wired ears take more latex and more time to dry because of the added weight. (then again, the one i made was thicker overall so that probably didn’t help). For the wired ones, I suggest making a pose where you can walk around and have the wire rest against your collarbone. I kept the wire straight down until it was resting against me, then curved it up and forward like a U shape, then twisted the jack-tip from there. The U is what sits on your collerbone though which helps support it’s weight. To see some examples (if I posted them) you can see me finished cosplay at Sakine-cosplay on Instagram.
It’s not perfect, but it served me well for the con (as long as you have time in the morning). If you have any suggestions on how to improve it, let me know! If you have any problems or questions feel free to ask. And if you make some or any other silicone related projects you may have used this for, I’d love to see how they turn out!
#cosplay#props#makeup#costume#jirou kyouka#tutorial#my hero academia#boku no hero academia#earphone jack#mha#bnha#how to#my art#convention
11 notes
·
View notes
Text
Jewelry-Making for Beginners Part 5: Other Supplies
In the realm of jewelry-making, there are a plethora of supplies and materials that can be used. Previously in this series, I've covered the following:
Jewelry Tools
Materials
Findings
Cords, Ribbons, and Laces
Beads
Before we move on to jewelry-making techniques, I thought it would be a good idea to quickly review some of the other materials used to make jewelry.
The materials I'm reviewing in this post are not ones that are necessary to have for all jewelry-making types. In fact, you may not need any of these at all. As well, I'm not even breaking the surface of all the jewelry supplies out there on the market. But, I felt that it was necessary to go over what some of these items are and how they might be used, especially since you may see them in future tutorials.
Bead Mat: This is simply a square of soft, fuzzy fabric. It's used for working on and keeps your beads from rolling away. I've seen them in the size shown above as well as a larger version. While it's nice to have one or more of these, a towel or washcloth works just as well.
Bead Board: Much like a bead mat, a bead board is used to contain your beads while you work on a project. It has several recessed, bowl-like areas to hold your beads. As well, there are grooves in the surface for placing your beads as your design your pieces. Around the grooves are measurements to help you get an idea of the length of your finished designs.
Wire Jig: The purple square above is known as a Wire Jig. There are other terms out there for them, mostly related to the brand or company that sells them. It's usually a small plastic or acrylic block with a grid of small holes in it. Pegs of varying sizes are placed in the holes and wire is wrapped around the pegs to create designs. I've had this wire jig for ages and haven't really used it much. Though now that I've pulled it out, I wonder why that is. It's such a cool tool.
Bead Spinner: Basically a bowl that spins, bead spinners are most often used with seed beads. Used in conjunction with a curved needle and thread/wire, these are a great tool for loading up a lot of beads onto your wire or thread. You place your needle into the bowl, spin it, and the beads pile up on the needle. I've used this one a few times. It does take several attempts to get the technique right, but then it works like magic. These come in a variety of sizes.
Bench Block & Anvil: These two work basically the same way. They are simply a supremely hard surface on which you can hammer. This is great for flattening wire, texturing metal, hammering items flat, stamping words or images into metal surfaces, etc. You should place some kind of buffer between the black/anvil and your table/work surface to protect it and buffer the sound. There are sandbags and rubber mats that can be purchased specifically for this purpose. I personally use a small folded towel.
Soldering Iron: This is a basic hardware tool that can be used in jewelry-making. I use mine together with copper tape, flux, and solder to join items together like attaching jump rings to surfaces or soldering two glass slides together. Using a soldering iron takes practice, but can be a lot of fun.
A variety of hammer types exist out there, more than I ever knew. Here are two of the ones most commonly used in jewelry-making
Texture Hammer: There are a variety of types of texture hammers. Some simply have a texture on one side, some are homemade from old regular hammers. The one I have has removable ends with small heads that can be interchanged for a variety of textures. These heads are banged onto the surface of the metal to create interesting finishes.
Ball-Peen Hammer: This is a jeweler's all-purpose hammer. One side is generally flat like a usual hammer, while the other side is small and rounded (almost spherical in shape). The flat side is great for hammering wire flat while the small end gives a lot of texture and detail.
Disc Cutters: Basically what it sounds like, these tools cut discs out of metal. You slide your metal in the block, fit a matching metal sphere into the circular space, and hammer until a disc pops out the bottom. This should only take one or two hits of the hammer. I admit that I haven't perfected this technique. My disc cutter is a fairly cheap version, and you get what you pay for. There are a variety of cutters like this out there, some even cutting out other basic shapes (squares, ovals, stars, teardrops, etc.), and they're in a variety of price ranges.
Hole Punch Pliers: Again, these are just what they sound like. They punch small holes in metal, much like a paper hole-punch. There are other tools out there that will achieve the same effect (like the disc cutters), but I've found these pliers to be the most efficient, depending on the metal itself.
Dapping/Doming Block: While this supply may look kinda crazy, it's purpose is totally simple: it domes metal pieces. Each of those knobs on a stick corresponds to a dome in the block. You hammer the spherical part of the stick into the dome to curve your metal. This example is a metal one, but I also have a smaller wood one that doesn't mar your material as much. Though, it's not as sturdy either.
Tin Snips: The ones pictured are only one version of tin snips. They come in a variety of shapes and sizes but generally look something like scissors. They do cut tin, along with a variety of other metals, so long as they are thin enough. Some tin snips are designed to cut straight lines, some to cut curved lines. Some of the stronger/larger ones (found in hardware stores) will leave "teeth marks" on the metal, so you should be careful when selecting yours.
Tweezers: I'm sure you are familiar with tweezers. In jewelry-making, they're perfect for picking up small beads, holding down small bits when gluing, or generally acting as tiny fingers.
Glue: Most jewelry techniques don't involve glue, but you will come across projects, from time to time, that need it. I often use E6000 as a super glue to adhere large elements (like cabochons) to other surfaces. Bead Stringing Glue is great because it has a needle tip to get in tiny spaces. I use it especially to secure knots in threaded projects.
Files: There are a variety of files out there that can be used to help make jewelry. Something as simple as a nail file can work in a pinch. But, if you're working with more industrial materials, you're going to need more industrial supplies. Pictured above are a metal nail file, a heavy-duty metal file, and a wire rounder. The wire rounder has a tiny cup on the end to help file down wire ends. This is especially great for making ear wires. Not pictured, but also key, are bead reamers. These are thin, round files that are inserted into the holes of beads to clean and file them.
Dremel: Another hardware-store supply is a Dremel tool. It's a multi-purpose electric tool with interchangeable heads. It can be used for drilling, sanding, filing, buffing, and many, many more tasks depending on the head you put on it.
The supplies I have pictured and mentioned here are just the tip of the iceberg. There's no way I could ever cover every little thing that might be used to help you make jewelry. You will undoubtedly uncover many more materials as you continue learning to make jewelry.
I'm looking forward to getting to the next part of this series when I'll finally start sharing techniques with you! For now, please let me know if you have any questions, corrections, or additions to this subject in the comments.
via Blogger http://ift.tt/2A9HmwX
1 note
·
View note
Text
DIY Fall Sign
Add a pretty statement piece to your seasonal decor with this easy DIY fall sign. Customize it to any colors and design you would like!
Seasonal Simplicity Series
Welcome back to Week 2 of the Seasonal Simplicity Series! Each week 20+ bloggers are sharing their best fall ideas – from fall crafts to seasonal recipes and fall decor! Last week we got started with our favorite fall recipes and this week is all about fall DIY and craft projects! You can find all of the beautiful ideas at the end of the post, so be sure to check them out before you go!
This post contains affiliate links. This means that I may make a small commission at no cost to you off items that you purchase directly through the links provided. Thanks so much for your support!
DIY Fall Sign
A big statement piece can make such an impact on your seasonal decor. Unfortunately, they can also be expensive and it can be hard to find exactly what you’re looking for. That’s why it’s always awesome if you can create your own! This DIY fall sign is made from a canvas with simple 1x2s as the frame. You can find the canvases in a number of different sizes and the design and colors can be switched up for any style, theme, or color scheme.
DIY Canvas Sign Tutorial
There are a number of different ways that you can make a DIY fall sign similar to this one. I’ll walk you through the step by step of how I did mine and then talk at the end about a few alternative methods that you could do if you want a slightly different look. if you have any questions, just let me know!
Materials
canvas {mine is 24×36}. These are often on sale at craft stores or a great way to use your coupons!
1×2 boards for the frame. A softer wood will be easier to attach {I learned this the hard way!}
stain {I used a dark walnut stain}
paint {I used black spray paint on mine but any paint will do}
vinyl {I used white vinyl for the smaller words with matte adhesive gold foil for Autumn}
tape measure
level
cutting machine {I used my Cricut Maker and Cricut Joy}
nail compressor or wood glue/clamps
NOTE: If you don’t have a cutting machine you can make your own stencils to use using this print and cut method or this transfer method.
Directions
Paint the canvas.
I just used some black spray paint on mine since it’s the fastest application, but any paint should work.
Come up with your design.
I found a quote that I loved and then played around with the design in Cricut Design space. If you don’t have a Cricut or other cutting machine, you can do a work up of your design in Photoshop or other photo editor. I used Thornburi and Pumpkin Harvest for my fonts. Check to make sure that the font size works with the size of your canvas. You might have to do a little bit of math!
Cut and adhere your design.
I used my Cricut Maker to do the bigger Autumn letters and my Cricut Joy to do the smaller letters {you can read more about Cricut Joy HERE}. This was my first time working with the gold foil and I loved it! Using vinyl transfer paper, apply the design to your canvas. It’s helpful to have a level and a tape measure on hand for this so you can get everything centred and levelled. I like to lay everything out before I start adhering it.
Prepare the frame.
Cut your 1x2s to fit your canvas. To keep things simple, I just framed it by butting up the pieces together rather than doing 45 degree cuts. First, cut 2 pieces the same length as the width {short side} of the canvas. For the 2 length pieces {long sides of the canvas}, you will need to cut them the length of your canvas plus the thickness of the wood x 2 {so your length piece will cover the width pieces on each end}. Just remember that canvases are not always perfectly square, so double check your measurements up along the side of the canvas just to be sure. Sand if needed.
Stain the 1x2s. I used a dark walnut stain to go with the other wood tones in our family room but I think a lighter stain would be nice against the black too. I find it easiest to apply the stain with some old rags and basically just wipe it on and then wipe it off. Let dry. You can sand these down if you would like a more distressed look or leave as is.
Attach the frame.
If you have a nail gun and compressor, this will be the easiest method to attach the frame. If you have a softer wood for your frame, you can just use the nail gun and attach the frame directly to the canvas. I’ve done this successfully many times in the past, but the wood I used for this project was a really hard wood {I think they were oak}. After a few failed attempts, we ended up using a very small drill bit to pre-drill the holes and then used the nail compressor. Success!!
Start by attaching the two short sides of the frame and then add the longer pieces.If you don’t have a nail gun and compressor, you can use wood glue and clamps to attach the frame. In the past, I’ve also used wood screws and drilled in from the inside of the canvas to attach the frame as well. This works if you have the thicker 2 inch canvases but the one I was using was just a 1 inch.
Distress your canvas.
This step is totally optional, but I found the black spray paint was just a little too “perfect” and I wanted to distress things a bit. I just used some chalk for this and rolled it over the canvas using the side of the chalk. I then used my hand to blend it all in until I got the look I wanted. This doesn’t really show up in the photos well, but you can see it better in different light. I think it just lightens up the look a bit.
Alternatively, you could do a light distressing with sandpaper over the canvas for a similar look. If I had thought of it at the beginning {before I applied the vinyl}, a little dry brushing with white paint would also do the trick.
Alternative Methods
There are a number of different ways that you can achieve a similar look with the lettering. I chose to just add the vinyl directly to the canvas and not use the vinyl as a stencil. This allows me to simply remove the vinyl if I want to use the canvas for another project in the future. Plus, it’s the easiest and least messy method! Here are a few alternative methods that you could use if you want a painted or more rustic look…
Use the negative space {the outline} from your vinyl to use as a stencil or make your own DIY stencil. For this method you would paint your background, add the stencil and then paint inside for your lettering.
Use the positive space from the vinyl as a stencil. This works best if you would like your letters to remain the white canvas color. Just apply your vinyl design to the canvas before painting. Once the vinyl is applied, paint the background, allow to dry and then carefully remove the vinyl.
Lightly draw out your design on the canvas and then paint it in.
Use a transfer method {there are two methods described depending on whether you will be transferring to a lighter or darker surface} and then fill in with paint. If you’re not great with a paint brush, paint pens are a much easier alternative!
I hope this tutorial was helpful for you! Remember that you can always scale the size down or leave off the frame if you want a quicker version. Let me know if you make one!
Now to finish off the rest of the fall mantel! {Can you see the summer letter board still on the shelf?} I’ll show you all of the details next week and our full fall family room home tour the week after that. Happy fall decorating!
More Fall DIY Projects
If you’re looking for more fall DIY and craft projects, check out all of these amazing ideas. These should keep you busy for a while!
DIY Fall Acrylic Abstract Landscape Painting at The Happy Housie
Five Fun Fall Arrangements at Finding Silver Pennies
How to Make a Dried Floral Wreath at the Tattered Pew
DIY Painted Pumpkins that Look Like Cement at Modern Glam
How to Make a Doormat with a Cricut at The DIY Mommy
DIY Fall Sign at Clean & Scentsible
Scrap Wood Fall Pumpkins at Tatertots and Jello
Macrame Garland at Life is a Party
DIY Abstract Art Our Best Tips at The Handmade Home
Modern Fall Lunaria Wreath at This is Simplicite
Painted Mason Jars at Dans le Lakehouse
Fall Macrame Wreath at Place of My Taste
Easy DIY Fall Shelf Decor at Cherished Bliss
DIY Glitter Pumpkins at Lolly Jane
DIY Rustic Fall Flower Arrangement at Pretty Life in the Suburbs
How to Make a Handmade Clay Bead Garland at My Sweet Savannah
DIY Rustic Wood Centerpiece Box at She Gave it a Go
How to Make a Fall Wall Hanging at Cassie Bustamante
Elegant Fall Flower Arrangement at Rambling Renovators
Blush Fall Hoop Wreath Tutorial at Chrissy Marie Blog
DIY Blue and White Chinoiserie Pumpkins at Jennifer Maune
The post DIY Fall Sign appeared first on Clean and Scentsible.
from Home Improvement https://www.cleanandscentsible.com/diy-fall-sign/
via http://www.rssmix.com/
0 notes
Last Seen Blogs

snowymogai
Snowy MOGAI : Coining, Headcanons & More

your-anemia
¿.anemia¿.

traciethompson
A World of Painted Stories

eclliipsed
nini ✩࿐

rediscoveredfaith
* angel of thursday!