#i2c-tools
Explore tagged Tumblr posts
Visit Tumblr Blog
Explore Tumblr blogs with no restrictions, modern design and the best experience.
Last Seen Tumblr Blogs


Fun Fact
Kazakhstan’s Minister of Communications and Informatics has blocked the Tumblr site because it contained 60 sites of terrorism, extremism, and pornography in 2015.
Text


Bus Pirate 5 is in stock and shipping now, going fast! 🚌 🏴☠️
Bus Pirate 5 is the latest edition of the original universal serial interface trusted by hackers since 2008. We've stocked and loved the Bus Pirate 4 for years and are excited to see the latest and greatest from the minds at WhereLabs.
The Bus Pirate is a RP2040 based, open-source hardware debugging tool that converts simple commands into common bus protocols such as 1-Wire, I2C, SPI, UART, several LEDs and more. Send commands to a chip or sensor and get the response, without writing a line of code.
#adafruit#buspirate#rp2040#opensourcehardware#debuggingtools#electronicsprojects#serialcommunication#embeddeddevelopment#hardwarehacking#diyelectronics#makersmovement#engineeringtools#prototyping
15 notes
·
View notes
Text
5 Common Mistakes in Battery Management Systems

There are a few common issues related to the time of adoption and usage of BMS that may affect longevity, safety, and efficiency of a battery pack. Here are five typical errors to avoid:
1. Inadequate Thermal Management
Mistake: Failing to adequately check and regulate the battery cells' temperature.
Consequence: Overheating brought on by poor thermal management might result in thermal runaway, lower battery efficiency, or a noticeably shorter battery life.
Solution: Make sure the Battery Management Systems (BMS) has several sensors for complete temperature monitoring, and when needed, combine it with an active heating or cooling system.
2. Ignoring Cell Balancing
Mistake: Not implementing cell balance in the battery pack or configuring it incorrectly.
Consequence: Ineffective cell balancing can cause individual cells to overcharge or undercharge, which can diminish the battery's total capacity and cause uneven wear and possibly damage to individual cells.
Solution: To ensure consistent charge levels in every cell, use a BMS with either passive or active cell balancing.
3. Overlooking BMS Compatibility
Mistake: Using a BMS that isn't entirely compatible with the battery chemistry or the battery pack's particular setup.
Consequence: Incompatibility can result in improper voltage limits, inappropriate protection, and even unsafe operating conditions.
Solution: Make the BMS specifically designed for the type of battery chemistry used (Lead Acid, Lithium-ion, etc.) and the type of battery pack layout series/parallel arrangement.
4. Inadequate Fault Detection and Diagnostics
Mistake: Not providing enough fault detection and diagnostic tools for the BMS.
Consequence: Faults like short circuits, cell failures, or wiring faults could go unreported without adequate fault detection, resulting in battery damage or dangerous situations.
Solution: Select a BMS (Battery Management Systems) that has advanced diagnostic and fault detection, data logging, real-time warning capability, and communications of problems with other systems or operators
5. Underestimating the Importance of Communication Protocols
Mistake: Integrating a BMS (Battery Management Systems) with other system components without using the proper communication standards.
Consequence: Inaccurate battery status reporting and other inefficiencies can result from poor communication, as might a complete system failure if vital information is not accurately exchanged with controllers or displays.
Solution: The BMS should be able to converse with and connect to the rest of the system: other vehicle control units, chargers, and user interfaces using the necessary protocols: CAN bus, I2C, etc.
Staying away from these common mistakes while selecting and setting a BMS enables you to ensure that your battery pack can serve for as long a time as possible safely and efficiently.
Lithion Power is a manufacturer of high-end Battery Management Systems that can realize maximum performance from any given battery while ensuring safety. BMS developed for electric vehicle applications, energy storage, and portable electronics are highly critical-they offer monitoring and protection with precision to extend the life of the battery and enhance its reliability.
2 notes
·
View notes
Text
The I2C Bi-Directional Logic Level Converter, equipped with 4 channels, is an essential tool for seamless communication between devices with different logic voltage levels. It functions as a bidirectional translator, ensuring data integrity and compatibility across a wide range of applications.
With its compact and efficient design, this level converter simplifies the task of interfacing devices operating at different logic levels. It serves as a bridge between 3.3V and 5V systems, allowing them to communicate flawlessly without the risk of voltage mismatch.
4 notes
·
View notes
Text
Rotary Torque Sensors: Enhancing Rotational Force Measurement with Star EMBSYS Solutions
Rotary torque sensors are critical components used to measure the rotational force (torque) applied on a rotating system, such as motors, gearboxes, or turbines. These sensors are essential in performance testing, quality control, and process monitoring across industries like automotive, aerospace, robotics, and manufacturing. Among the innovative providers in this space, Star EMBSYS offers high-performance, customizable rotary torque sensor systems that integrate advanced embedded technology for unmatched precision and reliability.
A rotary torque sensor measures torque by detecting the strain (twisting) on a rotating shaft. Typically based on strain gauge or magnetoelastic principles, these sensors output a signal proportional to the applied torque. Unlike static torque sensors, rotary torque sensors are designed to operate on rotating shafts, often using slip rings, wireless telemetry, or rotary transformers to transmit data.
Star EMBSYS brings its embedded systems expertise into torque sensing by offering intelligent rotary torque sensor solutions. These systems are equipped with real-time data acquisition, signal conditioning, and digital communication interfaces, making them ideal for dynamic and high-speed applications. Their sensors support both analog (voltage/current) and digital (UART, SPI, I2C, CAN) outputs, ensuring seamless integration with control systems, data loggers, and monitoring software.
One of the core strengths of Star EMBSYS is its ability to deliver customized sensor solutions tailored to the client’s mechanical and electrical requirements. Whether it's a high-precision lab-grade application or a rugged industrial setting, Star EMBSYS designs torque sensors with features like temperature compensation, vibration resistance, and long-term stability. Their embedded firmware ensures accurate real-time monitoring with minimal latency, critical for applications like EV motor testing or robotic joint torque feedback.
Additionally, Star EMBSYS offers user-friendly calibration and diagnostic tools, allowing engineers to maintain accuracy and system health over time. Their rotary torque sensors can be combined with wireless telemetry for remote monitoring, a vital feature for testing in mobile or rotating systems where cabling is impractical.
In conclusion, rotary torque sensors are essential for understanding and optimizing mechanical performance. Star EMBSYS stands out by delivering not just sensors, but smart embedded torque measurement solutions that empower engineers with real-time, high-fidelity data. With a commitment to innovation and customization, Star EMBSYS is a trusted partner for precision torque sensing in today’s demanding engineering applications.
Visit:- https://www.starembsys.com/rotary-torque-sensor.html
0 notes
Text

Introduction STM32F405RGT6 for ST MCU Distributor Discover the cutting-edge STM32F405RGT6 microcontroller, where advanced technology meets versatility. Designed for enthusiasts, makers, and professionals alike, this microcontroller provides the perfect blend of performance, efficiency, and reliability. Whether you're working on robotics, automation, or IoT projects, the STM32F405RGT6 is ready to bring your ideas to life. MOQ of the ST MCU The MOQ is 100units as seen online.However,they are negotiable,if you interested with much more quantity,contact us to chat details. STM32F405RGT6 boasts a powerful ARM Cortex-M4 processor that can run at frequencies up to 168 MHz. With 1024 KB of flash memory and 256 KB of SRAM, it ensures that you can handle complex computations and multitasking with ease. Its integrated digital signal processing (DSP) capabilities enable real-time data processing, making it ideal for applications requiring high-speed calculations. IOT Solution Equipped with a rich set of interfaces, the STM32F405 allows seamless integration with a variety of peripherals. It features UART, SPI, I2C, and USB connectivity options that cater to a wide range of applications. Whether you need to connect sensors, motors, or other microcontrollers, the STM32F405RGT6 offers the flexibility you need. Plus, with support for multiple communication protocols, your projects are only limited by your imagination. In addition to its impressive specifications, this stm mcu is supported by an extensive ecosystem of development tools and resources. With various libraries, example codes, and a vibrant community, you'll have everything you need to step into the world of embedded systems development confidently. Even if you are a novice, you'll find a wealth of information to guide you in harnessing the full potential of this microcontroller. In summary, the STM32F405 is not just another microcontroller; it's a gateway to limitless possibilities. By choosing this mcu for your project, you equip yourself with a reliable and fast platform that can grow alongside your ideas. Dive into the world of embedded systems today and experience the power of STM32F405! If you interested with much more electronic components price,view here to know more about our company business. Read the full article
0 notes
Text
Why India’s Drone Industry Needs Periplex: The Hardware Tool Drones Didn’t Know They Needed
As drones fly deeper into critical roles — from agricultural intelligence to autonomous mapping, from disaster response to military ops — the hardware stack that powers them is undergoing a silent revolution.
At the center of that transformation is Periplex — a breakthrough tool from Vicharak’s Vaaman platform that redefines how drone builders can interface with the real world.

What is Periplex?
Periplex is a hardware-generation engine. It converts JSON descriptions like this:{ "uart": [ { "id": 0, "TX": "GPIOT_RXP28", "RX": "GPIOT_RXN28" } ], "i2c": [ { "id": 3, "SCL": "GPIOT_RXP27", "SDA": "GPIOT_RXP24" }, { "id": 4, "SCL": "GPIOL_63", "SDA": "GPIOT_RXN24" } ], "gpio": [], "pwm": [], "ws": [], "spi": [], "onewire": [], "can": [], "i2s": [] }
…into live hardware interfaces, directly embedded into Vaaman’s FPGA fabric. It auto-generates the FPGA logic, maps it to kernel-level drivers, and exposes them to Linux.
Think of it as the “React.js of peripherals” — make a change, and the hardware updates.
Real Drone Applications That Truly Need Periplex
Let’s break this down with actual field-grade drone use cases where traditional microcontrollers choke, and Periplex thrives.
1. Multi-Peripheral High-Speed Data Collection for Precision Agriculture
Scenario: A drone is scanning fields for crop health with:
2 multispectral cameras (I2C/SPI)
GPS + RTK module (2x UART)
Wind sensor (I2C)
Sprayer flow monitor (PWM feedback loop)
ESCs for 8 motors (PWM)
1 CAN-based fertilizer module
The Periplex Edge: Microcontrollers would require multiple chips or muxing tricks, causing delays and bottlenecks. With Periplex:
You just declare all interfaces in a JSON file.
It builds the required logic and exposes /dev/pwm0, /dev/can0, etc.
Zero code, zero hassle, zero hardware redesign.
2. Swarm Communication and Custom Protocol Stacks
Scenario: Swarm drones communicate over:
RF LoRa (custom SPI/UART)
UWB mesh (proprietary protocol)
Redundant backup over CAN
Periplex lets you:
Create hybrid protocol stacks
Embed real-time hardware timers, parity logic, and custom UART framing — none of which are feasible in most MCUs
Replacing Microcontrollers, Not Just Augmenting Them
| Feature | Microcontroller | Periplex on Vaaman | |---------------------------|----------------------------|------------------------------------| | Number of peripherals | Limited (4–6) | Virtually unlimited (30+ possible) | | Reconfiguration time | Flash + reboot | Real-time, dynamic reload | | Timing precision | Software-timer limited | FPGA-grade nanosecond-level timing | | AI compatibility | Not feasible | Integrated (Gati Engine) | | Sensor fusion performance | Bottlenecked | Parallel FPGA pipelines |
Developers Love JSON, Not Register Maps
No more:
Scouring 400-page datasheets
Bitmasking registers for I2C configs
Writing interrupt handlers from scratch
Just declare what you need. Let Periplex do the work. Peripherals become software-defined, but hardware-implemented.
Built in India, for India’s Drone Revolution
Vaaman + Periplex isn’t just about tech. It’s about self-reliance.
India’s defence, agriculture, and logistics sectors need secure, reconfigurable, audit-friendly hardware — not black-box SoCs from questionable supply chains.
Periplex is the hardware engine for Atmanirbhar Bharat in drones.
TL;DR
Periplex lets drones adapt hardware to the mission — instantly.
It replaces tangled microcontroller logic with clean, structured JSON.
It unlocks use cases microcontrollers can’t touch: AI at the edge, dynamic reconfiguration, secure protocol stacks, and more.
And it’s built into Vaaman, India’s first reconfigurable edge computer.
Ready to Get Started?
Explore Vaaman on Crowd Supply Reach out for Periplex SDK access: [email protected]
Raspberry Pi
Drones
Drones Technology
Jetson Orin Nano
Technology
0 notes
Text
Embedded Controls Development: From Design to Deployment

Embedded controls development is a critical area in embedded systems engineering, involving the design, programming, and integration of control systems into hardware platforms. These systems are typically found in devices that perform dedicated functions, ranging from consumer electronics to industrial automation and automotive applications. The development process requires a combination of hardware knowledge, software engineering, and systems integration skills.
What Are Embedded Controls?
Embedded controls are computer-based systems that control specific functions within a larger mechanical or electrical system. They use microcontrollers, digital signal processors (DSPs), or microprocessors to monitor inputs from sensors, process data according to a control algorithm, and output control signals to actuators or other system components. These control loops can be simple (like turning on a fan when a sensor detects high temperature) or complex (like managing engine timing and fuel injection in modern vehicles).
Development Lifecycle
The development lifecycle for embedded controls typically follows several key stages:
Requirements Definition: Understanding what the control system needs to do. This includes identifying input/output interfaces, environmental constraints, performance requirements, and safety or compliance standards.
System Design: Creating a high-level architecture that defines how software and hardware will interact. This stage also involves choosing the right microcontroller or processor, selecting sensors and actuators, and outlining communication protocols.
Software Development: Writing code for the embedded control system, often in C or C++. Developers must consider memory limitations, real-time constraints, and hardware-specific details. This stage includes implementing control algorithms, handling interrupts, and developing communication interfaces such as I2C, SPI, UART, or CAN.
Hardware Integration: Integrating the embedded software with physical components. This includes setting up the development board, connecting sensors and actuators, and testing signal integrity and power consumption.
Testing and Validation: Rigorously testing the control system to ensure it functions as expected under various conditions. Unit testing, integration testing, and hardware-in-the-loop (HIL) simulations are commonly used to verify performance and reliability.
Deployment and Maintenance: After development and testing, the system is deployed into the final product. Ongoing maintenance may involve firmware updates, bug fixes, or performance improvements.
Tools and Platforms
A wide range of tools are used in embedded controls development, including:
Integrated Development Environments (IDEs): Tools like Keil µVision, MPLAB X, STM32CubeIDE, and Arduino IDE are popular for writing and debugging code.
Real-Time Operating Systems (RTOS): Systems such as FreeRTOS or VxWorks provide scheduling, task management, and synchronization capabilities for time-sensitive applications.
Version Control Systems: Git is widely used to manage code versions and support collaborative development.
Simulation and Modeling Tools: MATLAB/Simulink is frequently used in control systems design for simulation and code generation.
In-Circuit Debuggers/Programmers: Tools like JTAG or SWD interfaces allow developers to program and debug the target microcontroller directly.
Challenges in Embedded Controls Development
Developing embedded control systems presents several challenges:
Resource Constraints: Embedded systems often have limited CPU power, memory, and energy availability. Efficient coding and hardware optimization are essential.
Real-Time Requirements: Many control systems must respond within strict timing constraints. Missed deadlines can result in system failure or unsafe behavior.
Hardware Dependence: Embedded software is closely tied to specific hardware, requiring deep knowledge of the processor, peripherals, and electrical characteristics.
Debugging Complexity: Diagnosing problems in embedded systems can be difficult due to limited visibility into internal states and limited logging capabilities.
Safety and Reliability: In industries like automotive or medical devices, the control systems must meet rigorous safety standards such as ISO 26262 or IEC 62304.
Applications
Embedded controls are used in countless applications:
Automotive Systems: Engine control units (ECUs), anti-lock braking systems (ABS), adaptive cruise control, and infotainment systems.
Consumer Electronics: Smart thermostats, washing machines, and robotic vacuum cleaners all rely on embedded control systems.
Industrial Automation: PLCs and industrial controllers manage processes on factory floors, often integrating with SCADA systems.
Aerospace and Defense: Flight control systems, unmanned aerial vehicles (UAVs), and radar systems.
Medical Devices: Infusion pumps, pacemakers, and diagnostic equipment all include embedded control systems to ensure safe and accurate operation.
Trends and Future Directions
The field of embedded controls is rapidly evolving. Several key trends are shaping the future:
IoT Integration: Many embedded systems are now connected to the internet, allowing for remote monitoring, control, and firmware updates.
Edge Computing: More processing is being done on the device itself, reducing the need to send data to the cloud and improving response times.
AI and Machine Learning: Embedded systems are beginning to incorporate ML algorithms for pattern recognition, predictive maintenance, and adaptive control.
Model-Based Design: Tools like Simulink allow engineers to design control systems graphically and automatically generate embedded code.
Cybersecurity: As systems become more connected, securing embedded control systems against hacking and data breaches is becoming essential.
Conclusion
Embedded controls development by Servotechinc is a complex but vital discipline that sits at the heart of modern technology. From managing vehicle dynamics to enabling smart home features, embedded control systems play a crucial role in ensuring that machines operate efficiently, safely, and intelligently. As technology advances, the demand for skilled engineers in this domain will only continue to grow.
0 notes
Text
【step by step】Easyi3C Host I3C adapter (2)
Easyi3C is a leading supplier of embedded system tools that simplify the development and debugging of various communication protocols. The company offers a range of products designed to help engineers and developers use I3C/I2C , USB and MIPI, JEDEC, MCTP and other protocols more efficiently.
Easyi3C Host I3C/I2C adapter is based on USB to I3C/I2C protocol, so you need to install USB driver first. Products on the market are generally based on USB to serial port, but the problem with this method is that the speed is slow and the serial port is not very stable. In order to solve this pain point, Easyi3C is directly based on USB protocol transmission, which improves the speed of data transmission and increases the stability of transmission, which is conducive to chip stress testing and long-term periodic cycle testing of chips, such as stress testing of PMIC chips.
The following is the installation process of the USB driver of Easyi3C. On the Windows platform, the installation is based on the GUI graphical interface, which is convenient and easy to use.
1. First, connect the Easyi3C Host I3C/I2C adapter to the computer via a USB Type-C cable. If the USB driver is not installed, the Windows device manager will display as follows:

2. You can now download the “Easyi3C Tower USB Driver Installer Tool.zip” file from the Easyi3C company’s official website.
3. Unzip the downloaded file above, and then open the program as shown below:

4. Select to install the USB driver as shown below:

5. If the USB driver is installed successfully, the following will be displayed in the Device Manager:
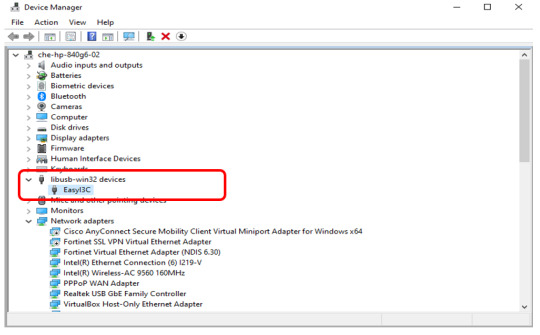
Through the above steps, the USB driver of Easyi3C has been installed successfully. Next, let’s continue to learn more about the product.
0 notes
Text
Understanding the 4 Core Components of an Embedded Linux System
Before diving into how to build a complete embedded Linux system, it’s important to know what major parts make up the system itself. A good way to understand this is by looking at the boot process — what happens when you power on a device like an embedded controller, industrial gateway, or smart gadget.
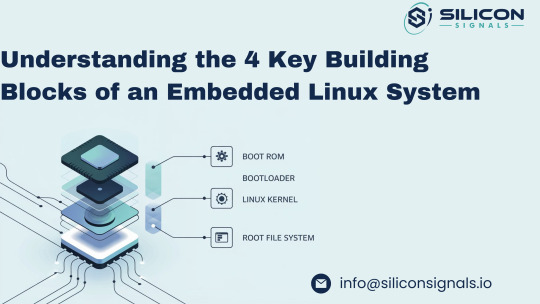
Each component plays a specific role in bringing the system to life, step by step. Here's a simple breakdown of the four essential parts of an embedded Linux system:
1. 🧠 Boot ROM – The Starting Point Inside the SoC
The Boot ROM is the very first code that runs when you power on your embedded device. It’s stored in read-only memory directly inside the System-on-Chip (SoC) and is similar to the BIOS on a standard computer. Although it's locked and can't be changed, it can react to external configurations (like boot pins) to decide where to load the next stage from – such as an SD card, eMMC, NAND flash, or even over UART/serial.
Some Boot ROMs also support secure boot by only allowing signed software to load next, adding a strong layer of security to the embedded system.
2. 🚀 Bootloader – Initializing the Hardware and Loading the Kernel
After the Boot ROM finishes its job, it passes control to the Bootloader. In many cases, the bootloader itself runs in two steps:
First stage: Prepares the system by initializing the RAM (since it's not ready right after power-up).
Second stage: Loads the Linux kernel from a chosen storage device or over a network (useful during development via TFTP).
Modern bootloaders also include features to:
Flash firmware or kernels onto memory devices like NAND or eMMC,
Test hardware components like I2C/SPI, RAM, and others,
Run Power-On Self-Tests (POST) to ensure system stability before launching the OS.
Popular bootloaders like U-Boot are often used in embedded Linux development for their flexibility and wide hardware support.
3. 🧩 Linux Kernel – The Core of the Operating System
The Linux Kernel is the brain of the system and is responsible for:
Talking to the hardware (drivers for peripherals),
Handling system tasks like scheduling and memory management,
Creating a stable environment for your applications to run.
It acts as the bridge between the hardware layer and the user space, making it possible to develop portable embedded applications that don’t rely on the specifics of the underlying board.
4. 📁 Root File System – The Application Playground
Once the kernel is up and running, its next task is to mount the root file system — the place where all applications, scripts, and shared libraries live.
Creating this from scratch is complex due to package dependencies and compatibility issues. That’s why tools like Buildroot, Yocto Project, or OpenEmbedded are used to automatically build and manage the root filesystem.
These tools help embedded developers customize and maintain a lightweight and reliable file system tailored to their device, ensuring consistency and performance.
Need Help Building Your Embedded Linux Solution?
At Silicon Signals, we specialize in custom embedded Linux development, including board bring-up, device driver integration, Android BSPs, secure boot implementation, and real-time optimizations.
Whether you're working on a new product or looking to optimize an existing one, our team can help you accelerate development and reduce risk.
📩 Contact us today to discuss how we can bring your embedded system to life. 🌐 Visit: www.siliconsignals.io ✉️ Email: [email protected]
#embeddedtechnology#embeddedsoftware#embeddedsystems#linux kernel#linuxdebugging#iot development services#iotsolutions
0 notes
Text
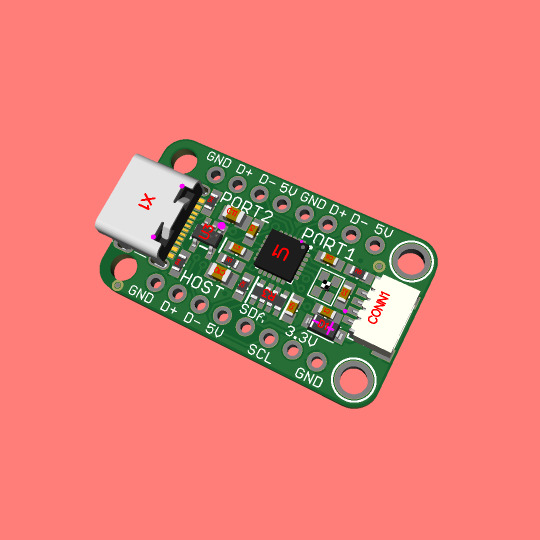
USB2422 configurable USB Hub chip
The Microchip USB2422 is kinda neat, its a low cost USB hub with EEPROM you can connect to I2C to configure. We thought it would make a nice little breakout for whenever you have a USB port but you sorta wish you had two! Maybe even embed in some hardware! We just made a couple USB hub breakouts with the CH334F ...
but this board might be nice if you want more configurability & control: the stemma QT connector on the end is what you can plug into to program it. we designed rev A of this board in 2021 and then it got slammed by part shortages, now its back in stock so we can revisit this design!
#adafruit#microchip#usb2422#usbhub#eeprom#i2cconfigurable#hardwareintegration#usbbreakout#stemmaqt#microcontroller#techdiy#electronicsproject#configurableusb
13 notes
·
View notes
Text
A Comprehensive Guide to Firmware Development

In the world of embedded systems and smart devices, firmware plays a critical role in enabling hardware to function effectively. Whether you're developing IoT devices, automotive systems, or industrial machinery, firmware development is the backbone that bridges hardware and software.
In this blog post, we’ll explore what firmware is, its importance, the development process, tools used, and best practices to ensure efficient and secure firmware solutions.
What is Firmware?
Firmware is a specialized type of software that provides low-level control for a device's specific hardware. Unlike regular software applications, firmware is tightly coupled with the hardware and is often stored in non-volatile memory such as ROM, EEPROM, or flash memory.
Examples of devices with firmware include:
Smartphones
Routers
Smart TVs
Medical devices
Automotive control units (ECUs)
Why is Firmware Important?
Firmware is essential because it:
Controls hardware operations: Without firmware, the hardware components of a device would be non-functional.
Ensures device functionality: It manages startup routines, I/O operations, sensor integration, and communication protocols.
Supports software-hardware integration: Firmware acts as a middle layer, allowing high-level software applications to interact with low-level hardware components.
Enables updates: Firmware can often be updated to fix bugs, enhance performance, or add features.
The Firmware Development Process
1. Requirements Gathering
Understanding the hardware specifications and the device’s purpose is crucial. Developers need to gather requirements from both hardware engineers and end users.
2. Architecture Design
This involves deciding on the architecture and communication protocols (e.g., I2C, SPI, UART), memory usage, and timing constraints.
3. Choosing a Development Platform
Most firmware is written in C or C++ due to their efficiency and hardware-level access. You’ll also need:
Microcontroller/microprocessor datasheets
Board Support Packages (BSPs)
RTOS (Real-Time Operating System), if required
4. Coding and Integration
Firmware code is written to interface directly with hardware. This includes writing drivers for peripherals (LEDs, sensors, motors) and managing power consumption, timing, and interrupts.
5. Testing and Debugging
Testing includes:
Unit testing
Hardware-in-the-loop (HIL) testing
Simulation and emulation tools
Debugging tools such as JTAG and SWD are used to step through code and analyze performance.
6. Deployment
Once tested, firmware is compiled and flashed onto the device using programmers or over-the-air (OTA) update mechanisms.
Tools Used in Firmware Development
Integrated Development Environments (IDEs): Keil µVision, MPLAB X, STM32CubeIDE
Compilers and Toolchains: GCC, IAR Embedded Workbench
Debuggers/Programmers: JTAG, ST-LINK, AVR ISP
Version Control Systems: Git
Simulators/Emulators: QEMU, Proteus
Best Practices for Firmware Development
Write modular and reusable code
Follow coding standards (e.g., MISRA C for safety-critical systems)
Optimize for memory and power consumption
Document thoroughly for maintainability
Implement fail-safes and watchdog timers
Secure your firmware (e.g., with encryption and secure boot loaders)
Plan for firmware updates with mechanisms like OTA updates
0 notes
Text
Enhancing Pharmaceutical Invoice-to-Cash Efficiency Through AI Integration
In the fast-paced pharmaceutical industry, managing cash flow efficiently is crucial for sustainability and growth. The invoice-to-cash (I2C) cycle plays a pivotal role in ensuring that payments are received on time, reducing financial bottlenecks and improving overall business performance. However, traditional I2C processes are often plagued with inefficiencies, manual errors, and delays. AI-powered automation offers a transformative solution to streamline these operations, ensuring faster processing, reduced disputes, and improved revenue collection.
Challenges in the Traditional Invoice-to-Cash Process
Pharmaceutical companies often face numerous challenges in their I2C cycle, including:
Manual Data Entry Errors: Inaccurate invoicing due to human errors can lead to payment delays and disputes.
Delayed Payment Processing: Inefficient workflows and lack of real-time tracking prolong the cash conversion cycle.
Ineffective Dispute Resolution: Difficulty in tracking invoice discrepancies and resolving disputes results in financial losses.
Regulatory Compliance Issues: Ensuring adherence to various financial and healthcare regulations adds complexity to the invoicing process.
Lack of Integration: Disconnected financial systems hinder seamless invoice processing and reconciliation.
How AI is Transforming Pharmaceutical Invoice-to-Cash Workflows
AI-driven solutions are revolutionizing the I2C process by automating manual tasks, improving accuracy, and providing actionable insights. Some key benefits of AI integration include:
1. Automated Invoice Processing
AI-powered document recognition and natural language processing (NLP) streamline invoice generation, reducing manual errors and ensuring timely submissions.
2. Predictive Analytics for Payment Behavior
Machine learning algorithms analyze historical payment patterns, enabling businesses to anticipate delays and optimize collection strategies accordingly.
3. Real-Time Tracking and Alerts
AI-enabled systems provide real-time invoice tracking, sending automated alerts for due and overdue payments to both vendors and customers.
4. Enhanced Dispute Management
AI-driven chatbots and automated dispute resolution workflows help identify discrepancies quickly, facilitating faster resolution and minimizing financial setbacks.
5. Regulatory Compliance and Fraud Detection
AI models ensure compliance with financial and industry regulations by detecting anomalies in invoices and flagging potential fraud risks.
Implementing AI in the Pharmaceutical Invoice-to-Cash Cycle
To successfully integrate AI into I2C workflows, pharmaceutical companies should:
Assess Current Pain Points: Identify inefficiencies in the existing invoice processing cycle.
Invest in Scalable AI Solutions: Implement AI-driven tools that align with business needs and regulatory requirements.
Ensure Seamless Integration: Connect AI systems with existing financial platforms for a smooth transition.
Train Employees for AI Adoption: Provide necessary training to finance teams to maximize AI adoption and efficiency.
Monitor and Optimize: Continuously analyze AI performance metrics to improve invoice management over time.
The Future of AI in Pharma Finance
As AI technology evolves, the pharmaceutical industry will witness even more advanced automation capabilities in financial operations. From blockchain-based invoicing to AI-driven risk assessment, the potential for innovation is vast. Companies that embrace AI-driven I2C solutions will gain a competitive advantage by improving cash flow efficiency, reducing operational costs, and enhancing overall financial performance.
For more insights on AI-driven financial solutions in the pharmaceutical industry, visit showcase.tech4bizsolutions.com
#AIinPharma#InvoiceToCash#PharmaFinance#AIforBusiness#AutomatedBilling#DigitalTransformation#FinTech#Tech4BizSolutions#showcaseTech4BizSolutions
0 notes
Text
raspberry pi pc
Yes, a Raspberry Pi would indeed work much better than an Arduino for implementing a system where two "computers" are communicating and learning from each other. The Raspberry Pi is a full-fledged single-board computer (SBC), which means it has far greater processing power, memory, and capabilities compared to an Arduino. This makes it much more suitable for complex tasks like data processing, machine learning, and communication between two devices.
Key Differences Between Arduino and Raspberry Pi for This Task:
1. Processing Power:
Arduino: Limited to simple microcontroller tasks (e.g., simple sensors, I/O operations, small control tasks). It has very little computational power and memory (e.g., 2 KB of RAM, 32 KB of flash memory).
Raspberry Pi: Has a powerful CPU, much more memory (e.g., 4 GB or 8 GB of RAM on newer models), and can run a full Linux-based operating system (e.g., Raspberry Pi OS). This makes it suitable for tasks like running machine learning models, more complex algorithms, and networking tasks.
2. Communication:
Arduino: Can communicate using simple protocols like Serial, I2C, or SPI, which are ideal for small-scale, low-speed communication between devices.
Raspberry Pi: Has multiple communication options including Ethernet, Wi-Fi, and Bluetooth, along with more advanced serial protocols. It can communicate over a local network or even the internet, making it ideal for real-time communication between two "computers."
3. Storage and Software:
Arduino: Does not have a storage system other than its limited onboard memory (though you can use SD cards for small amounts of storage). The code running on an Arduino is typically bare-metal (no operating system), and it can only run a single program at a time.
Raspberry Pi: Has access to a large amount of storage (via microSD card or external storage), and runs a full operating system, allowing you to install software libraries, run multiple processes simultaneously, and use advanced tools and frameworks for communication and learning (e.g., TensorFlow, OpenCV, etc.).
4. Machine Learning and Data Processing:
Arduino: You can implement simple algorithms (like decision trees or basic pattern recognition), but it’s not suited for real-time machine learning or complex data analysis.
Raspberry Pi: Can run machine learning models, handle large datasets, and run frameworks like TensorFlow, PyTorch, scikit-learn, etc. This makes it much more capable of "learning" from data, making decisions, and adapting based on feedback.
5. How a Raspberry Pi PC System Could Work Better
Given that Raspberry Pi is a full-fledged computer, you can implement the original idea of two computers communicating and learning from each other in a much more robust way. Here’s how you can achieve that:
Hardware Setup for Raspberry Pi PCs:
Two Raspberry Pi boards (e.g., Raspberry Pi 4, Raspberry Pi 3, or even Raspberry Pi Zero for smaller setups).
Display, keyboard, and mouse for local interaction, or run everything remotely via SSH (headless).
Networking: Use Wi-Fi or Ethernet to connect the two Raspberry Pi boards and enable communication.
Optional: Camera, microphone, sensors, or other input/output devices for more advanced interaction and learning tasks.
Communication Between Raspberry Pi PCs:
You can use several methods for communication between the two Raspberry Pi boards:
TCP/IP Communication: Set up a client-server model, where one Raspberry Pi acts as the server and the other as the client. They can communicate over a local network using sockets.
MQTT: A lightweight messaging protocol suitable for device-to-device communication, commonly used in IoT.
HTTP/REST APIs: You can use a web framework (e.g., Flask, FastAPI) to create APIs on each Raspberry Pi, allowing them to communicate via HTTP requests and responses.
WebSocket: For real-time bidirectional communication, you can use WebSockets.
Software/Frameworks for Machine Learning:
You can install frameworks like TensorFlow, Keras, or scikit-learn on the Raspberry Pi to allow for more advanced learning tasks.
Use Python as the programming language to communicate between the two Pi boards and implement machine learning algorithms.
Raspberry Pi can interact with real-world data (e.g., sensors, cameras, etc.) and learn from it by running algorithms like reinforcement learning, supervised learning, or unsupervised learning.
6. Example Use Case: Two Raspberry Pi PCs Learning from Each Other
Here’s an example scenario where two Raspberry Pi boards communicate and learn from each other using TCP/IP communication and basic machine learning (e.g., reinforcement learning).
Raspberry Pi 1 (PC1): This board makes a decision based on its current state (e.g., it guesses a number or makes a recommendation).
Raspberry Pi 2 (PC2): This board evaluates the decision made by PC1 and sends feedback. PC2 might "reward" or "punish" PC1 based on whether the decision was correct (e.g., in a game or optimization problem).
Feedback Loop: PC1 uses the feedback from PC2 to adjust its behavior and improve its future decisions.
Example Architecture:
PC1 (Raspberry Pi 1):
Makes a guess (e.g., guesses a number or makes a recommendation).
Sends the guess to PC2 via TCP/IP.
Receives feedback from PC2 about the quality of the guess.
Updates its model/behavior based on the feedback.
PC2 (Raspberry Pi 2):
Receives the guess or recommendation from PC1.
Evaluates the guess (e.g., checks if it’s close to the correct answer).
Sends feedback to PC1 (e.g., positive or negative reinforcement).
Basic Python Code for TCP Communication:
On both Raspberry Pis, you can use Python’s socket library to establish a client-server communication:
PC1 (Server) Code:
import socket import random # Create a TCP/IP socket server_socket = socket.socket(socket.AF_INET, socket.SOCK_STREAM) server_socket.bind(('0.0.0.0', 65432)) # Bind to any address, port 65432 server_socket.listen(1) print("PC1: Waiting for connection...") connection, client_address = server_socket.accept() print("PC1: Connected to PC2") while True: # Simulate a decision (e.g., guessing a number) guess = random.randint(1, 100) print(f"PC1: Guessing number {guess}") # Send the guess to PC2 connection.sendall(str(guess).encode()) # Wait for feedback from PC2 feedback = connection.recv(1024).decode() print(f"PC1: Received feedback: {feedback}") # Adjust behavior based on feedback (simple learning mechanism) if feedback == "correct": print("PC1: Correct guess!") else: print("PC1: Incorrect guess, trying again.") # Wait before making another guess time.sleep(2)
PC2 (Client) Code:
import socket # Create a TCP/IP socket client_socket = socket.socket(socket.AF_INET, socket.SOCK_STREAM) client_socket.connect(('PC1_IP_ADDRESS', 65432)) # Connect to PC1 while True: # Receive the guess from PC1 guess = int(client_socket.recv(1024).decode()) print(f"PC2: Received guess {guess}") # Evaluate the guess (simple decision: correct if guess is 50) if guess == 50: feedback = "correct" else: feedback = "incorrect" # Send feedback to PC1 client_socket.sendall(feedback.encode()) print(f"PC2: Sent feedback: {feedback}")
7. Expanding This System
Advanced Communication: If you're looking for real-time interaction, you can explore using WebSockets or MQTT for more efficient, bidirectional communication.
Machine Learning: You can train models on both Raspberry Pi devices, where one device sends data to the other for training, and they both improve over time.
Distributed Systems: With two Raspberry Pis, you can build a distributed system where each Pi runs part of the computation, and they collaborate to solve more complex tasks.
Conclusion:
Raspberry Pi is definitely a better choice for the task of two computers communicating and learning from each other, as it offers the computational power, memory, and flexibility needed for machine learning, real-time communication, and more advanced systems. The Arduino is more suitable for simple tasks and small embedded systems, whereas the Raspberry Pi can handle much more complex processing, communication, and learning systems.
If you want to build a more advanced learning system, I would recommend using Raspberry Pi boards. Would you like to dive deeper into a specific part of the setup or need help with more advanced machine learning on Raspberry Pi?
Creating a Raspberry Pi-based PC involves setting up a Raspberry Pi board to function as a full desktop computer, capable of running an operating system, connecting to the internet, and supporting peripherals like a keyboard, mouse, and display. Unlike an Arduino, which is used for embedded systems, a Raspberry Pi is a full-fledged computer, making it much easier to set up as a personal computer.
Here’s a step-by-step guide on how to turn a Raspberry Pi into a fully functional PC.
What You Need:
Raspberry Pi Board (e.g., Raspberry Pi 4, Raspberry Pi 3, or Raspberry Pi Zero)
MicroSD Card (at least 8 GB, recommended 16 GB or more) for the operating system
Power Supply (5V 3A USB-C for Raspberry Pi 4, or appropriate power for other models)
HDMI Cable and a Display (HDMI-compatible monitor or TV)
Keyboard and Mouse (USB or Bluetooth, depending on your preference)
Internet connection (Ethernet cable or Wi-Fi)
USB storage (optional, for additional storage)
MicroSD card reader (for flashing the operating system)
Step-by-Step Guide:
1. Prepare the MicroSD Card with Raspberry Pi OS
First, you'll need to install the operating system on your MicroSD card. The most common and recommended OS for Raspberry Pi is Raspberry Pi OS (formerly Raspbian).
Download Raspberry Pi Imager: Visit Raspberry Pi’s official website and download the Raspberry Pi Imager for your computer (Windows, macOS, or Linux).
Install Raspberry Pi OS:
Open the Raspberry Pi Imager, select "Choose OS", and select Raspberry Pi OS (32-bit) (recommended for most users).
Select your MicroSD card as the target.
Click Write to flash the OS onto the SD card.
Enable SSH or Wi-Fi (Optional): If you plan to use the Raspberry Pi headlessly (without a monitor, keyboard, or mouse), you can enable SSH or configure Wi-Fi before inserting the SD card into the Pi:
After flashing, insert the SD card into your computer.
Open the boot partition and create an empty file named "ssh" (no extension) to enable SSH.
For Wi-Fi, create a file called wpa_supplicant.conf with your Wi-Fi credentials: country=US ctrl_interface=DIR=/var/run/wpa_supplicant GROUP=netdev update_config=1 network={ ssid="Your_SSID" psk="Your_Password" }
2. Set Up the Raspberry Pi
Insert the SD card into the Raspberry Pi.
Connect your HDMI cable from the Raspberry Pi to the monitor.
Plug in your keyboard and mouse via the USB ports.
Connect the power supply to the Raspberry Pi.
3. First Boot and Raspberry Pi OS Setup
When you power on the Raspberry Pi, it should boot into Raspberry Pi OS.
Follow the on-screen instructions to:
Set up your language, timezone, and keyboard layout.
Set up your Wi-Fi connection (if not already done).
Update the system by running sudo apt update and sudo apt upgrade in the terminal.
4. Install Additional Software
Once your Raspberry Pi is running, you can install additional software based on your needs. For example:
Web Browsing: The default browser is Chromium, but you can install others like Firefox.
Office Suite: Install LibreOffice for document editing, spreadsheets, and presentations.
Command: sudo apt install libreoffice
Development Tools: If you want to use the Pi for programming, you can install IDEs like Thonny (for Python) or Visual Studio Code.
Command: sudo apt install code
Media Software: You can use VLC for media playback or Kodi for a home theater system.
5. Optimize Your Setup
To make your Raspberry Pi run smoothly and feel more like a desktop PC:
Increase Memory Allocation: If you're using a Raspberry Pi 4, you can allocate more memory to the GPU via sudo raspi-config.
Enable Auto-Login: To skip the login screen on boot, you can configure auto-login:
Run sudo raspi-config.
Select Boot Options → Desktop/CLI → Desktop Autologin.
Configure Performance Settings: You can tweak performance settings like CPU overclocking or enabling hardware acceleration for graphics in the Raspberry Pi configuration tool (raspi-config).
6. Optional: Adding a Large Storage Device
If the 8 GB or 16 GB of storage on the SD card isn’t enough, you can plug in a USB hard drive or USB flash drive to expand your storage. You can also configure the Raspberry Pi to boot from a USB drive (for faster performance compared to an SD card).
7. Set Up Remote Access (Optional)
If you prefer to control the Raspberry Pi from another computer:
SSH: You can access the Raspberry Pi's terminal remotely via SSH (if enabled during setup). To connect, use a tool like PuTTY (Windows) or the terminal (Linux/macOS):
Command: ssh pi@<raspberrypi-ip-address>
VNC: You can use VNC for remote desktop access.
Enable VNC using sudo raspi-config.
Download and install RealVNC on your computer to access the Raspberry Pi’s graphical desktop remotely.
8. Using Your Raspberry Pi as a Full PC
Once you’ve completed the setup, your Raspberry Pi will be ready to use like a regular desktop computer. You can:
Surf the web, check emails, and use social media with browsers like Chromium or Firefox.
Write documents, create spreadsheets, and presentations using LibreOffice.
Code in multiple languages (Python, Java, C++, etc.).
Play media files with VLC or stream content using Kodi.
9. Advanced Uses: Building a Raspberry Pi "Server"
If you want your Raspberry Pi to act as a server or take on additional tasks, you can configure it for various roles:
Home Automation: Set up a Home Assistant or OpenHAB server for smart home automation.
Web Server: You can install Apache or Nginx and run a web server.
Command: sudo apt install apache2
Cloud Server: Set up Nextcloud or ownCloud to create your own cloud storage.
Conclusion
Creating a Raspberry Pi PC is a great way to repurpose the Raspberry Pi as a low-cost, energy-efficient desktop computer. Whether you're using it for everyday tasks like browsing, programming, or media consumption, or even more advanced tasks like running servers or learning about Linux, the Raspberry Pi is incredibly versatile.
If you need help with specific configurations, software installation, or troubleshooting, feel free to ask!
0 notes
Text

Introduction PIC24FJ256GA106-I/PT for Microchip MCU IC Distributor The PIC24FJ256GA106-I/PT microcontroller is engineered to deliver outstanding performance for your embedded applications. With its 16-bit architecture and a clock speed of up to 32 MHz, this microcontroller offers a perfect blend of power and efficiency. Designed by Microchip Technology, the PIC24F series provides an extensive range of features, making it adaptable to various applications including automotive, industrial, and consumer electronics. MOQ of the PIC24FJ256GA106-I/PT for Microchip MCU IC Distributor MOQ is 100 units as seen online,more quantity more discount.Chat with us to negotiable to wholesale price.PIC24FJ256GA106 datasheet is here. Key Features The PIC24FJ256GA106-I/PT is loaded with essential features that enhance its versatility. It boasts 256 KB of Flash memory and 16 KB of RAM, allowing for the development of complex applications without limitations on memory. Additionally, the device incorporates multiple peripherals such as PWM outputs, ADC, UART, and I2C which cater to diverse project requirements. Moreover, its low power consumption helps in extending battery life, making it an ideal choice for portable devices. The integrated hardware support for USB connectivity integrates smoothly into designs necessitating user interfaces or data transfer capabilities. Applications and Use Cases This microcontroller is suitable for a variety of applications ranging from simple data logging devices to sophisticated control systems. Its capability to interface with sensors and actuators makes it indispensable in robotic systems, automotive applications, and smart home devices. Furthermore, the easy-to-use development tools provided by Microchip assist engineers in accelerating their design processes, resulting in reduced time to market. In summary, whether you are developing a new product or upgrading an existing one, the PIC24FJ256GA106-I/PT microcontroller is designed to meet the rigorous demands of modern electronics. Its blend of performance, versatility, and power efficiency makes it an excellent choice for anyone looking to leverage the latest in microcontroller technology. If you interested with more other parts number,view here.Know more about our company business. Read the full article
0 notes
Text
Mastercard Unveils One Credential for Seamless Digital Payments

Mastercard has introduced One Credential, a unified digitally connected payment solution that offers consumers and businesses multiple ways to pay through a single, secure credential. This new tool provides flexibility by allowing users to choose between debit, credit, prepaid, or installment options within a streamlined digital experience.
Enhancing the Digital Checkout Experience
Designed to cater to modern payment preferences, especially those of Gen Z and digital-first users, One Credential ensures a seamless, efficient, and personalized payment journey. Consumers and small businesses can now access expanded funding options, customize payment preferences, and manage transactions through a secure digital interface.
For issuing banks, One Credential serves as a differentiated offering, particularly attractive to younger consumers and SMEs, by providing greater choice, control, and convenience in managing financial transactions.
Industry Collaboration and Market Expansion
Developed in partnership with financial institutions including Bendigo and Adelaide Bank Group, Episode Six, Galileo Financial Technologies, i2c, Lithic, Marqeta, and Wio Bank, One Credential aims to redefine digital payments while ensuring compliance with industry regulations and security standards.
Mastercard continues to evolve its offerings, focusing on secure, flexible, and consumer-centric solutions that align with the growing demand for personalized financial tools in a rapidly changing digital economy.
0 notes
Text

Top 10 Skills You’ll Learn in an Embedded System Development Course in India
Today, with advanced technology in every field, the world has taken a big step toward creating new industries and innovations. It is one of the most challenging and exciting fields, and it's worth investing in by enrolling in an embedded system development course in India. The knowledge and skills gained are useful for outstanding performance in various domains such as IoT, robotics, and automotive technology. Here, we look at the top 10 skills you would learn in an embedded system development course, including a fascinating project initiative, TechnosCOE.
1. Familiarity with Microcontrollers and Microprocessors
Microcontrollers and microprocessors are the foundation base for embedded systems. Courses include architecture, functioning, and programming, with hands-on experience in popular controllers such as Arduino, PIC, and ARM, which form the backbone of most embedded applications.
2. Programming Languages
One of the main emphases of an embedded system development course in India is acquiring skills in programming languages such as C and C++. These skills are essential to writing firmware and developing applications for embedded systems. It also makes some courses introduce Python for scripting and debugging purposes to improve a student's versatility.
3. Real-Time Operating Systems (RTOS)
The creation of efficient and reliable systems is based on the understanding of how RTOS works. These courses cover the principles of multitasking, scheduling, and inter-process communication. By mastering RTOS concepts, students can develop systems for industries such as telecommunications and healthcare.
4. Circuit Design and PCB Development
These contain custom circuitry designs and a printed circuit board (PCB). The knowledge gained from developing circuitry robust and efficient within Eagle and Altium Designer gives immense value toward the prototyping and product development phase.
5. Sensor integration and data acquisition
Modern embedded systems interact with the physical world through sensors. Courses teach students how to integrate sensors, process their data, and use it in meaningful ways. Applications include temperature monitoring, motion detection, and environmental sensing, among others.
6. IoT (Internet of Things) Development
IoT has changed the face of industries, and at the center of this change is the concept of embedded systems. Students are taught to design devices that are internet-enabled, which can talk to other devices, and perform analytics in real-time data. The same skill can be applied to smart home automation and industrial applications.
7. Embedded Linux
Training on Embedded Linux is generally a part of an embedded system development course in India. It is a highly versatile and widely used open-source software in the world of embedded systems. A student learns how to develop applications, configure the kernel, and build custom distributions for different types of devices.
8. Debugging and Testing Techniques
Debugging is a key tool in embedded system development. Students become experts in using tools like JTAG debuggers and oscilloscopes to identify and debug those issues. Techniques on testing address all the requirements for the performance and safety of the system.
9. Communication Protocols
Understanding communication protocols is very important to the embedded engineers. The curriculum covers some popular protocols such as I2C, SPI, UART, CAN, and Ethernet, which are usually used in applications such as car systems and automation in industrial places.
10. Project Management and Documentation
Beyond technical skills, students also learn project management techniques and documentation practices. These soft skills ensure that they can efficiently collaborate with teams, manage timelines, and maintain accurate records of their work.
Role of TechnosCOE in Embedded Learning
Most embedded system courses include real-world projects that allow students to apply their skills practically. TechnosCOE is one such project, an initiative designed to bridge the gap between theoretical knowledge and practical application. TechnosCOE offers students opportunities to work on cutting-edge projects involving IoT, robotics, and smart devices.
This initiative focuses on teamwork, innovation, and problem-solving, ensuring learners are industry-ready. Through the TechnosCOE, students are exposed to real-world challenges and learn how to apply embedded system principles to develop effective solutions.
Why Choose an Embedded System Development Course in India?
India is turning out to be a fast-growing hub for embedded technology. Industries like automotive, healthcare, and consumer electronics will have a vast number of opportunities. Embedded system development courses offered in India will ensure expert faculty members, state-of-the-art labs, and industrial collaborations. They also offer internship and placement support, which proves to be perfect for career growth.
Conclusion
The course on embedded system development course in India not only gives the students technical expertise but also prepares them for dynamic and rewarding careers. Mastering microcontrollers to developing IoT solutions, these skills are invaluable in today's technology-driven world. Initiatives like TechnosCOE further enhance the learning experience, making these courses a worthwhile investment for aspiring engineers.
0 notes