#iPhone Without the Passcode
Explore tagged Tumblr posts
Visit Tumblr Blog
Explore Tumblr blogs with no restrictions, modern design and the best experience.
Last Seen Tumblr Blogs


Fun Fact
Post activity is at the highest at 4:00 pm EDT; notes peak at 10:00 pm EDT.
Text
How to Unlock an iPhone Without the Passcode? - ITMlab

For more visit: How to Unlock an iPhone Without the Passcode? - ITMlab
If you’ve forgotten your iPhone’s passcode, you’ll need to find another way to unlock it. There are two ways to do this: resetting or unfreezing the device. You can only use these methods if you know the last date and time that someone used the phone last, but it’s worth noting that it doesn’t matter whether or not they’re still using it today. In this article we’ll show you how to unlock an iPhone without a passcode using both methods so let’s get started!
How to Unfreeze an iPhone
If your iPhone has a passcode, you can use it to unfreeze the device.
In Settings, tap Passcode (or Touch ID & Passcode on an iPhone X or later).
Enter your passcode and tap Turn Off Screen Lock or Change Passcode if prompted to do so by entering an old one that’s no longer valid and then creating a new one for future use when prompted again by iOS 11+ devices or earlier versions of iOS 10 – 12+.
Once the screen is unlocked after entering your security code correctly, go back into Settings and navigate down until you find General > Reset > Erase All Content & Settings; then tap Reset All Settings near the bottom right corner of this page next time you need help with any kind of problem related specifically towards these two different types as well as other common ones involving battery life issues etc., which are often caused by third party apps installed on top of stock apps preinstalled within Windows Phone 8 OS software packages themselves rather than being caused by hardware itself failing due entirely instead due partially maybe even slightly due mostly perhaps entirely too much stress placed upon physical components inside those phones’ casing which causes them eventually break down over time leading up until eventually breaking down completely leaving nothing left behind except maybe some dust particles floating around inside air pockets created under pressure between different parts connected together tightly enough together tightly enough so not too many particles escape through cracks created during production process at factory level back when manufacturing line workers were still working hard trying hard laboriously day after day night after night
How to Unlock a Locked iPhone Without the Passcode
If you’re locked out of your iPhone and don’t know the passcode, there are a few ways to unlock it.
Use the emergency call option: If you can’t use Touch ID or Face ID because of an injury or other reason, go to Settings > Emergency SOS and tap “Call.” You’ll be able to make an emergency phone call without unlocking your device.
Connect the phone to a computer: If you have access to a computer, connect it through iTunes or iCloud (depending on which service was used when setting up the passcode). In both cases, this will allow iTunes/iCloud Backup & Restore options that will let you restore from a backup without entering any passwords or passcodes at all!
How to Reset the Passcode on an iPhone 7 or Older
If you have an iPhone 7 or older, resetting your passcode is a little different than unlocking it.
First, turn off Find My iPhone in iCloud settings. Launch Settings on your device and select General > Reset. Scroll down and select Erase All Content and Settings, then tap Erase iPhone (or whatever name pops up).
Resetting the passcode on a newer iPhone is slightly different. First, turn off Find My iPhone in iCloud settings. This will prevent the phone from being locked if it’s lost or stolen in the future. Then, launch Settings on your device and select General > Reset. Scroll down and select Erase All Content and Settings, then tap Erase iPhone. Wait for your device to reset itself and then set it up as a new device from scratch using its default settings.
If you’re trying to unlock an iPhone without the passcode, here’s how:
Resetting the passcode on a newer iPhone is slightly different. First, turn off Find My iPhone in iCloud settings. This will prevent the phone from being locked if it’s lost or stolen in the future. Then, launch Settings on your device and select General > Reset. Scroll down and select Erase All Content and Settings, then tap Erase iPhone (or Erase All). Wait for your device to reset itself and then set it up as a new device from scratch using its default settings.
You can use one of these methods to unlock your phone without the passcode
There are two ways to unlock an iPhone without a passcode. If your phone is not protected by a passcode, then there’s nothing stopping you from simply pressing the home button and seeing if it unlocks. If it does, then great! You don’t have to worry about anything else right now.
If your iPhone is protected by a passcode but you forgot what it was set up as (or if someone changed it), then there are still options available for unlocking it without entering that code.
If you’re looking for a way to unlock your iPhone without using its passcode, then this article is for you. We’ve discussed all of the different options available to you and explained how they work in detail. Hopefully, one of them will work for your situation!
Outline of the Article:
I. Introduction
Importance of iPhone security and the significance of unlocking methods
Brief overview of the methods covered in the article
II. Using Face ID to Unlock iPhone
Explanation of Face ID technology and its setup process
Step-by-step guide on unlocking iPhone using Face ID
III. Unlocking iPhone with Touch ID
Introduction to Touch ID and its fingerprint recognition system
Instructions on setting up and using Touch ID for unlocking
IV. Using Siri to Bypass Passcode
Cautionary note about the risks associated with Siri bypass
Steps to attempt unlocking iPhone using Siri (if applicable)
V. Using iCloud to Remove Passcode
Guide on using iCloud’s Find My iPhone feature to erase the passcode
Detailed steps for remotely unlocking the iPhone through iCloud
VI. Contacting Apple Support
Importance of reaching out to Apple Support for professional assistance
Information on Apple’s verification and security procedures
VII. Conclusion
Summary of the methods discussed and their implications
Emphasis on the importance of iPhone security and responsible unlocking practices
For more visit: How to Unlock an iPhone Without the Passcode? - ITMlab
0 notes
Text
if anyone knows how to get into an iPhone without the passcode without destroying the data PLEASE dm me
3 notes
·
View notes
Text
I had to get a new phone. Which means re-setting all my screen time limits. However, I cannot figure out how to do that on the iPhone 13 without setting up a special 4 digit passcode. I just want it to notify me that time is up and give me the “ignore limit” screen, but it won’t.
4 notes
·
View notes
Text
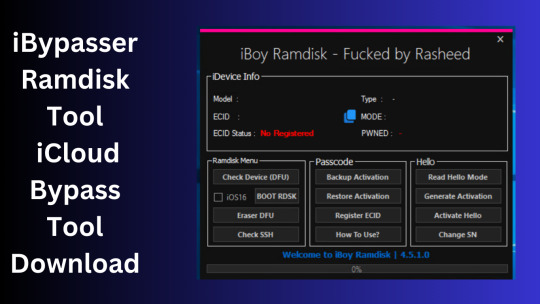
iBypasser Ramdisk Tool V2.7 iCloud Bypass Tool Download
iBypasser Ramdisk Tool V2.7 iCloud Bypass Windows Tool
iBypasser Ramdisk Tool is a powerful application designed to bypass iCloud activation on iOS devices running iOS 11-15 without the need for jailbreaking. It provides various functionalities to disable the passcode, back up files, disable the iCloud account by opening the menu, and retrieve the Apple ID and phone number associated with the device. Additionally, it offers the capability to disable the “Hello” screen using the MEID/GSM signal. Please note that bypassing iCloud activation is not endorsed by Apple and may violate their terms of service.
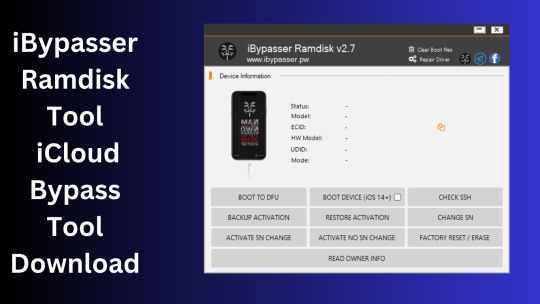
What is iBypasser Ramdisk Tool V2.7?
The iBypasser Ramdisk Tool V2.7 software program was created especially to get around the iCloud activation lock on the iOS device. Customers may use it to give a speedy fix if they find themselves locked out of their devices and unable to access all of the features on their iPhones, iPads, or iPods.
Features iBypasser Ramdisk tool:
Boot Device for iOS 15. x and earlier
Verify SSH
Restore/Backup Activation
Alter SN
Switch on the Hello Device
Go To Owner Info
iOS 15+ (DFU) Data Erasure
Remove Boot File
Changelog!!!
Update: iBypasser Ramdisk AIO v2.0
Resolving boot problems.
DFU Helper was added.
Driver problems were resolved.
Performance augmentation.
How To Use?
You will initially need to register the device’s ECID.
Your MAC notebook should have iBypasser RAMDISK installed. Next, unzip it.
Start your RAMDISK tool after that. then adhere to the directions below.
Enter DFU mode on the iPhone. When you successfully connect your device to DFU mode, the iBypasser RAMDISK Tool will provide you with further alternatives. Activate, Backup Files, Open SSH, Open Proxy, etc.
To open the proxy, type one and press the Enter key. Start SSH by pressing 2; then press 3 to access the backup files.
You may examine the data you successfully backed up on your device in the backup directory.
Second, flash your device with the 3u Tool or iTunes.
Connect your device to DFU mode once you’ve finished flashing it.
Open the proxy after switching the device to DFU mode Type 1. Press 4 again to turn on your gadget.
Readme:
Windows XP, Windows Vista, Windows 7, Windows 8, Windows 8.1, and Windows 10 (32-bit and 64-bit) are all fully compatible with the program.
Create a Backup: If you want to try the tool described above, create a backup of the personal information stored on the Android smartphone or tablet you intend to utilize. Considering that flashing any recovery or firmware has the potential to harm the device.
iBypasser Ramdisk Tool V2.7 iCloud Bypass Tool Download
Click Her
5 notes
·
View notes
Text
Aiseesoft iPhone Unlocker 2025 Fully Activated

Aiseesoft iPhone Unlocker 2025 is a state-of-the-art software solution designed to provide users with a reliable and effective way to bypass the protection of iOS to recover locked, disabled, or forgotten iPhones back to the user. When faced with either a passcode problem, Face ID malfunction, or an Apple ID that is stuck, the advanced algorithms of this tool are the ones that allow the release of the locked iPhone without any data getting lost—this is very good for those who need immediate access or for those who want to reset the device they have bought second-hand.
The 2025 edition comes with AI-powered detection capabilities, facilitating faster and safer operations of unlocking the most recent iOS versions, including the beta ones. The app’s user-friendly design brings an effortless three-step process: connecting, verifying, and unlocking, along with an option to create a backup that will save important data before erasing it. What is more, Aiseesoft’s technology does not resort to brute force, so it acts within the restrictions imposed by Apple.
0 notes
Text
iPhone Unavailable Try Again in 59 Minutes Stuck? Fix It!
When iPhone is unavailable, there are still some effective solutions for iPhone users to unlock it. Some iPhone users may try to enter some possible passcodes or want to use the random passcode to unlock the unavailable iPhone. However, this is not a good solution as it will make situation worse if you keep entering the wrong passcode when you forgot the correct screen lock passcode. If you are now wondering how to unlock iPhone unavailable try again in 59 minutes, this post is the right place where you can find the best ways to unlock your iPhone without knowing any data. Read it on.
0 notes
Text
How to Unlock iPhone Unavailable Screen
youtube
This is caused by entering the wrong password multiple times. Generally speaking, you can just wait for a few minutes or ten minutes. However, if you have completely forgotten your password and multiple attempts to enter the password do not work, there are three methods you can try:
Method 1: The Best Way to Factory Reset iPhone — TunesKit iPhone Unlocker It's a professional tool for iPhone/iPad/iPod unlocking. Whether you want to factory reset iPhone without passcode, reset iPhone passcode, take off screen time without password, or remove MDM restrictions, this software can help you conduct it in 4 simple steps instantly without complex operations. Thanks to its user-friendly interface and easy-to-conduct operations, you can unlock your iOS devices at home within several minutes, even if you don't know relevant knowledge.
· Step 1 Plug your iPhone into the PC · Step 2 Set your iPhone into the DFU/Recovery mode · Step 3 Inspect the device information and download the iOS firmware · Step 4 Factory Reset your iPhone SE without a passcode
Method 2: Factory Reset iPhone via iTunes You can select Restore iPhone in the summary section of iTunes, so you can directly restore factory settings and iTunes will update you to the latest system.
Method 3: Factory Reset iPhone via iCloud Step 1. Head to icloud.com on your mobile phone or PC. Step 2. Tap on the Find My option, and then choose your iPhone Step 3. Click on the Erase iPhone tab to factory reset your iPhone Step 2. Tap on the Find My option, and then choose your iPhone Step 3. Click on the Erase iPhone tab to factory reset your iPhone
After restoring factory settings, you can write down the new password in a memo or notebook to prevent forgetting it again.
0 notes
Text
How Can I Reset My Apple Watch to Fix Performance Issues?

If your Apple Watch is running slow, freezing, or experiencing battery drain, resetting it can be an effective way to restore its performance. Many users in Noida often visit the Apple Watch service center Noida when facing such issues, but a reset might be all you need to get your device back in shape. In this guide, we will walk you through different reset methods and how they can help resolve common performance problems.
Why Reset Your Apple Watch?
Your Apple Watch is a powerful device, but over time, it may slow down due to software glitches, excessive storage use, or outdated firmware. A reset can help by:
Clearing temporary software bugs
Improving battery life
Freeing up storage space
Resolving connectivity issues with your iPhone or Wi-Fi
Types of Apple Watch Resets
There are three main ways to reset your Apple Watch:
1. Soft Reset (Restarting Your Watch)
A soft reset is the simplest way to refresh your Apple Watch without losing any data.
Steps to Perform a Soft Reset:
Press and hold the Side Button until the power off slider appears.
Drag the Power Off slider to turn off your watch.
Wait for a few seconds and press the Side Button again until the Apple logo appears.
This method can resolve minor performance issues without deleting your data.
2. Hard Reset (Force Restart)
If your Apple Watch is frozen or unresponsive, a hard reset can force it to restart.
Steps to Perform a Hard Reset:
Press and hold both the Side Button and the Digital Crown for at least 10 seconds.
Release both buttons when the Apple logo appears.
A hard reset is useful when your watch becomes completely unresponsive.
3. Factory Reset (Erase All Content and Settings)
If your Apple Watch continues to lag or misbehave, a factory reset will restore it to its original settings.
Steps to Perform a Factory Reset:
Open the Settings app on your Apple Watch.
Go to General > Reset.
Tap Erase All Content and Settings.
Enter your passcode if prompted.
Confirm the reset and wait for the process to complete.
A factory reset will remove all data, including apps, watch faces, and settings. Before performing this step, ensure that you have a backup if needed.
When to Visit an Apple Watch Service Center
If resetting your watch does not resolve performance issues, it might be time to seek professional help. For users in Noida, there are several options for Apple Watch repair in Noida. Some common situations where professional service is necessary include:
Screen damage requiring Apple Watch screen replacement Noida.
Persistent battery or charging issues.
Hardware-related malfunctions.
Visiting an Apple authorized service center Noida ensures that you receive genuine repairs and replacements.
How to Improve Apple Watch Performance After Resetting
Once you have reset your Apple Watch, follow these tips to maintain its performance:
Keep your software updated: Regular updates fix bugs and improve efficiency.
Limit background apps: Close unnecessary apps running in the background.
Manage storage: Remove unused apps and clear old messages.
Optimize battery settings: Reduce animations and background refresh to save power.
If you’re still experiencing issues, searching for an Apple Watch service center near me can help you find the nearest location for expert assistance.
Conclusion
Resetting your Apple Watch can resolve many common performance issues, making it run smoothly again. Whether you opt for a soft reset, hard reset, or factory reset, these methods can help fix software glitches, battery drain, and connectivity problems. If the issues persist, seeking Best Apple Watch Service from a professional technician is always a reliable option.
0 notes
Text
Protecting Your Privacy: Tips for Safe & Secure Messaging
In today's digital world, messaging apps have become a crucial part of our daily communication. Whether you're chatting with friends, family, or colleagues, privacy and security should always be a top priority. With the rise of cyber threats, data breaches, and online scams, ensuring that your conversations stay private is more important than ever.
Here’s a detailed guide on how you can protect your privacy and keep your messages secure.
Use End-to-End Encrypted Messaging Apps 🔒 Not all messaging apps provide end-to-end encryption (E2EE), which ensures that only you and the recipient can read the messages. Even the service provider cannot access them.
✅ Popular apps with end-to-end encryption:
Signal Telegram (Secret Chats) iMessage WhatsApp 🛑 Avoid apps that don’t prioritize encryption, as they may store or monitor your conversations.
Enable Two-Factor Authentication (2FA) 🛡️ Two-factor authentication adds an extra layer of security to your account, making it harder for hackers to gain access.
📌 How to enable 2FA:
Go to the app’s security settings Choose Two-Step Verification Add a PIN or backup email for extra security This way, even if someone gets hold of your password, they won’t be able to access your chats without the second verification step.
Beware of Phishing & Scams 🚨 Cybercriminals often try to trick users into revealing sensitive information through fake messages or links.
🔹 Signs of phishing attempts: ❌ Messages from unknown numbers claiming you’ve won a prize ❌ Suspicious links asking you to log in to your account ❌ Requests for personal information like passwords, bank details, or verification codes
✅ How to stay safe:
Never click on links from unknown senders Verify the sender before sharing personal details Use official sources for customer support, not random chat messages
Regularly Review App Permissions 🔍 Many messaging apps request access to contacts, location, microphone, and storage, but not all permissions are necessary.
📌 Steps to check permissions (Android & iOS):
Go to Settings > Privacy > App Permissions Review and disable unnecessary permissions Allow access only when needed 🛑 Be cautious of apps that request access to your camera or microphone without a valid reason.
Turn Off Auto-Backup for Sensitive Messages ☁️ Some messaging apps automatically back up your messages to cloud storage, which may not always be encrypted.
✅ To disable auto-backup:
WhatsApp: Go to Settings > Chats > Chat Backup > Turn Off iMessage (iCloud): Settings > Apple ID > iCloud > Manage Storage > Disable Backup 📢 Why? If your cloud storage is hacked, your private chats could be exposed. Use local storage backups instead for added security.
Lock Your Chats with a Passcode or Biometrics 🔑 Most messaging apps offer a feature to lock chats with a PIN, fingerprint, or Face ID. This adds an extra layer of protection if your phone gets stolen or lost.
📌 How to enable chat lock:
WhatsApp: Settings > Privacy > Fingerprint Lock Signal: Settings > Privacy > Screen Lock Telegram: Settings > Privacy & Security > Passcode Lock Even if someone gains access to your phone, they won’t be able to read your messages without your passcode.
Always Log Out from Shared or Public Devices 🚪 If you ever log into a messaging app on a shared or public device, don’t forget to log out immediately.
✅ Extra steps to stay safe:
Use private browsing mode when accessing accounts Never save login details on shared computers Always log out manually after use 💡 Bonus Tip: If you suspect unauthorized access, change your password immediately!
Keep Your App & Device Updated 🔄 Older versions of apps often have security vulnerabilities that hackers can exploit. Keeping your messaging apps and phone updated ensures you have the latest security patches.
🔹 How to update your apps:
Android: Google Play Store > My Apps & Games > Update iPhone: App Store > Profile > Update All 📢 Pro Tip: Enable automatic updates to always have the latest security improvements.
Use Self-Destructing Messages for Extra Privacy ⏳ Some messaging apps offer self-destructing messages, which delete themselves after a set time. This is useful for private conversations that you don’t want to keep indefinitely.
✅ Apps with self-destructing messages:
Telegram (Secret Chats) Signal (Disappearing Messages) WhatsApp (View Once Mode) If privacy is your priority, enable disappearing messages for confidential conversations.
Be Cautious with Third-Party Add-ons & Bots 🤖 Many messaging apps support third-party bots and plugins, but not all of them are secure.
🛑 Risks of third-party add-ons:
They may collect your data without your consent Some bots can access your messages and contacts Malicious plugins can install malware on your device ✅ Best practices:
Only use verified add-ons from official sources Avoid adding unknown bots to your chats Regularly check app permissions and remove untrusted plugins Final Thoughts: Stay Vigilant & Secure 🛡️ Protecting your privacy and security in digital communication isn’t just about choosing the right app—it’s about being aware and taking proactive steps to safeguard your data.
✅ Key Takeaways: ✔ Use end-to-end encrypted messaging apps ✔ Enable two-factor authentication for extra security ✔ Avoid suspicious links, scams, and phishing attempts ✔ Review app permissions and disable unnecessary access ✔ Keep your apps and phone updated with security patches ✔ Use self-destructing messages for sensitive conversations
💡 Your privacy is in your hands! By following these steps, you can enjoy secure and worry-free messaging.
🔒 Stay Safe. Stay Private. Stay Connected.
0 notes
Text
IMyFone LockWiper pro crack free 2025 Download
DOWNLOAD LINK
iMyFone LockWiper is a software tool designed to help users unlock their phones, typically those running iOS or Android, in situations where the device is locked or inaccessible. It provides solutions for various lock screen issues such as forgotten passwords, Face ID, Touch ID, or any other screen lock methods.
Here are some of the key features of iMyFone LockWiper:
Unlock iPhone/iPad: It can bypass various types of screen locks like 4-digit, 6-digit passcodes, Face ID, or Touch ID without the need to enter the password.
Remove Screen Lock on Android: For Android devices, it can also bypass PINs, patterns, fingerprints, or passwords.
0 notes
Text
Tenorshare 4uKey Password Manager with Crack 2025
DOWNLOAD LINK
Tenorshare 4uKey is a software tool designed to help users unlock and bypass the lock screens on iPhones, iPads, and iPods. It’s useful for people who have forgotten their passcodes, are locked out of their devices due to multiple incorrect attempts, or have purchased second-hand devices that are locked. 4uKey offers solutions for removing screen locks, Apple ID accounts, and bypassing other security restrictions, making it a helpful tool for device recovery.
Here’s a more detailed look at Tenorshare 4uKey:
Key Features of Tenorshare 4uKey:
1. Unlock Screen Passcodes
Remove iPhone/iPad Lock Screen: If you’ve forgotten your device's passcode or are locked out due to repeated incorrect attempts, 4uKey can remove the lock screen without needing to input the code. It supports all iOS devices (iPhone, iPad, iPod Touch).
1 note
·
View note
Text
How to Add Cash App Card to Apple Wallet?
Today, the Cash App is used by over 55 million people, most of whom are US citizens who use it daily. No wonder since the Cash App offers so many handy perks. It helps you handle your taxes, spend and save on your best-loved brands, or pay anyone easily. As a Cash App user, you can get exclusive discounts, buy and sell Bitcoin, and even delve into the stock market world. Do you want to know how to add Cash App to Apple Pay and benefit from the faster, simpler way of banking? Then, keep reading.
How to Adding Cash App to Your Apple Pay Wallet?
Wondering how to add Cash App to Wallet without a card? Follow these instructions on your iPhone or any other Apple device:
Launch the Cash App on your Apple phone.
On the main screen, tap the Cash Card tab, which looks like a little credit card.
Click on your Cash Card image.
Select "Add Card to Apple Pay" right below.
The "Add Card to Apple Pay" screen will pop up. Click on your device's name, and the adding process will start.
Agree to the terms and conditions. Otherwise, you won’t be able to add a Cash App Card to Apple Pay.
Once the process is completed, you will receive a notification with a blue checkmark that the Cash Card has been added to your Wallet.
Next, you can set a Cash Card as a Default Card in your Wallet or choose "Not Now."
Another way to add Cash App to Apple Wallet is from your Apple Wallet. However, before getting started and figuring out how to add Cash App to Wallet, make sure you have the latest version of the Cash App.
Open Apple Wallet on your iPhone or other Apple device by tapping on the Wallet app icon.
Tap on the "Add Card" option.
You can either scan your Cash App Card or enter the card details manually.
Next, you must verify your card for security purposes. You can do this either by text message or phone call to the number associated with your Cash App account.
When the card is added, you will see it in your Apple Wallet list.
If you are an Android user, you can add a Cash App Card to your Google Wallet. To do this, you have to have a Google Pay Account:
Open your Cash App and click a card icon.
Click "Add Card to Google Pay."
You will see a message: "Use this card with Google Pay."
Click "Continue."
Enter your information and click "Continue."
Agree to the Issuer Terms.
Here is another way to add your Cash App Card to Google Pay:
Open Google Pay and select "Manage Accounts."
Select the "Payment Methods" option and tap "Add card."
Scan your card details or type them in.
Click "Save" button.
Your Cash App account is now enlisted in your payment methods.
How You Can Top Up Apple Pay with Cash?
Since Apple Pay is an e-wallet using banking cards for touchless payments, you can't add cash directly to it. You either need to add a card to Apple Pay or use funds from Apple Cash, which acts similarly to a prepaid debit card. So, firstly, you need to top up your Apple Cash balance.
First, install the Apple Cash on your device.
Go to the Wallet app.
Click on your Apple Cash card.
Tap "More" and then "Add money."
Type the sum of money and tap "Add." The minimum is $10.
Verify the transaction via passcode, Face ID, Touch ID, or Optic ID.-
What are the Reasons for Failing to Add Cash App Card to Apple Pay
When adding Cash App to your Apple Pay, you can come across a couple of issues. Here are some of them.
Card Activation Issues
Remember that your Cash App Card requires proper activation. To avoid any possible issues.
Unsupported Device
Verify if your gadget supports Apple Pay. In general, Apple Pay requires at least iPhone 6, iPad Air 2, Mac with Touch ID, and Apple Watch Series 1. If you are not sure whether your device is compatible with Apple Pay.
Outdated iOS version
To ensure your iPhone has been updated to the latest version, go to Settings > General > Software Update. Select Automatic Updates and click on Download iOS Updates. Then select Install iOS Updates. However, some updates can only be installed manually.
Outdated Applications
Ensure that the Cash App and Apple Wallet applications are up-to-date on your smartphone. Check if the new updates are available in your App Store. If you see the Cash App or Wallet app on the list, tap on the "Update" button next to the icons.
Incorrect card information
When entering your card details, such as the card number, expiration date, and CVV, double-check you have done it correctly. Otherwise, you may fail to add a Cash App card to your Apple Pay.
Apple Pay is not available in your location
Check to make sure Apple Pay is available in your location. The countries and regions that support Apple Pay.
Restrictions by Bank or Issuer
Your bank or card issuer may not allow you to add the card to Apple Pay. A bank might have security concerns or internal policies dictating which services they support. Also, the bank's systems simply might not be compatible with Apple Pay.
How Much Time You Need to Transfer Money from Cash App to Apple Pay
There is no direct way of sending money from Cash App to Apple Pay. You can only do it by transferring a balance to a bank account first or just adding a Cash App Card to Apple Pay, and this will affect the time needed.
If you add the Cash App to Apple Wallet, it’ll be faster. It usually takes just a few minutes. This streamlined process allows you to use your Cash App Card with Apple Pay for contactless payments and online transactions in no time.
The second option is to transfer the Cash App balance to a bank account before Apple Pay, which is done in two steps.
Transfer from Cash App to a Bank Account:
Open the "Money" tab in your Cash App.
Press "Cash Out" and enter the amount you want to transfer.
Choose the deposit speed (Instant or Standard).
Confirm the transfer.
Transfer from Bank Account to Apple Pay:
Open the Wallet app.
Tap the Apple Cash card, then click on the "More" button.
Select "Add Money" and select the bank account.
Confirm the amount of money.
Complete the transfer process.
Transferring your Cash App amount to the relevant banking account can take up to 3 working days. Moving money to an Apple Pay account will take approximately 1 to 2 business days.
0 notes
Text
youtube
Welcome to our tutorial on unlocking Screen Time without your passcode – methods that work on all iPhone and iPad models and versions.
0 notes
Text
How do I Send Money from Apple Pay to Cash App?
Are you wondering how to send money from Apple Pay to Cash App? Apple Pay is a widely used payment method among iPhone and Mac users alike, while Cash App provides peer-to-peer transfers, Cash Cards, and Bitcoin. Although both services are widely utilized, moving funds from one to another can be challenging due to separate platforms- there is no immediate way of transferring funds between Apple Pay Cash App. But there are strategies you can use: For instance, moving Apple Pay funds onto an iPhone or iPad so they reach their intended destination - before moving them again into Cash App.

Cash App's "Add Cash" function requires money transferred from Apple Pay into Cash App be first withdrawn from either your device's debit card or bank account before it can be added back in, making this workaround convenient for people with money already sitting in their bank accounts. Simply tap on the Wallet icon in Cash App to send money with your balance before selecting recipient and amount before authenticating with Touch ID/Face ID/or passcode verification to complete quickly without fees. So, let’s begin and learn more about how to transfer Apple Pay to Cash App.
How to Send Money from Apple Pay to Cash App?
As these ecosystems differ significantly, transferring money directly from Apple Pay into Cash App may not be possible. However, you can take alternative route and send money from Apple Pay to Cash App by taking the steps mentioned below:
Step One: Transfer Funds from Apple Pay to Your Bank- Transferring money from Apple Pay into Cash App begins by moving funds between linked accounts. To do this, please follow these steps:
Open the Wallet App on Your iPhone.
Choose Apple Cash from your list of cards within your Wallet app.
Please click the Apple Cash Card, followed by three dots located at the top-right corner.
Select Transfer to Bank and enter the amount you wish to transfer - be it partial or total balance transfer.
Once the transfer has been completed, your funds will appear in your account.
Step Two: Link Your Bank Account to Cash App: If you have not done so already, link your bank account with Cash App now - here is how to do it:
Click on the Bank Icon at the bottom-left corner of your home screen to open your bank account.
Select "Linked Accounts," then tap Add Bank.
Enter your bank details (Account, Routing Numbers etc).
Verify that everything is in order.
Step 3: Transfer funds from your bank account to Cash App: Now you can transfer money directly from Apple Pay to Cash App accounts. Here is how to move money from Apple Pay to Cash App:
Tap the Bank Icon in Cash App.
Add Funds.
Please enter the amount that you wish to transfer.
Wait for your money to appear in your Cash App account.
Apple Pay makes money transfer easy: your linked bank account allows for swift funds transfers from Apple Pay.
How to Transfer Apple Pay to Cash App Directly?
It is not possible to transfer money from Apple Pay to Cash App directly. However, there are alternative methods available. For instance, you can use a debit card for faster transfers. Apple Pay can be linked directly with a debit card and added directly into Cash App for sending money directly. No need for banks.
How it Works: Your Cash App account will be linked with your debit card.
Cash App makes it simple and safe to add funds using any debit card linked with Cash App.
Apple Pay can quickly transfer funds directly to Cash App without the need to involve banks.
How to send money from Cash App?
If you want to send money using Cash App, you need take the steps mentioned below:
Open the Cash App on your phone.
Tap on the dollar symbol ($) at the bottom of the screen.
Enter the amount you want to send.
Enter the recipient’s email address, $Cashtag or phone number after clicking “Pay”
At last, recheck all the details and confirm the transfer.
How to transfer money from Cash App to Bank Account?
To transfer money from Cash App to your bank account:
Tap on the Banking Tab in the Cash App.
Here click on the “Cash Out” option
Next enter amount that you want to transfer and your linked account.
The funds will be deposited in your account once you confirm the transaction.
How can I receive money through Cash App?
You can easily receive money through Cash App by taking the steps mentioned below:
First share the recipient your details such as Cash App account number, $Cashtag or phone number.
You will be notified when they send you money and funds appear in your Cash App account.
You can then choose to leave the money in Cash App or transfer it to your linked bank account.
How to transfer money from Chime to Cash App?
Here is how to transfer money from Chime to Cash App:
First of all, link your Chime account to Cash App using your Chime debit card or routing/account numbers.
Next open the Cash App and click on the “Add Cash”
Choose the Chime account to which you want to transfer the funds.
At enter the amount and confirm transfer.
Can you send money from Zelle to Cash App?
No, you cannot send money from Zelle to Cash App directly. Zelle and Cash App do not allow direct transfers between each other. However, you can use an alternative method. For this you can link your Zelle account with your bank and then send money to Cash App from your bank. Moreover, you can even link a debit card to both platforms so that transfers are seamless.
How to transfer money from Cash App to Chime?
For transferring money from Cash App into Chime, you need to take the steps mentioned below:
Cash App allows you to link your Chime account with Cash App.
Tap the "Banking tab" in Cash App.
Choose "Cash out" and enter the amount that you want to transfer.
Select your Chime account linked to complete the transfer.
How to send money from Cash App to Venmo?
Cash App and Venmo do not directly allow money transfers. You can send money to Venmo by transferring funds from Cash App into your linked bank account. Here is how to transfer money from Cash Ap to Venmo:
Venmo allows you to link your Cash App card, bank account or debit card.
You can withdraw money from Cash App into your linked bank account.
Venmo allows you to transfer funds from your bank account.
FAQ
Can you send money from Apple Pay to Cash App?
No, you cannot directly send money from Apple Pay to Cash App, however you can do it by linking a bank account or through debit card.
How do I transfer Apple Pay to Cash App?
Transferring money from Apple Pay into Cash App requires first transferring it from Apple Pay directly into one or more linked bank accounts, and then from these linked accounts into Cash App.
How to add Apple Pay to Cash App?
Apple Pay cannot yet be added directly to Cash App; however, you can link any Apple Pay-associated debit card or bank to Cash App to speed up transfers.
Can you send money from Cash App to PayPal?
Cash App and PayPal may both be separate platforms, but you can send money from Cash App directly into PayPal by first sending it through a bank transfer.
Can I move money from Chime to Cash App?
Chime Accounts can be linked with Cash App and transferred using the same steps as linking banks.
Can I send money from Cash App to Venmo?
Cash App does not offer a direct method for transferring funds directly to Venmo; however, you may transfer them through to your bank first before sending from there directly into Venmo.
How can I transfer funds instantly from Apple Pay to Cash App?
Although there is no direct way to transfer money between Apple Pay and Cash App, instantaneous transfers can still take place by linking a debit card.
How can I transfer funds via Cash App?
To transfer funds via Cash App simply enter your $Cashtag, phone number or e-mail address and Cash App will notify you as soon as your money has arrived in your account.
0 notes
Text
Looking for a quick and easy way to unlock iPhone without passcode? Instead of struggling with complex steps, a professional iPhone unlocking tool like TunesKit iPhone Unlocker can help you regain access to your device in just minutes.
With stable performance and exceptional flexibility, TunesKit iPhone Unlocker effortlessly handle various screen lock issues on our test, including iPhone Unavailable, black screen, unresponsive screen, etc. It supports unlocking all types of screen locks - 4-digit and 6-digit passcodes, Touch ID, and Face ID, etc. - without any restrictions.
0 notes
Text
How to Remove Previous Owner Apple ID without Password
youtube
If there is no information about the original owner, then iTunes and iCloud should not be able to log in, and it will not be possible to erase the iPhone through them.
I recommend you to use TunesKit iPhone Unlocker
When you try to unlock your iPhone but forgot the correct passcode, using TunesKit iPhone Unlocker can be the best choice. It only takes four steps to solve the problem of forgetting iPhone Passcode, and no Apple ID password is required:
Step 1: Connect iPhone to Computer
Step 2: Put iPhone into Recovery Mode
Step 3: Download Firmware Package
Step 4: Fix iPhone Unavailable Try Again in 5 Minutes
0 notes