#image to PSD conversion
Explore tagged Tumblr posts
Visit Tumblr Blog
Explore Tumblr blogs with no restrictions, modern design and the best experience.
Last Seen Tumblr Blogs


Fun Fact
Tumblr has 16.74 million mobile monthly users in the US.
Text
Converting Sketch files to PSD involves translating the vector-based design elements of Sketch into the pixel-based structure of Photoshop. This process can be complex, and the results may vary depending on the complexity of the Sketch design.
0 notes
Text
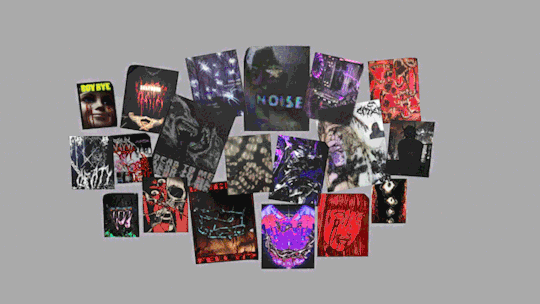
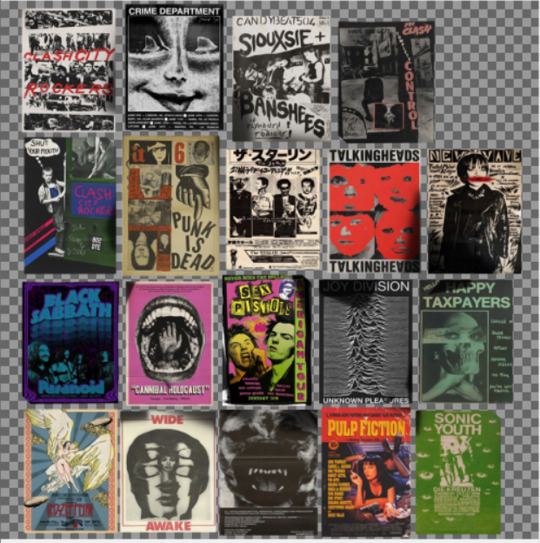
4t3 Conversion of Grouped posters by @cosmiccs4 + Recoloring PSD with tutorial
8 non-recolorable presets
1024 textures
Included PSD for retexturing (tutorial how to use under the cut)
113 poly, all LODs
Shiftable
Price - 5§
BGC
Compressed package
TOU, Ko-Fi

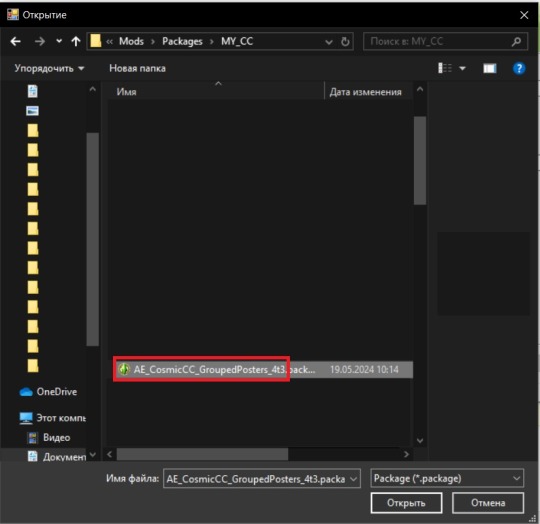
DOWNLOAD | ALT | SIMBLR.CC
Tutorial: How to use my PSD for retexturing
You need:
Photoshop with .dds plugin
My retexture PSD and package file of posters
19 pictures to your liking, preferably vertical
TSRW
Sims3Pack Multi Installer and Compressionizer
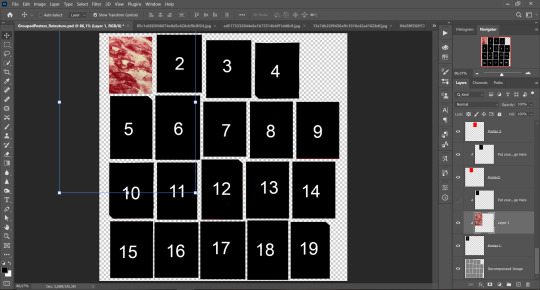
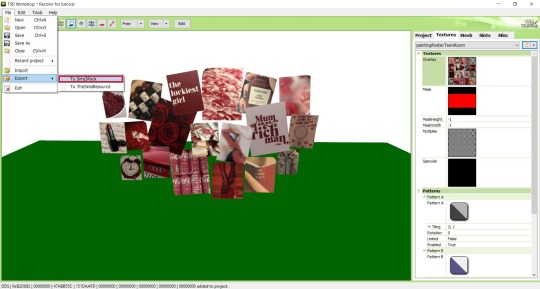
Step 1: Open my PSD file, open your images:
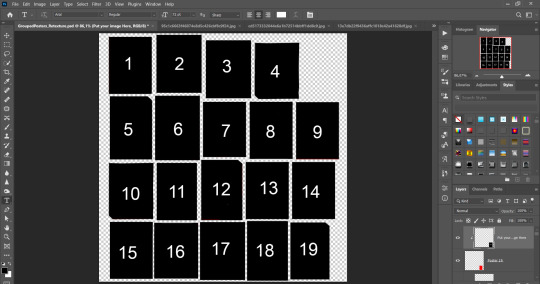
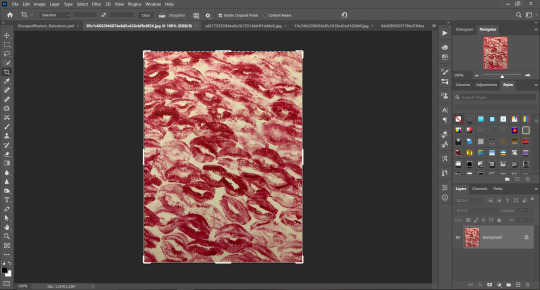
Step 2: Select (Ctrl+A) copy and paste to posters file (Ctrl+C, Ctrl+V) first of your images :
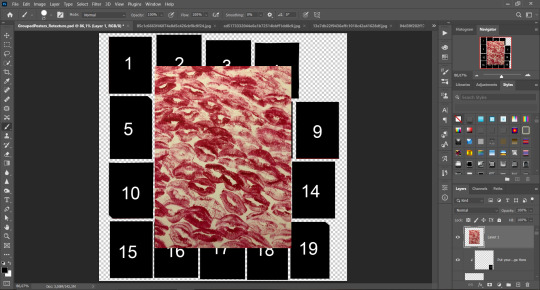
Step 3: Choose where you want to put it, for reference you can use one of the presets:
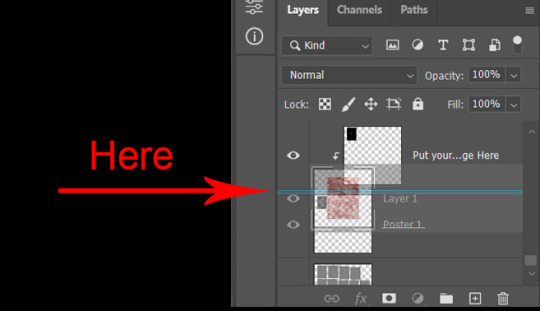
Step 4: After you decided with placement of your image. Move its layer in the Layers tab between "Poster x" and "Put your image here" layers, it will create a clipping mask, which allows the picture to be fit within the poster without cropping. Hide or delete "Put your image here" layer.
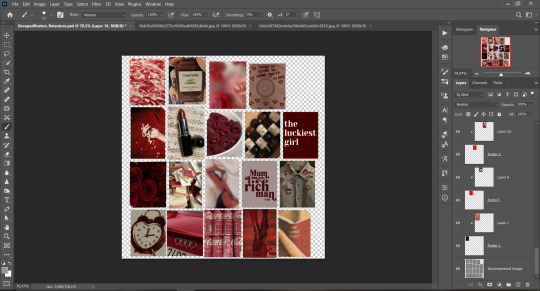
Step 5: Use Transform, Free Transform and Move tools to resize the image by your liking:

Step 6: Repeat the Step 2-5 with other 18 images:
*vibes are totally random, all images from Pinterest*
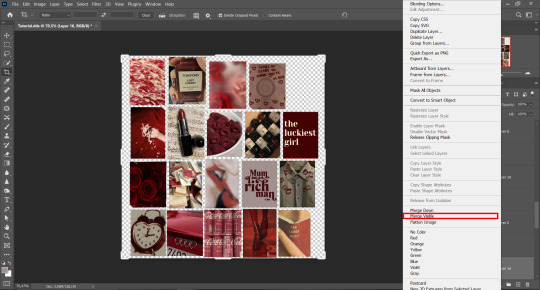
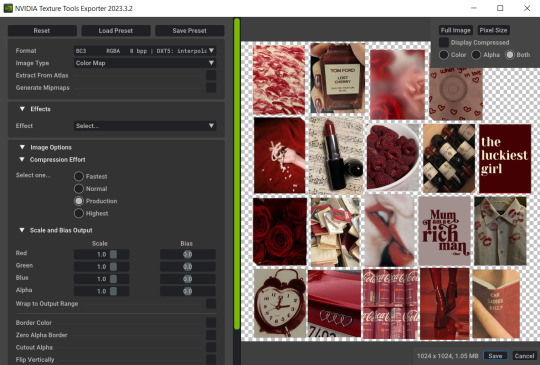
Step 7: After you've done, delete all the "Put your image here" layers, if you didn't it before. Right-click on the Layers tab and press Merge Visible (Shift + Ctrl + E). Now press Save As (Control + Shift + S) and save your image as .DDS with this parameters (2nd picture):
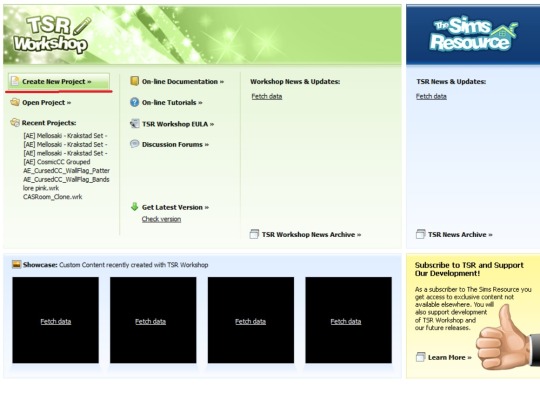
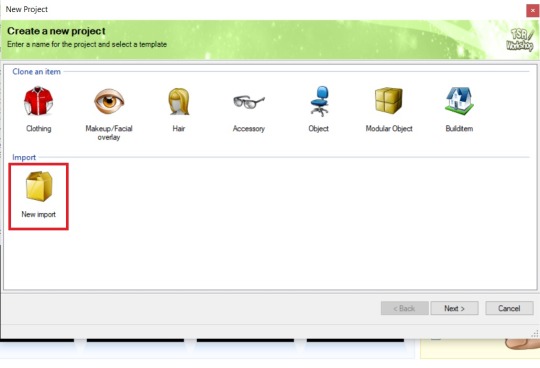
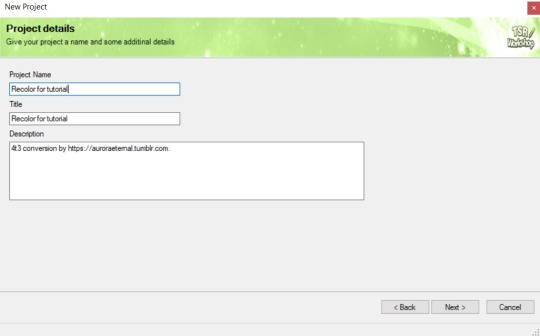
Step 8: Go to TSRW. Press Create New Project > New Import, and select package with my posters. Give for your recolor unique Title and Project name, otherwise it will override original posters:
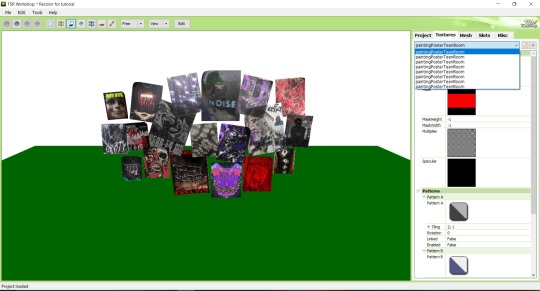
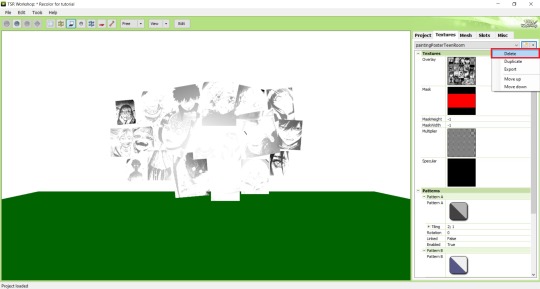
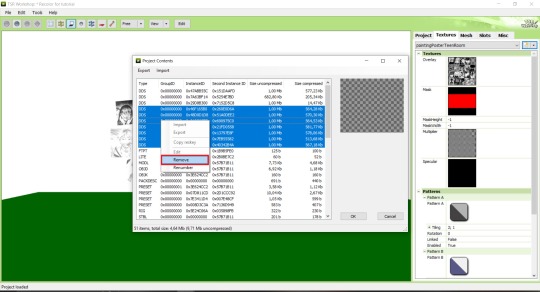
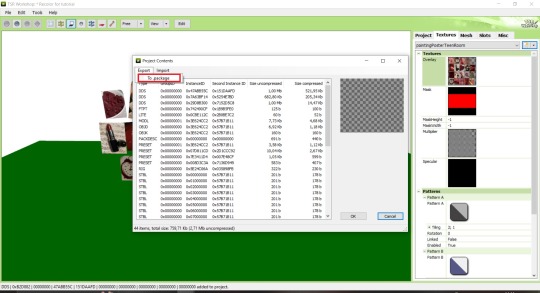
Step 9: In Textures tab go through all the presets except the first one and delete them. Then go to Edit > Project Contents and remove all the textures of removed presets. Its pretty common when someone make retexture of TS3 mesh and leave that unused textures in file, which leads to increasing its size:
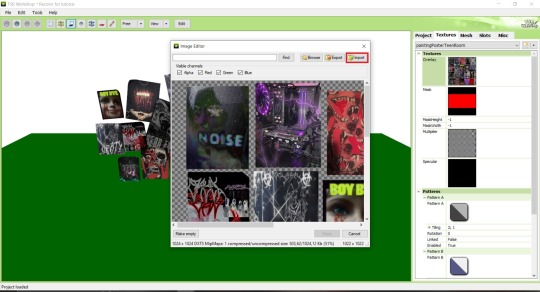
Step 10: Press Edit button next to the Overlay tab. Then press Import button and select your retexture. Press Done and when this pop-up appears, press Yes:
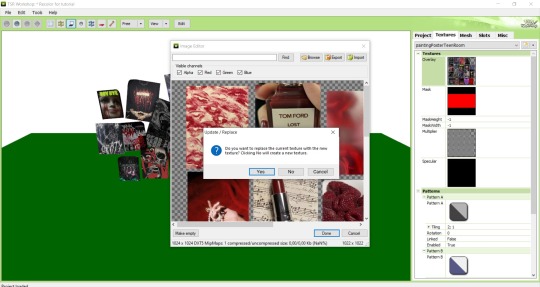
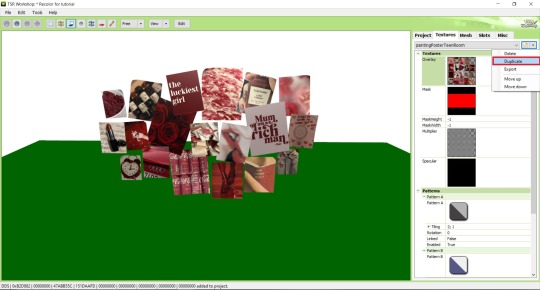
Step 11: If you want to add more presets press Duplicate and reapeat Step 10, but instead, when pop-up about replacing the texture appears, press No.
Step 12: After you've done, press File > Export > To Sims3pack or Edit > Project Contents > Export > To .package. If you choose the first method, convert your Sims3pack to Package and in both cases run it through Compressionizer. Test your recolor In-game, make thumbnails (if you want to share it) and have fun!
For those who read this tutorial to the end, click HERE to download this recolor.

@pis3update @xto3conversionsfinds @wanderingsimsfinds @kpccfinds @simfluencer-network @sssvitlanz @simblrcc-site
889 notes
·
View notes
Text
Gaming GIF Tutorial (2025)
Here is my current GIF making process from video game captures!

PART 1: Capturing Video
The best tip I can give you when it comes to capturing video from your games, is to invest in an injectable photomode tools - I personally use Otis_Inf's cameras because they are easy to use and run smoothly. With these tools, you can not only toggle the UI, but also pause cutscenes and manually change the camera. They are great for both screenshots and video recording!
As for the recording part, I personally prefer NVIDIA's built-in recording tools, but OBS also works well in my experience when NVIDIA is being fussy.
PART 2: Image Conversion
Do yourself a huge favour and download PotPlayer. It is superior to VLC in more ways than one in my opinion, but is especially helpful for its Consecutive Image Capturer tool.
Open the video recording in PotPlayer, and use CTRL + G to open the tool. If this is your first time, be sure to set up a folder for your image captures before anything else! Here are the settings I use, albeit the "Every # frame" I change from time to time:
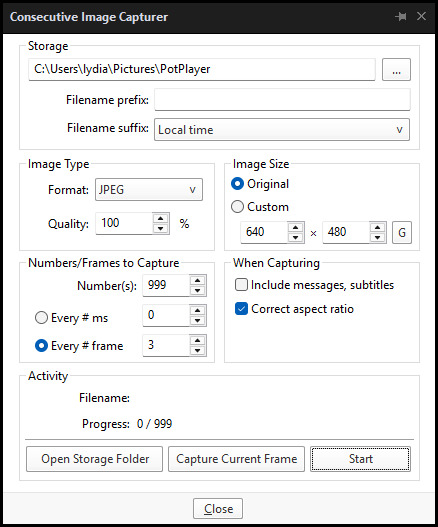
When you're ready, hit the "Start" button, then play the part of the video you want to turn into a GIF. When you're done, pause the video, and hit the "Stop" button. You can then check the images captured in your specified storage folder.
(TIP: Start the video a few seconds a head and stop a few seconds after the part you want to make into a GIF, then manually delete the extra images if necessary. This will reduce the chance of any unwanted cut-offs if there is any lagging.)
PART 3: Image Setup
Now, this part I personally always do in GIMP, because I find its "Open as Layers" and image resizing options 100% better and easier to use than Photoshop. But you don't have to use GIMP, you can do this part in Photoshop as well if you prefer.
Open the images each as an individual layer. Then, crop and/or scale to no more than 540px wide if you're uploading to Tumblr.
(TIP: This might just be a picky thing on my end, but I like to also make sure the height is a multiple of 10. I get clean results this way, so I stick to it.)
If you use GIMP for this part, export the file as .psd when done.
PART 4: Sharpening
If you use GIMP first, now it's time to open the file in Photoshop.
The very first thing I always do is sharpen the image using the "Smart Sharpen" filter. Because we downsized the image, the Smart Sharpen will help it look more crisp and naturally sized. These are the settings I mostly use, though sometimes I change the Amount to 200 if it's a little too crunchy:

Here's a comparison between before and after sharpening:


Repeat the Smart Sharpen filter for ALL the layers!
PART 5: Timeline
First, if your timeline isn't visible, turn it on by click on Windows > Timeline. Then, change the mode from video to frame:

Click "Create Frame Animation" with the very bottom layer selected. Then, click on the menu icon on the far-right of the Timeline, and click "Make Frames from Layers" to add the rest of the frames.
Make sure the delay should be 0 seconds between frames for the smoothest animation, and make sure that the looping is set to forever so that the GIF doesn't stop.
Part 5: Editing
Now that the GIF is set up, this is the part where you can add make edits to the colours, brightness/contrast, add text, etc. as overlays that will affect all the layers below it.
Click on the very top layer so that it is the one highlighted. (Not in the timeline, in the layers box; keep Frame 1 highlighted in the timeline!)
For this example, I'm just going to adjust the levels a bit, but you can experiment with all kinds of fun effects with time and patience. Try a gradient mask, for example!
To test your GIF with the applied effects, hit the Play button in the Timeline. Just remember to always stop at Frame 1 again before you make changes, because otherwise you may run into trouble where the changes are only applied to certain frames. This is also why it's important to always place your adjustment layers at the very top!
Part 6: Exporting
When exporting your GIF with plans to post to Tumblr, I strongly recommend doing all you can to keep the image size below 5mb. Otherwise, it will be compressed to hell and back. If it's over 5mb, try deleting some frames, increasing the black parts, or you can reduce to number of colours in the settings we're about to cover below. Or, you can use EZGIF's optimization tools afterwards to reduce it while keeping better quality than what Tumblr will do to it.
Click on File > Export > Save for Web (Legacy). Here are the settings I always use:

This GIF example is under 5mb, yay! So we don't need to fiddle with anything, we can just save it as is.
I hope this tutorial has offered you some insight and encouragement into making your own GIFs! If you found it helpful, please reblog!
135 notes
·
View notes
Text
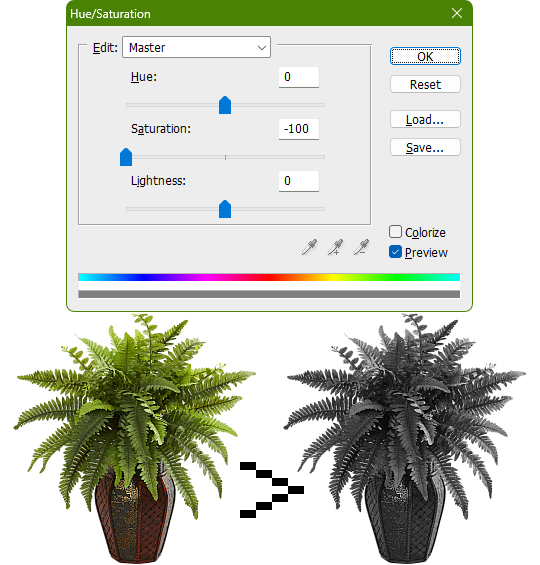
Tidbit: The "Threshold" Effect of Desaturated Objects Due to Increased Contrast
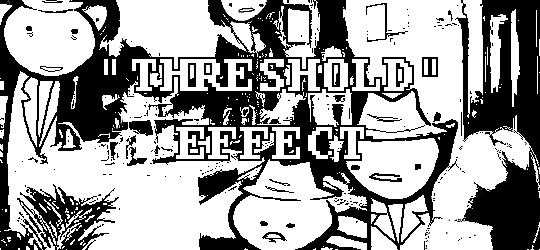
If you've ever asked how to replicate an effect like this...
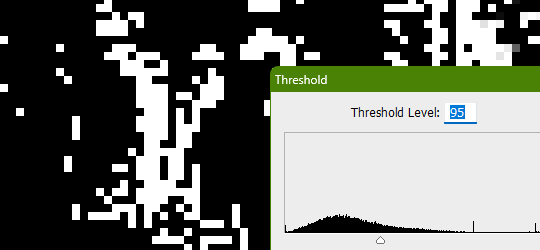
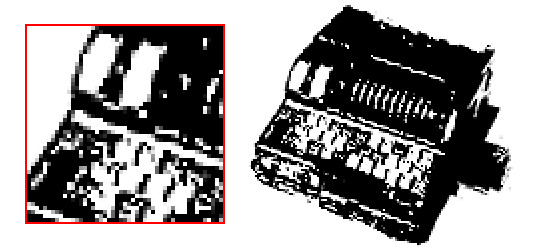
...it's likely someone told you to apply the threshold filter, which converts any light colors to pure white, and any dark colors to pure black. And it's perfectly fine to do so. It's simple, straightforward, efficient. But I take issue with the assertion that it's definitively the only conceivable way Hussie did it when the evidence points to the contrary. Scrutinize the following examples under a microscope:
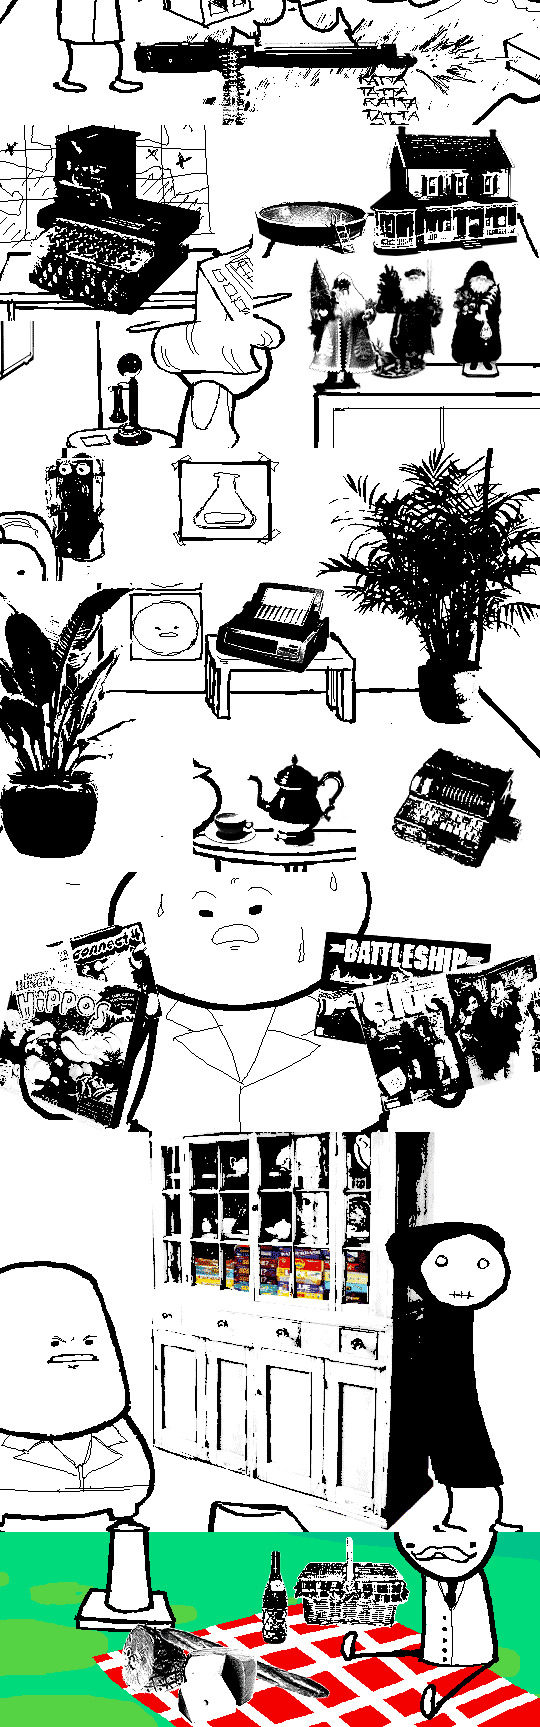
Did you see it? The singular detail that distinguishes these images from ones that have been thresholded? Congratulations if you noticed that these contain not only black and white pixels, but GRAY pixels as well! A threshold filter's conversion is binary; a pixel is either black, or it is white. No in-between. The presence of these gray values rules out its use, then.
One thing is clear, at least: these images are black and white in the traditional sense of the term, i.e. "grayscale", even if it's in drastic form. They've been stripped of any color, hue, chroma. Completely desaturated, in other words.
So from this observation, we can reason that they were converted to be grayscale at some point in the process of editing.
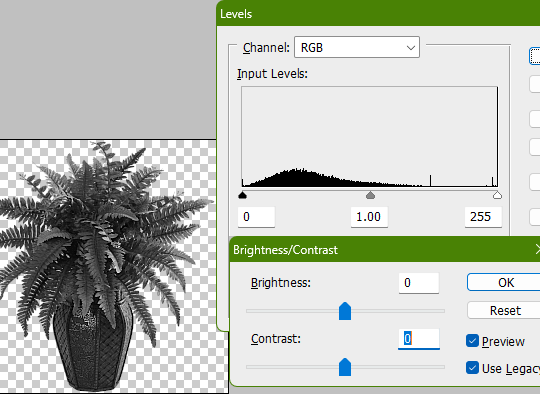
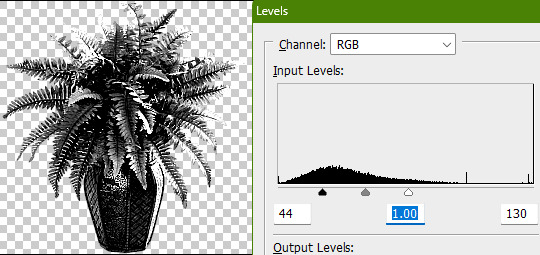
Of course, this is still lacking in the pure black and pure white departments. If only there was a way to adjust the intensity levels and push them both to their extremes... oh wait, THERE IS! Using the Levels adjustment tool!
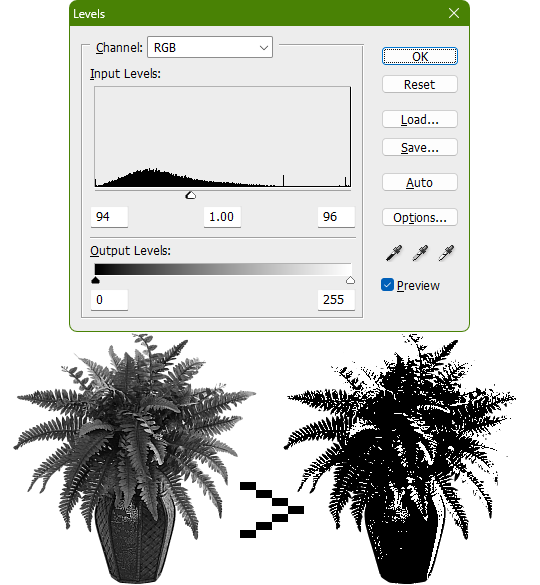
Pushing the black input levels slider to the right makes all dark colors turn darker, and conversely, pushing the white input levels slider to the left makes any light colors turn lighter. This is a great way of increasing the contrast and adjusting the brightness. Speaking of which, the Brightness/Contrast adjustment tool in Photoshop with "Use Legacy" enabled also accomplishes a nearly identical effect.
This timelapse demonstrates how the Brightness/Contrast adjustment is basically equivalent to using the Levels one when used this way
I say nearly identical because raising the contrast all the way to 100% with Brightness/Contrast makes it actually identical with the Threshold adjustment tool. The black and white input levels sliders can't fully join in the middle because of the gray input level slider occupying the space, hence why there are some stray gray pixels even when pushing them to their limits.
Well, there could be several reasons explaining why there could be gray pixels other than the contrast not being high enough to clip them, but I'll spare you another needlessly complicated and overly technical rambling on how I can tell it's most definitely the Levels adjustment tool always.
This post is getting a little long, so I'll stop here and elaborate a little more on pertinent things under the read more link, like semi-opaque pixels, scaling down, sharpening, and the gamma slider. Also here's the potted plant PSD if you wanna check it out I guess.
ADDENDUM
Semi-opaque pixels
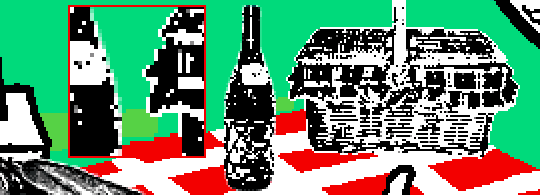
When separating objects from a background, it's usually easiest to do so with a magic wand selection tool, which selects regions of similar colors. There's an option to make the selection anti-aliased, smoothing the edges of whatever you've cropped. Unchecking it will make the pixels hard and jagged. The wine bottle and picnic basket are a good example of each, respectively.
If you've already cropped out something with anti-aliasing enabled, there's still a way to sharpen the edges after the fact. Duplicating the layer multiple times will increase the semi-transparent pixels' opacity. Do it enough times and they'll eventually become completely opaque. An analogy would be stacking multiple panes of tinted glass on top of each other. Stack enough of them and you wouldn't be able to see through anymore.

These semi-opaque black pixels would appear gray on a white background, and so would semi-opaque white pixels on a black one. That's the reason for the gray pixels around the edges on some of these examples.

Scaling down/Sharpening
Suppose you've already gone ahead and went through the whole rigamarole of editing the object to be black and white before deciding firmly on the size of it in your composition, and now you think it could be a little smaller. You could always resize it and scale it down, but with the interpolation method set to none/nearest-neighbor, it's going to look kind of shit, and with it set to something else like bilinear or bicubic, the anti-aliasing is going to make it a bit blurry (introducing these gray values). You could increase the contrast again, or you could use the Sharpen filter to do it.
Not to suggest that this particular example was scaled down after editing, it's just the one that looks closest to it since I'm too lazy to make one.

Sharpening repeatedly will bump up the contrast, plus Photoshop's Sharpen filter has the added benefit of hardening any semi-opaque pixels as well, making the edges sharper.
GIMP's Sharpen filter doesn't do that latter part, unfortunately, but if the layer has an opaque white background, it'll do the same.
Gamma slider
This effect might not be so obvious, but really take a good look at these board games:
Actually, maybe this Problem Sleuth bonus panel shows what I mean better:

The dark values are cranked up very high, and so are the light values a bit, but there's an inordinate amount of midrange values that are on the lighter side than what would be normal. That's because of the midtones input levels slider, the gray slider, the gamma slider, whatever.

I'm toot tired to explain any more than that, so make of that what you will. The end.
481 notes
·
View notes
Text
Watchmen Shades - 4t2 Sunny Shades Recolors in Watchmen
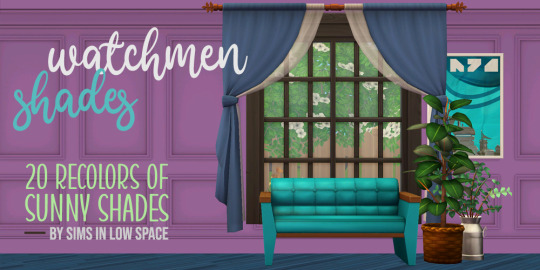
Happy Friday everyone! Here's another set of Sunny Shades curtain recolors! Details and download below. 🦉
Here are my 4t2 Sunny Shades conversion recolored in Watchmen. I messed up the preview image and I don't have the PSD to edit right now, so I can't fix it yet, but it should read 25 colors, because that's what you get (truly, Sarah, thy name is Spacey 🤦🏻♀️):
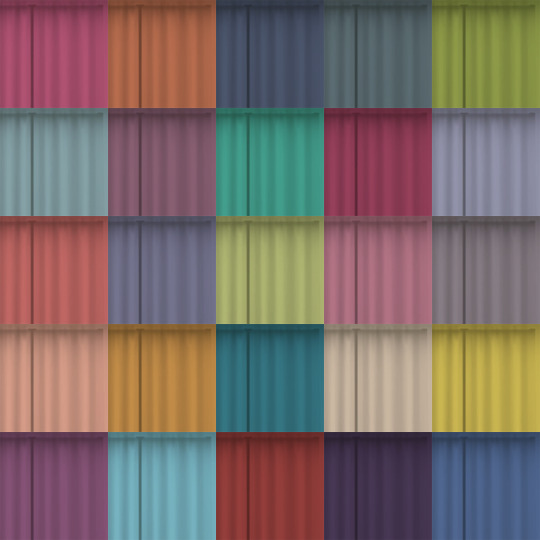
A numbered swatch is included. The meshes are not included, so make sure you grab those here.
DOWNLOAD (SFS) Recolors are ~3.5MB
Still behind on messages, still behind on my projects, but I'm hoping to have more goodies to share this weekend, plus some fixes for a couple of objects I borked in the process of relearning how to convert. Yeah. 🗑️🔥😎 Thanks for your patience and support; I appreciate all of you!
Lots of love, Spacey
#ts2cc#s2cc#ts2 download#ts2 custom content#sims 2 download#sims 2 custom content#s2 cc#ts2#ts2 curtains
188 notes
·
View notes
Text
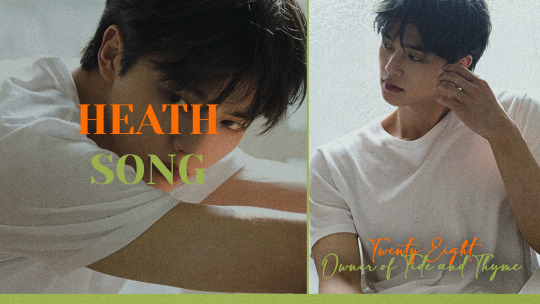
❀ you’re not from around here , are you? i figured because you totally just missed HEATHCLIFF 'HEATH' SONG walking by. don’t tell me you don’t know who HE is ? they kind of look like SONG KANG and i could be wrong but i think that they might be TWENTY EIGHT years old right now. they’ve been living in palmview for the last TWENTY YEARS. and i don’t know if anyone has ever told them this before but they kind of remind me of HOWL JENKINS PENDRAGON from HOWL'S MOVING CASTLE. if you stick around the town long enough you might catch them in action working at TIDE AND THYME as the OWNER. you see this town isn’t really that big of a place, some folks like to call them the LITTLE PRINCE of palmview! they took a liking to the name too after a while, go figure. oh crap, they must have heard me yapping. they’re coming this way. i got to warn you though, rumor has it they can pretty MELODRAMATIC at times. i wouldn’t take it too seriously though, from the times i’ve spoken to them they seemed pretty CHARISMATIC to me. we see each other all the time since they live in that FOUR BEDROOM cottage beside me over in 402 SPRING STREET. i better leave you to it. it was nice meeting you! psd credit.
★ statistics.
full name: heathcliff syriacus song. nickname(s): heath. age: twenty eight. date of birth: 7th july. star sign: cancer. sexual orientation: pansexual. romantic orientation: panromantic. hometown: daegu, south korea. occupation: owner of tide and thyme. ethnicity: korean. nationality: korean-american. inspo: howl jenkins pendragon (howl's moving castle), cat noir (miraculous ladybug), nate archibald (gossip girl).
★ personality.
there are two distinct sides to heath. first, is the one he shows to the world. handsome, charming, put-together… he talks with a suaveness that is almost unparalleled, his smile could end wars, his tendency to talk in circles is endearing rather than frustrating. he's practically an expert flirt, with it being second nature to him, as natural to him as laughing or breathing. perhaps it's those carefully curated looks of his, or the tone of his speech, whatever it is, to most of the world, heath seems almost princely in nature. the second, is the boy beneath. melodramatic, whiny and childish. he doesn't handle hard emotions very well and, instead, chooses to avoid them any way possible. perhaps that's why he has such a long string of short-lived, meaningless relationships, perhaps that's why he chooses to charm his way out of conversation rather than face it, perhaps that's why he's been dyeing his hair a shade or two darker for the last five years and doesn't want anyone to know about it. sometimes, the childishness gives way to carelessness, and he can end up in situations that are perhaps a tad dangerous or reckless, and it's then that his immaturity truly shines. it's hard for some people not to think that heath is something of a charlatan. after all, it certainly seems that way, doesn't it? but in truth, that princely image of his protects that scared boy underneath. that womanising reputation is another tool he can use to keep most at arm's length. this is the greatest performance of his life, and he does it all to cope.
★ biography.
i. daegu, the mid-90s. heath is a fragile boy born to a young mother who was only eighteen years old. the love that permeated their relationship, however, forever remained imprinted on his heart. she cherished him like a precious stone, kept him fed and happy, and put little sprigs of rosemary and jasmine in his socks when she noticed he seemed to have a nose for herbs and flowers. their home was eclectic and busy but it was theirs, their home that she had worked so hard for. he didn’t know his father, didn’t need to. there was no story there, no big abandonment or leaving, it had just simply always been heath and his mother – until it wasn't.
ii. remember that fragility? inherited – maternally, of course. after only eight years together, heath came home from school one day to find his mother passed out on the floor. that evening, she went into the hospital and she never returned. suddenly he was alone, an eight year old boy sat in the hospital waiting room, confused and coping with emotions he didn't yet understand. all of his belongings, everything he'd ever known, was in that trinket-filled home he would never see again, a trinket-filled home that suddenly seemed cold and looming.
iii. everything was a whirlwind after that. his grandparents, who had only recently moved to florida to live out their golden years, came to collect him as soon as they heard. the songs were good, honest, hard-working people who had set up a small place called tide and thyme in palmview. his grandmother, specifically, considered it her life's work, and she happily worked there night and day. when heath arrived, the first thing he noticed was how the shop smelled like home – perhaps it was the only thing that kept him sane.
iv. adjusting was hard, especially for a boy like heath. back home in daegu he had been the quiet one of his friends, a gentle soul who helped snails reach the other side of the road and held umbrellas over the local stray dogs in the rain. he quickly realised that if he were to act the same in palmview, he would get left by the wayside. all of the kids in his class were so loud, so sure of who they were, he had to catch up quick.
v. it was by total chance that he ended up as the lead in the school play at twelve years old. his best friend at the time was supposed to be the leading man, and he'd convinced heath to be his understudy ‘just in case’. one bad hotdog later, heath found himself in the spotlight for the first time ever… and he enjoyed it. it turns out, when you're a young child gripped by the complications of grief, acting like you aren't is the best medicine. the praise he was showered in seemed to fuel him, made him glow from the inside out, and he would keep chasing that high for years to come.
vi. as he continued to grow and blossom, heath became beloved by his peers. homecoming king, prom king, voted biggest flirt, he charmed his way into the hearts of many – and left just as many broken hearts in his wake. he didn't know what it was, exactly, that left such a glaring flaw in that perfect persona of his. the fear of being abandoned? the fear of loving something so much only to lose it again? or perhaps it was simply that strange emptiness he felt whenever he laid with someone, almost as if his gut simply knew they weren't right. whatever it was, it gained him a reputation.
vii. thankfully, most of that reputation was offset by his grandparents, and the way they were so insistent on standing up for him even as he began to move into his adult years. nobody could quite understand it… ‘your grandson is a lothario! he’s a shameless flirt and a lazy layabout!' but the songs simply shook their heads with a smile. they knew heath wasn't like that but, for whatever reason, he had insisted upon this performance for years now – behind the scenes, he stayed up late preparing meals for the soup kitchen, he donated almost all of his personal earnings to charity, he rescued multiple kittens off the street, and he painstakingly took care of the both of them, no matter what. they loved him because they knew who he was underneath, not who he portrayed, even if they didn't agree with the fact he would never get any of the credit.
viii. at his grandparents' insistence, heath went travelling on and off for a few years in his mid-twenties. if you name a place, heath visited it, and brought back a charming little souvenir as evidence. he, of course, made plenty of friends on his travels (and probably enemies, too) but little did he know there was a reason behind his short sabbatical.
ix. whilst, thankfully, his grandparents were in great health, they wanted to retire. when he returned from travelling at 26, they sat him down and had a long talk with him. they understood that his local reputation may not be sparkling, they understood that some of the people in palmview just didn't understand him, but they did. they saw how his eyes lit up when he bottled the herbs, how he truly came to life when explaining a tincture to a customer, how he recommended mixes and crystals and mindfulness practices they never would've even thought of or knew about. he was his mother's son and they were so, so proud… so they wanted to give him their shop.
x. having now been at the helm for the past two years, heath truly finds it to be his happy place. whilst he still hams it up with his colleagues, mainly to annoy them, the version you get of him within its four walls is a much more muted, down to earth version of the man he is beyond the front door. slowly but surely people seem to be realising he's more than the outrageous flirt with the endless dangly earring collection, he's more than the songs precious, well-kept grandson who's never done a hard day's work in his life, he's heathcliff song. and he's proud to welcome you into his small corner of safety – tide and thyme.
★ extras.
i. his middle name comes from the scientific name for the rose of sharon, hibiscus syriacus, which is the national flower of south korea. its name is roughly translated to ‘the eternal flower which never fades’, which his mother decided to bestow upon him to hopefully spare him of her ill health and eventual fate. if you've ever received a personalised item from tide and thyme made by heath, anything from a tincture to a herbal blend, it is signed by ‘syriacus’. ii. there was a large herbal medicine scene in daegu, and it was one his mother was heavily involved in. these skills were passed down to heath even before he set foot in tide and thyme, and he's always been incredibly proud of being able to help people holistically. that doesn't mean he isn't a man of science, though. don't ever start that debate with heath, who's incredibly passionate about new scientific breakthroughs, and loves to read medical journals for fun. iii. due to the sudden loss of his childhood home and everything in it, heath has a particular penchant for trinkets and collections and gets easily attached to inanimate objects. anything he can get his hands on, he will collect: old teaspoons, gemstones, vintage rings, broken clocks… it's why his home has so many rooms. impressively, he's organised it all in such a way that it's more quirky than concerning, and he manages to keep most of it contained to his own room. likes: trinkets, freshly cut herbs, expensive silk, strawberry jam on toast, spring, affection, maison margiela fragrances, cats, humidity, evenings, full moons. dislikes: early mornings, rude salespeople, the woman who dyed his hair green once upon a time, rain, cleaning, when the uv index is above a 5, mathematics.
★ counterpart inspired plots.
i. his calcifer – heath's heart, his missing piece, his eternal partner in crime and the one who keeps him grounded. calcifer, much like the movie, is the fiery spirit that heath seems to be lacking and the driving force that pushes him forward, especially when he's having one of his episodes. these two are ride or die and, while on the surface they bicker and squabble like siblings, you better not bad mouth one in front of the other… lest you get a side to either of them you won't like. these two have known each other since they were kids, when calcifer stood up to the bullies that were picking on heath at the playground. the rest, they say, is history. could even be the person who asked heath to be his understudy for the school play that shot him to palmview fame. ii. his markl – someone younger in heath's life who actually seems the older of the two. on the surface, it appears that markl is the one in this dynamic making all the decisions, the one who puts out the fires (metaphorical and physical), the one who keeps them alive… but in reality, it's heath. markl is still struggling to really figure out where they are in life and that's where heath came in. he picked them up at a rough time in their life, helped them with what they needed to get back on their feet, kept their secrets, and now in return they insist on helping heath out any way they can. yeah, maybe heath hams it up a bit, acts like he's less competent than he is so that the other feels like they're really doing something, but he doesn't mind being the bumbling buffoon if it helps markl carve a path of their own one day. iii. his witch of the wastes – the most sour of all of heath's exes is the witch of the wastes, but she has a right to be. the two were engaged to be wed but mere months before the wedding, heath called it off – a gut feeling, he called it, that had befallen him by way of the stars. (in other words, they were cosmically doomed.) in truth, the relationship was largely based on looks and other materialistic things and he didn't have the guts to admit it to her face. she was very embarrassed by the whole ordeal and it took a while for her image to recover, something she's always been very concerned with.
★ other wanted plots.
roommates (0/2) – can be combined with the markl or calcifer plots up above or can be totally separate, but i definitely pictured heath having two roomies. kind of a similar dynamic to the film, i imagine, where they all have their little spaces they're comfortable in and are a bit of a dysfunctional found family. heath definitely doesn't charge them rent because 1) it's not in his nature and 2) he doesn't understand any of that anyway. most loyal customer (0/1) – self-explanatory! this person's been going to tide and thyme for as long as they can both remember, definitely knows heath's grandparents and asks about them often. most friends hang out at the local coffee shop, these two hang out at the tide and thyme front counter… much to the annoyance of his employees. they're also sort of a guinea pig for new concoctions sometimes. exes (0/?) – let this man live his truth and be a wh*re!!! i'll take them all, good terms, bad terms, short term, long term. let's have some fun with it <3
#palmviewintro#palmviewintro.#❛ ooc / intro.#this is rlly long i'm sorry#i need to switch to google docs but im lazyyyy#parental death tw#parent death tw#that's the only one im pretty sure!!!
8 notes
·
View notes
Text
INTRO
Step right up and let me show you the secrets of the game.
I'm Kakavasha, your guide to the thrills and excitement of the casino world.
But tonight, it's not just about the cards or the chips; it's about making sure you have a winning experience in every way.
Ready to let me deal you in?
REQUEST GUIDELINES
Each request will contain six transparent and upscaled PNGs. [Max of eight, if you'd prefer less; just include so in your request.]
In order to request, you need to provide any of the minimum; link to video [and frames if you have a preference], a character and their media/source, or pre-gathered screenshots you'd like edited.
I will work with almost any [within reason] media; I have no blacklist; but if i deem something unsuitable or inappropriate; you will be alerted privately (unless you ask anonymously, then I will answer your ask publicly,) and I will not be completing the job.
CREDIT REQUIREMENTS
When using my content in edits, or other media, please tag me, so that my content can reach and be utilized by more people.
You need to credit me when using my renders. This is how we reach more people you can use my assets.
My content is available with credit, however if you'd like to partner up, feel free to ask about it! [Per example, an editing blog would like to collaborate in order to complete a larger editing project and/or request.
MISC
I don't mind spam reblogs or random promos.
It is completely okay to use my ask box for questions or casual conversation.
If you find yourself too timid to use you account and utilize the anonymous option, i understand that you cannot post imagery in asks. Please just describe what you are looking for textually and we will work together.
Do be patient with me, as this is my first time running a blog of any kind like this. However you are more than welcome to leave constructive criticism, but be honest. If you believe there is an aspect of my work that I should focus on improving, I'd love to hear about it. A simple ask would be fine,
If you see an issue with my work, as if there is a discrepancy within an image, you are more than welcome to point it out in an ask. I can always edit the image and the post to update it with a better version of the image.
The credit for the PSD in my banner, icon, and dividers belong rightfully to pinkmiku on Tumblr.
Gifs in my profile were made by my beloved @boothyll
The "number of cards" in my blog description is the number of requests in my inbox!
Each request can take anywhere between 1 hour and 4 hours to complete. Patience is appreciated, as I work full time, often over 40 hours a week.
I'm actually okay with people mentioning that they'd like me to rush their request, especially if they need the asset to complete a project of their own, but be humble. I'm serious.
@tokenpng-main is the host blog for this account, it is 100% official. No need to sound the alarms.
INBOX
Fu Xuan Renders
Topaz + Guinifen Renders
Lingyang Renders
Ruan Mei Renders
Sparkle Renders

15 notes
·
View notes
Note
do you have any raw .drw files? how does its file size compare to a vector image / raster image of the same size / similar content? like ik vector files can be very small compared to a jpeg... storing timing info sounds simple to implement, but i wonder if it bloats up .drw file sizes?
Oooh, good question, and my answer uhh... got a little out of hand..
Here's the files in the folder for one of my drawings on the windows beta:

So we have the .drw file, the .sim file, a .csv file (this stores text data for my added title and description), and a .png and .sim for the thumbnail.
The .sim file is new to me, but looking at other files I believe the .sim files holds the individual layer data. Maybe the .sim stores the actual image data for display during drawing?
For example, heres the files for my haunter painting:

And here are the layers for the drawing in game (software?):

The sizes match up pretty well with the actual data on each layer!
(I should mention here that looking at file types and figuring out how they work is completely new to me so I could be getting some things wrong. I'm debating if I should reach out to the dev directly to check my work before starting this essay proper... but it's also been fun for me and my brain to try and figure this stuff out on my own)
Actually.. the sim files made me curious... if the main data is in the .drw file, what would happen if I delete the .sim files? Would the file still work?

First off, the thumbnail does not load, but the file still opens fine and the replay function still works.

And we still got all the layers no problem.

Hmm, if I save changes to the images, will it create .sim files?


It did! Huh!
Then uhh.. I don't really know what the .sim files do. If has something to do with display in game which is why the thumbnail didn't display. But I don't know where the layer files would be displaying if it's all based on the .drw. Maybe it's for file conversion? For uploading to the gallery? I don't know...
Anyways... back to the topic at hand, files sizes! The windows beta lets you export files as layered .psd files, .png files, and partial replay in uncompressed and compressed .avi!
So a quick reminder, here are the file sizes of the original image set up for Colors Live:

The .drw is pretty small!!
And here are my exports!:

The .drw is MINUSCULE compared to the .psd. And the .sim size falls between the two sizes of .png. Hmm, still don't know what's going on with that. Also for fun we can look at the size of an uncompressed two minute long .avi looks like. 4 million kilobytes, yay ^_^
Vector wise.. I'm actually not super familiar with vector programs (should probably brush up on them for this essay, huh?) so I'm not sure what exactly is comparable... I've had to use Illustrator this semester but I feel like Colors and Illustrator are approaching vector graphics in a very different way. Illustrator is saving data for vector objects, but Colors is saving data for brush strokes!
Well.. anyway we can open up one of my projects:

And we can stretch that layers panel all the way out so you can see all my layers and paths and objects:

And let's check the file size...

Yep! Pretty small!
For fun we can also convert that .psd I made into a .ai..

Yep! It's smaller!
Regarding file bloat... I think the devs did a fantastic job creating such a small file size and it's perfect for drawing on game consoles that usually have very limited space! However, my experience with Colors! 3D as a kid did have issues with file sizes.. Colors! was the biggest app on my 3DS and I constantly had to juggle uninstalling games and uploading and deleting paintings so I would have more room for new paintings. I did have quite a number of painting files... in various states of progress (as is typical) but storage space was a real issue for me. Now, were my SD cards only 2 or 4 gb big? Yes. Did I understand at the time that those were quite small for SD cards, even at the time? No. Does my experience mean anything then? I don't know.
Colors! 3D also had an issue were particularly lengthy paintings (were talking hitting the ~4 hour mark) would stop saving replay data. The replay would only play up until a certain point. I'm not sure why that is, based on what we know about .drw files I don't think it can be a limitation with the file type? That's kinda all it does? Maybe it's a limitation with the size of the 3DS memory that couldn't play the replays that long? Hitting that ~4 hour mark would also limit the amount of undos you were able to do so it could easily have to do with memory.
(Bit off tangent but undos take soooo long in Colors. And the more undos you do the longer they take! Colors didn't official start limiting the players undos until that ~4 hour mark but they were already limited by your patience)
Anyways, I will leave you with this, a link to the documentation of the .drw file format. It's only two and half pages long which I think is pretty short? Maybe you can find more info in there that what I can parse...
2 notes
·
View notes
Text
The Ultimate Guide to Image Converter Tools in 2025 Why SnapConv Stands Above the Rest
Picture this: You're rushing to meet a deadline, and suddenly you realize your presentation images are in the wrong format. Your client needs JPEGs, but you have PNGs. Your website requires WebP files for faster loading, but your designer sent you TIFF images. Sound familiar?
Welcome to the modern digital world, where image converter tools have become as essential as your morning coffee. But here's the thing – not all image converters are created equal, and choosing the wrong one can cost you precious time, money, and sometimes even your sanity.
What Exactly Is an Image Converter?
An image converter is a digital tool that transforms images from one file format to another without losing quality or compromising the visual integrity of your content. Think of it as a universal translator for your digital images – it speaks PNG, JPG, WebP, AVIF, and dozens of other "languages" that different platforms and applications require.
But here's where most people get it wrong: they think any free image converter online will do the job. That's like saying any car will get you from point A to point B – technically true, but the experience can vary dramatically.
The Hidden Cost of Choosing the Wrong Image Converter Online
Before we dive into what makes a great online image converter, let me share something that might surprise you. Last year, our team analyzed over 50 different image conversion tools, and the results were shocking:
73% of free converters added watermarks to converted files
61% required email registration for basic features
45% had severe file size limitations
38% actually reduced image quality during conversion
29% stored user files indefinitely (yes, your private images)
These aren't just numbers – they represent real frustrations that millions of users face daily when trying to convert images online.
Why Format Compatibility Matters More Than Ever in 2025
The digital landscape has evolved dramatically. What worked in 2020 simply doesn't cut it anymore. Here's why image format conversion has become mission-critical:
Web Performance Revolution: Google's Core Web Vitals now heavily penalize slow-loading websites. Converting images to modern formats like WebP or AVIF can reduce file sizes by up to 65% without quality loss.
Device Diversity Explosion: With smartphones, tablets, desktops, smart TVs, and IoT devices all displaying images differently, having the right format for each platform isn't optional – it's essential.
Storage Cost Reality: Cloud storage isn't free, and neither is bandwidth. Efficient image formats can cut your hosting costs significantly.
Accessibility Requirements: Modern web standards demand optimized images for users with slower internet connections or limited data plans.
The 25+ Formats That Actually Matter
While basic image converter online tools offer the usual suspects (JPG, PNG, GIF), professional workflows demand much more. Here's what you should look for:
Essential Web Formats:
WebP: Google's format that reduces file sizes by 25-35% compared to JPEG
AVIF: The newest format offering 50% better compression than JPEG
HEIC: Apple's efficient format (though compatibility can be tricky)
Professional Photography Formats:
RAW: For serious photo editing and maximum quality retention
TIFF: Industry standard for print and professional publishing
DNG: Adobe's open-source RAW format
Specialized Use Cases:
ICO: Essential for website favicons and application icons
SVG: Vector format perfect for logos and scalable graphics
EPS: Required for professional printing and vector work
PSD: Photoshop format preservation for advanced editing
Legacy and Niche Formats:
BMP: Still used in many enterprise applications
TGA: Gaming and 3D rendering industry standard
DDS: Texture files for game development
WBMP: Mobile applications (yes, still relevant)
What Makes SnapConv Different (And Why It Matters)
After testing dozens of image converter tools, I can honestly say that SnapConv represents what online conversion should be. Here's why:
No Compromise Philosophy: While competitors force you to choose between quality and convenience, SnapConv delivers both. No watermarks, no registration requirements, no file size limits that matter.
Format Depth: Supporting 25+ formats isn't just about quantity – it's about recognizing that different professionals have different needs. Web developers need WebP optimization, photographers need RAW conversion, designers need vector format support.
Processing Speed: Their cloud infrastructure automatically scales, meaning you get consistent performance whether you're converting one image or a hundred.
Privacy First: Files are processed and immediately deleted. No analysis, no storage, no data collection. In an era where privacy is increasingly precious, this approach is refreshing.
The Technical Side (Without the Boring Parts)
Here's what happens when you use a professional online image converter like SnapConv:
Smart Quality Preservation: Advanced algorithms analyze each image to determine the optimal conversion settings, maintaining visual quality while optimizing file size.
Metadata Handling: Depending on your needs, important information like camera settings or color profiles can be preserved or stripped for privacy.
Batch Processing: Real batch conversion that can handle multiple files simultaneously, not the fake "batch" processing that processes files one by one.
Error Recovery: Professional tools gracefully handle corrupted files or unusual formats instead of simply failing.
Real-World Use Cases That Prove the Value
E-commerce Optimization: An online retailer converted their product images from PNG to WebP using SnapConv, reducing page load times by 40% and increasing conversion rates by 12%.
Marketing Agency Efficiency: A digital agency cut their image preparation time by 75% using bulk conversion features, allowing designers to focus on creative work instead of technical tasks.
Photography Portfolio Success: A photographer converted RAW files to multiple web-optimized formats simultaneously, maintaining quality for print clients while optimizing for web galleries.
App Development Streamlining: A mobile app team used automated ICO generation for app icons across different platforms, ensuring consistency and saving hours of manual work.
The Free vs. Premium Converter Debate
Here's something most articles won't tell you: the best image converter tools are often completely free, but the worst ones pretend to be free while nickeling and diming you with limitations.
Red Flags to Avoid:
"Free with watermark" (not actually free)
Email required for download (your privacy is the payment)
File size limits under 5MB (practically useless)
Quality degradation (defeats the purpose)
Limited format support (forces you to use multiple tools)
What True Free Conversion Looks Like:
Unlimited file processing
No quality degradation
No registration requirements
Privacy protection
Comprehensive format support
SnapConv exemplifies this approach – truly free conversion without compromise.
Advanced Tips for Professional Image Conversion
Optimize for Purpose: Converting images isn't just about changing file extensions. For web use, consider quality vs. size tradeoffs. For print, prioritize quality retention.
Understand Color Profiles: When converting between formats, be aware of color space changes. RGB for digital, CMYK for print.
Batch Processing Strategy: Group similar images and convert them together with consistent settings for professional results.
Format-Specific Considerations:
JPG: Best for photographs with many colors
PNG: Ideal for images with transparency or few colors
WebP: Perfect balance for modern web use
SVG: Scalable graphics and logos
The Future of Image Conversion
The image conversion landscape is evolving rapidly. Here's what's coming:
AI-Enhanced Conversion: Machine learning algorithms that can upscale images while converting, improving quality beyond the original.
Real-Time Format Optimization: Tools that automatically detect the user's device and deliver the optimal format.
Advanced Compression: New formats that maintain quality while achieving unprecedented file size reductions.
Automated Workflow Integration: Conversion tools that integrate directly with content management systems and design workflows.
Security and Privacy in Image Conversion
This topic doesn't get enough attention, but it should. When you upload images to an online image converter, you're potentially sharing sensitive information. Consider these scenarios:
Business documents with confidential information
Personal photos with EXIF data containing location information
Product images before public launch
Legal documents or medical images
Professional conversion tools like SnapConv address these concerns by:
Processing files immediately without storage
Using HTTPS encryption for all transfers
Not analyzing or indexing uploaded content
Complying with international privacy standards
Making the Right Choice for Your Needs
Choosing the right image converter depends on your specific use case:
For Web Developers: Prioritize tools that support modern formats like WebP and AVIF, with batch processing capabilities for efficiency.
For Photographers: Look for RAW format support and quality preservation algorithms that maintain professional standards.
For Designers: Vector format support (SVG, EPS) and PSD compatibility are essential for workflow integration.
For Business Users: Privacy, reliability, and format versatility matter most for professional communications.
For Casual Users: Simplicity and universal format support without technical complexity.
Conclusion: Why Quality Matters in Image Conversion
In our rush to digitize everything, we sometimes forget that quality matters. Your images represent your brand, your memories, your professional work. They deserve better than a rushed conversion that degrades quality or compromises your privacy.
The best image converter online tools don't just change file formats – they preserve the integrity of your visual content while adapting it for its intended purpose. Whether you're optimizing for web performance, preparing for print, or ensuring compatibility across devices, the right tool makes all the difference.
SnapConv represents this philosophy in action – professional-grade conversion that's actually free, actually private, and actually designed for real-world use. In a market full of compromises, it's refreshing to find a tool that simply works the way it should.
Your images are important. Your time is valuable. Your privacy matters. Choose your image converter accordingly, and experience the difference that quality makes.
Ready to see what professional image conversion looks like? Try SnapConv free image converter today – no registration, no limitations, no compromises. Just the conversion results you deserve.
1 note
·
View note
Text
XnConvert: The Best Bulk Image Converter
XnConvert is a fast, powerful and free cross-platform batch image converter. It allows to automate editing of your photo collections: you can rotate, convert and compress your images, photos and pictures easily, and apply over 80 actions (like resize, crop, color adjustments, filter, ...). All common picture and graphics formats are supported (JPEG, TIFF, PNG, GIF, WebP, PSD, JPEG2000, JPEG-XL, OpenEXR, camera RAW, AVIF, HEIC, HEIF, PDF, DNG, CR2). You can save and re-use your presets for another batch image conversion.
0 notes
Text

Collaboration Tips Between Ecommerce Managers and Editors
How Ecommerce Brands Can Boost Efficiency, Sales, and Visual Quality with Smart Collaboration
In the fast-paced world of ecommerce, visuals are everything. A product might be the best in its category, but if the image doesn’t pop, potential buyers scroll past.
This is where the collaboration between ecommerce managers and photo editors becomes vital.
When both roles align effectively, the results are stunning product visuals, higher conversion rates, and better brand consistency.
One of the most frequently searched topics in the ecommerce space is How to Remove Background on eBay Photos — this isn't just about aesthetics, but about building buyer trust and maintaining marketplace standards.
Whether you're working on eBay, Amazon, Shopify, or your own ecommerce store, removing distractions from your product images is a non-negotiable.
At Clipping Way, we specialize in Image Clipping Path Services, helping ecommerce brands produce clean, compelling, and professional-grade product images at affordable prices.
We even offer a Free Trial and the ability to Get Instant Quotation, making collaboration smoother and more accessible than ever.
Let’s explore how ecommerce managers and editors can work hand-in-hand for success.
1. Understand Each Other’s Roles and Responsibilities
The first key to successful collaboration is mutual understanding. Ecommerce managers handle product listings, marketing strategies, pricing, and sales funnels.
Editors, on the other hand, focus on photo retouching, clipping paths, background removal, and visual presentation.
Tip: Hold a quick onboarding meeting to explain workflows. When editors understand which images are priority (e.g., seasonal products or ad campaigns), they can prioritize edits accordingly.
2. Set Clear Image Guidelines
Imagine receiving 50 product photos and not knowing the specs: DPI? Background color? Shadows or no shadows? Ecommerce managers should create a clear image guideline document that covers:
Image dimensions
File formats (JPEG, PNG, PSD, etc.)
Background style (white, transparent, custom)
Shadow requirements
Retouching expectations
At Clipping Way, our editors strictly follow brand-specific guidelines to ensure consistency across all platforms.
3. Use Shared Tools for Smooth Communication
Miscommunication causes delays and errors. Avoid endless email threads by using collaborative tools like:
Google Drive or Dropbox: For sharing and storing high-resolution files.
Slack or Trello: For task management and direct communication.
WeTransfer or FTP: For bulk uploads/downloads of large image files.
When managers and editors share the same digital workspace, updates and feedback flow much more smoothly.
4. Plan a Realistic Turnaround Schedule
One of the major friction points in editing workflows is unrealistic timelines.
Editors need time to perform quality clipping path services, especially for complex images with fine edges like jewelry or fashion items.
Clipping Way offers fast delivery options for urgent projects — without compromising quality. But planning ahead helps maintain both speed and perfection.
5. Offer Constructive Feedback, Not Just Corrections
When ecommerce managers give feedback like “This doesn’t look right,” it doesn’t help editors improve or understand the issue. Instead, say: “Let’s make the shadow softer under the shoe to match the other listings.”
Use annotated screenshots or timestamps when giving feedback, and always acknowledge good work. A simple “Great job on the hair masking!” can boost morale and strengthen long-term collaboration.
6. Consider Outsourcing to a Dedicated Clipping Path Service Provider
Hiring an in-house editor might work for smaller volumes, but for large-scale ecommerce stores, outsourcing to a reliable partner like Clipping Way ensures scalability, consistency, and cost-efficiency.
We offer:
Affordable pricing
24/7 turnaround
Dedicated account managers
Free Trial for new clients
Instant quotation system
Whether you need simple background removal or multi-layer masking, we’re here to help editors and managers streamline their workflow.

FAQs
1. What is a Clipping Path and Why is it Important for Ecommerce?
A: A clipping path is a photo editing technique used to remove backgrounds or isolate objects in an image. It’s crucial for ecommerce because it creates clean, distraction-free product photos that enhance buyer focus and conversion rates.
2. How Fast Can You Deliver Edited Images?
A: At Clipping Way, we offer flexible turnaround times based on your needs. Most standard orders are delivered within 24 hours, with express options available.
3. Can I Try Your Service Before Committing?
A: Yes! We offer a Free Trial so you can experience our quality before making any commitments.
4. How Do I Get a Price Quote?
A: You can use our instant quotation tool on our website. Just upload your image and select the services you need — you’ll get a price right away.
5. Do You Handle Bulk Orders for Large Ecommerce Stores?
A: Absolutely. We’re equipped to manage high-volume orders for enterprise-level clients, with a dedicated team and priority workflow to meet tight deadlines.
Conclusion
In the ecommerce space, visuals are no longer optional — they are the storefront.
By fostering clear communication, mutual respect, and efficient workflows, ecommerce managers and editors can create stunning, high-converting product galleries.
Outsourcing to a professional Image Clipping Path Service like Clipping Way can further streamline the process, saving time and money.
Start improving your visuals today with our Free Trial or Get a Quick Quote — and let’s build something amazing together.
0 notes
Text
Softhunters: Best PSD to HTML, XML, xHTML Conversion Experts
Why Choose PSD to HTML/XML/xHTML Conversion?
Photoshop (PSD) designs are ideal for creating static layouts. However, for these layouts to function on the web, they need to be converted into responsive and browser-compatible code. Converting PSD to HTML, XML, or xHTML ensures your website is not just visually attractive but also fast, mobile-friendly, and SEO-ready.
Whether you are a business owner with a stunning website design or an agency looking to deliver projects with pixel accuracy, our team of expert developers and web designers in Jaipur can transform your PSD files into dynamic, interactive web pages with clean, structured code.
Visit Now ;- https://softhunters.in/psd-to-html-xhtml-conversion-services/
Benefits of Our PSD to HTML & XML Conversion Services
1. Pixel-Perfect Conversion
We maintain 100% design integrity while converting your PSD to HTML or XML. Every visual element — colors, fonts, layout spacing, and responsiveness — is handled with precision, ensuring your web interface looks just like your original design.
2. W3C-Compliant Code
As a leading website designing company in Jaipur, Softhunters adheres strictly to W3C standards. Our clean, well-commented, and validated code helps improve SEO performance and cross-browser compatibility.
3. Responsive Design
With the increasing use of mobile devices, it’s vital for websites to be responsive. Our developers use the latest HTML5 and CSS3 techniques to make sure your site adjusts beautifully across screens and devices.
4. SEO-Friendly Markup
The conversion process incorporates SEO-friendly practices right from the start. We use semantic HTML tags and optimized images, which helps search engines index your site faster and better.
5. Fast Loading Speed
We optimize the code, compress images, and minimize the use of unnecessary scripts. This ensures quick load times — an essential factor for user experience and search engine ranking.
Why Softhunters Technologies?
With over a decade of experience in web development, Softhunters Technologies has established itself as a reputable website designing company in Jaipur. We combine technical skill with creative vision to bring your PSD designs to life. Our team of certified developers and creative web designers in Jaipur are known for their dedication to quality, innovation, and client satisfaction.
Our Core Strengths:
Dedicated Developers: Skilled in HTML5, CSS3, JavaScript, and frameworks like Bootstrap.
Cross-Browser Compatibility: Websites are tested on Chrome, Firefox, Safari, Edge, and others.
Quick Turnaround Time: We deliver projects on time without compromising on quality.
Affordable Pricing: High-quality conversion services at competitive rates.
Our PSD Conversion Process
We follow a structured, transparent approach that ensures you get the best results:
Requirement Analysis: We understand your PSD file and desired output (HTML, XML, or xHTML).
Slicing: The PSD is carefully sliced into multiple layers to manage each element efficiently.
HTML Markup: Clean, SEO-friendly HTML code is written using the latest standards.
Styling with CSS: CSS3 is used for styling, including animations, transitions, and layout formatting.
Integration and Testing: We integrate your HTML/XML code with CMS if needed and test it across all platforms and devices.
Delivery: The final product is delivered with full documentation and support.
Industries We Serve
Our PSD to HTML and XML services cater to a wide range of industries:
E-commerce
Healthcare
Real Estate
Education
Travel and Hospitality
Fashion & Lifestyle
Whether you’re a startup or an enterprise, we customize every project according to your specific needs.
Hire the Best Web Designers in Jaipur
If you’re searching for a reliable web designer in Jaipur, Softhunters is home to some of the most creative minds in the industry. Our design team doesn’t just convert files — they understand UI/UX principles, accessibility, and the latest design trends. This means your website won’t just look good, it will feel right for users.
We take pride in being among the top choices for PSD to HTML and XML conversion in Jaipur. Our client testimonials and successful project deliveries speak for our commitment and excellence.
Let’s Build Something Great
At Softhunters Technologies, we believe that your website should be a reflection of your brand. From PSD design to flawless HTML or XML implementation, we offer end-to-end solutions that help businesses grow online. Whether you need a static website, an eCommerce platform, or CMS integration, we’re here to make it happen.
0 notes
Text
Ghost Mannequin Services: Elevating Your E-Commerce Fashion Photography

In the highly competitive world of e-commerce, especially in fashion retail, product presentation is everything. One of the most in-demand image editing techniques today is Ghost Mannequin Services—a process that removes the mannequin from apparel images, creating a clean, 3D “hollow man” effect that keeps the product front and center. This service is essential for brands looking to create a polished and professional look for their online store.
What Is Ghost Mannequin Service? Ghost Mannequin Service (also called invisible mannequin or neck joint service) is a specialized image editing technique used to combine multiple photos of a garment—usually one worn on a mannequin and another showing inner details like labels or necklines. The mannequin is then removed digitally, and the images are seamlessly merged, making the apparel look like it’s floating naturally.
This effect allows customers to see the true shape, fit, and texture of the clothing without distractions, providing a professional and clean display.
Why Use Ghost Mannequin Services? • Enhance Product Presentation – Create a consistent and distraction-free look. • Boost Conversions – Clean visuals build trust and drive more sales. • Save Studio Costs – No need to hire models for every shot. • Create a 3D Effect – Shows depth and dimension that flat lays cannot achieve. • Maintain Branding Consistency – Uniform look across your product catalog.
FAQ: Ghost Mannequin Services Q1: What types of clothing can use ghost mannequin editing? A: Shirts, jackets, trousers, dresses, swimsuits, and lingerie all benefit from ghost mannequin services. Any apparel item shot on a mannequin can be edited. Q2: How long does it take to complete a ghost mannequin edit? A: Depending on the volume and complexity, it typically takes 12–48 hours per batch. Q3: Is it better than flat-lay photography? A: Yes. Ghost mannequin photos give garments a realistic 3D look, helping customers better visualize how the item fits. Q4: Can I combine ghost mannequin with other edits like color correction or background removal? A: Absolutely. Most professional services include color correction, wrinkle fixing, and background cleanup along with ghost mannequin edits. Q5: Will I get layered PSD files? A: Upon request, most editors will provide layered PSD files along with JPEG or PNG exports for flexibility.
Final Words If you're in the fashion or apparel business, investing in high-quality Ghost Mannequin Services is a smart move. It not only elevates the visual appeal of your products but also builds credibility and trust with online shoppers. Whether you're a small boutique or a large e-commerce retailer, this service helps you stay ahead in the competitive digital market.
0 notes
Text
PSD to HTML5 Conversion Services by Converthink Solutions

In the fast-paced digital world, having a responsive, high-performance, and aesthetically pleasing website is crucial for businesses. Converthink Solutions specializes in PSD to HTML5 conversion services, ensuring that your static PSD designs are transformed into dynamic, feature-rich, and mobile-friendly web pages. Our expertise helps businesses establish a compelling online presence with high-quality, hand-coded HTML5 and CSS3 markups.
Why Choose Converthink Solutions for PSD to HTML5 Conversion?
1. Pixel-Perfect Design Conversion
At Converthink Solutions, we ensure that every pixel of your PSD design is meticulously converted into HTML5 while maintaining the visual integrity of your design. Our team of skilled front-end developers ensures that your website looks exactly as intended across all devices and browsers.
2. Responsive and Mobile-Friendly Designs
We understand the importance of mobile responsiveness in today’s digital landscape. Our PSD to HTML5 conversion services guarantee that your website adapts seamlessly to various screen sizes and resolutions, providing an optimal user experience on desktops, tablets, and smartphones.
3. Hand-Coded, SEO-Friendly Markup
Unlike automated tools, we follow a hand-coded approach to ensure clean, semantic, and W3C-compliant HTML5 and CSS3 code. This not only enhances your website’s performance but also improves its SEO ranking, making it more visible to search engines.
4. Cross-Browser Compatibility
Our team ensures that your HTML5 website works flawlessly across all major browsers, including Chrome, Firefox, Safari, Edge, and Opera. We conduct thorough testing to eliminate any compatibility issues, ensuring a seamless browsing experience for users.
5. Faster Loading Speed & Optimized Performance
We optimize images, scripts, and stylesheets to enhance your website’s loading speed. A faster website not only improves user experience but also boosts search engine rankings and conversion rates.
6. Integration with CMS and E-Commerce Platforms
Whether you need your HTML5 website integrated with WordPress, Magento, Shopify, or any other CMS or e-commerce platform, our developers ensure smooth and hassle-free integration. This allows you to manage your content effortlessly without requiring extensive technical knowledge.
7. Dedicated Support and Maintenance
At Converthink Solutions, we provide ongoing support and maintenance services to keep your website updated and secure. From bug fixes to performance enhancements, we ensure that your site remains in top shape at all times.
Our PSD to HTML5 Conversion Process
Requirement Analysis – Understanding your project needs and objectives.
PSD Slicing – Cutting the design into multiple layers for better flexibility.
HTML5 & CSS3 Coding – Hand-coding the design with clean, semantic markup.
Responsive & Cross-Browser Testing ��� Ensuring compatibility and responsiveness.
Integration & Final Deployment – Adding CMS/e-commerce functionalities and making the site live.
Get in Touch with Converthink Solutions
If you’re looking for high-quality PSD to HTML5 conversion services, Converthink Solutions is here to help. Contact us today to bring your designs to life with clean, responsive, and SEO-friendly HTML5 code.
1 note
·
View note
Text
How Clipping Path Services Help Businesses Stand Out Online

Introduction
Have you ever scrolled through an online store and felt drawn to a product simply because of how crisp and clean the images looked? That’s the power of professional image editing! In the digital world, first impressions matter. Clipping path services help businesses stand out online by creating professional-looking, polished images that focus attention on products, enhancing brand consistency and saving time and effort on image editing. But what exactly is a clipping path, and how does it work? Let’s dive in.
Table of Contents
What is Clipping Path?
Why Businesses Need Clipping Path Services
Key Benefits of Clipping Path Services
How Clipping Path Works: Step-by-Step Guide
Image Editing: The Foundation of a Great Photo
Image Selection: Choosing the Right Visuals
Creating a Path Around the Subject
Refining Edges for a Natural Look
Applying the Clipping Path and Removing Background
Adding a New Background (If Necessary)
Adjusting Shadows and Highlights for Depth
Final Touch-ups and Enhancements
Exporting the Image for Various Uses
Common Mistakes to Avoid in Clipping Path Services
Conclusion & FAQs
What is Clipping Path?
Clipping path is a photo-editing technique used to remove the background from an image, allowing the subject to stand out clearly. It involves drawing a precise path around the subject using specialized software like Adobe Photoshop.
Professional Clipping Path Services for Stunning Photos!"
Give your images a professional touch with high-quality clipping path services! Whether it’s background removal or detailed cutouts, we make your photos stand out effortlessly. #PhotoEditingServices #ClippingPathExperts #ProductPhotography #ImageEditing #GraphicDesign
Why Businesses Need Clipping Path Services
With the rise of eCommerce and digital marketing, high-quality visuals are essential. Poorly edited images can make even the best products look unprofessional, reducing customer trust. Clipping path services ensure that product images are clean, consistent, and appealing to potential buyers.
Key Benefits of Clipping Path Services
Professional and Polished Images: Creates visually appealing photos.
Brand Consistency: Helps maintain a uniform look across platforms.
Time and Effort Savings: Eliminates the hassle of manual editing.
Increased Conversion Rates: High-quality images attract more buyers.
How Clipping Path Works: Step-by-Step Guide
1. Image Editing: The Foundation of a Great Photo
Before applying a clipping path, the image should be optimized—adjusting brightness, contrast, and color balance to ensure it looks its best.
2. Image Selection: Choosing the Right Visuals
Not all images need a clipping path. Select photos with clear subjects and good lighting for the best results.
3. Creating a Path Around the Subject
Using the pen tool in Photoshop, a precise path is drawn around the product or subject to separate it from the background.
4. Refining Edges for a Natural Look
Edges are smoothed and refined to avoid rough or unnatural outlines, ensuring the image blends seamlessly when placed on a new background.
5. Applying the Clipping Path and Removing Background
Once the path is complete, the background is removed, leaving only the subject.
6. Adding a New Background (If Necessary)
A new background can be added, whether it’s a plain white backdrop (popular in eCommerce) or a more creative setting.
7. Adjusting Shadows and Highlights for Depth
Shadows and highlights enhance the image, adding depth and making it look more realistic.
8. Final Touch-ups and Enhancements
Minor imperfections are corrected, colors are adjusted, and any final refinements are made to perfect the image.
9. Exporting the Image for Various Uses
The final image is saved in the required format (JPEG, PNG, or PSD) for use in online stores, advertisements, and social media.
Common Mistakes to Avoid in Clipping Path Services
Using Automatic Tools Without Manual Adjustments: AI-based tools can leave rough edges.
Over-Smoothing the Subject: Can make images look unrealistic.
Ignoring Shadow Adjustments: Flat images appear less appealing.
Incorrect File Exporting: Using the wrong file format can reduce quality.
Conclusion
Clipping path services are essential for businesses aiming to create high-quality, eye-catching visuals. Whether you’re running an online store, marketing a product, or improving your brand’s aesthetics, these services can help you stand out. Investing in professional image editing ensures that your visuals reflect the quality and professionalism of your brand.
Boost Your Brand with High-Quality Clipping Path Edits!
Clean, sharp, and flawless—our clipping path services provide pixel-perfect cutouts for marketing, e-commerce, and personal projects. Get the best edits with precision! #ProfessionalEditing #ImageEnhancement #EcommerceDesign #ClippingPath #PhotoshopEdits
FAQs
1. What industries benefit the most from clipping path services?
Industries such as eCommerce, fashion, photography, advertising, and graphic design rely heavily on clipping path services to create clean, professional images.
2. Can I use free tools for clipping path services?
While free tools exist, they often lack precision. Professional software like Adobe Photoshop ensures higher quality results.
3. How long does it take to complete a clipping path?
The time required depends on image complexity. Simple paths may take minutes, while detailed images can take much longer.
4. Is a clipping path the same as background removal?
Not exactly. A clipping path is a precise outline around the subject, whereas background removal eliminates unwanted areas entirely.
5. Can I apply clipping path services to bulk images?
Yes! Many businesses outsource bulk image editing to professional services to save time and maintain consistency.
Company Information:
Website: https://clippingpathzone.com/
Facebook: https://www.facebook.com/clippingpathzone/
Contact : https://clippingpathzone.com/contacts/
Resources: https://clippingpathzone.com/blog/
Pinterest: https://www.pinterest.com/cpzmedia/
Twitter: https://www.linkedin.com/in/clipping-path-zone-187698137/
Quote: https://clippingpathzone.com/request-to-get-a-quote/
Skype: skype:Clippingpathzone?chat
Office Address:
United States Office
30 North Gould Street, Sheridan, WY 82801
19173362276
Bangladesh Office
1188/1, East Shewrapara, Mirpur, Dhaka-1216 Bangladesh
8801612348152
0 notes
Text
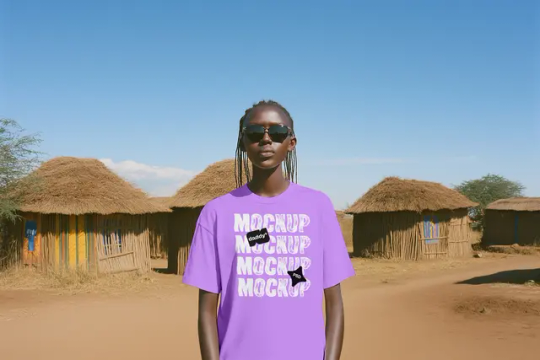
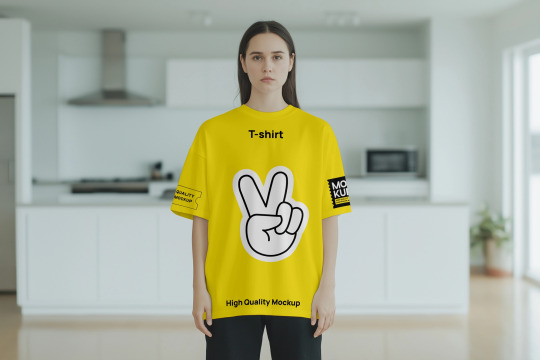
Photoshop vs. Online T-Shirt Mockups: Which One Is Best for Your Business?
Creating stunning T-shirt design mockups is a crucial step for any print-on-demand (POD) entrepreneur, designer, or eCommerce store owner. High-quality visuals can make or break your sales, influencing customer perception and conversion rates. But should you use Photoshop or an online mockup generator when generating these mockups?
In this article, we’ll dive deep into the strengths and limitations of both methods, analyzing usability, cost, efficiency, learning curve, and overall business impact. Whether you're an experienced designer or just starting, this guide will help you make an informed decision.
The Importance of High-Quality T-Shirt Mockups in eCommerce
Before we compare Photoshop and online tools, let's address why T-shirt mockups matter:
Boost Conversions: Professionally presented products increase customer confidence.
Reduce Returns: Clear visuals help buyers set accurate expectations.
Enhance Branding: Consistent, well-designed mockups reinforce brand identity.
With these benefits in mind, choosing the right mockup method is essential for your business’s success.
Photoshop for T-Shirt Mockups: A Professional’s Playground
Adobe Photoshop has long been the industry standard for graphic design. It offers a level of customization and control that is unmatched. But does that mean it’s the best choice for T-shirt mockups?
Advantages of Photoshop
1. Unmatched Customization
With Photoshop, you can manipulate every detail of your mockup:
Adjust shadows, highlights, and textures.
Change the color and lighting to match brand aesthetics.
Add realistic wrinkles, folds, and fabric effects.
2. High-Resolution Output
Unlike some online tools that compress images, Photoshop allows full control over resolution, ensuring crisp and clear designs for product listings and marketing.
3. Freedom to Use Smart Objects
Smart Objects make it easy to insert your T-shirt design seamlessly into a layered PSD mockup, ensuring a realistic appearance.
4. Full Control Over Branding
From background customization to integrating brand elements, Photoshop ensures every mockup aligns with your branding.
Disadvantages of Photoshop
1. Steep Learning Curve
Mastering Photoshop takes time. If you’re new to graphic design, learning its features can be overwhelming.
2. Costly Subscription
Adobe Creative Cloud costs at least $20.99/month for Photoshop alone. For small business owners, this recurring fee can be a drawback compared to free or low-cost online mockup tools.
3. Time-Consuming Process
Unlike quick online generators, Photoshop requires manual adjustments, making it less efficient for entrepreneurs handling multiple designs.
Online T-Shirt Mockup Generators: The Fast & Easy Alternative
Online mockup generators like MockupDaddy offer a more streamlined approach, eliminating complex design processes.
Advantages of Online Mockup Generators
1. User-Friendly Interface
Most online mockup tools have an intuitive drag-and-drop interface. Even without design experience, you can generate a professional-looking mockup in minutes.
2. Speed & Efficiency
Need to upload a design and generate a mockup in under a minute? Online generators allow rapid creation, making them ideal for POD sellers handling large catalogs.
3. Affordable & Subscription-Free Options
Many online platforms offer free mockup generation, while premium versions cost a fraction of Photoshop’s price.
4. Pre-Designed Templates
Services like MockupDaddy provide an extensive library of pre-made templates, allowing you to showcase T-shirts on different models, in various settings, and with unique aesthetic styles.
Disadvantages of Online Mockup Tools
1. Limited Customization
Most online mockup tools don’t allow fine-tuned adjustments like Photoshop. Shadows, fabric textures, and lighting may be fixed or auto-generated.
2. Lower Resolution Limitations
Some free online tools limit the resolution of downloadable mockups, making them unsuitable for large-scale marketing materials.
3. Branding Constraints
Unlike Photoshop, where you control every detail, online mockups may restrict customization options like watermarking or unique brand elements.
Business Impact: Which One Should You Choose?
When Photoshop is Best for Your Business
If you run a high-end, custom apparel brand requiring premium visual aesthetics.
If you have graphic design skills or a team proficient in Photoshop.
If you need absolute creative control over every detail.
When Online Mockup Tools Are Ideal
If you’re a POD entrepreneur managing multiple designs quickly.
If you prefer a cost-effective, no-learning-curve solution.
If you need instant mockups for social media, ads, or product pages.
Real-World Example: The Best of Both Worlds
Take Sarah, a small business owner selling eco-friendly T-shirts. Initially, she relied on Photoshop but found it too time-consuming. After switching to MockupDaddy, she slashed her workflow time in half while maintaining high-quality visuals.
Conversely, David, a luxury streetwear brand owner, sticks to Photoshop to fine-tune his mockups, ensuring an exclusive, high-end appeal.
Both approaches work—it depends on your business model and priorities.
Choosing between Photoshop and online mockup generators isn’t a one-size-fits-all decision. It boils down to your business needs, skill level, and time investment.
If you crave full creative control and high-end customization, Photoshop remains unmatched. But if you need speed, efficiency, and an easy workflow, online mockup tools like MockupDaddy are a game-changer.
The best part? You don’t have to choose just one. Many successful brands use a mix of both, leveraging Photoshop for premium designs and online generators for rapid turnaround times. So, what’s your mockup strategy?
0 notes