#install docker engine on ubuntu
Explore tagged Tumblr posts
Visit Tumblr Blog
Explore Tumblr blogs with no restrictions, modern design and the best experience.
Last Seen Tumblr Blogs


Fun Fact
Tumblr posted its first advertisements in May 2012 and subsequently earned $13M in revenue.
Text
Linux Course in Chandigarh: A Comprehensive Guide for Aspiring IT Professionals
In today’s digital world, Linux has become an essential component of IT infrastructure, powering everything from web servers and cloud systems to embedded devices. As demand for Linux professionals continues to rise, Chandigarh has emerged as a growing hub for quality IT training. This article delves into the importance of Linux, the structure of a typical Linux course in Chandigarh, and how such training can open up a world of opportunities for IT aspirants.
Why Learn Linux?
Linux is a Unix-like operating system that is free, open-source, and widely used in servers, data centers, and cloud computing environments. Here's why learning Linux is a smart career move:
Widely Used: Over 90% of cloud infrastructure and web servers run on Linux.
Career Demand: System administrators, DevOps engineers, cloud professionals, and cybersecurity experts require strong Linux skills.
Open Source Flexibility: Linux allows customization and is at the core of many enterprise technologies including Red Hat, Ubuntu, and CentOS.
Industry Certifications: Linux knowledge is a stepping stone to certifications like RHCSA, RHCE, CompTIA Linux+, and LFCS.
Chandigarh: A Growing IT Education Hub
Chandigarh, with its growing IT infrastructure and educational institutions, is an ideal place for pursuing technical training. The city offers:
Reputed Training Institutes: Several well-established institutes offer Linux and other IT courses.
Affordable Living: Compared to metro cities, Chandigarh is cost-effective for students.
Safe and Student-Friendly: The city has a strong student population and a clean, organized environment.
Who Should Take a Linux Course?
A Linux course is suitable for:
Students pursuing Computer Science or IT.
Working professionals looking to enhance their system administration or DevOps skills.
Fresher graduates who want to enter the IT industry with a specialized skill.
Network administrators aiming to deepen their understanding of Linux-based servers.
Structure of a Linux Course in Chandigarh
Most Linux training programs in Chandigarh are structured to suit both beginners and intermediate learners. Here's what a standard curriculum includes:
1. Introduction to Linux
History and philosophy of Linux
Types of Linux distributions
Installation and configuration
2. Linux Command Line
Basic shell commands
Directory and file manipulation
Text editing using vi or nano
3. File System Management
File types and permissions
Disk partitions and mounting
Logical Volume Manager (LVM)
4. User and Group Management
Creating and managing users/groups
Setting permissions and access control
Understanding /etc/passwd and /etc/shadow
5. Package Management
Using RPM, YUM, DNF (Red Hat-based)
Using APT (Debian/Ubuntu-based)
Installing, updating, and removing software
6. System Services and Daemons
Managing services with systemctl
Configuring startup processes
Working with cron jobs and background tasks
7. Networking Basics
IP addressing and configuration
Configuring DNS, DHCP, SSH
Troubleshooting tools: ping, netstat, traceroute
8. Shell Scripting
Writing and executing bash scripts
Variables, loops, and conditionals
Automating repetitive tasks
9. Security and Firewall Configuration
Setting up a firewall with iptables or firewalld
User authentication and sudo privileges
Securing services and open ports
10. Advanced Topics
Kernel management
Virtualization basics using KVM
Introduction to containers (Docker)
Modes of Training
Chandigarh-based institutes offer various formats of training to suit different needs:
Classroom Training: Instructor-led sessions with hands-on practice in a lab environment.
Online Classes: Live interactive classes or self-paced video modules.
Weekend Batches: Ideal for working professionals.
Fast-Track Courses: Intensive programs for those on a tight schedule.
Certification Support
Many Linux courses in Chandigarh also prepare students for globally recognized certifications, such as:
RHCSA (Red Hat Certified System Administrator)
RHCE (Red Hat Certified Engineer)
LFCS (Linux Foundation Certified System Administrator)
CompTIA Linux+
Certification-oriented training includes mock tests, practical labs, and real-time scenario-based exercises.
Top Institutes Offering Linux Training in Chandigarh
Several reputed training centers offer Linux courses in Chandigarh. While names may vary over time, some consistent features to look for include:
Experienced Trainers with industry background.
Updated Curriculum aligned with Red Hat and Linux Foundation.
Lab Infrastructure to practice real-world scenarios.
Placement Support with interview preparation and resume building.
Some institutes also have partnerships with Red Hat or offer authorized training, giving students access to official courseware and exams.
Career Opportunities After a Linux Course
After completing a Linux course, students can pursue various career roles depending on their skill level and interest:
1. Linux System Administrator
Responsible for installation, configuration, and maintenance of Linux servers.
2. DevOps Engineer
Combines Linux skills with tools like Docker, Jenkins, and Kubernetes to streamline software delivery.
3. Cloud Engineer
Works with cloud platforms like AWS, Azure, and Google Cloud, where Linux is often the default OS.
4. Network Administrator
Manages routers, firewalls, and switches with Linux as the control system.
5. Cybersecurity Analyst
Uses Linux tools for penetration testing, log analysis, and threat detection.
Salary Expectations
Starting salaries for Linux professionals in India typically range from ₹3–6 LPA for freshers, and go up to ₹12–20 LPA for experienced professionals in DevOps or cloud roles.
Benefits of Taking a Linux Course in Chandigarh
Affordable Quality Training: Courses in Chandigarh offer a good balance of cost and content.
Industry-Relevant Curriculum: Most institutes design their syllabus with inputs from industry professionals.
Community and Networking: Access to tech meetups, local developer groups, and hackathons.
Strong Placement Records: Many institutes have tie-ups with IT companies and conduct placement drives.
Tips for Choosing the Right Institute
When selecting a Linux course in Chandigarh, consider the following:
Check the trainer’s credentials and experience.
Ask for a demo class to evaluate teaching style.
Look for hands-on labs and real-world projects.
Ensure they offer certification guidance.
Verify placement support and success stories.
Final Thoughts
With its increasing demand in the job market and wide-ranging applications, Linux has become an indispensable skill for IT professionals. Chandigarh, with its vibrant tech training ecosystem, offers an excellent environment to learn Linux from the ground up.
Whether you are a student planning your career path, a professional looking to upgrade your skills, or an entrepreneur wanting to manage your servers more efficiently, a Linux course in Chandigarh can be your gateway to a successful IT journey.
0 notes
Text
Installing Docker on Ubuntu and CentOS
In this post I will follow the latest official docker steps to install docker engine from docker apt repository on Ubuntu and CentOS. Installing docker engine on Ubuntu I have spawned an Ubuntu server on cloud hosting and will connect with SSH to the machine. It is a fresh server of Ubuntu. Uninstall old versions As per the instructions we have to ensure that any conflicting packages are…

View On WordPress
0 notes
Text
How to Install Docker on Linux Mint 20.
How to Install Docker on Linux Mint 20.
Hi hope you are doing well, lets learn about “How to Setup and Install Docker on Linux Mint 20”, the Docker is the fastest growing technology in the IT market. Docker is the container technology. Many industries are moving towards docker from the normal EC2 instances. It is PAAS (Platform as a Service), which uses a OS virtualisation to deliver software in packages called containers. The…

View On WordPress
#docker hub#docker install rocky linux#install docker ce on Linux Mint 20#Install Docker CE on Rocky Linux#install docker engine on ubuntu#Install docker in rocky linux 8#install docker on Linux Mint 20#Install docker on rocky linux 8#Install docker on ubuntu#Install docker on ubuntu 20.04#install mongodb docker
0 notes
Text
Rhel Docker


Rhel Docker
Rhel Docker Ce
Rhel Docker
Rhel Docker Ce
The Remote - Containers extension lets you use a Docker container as a full-featured development environment. Whether you deploy to containers or not, containers make a great development environment because you can:
Develop with a consistent, easily reproducible toolchain on the same operating system you deploy to.
Quickly swap between different, isolated development environments and safely make updates without worrying about impacting your local machine.
Make it easy for new team members / contributors to get up and running in a consistent development environment.
Try out new technologies or clone a copy of a code base without impacting your local setup.
Rhel Docker
Rhel Docker Ce
The extension starts (or attaches to) a development container running a well defined tool and runtime stack. Workspace files can be mounted into the container from the local file system, or copied or cloned into it once the container is running. Extensions are installed and run inside the container where they have full access to the tools, platform, and file system.
Rhel Docker
Amazon Web Services (AWS) and Red Hat provide a complete, enterprise-class computing environment. Red Hat solutions on AWS give customers the ability to run enterprise traditional on-premises applications, such as SAP, Oracle databases, and custom applications in the cloud.
Windows 10 Home (2004+) requires Docker Desktop 2.2+ and the WSL2 back-end. (Docker Toolbox is not supported.) macOS: Docker Desktop 2.0+. Linux: Docker CE/EE 18.06+ and Docker Compose 1.21+. (The Ubuntu snap package is not supported.) Containers: x8664 / ARMv7l (AArch32) / ARMv8l (AArch64) Debian 9+, Ubuntu 16.04+, CentOS / RHEL 7+ x8664.
Docker volumes allow you to back up, restore, and migrate data easily. This tutorial explains what a Docker volume is and how to use it, as well as how to mount a volume in Docker.
Amazon Web Services (AWS) and Red Hat provide a complete, enterprise-class computing environment. Red Hat solutions on AWS give customers the ability to run enterprise traditional on-premises applications, such as SAP, Oracle databases, and custom applications in the cloud.
You then work with VS Code as if everything were running locally on your machine, except now they are isolated inside a container.
System Requirements
Local:
Windows:Docker Desktop 2.0+ on Windows 10 Pro/Enterprise. Windows 10 Home (2004+) requires Docker Desktop 2.2+ and the WSL2 back-end. (Docker Toolbox is not supported.)
macOS: Docker Desktop 2.0+.
Linux: Docker CE/EE 18.06+ and Docker Compose 1.21+. (The Ubuntu snap package is not supported.)
Containers:
x86_64 / ARMv7l (AArch32) / ARMv8l (AArch64) Debian 9+, Ubuntu 16.04+, CentOS / RHEL 7+
x86_64 Alpine Linux 3.9+
Other glibc based Linux containers may work if they have needed prerequisites.
While ARMv7l (AArch32), ARMv8l (AArch64), and musl based Alpine Linux support is available, some extensions installed on these devices may not work due to the use of glibc or x86 compiled native code in the extension. See the Remote Development with Linux article for details.
Note that while the Docker CLI is required, the Docker daemon/service does not need to be running locally if you are using a remote Docker host.
Installation
To get started, follow these steps:
Install VS Code or VS Code Insiders and this extension.
Install and configure Docker for your operating system.
Windows / macOS:
Install Docker Desktop for Mac/Windows.
If not using WSL2 on Windows, right-click on the Docker task bar item, select Settings / Preferences and update Resources > File Sharing with any locations your source code is kept. See tips and tricks for troubleshooting.
To enable the Windows WSL2 back-end: Right-click on the Docker taskbar item and select Settings. Check Use the WSL2 based engine and verify your distribution is enabled under Resources > WSL Integration.
Linux:
Follow the official install instructions for Docker CE/EE. If you use Docker Compose, follow the Docker Compose install directions.
Add your user to the docker group by using a terminal to run: sudo usermod -aG docker $USER Sign out and back in again so this setting takes effect.
Rhel Docker Ce
Working with Git? Here are two tips to consider:
If you are working with the same repository folder in a container and Windows, be sure to set up consistent line endings. See tips and tricks to learn how.
If you clone using a Git credential manager, your container should already have access to your credentials! If you use SSH keys, you can also opt-in to sharing them. See Sharing Git credentials with your container for details.
Getting started
Follow the step-by-step tutorial or if you are comfortable with Docker, follow these four steps:
Follow the installation steps above.
Clone https://github.com/Microsoft/vscode-remote-try-node locally.
Start VS Code
Run the Remote-Containers: Open Folder in Container... command and select the local folder.
Check out the repository README for things to try. Next, learn how you can:
Use a container as your full-time environment - Open an existing folder in a container for use as your full-time development environment in few easy steps. Works with both container and non-container deployed projects.
Attach to a running container - Attach to a running container for quick edits, debugging, and triaging.
Advanced: Use a remote Docker host - Once you know the basics, learn how to use a remote Docker host if needed.
Available commands
Another way to learn what you can do with the extension is to browse the commands it provides. Press F1 to bring up the Command Palette and type in Remote-Containers for a full list of commands.
You can also click on the Remote 'Quick Access' status bar item to get a list of the most common commands.
For more information, please see the extension documentation.
Release Notes
While an optional install, this extension releases with VS Code. VS Code release notes include a summary of changes to all three Remote Development extensions with a link to detailed release notes.
As with VS Code itself, the extensions update during a development iteration with changes that are only available in VS Code Insiders Edition.
Questions, Feedback, Contributing
Have a question or feedback?
See the documentation or the troubleshooting guide.
Up-vote a feature or request a new one, search existing issues, or report a problem.
Contribute a development container definition for others to use
Contribute to our documentation
...and more. See our CONTRIBUTING guide for details.
Or connect with the community...
Telemetry
Visual Studio Code Remote - Containers and related extensions collect telemetry data to help us build a better experience working remotely from VS Code. We only collect data on which commands are executed. We do not collect any information about image names, paths, etc. The extension respects the telemetry.enableTelemetry setting which you can learn more about in the Visual Studio Code FAQ.
License
By downloading and using the Visual Studio Remote - Containers extension and its related components, you agree to the product license terms and privacy statement.
2 notes
·
View notes
Text
My Homelab/Office 2020 - DFW Quarantine Edition
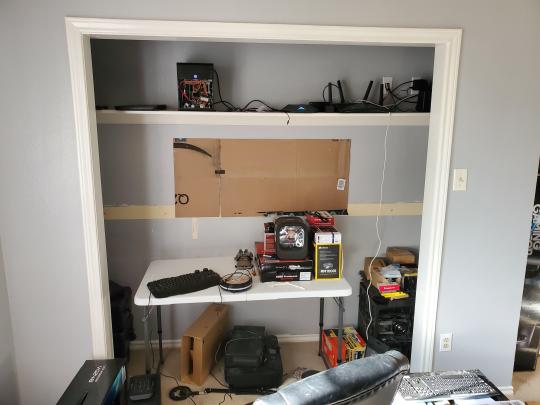
Moved into our first home almost a year ago (October 2019), I picked out a room that had 2 closets for my media/game/office area. Since the room isn't massive, I decided to build a desk into closet #1 to save on space. Here 1 of 2 shelves was ripped off, the back area was repainted gray. A piece of card board was hung to represent my 49 inch monitor and this setup also gave an idea how high I needed the desk.
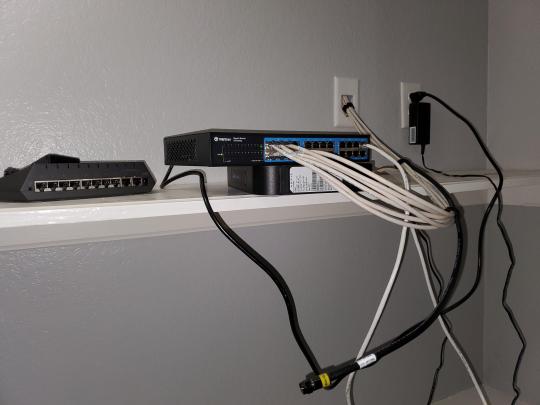
On my top shelf this was the initial drop for all my Cat6 cabling in the house, I did 5 more runs after this (WAN is dropped here as well).
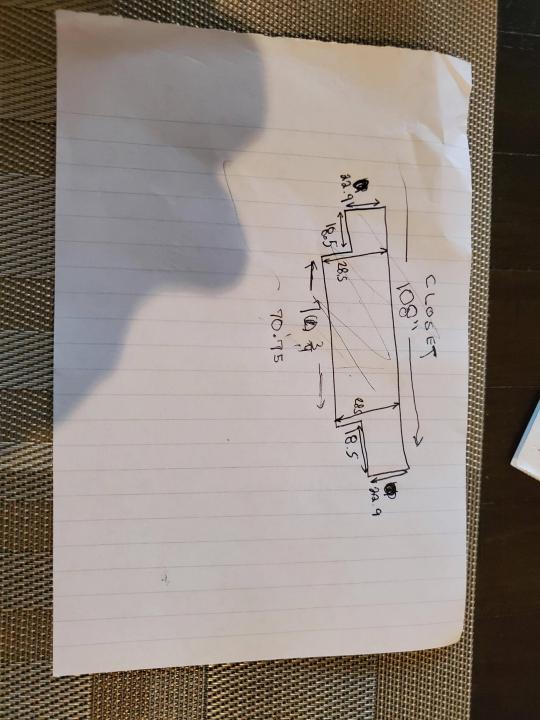
I measured the closet and then went to Home Depot to grab a countertop. Based on the dimensions, it needed to be cut into an object shape you would see on Tetris.

Getting to work, cutting the countertop.
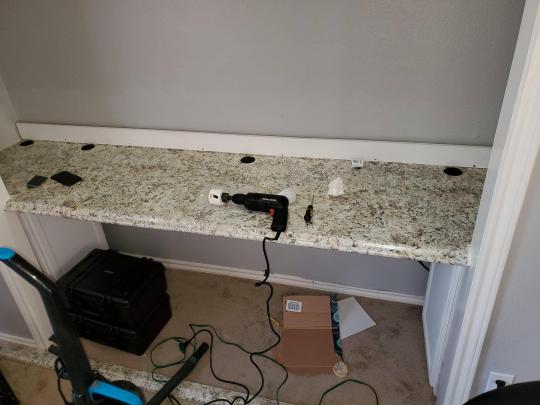
My father-in-law helped me cut it to size in the driveway and then we framed the closet, added in kitchen cabinets to the bottom (used for storage and to hide a UPS). We ran electrical sockets inside the closet. I bought and painted 2 kitchen cabinets which I use for storage under my desk as well.
The holes allowed me to run cables under my desk much easier, I learned many of these techniques on Battlestations subreddit and Setup Wars on Youtube. My daughter was a good helper when it came to finding studs.
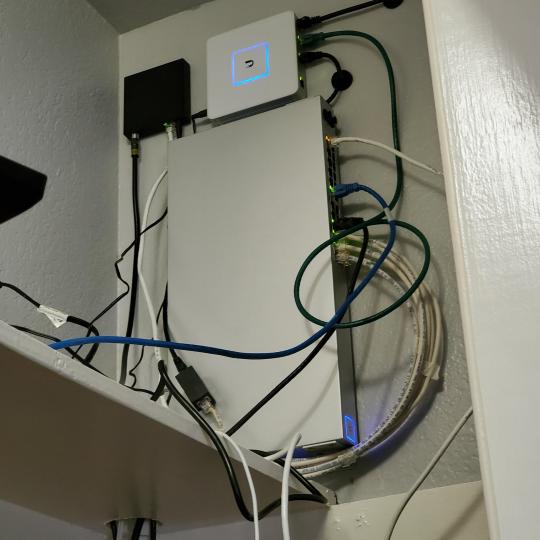
Some of my cousins are networking engineers, they advised me to go with Unifi devices. Here I mounted my Unifi 16 port switch, my Unifi Security Gateway (I'll try out pfSense sometime down the line), and my HD Homerun (big antenna is in the attic). I have Cat6 drops in each room in the house, so everything runs here. On my USG, I have both a LAN #2 and a LAN #1 line running to the 2nd closet in this room (server room). This shot is before the cable management.

Cable management completed in closet #1. Added an access point and connected 3 old Raspberry Pi devices I had laying around (1 for PiHole - Adblocker, 1 for Unbound - Recursive DNS server, and 1 for Privoxy - Non Caching web proxy).
Rats nest of wires under my desk. I mounted an amplifier, optical DVD ROM drive, a USB hub that takes input from up to 4 computers (allows me to switch between servers in closet #2 with my USB mic, camera, keyboard, headset always functioning), and a small pull out drawer.

Cable management complete, night shot with with Nanoleaf wall lights. Unifi controller is mounted under the bookshelf, allows me to keep tabs on the network. I have a tablet on each side of the door frame (apps run on there that monitor my self hosted web services). I drilled a 3 inch hole on my desk to fit a grommet wireless phone charger. All my smart lights are either running on a schedule or turn on/off via an Alexa command. All of our smart devices across the house and outside, run on its on VLAN for segmentation purposes.

Quick shot with desk light off. I'm thinking in the future of doing a build that will mount to the wall (where "game over" is shown).
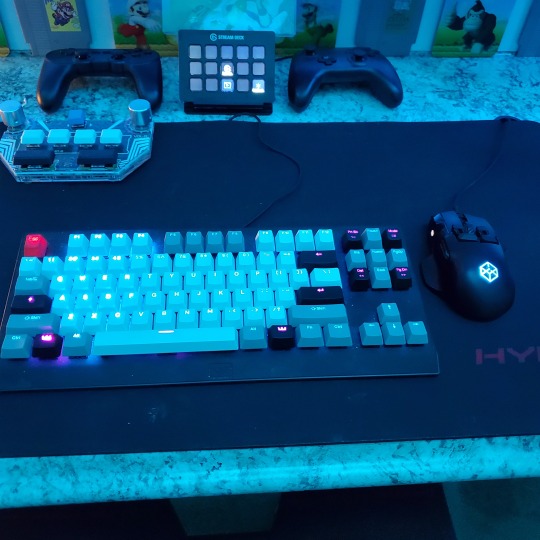
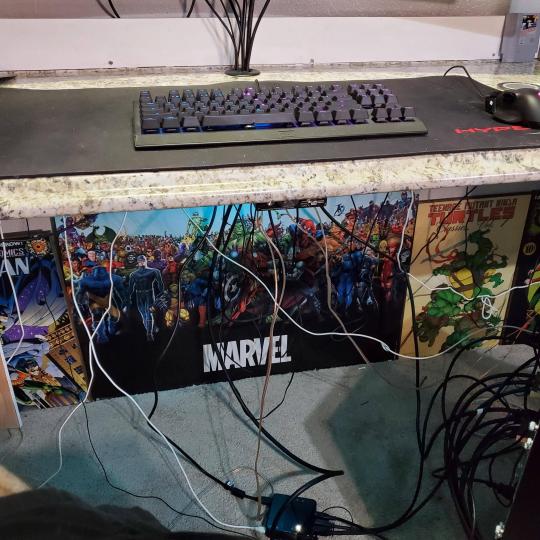
Wooting One keyboard with custom keycaps and Swiftpoint Z mouse, plus Stream Deck (I'm going to make a gaming comeback one day!).

Good wallpapers are hard to find with this resolution so pieced together my own.
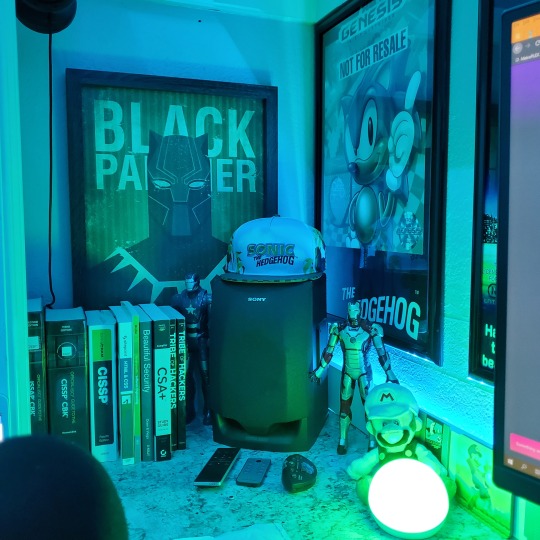
Speakers and books at inside corner of desk.

Speakers and books at inside corner of desk.

Closet #2, first look (this is in the same room but off to the other side). Ran a few CAT6 cables from closet #1, into the attic and dropped here (one on LAN #1, the other on LAN #2 for USG). Had to add electrical sockets as well.
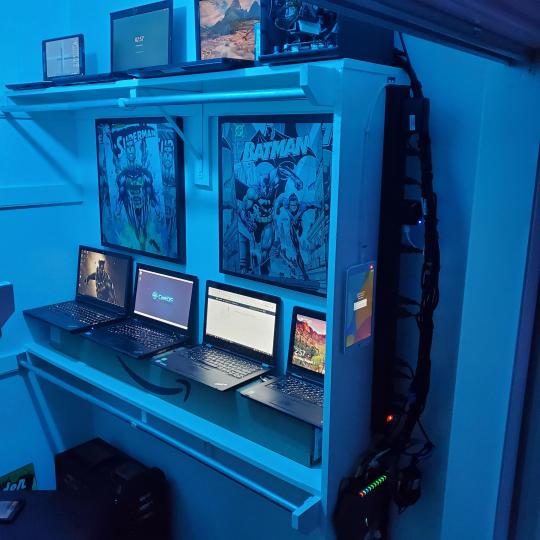
I have owned a ton of Thinkpads since my IBM days, I figured I could test hooking them all up and having them all specialize in different functions (yes, I have a Proxmox box but it's a decommissioned HP Microserver on the top shelf which is getting repurposed with TrueNAS_core). If you're wondering what OSes run on these laptops: Windows 10, Ubuntu, CentOS, AntiX. All of these units are hardwired into my managed Netgear 10gigabit switch (only my servers on the floor have 10 gigabit NICs useful to pass data between the two). Power strip is also mounted on the right side, next to another tablet used for monitoring. These laptop screens are usually turned off.
Computing inventory in image:
Lenovo Yoga Y500, Lenovo Thinkpad T420, Lenovo Thinkpad T430s, Lenovo Thinkpad Yoga 12, Lenovo Thinkpad Yoga 14, Lenovo Thinkpad W541 (used to self host my webservices), Lenovo S10-3T, and HP Microserver N54L

Left side of closet #2
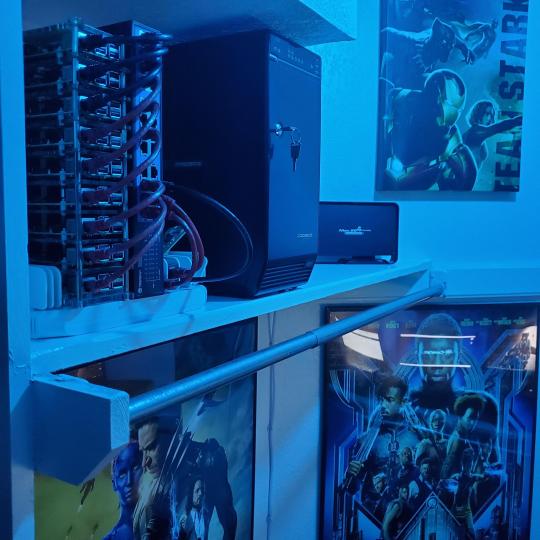
**moved these Pis and unmanaged switch to outside part of closet**
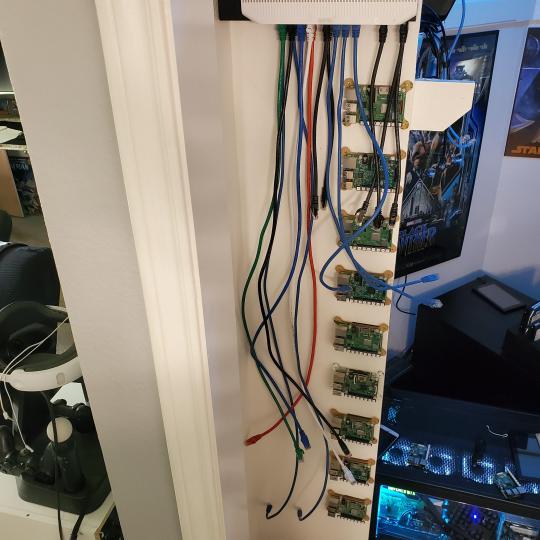
Since I have a bunch of Raspberry Pi 3s, I decided recently to get started with Kubernetes clusters (my time is limited but hoping to have everything going by the holidays 2020) via Rancher, headless. The next image will show the rest of the Pis but in total:
9x Raspberry Pi 3 and 2x Raspberry Pi 4
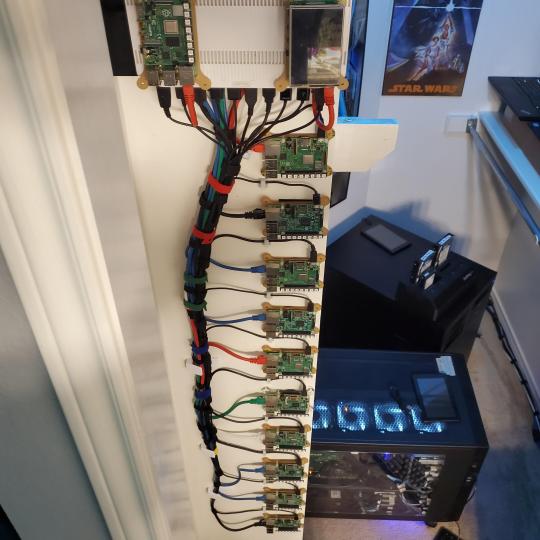
2nd shot with cable management. The idea is to get K3s going, there's Blinkt installed on each Pi, lights will indicate how many pods per node. The Pis are hardwired into a switch which is on LAN #2 (USG). I might also try out Docker Swarm simultaneously on my x86/x64 laptops. Here's my compose generic template (have to re-do the configs at a later data) but gives you an idea of the type of web services I am looking to run: https://gist.github.com/antoinesylvia/3af241cbfa1179ed7806d2cc1c67bd31
20 percent of my web services today run on Docker, the other 80 percent are native installs on Linux and or Windows. Looking to get that up to 90 percent by the summer of 2021.
Basic flow to call web services:
User <--> my.domain (Cloudflare 1st level) <--> (NGINX on-prem, using Auth_Request module with 2FA to unlock backend services) <--> App <--> DB.
If you ever need ideas for what apps to self-host: https://github.com/awesome-selfhosted/awesome-selfhosted

Homelabs get hot, so I had the HVAC folks to come out and install an exhaust in the ceiling and dampers in the attic.

I built my servers in the garage this past winter/spring, a little each night when my daughter allowed me to. The SLI build is actually for Parsec (think of it as a self hosted Stadia but authentication servers are still controlled by a 3rd party), I had the GPUs for years and never really used them until now.
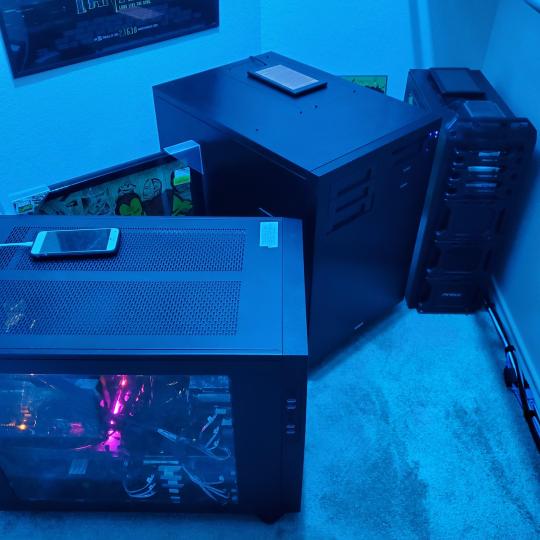
Completed image of my 2 recent builds and old build from 2011.
Retroplex (left machine) - Intel 6850 i7 (6 core, 12 thread), GTX 1080, and 96GB DDR4 RAM. Powers the gaming experience.
Metroplex (middle machine) - AMD Threadripper 1950x (16 core, 32 thread), p2000 GPU, 128GB DDR4 RAM.
HQ 2011 (right machine) - AMD Bulldozer 8150 (8 cores), generic GPU (just so it can boot), 32GB DDR3 RAM.
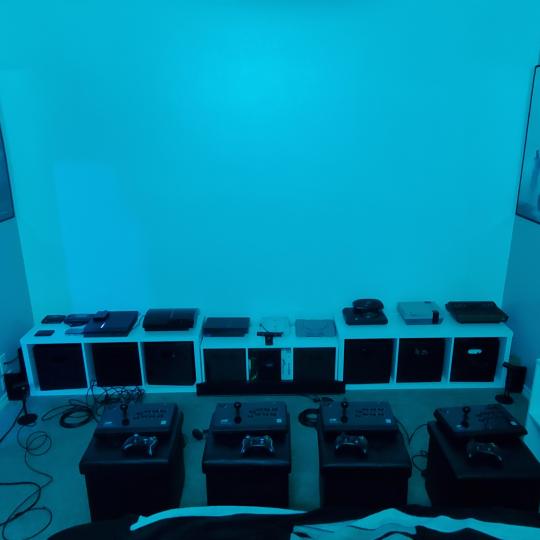
I've been working and labbing so much, I haven't even connected my projector or installed a TV since moving in here 11 months ago. I'm also looking to get some VR going, headset and sensors are connected to my gaming server in closet #2. Anyhow, you see all my PS4 and retro consoles I had growing up such as Atari 2600, NES, Sega Genesis/32X, PS1, Dreamcast, PS2, PS3 and Game Gear. The joysticks are for emulation projects, I use a Front End called AttractMode and script out my own themes (building out a digital history gaming museum).
My longest CAT6 drop, from closet #1 to the opposite side of the room. Had to get in a very tight space in my attic to make this happen, I'm 6'8" for context. This allows me to connect this cord to my Unifi Flex Mini, so I can hardware my consoles (PS4, PS5 soon)

Homelab area includes a space for my daughter. She loves pressing power buttons on my servers on the floor, so I had to install decoy buttons and move the real buttons to the backside.
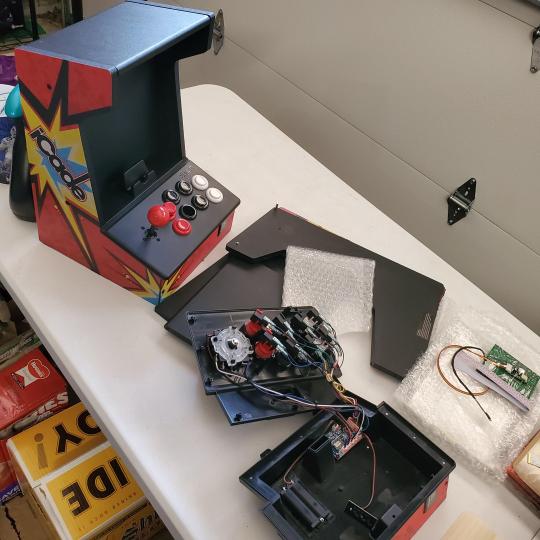
Next project, a bartop with a Raspberry Pi (Retropie project) which will be housed in an iCade shell, swapping out all the buttons. Always have tech projects going on. Small steps each day with limited time.
6 notes
·
View notes
Text
Linuxizing the Office: An Interview with The Mad Botter

If you follow us on Twitter, you’ve probably seen software development company The Mad Botter dangling a System76 machine before your very eyes. Thanks to the company’s recent conversion to Linux, that’s not the only System76 machine you’ll find there! This week, we sat down with Michael Dominick, The Mad Botter’s Founder and CEO, to discuss his team’s switch to System76.
What kind of work goes on at The Mad Botter?
Michael: We’re a software development company. We mostly code on Python, along with some Ruby and Rust, coding IDEs, and using a whole lot of LibreOffice. One of our products is a radar display that runs on Linux and Windows. We actually use a Thelio as a flight simulator to test our software.
Our new product is an automation tool called Rabbot. It involves us having to very quickly spin up a bunch of Ubuntu servers for customers who need them. Having the .deb instances on our computers has made that process a hundred times easier, because we can deploy test units to our machines with the same docker container that works exactly the same as it does on our cloud instances.
Why is it called Rabbot? And what’s with The Mad Botter?
I went a little crazy with the Lewis Carroll references. I have a degree in literature, so I’m very familiar with Carroll’s work. When I moved from New Jersey down to Florida, the name of the company conflicted with a very large football team in Florida, and they did not like that. I had to rejigger everything. We already had a product called Alice at the time, so we decided to build around that.
How long have you been in business?
The Mad Botter has been around for 3 years, and the company before it in New Jersey was around for an additional 3 years. I’ve been running development businesses for around 11 years.
How did you hear about System76?
When I was hosting Coder Radio with Chris Fisher, he would always tease me for being an Apple guy. You know—hipster coffee, the whole thing. He told me, “If you really want a controlled experience to try Linux, take a look at these guys in Denver.” So I did. It wasn’t a huge investment to try on a laptop, and I ended up loving it, so I got the Ratel tower. That was the beginning of a long road to Linux purity.
What System76 machines do you have around the office?
I was the first one to adopt a System76 computer at the company. Now, to make life easy, we only buy System76 computers. Currently we have an older Galago Pro, a Thelio, and 3 Lemur Pros. There’s a couple of Darter Pros running around, too. All of our machines are running Pop!_OS 20.04.
Moving forward, we’re standardizing down to the Lemur Pro and the Oryx Pro. People who have to run VMs are getting the Oryx Pro because you can spec it up a little more. Everybody else is using the Lemur Pro, which is a great all-around computer. The Thelio is a special case because we have to run our flight simulation software on it.
What prompted you to bring your company fully onto Linux?
Honestly, it was macOS Catalina. We were having too many problems with people updating OS X and breaking Homebrew packages, to the point where we had to reinstall our custom toolchain every time we updated. The last guy on Mac updated to Catalina recently, and he had to struggle with Excel libraries because Apple moves things between OS versions. It just wasn’t worth it. I’ve been talking about it for about a year with my CTO.
All of our back-end service runs Ubuntu. Most of the client-side work we’re doing is for IOT devices, and that’s all Linux. We ended up basically having an expensive machine so that we could emulate Linux on anything. It didn’t make a lot of sense to keep using Mac, so we switched.
How was the transition from macOS to Linux?
Actually super easy! Once we wrote a few setup scripts and packages we needed for different jobs in our pipeline, we were up and running. We already had a bunch of scripting and automations for the servers we had, and they’re all on Ubuntu, so it’s not a big jump in terms of the command line.
How did you find the overall experience on Pop!_OS 20.04?
I found it pretty intuitive. Learning the keyboard shortcuts took about a week. I really don’t have any issues. I like the tiling, I use that every day. It definitely makes it easier to multitask on a laptop screen.
Have you tried other distros?
We had a brief stint with Fedora, but because all of our back end was on Debian or Ubuntu, it made sense to stick with that Debian world. We also tried Linux Mint briefly. But honestly the ease of being able to buy a system pre-installed with Pop!_OS that you guys support—where I can just go to your GitHub and see if there’s an issue—is an attractive option.
Have you had any experiences with our support team?
I have a bad habit of spilling tea and other beverages in my laptops... A few times you guys were able to walk me through my issue. I think the most recent one was with Thelio. There was an issue with the graphics card where only one of the DisplayPorts actually worked, so they walked me through trying different things and we were eventually able to figure out why that was happening.
______________________________________________________________
Committed to STEM education and open source software, The Mad Botter INC team is holding a Fourth of July contest for high school and college students! Create and share an open-source project that addresses ballot access or assists with voting, and you can win a System76 Thelio. Hey wait, that’s us! Check out the contest page for details on how to enter.
Michael Dominick is also host of The Mike Dominick Show, where he looks at the latest news from the worlds of technology and open source. Listen to his interview with System76 Principal Engineer Jeremy Soller—stay tuned for the teaser!
If you want to talk to us about how System76 has helped your business, contact [email protected].
#engineering#educationaltechnology#tech#technology#stem#linux#automation#software#development#system76#76#Pop!_OS#Ubuntu#Thelio#computers#laptop#laptops#desktops#mac#apple#alice in wonderland#fedora#mint#ruby#rust#python#catalina#coder radio
10 notes
·
View notes
Text
Panoptes, an open source distributed network telemetry ecosystem is now available on Docker
James Diss, Software Systems Engineer, Verizon Media
Panoptes is an open source network telemetry system that we built to replace a myriad of tools and scripts built up over time to monitor the fleet of hosts worldwide.
The core framework is designed to be extended through the use of plugins which allows the many different devices and device types to be monitored. Within Verizon Media, Panoptes provides the data collection layer that we feed to other projects to allow for visualization of device health according to need, alerting and collation of information.

Normally the components of Panoptes run as a distributed system that allows for horizontal scaling and sharding to different geographical and virtual locations, handling thousands of endpoints, but this can be a difficult environment to simulate. Therefore, we have created a docker image which holds the entire structure of Panoptes in a single container.
I hasten to add that this is not a production instance of Panoptes, and we would not recommend trying to use the docker container “as-is”. Rather, it is more of a workbench installation to examine in motion.

The container is entirely self-contained and builds Panoptes using the freely available package with pip install yahoo-panoptes; it is open-source and built on the ubiquitous Ubuntu 18.04 (Bionic Beaver). A set of scripts are supplied that allow for examination of the running container, and it also runs a Grafana instance on the container to see the data being collected. A dashboard already exists and is connected to the internal data store (influxdb) collecting the metrics.
If you would like to get started right away, you can have Panoptes running very easily by using the prebuilt docker hub image;
docker pull panoptes/panoptes_docker docker run -d \ --sysctl net.core.somaxconn=511 \ --name="panoptes_docker" \ --shm-size=2G \ -p 127.0.0.1:8080:3000/tcp \ panoptes/panoptes_docker
This pulls the docker image from docker hub, then runs the image with a couple of parameters. In order, the “sysctl” command allows redis to run, the “name” is the name that the running container will be given (docker ps shows the currently running containers), and the “shm-size” reserves memory for the container. The “p” parameter exposes port 3000 inside the container to port 8080 on the outside; this is to allow the Grafana library to communicate outside of the container.
If you’re more interested in building the image yourself (which would allow you to play with the configuration files that are dropped in place during the build), clone the repo and build from source.
git clone https://github.com/yahoo/panoptes_docker.git && cd panoptes_docker docker build . -t panoptes_docker
Once the image is built, run with:
docker run -d \ --sysctl net.core.somaxconn=511 \ --name="panoptes_docker" \ --shm-size=2G \ -p 127.0.0.1:8080:3000/tcp \ panoptes_docker
Here are a few useful links and references:
Docker Resources
Docker desktop for Mac https://docs.docker.com/docker-for-mac/install/
Docker desktop for Windows https://docs.docker.com/docker-for-windows/install/
Docker Hub - prebuilt images https://hub.docker.com
Panoptes Resources
Panoptes in Docker prebuilt image https://hub.docker.com/r/panoptes/panoptes_docker
Panoptes in Docker GitHub repo https://github.com/yahoo/panoptes_docker
Panoptes GitHub repo https://github.com/yahoo/panoptes/
Questions, Suggestions & Contributions
Your feedback and contributions are appreciated! Explore Panoptes, use and help contribute to the project, and chat with us on Slack.
3 notes
·
View notes
Text
Parity Wallet
The Parity Wallet is one of several well-liked remedies that were designed for you to serve as each a wallet and a software between the Ethereum software and your laptop or computer. Like MyEtherWallet, Parity is genuinely a browser and not some sort of budget. Parity even bills itself as an �Ethereum Browser� � a web browser is needed because Ethereum is really an extensive system. The idea guiding Parity is to provide the particular most effective connection between Ethereum and various technologies possible. Ethereum came to be as a decentralized data safe-keeping solution, but it is widespread since cryptocurrency because it will be encrypted and very safe. The great way to think of Ethereum is a new second, encrypted network in the internet. Parity is created like a entrance to that network together with an software between the web and even Ethereum. A FULL NODE WALLET Parity was designed since a full-node pocket book the fact that means you can carry out everything this. You will store Ethereum and ERC-20 up to date initial cryptocurrency solutions (ICOs). More importantly, you are able to send and receive bills, buy and sell Azure and ICO tokens, mine, invest in Ethereum plus add the wallet with a wide variety of programs. That makes Parity Ethereum management tool you can add to a number regarding internet browsers and run upon a number of operating systems. Presently, it works with Ubuntu, OS 10, Dockers and Home windows. One reason why users like the Parity Wallet is definitely that provides a dashboard that can be used to manage Ether on your own screen. It will perhaps purpose on desktops just where MyEtherWallet and Mist have got been extra. EASY TO BE ABLE TO USE Parity is pretty effortless if you abide by the instructions in the dash, which are fairly straightforward together with explanatory. If anyone look carefully you ought to see everything explained in order to anyone. This makes saving and managing Ethereum since easy as shopping with Amazon. Although it might take a good while to get your money to exhibit way up in Parity, users survey that it takes many time to be able to record dealings. Another favorite feature is the easy recovery bed sheet with a quick study (QR) code that an individual can scan with nearly any phone. That permits you regain your Parity account quick if that is lost or your own personal pc crashes. LOTS INVOLVING SUPPORT Several developers and even consumers like Parity mainly because the idea has a lot of assist. It is quite uncomplicated to contact and assist the firm responsible intended for the finances. The browser was the creation of the company named Parity Solutions. Based in Manchester and Munich, Parity�s aim is certainly to create a superfast networking that combines expert to see payments, networking, algorithms, cryptography, databases, and decentralized purposes. This provides a new more specialized operation in addition to a higher level connected with assistance than some connected with Parity��s challengers. Parity offers what it wants to phone the �world�s best plus lightest client� that may be included immediately into a net cell phone browser. That means it is a lot a great deal more than a wallet. You can store, receive and send Ethereum by means of Parity, yet you can likewise create or execute contracts and even design, deploy, plus any wide variety involving Ethereum-based applications. The best way it does that is to be able to work as the interface involving various networks. The assist on Parity includes device tests and review designed to make certain every performs. That also contains some associated with the most experienced cryptocurrency technical engineers around. HIGH AMOUNT OF KNOWLEDGE Parity Systems includes some of the people that helped develop Ethereum itself. Parity�s founder Doctor Gavin Solid wood, worked well together with Ethereum founder Vitalik Buterin when this individual first designed the blockchain system. Wood is actually wanting to develop a greater and much more comprehensive Ethereum software built to serve as the full-service payment network. Often the Parity Wallet is meant to become the cornerstone of that system. Ethereum Parity v2.3.4 can be to create next-generation Fin-Tech solutions which can be marketed for you to banks, retailers, off-set money, credit card companies, governing bodies, and other organizations. These remedies would certainly utilize the Ethereum blockchain to make market segments, retail systems, and economic products. THE FEATURES CONNECTED WITH PARITY Some Parity�s illustrates and selling things incorporate: Will work with The apple company McIntosh computers via the OSX operating technique. Will certainly work using the Linux-based Ubuntu operating system. Works together with an ecommerce applications software called Docker. Basic one-word online setup intended for Apple pc and Ubuntu, and perhaps Stainless and Android. PARITY FEATURES The most impressive matter about Parity is several of the very advanced features it provides. They look to possibly be years prior to other wallets and handbags and might supply a good more effective payment alternative. Competitors would be well-advised to help imitate some of Parity�s very-impressive new attributes. These are a little technological but if they will work as offered, those people features will make Parity of the best level of privacy wallets currently available. One least appreciated Parity attribute is often the Rust programming terminology which usually is low-level. That helps make Parity, simple and faster than other wallets and handbags, and even should reduce errors. Rust will allow the creation regarding complex smart contracts using JITEVM turbocharging and multi-level storage caching. Parity Systems claims that Rust guarantees safety with actor-based modality, unit testing, and expert review. That is made to create a better made and resilient process. More levels of durability are really created along with a standard, JSON-based company specs structure, native rate contracts plus modular design. Higher levels of security, privateness, and even anonymity are offered by means of Parity�s small impact. Acquiring a small footprint helps make Parity harder to detect and track on-line. A smaller footprint provides a bigger level involving cache management and generates a more compact storage footprint that is certainly less complicated to manage but harder for the bad guys to be able to discover. Even though the website fails to mention Android mobile phone or Chromium, the builders claim it truly is highly suitable with Linux-based operating systems. This kind of is achieved through 100% test conformant consensus conformant execution, standard devp2p community standard protocol, and full match ups with JSON-RPC-API. All the fact that should really make Parity specific simple to operate with one collection Apple pc and even Linux installation. That means one line installation on Chrome and even Android might be available for the reason that those Google solutions usually are Linux-based. Installation can furthermore be made with Docker photos. PARITY VS MYETHERWALLET Parity by far is made for the considerably more techie user who needs to get smart having the interior workings associated with ethereum wallets and handbags. There� Parity Wallet Download 2.4.0 for stuff like multisig legal papers, manual adjustment associated with GWEI (useful if a person are trying to find directly into a new highly reasonably competitive ICO) values, and more. However, Parity does not necessarily have the easiest-to-use user interface and, as things proceed, certainly not as user-friendly as MyEtherWallet. Power users will certainly almost certainly prefer Parity in excess of MyEther Wallet. Casual consumers who else just need a good private pocket to shop ERC20 tokens will most likely desire MyEtherWallet Is Parity with regard to You? All this creates Parity a great solution for severe Ethereum geeks and people that are trying to developing next-generation Ethereum solutions. Parity would end up being a great use for you if you want for you to create or maybe execute great contracts one example is. Persons together with organizations that want a internet browser that can help average people access and usage Ethereum would be well-served simply by Parity. That causes a great substitute for ecommerce companies and fiscal professionals. Parity may well certainly not be a good alternate for somebody who is definitely just searching for a good suggests of buying, stocking, sending and trading Ethereum. The big drawback to Parity that individuals can see is definitely that this will not look to be compatible together with any of the well-liked cryptocurrency hardware wallets. It appears to be as if no assist can be obtained for the TREZOR or any in the Journal products such as this Piccolo S. That may well make MyEtherWallet which will easily be installed on often the TREZOR and Piccolo T, some sort of better alternative. Why You Need More in comparison with Only one Cryptocurrency Wallet A good totally obvious solution for the particular person that will wants for you to store Ethereum will be to possess two or more wallets and handbags. A major advantage to Parity is that it is supposed to be compatible with pouches like the Mist together with MyEtherWallet. A person can use Parity regarding sophisticated Ethereum tasks like making money with smart contracts, as well as the additional wallet for storing altcoins or switching it to equipment wallets. One of typically the best strengths to Parity is that it is creators� acknowledge the need for several wallet. If an individual watch good news, you almost certainly know that every altcoin within the sun has been recently hacked. Using two or maybe more wallets can add more security and produce the idea harder for crooks to swipe your current coins. Parity�s recognition on this a weakness in addition to the need for diversity is a solid marketing point with regard to the items. It might likewise possibly be an indication that Parity Technologies is planning some other products in the future such as a Australian visa or MasterCard debit credit card or a mobile app that converts cryptocurrency for you to fiat currencies such while money. A smart strategy is to possess two or more wallets and handbags with your computer and much more in comparison with one hardware wallet. A good good mix of billfolds would have been a Parity, MyEtherWallet, a new standard commercial wallet like Coinbase, a trading remedy like CEX. IO, a TREZOR for travel, one other components wallet for storage space, including least wallet using a MasterCard or Australian visa payment selection. There may be now several wallets linked to MasterCard and Visa debit cards such as TenX. These a option would be some sort of superior option � as you can make use of the debit card in places like the grocery store and also to get dollars from ATMs if have be. A VERY INNOVATIVE BUDGET WITH A LARGE LEVEL OF TESTING You should definitely consider using Parity should you need an innovative wallet that provides a great deal of support. The Parity Technological innovation Team seems to offer a lot more support and a new a higher level00 seriousness than a few of it is competitors. Their best attribute is undertaking a lot of examining. There is certainly enough support to help create a merchandise honestly, that is stable and basically gets results. Unlike some other altcoin solution providers, Parity Technology tests its merchandise alone rather than dumping all of them out online for uninformed consumers to tests. A proven way Parity tries to sustain sturdiness and stability is definitely by trying to test and release new editions or updates every six weeks. An additional is through 100 % unit-testing which many cryptocurrency geeks know is definately not often the industry standard. Parity features even managed to conduct more than 1, 000 opinion checks in a great hard work to be sure its products really work. Individuals reviews contain static program code checking, and even obtaining more than one expert programmers review every single update in advance of it is revealed. In the event you need a wallet of which completely has to help work, Parity is intended for you. The testing should really provide a higher levels of resilience plus trustworthiness than you are possibly utilized to. HIGH LEVEL REGARDING TRANSPARENCY Additionally, Parity basically outlines its� testing techniques and procedures online. This actually goes out of the way to reveal this kind of attributes as block-processing rate, memory footprint, and trie benchmarks online. That indicates techies can actually for you to see if Parity�s promises are for real. Parity Wallet v2.3.4 delivers a far higher amount of transparency than will be usually seen through several crypto solution suppliers. It is a true start taken solution created using a dangerous of visibility and sincerity. Developers will certainly definitely appreciate the fact that although so will regular people that want something sufficient for the pros to be able to use. A person big advantages to Parity is the fact that the idea is a professional alternative.

PARITY IS A GOOD SOLUTION FOR ENTREPRENEURS When you need something of which developers might access in addition to play with, Parity is normally definitely for you. That would help it become some sort of fine solution for anyone that is trying to produce smart contracts, a good ICO, or an Ethereum-based web commerce market platform, or product. Somebody that expects to hire a team connected with engineers to help develop a good new Ethereum-solution would be incredibly well served by Parity. So would entrepreneurs looking to do business with large institutions such like big banks, governments, large firms, investment banking institutions, hedge funds, credit-card providers, and technology companies. Parity might be more likely to be able to offer the degree of documentation, safety, and visibility those companies require. That makes Parity a great choice of finances for those trying for you to create or even design following generation internet solutions. In case you own a organization or website and you want to add more Ethereum � Parity will be a great way to do the idea. This means Parity is certainly not necessarily a fantastic solution to get private individuals. It appears to be like some sort of business solution for professionals � that requires some level of technical skills to implement. In case you want to understand Ethereum and how to help produce Ethereum-based solutions, you should definitely get informed about Parity and learn to use it. Persons that will just want to make use of Ethereum as a repayment alternative, might be better served by way of a more consumer-friendly solution like MyEtherWallet. With luck ,, the Parity Technologies group will generate a simpler version of their wallet for use by this general public eventually. Their product is impressive and it also deserves to find the large advertise and market. Note that typically the split developers behind parity are putting their abilities in to developing a new crypto that aims to become the next big movement above ethereum � many might argue the next generation regarding blockchain technological innovation � using a internet of �blockchains� that aims to interface together with connect with different blockchains. This new cryptocurrency is termed Polkadot and goes survive Q4 2019. People the fact that want to see what a cryptocurrency wallet plus an Ethereum browser have to look such as must check out Parity. Parity Ethereum v2.3.5 might well come to be the yellow metal standard involving Ethereum-interface alternatives.
1 note
·
View note
Text
Parity Wallet
The Parity Wallet is 1 of several well-known options that were designed to be able to serve as each the wallet and a good software between the Ethereum program and your computer. Like MyEtherWallet, Parity is really a browser rather than just a wallet. Parity perhaps bills itself as an �Ethereum Browser� � a web browser is needed because Ethereum is absolutely an extensive community. The idea behind Parity is to provide this fastest connection between Ethereum as well as other technologies possible. Ethereum is made as a decentralized data storage solution, but it is widely used while cryptocurrency because it will be encrypted and very safe and sound. The great way to believe of Ethereum is some sort of second, encrypted network inside the internet. Parity is made as a portal to of which network together with an program between the website and even Ethereum. The FULL NODE WALLET Parity was designed since the full-node finances that means you can do everything this. You might store Ethereum and ERC-20 certified initial cryptocurrency offerings (ICOs). More importantly, you may send and receive obligations, buy and sell Ether and ICO tokens, mine, invest in Ethereum plus add the wallet with a wide variety of software. That makes Parity Ethereum management tool you can add more to a number involving windows together with run upon several operating systems. At the moment, the idea works with Ubuntu, OSX, Dockers and House windows. One of the reasons for this why users prefer the Parity Wallet is that provides a dashboard that can be made use of to manage Ether on the screen. It will possibly purpose on personal computers just where MyEtherWallet and Mist possess been additional. EASY IN ORDER TO USE Parity is quite quick if you stick to the instructions on the dashboard, which are fairly very simple plus explanatory. If a person look strongly you will need to see everything explained for you to anyone. This makes holding and handling Ethereum since easy as shopping on Amazon. Although it may possibly take some sort of while with regard to your funds to indicate up in Parity, users statement that it takes several time to be able to record transactions. An additional famous feature will be the easy recovery linen with a quick read through (QR) code that anyone can scan along with almost any phone. That let us you regain your Parity account quick if it is lost or your own pc crashes. LOTS CONNECTED WITH SUPPORT Many developers plus consumers similar to Parity mainly because the idea provides extensive of assist. It is rather quick to contact and handle the business responsible regarding the particular pocket. The browser was the creation of a good company called Parity Systems. Based in London and Munich, Parity�s target is usually to create a superfast networking system that combines expert to peer payments, networking, algorithms, cryptography, databases, and decentralized applications. This provides a more expert operation together with a higher level of support than some associated with Parity�s challengers. Parity provides what it loves to contact the �world�s fastest in addition to lightest client� which might be integrated directly into a web web browser. That means it is a lot a lot more than a good wallet. A person can store, be given together with send out Ethereum by way of Parity, but you can in addition produce or execute plans and even design, deploy, in addition to any wide variety of Ethereum-based applications. One of the ways the idea does that is to function as a great interface among diverse networks. The support on Parity includes device testing and review created to ensure that every functions. That also includes some involving the most experienced cryptocurrency technical engineers around. HIGH STAGE OF EXPERTISE Parity Technologies includes some people that assisted develop Ethereum itself. Parity�s founder Dr . Gavin Real wood, worked well using Ethereum author Vitalik Buterin when they first designed typically the blockchain podium. Wood is actually wanting to develop a much larger and even more comprehensive Ethereum podium created to serve as a full-service settlement network. The Parity Budget is expected to turn out to be the cornerstone of that system. 1 apparent goal here can be to make next-generation Fin-Tech solutions that may be marketed to help banks, retailers, off-set resources, credit card companies, authorities, and various organizations. These options would utilize the Ethereum blockchain to develop markets, retail systems, and financial products. THE HIGHLIGHTS CONNECTED WITH PARITY Some Parity�s highlights and selling points consist of: Will work with Apple mackintosh McIntosh computers via often the OSX operating technique. Will work with Ethereum Parity v2.3.5 -based Ubuntu operating process. Works with an ecommerce software software called Docker.

Straightforward one-word online setup intended for Mac and Ubuntu, and possibly Chromium and Android. PARITY FUNCTIONS The most impressive point about Parity is a few of the very advanced features it provides. They look to always be years in front of other wallets and handbags and might present a new more effective payment answer. Competitors would be well-advised to help imitate some associated with Parity�s very-impressive new characteristics. These are a touch techie but if that they work as publicized, individuals features will make Parity of the best privacy wallets on the market. One most difficult Parity function is this Rust programming language which usually is low-level. That tends to make Parity, simple and faster than other wallets, together with should reduce errors. Oxidation enables the creation connected with complex smart contracts using JITEVM turbocharging and multi-level memory space caching. Parity Technologies claims that Rust guarantees safety with actor-based modality, unit testing, and expert review. That is created to create a more robust and resilient method. Additional levels of strength are created having the regular, JSON-based company standards format, native acceleration contracts together with modular buildings. Higher levels of security, comfort, in addition to anonymity are given by way of Parity�s small footprint. Obtaining a small impact tends to make Parity harder to detect and track on-line. A small footprint provides a higher level regarding cache managing and makes a lesser storage impact that is less difficult to manage but more difficult for the bad guys to identify. Even though the website does not mention Android mobile phone or Stainless, the creators claim it can be highly appropriate with Linux-based systems. This is achieved through totally test conformant consensus conformant setup, standard devp2p network protocol, and full compatibility with JSON-RPC-API. All that will should really make Parity specific convenient to use with one line Macintosh personal computer in addition to Linux installation. That means one line assembly on Chrome in addition to Android might be available due to the fact those Google solutions are Linux-based. Installation can in addition be made with Docker photos. PARITY VS MYETHERWALLET Parity by far is usually made for the whole lot more technical user who likes to get smart using the internal workings of ethereum pouches. There�s help support for stuff like multisig deals, manual adjustment connected with GWEI (useful if an individual are trying to find directly into a good highly aggressive ICO) values, and whole lot more. However, Parity does not really have the easiest-to-use interface and, as things get, not really as user-friendly as MyEtherWallet. Power users is going to most likely prefer Parity more than MyEther Wallet. Casual customers who just need the private pocket to shop ERC20 tokens probably will like MyEtherWallet Is Parity for You? All this makes Parity a great alternative for serious Ethereum geeks and people which might be attempting to developing next-generation Ethereum solutions. Parity would end up being a very good app for an individual if you want to be able to create as well as execute smart contracts such as. Persons and even businesses that require a web browser that can help regular people access and employ Ethereum would be well-served by way of Parity. That causes a great choice regarding ecommerce companies in addition to fiscal professionals. Parity may possibly certainly not be a good choice for somebody who can be just seeking the signifies of buying, storing, sending and trading Ethereum. A good big drawback to Parity which we can see is that it does not turn up to be compatible along with any of the favorite cryptocurrency hardware wallets. It appears to be as if no help is offered for the TREZOR or any with the Journal products such as the particular Nano Ersus. That might make MyEtherWallet which can certainly easily be installed on typically the TREZOR and Ridotto T, some sort of better solution. So why You Need More than One Cryptocurrency Wallet A great obvious solution for a good person that will wants to be able to store Ethereum would be to have two or more billfolds. A big advantage to Parity is that it is supposed to be able to be compatible with pouches like the Mist plus MyEtherWallet. A person can certainly use Parity regarding sophisticated Ethereum tasks for example earning cash smart contracts, as well as some other wallet for saving altcoins or shifting these to components billfolds. One of the particular best positive aspects to Parity is that it is creators� acknowledge the need for a couple of wallet. If a person watch the news, you probably know that every altcoin within the sun has been hacked. Employing two or maybe more wallets can add more a great deal more security and try to make it more difficult for crooks to help swipe your coins. Parity�s recognition of this weak point and even the need for division is a sturdy advertising point regarding the items. It might in addition be an indication that Parity Technologies is planning other products in the future such as a Visa for australia or MasterCard charge credit or a mobile application that converts cryptocurrency to be able to fiat currencies such while dollars. A smart technique is to include a couple of or more wallets about your computer and more in comparison with one components pocket book. A new good mix of billfolds might be a Parity, MyEtherWallet, some sort of typical commercial wallet like Coinbase, a trading solution like CEX. IO, a good TREZOR for travel, another computer hardware wallet for storage space, including least wallet together with a Master card or Visa for australia payment option. There are generally now various wallets associated with MasterCard and Visa free e cards such as TenX. These a fix is a good fine option � because you can employ the debit card on places like the market store in order to get cash from ATMs if have to have be. A VERY INNOVATIVE WALLET WITH A HIGH LEVEL OF TESTING Anyone should definitely consider employing Parity if you need an state-of-the-art wallet that provides lots of support. The Parity Systems Team seems to offer even more support and a good higher level of professionalism and reliability than quite a few of the competitors. Their best attribute is apparently undertaking a lot of tests. You can find enough support in order to create a item honestly, that is stable and really works. Unlike some different altcoin solution providers, Parity Systems tests its merchandise alone rather than dumping them all out online for naive consumers to tests. A proven way Parity tries to sustain strength and stability will be by trying to test plus release new versions or maybe updates every 6 weeks. An additional is through totally unit-testing which many cryptocurrency geeks know is definately not this industry standard. Parity possesses even managed to perform over 1, 000 consensus testing in an energy to guarantee its products actually work. These reviews include things like static code checking, together with possessing one or two expert coders review every update ahead of it is printed. When you need a finances the fact that totally has to help work, Parity is regarding you. The testing is supposed to provide a higher grade of resilience together with stability than you are probably accustomed to. HIGH LEVEL OF TRANSPARENCY Additionally, Parity truly outlines its� testing processes and procedures online. Parity Ethereum v2.3.4 in fact dissapear of typically the way to reveal these attributes as block-processing velocity, memory footprint, and trie benchmarks online. That means techies can actually for you to see if Parity�s claims are for real. That provides a far higher stage of openness than is definitely usually seen via several crypto solution vendors. The idea is a true available procured solution designed with a high level of openness and ethics. Developers will certainly definitely take pleasure in the fact that nevertheless so will average consumers that want something suitable for the pros for you to use. 1 big edge to Parity is the fact that is a professional alternative. PARITY IS A GOOD SOLUTION FOR ENTREPRENEURS In the event you need something of which developers might access and even play with, Parity is normally definitely for you. The fact that would allow it to be a new superior solution intended for somebody who else is trying to produce smart contracts, the ICO, or an Ethereum-based web commerce market platform, or even item. Somebody that intends to be able to hire a team regarding engineers to be able to build a new new Ethereum-solution might be incredibly well dished up by Parity. So would entrepreneurs that want to do business with large businesses such as big banks, governing bodies, substantial corporations, investment banks, hedge funds, credit-card services, and even technology companies. Parity will be more likely to supply the degree of paperwork, safe practices, and openness those businesses require. Generates Parity a new great choice of budget for those trying in order to create or even design following generation ecommerce solutions. When you own a company or perhaps website and you want to include Ethereum � Parity will be a fantastic way to do it. Parity Wallet Download 2.4.0 implies Parity is not necessarily necessarily an excellent solution for private people. It appearance like some sort of business remedy for professionals � that will require some level of technical competence to implement. In the event that you want to study Ethereum and how to make Ethereum-based solutions, an individual should definitely get informed about Parity and learn in order to use it. Persons the fact that just want to work with Ethereum as a payment option, might be better served by a more consumer-friendly solution like MyEtherWallet. Hopefully, the Parity Technologies company will make a much easier version of their wallet for use by this general public at some time. Their very own product is impressive and it also deserves to find a large market place and viewers. Note that the particular split developers behind parity are really putting their skills in developing a new crypto that aims to always be the next big movement past ethereum � many will argue the next generation associated with blockchain technology � together with an net of �blockchains� that should interface in addition to connect with different blockchains. This new cryptocurrency is called Polkadot and goes dwell Q4 2019. People of which need what a cryptocurrency pocket book together with an Ethereum browser ought to look such as must check out Parity. Parity Wallet v2.3.5 might well grow to be the platinum standard regarding Ethereum-interface solutions.
1 note
·
View note
Text
Notes for myself: Configuring your development environment with Docker and Java/Spring
This is a note to the future: setting up a development environment
Docker
This may be the first software to install and set up the everything goes smoothly while I prepare the environment for this new project.
Here, the docker documentation is your best friend. I know, the direct link is on Ubuntu because I use this respective OS.
Notes to myself:
Install the Docker Engine using the repository
Then do the install for Docker Desktop for Linux
I encounter myself with some errors that only a clean install again-and-again fixes. So, I took this as advice for the future.
Also, don’t forget to set the permissions.
This 4.2 is really important if can’t connect to the docker daemon.
Java/Spring
Always verify the source compatibility from the project and check the IDE’s SDK to build for gradle or maven depending on the project.
And this is enough to everything doesn't take no more than 30 minutes, instead of the hours of documentation and search it through that it took me to fix a bunch of errors.
0 notes
Text
In dieser Anleitung installieren wir Podman, auch unter den Namen „Pod-Manager“ bekannt, auf einen Server mit Linux Ubuntu 22.04. Podman gilt als moderne und freie Alternative für die Docker-Software, da sie im Punkto Sicherheit nicht auf Root-Rechte angewiesen ist und ohne den speicherlastigen Docker-Daemon auskommt.
Red Hat Enterprise Linux hat die Docker-Engine selbst erst in diesem Jahr aufgrund von Unstimmigkeiten mit den Entwicklern verbannt, und empfiehlt fortan die Verwendung von Podman für die Containervirtualisierung. Jeglicher Support seitens RHEL wurde aus mehreren Gründen eingestellt...[Weiterlesen]
0 notes
Text
How to Install Docker on Ubuntu 20.04.
How to Install Docker on Ubuntu 20.04.
Hi hope you are doing well, lets learn about “How to Setup and Install Docker on Ubuntu 20.04”, the Docker is the fastest growing technology in the IT market. Docker is the container technology. Many industries are moving towards docker from the normal EC2 instances. It is PAAS (Platform as a Service), which uses a OS virtualisation to deliver software in packages called containers. The…

View On WordPress
#docker hub#docker install rocky linux#Install Docker CE on Rocky Linux#install docker engine on ubuntu#Install docker in rocky linux 8#Install docker on rocky linux 8#Install docker on ubuntu#Install docker on ubuntu 20.04#install mongodb docker#setup docker on rocky linux
0 notes
Text
This guide will walk you through steps used to install JFrog Artifactory on CentOS 7. JFrog Artifactory is the world’s most advanced repository manager which fully supports software created in any language or using any tool. JFrog Artifactory is designed to integrate with the majority of continuous integration and delivery tools to deliver an end to end automated solution for tracking artifacts from development to production. A number of open source plugins are available to give you an easy way to extend the capabilities of Artifactory and integrate with other tools. Examples are Jenkins, TeamCity, Bamboo, Maven, Bower and Gradleand much more. For Ubuntu, use: How to Install JFrog Artifactory on Ubuntu There are different editions of JFrog Artifactory available, check the Comparison Matrix. There two ways of installing Artifactory on CentOS 7: Using Docker Installing from RPM packages Method 1: Install JFrog Artifactory using Docker For Docker installation, here are the steps to use: Step 1: Install Docker Engine Install Docker using our previous guide: How to install Docker CE on Ubuntu / Debian / Fedora / Arch / CentOS Step 2: Download JFrog Artifactory Docker image Pull the latest Docker image of JFrog Artifactory. docker pull docker.bintray.io/jfrog/artifactory-oss:latest For CE edition: docker pull docker.bintray.io/jfrog/artifactory-cpp-ce Confirm Docker images: $ docker images REPOSITORY TAG IMAGE ID CREATED SIZE docker.bintray.io/jfrog/artifactory-cpp-ce latest 24d943a892ac 43 hours ago 582MB docker.bintray.io/jfrog/artifactory-oss latest 58d49856785f 43 hours ago 582MB Step 3: Create Data Directory Create data directory on host system to ensure data used on container is persistent. sudo mkdir -p /jfrog/artifactory sudo chown -R 1030 /jfrog/ Step 4: Start JFrog Artifactory container To start an Artifactory container, use the command: docker run --name artifactory -d -p 8081:8081 -p 8082:8082 \ -v /jfrog/artifactory:/var/opt/jfrog/artifactory \ docker.bintray.io/jfrog/artifactory-oss:latest You can pass Java system properties to the JVM running Artifactory using EXTRA_JAVA_OPTIONS. Check more on Docker setup link. See example below. docker run --name artifactory -d -p 8081:8081 -p 8082:8082 \ -v /jfrog/artifactory:/var/opt/jfrog/artifactory \ -e EXTRA_JAVA_OPTIONS='-Xms512m -Xmx2g -Xss256k -XX:+UseG1GC' \ docker.bintray.io/jfrog/artifactory-oss:latest Use docker ps command to view container information. Step 5: Running JFrog Artifactory container with Systemd Systemd is the default init system for CentOS 7. We can use it to manage JFrog Artifactory container. Create Artifactory service unit file. sudo vim /etc/systemd/system/artifactory.service Add: [Unit] Description=Setup Systemd script for Artifactory Container After=network.target [Service] Restart=always ExecStartPre=-/usr/bin/docker kill artifactory ExecStartPre=-/usr/bin/docker rm artifactory ExecStart=/usr/bin/docker run --name artifactory -p 8081:8081 -p 8082:8082 \ -v /jfrog/artifactory:/var/opt/jfrog/artifactory \ docker.bintray.io/jfrog/artifactory-oss:latest ExecStop=-/usr/bin/docker kill artifactory ExecStop=-/usr/bin/docker rm artifactory [Install] WantedBy=multi-user.target Reload systemd. sudo systemctl daemon-reload Then start Artifactory container with systemd. sudo systemctl start artifactory Enable it to start at system boot. sudo systemctl enable artifactory Status can be checked with: systemctl status artifactory Sample output: Also check service binding with: ss -tunelp | grep 8081 Step 6: Access Artifactory Web Interface Artifactory can be accessed using the following URL: http://SERVERIP_OR_DOMAIN:8081/artifactory Follow setup instructions that follows. Select the package type(s) you want to create default repositories for.
You can skip to set later. Click “Finish” button to complete installation. Step 7: Configure Nginx reverse proxy (Optional) If you want to use Nginx as Proxy with SSL, check out the guide below: Configure JFrog Artifactory behind Nginx and Let’s Encrypt SSL Method 2: Install JFrog Artifactory using RPM Here are the steps you need to install JFrog Artifactory on CentOS 7 from RPM packages. Step 1: Install Java Use the commands below to install Java on CentOS: sudo yum -y install java-1.8.0-openjdk java-1.8.0-openjdk-devel sudo alternatives --config java java -version Step 2: Set JAVA_HOME After installing Java, Set JAVA_HOME environment variable. Set JAVA_HOME on CentOS / RHEL / Fedora Step 3: Install and Configure Database Server Install MariaDB Database Server: Install MariaDB Server on CentOS 7 Step 4: Add JFrog Artifactory RPM repository The JFrog Artifactory packages are available on official repository. Add it by running: curl -sL https://bintray.com/jfrog/artifactory-rpms/rpm | sudo tee /etc/yum.repos.d/bintray-jfrog-artifactory-rpms.repo This repository works for both Artifactory CE and Artifactory OSS editions. Step 5: Install JFrog Artifactory on CentOS 7 Installing JFrog Artifactory is a matter of running yum command and specifying Artifactory edition to install. Install JFrog Artifactory OSS: sudo yum -y install jfrog-artifactory-oss wget Install JFrog Artifactory CE: sudo yum -y install jfrog-artifactory-cpp-ce wget Set ARTIFACTORY_HOME. echo "export ARTIFACTORY_HOME=/opt/jfrog/artifactory" | sudo tee -a /etc/profile source /etc/profile env | grep ARTIFACTORY_HOME Files and Folders Locations: When installed from an RPM distribution, Artifactory retains the FHS (Filesystem Hierarchy Standard) format: File/Folder Location Ownership Tomcat home /opt/jfrog/artifactory/tomcat artifactory (root for sub dirs) Artifactory startup script /etc/init.d/artifactory root Artifactory logs /var/opt/jfrog/artifactory/logs artifactory Artifactory home /var/opt/jfrog/artifactory artifactory Artifactory etc /etc/opt/jfrog/artifactory artifactory Artifactory env variables /etc/opt/jfrog/artifactory/default artifactory Artifactory binary /opt/jfrog/artifactory root Step 6: Configuring Artifactory to use MariaDB 1. Copy Artifactory database configuration template. sudo mkdir /var/opt/jfrog/artifactory/etc sudo cp /opt/jfrog/artifactory/misc/db/mariadb.properties /var/opt/jfrog/artifactory/etc/db.properties 2. Run MariaDB configuration script. sudo /opt/jfrog/artifactory/bin/configure.mysql.sh Provide root password and set Artifactory user password then Agree to download Artifactory. ######################################################## # Welcome to the Artifactory MySQL configuration tool! # ######################################################## Please enter the MySQL server admin username [root]: Please enter the MySQL server admin password: Please enter the Artifactory database username [artifactory]: Please enter the Artifactory database password [password]: Creating the Artifactory MySQL user and database... No MySQL JDBC connector found. Download or copy one needed. Does the current server has access to the Internet? [Y/n] y Downloading mysql-connector-java-5.1.24.jar to /opt/jfrog/artifactory/tomcat/lib... Configuration completed successfully! You can now start up the Artifactory service to use Artifactory with MySQL. Press enter to exit... Start Artifactory service: sudo systemctl start artifactory.service sudo systemctl enable artifactory.service Check service status: $ systemctl status artifactory.service ● artifactory.service - Setup Systemd script for Artifactory in Tomcat Servlet Engine Loaded: loaded (/usr/lib/systemd/system/artifactory.service; enabled; vendor preset: disabled) Active: active (running) since Wed 2019-04-10 10:31:16 CEST; 36s ago
Process: 5091 ExecStop=/opt/jfrog/artifactory/bin/artifactoryManage.sh stop (code=exited, status=0/SUCCESS) Process: 5164 ExecStart=/opt/jfrog/artifactory/bin/artifactoryManage.sh start (code=exited, status=0/SUCCESS) Main PID: 5213 (java) CGroup: /system.slice/artifactory.service ‣ 5213 /usr/bin/java -Djava.util.logging.config.file=/opt/jfrog/artifactory/tomcat/conf/logging.properties -Djava.util.logging.manager=or… Apr 10 10:31:16 artifactory artifactoryManage.sh[5164]: + runReplicator Apr 10 10:31:16 artifactory artifactoryManage.sh[5164]: + '[' '' == true ']' Apr 10 10:31:16 artifactory artifactoryManage.sh[5164]: + return 1 Apr 10 10:31:16 artifactory artifactoryManage.sh[5164]: + startMetadata Apr 10 10:31:16 artifactory artifactoryManage.sh[5164]: + runMetadata Apr 10 10:31:16 artifactory artifactoryManage.sh[5164]: + '[' '' == true ']' Apr 10 10:31:16 artifactory artifactoryManage.sh[5164]: + return 1 Apr 10 10:31:16 artifactory artifactoryManage.sh[5164]: + '[' 0=0 ']' Apr 10 10:31:16 artifactory artifactoryManage.sh[5164]: + exit 0 Apr 10 10:31:16 artifactory systemd[1]: Started Setup Systemd script for Artifactory in Tomcat Servlet Engine. Step 7: Access Artifactory Web Interface Artifactory can be accessed using the following URL: http://SERVERIP_OR_DOMAIN:8081/artifactory You should see Artifactory welcome page. Check Artifactory Documentation for more features and usage guides.
0 notes
Text
Dockerizing an app
Uninstall old versions https://docs.docker.com/engine/install/ubuntu/
sudo apt install gnome-terminal
sudo apt remove docker-desktop
rm -r $HOME/.docker/desktop
sudo rm /usr/local/bin/com.docker.cli
sudo apt purge docker-desktop
Set up the repository
https://docs.docker.com/engine/install/ubuntu/#set-up-the-repository
sudo apt-get update
sudo apt-get install ca-certificates curl gnupg lsb-release
echo \ "deb [arch=$(dpkg --print-architecture) signed-by=/etc/apt/keyrings/docker.gpg] https://download.docker.com/linux/ubuntu \ $(lsb_release -cs) stable" | sudo tee /etc/apt/sources.list.d/docker.list > /dev/null
Install Docker Engine
sudo apt-get update
sudo apt-get install docker-ce docker-ce-cli containerd.io docker-compose-plugin
If it errors with no installation candidate
sudo apt-get install ca-certificates curl gnupg lsb-release
sudo mkdir -p /etc/apt/keyrings
curl -fsSL https://download.docker.com/linux/ubuntu/gpg | sudo gpg --dearmor -o /etc/apt/keyrings/docker.gpg
echo "deb [arch=$(dpkg --print-architecture) signed-by=/etc/apt/keyrings/docker.gpg] https://download.docker.com/linux/ubuntu $(lsb_release -cs) stable" | sudo tee /etc/apt/sources.list.d/docker.list > /dev/null
sudo apt update
sudo apt-get install docker-ce docker-ce-cli containerd.io docker-compose-plugin
apt-cache madison docker-ce (Check all version available)
sudo apt-get install docker-ce=<VERSION_STRING> docker-ce-cli=<VERSION_STRING> containerd.io docker-compose-plugin
sudo apt-get install docker-ce=5:20.10.19~3-0~ubuntu-jammy docker-ce-cli=5:20.10.19~3-0~ubuntu-jammy containerd.io docker-compose-plugin
Test Docker Engine
sudo service docker start
sudo docker run hello-world
0 notes
Text
Kitematic error virtualbox not installed macbook

Kitematic error virtualbox not installed macbook install#
Kitematic error virtualbox not installed macbook full#
Kitematic error virtualbox not installed macbook code#
Now, you see the main screen of Kitematic. The first time you start Kitematic, it will create a new virtual machine in VirtualBox. Using Kitematic 5.1 Virtual Machine for Docker Machine With this IP address and port, container can be accessed from the outside world.ĥ. Be aware that all your containers created on Docker machine have this same IP address. When Docker Terminal is started, you will see there is an IP address, eg. For example, you cannot access docker in host terminal if it’s in the virtual machine. Whenever you start to work in command lines, be sure you are in the right terminal. In Docker Terminal, execute ‘docker exec -it sh’ Spotlight Search->Docker QuickStart Terminal There are three types of terminal if docker is hosted on virtual machine. In this case, you can only use Docker QuickStart Terminal to access docker. There is one more VirtualBox VM between host machine and docker machine.
Kitematic error virtualbox not installed macbook install#
If you install docker through Docker Toolbox, like what we did in this posting, the structure is different. The host terminal can access both docker and host system. If you install docker manually, like what I did for Ubuntu mentioned in the posting Installing and Using Docker on Ubuntu, the docker is hosted directly by host machine. It’s necessary to understand the structure of docker and what terminal can access it. You don’t need to install Kitematic separately, it is installed as you install Docker Toolbox.Īfter the installation is finished.If you’ve already installed Oracle VirtualBox on your Mac, then this component won’t be installed.Download and follow the wizard to install. You can find its source files repository on GitHub. Kitematic integrates with Docker Machine to provision a VirtualBox VM and install the Docker Engine locally on your machine. Kitematic automates the Docker installation and setup process and provides an intuitive graphical user interface (GUI) for running Docker containers. Kitematic is an open source project built to simplify and streamline using Docker on a Mac or Windows PC. a shell preconfigured for a Docker command-line environment.Docker Compose for running the docker-compose commands.Docker Engine for running the docker commands.Docker Machine for running docker-machine commands.The Docker Toolbox is an installer to quickly and easily install and setup a Docker environment on your computer. Use Kitematic to easily manage docker containers without using Docker command-line.
Kitematic error virtualbox not installed macbook full#
Continuously Deploy Full Stack React App to Heroku with Travis-CI.
Continuously Deploy Full Stack React App to Heroku and Netlify with Travis-CI.
Deploying Full Stack React App to Heroku.
Building Online Chinese Dictionary with React and Express.
Kitematic error virtualbox not installed macbook code#
Building Online Code Editor with React and Express.
Creating Full Stack App with React and Node.js.
Continuously Deploy React and Socket.IO App to Heroku with Travis-CI.
Deploying React and Socket.IO App to Heroku.
Building Course Player with React and Socket.IO.
Building Course Player with Node.js and Socket.IO.
Building Course Player with SignalR and ASP.NET.
Building Realtime Application with SignalR.
Building Realtime Web Application with WebSocket.
Deploying Game Store React App to Azure with FTP.
Deploying Game Store React App to Netlify.
Building Web Application with React and Redux.
Elasticsearch - Real World Usage - Draft.
0 notes
Text
Install weka ubuntu 16.04

Install weka ubuntu 16.04 install#
Install weka ubuntu 16.04 Patch#
Install weka ubuntu 16.04 trial#
Install weka ubuntu 16.04 series#
Install weka ubuntu 16.04 download#
See this StackOverflow question for Google Cloud Functions. You’ll need to extract the distribution-specific package, bundle it with necessary libraries, configuration and/or fonts and then upload it. Head over to the packaging repository and start a discussion if your platform isn’t listed.
Install weka ubuntu 16.04 install#
cannot install package – you can always extract it (google for extract from ), but you’ll need to have the dependencies installed.
the major release isn’t listed – we only support LTS versions, so try a LTS version older than your release.
Install weka ubuntu 16.04 Patch#
but not the specific patch release – try it, as it’s very likely to work regardless.If the distribution you are using is listed:
Install weka ubuntu 16.04 download#
I don’t see an appropriate download for my platform! It’s not possible to abstract everything out and test/fix everything for every OS/distribution with the limited resources this project has – it makes more sense to make distribution-specific versions which are almost guaranteed to work, as they use the specific versions that the distribution has packaged. This may work for them, but wkhtmltopdf also depends on the runtime configuration on actual fonts installed (i.e. alpine is not recommended with binary wheels if you google for it), and requires you to statically link everything. While Python has also tried to do this using manylinux – it doesn’t always work well (e.g. So the generic binaries never really worked on Alpine. This doesn’t use glibc at all, but the musl libc. But due to the rise of Docker, the alpine image became very popular. This was worked around earlier by using CentOS 6 (which had an old enough glibc version). If you compile with a later version, it won’t work on a distribution which uses an older version.
incompatible libc: not every distribution has the same glibc version.
This was the direct motivation to create a separate packaging repository. This led to a situation where there was effectively zero backward compatibility and things started breaking randomly – see #3001 for a very long read of the problems faced.
different OpenSSL versions: due to OpenSSL having a bad track record then ( it’s better now), distributions started aggressively upgrading their OpenSSL version and disabling unused parts of the library.
While this could be addressed easily by linking them statically (and was actually done so for previous releases) – it broke down when it came to the next point.
Install weka ubuntu 16.04 series#
This was especially the case for libpng and libjpeg, with a lot of distributions choosing between the 1.2, 1.5 and 1.6 series for the former and multiple versions of libjpeg and/or its fork libjpeg-turbo.
different library versions: not every distribution provides the same versions.
Install weka ubuntu 16.04 trial#
Over a period of time, major areas of divergence between distributions were found by trial and error: A static build means that only Qt is linked in this manner – the remaining system packages still need to be installed. Why are there no “generic” Linux builds ( which were provided earlier)?Īlthough the builds are static, it is very important to understand what it means in the context of Qt – on which wkhtmltopdf is built. This leads to quite different behavior – you get a later web engine, but behavior can vary from distribution to distribution. Most Linux distributions ( quite understandably) would prefer that this project upstreamed the patches, and choose to compile without those features. Some features require you to use a patched Qt, because those aren’t yet upstream – please read the project status for a longer explanation. FAQ Why do you have static builds with patched Qt? If you need versions older than 0.12.0, you can look at the obsolete downloads. It is recommended to use the latest stable release instead, and report an issue if there is a regression from a previous release. Please note that bug reports will not be accepted against the following, which are considered obsolete. OS/DistributionĪll of the above packages were produced automatically via Azure Pipelines and were built on the latest OS/distribution patch release at the time of the release. The current stable series is 0.12.6, which was released on J– see changes since 0.12.5. All downloads are currently hosted via GitHub releases, so you can browse for a specific download or use the links below.ĭo not use wkhtmltopdf with any untrusted HTML – be sure to sanitize any user-supplied HTML/JS, otherwise it can lead to complete takeover of the server it is running on! Please read the project status for the gory details.
0 notes