#install mongodb docker
Explore tagged Tumblr posts
Visit Tumblr Blog
Explore Tumblr blogs with no restrictions, modern design and the best experience.
Last Seen Tumblr Blogs


Fun Fact
There were a total of 171.5 billion posts on Tumblr in 2019.
Text
Graylog Docker Compose Setup: An Open Source Syslog Server for Home Labs
Graylog Docker Compose Install: Open Source Syslog Server for Home #homelab GraylogInstallationGuide #DockerComposeOnUbuntu #GraylogRESTAPI #ElasticsearchAndGraylog #MongoDBWithGraylog #DockerComposeYmlConfiguration #GraylogDockerImage #Graylogdata
A really great open-source log management platform for both production and home lab environments is Graylog. Using Docker Compose, you can quickly launch and configure Graylog for a production or home lab Syslog. Using Docker Compose, you can create and configure all the containers needed, such as OpenSearch and MongoDB. Let’s look at this process. Table of contentsWhat is Graylog?Advantages of…

View On WordPress
#Docker Compose on Ubuntu#docker-compose.yml configuration#Elasticsearch and Graylog#Graylog data persistence#Graylog Docker image#Graylog installation guide#Graylog REST API#Graylog web interface setup#log management with Graylog#MongoDB with Graylog
0 notes
Text
#youtube#video#codeonedigest#microservices#microservice#docker#springboot#spring boot#mongodb configuration#mongodb docker install#spring boot mongodb#mongodb compass#mongodb java#mongodb#dockercontainers#docker image#docker container#docker tutorial#dockerfile#spring boot microservices#java microservice#microservice tutorial
0 notes
Text
Docker Tutorial for Beginners: Learn Docker Step by Step
What is Docker?
Docker is an open-source platform that enables developers to automate the deployment of applications inside lightweight, portable containers. These containers include everything the application needs to run—code, runtime, system tools, libraries, and settings—so that it can work reliably in any environment.
Before Docker, developers faced the age-old problem: “It works on my machine!” Docker solves this by providing a consistent runtime environment across development, testing, and production.
Why Learn Docker?
Docker is used by organizations of all sizes to simplify software delivery and improve scalability. As more companies shift to microservices, cloud computing, and DevOps practices, Docker has become a must-have skill. Learning Docker helps you:
Package applications quickly and consistently
Deploy apps across different environments with confidence
Reduce system conflicts and configuration issues
Improve collaboration between development and operations teams
Work more effectively with modern cloud platforms like AWS, Azure, and GCP
Who Is This Docker Tutorial For?
This Docker tutorial is designed for absolute beginners. Whether you're a developer, system administrator, QA engineer, or DevOps enthusiast, you’ll find step-by-step instructions to help you:
Understand the basics of Docker
Install Docker on your machine
Create and manage Docker containers
Build custom Docker images
Use Docker commands and best practices
No prior knowledge of containers is required, but basic familiarity with the command line and a programming language (like Python, Java, or Node.js) will be helpful.
What You Will Learn: Step-by-Step Breakdown
1. Introduction to Docker
We start with the fundamentals. You’ll learn:
What Docker is and why it’s useful
The difference between containers and virtual machines
Key Docker components: Docker Engine, Docker Hub, Dockerfile, Docker Compose
2. Installing Docker
Next, we guide you through installing Docker on:
Windows
macOS
Linux
You’ll set up Docker Desktop or Docker CLI and run your first container using the hello-world image.
3. Working with Docker Images and Containers
You’ll explore:
How to pull images from Docker Hub
How to run containers using docker run
Inspecting containers with docker ps, docker inspect, and docker logs
Stopping and removing containers
4. Building Custom Docker Images
You’ll learn how to:
Write a Dockerfile
Use docker build to create a custom image
Add dependencies and environment variables
Optimize Docker images for performance
5. Docker Volumes and Networking
Understand how to:
Use volumes to persist data outside containers
Create custom networks for container communication
Link multiple containers (e.g., a Node.js app with a MongoDB container)
6. Docker Compose (Bonus Section)
Docker Compose lets you define multi-container applications. You’ll learn how to:
Write a docker-compose.yml file
Start multiple services with a single command
Manage application stacks easily
Real-World Examples Included
Throughout the tutorial, we use real-world examples to reinforce each concept. You’ll deploy a simple web application using Docker, connect it to a database, and scale services with Docker Compose.
Example Projects:
Dockerizing a static HTML website
Creating a REST API with Node.js and Express inside a container
Running a MySQL or MongoDB database container
Building a full-stack web app with Docker Compose
Best Practices and Tips
As you progress, you’ll also learn:
Naming conventions for containers and images
How to clean up unused images and containers
Tagging and pushing images to Docker Hub
Security basics when using Docker in production
What’s Next After This Tutorial?
After completing this Docker tutorial, you’ll be well-equipped to:
Use Docker in personal or professional projects
Learn Kubernetes and container orchestration
Apply Docker in CI/CD pipelines
Deploy containers to cloud platforms
Conclusion
Docker is an essential tool in the modern developer's toolbox. By learning Docker step by step in this beginner-friendly tutorial, you’ll gain the skills and confidence to build, deploy, and manage applications efficiently and consistently across different environments.
Whether you’re building simple web apps or complex microservices, Docker provides the flexibility, speed, and scalability needed for success. So dive in, follow along with the hands-on examples, and start your journey to mastering containerization with Docker tpoint-tech!
0 notes
Text
PROJETO
Passo a Passo da Implementação da NeoSphere
1. Configuração do Ambiente de Desenvolvimento
Ferramentas Necessárias:
Python 3.10+ para backend Web2 (FastAPI, Redis).
Node.js 18+ para serviços Web3 e frontend.
Solidity para smart contracts.
Docker para conteinerização de serviços (Redis, MongoDB, RabbitMQ).
Truffle/Hardhat para desenvolvimento de smart contracts.
# Instalação de dependências básicas (Linux/Ubuntu) sudo apt-get update sudo apt-get install -y python3.10 nodejs npm docker.io
2. Implementação da API Web2 com FastAPI
Estrutura do Projeto:
/neosphere-api ├── app/ │ ├── __init__.py │ ├── main.py # Ponto de entrada da API │ ├── models.py # Modelos Pydantic │ └── database.py # Conexão com MongoDB └── requirements.txt
Código Expandido (app/main.py):
from fastapi import FastAPI, Depends, HTTPException from pymongo import MongoClient from pymongo.errors import DuplicateKeyError from app.models import PostCreate, PostResponse from app.database import get_db import uuid import datetime app = FastAPI(title="NeoSphere API", version="0.2.0") @app.post("/posts/", response_model=PostResponse, status_code=201) async def create_post(post: PostCreate, db=Depends(get_db)): post_id = str(uuid.uuid4()) post_data = { "post_id": post_id, "user_id": post.user_id, "content": post.content, "media_urls": post.media_urls or [], "related_nft_id": post.related_nft_id, "created_at": datetime.datetime.utcnow(), "likes": 0, "comments_count": 0 } try: db.posts.insert_one(post_data) except DuplicateKeyError: raise HTTPException(status_code=400, detail="Post ID já existe") return post_data @app.get("/posts/{post_id}", response_model=PostResponse) async def get_post(post_id: str, db=Depends(get_db)): post = db.posts.find_one({"post_id": post_id}) if not post: raise HTTPException(status_code=404, detail="Post não encontrado") return post
3. Sistema de Cache com Redis para NFTs
Implementação Avançada (services/nft_cache.py):
import redis from tenacity import retry, stop_after_attempt, wait_fixed from config import settings class NFTCache: def __init__(self): self.client = redis.Redis( host=settings.REDIS_HOST, port=settings.REDIS_PORT, decode_responses=True ) @retry(stop=stop_after_attempt(3), wait=wait_fixed(0.5)) async def get_metadata(self, contract_address: str, token_id: str) -> dict: cache_key = f"nft:{contract_address}:{token_id}" cached_data = self.client.get(cache_key) if cached_data: return json.loads(cached_data) # Lógica de busca na blockchain metadata = await BlockchainService.fetch_metadata(contract_address, token_id) if metadata: self.client.setex( cache_key, settings.NFT_CACHE_TTL, json.dumps(metadata) ) return metadata def invalidate_cache(self, contract_address: str, token_id: str): self.client.delete(f"nft:{contract_address}:{token_id}")
4. Smart Contract para NFTs com Royalties (Arquivo Completo)
Contrato Completo (contracts/NeoSphereNFT.sol):
// SPDX-License-Identifier: MIT pragma solidity ^0.8.20; import "@openzeppelin/contracts/token/ERC721/ERC721.sol"; import "@openzeppelin/contracts/access/Ownable.sol"; import "@openzeppelin/contracts/interfaces/IERC2981.sol"; contract NeoSphereNFT is ERC721, Ownable, IERC2981 { using Counters for Counters.Counter; Counters.Counter private _tokenIdCounter; struct RoyaltyInfo { address recipient; uint96 percentage; } mapping(uint256 => RoyaltyInfo) private _royalties; mapping(uint256 => string) private _tokenURIs; event NFTMinted( uint256 indexed tokenId, address indexed owner, string tokenURI, address creator ); constructor() ERC721("NeoSphereNFT", "NSPH") Ownable(msg.sender) {} function mint( address to, string memory uri, address royaltyRecipient, uint96 royaltyPercentage ) external onlyOwner returns (uint256) { require(royaltyPercentage <= 10000, "Royalties max 100%"); uint256 tokenId = _tokenIdCounter.current(); _tokenIdCounter.increment(); _safeMint(to, tokenId); _setTokenURI(tokenId, uri); _setRoyaltyInfo(tokenId, royaltyRecipient, royaltyPercentage); emit NFTMinted(tokenId, to, uri, msg.sender); return tokenId; } function royaltyInfo( uint256 tokenId, uint256 salePrice ) external view override returns (address, uint256) { RoyaltyInfo memory info = _royalties[tokenId]; return ( info.recipient, (salePrice * info.percentage) / 10000 ); } function _setTokenURI(uint256 tokenId, string memory uri) internal { _tokenURIs[tokenId] = uri; } function _setRoyaltyInfo( uint256 tokenId, address recipient, uint96 percentage ) internal { _royalties[tokenId] = RoyaltyInfo(recipient, percentage); } }
5. Sistema de Pagamentos com Gateway Unificado
Implementação Completa (payment/gateway.py):
from abc import ABC, abstractmethod from typing import Dict, Optional from pydantic import BaseModel class PaymentRequest(BaseModel): amount: float currency: str method: str user_metadata: Dict payment_metadata: Dict class PaymentProvider(ABC): @abstractmethod def process_payment(self, request: PaymentRequest) -> Dict: pass class StripeACHProvider(PaymentProvider): def process_payment(self, request: PaymentRequest) -> Dict: # Implementação real usando a SDK do Stripe return { "status": "success", "transaction_id": "stripe_tx_123", "fee": request.amount * 0.02 } class NeoPaymentGateway: def __init__(self): self.providers = { "ach": StripeACHProvider(), # Adicionar outros provedores } def process_payment(self, request: PaymentRequest) -> Dict: provider = self.providers.get(request.method.lower()) if not provider: raise ValueError("Método de pagamento não suportado") # Validação adicional if request.currency not in ["USD", "BRL"]: raise ValueError("Moeda não suportada") return provider.process_payment(request) # Exemplo de uso: # gateway = NeoPaymentGateway() # resultado = gateway.process_payment(PaymentRequest( # amount=100.00, # currency="USD", # method="ACH", # user_metadata={"country": "US"}, # payment_metadata={"account_number": "..."} # ))
6. Autenticação Web3 com SIWE
Implementação no Frontend (React):
import { useSigner } from 'wagmi' import { SiweMessage } from 'siwe' const AuthButton = () => { const { data: signer } = useSigner() const handleLogin = async () => { const message = new SiweMessage({ domain: window.location.host, address: await signer.getAddress(), statement: 'Bem-vindo à NeoSphere!', uri: window.location.origin, version: '1', chainId: 137 // Polygon Mainnet }) const signature = await signer.signMessage(message.prepareMessage()) // Verificação no backend const response = await fetch('/api/auth/login', { method: 'POST', headers: { 'Content-Type': 'application/json' }, body: JSON.stringify({ message, signature }) }) if (response.ok) { console.log('Autenticado com sucesso!') } } return ( <button onClick={handleLogin}> Conectar Wallet </button> ) }
7. Estratégia de Implantação
Infraestrutura com Terraform:
# infra/main.tf provider "aws" { region = "us-east-1" } module "neosphere_cluster" { source = "terraform-aws-modules/ecs/aws" cluster_name = "neosphere-prod" fargate_capacity_providers = ["FARGATE"] services = { api = { cpu = 512 memory = 1024 port = 8000 } payment = { cpu = 256 memory = 512 port = 3000 } } } resource "aws_elasticache_cluster" "redis" { cluster_id = "neosphere-redis" engine = "redis" node_type = "cache.t3.micro" num_cache_nodes = 1 parameter_group_name = "default.redis6.x" }
Considerações Finais
Testes Automatizados:
Implementar testes end-to-end com Cypress para fluxos de usuário
Testes de carga com k6 para validar escalabilidade
Testes de segurança com OWASP ZAP
Monitoramento:
Configurar Prometheus + Grafana para métricas em tempo real
Integrar Sentry para captura de erros no frontend
CI/CD:
Pipeline com GitHub Actions para deploy automático
Verificação de smart contracts com Slither
Documentação:
Swagger para API REST
Storybook para componentes UI
Archimate para documentação de arquitetura
Este esqueleto técnico fornece a base para uma implementação robusta da NeoSphere, combinando as melhores práticas de desenvolvimento Web2 com as inovações da Web3.
0 notes
Text
Mobile App Development Services: Transforming Ideas into Powerful Digital Experiences
In today’s mobile-first world, having a strong mobile presence isn’t just a competitive advantage—it’s a necessity. With over 6.8 billion smartphone users globally, businesses that invest in mobile app development can reach their customers where they spend most of their digital time. At Xoance, we specialize in crafting seamless, scalable, and smart mobile applications that help brands elevate user engagement and drive measurable growth.
Why Mobile App Development Matters
Mobile apps are more than just a convenience; they’re strategic tools that can boost brand loyalty, enhance customer experiences, and streamline operations. Whether you’re a startup, SME, or enterprise, a well-developed mobile app can:
Improve customer engagement and retention
Provide personalized services and real-time communication
Increase operational efficiency
Generate new revenue streams
Collect valuable user data and feedback
At Xoance, we understand the value of delivering meaningful mobile experiences. Our mobile app development services are designed to meet the dynamic needs of modern businesses across a wide range of industries.
Who We Are
Xoance is a full-service digital solutions company that combines creativity with technology to build exceptional digital products. With core expertise in web and mobile development, UI/UX design, branding, and SaaS, we offer end-to-end services tailored to your goals. Our mobile solutions cater to diverse sectors including healthcare, retail, education, real estate, FMCG, media, and manufacturing, making us a versatile partner in your digital journey.
Our Mobile App Development Services
We provide comprehensive mobile app development services that cover the entire lifecycle—from ideation to post-launch support.
1. iOS App Development
Our team builds elegant, high-performance iOS apps using Swift and Objective-C, designed for the Apple ecosystem. Whether it’s an enterprise-grade tool or a consumer-facing application, we ensure intuitive design and flawless functionality.
2. Android App Development
Using Kotlin and Java, we create custom Android applications that are optimized for performance, compatibility, and user satisfaction. Our apps are designed to work across a wide range of Android devices and versions.
3. Cross-Platform App Development
Need faster time-to-market without compromising quality? Our experts use Flutter and React Native to build cross-platform apps that offer native-like performance while reducing development time and cost.
4. Progressive Web Apps (PWA)
We also develop PWAs—web apps that deliver app-like experiences right from the browser. PWAs are lightweight, fast, and ideal for businesses looking to reach users across platforms without requiring a full app install.
5. App Maintenance & Optimization
Our support doesn’t end at launch. We offer ongoing maintenance, performance optimization, and feature upgrades to ensure your app remains updated, secure, and competitive.
Our Process: From Idea to Execution
At Xoance, we follow an agile, user-first approach to mobile app development. Our process is structured yet flexible to adapt to your vision:
Discovery & Planning: Understanding your goals, market, and audience
UI/UX Design: Creating intuitive, attractive, and human-centered interfaces
Development: Writing clean, scalable code using the latest tools and frameworks
Testing: Rigorous manual and automated QA for flawless performance
Launch & Support: Seamless deployment, app store publishing, and ongoing maintenance
We believe in close collaboration, transparency, and agility—ensuring you're involved every step of the way.
Technologies We Use
We leverage the latest technologies to build fast, secure, and scalable mobile apps:
Frontend: React Native, Flutter
Backend: Node.js, Firebase, PHP, Laravel
Databases: MySQL, MongoDB, Firestore
DevOps & Tools: Docker, GitHub Actions, CI/CD, Jira, Figma, Postman
Our deep technical expertise allows us to choose the right stack for each project, ensuring optimal performance and scalability.
Industries We Serve
Our mobile solutions are built with domain-specific features that cater to the unique needs of different industries:
Healthcare: Appointment booking, telemedicine, patient management
Retail & E-commerce: Product catalogs, loyalty programs, order tracking
Education: E-learning platforms, student portals, test prep apps
Real Estate: Property listings, virtual tours, agent tools
Media & Entertainment: Streaming apps, content discovery, interactive UX
Manufacturing: Field service apps, inventory tracking, process monitoring
Why Choose Xoance?
Client-Centric Approach: We focus on your goals, not just the tech.
UX-First Design: Our design process combines user psychology and data insights.
Scalability: We build with future growth in mind.
Dedicated Teams: Work with experienced developers, designers, and project managers.
End-to-End Service: From concept to post-launch support, we’re with you every step of the way.
Success Stories
We’ve helped startups scale, enterprises digitize, and brands connect with millions of users. From real-time tracking apps to e-commerce platforms and educational tools, our portfolio speaks for itself.
“Xoance turned our vision into a reality. The app they developed helped us increase user retention by 45% within six months.” – A satisfied client
Let’s Build Something Incredible
Ready to launch your next big idea? Whether you need a standalone app or want to integrate mobile into your digital ecosystem, Xoance is your trusted partner for mobile app development services. Let’s bring your concept to life with technology that works—and experiences that wow.
Contact Us Today 📧 [email protected] 🌐 www.xoance.com 📞 +1 559-465-8444
0 notes
Text
How to Create a Real-Time Chat Application?
In the fast-paced world of Web Development Services, real-time communication has become an essential feature for modern applications. Whether you're creating a customer support system, a collaborative workspace, or a social networking platform, real-time chat improves user engagement and interaction. With the rise of advanced frameworks and tools like Magento web development, implementing such features has become easier than ever.

Understanding Real-Time Chat Applications
Real-time chat applications allow users to communicate instantly via the internet. Unlike traditional messaging systems, which rely on periodic refreshes, real-time chat uses advanced protocols such as WebSockets to deliver messages immediately. This immediate delivery guarantees a seamless and interactive experience.
Real-time chat applications have the following key features: • Instant messaging enables real-time delivery of text, media, and files. • Provide secure sign-in processes to protect user data. • Chat Rooms: Public and private spaces for group discussions. • Receive real-time alerts for new messages. • Message History: Stores and retrieves past conversations.
Tech Stack for Building a Real-Time Chat Application
Choosing the appropriate technology stack is critical for developing a robust real-time chat application. Here are some frequently used tools and frameworks: • Frontend HTML, CSS, and JavaScript. Framework: React, Angular, and Vue.js. • Backend Node.js (using Express or Fastify) Python (Django or Flask) • Real-time communication WebSockets (Socket.IO for Node.js) Firebase Real-time Database. • Database MongoDB (NoSQL) PostgreSQL (SQL). • Deployment Docker (containerization) AWS, Azure, or Google Cloud (for hosting)
Step-by-Step Guide to Building a Real-Time Chat Application
1. Set Up the Environment
Begin by making a new project directory and starting a Node.js application. Make sure you install the necessary packages for backend and real-time communication support.
2. Build the Server
Create a basic server with your preferred backend technology. Add WebSocket support for real-time message delivery between clients.
3. Create the Frontend
Create a simple and intuitive user interface for sending and receiving messages. Connect it to a backend that supports WebSockets to ensure compatibility with real-time updates.
4. Implement User Authentication
Secure user authentication can be integrated into a production-grade application using JWT (JSON Web Tokens) or OAuth. This ensures that only authorized users can read and send messages.
5. Optimize and Scale
To deal with increased user traffic, consider these optimization techniques: • Load balancing: Distribute traffic among multiple servers. • Optimize queries for faster retrieval through database indexing. • Use Redis for faster data access.
Testing and Deployment
Test your application thoroughly to find and fix bugs. To deploy the app, containerize it with Docker and host it on cloud services such as AWS or Azure for scalability and reliability. Real-time chat applications are built using modern frameworks and communication protocols. With the right approach and technology stack, you can create a scalable and responsive chat platform. By utilizing Web Development Services and Magento web development, you can ensure that your application meets modern user expectations while maintaining high performance.
0 notes
Text
Ansible and Docker: Automating Container Management
In today's fast-paced tech environment, containerization and automation are key to maintaining efficient, scalable, and reliable infrastructure. Two powerful tools that have become essential in this space are Ansible and Docker. While Docker enables you to create, deploy, and run applications in containers, Ansible provides a simple yet powerful automation engine to manage and orchestrate these containers. In this blog post, we'll explore how to use Ansible to automate Docker container management, including deployment and orchestration.
Why Combine Ansible and Docker?
Combining Ansible and Docker offers several benefits:
Consistency and Reliability: Automating Docker container management with Ansible ensures consistent and reliable deployments across different environments.
Simplified Management: Ansible’s easy-to-read YAML playbooks make it straightforward to manage Docker containers, even at scale.
Infrastructure as Code (IaC): By treating your infrastructure as code, you can version control, review, and track changes over time.
Scalability: Automation allows you to easily scale your containerized applications by managing multiple containers across multiple hosts seamlessly.
Getting Started with Ansible and Docker
To get started, ensure you have Ansible and Docker installed on your system. You can install Ansible using pip: pip install ansible
And Docker by following the official Docker installation guide for your operating system.
Next, you'll need to set up an Ansible playbook to manage Docker. Here’s a simple example:
Example Playbook: Deploying a Docker Container
Create a file named deploy_docker.yml:
---
- name: Deploy a Docker container
hosts: localhost
tasks:
- name: Ensure Docker is installed
apt:
name: docker.io
state: present
become: yes
- name: Start Docker service
service:
name: docker
state: started
enabled: yes
become: yes
- name: Pull the latest nginx image
docker_image:
name: nginx
tag: latest
source: pull
- name: Run a Docker container
docker_container:
name: nginx
image: nginx
state: started
ports:
- "80:80"
In this playbook:
We ensure Docker is installed and running.
We pull the latest nginx Docker image.
We start a Docker container with the nginx image, mapping port 80 on the host to port 80 on the container.
Automating Docker Orchestration
For more complex scenarios, such as orchestrating multiple containers, you can extend your playbook. Here’s an example of orchestrating a simple web application stack with Nginx, a Node.js application, and a MongoDB database:
---
- name: Orchestrate web application stack
hosts: localhost
tasks:
- name: Ensure Docker is installed
apt:
name: docker.io
state: present
become: yes
- name: Start Docker service
service:
name: docker
state: started
enabled: yes
become: yes
- name: Pull necessary Docker images
docker_image:
name: "{{ item }}"
tag: latest
source: pull
loop:
- nginx
- node
- mongo
- name: Run MongoDB container
docker_container:
name: mongo
image: mongo
state: started
ports:
- "27017:27017"
- name: Run Node.js application container
docker_container:
name: node_app
image: node
state: started
volumes:
- ./app:/usr/src/app
working_dir: /usr/src/app
command: "node app.js"
links:
- mongo
- name: Run Nginx container
docker_container:
name: nginx
image: nginx
state: started
ports:
- "80:80"
volumes:
- ./nginx.conf:/etc/nginx/nginx.conf
links:
- node_app
Conclusion
By integrating Ansible with Docker, you can streamline and automate your container management processes, making your infrastructure more consistent, scalable, and reliable. This combination allows you to focus more on developing and less on managing infrastructure. Whether you're managing a single container or orchestrating a complex multi-container environment, Ansible and Docker together provide a powerful toolkit for modern DevOps practices.
Give it a try and see how much time and effort you can save by automating your Docker container management with Ansible!
For more details click www.qcsdclabs.com
#redhatcourses#information technology#containerorchestration#container#linux#docker#kubernetes#containersecurity#dockerswarm#aws
0 notes
Text
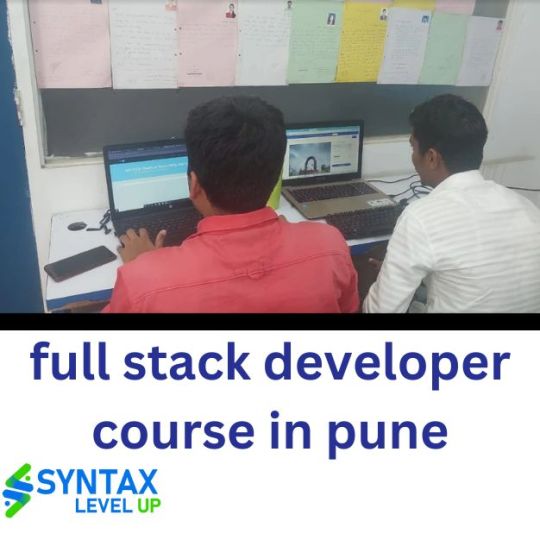
SyntaxLevelUp offers a Full Stack Developer Course in Pune
The tech industry is booming, and full stack developers are at the heart of this digital revolution. Whether you're a newbie looking to enter the tech world or an experienced professional aiming to enhance your skills, a full stack developer course in pune can be a game-changer. Pune, known as the "Oxford of the East" for its educational institutions and thriving IT sector, offers excellent opportunities for aspiring developers. One standout option is the Full Stack Developer Course in pune at SyntaxLevelUp. In this blog, we'll explore why this course is a great choice and provide details on the fees.
Why Choose a Full Stack Developer Course?
A full stack developer is proficient in both front-end and back-end technologies, making them versatile and highly sought after in the tech industry. Here are some reasons to consider becoming a full stack developer classes in pune:
1. High Demand and Job Security: Full stack developers training in pune are in high demand across various industries. Companies value their ability to handle diverse tasks, leading to better job security and competitive salaries.
2. Comprehensive Skill Set: Full stack development encompasses a wide range of skills, including HTML, CSS, JavaScript, backend languages (such as Python, Ruby, or Java), database management, and more. This holistic knowledge opens doors to numerous career opportunities.
3. Career Flexibility: With expertise in both front-end and back-end development, you can work on a variety of projects, from web development to mobile app development, and even software engineering.
4. Creative and Analytical Balance: Full stack development allows you to engage both your creative and analytical skills, making it a fulfilling and dynamic career choice.
Why SyntaxLevelUp in Pune?
Pune has established itself as a major IT hub in India, attracting top tech companies and startups. Here's why SyntaxLevelUp stands out:
1. Industry-Driven Curriculum: SyntaxLevelUp's curriculum is designed in collaboration with industry experts, ensuring that you learn the most relevant and in-demand skills. The course covers everything from fundamental programming languages to advanced frameworks and tools.
2. Experienced Instructors: The instructors at SyntaxLevelUp are seasoned professionals with extensive industry experience. They provide hands-on training, real-world insights, and personalized guidance to help you master full stack development.
3. State-of-the-Art Facilities: SyntaxLevelUp boasts modern facilities equipped with the latest technology, providing an optimal learning environment.
4. Placement Assistance: The institute offers robust placement support, helping you secure internships and job opportunities with leading tech companies in Pune and beyond.
Course Fees and Details
Understanding the investment required for your education is crucial. Here's a breakdown of the fees for the Full Stack Developer Course in pune at SyntaxLevelUp:
Registration Fee: INR 5,000 (non-refundable)
Course Fee: INR 75,000 (can be paid in installments)
Duration: 6 months (including live projects and internship opportunities)
Mode: Both online and offline options are available to cater to different learning preferences.
What You’ll Learn
The Full Stack Developer Course in pune at SyntaxLevelUp covers a wide range of topics, ensuring a comprehensive understanding of full stack development:
Front-End Development: HTML, CSS, JavaScript, React.js
Back-End Development: Node.js, Express.js, Python, Django
Database Management: SQL, MongoDB
Version Control: Git and GitHub
Deployment and DevOps: Docker, CI/CD pipelines
Soft Skills: Team collaboration, project management, and communication
How to Enroll
Enrolling in the Full Stack Developer Course in pune at SyntaxLevelUp is straightforward:
1. Visit the Official Website: Go to the SyntaxLevelUp website and navigate to the Full Stack Developer Course in pune page.
2. Fill Out the Application Form: Provide your details and submit the application form.
3. Attend the Counseling Session: Participate in a counseling session to understand the course structure, fees, and career prospects.
4. Complete the Registration: Pay the registration fee and secure your spot in the course.
Conclusion
A Full Stack Developer Course in Pune at SyntaxLevelUp is more than just an educational program; it's a pathway to a rewarding and dynamic career in the tech industry. With a curriculum designed to meet industry standards, experienced instructors, and comprehensive placement support, SyntaxLevelUp provides everything you need to succeed as a full stack developer. Invest in your future today and take the first step towards becoming a versatile and in-demand tech professional.Looking to elevate your tech career? Enroll in full stack training at SyntaxLevelUp in Pune. Our comprehensive full stack developer classes in pune cover essential skills for both front-end and back-end development. Recognized as the best full stack developer course in Pune, our program ensures you gain proficiency in HTML, CSS, JavaScript, Node.js, and more. Choose SyntaxLevelUp for top-tier full stack courses and classes in Pune, designed to provide hands-on experience and job-ready skills.
#full stack training in pune#full stack developer classes in pune#best full stack developer course in pune#full stack developer course in pune#full stack courses in pune#full stack classes in pune#full stack developer#full stack developers in pune
1 note
·
View note
Text
Learning MERN Developing Dynamic Web Applications from the Ground level
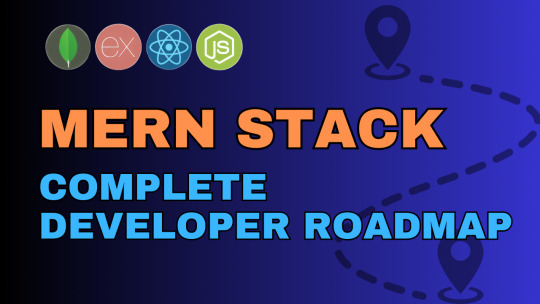
We’ll begin by exploring the fundamentals of the MERN stack, its components, and how they work together to build powerful web applications. You'll gain insights into the core technologies - MongoDB, Express.js, React, and Node.js - and understand their roles in modern web development.
Setting Up Your Development Environment
Prepare to get right into the practical work! We'll walk you through configuring your development environment for MERN stack development in this module. After setting up your workspace and installing the required software, you'll be ready to begin developing your first MERN application.
Constructing a RESTful API with Express and Node.js Discover how to use Node.js and Express.js to build a solid backend for your MERN applications. We'll go over things like managing HTTP requests, routing, middleware, and integrating MongoDB for data storing and retrieval. After completing this module, you'll have a firm grasp on creating RESTful APIs.
Working with MongoDB
Dive deep into MongoDB, a NoSQL database that complements the MERN stack development courseperfectly. You'll learn how to design schemas, perform CRUD operations, and leverage MongoDB's powerful querying capabilities to efficiently manage your application's data.
Building Dynamic User Interfaces with React
Learn how to use React to build dynamic, interactive user interfaces for your MERN apps. You'll discover the fundamental ideas and industry-best techniques for creating scalable front-end applications, from component-based architecture to state management with Redux or Context API.
Integrating Frontend with Backend
Bring together the frontend and backend of your MERN application seamlessly. Learn how to make API calls from React components to fetch and display data from your Express.js server. You'll also explore authentication and authorization techniques to secure your application.
Deployment and Continuous Integration
Upload your MERN application to a cloud platform like AWS or Heroku to get it ready for the real world. We'll also go over continuous integration and delivery (CI/CD) techniques, which help you automate the deployment process and guarantee that your users receive updates without any problems.
Advanced Topics and Best Practices
we'll delve into advanced topics and best practices for MERN stack development. From performance optimization to error handling and debugging, you'll learn strategies to enhance the scalability, reliability, and maintainability of your MERN applications.
Building a Social Media Platform
Take your MERN abilities to another level by starting a large-scale real-world project. Using WebSockets, you will create a social media platform from the ground up with features like posting, commenting, like, and real-time updates. You will use every idea and method you have studied in earlier courses to construct a fully functional application during this module.
Testing and Quality Assurance
Learn the importance of testing and quality assurance in MERN stack development course. Explore different types of testing including unit testing, integration testing, and end-to-end testing, and discover tools and frameworks such as Jest, Mocha, and Chai. By writing comprehensive tests, you'll ensure the reliability and stability of your MERN applications.
Performance Optimization and Scalability
Optimize the performance of your MERN applications to deliver fast and responsive user experiences. You'll learn techniques for reducing load times, optimizing database queries, caching data, and implementing server-side rendering (SSR) with React. Additionally, we'll discuss strategies for scaling your application to handle increased traffic and user demand.
DevOps and Infrastructure as Code
Gain insights into DevOps practices and the concept of Infrastructure as Code (IaC) for managing your MERN application's infrastructure efficiently. You'll explore tools such as Docker and Kubernetes for containerization and orchestration, as well as infrastructure automation using Terraform or AWS CloudFormation.
Security Best Practices
Ensure the security of your MERN applications by understanding common vulnerabilities and implementing best practices. Topics covered include data validation and sanitization, protecting against cross-site scripting (XSS) and SQL injection attacks, implementing secure authentication and authorization mechanisms, and securing communication over HTTPS.
Monitoring and Logging
Monitor the health and performance of your MERN applications in production environments. Learn how to set up monitoring tools such as Prometheus and Grafana to track key metrics, as well as logging frameworks like Winston or ELK stack (Elasticsearch, Logstash, Kibana) for aggregating and analyzing logs to troubleshoot issues effectively.
Continuous Learning and Career Growth
Wrap up the course by exploring avenues for continuous learning and career growth in the field of MERN stack development course. Whether it's staying updated with the latest technologies and trends, contributing to open-source projects, or pursuing advanced certifications, you'll be equipped with the knowledge and resources to thrive in your career journey.
Conclusion
With the information you've learned from MERN stack development course, you're prepared to take on difficult tasks, overcome real-world challenges, and positively influence the web development sector. Whether your goal is to become a full-stack developer, launch your own firm, or just get more experience in the IT industry, the skills and knowledge you've acquired here will be a great foundation for success. But education never stops. Technology is a vibrant, ever-changing field that presents a myriad of opportunities for growth and innovation. Never stop asking questions, look into new technologies and methods, and never give up on honing your craft. Seize every opportunity to broaden your knowledge and skills, whether it is through more in-depth coursework, involvement in open-source projects, or earning further training and certifications.
0 notes
Text
#youtube#video#codeonedigest#microservices#aws#aws ec2 server#aws ec2 instance#aws ec2 service#ec2#aws ec2#mongodb configuration#mongodb docker install#spring boot mongodb#mongodb compass#mongodb java#mongodb
0 notes
Text
Web Servers, Databases, and Server-Side Frameworks

1. Web Servers:
- Definition: Web servers are responsible for handling incoming HTTP requests and serving responses to clients. Popular web servers include Apache, Nginx, and Microsoft Internet Information Services (IIS).
- Practical Example: Using Nginx to serve static files for a Python web application.
```nginx
server {
listen 80;
server_name example.com;
location /static/ {
alias /path/to/static/files;
}
location / {
proxy_pass http://127.0.0.1:8000;
proxy_set_header Host $host;
proxy_set_header X-Real-IP $remote_addr;
}
}
```

2. Databases:
- Definition: Databases are crucial for storing and managing structured data. There are two main categories: relational databases (e.g., MySQL, PostgreSQL) and NoSQL databases (e.g., MongoDB, Redis).
- Practical Example: Using MySQL as a relational database for a Python web application.
```python
import mysql.connector
connection = mysql.connector.connect(
host="localhost",
user="username",
password="password",
database="mydatabase"
)
```

3. Server-Side Frameworks:
- Definition: Server-side frameworks provide tools and libraries for building web applications efficiently. Python offers several popular frameworks, including Django, Flask, and Pyramid.
- Practical Example: Creating a simple web application using the Flask framework.
```python
from flask import Flask
app = Flask(__name)
@app.route('/')
def hello_world():
return 'Hello, World!'
if __name__ == '__main__':
app.run()
```

4. Web Application Deployment:
- Definition: Deploying a web application involves making it available to users. Tools like Docker and cloud platforms (e.g., AWS, Azure) are essential for deployment.
- Practical Example: Deploying a Python web application using Docker.
```Dockerfile
FROM python:3.8
WORKDIR /app
COPY requirements.txt requirements.txt
RUN pip install -r requirements.txt
COPY . .
CMD ["python", "app.py"]
```

5. Load Balancing:
- Definition: Load balancing ensures that incoming traffic is evenly distributed among multiple servers, enhancing performance and fault tolerance.
- Practical Example: Setting up load balancing for a Python web application using Nginx.
```nginx
upstream backend {
server backend1.example.com;
server backend2.example.com;
}
server {
listen 80;
location / {
proxy_pass http://backend;
}
}
```

These components collectively form the core of the back-end technology stack, and selecting the right combination of web servers, databases, frameworks, and deployment strategies depends on the specific requirements of your project. The practical examples provided demonstrate how these components work together to create a functional web application.
#fullstackdeveloper#developer#whatisfullstackdeveloper#fullstackdeveloperjobs#fullstackwebdeveloper#softwaredeveloper#dontbecomeafullstackdeveloper#shreejitjadhav#dinvstr#shouldyoubecomeafullstackdeveloper?#aideveloper#howtobecomeasoftwaredeveloper#whyyoushouldntbecomeafulltackdeveloper#dataanalystvswebdeveloper#webdeveloper#developerjobs#howtobeaideveloper#fullstackdeveloperjob#willaireplacewebdevelopers
0 notes
Text
Roadmap To Become a Full Stack Developer & The Best Full Stack Developer Course.
Introduction:
In today's digital age, the demand for full stack developers is on the rise. A full stack developer is in high demand in the IT business since they are capable of handling both front-end and back-end programming. If you aspire to become a full stack developer, this blog will provide you with a roadmap to follow and introduce you to the best full stack developer course available.
Roadmap to Become a Full Stack Developer:
Understand the Fundamentals:
Before diving into full stack development, it's essential to have a strong foundation in programming concepts. Begin by learning HTML, CSS, and JavaScript, which form the core of web development. These languages are crucial for front-end development.
Master Front-End Development:
Once you have a good grasp of the fundamentals, focus on front-end technologies. Explore popular frameworks like React, Angular, or Vue.js, which enable you to build interactive and responsive user interfaces. To improve the user experience, educate yourself on UI/UX Training principles and responsive web design.
Learn Back-End Development:
You must comprehend back-end development if you want to develop into a well-rounded full stack developer. Familiarize yourself with server-side programming languages such as Python, Java, or JavaScript (Node.js). To handle data storage and retrieval effectively, learn about databases, APIs, and server management.
Database Management:
Understanding how databases work is crucial for full stack development. Learn about database management systems like MySQL, MongoDB, or PostgreSQL. Gain knowledge of SQL (Structured Query Language) for efficient data manipulation and storage.
APIs and Web Services:
Develop an understanding of RESTful APIs (Application Programming Interfaces) and how to build and consume them. To take advantage of services and functions already in place, learn how to integrate third-party APIs into your applications.
Version Control and Collaboration:
Become proficient in using version control systems like Git. Recognise branching, merging, and conflict resolution. Recognise branching, merging, and conflict resolution.
Deployment and Cloud Services:
Learn how to install your applications on cloud computing infrastructure like AWS, Azure, or Google Cloud. Understand concepts like scalability, load balancing, and containerization (using tools like Docker) to ensure smooth deployment and maintenance of your applications.
Clontinuous Learning:
The field of Web Development is constantly evolving, so it's important to stay updated. To keep learning and improving your skills, follow industry blogs, take part in online forums, and join developer communities.
The Best Full Stack Developer Course:
While there are numerous online courses available, one highly recommended option for becoming a full stack developer is the "Full Stack Web Development" course offered by online learning platforms like Udemy, Coursera, or edX. This course offers a thorough education in front-end and back-end development.
The course typically covers topics such as HTML, CSS, JavaScript, React/Angular, Node.js, Express.js, MongoDB, RESTful APIs, and deployment on cloud platforms. It includes hands-on projects and exercises to reinforce your learning.
Conclusion:
Becoming a Full Stack Developer requires dedication, continuous learning, and hands-on practice. You can acquire the abilities and information required to succeed in this field by following the road map provided in this blog. Additionally, enrolling in a comprehensive Full Stack Developer course will provide you with structured learning and practical experience. Embark on your journey to becoming a full stack developer, and embrace the endless opportunities that lie ahead in the world of web development.
0 notes
Text
How to Install MongoDB on Docker Container linux.
How to Install MongoDB on Docker Container linux.
Hi Guys! Hope you are doing well. Let’s Learn about “How to Install MongoDB on Docker Container Linux”. The Docker is an open source platform, where developers can package there application and run that application into the Docker Container. So It is PAAS (Platform as a Service), which uses a OS virtualisation to deliver software in packages called containers. The containers are the bundle of…

View On WordPress
#docker hub#install mongodb#install mongodb docker#install mongodb docker container#install mongodb docker image#install mongodb docker linux#install mongodb docker ubuntu#install mongodb on docker container#mongodb docker install#mongodb docker tutorial#run docker on mongodb container
0 notes
Text
A Guide to Creating APIs for Web Applications

APIs (Application Programming Interfaces) are the backbone of modern web applications, enabling communication between frontend and backend systems, third-party services, and databases. In this guide, we’ll explore how to create APIs, best practices, and tools to use.
1. Understanding APIs in Web Applications
An API allows different software applications to communicate using defined rules. Web APIs specifically enable interaction between a client (frontend) and a server (backend) using protocols like REST, GraphQL, or gRPC.
Types of APIs
RESTful APIs — Uses HTTP methods (GET, POST, PUT, DELETE) to perform operations on resources.
GraphQL APIs — Allows clients to request only the data they need, reducing over-fetching.
gRPC APIs — Uses protocol buffers for high-performance communication, suitable for microservices.
2. Setting Up a REST API: Step-by-Step
Step 1: Choose a Framework
Node.js (Express.js) — Lightweight and popular for JavaScript applications.
Python (Flask/Django) — Flask is simple, while Django provides built-in features.
Java (Spring Boot) — Enterprise-level framework for Java-based APIs.
Step 2: Create a Basic API
Here’s an example of a simple REST API using Express.js (Node.js):javascriptconst express = require('express'); const app = express(); app.use(express.json());let users = [{ id: 1, name: "John Doe" }];app.get('/users', (req, res) => { res.json(users); });app.post('/users', (req, res) => { const user = { id: users.length + 1, name: req.body.name }; users.push(user); res.status(201).json(user); });app.listen(3000, () => console.log('API running on port 3000'));
Step 3: Connect to a Database
APIs often need a database to store and retrieve data. Popular databases include:
SQL Databases (PostgreSQL, MySQL) — Structured data storage.
NoSQL Databases (MongoDB, Firebase) — Unstructured or flexible data storage.
Example of integrating MongoDB using Mongoose in Node.js:javascriptconst mongoose = require('mongoose'); mongoose.connect('mongodb://localhost:27017/mydb', { useNewUrlParser: true, useUnifiedTopology: true });const UserSchema = new mongoose.Schema({ name: String }); const User = mongoose.model('User', UserSchema);app.post('/users', async (req, res) => { const user = new User({ name: req.body.name }); await user.save(); res.status(201).json(user); });
3. Best Practices for API Development
🔹 Use Proper HTTP Methods:
GET – Retrieve data
POST – Create new data
PUT/PATCH – Update existing data
DELETE – Remove data
🔹 Implement Authentication & Authorization
Use JWT (JSON Web Token) or OAuth for securing APIs.
Example of JWT authentication in Express.js:
javascript
const jwt = require('jsonwebtoken'); const token = jwt.sign({ userId: 1 }, 'secretKey', { expiresIn: '1h' });
🔹 Handle Errors Gracefully
Return appropriate status codes (400 for bad requests, 404 for not found, 500 for server errors).
Example:
javascript
app.use((err, req, res, next) => { res.status(500).json({ error: err.message }); });
🔹 Use API Documentation Tools
Swagger or Postman to document and test APIs.
4. Deploying Your API
Once your API is built, deploy it using:
Cloud Platforms: AWS (Lambda, EC2), Google Cloud, Azure.
Serverless Functions: AWS Lambda, Vercel, Firebase Functions.
Containerization: Deploy APIs using Docker and Kubernetes.
Example: Deploying with DockerdockerfileFROM node:14 WORKDIR /app COPY package.json ./ RUN npm install COPY . . CMD ["node", "server.js"] EXPOSE 3000
5. API Testing and Monitoring
Use Postman or Insomnia for testing API requests.
Monitor API Performance with tools like Prometheus, New Relic, or Datadog.
Final Thoughts
Creating APIs for web applications involves careful planning, development, and deployment. Following best practices ensures security, scalability, and efficiency.
WEBSITE: https://www.ficusoft.in/python-training-in-chennai/
0 notes
Text
Digital Marketing Courses in Chandigarh
It is no secret that trainers and the whole team behind running an academy are busy folks!
Digital Marketing Courses in Chandigarh- With a demanding schedule, it can be a chore to keep up to date with coaching modules and industry trends. However, writing great teaching blogs helps us to stay relevant. Sharing ideas and commenting on coaching blogs also helps to build a strong coaching community internationally.
Here I am talking about the Rohar Academy about its courses and training standards:
Digital Marketing courses in Chandigarh
Digital Marketing Courses in Chandigarh- Full Stack Development
Firstly, Digital Marketing courses in Chandigarh and Full Stack Web Developer program is to equip learners with the unique skills they need to build database-backed APIs and web applications. A certification holder of this program will be able to design and build databases for software applications. Also, they can create and deploy database-backed web APIs, and secure and manage user authentication and access control for an application backend. Students will also learn how to install a Flask-based web application to the cloud using Docker and Kubernetes.
Digital Marketing Courses in Chandigarh- Artificial Intelligence with Python
Secondly, AI is one of the fastest-growing and most transformational technologies of our time. You can learn the basics to advance quantitative analysis, including data processing, trading signal generation, and portfolio management. With the use of Python to work with historical stock data, develop trading strategies, and construct a multi-factor model with optimization.
Data Science with Python
With this course, you can build expertise in data manipulation, visualization, predictive analytics, machine learning, and data science. In addition, the skills you learn in this program can allow you to launch or advance a successful data career. Start acquiring valuable skills right away, create a project portfolio to demonstrate your abilities, and get support from Rohar Academy mentors, peers, and experts in the field. Moreover, we offer you five unique programs to support your career goals in the data science field.
Digital Marketing
As in modern times, the consumer has made the revolutionizing shift to digital platforms. Nowadays, Digital Marketing is gaining strong terms across all parallels of the industry. Recently, the rise of Digital Marketing necessarily means that job opportunities in this niche are increasing at a fast pace. While the demand for skilled Digital Marketing professionals is extremely high now. However, the companies are facing the challenge of finding the right fit for their Digital Marketing job profiles.
Software Development
Another course we are talking about is Software Development. Hopefully, it is changing at a lightning speed. Similarly, there are new products, tools, languages, and apps released into the world every day. In the same way, Rohar Academy provides you a platform to learn carefully designed modules according to achieve the demands of Corporate standards.
Cyber Security
The Cyber Security Course will give you all the skills needed to become an expert in this fast-growing niche. In addition, you will learn extensive approaches to protecting your infrastructure, including securing data and information, running risk analysis and mitigation, designing cloud-based security, achieving compliance, and much more in this program.
Advanced Java
If you’re looking to get expertise in web application development for virtually any computing platform, this Java Certification Training course is for you. Although, this all-in-one Java training will give you a firm foundation in Java. Moreover, the most commonly used programming language in software development.
Big Data
This Big Data Certification program provides online training on the best big data courses to impart skills required for a successful career in data engineering. Also, you can Master the program of Big Data & Hadoop frameworks, leverage the functionality of AWS services, and use the database management tool MongoDB to store data.
Machine Learning with Python
This Machine Learning online course offers an in-depth overview of Machine Learning topics including working with real-time data, developing algorithms using supervised & unsupervised learning, regression, classification, and time series modelling. Learn how to use Python in this Machine Learning certification training to draw predictions from data.
For more information visit our website Rohar academy
3 notes
·
View notes
Photo

hydralisk98′s web projects tracker:
Core principles=
Fail faster
‘Learn, Tweak, Make’ loop
This is meant to be a quick reference for tracking progress made over my various projects, organized by their “ultimate target” goal:
(START)
(Website)=
Install Firefox
Install Chrome
Install Microsoft newest browser
Install Lynx
Learn about contemporary web browsers
Install a very basic text editor
Install Notepad++
Install Nano
Install Powershell
Install Bash
Install Git
Learn HTML
Elements and attributes
Commenting (single line comment, multi-line comment)
Head (title, meta, charset, language, link, style, description, keywords, author, viewport, script, base, url-encode, )
Hyperlinks (local, external, link titles, relative filepaths, absolute filepaths)
Headings (h1-h6, horizontal rules)
Paragraphs (pre, line breaks)
Text formatting (bold, italic, deleted, inserted, subscript, superscript, marked)
Quotations (quote, blockquote, abbreviations, address, cite, bidirectional override)
Entities & symbols (&entity_name, &entity_number,  , useful HTML character entities, diacritical marks, mathematical symbols, greek letters, currency symbols, )
Id (bookmarks)
Classes (select elements, multiple classes, different tags can share same class, )
Blocks & Inlines (div, span)
Computercode (kbd, samp, code, var)
Lists (ordered, unordered, description lists, control list counting, nesting)
Tables (colspan, rowspan, caption, colgroup, thead, tbody, tfoot, th)
Images (src, alt, width, height, animated, link, map, area, usenmap, , picture, picture for format support)
old fashioned audio
old fashioned video
Iframes (URL src, name, target)
Forms (input types, action, method, GET, POST, name, fieldset, accept-charset, autocomplete, enctype, novalidate, target, form elements, input attributes)
URL encode (scheme, prefix, domain, port, path, filename, ascii-encodings)
Learn about oldest web browsers onwards
Learn early HTML versions (doctypes & permitted elements for each version)
Make a 90s-like web page compatible with as much early web formats as possible, earliest web browsers’ compatibility is best here
Learn how to teach HTML5 features to most if not all older browsers
Install Adobe XD
Register a account at Figma
Learn Adobe XD basics
Learn Figma basics
Install Microsoft’s VS Code
Install my Microsoft’s VS Code favorite extensions
Learn HTML5
Semantic elements
Layouts
Graphics (SVG, canvas)
Track
Audio
Video
Embed
APIs (geolocation, drag and drop, local storage, application cache, web workers, server-sent events, )
HTMLShiv for teaching older browsers HTML5
HTML5 style guide and coding conventions (doctype, clean tidy well-formed code, lower case element names, close all html elements, close empty html elements, quote attribute values, image attributes, space and equal signs, avoid long code lines, blank lines, indentation, keep html, keep head, keep body, meta data, viewport, comments, stylesheets, loading JS into html, accessing HTML elements with JS, use lowercase file names, file extensions, index/default)
Learn CSS
Selections
Colors
Fonts
Positioning
Box model
Grid
Flexbox
Custom properties
Transitions
Animate
Make a simple modern static site
Learn responsive design
Viewport
Media queries
Fluid widths
rem units over px
Mobile first
Learn SASS
Variables
Nesting
Conditionals
Functions
Learn about CSS frameworks
Learn Bootstrap
Learn Tailwind CSS
Learn JS
Fundamentals
Document Object Model / DOM
JavaScript Object Notation / JSON
Fetch API
Modern JS (ES6+)
Learn Git
Learn Browser Dev Tools
Learn your VS Code extensions
Learn Emmet
Learn NPM
Learn Yarn
Learn Axios
Learn Webpack
Learn Parcel
Learn basic deployment
Domain registration (Namecheap)
Managed hosting (InMotion, Hostgator, Bluehost)
Static hosting (Nertlify, Github Pages)
SSL certificate
FTP
SFTP
SSH
CLI
Make a fancy front end website about
Make a few Tumblr themes
===You are now a basic front end developer!
Learn about XML dialects
Learn XML
Learn about JS frameworks
Learn jQuery
Learn React
Contex API with Hooks
NEXT
Learn Vue.js
Vuex
NUXT
Learn Svelte
NUXT (Vue)
Learn Gatsby
Learn Gridsome
Learn Typescript
Make a epic front end website about
===You are now a front-end wizard!
Learn Node.js
Express
Nest.js
Koa
Learn Python
Django
Flask
Learn GoLang
Revel
Learn PHP
Laravel
Slim
Symfony
Learn Ruby
Ruby on Rails
Sinatra
Learn SQL
PostgreSQL
MySQL
Learn ORM
Learn ODM
Learn NoSQL
MongoDB
RethinkDB
CouchDB
Learn a cloud database
Firebase, Azure Cloud DB, AWS
Learn a lightweight & cache variant
Redis
SQLlite
NeDB
Learn GraphQL
Learn about CMSes
Learn Wordpress
Learn Drupal
Learn Keystone
Learn Enduro
Learn Contentful
Learn Sanity
Learn Jekyll
Learn about DevOps
Learn NGINX
Learn Apache
Learn Linode
Learn Heroku
Learn Azure
Learn Docker
Learn testing
Learn load balancing
===You are now a good full stack developer
Learn about mobile development
Learn Dart
Learn Flutter
Learn React Native
Learn Nativescript
Learn Ionic
Learn progressive web apps
Learn Electron
Learn JAMstack
Learn serverless architecture
Learn API-first design
Learn data science
Learn machine learning
Learn deep learning
Learn speech recognition
Learn web assembly
===You are now a epic full stack developer
Make a web browser
Make a web server
===You are now a legendary full stack developer
[...]
(Computer system)=
Learn to execute and test your code in a command line interface
Learn to use breakpoints and debuggers
Learn Bash
Learn fish
Learn Zsh
Learn Vim
Learn nano
Learn Notepad++
Learn VS Code
Learn Brackets
Learn Atom
Learn Geany
Learn Neovim
Learn Python
Learn Java?
Learn R
Learn Swift?
Learn Go-lang?
Learn Common Lisp
Learn Clojure (& ClojureScript)
Learn Scheme
Learn C++
Learn C
Learn B
Learn Mesa
Learn Brainfuck
Learn Assembly
Learn Machine Code
Learn how to manage I/O
Make a keypad
Make a keyboard
Make a mouse
Make a light pen
Make a small LCD display
Make a small LED display
Make a teleprinter terminal
Make a medium raster CRT display
Make a small vector CRT display
Make larger LED displays
Make a few CRT displays
Learn how to manage computer memory
Make datasettes
Make a datasette deck
Make floppy disks
Make a floppy drive
Learn how to control data
Learn binary base
Learn hexadecimal base
Learn octal base
Learn registers
Learn timing information
Learn assembly common mnemonics
Learn arithmetic operations
Learn logic operations (AND, OR, XOR, NOT, NAND, NOR, NXOR, IMPLY)
Learn masking
Learn assembly language basics
Learn stack construct’s operations
Learn calling conventions
Learn to use Application Binary Interface or ABI
Learn to make your own ABIs
Learn to use memory maps
Learn to make memory maps
Make a clock
Make a front panel
Make a calculator
Learn about existing instruction sets (Intel, ARM, RISC-V, PIC, AVR, SPARC, MIPS, Intersil 6120, Z80...)
Design a instruction set
Compose a assembler
Compose a disassembler
Compose a emulator
Write a B-derivative programming language (somewhat similar to C)
Write a IPL-derivative programming language (somewhat similar to Lisp and Scheme)
Write a general markup language (like GML, SGML, HTML, XML...)
Write a Turing tarpit (like Brainfuck)
Write a scripting language (like Bash)
Write a database system (like VisiCalc or SQL)
Write a CLI shell (basic operating system like Unix or CP/M)
Write a single-user GUI operating system (like Xerox Star’s Pilot)
Write a multi-user GUI operating system (like Linux)
Write various software utilities for my various OSes
Write various games for my various OSes
Write various niche applications for my various OSes
Implement a awesome model in very large scale integration, like the Commodore CBM-II
Implement a epic model in integrated circuits, like the DEC PDP-15
Implement a modest model in transistor-transistor logic, similar to the DEC PDP-12
Implement a simple model in diode-transistor logic, like the original DEC PDP-8
Implement a simpler model in later vacuum tubes, like the IBM 700 series
Implement simplest model in early vacuum tubes, like the EDSAC
[...]
(Conlang)=
Choose sounds
Choose phonotactics
[...]
(Animation ‘movie’)=
[...]
(Exploration top-down ’racing game’)=
[...]
(Video dictionary)=
[...]
(Grand strategy game)=
[...]
(Telex system)=
[...]
(Pen&paper tabletop game)=
[...]
(Search engine)=
[...]
(Microlearning system)=
[...]
(Alternate planet)=
[...]
(END)
4 notes
·
View notes