#install docker on a hyper-v virtual mac
Explore tagged Tumblr posts
Visit Tumblr Blog
Explore Tumblr blogs with no restrictions, modern design and the best experience.
Last Seen Tumblr Blogs


Fun Fact
Tumblr was attacked by a cross-site scripting worm deployed by the Internet troll group GNAA on Dec 3, 2012.
Text
Watch "Install hyper v on windows 10 - Install hyper-v on windows 10" on YouTube
Watch “Install hyper v on windows 10 – Install hyper-v on windows 10” on YouTube
View On WordPress
#enable hyper v on windows 10#enable hyper v windows 10#enable hyper-v in windows 10#how to activate hyper v in windows 10#how to disable hyper v on windows#how to enable hyper v on windows#how to enable hyper v on windows 10#how to install hyper v gui tools#how to install hyper v on windows#how to install hyper-v#How to install Hyper-V on Windows 10#hyper v virtual machine#Hyper v vs vmware#Hyper-V#hyper-v install#hyper-v windows 10#install docker on a hyper-v virtual mac#install hyper v on windows 10#install hyper-v on windows 10 home#install hyper-v on windows 10 powershell#install hyper-v on windows 10 pro#virtual machine
0 notes
Text
A Vagrant Story
Like everyone else I wish I had more time in the day. In reality, I want to spend more time on fun projects. Blogging and content creation has been a bit on a hiatus but it doesn't mean I have less things to write and talk about. In relation to this rambling I want to evangelize a tool I've been using over the years that saves an enormous amount of time if you're working in diverse sandbox development environments, Vagrant from HashiCorp.
Elevator pitch
Vagrant introduces a declarative model for virtual machines running in a development environment on your desktop. Vagrant supports many common type 2 hypervisors such as KVM, VirtualBox, Hyper-V and the VMware desktop products. The virtual machines are packaged in a format referred to as "boxes" and can be found on vagrantup.com. It's also quite easy to build your own boxes from scratch with another tool from HashiCorp called Packer. Trust me, if containers had not reached the mainstream adoption it has today, Packer would be a household tool. It's a blog post in itself for another day.
Real world use case
I got roped into a support case with a customer recently. They were using the HPE Nimble Storage Volume Plugin for Docker with a particular version of NimbleOS, Docker and docker-compose. The toolchain exhibited a weird behavior that would require two docker hosts and a few iterations to reproduce the issue. I had this environment stood up, diagnosed and replied to the support team with a customer facing response in less than an hour, thanks to Vagrant.
vagrant init
Let's elaborate on how to get a similar environment set up that I used in my support engagement off the ground. Let's assume vagrant and a supported type 2 hypervisor is installed. This example will work on Windows, Linux and Mac.
Create a new project folder and instantiate a new Vagrantfile. I use a collection of boxes built from these sources. Bento boxes provide broad coverage of providers and a variety of Linux flavors.
mkdir myproj && cd myproj vagrant init bento/ubuntu-20.04 A `Vagrantfile` has been placed in this directory. You are now ready to `vagrant up` your first virtual environment! Please read the comments in the Vagrantfile as well as documentation on `vagrantup.com` for more information on using Vagrant.
There's now a Vagrantfile in the current directory. There's a lot of commentary in the file to allow customization of the environment. It's possible to declare multiple machines in one Vagrantfile, but for the sake of an introduction, we'll explore setting up a single VM.
One of the more useful features is that Vagrant support "provisioners" that runs at first boot. It makes it easy to control the initial state and reproduce initialization with a few keystrokes. I usually write Ansible playbooks for more elaborate projects. For this exercise we'll use the inline shell provisioner to install and start docker.
Vagrant.configure("2") do |config| config.vm.box = "bento/ubuntu-20.04" config.vm.provision "shell", inline: <<-SHELL apt-get update apt-get install -y docker.io python3-pip pip3 install docker-compose usermod -a -G docker vagrant systemctl enable --now docker SHELL end
Prepare for very verbose output as we bring up the VM.
Note: The vagrant command always assumes working on the Vagrantfile in the current directory.
vagrant up
After the provisioning steps, a new VM is up and running from a thinly cloned disk of the source box. Initial download may take a while but the instance should be up in a minute or so.
Post-declaration tricks
There are some must-know Vagrant environment tricks that differentiate Vagrant from right-clicking in vCenter or fumbling in the VirtualBox UI.
SSH access
Accessing the shell of the VM can be done in two ways, most commonly is to simply do vagrant ssh and that will drop you at the prompt of the VM with the predefined user "vagrant". This method is not very practical if using other SSH-based tools like scp or doing advanced tunneling. Vagrant keeps track of the SSH connection information and have the capability to spit it out in a SSH config file and then the SSH tooling may reference the file. Example:
vagrant ssh-config > ssh-config ssh -F ssh-config default
Host shared directory
Inside the VM, /vagrant is shared with the host. This is immensely helpful as any apps your developing for the particular environment can be stored on the host and worked on from the convenience of your desktop. As an example, if I were to use the customer supplied docker-compose.yml and Dockerfile, I'd store those in /vagrant/app which in turn would correspond to my <current working directory for the project>/app.
Pushing and popping
Vagrant supports using the hypervisor snapshot capabilities. However, it does come with a very intuitive twist. Assume we want to store the initial boot state, let's push!
vagrant snapshot push ==> default: Snapshotting the machine as 'push_1590949049_3804'... ==> default: Snapshot saved! You can restore the snapshot at any time by ==> default: using `vagrant snapshot restore`. You can delete it using ==> default: `vagrant snapshot delete`.
There's now a VM snapshot of this environment (if it was a multi-machine setup, a snapshot would be created on all the VMs). The snapshot we took is now on top of the stack. Reverting to the top of the stack, simply pop back:
vagrant snapshot pop --no-delete ==> default: Forcing shutdown of VM... ==> default: Restoring the snapshot 'push_1590949049_3804'... ==> default: Checking if box 'bento/ubuntu-20.04' version '202004.27.0' is up to date... ==> default: Resuming suspended VM... ==> default: Booting VM... ==> default: Waiting for machine to boot. This may take a few minutes... default: SSH address: 127.0.0.1:2222 default: SSH username: vagrant default: SSH auth method: private key ==> default: Machine booted and ready! ==> default: Machine already provisioned. Run `vagrant provision` or use the `--provision` ==> default: flag to force provisioning. Provisioners marked to run always will still run.
You're now back to the previous state. The snapshot sub-command allows restoring to a particular snapshot and it's possible to have multiple states with sensible names too, if stepping through debugging scenarios or experimenting with named states.
Summary
These days there's a lot of compute and memory available on modern laptops and desktops. Why run development in the cloud or a remote DC when all you need is available right under your finger tips? Sure, you can't run a full blown OpenShift or HPE Container Platform but you can certainly run a representable Kubernetes clusters where minishift, microk8s and the likes won't work if you need access to the host OS (yes, I'm in the storage biz). In a recent personal project I've used this tool to simply make Kubernetes clusters with Vagrant. It works surprisingly well and allow a ton of customization.
Bonus trivia
Vagrant Story is a 20 year old videogame for PlayStation (one) from SquareSoft (now SquareEnix). It features a unique battle system I've never seen anywhere else to this day and it was one of those games I played back-to-back three times over. It's awesome. Check it out on Wikipedia.
1 note
·
View note
Text
This guide demonstrates how to run Ubuntu Virtual Machines on Linux and macOS using Multipass. But before we dive into the crux of this tool. Let us get to know what this tool is. What is Multipass? There are many virtualization tools available to deploy VMs for testing and learning purposes. These include Virtualbox, VMware, LXD, KVM, Docker, LXC, Proxmox, Vagrant e.t.c I use Virtualbox and VMware regularly for testing various Linux applications on Linux distributions. In this guide, we are going to take in yet another virtualization tool known as Multipass. This tool makes it easy to create and launch Ubuntu Virtual Machines for regular users, developers, and system admins. Multipass is a lightweight Virtual machine manager developed by the canonical team to create and launch ubuntu instances on your local machine. It is developed to run on macOS, Windows, and GNU/Linux systems. Multipass uses KVM on Linux, Hyper kit on macOS, and Hyper-V on Windows to run the virtual machine with minimal overhead. With Multipass, one can run commands directly into the VM’s shell from your local computer. Moreso, it is possible to mount directories of your host system and share files with the VM. With the above knowledge, we are now set to dive into the installation of Multipass. Step 1: Install Multipass On Linux and macOS 1. Install Multipass on Linux On Linux, Multipass is available as a snap package. It can easily be installed on any Linux distribution that supports snapd. In some distributions such as Zorin OS, Solus 3 and Ubuntu releases from 16.04 LTS snap comes as a pre-installed application. You can install snapd as below: ###On Debian/Ubuntu sudo apt install snapd ###On RHEL 7/CentOS 7 sudo yum -y install https://dl.fedoraproject.org/pub/epel/epel-release-latest-7.noarch.rpm sudo yum -y upgrade sudo yum -y install snapd ###On Rhel 8/Centos 8/Rocky Linux 8/Fedora sudo dnf -y install https://dl.fedoraproject.org/pub/epel/epel-release-latest-8.noarch.rpm sudo dnf -y upgrade sudo dnf -y install snapd Then enable snapd as below: sudo systemctl enable --now snapd.socket sudo ln -s /var/lib/snapd/snap /snap With snap installed and started, we are set to install Multipass on any Linux distribution using the command: First, update and upgrade your system. Then install Multipass on Linux as below sudo snap install multipass If the above fails to run for any reason, try to install Multipass with this command: sudo snap install multipass --classic With Multipass successfully installed, you will see this output: multipass 1.10.1 from Canonical✓ installed 2. Install Multipass on macOS On macOS, there are multiple ways to get Multipass installed on your system. 1. Using Multipass Installer Download the Multipass installer from the official downloads page then install it. With the .pkg package downloaded, Install it on your macOS system by activating it. Follow through the steps given using Administrator privileges. 2. Using Brew With brew, you can easily install Multipass on macOS using the command below: brew install --cask multipass On macOS, Multipass supports VirtualBox as a virtualization provider. If you would like to use VirtualBox, issue the below command: sudo multipass set local.driver=virtualbox Verify your Multipass installation using the command. $ multipass version multipass 1.10.1+mac multipassd 1.10.1+mac Step 2: Create and launch Ubuntu VMs with Multipass on Linux and macOS With Multipass successfully installed on your system, running Ubuntu VM’s is incredibly easy. To launch an Ubuntu Instance use the command: multipass launch --name test-instance alternatively use: multipass launch -n test-instance In the above code, replace test-instance with your desired Ubuntu instance name. The latest minimal Ubuntu LTS instance will be downloaded and automatically started as below: You can now list your available VMs using the command: multipass list Sample Output:
Name State IPv4 Image test-instance Running 10.14.155.56 Ubuntu 20.04 LTS From the above output, we have an Ubuntu instance with the name test-instance with Ubuntu 20.04 LTS and also the IP is provided. Execute commands for your VM from the Local System. One of the amazing features of Multipass is that it allows one to run commands for the Ubuntu instance from the local machine. To find the system’s details for a running VM use: multipass exec test-instance -- lsb_release -a In the code, test-instance is the name for the VM we want the details for. Sample Output: Launch Ubuntu VM’s shell. Aside from running commands from the local system’s shell, you can launch the Ubuntu VM’s shell and directly run the commands on it. The Shell for the Ubuntu VM is launched with the command: multipass shell test-instance Sample Output: Welcome to Ubuntu 20.04.3 LTS (GNU/Linux 5.4.0-81-generic x86_64) * Documentation: https://help.ubuntu.com * Management: https://landscape.canonical.com * Support: https://ubuntu.com/advantage System information as of Mon Aug 30 14:32:29 EAT 2021 System load: 0.08 Processes: 104 Usage of /: 27.4% of 4.67GB Users logged in: 0 Memory usage: 18% IPv4 address for ens4: 10.14.155.56 Swap usage: 0% 1 update can be applied immediately. To see these additional updates run: apt list --upgradable Last login: Mon Aug 30 14:31:40 2021 from 10.14.155.1 To run a command as administrator (user "root"), use "sudo ". See "man sudo_root" for details. ubuntu@test-instance:~$ From the shell, you can execute the normal Ubuntu command such as: sudo apt update To logout from the shell use: exit Find other instances to Launch As we already saw earlier, Multipass finds and downloads the current LTS version of Ubuntu for the VM. But you still can find other available versions you want to run using the command: $ multipass find Image Aliases Version Description snapcraft:core18 18.04 20201111 Snapcraft builder for Core 18 snapcraft:core20 20.04 20210921 Snapcraft builder for Core 20 snapcraft:core22 22.04 20220426 Snapcraft builder for Core 22 snapcraft:devel 20220913 Snapcraft builder for the devel series core core16 20200818 Ubuntu Core 16 core18 20211124 Ubuntu Core 18 18.04 bionic 20220901 Ubuntu 18.04 LTS 20.04 focal,lts 20220824 Ubuntu 20.04 LTS 22.04 jammy 20220902 Ubuntu 22.04 LTS daily:22.10 devel,kinetic 20220910 Ubuntu 22.10 appliance:adguard-home 20200812 Ubuntu AdGuard Home Appliance appliance:mosquitto 20200812 Ubuntu Mosquitto Appliance appliance:nextcloud 20200812 Ubuntu Nextcloud Appliance appliance:openhab 20200812 Ubuntu openHAB Home Appliance appliance:plexmediaserver 20200812 Ubuntu Plex Media Server Appliance anbox-cloud-appliance latest Anbox Cloud Appliance charm-dev latest A development and testing environment for charmers docker latest A Docker environment with Portainer and related tools jellyfin latest Jellyfin is a Free Software Media System that puts you in control of managing and streaming your media. minikube latest minikube is local Kubernetes
From the output, there are several Ubuntu LTS versions. You can launch an instance from the list using the syntax below. $ multipass launch --name test1-instance 22.04 This command will launch an instance for Ubuntu 22.04. Create an Instance with Custorm Specifications. Multipass by default will create a VM with 5 GB hard disk size, 1 CPU, and 1 GB RAM. However, this can be altered by making custom settings for the VM you want. This helps one create a VM meeting desired specifications and need. For example in the below code, I will demonstrate how to create a VM with 2 CPUs, 4 GB RAM, and 15 GB storage space. multipass launch -c 2 -m 4G -d 15G -n test2-instance View info about the instance: $ multipass info test2-instance Name: test2-instance State: Running IPv4: 10.14.155.175 Release: Ubuntu 20.04.3 LTS Image hash: 97bb9f79af52 (Ubuntu 20.04 LTS) Load: 0.47 0.31 0.12 Disk usage: 1.3G out of 14.4G Memory usage: 149.0M out of 3.8G Mounts: -- Remember, the minimum allowed requirements are: CPU- 1 Memory- 128 MB Hard diks- 512 MB Launch with custom network interface List available networks: $ multipass networks Name Type Description bridge0 bridge Network bridge with en1, en2, en3, en4 en0 wifi Wi-Fi (Wireless) en1 thunderbolt Thunderbolt 1 en2 thunderbolt Thunderbolt 2 en3 thunderbolt Thunderbolt 3 en4 thunderbolt Thunderbolt 4 Launch an instance with specified network interface: multipass launch -c 2 -m 4G -d 15G --network name=en0 -n test2-instance Wait for instance to start then check available interfaces: $ multipass shell test2-instance ubuntu@test2-instance:~$ ip ad 1: lo: mtu 65536 qdisc noqueue state UNKNOWN group default qlen 1000 link/loopback 00:00:00:00:00:00 brd 00:00:00:00:00:00 inet 127.0.0.1/8 scope host lo valid_lft forever preferred_lft forever inet6 ::1/128 scope host valid_lft forever preferred_lft forever 2: enp0s3: mtu 1500 qdisc fq_codel state UP group default qlen 1000 link/ether 52:54:00:7f:cb:cf brd ff:ff:ff:ff:ff:ff inet 10.0.2.15/24 brd 10.0.2.255 scope global dynamic enp0s3 valid_lft 85884sec preferred_lft 85884sec inet6 fe80::5054:ff:fe7f:cbcf/64 scope link valid_lft forever preferred_lft forever 3: enp0s8: mtu 1500 qdisc fq_codel state UP group default qlen 1000 link/ether 52:54:00:43:43:b4 brd ff:ff:ff:ff:ff:ff inet 192.168.100.164/24 brd 192.168.100.255 scope global dynamic enp0s8 valid_lft 85890sec preferred_lft 85890sec inet6 fe80::5054:ff:fe43:43b4/64 scope link valid_lft forever preferred_lft forever Suspend running instances To suspend instance on Multipass, run the command: multipass suspend test-instance Verify if the instance is suspended: $ multipass info test-instance Name: test-instance State: Suspended IPv4: -- Release: -- Image hash: 97bb9f79af52 (Ubuntu 20.04 LTS) Load: -- Disk usage: -- Memory usage: -- Mounts: -- The command multipass info test-instanceis generally used to get information about an instance. Step 3: Manage Ubuntu VMs on Multipass. You can start and stop Ubuntu VMs on Multipass using the below commands: ###Stop a VM multipass stop test-instance ###Start a VM multipass start test-instance Alternatively, you can manage your VMs using the Multipass Tray icon. This is done by launching Multipass GUI from the App Menu on the host system. From the tray icon, one can stop/start, open shell, disable and enable autostart of a VM and also quit Multipass. Delete VMs With intended tasks for the VM achieved, you can delete the VM if you no longer need it. First, you need to stop the VM. multipass stop test-instance Then delete it as below: multipass delete test-instance multipass purge Mount and Unmount a local directory To mount a local directory use the following command syntax:
multipass mount [ ...] Example: $ multipass list Name State IPv4 Image ubuntu-focal Running N/A Ubuntu 20.04 LTS $ multipass mount ~/Downloads ubuntu-focal $ multipass info ubuntu-focal Name: ubuntu-focal State: Running IPv4: N/A Release: Ubuntu 20.04.3 LTS Image hash: 10f8ae579fbf (Ubuntu 20.04 LTS) Load: 0.00 0.01 0.05 Disk usage: 1.3G out of 19.2G Memory usage: 164.0M out of 1.9G Mounts: /Users/jmutai/Downloads => /Users/jmutai/Downloads UID map: 501:default GID map: 20:default $ multipass ssh ubuntu-focal $ ubuntu@ubuntu-focal:~$ df -hT Filesystem Type Size Used Avail Use% Mounted on udev devtmpfs 977M 0 977M 0% /dev tmpfs tmpfs 199M 968K 198M 1% /run /dev/sda1 ext4 20G 1.3G 18G 7% / tmpfs tmpfs 994M 0 994M 0% /dev/shm tmpfs tmpfs 5.0M 0 5.0M 0% /run/lock tmpfs tmpfs 994M 0 994M 0% /sys/fs/cgroup /dev/loop0 squashfs 56M 56M 0 100% /snap/core18/2128 /dev/loop1 squashfs 71M 71M 0 100% /snap/lxd/21029 /dev/loop2 squashfs 33M 33M 0 100% /snap/snapd/12883 /dev/sda15 vfat 105M 5.2M 100M 5% /boot/efi tmpfs tmpfs 199M 0 199M 0% /run/user/1000 /dev/loop3 squashfs 128K 128K 0 100% /snap/bare/5 /dev/loop4 squashfs 1.2M 1.2M 0 100% /snap/multipass-sshfs/145 :/Users/jmmutai/Downloads fuse.sshfs 1000G 0 1000G 0% /Users/jmutai/Downloads To unmount use the command: $ multipass umount ubuntu-focal $ multipass info ubuntu-focal Name: ubuntu-focal State: Running IPv4: N/A Release: Ubuntu 20.04.3 LTS Image hash: 10f8ae579fbf (Ubuntu 20.04 LTS) Load: 0.00 0.00 0.04 Disk usage: 1.3G out of 19.2G Memory usage: 159.8M out of 1.9G Mounts: -- In case you get stuck when using Multipass, there is a way out by getting help using the command: $ multipass help Usage: multipass [options] Create, control and connect to Ubuntu instances. This is a command line utility for multipass, a service that manages Ubuntu instances. Options: -h, --help Display this help -v, --verbose Increase logging verbosity. Repeat the 'v' in the short option for more detail. Maximum verbosity is obtained with 4 (or more) v's, i.e. -vvvv. Available commands: delete Delete instances exec Run a command on an instance find Display available images to create instances from get Get a configuration setting help Display help about a command info Display information about instances launch Create and start an Ubuntu instance list List all available instances mount Mount a local directory in the instance networks List available network interfaces purge Purge all deleted instances permanently recover Recover deleted instances restart Restart instances set Set a configuration setting shell Open a shell on a running instance start Start instances stop Stop running instances suspend Suspend running instances transfer Transfer files between the host and instances umount Unmount a directory from an instance version Show version details Conclusion. Congratulations! That marks the end of this guide on how to run Ubuntu Virtual Machines on Linux and macOS using Multipass. We have seen how easy it is to create and run Ubuntu instances with Multipass. I hope this was helpful
0 notes
Text
Windows 10 enterprise enable windows store 無料ダウンロード.Windows 評価版ソフトウェア
Windows 10 enterprise enable windows store 無料ダウンロード.Windows 10 上に Hyper-V をインストールする

Windows 10 November 2021 Update.WSL のインストール | Microsoft Docs
Nov 02, · この記事の内容. 適用対象. Windows 10; Windows の各エディションでサポートされている機能について詳しくは、「Windows 10 エディションの比較」をご覧ください。 IT 担当者は、自分の組織のクライアント コンピューターに対して Microsoft Store へのアクセスを構成できます。 説明. Windows 10 Enterprise は、IT プロフェッショナルに以下の機能を提供することで、大規模および中規模の組織のニーズに対応するよう設計されています。. 最新のセキュリティ上の脅威からの最先端の保護. 柔軟な展開、更新、およびサポートの各種 Nov 23, · Windows ボタンを右クリックし、[アプリと機能] を選択します。 右側の関連する設定にある [プログラムと機能] を選択します。 [Windows の機能の有効化または無効化] を選択します。 [Hyper-V] を選択して、[OK] をクリックします。
Windows 10 enterprise enable windows store 無料ダウンロード.Windows に Docker Desktop をインストール — Docker-docs-ja ドキュメント
Dec 20, · To restore or reinstall Windows Store in Windows 10, start PowerShell as Administrator. Click Start, type Powershell. In the search results, right-click “PowerShell” and click Run as administrator. In the PowerShell window, type the following command and press ENTER Docker Desktop for Windows は Docker Hub からダウンロードできます。. このページは、Docker Desktop を Windows 10 Pro、Enterprise、Education にインストールするための情報です。. Docker Desktop を Windows 10 Home にインストールする情報をお探しであれば、 Windows Home に Docker Desktop をインストール をご覧ください。. Docker Hub からダウ Nov 02, · この記事の内容. 適用対象. Windows 10; Windows の各エディションでサポートされている機能について詳しくは、「Windows 10 エディションの比較」をご覧ください。 IT 担当者は、自分の組織のクライアント コンピューターに対して Microsoft Store へのアクセスを構成できます。
Docker Desktop for Windows は、Mirosoft Windows 用の Docker コミュニティ 版です。Docker Desktop for Windows は Docker Hub からダウンロードできます。. このページは、Docker Desktop を Windows 10 Pro、Enterprise、Education にインストールするための情報です。Docker Desktop を Windows 10 Home にインストールする情報をお探しであれば、 Windows Home に Docker Desktop をインストール をご覧ください。. Docker Desktop のダウンロード中に、 Docker Software End User License Agreement と Docker Data Processing Agreement に同意ください。.
Docker による Windows 用 Docker Desktop のサポートは、Microsoft の Windows 10 オペレーティングシステムに対するサポート・ライフサイクルに基づきます。詳細な情報は Windows ライフサイクル・ファクトシート を御覧ください。. Docker Desktop のインストールに含まれるのは、 Docker Engine 、 Docker CLI クライアント、 Docker Compose 、 Notary 、 Kubernetes 、 Credential Helper です。.
Docker Desktop で作成したコンテナやイメージは、インストールしたマシン上の全ユーザ間で共有です。これは、すべての Windows アカウントが同じ仮想マシンでコンテナを構築・実行するからです。ただし、Docker Desktop WSL2 ��ックエンドを使用する場合は、ユーザ間でコンテナやイメージの共有ができないのでご注意ください。. VMware や Parralles インスタンス上で Docker Desktop を実行するような、ネストした仮想化でも動くでしょうが、無保証です。詳しい情報は win-running-docker-desktop-for-windows-in-nested-virtualization-scenarios をご覧ください。.
もしもまだインストーラ( Docker Desktop Installer. exe )をダウンロードしていなければ、 Docker Hub から取得できます。ダウンロードは通常「ダウンロード」フォルダ内か、ウェブブラウザ上のダウンロード・バーに表示される最近ダウンロードした場所です。. 確認画面が出たら、 Enable Hyper-V Windows Features (Hyper V の Windows 機能を有効にする)のオプションが、設定ページで選択されているかどうかを確認します。.
インストール後の Docker Desktop は、自動的に起動できません。Docker Desktop を開始するには Docker を検索し、検索結果にある Docker Desktop を選択します。. もしも鯨アイコンが通知エリアから隠れている場合は、タスクバーで「上」を向いた矢印をクリックして表示します。詳しく知るには Docker の設定 を御覧ください。. 初期化が完了すると、Docker Desktop は開始チュートリアルを起動します。チュートリアルには Docker イメージを構築、実行し、Docker Hub にイメージを送信するまでの例を含みます。. Docker Desktop のアンインストールは、ローカルのマシンにある Docker コンテナのイメージを破棄し、アプリケーションによって作成された全てのファイルも破棄します。.
Docker Desktop は、自分で Stable (安定版)リリースと Edge (最新)リリースを切り替え可能です。しかしながら、 Docker Desktop を一度にインストールできるのは、1つのバージョンのみ です。Stable と Edge 版のリリース切り替えるは、開発環境の安定性を損なう可能性があります。特に、新しい(Edge)チャンネルを古い(Stable)チャンネルに切り替える場合です。. 例えば、 Docker Desktop の新しい Edge バージョンでコンテナを作成する場合、Stable に切り戻すと動作しなくなる可能性があります。これは、Edge の機能を使って作成したコンテナには、まだ Stable には反映されていない機能が用いられている場合があるからです。Edge コンテナで作成したり作業したりする場合には、留意し続けてください。.
Edge と Stable バージョン間を安全に切り替えるには、必要に応じてイメージの保存(save)やコンテナの出力(export)を確実に行い、他のバージョンをインストールする前に、既存のバージョンをアンインストールします。詳しい情報については、以下にあるデータの保存と修復を御覧ください。. データ・ボリュームのバックアップと修復の仕方に関する情報は、 データ・ボリュームのバックアップ・修復・移行 を御覧ください。. Docker-docs-ja Guides - ガイド Docker の入手 Get started - 始めましょう Docker で開発 プロダクションでアプリを実行 Product manuals - マニュアル Docker Engine Docker Compose Docker Desktop 概要 Mac Windows Windows に Docker Desktop をインストール インストール前に知っておくこと Windows に Docker Desktop をインストール Docker Desktop のスタート Docker Desktop のアンインストール Stable と Edge バージョンの切り替え 次はどこへ行きますか Windows Home に Docker Desktop をインストール Docker for Windows を始めよう Kubernetes 上にデプロイ Docker Desktop for Windows のネットワーク構築機能 Docker Toolbox の移行 ログとトラ��ルシューティング よくある質問と回答 [FAQ] Docker for Windows Stable リリースノート Docker for Windows Edge リリースノート Docker Desktop WSL 2 バックエンド ダッシュボード オープンソース・ライセンス Docker Hub Docker Machine Docker Toolbox Docker Registry Docker Swarm Reference - 参考資料 コマンドライン・リファレンス Dockerfile リファレンス Compose file リファレンス 用語集 Samples - サンプル サンプル Docker について リリース・ノート 日本語版について Docker ドキュメント逆引きガイド Docker ドキュメント日本語版 PDF ダウンロード Docs アーカイブ v Docs » Docker Desktop » Docker Desktop for Windows » Windows に Docker Desktop をインストール Edit on GitHub.
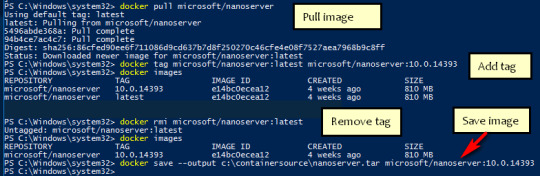
Docker Desktop Installer. exe をダブルクリックし、インストーラを起動します。 もしもまだインストーラ( Docker Desktop Installer. exe )をダウンロードしていなければ、 Docker Hub から取得できます。ダウンロードは通常「ダウンロード」フォルダ内か、ウェブブラウザ上のダウンロード・バーに表示される最近ダウンロードした場所です。 2. 確認画面が出たら、 Enable Hyper-V Windows Features (Hyper V の Windows 機能を有効にする)のオプションが、設定ページで選択されているかどうかを確認します。 3. インストール・ウィザードの指示に従い、利用規約(ライセンス)を承諾し、インストーラに権限を与えてインストールを進めます。 4. tar image1 [image tar container を使い、保持したい全てのコンテナをエクスポート(出力)します。Docker Engine コマンドライン・リファレンスの export セクションを御覧ください。 現在のバージョンの Docker Desktop をアンインストールし、異なるバージョン(Stable 又は Edge)をインストールし、仮想マシン・ディスクをリセットします。 docker load -i images.
tar を使い、以前に保存したイメージを再読み込みします。Docker Engine の load を御覧ください。 docker import -i myContainer1. tar を使い、以前にエクスポートしたコンテナに対応するファイルシステム・イメージを作成します。Docker Engine の import を御覧ください。 データ・ボリュームのバックアップと修復の仕方に関する情報は、 データ・ボリュームのバックアップ・修復・移行 を御覧ください。.
0 notes
Text
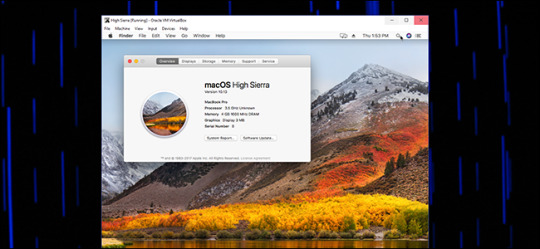
Latest Macos High Sierra Version

MacOS High Sierra 10.13.5 (17F77) Free Download Latest Version for Mac. It is full offline installer standalone setup of MacOS High Sierra 10.13.5 (17F77) for 32/64.
We would like to show you a description here but the site won’t allow us. The MacPorts Project is an open-source community initiative to design an easy-to-use system for compiling, installing, and upgrading either command-line, X11 or Aqua based open-source software on the Mac OS X operating system.
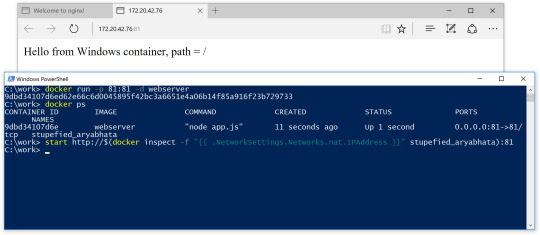
To start a stopped container, use docker start, followed by the container ID or the container’s name. Let’s start the Ubuntu-based container with the ID of 1c08a7a0d0e4: docker start 1c08a7a0d0e4; The container will start, and you can use docker ps to see its status. Run docker in ubuntu wsl. Installing Docker on Ubuntu 20.04 is easy with this tutorial. Learn to install, start, and run Docker. Get started with this powerful virtualization tool! We can now finally start the container. Run docker.exe again, and tell it to run the new image: C: Users mathi. Docker.exe run -it ubuntu Congratulations! You have successfully set up your system to use containers with Hyper-V isolation on Windows, and have run your very own Ubuntu container.
MacOS High Sierra 10.13.5 (17F77) Overview
MacOS High Sierra 10.13.5 is the new version of the previous OS X which is Apple’s exclusive Operating System. This version is developed for the PCs and the Macintosh servers. The developers have worked really hard to increase the performance, stability and the security of the OS. By downloading and installing this newer version you can easily perform your tasks with more efficiency and smartly. You can also download Mac OS X Lion 10.7.5 DMG.
MacOS High Sierra 10.13.5 supports the Full Screen and the Gesture function so that you can be more productive. It has included the feature of Split View through which you can multitask. You can also tap to your favorite websites without any problem and work fast. You can easily record your notes in a provided checklist and also you will see some new features in the background. There are many fixes and improvements in this version of the OS which will affect the performance of your Hardware. It has an improved design which really complements the overall appearance. You can use the Metal Graphic Interface which increases the speed and efficiency of the games and softwares. You can Mac OS X Lion v10.7.4 DMG.
Features of MacOS High Sierra 10.13.5
Below are some noticeable features which you’ll experience after MacOS High Sierra 10.13.5 free download.
Macos El Capitan
A new version of the previous OS X which is Apple’s exclusive Operating System.
Developed for the PCs and the Macintosh servers.
Can easily perform your tasks with more efficiency and smartly.
Supports the Full Screen and the Gesture function so that you can be more productive.
Included the feature of Split View through which you can multitask.
Can also tap to your favorite websites without any problem and work fast.
Can easily record your notes in a provided checklist and also you will see some new features in the background.
Got an improved design which really complements the overall appearance.
Can use the Metal Graphic Interface which increases the speed and efficiency of the games and softwares.
MacOS High Sierra 10.13.5 Technical Setup Details

Software Full Name: MacOS High Sierra 10.13.5 (17F77)
Setup File Name: macOS_10.13.5_High_Sierra.dmg
Full Setup Size: 4.6 GB
Setup Type: Offline Installer / Full Standalone Setup
Compatibility Architecture: 64 Bit (x64)
Latest Version Release Added On: 05th Jun 2018
Developers: MacOS
System Requirements For MacOS High Sierra 10.13.5
Before you start MacOS High Sierra 10.13.5 free download, make sure your PC meets minimum system requirements.

Operating System: Windows 7/8/8.1/10
Memory (RAM): 1 GB of RAM required.
Hard Disk Space: 5 GB of free space required.
Processor: Intel Dual Core processor or later.
MacOS High Sierra 10.13.5 Free Download
Click on below button to start MacOS High Sierra 10.13.5 Free Download. This is complete offline installer and standalone setup for MacOS High Sierra 10.13.5. This would be compatible with 64 bit windows.
High Speed Magnet Link

Macos Catalina Download
More from my site
This Post was Last Updated On: January 3, 2020
Start up from macOS Recovery
Determine whether you're using a Mac with Apple silicon, then follow the appropriate steps:
Apple silicon: Turn on your Mac and continue to press and hold the power button until you see the startup options window, which includes a gear icon labeled Options. Select Options, then click Continue.
Intel processor: Make sure that your Mac has a connection to the internet. Then turn on your Mac and immediately press and hold Command (⌘)-R until you see an Apple logo or other image.
If you're asked to select a user you know the password for, select the user, click Next, then enter their administrator password.
Reinstall macOS
Select Reinstall macOS from the utilities window in macOS Recovery, then click Continue and follow the installer's instructions.
Follow these guidelines during installation:
Classic puzzle games like tetris, jigsaw puzzles, bust a move, mahjong and sudoku, classic strategy games like chess, classic simulation games like tycoon, classic sports games like pool/billiards, bowling, classic card games like solitaire and poker, classic word games like scrabble, crossword, word search and more free downloads. Tetris is an authentic retro-Tetris game designed and optimized specifically for Windows and OS X. Pros: Fun, easy to play. Cons: The music for this game has always been distracting to me. I find it easier to play with the sound off. Conclusion: Tetris Zone is a decent game and it’s a lot of fun. The graphics are good, and the sound is decent. Download this game from Microsoft Store for Windows 10. See screenshots, read the latest customer reviews, and compare ratings for Tetris.NET. Download Tetris Games. Free and safe download. Download the latest version of the top software, games, programs and apps in 2021. The 6 Pieces 3D Tetris Cube PowerPoint Diagram is useful business template. For example, display an innovative product design and its features, discuss a development strategy or demonstrate complex model. The editable PowerPoint of 6 pieces Tetris 3D cube assist users in quickly and effortlessly modify the design as necessary. Free tetris for mac.
Allow installation to complete without putting your Mac to sleep or closing its lid. Your Mac might restart and show a progress bar several times, and the screen might be empty for minutes at a time.
If the installer asks to unlock your disk, enter the password you use to log in to your Mac.
If the installer doesn't see your disk, or it says that it can't install on your computer or volume, you might need to erase your disk first.
If the installer is for a different version of macOS than you expected, learn about other installation options, below.
If the installer offers you the choice between installing on Macintosh HD or Macintosh HD - Data, choose Macintosh HD.
After installation is complete, your Mac might restart to a setup assistant. If you're selling, trading in, or giving away your Mac, press Command-Q to quit the assistant without completing setup. Then click Shut Down. When the new owner starts up the Mac, they can use their own information to complete setup.
Other macOS installation options
By default, macOS Recovery installs the latest macOS that was previously installed on your Mac.* You can get other macOS versions using one of these methods:
On an Intel-based Mac, you can use Option-Command-R at startup to upgrade to the latest macOS that is compatible with your Mac. Exceptions:
If macOS Sierra 10.12.4 or later was never previously installed, you will receive the macOS that came with your Mac, or the closest version still available.
If your Mac has the Apple T2 Security Chip and you never installed a macOS update, you will receive the latest macOS that was installed on your Mac.
On an Intel-based Mac that previously used macOS Sierra 10.12.4 or later, you can use Shift-Option-Command-R at startup to install the macOS that came with your Mac, or the closest version still available.
Reinstall macOS from the App Store instead of using macOS Recovery. If you can't install the latest macOS, you might be able to install an earlier macOS.
Create a bootable installer, then use it to install macOS on your Mac or another Mac.
* If you just had your Mac logic board replaced during a repair, macOS Recovery might offer only the latest macOS compatible with your Mac. If you erased your entire disk instead of just the startup volume on that disk, macOS Recovery might offer only the macOS that came with your Mac, or the closest version still available.
0 notes
Text
Docker Commands Windows

Docker Commands Windows
Docker Commands Windows Server 2016
MongoDB document databases provide high availability and easy scalability. You do not need to push your certificates with git commands. When the Docker Desktop application starts, it copies the /.docker/certs.d folder on your Windows system to the /etc/docker/certs.d directory on Moby (the Docker Desktop virtual machine running on Hyper-V). Docker Desktop for Windows can’t route traffic to Linux containers. However, you can ping the Windows containers. Per-container IP addressing is not possible. The docker (Linux) bridge network is not reachable from the Windows host. However, it works with Windows containers. Use cases and workarounds.
Estimated reading time: 15 minutes
Welcome to Docker Desktop! The Docker Desktop for Windows user manual provides information on how to configure and manage your Docker Desktop settings.
For information about Docker Desktop download, system requirements, and installation instructions, see Install Docker Desktop.
Settings
The Docker Desktop menu allows you to configure your Docker settings such as installation, updates, version channels, Docker Hub login,and more.
This section explains the configuration options accessible from the Settings dialog.
Open the Docker Desktop menu by clicking the Docker icon in the Notifications area (or System tray):
Select Settings to open the Settings dialog:
General
On the General tab of the Settings dialog, you can configure when to start and update Docker.
Start Docker when you log in - Automatically start Docker Desktop upon Windows system login.
Expose daemon on tcp://localhost:2375 without TLS - Click this option to enable legacy clients to connect to the Docker daemon. You must use this option with caution as exposing the daemon without TLS can result in remote code execution attacks.
Send usage statistics - By default, Docker Desktop sends diagnostics,crash reports, and usage data. This information helps Docker improve andtroubleshoot the application. Clear the check box to opt out. Docker may periodically prompt you for more information.
Resources
The Resources tab allows you to configure CPU, memory, disk, proxies, network, and other resources. Different settings are available for configuration depending on whether you are using Linux containers in WSL 2 mode, Linux containers in Hyper-V mode, or Windows containers.
Advanced
Note
The Advanced tab is only available in Hyper-V mode, because in WSL 2 mode and Windows container mode these resources are managed by Windows. In WSL 2 mode, you can configure limits on the memory, CPU, and swap size allocatedto the WSL 2 utility VM.
Use the Advanced tab to limit resources available to Docker.
CPUs: By default, Docker Desktop is set to use half the number of processorsavailable on the host machine. To increase processing power, set this to ahigher number; to decrease, lower the number.
Memory: By default, Docker Desktop is set to use 2 GB runtime memory,allocated from the total available memory on your machine. To increase the RAM, set this to a higher number. To decrease it, lower the number.
Swap: Configure swap file size as needed. The default is 1 GB.
Disk image size: Specify the size of the disk image.
Disk image location: Specify the location of the Linux volume where containers and images are stored.
You can also move the disk image to a different location. If you attempt to move a disk image to a location that already has one, you get a prompt asking if you want to use the existing image or replace it.
Download Apple MacOS High Sierra for Mac to get a boost with new technologies in the latest Mac OS update coming fall 2017. Apple download sierra.
File sharing
Note
The File sharing tab is only available in Hyper-V mode, because in WSL 2 mode and Windows container mode all files are automatically shared by Windows.
Use File sharing to allow local directories on Windows to be shared with Linux containers.This is especially useful forediting source code in an IDE on the host while running and testing the code in a container.Note that configuring file sharing is not necessary for Windows containers, only Linux containers. If a directory is not shared with a Linux container you may get file not found or cannot start service errors at runtime. See Volume mounting requires shared folders for Linux containers.
File share settings are:
Add a Directory: Click + and navigate to the directory you want to add.
Apply & Restart makes the directory available to containers using Docker’sbind mount (-v) feature.
Tips on shared folders, permissions, and volume mounts
Share only the directories that you need with the container. File sharing introduces overhead as any changes to the files on the host need to be notified to the Linux VM. Sharing too many files can lead to high CPU load and slow filesystem performance.
Shared folders are designed to allow application code to be edited on the host while being executed in containers. For non-code items such as cache directories or databases, the performance will be much better if they are stored in the Linux VM, using a data volume (named volume) or data container.
Docker Desktop sets permissions to read/write/execute for users, groups and others 0777 or a+rwx.This is not configurable. See Permissions errors on data directories for shared volumes.
Windows presents a case-insensitive view of the filesystem to applications while Linux is case-sensitive. On Linux it is possible to create 2 separate files: test and Test, while on Windows these filenames would actually refer to the same underlying file. This can lead to problems where an app works correctly on a developer Windows machine (where the file contents are shared) but fails when run in Linux in production (where the file contents are distinct). To avoid this, Docker Desktop insists that all shared files are accessed as their original case. Therefore if a file is created called test, it must be opened as test. Attempts to open Test will fail with “No such file or directory”. Similarly once a file called test is created, attempts to create a second file called Test will fail.
Shared folders on demand

You can share a folder “on demand” the first time a particular folder is used by a container.
If you run a Docker command from a shell with a volume mount (as shown in theexample below) or kick off a Compose file that includes volume mounts, you get apopup asking if you want to share the specified folder.
You can select to Share it, in which case it is added your Docker Desktop Shared Folders list and available tocontainers. Alternatively, you can opt not to share it by selecting Cancel.
Proxies
Docker Desktop lets you configure HTTP/HTTPS Proxy Settings andautomatically propagates these to Docker. For example, if you set your proxysettings to http://proxy.example.com, Docker uses this proxy when pulling containers.
Your proxy settings, however, will not be propagated into the containers you start.If you wish to set the proxy settings for your containers, you need to defineenvironment variables for them, just like you would do on Linux, for example:
For more information on setting environment variables for running containers,see Set environment variables.
Network
Note
The Network tab is not available in Windows container mode because networking is managed by Windows.
You can configure Docker Desktop networking to work on a virtual private network (VPN). Specify a network address translation (NAT) prefix and subnet mask to enable Internet connectivity.
DNS Server: You can configure the DNS server to use dynamic or static IP addressing.
Note
Some users reported problems connecting to Docker Hub on Docker Desktop. This would manifest as an error when trying to rundocker commands that pull images from Docker Hub that are not alreadydownloaded, such as a first time run of docker run hello-world. If youencounter this, reset the DNS server to use the Google DNS fixed address:8.8.8.8. For more information, seeNetworking issues in Troubleshooting.
Updating these settings requires a reconfiguration and reboot of the Linux VM.
WSL Integration
In WSL 2 mode, you can configure which WSL 2 distributions will have the Docker WSL integration.
By default, the integration will be enabled on your default WSL distribution. To change your default WSL distro, run wsl --set-default <distro name>. (For example, to set Ubuntu as your default WSL distro, run wsl --set-default ubuntu).
You can also select any additional distributions you would like to enable the WSL 2 integration on.
For more details on configuring Docker Desktop to use WSL 2, see Docker Desktop WSL 2 backend.
Docker Engine
The Docker Engine page allows you to configure the Docker daemon to determine how your containers run.
Type a JSON configuration file in the box to configure the daemon settings. For a full list of options, see the Docker Enginedockerd commandline reference.
Click Apply & Restart to save your settings and restart Docker Desktop.
Command Line
On the Command Line page, you can specify whether or not to enable experimental features.
You can toggle the experimental features on and off in Docker Desktop. If you toggle the experimental features off, Docker Desktop uses the current generally available release of Docker Engine. Final cut pro mac app store.
Experimental features
Experimental features provide early access to future product functionality.These features are intended for testing and feedback only as they may changebetween releases without warning or can be removed entirely from a futurerelease. Experimental features must not be used in production environments.Docker does not offer support for experimental features.
For a list of current experimental features in the Docker CLI, see Docker CLI Experimental features.
Run docker version to verify whether you have enabled experimental features. Experimental modeis listed under Server Adobe photoshop 2020 patcher windows. data. Sonos controller mac 10.6.8 download. If Experimental is true, then Docker isrunning in experimental mode, as shown here:
Kubernetes
Note
The Kubernetes tab is not available in Windows container mode.
Docker Desktop includes a standalone Kubernetes server that runs on your Windows machince, sothat you can test deploying your Docker workloads on Kubernetes. To enable Kubernetes support and install a standalone instance of Kubernetes running as a Docker container, select Enable Kubernetes.
For more information about using the Kubernetes integration with Docker Desktop, see Deploy on Kubernetes.
Reset
The Restart Docker Desktop and Reset to factory defaults options are now available on the Troubleshoot menu. For information, see Logs and Troubleshooting.
Troubleshoot
Visit our Logs and Troubleshooting guide for more details.
Log on to our Docker Desktop for Windows forum to get help from the community, review current user topics, or join a discussion.
Log on to Docker Desktop for Windows issues on GitHub to report bugs or problems and review community reported issues.
For information about providing feedback on the documentation or update it yourself, see Contribute to documentation.
Switch between Windows and Linux containers

From the Docker Desktop menu, you can toggle which daemon (Linux or Windows)the Docker CLI talks to. Select Switch to Windows containers to use Windowscontainers, or select Switch to Linux containers to use Linux containers(the default).
For more information on Windows containers, refer to the following documentation:
Microsoft documentation on Windows containers.
Build and Run Your First Windows Server Container (Blog Post)gives a quick tour of how to build and run native Docker Windows containers on Windows 10 and Windows Server 2016 evaluation releases.
Getting Started with Windows Containers (Lab)shows you how to use the MusicStoreapplication with Windows containers. The MusicStore is a standard .NET application and,forked here to use containers, is a good example of a multi-container application.
To understand how to connect to Windows containers from the local host, seeLimitations of Windows containers for localhost and published ports
Settings dialog changes with Windows containers
When you switch to Windows containers, the Settings dialog only shows those tabs that are active and apply to your Windows containers:
If you set proxies or daemon configuration in Windows containers mode, theseapply only on Windows containers. If you switch back to Linux containers,proxies and daemon configurations return to what you had set for Linuxcontainers. Your Windows container settings are retained and become availableagain when you switch back.
Dashboard
The Docker Desktop Dashboard enables you to interact with containers and applications and manage the lifecycle of your applications directly from your machine. The Dashboard UI shows all running, stopped, and started containers with their state. It provides an intuitive interface to perform common actions to inspect and manage containers and Docker Compose applications. For more information, see Docker Desktop Dashboard.
Docker Hub
Docker Commands Windows
Select Sign in /Create Docker ID from the Docker Desktop menu to access your Docker Hub account. Once logged in, you can access your Docker Hub repositories directly from the Docker Desktop menu.
For more information, refer to the following Docker Hub topics:
Two-factor authentication
Docker Desktop enables you to sign into Docker Hub using two-factor authentication. Two-factor authentication provides an extra layer of security when accessing your Docker Hub account.
You must enable two-factor authentication in Docker Hub before signing into your Docker Hub account through Docker Desktop. For instructions, see Enable two-factor authentication for Docker Hub.
Docker Desktop for Windows user manual. Estimated reading time: 17 minutes. Welcome to Docker Desktop! The Docker Desktop for Windows user manual provides information on how to configure and manage your Docker Desktop settings. The fastest and easiest way to get started with Docker on Windows. Docker Desktop is an application for MacOS and Windows machines for the building and sharing of containerized applications and microservices. Docker Desktop delivers the speed, choice and security you need for designing and delivering containerized applications on your desktop. I have the same thing, but I also noticed that Hyper-V has to be enabled. As in, if your copy of Windows 10 has Hyper-V, you can install it by simply enabling it because it’s already there. On Windows 10 Home, though, there is no Hyper-V to enable. I also have Windows 10 Home. The only option for Home edition users is to use Docker. Docker supports Docker Desktop on Windows for those versions of Windows 10 that are still within Microsoft’s servicing timeline. What’s included in the installer The Docker Desktop installation includes Docker Engine, Docker CLI client, Docker Compose, Notary, Kubernetes, and Credential Helper. https://luckyloading560.tumblr.com/post/653769899713380352/docker-windows-home-edition.
After you have enabled two-factor authentication:
Docker Commands Windows Server 2016
Go to the Docker Desktop menu and then select Sign in / Create Docker ID.
Enter your Docker ID and password and click Sign in.
After you have successfully signed in, Docker Desktop prompts you to enter the authentication code. Enter the six-digit code from your phone and then click Verify.
After you have successfully authenticated, you can access your organizations and repositories directly from the Docker Desktop menu.
Adding TLS certificates
You can add trusted Certificate Authorities (CAs) to your Docker daemon to verify registry server certificates, and client certificates, to authenticate to registries.
How do I add custom CA certificates?
Docker Desktop supports all trusted Certificate Authorities (CAs) (root orintermediate). Docker recognizes certs stored under Trust RootCertification Authorities or Intermediate Certification Authorities.
Docker Desktop creates a certificate bundle of all user-trusted CAs based onthe Windows certificate store, and appends it to Moby trusted certificates. Therefore, if an enterprise SSL certificate is trusted by the user on the host, it is trusted by Docker Desktop.
To learn more about how to install a CA root certificate for the registry, seeVerify repository client with certificatesin the Docker Engine topics.
How do I add client certificates?
You can add your client certificatesin ~/.docker/certs.d/<MyRegistry>:<Port>/client.cert and~/.docker/certs.d/<MyRegistry>:<Port>/client.key. You do not need to push your certificates with git commands.
When the Docker Desktop application starts, it copies the~/.docker/certs.d folder on your Windows system to the /etc/docker/certs.ddirectory on Moby (the Docker Desktop virtual machine running on Hyper-V).
You need to restart Docker Desktop after making any changes to the keychainor to the ~/.docker/certs.d directory in order for the changes to take effect.
The registry cannot be listed as an insecure registry (seeDocker Daemon). Docker Desktop ignorescertificates listed under insecure registries, and does not send clientcertificates. Commands like docker run that attempt to pull from the registryproduce error messages on the command line, as well as on the registry.
To learn more about how to set the client TLS certificate for verification, seeVerify repository client with certificatesin the Docker Engine topics.
Where to go next
Try out the walkthrough at Get Started.
Dig in deeper with Docker Labs example walkthroughs and source code.
Refer to the Docker CLI Reference Guide.
windows, edge, tutorial, run, docker, local, machine
0 notes
Text
Linux Download Docker

March 2, 2020 by Matt Hernandez, @fiveisprime
When the command is invoked, docker contacts Docker hub and downloads a docker image called ‘hello-world’. Docker then creates a new container that runs the executable script that streams the message ‘ Hello from Docker! To download or pull an image from Docker hub without running it, use the syntax: $ sudo docker pull. The Linux NAS distribution (Debian based) Open Media Vault (OMV) has an UrBackup server plugin starting with OMV 3.0 in OMV-extras. Starting with OMV 5.0 use the Docker container below. ASUSTOR - ASUS NAS.
Last June, the Docker team announced that they will be investing in getting Docker running with the Windows Subsystem for Linux (WSL). All of this is made possible with the recent changes to the architecture of WSL to run within a lightweight virtual machine (VM), which we talked about in an earlier blog post about WSL 2. Since this announcement, the Docker team has released a Technical Preview of Docker that includes support for running with WSL 2.
This article explains how the Docker Desktop technical preview works as well as how to use the Docker extension with the technical preview.
How it works
This new Docker architecture works a lot like Visual Studio Code's WSL remote development support in that the Docker CLI running on the host machine executes commands within the Docker Integration Package, which runs on the remote WSL VM.
Image credit: Docker Engineering
DockerD runs directly within WSL so there's no need for the Hyper-V VM and all Linux containers run within the Linux userspace on Windows for improved performance and compatibility.
Getting set up
First some prerequisites:
Jul 05, 2018 Docker is an application that simplifies the process of managing application processes in containers. In this tutorial, you'll install and use Docker Community Edition (CE) on Ubuntu 18.04. Docker upgrade ubuntu. Nov 07, 2019 When running docker desktop version 2.1.5.0 (40323) on: OS Name: Microsoft Windows 10 Pro OS Version: 10.0.19013 N/A Build 19013 Eben though WSL 2 based engine is enabled in Settings/General docker container run hello-world on Ubuntu rep.
Install Windows 10 Insider Preview build 18975 (Slow) or later for WSL 2.
Install Ubuntu from the Microsoft store.
Enable WSL 2 by following this guide.
Install the Remote - WSL extension for VS Code.
Install the Docker WSL 2 Technical Preview.
Once installed, Docker will recognize that you have WSL installed and prompt to enable WSL integration. You want to Enable WSL integration for this tutorial.
This option will allow you to access Docker Desktop via the Docker CLI directly from within your Linux distro.
If you have multiple Linux distros, make sure you only have WSL integration turned on for the correct one in your Docker settings:
With that configured, all commands will execute in the Linux context - this includes Docker commands run from PowerShell so running something like docker run mongo… will start a Linux container within the WSL VM.
Running the docker ps command over in WSL, you'll see the container as expected. Notice that the container ID matches.
Using VS Code
With this set up and running, you can install the VS Code Docker extension and access your containers. If you're already running WSL 2 and the Remote - WSL extension, this will help you get Docker integrated into your WSL workflow rather than switching contexts when you need containers. And because the Docker CLI's context is set to use DockerD in WSL, the extension will work with your containers regardless of whether you opened VS Code using the Remote - WSL extension.
Notice how in the screenshot below, I'm connected and working in WSL and still building/running containers without changing from my preferred environment (zsh in Ubuntu).
Theme: Noctis Sereno
I've personally noticed a vast improvement in container execution times using this configuration and each part of my typical development workflow remains the same. I'm also using the Remote - Containers extension within WSL for testing specific environments without setting things up directly on my machine.
We want your feedback
Keep in mind that you're using prerelease software and, while the Windows Insiders Slow ring is very stable, you may run into some issues. If you do find something that isn't working as expected, please open an issue via the Feedback tool in Windows. Any direct Docker issues or feedback can be logged in the Docker for Windows repo.
Happy Coding!
Matt Hernandez, VS Code Program Manager @fiveisprime
Estimated reading time: 7 minutes
You can run Compose on macOS, Windows, and 64-bit Linux.
Prerequisites
Docker Compose relies on Docker Engine for any meaningful work, so make sure youhave Docker Engine installed either locally or remote, depending on your setup.
https://huntercountry477.tumblr.com/post/653677848988729344/catalina-dmg. On desktop systems like Docker Desktop for Mac and Windows, Docker Compose isincluded as part of those desktop installs.
On Linux systems, first install theDocker Enginefor your OS as described on the Get Docker page, then come back here forinstructions on installing Compose onLinux systems.
To run Compose as a non-root user, see Manage Docker as a non-root user.
Install Compose
Follow the instructions below to install Compose on Mac, Windows, Windows Server2016, or Linux systems, or find out about alternatives like using the pipPython package manager or installing Compose as a container.
Install a different version
The instructions below outline installation of the current stable release(v1.28.6) of Compose. To install a different version ofCompose, replace the given release number with the one that you want. Composereleases are also listed and available for direct download on theCompose repository release page on GitHub.To install a pre-release of Compose, refer to the install pre-release buildssection.
Install Compose on macOS
Docker Desktop for Mac includes Compose alongwith other Docker apps, so Mac users do not need to install Compose separately.For installation instructions, see Install Docker Desktop on Mac.
Install Compose on Windows desktop systems
Docker Desktop for Windows includes Composealong with other Docker apps, so most Windows users do not need toinstall Compose separately. For install instructions, see Install Docker Desktop on Windows.
If you are running the Docker daemon and client directly on MicrosoftWindows Server, follow the instructions in the Windows Server tab.
Install Compose on Windows Server
Follow these instructions if you are running the Docker daemon and client directlyon Microsoft Windows Server and want to install Docker Compose.
Start an “elevated” PowerShell (run it as administrator).Search for PowerShell, right-click, and chooseRun as administrator. When asked if you want to allow this appto make changes to your device, click Yes.
In PowerShell, since GitHub now requires TLS1.2, run the following:
Then run the following command to download the current stable release ofCompose (v1.28.6):
Note: On Windows Server 2019, you can add the Compose executable to $Env:ProgramFilesDocker. Because this directory is registered in the system PATH, you can run the docker-compose --version command on the subsequent step with no additional configuration.
Test the installation.
Install Compose on Linux systems
On Linux, you can download the Docker Compose binary from theCompose repository release page on GitHub.Follow the instructions from the link, which involve running the curl commandin your terminal to download the binaries. These step-by-step instructions arealso included below.
For alpine, the following dependency packages are needed:py-pip, python3-dev, libffi-dev, openssl-dev, gcc, libc-dev, rust, cargo and make.
Run this command to download the current stable release of Docker Compose:
To install a different version of Compose, substitute 1.28.6with the version of Compose you want to use.
If you have problems installing with curl, seeAlternative Install Options tab above.
Apply executable permissions to the binary:
Note: If the command docker-compose fails after installation, check your path.You can also create a symbolic link to /usr/bin or any other directory in your path.
For example:
Optionally, install command completion for thebash and zsh shell.
Test the installation.
Linux Download Docker
Alternative install options
Install using pip
For alpine, the following dependency packages are needed:py-pip, python3-dev, libffi-dev, openssl-dev, gcc, libc-dev, rust, cargo, and make.
Compose can be installed frompypi using pip. If you installusing pip, we recommend that you use avirtualenv because many operatingsystems have python system packages that conflict with docker-composedependencies. See the virtualenvtutorial to getstarted.
If you are not using virtualenv,
pip version 6.0 or greater is required.
Install as a container
Compose can also be run inside a container, from a small bash script wrapper. Toinstall compose as a container run this command:
Install pre-release builds
If you’re interested in trying out a pre-release build, you can download releasecandidates from the Compose repository release page on GitHub.Follow the instructions from the link, which involves running the curl commandin your terminal to download the binaries.
Pre-releases built from the “master” branch are also available for download athttps://dl.bintray.com/docker-compose/master/.
Pre-release builds allow you to try out new features before they are released,but may be less stable.
Upgrading
If you’re upgrading from Compose 1.2 or earlier, remove ormigrate your existing containers after upgrading Compose. This is because, as ofversion 1.3, Compose uses Docker labels to keep track of containers, and yourcontainers need to be recreated to add the labels.
If Compose detects containers that were created without labels, it refusesto run, so that you don’t end up with two sets of them. If you want to keep usingyour existing containers (for example, because they have data volumes you wantto preserve), you can use Compose 1.5.x to migrate them with the followingcommand:
Alternatively, if you’re not worried about keeping them, you can remove them.Compose just creates new ones.
Uninstallation
To uninstall Docker Compose if you installed using curl:
To uninstall Docker Compose if you installed using pip:
Got a “Permission denied” error?
Docker For Linux Download
If you get a “Permission denied” error using either of the abovemethods, you probably do not have the proper permissions to removedocker-compose. To force the removal, prepend sudo to either of the abovecommands and run again.
Where to go next
Linux Download Docker-compose
compose, orchestration, install, installation, docker, documentation
0 notes