#installation of svn
Explore tagged Tumblr posts
Visit Tumblr Blog
Explore Tumblr blogs with no restrictions, modern design and the best experience.
Last Seen Tumblr Blogs


Fun Fact
In 2020, 44% of users from Denmark used Tumblr daily.
Text

0 notes
Text
Diploma in Electrical Engineering at SVN
Interested in circuits, machines, and power systems? SVN offers a comprehensive Diploma in Electrical Engineering that focuses on both hands-on skills and theoretical depth. Ideal for students who want to enter the technical workforce early or pursue higher education in engineering, this course covers everything from electrical installations to automation. With dedicated labs, experienced instructors, and campus placements. Apply Now - https://svn.ac.in/department-of-electrical-engineering/
0 notes
Text
Desktop Application Development in Nagpur

Introduction: The Evolution of Desktop Applications in the Digital Age
Despite the rise of mobile and web apps, desktop applications remain crucial for industries requiring high performance, data security, offline capabilities, and advanced hardware integration. In Nagpur, the desktop application development landscape is flourishing, powered by a skilled IT workforce and cost-effective infrastructure. This comprehensive, SEO-optimized blog explores the scope, advantages, services, top developers, technology stacks, industries served, and the future of desktop software development in Nagpur.
What is Desktop Application Development?
Desktop application development involves creating software that runs on operating systems such as Windows, macOS, or Linux. These applications are installed directly on a computer and can work offline or online.
Key Characteristics:
High performance and speed
Offline functionality
Hardware integration (printers, scanners, sensors)
Secure local data storage
Platform-specific user interface (UI/UX)
Benefits of Desktop Applications for Nagpur-Based Businesses
Enhanced Performance: Ideal for computation-heavy or graphics-intensive tasks
Offline Access: Useful in logistics, warehouses, and manufacturing units
Data Security: Localized storage enhances data privacy
Tailored Functionality: Full control over features, behavior, and deployment
Reduced Internet Dependency: No reliance on constant connectivity
Industries Leveraging Desktop Apps in Nagpur
Manufacturing & Automation: Equipment control, ERP integration
Healthcare: EMR systems, diagnostic device control
Education: E-learning tools, testing software
Retail & POS: Billing systems, inventory control
Logistics: Shipment tracking, fleet monitoring
Finance: Accounting systems, portfolio management
Top Desktop Application Development Companies in Nagpur
1. Lambda Technologies
Focus: Custom desktop apps with hardware interface and BI dashboards
Tools: WPF, Electron, Qt, .NET, C#
Clients: Local manufacturing firms, medical device providers
2. TechnoBase IT Solutions Pvt. Ltd.
Expertise: Inventory management, ERP desktop apps
Platforms: Windows, cross-platform (Electron.js)
3. Biztraffics
Specialty: Retail billing systems, accounting apps
Features: GST compliance, barcode printing, local database support
4. LogicNext Software Solutions
Services: Desktop CRM and finance tools
Technologies: Java, JavaFX, Python PyQt
Clients: Finance consultants, small businesses
5. Neolite Infotech
Offerings: EdTech and LMS software for desktops
Tech Stack: C++, Electron.js, SQLite
Features Commonly Integrated in Desktop Apps
User Authentication
Database Management (MySQL, SQLite, PostgreSQL)
Barcode/QR Code Scanning Support
Multi-language Interface
Data Encryption & Backup
Print & Export (PDF/Excel)
Notifications and Alerts
System Tray Applications
Desktop App Development Technologies Used in Nagpur
Languages: C#, C++, Java, Python, Rust
Frameworks: .NET, Electron.js, Qt, JavaFX, Tkinter
Databases: SQLite, PostgreSQL, MySQL
UI Design Tools: WPF, WinForms, GTK
Cross-Platform Tools: Electron.js, NW.js, JavaFX
Version Control: Git, SVN
Windows vs Cross-Platform Development in Nagpur
Windows-Specific Apps:
Preferred by industries with Microsoft-based infrastructure
Developed using WPF, WinForms, .NET
Cross-Platform Apps:
Developed using Electron.js, JavaFX
Cost-effective, consistent UI/UX across macOS, Linux, Windows
SEO Strategy for Desktop Application Development Companies in Nagpur
Primary Keywords: Desktop application development Nagpur, desktop software developers Nagpur, custom desktop apps Nagpur, POS software Nagpur
Secondary Keywords: Windows app development Nagpur, inventory software Nagpur, ERP desktop app Nagpur
On-Page SEO:
Meta tags, image alt text, header tags
Keyword-rich titles and internal linking
Content Marketing:
Use cases, blogs, whitepapers, client stories
Local SEO:
Google Maps, business listings on IndiaMART, Sulekha, JustDial
Custom vs Off-the-Shelf Desktop Apps
Custom Desktop Apps
Designed to meet exact business requirements
Local development support
Better performance and security
Off-the-Shelf Software
Quick setup, lower initial cost
Limited customization and features
Dependency on third-party vendors
Testimonials from Clients in Nagpur
"TechnoBase built our billing desktop app, and it works flawlessly offline."
"Lambda created a custom desktop ERP that revolutionized our manufacturing unit."
"Biztraffics’ GST billing software helped streamline our retail operations."
Case Study: Desktop ERP for a Nagpur-Based Furniture Manufacturer
Challenge: Manual inventory, production tracking
Solution: Desktop ERP integrated with barcode printers, accounting tools
Results: 50% inventory accuracy improvement, 3x faster order processing
Future Trends in Desktop App Development in Nagpur
AI-Integrated Desktop Software: Smart assistants, auto-suggestions
Cloud Sync + Offline Mode: Hybrid functionality
Desktop SaaS Models: Licensing and subscription management
Hardware-Integrated Apps: IoT, USB device access, POS peripherals
Minimal UI Frameworks: Lightweight interfaces with rich UX
Why Choose Desktop Software Developers in Nagpur?
Affordable Development: Lower costs compared to metros
Highly Skilled Talent: Engineers from VNIT, IIIT, and RTMNU
Faster Turnaround Time: Agile and iterative models
Local Presence: Physical meetings, training, support
Domain Expertise: Manufacturing, education, healthcare, retail
Conclusion: The Strategic Role of Desktop Applications in Nagpur's Tech Future
Nagpur has become a hotspot for desktop application development, thanks to its cost-efficiency, technical talent, and industry alignment. Whether your business needs a custom POS, ERP, or inventory management tool, Nagpur’s desktop developers offer scalable, robust, and secure software tailored to local and global.
0 notes
Text
Real nifty I can connect with SSH and SFTP is basically already configured. Obviously I don't want the SFTP to be the home directory so I'll have some configuring to do.
It was surprisingly easy to get up and running a headless Pi install. I'll deal with everything else tomorrow. I'm not even sure how I want to do the network share stuff. I do want at least a spot to store my music library, and either a personal git or svn is on my list too.
I'm torn between NFS and SMB. A lot of it comes down to if I wanna be able to use my W10 machine with this or not. If I'm gonna end up on SteamOS eventually anyways then it probably doesn't matter. SMB does seem simpler but all this is stuff to ponder tomorrow.
#nicoisms#I like the idea of being able to use rsync too#also maybe store my react folders and roms/saves on the pi so I don't have two copies or have to pull out the usb drives#so many things I could do
0 notes
Text
Setting Up and Configuring an SVN Server on Ubuntu 22.04: A Step-by-Step Guide
Introduction
Subversion, commonly referred to as SVN, is a version control system that allows teams to manage and track changes to their codebase efficiently. Setting up an SVN server on Ubuntu 22.04 can be a valuable addition to your development workflow, enabling collaborative software development with ease. In this step-by-step guide, we will walk you through the process of installing and configuring an SVN server on Ubuntu 22.04.
Prerequisites
Before we dive into the installation and configuration process, ensure you have the following:
Ubuntu 22.04: You should have a clean installation of Ubuntu 22.04 on your server or virtual machine.
Access to Terminal: You'll need access to the terminal on your Ubuntu system.
Root Privileges: Make sure you have root or sudo privileges to execute commands.
Install SVN on Ubuntu 22.04
Let's begin by installing the SVN package on your Ubuntu 22.04 system. Open a terminal window and execute the following commands:
shellCopy code
sudo apt update sudo apt install subversion
The first command updates the package list, while the second command installs the Subversion package. Once the installation is complete, you'll have SVN ready to use on your system.
Create a Repository
With SVN installed, the next step is to create a repository where you can store your projects. You can choose any directory on your system for this purpose. For this example, we'll create a repository named "myproject" in the /svn directory:
shellCopy code
sudo mkdir /svn sudo svnadmin create /svn/myproject
This will create a new SVN repository at /svn/myproject. You can replace "myproject" with the name of your choice.
Configure SVN Server
Now that we have a repository, let's configure the SVN server to manage access to it. We'll use Apache as the server for SVN, which provides a web-based interface for repository access.
Install Apache and the required modules:
shellCopy code
sudo apt install apache2 libapache2-mod-svn
Create an Apache configuration file for SVN:
shellCopy code
sudo nano /etc/apache2/sites-available/svn.conf
In this file, add the following configuration, replacing /svn with the path to your repository:
apacheCopy code
<Location /svn> DAV svn SVNParentPath /svn AuthType Basic AuthName "Subversion Repository" AuthUserFile /etc/apache2/dav_svn.passwd Require valid-user </Location>
Save the file and exit the text editor.
Create a password file for authentication:
shellCopy code
sudo htpasswd -c /etc/apache2/dav_svn.passwd your_username
Replace your_username with the username you want to use for SVN access. You'll be prompted to set a password for the user.
Enable the Apache SVN module and the new site configuration:
shellCopy code
sudo a2enmod dav_svn sudo a2ensite svn.conf
Restart the Apache service to apply the changes:
shellCopy code
sudo systemctl restart apache2
Access SVN Repository
Now that your SVN server is configured, you can access your repository using an SVN client. If you want to access it via a web browser, open your browser and enter the following URL:
http://your_server_ip/svn/myproject
Replace your_server_ip with the actual IP address or domain name of your Ubuntu 22.04 server.
To access the repository using an SVN client, you'll need to install an SVN client on your local machine. You can do this by running:
shellCopy code
sudo apt install subversion
Then, you can use commands like svn checkout, svn commit, and svn update to interact with your SVN repository.
Conclusion
In this step-by-step guide, we have walked you through the process of setting up and configuring an SVN server on Ubuntu 22.04. You can now create repositories, manage access, and collaborate with your team efficiently using Subversion. Install SVN Ubuntu 22.04 is a valuable addition to your development toolkit, providing version control capabilities for your projects. Enjoy seamless collaboration and version tracking with SVN on Ubuntu 22.04!
0 notes
Text
Continuous Integration using Jenkins with Python

Continuous Integration (CI) has changed how we create and deliver software, making it quicker, more efficient, and reducing mistakes. Jenkins, a well-known free tool, is crucial for CI because it automates different parts of building software.
In this blog, we will take a gander at how Jenkins functions impeccably with Python, a famous programming language. We will go through how to set up Jenkins for Python projects, how to configure it, and how to run these projects. This shows how utilizing Jenkins with the Python Development process smoother, increases work efficiency, and keeps the quality of software consistent. This post is useful for everybody, from experienced designers to those simply beginning with CI, offering helpful hints on capitalizing on Jenkins and Python in your CI process.
What is Jenkins?
Jenkins is an open-source automation server that enables developers to integrate, test, and deploy code changes seamlessly. It facilitates continuous integration and continuous delivery (CI/CD) practices, ensuring that software applications are built, tested, and released in a timely and efficient manner.
Prerequisites of integrating Jenkins with Python
Before diving into integrating Jenkins with Python, there are a few key things you’ll need.
Basic Understanding of Python Programming: You should be comfortable with writing and understanding Python code. This knowledge is crucial since we’ll be working with Python projects.
Familiarity with Git Version Control System: Knowing how to use Git is important because Jenkins often interacts with repositories for CI processes.
Essential Requirements
In addition to the basic knowledge, there are some essential tools and setups you need:
Jenkins Installation and Configuration: You should have Jenkins installed and properly configured on your machine or a cloud platform. This is the backbone of the CI process we’re discussing.
Python Development Environment Setup: Your machine should be set up for Python development, including having Python installed along with any necessary libraries and development tools.
With these prerequisites and essentials in place, you’ll be well-prepared to start integrating Jenkins with your Python projects.
Also Learn: Python Environment Variables
Core Functionality of Jenkins
Continuous Integration (CI): Jenkins monitors source code repositories like Git or SVN for code changes. Whenever a change is detected, it automatically triggers a build process, which involves compiling, testing, and analyzing the code. This ensures that the codebase remains stable and free of errors.
Continuous Delivery (CD): Once the build process is complete and the code is deemed stable, Jenkins can automatically deploy the updated code to production environments. This eliminates the need for manual deployment tasks, reducing the time it takes to release new features and bug fixes.
Pipelines: Jenkins utilizes pipelines to define and execute automated workflows for building, testing, and deploying code. Pipelines are composed of stages, each representing a specific step in the workflow. This allows for granular control over the automation process.
Plugins: Jenkins boasts a vast ecosystem of plugins that extend its functionality and integrations with various tools and platforms. Plugins provide a wide range of capabilities, such as code analysis, reporting, and integration with different cloud providers.
Benefits of Using Jenkins
Improved Code Quality: Jenkins automates testing, enabling early detection of bugs and ensuring code quality throughout the development cycle.
Faster Release Cycles: Automated builds and deployments significantly reduce the time it takes to release new features and updates.
Reduced Errors: Automation minimizes human error and ensures consistency in the build, test, and deployment process.
Scalability: Jenkins can handle complex workflows and manage multiple builds simultaneously, making it suitable for large-scale projects.
Cost-Effectiveness: Automation frees up developers’ time, allowing them to focus on core development tasks and reducing overall development costs.
Let’s get started by creating a simple fast API application that sends data to a RabbitMQ queue, and the consumer consumes the data from the queue.
Here’s the link to set up RabbitMQ in Ubuntu 22.04
Let’s set up the repository in the local. The steps to set up are as follows.
Clone the repository from the URL mentioned
2. After that create virtualenv in your system by using the following command
virtualenv venv
source venv bin/activate
I have named the virtualenv as venv, we can use any name as per our choice.
after that, let’s install the requirements using the command
pip install –r requirements.txt
uvicorn main:app
Now we have a fast API application up and running
Also Learn: Jaeger Integration with Spring Cloud
Let’s integrate Jenkins into our fast API application
Jenkins requires Java to run. Ensure you have Java installed on your system
sudo apt update
sudo apt install default-jre
Add the Jenkins repository key to your system and install Jenkins
wget -q -O – https://pkg.jenkins.io/debian/jenkins.io.key | sudo apt-key add –
sudo sh -c ‘echo deb http://pkg.jenkins.io/debian-stable binary/ > /etc/apt/sources.list.d/jenkins.list’
sudo apt update
sudo apt install Jenkins
Once installed, start and enable the Jenkins service
sudo systemctl start Jenkins
sudo systemctl enable Jenkins
Jenkins usually runs on port 8080 by default. Open a web browser and navigate to http://localhost:8080 or http://your_server_ip:8080 to access the Jenkins dashboard.
Follow the setup wizard in the browser to complete the installation. You’ll need to retrieve the initial admin password, which can be found in the Jenkins server logs:
sudo cat /var/lib/jenkins/secrets/initialAdminPassword
Go to Jenkins Dashboard -> Manage Jenkins -> Manage Plugins -> Available. Look for plugins related to Python, such as “Python Plugin” or “Pipeline Utility Steps”, and install them.
Now, to create a new job, follow the below steps
Step 1: Create a new job
In Jenkins, go to Manage Jenkins > New Item.
Select Pipeline from the Job Type drop-down menu.
Enter a name for your job, such as “MyPipelineJob”.
Click OK to create the job.
Step 2: Configure the Git repository
On the job configuration page, go to the Source Code Management section.
Select Git from the SCM drop-down menu.
Enter the URL of your git repository in the Repository URL field.
If your repository requires authentication, click the Credentials button and select the appropriate credentials from the list.
Click Save to save the configuration.
Step 3: Define the pipeline script
On the job configuration page, go to the Pipeline Scripts section.
Select Pipeline script from SCM from the Pipeline Source drop-down menu.
Enter the name of the pipeline script file in the Pipeline script path field. For example, if your pipeline script is named pipeline.groovy, enter pipeline.groovy.
Click Save to save the configuration.
Step 4: Trigger the pipeline on commits
On the job configuration page, go to the Build Triggers section.
Select Poll SCM from the Build Triggers drop-down menu.
Enter a value for the Poll SCM frequency field. This value determines how often Jenkins will poll your git repository for changes. For example, if you enter *** * * * ***, Jenkins will poll your repository every minute.
Click Save to save the configuration.
Changes to be made in the Jenkins settings
The following changes should be made in the Jenkins settings
Create a new job: This job will be responsible for running the pipeline whenever a code is committed in a particular Git repository.
Configure the Git repository: This step specifies the URL of the Git repository that you want to monitor for changes.
Define the pipeline script: This step specifies the location of the pipeline script file that contains the code for your pipeline.
Trigger the pipeline on commits: This step tells Jenkins to poll your git repository for changes and run the pipeline whenever a new commit is detected.
Additional notes:
You can also use the Build with Parameters option to allow users to pass parameters to the pipeline when it is triggered.
You can use the Build Authorization option to restrict who can trigger the pipeline.
You can use the Notifications option to configure notifications for pipeline events, such as builds starting and completing.
Let’s configure the webhook in GitHub
Configuring the GitHub repository:
Access repository settings: Navigate to the GitHub repository where you want to enable webhooks. Click on the repository name, then select “Settings” from the dropdown menu.
Enable webhooks: In the settings sidebar, locate the “Integrations” section and click on “Webhook”.
Create a new webhook: Click on the “Add webhook” button.
Provide webhook URL: In the “Payload URL” field, enter the URL of your Jenkins job. This URL will be used to deliver notifications about code changes.
Select content type: Choose the content type for the webhook payload. The preferred option is “application/json”, which sends the payload directly as a JSON object in the POST request.
Optional: Configure webhook secret: For added security, you can set a webhook secret. This secret will be used to verify the authenticity of incoming requests from GitHub.
Select events to trigger webhook: Choose the events that should trigger the webhook. Common options include “push” (for code pushes), “pull_request” (for pull requests), and “delete” (for deleting branches or tags).
Click “Add webhook” to save: Once you’ve configured the webhook settings, click on the “Add webhook” button to save the changes.
Now, it is time to configure Slack with Jenkins which sends a Slack notification whenever a Jenkins job starts, succeeds, or fails
Create a Slack App: In your Slack workspace, navigate to the “Apps” page. Click on the “Create New App” button and select “From Scratch”.
Name your Slack App: Enter a name for your Slack app, such as “Jenkins Notifications”.
Choose app type: Select “Incoming Webhooks” as the app type. This will allow your Jenkins job to send notifications to Slack channels.
Add bot user: Click on the “Add bot user” button. This will create a bot user for your Slack app, which will be used to send notifications.
Copy webhook URL: Note down the webhook URL provided by Slack. This URL will be used in the Jenkins job configuration.
Install Slack app: Click on the “Install to Slack” button and follow the prompts to install the Slack app in your workspace.
Configuring Jenkins:
Install Slack Plugin: In Jenkins, go to Manage Jenkins > Plugins. Search for the “Slack Plugin” and install it.
Configure Slack Global Settings: In Jenkins, go to Manage Jenkins > Configure System. Under the “Slack” section, enter the following information:
Slack Webhook URL: Paste the webhook URL you copied from Slack.
Default Channel: Specify the default Slack channel where notifications should be sent. You can override this channel for specific jobs.
Configure Slack Notifications for a Job: Open the job configuration page for the job you want to receive Slack notifications for.
Slack Notifications: Under the “Post-build Actions” section, select “Slack Notification”.
Channel: Choose the Slack channel where notifications should be sent for this job. You can also use a custom channel syntax like #my-custom-channel.
Condition: Select the events for which you want to send Slack notifications. Options include “Always”, “Success”, “Failure”, “Unstable”, and “Not Built”.
Message: Customize the message that will be sent to Slack. You can use variables like ${JOB_NAME}, ${BUILD_STATUS}, and ${BUILD_URL} to insert job-specific information.
Save Jenkins Job Configuration: Click on the “Save” button to apply the Slack notification settings for the job.
Now, whenever your Jenkins job starts, succeeds, or fails, a Slack notification will be sent to the specified channel, providing you with real-time updates on your build status.
So now, we have a CI-ready Fastapi web application using Jenkins, slack, and GitHub webhooks.
To sum it up, using Jenkins with Python for Continuous Integration can really change the way you develop software. It not only makes things faster but also helps in reducing mistakes, leading to a more efficient and smooth workflow. Automating various steps, like testing and deploying your software, is key to making sure it’s of good quality.
With Jenkins and Python together, developers can create software that’s both trustworthy and strong. Plus, Jenkins has a lot of extra tools and resources that can make your Continuous Integration process even better. It’s a tool that can grow with your needs in today’s software development world. So, I suggest exploring these tools and resources to make the most out of Jenkins in your Python projects and see how far you can go with Continuous Integration.
Also Learn: How to Integrate Apache Kafka with Spring Boot
Originally published by: Continuous Integration using Jenkins with Python
#ContinuousIntegration#IntegratingJenkinswithPython#JenkinsIntegration#ContinuousDeployment#PythonAutomation#Jenkins
0 notes
Text
How to Install Apache Subversion on a Linux System
How to Install Apache Subversion on a Linux System

View On WordPress
#a2enmod dav#access apache subversion#apache subversion#centralized version control#configure apache for subversion#create a subversion repository#installation of svn#open source version control#svn internet sites#svn postfix config#Version Control
0 notes
Text
How To Download Excel For Mac

Microsoft Excel spreadsheet app lets you create, view, edit and share your files with others quickly and easily. It also lets you view and edit workbooks attached to email messages. Work in accounting, auditing, finance or other fields, with anyone, anywhere, with confidence. With Excel, your Office moves with you and can implement the most complex formulas, with amazing features
Free Excel Download
Microsoft Excel Free Download For Pc
Microsoft Excel For Mac 2016
How To Download Excel Macros
How To Download Excel 2016 For Mac
Enter your Mac login password, if prompted, and then click Install Software. (This is the password that you use to log in to your Mac.) The software begins to install. Click Close when the installation is finished. If Office installation fails, see What to try if you can't install or activate Office for Mac. How to install PH Stat for Mac users Step 1: Install Microsoft Office 2011 for Mac. If you need instructions on how to do this just Google it, it's fairly easy. Step 2: After installing MS Office 2011, open up a blank excel document and leave it open in order to install PH Stat. Step 3: After opening an Excel document go to D2L and download the. Megastat Excel 2011 For Mac Free Download. Search Latest Articles Google Chrome Download Mac English Download Mac Os X 10.5 Iso Image Civilization 2 Download Mac Where Can I Download Mac Os Svn For Mac Free Download Adobe Lightroom 4 Download Mac Download Music From Mac To Android 2018 everythingend.web.fc2.com. I became an Excel MVP in 2001, and Ron followed soon after, in 2002. Ron has been a strong advocate for users of Excel on the Mac. Ron covers many Excel and VBA topics on Excel Automation, and he covers Mac-specific Excel issues at Mac Excel Automation.
Highlights:
Unmistakably Office, designed for Mac - MacBook Pro Touch Bar is fully supported by Microsoft Excel. If you type an equals sign into a cell, Excel will immediately pull up the most recently used functions in the Touch Bar. Go easy on your eyes with Dark Mode. Excel makes it easier to view your spreadsheets in low-light environments by supporting Dark Mode for macOS Mojave
Create, calculate and analyse with confidence - jump-start your budget, task list, accounting or financial analysis with Excel’s modern templates. Use familiar formulas to run calculations and analyse your data. Rich features and formatting options make your workbook easier to read and use. All spreadsheet features, formats and formulas operate the same way - whatever device you use.
Get a better picture of your data - new charts and graphs help you present your data in compelling ways, with formatting, sparklines and tables to better understand your data. Easily create forecasts with just a click to predict trends
Turn data into insights - enhanced by intelligence, Excel learns your patterns, organising your data to save you time. Create spreadsheets with ease from templates or on your own and perform calculations with modern formulas
Work better together - share your workbook with others and always work on the latest version for real-time collaboration to help get work done faster. With Office 365, work within an Excel file from mobile, desktop and web
Is Excel for Mac free?
Microsoft Excel and can be purchased for $139.99 or is part of Office 365 which offers you a 1-month trial and includes: Excel, PowerPoint, OneDrive, Skype, Outlook, and Word for $69.99 a year.
If you only need Excel, purchasing it is the better option for you but most want access to the other apps and elect to use the subscription option.
1. Microsoft 365 is a cloud-based subscription service that brings together premium versions of Word, Excel, PowerPoint, Outlook and OneDrive, with the best tools for the way people work today.
2. Microsoft 365 includes premium Word, Excel, and PowerPoint apps, 1 TB cloud storage in OneDrive, advanced security, and more, all in one convenient subscription.
3. Data provided through the use of this store and this app may be accessible to Microsoft or the third-party app publisher, as applicable, and transferred to, stored, and processed in the United States or any other country where Microsoft or the app publisher and their affiliates or service providers maintain facilities.
4. Microsoft 365 annual subscriptions purchased from the app will be charged to your App Store account and will automatically renew within 24 hours prior to the end of the current subscription period unless auto-renewal is disabled beforehand.
Features and Description

Key Features
Latest Version: 16.51
Licence: Free
Free Excel Download
What does Microsoft Excel do? This application requires a qualifying Microsoft 365 subscription. Microsoft 365 includes premium Word, Excel, and PowerPoint apps, 1 TB cloud storage in OneDrive, advanced security, and more, all in one convenient subscription. With Microsoft 365, you get features as soon as they are released ensuring you’re always working with the latest.Create, view, edit, and share your spreadsheets using Excel for Mac. Now it’s easier than ever to work with spreadsheets across your devices and with others. Share your files and collaborate in real time within a document or edit Office docs attached to emails. Get smart assistance features as soon as they are released in Word, Excel, and PowerPoint so you’re always working with the latest. Whether you’re balancing a budget, tracking milestones, or looking to visualize any data, Excel is your go-to app for working with spreadsheets. Kickstart your analysis• Achieve more and enhance your documents with access to a growing catalog of premium templates for Word, Excel, and PowerPoint.• Rich formatting and layout options produce beautifully pristine documents on any device including laptops, iPads, and iPhones. Analyze with confidence• AI enhances your workbooks by recognizing patterns in your data and making suggestions that speed up your work.• New charts and graphs help you present your data in compelling ways, with formatting, sparklines, and tables to better understand your data. • Easily create forecasts with just a click to predict trends. Accomplish more together• Whether it’s a school project, expense report, or family budget, seamlessly work with others with real-time co-authoring to bring your ideas and plans together faster.• Share your documents with the click of a button to invite others to edit in real time. Easily manage permissions and see who’s currently working in a document. • Add comments or assign tasks to people in your group for clean editing and organization.Learn more about Microsoft 365Microsoft 365 is a cloud-based subscription service that brings together premium versions of Word, Excel, PowerPoint, Outlook and OneDrive, with the best tools for the way people work today. Please visit: http://go.microsoft.com/fwlink/?linkid=2015120 for information on Licensing Terms.Unlock the full Microsoft Office experience with a qualifying Microsoft 365 subscription for your phone, tablet, PC, and Mac. Microsoft 365 annual subscriptions purchased from the app will be charged to your App Store account and will automatically renew within 24 hours prior to the end of the current subscription period unless auto-renewal is disabled beforehand. You can manage your subscriptions in your App Store account settings.This app is provided by either Microsoft or a third-party app publisher and is subject to a separate privacy statement and terms and conditions. Data provided through the use of this store and this app may be accessible to Microsoft or the third-party app publisher, as applicable, and transferred to, stored, and processed in the United States or any other country where Microsoft or the app publisher and their affiliates or service providers maintain facilities.Please refer to the Microsoft Software License Terms for Microsoft Office. See “License Agreement” link under Information. By installing the app, you agree to these terms and conditions.
Download for MacOS - server 1 --> Free
Microsoft Excel Free Download For Pc
Download Latest Version
Download and Install Microsoft Excel
Download for PC - server 1 --> MAC:
Microsoft Excel For Mac 2016
How To Download Excel Macros
Download for MacOS - server 1 --> Free
How To Download Excel 2016 For Mac
Thank you for visiting our site. Have a nice day!
More apps by Microsoft Corporation
1 note
·
View note
Text
Download Mercurial For Mac

Mercurial Grabber Download
Download Mercurial For Mac Download
Download Mercurial For Mac Free
Download Mercurial version 3.2.3+ for your OS from Run the installer Open a fresh terminal and run 'hg -version', check that it is 3.2.3 or later. If you are running SourceTree for Mac version 2.0.3 or earlier here's how fix your Git/Hg versions: Security vulnerability CVE-2014-9390 SourceTree version 2.0.4 and later's embedded Git/Mercurial versions address CVE-2014-9390. We do not recommend installing from a tarball, even though we make one available for download. We prefer the use of a local clone of TortoiseHg instead. If you do use a tarball, you will need to manually edit the installed thgutil/config.py. Download Mercurial - Mercurial 5.9.1, Mercurial (hg) is a revision control system designed for efficient handling of very large distributed projects. Feb 13, 2017 The 3.10.3 version of Mercury for Mac is provided as a free download on our website. The bundle identifier for this app is uk.ac.cam.ccdc. The following versions: 3.3, 2.4 and 0.3 are the most frequently downloaded ones by the program users. Our built-in antivirus scanned this Mac download and rated it as 100% safe.

News
2021-09-12: TortoiseHg (with Mercurial) 5.9.1 released
2021-07-11: TortoiseHg (with Mercurial) 5.8.1 released
2021-05-12: TortoiseHg (with Mercurial) 5.8 released
2021-03-13: TortoiseHg (with Mercurial) 5.7.1 released
2021-02-06: TortoiseHg (with Mercurial) 5.7 released
2020-12-06: TortoiseHg (with Mercurial) 5.6.1 released
2020-11-03: TortoiseHg (with Mercurial) 5.6 released
2020-10-03: TortoiseHg (with Mercurial) 5.5.2 released
2020-09-09: TortoiseHg (with Mercurial) 5.5.1 released
2020-08-08: TortoiseHg (with Mercurial) 5.5 released
2020-07-10: TortoiseHg (with Mercurial) 5.4.2 released
2020-06-06: TortoiseHg (with Mercurial) 5.4.1 released
2020-06-25: TortoiseHg (with Mercurial) 5.4 released
2020-04-09: TortoiseHg (with Mercurial) 5.3.2 released
2020-03-11: TortoiseHg (with Mercurial) 5.3.1 released
2019-03-05: TortoiseHg (with Mercurial) 5.3 released
2019-07-22: TortoiseHg (with Mercurial) 5.0.2 released
2019-04-14: TortoiseHg (with Mercurial) 4.9.1 released
2019-02-23: TortoiseHg (with Mercurial) 4.9.0 released
2019-01-19: TortoiseHg (with Mercurial) 4.8.2 released
2018-12-09: TortoiseHg (with Mercurial) 4.8.1 released
2018-11-12: TortoiseHg (with Mercurial) 4.8 released
2018-10-14: TortoiseHg (with Mercurial) 4.7.2 released
2018-09-15: TortoiseHg (with Mercurial) 4.7.1 released
2018-08-19: TortoiseHg (with Mercurial) 4.7 released
2018-06-19: TortoiseHg (with Mercurial) 4.6.1 released
2018-05-21: TortoiseHg (with Mercurial) 4.6 released
2018-04-08: TortoiseHg (with Mercurial) 4.5.3 released
2018-03-10: TortoiseHg (with Mercurial) 4.5.2 released
2018-02-12: TortoiseHg (with Mercurial) 4.5 released
Mercurial is a free, distributed source control management tool. It efficiently handles projects of any size and offers an easy and intuitive interface.
All in all, if you're a developer who's using Mercurial as his version control system of choice then TortoiseHg is just the right tool to have installed on your Mac to make your development workflow faster and more productive. Mercurial GUI Mercurial user interface VCS GUI Repository. Mercurial downloads. Windows users are likely to enjoy the TortoiseHg GUI the most. It integrates Mercurial directly into your explorer. # Debian/Ubuntu $ apt-get install mercurial # Fedora $ dnf install mercurial # Gentoo $ emerge mercurial # Mac OS (homebrew) $ brew install mercurial # FreeBSD $ cd /usr/ports/devel/mercurial $ make. Mercurial began close. Comes with a handy Widget for Mac OS – you can monitor account activity across all of your projects from one simple interface. However, some purists actually shy away from gui-fied SVN clients and use the terminal client instead. A native OS X GUI client for Mercurial. It is modern and fully multi-threaded using Grand Central Dispatch and threading goodness. It has a clean interface and allows multiple repositories per document, using a standard mac sidebar interface. It incrementally loads data so its very fast. SmartGit/Hg is a commercial GUI Git/Mercurial client for Mac OS X. This is a cross-platform license, so the one licence can be used on all supported platforms: Mac, Windows and Linux. This is a cross-platform license, so the one licence can be used on all supported platforms: Mac, Windows and Linux.
Mercurial Grabber Download
Download now Mercurial
Another OS? Get Mercurial for:
Mac OS X
Windows
other
Download Mercurial For Mac Download
How you can benefit from Mercurial
It is fast and powerful
Mercurial efficiently handles projects of any size and kind. Every clone contains the whole project history, so most actions are local, fast and convenient. Mercurial supports a multitude of workflows and you can easily enhance its functionality with extensions.
It is easy to learn
You can follow our simple guide to learn how to revision your documents with Mercurial, or just use the quick start to get going instantly. A short overview of Mercurial's decentralized model is also available.
And it just works
Mercurial strives to deliver on each of its promises. Most tasks simply work on the first try and without requiring arcane knowledge.
Quick Start

Download Mercurial For Mac Free
Clone a project and push changes
Mercurial Client For Mac
Best passport drive for mac. Create a project and commit
1 note
·
View note
Text
Winscp For Mac Free

RemoteFinder v.0.12RemoteFinder is a graphical SCP program for Mac OS X. It will provide features similar to other programs such as WinSCP. The Look and Feel will be Mac-Like.In the future, other Protocols such als FTP and WebDAV will be ...
Download Scp For Windows
Sftp Client For Mac
How To Install Winscp Open Source Software In Ubuntu 18.04: First, download the packages from here https. WinSCP 5.17 is a major application update. New features and enhancements include: Improvements to sessions and workspace management, so that WinSCP can now easily restore tabs that were open when it was last closed. Jan 03, 2018 But it's open source, so a Mac spawn of WinSCP. Still on the hunt for a WinSCP equivalent for Mac OSX. Just google Cyberduck for Mac and download it for free! Find the best programs like WinSCP for Mac. More than 19 alternatives to choose: FileZilla, Cyberduck. Free Download Platform Mac. Open source SFTP. Verdict: WinSCP contains many more features and functionalities like connection tunneling, workspaces, master password, directory caching, file masks, etc. Price: WinSCP is a free and open-source tool. Website: WinSCP.
Beyond CVS Eclipse Plug-In v.201003051612BeyondCVS is an Eclipe plug-in that enables using Beyond Compare (externally) for comparing files and folders. It also allows comparing a single file to a previous revision in CVS/SVN or Local History. There is also support for opening Putty and ...
DatacenterManager v.1.0Remotely Inventory and Poll UNIX servers in seconds. (without installing extra software on your servers, just by SSH communication plain old UNIX commands).Your entire datacenter can be automatically inventoried by supplying hostname, username & ...
SSH System Administration Tool v.201211071651ssh Java interface for Unix, Linux and MS Windows system administration.Allows you to remotely access and control your servers through google talk.Automates firewall rule checks; exporting the results into Excel.Allows you to run multiple ...

Winscp software by TitlePopularityFreewareLinuxMac
Download Scp For Windows

Today's Top Ten Downloads for Winscp

DatacenterManager Remotely Inventory and Poll UNIX servers in seconds.
Beyond CVS Eclipse Plug-In BeyondCVS is an Eclipe plug-in that enables using Beyond
RemoteFinder RemoteFinder is a graphical SCP program for Mac OS X. It
SSH System Administration Tool ssh Java interface for Unix, Linux and MS Windows system


Sftp Client For Mac
Visit HotFiles@Winsite for more of the top downloads here at WinSite!
1 note
·
View note
Video
youtube
Welcome to the video series on git, a source control a.k.a Version control system or VCS
Git is one of the widely used and powerful distributed version control system. It was originally created in 2005 by Linux Community and Linus Torvalds (The Creator of Linux). Git has grown a lot after that and github (https://www.github.com) is a preferred repository for storing, managing and distributing open source code.This is an introductory git tutorial for beginners video of this series where I'm talking about git basics but very important aspects of this distributed VCS. These concepts are a MUST before one can properly understand git and that's the precise reason why I've dedicated a complete video on gitHere are the things which are covered in this video- What is version control ? What exactly is meant by it and why we should use the same?- Type of VCS (aka Version Control Systems)- An introduction to Centralized VCS liks SVN- An introduction of Decentralized VCS like git- How git store the data as compared to other VCS (Snapshot Vs. Delta)- GIt States - Modified, Staged and Committed- How to install git in your system and check the sameGit works in all operating system i.e. Windows, Linux and MacOS . At the end of this video there will be a small git bash tutorial, where I'll tell you about git bash. In the windows operating system the git installation install git bash automatically
2 notes
·
View notes
Text
Notes on MCCC 6.0.0 (Sims 4)
Survived the November patches, and another birthday, too (Dec 6). NOW I'll admit it's officially the Christmas/Holiday Season.
About those two Sims 4 November patches... from what we've seen on Deaderpool's Discord, some folks still need to do some cleaning up in your Mods folders.
First, check MCCC. Version 6.0.0 paths in lastExceptions should look like this:
File "D:\SVN\S4_Modules\mc_cmd_center\mc_utils.py"
not
File "D:\Users\mhrug\Documents\Electronic Arts\The Sims 4\Python WIP Mods\S4_Modules\mc_cas\mc_cas_inject.py"
I have seen both paths in the same lastException. That is definitely not how MCCC should be installed. Mixing up versions is a Bad Idea.
MCCC 6.0.0, Installed.
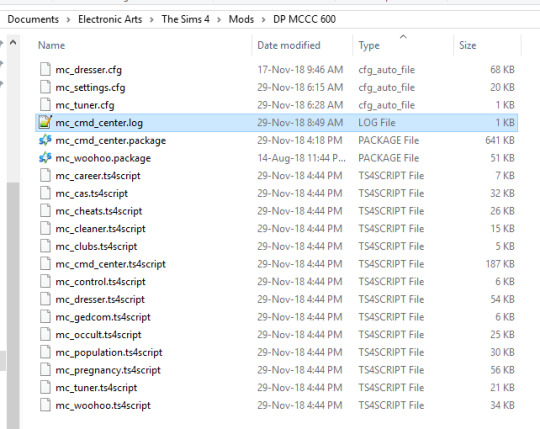
ALL ts4script files for MCCC 6.0.0 should be dated November 29.
The two package file dates change whenever Translations are added, right now they're dated December 5. (Above screenshot was taken when 6.0.0 was first released.)
Also, on a related subject, I've noticed some confusion about the dresser and tuner files. I believe it comes from this, on the Installation page:
For upgrades, leave your mc_settings.cfg, mc_tuner.cfg and mc_dresser.cfg files
That's referring to CONFIG files, not the ts4script files included in the zip. Always delete all package and ts4script files and then add the new ones. The three files above the blue line are the ones to keep, if you have them, to preserve any settings. You SHOULD have a mc_settings.cfg file.
You will only have a mc_tuner.cfg file if you have used MCCC's Autoscan.
You will only have a mc_dresser.cfg file if you have Saved an Outfit, or Whitelisted or Blacklisted items using MCCC's Dresser on Sims in your game.
Weekend's here, it's an excellent chance to straighten up your files a bit. As always, if you play via Origin, are updated, and have an error come up, feel free to visit Deaderpool's Discord for help.
Happy Holidays!
Finding egwarhammer
https://eg4mccc.tumblr.com/
https://twitter.com/eg4mccc
https://www.patreon.com/egwarhammer
451 notes
·
View notes
Text
Drupal 9 Preview with Lando
Drupal 9 is scheduled to be released this summer (no earlier than June 3, 2020).
But if you're anything like me, you don't want to wait to kick the tires and take it for a spin.
Luckily, I've put together a quick and easy tutorial to help you get the latest dev version up and running before it is released!
First, you will need to install some other software.
You'll use Composer, a dependency manager for PHP packages, to install the development branch.
Installation instructions for Composer are here: https://getcomposer.org/
You'll use Lando (and Docker) to create and manage a Docker container with your project inside.
Installation instructions and system requirements are here: https://docs.lando.dev/basics/installation.html#system-requirements
I chose Lando because it handles a lot of your configuration for you by providing configuration "recipes" out of the box.
The only catch is, there is no drupal9 recipe for Lando yet, Luckily, we can use the drupal8 recipe with minor modifications.
$ composer create-project drupal/recommended-project:^9@dev
Watch all the stuff scroll by. That's pretty cool. Composer is installing the recommended Drupal project for you. There are lots of things to learn about here, but for now just sit back and let Composer do its thing.
Near the end, it will pause and ask you something:
Do you want to remove the existing VCS (.git, .svn..) history? [Y,n]?
Answer n to this question if you're interested in participating in Drupal 9 core development.
There's a lot going on right now in order to make the deadline for release this summer, and anyone can contribute!
After that, the composer/core-project-message will display some helpful links to documentation about steps to take next:
Congratulations, you’ve installed the Drupal codebase from the drupal/recommended-project template! Next steps: * Install the site: https://www.drupal.org/docs/8/install * Read the user guide: https://www.drupal.org/docs/user_guide/en/index.html * Get support: https://www.drupal.org/support * Get involved with the Drupal community: https://www.drupal.org/getting-involved * Remove the plugin that prints this message: composer remove drupal/core-project-message * Homepage: https://www.drupal.org/project/drupal * Support: * docs: https://www.drupal.org/docs/user_guide/en/index.html * chat: https://www.drupal.org/node/314178
Go ahead and read some of the great info at those links, but keep in mind that this is the documentation for Drupal 8, because the docs for Drupal 9 are still being written!
If all goes according to plan, however, the transition between Drupal 8 and 9 will be much smoother than those between D7 / D8, or D6 / D7, or basically any other major version upgrade in Drupal's long and eventful history. You can read more about the philosophy behind this transition here: https://dri.es/drupal-7-8-and-9
Next, we are ready to run lando init to create our .lando.yml configuration file. Let's try it and see how well the drupal8 recipe works:
$ cd recommended-project $ lando init --source cwd --webroot web --name drupal9-tester --recipe drupal8 $ lando start
Point your browser at http://drupal9-tester.lndo.site and run the Drupal 9 installer.
Oh no! It will fail because you need to specify a newer PHP version; Drupal 9 requires PHP 7.3, but the drupal8 recipe installs PHP 7.2.
Let's back up a minute. We need to destroy this project and rebuild it with different options.
$ lando destroy $ lando init --source cwd --webroot web --name drupal9-tester --recipe drupal8 --option php=7.3 $ lando start
NOW WE'RE COOKING WITH FIRE!!!
Point your browser at http://drupal9-tester.lndo.site and run the Drupal 9 installer.
When you get to the database configuration, just remember that the database, password, and user are all drupal8 (remember, we had to use the drupal8 recipe because there is no drupal9 recipe yet) but the database service is called database, not localhost. You'll need to open the Advanced options to change that.
And just like that, you can be the first kid on your block to run Drupal 9 under Lando!
1 note
·
View note
Text
How I Corebooted my thinkpad x220t
Note: I ordered my SOIC8 test clip from China, but it never came and so this guide is a theoretical write up of how I would’ve done this had it arrived. This was very unfortunate as I had everything else prepared.
This is a guide on how to coreboot a thinkpad x220t. Most thinkpads are pretty similar so this guide can also be used for an x200-x230, though you should still google for any model specific details.
Also backup your BIOS for the love of god, and don’t panic if you brick it, just reflash with your backup. And be careful not to fry the flash chip, if you do, you might be able to desolder and replace it.
This guide comes with no warranty, proceed at your own risk.
What you need
x220t
Raspberry Pi 3B
A linux computer to SSH into the Pi
Female jumper leads (to connect the Pi and the test clip)
SOIC 8 pin test clip (like this)
Procedure
Download and flash Raspbian Lite to a micro SD card.
Make a file called ssh in the root directory (to enable SSH)
Follow the directions here to set up wifi on the Pi so you can access it remotely (you can use a wired connection if you want)
Use nmap or check your router to find the ip address of the Pi
SSH into the pi (default user and pw is pi and raspberry)
Prepare the Pi for flashing by updating it and installing everything with the following commands
sudo apt-get update && sudo apt-get dist-upgrade && sudo reboot
sudo apt-get update && sudo apt-get install libftdi1 libftdi-dev libusb-dev libpci-dev subversion
sudo apt-get install build-essential pciutils usbutils libpci-dev libusb-dev libftdi1 libftdi-dev zlib1g-dev subversion
svn co svn://flashrom.org/flashrom/trunk flashrom
cd flashrom/
make
sudo make install
Use the following commands to add the SPI kernal modules to /etc/modules so they persist between boots.
sudo modprobe spi_bcm2835
sudo modprobe spidev
Shutdown the Pi, unplug the x220t and remove the batteries.
Remove the palmrest and keyboard from the x220t (consult the hardware maintenance manual for instructions on how to) and expose the flash chip (see image 1 in the appendix)
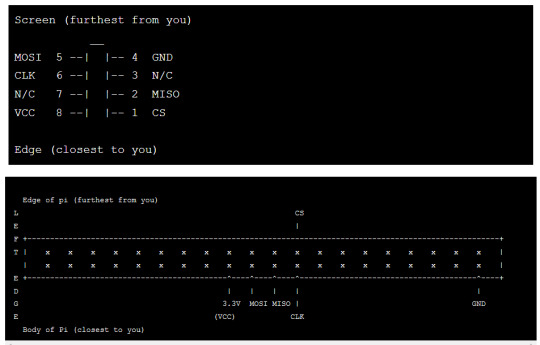
Hook up the test clip to the Pi (see image 2 in the appendix for a wiring diagram)
Connect the clip to the motherboard then turn the Pi on
Read the contents of the flash chip with the following command (do this several times and make sure the hash matches
sudo flashrom -p linux_spi:dev=/dev/spidev0.0 -r read01.bin
Download coreboot and use the ifdtool to extract whats need from the stock rom
git clone http://review.coreboot.org/coreboot.git ~/coreboot
cd ~/coreboot
git submodule update --init --recursive
cd ~/coreboot/util/ifdtool
make
sudo make install
cd ~
ifdtool -x ~/flash01.bin
mkdir -p ~/coreboot/3rdparty/blobs/mainboard/lenovo/x220
cd ~/coreboot/3rdparty/blobs/mainboard/lenovo/x220
mv ~/flashregion_0_flashdescriptor.bin descriptor.bin
mv ~/flashregion_2_intel_me.bin me.bin
mv ~/flashregion_3_gbe.bin gbe.bin
Use me_cleaner to neutralize the Intel ME
git clone https://github.com/corna/me_cleaner ~/me_cleaner
sudo apt-get install python3
./me_cleaner.py ~/coreboot/3rdparty/blobs/mainboard/lenovo/x220/me.bin
Configure coreboot
cd ~/coreboot
make nconfig
Build coreboot
make crossgcc-i386 CPUS=4 -b
make iasl
make
Flash coreboot
sudo flashrom -p linux_spi:dev=/dev/spidev0.0 -w ~/coreboot/build/coreboot.rom -c flashChipModel
Disconnect the clip and power up the laptop, it should boot to SeaBIOS
Appendix
image 1 - Flash chip on the motherboard
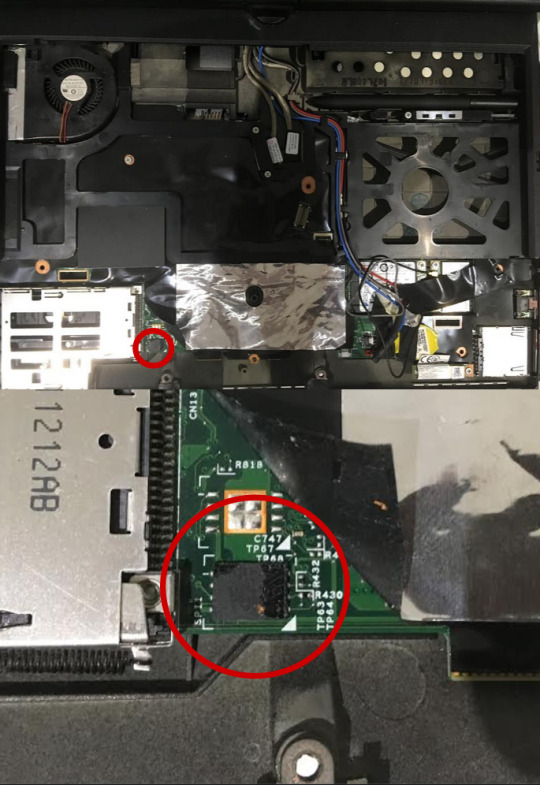
image 2 - Wiring diagram for the Pi
References
https://github.com/grisu48/Coreboot/tree/master/x220t
https://karlcordes.com/coreboot-x220/
https://tylercipriani.com/blog/2016/11/13/coreboot-on-the-thinkpad-x220-with-a-raspberry-pi/
https://wej.k.vu/coreboot/coreboot_on_the_lenovo_thinkpad_x220/
https://github.com/thetarkus/x220-coreboot-guide
1 note
·
View note
Text
2Coom is hiring Python Developer Job Details Work Location: 6th of October, Giza, Egypt Number of working hours: 8 working hours Day off: 1 day off Experience Needed: 4 to 7 years Status: Full-time About 2Coom 2Coom is a management consulting firm specializing in supporting SMEs & start-up businesses. 2Coom is built on a mindset of utilizing historical data analytics, cross-function analysis & market analysis to empower small and medium enterprises to make better business decisions as well as to build the most efficient framework for a start-up business by stockholders’ vision and industry nature. Job Description Responsibilities Collect Needs and draft ERP application requirements Design, Development and testing of Odoo (OpenERP) modules, projects, products and interfaces. Maintaining existing modules. Complete and clear documentation for any task/work done. Test new functions / modifications to existing application modules in accordance with application support. Configuration, installation and maintenance of server and multi database Odoo/Ubuntu environments. Keeping different projects/versions under control using SVN or Git. Other development tasks in systems developed in Python other than Odoo. Job Requirements Skills Bachelor degree preferably in Computer Science, Information Systems, or Engineering, but any other field is welcomed, specially if supported with good experience. Minimum of 1 year of experience in Odoo development, or 2-3 years in Python. Superior knowledge of relational database concepts, SQL and ORM. Good knowledge of non-relational database concepts (MongoDB and Cassandra). Excellent knowledge of web development languages (HTML, CSS, JavaScript, JQuery). Good knowledge of Linux and Ubuntu. Good knowledge of SVN and/or Git. Knowledge of Python development frameworks (Django and Flask). Knowledge of frontend development languages is a great plus (AngularJS or Meteor). Ability to learn fast and execute accordingly. Outstanding communication and interpersonal abilities Patience and professionalism Reliability and discretion: you will often learn of confidential matters Communication, negotiation and relationship-building skills Excellent time management skills and the ability to prioritize work Attention to detail and problem solving skills Excellent written and verbal communication skills Strong organizational skills with the ability to multi-task Work Experience: Have a total development experience of 4-8 years as Odoo ERP developer, 1-2years in database administration. Excellent knowledge in different stacks - Python, PostgreSQL, JavaScript, HTML,CSS, XML etc.- Min 3 Years If you're interested, kindly send your CV to
0 notes
Text
In this blog post, we will look at how y... https://www.computingpost.com/install-svn-server-on-ubuntu-20-0418-0416-04-debian-109/?feed_id=20031&_unique_id=63786ff3e829e
0 notes