#it was less tutorial and more step by step instructions to replicate
Explore tagged Tumblr posts
Visit Tumblr Blog
Explore Tumblr blogs with no restrictions, modern design and the best experience.
Last Seen Tumblr Blogs


Fun Fact
Tumblr was named as a finalist in Lead411’s New York City Hot 125 in Aug 2010.
Text

Month 11, day 30
So idk what I did in the castle scene that crashed my whole computer but I sure as heck did that, and lost a whole lot of work where I didn't even really learn anything, so I've given up on it and moved on to the next CG Fast Track tutorial series, which is optimizing Cycles (and which I'm pretty sure I've already done thanks to other tutorials and also fucking around by poking buttons but whatevs).
Anyway he gave me a nice Mando model and environment setup so that's my art progress for the night :)
I'm like 99% sure I can cut down my render time on this thing exponentially but whatevs, I'm following instructions, and 3 minutes isn't all that bad for a still image, really lol
#the great artscapade of 2024#art#my art#blender#blender render#blender 3d#cycles render#cg fast track#mando#I really liked the project the lady who made the castle tutorial did but I also don't really vibe w/ her teaching style so alas#to be fair her teaching style was more ''do this do that do the other thing'' and no explaining WHY we're doing the things#it was less tutorial and more step by step instructions to replicate#which is fine I can learn from that!#the columns and balustrades were definitely things I needed to learn how to make#...mostly for Prav's sword tbh lol#but the rest of the tutorial was just rehashing things I already know how to do and tbh I know how to do them more efficiently lol#or more efficiently for my particular workflow anyway
3 notes
·
View notes
Video
youtube
✅👉🏻Official Website: https://cutt.ly/PhoenixGenerator Phoenix Generator - Phoenix Generator Reviews - What is Phoenix Generator? Review 2023.
✅What is Phoenix Generator? If you are tired of spending hundreds of dollars on electricity bills every month, then The Phoenix Generator program is the perfect solution for you. This DIY power system allows you to generate your own electricity, eliminating those high monthly costs. Todd has provided straightforward instructions to assist you in providing your family with free, inexpensive energy. The best part about this DIY generator is that it’s very easy to build and requires minimal tools or experience. Moreover, the cost of building a generator with this program is significantly lower than the cost of buying an equivalent pre-built generator. Numerous armed forces, particularly those operating in arid regions, have found this power generation program to be valuable.
✅What does it offer? The Phoenix Generator program assists you in constructing an electromagnetic generator that will provide you with free energy for the rest of your life. It replicates conventional power producing capabilities in every detail. Using readily available spare parts, the system may be operational in under four hours.
✅Here is what you get: A step-by-step guide and video tutorial on how to have your do-it-yourself power generator operational by the end of the day. Each step is accompanied by drawings, measurements, and descriptions that make the instructions simple to follow and implement. Even if you work slowly, the whole process will take four hours. It does not require physical strength and the most difficult task you may confront is cutting. How to buy the required instruments without spending hundreds or thousands of dollars on each. You are guided through each stage by Todd. Therefore, no understanding of pipes, chemistry, or an engineering degree is required. Not only does it provide detailed plans for building a generator yourself but also includes bonus items such as wiring diagrams and safety guidelines. Several essential guidelines are presented to prevent any development issues. You can save money and time during the development process by using a few of Todd’s helpful tips. What particular security concerns should you be aware of? This will make your homemade generator efficient. And so much more!
✅Where to buy: Phoenix Generator is available exclusively on the official website. It can be bought for $37. Other readily accessible portable power generators on the market cost at least $2,000. Using the Phoenix Generator tutorial, you can easily construct a power generator for less than $99. Additionally, the Phoenix Generator software comes with a 60-day money-back guarantee. You may request a refund during the first sixty days if the generator does not operate as claimed. Utilize the official website to contact the Phoenix Generator support team for all kinds of inquiries.
✅👉🏻Official Website: https://cutt.ly/PhoenixGenerator
✅👉🏻Official Website: https://cutt.ly/PhoenixGenerator
2 notes
·
View notes
Note
I had no idea you could somehow save certain actions in ps! 😱 can you explain how you do that? 💖
Absolutely, Sophie! ❤ Always happy to talk Photoshop ♡\( ̄▽ ̄)/♡
Note: there are limits to what Photoshop Actions can record. It’s great for stuff like applying filters or moving layers, but can’t do stuff like replicate brush strokes or freehand selections. Also, actions will replicate your steps very precisely, so I often use shortcuts like Alt + ] or Alt + [ (select 1 layer up/down) instead of clicking on a specific layer to make actions more reusable (more on that later).
You can open the Actions panel by going to Windows > Actions. Photoshop usually has some default actions already preloaded (I’ve never used these but they’re there lol).
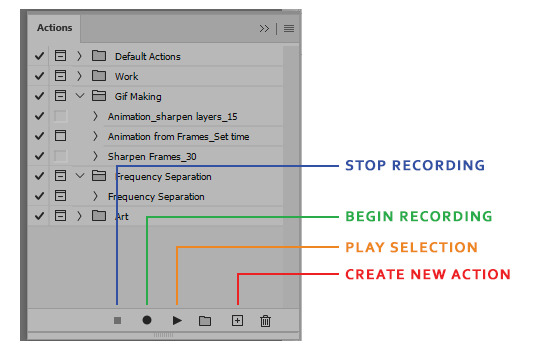
(Rest of the tutorial under the cut because it’s kind of long)
1. When you want to make a new action, you’ll first have to click Create New Action and give it a name:

There’s also a few other options on the creation pop up:
Set: actions can be sorted into folders! You can move them around afterwards just like layers and groups.
Function Key: You can assign your action it’s own keyboard shortcut, provided it doesn’t conflict with a preexisting one.
Color: idk, give it a pretty color? 😅
2. When you’re ready, hit Record:

The Record button will be red as long as you’re recording. You can stop with the Stop button at any time and resume by pressing Record.
The steps it recorded will show up under the action dropdown. You can also click each individual step’s dropdown toggle to see specific details. For example, one of the steps I recorded was to apply Smart Sharpen to a layer, and it tells you the exact settings used.
3. Recording your steps:
So for this example, I imported Video Frames to Layers, and trimmed it down to 30 frames I want to use. Here’s what I want to record for my example action:
Resize the gif to 540px in width
Apply Smart Sharpen to each layer
You can record much, much more (seriously, I’ve seen actions that took Photoshop 15+ minutes to run from start to finish) but I’m going to keep it short so this gif doesn’t run too long.
Here’s what the Layers panel and the Actions panel look like side by side while I’m recording this example action:

So as you can see, I use the shortcut Alt + ] instead of just clicking on the layer. Why? If you click on a layer, Photoshop will record the step as “select Layer 66″ (or whatever the layer happens to be named). Then if you try to use the action again on another set and you don’t have a Layer 66, the action won’t be able to proceed. When you use Alt + ] you can see in the gif above that the step is recorded as “Select Forward Layer” instead of with a specific layer name. This was, you can reuse the Action over and over.
Important Note:
Think of actions like instructions you’ve written for a robot. It will follow those directions to the letter and not know how to swerve around obstacles. So we gotta anticipate them.
For example: the Sharpen Frames action I have specifically applies Smart Sharpen to 30 layers. So what happens if I have less than 30 layers?
Let’s say I have 25 layers that need sharpening. You actually do not need to run the action from start to finish. You can tell it to begin playing at a specific step instead of at the very beginning:

You can also toggle specific steps on or off:

And that’s most of the basics! If you have a lot of repetitive steps in your gifmaking process, Actions are a really convenient way to save time. Hope that helps!
Phlearn on YouTube also has a great tutorial about making actions [here].
18 notes
·
View notes
Text
So you wanna be a king (pt2)
(or at least cosplay one.)
Continuing the cosplay creation saga for anyone interested, here’s how I put together my King Graham cosplay:

Part 2: Jerkin
Disclaimer: I’m totally novice at cosplay and only do it for like one event per year if that, so take what you will or throw it all away.
Also this is not really a step by step tutorial post because this is several years ago and the details are hazy.
If you’re following along, then you should have a cloak and cowl (click for sort-of-instructions-here).
Step one: Pull out those reference screencaps you made in the first part and stare at them. Repeat that you still love this character and that you’re committed to this nonsense. Ready? Let’s go.

The long sleeved purple undershirt I just happened to find at Goodwill. Please try to find something lightweight--this costume is warm.
But you won’t be so lucky to find a jerkin at Goodwill too. You’ll have to make it, or at least modify something.
Still, it’s just an elaborate brown tank top, more or less. You don’t even have to worry about attaching sleeves! Surely this is an eas--wait, what are those lace things? Could you even bend down to pick up inventory items with laces that thick and close together? How can I translate that into something semi-practical I can wear without wanting to eat my adventuring hat?

It’s a great design, but I’m mortal, not digital. If you can determine a simple way to get that lacing to look accurate while still being comfortably wearable, let me, novice cosplayer that I am, know. (maybe if they were just made separately, flat, and sewn on, like a decal thing?)

I had planned on building this out of fake leather/suede-ish material, but then I remembered I wanted to also wear this as my new RenFest costume, and I didn’t want to die in July.
So I went to my local Joann’s and picked up a considerably lighter, thinner, and satisfactorily rich looking brown fabric (I think it was this stuff: https://www.joann.com/kona-cotton-solid-quilt-fabric/1378397.html) for both jerkin and bracers. I’ve lost the original receipt, so I’m not sure how much I bought. Too much, because my storage bin is full of leftovers. I’m sure 3 yards is more than plenty, but measure to be sure.

Tunic time!
This is the point where the “How To Graham” tutorial breaks down and becomes especially fuzzy and experimental, because I kept none of my in-process notes. High five, Gerbil, very helpful indeed. You might just want to glance at this for ideas before doing your own thing.
I laugh in the face of patterns, hahahaha. (bad idea, don’t be me.)
I got my favorite fitted t-shirt (Disney Afternoon ftw), paper, a ruler, and old scrap fabric to maul as practice. I pinned my shirt flat to paper and traced both the front and back separately (folded the sleeves in so my tracework was sleeveless). The front had a deeper neckline but was otherwise nearly identical to its back partner. Once both sides were traced, I added a half inch margin around them, cut them out, and started working on fake jerkins, so I could sculpt the right fit before I got out the nice fabric. I wanted the jerkin to be pretty form fitting as Graham’s is, so I curved the sides in a bit deeper.
I made at least two fake jerkins, fyi.

Since I went pattern-less (hahahaarrgh), tests were crucial, especially regarding the neck hole. The t-shirt is elastic, but my fabric is not. I personally require at least 22″ around the neck to get the thing over my nose, and it’s barely enough clearance. (I’m fairly certain I measured some other shirts with my fabric ruler for a loose size to aim for, then did edits on the junk fabric til I had a size that worked.)
Tests also showed that the back piece needed an additional two and a half inches of fabric on the bottom thanks to how it sits on my shoulders. In the above image, you can see the green fabric is higher, but I wanted the piece to look balanced from the side.

It’s a touch hard to see as it’s usually hidden by the cloak, but I find a balanced jerkin is a happy jerkin.

And here’s that additional fabric without a human in it. (ack don’t look at my uneven stitches)
By now, you should have a belt (in my method it doesn’t matter how it clasps, so pick any belt you please as you’ll be wearing it backward) so you can determine how long the flappy things on the front and back should be. Where your belt sits comfortably is where your side laces will stop and your trim on the flap things will start--the belt hides the transition.
Graham’s belt sits low on his (fantastically defined) hips. I prefer it on my waist so it doesn’t slide up when I’m walking, so my flap things are longer than his. For reference, my flap things...no, wait, there must be a technical term....Google says it’s a peplum. My peplum (??) are 8″ish long, though his look like they’re about half that.

For reference, as a 5′6″ person, from hanger to hem my jerkin’s back piece is approximately 28″ long. The most important things here are how long it is overall, and if the neck hole is big enough to fit over your head: nearly everything else can be altered when wearing it via the lacework I have planned.

Look, at this point, you might want to give up on me and find a real shirt pattern, fitted or not. I understand. I’ll wait. This isn’t actually a step by step tutorial so much as a vague What I Did And It’s Probably Wrong.

Okay, you’ve traced your favorite shirt (or bought a real pattern like a good person). Your tests have shown that your peplum sit at the same height on your leg, and you like the shape and feel of it when you wear your scrap fabric test (I recommend using safety pins to replicate the laces during the early size test phase). You’ve cut out the front and back shirt shaped pieces of brown fabric (with that half inch hem margin all around), and now they’re sitting on your floor, mocking you.
The actual construction part!
The only attachment you’ll give these pieces is via the shoulders. If you’re new to this Making Your Own Clothes thing and your fabric has a nice side and a not nice side, put the nice sides against each other and sew along the not nice side so when you turn it over your hem is inside.

I seam-ripped a collar from a shirt I loved but was too worn to wear otherwise--no math or sewing your own collar from scratch if you swipe it from another shirt. No one will ever see it since your cowl tucks into it, so it doesn’t matter how it looks, though natural colors are better than, say, blue, in case your cowl slips a bit. There are lots of lovely videos about attaching collars: this one seems nice, if you skip ahead to the actual sewing-on part at 4:50. https://www.youtube.com/watch?v=k31FWDp1s5I

At this point, since you’ve fitted it and trimmed it and done all that you want to it to get the shape you like, you’ll want to hem your shirt by that half inch margin all around so it’s clean and easy for the next part. It only looks vaguely shirt-like now since it’s held together just by the shoulders.
Now, let’s get medieval on it.
Time for lacing!
I used a blond suede leather rope to mimic the lighter color on Graham’s sides (check the beading or leather working section of the craft stores, and make sure it’s thick enough that it won’t snap under light strain, and thin enough it’ll fit through the grommet size you select). I already happened to own an anvil (...why?), so I just needed grommets. Mine appear to be 12mm--I got them in Ancient Copper. You’ll use them in the bracers later, too, so leftovers are a good thing for once. Hobby Lobby or Michaels can hook you up with supplies, but Etsy and eBay have more diverse color choices.

Every inch from where the armpit opening stops to where the trim of the peplums begins (the height of which was established earlier when I decided to how to wear the belt), I made a mark for a grommet, and marked its corresponding partner. For reference, I have 9 holes down each hem, for 18 total holes per side, and a grand total 36 grommets in the tunic. I jammed an awl through the holes marked and applied the grommets as per the packet’s instruction.
Like making a metal and fabric sandwich. With a hammer.

It’s totally therapeutic. I can see why Amaya’s into this stuff.

(It’s not a Looney Toons anvil, by the by: like this, instead.)
Unspool the suede rope and thread it through the grommets. To try and mimic the game, I use a ladder shoelace tie, starting with the grommet pair beneath the arms and running down until I tie a bow in the last pair. I tuck the loose ends into the waistband of the trousers. So, this: https://www.fieggen.com/shoelace/ladderlacing.htm

Finally, I made (because I couldn’t find to buy) my own trim about 1/2″ wide from some scrap light brown suede in the Joann Scrap Bin, and attached it to the peplum (is this truly a better word than flap, vote now).

And that, friend, is a jerkin that would make any real medieval person flinch but should be cool for cosplay. You should try it with your cloak and cowl. If you’re following my method, you get to layer up, lucky you: anchor shirt, long-sleeved-purple-undershirt, jerkin, cloak (snaps through the jerkin’s collar onto the anchor shirt), cowl (to cover your shoulders so you don’t see the cloak tugging at your jerkin collar).
Yeah, it’s warm. Sorry.
Drink some water.
When you’re done sweating in it (eww, I know it’s awful, sorry), handwash it. Strip the rope out of the grommets, use handwashing detergent in a (clean!) bathroom sink, then hang it over a bathtub to dry before relacing it using that ladder shoelace technique and storing it on a hanger. I always have it laced, and pull it on over my head with it laced, too.
And with that, you’ve got about half of your entire cosplay done. Congrats! Take some time to relaaaax. You’re gonna be a king.

(is this helpful at all to anyone? should i keep going?)
(peplum?? really????)
#King's Quest#kings quest#King Graham#cosplay#ack i'm sorry this is probably zero help whatsoever#tutorial
21 notes
·
View notes
Text
Divining the Future With the Dead
I love divination. I also love speaking to the dead, building relationships with them, and letting their voice and story be heard. Because of this, I have been figuring out ways to incorporate the whole "advice from those that lived through it" concept into my divination practice. I contact the dead to divine the future, and in this way, I can help them feel listened to, respected, and equipped to help us, and our futures.
There isn't a right or wrong way to do any divination practice, so I honestly recommend doing what you feel works best for both the spirit and yourself. These are my tips, ideas, and thoughts on the topic, so feel free to replicate it or completely nix the idea for yourself. Thanks for reading!
Choosing a Method
Divination methods vary. From scrying with black mirrors to examining the results of graphology, the lines of what you can use are basically endless. Deciding what you want to do is a very personal decision, and it may take a few tries to discover something you click with. Here are some ideas, but, please, if you don't feel drawn to any of these, or just want to look for more, I definitely recommend doing so.
Scrying - scrying is gazing into a surface, a pattern, or even a reflection, to divine. Images (sometimes still, sometimes moving) may appear, whether inside your mind or on the surface itself. Some common methods involve gazing at fire, water, a black mirror, smoke, or a dark liquid. To me, this is a very versatile divination tactic to try, though many people struggle with learning how to do it due to its meditative nature.
Cartomancy/Tarot - Using cards to divine is one of the more direct and straightforward approaches to divination. Using a system that defines what each card may represent (whether you make it yourself or use one that already exists), you can ask questions and communicate. Interpreting the cards is another personal thing, and if you feel a card means something for one reading and not another, follow your gut. Oracle cards are another form of cartomancy, and are looser in defined meanings in most cases.
Pendulum - By using a pendulum (a chain, thread, or string with a weighted end) you can receive yes/no/maybe/don't want to answer as responses, depending on the board you choose to use. Some people even include letters and numbers, as seen in Ouija boards. There are many tutorials and instructions online, so I won't go into to much detail, but you hold it over a board with each direction noted. Ask your question. Then, wait for it to swing, and you have received your answer.
Scrawl divination - Scrawl divination (also known as graphology), is a somewhat lesser known form of divination, and, at times, has been criticized as semidangerous due to the fact that the spirit guides your hand. However, I disagree, because similar to communicating with spirits using Tarot, you are guided by them, and I haven't heard of any issues with that. I haven't had issues with graphology, either, and really like the accurate nature of it. Basically, you close your eyes or look away, and draw or write on a pad of paper. Try not to create any shapes or designs yourself, let the spirit you are talking to do the writing. I typically get my hand moving, and follow whatever direction it feels like I need to go. I recommend pairing this with other forms of divination, such as tarot or pendulum dowsing, to start a conversation and request their assistance.
Obviously, there are many more options, these are just my favourite fairly common ones. I used to run a blog called @the-daily-diviner and it's still up as an archive. I posted tons of informational and how-to posts regarding divination on that blog, so that would be a good place to start if you want to keep looking.
Building a Space
To build a space, you don't need much. In fact, all you really need is somewhere you can focus, feel safe, and have access to any tools or resources you may need. For me, this is my altar. For others, it is a space within themselves, a temple they have built inside of their minds.
Some additions to a space (which are entirely optional and not necessary) are listed below. Please note that personalizing these things to your practice (ex: crystals for spirit communication) can help you on your way. You can also add any personal items you feel need to be there.
Incense
Candles
Crystals
Graveyard Dirt (please make sure to harvest this respectfully. Always ask the spirit for permission, and never do anything illegal to acquire it)
Heirlooms (for ancestral communication)
Lights (lamps etc)
Curtains (adds privacy, and darkness if you want it)
Protective charms/wards
Divination tools
Spirit Vessels of those you are contacting if they have them
Creating Relationships
This is, in my opinion, the most important step. Connecting to a spirit is one thing. Building a relationship that is full of give and take is another. I have found that the more one talks and communicates with a spirit, the more natural it becomes, and the easier it is to spot any potential danger warning signs and lies. Which us also very important. Always try your best to screen the spirits you invite to speak with you (especially in any personal spaces such as your home). In this case, it becomes slightly less dangerous, as we are discussing human spirits, who are generally (but NOT always) less aggressive. However, caution is never a bad thing.
Start small, ask them their name, where they're from. At first, and maybe forever, don't discuss their death or any trauma they suffered in life unless they bring it up. It can cause anger, guilt, resentment, etc to come to the surface, and it isn't polite to ask about things like that when you have just met and acquainted yourself with them. Use good manners is the end of it.
Use a journal or online document to record what the spirit has communicated to you, whether it be advice or personal information about them. It is always nice to be able to look back and see what they said about something, especially if it was a prediction. It can also help you in researching who they were in life if that's something the two of you want to do.
Divining With Them
Let it be known upfront that you are looking for a spirit who can and will help you decipher potential ways that the future may go. It will help both of you find a perfect fit, and you won't be waiting and waiting for the spirit to come around and tell you what may happen. Be open, be honest. Likewise, ask them to do the same.
Setting a time to do these divination sessions is all up to the two of you. It can be on certain dates, moon phases, or even whenever the two of you feel you need to learn of the future. Planning it out ahead of time, and offering them a hand in the decision, will keep your relationship healthy and hopefully not strained. Try not to put too much pressure on the spirit to be constantly foretelling the future about little things of no crucial importance. If you wouldn't ask a friend for a bunch of readings in person, don't ask a spirit either.
Record the questions you asked and the responses you received. In this way, you can decide for yourself how accurate the spirit you are communicating with is. You can even make separate pages or documents for individual scenarios, such as presidential or political actions or things like your career.
Don't forget to pay them just like you can with other diviners. Decide together what you will give them for their help, perhaps an offering of flowers or food. Ask them what they like, and see what you can do.
I hope this has helped clear up any questions you may have had on this topic!
557 notes
·
View notes
Text
Final crit day instillation


I installed my work close to the window, using the floor and hanging rail. Since the last crit, I thought about sound, developing ideas from my clay models, a sense of play and communal discovery, string and barriers, creating a sense of a site - thinking more about space and how to invite a viewer in.
I had the sound of materials and the rocks being chiselled playing from a speaker inside the hanging sculpture. I made a leaflet to give to people - it had the map on one side and the “specimens” and “artefacts” on the other - I wanted to convey the sense of an archive in the process of being made, unsteady history being marked out and valued. I used my typewriter to write text to accompany the images on the leaflet.
The clay stacking models I made were important in me finding my interests. I enjoyed laying out written and visual marks - they acted as drawings to flesh out ideas and they felt like maquettes for larger forms I hoped to make. The hanging sculpture I made for my instillation came from these ideas. I made a paper mâché form using chicken wire, and then painted it white. It housed my speaker and a disco light. I really enjoyed how the light looked glowing through the hole in the sculpture.
I also paper mached and painted my sandpit - I got the sand from outside someones house. In a tutorial I discussed the idea of a sand pit - it links to a sense of play and could encourage people to interact.
Thinking about my use of string, I always prefer for it to be bold and make a clear line - even if this isn’t linear and a closed barrier. I want to think about a sense of inside/outside space. I feel like it was visually cohesive, the pink string and colourful light and white of the plaster and paint. Im thinking about the line between artificial and natural, and something natural vs recreated. The experience of uncovering objects in the work is, in reality, a replica of a real experience of discovery. I want my pieces to take aspects of the organic and the replicated.
Feedback:
Light and string confusing - maybe not clear what tone is. People commented some elements felt more artificial and constructed (like the white and the plaster) and others felt more realistic and natural (sand). I wanted to play with this contradiction but I can see how it could confuse the viewer’s response. Maybe the two aspects feel too separate?
What’s the point of rediscovery? people are uncovering objects that have already been found by me. I want to evoke feelings of excitement, curiosity, learning, process of assigning value and working out history as you find it. But this rediscovery feels faux maybe - too easy? Should the objects then be harder to get to and uncover? People said the chipping worked well as there was more labour involved - it was harder work and took more time so made it a more worthwhile process.
Alien quality of light! The disco light I enjoyed aesthetically but it was a risk, and not sure anyone else got it.
Feels experimental - interactive, but it is open how the viewer interprets their role. It could be more clear how the audience is meant to interact. Do people feel like they’re allowed to take the objects? What do they do with them after? Tricky to navigate - where is the start point? There could be more ordered steps if there were clearer instructions for people to follow. People were unsure what to do. The tools were out but the instillation could be viewed as a site on pause, not meant to be restarted by the audience.
Should the site I create be more realistic? If I’m referencing an archeological dig, should it be more messy and less “sanitised”? I could use different materials that feel more connected to nature - dry clay, bone dry uncooked terracotta. I could take visual language of dig sites - looking at barriers and cordoning, making it look more authentic and professional, trying to install outdoors.
What’s art and what’s not art? Define this line.
I could develop it in different ways, either make it more real and natural or make it more beautiful. Take waste and transform it into precious, encrusted forms. Or make my rocks more realistic, make the site more like a dig - muddy, dirty, outdoors, etc.
0 notes
Text
Cross-account replication with Amazon DynamoDB
Hundreds of thousands of customers use Amazon DynamoDB for mission-critical workloads. In some situations, you may want to migrate your DynamoDB tables into a different AWS account, for example, in the eventuality of a company being acquired by another company. Another use case is adopting a multi-account strategy, in which you have a dependent account and want to replicate production data in DynamoDB to this account for development purposes. Finally, for disaster recovery, you can use DynamoDB global tables to replicate your DynamoDB tables automatically across different AWS Regions, thereby achieving sub-minute Recovery Time and Point Objectives (RTO and RPO). However, you might want to replicate not only to a different Region, but also to another AWS account. In this post, we cover a cost-effective method to migrate and sync DynamoDB tables across accounts while having no impact on the source table performance and availability. Overview of solution We split this article into two main sections: initial migration and ongoing replication. We complete the initial migration by using a new feature that allows us to export DynamoDB tables to any Amazon Simple Storage Service (Amazon S3) bucket and use an AWS Glue job to perform the import. For ongoing replication, we use Amazon DynamoDB Streams and AWS Lambda to replicate any subsequent INSERTS, UPDATES, and DELETES. The following diagram illustrates this architecture. Initial migration The new native export feature leverages the point in time recovery (PITR) capability in DynamoDB and allows us to export a 1.3 TB table in a matter of minutes without consuming any read capacity units (RCUs), which is considerably faster and more cost-effective than what was possible before its release. Alternatively, for smaller tables that take less than 1 hour to migrate (from our tests, tables smaller than 140 GB), we can use an AWS Glue job to copy the data between tables without writing into an intermediate S3 bucket. Step-by-step instructions to deploy this solution are available in our GitHub repository. Exporting the table with the native export feature To export the DynamoDB table to a different account using the native export feature, we first need to grant the proper permissions by attaching two AWS Identity and Access Management (IAM) policies: one S3 bucket policy and one identity-based policy on the IAM user who performs the export, both allowing write and list permissions. The following code is the S3 bucket policy (target account): { "Version": "2012-10-17", "Id": "Policy1605099029795", "Statement": [ { "Sid": "Stmt1605098975368", "Effect": "Allow", "Principal": { "AWS": "arn:aws:iam:::user/" }, "Action": [ "s3:ListBucket", "s3:PutObjectAcl", "s3:AbortMultipartUpload", "s3:PutObject" ], "Resource": [ "arn:aws:s3::: ", "arn:aws:s3::: /*" ] } ] } The following code is the IAM user policy (source account): { "Version": "2012-10-17", "Statement": [ { "Sid": "Stmt1605019439671", "Action": [ "s3:ListBucket", "s3:PutObject", "s3:PutObjectAcl" ], "Effect": "Allow", "Resource": "arn:aws:s3:::" } ] } Make sure DynamoDB Streams is enabled in the source table at least 2 minutes before starting the export. This is needed for the ongoing replication step. For instructions on performing the export, see New – Export Amazon DynamoDB Table Data to Your Data Lake in Amazon S3, No Code Writing Required. When doing the export, you can choose the output format in either DynamoDB JSON or Amazon Ion. In this post, we choose DynamoDB JSON. The files are exported in the following S3 location: s3:///AWSDynamoDB//data/ After the export has finished, the objects are still owned by the user in the source account, so no one in the target account has permissions to access them. To fix this, we can change the owner by using the bucket-owner-full-control ACL. We use the AWS Command Line Interface (AWS CLI) in the source account and the following command to list all the objects in the target S3 bucket and output the object keys to a file: aws s3 ls s3:// --recursive | awk '{print $4}' > file.txt Then, we created a bash script to go over every line and update the owner of each object using the put-object-acl command. Edit the script by changing the path of the file, and run the script. Importing the table Now that we have our data exported, we use an AWS Glue job to read the compressed files from the S3 location and write them to the target DynamoDB table. The job requires a schema containing metadata in order to know how to interpret the data. The AWS Glue Data Catalog is a managed service that lets you store, annotate, and share metadata in the AWS Cloud. After the data is cataloged, it’s immediately available for querying and transformation using Amazon Athena, Amazon EMR, Amazon Redshift Spectrum, and AWS Glue. To populate the Data Catalog, we use an AWS Glue crawler to infer the schema and create a logical table on top of our recently exported files. For more information on how configure the crawler, see Defining Crawlers. Most of the code that the job runs can be generated by AWS Glue Studio, so we don’t have to type all the existing fields manually. For instructions, see Tutorial: Getting started with AWS Glue Studio. In this post, we focus on just two sections of the code: the data transformation and the sink operation. Our GitHub repo has the full version of the code. The following is the data transformation snippet of the generated code: Transform0 = ApplyMapping.apply(frame = DataSource0, mappings =[ ("item.ID.S", "string", "item.ID.S", "string"), ("item.date.M", "string", "item.date.M", "string"), ("item.location.M.lat.S", "string", "item.location.M.lat.S", "string"), ("item.location.M.lng.S", "string", "item.location.M.lng.S", "string")], transformation_ctx = "Transform0") Now we have to make sure all the key names, data types, and nested objects have the same values and properties as in the source. For example, we need to change the key name item.ID.S to ID, item.date.M to date, the date type from string to map, and so on. The location object contains nested JSON and again, we have to make sure the structure is respected in the target as well. Our snippet looks like the following after all the required code changes are implemented: Mapped = ApplyMapping.apply(frame = Source, mappings = [ ("item.ID.S", "string", "ID", "string"), ("item.date.M", "string", "date", "map"), ("item.location.M.lng.S", "string", "location.lng", "string"), ("item.location.M.lat.S", "string", "location.lat", "string")], transformation_ctx = "Mapped") Another essential part of our code is the one that allows us to write directly to DynamoDB. Here we need to specify several parameters to configure the sink operation. One of these parameters is dynamodb.throughput.write.percent, which allows us to specify what percentage of write capacity the job should use. For this post, we choose 1.0 for 100% of the available WCUs. Our target table is configured using provisioned capacity and the only activity on the table is this initial import. Therefore, we configure the AWS Glue job to consume all write capacity allocated to the table. For on-demand tables, AWS Glue handles the write capacity of the table as 40,000. This is the code snippet responsible for the sink operation: glueContext.write_dynamic_frame_from_options( frame=Mapped, connection_type="dynamodb", connection_options={ "dynamodb.region": "", "dynamodb.output.tableName": "", "dynamodb.throughput.write.percent": "1.0" Finally, we start our import operation with an AWS Glue job backed by 17 standard workers. Because the price difference was insignificant even when we used half this capacity, we chose the number of workers that resulted in the shortest import time. The maximum number of workers correlates with the table’s capacity throughput limit, so there is a theoretical ceiling based on the write capacity of the target table. The following graph shows that we’re using DynamoDB provisioned capacity (which can be seen as the red line) because we know our capacity requirements and can therefore better control cost. We requested a write capacity limit increase using AWS Service Quota to double the table default limit of 40,000 WCUs so the import finishes faster. DynamoDB account limits are soft limits that can be raised by request if you need to increase the speed at which data is exported and imported. There is virtually no limit on how much capacity you request, but each request is subject to review by the DynamoDB service. Our AWS Glue job took roughly 9 hours and 20 minutes, leaving us with a total migration time of 9 hours and 35 minutes. It’s considerably faster when compared to the total of 14 hours migration using Data Pipeline, for a lower cost. After the import finishes, change the target DynamoDB table write capacity to either one of the following options based on the target table’s use case: On-demand – Choose this option if you don’t start the ongoing replication immediately after the initial migration or if the target table is a development table. The same WCU you have in the source table – If you’re planning to start the ongoing replication immediately after the initial migration finishes, this is the most cost-effective option. Also, if this is a DR use case, use this option to match the target throughput capacity with the source. Ongoing replication To ensure data integrity across both tables, the initial (full load) migration should be completed before enabling ongoing replication. In the ongoing replication process, any item-level modifications that happened in the source DynamoDB table during and after the initial migration are captured by DynamoDB Streams. DynamoDB streams store these time-ordered records for 24 hours. Then, a Lambda function reads records from the stream and replicates those changes to the target DynamoDB table. The following diagram (option 1) depicts the ongoing replication architecture. However, if the initial migration takes more than 24 hours, we have to use Amazon Kinesis Data Streams instead. In our case, we migrated 1.3 TB in just under 10 hours. Therefore, if the table you’re migrating is bigger than 3 TB (with the DynamoDB table write limit increased to 80,000 WCUs), the initial migration part could take more than 24 hours. In this case, use Kinesis Data Streams as a buffer to capture changes to the source table, thereby extending the retention from 1 day to 365 days. The following diagram (option 2) depicts the ongoing replication architecture if we use Kinesis Data Streams as a buffer. All updates happening on the source table can be automatically copied to a Kinesis data stream using the new Kinesis Data Streams for DynamoDB feature. A Lambda function reads records from the stream and replicates those changes to the target DynamoDB table. In this post, we use DynamoDB Streams (option 1) to capture the changes on the source table. The ongoing replication solution is available in the GitHub repo. We use an AWS Serverless Application Model (AWS SAM) template to create and deploy the Lambda function that processes the records in the stream. This function assumes an IAM role in the target account to write modified and new items to the target DynamoDB table. Therefore, before deploying the AWS SAM template, complete the following steps in the target account to create the IAM role: On the IAM console, choose Roles in the navigation pane. Choose Create role. Select Another AWS account. For Account ID, enter the source account number. Choose Next. Create a new policy and copy the following permissions to the policy. Replace with the target DynamoDB table ARN. { "Version": "2012-10-17", "Statement": [ { "Sid": "VisualEditor0", "Effect": "Allow", "Action": [ "dynamodb:BatchGetItem", "dynamodb:BatchWriteItem", "dynamodb:PutItem", "dynamodb:DescribeTable", "dynamodb:DeleteItem", "dynamodb:GetItem", "dynamodb:Scan", "dynamodb:Query", "dynamodb:UpdateItem" ], "Resource": "" }, { "Sid": "VisualEditor1", "Effect": "Allow", "Action": "dynamodb:ListTables", "Resource": "*" } ] } Return to the role creation wizard and refresh the list of policies. Chose the newly created policy. Choose Next. Enter the target role name. Choose Create role. Deploying and running the ongoing replication solution Follow the instructions in the GitHub repo to deploy the template after the initial migration is finished. When deploying the template, you’re prompted to enter several parameters including but not limited to TargetRoleName (the IAM role created in last step) and SourceTableStreamARN. For more information, see Parameter Details in the GitHub repo. One of the most important parameters is the MaximumRecordAgeInSeconds, which defines the oldest record in the stream that the Lambda function starts processing. If DynamoDB Streams was enabled only a few minutes before starting the initial export, set this parameter to -1 to process all records in the stream. If you didn’t have to turn on the stream because it was already enabled, set the MaximumRecordAgeInSeconds parameter to a few minutes (2–5 minutes) before the initial export starts. Otherwise, Lambda processes items that were already copied during the migration step, thereby consuming unnecessary Lambda resources and DynamoDB write capacity. For example, let’s assume you started the initial export at 2:00 PM and it took 1 hour, finishing at 3:00 PM. After that, the import has started and took 7 hours to complete. If you deploy the template at 10:00 PM, set the age to 28,920 seconds (8 hours, 2 minutes). The deployment creates a Lambda function that reads from the source DynamoDB Streams and writes to the table in the target account. It also creates a disabled DynamoDB event source mapping. The reason why this was disabled is because the moment we enable it, the function starts processing records in the stream automatically. Because we should start the ongoing replication only after the initial migration finishes, we need to control when to enable the trigger. To start the ongoing replication, enable the event source mapping on the Lambda console, as shown in the following screenshot. Alternatively, you can also use the update-event-source-mapping command to enable the trigger or change any of the settings, such as MaximumRecordAgeInSeconds. Verifying the number of records in the source and target tables To verify number of records in both the source and target tables, check the Item summary section on the DynamoDB console, as shown in the following screenshot. You can also use the following command to determine the number of items as well as the size of the source and target tables: aws dynamodb describe-table --table-name DynamoDB updates the size and item count values approximately every 6 hours. Alternatively, you can run an item count on the DynamoDB console. This operation does a full scan on the table to retrieve the current size and item count, and therefore it’s not recommended to run this action on large tables. Cleaning up Delete the resources you created if you no longer need them: Delete the IAM roles we created. Disable DynamoDB Streams. Disable PITR in the source table. Delete the AWS SAM template to delete the Lambda functions: aws cloudformation delete-stack --stack-name Delete the AWS Glue job, tables, and database. Conclusion In this post, we showcased the fastest and most cost-effective way to migrate DynamoDB tables between AWS accounts, using the new DynamoDB export feature along with AWS Glue for the initial migration, and Lambda in conjunction with DynamoDB Streams for the ongoing replication. Should you have any questions or suggestions, feel free to reach out to us on GitHub and we can take the conversation further. Until next time, enjoy your cloud journey! About the Authors Ahmed Zamzam is a Solutions Architect with Amazon Web Services. He supports SMB customers in the UK in their digital transformation and their cloud journey to AWS, and specializes in Data Analytics. Outside of work, he loves traveling, hiking, and cycling. Dragos Pisaroc is a Solutions Architect supporting SMB customers in the UK in their cloud journey, and has a special interest in big data and analytics. Outside of work, he loves playing the keyboard and drums, as well as studying psychology and philosophy. https://aws.amazon.com/blogs/database/cross-account-replication-with-amazon-dynamodb/
0 notes
Link
Crafting Evergreen Content Means Less Posts & More Traffic
Sure timely blog posts have value, but crafting evergreen content means ranking for high volume keywords over a long period of time.
Seasoned webmasters and Internet marketers are well aware of the importance of publishing high-quality content on their websites. Content attracts visitors and search engines alike, encouraging more traffic and higher search rankings. Today we’re going to take a closer look at a specific type of web content known as evergreen content, revealing what it is and why it’s beneficial.
Evergreen Content Defined
The term “evergreen content” is used to describe any web content that’s not time-sensitive.
Much like evergreen trees retain their leaves throughout the year, evergreen content retains its relevancy 2 days or 2 years from now. An example of an evergreen article for an automotive website would be “5 Ways to Improve Your Car’s Gas Mileage.” Because this topic remains relevant, regardless of the date or time, it’s considered to be evergreen. This is in stark contrast to news-style articles or blog posts that are focused around a trending or time-sensitive topic.
Benefits of Publishing Evergreen Content
There are several key advantages to publishing evergreen content, one of which is the fact that people will always be searching for it. If you publish an article about a current event, it may receive some initial traffic before slowly dying off. Evergreen articles, on the other hand, are always in high demand since they are not time-sensitive.
Another benefit of publishing evergreen content is the simple fact that search engines love it. This means you’ll have an easier time achieving a top search ranking for an evergreen article as opposed to a time-sensitive article.
Tips on Crafting Evergreen Content:
Use the Google Adwords Keyword Planner tool to uncover high-traffic, low-competition keywords that are associated with your website’s niche.
Follow the mantra of “quality over quantity.” A single article of exceptional quality is worth more than two or even three articles of mediocre quality.
Keep an eye on your website’s statistics to determine which evergreen articles have the most hits. Using this information, you can replicate the process with similar articles.
If you’re running out of evergreen topics, scan through some of your competitors’ websites to see what they are doing. You obviously don’t want to copy their work, but you can use it for inspiration.
Remember, you shouldn’t focus all of your efforts on evergreen content. Diversifying your website with both time-sensitive news-style articles and evergreen content will allow you to reach a broader audience.
WordStream Provided the following Tips for common evergreen content formats you might consider in generating lasting content.
Lists
Top Tips
Instructional “How To” Tutorials
Encyclopedia-esque Entries
Product Reviews
Videos
Writing in these formats does not automatically make your piece evergreen, but these structures tend to work well with evergreen writing. Videos are especially effective when you need to illustrate how to do something, like how to frost a cupcake or how to grout a tub. If videos aren’t possible, consider using a series of images (photos or illustrations, diagrams, etc.) to your advantage.
Use of Images & Branding
Don’t make your evergreen content easy to copy or steal.
Brand and watermark your content! Your content can be based around an image or infographic, but try not to make it only an image post.
By combining different types of content forms together in one piece you’ll crush the evergreen criteria for ranking.
Video can be useful, too. It can just be in a slideshow format, as long as it is useful and brief. Longer tutorial videos should be able to be summarized for easier sharing.
Make sure all of your visual content is branded and that your posts incorporate your voice to make it stand out. Also, speaking of voices, you should consider creating podcasts or audio tutorials that can be easily accessed on streaming services. Why put all that effort into making a video for evergreen content and miss the opportunity to reach a wider audience?
People love to listen to guides, advice, and interesting stories on their phone or on their drive to work.
Tip: A great way to combine multiple content types when using video is simply to covert your video to text and publish both together as a blog post. This gives you the video and contextual advantage for ranking in multiple search categories.
How To Articles:
What you will often find is that evergreen content tends to be in the “how to” column of content formats with sites like:
about.com
wikipedia.com
answers.com
imdb.com
ehow.com
…being the top producers of evergreen content across a broad spectrum of topics. This is important, because it tells us that evergreen content typically answers an introductory level question for a specific niche or topic. To help clarify this with examples:
How do I edit the home page on BigCommerce?
What should I know before migrating my Ecommerce website to a new platform?
How do I convert my existing website to mobile friendly responsive design?
How to identify sources of high quality backlinks?
Summary
If it’s your goal to start writing evergreen content for your blog, then remember these steps; write for your readers, narrow your topic and make sure that your content is comprehensive but not too technical.
Additional Resources:
How I Improved My Content Marketing In Just One Day
Your Guide to Creating Content for SEO
How to Measure ROI for Content Marketing
How to Produce High Quality Content for Your Blog
0 notes
Text
Free Wordpress Web Hosting Service In 2019
If it comes to making a site, without a doubt the main thing on the record probably getting an encouraging association. Regardless, is definitely not an essential work, particularly when there are a lot of organization suppliers out there that outfit you with the substitute. When there are most likely heaps of paid and premium activities that every pro association's supply, what might it be prudent for us to light up you that you can start your very own site on zero cost?
Well in case it was just a primer version, by then you will find the discussion of this range of time you can discover the organizations free of expense. Be that as it may, since these organizations are FREE, there is essentially no time limit! Genuinely, you heard that right, you may altogether appreciate those encouraging choices gave that you need before you become dynamic features for your site!

The expense of preparing and keeping up a site can assemble snappy, so picking the best free site encouraging provider for your needs may help decline costs. Regardless, be mindful, as we found that from a once-over of various free site providers we collected, only a few them - not actually a half, by the day's end really passed on the thing.
1. WordPress.com
WordPress.com is the most perfectly awesome complimentary WordPress arrange that it's possible to discover. You don't have to get any spread or programming hostings or potentially manage a web server. Subsequently, making it the perfect spot to start if you are a side interest writer.

Key Features:
* Incorporates premium plans isolated from the totally free assistance.
* Several subjects to peruse.
* Portable all around arranged site improvement.
* Portable and Desktop applications are open.
* Worked in social offering to finish examination.
* Website improvement Friendly.
* Apprentice is useful with assistants.
Pros:
* It isn't critical to get some item or installer.
* Free for up to 3 GB plate space.
* Programmed updates and copies.
* Innumerable characterize subjects accessible.
Cons:
* Advancement will be put individually unique free site with no getting the ideal position.
* Your site can be deleted if you misuse their Terms of Service.
* You can not build enlistment destinations.
2. 000Webhost
000webhost is a thoroughly free website page encouraging provider had and work by Hostinger. In 2015, the provider's entire database was undermined with points of interest of a normal 13.5 million records stolen. As far back as that minute, 000Webhost has completely changed yet most customers still recollect the hack this day.

There's no control board, regardless of the way that there are 3 different ways if you should need to amass a webpage: You can use the Zyro website specialist, or WordPress, or considerably exchange your very own reports.
Exactly as expected, there's emphatically no SSL confirmation, however rather surprising is that the nonattendance of subdomains, email accounts, nearby assistance during tickets (you have to encounter the social affairs).
Key Features:
* 99% Uptime accreditation gave.
* Supports PHP and MySQL with no goals.
* Huge circle space and transmission limit gave.
* A solitary Click Setup Procedure which is snappier and straightforward.
* In-developed Easy Website Builder open.
* Amicable and responsive customer support.
* Auto Installer.
* Backing for PHP and MySQL databases.
* Quick incitation without a cost.
Pros:
* Tremendous circle space and exchange speed open.
* Free and trustworthy for eternity.
* Instructional activities and counselors for help with the methods.
* Driving encouraging organization with guaranteed uptime.
Cons:
* Spam issue.
* A foreordained number of concurrent MySQL affiliations.
* Least security.
3. Freehostia
Freehostia.com was set up in year 2005 and was laboring for 13 decades today. They've one free encouraging application to present WordPress. It ought to be communicated that neverthelessit consolidates just 1 database and can't outperform a size of 10 MB.

The server speed is radiant. Function admirably. If there genuinely isn't the need of a huge amount of space to find MySQL database, by then freehostia.com could be an insightful choice.
Key Features:
* Alternative to browse cloud and shared encouraging stage.
* A solitary tick installer for basic transparency.
* Site the board gadgets included.
* Measurements to check advance.
* Clear change to premium varieties.
* throughout each and every day obliging customer support.
Pros:
* Decision of shared cloud or encouraging system.
* Clear change to dominating ventures.
* Abnormal condition of security.
* Enhanced properties for basic accessibility.
Cons:
* Restricted exchange speed and circle space.
* Limited MySQL database availability.
4. X10hosting
X10Hosting offers free WordPress encouraging using some sensational focal points with no covered prerequisites as are in the rest of the free encouraging providers.

Their free program connects with you to set two additional areas, 1 ceased territory and 3 subdomains. They supply free WordPress encouraging without any notices to start your WordPress site.
Key features:
* Circle space: 100 MB – 2500 MB.
* Promotions: No ads (flag less).
* Transfer decisions: FTP, Browser, SiteCopy.
* Bolstered Scripting: CGI, PHP, SSL, FrontPage Extensions, Perl, Python
* Others: Bandwidth limits 3,000 – 45,000 MB/month. cPanel, Fantastico
Pros:
* Improved uptime and customer support differentiated and other individuals.
* CPanel with pretty much all features and customized content makers, for instance, Softaculous.
* Unmetered transmission limit and hover space (there is FUP in video structure shows by the by ).
Cons:
* A great deal of cases of abuse, higher resource use and boycotting.
* Bolster requesting acknowledge some open way to discover an answer, since the staff burns through the greater part of the countering abuse.
* Never again Live Chat or phone support.
* Confined security.
5. AwardSpace
Another marvelous option for those that are attempting to get a free encouraging for WordPress utilizing paid organization choices to help with improving your experience is AwardSpace. AwardSpace gives four dimensions of organization to point of reference Freehostia. Organizations and options vacillate and increase as you climb each degree cost.

Key Features:
* Great assurance of circle transmission limit and space can be procured.
* Spam/contamination guaranteed web condition.
* Free website specialist with a solitary tick foundation.
* 100 percent advancement free air.
* Electronic record boss to secure even more basic exchanges.
* throughout each and every day customer support.
Pros:
* Promotion free encouraging structure open.
* Spam and contamination guaranteed sponsorship gave.
* 1 space name with 3 sub-territories.
* Scope of information exchange limit and circle space.
* Improved for unrivaled segment.
Cons:
* 30 MB purpose of control MySQL Database measure.
* Free encouraging applications are unimportant in features and power.
6. 100WebSpace
If you are planning to start online free of issue and danger, 100WebSpace is the move to make. This could empower you to set a site. Extraordinary for any site, we irrefutably prescribe this organization when starting!
The amazing thing about the encouraging is the clear reality that it fuses the multipurpose controller board guaranteeing you see all parts of it. Also, the customer sponsorship is as feasible and profitable!

Key Features:
* A solitary tick installer.
* Multilingual Control Panel is similarly maintained.
* throughout the day, consistently astonishing customer support.
* Decision to consolidate three email record is available.
* Certification 99.9% Uptime.
* Supportive site the board programming ventures.
* Broad Online Documentation.
* Extraordinary Video Tutorials support.
Pros:
* Discretionary Dedicated Ip address is moreover available.
* Site Statistics open to care for track.
* Hostile to contamination protection.
Cons:
* No totally free zone name enlistment.
* Preliminary not given.
7. CloudAccess
CloudAceess.net is your past anyway verifiably not the least appeared differently in relation to most of the other encouraging on our posting. With their organization, they get a principal CCP or Cloud Control Panel adjacent various features like Website Replicator and Program Snapshot gadget absolutely free. This just as for newcomer and Novice's advantage, anyway the site in like manner gives aggregate and free getting ready to help get moving on their encouraging organization. Get encouraging instantly!!

Key Features:
* Quick setup and begin.
* Instructional exercise and preparing open.
* CCP with App Snapshot gadgets.
* Open give encouraging organization that is versatile.
* Free getting ready and instructional activities.
* Full access to MySQL.
Pros:
* Open give encouraging organization that is versatile.
* CCP with gadgets that are dumbfounding.
* step by step copies for the good of safety.
Cons:
* Confined to sub-territories system.
* Can remove your site each time if you misuse your own ailments.
* Ought to login to CCP routinely.
Picking your site for Wordpress suitably plays a vital role in expanding your business. Choose wisely depending on your requirements.
0 notes
Text
Get Free Wordpress Hosting Service Sites
If it comes to making a site, irrefutably the primary thing on the record in all probability getting an encouraging association. Regardless, is definitely not a fundamental work, particularly when there are a lot of organization suppliers out there that outfit you with the substitute. When there are presumably heaps of paid and premium ventures that every expert association's supply, what might it be prudent for us to enlighten you that you can start your very own site on zero cost?
Well if it was just a starter version, by then you will find the discussion of this range of time you can discover the organizations free of expense. Be that as it may, since these organizations are FREE, there is essentially no time limit! Genuinely, you heard that right, you may altogether appreciate those encouraging alternatives gave that you need before you become dynamic features for your site!

The expense of preparing and keeping up a site can accumulate snappy, so picking the best free site encouraging provider for your needs may help lessening costs. Regardless, be mindful, as we found that from a once-over of various free site providers we collected, only a few them - not actually a half, by the day's end genuinely passed on the thing.
1. WordPress.com
WordPress.com is the most flawlessly awesome complimentary WordPress arrange that it's possible to discover. You don't have to get any spread or programming hostings or conceivably manage a web server. Thus, making it the perfect spot to start if you are a leisure activity writer.
Key Features:
* Incorporates premium plans isolated from the completely free assistance.
* Several subjects to peruse.
* Portable all around arranged site improvement.
* Portable and Desktop applications are open.
* Worked in social offering to finish examination.
* Website improvement Friendly.
* Apprentice is useful with assistants.
Pros:
* It isn't critical to get some item or installer.
* Free for up to 3 GB plate space.
* Programmed updates and copies.
* Innumerable arrange subjects accessible.
Cons:
* Advancement will be put without anyone else unique free site with no getting the good position.
* Your site can be deleted if you misuse their Terms of Service.
* You can not develop enlistment locales.
2. 000Webhost

000webhost is an absolutely free site page encouraging provider had and work by Hostinger. In 2015, the provider's entire database was undermined with points of interest of a normal 13.5 million records stolen. As far back as that minute, 000Webhost has completely changed yet most customers still recollect the hack this day.
There's no control board, in spite of the way that there are 3 different ways if you should need to amass a webpage: You can use the Zyro website specialist, or WordPress, or considerably exchange your own reports.
Exactly as expected, there's emphatically no SSL confirmation, yet rather shocking is that the nonattendance of subdomains, email accounts, close by assistance during tickets (you have to encounter the social affairs).
Key Features:
* 99% Uptime affirmation gave.
* Supports PHP and MySQL with no objectives.
* Huge circle space and transmission limit gave.
* A solitary Click Setup Procedure which is speedier and basic.
* In-built Easy Website Builder available.
* Amicable and responsive customer support.
* Auto Installer.
* Backing for PHP and MySQL databases.
* Quick incitation without a cost.
Pros:
* Tremendous circle space and exchange speed open.
* Free and trustworthy until the end of time.
* Instructional activities and consultants for help with the methodology.
* Driving encouraging organization with guaranteed uptime.
Cons:
* Spam issue.
* A foreordained number of concurrent MySQL affiliations.
* Least security.
3. Freehostia

Freehostia.com was set up in year 2005 and was laboring for 13 decades today. They've one free encouraging application to present WordPress. It ought to be communicated that neverthelessit consolidates just 1 database and can't outperform a size of 10 MB.
The server speed is radiant. Function admirably. If there genuinely isn't the need of a huge amount of space to find MySQL database, by then freehostia.com could be a keen choice.
Key Features:
* Alternative to browse cloud and shared encouraging stage.
* A solitary tick installer for straightforward receptiveness.
* Site the board gadgets included.
* Measurements to check advance.
* Clear change to premium varieties.
* throughout each and every day obliging customer support.
Pros:
* Decision of shared cloud or encouraging structure.
* Clear change to dominating ventures.
* Abnormal condition of security.
* Enhanced properties for straightforward accessibility.
Cons:
* Restricted exchange speed and circle space.
* Limited MySQL database openness.
4. X10hosting

X10Hosting offers free WordPress encouraging using some exceptional focal points with no covered prerequisites as are in the rest of the free encouraging providers.
Their free program connects with you to set two additional areas, 1 ceased region and 3 subdomains. They supply free WordPress encouraging without any ads to start your WordPress site.
Key features:
* Circle space: 100 MB – 2500 MB.
* Promotions: No advertisements (flag less).
* Transfer decisions: FTP, Browser, SiteCopy.
* Bolstered Scripting: CGI, PHP, SSL, FrontPage Extensions, Perl, Python
* Others: Bandwidth limits 3,000 – 45,000 MB/month. cPanel, Fantastico
Pros:
* Improved uptime and customer sponsorship differentiated and other individuals.
* CPanel with pretty much all features and customized content producers, for instance, Softaculous.
* Unmetered transmission limit and hover space (there is FUP in video structure shows by the by ).
Cons:
* A great deal of examples of abuse, higher resource use and boycotting.
* Bolster requesting acknowledge some open way to discover an answer, since the staff burns through the vast majority of the countering abuse.
* Never again Live Chat or phone support.
* Confined security.
5. AwardSpace

Another wonderful option for those that are trying to get a free encouraging for WordPress utilizing paid organization choices to help with improving your experience is AwardSpace. AwardSpace gives four dimensions of organization to point of reference Freehostia. Organizations and choices vacillate and increase as you climb each degree cost.
The Free WordPress Host Plan offers:
1 GB Disk Space
5 GB Traffic
1 Domain Hosting
3 Subdomains
1 MySQL(v.5) Database
100% NO ADS
PHP5, Perl/CGI-BIN, FTP
Joomla and WordPress Installer
1 Email(IMAP, POP3), Webmail
Email Sending (SMTP ON)
Key Features:
* Great assurance of circle transmission limit and space can be procured.
* Spam/disease guaranteed web condition.
* Free website specialist with a solitary tick foundation.
* 100 percent advancement free air.
* Electronic record boss to get even more straightforward exchanges.
* all day every day customer support.
Pros:
* Promotion free encouraging system available.
* Spam and disease guaranteed support gave.
* 1 space name with 3 sub-zones.
* Scope of information exchange limit and circle space.
* Improved for prevalent part.
Cons:
* 30 MB purpose of repression MySQL Database measure.
* Free encouraging applications are irrelevant in features and power.
6. 100WebSpace
If you are wanting to start online free of issue and peril, 100WebSpace is the move to make. This could empower you to set a site. Amazing for any site, we obviously suggest this organization when starting!

The remarkable thing about the encouraging is the clear reality that it consolidates the multipurpose controller board guaranteeing you see all parts of it. In addition, the customer support is as suitable and favorable!
Key Features:
* A solitary tick installer.
* Multilingual Control Panel is in like manner maintained.
* throughout the day, consistently astounding customer support.
* Decision to consolidate three email record is open.
* Certification 99.9% Uptime.
* Supportive site the board programming ventures.
* Broad Online Documentation.
* Extraordinary Video Tutorials support.
Pros:
* Discretionary Dedicated Ip address is furthermore open.
* Site Statistics available to take care of track.
* Hostile to disease protection.
Cons:
* No completely free zone name enlistment.
* Preliminary not gave.
7. CloudAccess

CloudAceess.net is your past anyway certainly not the least appeared differently in relation to most of the other encouraging on our posting. With their organization, they get a crucial CCP or Cloud Control Panel adjacent various features like Website Replicator and Program Snapshot gadget absolutely free. This just as for newcomer and Novice's advantage, anyway the site moreover gives aggregate and free planning to help get moving on their encouraging organization. Get encouraging instantly!!
Key Features:
* Quick setup and begin.
* Instructional exercise and preparing available.
* CCP with App Snapshot gadgets.
* Open give encouraging organization that is versatile.
* Free planning and instructional activities.
* Full access to MySQL.
Pros:
* Open give encouraging organization that is versatile.
* CCP with gadgets that are surprising.
* step by step copies for the wellbeing of safety.
Cons:
* Confined to sub-regions structure.
* Can oust your site each time in case you misuse your very own sicknesses.
* Ought to login to CCP routinely
Think About This:
Picking your encouraging site for WordPress is a basic business decision. Putting aside the push to grasp what an association offers just as what potential restrictions they have is urgent to your introduction and potential improvement.
Picking which sort of organizations that you need like information trade goals, transmission limit solicitations, and fortification choices are critical request that you wish to reply, likewise the dimension of customer organization support and up-time your WordPress encouraging firm supplies.
Picking your encouraging site for WordPress
#freehosting#webhosting#freeweb#freewebhosting#freeservice#freehostingservice#wordpress#wordpresshosting
0 notes
Text
Let Your Minis Have a Religious Experience: Stained Glass - The Miniatures of Tomorrow Method.
Hey there true believers, today I’ve got the long promised tutorial on how to create your own stained glass for diorama & display. This method, creates a very true to life effect, that while not as fast as printing on transparencies, replicates both the texture and actual principle of stained glass. This means that it casts a colored light like stained glass, and has the same high gloss as glass proper.

We’ll get started with supplies after the jump.
Stuff You’ll Need

ESSENTIAL BITS A bit of blister plastic, from anything with a plastic clamshell container.
A Fine Point Sharpie, or similar (black)
High Gloss Mod Podge
Tamiya Clear Paints, Red, Orange, Yellow, Green, Blue
OPTIONAL BITS
An image you want to stained glassify.
A printer
INSTRUCTIONS
First off, you’re going to want to figure out what you want to portray in stained glass. This can be a bit harder than you think, initially. You’re going to want something iconic, that won’t be too distorted by the heavy black lines of “lead” that separate the individual colored panels. For my tutorial example, I chose a fairly recognizable bit of Dark Angels iconography. The personal banner of Supreme Grand Master Azrael of the Dark Angels in Warhammer 40k.

This piece already features strong blacklines, and is broken up into very distinct blocks of color. Additionally, it has that two dimensional bas relief feel to the positioning, making it a figure ideal for a stained glass treatment. I resized the image to my needs in paint and printed it out on normal printer paper. My printer is running low on toner (as it’s more expensive to buy toner than it was the printer proper) but that didn’t really matter. Then it was a simple matter of taping a cut square of blister plastic onto the paper, over the image; and beginning to trace the outlines with the fine point Sharpie.

I ended up adding some blacklines to break up larger contiguous panels, which you wouldn’t see in stained glass. I recommend getting some photo examples and then following the rule of cool (if you think it looks cool, then it is). When you’re satisfied with tracing on this side, it’s then time to flip the plastic over and trace over your tracing on the otherside. We’re going to be repeating every step on both sides of the image, as it’s important to insure that you’ve solid coverage and the correct opacity. If you just blackline one side, the “lead” will be less than 100% opaque in some areas and diminish the effect.
With both sides blacklined, then it’s onto the next step. We’re going to paint high gloss Mod Podge over the panels themselves. If you’ve been a follower of the Miniatures of Tomorrow tutorial series for any amount of time, you’ll know that I practically drink this stuff. It has so many applications to the aspiring dioramist that I think it should be in every miniaturists toolbox. We’re applying the mod podge to bring texture and depth to the glass, so that it catches and refracts light more like actual colored glass than just a flat plastic pane. This step is essential to nailing the look, so take your time here. It’s essential to apply a thin coat to every glass panel and avoid covering the black lines. This will make them pop out against the lead and really convey that this is more than a plastic sheet with some stuff painted on it.

Below, you’ll see a clip of the shimmer in action. Note the difference in the way the light plays off of the panels with Mod Podge, VS the naked blister plastic. Quite a distinction.
youtube
With the one side done and given time to cure (it’ll be completely transparent when set), it’s time to flip it over and do it all over again. Not the least tedious task in the world, certainly, but we get the results that we work for in life, our craft included.
With both side textured and allowed to cure, it’s onto the coloring bit. You can’t use normal hobby paints for this, as they’re opaque and the whole point of the window to to catch light, so we’re going to reach for the Tamiya “Clear” series of paints.

These are both a blessing and a curse. They dry transparent and with a high gloss, staining whatever is beneath them while still allowing light through. This saves us a ton of hassle in mixing inks and mediums, and allows us consistent coverage and color, throughout the project. On the flip side, they’re a damned nightmare. They don’t play well with paint mediums and additives, nor do they mix well with other paints (themselves included). They dry into a sticky gelatinous mess very rapidly, but take several hours to cure to the touch. This means you have a very short window to remove or tinker with the paint, but hours to ruin the effect of leave a perfectly defined fingerprint in your glass. This is exacerbated by the fact that we have to color both sides of the glass to get a convincing effect, as just one side will be blotchy and inconsistent. While stained glass does generally have some variation in the color intensity within a panel, it definitely doesn’t have any clear patches in it. The extra effort goes towards eliminating that issue. At any rate, this step is pretty much paint by numbers. Color in the panels with the color you find appropriate, flip and repeat.
THE RESULTS
Now for the final product. This example is MUCH larger than the pieces I’ve done previously, and would represent a massive stained glass piece on the 28mm scale. Even with this bit of grandiosity, the effect is still convincing.


Now it’s just a simple matter of cutting it out of the surrounding plastic, and placing it in your scene. I hope you folks enjoy this tutorial in my neverending series to make you a better craftsperson. As always, feel free to send questions, comments and commission inquiries to [email protected]. Keep your bristles damp! Will
125 notes
·
View notes
Text
Week 6: creating a 2d photoshop rendering
In this week’s tutorial, we learned how to use photoshop to render an image of a hairdryer. As this is the first time I've ever used photoshop, I was really confused at every step of the instructions we were given, and the instructions and pictures were based on a much older version of photoshop, at times it was quite confusing. Watching some tutorials and googling, as well as asking for some tips helped push past these difficulties and I was able to complete the task given to some extent.
I had a lot of trouble with the lighting aspect, as it all had to be done manually and I had no previous artistic inclination as to how lighting/reflection works. After studying the pictures for some time and then using the brush tool as the instructions listed, I was pleasantly surprised to see different finishes and reflections being able to be replicated with just different shading methods. I also got stuck on the whole interface usage with the myriad of masks and layers, as it was very perplexing as to where to add which paths to which layers, and which setting affected which part etc. Luckily as each of the segments of the hairdryer was in individual groups as well as the background and file layers, if I made a mistake (of which I made multiple) it did not affect the rest and I could more or less easily recover it and fix the problem.
It was quite fun at times to work through this, but I have a nagging feeling that some of the steps could be operated differently through various functions to obtain a better/simpler result, but my knowledge of photoshop is pretty much nigh zero, so ill stick to what the instructions and tutorials said.
All throughout the process of rendering the image, I found some things didn't look that exact or clean as it should've been. So if you look slightly closer, you can see multiple lines that overlap and colours which are distorted. I wasn't sure how to fix them as I thought the instructions said to do some parts quickly and then we would be able to fix them later on, but either I missed the fixing part at the end or it wasn't there, so it turned out kinda funny.
One thing I really wished I knew how to do, was how to bend the text with the product’s name and brand, as the casing was curved. I assumed the text would be printed on but would appear curved in real life, but I couldn't find the tool to curve the edges of the text to give the impression it wasn't just written on, but actually printed to the curve of the hairdryer casing.
All in all, opening photoshop for the first time and being asked to do this hairdryer rendering was a lot scarier than I thought, but it was a good experience which will hopefully set me up well for the upcoming rendering assignment.


4 notes
·
View notes
Text
Best ASP.NET Hosting – Your Windows To The Internet
ASP.NET internet hosting is simple to make make the most of of however no much less extraordinarily environment friendly. That is succesful of perchance expose you learn how to assemble a extraordinarily environment friendly dynamic net mumble or web-based principally totally principally utility. Even though not as simple to get as simple Linux internet hosting, there are restful many mountainous suppliers providing the best ASP.NET internet hosting.
We evaluated tempo, effectivity, reliability, capabilities, and pricing – to take best the best there may maybe be.
So when you’re taking a stare to flee your net mumble or app on ASP.NET, take a stare at what we came upon.
The Best ASP.NET Website hosting Firms
Moral ASP.NET internet hosting will win your venture hasty and steady. And in addition you if truth be instructed should not should make the most of a spacious part of your price range on it.
So we picked hasty and legit suppliers providing the best charge. Listed below are the 6 best ASP.NET internet hosting suppliers:
Liquid Internet – the best ASP.NET internet hosting.
InterServer – versatile and hasty ASP.NET internet hosting.
HostGator – smart internet hosting for ASP.NET.
Hostinger – the best high charge ASP.NET internet hosting.
GoDaddy – legit and fully-featured internet hosting.
Hostwinds – extraordinarily scalable ASP.NET internet hosting.
So what attain they provide?
1. Liquid Internet – the Best Managed ASP.NET Website hosting on VPS
Uptime
100%
Response time
402ms
Hold from
$74/mo
Focus on with mumble
Liquid Internet gives educated ASP.NET internet hosting on its totally managed VPS servers. The supplier makes a speciality of high-level effectivity, safety, and availability. It additionally gives a great deal of customization methods to match the needs of all professionals.
You may maybe maybe additionally choose from a pair of ASP.NET variations, MSSQL Server methods, and even regulate panels. All of which shall be professionally managed by the 24/7 give a improve to group.
Choosing Liquid Internet in your ASP.NET venture, you’ll be able to even win high charge CDN, DDoS safety, and 100% community and vitality uptime ensures. So when you may maybe maybe most probably most probably be looking for essentially the most legit and steady host, Liquid Internet is the one.
The pricing for Liquid Internet managed VPS packages originate up at $74/mo when you pay yearly. This plan will get you 4GB RAM, 100GB disk home, and 10TB bandwidth. That you just simply may even be in a location to retain watch over your fantasy for the person-grand Plesk Onyx regulate panel.
And for when your venture grows, you may maybe want sufficient mumble to scale – $169/mo will win you 16GB RAM, 200GB disk home, and 10TB bandwidth.
So does Liquid Internet effectivity match the expectations?
Liquid Internet Effectivity Outcomes
Liquid Internet is our excessive ASP.NET internet hosting supplier for promising and delivering high-level corporations and merchandise alongside aspect the best server effectivity. It averages at 291ms response time with essentially the most response time by no means peaking above 400ms. This reveals mountainous server stability even when the site site visitors will improve.
The supplier additionally has a 100% uptime and vitality assure. Pondering that Home windows servers require rebooting in painting to put in updates, that is a really intrepid assertion.
What’s spectacular, Liquid Internet manages to convey. It has not lengthy gone down correct in the course of the complete time we had been testing its servers.
So combine high charge managed corporations and merchandise, extraordinarily legit effectivity, and ease of make the most of. This gives you the best ASP.NET internet hosting supplier throughout the market lawful now.
Even though not low-fee, Liquid Internet is the quickest and most legit ASP.NET supplier on our listing. It combines spectacular effectivity and high charge managed platform capabilities to supply the best internet hosting ambiance in your venture.
2. InterServer – Low cost ASP.NET Website hosting With out Contracts
Uptime
100%
Response time
179ms
Hold from
$4/mo
Focus on with mumble
InterServer is the best price range choice to host ASP.NET capabilities and websites. With right one plan starting at $4/mo when you pay for Three years upfront, you may maybe maybe most probably additionally host as a lot as 25 initiatives. InterServer does not limit storage, bandwidth, or emails.
To win the deal even additional attention-grabbing, you are going to pay month-to-month. It’s mountainous for temporary size of time initiatives or finding out ASP.NET.
Nevertheless even with very unbiased and helpful pricing, InterServer manages to convey mountainous effectivity. The supplier makes use of best 50% of server means. This method, your venture can safe fairly a great deal of home to develop with out affected by overcrowded servers and sad effectivity.
The supplier additionally entails different worthwhile capabilities for tempo and safety. That is weekly backups, caching, Cloudflare CDN, and tempo optimization.
To excessive it off, InterServer has unquestionably considered one of many most educated give a improve to teams working 24/7. You doubtlessly can contact them for recommendation or any topic you may maybe maybe most probably stumble upon.
So now let’s check out if InterServer is extraordinarily environment friendly sufficient in your venture.
InterServer Effectivity Outcomes
InterServer takes a bunch of measures to make lunge legit server effectivity. Even though for the sake of testing the naked minimal, we turned the CDN and caching off. It confirmed us the top quality of InterServer effectivity which was reasonably spectacular. The supplier averages at 426ms response time. And whereas there had been numerous increased peaks, it didn’t attain 1s designate.
This method you may maybe maybe most probably additionally query numerous cases higher outcomes with the entire effectivity corporations and merchandise turned on.
InterServer has a passe 99.9% uptime assure however it fully outperforms its ensures. For the entire size of monitoring InterServer, it hasn’t lengthy gone down even for a minute, sustaining uptime at 100%.
Even though InterServer just isn’t the quickest supplier, its effectivity is restful spectacular. Not best that, however it fully’s additionally unquestionably considered one of many most fee-efficient hosts offering high charge ASP.NET corporations and merchandise.
InterServer is the best ASP.NET internet hosting supplier providing smart internet hosting. It makes a speciality of delivering extreme charge and effectivity packages each for lengthy and momentary initiatives.
3. HostGator – the Best Low cost Beginner-Glorious ASP.NET Website hosting
Uptime
100.00%
Response time
2,034ms
Hold from
$4.76/mo
Focus on with mumble
HostGator has the best smart and newbie-grand Home windows internet hosting choice kind for ASP.NET apps and websites. The supplier makes use of essentially the most trendy Plesk regulate panel, in command that beginner clients can with out issues handle their internet hosting accounts.
It additionally entails instantaneous net mumble setup, a great deal of tutorials, and step-by-step out there 24/7 buyer give a improve to able to reply to your complete questions.
Choosing any package, you may maybe maybe most probably additionally make make the most of of a pair of ASP.NET variations: ASP.NET 2.0, 3.5, 4.0, and 4.5. HostGator additionally installs your wished modules completely free, making it a unprejudiced right answer for finding out or testing your distinctive packages.
And what makes HostGator in truth mountainous is the pricing.
HostGator has best 2 plans. The Interior most plan fees $4.76/mo and already entails limitless disk home and bandwidth. Then once more, or not it’s restricted to right one net mumble.
For as a lot as 5 web websites, you may maybe maybe most probably additionally choose the Enterprise plan for $14.36/mo. It entails limitless information as successfully as sure SSL and free devoted IP.
So does the effectivity retain?
HostGator Effectivity Outcomes
HostGator gives steady and legit effectivity. It averages at 386ms response time with essentially the most smart peak best reaching 543ms. Whereas or not it’s not the quickest effectivity, it sure is certainly considered one of many most steady ones. Even though your net web page site visitors peaks, it can additionally not replicate on effectivity.
You may maybe maybe additionally moreover win sure about HostGator’s reliability. Whereas it has best a 99.9% uptime assure, the supplier has remained up correct in the course of the complete monitoring. You may maybe maybe additionally moreover peek how legit it’s a methods throughout the keep uptime tracker throughout the supplier’s desk above.
HostGator has a grand practising ambiance for all ASP.NET inexperienced individuals. For an low-cost label, it gives legit effectivity, simple to make make the most of of regulate panel, and in addition a whole lot tutorials that can expose you learn how to originate up.
4. Hostinger – Extremely environment friendly and Scalable ASP.NET Website hosting
Uptime
100%
Response time
65ms
Hold from
$26/mo
Focus on with mumble
Hostinger gives straightforward-to-utilize, extraordinarily environment friendly, and intensely scalable ASP.NET internet hosting on its Home windows VPS servers.
With the supplier’s extraordinarily environment friendly and easy to make make the most of of VPS regulate panel, you may maybe maybe most probably additionally set up any model of ASP.NET in step with your needs.
And even with the entry plan for $26/mo, you may maybe maybe most probably additionally originate a heavy-weight on-line venture to life. Most cost-effective plan gives 2GB RAM, 50GB storage, and 4TB of bandwidth.
Additionally, the plans Hostinger gives are totally equipped – Four core servers, SSD-based principally totally principally storage, devoted IPs with IPv6, and challenge-level information backups.
So throughout the event you should scale – there may maybe be sufficient home.
The Most mighty resource-elephantine plan for $250/mo will win you 16GB RAM, 400GB disk home, and 7TB of bandwidth.
With the entire plans, you’ll be able to even win a 24/7 high charge buyer give a improve to service. So even with unmanaged servers, you win devoted give a improve to kindly of fixing any negate.
Nevertheless in case one factor does not match your needs, you may maybe maybe most probably additionally win your cash help for 30 days after steal. Having a stare on the effectivity, you’re doubtlessly to not make make the most of of it:
Hostinger Server Effectivity
Hostinger is reasonably distinctive to the Home windows internet hosting ambiance however it fully’s already higher than most of its opponents. True in the course of the monitoring, the supplier averaged at 424ms response time, however when you may maybe check out into the keep tracker above, you may maybe peek a particular end result.
The keep tracker in total data response cases even lower than 100ms.
Hostinger shall be extraordinarily legit. As you may maybe maybe most probably additionally peek, it hasn’t lengthy gone down correct in the course of the complete testing size. And with fixed Home windows updates and safety patches, that is end result.
Hostinger combines excessive-high high quality {hardware}, simple to make make the most of of regulate panel, and excessive-fee internet hosting plans to supply a unprecedented commerce answer. Everytime you may maybe maybe most probably most probably be looking for the best ASP.NET internet hosting that is educated and smart with high-level give a improve to – Hostinger is well the pause determination.
5. GoDaddy – Customizable, Extremely environment friendly, and Consumer-Oriented ASP.NET Website hosting
Uptime
100%
Response time
378ms
Hold from
$5.99/mo
Focus on with mumble
GoDaddy has all-inclusive shared ASP.NET internet hosting packages. It additionally ensures trade-leading effectivity and mountainous reliability. The supplier entails a bunch of high charge capabilities – free area for the entire internet hosting size, backups, Odin Plesk regulate panel, and instantaneous 24/7 buyer give a improve to.
In your ASP.NET internet hosting, you may maybe maybe most probably additionally make make the most of of Conventional ASP, ASP.NET AJAX, ASP.NET MVC3, and different toolkits, scripts, and frameworks.
Specializing in customizability and reliability, GoDaddy is surprisingly smart too. It has Three plans starting at $5.99/mo:
The Financial system for $5.99/mo hosts one net mumble with 100GB storage and limitless bandwidth.
The Deluxe for $7.99/mo can host limitless web websites with limitless storage,
The Remaining for $12.99/mo will encompass high charge DNS, SSL certificates, and limitless databases.
So how regarding the effectivity?
GoDaddy Effectivity Outcomes
GoDaddy’s effectivity outcomes replicate on one extraordinarily crucial ingredient about internet hosting – buyer give a improve to proactiveness. The supplier averages at 421ms response time however up besides October 12, the implications had been grand worse. We now safe contacted the give a improve to and as well they’d been in a location to help us.
After that, our net mumble was transferred to a much less crowded server and the effectivity improved hundreds.
Even with the fetch mumble change, GoDaddy managed to achieve that with no downtime. That is end result for a reasonably low-fee ASP.NET internet hosting supplier providing a 99.9% uptime assure.
GoDaddy has smart plans, legit servers, and buyer give a improve to that if truth be instructed cares about their clients. Choosing the supplier, you’ll be able to even be in a location to make make the most of of a newbie-grand regulate panel and a bunch of superior ASP.NET devices.
6. Hostwinds – Best Scalability and Legit Effectivity ASP.NET Website hosting
Uptime
100%
Response time
136ms
Hold from
$7.99/mo
Focus on with mumble
Hostwinds hosts ASP.NET web websites and apps on its extraordinarily environment friendly and intensely scalable Home windows VPS servers. The supplier makes a speciality of extreme effectivity, safety, and reliability implemeting among the many crucial best 99.9999% uptime ensures.
With the pricing starting at $7.99/mo, you may maybe win 30GB disk home, 1CPU core, 1GB RAM, and 1TB change.
The entire plans additionally encompass capabilities love server snapshots, challenge-level firewalls for safety, and free net mumble transfers.
The 24/7 give a improve to group goals to win sure that your net mumble would incessantly be out there and guarded. That entails nightly backups, 24/7 server monitoring, and subject-resolving, and redundant server networks.
Prompt scalability permits your venture to achieve as a lot as 16 CPU cores with 9TB bandwidth. So even if you originate up puny, you may maybe maybe most probably additionally win sure that Hostwinds can safe methods to scale with out a downtime.
Hostwinds Effectivity Outcomes
Hostwinds averages at 482ms response time with reasonably numerous increased peaks. Whereas the result just isn’t as spectacular as different suppliers’, or not it’s restful successfully above the commerce reasonable.
On the totally different hand, Hostwinds outperforms its uptime ensures. It has a 99.9999% uptime assure, although it hasn’t lengthy gone down correct in the course of the complete testing, sustaining uptime at 100%.
So whereas Hostwinds does not safe essentially the most spectacular tempo, it’s a methods simply legit. So when you may maybe maybe most probably most probably be looking for an low-cost managed VPS answer – the supplier has among the many crucial best offers for ASP.NET.
Hostwinds is a extraordinarily scalable and legit supplier providing 99.9999% uptime assure. Alongside smart pricing, or not it’s unquestionably considered one of many best values for managed VPS ASP.NET internet hosting.
Choosing the Best ASP.NET Website hosting
Even though there often will not be so many ASP.NET internet hosting suppliers, you restful deserve to look at out to pick out a legit one. Your complete commerce is recognized for taking some soiled pricing methods, providing non-existent uptimes ensures, and upselling hundreds.
So proper right here we now safe prepared a listing of recommendation on methods to take a legit ASP.NET internet hosting supplier in your needs.
#1 Know your internet hosting needs #2 Take a look at the pricing #Three Take a look at uptime and effectivity outcomes #Four Impress sure key capabilities are included
Let’s win into the particulars.
#1 Know Your Website hosting Wants
There are assorted types of internet hosting for assorted particular person needs alongside aspect shared, cloud, VPS, and devoted. Equally, pricing aspects are assorted.
Shared internet hosting is the price range choice for puny to medium initiatives. It gives fewer server sources, a lower stage of privateness, and essentially the most smart label. So or not it’s in total a reputation for purchasers which shall be right getting began, internet hosting personal initiatives or finding out.
Cloud internet hosting is extremely the identical to shared internet hosting however it fully shall be scaled to change into as extraordinarily environment friendly as you want it to be. It’s miles a microscopic bit bit additional pricey but entails a better stage of privateness and heaps higher scalability methods. You may maybe maybe additionally choose cloud internet hosting whether or not you may maybe maybe most probably most probably be getting began or already safe a excessive-web web page site visitors net mumble.
VPS internet hosting is a gateway to essentially the most extraordinarily environment friendly and scalable internet hosting. It allocates a apparent amount of bodily server sources rising a digital personal server. VPS requires additional technical information, is additional pricey however can host extreme quantity initiatives.
Devoted internet hosting is the costliest and superior answer probably. It gives the entire server right in your self – grand for excessive-volume excessive-web web page site visitors initiatives internet hosting a pair of web websites or web-based principally totally principally capabilities.
Shared internet hosting is the best service that comes managed as a default – internet hosting supplier takes care of the backend stuff whereas you may maybe maybe most probably additionally best point of interest on the lisp materials.
Cloud, VPS, and Devoted servers shall be each managed and unmanaged. Relying in your needs, expertise stage, and price range you may maybe maybe most probably additionally choose whichever you steal. Unmanaged service gives you grand additional customization although it requires specific technical information, in inequity to managed internet hosting.
#2 Take a look at the Pricing
Even though ASP.NET is beginning-provide and free, the Home windows servers or not it’s in total being hosted on are reasonably pricey to flee. That is why there are so few suppliers providing the service and or not it’s additional pricey.
Nevertheless not right that, the internet hosting commerce is sinful for soiled pricing methods, upsells, and renewals. So take a good check out at these before you be half of a contract:
Renewal pricing – invent not be curved on low-fee first-length of time offers and check out if it renews on the equivalent label.
Upsells – some suppliers take additional for such necessities love backups, DDoS mitigation, and different crucial capabilities. Impress sure these are included and by no means charged additional on the checkout.
Unreasonable pricing – there is no should pay for shared internet hosting over $13 when you may maybe maybe most probably additionally win VPS or Cloud for $5. Take a look at your methods.
#Three Take a look at Uptime and Effectivity Outcomes
Effectivity and uptime are wanted for each venture. There may maybe be not grand make the most of of a poorly functioning mumble that is by no means out there.
Thankfully, there are many devices lawful now to confirm how legit are the suppliers.
For exAMPle, we be acutely aware and supply keep information about suppliers’ effectivity – you may maybe maybe most probably additionally check out it in each supplier’s desk.
We take 200ms as a benchmark of the best effectivity. It’s miles in total worn by google to categorize web websites as listless or hasty.
Above 200ms is labeled as listless whereas beneath – hasty. Sadly, the commerce reasonable is throughout the point out time throughout the 500s, so suppliers changing into into 500ms are often even handed to be mountainous.
#Four Impress Certain Key Elements are Built-in
There are a number of capabilities that each net mumble wishes to win on-line, be steady, and effectivity appropriately.
Make sure these are included in your internet hosting plan:
SSL certificates for safety.
Area set up so your net mumble shall be reached.
Backups so that you simply simply may maybe maybe most probably additionally restore an internet mumble after any topic. Whereas automated backups are most well-favored, instantaneous handbook backups are worthwhile too.
Technical give a improve to – you may maybe maybe most probably additionally safe help setting up an internet mumble, fixing factors, in any other case you may maybe maybe most probably uncover numerous server-level error even before the tech group.
Best ASP.NET Website hosting FAQs
If ASP.NET internet hosting restful raises additional questions for you than it solutions, now we safe prepared solutions to essentially the most generally requested questions.
Here’s what you may maybe maybe most probably are looking to learn about ASP.NET internet hosting.
What is the Distinction Between ASP.NET and Linux Website hosting?
The predominant distinction between ASP.NET and Linux internet hosting is that ASP.NET refers to net capabilities and websites’ framework whereas Linux is a server working plan.
Folks talking about ASP.NET internet hosting in total seek advice from Home windows Server internet hosting. Whereas nowadays or not it’s probably to flee ASP.NET each on Linux and Home windows, or not it’s restful principally worn on the latter’s servers.
The predominant distinction between Home windows and Linux is that Home windows makes use of a graphic interface to flee instructions whereas Linux requires to make make the most of of the dispute line.
There are additionally variations by which net capabilities you may maybe maybe most probably additionally flee in your server, the method updates are put in, regulate panels worn, and others.
Is ASP.NET Website hosting Extra Pricey?
ASP.NET internet hosting seems to be prefer to be additional pricey from first stare. Then once more, the framework is beginning-provide and free. The pricing comes from different capabilities:
Home windows Server OS requires licensing reasonably than Linux which is free.
MSSQL databases which shall be best to make make the most of of with ASP.NET additionally require pricey licensing.
There may maybe be a particular information location required to defend up Home windows servers.
For these causes, there are fewer suppliers providing Home windows and ASP.NET internet hosting and its pricing tends to be increased.
Is There Free ASP.NET Website hosting Accessible?
Free ASP.NET internet hosting is equipped by numerous suppliers however we extraordinarily suggest heading off them.
Free net mumble internet hosting comes with a great deal of risks alongside aspect information leaks, unreliability, and sad effectivity.
The Best ASP.NET Website hosting Firms – the Verdict
Discovering a good ASP.NET internet hosting is a reasonably subtle job. Discovering the best ASP.NET internet hosting particularly for you is much more troublesome.
Thankfully, after a whole lot testing, we came upon the best suppliers throughout the market lawful now. All of them are hasty, legit, and provide capabilities that can match assorted needs and budgets.
So proper here’s what our excessive ASP.NET internet hosting suppliers are best at:
Liquid Internet is a professionally managed ASP.NET internet hosting service for commerce and educated clients. It gives high-level effectivity, high charge capabilities, and fabulous give a improve to.
InterServer is an low-cost answer that requires no contract. It gives mountainous devices to reinforce effectivity and intensely out there servers.
HostGator works on offering incessantly-available options for puny web-based principally totally principally ASP.NET apps and websites. It’s miles in total a mountainous practising floor for novices with simple to make make the most of of regulate panel.
Hostinger is a high charge ASP.NET internet hosting service engaged on VPS servers. Excessive effectivity, grand give a improve to, and intuitive regulate panel are all included throughout the package.
GoDaddy gives a bunch of devices to vitality your ASP.NET internet hosting. It additionally has unprejudiced right buyer give a improve to that actively reacts to all factors and fixes them with out lengthen.
Hostwinds is the best scalable ASP.NET internet hosting methods. It gives each smart servers to originate up and high charge excessive-vitality ones to scale.
Which one suits your needs? Half your methods with us throughout the remark allotment down beneath!
The submit Best ASP.NET Website hosting – Your Home windows To The Internet appeared first on Internet Website hosting Studies by Real Prospects and Internet Website hosting Consultants.
from WordPress https://ift.tt/31vsq8W via IFTTT
0 notes
Text
Cooking With Anime: Gluten-Free Curry feat. Mob from Mob Psycho 100!
The funny thing about cooking A LOT is that I often find that out-of-the-ordinary food preferences—like veganism, vegetarianism, and gluten intolerance—become a lot less formidable. Once you really know your way around the cooking process and you can understand the basic components of a recipe—why certain things are included, what a certain procedure is for—the haze clears, and you can more clearly see the simple steps needed to take a basic recipe to a more nuanced level. In my case, since I cook for someone who cannot have gluten, it has forced me to really learn what gluten is, how it works, and why we need it in certain recipes. In some instances, it's impossible to exactly replicate the texture gluten provides to things like breads and cakes. In other instances, however, the line isn't quite so finely drawn. And, as it turns out, it's simple (REALLY simple) to make recipes gluten-free.
So I decided to test this ideology with Japanese curry. If you've never had it before, Japanese curry is typically made with curry roux blocks—prepackaged seasoning that you can get at most Asian supermarkets. They are made up of spices, flour, and fat (like butter) that, when released into your stew base, make a rich, savory curry. The problem with Japanese curry is that it's definitely not gluten-free, meaning that if you love the unique sweet-spicy flavor, you have to make the curry roux from scratch. So I did.
It was less complicated than I thought it'd be. First, I needed to make the spice mixture. If you can pick up S&B curry seasoning at your grocery store, this will be easier. (The S&B brand is the traditional Japanese blend of curry). In my case, I made a dupe using a bunch of powdered spices. Then, the roux. You melt butter in a pan and blend it with gluten-free flour, cooking it until toasty. Add in the curry powder, garam masala, and cayenne pepper, and you've got yourself a bonafide gluten-free Japanese curry roux!
From there the steps are easy: make the stew base by sauteeing onion, garlic, and ginger. Add in the chicken, season with salt, and then add in the liquids, carrots, potatoes, and seasonings. Let cook down, and then adding the roux. Stir to bring the whole thing together, and there you have it! Adding Mob's face to the top was the natural next step. He has an easy face to replicate, and, as it turns out, is quite delicious when eaten with gluten-free curry!
Watch the video below for more step-by-step instructions!
youtube
Ingredients for Gluten-Free Japanese Curry
Curry Powder Mix
-3 1/2 tbsp ground turmeric
-1 3/4 tbsp ground coriander seeds
-1 tbsp ground cumin seeds
-1/2 tbsp ground cardamom
-1/2 tbsp ground pepper
-1 tsp ground chili powder
-1 tsp ground cloves
-1 tsp ground fennugreek
Curry Roux
-6 tbsp butter
-8 tbsp gluten-free flour
-2 tbsp curry powder mixture
-2 tbsp garam masala
-1/2 tsp cayenne pepper
Curry Stew
-2 tbsp olive oil
-1 large yellow onion
-4 cloves garlic, roughly chopped
-1 inch ginger, minced
-1 lb chicken thighs, cut into bite-sized pieces
-4 cups chicken stock
-2 large carrots, peeled and cut into bite-sized pieces
-2 russet potatoes, peeled and cut into bite-sized pieces
-1 Fuji apple, peeled
-2 tsp salt
-1 tsp honey
To Make the Gluten-Free Japanese Curry
1. Start by combining spices to make curry powder. Set aside. Then, add butter to a medium pan and let melt. Add in gluten-free flour, and stir together. Let cook until it gets toasty and brown, about twenty minutes. Then, add in two tablespoons of curry powder, garam masala, and cayenne pepper. When combined, remove from the heat and set aside.
2. Prep ingredients for the curry. Heat a large pot on medium high heat, and add in olive oil. Sautee onions for a minute, then add in garlic and ginger. Sautee until the ingredients soften, then add in the chicken. Season well with salt, and cook about 3-5 minutes until lightly browned.
3. Add in the chicken stock, and bring to a boil. Skim the scum off the top, and then add in the carrots and potatoes. Grate the apple into the mix, and add salt and honey. Stir together and simmer ~15 minutes, or until potatoes are soft and break apart easily.
4. Get a cup of freshly cooked rice, and shape into a ball. Cut out shapes for Mob's hair, eyes, nose, and mouth out of nori. Make the whites of his eyes out of cheese.
5. Assemble! Put the rice ball in the middle of your bowl, and garnish with the face. Then, add the curry around, and enjoy!
I hope you enjoyed this post! Check in next week for another recipe, and to check out more anime food recipes, visit my blog. If you have any questions or comments, leave them below! I recently got a Twitter, so you can follow me at @yumpenguinsnack if you would like, and DEFINITELY feel free to send me food requests! My Tumblr is yumpenguinsnacks.tumblr.com. Find me on Youtube for more video tutorials! Enjoy the food, and if you decide to recreate this dish, show me pics! :D
What other famous anime dishes would you like to see Emily make on COOKING WITH ANIME? Let us know in the comments!
Do you love writing? Do you love anime? If you have an idea for a features story, pitch it to Crunchyroll Features!
0 notes
Text
How to optimize your local business for voice search
Voice search is growing, a statement appearing time and time again throughout the web. It has fundamentally changed the way people search and it’s here to stay.
With a simple command, users can conduct searches for information, products, services and local businesses.
It’s such a hot topic that our Head of Search and Strategy Stuart Shaw spoke at one of the UK’s largest SEO conferences a few weeks ago to talk about the details of voice search and why it’s important for brands.
While voice isn’t likely to surpass traditional search any time soon, it has spurred us to explore how local businesses can optimize, adjust their marketing strategies and understand the potential voice search could have on their bottom lines.
The opportunity for local businesses
To get information about a local service near to us, we pull out our phones and we search for it:
‘Plumbing services near me’
‘Local pizza delivery’
‘What are the opening times for…’
‘Is so and so open today?’ etc.
In fact, a recent study by Brightlocal highlighted that 53% of people owning smart speakers such as Amazon’s Alexa & Google Home are performing searches like these for local businesses every day in the US:
Putting that in context for the UK
A recent YouGov study showed that people in the UK owning a smart speaker had doubled between Q3 2017 and Q1 2018 to 10% of the total population.
A study by radiocentre predicted that this growth could reach as high as 40% by the end of 2018.
Looking a little deeper, we could say that per household there is more than one occupant. In fact on average there’s actually 2.3 people per household, according to the most recent UK gov statistics:
Source: Office of national statistics
So, if the 40% of UK households prediction is correct, that is potentially 11 million households exposing voice search content to 25 million people in the UK.
Who’s leading the smart speaker market?
Three-quarters of the market share in the UK in Q1 2018 was taken up by Amazon’s Alexa. This, of course, will change but right now this is where the biggest opportunity lies for local businesses optimizing for smart speakers in the UK:
Source: Office of national statistics
Although voice search is still in a stage of infancy, and we have only talked about smart speakers, it’s clear to see just how relevant this technology is to brick and mortar businesses.
And, it’s constantly evolving…
Here’s a timeline from Stuart’s presentation, highlighting significant changes in voice search, and it’s becoming increasingly accessible for more and more people to conduct a voice search every day:
3 Biggest steps to optimize your local business for voice search
1. Take ownership of your digital footprint
Although voice assistants seem all-knowing, they rely heavily on information they can find around the web about your business.
A big part of optimizing for local SEO is ‘citations’ which are online references to your business name, address and phone number (NAP).
Voice assistants use these citations from trusted sources to provide information to users that are conducting local search queries.
So, where should I cite my business?
Each voice assistant relies on different and sometimes multiple data aggregators for answers to local search queries:
Siri
Search: Google
Business listings: Apple maps
Reviews: Yelp
Alexa
Search: Bing
Business listings: Yelp and more recently Yext
Reviews: Yelp
Google Assistant
Search: Google
Business listings: Google my Business
Reviews: Google my Business
Cortana
Search: Bing
Business listings: Bing
Reviews: Yelp
So, these data sources are the most important places to make sure your business is correctly cited, up-to-date and optimised:
Google My Business – Create a listing
Apple Maps – Create a listing
Bing – Create a listing
Yelp – Create a listing
2. Utilize schema markup
Schema is a type of on-page data markup that allows webmasters to provide search engines with data about their business in a more structured way.
The structured format allows search engines to understand the contents and context of web pages much easier (less algorithmic interpretation) and, subsequently, the engines can better understand the relevance of pages to particular search queries and present richer results.
Schema is only going to play a bigger part in ranking for rich results and featured snippets which are heavily used in for voice search content.
What does schema markup do?
Search engines experiment with how they display rich results all the time and by having your site marked up, you have the opportunity to be featured in new rich results.
For example, Google experimented with a ‘prominent knowledge panel card’ shown on mobile devices which displays when users conduct a branded search for the business. In the knowledge card you can see ‘place actions’ such as ‘find a table’ or ‘book an appointment’ which would direct searchers into an appropriate webpage to conduct the action.
These rich results went on to influence the structure of Google My Business which is now heavily used by local businesses. The point here is that the business websites shown in the example image below were ‘future proofed’ and optimal which qualified them for this rich result.
In other words, as Gary Illyes – web trends analyst at Google puts it:
“If you want your sites to appear in search features, implement structured data.”
The biggest benefit and ‘thing it does’ is help Google understand relevance much more fluently. Another few quotes from Gary Illyes helps explain this:
“Add structured data to your pages because, during indexing, we will be able to better understand what your site is about.”
“And don’t just think about the structured data that we documented on developers.google.com. Think about any schema.org schema that you could use on your pages. It will help us understand your pages better, and indirectly… it leads to better ranks.”
Why it’s important for local businesses
Schema is a tool which search engines and subsequently voice assistants are using to paint a clearer picture of a business website’s central topic and the services the site can offer users.
With structured data present, it is much more likely that your business (if relevant) will be identified as a good candidate for answering local voice search queries.
Using local business schema will:
Future-proof your website for richer search features (which voice search content is heavily influenced by)
Reinforce your online digital footprint
Bolster relevancy signals & geographic accuracy
Help drive more conversions both online and offline
Indirectly help your website rank better (important for voice)
So how do you take control?
There are hundreds of schema types which can be utilised for hundreds of business and content types.
There are also multiple ways of marking up schema in your page source code. By far the easiest is using JSON-LD. Using the example from above the marked up code looks something like this:
The best way to get your code ready is to go to SchemaApp.com, follow the instructions or use this tutorial and locate the schema types that are most relevant to you and your business.
Types of local business data that can be marked up:
Business name
Address
Phone number
Main email address
Business opening hours
Geo-location information (latitude and longitude)
Reviews
Company logo
Business description
Social profile links
Site name
Bear in mind there are guidelines for usage summarized below:
‘Data must not deceive or mislead experience for search users’
‘Use only the most specific types and property names defined by schema.org’
‘Marked-up content must be visible on the page where the script is added’
See Google’s policies for structured data for more information.
Once you’ve gone through SchemaApp, copy and paste the output code into relevant pages before your closing </head> tag or, if it’s content specific schema (such as the review rating above), paste the code before the closing </body> tag in the HTML of your page.
Finally, check your mark up with this structured data testing tool which will highlight any errors once implemented.
Note: Avoid using Google Tag Manager for this markup, apply the code natively where possible.
3. Produce content relevant to voice search needs
There are great ways of optimizing specifically for voice search using your on-site content.
The simplest is to explore the realm of user intent and uncover the types of questions people may want answering, when it comes to your business.
That doesn’t mean you need to create 1000s of pages that are optimized specifically for voice search terms. Instead, search engines such as Google pulls answers to voice queries directly from page content, even if it is a snippet that makes up a small section of the content.
Work long tail queries into long-form content
Conduct some long tail keyword research and look for questions people ask about your local business and work them into your content, where it is relevant to do so. I highly recommend Answer the Public to scale your efforts here.
Here’s an example of what I mean.
This is a query I searched recently that could be relevant to any local business:
‘Does tesco take american express?’
Here’s what was shown at the top in a featured snippet (the content that will be read out if conducting a voice search with Google Home):
And here’s the content that Google has pulled out from halfway down the page from choose.co.uk:
FAQ pages can be perfect for voice search
Written correctly, an FAQ page can serve voice search queries really effectively and if you struggle to work in your long tail optimisation into relevant pages, an FAQ page is a great way to get around it:
People use voice search conversationally, which you can naturally replicate on an FAQ page without the content appearing out of place
It appeals to long tail voice & traditional searches which widen your reach
Voice search often seeks concise information, under 30 words, which an FAQ page can clearly communicate
Creating a dedicated page specifically with this key information in mind could help with higher placement in SERPs for voice searches, which is vital for capturing that first click/interaction
Conclusion
However, you look at SEO, voice is the future and it’s growing exponentially and it’s being integrated into more and more of our everyday tech. Local business marketers should be making specific efforts to capitalize on voice search to maximize their online and offline conversion.
The caveat here is not to let your standard SEO practice fall behind. Having a fully mobile responsive website, fast site speed and good quality local backlinks, among many other optimizations, are still, and will remain, vital for ranking in local search and will greatly impact your voice search efforts.
Get a deeper dive to voice search or get help with your voice search strategy.
The post How to optimize your local business for voice search appeared first on Search Engine Watch.
source https://searchenginewatch.com/2018/11/20/optimize-local-business-voice-search/ from Rising Phoenix SEO http://risingphoenixseo.blogspot.com/2018/11/how-to-optimize-your-local-business-for.html
0 notes
Text
How to optimize your local business for voice search
Voice search is growing, a statement appearing time and time again throughout the web. It has fundamentally changed the way people search and it’s here to stay.
With a simple command, users can conduct searches for information, products, services and local businesses.
It’s such a hot topic that our Head of Search and Strategy Stuart Shaw spoke at one of the UK’s largest SEO conferences a few weeks ago to talk about the details of voice search and why it’s important for brands.
While voice isn’t likely to surpass traditional search any time soon, it has spurred us to explore how local businesses can optimize, adjust their marketing strategies and understand the potential voice search could have on their bottom lines.
The opportunity for local businesses
To get information about a local service near to us, we pull out our phones and we search for it:
‘Plumbing services near me’
‘Local pizza delivery’
‘What are the opening times for…’
‘Is so and so open today?’ etc.
In fact, a recent study by Brightlocal highlighted that 53% of people owning smart speakers such as Amazon’s Alexa & Google Home are performing searches like these for local businesses every day in the US:
Putting that in context for the UK
A recent YouGov study showed that people in the UK owning a smart speaker had doubled between Q3 2017 and Q1 2018 to 10% of the total population.
A study by radiocentre predicted that this growth could reach as high as 40% by the end of 2018.
Looking a little deeper, we could say that per household there is more than one occupant. In fact on average there’s actually 2.3 people per household, according to the most recent UK gov statistics:
Source: Office of national statistics
So, if the 40% of UK households prediction is correct, that is potentially 11 million households exposing voice search content to 25 million people in the UK.
Who’s leading the smart speaker market?
Three-quarters of the market share in the UK in Q1 2018 was taken up by Amazon’s Alexa. This, of course, will change but right now this is where the biggest opportunity lies for local businesses optimizing for smart speakers in the UK:
Source: Office of national statistics
Although voice search is still in a stage of infancy, and we have only talked about smart speakers, it’s clear to see just how relevant this technology is to brick and mortar businesses.
And, it’s constantly evolving…
Here’s a timeline from Stuart’s presentation, highlighting significant changes in voice search, and it’s becoming increasingly accessible for more and more people to conduct a voice search every day:
3 Biggest steps to optimize your local business for voice search
1. Take ownership of your digital footprint
Although voice assistants seem all-knowing, they rely heavily on information they can find around the web about your business.
A big part of optimizing for local SEO is ‘citations’ which are online references to your business name, address and phone number (NAP).
Voice assistants use these citations from trusted sources to provide information to users that are conducting local search queries.
So, where should I cite my business?
Each voice assistant relies on different and sometimes multiple data aggregators for answers to local search queries:
Siri
Search: Google
Business listings: Apple maps
Reviews: Yelp
Alexa
Search: Bing
Business listings: Yelp and more recently Yext
Reviews: Yelp
Google Assistant
Search: Google
Business listings: Google my Business
Reviews: Google my Business
Cortana
Search: Bing
Business listings: Bing
Reviews: Yelp
So, these data sources are the most important places to make sure your business is correctly cited, up-to-date and optimised:
Google My Business – Create a listing
Apple Maps – Create a listing
Bing – Create a listing
Yelp – Create a listing
2. Utilize schema markup
Schema is a type of on-page data markup that allows webmasters to provide search engines with data about their business in a more structured way.
The structured format allows search engines to understand the contents and context of web pages much easier (less algorithmic interpretation) and, subsequently, the engines can better understand the relevance of pages to particular search queries and present richer results.
Schema is only going to play a bigger part in ranking for rich results and featured snippets which are heavily used in for voice search content.
What does schema markup do?
Search engines experiment with how they display rich results all the time and by having your site marked up, you have the opportunity to be featured in new rich results.
For example, Google experimented with a ‘prominent knowledge panel card’ shown on mobile devices which displays when users conduct a branded search for the business. In the knowledge card you can see ‘place actions’ such as ‘find a table’ or ‘book an appointment’ which would direct searchers into an appropriate webpage to conduct the action.
These rich results went on to influence the structure of Google My Business which is now heavily used by local businesses. The point here is that the business websites shown in the example image below were ‘future proofed’ and optimal which qualified them for this rich result.
In other words, as Gary Illyes – web trends analyst at Google puts it:
“If you want your sites to appear in search features, implement structured data.”
The biggest benefit and ‘thing it does’ is help Google understand relevance much more fluently. Another few quotes from Gary Illyes helps explain this:
“Add structured data to your pages because, during indexing, we will be able to better understand what your site is about.”
“And don’t just think about the structured data that we documented on developers.google.com. Think about any schema.org schema that you could use on your pages. It will help us understand your pages better, and indirectly… it leads to better ranks.”
Why it’s important for local businesses
Schema is a tool which search engines and subsequently voice assistants are using to paint a clearer picture of a business website’s central topic and the services the site can offer users.
With structured data present, it is much more likely that your business (if relevant) will be identified as a good candidate for answering local voice search queries.
Using local business schema will:
Future-proof your website for richer search features (which voice search content is heavily influenced by)
Reinforce your online digital footprint
Bolster relevancy signals & geographic accuracy
Help drive more conversions both online and offline
Indirectly help your website rank better (important for voice)
So how do you take control?
There are hundreds of schema types which can be utilised for hundreds of business and content types.
There are also multiple ways of marking up schema in your page source code. By far the easiest is using JSON-LD. Using the example from above the marked up code looks something like this:
The best way to get your code ready is to go to SchemaApp.com, follow the instructions or use this tutorial and locate the schema types that are most relevant to you and your business.
Types of local business data that can be marked up:
Business name
Address
Phone number
Main email address
Business opening hours
Geo-location information (latitude and longitude)
Reviews
Company logo
Business description
Social profile links
Site name
Bear in mind there are guidelines for usage summarized below:
‘Data must not deceive or mislead experience for search users’
‘Use only the most specific types and property names defined by schema.org’
‘Marked-up content must be visible on the page where the script is added’
See Google’s policies for structured data for more information.
Once you’ve gone through SchemaApp, copy and paste the output code into relevant pages before your closing </head> tag or, if it’s content specific schema (such as the review rating above), paste the code before the closing </body> tag in the HTML of your page.
Finally, check your mark up with this structured data testing tool which will highlight any errors once implemented.
Note: Avoid using Google Tag Manager for this markup, apply the code natively where possible.
3. Produce content relevant to voice search needs
There are great ways of optimizing specifically for voice search using your on-site content.
The simplest is to explore the realm of user intent and uncover the types of questions people may want answering, when it comes to your business.
That doesn’t mean you need to create 1000s of pages that are optimized specifically for voice search terms. Instead, search engines such as Google pulls answers to voice queries directly from page content, even if it is a snippet that makes up a small section of the content.
Work long tail queries into long-form content
Conduct some long tail keyword research and look for questions people ask about your local business and work them into your content, where it is relevant to do so. I highly recommend Answer the Public to scale your efforts here.
Here’s an example of what I mean.
This is a query I searched recently that could be relevant to any local business:
‘Does tesco take american express?’
Here’s what was shown at the top in a featured snippet (the content that will be read out if conducting a voice search with Google Home):
And here’s the content that Google has pulled out from halfway down the page from choose.co.uk:
FAQ pages can be perfect for voice search
Written correctly, an FAQ page can serve voice search queries really effectively and if you struggle to work in your long tail optimisation into relevant pages, an FAQ page is a great way to get around it:
People use voice search conversationally, which you can naturally replicate on an FAQ page without the content appearing out of place
It appeals to long tail voice & traditional searches which widen your reach
Voice search often seeks concise information, under 30 words, which an FAQ page can clearly communicate
Creating a dedicated page specifically with this key information in mind could help with higher placement in SERPs for voice searches, which is vital for capturing that first click/interaction
Conclusion
However, you look at SEO, voice is the future and it’s growing exponentially and it’s being integrated into more and more of our everyday tech. Local business marketers should be making specific efforts to capitalize on voice search to maximize their online and offline conversion.
The caveat here is not to let your standard SEO practice fall behind. Having a fully mobile responsive website, fast site speed and good quality local backlinks, among many other optimizations, are still, and will remain, vital for ranking in local search and will greatly impact your voice search efforts.
Get a deeper dive to voice search or get help with your voice search strategy.
The post How to optimize your local business for voice search appeared first on Search Engine Watch.
from Digtal Marketing News https://searchenginewatch.com/2018/11/20/optimize-local-business-voice-search/
0 notes