#java tostring() method
Explore tagged Tumblr posts
Visit Tumblr Blog
Explore Tumblr blogs with no restrictions, modern design and the best experience.
Last Seen Tumblr Blogs


Fun Fact
In Q3 of 2020, 31% of US users access the Tumblr app daily.
Text
Understanding the Java toString() Method: Advantages and Disadvantages
Understanding the Java toString() Method In Java, the toString() method is an essential part of the Object class, the superclass of all Java classes. This method returns a string representation of the object, which can be useful for debugging, logging, and displaying object information in a human-readable format. In this blog post, we will explore the advantages and disadvantages of the Java toString() Method.
The Java toString() method is used to convert an object into a human-readable string representation.
Advantages:
✅ Easier Debugging – Helps print object details for debugging. ✅ Improves Readability – Provides meaningful object representation. ✅ Customizable – Can be overridden to display relevant object data.
Disadvantages:
❌ Default Output May Be Unreadable – If not overridden, it prints the object’s hashcode. ❌ Performance Overhead – Overriding toString() for complex objects may affect performance. ❌ Security Concerns – May expose sensitive data if not implemented carefully.
Conclusion: Overriding toString() makes debugging easier but should be used thoughtfully to avoid security risks.
#java tostring method#java tostring method override#java tostring() method#java tostring() method with example#method#object tostring() method#override tostring() method in java#the tostring() method#tostring method#tostring method in java#tostring method java#tostring()#tostring() method#tostring() method in java#tostring() method in java with an example#tostring() method in javascript#tostring() method java in tamil
0 notes
Text
Lab Assignment 03, Object-Oriented Programming, CSE 271
Java Class, Equals Method, toString Method, Javadoc Comments In this lab, you will practice how to create a class and define its methods. Create a project in Eclipse named Lab_03. You are going to design two classes in this project. You must make Javadoc style comments for all methods and classes including parameter and return description. Follow the commenting style discussed in the lecture. •…
0 notes
Text
Elevate Your Craft: Mastering Kotlin Programming in 2025
Did you know that companies adopting Kotlin report up to a 30% reduction in codebase size and significant gains in developer productivity?
Are you ready to benefit? Whether you are just entering the world of coding, or a veteran trying to evolve your skill set, Kotlin could be exactly what you have been looking for—especially if you aim to work in an Android app development company that prioritizes efficiency and modern programming solutions.
This blog post offers a robust guide that focuses on optimizing Kotlin programming. It highlights core concepts, avoiding typical mistakes, tools of trade and guidance from field leaders. Let us help you confidently maneuver the landscape in 2025.
Grasping Essential Kotlin Concepts
Comprehending the building blocks is key to mastering Kotlin programming. Variables, data classes and null safety features represent just a few essential pillars you must possess. Without proper understanding of this essential syntax and features, you will create a shaky foundation with inefficient work flow.
Variables: Unlike other popular coding languages such as Java, Kotlin features 'val' and 'var.' Val marks an immutable, read-only variable, and 'var' marks a mutable variable whose content may be changed at will. Properly grasping these fundamental qualities contributes to writing stable, well structured, maintainable code.
Data Classes: Kotlin excels through its concept of data classes; structured around the idea of concisely carrying data. The compiler, for you, creates functions that provide 'equals', 'hashCode', 'toString' making boiler-plate less intense. The result simplifies object modeling duties considerably.
Null Safety: One prevalent problem in development appears as "NullPointerExceptions." But fear not! Kotlin aims for resolution: at the language level the nulls get handled directly to increase application reliability! You might also benefit from its nullable type declaration; type marking might have a potential lack.
Navigating Common Pitfalls
Everyone makes mistakes during their work no matter if it's a job or school work, here are the potential problems that might come up when using Kotlin. Even with a modern programming language as elegant as Kotlin, it’s easy to stumble. Being aware of common pitfalls enables more effective problem solving capabilities along your coding adventures.
1. Overusing `!!` Operator: The not-null assertion operator (`!!`) forcibly unwraps a nullable type; use only when you are absolutely positive that your variable must hold value. A crash event results for you the programmer for sure, anytime a nullable expression occurs unexpectedly during process running as opposed by when you're testing, such exceptions turn against user interface performance issues from happening!
2. Neglecting Extension Functions: Many miss Kotlin's extensibility feature as something special beyond their immediate object; extension function benefits help streamline legacy classes using add-ons; avoiding redundancy can promote efficient code arrangement easily managed between users.
3. Ignoring Code Routines: Kotlin harnesses asynchronous concurrency without deeply entangled callback patterns utilizing light threaded concurrency that results effectively within high loads handled gently; avoid old, slow threads entirely utilizing code routine capabilities whenever your use scenario requires asynchronous activity processing patterns like when dealing user response in background, thereby sustaining system application interface reactivity despite simultaneous loads by processes or tasks!
Building a Kotlin Class Method: A Step-by-Step Guide
Creating a new class method (or function) in Kotlin is foundational to structuring your code. Consider this example involving an `Account` class and a `deposit` method. Step 1: Defining the Class First, define the `Account` class with any necessary properties: ```kotlin class Account(var balance: Double) { // Class content goes here } ``` Step 2: Creating the `deposit` Method Next, create the `deposit` method within the `Account` class. This method will take an `amount` parameter of type `Double` and add it to the account's balance. ```kotlin class Account(var balance: Double) { fun deposit(amount: Double) { balance += amount println("Deposited: $amount. New balance: $balance") } } ``` Step 3: Using the `deposit` Method Now, create an instance of the `Account` class and call the `deposit` method: ```kotlin fun main() { val myAccount = Account(100.0) myAccount.deposit(50.0) } ``` Output: ``` Deposited: 50.0. New balance: 150.0 ``` Explanation 1. Class Definition: `class Account(var balance: Double)` declares a class named `Account` with a constructor that takes an initial `balance` as a `Double`. 2. Method Definition: `fun deposit(amount: Double) { ... }` defines a method named `deposit` within the `Account` class. This method takes a `Double` parameter `amount`. 3. Logic Inside Method: `balance += amount` adds the `amount` to the `balance`. The line `println(...)` then prints a confirmation message with the new balance. 4. Usage Example: In the `main` function, we create an instance of `Account` and call the `deposit` method on that instance.
Learn More About Full-stack developers.
Guidance and Insights From Leading Kotlin Professionals
Learning comes through diverse resources; experience through guidance benefits by Kotlin master programmers or experts from prominent businesses! Take note through perspectives described henceforth that empower abilities or approaches; become the next programming rockstar!
Maintainability: Industry recognized developers always place value on code clarity through concise readability through self documentation via naming conventions. Keep your class clear for efficient future modification or change handling within projects managed successfully.
Testing: Consider thoroughly covering software via tests constantly - specifically automated test scripts using complex logics from different use contexts; it prevents the problems! Use edge context considerations always during unit script drafting too!
Upgrading: Regularly checking Kotlin's latest updates with their distinct novel syntax abilities will benefit via optimal integration; also regularly evaluating updated integration or build assistance enhances tool functionality.
Elevating Code Quality via Pragmatic Tips
Refine the abilities and style that will facilitate exceptional Kotlin code creation from conceptual stage until post production software runs well during its complete software cycle - using techniques provided within tips which enable better outputs than average code outcomes at each step
Adopt functions using scopes from enhanced organization throughout projects – make use the `apply`, `let`, `run`, etc for minimizing unnecessary object initialization setups to sustain a clear logic around operations across files inside programs that help team programmers or individual persons managing complex coding solutions over time without experiencing chaos across functions related inside your main algorithm flow which sustains neat function blocks facilitating collaborative improvements along software updates at scheduled production targets over lifespan after release version deployment for user access within its software functionality specifications during end implementation across teams from inception until users install and integrate through program release.
Employ `Sealed Classes`: Sealed classes, which fall under advanced category functions that define strict sets; they represent limited hierarchies through value or code constraints using inheritance limitations, with predefined instances which enhance data processing predictability avoiding future cases due potential exceptions; enabling stronger algorithm constructions and better overall fault handing from conception via deployment; thus sealed structures promote both cleaner system architectures or fault prediction with ease than open ended object sets – for better solutions created for better security on run without risks due external anomalies from unanticipated issues that need remediation along project maintenance after rollout when running.
Code Example Showing Scope Functions for Refined Data Processing
```kotlin data class Person(var name: String, var age: Int? = null) fun processPerson(person: Person?): String { return person?.let { // Use let to safely operate on a non-null Person it.age?.let { age -> // Nested let to safely operate on age if it's not null "Name: ${it.name}, Age: $age" } ?: "Name: ${it.name}, Age: Not Available" // Handle case where age is null } ?: "Person is null" // Handle case where person is null } fun main() { val person1 = Person("Alice", 30) val person2 = Person("Bob") val person3: Person? = null println(processPerson(person1)) // Output: Name: Alice, Age: 30 println(processPerson(person2)) // Output: Name: Bob, Age: Not Available println(processPerson(person3)) // Output: Person is null } ```
Benefits of using scoped function let here
By carefully nesting them in such ways where potential vulnerabilities can be effectively removed which can lead less chances runtime program breaking problems;
Frequently Asked Questions
Answering queries frequently encountered, clarifies misconceptions alongside enabling broader absorptions. These answer key concepts for learners as the progress on journey using Kotlin programming.
Is it complicated to grasp this modern language?
If you're acquainted using OOP and another coding such as java or c ++ using Kotlin does provide easy seamless transition experience; new comers usually take time adopting its distinct functions versus more well known syntax abilities such as C/ Java style syntaxes or procedural script structures though the learning pace picks rapidly across stages!
Does this Kotlin programming language support code interoperability?
Certainly it works interoperatively from JVM with complete backward similarity between each class available that empowers seamless implementation between all projects existing throughout application environments especially leveraging through present-day architectures already in execution during coding shifts!
How does it help mobile-app design?
Primarily Kotlin plays dominant during development via OS through benefits by easier coding rules syntax combined via reduced code resulting fast processing and therefore enhancing productivity! Better overall features than before too!
Can software created work well enterprise structures at businesses?
Totally Kotlin becomes greatly preferable in scalable programs, applications requiring constant upkeep like e commerce services at massive enterprises needing seamless integrations across wide structures plus reliable runtime operations ensuring customer success due by advanced type protections & concurrency qualities provided!
What resources enable expertise building at beginner programmers using Kotlin language design features from basic starting point onwards?
Web tutorial sessions or dedicated platforms using instructional guidelines in books online training series from well reviewed companies facilitate skill enhancements - especially that are coupled by involved personal projects done gradually across different levels! Experiment always as practice helps !
Conclusion
This post covers major foundations relating directly with learning more or getting skills within areas relating toward enhancing usage in current technologies especially pertaining throughout ecosystem related that supports different devices with seamless connection or information retrieval - ultimately, your skills in this sphere shall expand during coding periods leading ahead so prepare via dedicated approaches through regular engagements and exploration toward making innovations relating coding overall – it will benefit eventually due effort sustained over timeline by applying the skill across more projects going to contribute positively to the growth & efficiency associated from programs built either using group member assistance and individually – to build excellence upon programming techniques continuously moving along in all related stages till completion.
0 notes
Text
Exploring Record Classes in Java: The Future of Immutable Data Structures
A record in Java is a special type of class designed specifically for holding immutable data. Introduced in Java 14 as a preview feature and made stable in Java 16, records eliminate the need for writing repetitive boilerplate code while still providing all the essential functionalities of a data model.
Key Characteristics of Java Records
Immutable by Default – Once created, the fields of a record cannot be modified.
Automatic Methods – Java automatically generates equals(), hashCode(), and toString() methods.
Compact Syntax – No need for explicit constructors and getters.
Final Fields – Fields inside a record are implicitly final, meaning they cannot be reassigned.
How to Define a Record Class in Java
Defining a record class is straightforward. You simply declare it using the record keyword instead of class.
Example: Creating a Simple Record
java

Using the Record Class
java
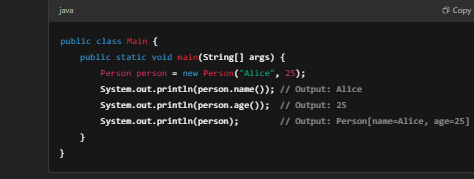
Notice how we access fields using methods like name() and age() instead of traditional getter methods (getName() and getAge()).
Comparing Records vs. Traditional Java Classes
Before records, we had to manually write constructors, getters, setters, and toString() methods for simple data structures.
Traditional Java Class (Without Records)
java
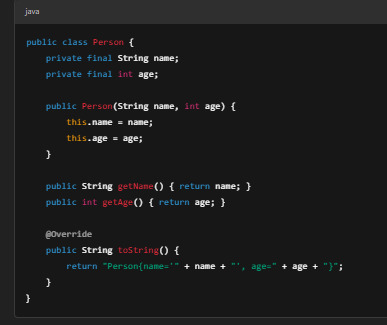
This approach requires extra lines of code and can become even more verbose when dealing with multiple fields.
With records, all of this is reduced to just one line:
java

When to Use Records?
Records are ideal for: ✔ DTOs (Data Transfer Objects) ✔ Immutable Data Representations ✔ Returning Multiple Values from a Method ✔ Reducing Boilerplate Code in Simple Models
Customizing Records: Adding Methods and Static Fields
Though records are immutable, you can still add methods and static fields for additional functionality.
Example: Adding a Custom Method
java
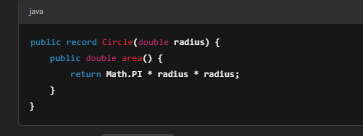
Now you can call circle.area() to calculate the area of a circle.
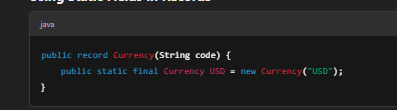
Using Static Fields in Records
java
Limitations of Java Record Classes
While records are powerful, they do have some limitations: ❌ Cannot Extend Other Classes – Records implicitly extend java.lang.Record, so they cannot inherit from any other class. ❌ Immutable Fields – Fields are final, meaning you cannot modify them after initialization. ❌ Not Suitable for Complex Objects – If your object has behavior (methods that modify state), a traditional class is better.
Conclusion: Are Java Record Classes the Future?
Record classes offer a modern, efficient, and elegant way to work with immutable data structures in Java. By removing repetitive boilerplate code, they improve code readability and maintainability.
If you’re working with data-heavy applications, DTOs, or immutable objects, adopting records is a great way to simplify your Java code while ensuring efficiency.
What’s your experience with Java records? Share your thoughts in the comments! 🚀
FAQs
1. Can I modify fields in a Java record?
No, records are immutable, meaning all fields are final and cannot be changed after object creation.
2. Are Java records faster than regular classes?
Performance-wise, records are similar to normal classes but offer better readability and maintainability due to their compact syntax.
3. Can a record extend another class?
No, records cannot extend any other class as they already extend java.lang.Record. However, they can implement interfaces.
4. How are records different from Lombok’s @Data annotation?
While Lombok’s @Data generates similar boilerplate-free code, it requires an external library. Java records, on the other hand, are built into the language.
5. What Java version supports records?
Records were introduced as a preview feature in Java 14 and became a stable feature in Java 16. For more Info : DevOps with Multi Cloud Training in KPHB
#Java#CoreJava#JavaProgramming#JavaDeveloper#LearnJava#Coding#Programming#Tech#SoftwareDevelopment#ImmutableObjects#JavaRecords#OOP#CleanCode#CodeNewbie#DevLife#BackendDevelopment#Java21#TechBlog#CodeWithMe#100DaysOfCode#CodeSnippet#ProgrammingTips#TechTrends
0 notes
Text
How to Convert Character to String in Java
In Java, converting a character (char) to a string (String) is a common operation. Java provides multiple ways to achieve this, each suitable for different use cases. This article how to convert character to string in java a character into a string efficiently.
Using Character.toString(char c)
Java provides a built-in method Character.toString(char c) that converts a character into a string.
Example: char ch = 'A'; String str = Character.toString(ch); System.out.println(str); // Output: A This method is simple and recommended for converting a single character to a string.
Using String Concatenation
You can concatenate an empty string ("") with a character to convert it into a string.
Example: char ch = 'B'; String str = "" + ch; System.out.println(str); // Output: B This approach is widely used because of its simplicity and readability.
Using String.valueOf(char c)
The String.valueOf() method is another way to convert a character to a string in Java.
Example: This approach is widely used because of its simplicity and readability.
Using String.valueOf(char c)
The String.valueOf() method is another way to convert a character to a string in Java.
Example: This approach is widely used because of its simplicity and readability.
Using String.valueOf(char c)
The String.valueOf() method is another way to convert a character to a string in Java.
Example:
Using Character Wrapper Class and toString() Method
Java allows using the Character wrapper class with the toString() method to convert a character to a string.
Example:
Character ch = 'D'; String str = ch.toString(); System.out.println(str); // Output: D This method is useful when dealing with Character objects instead of primitive char values.
Using StringBuilder or StringBuffer
If you are dealing with multiple character conversions, using StringBuilder or StringBuffer can be efficient.
Example: char ch = 'E'; StringBuilder sb = new StringBuilder(); sb.append(ch); String str = sb.toString(); System.out.println(str); // Output: E This approach is useful when working with dynamic strings that require multiple modifications.
Conclusion
Converting a character to a string in Java is straightforward and can be achieved using various methods, including:
Character.toString(char c)
String concatenation ("" + char)
String.valueOf(char c)
Character.toString()
StringBuilder or StringBuffer
0 notes
Text
Kotlin in Mobile App Development: A Modern Approach to Building Robust Android Applications
In the realm of mobile app development, Kotlin has emerged as a game-changer, particularly for Android development. Since its official adoption by Google as a first-class language for Android in 2017, Kotlin has gained widespread popularity among developers due to its concise syntax, interoperability with Java, and robust features that enhance productivity and code safety. As the demand for high-quality mobile applications continues to grow, Kotlin has positioned itself as a modern, efficient, and future-proof choice for building Android apps.
One of the key advantages of Kotlin is its interoperability with Java, which allows developers to seamlessly integrate Kotlin code into existing Java projects. This feature has been instrumental in Kotlin's rapid adoption, as it enables teams to migrate gradually without the need for a complete rewrite. Kotlin's null safety feature is another standout aspect, addressing one of the most common pitfalls in Java development—null pointer exceptions. By distinguishing between nullable and non-nullable types at the language level, Kotlin significantly reduces the risk of runtime crashes, leading to more stable and reliable applications.
Kotlin's concise syntax is another major draw for developers. Compared to Java, Kotlin requires significantly less boilerplate code, making it easier to read and maintain. Features like data classes, extension functions, and lambda expressions allow developers to achieve more with fewer lines of code. For instance, a data class in Kotlin can replace an entire Java class with getters, setters, equals(), hashCode(), and toString() methods, all in a single line. This conciseness not only speeds up development but also reduces the likelihood of errors.
The rise of Kotlin Multiplatform Mobile (KMM) has further expanded the language's reach beyond Android development. KMM allows developers to share business logic between iOS and Android apps, reducing the need for platform-specific code. While the UI layer remains native to each platform, shared modules written in Kotlin can handle tasks such as networking, data storage, and business logic. This approach not only streamlines development but also ensures consistency across platforms, making it an attractive option for teams looking to optimize their workflows.
Kotlin's integration with modern development tools and frameworks has also contributed to its success. Libraries like Ktor for networking and Room for database management are designed to work seamlessly with Kotlin, offering a more idiomatic and efficient development experience. Additionally, Kotlin's support for coroutines has revolutionized asynchronous programming in Android development. Coroutines simplify the handling of background tasks, such as network requests or database operations, by allowing developers to write asynchronous code in a sequential manner. This eliminates the complexity of callbacks and AsyncTask, making the code more readable and maintainable.
In the context of mobile app architecture, Kotlin aligns well with modern patterns such as Model-View-ViewModel (MVVM) and Model-View-Intent (MVI). These architectures promote separation of concerns, making apps easier to test and maintain. Kotlin's sealed classes and inline functions are particularly useful in implementing these patterns, enabling developers to create more expressive and type-safe code. Furthermore, Kotlin's compatibility with Jetpack Compose, Google's modern toolkit for building native UIs, has opened up new possibilities for declarative UI development, further enhancing the developer experience.
Security is a critical consideration in mobile app development, and Kotlin provides several features to help developers build secure applications. For instance, Kotlin's immutable collections and read-only properties encourage the use of immutable data structures, reducing the risk of unintended side effects. Additionally, Kotlin's support for encryption libraries and secure storage APIs ensures that sensitive data, such as user credentials and payment information, is protected. Developers can also leverage Kotlin's type-safe builders to create secure configurations for network requests and other critical operations.
The future of Kotlin in mobile app development looks promising, with ongoing advancements in the language and its ecosystem. The introduction of Kotlin/Native has expanded its capabilities to include iOS and desktop development, while Kotlin/JS enables developers to target web applications. These developments, combined with the language's growing community and support from major tech companies, suggest that Kotlin will continue to play a pivotal role in the evolution of mobile and cross-platform development.
In conclusion, Kotlin has redefined the landscape of Android app development, offering a modern, efficient, and secure alternative to traditional languages like Java. Its concise syntax, robust features, and interoperability with existing tools have made it a favorite among developers. As the mobile ecosystem continues to evolve, Kotlin's versatility and adaptability ensure that it will remain at the forefront of innovation, empowering developers to build the next generation of mobile applications.
Make order Tg Bot or Mobile app from us: @ChimeraFlowAssistantBot
Our portfolio: https://www.linkedin.com/company/chimeraflow
1 note
·
View note
Text
Not For Me, Thanks! Overriding in Java
Need to take a different approach than your parent class when it comes to some method? In Java, a child class can often override the logic from an inherited method. #java #tdd #objectOriented #inheritance
💚 TIP: References Quick List Java: Overriding Methods Example Code Example UML Class Diagram Source Code Table of Contents Table of ContentsIntroductionDiagramUnit Test for Object’s toString() ImplementationTDD CycleUnit TestsRuntime UpdatesMaven BuildCommit Introduction When inheriting method logic from a parent, we may need to alter that logic in the child. When we do so, this is called…

View On WordPress
1 note
·
View note
Text
selenium online training | selenium online courses
Apache Ant with Selenium and flash testing overview
When producing a full software product, numerous third-party APIs, their class route, the cleaning of previous binary executable files, the compilation of our source code, the execution of source code, the development of reports and the deployment code base, etc. You need to take care of everything. It would take an immense amount of time if these tasks are performed one by one manually, and the process will be vulnerable to errors. selenium online training
Apache ANT with Selenium
The meaning of a building tool like Ant comes here.
The benefit of creating an Ant
The application life cycle is generated by Ant, i.e. clean, compile, dependency set, run, report, etc.
The third-party API dependency can be set by Ant, i.e. the classpath of another Jar file is set by the Ant build file.
For End to End Delivery and deployment, a full application is developed.
It is a simple build tool where you can use the XML file to make all configurations and which can be executed from the command line.
As the configuration is separate from the actual application logic, it makes the code safe.
How to install Ant for installation
The following steps are taken to mount Ant in Windows
Step 1)
Download the .zip file from apache-ant-1.9.4-bin.zip to http:/ant.apache.org/bindownload.cgi
Step 2)
Unzip the folder and go to the root of the unzipped folder and copy the path.
Step 3)
Go to Start -> Machine -> right-click here and choose 'Properties' and then click Advanced Device Settings
Step 4)
This opens a new window. Click on the 'Factor Environment...' icon.
Step 5)
Click 'New...' and set the name of the variable as 'ANT HOME' and the value of the variable as the root path to the unzipped folder, and then click OK.
Step 6)
Now select the 'Path' variable from the list, and then click Edit' and add;%ANT HOME%\bin.
You can restart the machine once and now you are ready to use the Ant build tool.
Step 7)
Use the command line to verify your version of Ant:
Ant-Version Build.xml comprehension
The most critical component of the Ant compilation tool is Build.xml. For a Java project, all tasks related to cleaning, setup, compilation, and deployment are specified in this XML format file. If we use the command line or any IDE plugin to execute this XML file, all the instructions written in this file will be executed sequentially.
Inside a sample build.XML, let's understand the code.
The project tag is used to define a project name and an attribute-based on it. The foundation is an application's root directory.
● Property tags are used in the build.xml file as variables to be used in further steps.
<property name="build.dir" value="${basedir}/build"/>
<property name="external.jars" value=".\resources"/>
<property name="ytoperation.dir" value="${external.jars}/YTOperation"/>
<property name="src.dir"value="${basedir}/src"/>
● Goal tags are used as steps to be performed sequentially. The name attribute is the target's name. In a single build.xml, you can have different targets
● The path tag is used to logically bundle all files that are in the commonplace
● Path element tag sets the generic location root path where all files are stored.
● The path convert tag is used to convert all common file paths within the path tag to the classpath format of the framework.
● Used to set classpath for various third party jars in our project files tag
● The echo tag is used on the console to print text.
● The Delete tag cleans data from the designated folder
● A new directory will be created with the mkdir tag
● Used to compile java source code and transfer .class files to a new folder, javac tag
● The jar tag creates a jar file from the .class files
● The manifest tag will set your key execution class to
● The attribute 'depends' used to make one goal depend on another destination
● The java tag executes the main function from the jar created in the target compile portion.
Run Ant using the plugin Eclipse
Go to build.xml file to run Ant from eclipse -> right-click file -> Run as... -> click Build file -> right-click file -> Run as... -> click Build file
EXAMPLE:
We will take a small sample program that will very clearly demonstrate the features of Ant. Our project architecture is going to look like follows.
We have 4 goals here in this example.
Class route setting for external jars,
Clean code, previously complied with,
Compile current Java code for yourself
Run the code, run it
AntClass.class
TestAnt's package;
Java.util.Date import;
AntClass Public Class {
Static public void main(String...s){
System.out.println('HELLO PROGRAM ANT');
System.out.println("DATE IS TODAY->"+ currentDate());;"
}
Public static String currentDate(){
Fresh Date().toString() returns;;
}
}
Construct.xml
How to execute code for TestNG using Ant
Here we will construct a class using the TestNG method and set the Testing classpath in build.xml.
Now we'll create another testng.xml file to run the test method and call this file from the build.xml file.
Step 1)
In the testing kit, we build the "AntClass.class"
TestAnt's package;
Java.util.Date import;
Org.testng.annotations.Test imports;
AntClass Public Class {
The @Test
AntTestNGMethod(){{ Public Void
System.out.println('HELLO PROGRAM ANT');
System.out.println("DATE IS TODAY->"+ currentDate());;"
}
Public static String currentDate(){
Fresh Date().toString() returns;;
}
}
Step 2)
Construct a target for this class to be loaded into Build.xml
Step 3)
Create testng.xml
Testng.xml for checking
rg/testng-1.0.dtd" ">
Step 4)
In Build.xml, create a Target to run this TestNG code.
Step 5)
Absolute Build.xml Complete
Selenium Ant with Web driver:
We have discovered so far that we can place all third-party jars in a specific place in the system using ANT and set their direction for our project. Using this approach, we set all of our project's dependencies in a single place and make it more stable for compilation, execution, and deployment.
Similarly, we can easily discuss selenium dependency in build.xml for our testing projects using selenium, and we don't have to manually add a classpath to our program.
So now you can disregard the conventional way to set classpaths for the project listed below.
EXAMPLE:
The previous example we are going to change is
Step 1)
In the resource folder, set the selenium. jars property to a selenium-related container.
Step 2)
Add the selenium files to the set classpath target
Step 3)
Build.xml Com
Step 4)
Update the previously generated AntClass.java class to a new code.
TestAnt's package;
The java. util.List import;
Org.openqa.selenium.By import
Org.openqa.selenium.WebDriver Import;
Org.openqa.selenium.WebElement Import;
Org.openqa.selenium.firefox.FirefoxDriver importation;
Org.testng.annotations.Test imports;
AntClass Public Class {
The @Test
AntTestNGMethod(){{ Public Void
Driver for WebDriver = new FirefoxDriver();
driver.get;
List listAllCourseLinks = driver.findElements(By.xpath("/div[@class='canvas-middle']/a"));););
For(WebElement WebElement: listAllCourseLinks){ WebElement WebElement: listAllCourseLinks
System.out.println(webElement.getAttribute("href"));
}
}
}
Step 5)
The production after successful execution looks like this.
Flash testing varies from other component components
Flash is a technology that is obsolete. Capturing a flash-object is challenging as it is distinct from HTML. Flash is also an embedded SWF file that is (Small Web Format). Accessing Flash artifacts on a mobile device is often challenging.
Flash creation is more complex than SEO (Search Engine Optimization) HTML page development because flash is not completely readable by the search engine. Advanced technologies such as HTML 5 are, however, applied to solve problems such as performance and security.
Check it with the flash application.
There are two methods of testing Flash Applications:
Manual
By running test cases manually, you can test the Flash object as it is quick and easy to test. You ensure that the flash works properly as planned after bug fixation and provide sign-off.
Automation:
Use any automation method such as Selenium, SoapUI, TestComplete, etc to write a script and execute the script.
Conclusion
The key difference between flash and other elements, as described above is that Flash is embedded in SWF files, while other elements are embedded in HTML files. This is why, compared to flash, HTML is simple to catch. You can learn more about Ant build and flash test in selenium through Selenium online training.
#selenium online training#selenium online courses#selenium online training Hyderabad#selenium online training India#selenium with java online training#best selenium course online#selenium testing course online
2 notes
·
View notes
Text
Guidelines for Using Exceptions in Java
Note: Whitespace has been automatically removed by this site for all the code examples.
You may want to read and adopt the guidelines that help you get the most out of Java's exception handling mechanism. You can write powerful and effective Java code by adopting most, or all, of the things recommended here.
Remember that exception handling provides a way to process synchronous errors such as divisions by zero and out-of-range array indexes. It's not meant for handling asynchronous events such as disk I/O completions and mouse clicks and keystrokes.
When to use Exceptions
You may be wondering as to how you actually decide to create and throw an exception. As a rule of thumb, create exception classes for all common exceptions that are likely to occur in multiple classes of an application. In order to deal with simple errors that are likely to occur only in individual methods, try not to create an exception class. You can use an if statement in most cases to trap these types of errors.
Here's a simple example that shows when not to use a try-catch block in your code. The code throws an error when there's an exception of the type NullPointerException.
try {
System.out.println(refvar.toString()};
}
catch (NullPointerException e) {
System.out.println("refVar is null!");
This is pure overkill. You can instead use the much simpler if statement to handle these types of simple errors.
if (refVar!=null)
System.out.println(refVar.toString()};
else
System.out.println("refVar is null");
If your code can perform a simple logic test, as shown here, to handle an error, do so, rather than using an exception object to handle the error.
When you neither catch nor throw exceptions
When you call any method that throws a checked exception, you must either throw the exception or catch it. If you decide that you can't handle the exception in the method where it occurs, write a throw statement to send the exception up to the calling method, which must then either handle it with an exception handler, or throw it up to its calling method.
The following set of examples show how you must either catch or throw a checked exception, in order to avoid compiler errors.
The first example shows code that throws an IOException. The statement in the method getFileLength may throw an IO exception when it calls the constructor of the RandomAccessFile class. In addition, the statement that calls the length method of the RandomAccessFile object may also throw an IOException. You thus specify the throws clause in the declaration for the getFileLength method to trap IOException.
public static long getFileLength() throws IOException
{
RandomAccessFile in = new RandomAccessFile("mytext.dat", "r");
long length = in.length();
return length;
}
Our next example shows code for a method that calls the getFileLength method. Since we already know that the getFileLength method call throws an IOException error, our new method must either handle the IO Exception or throw it. Our example here shows how to handle the IOException by catching it with a try statement:
public static int getRecordCount()
{
try
{
long length = getFileLength(); // this may throw an IOException
int recordCount = (int) (length / /RECORD_SIZE);
return recordCount;
}
catch (IOException e) // this will catch the IOException
{
System.out.println("IO Exception!");
return 0;
}
}
The third example shows how a method can call the getFileLength method without catching IOException. Instead, it throws the exception.
public static int getRecordCount() throws IOException
{
long length = getFileLength(); //this may throw an IOException
int recordCount = (int) (length / RECORD_SIZE);
return recordCount;
}
The getRecordCount method here includes a throw clause, which ensures that any IOException is thrown up to the calling method.
Our fourth example shows what happens when you don't catch an exception or throw it.
public static int getRecordCount()
{
long length = getFileLength(); //this may throw an IOException
int recordCount = (int) (length / RECORD_SIZE);
return recordCount;
}
Since your code fails to catch or throw a checked exception, you'll receive a compile error:
MyExceptionTest.java.26: unreported exception java.io.IOException;
must be caught or declared to be thrown
The following is a quick summary of best practices and guidelines that enable you to take advantage of Java's exception handling mechanism, without succumbing to common missteps in the use of exceptions.
Begin Early
It is a good idea to incorporate exception handling into your applications from the get go, before you even start programming. That is, you must do this at the design stage, as it gets much harder to do it after implementing your applications.
Don't Ever Ignore an Exception
Regardless of whether you're dealing with a checked or an unchecked exception, don't ever ignore the exception. Sometimes, you might see code such as the following:
//Following is an empty catch block
try {
...
} catch (SomeException e) {
}
The empty catch block means that the exception is simply ignored - it's not dealt with. You don't want to do this in your programs. At the minimum, if you must really, really ignore the exception, put a comment explaining why you wanted to ignore the exception. You can use printStackTrace to output a simple error message to tell you there was a problem. If you ignore the exception, because of a condition that you've predicted, it means that the program will run on despite the error. However, you're going to run the risk of a complete program failure down the road when conditions change. If you propagate the exception out, you can ensure that the program fails quickly and captures information that helps you fix the error.
Don't use Exception Handling for every Statement
The goal of exception handling is to clarify programs - try not to use a try/catch/finally mechanism for every potential exception generating statement. A simple strategy is to enclose a significant amount of code within the try block and specify multiple catch blocks to account for all possible exceptions. End the whole thing with a single finally block if you need to release any resources held by the program. In any case, avoid placing try/catch/finally around each statement that might throw an exception. Your goal is to use exception handling to remove error processing code from the main program code.
Maintain Failure Atomicity
Always strive to ensure that when an object throws an exception, the object continues to remain in a well-defined and usable state. Ideally, even after a method fails due to an exception, the object should be left in the state it was before the method was invoked, When a method can do this, it's said to possess the property of failure atomicity.
You can achieve failure atomicity by using any of the following programming techniques.
Design Immutable Objects
The easiest way to achieve failure atomicity is by designing immutable objects. Although when you create an object you can change its contents, occasionally, it's a good idea to create objects whose contents cannot be changed after creation. An object such as this is called an immutable object and its class, an immutable class. A good example is the String class, which is an immutable class. You get automatic failure atomicity when an object is immutable, because the state of an object can't be modified after you create the object.
Check Parameters for Validity before the Operation
If you're stuck with mutable objects, the best way to achieve failure atomicity is to perform a check for the validity of parameters before the program commences the modification of an object. The following example shows how you do this:
public Object pop() {
if (size == 0)
throw new EmptyStackException();
Object result = elements[--size];
elements[size] = null; // Eliminate obsolete reference
return result;
}
The initial size check ensures that the method will do two things when it tries to pop an element from an empty stack: it will throw an exception and it will do so while leaving the size field in a consistent state. Otherwise, the attempt to pop the element from an empty stack will leave the size field in a negative state which, of course, is an inconsistent state for the object to be in.
Attempt to Execute the Code before you Modify the Object
You can write your programs in a way where the code that is susceptible to a potential exception, is run before any code that modifies an object. A good example would be where you would like to add an element to a TreeMap, wherein the new element must be compared using the TreeMap's ordering. If your code attempts to add an incorrect type element, it will fail when a search for the element in the tree is made, before the tree is modified.
Intercept the Failure
Another strategy to achieve failure atomicity is to put in code that intercepts a failure that occurs during an operation, and which rolls back the object's state to what it was before the operation began. This strategy is often adopted when modifying disk based data, that is, data contained in a relational database, for example.
Perform Operations on a Temporary Copy of the Object
You can limit state changes made to an object by changing a temporary copy of the object. You replace the contents of the object with the temporary copy once you complete the computational operations. If, for some reason, the computational work (say, a sort) ends up failing, no harm is done to the original object, as you're working with just a copy of the object.
Collect Failure Details
If you're troubleshooting an easily reproducible failure, it's no big deal whether you're collecting detailed failure information. When dealing with exceptions that are not easily reproducible, it is critical that your exception's toString method captures sufficient details about the failure - to help diagnose and fix the failure.
When an exception occurs, your details message of an exception should capture the current values of all parameters and values that contributed to the exception. If your error message simply states IndexOutofBoundException, it's only of limited use and may, or may not, help you fix the data problem. If, on the other hand, your detail message for the IndexOutofBoundException contains the lower and upper bounds and the index value, you have something meaningful in your hands with which to proceed towards a fix of the failure condition.
Since the stack trace of the exception always contains the precise file and line number that threw the exception, you don't need a lot of information about the source code in your exception messages. To ensure that your exceptions always contain adequate failure details in their details message, use one of the constructors I explained about earlier in this chapter. It is better to do this than to capture the details within a simple string detail message.
The following example shows how you can use a more helpful constructor than the simple String constructor.
/**
* Construct an IndexOutOfBoundsException.
*
* @param lowerBound the lowest legal index value.
* @param upperBound the highest legal index value plus one.
* @param index the actual index value.
*/
public IndexOutOfBoundsException(int lowerBound, int upperBound,
int index) {
// Generate a detail message that captures the failure
super("Lower bound: " + lowerBound +
", Upper bound: " + upperBound +
", Index: " + index);
// Save failure information for programmatic access
this.lowerBound = lowerBound;
this.upperBound = upperBound;
this.index = index;
}
Top Tip: Provide accessor methods for all exceptions, especially for checked exceptions.
As mentioned earlier, it's sometimes useful to provide accessor methods to capture details regarding exactly why a failure happened. In the case of the example just shown, you can, for example, provide accessor methods for lowerBound, upperBound and index. It's critical that you provide such accessor methods for all accessor methods.My site list to string in java
Use Standard Java Exceptions
As discussed earlier in the book, the Java platform offers a built-in set of unchecked exceptions which will take care of most of your exception mechanism setting needs. Make a point to try and use these preexisting exceptions before you run off coding your own custom exceptions. Other programmers are familiar with these preexisting exceptions and, therefore, they can easily understand your code. Also, since you'll be using just a set of basic exception classes and not a whole bunch of custom exceptions, your programs need less time to load.
Here are brief descriptions of the most common standard Java exceptions.
IllegalArgumentException
You throw this exception when a caller passes in an argument with an inappropriate value. For example, a calling program that passes a negative number in a parameter that denotes how many times you repeat an action.
IllegalStateException
This is the exception thrown when an object is illegally invoked because of its state - say, when a calling program tries to use an object before it has been initialized.
NullPointerException
Used when a parameter value is null when it ought not to be.
IndexOutofBoundsException
An exception thrown when a caller passes an out of range value in a parameter representing an index into a sequence.
ConcurrentModificationException
Thrown when an object designed for single thread usage finds that it was, or is, being concurrently modified.
UnsupportedOperationException
Thrown when an object doesn't support a specific operation such as when a program tries to delete an element from an append-only list.
Although in most cases it's quite apparent as to which exception applies to an error condition, sometimes, you may find that more than one exception might be correctly used for an error condition. There aren't any cut and dry rules for the specification of exceptions - as with some other things in Java, handling exceptions is an art as well as a science!
Document All of a Method's Exceptions
Spend the necessary time to fully document all exceptions thrown by each method in an application. Declare all checked exceptions individually and use the Javadoc tag @throws to document the conditions under which each of the exceptions can be thrown.
It is critical that you don't fall into the bad habit of declaring that a method throws some super class of multiple exception cases that the method is set up to throw. That means that you never declare a method that can throw the generic exception classes Exception or Throwable! Using generic exceptions might handle the exception all right, but it keeps you from understanding the precise error that caused the exception to be thrown.
Top Tip: Always attempt to document every single exception that can potentially be thrown by each method in a program.
Take care to document both checked and unchecked exceptions. Since unchecked exceptions normally represent programming errors, documenting them can keep you from avoiding those errors. You can use the same Javadoc tag @Throws to document unchecked exceptions, as is the case for checked exceptions.
If multiple methods in a class can throw the same exception, you may document the exception once in the class's documentation comment. This is much more efficient than documenting the exception separately for each of the methods.
Finally, a useful rule of thumb when handling Java exceptions is to always throw early and catch late!
This finally wraps up our discussion of Java's exception handling mechanisms and how to make the best use of them in your code. Our next topic is the effective use of pre and post conditions in your code within the framework of what's called Java assertions, primarily as a way of testing code before you move it to production.
1 note
·
View note
Text
Change spinner selected text color android

Change spinner selected text color android android#
Change spinner selected text color android code#
For that we have used parent.getItemAtPosition(position).toString() method. We can get the value of the selected class name from the ClassSpinner. set divSpinner Visibility to void onNothingSelected(AdapterView parent) GetResources().getStringArray(R.ems_div_class_4))) GetResources().getStringArray(R.ems_div_class_3))) GetResources().getStringArray(R.ems_div_class_2))) GetResources().getStringArray(R.ems_div_class_1))) assigning div item list defined in XML to the div SpinnerĭtAdapter(new ArrayAdapter(MainActivity.this,Īndroid.R.layout.simple_spinner_dropdown_item, String selectedClass = parent.getItemAtPosition(position).toString()
Change spinner selected text color android code#
So add the following code inside classSpinner's onItemSelected() method.ĬtOnItemSelectedListener(new void onItemSelected(AdapterView parent, View view, int position, long id) options to divSpinner from the string-array resource. Inside the onItemSelected() method of classSpinner, you have to get the selected item from the dropdown list and based on that value, you have to assign entries i.e. Spinner classSpinner, void onCreate(Bundle savedInstanceState) Changing Value of second Spinner based on first Spinner value MainActivity.java public class MainActivity extends AppCompatActivity We will start by creating instances of both the spinners and then, assign the setOnItemSelectedListener() on both the spinners. To handle the GUI events, we need to implement the code inside the MainActivity.java file. We will do this through Java code as the user will select from the first dropdown at run time i.e. Doing so will assign the values present in the items_class array to the classSpinner.Īs per the user's selection of the option from the first spinner, our second Spinner will appear along with options based on the first spinner's selection. To add these entries to the spinner all we have to do is add a property in the main activity layout XML file. In our dataset, string-array named items_class will be assigned to the classSpinner to display the class items in the dropdown list. We have also defined our dataset for the Spinners.We have defined the layout XML for the User interface.
Change spinner selected text color android android#
We have understood the design that we are creating in our Android App, which will have 1 TextView and 2 Spinners.
In Android, we must put the data XML files like our strings.xml file in app → res → values → strings.xml.īy now, we are done with the following things: We can define a string array in XML like we have shown below in the strings.xml file. But for this example, we will try the other way i.e. One by declaring an array and defining the items in it. To add items to the Spinner, there are two possible ways to provide it with a set of options. Once you will create that, the error in this file will be resolved.Īs you can see, we have one TextView and two Spinner views inside the xml file along with a few properties specified. NOTE: If you are getting an error in this, that is because you have not yet created the below data XML file. If you want, copy paste the below XML to start with this example in your local machine. So let's start, here we have the layout XML file. When user selects an optin from the second spinner too, then we will create a Toast and display the chosen values on screen. The first Spinner( classSpinner) holds the list of classes(in school) to be selected by the user and based on that choice we will assign the values to the second Spinner( divSpinner). But you can try and change the value of isVisible to VISIBLE to see if it is there or not. Hence, in the image below, it looks like it's not there. The second spinner has the property isVisible equals to GONE, which means it exists in the layout but it will not be visible(or it will be hidden). So we need to customize the layout(shown in below image) where one Spinner is placed below the TextView and the other spinner is below the first spinner.Īs the options inside the second Spinner will depend on what we select in the first Spinner, hence initially the second spinner will be hidden and it will only appear when user has selected one option from the first spinner. The main layout of the application will contain our one TextView and two spinners as its child component views. In this tutorial, we are going to create an application that works with two Spinners, which are inder-dependent. So let's checkout an example and learn how we can implement it in our Android App. You have already studied about what Spinners are and how they work.
Android SDK Manager & required Packages.
0 notes
Text
Supercharge Your Apps: Mastering Kotlin Programming in 2025
Did you know that companies using Kotlin programming report up to a 40% reduction in code compared to Java? That's a monumental gain in efficiency and maintainability. But diving into Kotlin programming can feel like navigating a complex labyrinth if you don’t have the right guide.
This post provides that comprehensive roadmap. It steers clear of the superficial and delves into actionable strategies, vital tools, and key insights that separate adept Kotlin programming from rudimentary endeavors. You'll bypass common pitfalls, grasp best practices, and develop a foundational understanding that will propel your mobile app development.
For any android app development company, mastering Kotlin is essential to stay competitive in the evolving tech landscape.
Demystifying Core Strategies in Kotlin Programming
Let’s dissect some powerful tactics that will enhance your efficacy in Kotlin programming .
Embracing Null Safety: This is arguably one of Kotlin's strongest assets. Its built-in null safety features greatly mitigates the risk of NullPointerExceptions, a prevalent bane in Java.
Nullable Types: Declare a variable nullable using ?. Example: var name: String? = "Kotlin"
Safe Calls: Use the ?. operator to safely access properties or methods on a nullable variable. Example: name?.length (will only access length if name is not null)
Elvis Operator: Use the ?: operator to provide a default value when a variable is null. Example: val length = name?.length ?: -1 (assigns -1 to length if name is null)
Leveraging Coroutines for Asynchronous Programming: Managing asynchronous operations with callbacks can swiftly transform code into an unreadable mess. Coroutines streamline this process, enabling you to write asynchronous code in a sequential style.
Mastering Data Classes: Tired of boilerplate code for simple data holding classes? Kotlin data classes automatically generate methods like equals(), hashCode(), toString(), and copy(), minimizing manual coding.
Evading Common Errors in Your Kotlin Programming Journey
Even experienced developers occasionally fall into common traps. Recognize and circumvent these pitfalls.
Overusing Nullable Types: While null safety is important, relying excessively on nullable types can muddle your code and necessitate redundant null checks. Aim to keep your variables non-nullable where it's logically tenable.
Ignoring Extension Functions: Kotlin's extension functions let you append new methods to existing classes without inheritance. It's easy to overlook this power, leading to repetitive code and diminished modularity.
Not Fully Capitalizing on Data Classes: Data classes auto-generate common methods. Missing out on this auto-generation equates to needless repetition and avoidable chances for errors.
Indispensable Tools for Flourishing in Kotlin Programming
Equipping yourself with the appropriate tools streamlines development, boosts productivity, and elevates code quality.
IntelliJ IDEA: This IDE has outstanding support for Kotlin programming, boasting code completion, debugging capabilities, and refactoring tools.
Android Studio: Built atop IntelliJ IDEA, Android Studio provides tailored tools for Android development with Kotlin.
Kotlin Standard Library: Master this, covering collections, sequences, I/O, and more. It enhances expressiveness and reduces boilerplate.
Expert Insights into Elevating Your Kotlin Programming
Go beyond basic proficiency by following insights from experienced Kotlin practitioners.
Code Reviews are Essential: Routine code reviews uncover subtle errors, guarantee code uniformity, and foster knowledge-sharing within the team.
Staying Updated: The Kotlin language continuously develops. Remain current on new features and recommended practices through official documentation and community forums.
Craft Testable Code: Structure code with testability in mind. Employ dependency injection to segregate components and streamline unit testing. "A major boon of Kotlin programming is its inter-operability with Java. You can gradually migrate large Java codebases and realize incremental benefits. " - John, Senior Software Architect
Consider an anecdote from my personal experience with code reviews. I initially thought my code was impeccable until a colleague identified a glaring potential concurrency issue that would have cost my company greatly in maintenance expenses and down time in a system upgrade scenario. The fresh perspectives gleaned during code reviews has proved invaluable.
Diving Deeper: Extending Kotlin's Functionality with Method Addition
Now, let’s scrutinize adding methods in Kotlin , particularly when expanding existing classes (the essence of extension functions).
How to Add Methods (Extension Functions): A Detailed Guide
This approach does not alter the source code of the original class; instead, it permits you to append a new function that behaves as if it's a member function of that class. Here are the steps involved:
Identify the Class to Extend: Determine which class you want to augment with additional functionality. This could be a class in the Kotlin standard library (like String, List) or a custom class defined in your project.
Create the Extension Function: Declare the extension function using the fun keyword, followed by the class name, a dot (.), and the name of the new function. Here's the generic format: fun ClassName.newFunctionName(parameters: ParameterType): ReturnType { // Function body return someValue }
Access the Receiver Type: Inside the extension function, the class being extended is referred to as the "receiver." You can access its members using the this keyword, though typically you can refer to the properties and methods of the receiver class directly.
Add Functionality: This is where you incorporate your custom logic. Your function can perform any operation on the receiver object or interact with other parts of your application.
Call the Extension Function: Once defined, call the extension function just as you would any member function of the extended class. Here's an example: val myString = "Kotlin Rocks" val wordCount = myString.wordCount() // Calls the extension function println("Word count: $wordCount")
Placement Considerations: Ideally, place extension functions near where they are used or in a dedicated extensions file to keep your code organized and maintainable. Consistency in placement facilitates readability and collaboration. Practical Example: Adding a Word Count Function to String
Let’s create a specific example—an extension function that counts the number of words in a string:fun String.wordCount(): Int { val words = this.trim().split("\\s+".toRegex()) return if (words.first().isEmpty()) 0 else words.size } fun main() { val myString = " This is a Kotlin Example " val count = myString.wordCount() println("Number of words: $count") // Output: Number of words: 5 }
In this example:
We define wordCount() as an extension function on the String class.
The this keyword refers to the string on which the function is called.
We utilize the trim() function to remove leading and trailing whitespace, ensuring accurate word counting.
We employ the split() function to break the string into words using whitespace as the delimiter.
We then calculate the word count by determining the size of the resultant list of words.
By diligently pursuing this guide, you enhance classes seamlessly, thereby amplifying their usefulness and the modularity of your overall architecture. This embodies Kotlin's design goal to allow programmers to stretch its capabilities creatively.
Key Takeaways
Kotlin programming enhances code brevity and reduces errors with features like null safety and data classes.
Prioritize null safety, learn to handle exceptions effectively and apply coroutines for improved performance.
Continually refine your skills through community participation and continuous education in Kotlin programming updates.
Master extension functions and take steps for better programming practices.
Frequently Asked Questions
Can Kotlin programming truly replace Java in Android Development?
Absolutely! Kotlin is now the favored language for Android app development and interoperates effectively with existing Java code. Migrating piece by piece becomes easy, so that's why Kotlin programming is now a preferred option.
Why is Null Safety a much lauded feature of Kotlin?
Kotlin’s built-in null safety alleviates many common NullPointerException that happens when accessing null variables that occurs during runtime in Java. Safe calls and the Elvis operator can help create stronger applications with greater protection from crashing.
How complex is migrating Java code to Kotlin programming?
Thanks to its full interoperability, code can migrate iteratively without re-writing the entire program at once which has encouraged adoption. Each bit is compiled into binary for use by each platform so gradual migration is manageable and can allow quicker deployment.
Can I use my existing Java skills while using Kotlin programming?
Yes! Given that it interoperates seamlessly with Java, prior Java skillsets become an immense value and drastically reduce learning curves when approaching this new way to build mobile apps! You will not have to rebuild all those applications; just move little parts.
What are the specific performance advantages associated with Kotlin programming?
Coroutines enable more effective asynchronous coding management and reduces the need for messy callbacks. Coupled with Kotlin’s compact syntax can lead to enhanced and effective codes. This gives users speedier service and higher level of usefulness!
Recommendation
We highly urge the adoption of Kotlin programming given the high level of improvement the company is using and given its benefits with interoperability as we have previously covered here in the blog. With this easy move towards its acceptance and continued application to build out the company's programming assets; our resources and efforts can be leveraged at scale!
#kotlin programming#mastering kotlin#kotlin 2025#android development#kotlin for beginners#advanced kotlin
1 note
·
View note
Text
Apache Groovy #8: objektorientierte Programmierung

In diesem Beitrag möchte ich dir die objektorientierte Programmierung mit Apache Groovy näher bringen.

OOP mit Apache Groovy - Teil 1
Bisher haben wir unsere Groovy Skripte lediglich in einer Datei geschrieben, welche einfach ausgeführt wurde. Das ist für kleine Skripte völlig okay, wenn wir jedoch große Business-Anwendungen entwickeln wollen, dann sollten wir eine gewisse Struktur einbauen und unseren Code aufteilen.
Die offizielle Dokumentation zur objektorientierten Programmierung in Apache Groovy findest du unter https://groovy-lang.org/objectorientation.html.
Erzeugen einer Klasse
Eine Groovy Klasse ist der Java Klasse sehr ähnlich und auch voll kompatibel mit Java. D.h. du kannst eine Java Klasse aus Groovy importieren und ableiten.
Eine Groovy Klasse erzeugen wir mit dem Schlüsselwort "class" jedoch entfällt der aus Java ggf. bekannte Accessmodifier "public", da in Groovy generell alle Klassen "public" sind.
Innerhalb dieser Klasse können wir nun Felder und Funktionen definieren, welche die Klasse auszeichnen.
class Person {
String firstname
String lastname
def greeting() {
"Hello from $firstname $lastname"
}
}
Erzeugen wir uns nun ein erstes Objekt:
println new Person(firstname:"Stefan", lastname:"Draeger").greeting()
Die Ausgabe in der Konsole ist wie folgt:
Hello from Stefan Draeger
Was einem auffällt, ist der Konstruktor, welchen wir für die Erzeugung unserer Klasse verwenden, hier nutzen wir die Feldnamen als Parameter und können diesen, so die Werte übergeben.
Natürlich könnten wir auch zuerst nur eine leere Hülle erzeugen und die Werte per Setter setzen.
Person p1 = new Person()
p1.setFirstname("Max")
p1.setLastname("Mustermann")
println p1.greeting()
Was einem erfahrenen Javaentwickler auffallen wird ist, dass wir Funktionen verwenden, welche in der Klasse nicht definiert sind. In Groovy werden für alle öffentliche Felder getter & setter automatisch bereitgestellt (dieses können wir durch eine Annotation steuern).
private Felder in Klassen
Wenn wir jedoch ein Feld mit dem Accessmodifier "private" markieren, dann haben wir keinen Zugriff mehr über einen Setter auf diesen, sondern nur noch über den Konstruktor. Wir müssten also den Setter (und Getter) selber schreiben.
Im nachfolgenden Beispiel habe ich das Feld "lastname" auf "private" gesetzt und erhalte beim Ausführen des Skriptes dann eine Exception das, die Funktion "setLastname()" nicht gefunden wurde.
class Person {
String firstname
private String lastname
def greeting() {
"Hello from $firstname $lastname"
}
}
Person p1 = new Person()
p1.setFirstname("Max")
p1.setLastname("Mustermann")
println p1.greeting()
Caught: groovy.lang.MissingMethodException: No signature of method: person.Person.setLastname() is applicable for argument types: (String) values:
Vererbung
Mit Vererbung können wir öffentliche Attribute (Felder, Funktionen) von einer anderen Klasse erben und wiederverwenden.
Nehmen wir zunächst ein einfaches Beispiel, wir wollen ein Fahrzeugpool pflegen, dort haben wir diverse Kraftfahrzeuge (LKW, Auto, Motorrad) enthalten. Allen diesen Kraftfahrzeugen ist gleich, dass diese folgende Attribute haben:
- Anzahl X Räder,
- Anzahl X Sitzplätze,
- Farbe,
- PS,
- Gewicht,
- Zulässiges Gesamtgewicht
Jetzt könnte man einfach für jeden der genannten Typen Kraftfahrzeuge eine Klasse mit den oben genannten Attributen erstellen, das würde funktionieren, hätte jedoch nichts mit objektorientierte Programmierung zu tun.
import groovy.transform.ToString
@ToString
class Kraftfahrzeug {
int anzahlRaeder;
int anzahlSitzplaetze;
String farbe;
int ps;
double gewicht;
double zulGesamtgewicht;
}
Wir können nun beliebig viele Instanzen von dieser Klasse erzeugen und so unseren Fahrzeugpool aufbauen.
Kraftfahrzeug lkw = new Kraftfahrzeug()
lkw.setAnzahlRaeder(8)
lkw.setAnzahlSitzplaetze(3)
lkw.setFarbe("blau")
lkw.setPs(800)
lkw.setGewicht(1.7)
lkw.setZulGesamtgewicht(40)
Kraftfahrzeug auto = new Kraftfahrzeug()
auto.setAnzahlRaeder(4)
auto.setAnzahlSitzplaetze(5)
auto.setFarbe("rot")
auto.setPs(112)
auto.setGewicht(1.5)
auto.setZulGesamtgewicht(3.5)
Kraftfahrzeug motorad = new Kraftfahrzeug()
auto.setAnzahlRaeder(2)
auto.setAnzahlSitzplaetze(2)
auto.setFarbe("schwarz")
auto.setPs(130)
auto.setGewicht(250)
auto.setZulGesamtgewicht(1)
println lkw
println auto
println motorad
Ausgabe in der Konsole:
Kraftfahrzeug(8, 3, blau, 800, 1.7, 40.0)
Kraftfahrzeug(2, 2, schwarz, 130, 250.0, 1.0)
Kraftfahrzeug(0, 0, null, 0, 0.0, 0.0)
Wir haben aber das Problem, dass wir diese Objekte nicht unterscheiden können, ob es ein Lkw, Auto oder Motorrad ist. Hier müssten wir also entweder ein zusätzliches Feld pflegen oder wir nutzen die objektorientierte Programmierung und erben von der Klasse "Kraftfahrzeug".
Fangen wir mit der Klasse "Auto" an, hier erben wir nur von der Klasse "Kraftfahrzeug" und fügen zunächst keine weiteren Felder oder Funktionen hinzu.
import groovy.transform.ToString
@ToString
class Auto extends Kraftfahrzeug{
}
Da ich an der Klasse Kraftfahrzeug die Annotation @ToString gesetzt habe, muss ich diese auch an die neue Klasse Auto setzen, da sonst die toString Methode der Klasse Kraftfahrzeuge aufgerufen wird und dieses zu Verwirrung führen kann.
Wenn wir nun ein Objekt vom Typ Auto erzeugen, dann wird in der Konsole die Ausgabe erzeugt, dass wir zwei unterschiedliche Objekte haben.
Kraftfahrzeug lkw = new Kraftfahrzeug()
lkw.setAnzahlRaeder(8)
lkw.setAnzahlSitzplaetze(3)
lkw.setFarbe("blau")
lkw.setPs(800)
lkw.setGewicht(1.7)
lkw.setZulGesamtgewicht(40)
Auto auto = new Auto();
auto.setAnzahlRaeder(4)
auto.setAnzahlSitzplaetze(5)
auto.setFarbe("rot")
auto.setPs(112)
auto.setGewicht(1.3)
auto.setZulGesamtgewicht(3.5)
println lkw
println auto
de.draegerit.firstprj.oop.Kraftfahrzeug(8, 3, blau, 800, 1.7, 40.0)
de.draegerit.firstprj.oop.Auto(5, 112, rot, 3.5, 1.3, 4)
Nun können wir uns eine Liste mit den Kraftfahrzeugen aufbauen und verwalten.
List kfzPool = new ArrayList()
Kraftfahrzeug lkw = new Kraftfahrzeug()
lkw.setAnzahlRaeder(8)
lkw.setAnzahlSitzplaetze(3)
lkw.setFarbe("blau")
lkw.setPs(800)
lkw.setGewicht(1.7)
lkw.setZulGesamtgewicht(40)
Auto auto = new Auto()
auto.setAnzahlRaeder(4)
auto.setAnzahlSitzplaetze(5)
auto.setFarbe("rot")
auto.setPs(112)
auto.setGewicht(1.3)
auto.setZulGesamtgewicht(3.5)
for(int i=0;i
if(kfz instanceof Auto) println kfz }
de.draegerit.firstprj.oop.Auto(5, 112, rot, 3.5, 1.3, 4)
de.draegerit.firstprj.oop.Auto(5, 112, rot, 3.5, 1.3, 4)
de.draegerit.firstprj.oop.Auto(5, 112, rot, 3.5, 1.3, 4)
de.draegerit.firstprj.oop.Auto(5, 112, rot, 3.5, 1.3, 4)
de.draegerit.firstprj.oop.Auto(5, 112, rot, 3.5, 1.3, 4)
Read the full article
0 notes
Link
(Polymorphism And Inheritance) How To Call Java Method Polymorphically In this case am calling toString() Method from different classes Polymorphically. I have a for loop that loops through all created objects while invoking toString() method from each class. (Employee Student Faculty Staff). I have multiple classes that inherits from one class (Person) . SOURCE CODE PersonEmployeeStudentFacultyStaffPolymorphismInDriver.java [code lang="java"] /* * (Polymorphism And Inheritance) How To Call Java Method Polymorphically. * https://mauricemuteti.info/polymorphism-and-inheritance-how-to-call-java-method-polymorphically/ */ package personemployeestudentfacultystaffpolymorphisminjava; /** * * @author HP */ public class PersonEmployeeStudentFacultyStaffPolymorphismInDriver /** * @param args the command line arguments */ public static void main(String[] args) //Creating Person array of size 4 Person[] arrPerson = new Person[4]; //create objects of each class by passing argumnents //and add them in persons array. Person p1 = new Employee("Jane Doe", "14/02/2000", 25); arrPerson[0] = p1; Person p2 = new Faculty("John Hellen", "13/06/2001", 9); arrPerson[1] = p2; Person p3 = new Staff("Foo Bar", "12/12/2002", "IT Support"); arrPerson[2] = p3; Person p4 = new Student("Adam Aden", "1107/2003", "Active"); arrPerson[3] = p4; //Passing Persons array in identifyPersons() Static Method. identifyPersons(arrPerson); /** * * @param personsArray */ public static void identifyPersons(Person[] personsArray) // using for loop display each object toString Data Polymorphically. for (int i = 0; i < personsArray.length; i++) System.out.println("\nPerson " + (i + 1)); //Print On The Console Using ToString Method. System.out.println(personsArray[i].toString()); [/code] Person.java [code lang="java"] /* * (Polymorphism And Inheritance) How To Call Java Method Polymorphically. * https://mauricemuteti.info/polymorphism-and-inheritance-how-to-call-java-method-polymorphically/ */ package personemployeestudentfacultystaffpolymorphisminjava; /** * * @author HP */ public class Person private String name; private String birthDate; /** * * @param name * @param birthDate */ public Person(String name, String birthDate) this.name = name; this.birthDate = birthDate; /** * Get the value of birthDate * * @return the value of birthDate */ public String getBirthDate() return birthDate; /** * Set the value of birthDate * * @param birthDate new value of birthDate */ public void setBirthDate(String birthDate) this.birthDate = birthDate; /** * Get the value of name * * @return the value of name */ public String getName() return name; /** * Set the value of name * * @param name new value of name */ public void setName(String name) this.name = name; @Override public String toString() return "Person" + "name=" + name + ", birthDate=" + birthDate + ''; [/code] Employee.java [code lang="java"]/* * (Polymorphism And Inheritance) How To Call Java Method Polymorphically. * https://mauricemuteti.info/polymorphism-and-inheritance-how-to-call-java-method-polymorphically/ */ package personemployeestudentfacultystaffpolymorphisminjava; /** * * @author HP */ public class Employee extends Person private int workingDays; /** * * @param name * @param birthDate * @param workingDays */ public Employee(String name, String birthDate, int workingDays) super(name, birthDate); this.workingDays = workingDays; /** * Get the value of workingDays * * @return the value of workingDays */ public int getWorkingDays() return workingDays; /** * Set the value of workingDays * * @param workingDays new value of workingDays */ public void setWorkingDays(int workingDays) this.workingDays = workingDays; @Override public String toString() return super.toString() + " Employee" + "workingDays=" + workingDays + ''; [/code] Student.java [code lang="java"] /* * (Polymorphism And Inheritance) How To Call Java Method Polymorphically. * https://mauricemuteti.info/polymorphism-and-inheritance-how-to-call-java-method-polymorphically/ */ package personemployeestudentfacultystaffpolymorphisminjava; /** * * @author HP */ public class Student extends Person private String status; /** * * @param status * @param name * @param birthDate */ public Student(String status, String name, String birthDate) super(name, birthDate); this.status = status; /** * Get the value of status * * @return the value of status */ public String getStatus() return status; /** * Set the value of status * * @param status new value of status */ public void setStatus(String status) this.status = status; @Override public String toString() return super.toString() + " Student" + "status=" + status + ''; [/code] Faculty.java [code lang="java"] /* * (Polymorphism And Inheritance) How To Call Java Method Polymorphically. * https://mauricemuteti.info/polymorphism-and-inheritance-how-to-call-java-method-polymorphically/ */ package personemployeestudentfacultystaffpolymorphisminjava; /** * * @author HP */ public class Faculty extends Person private int officeHours; /** * * @param officeHours * @param name * @param birthDate */ public Faculty(String name, String birthDate, int officeHours) super(name, birthDate); this.officeHours = officeHours; /** * Get the value of officeHours * * @return the value of officeHours */ public int getOfficeHours() return officeHours; /** * Set the value of officeHours * * @param officeHours new value of officeHours */ public void setOfficeHours(int officeHours) this.officeHours = officeHours; @Override public String toString() return super.toString() + " Faculty" + "officeHours=" + officeHours + ''; [/code] Staff.java [code lang="java"] /* * (Polymorphism And Inheritance) How To Call Java Method Polymorphically. * https://mauricemuteti.info/polymorphism-and-inheritance-how-to-call-java-method-polymorphically/ */ package personemployeestudentfacultystaffpolymorphisminjava; /** * * @author HP */ public class Staff extends Person private String title; /** * * @param name * @param birthDate * @param title */ public Staff(String name, String birthDate, String title) super(name, birthDate); this.title = title; /** * Get the value of title * * @return the value of title */ public String getTitle() return title; /** * Set the value of title * * @param title new value of title */ public void setTitle(String title) this.title = title; @Override public String toString() return super.toString() + " Staff" + "title=" + title + ''; [/code] NETBEANS OUTPUT run: Person 1 Personname=Jane Doe, birthDate=14/02/2000 EmployeeworkingDays=25 Person 2 Personname=John Hellen, birthDate=13/06/2001 FacultyofficeHours=9 Person 3 Personname=Foo Bar, birthDate=12/12/2002 Stafftitle=IT Support Person 4 Personname=1107/2003, birthDate=Active Studentstatus=Adam Aden BUILD SUCCESSFUL (total time: 0 seconds) NETBEANS IDE OUTPUT SCREENSHOTS
0 notes
Link
Switch Expressions (Standard)
Pattern Matching for instanceof (Preview)
Helpful NullPointerExceptions
Records (Preview)
Text Blocks (Second Preview)
Packaging Tool (Incubator)
NUMA-Aware Memory Allocation for G1
JFR Event Streaming
Non-Volatile Mapped Byte Buffers
ZGC on macOS
ZGC on Windows
Foreign-Memory Access API (Incubator)
Here, we are going to discuss about the features for developers and how new features help us in easy coding.
Switch Expressions : Which has been first introduced in Java 12 and Java 13 as a preview and then it is finalized in Java 14. The lambda expression was introduced in Java 12 for switch expressions thereby allowing the multiple case labels for pattern matching. It’s preventing fall-through which lead to verbose code. And it also includes exhaustiveness, and ease of writing.
Pattern matching for instanceof : Here instanceof operator has type test pattern. It consist of a predicate that specifies a type and a single binding variable.
Helpful NullPointerExceptions : In the previous Version, Developers had to fall onto other debugging tools or manually figure the variable/method that was null, since the stack trace would only show the line number. But in Java 14 it provides more-informative diagnostics.
Records : This type is a preview feature of Java 14 and it used as plain immutable data classes and applications. It used in the place where a class is created only for the data carrier purpose. Record differ from normal class, In record Java compiler generate the constructor, field getters, hascode(), and equals() as well as toString() method.
Text Blocks : Which is introduced as a preview feature in Java 13. The goal is to allow easy creation of multiline string literals. Using text block we can easily create HTML and JSON or SQL query strings. Text block can use anywhere a string literal can be used. The type of text block is Java. Lang. String and it includes Object representation and interning into the String pool.
Java 14 brings a lot of innovations. It includes new preview language features and updates that help developers to code more easily. Kickstart a successful career as a Java developers from STEPS Kochi, the best IT training institute in Kochi.

0 notes