#kamuicosplay
Text


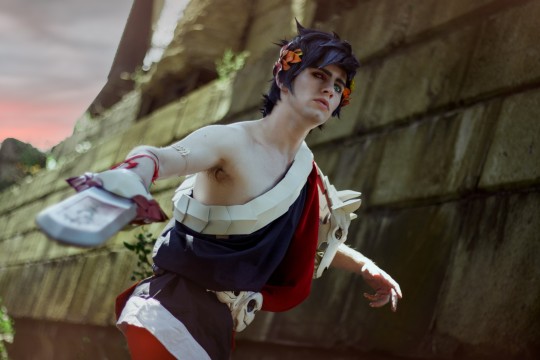
Sesión de fotos de Kamui (Gintama). Fotografía y edición por LiaOnioka (Twitter, Instagram y TikTok)
8 notes
·
View notes
Text

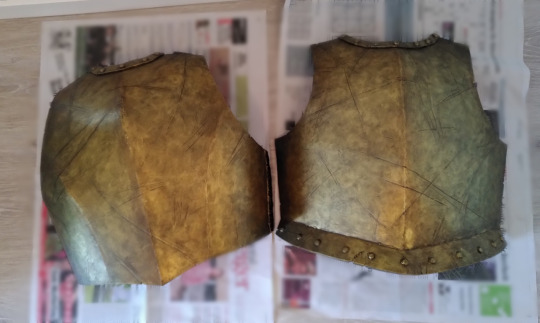
IT IS HAPPENING LADS!! SAM VIMES COSPLAY!!
I've dreamed of doing this for years and now that I've finally gained the Secret Knowledge of Foam Armour, I can finally go for it!
Jokes aside, I asked a couple of cosplay pros for advice at the last con and they were all super nice & answered every single one of my questions, in detail!
So far the breastplate, backplate and badge are done and I'm super happy. Detailed process under the cut!
How it went:
First, the pattern! Shoutout to the guys at cosplay-atelier for the recommendation. They pointed me to kamuicosplay, because they sell downloadable patterns for all sorts of things, including armour. Which is how I got to this:
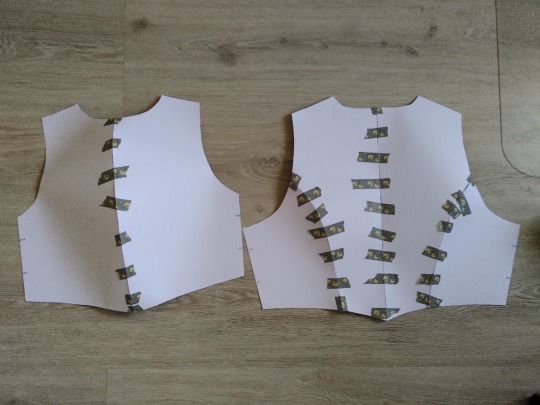
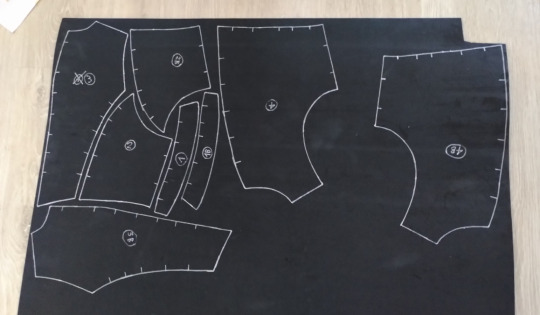
Downloaded two of their breastplate patterns, smooshed them together and altered them to fit my body and the look I wanted. I did all of that with thick paper. Then I took it apart again and traced the bits onto 5mm EVA foam that I ordered from a cosplay store.
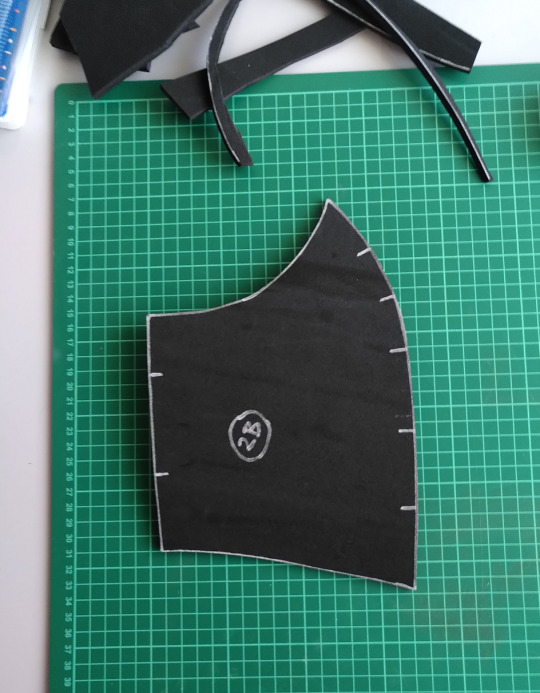
Then I numbered and cut all the pieces and glued them together! I used hot glue, cause it's more accessible and less intimidating for me than other types of glue. It isn't as strong as other recommended glues, but works fine for me. (used many pointers from this tutorial.)
However, safety point: I've seen it recommended to wear breathing protection when heating up foam in any way whatsoever, and that includes hot glue, heat shaping and heat sealing. Use a respirator or other breathing protection that is made specifically for chemical fumes & work outside or in a well ventilated area (i.e. open ALL the windows)! Ask at your local hardware store if you're unsure.
PSA over. Now to the painting stage!
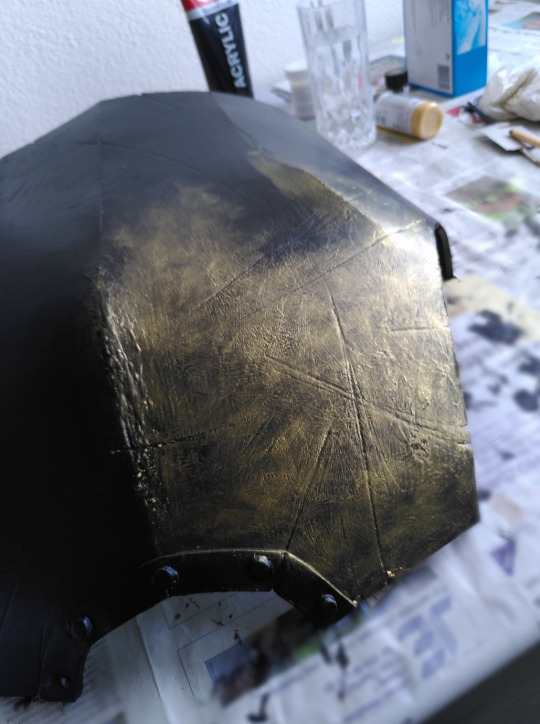
The scratches I made with my fingernails and the tip of a pair of scissors. XD Then I covered everything in 2 layers of black flexipaint (which is a water-based flexible paint/primer that works really well on foam). After that, I worked with regular artist's acrylic paint. Above you can see the first layer being applied with dry-brushing.
Then I went over it with a dark brown wash to make it look dirty (mix black & brown acrylic paint with water & apply liberally)
Then I went over it again with bronze by applying the paint with my fingers, wearing a plastic glove. (Same tutorial as before.) making sure I don't get any paint in the scratches. And then finally, another dark brown wash to make it all look nicely weathered. I did accidentally remove some paint by going over it too often with the wash, but it wasn't too hard to fix.
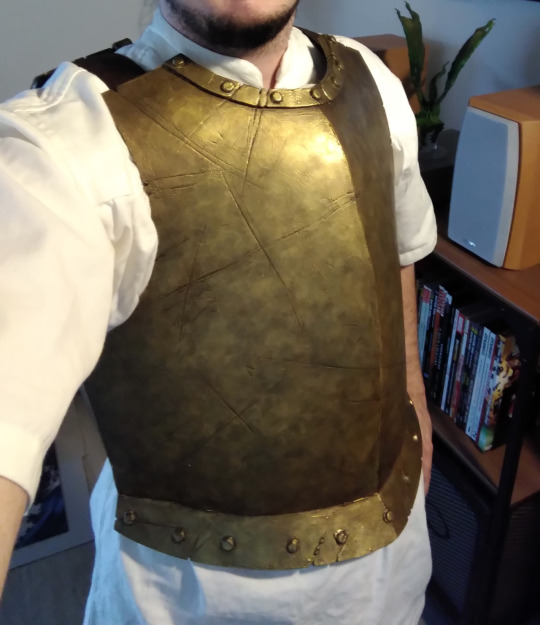
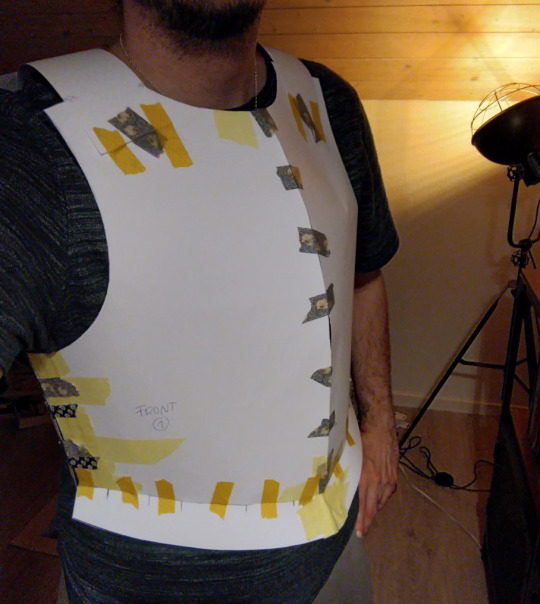
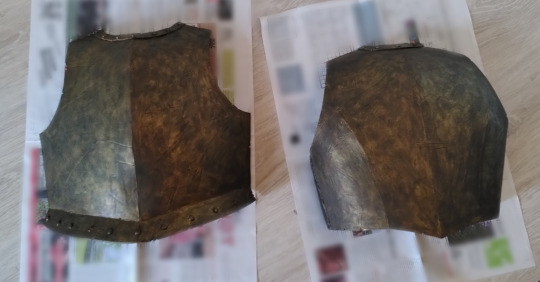
And this is the costume test, after adding velcro! It's really easy to put on and take off. I'm a bit worried about the velcro on the sides, but I can always add straps on the outside if it doesn't hold up.
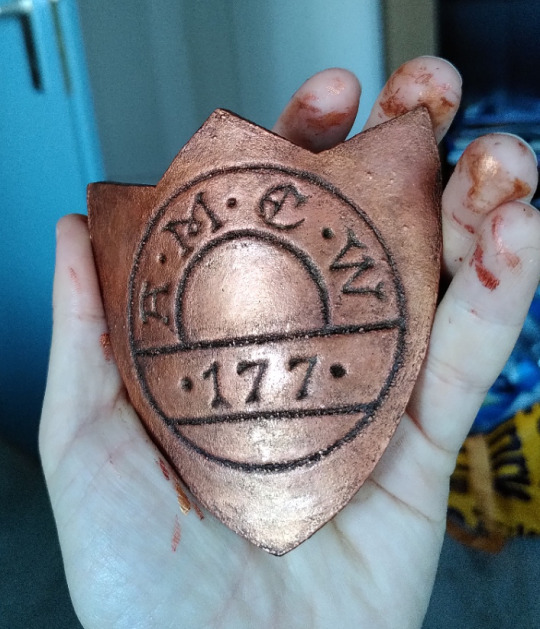
Next was the badge:
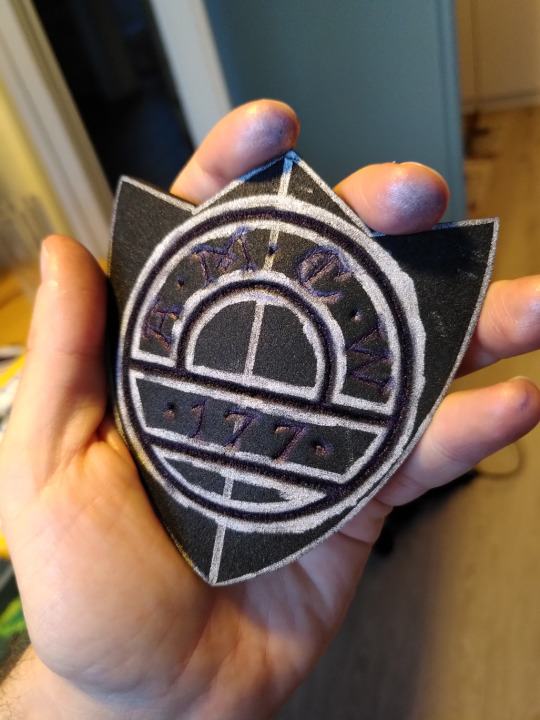
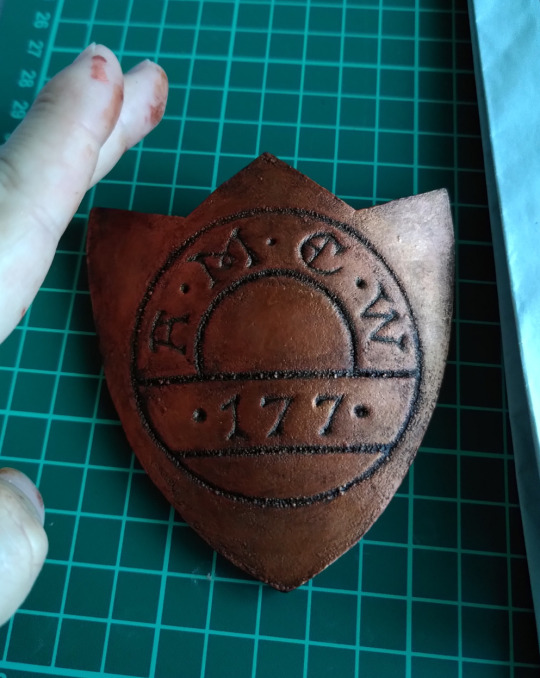
I referenced a pin badge that came out as a collectible a few years ago (sadly out of stock), cause I love the design! Carved in the letters and lines by drawing on it with a ballpoint pen and applying a lot of pressure. Then painted it with the same process as the breastplate, just with copper instead of bronze.
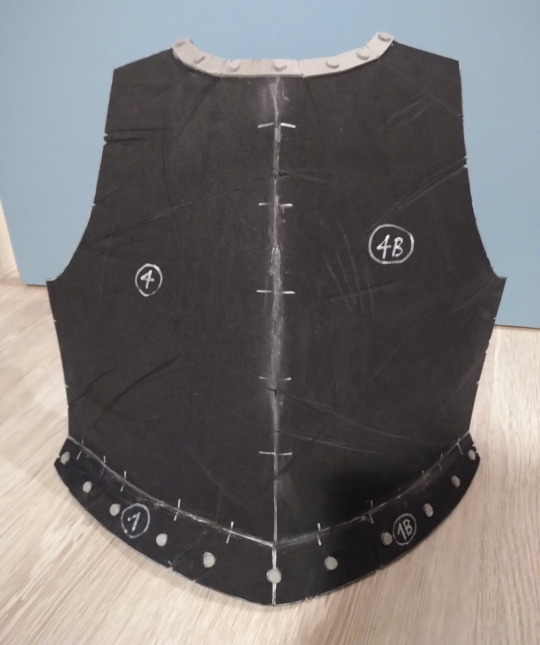
And just for funsies: here's the back of the breastplate in all its glorious mess XD
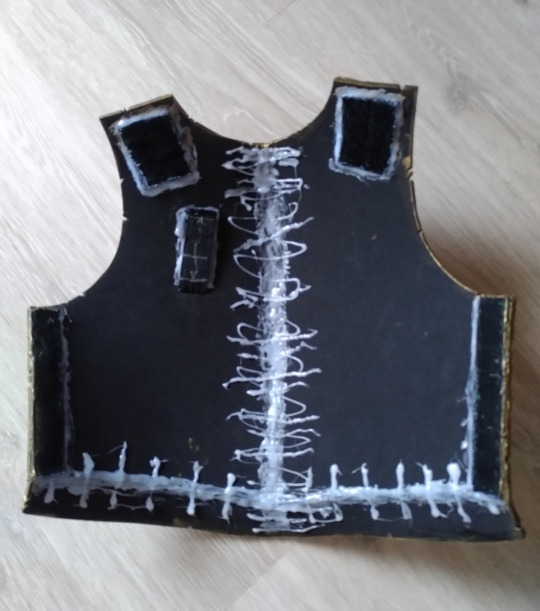
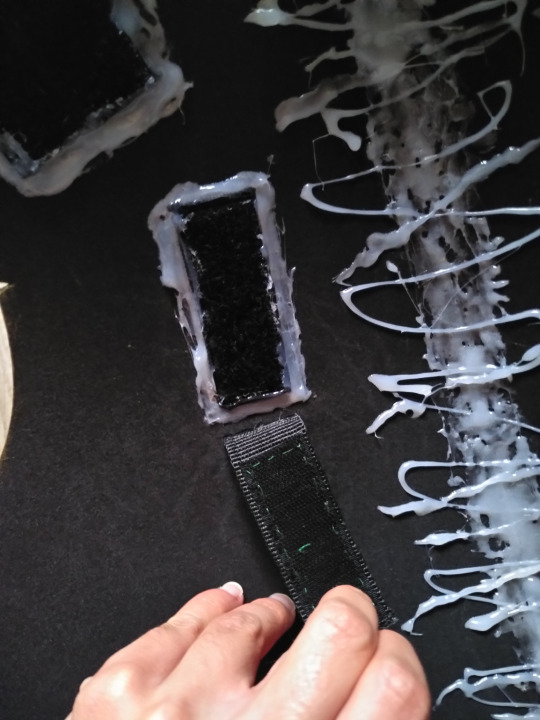
On the right side you can see how I attached the badge: By cutting a slit through the breastplate and making a velcro attachment. That way I can remove the badge and add, say, a sprig of lilac, should my fancy take me there. Reason being that our biggest con is in May.
If you know, you know.
Annnnd here it is; the finished breastplate with badge:
I'm honestly having the time of my life. It's a super fun project and I am very excited to see how it turns out! I'm already working on the cape with a good friend of mine (I despise sewing, she loves it XD) and have materials on the way to make some bits of chainmail.
#Discworld#Sam Vimes#Samuel Vimes#Commander Vimes#cosplay#cosplay process#foam armour#fantasy armour#foam crafting#terry pratchett#city watch#night watch
163 notes
·
View notes
Text
kamuicosplay detailed video on how she built an entire cosplay save me. save me kamuicosplay
11 notes
·
View notes
Text
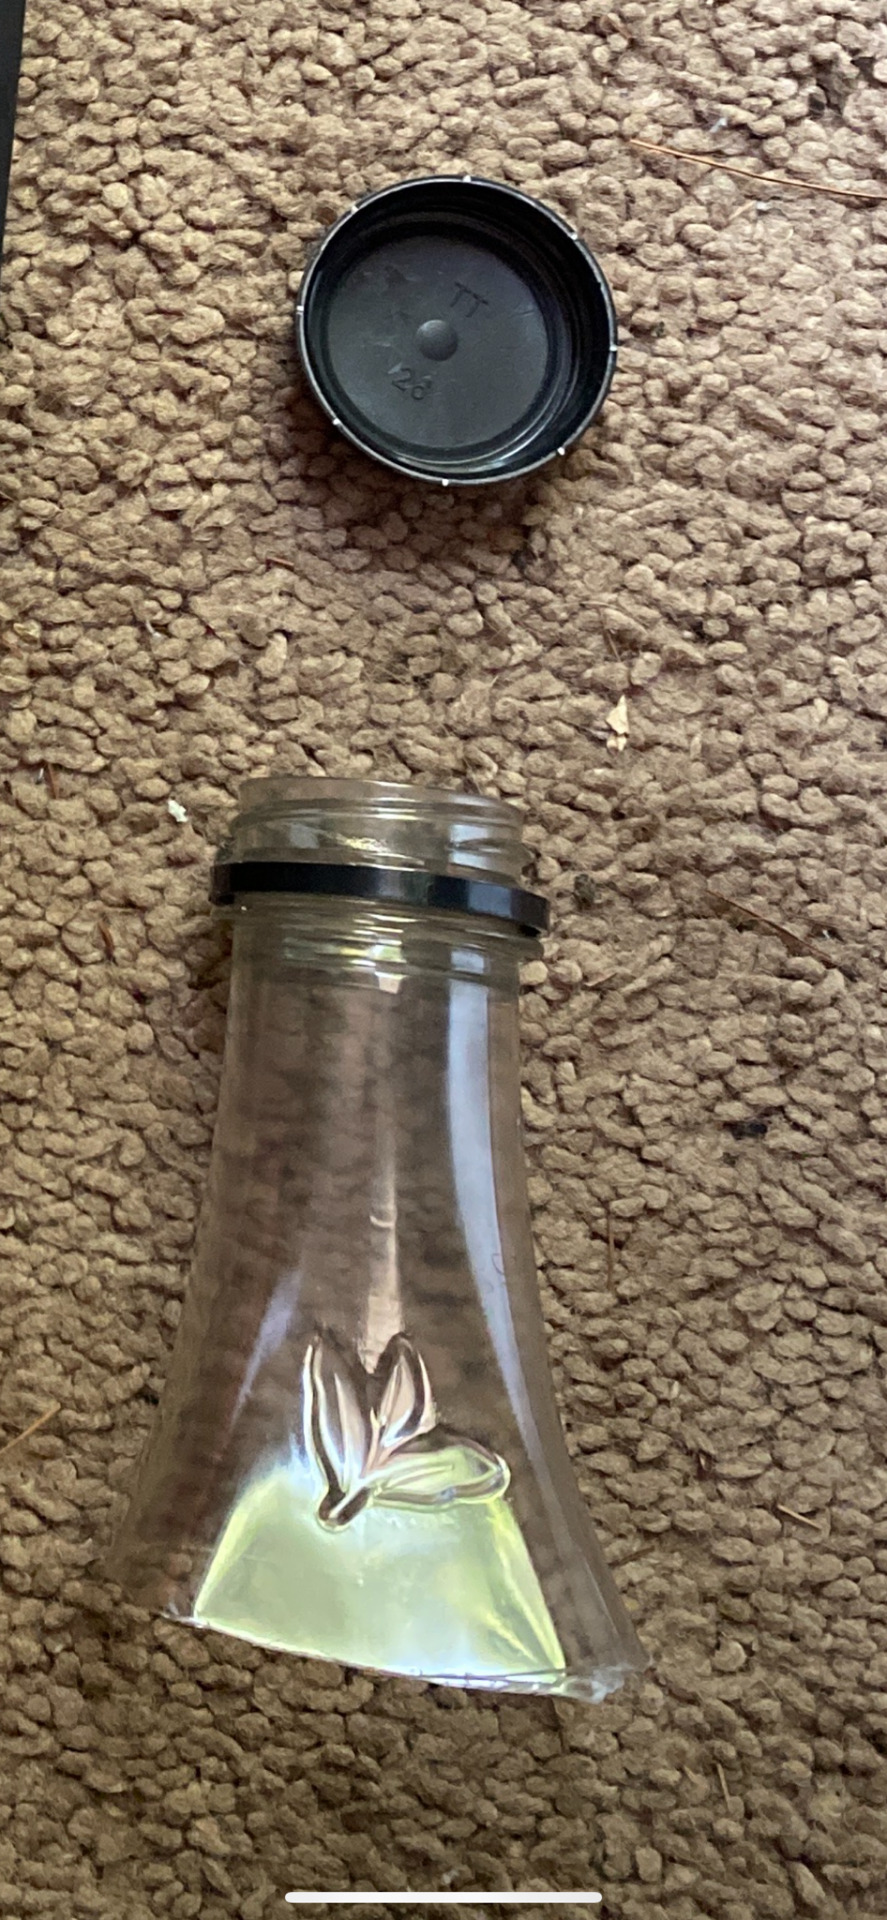
MASTER SHAKE'S STRAW FOR COSPLAY
EVA foam (I used 6mm thickness) first time using Eva foam? https://youtu.be/dN3NHy7Asqc?si=xw5WCLOEKci1tYAp
youtube
youtube
Contact cement (for EVA foam)
Respirator and/or a well-ventilated area like outside
Heating gun or an iron
Exacto knife/Hobby knife
Kwik seal
Clear Plasti dip
Acrylic Paints
—————————————
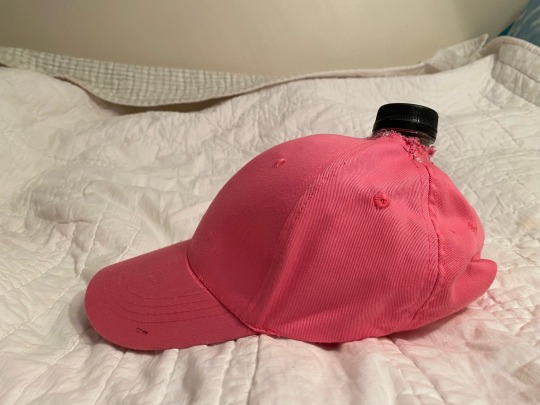
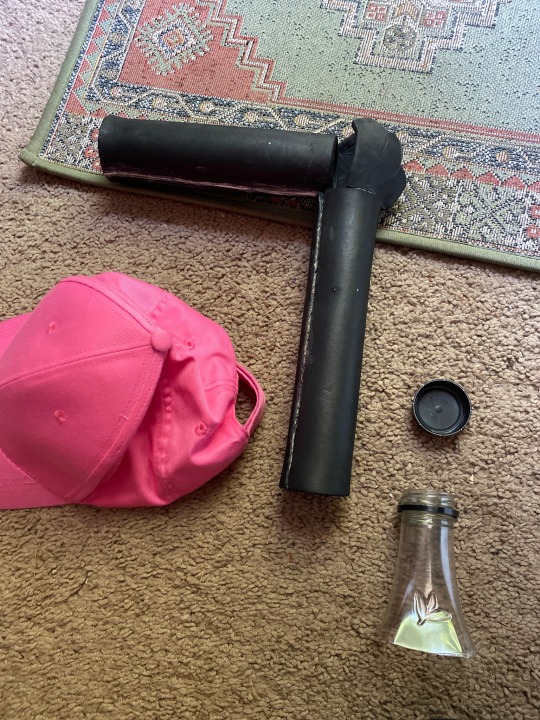
Pink structured baseball cap (Velcro backing works best imo)
Lipton ice tea bottle
Needle and thread
Scissors
—————————————-
If you have prior experience with using Eva foam this is relatively a light project. Eva is great for armor and prop cosplay, it’s light and durable. If this is your first time using Eva foam I highly recommend watching KamuiCosplay on YouTube she goes over the basics and what you need to know about Eva foam, heat sealing it and priming it.
This is my first time making a step-by-step thing, i don't have every photo for each step due to being in a time crunch.
EDIT: for cosplay something called like the 5 foot rule (someone please correct me if I’m wrong) where it’s you make something big enough to be noticeable from a couple of feet or more because thats how far away people are going to see you at a con.
____________________
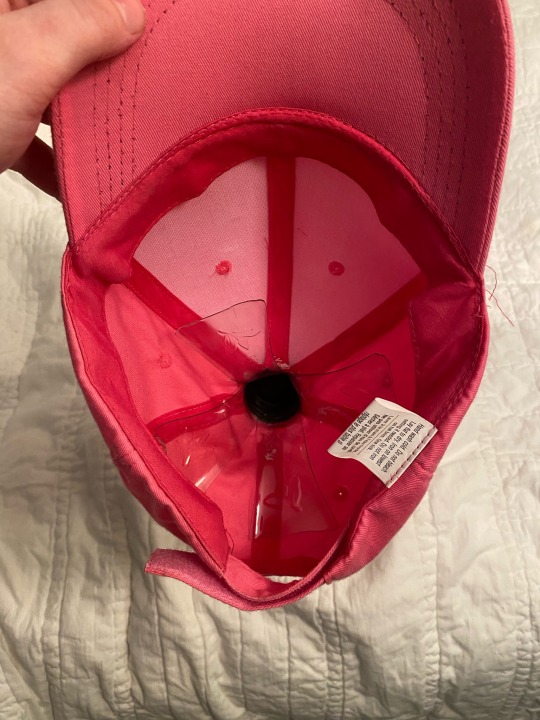
Inside of hat
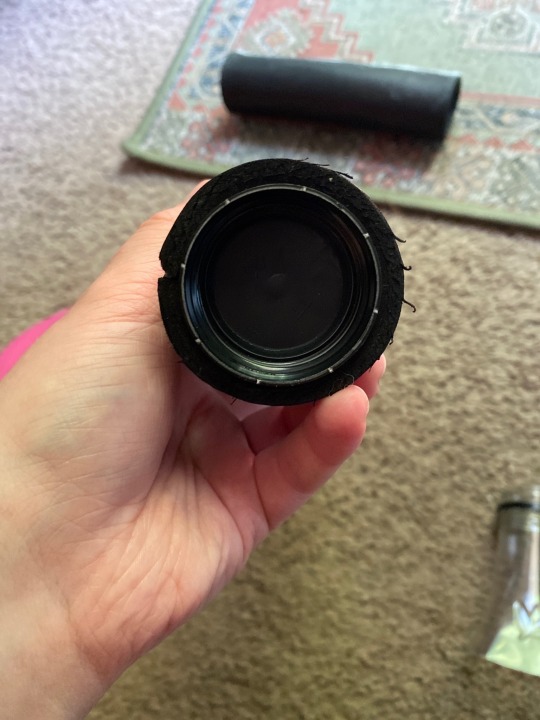
1 Empty Lipton iced tea bottle (using the neck up from the bottle)
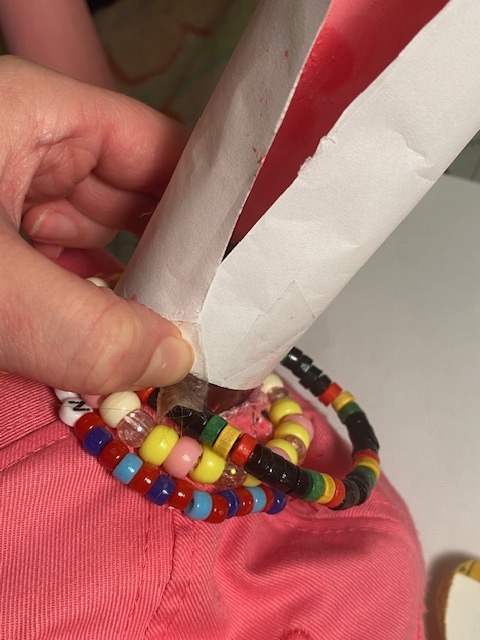
Extremely important to not lost the cap and to keep the rest of the lid and twist part intact along with the long neck of the bottle (cut the neck just above the body of the bottle) The circumference of the cap will be used to measure the circumference of entirety of the straw. I am not good with math so what i did was tape the edge of a piece of paper and gently rolled it until it met with the paper again
The neck of the bottle will be cut into 4 sections length wise; these flat sections will lie inside of the hat and on top of your head. This is where to use a heating gun or an iron. In my case I only had an iron available to me. So, I took parchment paper between the iron and the plastic and heated it and bending them back one by one. Be sure to either sand or heat the cut corners so they don’t cut into you or the hat. I was under a time crunch so most of this prop was half assed
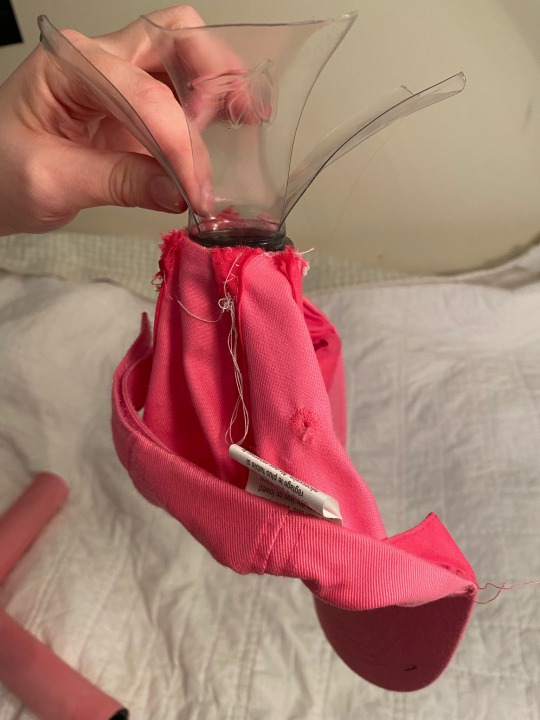
The flat parts will be used for support and keeping the straw upright
The twist and cap part of bottle will be used as a base to hold the straw in a “up” position
Very important to have a structured hat, it will help give support.
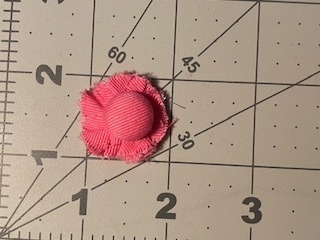
The button on the hat will be cut out, It seems small BUT this is where the bottle will be pushed through the hole in the hat.
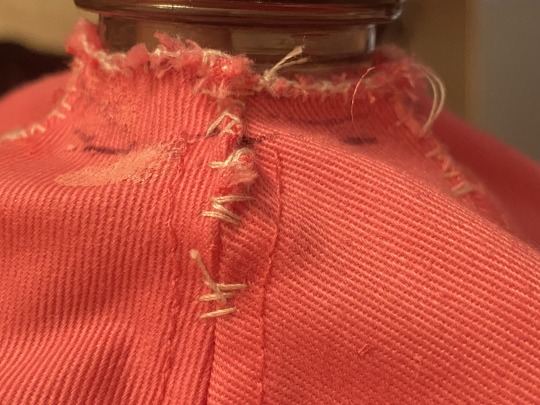
After a hole is cut, much smaller hole than the circumference of the cap. This will be so the hat will be fitted around the neck of the bottle. Push the top of the bottle through so it’s just the twist part showing. KEEP THIS IN WHILE SEWING. Start to stitch below the cut to keep the seams of the hat secure and together.
heres how to start a knot: Basic Hand Sewing - Tying a Starting Knot (youtube.com)
heres how to finish off with a knot: Basic Hand Sewing - Tying a Finishing Knot (youtube.com)
i did the blanket stitch so the hat was fitted around the neck of the bottle. like the picture above the plastic support is now fitted onto the hat. So, if the hat gets knocked off of you or anything the prop will still be in one piece!
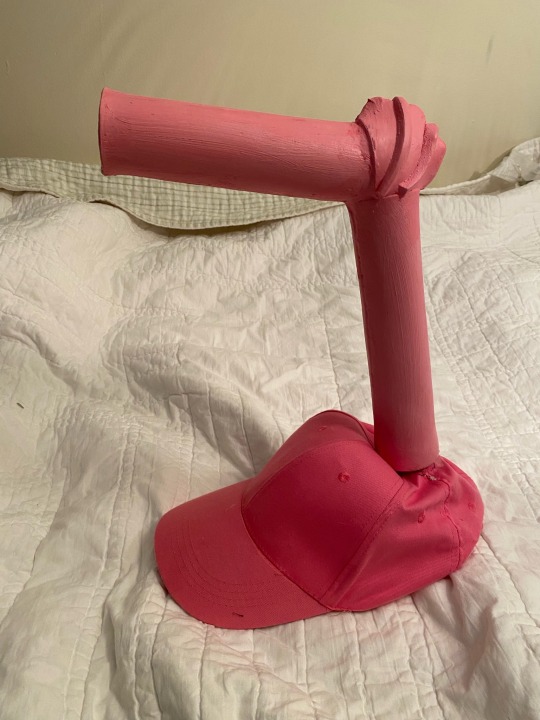
Building the straw
The foam will shrink a bit due from the heat making make a snug fit on the cap. When this happens, after the contact cement has been applied and the foam has been shaped to your desirer Kwik seal is good for filling those cracks in. when the whole thing is glued together there will be some spaces where the bendy part meets the top straw, i honestly filled it with a bunch of Kwik seal and painted it over. Once it's all glued this is where Plasti Dip comes in, it help seals in the foam from the acrylic paints. it takes a few layers of Plasti Dip i think i used 2-3 layers with 30 mins in between dry time. I also diy some metallic paint with eyeshadow to make it glisten in the sun.
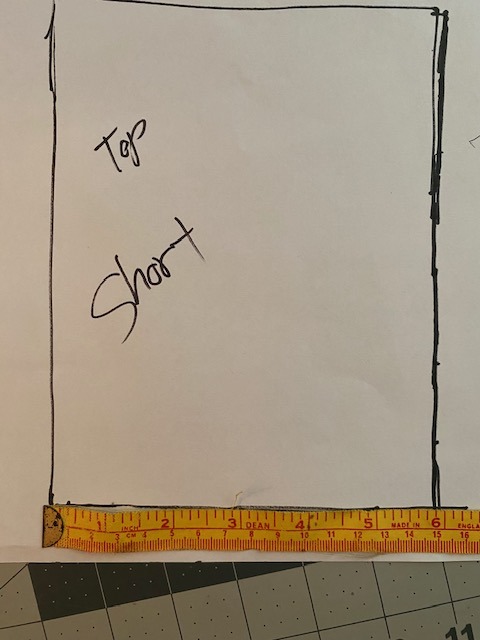
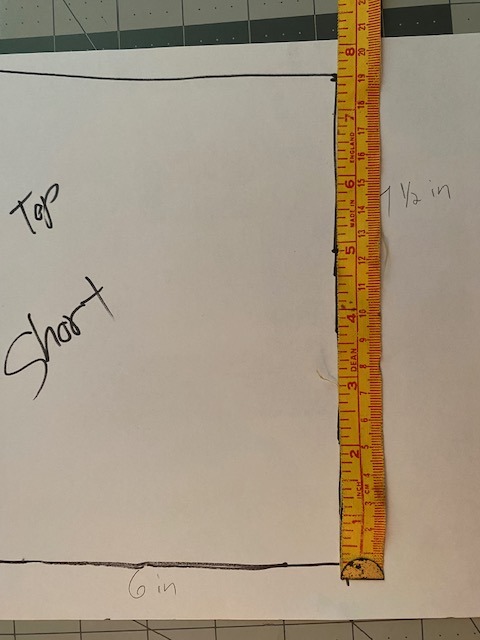
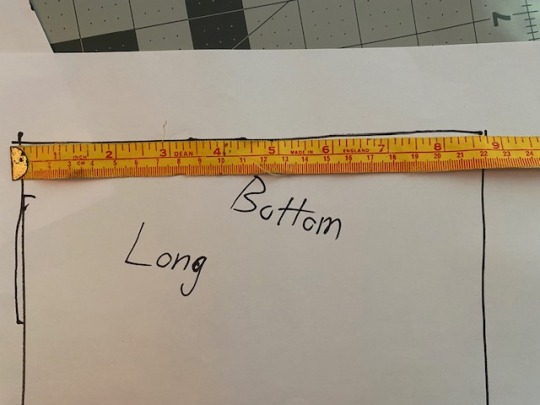
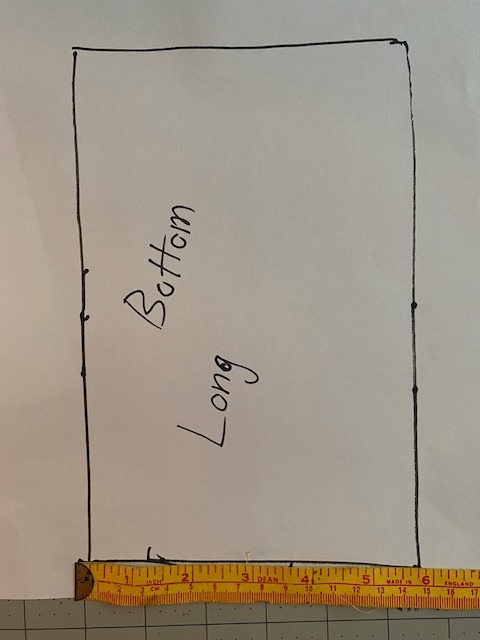
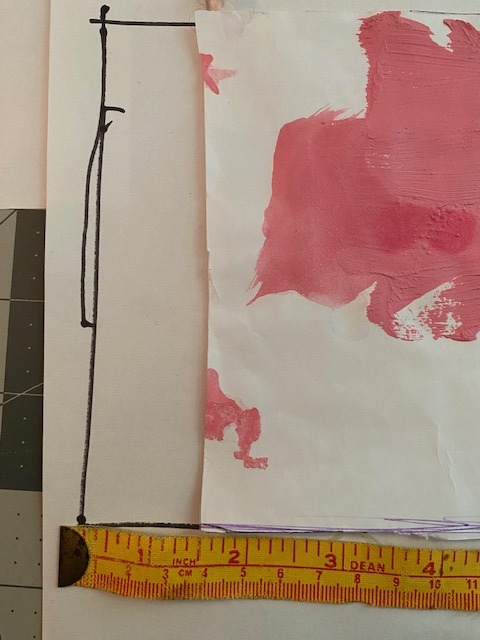
Below are the mesuments of how long the bottom and top straw should be. (8 inches and 3/4ths) 9 inches basically VVVVV
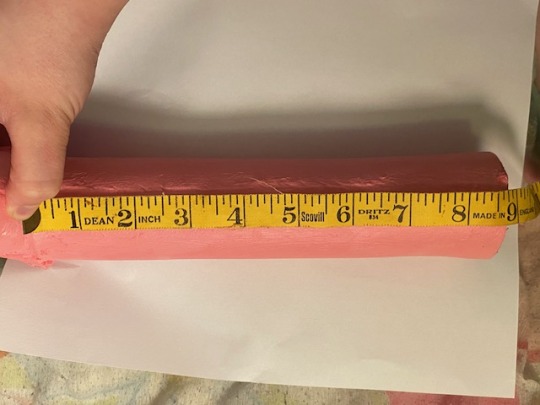
this is the bottom half of the straw (7 1/2 inches to make it easier)VVVVVV and the bend of the straw, it will be 2 pieces. I really struggled with the bendy part. if anyone else finds a better way to make it please tag me ill add it onto this
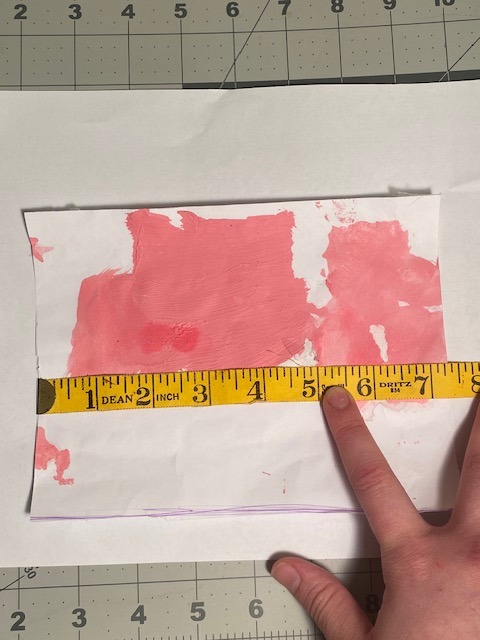
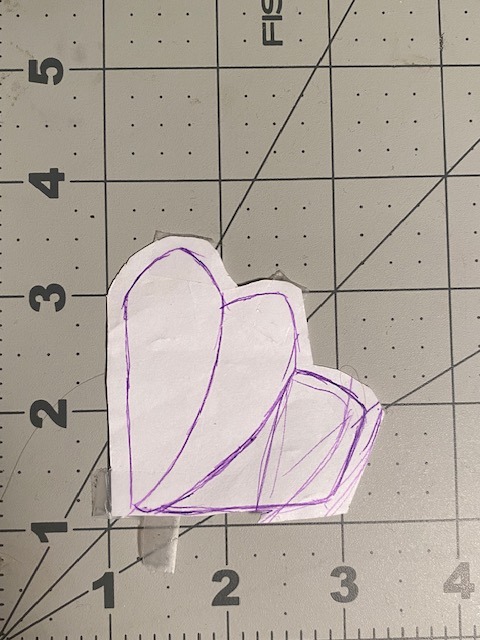
the top half of the straw is short so when the straw is glued inside the "bendy" part of the straw so it may seem shorter when all put together. I don't remember much of putting the straw together to due outside stressors and con crunching
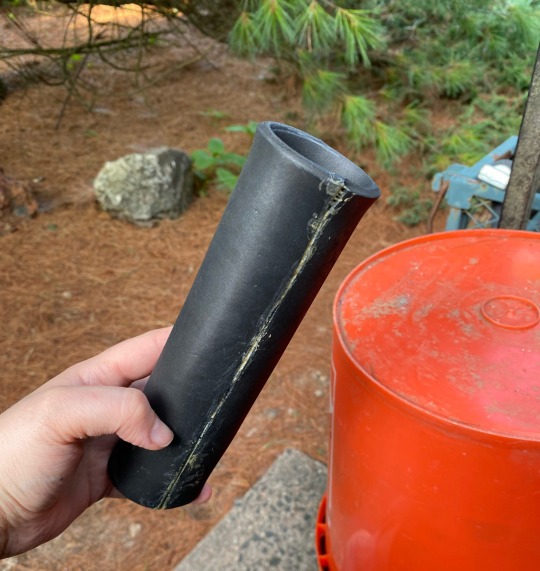
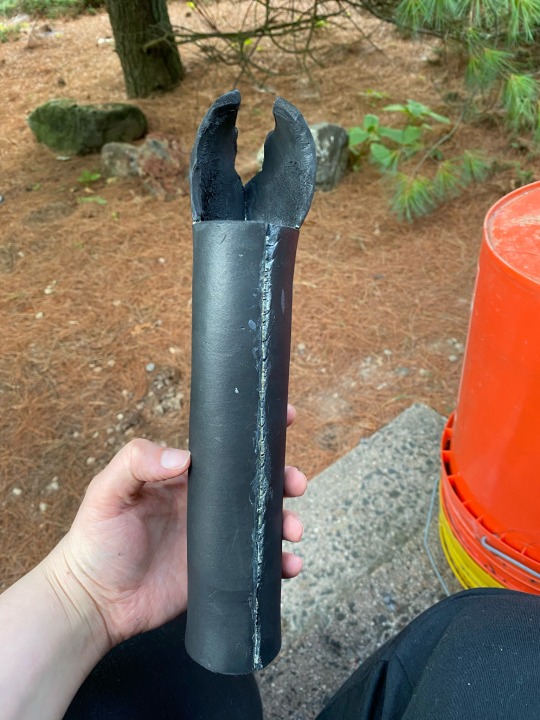
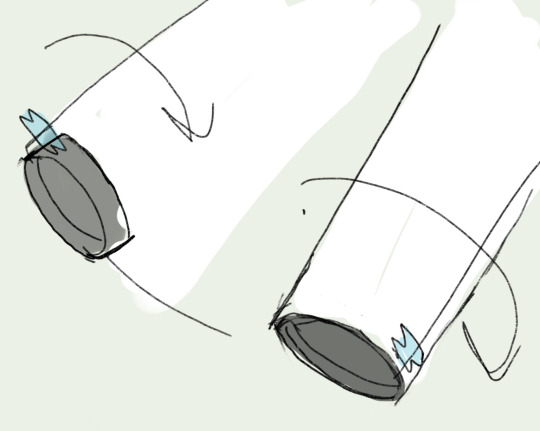
After the foam has been cut heat it up, you should see it seal itself. when its hot get it into a round tubelike shape, it make take a few times depending on what tool you're using (heating gun or iron) MAKE SURE YOU DO NOT MELT THE CAP!! while its still warm fit the cap in one end of the straw so it keeps that shape. i did not glue the straw to the cap. the foam will be tight enough for it NOT to need glue and now if needed it can be broken down for easier storage.
but it was basically heat shaping the bend of the straw, it was 2 sperate pieces that were beveled inward, heated and shaped and then glued. after that the upper straw piece was inside and when it was ready, it was heated and then glued finally. I glue some scrap pieces of foam on the bend to give it more wrinkles,,,i honestly don't know why i did that i was already mentally checked out
Sooo i think thats it for the tutorial. Hopefully i covered everything best I can. Feel free if you guys have found better ways to build this prop, all i ask is that DONT put it behind a paywall and please tag me/credit me when sharing and reposting.
It’s not required but is appreciated if you leave a kofi for me https://ko-fi.com/zimvatt
#Youtube#eva foam#cosplay#cosplay props#master shake#aqua teen hunger force#athf#cosplay tutorial#athf master shake#demonpikmin#kofi#buy me a kofi#props#cosplaying#convention#aqua teen forever#art#artists on tumblr
12 notes
·
View notes
Text


Helmet progress! I’m making Light Beyond Nemesis, my fav Warlock helmet from D1. The helmet itself was based on a pattern from KamuiCosplay, and then I cut out the visor. I used a dremel to smooth out the edges of the,,,,, side thingies (dunno what to call those lol) and bevel some detail pieces. Oh and also every single fucking feather got dremeled along the edges, which was such a PAIN but it looks good so. Worth it, ig. Seams were smoothed out w EVA foam clay.
It’s not fully assembled here, just taped together as a mockup. I still need to add one more detail piece to the front, sand some of the clay that’s still drying, heat-form the feathers to get the right curve, prime w plastidip, spraypaint, and then finally put the damn thing together. …..pray for me.
14 notes
·
View notes
Text


Minthara patterning! I bought a bunch of base patterns from KamuiCosplay and I’m building off of them :) My foam doesn’t arrive til next week so i just have to work on the pattern til then 😭
8 notes
·
View notes

Text
"Ready for another Go Megara?"
📷@karamelphotography
Wig: @ardawigs @omgitsbarri @mysticmeringue
3d files: @spearmastercosplay
Printers: @rhino20k @twoacross106
Skull pattern: @kamuicosplay
30 notes
·
View notes
Note
how, may I ask, did you come up with the incredibly specific premise for SAD
okay, it was an evolution but it went:
haha cosplay au. they see each other at conventions and catra is like >:( and adora is :') >
oh both were makers but then adora became a known cosplayer and catra didn't get recognition even though they were equally skilled >
okay propmakers and then adora took that to become a cosplayer, leaving catra still back where they started >
and then some iteration that's spoilers (even if it's only for chapters 2 or 3 so far, because that's as far as I've written)
originally hordak owned the horde and shadow weaver was the manager, and there was some vague idea of them being her wards she then used as extra hands there, but then i remembered child labor laws and stuff and decided that probably wasn't going to fly, so i decided to make her a stage manager trying to make them cash cows. they escaped her and walked right back into another abusive/exploitative situation
as far as why any of those things occurred to me, i've followed cosplayers, prop makers, sewists, and general makers for a long time and cosplayed myself, so all that stuff is in my orbit. also i know some stories of exploited child stars. one in particular was the inspiration because she was "adopted" by her stage manager and then taken to hollywood to be a cash cow - years later her mother would claim she was all but forcibly taken from her by the stage manager, and because the mom already had other children in foster care (she couldn't support them all so some were fostered), she could do nothing about it. the child star in question had a tumultuous life and eventually disappeared without a trace.
Weta Workshop (prop shop behind the LOTR franchise) was a big inspiration for the Horde's workshop in this (in the logistics of how it works, as far as i know their business practices are only discriminatory to women 🙃), as well as M5 from the mythbusters.
catra's workshop is based off laura kampf's (german butch youtuber, also some influences from her swedish-american friend simone giertz) and adora's shared workshop is based on kamuicosplay's (german? i think instagrammer.... just realized theyre both german. i dont think anyone else i follow in these spaces is german. it just worked out that way. huh), but truly everyone i've followed in this space has been a source of inspiration.
15 notes
·
View notes
Video
youtube
Liked on YouTube: I Made a Dragon Puppet! (in a week) || https://www.youtube.com/watch?v=xuErYI5PGrc || HI FRIENDS! The time has finally come to take on this MASSIVE project that I've kept putting off, lol. And that is: to make a giant dragon puppet! I've seen other amazing creators do this and it's always been a dream of mine so let's FRICKIN' do it y'all. And what better pair to do this than Daenerys and Drogon? Mother and son? ANYWHO this whole project was full of many trials and tribulations and mostly Futzing Around and Finding Out. ENJOY! Olivia's Socials! @AvantGeek https://ift.tt/noL4Ngw All the resources that were SUPER helpful: Keep Drawing Charlie: @KeepDrawingCharlie Tiny Badger: @tiny1badger Hinge Tutorial: https://youtu.be/_s0T3W61sio Kamui cosplay (for foam clay tips and tricks!): @KamuiCosplay Chapters: 00:00 Intro 03:02 Body-ody-ody 04:57 The Head 05:58 Legs N' Such 10:01 Sculpting With Foam Clay 12:51 Let's Shave Some Legs 15:49 PROGRESS 18:07 Painting Time (AW YEA) 19:34 Dany's Outfit 22:05 Fake Arm Shenanigans 24:37 The Reveal 25:45 Wrap-Up & Bloopz Patreon: https://ift.tt/zlJb82P Insta: https://ift.tt/O823rCf TikTok: @rachelmaksy
0 notes
Text
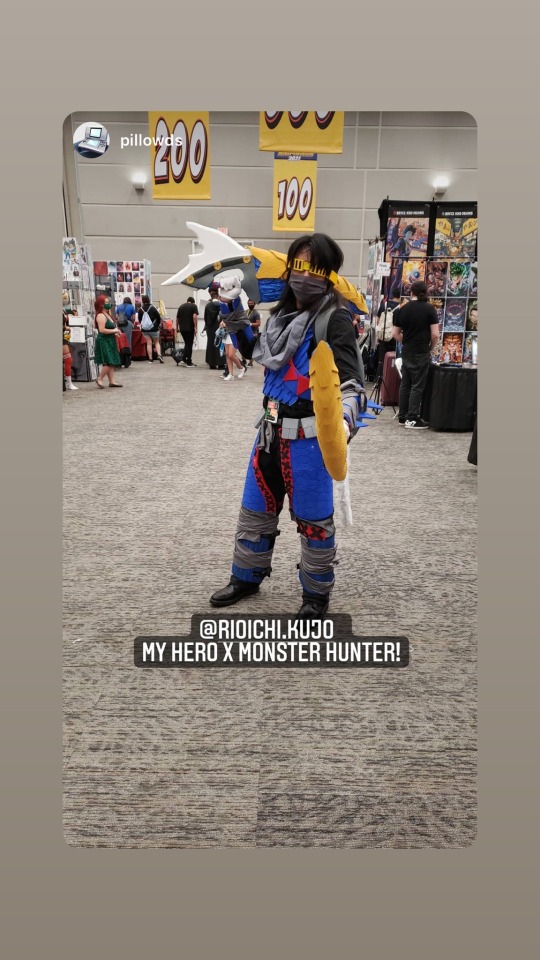
Ah yes, forgot to post a full picture of my finished work. It’s the best I could do with short time on the armor but it looks amazing. My Monster hunter My hero academia cosplay of Silverwind nargacuga and Aizawa.
#cosplay#cosplayer#monsterhunter#animanga2021#nargacugaarmor#kamuicosplay#nargacugacosplay#zinogre#nargacuga#aizawa shouta#Shouta Aizawa cosplay#monster hunter cosplay#silverwind nargacuga#mha cosplay#mha collab#monster hunter collab#zinogredualblades#dual blades#mha aizawa#aizawa cosplay#monster hunter cosplay collab
13 notes
·
View notes
Photo


16 notes
·
View notes
Text
Avondklokestafette 081: built the Mandalorian STAR WARS Rifle
Avondklokestafette 081: built the Mandalorian STAR WARS Rifle

View On WordPress
#avond#avondklokestafette#butt lift#KamuiCosplay#rifle#star wars#svetlana schwarz#the mandalorian#wijf
1 note
·
View note
Photo

“Monster Hunter” x “Corgi” Zelda (left) & Midna (right).
By KamuiCosplay // kamuicosplay.com
#monsterhunter#monhan#monhun#monster hunter#mh#モンスターハンター#モンハン#monster hunter world#mhworld#mhw#kamuicosplay
315 notes
·
View notes
Photo

Satsuki Kiryuin 👰🏻💙 A shot in the stairwell at #animefest2019 “This is the form in which a Kamui is able to unleash the most power! The fact that you are embarrassed by the values of the masses only proves how small you are!” One of my fave quotes from Satsuki! 😌💙💙💙 #killlakill #killlakillcosplay #killlakillsatsuki #satsuki #cosplay #satsukikiryuin #satsukikiryuincosplay #satsukikiryuuin #anime #kamui #junketsu #junketsucosplay #kamuicosplay #waifu #kittyberry #animefest #afest2019 #afest #animefestcosplay #cosplaygirl #cosplayofinstagram (at Sheraton Dallas) https://www.instagram.com/p/B2ycqZLH0Tm/?igshid=12991rt8sr3tg
#animefest2019#killlakill#killlakillcosplay#killlakillsatsuki#satsuki#cosplay#satsukikiryuin#satsukikiryuincosplay#satsukikiryuuin#anime#kamui#junketsu#junketsucosplay#kamuicosplay#waifu#kittyberry#animefest#afest2019#afest#animefestcosplay#cosplaygirl#cosplayofinstagram
2 notes
·
View notes
Photo
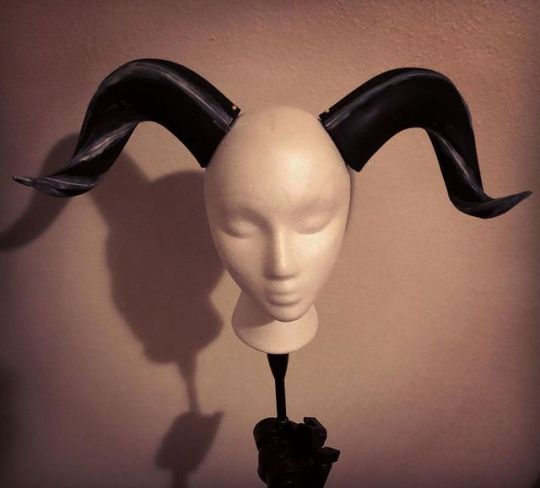
First bit of progress to share on my next cosplay! I am making one of my D&D characters who is a Minotaur! Since I’m trying to put this cosplay together in under a month, I’m using some existing resources from the community to speed up the process, for example the pattern for these horns was made by the queen of cosplay herself, @kamuicosplay !! 🌈 I’ll be adding ridges to them soon. And I will be posting progress photos for this project hopefully once a week among more photos of my recently completed cosplays. 🙏 #cosplay #cosplayhorns #cosplaypattern #foamsmith #minotaur #minotaurcosplay #dnd #dndcosplay #dnd5e #dungeonsanddragons #cosplaywip #cosplayprogress #cosplayprop #kamuicosplay
https://www.instagram.com/p/Bxc_7D7jufI/?igshid=1h6cmqh75dxa5
#cosplay#cosplayhorns#cosplaypattern#foamsmith#minotaur#minotaurcosplay#dnd#dndcosplay#dnd5e#dungeonsanddragons#cosplaywip#cosplayprogress#cosplayprop#kamuicosplay#my cosplay
3 notes
·
View notes
Last Seen Blogs

yookihhhoney
Mimi

flyingdannywolf
Things I find pleasant

rangelmaria
What’s on MaЯia’s Mind?

megastar520
Ⓓ-➊➏ ♥ Ⓕ-➊➎ ★
♚♛

viva-la-swen
Deserve Victory