#learn javascript step by step
Explore tagged Tumblr posts
Visit Tumblr Blog
Explore Tumblr blogs with no restrictions, modern design and the best experience.
Last Seen Tumblr Blogs


Fun Fact
28.6 is the average number of monthly visits per US mobile user.
Text
In the wake of the TikTok ban and revival as a mouthpiece for fascist propaganda, as well as the downfall of Twitter and Facebook/Facebook-owned platforms to the same evils, I think now is a better time than ever to say LEARN HTML!!! FREE YOURSELVES FROM THE SHACKLES OF MAJOR SOCIAL MEDIA PLATFORMS AND EMBRACE THE INDIE WEB!!!
You can host a website on Neocities for free as long as it's under 1GB (which is a LOT more than it sounds like let me tell you) but if that's not enough you can get 50GB of space (and a variety of other perks) for only $5 a month.
And if you can't/don't want to pay for the extra space, sites like File Garden and Catbox let you host files for free that you can easily link into NeoCities pages (I do this to host videos on mine!) (It also lets you share files NeoCities wouldn't let you upload for free anyways, this is how I upload the .zip files for my 3DS themes on my site.)
Don't know how to write HTML/CSS? No problem. W3schools is an invaluable resource with free lessons on HTML, CSS, JavaScript, PHP, and a whole slew of other programming languages, both for web development and otherwise.
Want a more traditional social media experience? SpaceHey is a platform that mimics the experience of 2000s MySpace
Struggling to find independent web pages that cater to your interests via major search engines? I've got you covered. Marginalia and Wiby are search engines that specifically prioritize non-commercial content. Marginalia also has filters that let you search for more specific categories of website, like wikis, blogs, academia, forums, and vintage sites.
Maybe you wanna log off the modern internet landscape altogether and step back into the pre-social media web altogether, well, Protoweb lets you do just that. It's a proxy service for older browsers (or really just any browser that supports HTTP, but that's mostly old browsers now anyways) that lets you visit restored snapshots of vintage websites.
Protoweb has a lot of Geocities content archived, but if you're interested in that you can find even more old Geocities sites over on the Geocities Gallery
And really this is just general tip-of-the-iceberg stuff. If you dig a little deeper you can find loads more interesting stuff out there. The internet doesn't have to be a miserable place full of nothing but doomposting and targeted ads. The first step to making it less miserable is for YOU, yes YOU, to quit spending all your time on it looking at the handful of miserable websites big tech wants you to spend all your time on.
#this is a side point so it's going here but I really think tech literacy should be a requirement in schools like math grammar history etc.#we live in a world so dominated by the stuff and yet a majority of the population does not understand it at even the most fundamental level#tiktok#tiktok ban#indie web#neocities#web development#current events#twitter#facebook#meta#amazon
11K notes
·
View notes
Text
#Web development guide#Beginner web development#Web development tutorial#Website creation tips#HTML CSS JavaScript#Learning web development#Step-by-step web development#Web development basics#Building websites#Frontend development#Backend development#Web development resources#Web development for beginners#DIY web development#Web development skills
1 note
·
View note
Text
Been really digging Frank's Laboratory on Youtube for JavaScript + Canvas tutorials since coming across him this past week. He keeps everything clear and shows patience for beginners. It's really been keeping me motivated to learn game dev in JS too! My dream...
#he goes through each thing and intentionally puts in mistakes to show how to troubleshoot them too!#super valuable to learn troubleshooting code and knowing what to look for 👍#also you guys GOTTA see his insane Canvas particle effects and animations PLEASE GO LOOK#regardless if you understand the code behind it it's mesmerizing!!#wk speaks#programming#javascript#web development#html5 canvas#game development#I've made a few simple games the last few months from other channels too#I love Youtube for learning these things 'cause I do best with step-by-step demonstrations I can follow#some don't explain things super well though so I don't get to fully understand what I followed#I gotta try my hand at tic-tac-toe again where I can understand the mechanisms of mapping its varied win/lose conditions#my first time doing it there was some binary code manipulation that lost me so much sdfsdf#I'm not THAT advanced yet oh gosh
0 notes
Note
hey dog! sorry to bug you with a coding question, but i'm learning rpg maker mv for a fangame & i'm wondering how you did a couple things. if it's not too much trouble, could you quickly explain some of it? i've scrounged around as much as i can but i cant find what i need so i thought it'd be worth asking directly ^^;
how did you get the players name to show up in the message log? i know theres a plugin that adds the name windows for other characters & i've got that figured out, but i have no idea how to get the players name to show up in the history after selecting stuff
how'd you get the graphic for the route diverging choices to show & play During choices? so far ive figured out that looping the images recreates the visual but then the game doesn't progress, bc its just stuck in that loop...
how'd you disable ( + grey out) dialogue options after selecting them??
how'd you add the fullscreen option? i found a code that was supposed to add a fullscreen option to the optionscore settings but that one just breaks the plugin & i simply Don't know enough javascript to figure it out myself
i'm using all the same plugins that dialtown has so clearly these are possible without extra ones, i just don't know how to do it,, thanks for explaining your pronoun system a little while ago btw! i wasn't the one who asked but your post was super helpful when i was setting it up for myself :D
It's been close to 6 years since I started making DT, and I had to figure out a few solutions to specific issues that cropped up which I've likely forgotten now, but I'll answer what I can remember. I'm also gonna give you some advice and advise you not to use RPG Maker for projects like these.
I basically Scott Cawthon'd DT and forced the engine to yield to my demands because I wanted to use the one I knew best. A few of these solutions are over-complicated because the easier ones (which would've worked in other engines) had to be constructed differently. I'll also mention a few solutions to problems you might not have encountered (but inevitably will if you try to recreate DT.) With that out of the way...
1)

You'll want these settings for the backlog plugin. the \c[x] commands refer to standard name colours. Log special inputs set to true, followed up by this below:
\n<\c[4]\n[1]\c[0]>%1
With \n[1] being the name you want and the number after the first c being what colour you want.
I'll also save you a potential future issue: I'd actually recommend you find the backlog plugin I used in DT's files (located inside the www/js/plugins folder) and use the version I have instead of the official release if you're not already, because I made a small change to fix an error. Basically, it breaks slightly with the plugin that lets you bring up the menu during dialogue because text reloads when you leave the menu and re-enter the text box, causing text to be logged at least twice after you pause it. If you keep bringing up the menu, you'll get constant duplication. I simply added a line of code that tells the log not to have two duplicates in a row. Not a programmer, but it seems works.
2)I did it in a funny way to ensure the engine wouldn't screw it up. Basically, there's 3 steps to the event and it's kinda hard to explain (and would be annoying to reproduce without a lot of trial and error for a beginner.) It's easier if I show my code. The first thing I do is run a common event (you can also just paste this code in and run it from the event) that renders the frames used by the popup, so they're loaded into memory + ready to go.

As you can see, they're set to 0 opacity but now ready to be used. Obviously they have to be on a layer that isn't being used by anything else in the scene (and won't be during this part of the game.) I run this event ahead of time, usually 4 messages before the choice comes up or so, so even slower PCs should have time to get them up.
The 'if head' thing just switches between the files for phone/typegingi's heads. I render each frame on separate layers and toggle their opacity from one to the next on a single frame to avoid flickering (bc RPG maker's renderer is hot trash and I have to work around it. Case in point.)
Step 2 is a second command event that orders the frames to fade in.

One layer is the text (which doesn't move) and the other is the first frame of the little head animation. A switch is also turned on at the end, and this signals the animation to go, which is handled by an event on any map where a choice like this comes up.
The event page that handles the animation itself has 2 pages, one to handle the animation as it goes and the other to handle when it stops (note that you could use one page and simply use a conditional branch. I didn't.)

Set to parallel so it runs in the bg behind normal events. As you can see, every 17 frames, I command one image to fade out over a single frame and another to fade in. It loops perfectly, cycling from middle frame, to left, to middle, to right, back to middle. Finally, when you select any route diverging choice, it sets off a second switch, which activates the second event page and commands the game to dispose of the graphics and then turn itself off.

Basically, it's the same animation but with a twist. The text is faded out over 60 frames and then the same animation is played as before, except the values it fades back into go from 255, to 170 to 85. Each of those commands is also followed by a 17 second fade to the opacity of the next frame. So, frame one renders in one frame at 255. Then seventeen frame fadeout to 170... Next frame renders for 1 frame AT 170, then fades out gradually to 85. Then next frame renders at 85 during 1 frame, fades to 0. This is how i synced the turning animation to fade out convincingly.
At the very end, I turn both of the switches this event page uses off so both event pages don't continue on loop. I also have a check for the first event variable to check if the game should still think the animation is running, as a failsafe. I don't remember if this mattered.
3)It's a function in the YEP Extended Message Pack. You'll see the commands for hiding (temporarily removing) + disabling choices (greying them out) as you scroll through the help list, almost 2/3 down. The thing you have to remember though is that messages that are commanded to be hidden/disabled will STAY disabled unless you turn them back on. So, ANY time there's a possibility to make a choice with a disabled or hidden message, add this plugin command to EVERY selectable choice
ClearChoiceSettings
This will ensure the game doesn't break from having a choice permadisabled. If you use loops or labels to make the game return to a previous choice, make sure the looping point is BEFORE any logic that may disable/hide a choice so it doesn't autoenable everything if the game has to go back.
4)Make a new RPG Maker project, copy the js folder from www/data/js and open the new project alongside your other one. Then check my YEP Option core plugin and follow this path in the plugin editor

This code should work.
On a similar note, I'd also take a look at how my plugins are ordered, if your list is different. I had to meddle with the list to make sure some plugins functioned correctly. This engine is held together with duct-tape and spite, so do what this advice what you will.
Hope this helps!
90 notes
·
View notes
Text
Since AO3 is (apparently) still blocking tumblr from creating link previews of AO3 pages (fics, chapters, users, etc), tonight I embarked on a fool’s errand 😂
Forgetting the fact that I’ve forgotten most of the Javascript I’ve ever learned, I spent, uh, too many hours creating a quick-and-dirty simple bookmarklet to halfway automate the manual creation of the link preview. (Quick-and-dirty because I’m certain there are edge cases I haven’t accounted for and which will break things.)
Add this bookmarklet to your browser.
Go to the AO3 page (fic/chapter/user/etc) you want a link preview for.
Run the bookmarklet, copy the resulting text from the popup window.
In the tumblr editor, switch to HTML mode.
Paste the copied text.
If there are no edge cases, you now have a link preview!
There are more detailed instructions on the page in Step 1.
This semi-technical, so not for everyone; hopefully AO3 will unblock tumblr soon 🤞
No warranty!
Edit 15 May 2025: Also, I keep forgetting that if you’ve locked your works to be visible only to logged-in AO3 accounts, then even when the tumblr link preview fetch is working, it will return an incorrect and useless result, so this bookmarklet will be useful in that case, too.
54 notes
·
View notes
Text

I've been itching to dive into something totally new and outside of my usual web dev comfort zone! After brainstorming for a while, I finally landed on a brilliant new project idea: building my very own desktop widget~!
Now, full disclosure—I have zero idea where to even start when it comes to programming a widget, but that’s where the fun comes in, right? I’m all about learning new things (I have an addiction to studying so…)~!
In this post however, I’ll be sharing my initial ideas for the widget and brainstorming what tech stack might bring this amazing idea to life~!
Prior knowledge on desktop widgets?
All I know is that they stick to the desktop area and some even always in front of the other windows. That’s all I know!
Widget Idea
So, the project idea I’ve chosen is something simple, just so I can get used to making widgets: a notepad. But, it’s not just any plain notepad widget—it’s going to have an aesthetic color scheme! (I know, pretty cool, right?) I really wanted to keep things basic for this first project.
The inspiration actually came from a Pinterest pin that I saved. I think the design is originally from a color palette generator website, but I want to take that concept and turn it into an actual desktop widget. Thus this project was born!

Tech Stack
Alright, I lied—I'm not entirely stepping out of my comfort zone for this one! I'll be using ReactJS, a technology I’m super comfortable with and absolutely love. But to keep things fresh and challenging, I’m diving into something new as well!
After researching (thank you, ChatGPT, Google, and YouTube), I found out there are plenty of ways to build a desktop application, or in this case, a widget. You can go with WinForms, WPF, Tauri (Rust), Qt, and others. But I wanted to stick closer to JavaScript—specifically something I could pair with ReactJS. So, ElectronJS seemed like the best fit.
For this project, my tech stack will be:
ReactJS (JavaScript)
ElectronJS (JavaScript)
SCSS (for those extra styling powers)
HTML (obviously)
Visual Studio Code (with a lovely brown theme 🧸)
Toward the end of the project, I’ll also explore how to package the widget so people can download and install it on their own computers, and how to store the notes locally!
Finally
As I post this I am going to start the project so I will soon post updates! (This is where I fail…!)
#xc: project logs#coding#codeblr#programming#progblr#studyblr#studying#tech#comp sci#computer science
95 notes
·
View notes
Text
oh i forgot this one:

yeah no i refuse to believe that 170+ people have now successfully done all their remote learning course completions + tradesperson business license renewals on my stupid god damn web app.
#just use a google javascript api they said. it'll be fine & not at all like last time they said.#me @ past me#on like. i think three separate occasions now lol.#IT'S NOT MY FAULT. EVERY TIME IT IS SUCH A PAIN IN THE ASS THAT I JUST INSTANTLY REPRESS ALL MEMORY OF THE PROCESS.#the aforementioned Dumbfuck Clown Solution in the original post above was a side effect of the google maps distance matrix api lol.#apis be like#hey you know how the most fun & cool quality of javascript is how you can in no way ever trust it to execute in the order you wrote it#what if that but ALSO u gotta do several asynchronous requests for data from google servers with various degrees of latency#number of requests is variable BUT you will NEED TO BE SURE you have FINISHED ALL OF THEM before continuing to next step#oh lol you thought jquery .each would work because it has an iterator in it AAAHAHA YOU FOOL.#AGAIN YOU FALL INTO THE TRAP OF ASSUMING JAVASCRIPT WILL BEHAVE LIKE A PROGRAMMING LANGUAGE.#WHEN WILL U LEARN.
7 notes
·
View notes
Text

The UK no longer has end to end encryption thanks to Keir Starmer’s Labour government reanimating the zombie policy that is the Snoopers Charter, first peddled by Theresa May’s Tory government and rejected by the public.
Apple withdrawing end-to-end encrypted backups from the UK "creates a dangerous precedent which authoritarian countries will surely follow".
UK now likened to authoritarian regimes and why Starmer won’t challenge Trump since he is in lock step with US policies, openly goes after sick, disabled, pensioners and poorest, increasing their hardship rather than tax the mega rich. US policy is UK policy.
So what does this mean for Apple users in the UK?
All your data in the cloud is no longer secure in comparison to having ADP enabled and can be accessed by the government upon request. The GDPR is all but dead in the UK, there are now so many government policies that snoop on us by the back door with even news outlets online now charging us for access without *cookies enabled (data farming you whilst you read with no option to opt out unless you pay)
I checked with the ICO myself and it is a fully approved policy despite its contradiction to the rights of consent, removed in the process.
If you want a workaround here are my suggestions
Cancel your iCloud storage, your data will stay on the cloud until the renewal date, use that time to back it up locally or on a flash drive.

Change your iMessage settings to delete audio messages after 2 minutes and permanently delete messages after 30 days.
Alternatively, use a third party messaging app with a delete on read feature and disable Apple iMessage altogether.
If you are tech savvy you can set up a USB drive or flash drive directly into your router hub (you should have at least one USB slot, some have two) and use FTP to back up over wifi, you can do this on any device, you don’t need a desktop.
Use a VPN service or set one up. If you’re really technical you can use a Raspberry Pi to do this, but you will need to hard code it. Think Mr Robot.
This change does not impact sensitive data like medical details which remain end to end encrypted.
If you want to learn more on the sweeping bills being pushed through government and any action your can take visit Big Brother Watch: https://bigbrotherwatch.org.uk
*If you want to read news articles without paying for the privilege of not handing over your cookie data, simply disable javascript within your browsers settings and refresh the browser page. Remember to turn it back on when your done. Alternatively disable all cookies but know this will impact your online experience and access.
#big brother watch#orwellian#labour government#data privacy#end to end encryption#apple#government#uk politics#equality#discrimination#the matrix#advance data protection#big brother#1984#distopia#keir starmer#authoritarian#totalitarian#fascisim#police state#Theresa May#gdpr#Information Commissioner's Office#ICO
17 notes
·
View notes
Text
Holoatypical: Dev Log 1

Number one in what's hopefully going to be a pretty long series of updates!
So, first things first: Godot rocks. I've been using it for two weeks now, having switched from GameMaker (and before that, Twine, and before that, Java and JavaScript), and Godot does so much of the heavy lifting for you. It genuinely feels like an engine that's designed for making games. Unlike GameMaker, which was like wading through molasses every step of the way, while some sort of molasses shark is biting at your ankles. And I've coded in JavaScript.
Second, let me show you what I've been up to!

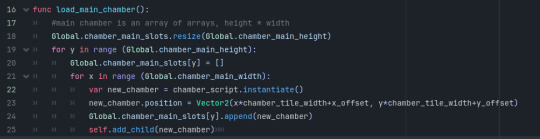
As you can see, I'm working on a prototype to try out the merging mechanic. It's got some (ha) bugs, and dragging things could be smoother, but the critters do actually snap into the grid and merge now, and I'm very pleased with that.
This chamber you see here is going to be the lab. As it's planned right now, the player will have infinite initial building blocks (eggs, spores, seeds...), which merge into different critters depending on environmental variables (artificially set in the lab) and on which other specimens are currently in the chamber. The challenge is to figure out the right parameters. I have no idea how big the chamber needs to be for that, but that's not really an issue, because...
This isn't so much a prototype as I'm just straight up building the foundations for a game, which is why it's taking me so long. The grid you see here is controlled with a few variables, and everything is flexible enough that I can simply change the grid size during playtesting and it still works.
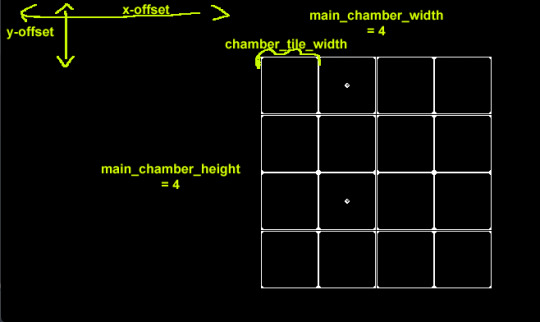
The tile grid is an array of arrays, filled with slot nodes that I instantiate at runtime. Is this the best way to learn a new program and language? Haha. Who knows.
Specimens have a sprite sheet with all their stages on it, and when a critter levels up, the part that's visible to the player just needs to be shifted 64 pixels to the right.

That's x starting point, which is the specimen stage/level times 64, then y starting point, width, and height. Fun! So easy!!
As to the sprite sheet, I'm going against common advice and making these big. The 1bit style is super fast to do, and in my opinion, a certain level of detail is important to make the sprites look like anything. I'm moreso playing with the look than really wanting to make a retro game.

This sheet only took me an evening! I'm enjoying it because it really forces you to abstract the shape and focus on what's most important about the critter. (This is a style test - I haven't decided yet how weird I want to go with these vs making them look more natural.)
Next up will be ironing out the kinks, making an egg dispenser and a specimen incinerator so the field can be filled up and emptied, coming up with a few more specimen, and then going into play testing.
But in the next dev log, you're probably going to hear way more about the story and the characters. I am eyeing a visual novel extension for Godot (dialogic), which, if it does what I think it does, is going to take a lot of work off my hands and only leaves me with writing the actual dialogue, which I've already started on.
@tragedycoded @badscientist @curiouscalembour @writingrosesonneptune @gioiaalbanoart @monstrify @cowboybrunch @tsunamiscale @marlowethelibrarian
Was this format interesting? Less code? More code? Anything you specifically want me to talk about in this process? Let me know!
19 notes
·
View notes
Text


coder friends, I require assistance!
basically, there is a tool I want that doesn't seem to exist, but it feels just simple enough that I feel like potentially I could learn the required skills to make it and I need a sanity check that it is as achievable as I hope, and also that I'm choosing the most sensible language (python from my vague google searching)
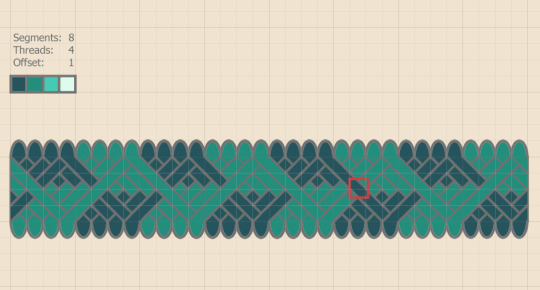
here is a rough mockup.
step one: decide how many segments
step 2: decide how many little bumps per segment
step 3: choose your offset
step 4: choose a colour (ideally you can use a colour picker or hex code, but I can live with a predefined palette)
step 5: (image one!) click a colour onto one of the bumps, that automatically makes lines between all of those bumps (angle defined by the offsets)
[repeat that for all bumps] (image 2)
step six (stretch goal): clicking one one of the threads moves that to the top (image 3)
this website is *kind* of similar to what im aiming for, it shows the way i want the colour to apply along the zigzag, and it shows how if you click somewhere the rotation changes? (sidenote: EXCELLENT website for inkle/tablet weaving!)
!
basically i want a sanity check that this seems like it'd be a Pretty Doable level of "learn 2 code", and that python is the most sensible language to learn?
i did also look at lua but idk if its a "slightly harder to learn python" but python could be more useful for other things sooo might as well work a little harder?
edit: a friend suggested JavaScript, plus they know it and have become Intrigued so will probably help me if I need it haha, so I shall start my quest with js
6 notes
·
View notes
Text
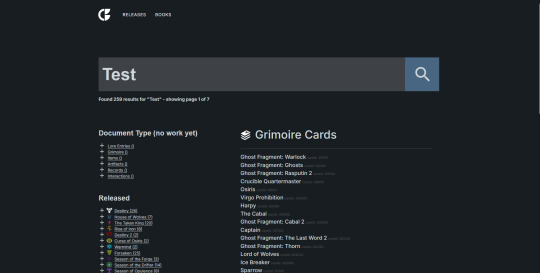
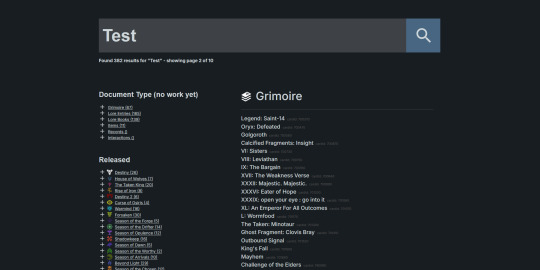
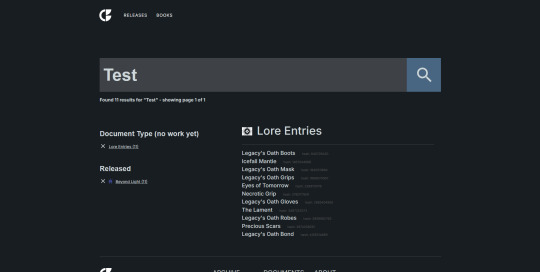
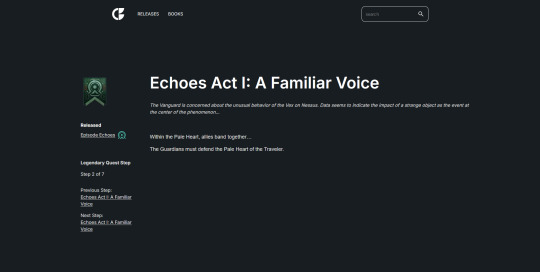
Small update to my Ishtar Clone project (Bray Archives)
I got the search updated a little bit. Now a lot more things can be filtered. You can now filter through seasons and results types (kinda, still a work in progress).
And it took a couple hours, but you can use the filters together without anything breaking, that I know of.
Quests
I also updated entries for quests where they will point to their previous and next steps (if there are any.) This will make it easier to follow along with a quest without going back to the search page.
I also spent most of the day working on the old Destiny 1 data and adding the released/document type tags to them. The doc tags were easy. BUT there is no way for me to automate the when they were released tag. So I have to manually add that for every item from D1 (except for the grimoire), which is around 8,000 items just for Destiny 1.
I also have to update those tags for a lot of the Destiny 2 items as well. The seasonal events also can't be auto tags to the season they came out in. So I have to also go through all the seasonal items and update their released tags.
It will be a lot of work..... But I did learn something interesting. You can place conditional statements in string literals in Javascript, which allowed me to get the two filters working in the search page.
#this is a huge project#destiny#btw my queue is almost caught up#destiny projects#coding#destiny fan creation#hours and hours and hours#destiny the game#future posts may be slow
12 notes
·
View notes
Text
How to Do Web Development
Introduction to Web Development
Web development is the process of creating websites or web applications that are accessible over the internet. In today's digital age, having a strong online presence is crucial for businesses and individuals alike. Whether you're building a personal blog, an e-commerce platform, or a corporate website, understanding the fundamentals of web development is essential.
Understanding the Basics
HTML: The Backbone of Web Development
HTML, or Hypertext Markup Language, is the standard markup language used to create the structure of web pages. It provides the basic building blocks for organizing content on the web. With HTML, you can define headings, paragraphs, lists, images, and other elements that make up a webpage.
CSS: Adding Style to Your Website
CSS, or Cascading Style Sheets, is used to enhance the presentation of HTML elements. It allows you to control the layout, colors, fonts, and other visual aspects of your website. CSS enables you to create responsive designs that adapt to different screen sizes and devices.
JavaScript: Making Your Website Interactive
JavaScript is a programming language that adds interactivity and dynamic behavior to web pages. With JavaScript, you can create interactive forms, animations, and user-friendly interfaces. It is widely used in frontend development to enhance the user experience.
Choosing the Right Tools and Technologies
Before starting a web development project, it's essential to choose the right tools and technologies based on your requirements and preferences.
Frontend Frameworks
Frontend frameworks like React, Angular, and Vue.js provide pre-built components and libraries to streamline the development process. They offer features like state management, routing, and data binding, making it easier to build complex web applications.
Backend Technologies
For server-side development, you can choose from a variety of backend technologies such as Node.js, Ruby on Rails, Django, and Laravel. These frameworks provide tools for handling database operations, authentication, and server-side logic.
Planning Your Web Development Project
Defining Goals and Objectives
Before diving into development, it's essential to define clear goals and objectives for your website. Whether it's increasing brand awareness, driving sales, or providing valuable content, having a clear vision will guide the development process.
Creating a Wireframe and Mockup
A wireframe is a visual representation of the layout and structure of your website. It outlines the placement of content, navigation elements, and user interface components. Mockups, on the other hand, provide a more detailed visual design, including colors, typography, and imagery.
Writing Clean and Maintainable Code
Importance of Clean Code
Writing clean and maintainable code is essential for the long-term success of your web development project. Clean code is easy to understand, modify, and debug, reducing the likelihood of errors and technical debt.
Best Practices for Writing Maintainable Code
Follow coding standards and best practices to ensure consistency and readability in your codebase. Use meaningful variable names, comment your code, and modularize your code into reusable components or functions.
Testing Your Website
Importance of Testing
Testing is a critical part of the web development process to ensure that your website functions correctly and meets the intended requirements. It helps identify bugs, performance issues, and compatibility issues across different browsers and devices.
Types of Testing in Web Development
There are various types of testing in web development, including unit testing, integration testing, regression testing, and usability testing. Each type serves a specific purpose in validating different aspects of your website.
Launching Your Website
Deployment Process
Once your website is developed and tested, it's time to deploy it to a web server and make it accessible to the public. The deployment process involves configuring the server, uploading files, and configuring domain settings.
Post-Launch Considerations
After launching your website, it's essential to monitor its performance, security, and user feedback continuously. Regular updates and maintenance are necessary to keep your website running smoothly and securely.
Continuous Learning and Improvement
Keeping Up with Industry Trends
Web development is a constantly evolving field, with new technologies and trends emerging regularly. Stay updated with industry news, attend conferences, and participate in online communities to keep abreast of the latest developments.
Expanding Your Skillset
To stay competitive in the job market, continuously expand your skillset by learning new programming languages, frameworks, and tools. Invest in online courses, tutorials, and hands-on projects to enhance your expertise in web development.
Web development is an exciting and dynamic field that offers endless opportunities for creativity and innovation. By mastering the fundamentals, choosing the right tools, and adopting best practices, you can build high-quality websites that engage users and achieve your objectives. Click Here
#Web development guide#Beginner web development#Web development tutorial#Website creation tips#HTML CSS JavaScript#Learning web development#Step-by-step web development#Web development basics#Building websites#Frontend development#Backend development#Web development resources#Web development for beginners#DIY web development#Web development skills
0 notes
Text
Self-paced learning
I've finally taken the first steps into Javascript, and I've been looking around at other courses that may help me with future employment. I'm not sure if a bootcamp is worth it, as a lot of it will teach me things I have already been learning by myself. Also, so many seem to focus on Python, whereas I would rather focus on C# and asp.net. I've seen a lot of job applications ask for C# but not Python...I'm sure it wouldn't hurt to learn both, but ultimately I would rather learn one that I would use more.
47 notes
·
View notes
Text
How to Build Software Projects for Beginners

Building software projects is one of the best ways to learn programming and gain practical experience. Whether you want to enhance your resume or simply enjoy coding, starting your own project can be incredibly rewarding. Here’s a step-by-step guide to help you get started.
1. Choose Your Project Idea
Select a project that interests you and is appropriate for your skill level. Here are some ideas:
To-do list application
Personal blog or portfolio website
Weather app using a public API
Simple game (like Tic-Tac-Toe)
2. Define the Scope
Outline what features you want in your project. Start small and focus on the minimum viable product (MVP) — the simplest version of your idea that is still functional. You can always add more features later!
3. Choose the Right Tools and Technologies
Based on your project, choose the appropriate programming languages, frameworks, and tools:
Web Development: HTML, CSS, JavaScript, React, or Django
Mobile Development: Flutter, React Native, or native languages (Java/Kotlin for Android, Swift for iOS)
Game Development: Unity (C#), Godot (GDScript), or Pygame (Python)
4. Set Up Your Development Environment
Install the necessary software and tools:
Code editor (e.g., Visual Studio Code, Atom, or Sublime Text)
Version control (e.g., Git and GitHub for collaboration and backup)
Frameworks and libraries (install via package managers like npm, pip, or gems)
5. Break Down the Project into Tasks
Divide your project into smaller, manageable tasks. Create a to-do list or use project management tools like Trello or Asana to keep track of your progress.
6. Start Coding!
Begin with the core functionality of your project. Don’t worry about perfection at this stage. Focus on getting your code to work, and remember to:
Write clean, readable code
Test your code frequently
Commit your changes regularly using Git
7. Test and Debug
Once you have a working version, thoroughly test it. Look for bugs and fix any issues you encounter. Testing ensures your software functions correctly and provides a better user experience.
8. Seek Feedback
Share your project with friends, family, or online communities. Feedback can provide valuable insights and suggestions for improvement. Consider platforms like GitHub to showcase your work and get input from other developers.
9. Iterate and Improve
Based on feedback, make improvements and add new features. Software development is an iterative process, so don’t hesitate to refine your project continuously.
10. Document Your Work
Write documentation for your project. Include instructions on how to set it up, use it, and contribute. Good documentation helps others understand your project and can attract potential collaborators.
Conclusion
Building software projects is a fantastic way to learn and grow as a developer. Follow these steps, stay persistent, and enjoy the process. Remember, every project is a learning experience that will enhance your skills and confidence!
3 notes
·
View notes
Text
Convert HTML to Image: A Step-by-Step Guide ✨

Do you want to turn some HTML code you've made that's on your website and have a way to convert it into an image for you to save?
Well, look no further! I too wanted to do the same thing but funny enough, there weren't any straightforward tutorials out there that could show you how! After hours of searching, I finally discovered the solution~!
This is an old tutorial I made 🐼

💛 Set your environment
Before we dive into the conversion process, I'll assume you already have your HTML code ready. What you want to learn is how to turn it into an image file. You should have a good grasp of HTML and JavaScript. For this tutorial, we'll use the following HTML code example:

We won't include the CSS code, as it doesn't affect this tutorial. The JavaScript file (script.js) at the bottom of the body element is where we'll add the functionality for the conversion.
Your page should resemble the following:

As you can see, the "Click me" button will handle the conversion. We aim to convert everything within the div.info-div into an image.
💛 Using the html2canvas JavaScript Library
The html2canvas library allows you to take screenshots of webpages and target specific elements on a screen. Here are the steps to include the library in your project:
The steps to put the library in your project:
Visit the html2canvas website for more information.
Copy the CDN link from here

and include it in a script tag in your project's head tag in the HTML file:

That's it for including the library on the HTML side. Now, let's move on to the JavaScript code.
💛 JavaScript Functionality
Here's the JavaScript code to handle the conversion:

In this code, I want to turn the whole div.info-div into an image, I put it into a variable in const div = document.querySelector(".info-div");.
I also put the button into a variable in const button = document.querySelector("button");
I added a click event listener to the button so when the user clicks the button, it will follow the code inside of the event listener!
You can find similar code like this in the documentation of the html2canvas library:

What is happening here is:
We add the div (or what the element we want to take an image of) into the html2canvas([element]).then((canvas)
Added the image file type url to a variable = const imageDataURL = canvas.toDataURL("image/png"); - You can replace the png to other image file types such as jpg, jpeg etc
Created an anchor/link tag, added the href attribute to imageDataURL
The download attribute is where we will give the default name to the image file, I added "dog.png"
Perform the click() function to the anchor tag so it starts to download the image we created
And that's it!
💛 The End
And that's it! You've successfully learned how to turn your HTML into an image. It's a great way to save and share your web content in a unique format.

If you have any questions or need further clarification, please comfortable to ask. Enjoy converting your HTML into images! 💖🐼
#my resources#coding#codeblr#programming#progblr#studying#studyblr#programmer#html#html css#javascript#neocities#coding tips#html5 tutorial#html tutorial
155 notes
·
View notes
Text
How to become full-stack developer in just 8 steps:
Step 1:- Learn HTML and CSS.
Step 2:- Learn JavaScript.
Step 3:- Learn React, Node.js
Step 4:- MySQL
Step 5:- MongoDB
Step 6:- Git Commands.
Step 7:- Build Projects and Push on GitHub.
Step 8:- Practice, Practice and Practice.
Anyone can be cool, But Awesome takes practice.
Trust me it takes time but you can do it.
#full stack development#full stack developers#webdevelopment#programming#progblr#codeblr#learn to code#learning#coding#studyblr#software
27 notes
·
View notes