#like as in a tutorial with pics of hands showing you how to draw them. or ever art of hands gets flagged!
Explore tagged Tumblr posts
Visit Tumblr Blog
Explore Tumblr blogs with no restrictions, modern design and the best experience.
Last Seen Tumblr Blogs


Fun Fact
The Tumblr office adopted Tommy, an 11-year-old Pomeranian.
Text
Hate that social media websites are using bots/ai to flag shit as mature content, because they keep labeling stuff that definitely is not. Like even showing real human hands can get a post labeled as mature sometimes
#its a problem on pinterest and now tumblr#I've recently seen so many innocent stimboards get labeled mature cause somebody's hands are in a gif playing with glitter#and I've gotten warnings from pinterest about me pinning mature content only to see said mature content is a hand drawing tutorial#like as in a tutorial with pics of hands showing you how to draw them. or ever art of hands gets flagged!#are we not allowed to show skin of any sort anymore on the super squeaky clean kid friendly internet now?#should we start wearing gloves?#this is literally ridiculous#this is stuff that wouldn't get flagged if real people were seeing it#sam's rants about life
3 notes
·
View notes
Text
Ok! I've finally decided to put together a (somewhat) comprehensive tutorial on my latest art~
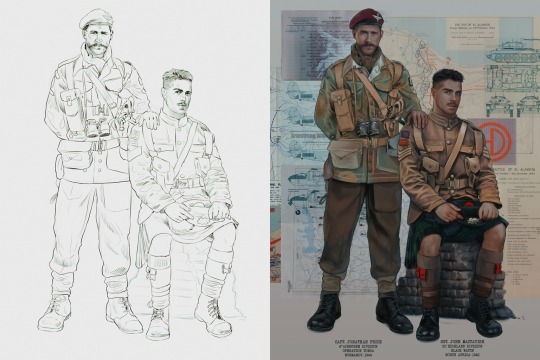
Please enjoy this little step-by-step 💁♀️
First things first--references!
Now I'm not saying you have to go overboard, but I always find that this is a crucial starting point in any art piece I intend on making. Especially if you're a detail freak like me and want to make it as realistic as possible 🙃
As such, your web browser should look like this at any given point:

Since this is a historical piece, it means hours upon hours of meaningless research just to see what color the socks are, but...again. that isn't, strictly, necessary 😅
Once I've compiled all my lovely ref pics, I usually dump them into a big-ass collage ⬇️
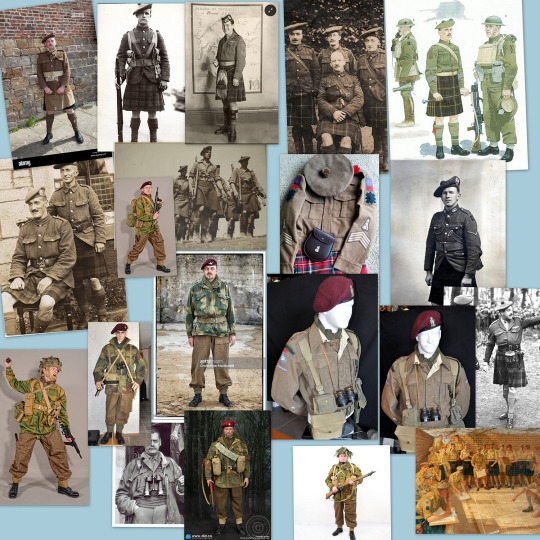
(I will end up not using half of these, alas :'D)
Another reference search for background material, and getting to showcase our models of choice for this occasion~
When picking a reference for an actor or model, the main thing I keep in mind (besides prettiness 🤭) is lighting and orientation. Because I already kinda know what pose I'm gonna go with for this piece, I can look for specific angles that might fit the criteria. I should mention that I am a reference hound, and my current COD actor ref folder looks like this:
Also keep in mind, if you're using a ref that you need to flip, make sure you adjust accordingly. This especially applies to clothing, as certain things like pants zippers and belt buckles can be quite specific ☝️
Now that we've spent countless hours googling, it's time to start with a rough sketch:
It doesn't have to be pretty, folks, just a basic guideline of where you want the figures to be.
The next step is to define it more, and I know this looks like that 'how to draw an owl' meme, but I promise--getting from the loose sketch above to below is not that difficult.
Things to keep in mind are--don't go too in-depth with the details, because things are still subject to change at this point. In terms of making a suitable anatomically-correct sketch, I would suggest lots of studying. This doesn't even have to be things like figure drawing, I genuinely look at people around me for inspiration all the time. Familiarize yourself with the human form, and things like weight, proportions, posing will seem a little more feasible.
It's also important at this stage to consider your composition. Remember to flip the canvas frequently to make sure you're not leaning to one side too often. I'm sure something can be said for the spiral fibonacci stuff, which I don't really try to do on purpose, but I think keeping things like symmetry and balance in mind is a good start ✌️

Next step is just blocking in the figures. Standard. No fuss 👍
Now onto the background!
It's frankly hilarious how many people thought I was *hand-drawing* these maps and stuff 😂😂 I cannot even begin to comprehend how insanely difficult that would be. So yeah, we're just taking the lazy copy and paste way out 🤙
I almost always prepare my backgrounds first, and this is mostly to get a general color scheme off the bat. For collage work, it's really just a matter of trial and error, sticking this here, slapping this there, etc. I like to futz around with different overlay options until I've found a nice arrangement. Advice for this is just--go nuts 🤷♀️
Next, I add a few color adjustments. I tend to make at least 2 colors pop in an art piece, and low and behold, they usually tend to be red and blue ❤️💙There's something about warm/cool vibes, idk man..
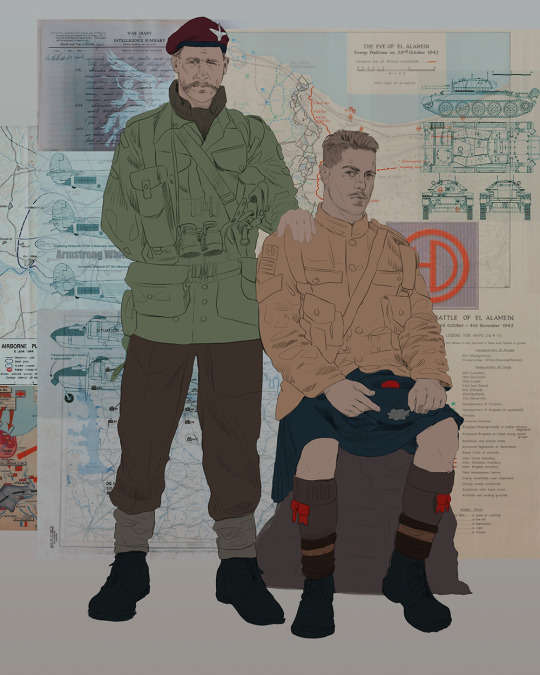
Now we move on to coloring the figures. This is just a basic block and fill, not really defining any of the details yet.
Next, we add some cursory values. Sloppy airbrush works fine, it'll look better soon I promise 🙏
And now--rendering!
I know a lot of beginner artists are intimidated by rendering, and I can totally understand why. It's just one of those things you have to commit to 💪
I've decided to show a brief process of rendering our dear Johnny's face here:
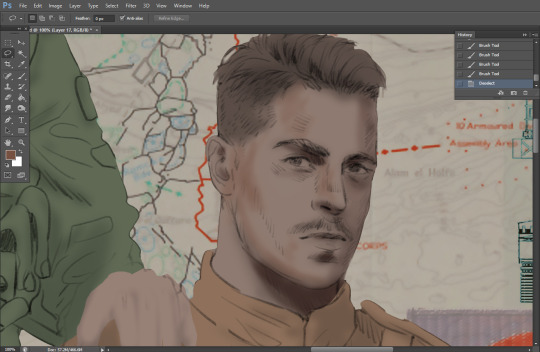
Starting off, I usually rely on the trusty airbrush just to get some color values going. Note--I've kept my sketch layer on top, but feel free to turn it on and off as you work, so as to not be too bound to the sketch. For now, it's just a guideline.
This next stage may look like a huge jump, but it's really just adding more to the foundation. I try to think of it like putting on make-up in a way~ Adding contours, accentuating highlights. This is also where I start adding in more saturation, especially around areas such as ears, nose and lips. Still a bit fuzzy at this point, but that's why we keep adding to it 💪
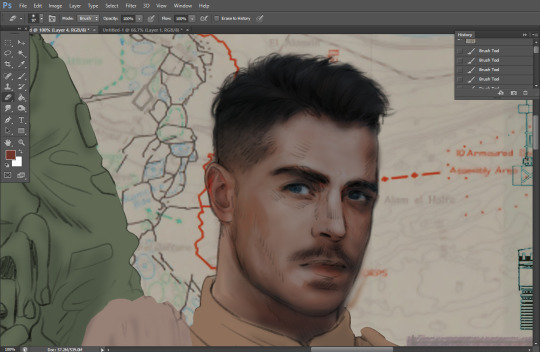
A boy has appeared! See--now I've removed most of the line layer, and it holds up on its own. I'll admit that in order to achieve this realistic style, you'll need lots and lots of practice and skill, which shouldn't be discouraging! Just motivate yourself with the prospect of getting to look at pretty men for countless hours 🙆♀️
I'll probably do a more in-depth explanation about rendering at some point, but let's keep this rolling~

Moving forward is just a process of adding to the figures bit by bit. I do lean towards filling in each section from top to bottom, but you can feel free to pop around to certain parts that appeal to you more. I almost always do the faces first though, because if they end up sucking, I feel less guilty about scrapping it 😂 But no--I think he's pretty enough to proceed 😚
They're coming together now 🙆♀️ Another helpful tip--make sure you reuse color. By that, I mean--try to incorporate various colors throughout your piece, using the eyedropper tool to keep a consistent palette. I try to put in bits of red and blue where I can
Here they are fully rendered! Notice I've made a few subtle changes from the sketch, like adjusting the belt buckles because I made a mistake 😬 Hence why you shouldn't put too much stock in your initial sketch~
The next step is more of a stylistic choice, but I usually go over everything with an outline, typically in a bright color like green. Occasionally, I can just use my initial line layer, but for this, I've made a brand new, cleaner line 👍
And the final step is adjusting the color and adding some text:
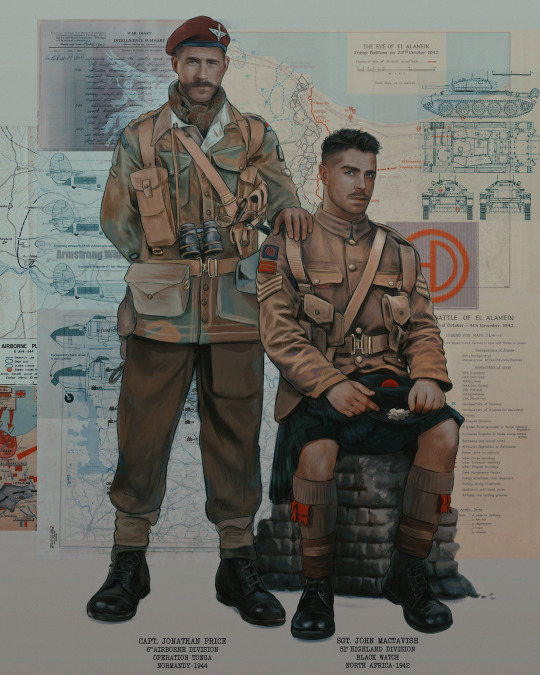
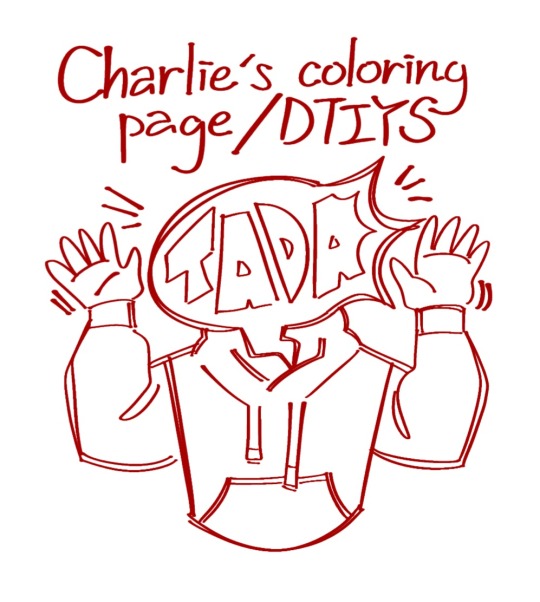
Tada!! It's done!
All in all, this took me the better part of a week, but I have a lot of free time, so yeah ✌️
I hope you appreciated that little walkthrough~ I know people have been asking me how I do my art, but the truth is--I usually have no clue how to explain myself 😅 So have this half-assed tutorial~
As a bonus, here is a cute (cursed) image of Johnny without his mustache:
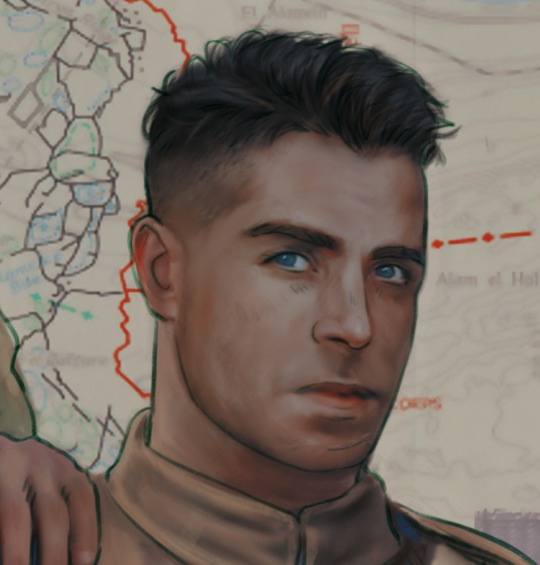
A baby, a literal infant child !!! who put this wee bairn on the front lines ??! 😭
Anyway! peace out ✌️
#tutorial#my art#art tutorial#since people have been asking#I remembered to save my process from this latest work~#enjoy 🙆♀️
1K notes
·
View notes
Note
hello i love your weird doubled lineart can you please show how you do that
Of course! I kind of just wing my drawings, so it's mostly guess-work and just my guts telling me it looks good enough. Nevertheless I'll try my best to explain my process :)
Tutorial under cut!
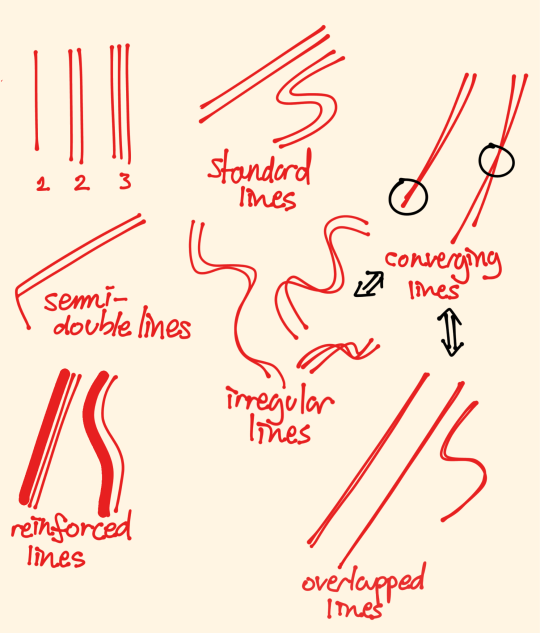
Let's first talk about the basic types of lines and techniques! :0
There are three types of lines: single, double, and triple. The number of lines will dictate the line-weight and thickness! The more lines there are, the thicker the it'll look. The same applies for how far apart these lines are. We'll talk more about this later.
Now that we know our lines, let's learn how to use them.
Usually when I draw, converging, irregular, and overlapping lines are the most common. They're all very similar, you'll see. Standard lines rarely ever come up. Standard lines are classic doubles lines that are perfectly parallel to one another, and that's very hard to do unless you use specific tools (poly-line tool, bézier curve tool).
So, let's stick with our imperfect, irregular lines and look at this drawing.
You can see a fuck ton of examples of converging, irregular, and overlapping lines here. For example, the face stands out a lot more than the hands behind it, doesn't it? That's because the face is largely composed of closely packed together, overlapping and converging lines. Meanwhile the hands are mostly further apart doubles lines, or single lines.
It's okay if you don't see it, there's a lot going on in that drawing. Let's check out some simpler, hopefully easier to see drawings!
In the first picture, you can clearly see the converging/overlapping lines on the torso area of the hoodie. BUT you can also clearly see the separated double lines on the sleeves. The same goes for the circled areas in the second pic. You get what I mean now?
Irregular lines can also be used to represent shakiness, or general unsteadiness, like in this doodle below. You can see the "nervousness" being shown in the shaky, irregular lines of the speech bubble.
Converging lines can work especially well for folds on clothes, as well as semi-double lines.
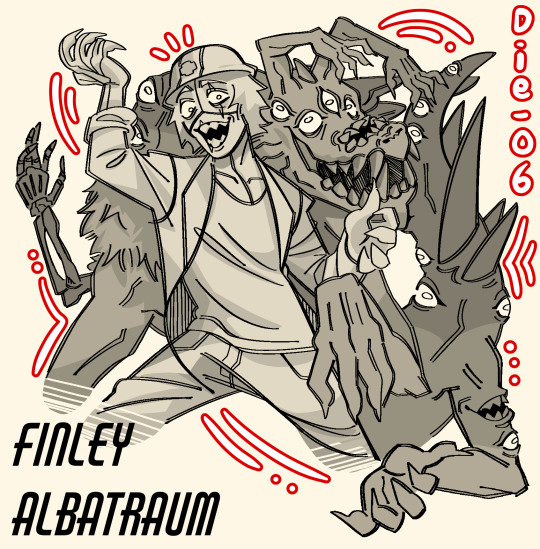
But having double lines everywhere can make it a little hard for the eye to pick out shape and detail. That's when reinforced lines come in clutch (featuring @die-06 OC, Finley Albatraum :)

Just look at how much of a difference it made! Simply by outlining the outer edges of the most prominent silhouettes, I was able to add a bit more depth into the drawing.
Another fun little fact about double lines is that you can color in between the lines!
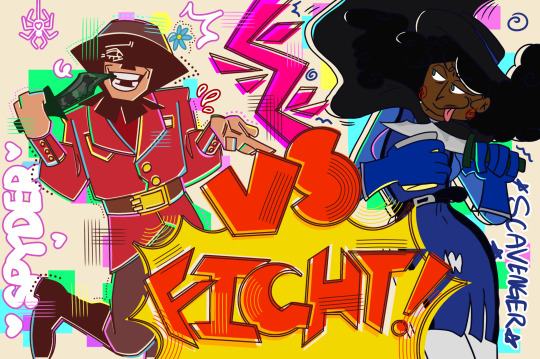
In this collab art I did with @froyocorp (featuring her OC, the Scavenger), it's a little hard to tell but I did the full drawing using the most standard lines as I could and making them as parallel as I could. In between the gaps of the lines, I filled it in with neon pinks, greens, blues and yellows to add a little more color :)
Anyways, hope this made any sense! Sorry if it didn't, it's a little hard to explain my art process. ily! <3
#asks#silly chatters#art tutorial#SORRY FOR @ING YOU FOR THOSE I MENTIONED- I JUST WANTED TO GIVE YOU CRESIT#*credit#my art
97 notes
·
View notes
Note
Hey there!!
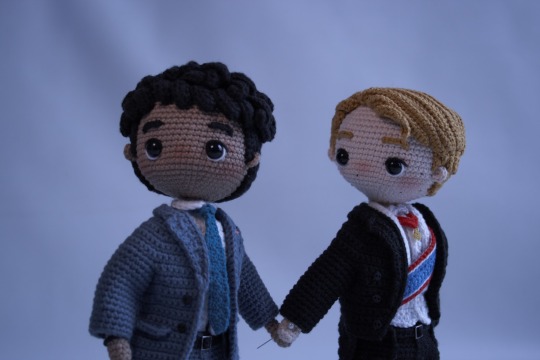
I was wondering if you could help me out a little bit! I already saw that you don't sell your crochet patterns, so I won't ask about that, but I was wondering if you had any tips or tricks for making dolls like the large Alex and Henry you made!
I'm a senior in college and I have a thesis project that I have to make. I'm considering making a crochet stop-motion animation for it!
Do you have any methods or tutorials you follow in order to make them so poseable and detailed? I noticed in the WIP photos that they have a wire skeleton! I'm also super impressed by the clothing and hair!
If you don't have any tips or anything, that's alright! I understand! I just thought I'd ask! 🙂
Hi! Of course, I'm going to try to explain everything to the best of my abilities ☺️ If you have more doubts afterwards, you can message me anytime you want!
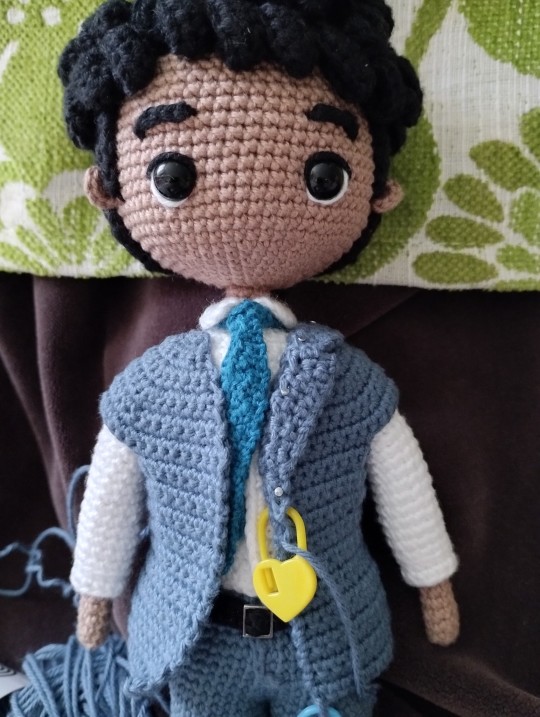
I can't really point you to any tutorials because at this point I just do my own thing and in the case of Alex and Henry I designed the body pattern taking into consideration that the clothes will be independent pieces. Most patterns that I've seen directly crochet the body as if it is wearing the clothes, like, for example if you want your doll to wear a red sweater, the torso and arms are crocheted in red. I think that's easier and the results are nice as well. My chibi amigurumis are crocheted like that, they have less mobility because they're really small, but that same technique in a bigger amigurumi will give you both the mobility and the advantage of not having to crochet so many pieces.
Now some tips for the mobility:
— A wire skeleton, as you've mentioned! It's not a perfect solution because sometimes the wire isn't strong enough to keep weird poses, but it helps! This video tutorial is in Spanish, but it's really visual and it shows how to add a wire skeleton. Honestly it was the best video that I saw back in the day, when I was looking for tutorials for this same thing.
— You can use pipe cleaners instead of wire as well, although they're weaker.
— Don't stuff the arms.
— Not too much stuffing on the legs/waist so there's enough room when you pose the amigurumi. Just a little bit less, enough for the piece to be firm but have mobility. If your legs are thin, don't stuff them, like with the arms.
— Now, another perk to crocheting the body as if it was already clothed is that it helps with mobility too. More layers of clothing means the movement will be more hindered.
— Crochet the head as an independent piece. I'll put on a couple of pics so it's easier to understand, but basically what you need to do is, once you've reached your desired width for the neck, keep crocheting rounds with the exact same amount of stitches until you have a tube. When finished, make sure to stuff it very tightly (or put pipe cleaners inside) and close it. After that, to crochet the head, start by creating a similar tube, so the neck tube fits inside the head tube. Once you've got the size you need for your tube it's only a matter of crocheting the rest of the head as you would normally.
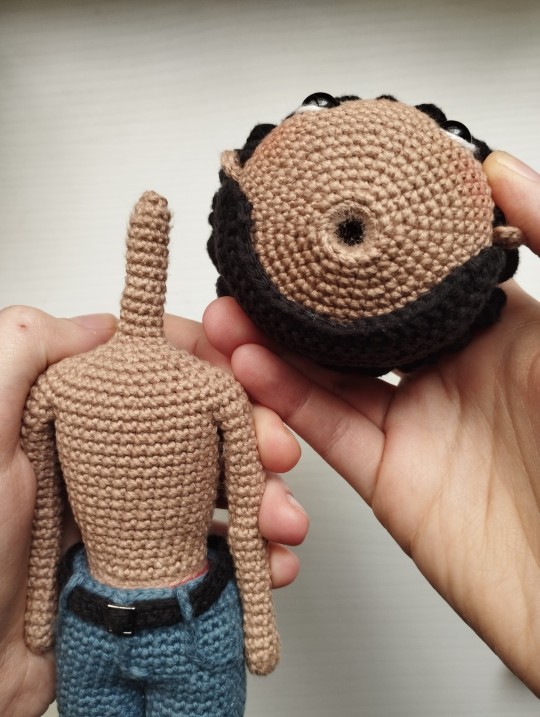
(I'm deeply sorry for that awful, awful drawing, I just thought it would help illustrate my point better but I'm not especially good at drawing on my phone)
— Use pins and skewers (like the ones for food). You can edit them out afterwards and that's probably the best tip because an amigurumi is a plushie and its mobility is never going to be really great 😅

These photos are unedited, that's why they're so dark but ANYWAYS, see the skewers on their backs in the first photo? And the pin keeping their hands together in the second? Think of them as aids for your purpose. Alex and Henry can stand on their own if you manage to find the perfect balance but oooof it IS frustrating. The amount of times I've managed to pose one and just then the other falls flat on his little face... AWFUL.
And for the clothes... it depends a bit on what you're crocheting I guess????? Although I highly recommend to not be like me and get obsessed with making everything in a single piece, sometimes it works better when the details are crocheted apart and then sewn or glued to the main piece. Like for example, for the jackets, the body is one piece and the neck is a different one, I just sewn them together with a row of single crochets.

Also most of the time the easier way to do something is the best way. Since crochet have certain limitations, it's important to keep in mind that sometimes it's better to simplify. This depends on the size of the amigurumi and the size of the piece, but yep, as one of my uni professors used to say: parsimoooooooony (or follow the Ockham's razor).
Another thing!!! Learn some basic embroidery techniques and how to do surface slip stitches, they can go a long way to make a piece seem more detailed! And use other materials like felt too!
I can't think of anything else right now. I tried to be as clear as I could but it's kinda hard to explain all of this when English is not your first language 😅 Anyway, I hope you find these tips interesting and you can always ask me again anytime!
14 notes
·
View notes
Text
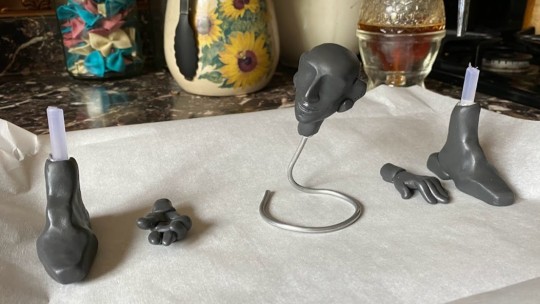
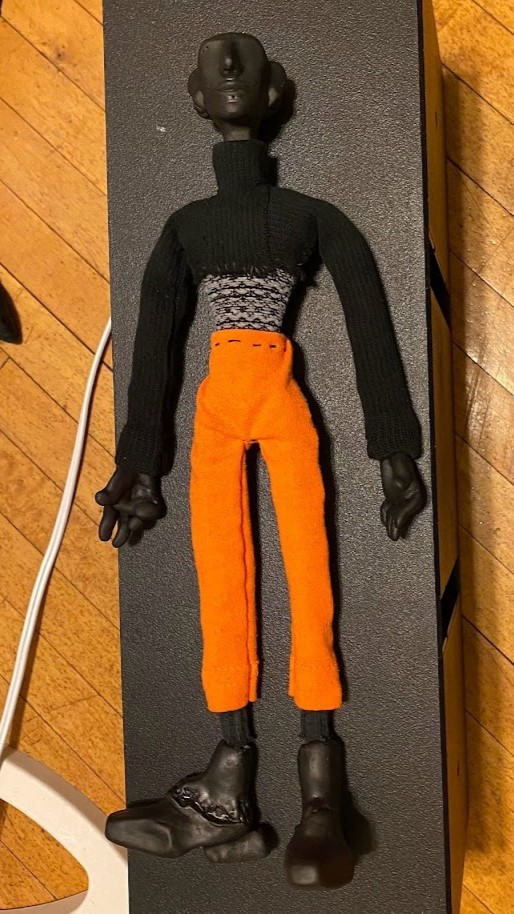
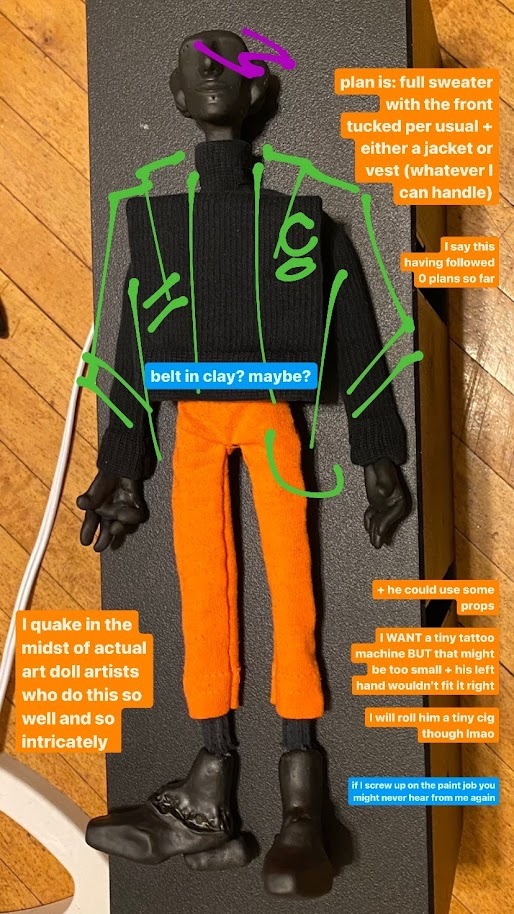
working on something I've never tried before. wip pics and the closest thing to a plan drawing I have from a story post. flying by the seat of my pants, feeling a bit like I'm the other[father] in coraline GAHAHA. it's Tracy!
documenting the process,
forgot the glue stick supports in his boots, tried to melt the glue back out of them after curing the polymer clay in the oven, ended up toasting everything. I'll either make him new boots or rework my bubbly coal blobs with some sandpaper to remember the chaos. the process is a meaningful part of an artwork, yeah? imagine, someone in your apartment building tossing a smoking baking sheet of tin foil and miniature body parts into the back lot.
haven't really looked at any tutorials so far except for one in anticipation of hair making+gluing, but have been paying attention to @strangegutz work for inspiration and some visual guidance.
polymer clay for the head and parts [no clay tools, just hands and a sewing needle], a flexible armature + old socks sewn into shape for the body, more socks glued around his arms and legs to bulk them up, and fabric scraps for clothing [even more socks and the cut off sleeves of t-shirts, so far]. his sock body is sort of sewn into a corset and then darned into shape, with parts of his sweater attached to it after; it's the handiwork of someone who only knows practical sewing skills, but I find it charming. he is handmade, I think that should show, and I don't feel like stressing on this project. I'll pad his shoulders a little more to fix the length of his neck, under his jacket. he should be able to pose in the end but he may not be able to stand from being top heavy. if I make new boots, there's a chance I can balance him back out.
his waistline stitching is lazy because it's a placeholder, until he has a full sweater and I know how much of the waist to cut out to leave enough gap to tuck his sweater in in the front [it's pinned in the image]. I don't have much clay left, but he'll get a little belt to cover whatever seam crimes continue to occur. his ears are very bulky to support his jewelry. holding my breath until his paint job is done.
I don't think you really need to know what you're doing or have any fancy materials or tools to attempt a project like this. just, a desire to try and some curious interest in problem solving. and some junk around the house. it's a good learning experience, no matter how it pans out, but I'm hopeful.
#my art#art doll#oc#tracy#mortitypes#its funnier to screw up of your own volition than to fail listening to someone else anyway imo#and a better memory/lesson
29 notes
·
View notes
Note
hi! I really enjoy your art, it has a very unique touch to it that I really like. do you sell prints of your art anywhere?
I've never been much of an artist myself, but lately I've been feeling like I would really like to try and learn how to draw. I know it takes a LOT of practise and that some have a more natural touch to it than others, but do you have any tips for a beginner? where should I start? I have tried reference pics and stuff like that but I never seem to get them right. how can I keep myself motivated when nothing I try turns out the way I imagine it?
sorry if you've already answered something similar to this, I would love to read that too. sending you good vibes and many thanks in advance ✨
Aaaahh thankyou so much! 💕 I don't yet but will soon I'll update on that 🎉🫶
Absolutely!
And wow that's great to hear! I'm really excited for you honestly because it's really fun :3 Well, my ways have always been a little unconventional but most teachers would tell you to pick up a pen and paper and.. just start drawing/doodling with whatever reference you have. Or if you have a pen tablet already, explore the program you're working with. Any kinds of brushes, try them out, try functions the program has- see what it does, make it a fun experience because you can't make any mistakes. It isn't something you have to deliver to anyone, this is practice and this is for you. Put on some music or watch a show on the side that's easy to follow (not one you have to pay close attention to) and just scribble away. You can use an extra program like 'Pureref' (which is free!) that allows you to drag in any references you need on top of your drawing-program or create an extra window where you can drag in any images and rearrange everything just the way you like it, like this:

And then let's try a Sasuke sketch in that pose upper-left corner.
I usually flood the document with a bunch of references in case I need it. (It's always more than I need but I hoard my files a lot 😂.. I think it's a fear of it not being enough "just in case"- but it's okay.) When I'm coloring a sketch, I think of colors beforehand but it kinda depends on my mood. Most of the time I don't bother until I get to the lighting stage. If you feel like you don't really got the hang of using a pen-tablet yet, there is a good tutorial with exercises here. And don't worry at all!!! Because it'll get much easier and easier overtime, just please take care of your hands and stretch gently always. Remember it is never supposed to hurt.
Honestly the way to improve fast with art is... just get obsessed over something 😂 and draw that. Find something you like and enjoy drawing it at least from my understanding that is what happened to many people. For me it's.. well.. If you want to get inspired, go to places, preferably professional spaces and make a board with art in styles you really like. (Or a folder for example!)
This way you can use references to make something and it's a good start/practice ^^! At least it was very helpful for me! If you feel like nothing turns out the way you imagine it, then don't worry about it please.. creating something involves so many steps it is nearly impossible.. or it is impossible actually to have something turn out exactly as you imagine it beforehand. It is more important that the end-result is something that is satisfying which has more to do with the actual process itself. And I know that is not something you might want to hear now but I guess you'd have to experience it? At least for me, every new art I make involves something along the lines of "oh I kinda liked that" or "ew, no, nope, no, not doing that ever again" it's a constant process. Here are some helpful video's for beginners because I think visual inspiration would be more beneficial for you than just a bunch of text from me!
5 FIRST STEPS TO LEARN TO DRAW
HOW TO DRAW SIMPLE FACES
HOW I STUDY DRAWING
Advice for Starting your Art Journey
Extra (not necessarily for beginners):
Why BELIEF Is More Important Than TALENT
How I Reduce TOXIC Perfection As An Artist (Best Drawing Exercise TO Do)
What to do If you aren't Improving
Why it takes so long to get good at art
I hope any of this is helpful to you and I hope you have a nice day 🌷💕! Happy drawing!
18 notes
·
View notes
Text
on a real note, i do truly understand the frustration as an artist to be told to just “draw more” when you feel frustrated and like you’re stuck in your development. yeah, time and experience DO help to an extent! your brain will unconsciously take in information over time, improving your observation and execution— but passively.
but what if you actually want to put in The Work?? what if you want to actively LEARN better art skills, but the only advice you get is to just wait for it to happen?? ive been on both sides of the equation before, and it’s infuriating— most people (unless they’ve taken higher level art classes) are never taught what goes into actually training their fundamentals, and have no idea how to pass on their knowledge once they’ve learned it.
so! to make up for years of “just draw more” advice, here’s a compilation of my personal favorite studies, tutorials, and hot tipz for artists! it covers things like composition, anatomy, color theory (shudder) and dynamic posing, along with a few other bits and bobs that i’ve found useful over the years.
please feel free to reblog with ur own additions 💖
Line-of-Action.com - a website dedicated to figure studies! it has thousands of pics in its library that get updated constantly, with a variety of body types. i prefer to work in studio mode (where the time between each picture starts out short and increases gradually) to do proper warmups.
Draw Better Hands Now by Marco Bucci - really and truly one of the best hand tutorials out there. he includes some simple exercises to improve hand anatomy that are SO vital, using them just once made me feel so much more confident!!
pixel art tutorials by pixelartjourney - tutorials on building shapes & color work! they were made originally for use with pixel art, but the ideas apply to other types of art as well.
maximum simplicity challenge by jakedontdraw (tiktok) - a challenge where you have to recreate a portrait in as few brush strokes as possible. SO helpful if you’re like me and have chronic overcomplicating disease, and the creator does a great job at explaining how and why he completes the challenge the way he does! i also very much recommend his video don’t draw noses, which goes into a similar topic in more detail :)
coolors.co - color theory is hard. there are Some basic rules, but most of it is just observation and repetition. see color combos you like, and recreate them until you get an instinctual sense of what looks good together. coolors.co is a super useful tool that auto-generates palettes for use in your art AND has a feature to pick out a palette from images! (i recommend using movie stills, especially from animated movies where each color is deliberately chosen)
composition study - i can’t remember where i originally saw this explained, so i’ll just write it here: while watching a tv show/movie, pause with every shot change and draw a thumbnail of what you see. spend as little time on each thumbnail as possible, only blocking out the important shapes. here’s some pics of when i did this exercise with the opening minute of baby driver:


Wally Wood’s 22 Panels That Always Work!! - self explanatory, useful reference for both sequential art and single illustrations

truly humiliating how the only way to improve at art is to LOOK at art and then…… MAKE IT????? 🤢🤢🤢🤢
78 notes
·
View notes
Note
kat, *shakes empty cup* spare coochie (uni jean hcs) pls
Spare coochie (jean headcanons) incoming!!!
Pairing: jean kirstein x fem!reader
Content/warnings: university! au, fluff, jean is nail artist because i said so, overstimulation
SFW
Kinesiology/exercise science/physical therapy major. Minors in either design or visual art as stress relief (we’ll come back to this). Eventually finishes up those required courses by the end of his 3rd year, so he decides to double major in business management because he didn’t feel like graduating early.
He has a general sense of what he wants to do. He knows he likes helping others, which is why physical therapy is appealing to him. But if that doesn’t work out, he doesn’t mind entering the business field. Has enough confidence and leadership skills to make it big there.
Remember how I said he minored in visual arts as a form of stress relief? Big mistake. As much as Jean loves painting, sketching, drawing, you name it, he realized that he hates doing it for a grade. He’s a perfectionist, and he hates the pressure that due dates put on him. He always feels like he’s half assing his work (still looks amazing) and he doesn’t want school to ruin his passion and inspiration.
Can get away with putting very minimal effort in studying for his classes. He remembers things pretty well, and is good at conceptualizing topics and applying them when it comes to tests.
That being said, he’ll gladly accompany you to the library or cafe to study. Means he gets a free pass to ogle at you all focused, without you noticing (most of the time).
When you do look up and find your boyfriend staring at you, he just cocks his head to the side and gives you a smile while reaching across the table to give your hand an encouraging squeeze.
Has an eye for photography. If you wanna live out your IG baddie influencer dreams, Jean will gladly be your photographer and hype man. If you’re camera shy, he (un)intentionally builds your confidence over time because of all the photos he takes of you. He’ll tell you how to pose, what expression to make, etc. You best believe he’ll buy an expensive editing program just to use their nice ass presets.
Has...a bit of cuteness aggression? Sometimes he sees you and just wants to squeeze the life out of you. He doesn’t tell you that though, and he has yet to give into those urges.
Likes it when you have your nails done, especially if they’re a bit on the longer side. Likes it even more when you run your nails across his skin or scratch his scalp lightly.
Speaking of nails, he doesn’t mind paying for them!! But there was one time where he found a really cool design that he wanted you to have but the nail tech couldn’t replicate it, so he decided to take matters into his own hands. 2 days later, Jean invites you over and he has a mini nail salon set up in his living room (thanks Amazon Prime).
Starts out with just those press on nails that he paints cute little designs on, but eventually progresses to using gel extensions (Jean: “the tutorials I watched said that acrylics are bad for your nail beds, babe. I’m just watching out for you.”)
He’s proud of his work LMAO. He’ll take pics of him holding your hand to show off your nails and also posts timelapses of him doing your nails on tiktok/instagram. Somehow goes viral overnight, and now people are seriously asking him for his prices. Maybe this is his calling.
He is very romantic, and very much likes to play into “traditional” dating stereotypes. Very chivalrous. If he could help it, you don't have to even lift a finger. He respects your independence, but also wants to help as much as he can. (“What’s the point of you dating me if you won’t let me carry your bag?”)
An excellent cook. He is, however, very particular about how things are done in the kitchen. Probably has to do with the fact that none of his housemates (Eren, Armin, Connie) even know how to properly julienne an onion. They are to stay clear of the kitchen when Jean is in there, lest they want a handful of flour to the face. You, however, can watch. He even lets you help him, even if it’s just by being a taste tester.
Don’t be surprised if he’s shoving a tupperware full of last night’s dinner into your hands when you show up to class, or texting you to come over because you just have to try his handmade ravioli. His love language is food and I will die on that hill!
NSFW
I’ve said this before, but Jean will turn you into a pillow princess. You don’t have a choice. His baby girl deserves only the best, so just sit back and enjoy the ride babe <3
It’s not that he dislikes having you do work, because he’ll gladly concede when you ask nicely (most of the time), it’s just that he likes seeing your body talk— and he likes seeing what it has to say when he’s the one causing it.
He especially likes it when you get that hazy look in your eyes, legs trembling from overstimulation
In my head, Jean is pretty gentle. I think he’s aware of his own strength and doesn’t lack spatial awareness (unlike a certain green eyed brunet) so he doesn’t want to accidentally hurt you. Unless you ask for it, of course.
When you suck him off, his hands are restless. Gripping your hair, jaw, neck, but he lets go quickly because he doesn’t want you to bruise. He eventually opts for fisting the sheets, knuckles turning white as he shoots cum down your throat.
Loves you in lingerie. The way the straps and lace hug your body has him sucking in his breath.
Will also ask you to nude model for him under the guise of it being “anatomy practice.” I thought artists weren’t allowed to touch the model? Then why is your boyfriend feeling you up?
Oh, and he will definitely be your photographer if you want a boudoir shoot. As long as he gets to keep the photos, of course.
#jean im so sorry i still dk how to spell your last name#jean x reader#aot x reader#jean kirstein x reader#jean kirschtein x reader#jean headcanons#jean kirstein headcanons#jean kirschstein smut#jean kirschtein headcanons#this is all i have im sorry#i go back into my hole now#kat’s writing
501 notes
·
View notes
Note
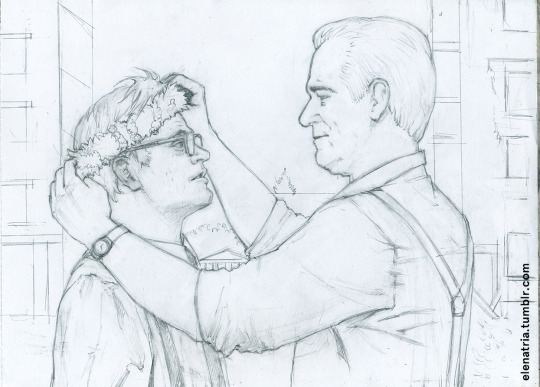
I'm truly so fascinated how you come up with these compositions, also how you are so good at the anatomy and proportions. Would you have any tips for someone on how to improve their drawings, maybe even a demonstration?
I'm a professional art teacher, however I've never made any tutorials. I guess I could give one free demo if people want to contact me in pm and then maybe have a skype session or something? Just once because I'm busy, sorry. 😅
The way I learned was years and years of practice, but the first thing I tell my students is to start tracing just to make things easier and stop being afraid of failure, whether they use tracing paper for traditional art, or layers in photoshop for digital art.
You find what you want to copy and trace it. Of course, there's the problem of finding the right angle of the character you want to draw, the right pose. So you either google the pose/clothes/background/expressions you want ("man sitting on couch", "holding hands", "men in suits" etc), take screenshots from the movie/TV show, or you have your friends model for you, and you take many many pics of them. You either print the photos or draw by looking at the screen (if you want to do free hand instead of tracing).
The hardest part is how to attach e.g. Valery's face on the bodies of your reference pics. That is learned only through trial and error, so don't be afraid to try and fail and throw away tons of paper. What I do is print out every single face/angle I think might be useful to me, so what you see in my art is a composite human figure, taking the expression from one picture, the hand movement from another, the hair from a third one etc.
I don't do tracing for my own art, I do free hand, but you can try either method and see what suits you.

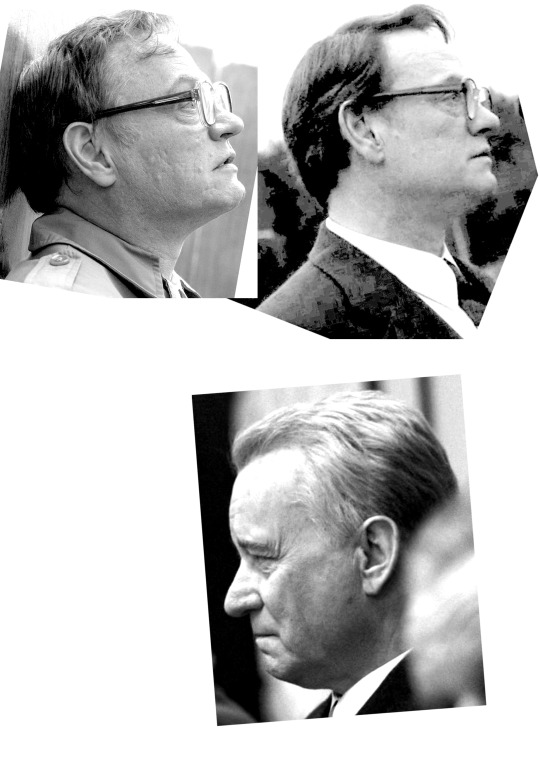

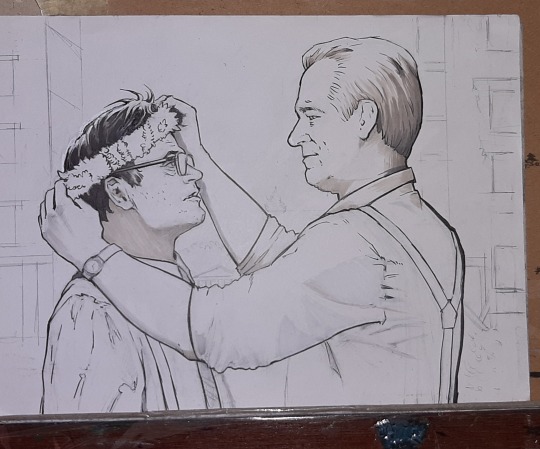
As you can see here, I changed Valery's head many times to the point that I had to erase it entirely because not only did it not look like him but also it was too small compared to Boris'. What a huge pain in the a$$.


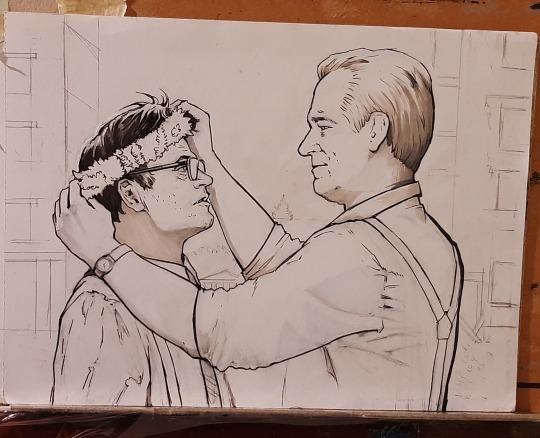
Then on to the inks.
I use kurecolor or copic markers, as many shades of gray as I can get my hands on - so much easier than messy watercolours and acrylics (which I adore but yeah, messy - also not handy if you want to draw during a flight).
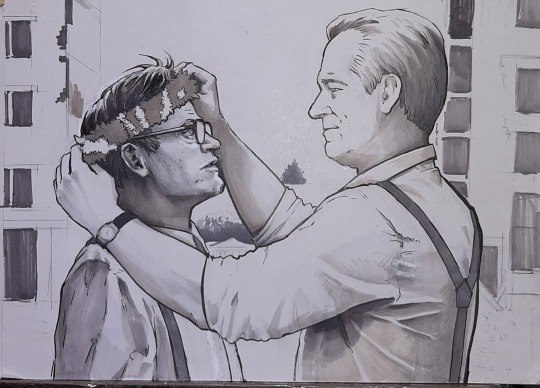

One useful tip is to take your distance from the drawing as many times as you can. While you draw you may think it looks right but once you get up, it doesn't. So make sure to take a few steps back and look at it from a distance while you work on it, that way you will notice easier any flaws or things you want to change.
Another tip for getting it right is looking at the art through a mirror (hey, Da Vinci did it so why not you). If not through a mirror, just take a picture of your WIP and reverse/mirror it on your phone. You'll notice any imperfections right away.
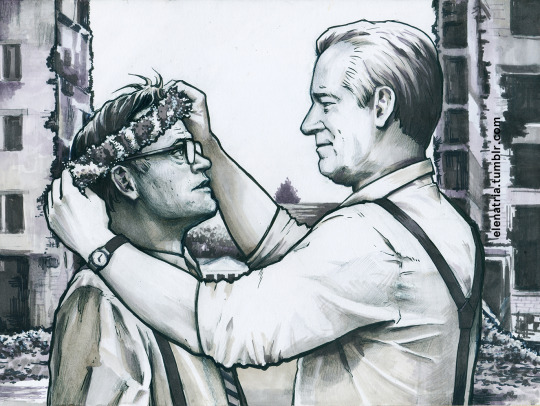
#chernobyl#valoris#valerylegasov#borisshcherbina#stellanskarsgard#jaredharris#wip#tutorial#sort of#art
26 notes
·
View notes
Note
Could you explain your drawing process? I'm a new artist and I love your style 💛 I'd love to know how you achieve it
Absolutely! I did a little tutorial for you anon, so have a look below the cut and I’ll walk you through how I did this rough little sketch.
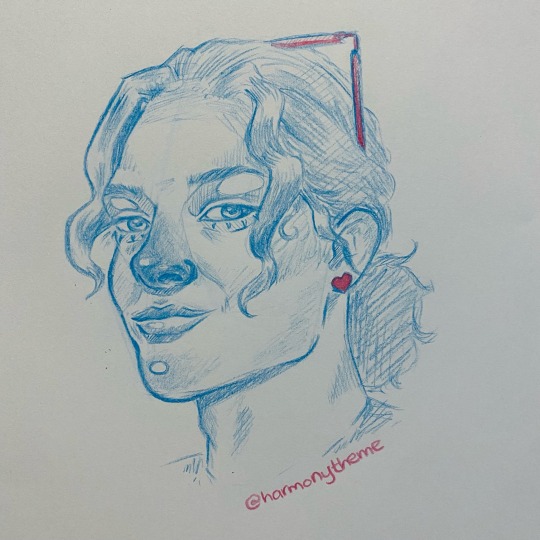
first off, i browse my very cheap set of coloured pencils and choose what i’m feeling for that day. these are two weeks old and it’s very obvious which are my favourites haha. i also look for a reference photo!


I chose a cute little turquoise colour for this, one that doesn’t show up on camera very well, and one which I later found out doesn’t erase very well. my reference is a very cute old pic of omar. i already decided here that i couldn’t be bothered drawing his hand lmao.
so, when it comes to guide lines, I tend not to use them when I’m doing side on profile shots, I’m not sure why, I think I’ve just been drawing so long that I don’t really need them anymore? but for this angle, I will use them, just to ensure I have the proportions correct for the angle and so that things line up right.

my guide lines, like my art lol, are definitely in my style. I wasn’t classically trained, but my mother was an artist, and so I’ve used a mixture of her teachings as well as my own research since then. I usually work out the rough shape of the face, centre line, the rough size and position of the nose, then to measure out the distance between eyes and eyebrows. this can all be messy, and as long as you’re using something erasable, you have plenty of freedom to change as you go.
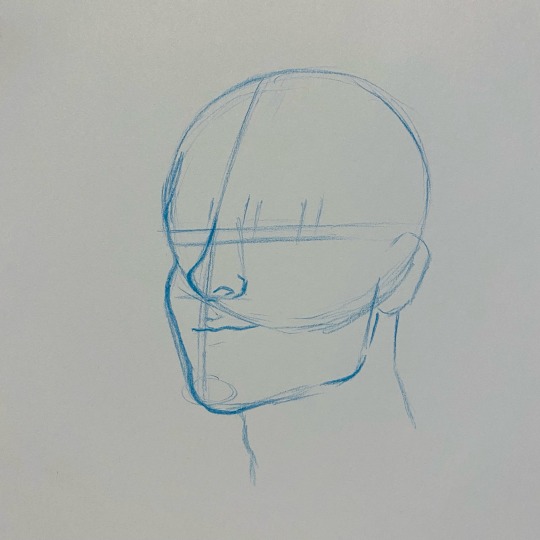
here I am next working out the jaw shape and defining the nose. as you can see with the mouth, it lines up better with the centre of the nose than the guideline I’ve set out, and that’s fine. it looks better that way.

erasing guidelines, defining features.

now here i am adding my daisy-ism’s in. these are the highlights/lowlights I add to almost every picture, even if the refefence does not have it. shadowing under the nose and mouth, a highlight in the brow, the tip of the nose and the chin.

hair time! as you can see, in my reference, he doesn’t have a visible bun, but I think it looks way cuter and more complete this way. I’m just doing a basic hair outline here, working out the shapes and flow, then putting in his lil sunglasses.

shading time! my shading is pretty stylised, but the gist of it is, looking at the reference photo, laying in some cross hatching for the heaviest areas, and making sure the highlights are left unshaded. I use my coloured pencils for shadow AND warmth, which is why I like to have heavily shaded noses and chins in my art. 😌 this also extends to knuckles, fingertips and ears. also shoulders, elbows and knees if those are exposed.
then I shade the hair and add in my final details. so, my little lower eyelashes that I always do, my signature and whatever else I want to add. in this I just gave him a lil heart earring and coloured his sunglasses pink for this.
when it comes to hair, my advice is for you to fake it ‘til you make it. hair is hard, really hard, but my best tips are to section it out and shade each section individually. pay attention to your reference photo and where the highlights and lowlights lay. you don’t need to draw every strand! the inference of hair is always more effective than every single strand drawn out one by one. also, its okay if the final result doesn’t look exactly like the reference. mine never do either! it’s impossible to get everything right, but the important part is having fun and enjoying the process.
and here is the final result! i limited my time on this one as i’m super busy today - usually i would refine it a lot more and spend a tonne of time making sure the shading is smooth, but you get the point, and that’s the important thing. i hope that helps, and if you have any questions, please feel free to send me an ask, or dm me any time! i’d love to help you on your art journey. ♥
#my art#ask#anonymous#idk what else to tag this is it doesnt fit in the yr tag#but i hope whoever sent this gets to see it! i'm a couple of days late replying#<3#again this is ROUGH#i am aware#this was just a quick little sketch for the kind anon <3#tutorial
68 notes
·
View notes
Note
Hi Giulia! I hope you're doing okay! I just wanna say that you have a very solid art style--I can definitely distinguish it whenever it appears on my dashboard. Do you have artists or references that influence your very own art? I guess I just wanna ask, what's your artistic process? Thanks and take care!
Hi RK! Aww thanks you're so kind 💜💜 it really means a lot 💜
Mmm I think my greatest influence was Disney, the cartoons obviously but also some Italian comics, in particular W.I.T.C.H. (five highschool girls that obtain superpowers and can communicate with the four elements) and Topolino (various stories of Mickey Mouse and Donald Duck and all their friends) and I used to copy every possible drawing available hahha All the various issues are drawn by different artists, so I got to see a lot of variety of styles and pick the ones I preferred or better even pick the bits of each I liked and make them mine. Topolino in particular has multiple stories in a single issue and comes out weekly, so I had lots and lots of material to look at. I had my subscription until 2 years ago honestly hahah but I stopped for lack of shelves in my room 😂
And then during university so like 4/5 years ago I bought some video tutorials by Disney artist Aaron Blaise (he's the director of Brother Bear but he worked on Beauty and the Beast, Aladdin, The Lion King and other movies) and those really were a booster because I got to study anatomy and character design and drawing lots of animals. I still buy his stuff whenever he adds something interesting, he's an excellent teacher. And I get to watch them all the times I want so I can review weak spots or more difficult points.
As for the drawing process, well first I try and find a pose, I collect everything available that inspires me from stars Instagram posts or tweets, to drawings of other artists (obviously if the pose I finally make is identical to the original I add the reference to the post) to movie GIFs on Tumblr or official art. Oh and Pinterest too, that’s a goldmine, but I always end up finding new stuff that distracts me and not what I was originally looking for haha
Then I sketch on paper or on Photoshop depending on the mood and time, lately I can't even watch a movie in peace because my hands itch because I need to draw. So in this case I use paper.
Like these new ones look what a mess they are and very unfinished. It mostly to just jot down the idea so I don't forget it.

And since I always make a mess of it, Photoshop is a blessing. I allows me to change stuff how many times I want, for ex if the head is too big I can select it and make it smaller, it allows me to flip the drawing which is one of the most useful things ever because watching your drawing mirrored makes all the horrors pop up, I've lost count of how many wrong eyes or super long arms I had to correct. Plus I can work on different layers so I usually have one layer for the head (even 2 or 3 like for Hange because they have bangs and ponytail that are tough and glasses) then one torso, two for the arms and so on. I only merge all layers into one lineart when I'm sure it's good to go.
And then I add flat colours and logos and stuff if needed (like the wings of freedom patches or blood).
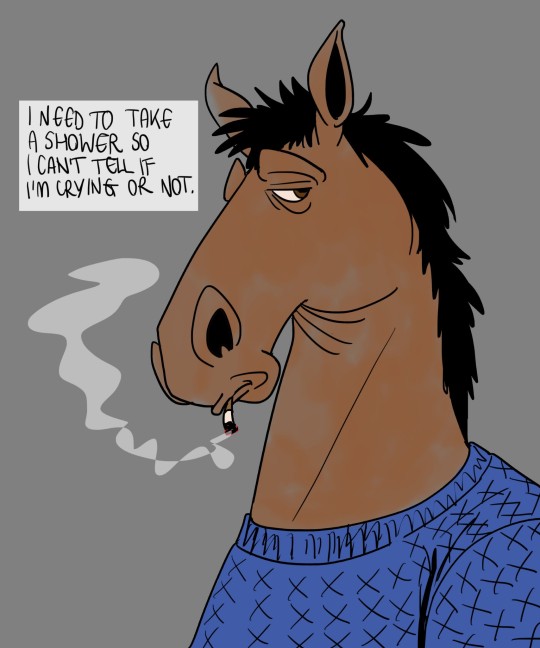
Like this is flat colours (I know you know Bojack from your Diane profile pic, which I've always loved from the first moment I saw it btw 💜 I love that show). This one stays like this because Bojack has a very simple line and pretty much no shadows unless needed. But otherwise I always add them.
But before making the shadows I tend to decide a background if needed or if I hadn't already one in mind. And the shadows colour tends to pair with the BG, but the general one is brownish (I use the same colour I use for Levi's bags under his eyes 😂 but set it to multiply so it gets darker but you can still see what's beneath).
Like this below.
I don't do many backgrounds by hand, i made one for my Secret Santa but usually I use photos or pictures (AOT is perfect for example because being a cartoon it fits with my style, with real photos I have to be more careful because it might collide instead of becoming part of the drawing) unless there's an object in real interaction with the characters.
For example this one below. The tree on which they sit was already in the frame (that's actually what gave me the idea of putting them on the branches) I tried using it like that but there was too much difference so I drew the tree myself. The rest is the real shot but blurred. Helps focusing on the characters.

Puff I think I'm done hahha sorry it came out longer that expected 😂😂 I hope the drawings make it less boring hahhaha
Anyway thanks for asking 💜💜 and if you have suggestions be sure to drop them by 💜
18 notes
·
View notes
Note
Hello Mars! how’s your day going? (mine’s pretty well) but anywhoo, i have like 4 questions to ask, but it here it goes!
1. When did you became a Mucha Lucha! fan? (mine’s been like 4 years and yet i have the dvd and the comics)
2. How long have you been drawing? (like an evolution of artwork through the years)
3. Who’s your Favorite ML! character and why?
4. Any future concepts or ideas on a possible artwork?
that’s all the questions that i have for now :P
hope you’re having a very great lucha day!
No problem, I'd be happy to answer them! 😊 this will be a WALL OF TEXT so prepare yourself!
1. I've been estimating this question with even myself as to exactly HOW LONG I've been into this show! And it all chocked up to a random memory I had in passing: I remember watching the opening with my baby cousins back in '03 when they were being babysitted! So way way back then 💀 ancient times
2. As for drawing: I've mostly started with random stick figure doodles in printer paper flipbooks, in which evolved into crude/traced attempts-at-art in one of my 'how to' guidebooks that I get at my local craft store! (This was in the span of times of '03-'06 if I can give an estimate)✨️then I decided one day I wanted to be more serious w the craft and started ACTUALLY free handing pics from magazines/Google images/and said tutorial books from before--even if they still seemed very crude ('07-'09)✨️THEN I tried searching for a specific style (before I figured out it didn't rly matter pfft) and drew from my mind/conjured up design features from varied media I was into at the time! ('10-'13)✨️ And after that, I went full digital and had YEARS of practicing with plethoras of tutorials along with attending art classes which REALLY helped out a whole bunch.. ('14-'17) ✨️ and now that I'm out of school basically, I'm just here practicing and drawing at my leisure! But I hope to use my knowledge in art with the degree I have + years of (self taught) practice 🎉🎉
You can find some of my favorite works on ARTFOL here: https://artfol.me/masa_ne
And no worries! I'll find a way to eventually print out some old (and cringe worthy) works and update it on this question in the future!
3. Oh GOSH,, I can say with confidence that my faves have fluctuated over the YEARS, and have been all over the place, so I'll break it into two categories: children/adults
Children- basically LOVED the elementals such as Zk and Pierre (the obvious pick), but some others include megawatt, electricity, and non-elements like La Pinata and ( in more recent years) French Twist!
Adults- Basically love the adults NOW more than I do the students, and I would consider them to be underrated characters that TOO can be rich with potential backstory development 💕
Some include Perro Salvaje, La Pared, and Rey Dinamico (I understand he's based on mysterio BUT-- he definitely has potential!!) Some MORE obscure pics would be a great handful of the parents, Hot Chocolate/Marshmallow, Hula Hattie, and the adult insectos!
4. I have a FEW in the works currently! (Most of which I'm holding off until after I move at the end of this month👍) But the one (or TWO) anniversary pics I'm aiming for will most likely be uploaded in September :"] a little inconvenient but it is what it is I suppose!
THANK YOU SO MUCH for your questions! 🙏✨️
You have a Lucha day YOURSELF!
4 notes
·
View notes
Text
HC: Y/N Wears a Revealing Version of their S/O’s hero suit
God it’s been so long since I’ve done headcannons, I miss them so much! These I’m going to keep tame, cause I don’t want them to be toooo spicy!
Also, I didnt iclude Shindo and Shinso, sorry! I realized rather quickly how long these got and didnt want to bog down this post, hope thats okay!
Pairings: Mirio x reader, Tamaki x reader, Bakugo x reader, Kaminari x reader (all characters aged to 18+)
。・:*:・゚★,。・:*:・゚☆ 。・:*:・゚★,。・:*:・゚☆ 。・:*:・゚
Mirio

It would be a disgrace if I didn’t use this pic
So you had been invited to a photo shoot for a pretty high end boutique to be one of the models
Were you stoked that this extremely prestigious brand wanted you on their front cover? Yes. Were you terrified as hell? Also a fat yes.
Mirio, being the adorable boyfriend he is, was hyping you up for it
“Your going to be amazing sunshine! Ya never know until you try, ya know?”
Even with him being your support, you still felt extremely self conscious
“I don’t know...I’m not a model, I don’t think I can do it-“
“Don’t talk so negatively like that babe! What if I came with you, would that calm your nerves some?”
Your practically melted into him, giving him the biggest hug everrrr
“Oh my god would you? That would make me feel so much better-“
“Of course babe! Wouldn’t say it if I didn’t mean it!”
So the day of, you came into the photo shoot fresh faced and pale as hell from nerves
They seperated you from Mirio, taking you to the makeup area and clothing area
You entered a room lined with extremely bright makeup stands and racks of clothing, your area in a small corner to the right with a mannequin wearing a certain set of clothes
You finally realized what you were actually modeling-and your mouth dropped
No wonder the asked you to model, being Mirio’s girlfriend-it was a sexy version of his hero suit
It was a skin tight leotard, the number “1000000” scrawled against your chest, a thick red cape draping against the back
Lemon colored glasses and thigh high blue boots completed the look, a huge gulp reverberating from your throat-
How the hell were you going to pull this off? In front of your boyfriend no less-
You pain stakingly got your makeup done and your hair, your strands pooled up like Mirio’s hair in the front and the rest cascading in bed head curls
You finally got the skin tight costume on, looking at yourself in the mirror-you felt nervous but-strangely calm-you didn’t look half bad, actually
A small smile graced your face as you walked out, your heels clicking against the floors as you walked into the photo shoot room
Now the question was where was your-
“Hey sunshine! Whoa, that get up looks great, looks pretty similar to something I wear dontcha think?” He was totally teasing you, his tone playful as he leaned into your blushing face
Suddenly your bravery was gone and you were a nervous wreck-your boyfriend was looking at you with hungry eyes, his orbs gazing over every exposed curve
“Mirio, you don’t have to look at me like that-“ you whined, feeling your cheeks burn bright red
“But I want to look at you like this babe,” he smiled, his voice dropping as he licked his lips- “you look absolutely delicious dressed up like that.”
Tamaki
“Oh cmon Tamaki, please come with us!” You pleaded with your nervous boyfriend, his brows furrowed in fear
It was the middle of October, and you and Neijire were planning to go to an early Halloween party in the middle of town
“I-I wish I could go bunny, I really do, it’s just-“
Tamaki was fiddling with is hands, his inky black hair cascading over his distraught face
He would love to go with you, but the thought of people, and dancing, and dressing up, and oh god what if they made fun of his costume-
You placed a kiss on your boyfriend’s cheek, sending him a reassuring smile
“No worries, Tama, I get it-just stay home and chill, I’ll make sure to come home a little early,”
“Oh-okay,” he obliged, watching you go into the bathroom to get ready
Tanaka decided to do exactly what you asked him to do-he watched some TV, ate some food, anything to calm his nerves as you got ready
After an hour or so, you emerged from the bathroom, walking into the kitchen in your full get up
Your hair was straight, see through yellow glasses covering your eyes. You wore a black leotard, the fabric hugging your curves as a beige cape draped around your thighs. Two purple belt laid against your hips, drawing attention to your plush thighs as your boots clicked around the apartment
Poor Tamaki practically choked on his cereal when you walked in-when you said you were wearing a costume, you didn’t tell him it was his hero suit!
Tamaki walked over a blush erupting over his face, “Y-y/n? W-what are you-wearing?”
You spin around, guilt pooling in your stomach as your eyes met your boyfriends flustered gaze
“I’m sorry Tamaki I should have told you! The party is “hero” themed, so I thought the best suit to wear was yours-do you...want me to take it off?”
Tamaki vigorously shook his head, his cheeks a fiery red
“N-no! Please don’t! Honestly, that’s the last thing I want...” he stuttered his shaking hands resting on your hips and pulling you gently to his chest
You had never seen Tamaki so bold-your eyes widened, your hands placed against his chest
“-but I don’t think you should go to that party tonight”
Bakugo
You ran over to Bakugo, your phone screen containing a pic of a cosplayer dressed up in full Bakugo hero suit, gauntlets and all
You legit shoved it into your boyfriends face, your face beaming- “look how cool this costume is!”
“Tch-Only I can wear my hero suit as well as me,” Bakugo scoffed, going back to eating his ramen
You looked at him distraught and disbelief- “Cmon, Bakugo, you had to admit it’s pretty cool-“
“Cool? He’s a fucking wierd ass nerd, making my hero suit...” Bakugo said under his breath, his eyes now glaring at his phone screen
You placed your hands on your hips- “So if I wore your hero suit, I would be ‘wierd ass nerd’?”
Bakugo chuckled harshly- “Yeah-but you couldn’t wear it, like I said, I’m the only one who can pull it off-“
Ha-if that fucker wanted to play, then you were here to win
You slammed your hands down on the table, your arms encasing a surprised Bakugo in between your arms
You gave him a wicked grin, making Bakugo’s crimson eyes wide with surprise-“Bet bitch.”
Y’all are so mean to each other 😳
You stomped out of the room, your mind now reeling-you had ZERO idea how to make his costume...
You quickly made a call to Mina and Momo, telling them about your predicament-Mina would help you design, and Momo would help make the materials
Both were extremely open to helping you, especially Mina-any attempt to destroy Bakugo’s overly high ego, she was down to do!
But she had a twist to your intial plan- “what if you did a sexy version of him! That’d show him!”
You weren’t exactly sure how that would do anything, but eh why not-if you could make him even more mad, this was the way to do it
Momo was hesitant to make such a lewd outfit, but you quickly reminded her of her revealing hero outfit
-she quickly agreed after that
Mina designed the “suit”-honestly it was just a bra with two orange X’s, bootie shorts with a grenade belt, and green ribbon connecting to the black thigh high boots
You complained to Mina about how uncomfortable the high heel was, which she responded with “Beauty is pain!”
You fought the urge to roll your eyes
How would Bakugo’s suit be complete without the gauntlets! You three had the hardest time with that-deifnitely spent a whole day watching 3 hours worth of cosplay tutorials to make those damn things
But after many hours of snacking, hot glue guns, and screams of annoyance, you three FINALLY had the costume finished-and you couldn’t be happier! It honestly made you feel so cool and powerful...especially those gauntlets-
no wonder why he wore the clunky things, they honestly were fun to wear
You decided to wear the outfit before Bakugo came home one day, your face smug as you waited for him to enter your shared apartment
You finally heard the click of the door, Bakugo wearing his usual baggy pants and shirt he wore when he came home, his shoulder holding his duffel bag full of things
“-Hey”, he welcomed you gruffily, not even noticing your attire
“Hey yourself-“ you replied, a shit eating grin on your face as you walked over to him.
He still wasn’t looking, too busy rummaging through his bag- “Am I still a wierd ass nerd?”
Bakugo looked up, and holy shit was he in for a sight
When you said you would make his hero suit, he didn’t take it that seriosuly- you? Make his suit? Psh like that’d happen
BUT IT HAPPENED
You looked-really good in it too-he deifnitely was appreciating the extra skin that was involved 😳
You smirked at his obvious surprise, his cheeks a fiery red as you did a small spin in the suit- “How does it look?”
Suddenly you felt pressure against your wrists from Bakugo’s hands, your back now against the wall as Bakugo drank you in with his piercing red eyes
Now it was your turn to be surprised-cause crap you didn’t expect that to happen
He was now in control of the situation and he knew it-he gave you a shit eating grin, making your blood feel incredibly warm
“-it looks decent...but I think it would be better on the floor”
Kaminari

“Mina no, I’m not-“
You were in shock, flabbergasted, confused-when did they have a intimates based off of hero suits?
AND WHY THE HELL DID THEY HAVE YOUR BOYFRIENDS SUIT
“MINA YES!” she squealed, giggling as she pulled your size out of the rack
The little outfit was pretty revealing- all it was was a white lacy bralette, with a short black jacket with white lighnting bolt decal and a short black leather skirt to match
It was honestly not your thing-it also just felt wierd to wear something like this-
“Your buying it and that’s that-you needed neccesities and this-“ she shook the outfit in your face, “is a necessity!”
The girl seriosuly shouldn’t be allowed to spend money-she stuffed the outfit in her full bag of clothes, bouncing over to the register as you followed her from behind
“I needed bras Mina, not lingerie!”
Yeah she didn’t listen
You finally got home, trying on your new outfits from your shopping spree when you fell upon the set shoved in your shopping bag
The little pink sneak
You pulled it out-it wouldn’t hurt to try it on, she did buy it for you...
You quickly got into it, admiring your body in the mirror-it was tight alright, but kinda cute in ...the skirt accentuated your legs, the bra was decently comfy, and the jacket pulled the whole thing together and made it a pretty cool yet revealing outfit
Just as you were testing out how much movement you had in the leather jacket,you heard the door open to the bedroom you and your boyfriend shared
“Hey babe, do we have any more toilet-“ Kamianri waltzed in, unknowingly oblivious to the scene before him, until he laid eyes on you
You never thought you saw the man blush harder-his eyes were wide with shock, his cheeks a hot shade of red as sparks of electricity flashed around his body
He obviously didn’t know how to react, and in his flusteredness, he somehow slipped on the floor, landing with a hard thud
“Denki!” You yelled out, scrambling to your ditzy boyfriend, “you okay?”
Kaminari gazed up at you, and holy crap he felt blessed- he had a full view of your exposed cleavage, a grin growing on his face as blood tricked down from his nose
“Oh no, Kami, you got a bloody nose-“ you scrambled to get him a towel, kneeling down to place it against his nose
He quickly swiped the blood away, his hands instead pinning yours against your back
“-Dont worry about that,” he grinned, his eyes a dangerous shade of yellow, “let’s worry about you babygirl...and where you got that little get up,”
。・:*:・゚★,。・:*:・゚☆ 。・:*:・゚★,。・:*:・゚☆ 。・:*:・゚
Taggings:
@weebartistinc @orokayagi @leeeah-loooser @bakarinnie @johnnysactualgf
#bnha#spicy times 🔥#spicy times#bnha x reader#bnha x reader hc#mirio x reader#bakugo x reader#tamaki x reader#kaminari x reader#bnha mirio x reader#bnha bakugo x reader#bnha tamaki x reader#bnha kaminari x reader#mha mirio x reader#mha bakugo x reader#mha tamaki x reader#mha kaminari x reader#mirio x reader hc#bakugo x reader hc#tamaki x reader hc#kaminari x reader hc#bnha mirio x reader hc#bnha kaminari x reader hc#bnha bakugo x reader hc#bnha tamaki x reader hc#mha mirio x reader hc#mha tamaki x reader hx#mha kaminari x reader hc#mha bakugo x reader hc
918 notes
·
View notes
Note
Hello I just found out about your blog today can I have some art advice on drawing things like bodies hands and feet ( for I am suffering q.q) so how do you do it without wanting to punch though you laptop/tablet ?
Unfortunately I do in fact want to punch through my tablet on a daily basis I don’t think that feeling goes away lmao.
But real talk?? Take a bunch of pictures of your hands and feet, find stock photos or stock models of dynamic poses, take photos of yourself in dynamic poses and THEN. Either look at these on your phone when you draw or trace them.
No one really talks about tracing bc it has bad connotations, like ppl associate it with stealing other peoples art but that is not what we are doing with this. Drawing on TOP of those stock images or your own pics is gonna make some muscle memory, THATS what you want. Use gestures, be blocky, be messy with it bc those sort of shapes will be easy for you to remember and recreate.
And maybe you can turn the pics into something totally unrecognizable but maybe you can’t- that’s not a wasted piece, the purpose was to practice for OTHER ones! I think this is especially helpful with just like proportion over all, you’ll start to be able to notice stuff like “oh I see I made the head too big” or “oh it’s just the arms are too short I’ll fix it real quick.” And it’ll get easier and easier to free hand bc you have absorbed all the proportion knowledge like a little sponge.
For me this was the only way I learned to draw hands. Tutorials of people step by step doing the square palm and showing you how to measure the thumb-none of that ever helped me. I’m gonna be real with you, I cannot draw feet. They are the bane of my existence. If you figure them out you can teach me lol 😂
I might get some flack for this idk but it’s how I learned. Don’t trace other peoples drawings that’s a no no. But slappin a gesture on top of a stock photo of a business man so you can get a pose started for a medieval king? Seems relatively harmless to me and is gonna help you learn anatomy. And then over time you won’t need to do that you can just glance at it, or make up a pose on your own totally free hand loosey goosey.
15 notes
·
View notes
Note
Have you thought about ever doing a step by step video/tutorial on how you make skins? Or record your process? I'm trying to start doing skins but there's a lot of stuff I don't understand that the site's tutorial doesn't really explain and speed paints aren't exactly great to look for answers, so I was wondering if you would ever do something of the sort, it would be cool
I’m kinda dumb and terribad at video recording but I can totes make a process with some screenies :0 Hopefully the following helps a bit. There is gonna be an assumption of basic knowledge on layers and whatnot just fyi! Perhaps someday I’ll actually record myself making a skin if I don’t get distracted and/or forget lol.
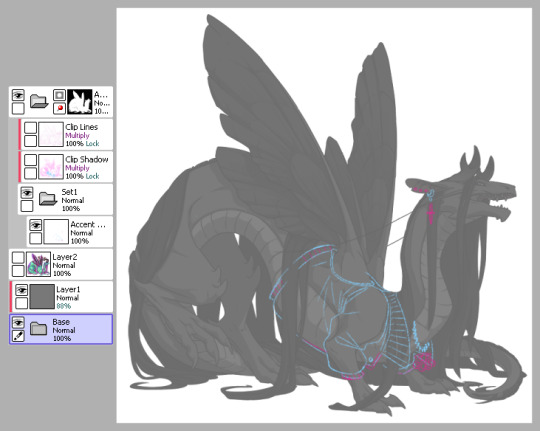
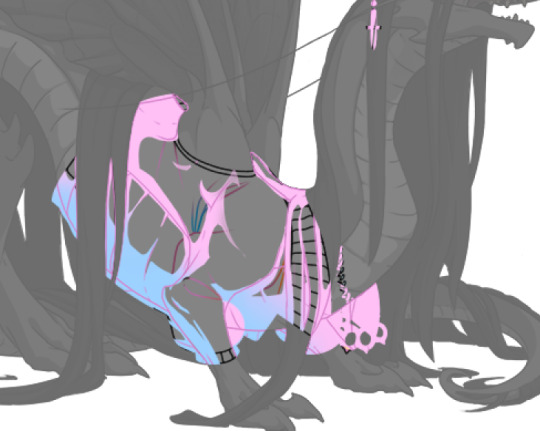
1) This is pretty much how I start my layers. I don’t change much from the default skin file provided by FR other than adding a mask to the skin folder so I don’t draw outside of the lines and then a gray overlay on top of the base just so it’s easier for me to see my sketch. I use bright colors like blue and pink to help me differentiate details. I turn off the clip lines/shadow as I don’t wanna see those atm.
The layer that says “Accent” is where I start my sketch.
If I’m making a skin for a particular dragon, I’ll often have them added in the file (note the hidden layer above the gray box). To do so, I save out a transparent version of the dragon and blow it up to 700px in waifu2x or something. Then I bump it up to 750px so it fits in the skin file. It’ll be a lil blurry but it’s good enough.
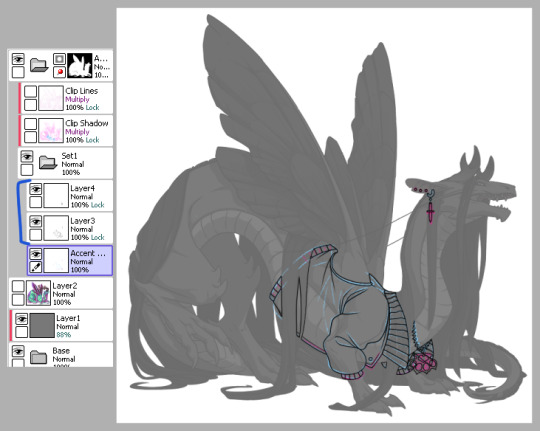
2) Next is line art - I have 2 layers for this skin: one for the jacket and another for the knuckle dusters and chains. Personally I like to close off all gaps in my line art, including drawing on the edges as you can see on the top of the collar by the wings or the gap formed by the hair on the midsection. This is just something I prefer doing as I find it makes my coloring less messy and annoying later on. But you can do it however it’s most comfortable.
At this stage, I’ll also either zoom out to 50% or resize to 50%, whichever works because it’s important to remember that the file size is 750 while the actual size you’ll have to save out will be 350 - details will shrink so make sure what you’re drawing will show up appropriately.
3) Now onto colors. Since I closed the gaps in the line art, I just fill bucket everything. For this skin, I drew the jacket’s colors on one layer because I’m trash and have 1 braincell but you can use as many layers as you need. In this case, the overlay layer was for extra saturation and the layer above that was for the black stripes. Be sure to clip additional color layers onto your base color so you keep things tidy and avoid coloring beyond the lines.
Again don’t forget to resize or zoom out to make sure your skin is looking as it should!

4) Finally I do some recoloring of the line art - in this case mostly the arm of the jacket. I lock the line art layer and go over it with colors darker than the surrounding colors - up to preference here. I don’t usually change the very edges just because I prefer a darker color there personally and my default is black. It’s also totally ok to have darker line art - again up to you.
Then I turn on the clip lines/shadow since you have to make sure those show up in the final piece. Clip lines is usually set to normal but I change it to multiply because I feel it turns out better for recoloring. When I recolor, I try to match the colors of the skin while also making sure it’s dark enough to be seen. Same goes for shadows.
*If you ever get a skin rejected, it’ll usually be how visible you make the original shadows and line art. There’s not really a hard rule on what counts as “passing” since it’s up to staff but I try to make it obviously visible without ruining my skin. So here you can still see the belly scales for example, but it’s not so pronounced that it takes away from the jacket. It’s a lil uggo imo but it is what it is.
*Something to note when you color: be careful how dark you make your base colors! Too dark and you won’t be able to see the clip lines/shadow very well in the future. Note how the collar of the jacket is light enough that the shadows and lines beneath are still visible.
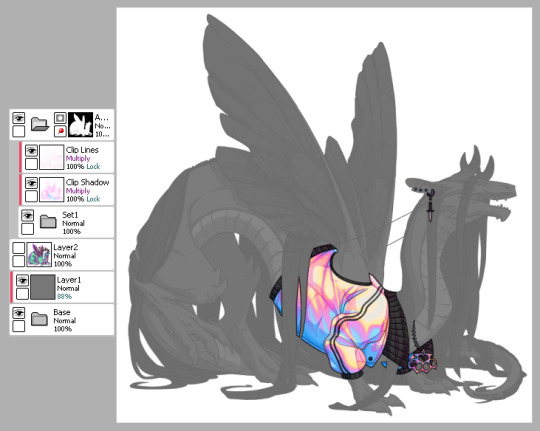
This is how my clip lines/shadow layers look on normal mode so you can see what colors I made them. Play around with the values to make sure you achieve some balance between your skin looking good while still showing off the base lines and shadows of the dragon. I used pink and blue here since it matched well with the skin. By default, the lines and shadows are gray and if you don’t recolor those, your skin will end up looking muddy.
*Other than recoloring, do not touch the clip lines/shadows at all. Do not edit them or erase them otherwise that’s a quick ticket to rejection.
5) Finally, turn off everything but your accent folder and save that sucker out and resize to 350px. At this point you can test it on your actual dragon by either pasting the skin onto a pic of the dragon or by using FR Tools. Reminder that you should not use/mention FR Tools on the official site cuz staff doesn’t like it. However on FR Tools you can also test the coverage of your skin when you select “upload skin.” Less than 30% and it’s an accent. Above that and it’s a skin. There’s other ways to test coverage but FR’s gimp tutorial sucks and is outdated and I don’t have photoshop so lol.
*I often go through several iterations of a skin just in case I see weird flaws or missing details. Testing is very important once you finish as major changes to your skin after submission is not a fun process so be sure to get it all squared away the first time.
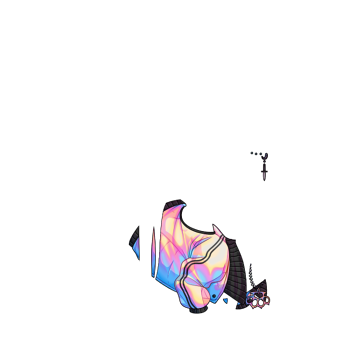
^ Your final product should look like this: transparent png (32bit) at 350px.
*Now this was the technical side of making skins using the tools at hand. If you have further questions I didn’t cover here, pls do feel free to ask! I’m no expert by any means but I can impart what I’ve learned after making a few.
#tutorial#fr skins and accents#flight rising#Anonymous#long post#sorry if it's a bit wordy#skin making isn't super hard but there's just a lotta rules and things to keep in mind
123 notes
·
View notes
Text
Random Spengler Sibling Headcanons
I thought I’d write down some ideas I have for Phoebe and Trevor, since Afterlife got delayed and I’m looking for ways to entertain myself during the wait.
(Disclaimer: I acknowledge that any of these can be contradicted by canon, and I’m ok with that. I am only writing these for fun.)
Trevor:
Their dad bought him a guitar for his 6th birthday and promised to teach him how to play, but never followed through with it. Trevor had to teach himself via Youtube tutorials. When Phoebe expressed interest in learning to play too, Trevor taught her.
Trevor wants to start a band, but could never convince his friends at his old school to join him. For now he’s happy to play with his sister, even if she’s too shy to play in front of an audience.
He’s ok at singing, but his voice is kind of raspy.
His favourite genres of music are grunge rock, garage rock, alternative, and country.
His favourite game genres are racing & party games.
Both he and his sister are on the autism spectrum, but he was never diagnosed. He tries harder to hide his “weird” traits, whether consciously or not.
His special interests are cars and music.
He doesn’t really have the attention span to read long books, but he does enjoy magazines and comics.
According to Phoebe, when he doesn’t get enough sleep, he starts to look like Tim Burton.
His favourite film genres are action, (preferably with good chase sequences) suspense, and musicals.
He doesn’t like horror movies but he’ll watch one if a cute girl wants to go to the movies with him? Maybe?
He struggles with math and science, and is jealous that his younger sister handles these subjects so easily.
He likes to play with cards and knows a few basic magic tricks. He becomes fascinated with Peter’s Zener cards.
He hides his insecurities behind dark humour and sarcasm.
He probably has Ticktock, or whatever their universe’s equivalent would be. He’s not very popular on it, though. (He can’t dance)
One time he convinced Phoebe to dress up as the Blues Brothers with him for Halloween, but nobody in their home town knew who they were supposed to be.
Phoebe:
Since they can’t afford new video games, they have a lot of old hand-me-down consoles and games from older friends and relatives. They have mixed feelings on this. Phoebe is happy they get to play the classics, but Trevor wishes he could play newer titles with his friends.
Phoebe’s favourite game genres are horror and platformers.
She acquires Ray’s NES at some point, or what’s left of it. (It still smells like mood slime)
Her special interest is physics. When she learns about the existence of ghosts, she becomes fixated on occultism as well.
You might think that she likes classical music because she’s so nerdy but in reality... She likes heavy metal.
Her favourite movie genres are sci-fi, horror, and musicals.
She likes to read sci-fi novels, comics, and joke books.
She’s really bad at telling jokes, but she tries her best.
Phoebe is surprisingly good at technical drawing for her age, but terrible at anything else. She can barely draw a stick figure.
She’s way better at singing and dancing than her brother but is extremely shy about it.
There’s a TV channel that shows reruns of old cartoons and Phoebe watches them all the time. She can recite episodes of “Dopey Dog” by heart.
Phoebe is very sensitive and particular about the clothes she wears. While her brother dresses to look “cool” she’s more concerned with comfort and practicality.
She likes to stim with toys, tools and slime. This is a problem later because when she encounters dangerous substances like ectoplasm, she has to fight the urge to touch it. She learns how to make her own play-slime and keeps it carefully labeled containers.
She isn’t ticklish. At all.
She has a hard time making friends due to her awkwardness. She wishes she had Trevor’s social skills.
Trevor likes to annoy her by sending her random pics of fictional characters who wear glasses and say “this is you :)”
26 notes
·
View notes