#like manually stabilizing frame by frame
Photo


george from wilbur’s stream 8/18/22
#georgenotfound#gnf#mcyt#dsmp#mine*#posting these at 2 in the morning bc that is obv optimal posting time#i'll give it a day rb tomorrow its fine#literally the amount of effort i poured into these too like#like manually stabilizing frame by frame#pretty proud of these for being screen recorded off of webcam footage of a phone video
151 notes
·
View notes
Text
The Influencer : Milo
Words by @engeorged
Illustrations by @badoobers
Milo was drifting in life. Now I’m his late twenties he hadn’t really found a purpose in life or a job that lasted for more than 6 months. He was more athletic than smart, but popular and always surrounded by people. He would do pretty much anything to gets a laugh. Setting fire to his farts was his specialty, guaranteed to bring the house down. Once nearly literally when he set fire to the curtains.
Never good enough to be captain but always good enough to be picked first for most things. He excelled in rugby due to his size and build. One thing he was head and shoulders above the rest at. Towering above most of this peers, by the time puberty have finished with him he was 6’6 and built like a house. He had broad shoulders with a physique to match. Thick arms and legs and an ass you might assume was some sort of joke prosthetic. Real country corn fed type with dirty blonde hair and usually some combination of darker facial hair.
When all his friends went off to university, he stayed behind to care for his father who was dying of a rather short lived and aggressive illness. This took him to a fairly dark and lonely place as he hit his twenties. He expected all his old friends to start drifting back to the town they grew up in but most were high flyers and weren’t interested in coming back to that small life. Ever the optimist Milo set about trying to find himself a career. He would try most things once. Hospitality didn’t really suit his bulking frame, knocking stuff over regularly with one of his large limbs. Being the size he was didn’t really suit nipping between tables either. Retail bored him and he rarely lasted a few weeks. Ballon modelling, catering, tree surgery, manual labour all came and went. Nothing really stuck. His life was spent between jobs crashing on sofas and living in his parents basement when that wasn’t an option.
His latest idea was to try and make it as a social media influencer. He was funny enough and decent looking enough to at least have a go but nothing he made seemed to go viral. There were a few times he thought he’d cracked it but his views never made it past the high hundreds. He was currently living above a pizza place in a shitty flat share and supporting himself with three jobs. Dog walking, delivering pizza flyers and a few days looking after some rich guys house whilst he was off round the world. Milo was coming to the sad realisation that he was just like every other washed up jock struggling to hold his shit together.

It was Friday evening and his employer Mr Gordon was away again. This time brokering a merger in Singapore or Shanghai or Seoul, something like that anyway. Milo was sat next to the pool drinking a beer, daydreaming of the day he would have his own house like this. He was in a bit of a funk and a little bit buzzed with the several beers he had downed on his empty stomach. As he brooded on his life he started a bit of a downward spiral. Eventually coming to the conclusion that he’d had enough. The influencer thing was dumb. Influencers were all ball sacks anyway, he wasn’t about that life.
Out of the blue last week he’d had a DM from a friend he’d not seen for years. Will had gotten married straight from college, as his cheerleader girlfriend got pregnant and Milo hadn’t really heard from him since. Apparently he now had a successful business in construction or logistics and after they were chatting he said he had a few entry level jobs going if he was interested. Milo had closed down the message at that point, but right now it was starting to look promising. The pay was ok and he would be trained on the job. Even if it meant a lifetime of desk work, maybe that kind of stability was just what he needed? As usual he couldn’t find his phone so he searched round for it and eventually found it in the footwell of his batteries pickup. Unlocking the screen, he began to go through and delete his five instagram accounts then his twitter handles. He’d leave Facebook as no one bothered with that any more anyway. However, as he opened his TikTok app he noticed a notification at the bottom of the screen. Opening it, his eyes widened, as he saw what was in the message. One of his videos in the last day had actually finally gone and done it. He’d gone viral. Quickly he scrolled through the notifications to work out which video it was and to his surprise it was a mukbang video he’d done a few weeks ago. He’d bought two kfc family buckets and had ploughed through them in half an hour. Chugging the soda at the end and showing everyone his swollen belly. It was a bit of a low point afterwards and he nearly deleted it as it made him feel a bit vulnerable. He was so glad he left it up there as now this might be his ticket to fame.
The video had amassed over 200,000 likes in just over 24 hours. Scrolling through the comments, there were people from all over the world commenting on how amazing the video was and how good he looked. Milo was a little surprised at how many thirsty comments on there. People commenting on how hot the video was and how hot it was to see his bloated belly at the end. They seemed to be impressed at how much he ate as well. He remembered at the time feeling a bit sick but he was a big guy. He was always capable to eating big. He was known for it with his three brothers who would always get a bit competitive over family meals. Especially at Christmas time when they would take bets on who could eat the most. Milo was pretty much the undefeated champion, even now his eldest brother Tom had gotten super fat.
There were hundreds of comments asking for more and demanding a live stream. Taking a moment to think, he came to the slow realisation that he was in a huge mansion with permission to eat anything he wanted. Mr Gordon wouldn’t even notice if he cleared the fridge which was always well stocked. He had already consumed a good dozen beers which was giving him a decent amount of Dutch courage. Dizzy with beer and ambition he hit the live button and headed to the kitchen. Several thoughts rushed through his head whilst he waited. The watcher count stayed at zero for 5 whole minutes. The adrenaline began to wear off and he started feeling embarrassed. Maybe he’d jumped the gun. Maybe he wasn’t destined for internet fame. Maybe the video going viral meant nothing. Just the victim of an algorithm. Then suddenly with a ping the counter went up to one. The lone watcher was typing . . .
🥵
Never had a single emoji made Milo feel so great. A few seconds later, a second ping happened, followed by a third. People were coming. Soon the watcher number began to rise and with an intake of breath Milo began talking. Moving round kitchen he showed the watchers what was in the fridge The beer and wine store was pretty stocked, so that was always an option but the general consensus was that they wanted him to eat not drink. Opening the double doors of the huge fridge revealed a world of options. Someone in the comments even asked him if he could eat the whole lot. To which he laughed and said ‘Maybe!’
In the end it was decided by the group, that he was to eat a load of leftovers from some party Mr Gordon had had a few days before. As soon as Milo started to pull the tubs out of the fridge he began to regret suggesting it. There was a lot of food. Two large tubs, a platter of entrees and a good two thirds of a huge chocolate and caramel cake covered in thick double cream. As he laid it all out on the Italian marble worktop he propped his phone up against the fancy fruit bowl. The watchers were up to 800 and still rising. Adrenaline pumping, Milo started stuffing his face. The comments were rolling in thick and fast. Too fast for him to read but as they rushed past he could see the people were loving it. Lots of little images were pinging up and AR lenses people started to be applying to him, making him look like a cowboy and then an alien and then a cute fluffy teddy bear which everyone agreed made him look adorable with.
As he shovelled in the rich canapés, he could feel his stomach begin to tighten. He wondered whether or not to say anything but the second he did the watcher went crazy for it! So he continued describing to the watchers everything that was happening to him, lifting his T-shirt to show them his slight curve as his thick abs began to rise. There were numbers and emojis flying all over his screen and he had no idea what any of them were but he was obviously smashing it. This gave him some momentum to plough through. The entire platter of entrees were now firmly inside his now gently curved stomach. As he finished the tray he lifted his shirt and showed everyone again, jokingly slamming the tray upside down on the counter.
Over the next hour he ate like he had never eaten before. The first run containing a selection of nibbles, including some of the best duck bao buns he’d ever seen. Every one was decorated to look like a cute little animal which the crowd watching especially enjoyed. After those he stated I inhaling some mini sliders and pulled pork blinis. He began to slow down a little as the tub began to empty and so, needing a little break, he stood and pulled his shirt completely off revealing his now substantially distended stomach. The comments were turning slightly feral as people were lapping it up this slab of a man, stuffing himself silly. Giving him instructions to rub it or push it out. There were a few weird vaguely sexual suggestions which he put out of his head for now. There was time to process that later. However, on the whole everyone was loving his engorged stomach. Who knew this was the thing would turn him into an influencer?
In the flurry of messages, one user was beginning to stand out. The messages he sent were in bold and a mustard yellow colour which made them stand out. Pausing the chat so he could try and read them, they came from user @fulltank87, who seemed to be offering some advice. The guy advised Milo to head to the fridge and grab a bottle of soda and chug it as fast as he could without belching and hold it for as long as he could whilst leaning to the right. He ran to the fridge and slowed down as his fullness hit him. Grabbing a 2 litre bottle of coke he lined up the shot and got ready. @fulltank87 gave one more instruction to push a straw into the neck of the bottle and push the end down the side. This came back to Milo as a cheap way of doing a beer bong. Rummaging through the cupboards he finally found a plastic straw and popped it inside the neck. Getting back into position so the audience could get the best view, he lifted the bottle to his lips and threw it back. The coke pushed down his throat fast nearly causing him to cough and choke but he managed to push through. Closing his eyes he concentrated on the heavy flow of the coke surging down into his already swollen gut. He had a way of relaxing his throat so he didn’t need to swallow which came back to him from his rugby party days. From the side the viewers got a perfect view of his thick adams apple bobbing up and down with the liquid and if you looked carefully you could see his stomach inching out a little further.
Toward the end the coldness of the cokeand the bubbles were hurting the back of his throat and he nearly had to stop, but he knew he could make it. With a loud roar he finished the whole thing and immediately felt sick. Remembering the suggestion, he leant to the right and tried to hold it but he could feel bubbles rushing up his nose. With another almighty roar he let out the biggest burp he had ever done. He could literally feel his belly going down as the gas escaped.
Instead of turning people off, this seemed to be the highlight of the live. Approval was pouring in from the now people watching, which now had reached 1k. The adoration and attention he was receiving, along with and the stretch provided by the coke gave him the momentum to keep going. Pulling open the second tub he found a whole load of chicken wings which were his all time favourite. There must have been at least thirty of them. He teased the load to the watching crowd who responded with more of the same reaction. Looking down at his stomach he was a little scared. He wasn’t this big when he did the kfc mukbang video. He’d seen his belly like this before at family gatherings but looking at how much food was left he would definitely be pushing his limit.
Milo decided to tell the live stream exactly how he was feeling, hoping it would endear him to people. He showed them how swollen stomach was, running his hand across is distended bulge. He was feeling an awful lot of pressure just under his ribs which he half remembered was where his stomach was. Obviously, tips and comments poured in from that point. People telling him how to eat, what angle to eat at, the speed at which he should eat them. Overwhelmed, he found a way to filter just @fulltank87’s comments, who was calmly explaining to him how he just needed to simply keep a fast pace up and rhythmically start eating. So Milo did just that. He got into a rhythm of breaking the wing and stripping the meat off with his teeth and sucking the succulent flesh off of it. Whilst he chewed it and swallowed, he prepped the next wing. Ignoring the pressure building up inside him he ploughed through and within 15 minutes the tub was empty. Standing again he proudly displayed his swollen belly. It was now much more pronounced. Making his long torso, oval as it swelled. Giving time for some audience interaction would be a good move to let him have a little breather. Rubbing his furry stomach and arching his back for emphasis he showed off the results of his feasting.
Milo was beginning to feel as if he wasn’t able to eat any more when he glanced at the watchers. He was up to 1.2k which was insane. He needed to finish this for the people watching. Plus, if he could finish this challenge he could definitely build a whole career out of this. The only thing left in the counter was the large cake. The only way he was doing this was to totally ignore the uncomfortable feeling of his belly pushing against the counter. This was possible. The end was in sight. And that end was 4000 calories of rich cake. Spurred on by the encouragements, Milo found the largest spoon he could find and stood up for this final lap. There was nothing for it but to undo the top button on his shorts which popped satisfyingly. He felt his stomach relax as it filled the space vacated. This also had the unfortunate impact of sliding his zipper all the way down. Panicking, he checked his phone screen and thankfully today was not a day when he had chosen to go commando.
Determined to finish this he hefted a large spoon full of the cake and pushed it into his mouth. The cake was unbelievable. The cake was light and fluffy with bitter dark chocolate ganache through it. The sweet salted caramel sauce filled his tastebuds with electricity. All offset but the light but heavy whipped cream. The cake was perfection. Pushing on he crammed more and more of the cake into his mouth, cream and chocolate smeared all over his face. He was beginning to loose himself in the tastes that were filling his brain, almost numb to the building swell of his stomach. The viewers going wild in the comments. Urging him to finish his challenge. Milo had an almost out of body experience where he was watching himself eat on his phone. On the screen, his stomach was comically distended, curving up from the gaping v of his fly. His neatly trimmed stomach hair covered in grease from the food on his hands as he had rubbed his distended gut. In a dream-like state he watched himself finish the cake. The whole thing now concealed inside his hugely bloated stomach. Comments and congratulations from all the watchers were streaming in as he stood face on to the camera breathing heavily. Belching under his breath he assured them he would be back and leant forward and turned the live stream off.
The silence in the kitchen was deafening. The only sounds he could hear were the faint gurgle of his stomach digesting the huge quantity of food and his own heart, beating in his ears.
Looking down his normally flat stomach was arched out from his body. He felt utterly packed full. He just about managed to make it to the shower where he stripped off and got in underneath the rainfall setting. The warm water soothing his massively swollen dome of a gut. He couldn’t even really move. He just allowed the soothing water to wash off the evidence gluttony. As he stood there with his eyes closed his thoughts turned to what he might do next.
Find Part Two here

#gainer fiction#belly expansion#gay gainer#stuffing#belly fiction#gainer stories#male gaining#stuffing art#gainer story#gainer artwork
863 notes
·
View notes
Note
This might sound like a weird question, but have you ever come across a camera with a Bird Watching setting? I have an Olympus SP-800UZ and one of the modes it comes programmed with is literally called that, for taking pictures of birds in the wild.
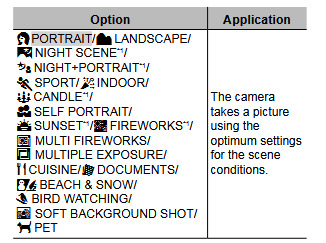
As someone whose special interest is birds, I love this setting and use it a LOT, but I've never been able to find another camera with a setting like it, and at some point I told myself I didn't want to replace the camera until I could find one with a similar setting.
The reason I ask is because I've been following for a while, and I've come to respect your opinions on photography.
I tried researching your camera and figuring out what exactly the bird watching mode does and even the official manual did not say. If I were to guess, it just sets the camera up with certain parameters that are usually ideal for photographing birds, but I don't think it does anything special that other cameras can't do. You would just have to set a different camera up to those parameters rather than the camera doing it for you.
If I were to guess, it probably enables a certain autofocus mode for small subjects and limits how slow the shutter speed can go so you don't get motion blur when very zoomed in.
However, I know exactly which features are important to get good bird photos, so as long as the camera has the following features, you don't really need a dedicated bird mode. Though if a camera has a "pet mode" it would probably work similarly to the bird mode you are used to.
Most important bird photography features...
Good autofocus
Good zoom range
Image stabilization (Either optical or sensor, not digital)
Autofocus has come a long way in the last few years. It's difficult to assess the autofocus from specifications alone, so you will probably need to rely on reviews to know if the camera locks in on subjects well. Some cameras have pet and wildlife autofocus features that can be very helpful in tracking smaller subjects like birds. So I would look out for any camera that has a pet autofocus mode or a review that says it locks onto smaller subjects well—even if they don't mention birds. If it can lock onto a chihuahua, it can usually do so with a bird too.
Birds and wildlife in general tend to get spooked easily and it is often difficult to get close without them running or flying away. So having a longer zoom range can really help you keep your distance and not startle your subject. I would say the minimum focal length for getting good bird shots is around 300mm (on a full frame camera). Some cameras only quantify their zoom by magnification (20x, 30x, 40x, etc.) and don't really say what that is in relation to. So focal length is a better metric to assess how zoomy a lens is. 10-35mm would be wide angle. 50mm is about like our eyes. 100mm is slightly telephoto. And 300mm and above would be very telephoto.
You may need to google the focal range equivalent to a full frame 35mm camera. So you would search "[camera model] 35mm equivalent focal range" to figure that out. And as long as it goes past 300mm, it might be a good candidate for birding.
When you have a camera that zooms in that far, any movement will be exaggerated—especially if you have naturally shaky hands. Not only can that introduce motion blur into your images, but it can make it very difficult to track your subject. Looking through the viewfinder will result in a wiggly mess and you won't know what you are pointing the camera at.
Image stabilization helps negate that exaggerated movement.
There are 3 kinds of stabilization. First is optical, which is built into the lens with a floating glass element. Then there is sensor stabilization (often called IBIS for "in-body image stabilization") which allows the sensor to shift and move to counteract any motion introduced by your hands. And the last form is digital stabilization which is done using the camera's software.
The first two are physical solutions that can adjust on the fly much like a chicken's head.

The digital solution is mostly just fancy image cropping. It zooms in a tiny bit on your image and then aligns a continuous crop to give the appearance of a stable image.
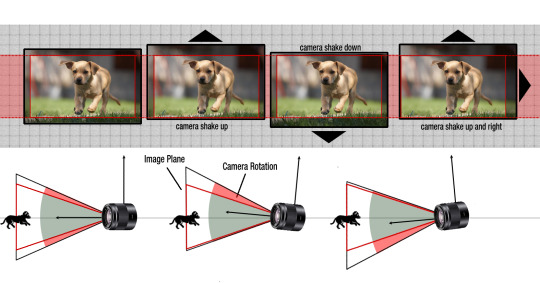
The lens and the sensor are still a jiggling mess, but this constant cropping allows you to see the illusion of a stable image in your viewfinder and in the videos you take. And while this is very helpful for tracking subjects and capturing video footage, it will not help you negate motion blur—which is why the other two methods are preferred for still photography.
Bigger cameras can often forego stabilization because the zoom lenses are bigger and heavier and don't shake as much and they let in a lot more light so you can raise your shutter speed to freeze motion. It's still nice to have, and if you have IBIS and optical stabilization combined on a big camera you can almost take pictures in the dark without camera shake, but all of those conveniences can get costly.
The camera you have now is called a "bridge" camera or a "superzoom". These are (relatively) inexpensive cameras that use a smaller smartphone-style sensor but with a more classic camera body surrounding it and a non-changeable lens. Small sensors have one big advantage where if you put a zoom lens in front of them, they can see from Alaska to Russia.
For instance, your camera has an 840mm equivalent lens. That is near telescopic.
For reference, this is what an 800mm lens looks like for a full frame professional camera.
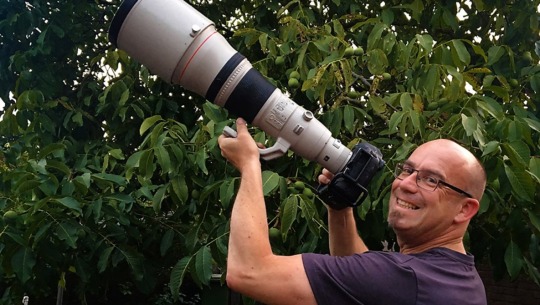
It weighs 10 pounds and costs about $13,000.
Granted the image quality of that lens is in another universe compared to your superzoom, but if you are mostly interested in documenting the birds you are encountering, a superzoom is a neat tool to have. It's like digital binoculars.
So I guess the question is, do you just want to document your bird adventures or do you want to delve into artistic bird photography?
You can upgrade to a nicer superzoom and get some improved clarity and ease-of-use features, which is totally valid. You could even get a "premium" superzoom that can do artistic bird photography in ideal lighting conditions.
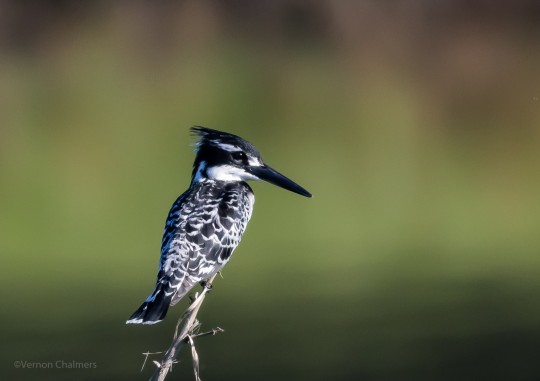
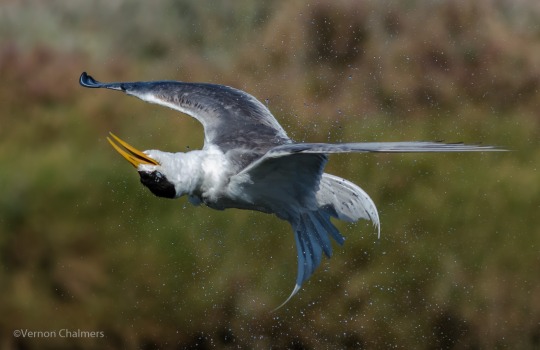
Or if you go with a more professional interchangeable lens camera system (ILC), you can achieve some stunning artistic photos like these...


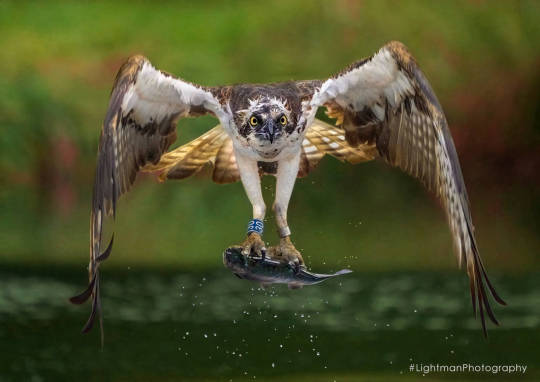
Freezing a bird midflight while catching a fish is just not really feasible with a basic superzoom.
Let's talk about the advantages and disadvantages of a superzoom bridge camera as compared to a more professional ILC setup.
Superzoom Pros
No learning curve. These cameras are designed for novice photographers and have very good automatic functions. You can pretty much pull them out of the box and start taking pictures without knowing the fundamentals of photography.
Incredible zoominess. You can get amazing zoom power for a fraction of the price.
Budget friendly. The top of the line superzoom camera is still only about $1500 as compared to the top of the line mirrorless ILC (for wildlife) which is $6500 *without* a lens. And the lower to mid range superzooms are even more affordable, especially if you consider used options.
Superzoom Cons
Noisy images in low light. These cameras are mostly suited for bright sunny days. The small sensors and cheaper lenses do not capture very much light. In more challenging lighting situations you will tend to get very noisy images due to using a high ISO to compensate.
Inconsistent image quality. Under the best of circumstances, you can get some really beautiful photographs. But when you push the camera to its extremes, the image quality can start to deteriorate. Low light causes noise. The more you zoom in, the softer your images will get. Low megapixels limit your options to crop in on far away subjects—which is often an issue with wildlife.
Deep depth of field. A lot of bird photographers like using shallow depth of field to blur the background so the bird really stands out in the photo. Small sensors can have a very hard time blurring the background unless the subject is quite far away and you are zoomed all the way in. But when you are all the way zoomed in, the image can get soft and lack detail. So you trade image quality for a blurry background.
Lack of professional features and accessories. There are many advanced features that can make bird photography much easier. Some cameras have advanced motion tracking that can allow you to capture birds in flight. The latest generation can even track a tiny bird's eye. There are also accessories that are only made for ILCs. Like motion activated shutter triggers that will take a picture of a bird automatically if you set up a camera near a feeder. There are flashes that work at very long distances. You can get camouflage skins for your lenses so the birds can't see you. Stuff like that.
ILC Pros
Lower image noise. With a bigger sensor and better lenses you can shoot with a very low ISO in good light and get incredibly clean noise-less images.
Better high ISO performance. If you are in low light, you can increase the ISO and still get a very good image. The noise on an ILC is much less distracting and easier to deal with—especially with advanced noise reduction software.
Background blur is easy. Due to the much larger sensor and telephoto lenses, almost every telephoto image will have beautiful blurry backgrounds no matter how small the aperture is.
Sharper, faster lenses. The lenses are much sharper and let in a lot more light. The quality of the image does not decrease as you zoom in. And the sharp optics allow a lot of leeway for cropping. So even if a bird was super far away, you can crop the image after the fact and it will still be quite detailed.
More megapixels. A lot of bird photography needs to be cropped in due to subject distance. Having more megapixels allows for more cropping. (I know I keep talking about cropping, but it really is a huge aspect of most bird photography.)
Advanced autofocus. This is the big game changer, especially on the new mirrorless cameras. The latest Canon and Sony cameras have eye detect autofocus for animals. You can literally lock onto a bird's eye while it is in flight and get perfect focus. It's bonkers.
ILC Cons
Steep learning curve. A lot of people think they'll get a big ILC and immediately get better pictures than their smartphone. They are often disappointed when that isn't the case. You really need to learn the fundamentals of photography to get good photos out of an ILC (free course here). They do have automatic modes, but without learning about aperture, shutter speed, and ISO (the exposure triangle) and how to balance them and when to prioritize what, you might end up with *worse* photos than a smartphone.
Wildlife photography can get very expensive. Big lenses with a lot of zoom are some of the priciest available. There are some budget options, but you will have to sacrifice quite a bit of zoom and light-gathering capabilities. The quality of the photos is usually worth it, but you may have to learn how to get closer to birds to photograph them.
Heavy as heck. Superzooms are very light and portable. A wildlife ILC configuration is very unwieldy. The camera is heavier. The lens is long and heavy. Carrying all of that gear into the wilderness can be quite a hassle.
Some camera suggestions...
Superzoom Options
If I'm being honest, in the sub $300 range, I don't think you'll be able to drastically improve over what you already have. All of the cameras in this range are quite similar and while a few might have some features that are helpful, the image quality is going to be roughly the same.
You are probably going to need to spend at least $400-700 to get a meaningful upgrade from what you have.
The top-of-the-line superzoom would be the Sony RX10 Mark IV at $1100 used. You can get the previous model, the Mark III, for about $900 used. It's a wonderful camera and the image quality and features rival or even surpass some ILC options. If you don't have the time to learn an ILC system but want the best possible quality, this might be an option. But an ILC will still give you better results if you are willing to put in the time.
For more mid-tier superzooms, you might look into the Panasonic Lumix models. They use slightly larger sensors than most superzooms and are known for their lens optical quality along with their stabilization.
The FZ1000 is getting very old, but it is still a powerful camera at a good price. The only downside is the focusing system isn't as advanced as newer cameras. But it will be better than what you have and you can find one used for around $400.
The newer FZ1000 II or the FZ2500 would be great options that have more modern autofocus and a lot more bells and whistles. They are fairly similar and can both be found for around $650 used. They do great video as well.
These are not the only options, but they are ones I know of and models I have heard positive things about. If you want to see what else is out there I would google "bridge superzoom cameras" and then maybe add your price range as well. Read reviews and watch YouTube videos to get a sense of the cameras you are interested in. As long as the camera has decent autofocus, I don't think you need a specific bird feature—so I wouldn't limit yourself in that regard.
ILC Options
When trying to come up with a good bird photography setup for interchangeable lens cameras, there is basically an easy, medium, and hard mode depending on how much you spend.
As I mentioned, the top-of-the-line mirrorless cameras have autofocus tracking that can lock onto a bird's eye while in flight. They have both IBIS and lenses with optical stabilization. They have burst modes that let you take 30 photos per second. They have 50 megapixel sensors that allow you to crop to your heart's content and still have megapixels left over.
It's quite dreamy if you have the money.
But I'm guessing if you are coming from an Olympus bridge camera that is probably a bit more of an upgrade than you were thinking.
So if easy mode is not viable, let's talk about medium and hard mode.
If you still want the bird detecting autofocus, in body image stabilization, and a pretty zoomy lens, Canon has some newer mirrorless cameras that would take amazing artistic bird shots. It's still spendy, but not $9000 spendy.
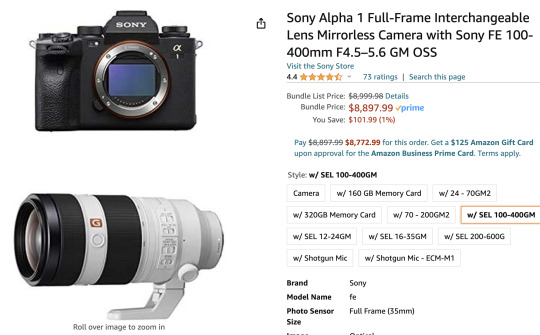
The Canon R7 is a great APS-C mirrorless camera with IBIS that can be found used for about $1300. It has 32 megapixels and due to having a slightly smaller sensor, you even get some bonus zoom out of all your lenses at about 1.6x. It's still a much larger sensor than a superzoom, just not quite the size of the Alpha 1.
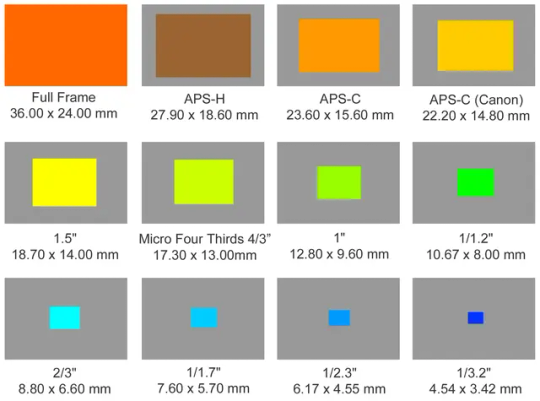
Alpha 1 is Full Frame. R7 is APS-C. And Superzooms don't get any bigger than the 1" sensor.
Pair the R7 with the RF 100-400mm lens ($600 used) with optical stabilization, and you would have a stellar bird photography setup for about $1900. (It would be a 160-640mm equivalent lens on the R7 due to the 1.6x crop factor.)
Which is probably still way more than you want to spend.
So we have the hard mode option.
No bird eye autofocus. No stabilization. You have to learn the fundamentals and practice in order to get good shots. However, wildlife photographers have been getting AMAZING photos with the gear I'm about to suggest. In fact, all of these photos were captured with the hard mode ILC combo.


The Canon 7D Mark II has been a beloved camera body for wildlife photography for many years. Many pros still use it to great effect to this day. It doesn't have bird autofocus, but it still has one of the best DSLR autofocus systems that was ever developed. It can even track moving subjects, it just doesn't know it is tracking a bird so it is more prone to error on occasion. It can be found used for $500-600.
The Canon 400mm F/5.6 telephoto lens is one of the most affordable lenses Canon ever made for wildlife. It is an old lens, but it is sharp and takes beautiful images. No stabilization, but it is big and heavy so that isn't a huge deal. You can also carry a monopod rest it on. And on the 7D II, it is the equivalent of a 640mm lens. It costs around $650 used, which is very inexpensive compared to other telephoto lenses.
So you are looking at around $1200 for the combo. But the photos you can achieve with these two items will blow pretty much any superzoom out of the water.
To sum up...
ILC photography is always going to have a steep learning curve and expensive barrier for entry, but you can achieve some truly stunning results.
Superzooms are getting better and some of the newer ones can still take excellent pictures of birds under the right circumstances. They are lightweight and hassle free and allow you to get incredible zooms for a low cost.
If you mostly take photos of stationary birds outside on bright sunny days, you will be fairly happy with a superzoom.
If you want to take photos during darker times like sunrise or sunset or in a dense forest... or if you want to take photos of birds mid-flight, you will probably have to get an ILC.
I hope that was helpful. I know I overdo these answers, but I try to help as many people as I can by giving a broad overview of the topic and the myriad ways to go about things.
46 notes
·
View notes
Text
how i make gifs using filmora x
(for anon ❤️)
read under the cut!
hey!! thanks for reading this! just a few notes before i explain about my editing process:
filmora x works very differently from photoshop. it's a video-editing software anyways, so treat it like that!
always use high-quality sources!! most of my issues with grainy gifs come from using low-quality sources. so, i always ensure to use sources at 1080p, at least!
if i'm creating multiple gifs from one match, i usually download the entire match (which is a hugeeee file 😵💫 but it's so worth it!!). but if it's only a scene or two, i screen record them! i have an astro supersport subscription and a beinsports account, so i don't have an issue screen recording clips, as their content are always in high-quality! but if you're using other sources or streams, then do ensure the quality is good!!
if the only available source is of low-quality, my trick is to make smaller gifs! for smaller gifs, i usually keep a 1:1 or 4:3 size ratio, and post them side-by-side in a single post - usually two in a row!
general colouring stuff applies here as well, you can check out the photoshop guide i've linked in the ask!
remember, there isn't one "correct" way to gif, you can gif however you like!
and now without further ado:-
step one: adjust video settings, speed and length
after importing the clip into filmora, setting the aspect ratio, resolution and frame rate according to preference, the first thing i'd do is to adjust the speed of the clip. i like to slow them down, so i usually go for a 0.5x speed. you can always adjust the speed to your preference!
i like to keep my gifs within a 3 to 5-second length, depending on the content, so i'll trim the clip or adjust the speed as desired. if the clip is shaky, i usually add stabilization at about 10%, but you can adjust as you like! here's an example of a clip before and after speed reduction:


step two: auto-enhance
once the clip is at your preferred length, size and speed, now it's time to make it look pretty! in filmora, there's an 'auto-enhance' feature, so i usually begin with that, setting it somewhere between 50% to 100%. here's an example of how it looks like before and after auto-enhancing at 100%:

step three: colour correction
head over to 'advanced colour correction', where you can use either the given presets, or manually adjust to your liking. i always manually adjust them!! you can also start off with a preset and make additional manual adjustments as I did below! what i did here was to darken it, then adjust the colour enhancement, white balance (hue and tint), colour (exposure, brightness, contrast, vibrance, saturation), lighting (highlight, shadow, black, white), and hsl (for this example, i adjusted only the red).
you can also save your adjustments as custom presets so that you can use them again in the future!
here's a quick look at how i do the colouring! from the before and after colour correction examples, you can see that this is the important part of the whole process!!


step four: sharpen
once i'm satisfied with my colouring, i sharpen them by adding the 'luma sharp' effect (usually at 50% or 70% alpha and 50% intensity)
here's how it looks like before and after sharpening:
step five: final touches and exporting
before i export, i make some final tweaks to the brightness, contrast and saturation, etc., ... and voila!! there also many other effects available for you to add (grainy effect, blur effect, etc.) so feel free to play around!

once you're satisfied with your result, it's time to export! now, video-editing softwares HATE gifs. you can always just export as gif from filmora directly, but i don't really like the way it turns out 😭 so, i export them as video (.mp4) and use external gifmakers (like ezgif!) to convert them from video to gif!
aaaand that's all!! here's a comparison of the original clip vs the end result!
final note: remember to size your gifs correctly for tumblr (540px for full width, and 268px for half), and keep each gif within the size limit of 10mb!! if you find that your gifs exceed the size limit, try reducing the number of frames or removing duplicate frames, increasing the contrast, or you may also crop the height if necessary.
if you have any questions about making gifs using filmora, feel free to reach out! thank you for reading, mwah mwah!! 💞
10 notes
·
View notes
Note
im actually curious, do you have a thorough description of how silence terlais looks? im planning to re-read prelude and i want to be able to have a good mental image as i do so
Yeah. I do. :3
Actually, I have to inhibit myself when I'm writing for her, because I'll often find myself going into long, drawn-out descriptions of her presence, both her physical appearance and her intangible gravitas, essentially every time I have a scene with her. Many of her scenes began with a single image in my head of Silence herself in some situation. There's a scene I wrote, many years ago now, that's basically "Silence in a showdown at high noon (in the style of a Hollywood Western)," and when the story actually catches up to that day I'm going to have to manage the whole narrative in order to make that one scene fit, lol. And that's just one example; I could name more. (An understatement.)
Going by our Earth units, Silence at the beginning of After The Hero—all of this is at the beginning of the story, as some of these traits change with time—is 32 years old (44 in Relancii years), so she has the timeless appearance of looking neither old nor young. She stands 5'11" (180 cm). She weighs 172 pounds (78 kg). Her eyes are exactly like mine: chameleon blue (looking different shades of blue, or even gray or green or hazel, in different lighting), with little fiery amber rings around the pupils. Her eye spacing is medium with just a slight edge toward narrow. Her exterior symmetry is pretty good.
She has tawny red hair, just a smidge darker than classic / carrot red, and her hair is straight. It comes all the way down to just below her hip joints, though she usually wears it in either a low ponytail with between one and three bunching wood rings, or in a "battle" ponytail that is much higher and is also bunched up (i.e. for safety). When wearing the Black Armor she has been known to sometimes eschew the Helm of the Black Armor in favor of wearing her head exposed, she sometimes gives the appearance of setting her hair aglow or aflame to intimidate her enemies (not unlike the plumed helms sometimes worn in Antiquity, which resemble bird plumages or fire).
She has unusual proportions, with large hands and feet (especially for a female), including long fingers and toes, and a broad frame with a lot of breadth in the shoulders for a female. One of the reasons for her physical prowess is that she is often physically larger than her opponents in virtually all dimensions. Her large feet slightly improve her stability, increasing her already-excellent agility. Her large hands likewise improve her manual precision in many things. (Though not everything of course; there are also advantages to being tiny.)
She has a pronounced pear shape, with a relatively narrow waist, naturally very wide hips, and, separately, the tendency to accumulate almost all of her fat below the navel (with the exception of her upper arms, which are well-padded). Her shoulders offset her pear shape somewhat, giving a more cello-like or hourglass appearance, but her hips are her biggest part by a wide margin. Her breasts are small, bordering on very small.
Her build at the start of ATH, when she is in her physical prime, is quite athletic; most of her heaviness comes from musculature padded with fat, and not primarily fatness itself, though this changes over the course of the story as she grows heavier.
Her nose is not petite though not especially large either. Her ears are much the same, except a few extra increments toward "especially large."
Taking all of this into account, a good word for Silence is that she is physically big. She's just plain big, eclipsing most males and almost all females.
Silence's mannerisms of physical movement are very noticeable for their deliberateness. If you have ever seen military servicemembers, or some martial arts masters or intelligence service officers, you might have a sense of what I mean. The movements of her body are very precise, giving a sense that she is always aware of every part of herself (which she is; one of her most powerful advantages in, say, physical combat, is her exceptional proprioception) and that she controls herself carefully to reap the benefits of this precision, which mainly involve readiness and the mitigation of hazards.
Her voice is husky but not tremendously so, and is also "big," always clear and projecting easily in public.
Silence is what we would call white and has almost preternaturally pale skin, though she isn't an albino. Together with her long red hair, extreme left-handedness, and physical largeness, her paleness is one of the most remarked-upon aspects of her appearance, often being described as "ghostly" or "milky," which adds to her otherworldly sense. Silence's skin, being extremely vulnerable to sunburn, is the main reason why she most often dresses very conservatively. The low amount of pinkness in her skin is partly the result of low dermal circulation, which together with her well-distributed body fat makes her well-insulated (especially for her relatively low weight), so her skin also plays a piece in Silence's reputation for being impervious to cold. Her skin is very oily, and is also fairly prone to blemishes and sores—partly through independent natural predisposition, partly because of her huge diet, partly because of her skin oiliness, partly because of her excessive sweating and natural skin clamminess, and partly because of her tight clothing. She has smooth skin with virtually no body hair (notwithstanding her crown, armpit, and pubic hair), further accentuating her paleness. She does have stretch marks, mainly around the belly, flank, and thigh areas, mostly very old, from growing into her wide figure at puberty, from putting on weight on arriving at Sele years later, from primiparous body changes, and from all the various other things that can cause stretch marks. She also has light cellulite around her thighs and buttocks.
Speaking of her sweatiness, imperviousness to old, and big diet, Silence has an extremely high metabolism, requiring great amounts of food to break even—and even more food than that because she is so physically active. She eats like an Olympic swimmer, i.e. in the realm of 8,000 to 12,000 calories a day, and is basically always hungry.
Such a big diet contributes not only to her sweatiness but to her powerful scent—scent being, among the Viutari, very much a part of one's physical "appearance." Silence doesn't stink per se, but I guess you might compare her to something like cheese or fermented foods, and cured meats; there are more than a few people who find her natural scent off-putting—and that's when she's clean, which of course isn't so easy when she is afield.
Speaking of her style of dress, she heavily prefers the color of deep forest green, and many of her outfits begin with this color, often branching out into cream yellow or various shades of blue, with black accents. (Though, that said, she does wear other colors.) The accent color on her suit of the Black Armor is also forest green. She most often favors clothes that are tight around the middle of the body and a bit looser on the limbs, though when she is afield she often wears clothing's that's snug on the limbs too, to minimize snagging. When in safe, secure spaces, and when she has no work to do (which is pretty uncommon), she prefers minimal dress—not quite a total nudist, as she will usually wear something around her crotch and butt out of a Galan appreciation for hygiene, but were it not for that, and for the pesky Sun, and for the threat of being come at with an enemy sword at practically any moment (lol), she would probably go around in her birthday suit quite often. Not only would this help to cool her down, as she is always struggling with overheating, but she is a sensualist who really appreciates the sensations of the body, including things like the brush of air over bare skin, and clothing heavily blunts one's tactile experience.
She wears high boots whenever afield, and usually about town as well. She has an elaborate, self-made apparatus for hanging her weapons to her body. Her clothing when afield is very practical, filled with pockets and designed for fastness (i.e. sureness) while maintaining ease of robing and disrobing. In fact she almost always wears practical clothing; it's very rare to see Silence dressed in eccentric fashions that inhibit movement or visibility.
She often wears gloves due to the nature of much of her work, and has engineered her own fabric so that her gloves can be as minimal as possible while still providing the desired protection.
Other than her ponytail rings she wears virtually no adornments of any kind: no jewelry, no makeup or body paint, very few tattoos, etc. She does not require eyeglasses.
Some people say that they have seen an inexplicable aura around her, some kind of light or glow, but, if such a thing is real, it is not consistent and not obviously apparent.
I mentioned Silence's extreme left-handedness; she will almost always be observed not only to favor the use of her left side but even sometimes to go out of her way to use that side instead of her right. If something can be done one-handed, she will almost always do it with her left hand, unless it is one of those tasks she has consigned to her right, such as defending and intercepting blows in combat, and certain personal hygiene. In a heavily right-handed world, this stands out prominently.
Silence's emotional canvas and her quickness to respond to, say, verbal provocations and fast wit, leans toward the cool and brooding, melancholic side, deliberate in her language, slow to be provoked, and cerebral, with a strong secondary peak of passionate intensity and fury when she is committed to something of great importance to her.
Finally, Silence, like me, is agender, but, in sort of a mirror image to me, is female-bodied / AFAB. I always pictured her this way, because Silence serves two roles that are extremely important to me, neither of which I talk about very often. One is that in some respects she is my animus (the proper gendered term would be "anima" but animus always felt more correct in Silence's case), essentially a metaphysical extension of self at the sexual boundary where my physical body stops. The other reason is to directly invalidate the endless ocean of patriarchal claims about female inferiority of body and mind—not the inferiority of women, which is easily rebuked the way any social construct can be criticized and rebuked, but of the physical manifestations of female biology and anatomy. It has always been important to me that there be an example of such a person as Silence. That's why I get so excited by people like Grandmaster Judit Polgár, who came very close to the top of the world rankings of chess players, or Olympian Katie Ledecky, who is said to "swim like a man" and who at her peak was not only swimming faster than any male in history prior to the midcentury, but whose speeds put her in the top tier of the contemporary male rankings. I really long for the day when the curves of the two binary sexes come close enough for female competitors to occasionally be number one. That's all I really want. I don't want female superiority; just female parity. Silence is a look into that future, in a sense. She actually has a song about it, about how, statistically, there are people who are heavier than her, stronger than her, smarter than her, nimbler than her, etc., but how, when you put it all together, there aren't enough people in the world to (statistically) produce someone who is her better. She's the best! Not at everything, of course, but at (some of) her chosen arts and disciplines.
Oh! Actually, that reminds me: Truly "finally": Part of Silence's appearance has to be her demeanor, her tonal presence: Silence holds herself with pride, poise, and dignity. She literally stands tall, no slouching. She is clear-eyed, purposeful, and thoughtful. She is commanding, dominant, and confident. She is very full of herself, not in the Trumpian sense but more like that of an old martial arts flick master, who knows what they are capable of and knows what they want, and has the will and resolve to pursue it regardless of outside pushback. Her vision expresses itself in her very presence; she has the disposition of an an emperor.
Anyway! I think that about covers it. Hopefully I'm not forgetting something obvious or important. If you can think of anything, feel free to call it out!
Thanks for the ask. I'll rarely turn down a chance to talk about Silence! Almost all of what I have described here has something to be noticed and appreciated in the Prelude. You could probably make a bingo card, lol!
3 notes
·
View notes
Text
Well this thing got my neurons activated
youtube
A retrospective
During the winter of 2017, my path in college was underground a profound shift. In the midst of this shift I decided to take an intro to photography class. I always had an interest in photography so this became my first serious foray into the arts.
At the time I was quite new to photography, having only recently received my first ever interchangeable lens camera the past Christmas. I leveraged this new reality to help propel myself into the world of professional photography.
While enrolled in the class I had the opportunity to use a Nikon FG, a 35mm (full frame) film camera dating to the mid 1980s. The camera was one of two film cameras I used during my time in college, the other being a Pentax K1000. The camera came with a Micro-NIKKOR 55mm F2.8 lens (which apparently Nikon still makes???) and our choice of a couple rolls of Ilford 100 or 400 black and white film. I went with ISO 400 for the added low light performance.
Whenever I had the opportunity to check out one of the film cameras I always went for the Nikon because of its more pleasant and intuitive interface (to me at least). I would end up shooting At least four rolls of black and white film. It was pretty cool using such an old camera. Even the screw-in manual shutter cable had a vintage look and feel to it. I never had any issues with it.
Due to the fact I only had 36 shots per roll and couldn’t zoom, I had to choose and compose my shots carefully, and hope that everything was in focus and properly exposed when I hit the shutter button. I think for a beginner interested in photography it’s a good experience to have. The whole dynamic changes when you can zoom as you please, take as many shots as you want, and get immediate results on a screen.
Side note: Apparently film camera connoisseurs have a lot of gripes with this camera and I’m just like “yeah it gets the job done and looks and feels pretty”. I bet these same people would have a heart attack I chose it over the Pentax.

Back to the camera
The Nikon ZF camera is such a neat blending of an old Nikon film camera with cutting-edge mirrorless camera technology. You get the nostalgia of a metal camera body and brass dials with a digital flip-out screen, a full frame sensor with great high ISO performance, in-body image stabilization, 4K video at 30 fps, and advanced subject identification software driven by AI.
Is it practical? Depends who you ask… Cameras have come a long way and I don’t imagine the new Nikon ZF is any more pleasant to hold for long periods of time than the Nikon FG was (though they do make special add-on hand grips for them). The camera has no “auto” setting on the shutter speed dial, which funny enough the much older Nikon FG had. There’s no “auto” on any of the dials actually, making this logistically a pain to use. On my camera I have an ISO button that makes setting auto ISO quick and easy, so having to dig through the menu to do the same on this camera is a hard sell personally.
But it does look pretty…

A bit about my own setup
I’m quite content with my own cameras. I have two: an older APS-C camera and a newer full frame camera. They’re the best cameras I’ve ever handled, each with lenses that are the best I’ve ever shot with.
That being said, I do have two vintage lenses I picked up from a vintage goods store for a great price. One is a prime lens and the other is a pump-action zoom lens. I can’t wait to try them out on my newest camera one of these days. To get an idea of how they really perform. There is a certain nostalgic charm in that. A compromise between the digital age and the analogue age, for regularly shooting in film is just too heckin’ expensive!
5 notes
·
View notes
Note
Im in my twenties and after an accident i need mobility aids. I dont know where to start so ive been reaching out to people on tumblr ( googling just gives me ads and its so frustrating). I was wondering if you have any recommendations on canes and wheelchairs
So this is going to be hard to hear but I really cannot give an outright recommendation to you without potentially causing you long-term harm. It depends what conditions/difficulties you have basically, and using the wrong mobility aid can cause long-term physical damage to your body to the point of it being another injury you need PT/aids for. It is always best to discuss with your dr and OT what is best for you. Even if you get the right aid, you still need to talk to an OT to make sure you're using it correctly (including correctly for you specifically). Using a cane wrong for example can cause shoulder damage.
Canes are for light/moderate mobility issues and are best for if you have balance issues or one single bad leg/the side that is bad switches but is not both sides. Canes can be purchased from most drug stores (CVS, Walgreens, etc).
Single point cane -- not really for putting weight on, just for balance.
3 or 4 point cane -- more stability, can put more weight on but not a lot.
Rolling cane -- less arm motion.
Crutch -- more stability, can put a LOT more weight on, can be in pairs so if both sides are bad you can get help with both sides.
You didn't ask but walkers are good for needing more weight on something while still retaining mobility in standing upright/walking. Walkers can also be purchased from drug stores.
Knee walker -- you put your knee on it if you have one bad leg and then roll.
Standard walker -- no wheels, you lift it like a cane, has good support for weight
2/3/4 wheel walkers -- they roll, less arm motion or ability to lift the walker. The number of wheels just makes it lighter if there's less (for lifting into cars and such).
You also didn't ask but there are mobility aids that are for the specific purpose of rehabilitation, if your injury is one where you might recover. Such as rehab walkers.
Wheelchairs are custom fit to you, everything from the center of gravity to the height of the backrest. If you have the wrong center of gravity you might fall a lot for example because your wheelchair is too tippy or you might not be able to go over a curb because it's not tippy enough. If I went over all the various customizations for wheelchairs we would be here forever but there is everything from standing wheelchairs to sports chairs to ones that lean back to reduce pressure sores etc. Do NOT get a transport/hospital chair as a permanent chair unless you have someone to push you because a transport chair especially if used often/for long periods will completely destroy your shoulders. They are not meant to be pushed by the user, they slow down when self propelled. Common brands of chair are TiLite and Quickie but there are several others, which mostly work with insurance but some do not (ex: hands on concepts doesn't take ins at all).
Manual chairs come in rigid and foldable. Both have pros and cons that will simply depend on your activity level and specific conditions. Manual chairs are for if you can push yourself with your arms and shoulders. You can hurt yourself very easily with a manual chair that doesn't fit properly. They also make power assists for manual chairs for people that can push themselves but fatigue after a while etc. Here's a link to some differences between rigid/foldable: https://www.passionatepeople.invacare.eu.com/folding-vs-rigid-manual-wheelchair-frames-decide/
Power chairs are for those who aren't able to push themselves/push themselves for long. There are a lot of variations of power chair that is specific to the condition, and lots of little add ons to help with daily functioning.
#I have a TiLite ZRA currently and a cane from fashionablecanes (I needed a custom height one)#We (household) also have a forearm crutch#ask#anonymous
12 notes
·
View notes
Text
«────── « HEADCANON » ──────»
As late-night boredom often has it, I decided to look at ETH.3N (Ethan) and try to determine his approximate composition and overall weight… Because unlike other robots on this blog, there really isn't a frame of reference to make a quick guess (e.g., Legion being more directly comparable to a living, organic species).
Or maybe there is, but I decided to take the complicated route!
So, like I have done for both Therapont and Alduin, I have decided to sit down and calculate these things manually. Despite me being bad at both math and chemistry! Both subjects I have almost failed at least once.
… This should go over well.
Put below the cut because I took explained everything like I was writing a damn thesis.
To start off, I want to clarify where I'm starting from. There are two key assumptions being made here:
Ethan is proportionally modeled after the average athletic human man. This is because the C6 classification of robots are designed to be worker drones and, specifically in Ethan's case, to be stand-ins for human soldiers.
Ethan is primarily composed of a 2-phase alpha-beta type Titanium alloy known as Ti-6AI-4V Titanium (6AI-4V), which is lightweight, corrosion-resistant, and incredibly strong. This type of metal is used in various modern military pieces of hardware, spacecraft components, medical/surgical devices, jet engine compressor blades, and other recreational equipment uses.
To explain a bit more on why 6AI-4V Titanium is one of the stronger (if not, strongest) metallic alloys, I want to briefly explain what a "2-phase alpha-beta type" really is. And to do that, I'm going to quote Yoshiki Oshida MS, PhD, in Bioscience and Bioengineering of Titanium Materials (Second Edition), 2013… or rather, the excerpt reposted onto Science Direct's website [LINK]:
Basically, titanium and titanium-based alloys can be classified into α type (HCP: hexagonal-closed packed crystalline structure), near α type, (α+β) type, and β type (BCC: body-centered cubic crystalline structure) alloy groups. Alloying elements added to titanium are divided into two groups: alpha (α) stabilizers and beta (β) stabilizers. Elements, such as Al, Sn, Ga, Zr, and interstitial elements (either singly of C, O, and N or in combination), dissolve into the titanium matrix and are strong solid solution strengtheners which produce little change at the transformation temperature (β-transus: 885°C for pure Ti) from the HCP (α) to the BCC (β) structure of pure titanium when heating and from BCC to HCP when cooling. Hence, they are known as α-stabilizers and exhibit good high-temperature performance. Alloying elements that decrease this phase transformation temperature are referred to as β-stabilizers. Generally, β-stabilizing elements are the transition metals, such as V, Mo, Nb, Ta, and Cr, providing much friability. Besides these alloying elements, Fe, Cu, Ni, Si, and B are frequently added to Ti-based alloys for improving mechanical strength, chemical stability, castability, and/or grain refining. By increasing the α-phase portion, it is generally recognized that (1) β-transus temperature increases, (2) creep strength as well as high-temperature strengths enhance, (3) flow stress increases, and (4) weldability improves. By increasing the β-phase portion, it is known that (1) room temperature strength increases, (2) heat-treatment and forming capabilities enhance, and (3) strain-rate sensitivity increases so that superplastic forming (SPF) is more favorably applicable.
What this translates to is that through mixing certain elements into the titanium, you get the properties of these elements reflected into the newly developed alloy. And titanium is already… fucking incredible.
So you add more shit to it, and you get something very, very versatile.
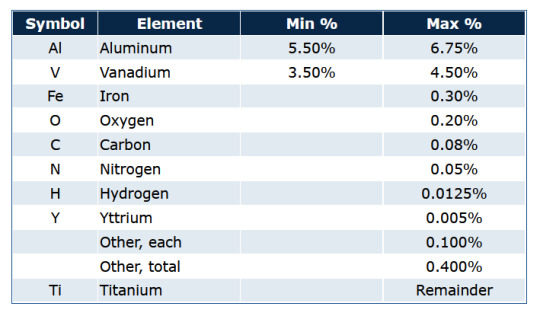
Particularly, with 6AI-4V Titanium, the primary elements being added to create the alloy are Al (Aluminum) and V (Vanadium), with both making up approximately 5.50%-6.75% and 3.50%-4.50% of the alloy respectively. Of course, there are smaller traces of other elements, such as iron, carbon, yttrium, etc., but these are trace compositions with little to no overall impact on the actual alloy. For those curious about the breakdown, here is a screenshot of the average chemical composition of 6AI-4V Titanium, courtesy of the Service Steel Aerospace Corporation:
With that background, we can get into the mathematical portion… almost. There is still the matter of Ethan's proportions. I couldn't get through to the original source material, but I did find the below image in "Modeling and Simulation of a Passive Lower-Body Mechanism for Rehabilitation" by Singh et al. (2016) [LINK]
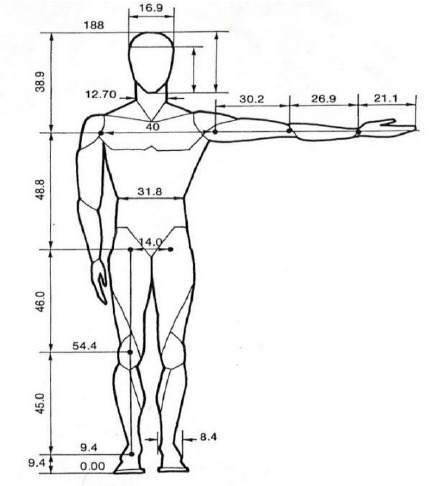
With these proportions in mind, we can assume Ethan is about 188 cm, or about 6 feet and 2 inches.
And then we get approximate breakdowns for each limb section (e.g., upper arm, lower arm).
Of course, these are not entirely accurate, as Ethan's build is not 1:1 with the human body. However, looking at a full body concept of Ethan (pictured below), we can forego really making any major adjustments as he's close… enough.

A bit on the stockier side, so I will account for this by simply adding 1.5x the baseline calculations. Why 1.5? It's an easy number. It adds up quick, though, so I would say it's a good guess.
And finally—par a brief disclaimer—we can get into the math.
DISCLAIMER: I am using TW Metals' calculator [LINK] to determine the approximate weights of each section. They do not have the specific alloy of titanium listed on their site, as they only list what they sell (I'm assuming). So, for the closest weight, I utilized the calculator's input for pure titanium. The weight will be off, but it's the closest I can calculate given the information I have on hand.
So! Let's begin.
First, to utilize the calculator, I have to break Ethan down into parts. Sad.
But it's fairly simple, given the visual references on hand.
Given the nature of Ethan's design, most of the metal is going to be plated (thicker than sheets), so I can really just break down the human body diagram and get a baseline for the amount of plates he has (minus the intricate joints and more defined features, such as his chest chassis and the various abdominal-like grooves).
I then make calculations using the calculator, assuming a varying number (between 6 and 8) of sheets are used per limb section (front, back, and sides; not a super thought out measurement, just an estimate), assume the sheets themselves are (at the bare minimum) 6mm thick, and that's how I got my final estimated range.
With these assumptions noted and input, we get the following approximations for each body section:
HEAD - 8.29 kg // 18.28 lbs
TORSO - 35.34 kg // 77.92 lbs
ARMS - 15.7 kg // 34.62 lbs
HANDS - 2.88 kg // 6.35 lbs
HIPS - 12.6 kg // 27.78 lbs
LEGS - 47.3 kg // 104.28 lbs
FEET - 2.66 kg // 5.86 lbs
And for that bulk adjustment mentioned earlier:
HEAD - 12.44 kg // 27.43 lbs
TORSO - 53.01 kg // 116.87 lbs
ARMS - 23.55 kg // 51.92 lbs
HANDS - 4.32 kg // 9.52 lbs
HIPS - 18.9 kg // 41.67 lbs
LEGS - 70.95 kg // 156.42 lbs
FEET - 3.99 kg // 8.80 lbs
Yeah, not a lot of math to really showcase, so I'll skip right to the good shit:
Ethan would, given my assumptions are fairly accurate, weigh between 124.77 kg // 275.07 lbs and 187.16 kg // 412.62 lbs.
Give or take. Not accounting for the weight of his circuitry and motors.
Which is a pretty sizeable margin, but again, that simple little 1.5x adjustment for bulk makes the difference. So, in my classic fashion, I will simply take the average of these variables, and use that as my canonical weight.
AKA: Ethan weighs 155.97 kg // 343.85 lbs.
Yay.
#(headcanon)#(m: ETH.3N)#(long post)#( why is me doing math at ungodly hours becoming a normal occurrence on this blog? someone put me down- )
2 notes
·
View notes
Text
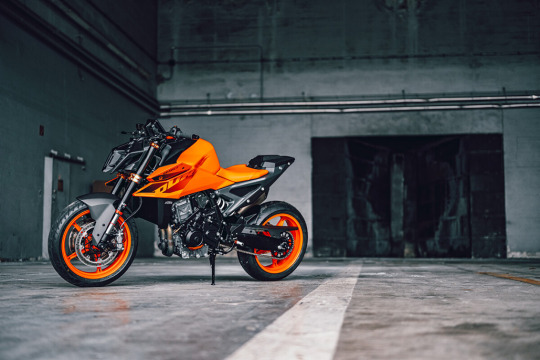
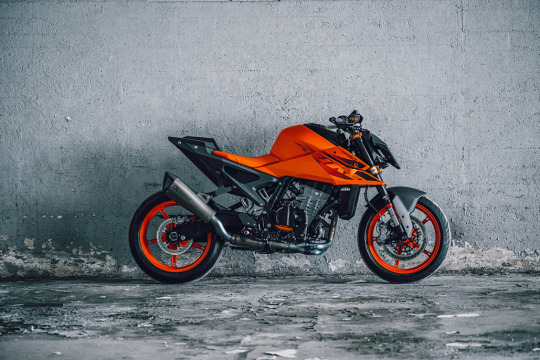
The 2024 KTM 990 Duke Hits The Bullseye With Sniper-like Accuracy
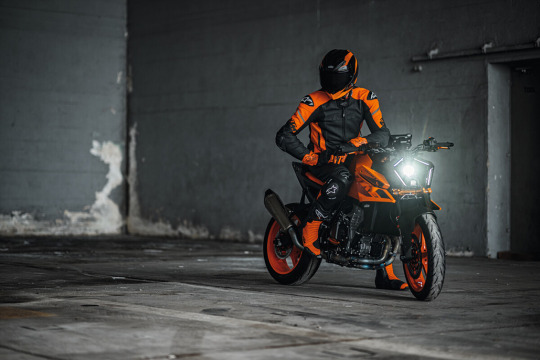
Heralding a massive leap forward for the KTM Naked range, the all-new KTM 990 DUKE takes aim directly at the coveted 1000 Naked bike segment, pulling no punches!
With 2024 marking 30 YEARS OF DUKE, the all-new KTM 990 DUKE slots into the line-up like a well-polished round in the chamber. In its quest to be the most performance-focused NAKED machine possible, the KTM 990 DUKE ticks all the right boxes mechanically, while deploying extreme new styling.
The KTM 990 DUKE makes its intentions perfectly clear. Apart from a blisteringly potent engine, an all-new chassis and swingarm design – not to mention updated ergonomics and technology – it now sizes up to larger capacity motorcycles in both displacement and proportions.
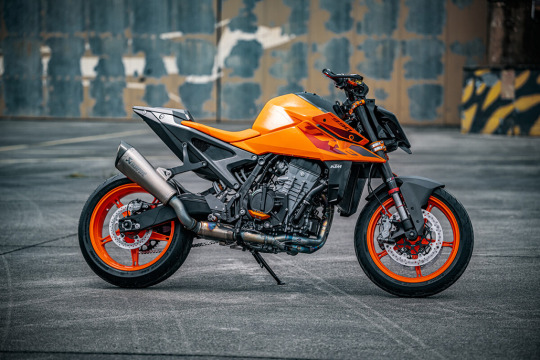
Side-on, the new design has been modelled around the concept of an explosion in a freeze-frame, harnessing extreme energy ready to be released. This new design is further enhanced by two colourway options; Black and Electric Orange – the latter being reminiscent of the Naked models of a bygone era, developed specifically to celebrate 30 YEARS OF DUKE.
At the face of it, predatory design meets reduced styling with its evolved LED headlight being a stand-out feature of the all-new KTM 990 DUKE. Constructed from a carefully chosen mix of materials, the new design ensures lighting stability in all road conditions. Position and daytime running lights are located on the profile of the headlight, which also auto-adjusts in intensity according to ambient light conditions thanks to a light sensor integrated into the dashboard.
Additionally, the KTM 990 DUKE is fitted with a Coming Home light function as standard. Here, the headlight will remain on after the ignition has been switched off, awarding the rider with a few seconds of light to open doors or for better visibility in the garage.
Power is taken care of by a dramatically updated version of the LC8c engine found in the KTM 890 DUKE R. Boasting 947 cc, the roaring heart of the KTM 990 DUKE receives new pistons, crankshaft and conrod, producing a fire-breathing 123 HP and 103 Nm, with a total motorcycle weight of only 179 kg, ready to ride.
The KTM 990 DUKE takes its DNA from the long lineage of hard-hitting DUKE models that have come before it, adding more verve and aggression for 2024. It is a performance-oriented machine at its core, designed around a lightweight, flickable chassis that inspires utmost rider confidence.
In typical DUKE fashion, a stiff trellis frame and a new closed-lattice swingarm come together to welcome high-quality adjustable WP APEX Suspension components. These, together with track-proven Bridgestone S22 tyres, provide SNIPER-like accuracy when it comes to cornering stability.
The WP APEX Suspension fitted to the KTM 990 DUKE features easy-to-adjust settings, encouraging the rider to push the limits comfortably. Upfront, the 43 mm WP APEX Suspension can be easily and accurately dialed in with 5 clicks on both rebound and compression. On the rear, the WP APEX Monotube shock absorber can be adjusted in 5-clicks, with manual preload adjustment also possible.
Once seated, riders are greeted by a 5-inch, anti-scratch bonded glass dashboard providing all the information a KTM 990 DUKE pilot could need. Revised graphics and menu structures are designed for faster, more intuitive access to the various features of the KTM 990 DUKE. This includes a new function that displays Lean Angle data, with an optional TRACK Mode complete with lap timer and telemetry stats. A USB-C connection is also added for device charging duties.
In short, the brief was simple; develop the ultimate mid-class NAKED machine. In achieving this, the 2024 KTM 990 DUKE hits the mark dead centre.
A full range of specially developed KTM PowerParts and KTM PowerWear are available for riders to personalise their motorcycles and get themselves kitted up in READY TO RACE performance.
The 2024 KTM 990 DUKE will be available from Authorised KTM Dealers from February 2024 onwards, for £12,999 OTR.
Discover more about 30 YEARS OF DUKE and the all-new 2024 KTM 990 DUKE at HERE.
Read the full article
2 notes
·
View notes
Text
Streamman Series: Mod Squad
Here’s something a little different. Instead of making a framing piece of fiction or just storing ideas in my writing notes, I thought I’d share a little breakdown of some background details in my The One True Streamman fanfic continuity. If you’d like to see more of this kind of stuff or have questions, be vocal about it!
Today’s topic: Who are the admins keeping the AIs’ Home Program running?
When you’ve got a community living in what’s essentially a cobbled-together video game made from whatever works, it takes diligent care to keep things working. It’s too much work for one person to handle on their own, so let’s get into the details of who has admin status and what they bring to the table.
Gordon
As the Science Team Plus Premium DLC’s resident window into the world beyond their world and the person who, y’know, pays the electric bill, Gordon is obligated to make sure his friends lives are comfortable without getting too invasive. He doesn’t know too much about programming, and has to look for help with others often. He’s the communicator, keeping track of what’s needed and making sure the right people are able to help, whether that’s one of the other admins or a freelance contractor.
G-Man Coolatta
When Gordon first extracted the AI, but before the program was complete, G-Man found that his unusual programming allowed him to be active and aware even while not running in a program or interacted with by a user. After making contact with Gordon, he used this gift in tandem with the working instinct his status as the G-Man gave him and his ceaseless drive to protect his son to help put the new universe in working order. Once the world was put together, he continues to run maintenance, and it fulfills him as a job. Perfect enrichment for him.
During the program’s creation, G-Man even worked his own “DNA”, so to speak, into the foundations of the program, making him something between a blood donor and one of those autonomous spaceship computers from scifi shows in terms of control. This was necessary on two fronts; for one, they needed to be sure that this world was an environment the AI characters could survive in natively, and this could make sure that happened. In addition, since the program needed to incorporate a bunch of different things, it needed to be as adaptable as the AI living there.
Darnold
Gordon’s first choice for a trustworthy admin whose name doesn’t start with G. Darnold has a far better grasp of the way things are supposed to be compared to Gordon, and he’s no slouch behind a keyboard. While G-Man can alter and stabilize things by sinking into the void and doing things manually, Darnold accesses things through his PC at home. Being more or less coworkers with Gordon has helped the two see eye to eye, and Darnold has been able to implement plenty of quality of life improvements.
Benrey
Does not have admin access. They don’t know how he keeps modifying things. Nearly crashed the program by installing thousands of mods to his house. Needs to be stopped. Put down that Minecraft Shader Pack or I swear to God
#gordon streamman#maybe my tag for this universe should be the ACTUAL name of the series...#the one true streamman
27 notes
·
View notes
Note
how do you do that stabilise thing you were talking about?
Hi nonnie. sorry this is late, i didn't have my laptop with me last week.
I did that in adobe after effects. Here’s a little tutorial i guess haha.
Okay, on the right side panel you got to effects & presents and in search there type "warp stabilization" then double click on that and let it run. that should stabilize the most of shaky cam, but if it still doesn't look stable enough you add motion tracking.

to do that you go to tacking on the left side panel and click on "stabilize motion"

if you don't see tracking there go to windows and select "tracking"

okay, now when you click on "stabilize motion" this dot will appear in two squares. you want to center it to the point in the video that you want to track, make the squares as big or as small as you want relative to the center point. it's better to track the point with high contrast to it's easier to read of Ae
then click on the play button and it will starts tracking, if you see that the tracker misses the point you can manually move it, just pause the video and go to the next frame and move the tracker where you want it

after the tracker is done it shoud look something like this, then you click on "apply" and you are done, you can also choose how you want the tracking to be applied, if you want to crop the video or just have it move and choose how you want to scale it later.

now that there is one point in center on some frames your video will look like this

to fix that you can scale and position video so it fills in all the empty edges:

and you're ready to render the video and make a gif with it!


8 notes
·
View notes
Text
Best DSLR for Content Creators in 2021
There are a few factors to consider when finding the best DSLR for content creation. The first is image quality. A good DSLR will have a high resolution sensor that can capture great detail in your photos and videos. Second is low light performance. A good DSLR will be able to take clear photos and videos even in dimly lit environments. Third is autofocus speed and accuracy. A good DSLR will be able to quickly and accurately focus on your subject, even if they are moving around. Fourth is shooting speed. A good DSLR will be able to take multiple photos in quick succession, allowing you to capture fast-moving subjects without blurring them. Lastly, you should consider price when choosing a DSLR for content creation; while there are some very expensive options out there, you don’t necessarily need to spend a lot of money to get a great camera for content creation purposes
youtube
Best DSLR for Content Creation: The Top Picks
There are a lot of great DSLRs on the market, but which one is the best for content creators? It really depends on what you’re looking for. Here are our top picks for the best DSLR for content creation.
1. Canon EOS 5D Mark IV: This camera is a great all-around option for content creators. It has excellent image quality and shooting performance, making it a great choice for both photos and videos.
2. Nikon D850: The D850 is another great option for content creators. It offers impressive image quality and shooting performance, plus features like 4K video recording and an articulating LCD screen.
3. Sony Alpha a7 III: The a7 III is an excellent choice if you’re looking for a compact DSLR that still offers high-end features and performance. It’s perfect for travel bloggers or vloggers who need to be able to pack light but still get professional-looking results.
Best DSLR for Content Creation: What to Look For
DSLR cameras are ideal for content creators because they offer excellent image quality and manual controls. When choosing the best DSLR for content creation, look for a camera with a powerful sensor, fast autofocus, and 4K video recording. You should also consider the type of lens you need and whether you want a camera with built-in Wi-Fi or Bluetooth.
Best DSLR for Content Creation: The Pros and Cons
There are a lot of factors to consider when choosing the best DSLR for content creation. The first is what type of content you plan on shooting. If you’re mostly shooting video, then you’ll want a camera with good video capabilities like 4K resolution and 60fps frame rates. For stills, you’ll want a camera with a high megapixel count so you can print large photos or crop them without losing too much detail. You’ll also want to consider things like image stabilization, autofocus speed and accuracy, and battery life when making your decision.
Once you’ve decided on the type of content you want to shoot, the next step is to decide what budget you have for your camera. DSLRs can range in price from around $500 to over $5,000, so it’s important to know how much money you’re willing to spend before started shopping around. If cost is no object, then the sky’s the limit in terms of what features and specs you can get in a DSLR. But if money is tight, there are still plenty of great options available that will allow
Best DSLR for Content Creation: How to Choose the Right One
There are a few things to consider when choosing the best DSLR for content creation. The first is megapixels. More megapixels means more detail and clarity in your photos, which is important for creating high-quality content. Another thing to consider is low light performance. A good DSLR will be able to take clear photos in low light without the use of a flash. Finally, you’ll want to consider video capabilities. Many DSLRs now offer 4K video recording, which is great for creating high-resolution videos.
When it comes to megapixels, more is not always better. Sure, having a lot of megapixels gives you the ability to crop and edit your photos more without losing quality, but it also means larger file sizes. This can make it difficult to manage your photo files if you’re not using an external hard drive or cloud storage solution. So while megapixels are important, don’t get too caught up in numbers; instead, focus on finding a balance that works for you and your content creation needs.”
“As for low light performance, this is where many entry-level DSLRs fall short. If you plan on doing any shooting in dimly lit environments (e indoors), then you’ll want a camera with good low light performance. This usually comes down to two things: sensor size and ISO sensitivity.”
“Finally, don’t forget about video capabilities when choosing the best DSLR for content creation purposes; 4K video recording is becoming increasingly common among higher-end models.”
Best DSLR for Content Creation: Tips and Tricks
Are you a content creator looking for the best DSLR to help you produce high-quality work? If so, then you’ve come to the right place. In this article, we’ll give you some tips and tricks on finding the best DSLR for content creation.
First, let’s start with what you should look for in a DSLR for content creation. The most important factor is image quality. You want a camera that can produce sharp, detailed images with minimal noise and distortion. Another important factor to consider is video quality. If you plan on shooting video as well as still photos, then you’ll want a camera that can shoot high-definition video without any issues.
Finally, consider your budget when choosing a DSLR for content creation. There are many great cameras on the market, but they vary widely in price. Don’t spend more than you need to get the features and performance that you want.
Now that you know what to look for in a DSLR for content creation, let’s take a look at some of the best options on the market today:
Best DSLR for Content Creation: FAQs
Assuming you would like a blog titled “Best DSLR for Content Creation: FAQs”:
“Best” is a relative term- what may be the best camera for one person may not be the best for another. It depends on factors such as budget, what kind of content you’ll be shooting, and your level of experience.
That being said, there are a few cameras that stand out as being particularly good options for content creators. The Canon EOS Rebel T7i is a great option for beginners or those on a tight budget. It’s user-friendly and produces high-quality images and videos. For more experienced shooters, the Nikon D850 is an excellent choice; it’s packed with features and produces stunning results. And if money is no object, the Leica S3 is in a class of its own- just be prepared to pay a hefty price tag.
No matter which camera you choose, remember that it’s just a tool; it’s up to you to create great content. So get out there and start shooting!
Conclusion
If you’re in the market for a new DSLR camera this year, there are several great options to choose from. However, if you’re primarily using your camera for content creation purposes, we’ve compiled a list of the best DSLR cameras for content creators in 2021.
Whether you’re looking for something lightweight and portable or something with more features and higher quality images, there’s a DSLR on this list that’s perfect for you. So, without further ado, here are the best DSLRs for content creators in 2021.
The post Best DSLR for Content Creators in 2021 appeared first on SwiftCreator.com.
https://ifttt.com/images/no_image_card.png
https://swiftcreator.com/content-creation/best-dslr-for-content-creators-in-2021/
https://ifttt.com/images/no_image_card.png
https://swiftcreatorcom.wordpress.com/2022/12/24/best-dslr-for-content-creators-in-2021/
3 notes
·
View notes
Note
do we know which definition of gravity chuuya manipulates. gravity is basically a force between two objects so, id assume it'd work on any two objects even if we put chuuya in space given that fact UNLESS it's specifically about the earth's gravity in which case earth is one of the two objects always which seems to be the case with how his powers work ? am i making sense
yes! you are right, gravity is a force between two objects and chuuya's ability seems to work a hell of a lot easier when dealing with the physical earth. There is definitely a reason for that and I was cursed by a wizard in my youth to constantly try to understand that reason as best I can and I’m still not very good at it I dont think but let me try to sketch out the parts I do understand here:
In classical physics, the more nuanced definition is that both objects always exert gravitational force on each other (newtons 1st law), and the magnitude of that force is directly dependent on the mass of the objects involved, while also inversely dependent on the squared distance between the two objects. in other words, the strength of natural gravity between two bodies is determined by the product of each of their masses, and that strength will drop off as the bodies get further apart (read about the inverse square law to learn more about that effect).
There is another constant, G, that we use to “quantify the relation between the geometry of spacetime and the stress-energy tensor”. Now I’m not going to pretend to be a physicist here I have an electrical engineering bs and I failed concepts of mathematics four times BUT! as I understand it: the stress-energy tensor is where the “information” about energy and momentum of a particular system (ie two bodies with gravitational attraction) is stored. You can use it to calculate things like gravitational flux, which is the derivative of gravitational force exerted on space-time.
Without getting too deep into relativity and frames of reference and multivariable calculus shit that honestly goes over my head too, I would say that we can think of this tensor as the magic sauce - it dictates the strength and direction of gravitational force based on fundamental mechanics of the universe that we are able to model without actually totally understanding what is “driving” it.
So I would also posit that this is what Chuuya’s ability is modifying. I think the strength of the change he is able to make is dependent on his emotional state and more specifically, I think his ability to distort it gets exponentially stronger relative to how pissed he is. That said, he’s not just able to freely push things in any random direction, it is much much easier to work with the natural flow of gravity than to craft brand new arcs of motion.
bsd gives us a lot of practical examples of this:
when he absorbs bullet impacts, he does not shoot them all back right along their path of motion, they float loosely around him for a moment before being repelled, rather than being perfectly reversed or anything like that. Note that bullets travel with a lot of stabilizing rotational momentum so it would actually be pretty difficult to just “send it back”. Repelling the relatively still bullets out in every direction is a much more intuitive manipulation of the force relationship between him and each bullet.
in fifteen, when someone shoots dead on at him, he diverts the path perpendicularly and then uses the force relationship between himself and the bullet to slingshot it back around his body along the trajectory it came from, which is very very different that stopping it and shooting it back
later, as an adult, we see that he IS now capable of firing bullets directly, though he’s doing it from a very high angle which suggests that he’s more just pushing the bullet past its usual terminal velocity on the way down and would still have to aim it manually before cutting it loose.
Finally, there’s the question of activation. Visually, we get the red aura cue to indicate something is “under his control”. Verbally, I think it’s described as him being able to manipulate the gravity of anything he’s in contact with and this is able to chain through various objects (layers of clothes, the dirt directly under his feet) to some degree. The chaining also seems to work better when he’s angrier, so he could for example pull up larger chunks of rock if he were pissed than he could if he were just showing off for fun.
We can clear up a lot of ambiguity around what actually constitutes touching by defining contact as exchange of force between two bodies. This actually solves problems like why can he pull up dirt but not like, make projectiles out of bundles of atmosphere or something. Dirt is a solid, meaning that although he is only directly in contact with the uppermost layer of dirt molecules, that upper layer is also distributing that force downwards deeper into the earth. Therefore, through chaining, he is able to pull up large chunks of the earth, centered around where he was standing. Liquid also has strong enough intermolecular bonds to behave roughly like a solid would: think of how water behaves in space. This does not work the same way as gaseous air - in a gas, molecules are constantly bouncing off each other, sharing and distributing force wildly. Some of those molecules would bounce off him, which does technically count as an activating condition, but they’re gone again just as quickly so he could not really do anything meaningful with it. In the end, if he were able to chain to surrounding atmosphere, it would be wisping away like smoke before he could do anything interesting with it.
Defining contact as exchange of force also solves another neat trick - exploding the laser sight guns. Light behaves like a particle - which is to say it travels through space-time and exerts and experiences force when it encounters other bodies. This force is very weak and generally not something we experience as tactile sense, but it is definitely there and is the driving principle behind solar sails (japan successfully launched a spacecraft called IKAROS that traveled at least 110 million km using this technology!). We also know that gravity is very much capable of distorting the path of light (as this is what creates that reddish halo we see around real black holes).
Therefore, a red dot sight trained on Chuuya would indeed count as contact and he would be able to invert the direction of the gravitational attraction between him and the dense stream of light particles. Now, lasers use optical feedback loops to focus and amplify light emission, which means that the current output of the system is used to calculate the future state of output. Operating normally, optical gain will stabilize the beam and light will be emitted from the laser. I don’t know enough about optics to say what would happen if one were to reverse the direction of the laser output, but it would certainly cause something fucking weird to happen and not out of the realm of plausibility to say it would generate a lot of heat. Now the last thing you want on an automated turret stacked with high powered explosives is a sudden heat source - you know how gunpowder works. Gun get hot, powder go boom.
And I am at 1.2k words here so I’m going to shut the fuck up now. But please feel free to ask further questions or poke holes in this, as it is quite literally my single favorite thought experiment to roll around in my brain. I hope you were able to learn something about Chuuya physics from it and if not, thank you for reading all my shit anyways. Let me know if theres anything that needs further explaining.
4 notes
·
View notes
Text
Mastering Jewelry Photography: A Comprehensive Guide

Jewelry photography is a specialized field that requires a keen eye for detail, an understanding of lighting and composition, and the right equipment. Capturing the true beauty and intricacy of jewelry pieces can significantly impact their appeal and sales potential. This comprehensive guide will walk you through everything you need to know to master jewelry photography.
Importance of Jewelry Photography
In the world of e-commerce and social media, high-quality images are crucial. For jewelry, where the appeal lies in the fine details, professional photography is essential. Well-captured photos can enhance perceived value, build trust with customers, and increase sales. High-quality images make jewelry pieces appear more luxurious and help customers feel confident about the quality and authenticity of the pieces. Attractive images are more likely to catch the eye of potential buyers and drive conversions.
Essential Equipment
Cameras
While professional DSLRs and mirrorless cameras are ideal, high-end smartphones can also produce excellent results. Key features to look for include high resolution for capturing fine details, manual controls to adjust settings like ISO, shutter speed, and aperture, and macro capabilities for capturing close-up details.
Lenses
Different lenses can dramatically affect the outcome of your jewelry photos. Macro lenses are perfect for capturing intricate details of jewelry. Prime lenses, with fixed focal lengths, offer sharp images and beautiful bokeh. Zoom lenses provide flexibility in framing and composition.
Lighting
Lighting is critical in jewelry photography. Options include natural light, which provides a soft, realistic look but is dependent on weather and time of day; studio lighting, including softboxes, ring lights, and LED panels for consistent, controllable lighting; and reflectors and diffusers to help control light and reduce harsh shadows.
Tripods
A stable camera is essential for sharp images. When choosing a tripod, consider adjustable height for shooting from different angles and a sturdy build to ensure stability and prevent camera shake.
Backgrounds
Simple, clean backgrounds are usually best for jewelry photography. Options include white or black backdrops, which are classic choices that make the jewelry stand out, and textured backgrounds, which can add depth and interest to the shots.
Other Accessories
A lightbox is a portable mini studio for small items. A remote shutter release helps avoid camera shake, and cleaning kits keep lenses and jewelry free from dust and smudges.
Setting Up Your Jewelry Photography Studio
Choose a location with ample natural light if possible and minimal clutter. Ensure the space is large enough to accommodate your setup and allow for movement around the subject. A three-point lighting setup is effective for jewelry photography. This includes a key light as the main light source, a fill light to reduce shadows created by the key light, and a backlight to separate the jewelry from the background and add depth.
Use a seamless background (a background that curves from the vertical to the horizontal surface) for a clean look. Ensure it’s large enough to accommodate the jewelry and eliminates unwanted lines. Place your camera on the tripod at eye level with the jewelry. Use the rule of thirds to compose your shot, positioning the jewelry off-center for a more dynamic image.
Capturing the Perfect Shot
Adjust your camera settings for the best results. A wider aperture (lower f-number) creates a shallow depth of field, while a narrower aperture (higher f-number) keeps more of the jewelry in focus. A faster shutter speed freezes motion, while a slower shutter speed can capture more light but may require a tripod to prevent blur. Keep ISO low to reduce noise; increase it only if necessary in low light conditions.
Manual focus allows for greater precision, especially when capturing detailed shots. Use focus peaking (if available) to highlight the in-focus areas. Compose your shot by experimenting with different angles to find the most flattering view of the jewelry. Ensure the jewelry is centered or creatively positioned according to the rule of thirds. Capture close-ups to highlight unique features. Shooting tethered, which involves connecting your camera to a computer, allows you to view images on a larger screen immediately, ensuring everything is in focus and properly lit.
Post-Processing Techniques
In post-processing, make basic adjustments to exposure, contrast, and white balance to enhance the image. Advanced editing includes retouching to remove imperfections or distractions, clipping paths to create clean cut-outs of the jewelry for a pure white background, and color correction to make the jewelry look more appealing. Popular photo editing software includes Adobe Photoshop for advanced editing capabilities, Adobe Lightroom for batch processing and basic adjustments, and GIMP as a free alternative with powerful features.
Creative Techniques and Tips
Use props to add context and enhance the visual appeal of your jewelry shots. Ensure they complement the jewelry without overpowering it. Lifestyle shots show your jewelry in use or in a realistic setting to help customers envision its wearability. This can be particularly effective for engagement rings, bracelets, and necklaces. Utilize reflective surfaces like glass or water to add interest. Ensure the reflections are controlled and enhance the overall image.
Try shooting from unusual angles or perspectives to create unique and eye-catching photos. Overhead shots, low angles, and macro close-ups can add variety to your jewelry images. Capture motion blur or use slow shutter speeds to show movement, such as swinging earrings or spinning rings. This technique can add a dynamic element to your shots.
Common Challenges and Solutions
Reflections can be problematic, especially with shiny jewelry. Use diffused lighting and position lights at different angles to minimize unwanted reflections. A polarizing filter can also help reduce glare. While some shadows can add depth, harsh shadows can be distracting. Use fill lights and reflectors to soften shadows. Adjust the distance and angle of your lights to control shadow intensity.
Ensure consistent white balance settings across all photos to achieve consistent colors. Use a grey card to set a custom white balance in your camera. In post-processing, match the color profiles to maintain consistency. Transparent jewelry like crystal or glass can be challenging. Use a gradient background or light the jewelry from behind to create separation. Experiment with different angles and lighting setups to highlight the jewelry’s edges and shape.
Showcasing Your Work
Build a well-organized portfolio showcasing your best work and highlighting your skills. Include a variety of shots to demonstrate your versatility. Online portfolio platforms like Behance, Adobe Portfolio, or a dedicated website can help you present your work professionally. Share your jewelry photos on social media platforms like Instagram, Pinterest, and Facebook. Use relevant hashtags, engage with your audience, and collaborate with influencers to increase visibility.
A blog can establish you as an authority in jewelry photography. Share tutorials, behind-the-scenes content, and case studies. This not only showcases your expertise but also attracts potential clients through organic search traffic. Attend industry events, join photography groups, and collaborate with other photographers and businesses. Networking can lead to referrals and new opportunities.
Measuring Success and Continuous Improvement
Use analytics tools to track the performance of your jewelry photos. Metrics to consider include conversion rates, engagement rates, and bounce rates. Request feedback from clients and peers to identify areas for improvement. Constructive criticism can help you refine your techniques and deliver better results.
Stay informed about the latest trends in e-commerce and photography. Subscribe to industry publications, follow influential photographers, and continuously experiment with new techniques and equipment. Take online courses, attend workshops, and read books on photography to continually enhance your skills. Platforms like Udemy, Coursera, and CreativeLive offer valuable resources for photographers at all levels.
Conclusion
Mastering jewelry photography requires a combination of the right equipment, proper techniques, and continuous learning. By understanding the importance of high-quality images, setting up an effective studio, capturing the perfect shot, and utilizing post-processing techniques, you can significantly enhance the visual appeal of your jewelry and attract more customers. Remember to showcase your work through various channels, seek feedback for improvement, and stay updated with industry trends to keep your skills sharp and your photos stunning.
Lensclicker jewelry photography services in Jaipur
At Lensclicker Photography, we specialize in delivering exceptional jewelry photography services in Jaipur. Our team of skilled photographers is dedicated to capturing high-quality images that elevate your brand and drive sales. From individual shots to group shots and lifestyle images, we cover all your jewelry photography needs. Our expert editing team ensures your images are flawless and ready to impress. We offer tailored photography packages to suit your specific requirements and budget.
Contact Us: 09521324743
For more information, please visit your website: — https://www.lensclicker.com/
#photography#ecommerce#photoshoot#services#product photography#artists on tumblr#across the spiderverse#michael cera#old bollywood#succession
0 notes
Text
Immersive Racing Simulator Cockpit: The Ultimate Driving Experience
In the realm of motorsports and gaming, the racing simulator cockpit stands as a pinnacle of innovation, offering enthusiasts and professional drivers alike an unparalleled driving experience. This sophisticated setup has transcended beyond mere gaming, becoming an essential tool for honing driving skills, training, and sheer entertainment. This article delves into the allure, components, and benefits of a racing simulator cockpit.

The Allure of Realism
A racing simulator cockpit is designed to replicate the sensation of driving a high-performance vehicle. The realism is achieved through meticulous design and advanced technology, ensuring that every aspect, from the seating position to the feedback from the steering wheel, mirrors the dynamics of actual racing. This immersive experience is what sets a racing simulator cockpit apart from traditional gaming setups.
Key Components
A racing simulator cockpit comprises several essential components, each contributing to the overall realism and functionality:
Cockpit Frame: The foundation of the simulator, the frame is typically made from sturdy materials like steel or aluminum. It ensures stability and can be adjusted to fit different body types and seating preferences.
Racing Seat: Designed for comfort and support, racing seats mimic those found in real race cars. They often come with adjustable sliders and recline features to cater to various ergonomic needs.
Steering Wheel and Pedals: These are the heart of the simulator. High-quality force feedback steering wheels replicate the tactile feedback from the road, while pedals, including throttle, brake, and sometimes clutch, offer precise control.
Shifters and Handbrakes: For a more authentic experience, many setups include manual shifters and handbrakes, mimicking those in rally or drift cars.
Monitors and VR Headsets: Visual immersion is crucial. Multiple monitors provide a wide field of view, while VR headsets offer a 360-degree perspective, further enhancing the sense of being in the driver’s seat.
Audio Systems: Surround sound systems or high-fidelity headphones are used to replicate the engine roars, tire screeches, and environmental sounds, adding to the immersive experience.
Benefits for Gamers and Drivers
The benefits of a racing simulator cockpit extend beyond entertainment:
Skill Development: For aspiring racers and professional drivers, simulators offer a risk-free environment to practice and refine driving techniques. They can simulate various tracks and weather conditions, helping drivers adapt and improve their performance.
Cost-Effective Training: Real-world track time is expensive and logistically challenging. Simulators provide a cost-effective alternative, allowing extensive practice without the associated costs of fuel, tires, and maintenance.
Physical Conditioning: High-end simulators can also contribute to physical conditioning. The force feedback systems help in building strength and endurance, particularly in the arms and shoulders, which are crucial for real-life racing.
Enhanced Gaming Experience: For gamers, the sheer thrill and immersion of using a racing simulator cockpit elevate the gaming experience to new heights. It transforms casual play into a deeply engaging activity.
Community and Competition: Many Buy racing simulators enthusiasts participate in online communities and competitions. Sim racing leagues offer a platform for friendly and competitive racing, fostering a sense of community and camaraderie.
0 notes
Text
Maximizing Efficiency and Precision with Gantry Type CNC Plasma Cutting Machine
In the realm of modern fabrication, precision and efficiency are paramount. Manufacturers are constantly seeking innovative solutions to streamline their production processes while maintaining the highest standards of quality. Enter the Gantry Type CNC Plasma Cutting Machine, a technological marvel revolutionizing the way metal fabrication is done.

What is a Gantry Type CNC Plasma Cutting Machine?
A Gantry Type CNC Plasma Cutting Machine is a sophisticated piece of equipment used in metal fabrication to precisely cut through various types of metals with the help of a plasma torch. Unlike traditional manual cutting methods, CNC (Computer Numerical Control) technology allows for automated, computer-controlled cutting, ensuring unparalleled accuracy and consistency.
Key Features:
Gantry Type Design: The term "gantry type" refers to the structure of the machine, where a gantry (a frame structure) spans the workspace. This design provides stability and allows for precise movement along multiple axes.
CNC Control: The integration of CNC technology enables precise control over the cutting process, including speed, direction, and depth of cut, leading to superior accuracy and repeatability.
Plasma Cutting: Plasma cutting utilizes a high-velocity jet of ionized gas (plasma) to melt through metal. This method is faster and more precise than traditional cutting methods like oxy-fuel cutting.
High Cutting Speed: Gantry Type CNC Plasma Cutting Machines are renowned for their high cutting speeds, resulting in increased productivity and shorter lead times.
Versatility: These machines can handle a wide range of materials and thicknesses, making them suitable for various industries such as automotive, aerospace, and construction.
Advantages of Gantry Type CNC Plasma Cutting Machines:
Precision: With CNC technology and advanced motion control systems, these machines can achieve intricate cuts with micron-level accuracy, ensuring the perfect fit of components.
Efficiency: The automated nature of Gantry Type CNC Plasma Cutting Machines reduces human error and minimizes material waste, leading to higher overall efficiency and cost-effectiveness.
Flexibility: Manufacturers can easily adapt the machine to different cutting tasks by simply changing the cutting program, allowing for quick production changes and versatility in operations.
Gantry Type CNC Plasma Cutting Machine Manufacturers
When it comes to investing in a Gantry Type CNC Plasma Cutting Machine, choosing the right manufacturer is crucial. Among the leading providers in the market, Metweld stands out for its commitment to quality, innovation, and customer satisfaction. Their cutting-edge machines are designed to meet the diverse needs of modern fabrication facilities, delivering unmatched performance and reliability.
In conclusion, the Gantry Type CNC Plasma Cutting Machine represents a significant advancement in metal fabrication technology, offering unparalleled precision, efficiency, and versatility. As manufacturers continue to prioritize quality and productivity, investing in this cutting-edge equipment is undoubtedly a wise decision.
#gantrytypecncplasmacuttingmachine#manufacturers#industrialproducts#metweld#cncmachine#industrialequipment
0 notes
Last Seen Blogs

peppersbian
Jess's Journal

sophisophioog-blog
sOphisOphi

makaaaroni
𝙼𝚊𝚔𝚊❤️

dragonsballsz
super saiyan 2: electric boogaloo

dixt
dixt