#linux centos monitoring software
Explore tagged Tumblr posts
Visit Tumblr Blog
Explore Tumblr blogs with no restrictions, modern design and the best experience.
Last Seen Tumblr Blogs


Fun Fact
Tumblr Inc. is using 66 technologies for its website.
Text

SYSTEM ADMIN INTERVIEW QUESTIONS 24-25
Table of Content
Introduction
File Permissions
User and Group Management:
Cron Jobs
System Performance Monitoring
Package Management (Red Hat)
Conclusion
Introduction
The IT field is vast, and Linux is an important player, especially in cloud computing. This blog is written under the guidance of industry experts to help all tech and non-tech background individuals secure interviews for roles in the IT domain related to Red Hat Linux.
File Permissions
Briefly explain how Linux file permissions work, and how you would change the permissions of a file using chmod. In Linux, each file and directory has three types of permissions: read (r), write (w), and execute (x) for three categories of users: owner, group, and others. Example: You will use chmod 744 filename, where the digits represent the permission in octal (7 = rwx, 4 = r–, etc.) to give full permission to the owner and read-only permission to groups and others.
What is the purpose of the umask command? How is it helpful to control default file permissions?umask sets the default permissions for newly created files and directories by subtracting from the full permissions (777 for directories and 666 for files). Example: If you set the umask to 022, new files will have permissions of 644 (rw-r–r–), and directories will have 755 (rwxr-xr-x).
User and Group Management:
Name the command that adds a new user in Linux and the command responsible for adding a user to a group. The Linux useradd command creates a new user, while the usermod command adds a user to a specific group. Example: Create a user called Jenny by sudo useradd jenny and add him to the developer’s group by sudo usermod—aG developers jenny, where the—aG option adds users to more groups without removing them from other groups.
How do you view the groups that a user belongs to in Linux?
The group command in Linux helps to identify the group a user belongs to and is followed by the username. Example: To check user John’s group: groups john
Cron Jobs
What do you mean by cron jobs, and how is it scheduled to run a script every day at 2 AM?
A cron job is defined in a crontab file. Cron is a Linux utility to schedule tasks to run automatically at specified times. Example: To schedule a script ( /home/user/backup.sh ) to run daily at 2 AM: 0 2 * * * /home/user/backup.sh Where 0 means the minimum hour is 2, every day, every month, every day of the week.
How would you prevent cron job emails from being sent every time the job runs?
By default, cron sends an email with the output of the job. You can prevent this by redirecting the output to /dev/null. Example: To run a script daily at 2 AM and discard its output: 0 2 * * * /home/user/backup.sh > /dev/null 2>&1
System Performance Monitoring
How can you monitor system performance in Linux? Name some tools with their uses.
Some of the tools to monitor the performance are: Top: Live view of system processes and usage of resource htop: More user-friendly when compared to the top with an interactive interface. vmstat: Displays information about processes, memory, paging, block IO, and CPU usage. iostat: Showcases Central Processing Unit (CPU) and I/O statistics for devices and partitions. Example: You can use the top command ( top ) to identify processes consuming too much CPU or memory.
In Linux, how would you check the usage of disk space?
The df command checks disk space usage, and Du is responsible for checking the size of the directory/file. Example: To check overall disk space usage: df -h The -h option depicts the size in a human-readable format like GB, MB, etc.
Package Management (Red Hat)
How do you install, update, or remove packages in Red Hat-based Linux distributions by yum command?
In Red Hat and CentOS systems, the yum package manager is used to install, update, or remove software. Install a package: sudo yum install httpd This installs the Apache web server. Update a package: sudo yum update httpd Remove a package:sudo yum remove httpd
By which command will you check the installation of a package on a Red Hat system?
The yum list installed command is required to check whether the package is installed. Example: To check if httpd (Apache) is installed: yum list installed httpd
Conclusion
The questions are designed by our experienced corporate faculty which will help you to prepare well for various positions that require Linux such as System Admin.
Contact for Course Details – 8447712333
2 notes
·
View notes
Text
How to Optimize Your Offshore SSD VPS for Maximum Efficiency
Having a well-optimized Offshore SSD VPS Hosting Solution is crucial for maintaining high performance, security, and cost-effectiveness. By implementing the right strategies, you can maximize the efficiency of your SSD VPS Servers while ensuring a seamless experience for your users. Here’s a step-by-step guide to help you achieve optimal performance.

1. Select the Right Operating System
Choosing an efficient OS like Linux (Ubuntu, CentOS, or Debian) can reduce resource consumption and improve server stability. Opt for minimal installations to avoid unnecessary processes that slow down your Offshore VPS Hosting Services.
2. Keep Software and System Updated
Regular updates enhance security and efficiency. Ensure your Offshore VPS Hosting Solutions receive the latest OS patches, security fixes, and software upgrades to maintain peak performance.
3. Optimize SSD Performance
Since SSDs provide high-speed storage, enabling TRIM support and reducing unnecessary write operations will extend their lifespan and enhance server performance. Using a lightweight file system like ext4 or XFS can further optimize storage efficiency.
4. Implement Caching Mechanisms
Caching reduces server load and speeds up content delivery. Tools like Memcached, Redis, or Varnish can significantly improve the responsiveness of your SSD VPS Servers by storing frequently accessed data.
5. Use a Lightweight Web Server
Switching to a high-performance web server like Nginx or LiteSpeed can enhance efficiency by handling more simultaneous connections with fewer resources. This optimization is essential for Offshore VPS Hosting Services that deal with heavy traffic.
6. Optimize Database Queries
Inefficient database queries can slow down your server. Use indexing, query caching, and database optimization tools to ensure fast and efficient data retrieval. MySQL tuning with InnoDB adjustments can also improve performance.
7. Strengthen Security Measures
Securing your Offshore SSD VPS Hosting Solutions is critical. Use firewalls (like UFW or CSF), SSH key authentication, and regular malware scans to prevent vulnerabilities and unauthorized access.
8. Leverage a Content Delivery Network (CDN)
A CDN reduces latency and speeds up global content delivery by caching and distributing resources across multiple locations. This reduces the direct load on your Offshore VPS Hosting Solutions.
9. Monitor Resource Usage
Tracking CPU, memory, and disk space usage is essential for identifying bottlenecks. Use monitoring tools like Nagios, Zabbix, or htop to ensure your SSD VPS Servers operate efficiently.
10. Optimize Bandwidth Usage
Reduce data transfer costs and improve performance by enabling Gzip or Brotli compression, minimizing HTTP requests, and optimizing website images. This ensures efficient bandwidth usage for your Off shore SSD VPS Hosting Solutions.
Conclusion
By applying these optimization techniques, you can enhance the efficiency, security, and performance of your Offshore SSD VPS Hosting Solutions. A well-maintained VPS ensures smooth operation, better user experience, and cost savings. Start implementing these strategies today to get the most out of your hosting solution!
0 notes
Text
Managed Server Enterprise Support: What You Need to Know
Enterprise IT environments demand reliable, secure, and high-performance server management to ensure business continuity. Managed server enterprise support provides proactive monitoring, maintenance, security, and troubleshooting for on-premises, cloud, or hybrid infrastructures.
1. Key Features of Managed Server Enterprise Support
🔹 24/7 Monitoring & Performance Optimization
✔ Real-time server health monitoring (CPU, memory, disk, network usage) ✔ Proactive issue detection to prevent downtime ✔ Load balancing & resource optimization
🔹 Security & Compliance Management
✔ Firewall & intrusion detection to block cyber threats ✔ Patch management & software updates to fix vulnerabilities ✔ Compliance audits (ISO 27001, HIPAA, GDPR)
🔹 Backup & Disaster Recovery
✔ Automated backups with offsite storage ✔ Disaster recovery solutions for business continuity ✔ RAID configuration & data redundancy
🔹 Server OS & Software Support
✔ Windows Server (2016, 2019, 2022) & Linux distributions (Ubuntu, CentOS, RHEL) ✔ Database management (MySQL, PostgreSQL, MS SQL) ✔ Virtualization & cloud integration (VMware, Hyper-V, AWS, Azure)
🔹 Helpdesk & Technical Support
✔ Dedicated IT support team with rapid response times ✔ Troubleshooting & issue resolution ✔ Custom SLAs for uptime guarantees
2. Types of Managed Server Enterprise Support
🔹 On-Premises Server Management
✔ Ideal for businesses with in-house data centers ✔ Supports hardware maintenance, OS updates, security patches ✔ Best for: Enterprises requiring full control over infrastructure
🔹 Cloud & Hybrid Server Management
✔ Managed services for AWS, Azure, Google Cloud ✔ Optimized for cloud security, scalability & cost-efficiency ✔ Best for: Enterprises adopting hybrid or multi-cloud strategies
🔹 Fully Managed vs. Co-Managed Support
✔ Fully Managed: Service provider handles everything (monitoring, security, backups, troubleshooting) ✔ Co-Managed: Internal IT team works alongside provider for collaborative management
3. Benefits of Enterprise Server Support
🔹 Minimized Downtime: 24/7 monitoring & quick response prevent disruptions 🔹 Stronger Security: Proactive firewall management, encryption & threat monitoring 🔹 Scalability: Adapt server resources as business grows 🔹 Cost Savings: Reduces IT staff workload & lowers infrastructure costs 🔹 Compliance Assurance: Meets industry security & legal requirements
4. How to Choose the Right Managed Server Provider
✔ Service Level Agreements (SLAs): Ensure 99.9%+ uptime guarantees ✔ Security Protocols: Must include firewalls, DDoS protection, and backups ✔ Support for Your Tech Stack: Compatible with Windows/Linux, databases, virtualization ✔ Customization & Scalability: Can adjust services based on business growth ✔ 24/7 Support & Response Time: Fast issue resolution & technical assistance
5. Cost of Managed Server Enterprise Support
💰 Pricing Models: ✔ Per Server: $100–$500/month (basic), $500–$2,500/month (enterprise) ✔ Per Resource Usage: Based on CPU, RAM, storage & bandwidth ✔ Custom Plans: Tailored pricing for hybrid & multi-cloud environments
6. Who Needs Managed Server Enterprise Support?
✔ Large Enterprises: Need mission-critical uptime & security ✔ eCommerce & SaaS Businesses: Require high-performance cloud hosting ✔ Financial & Healthcare Organizations: Must comply with data security regulations ✔ Growing Startups: Benefit from scalable, cost-effective infrastructure
Need a Custom Managed Server Plan?
Let me know your server type, workload, and business needs, and I can recommend the best managed enterprise support solution!

0 notes
Text
Linux Zero to Hero: Mastering the Open-Source Operating System
Linux, an open-source operating system, is the backbone of countless systems, from personal computers to enterprise servers and supercomputers. It has earned its reputation as a robust, versatile, and secure platform for developers, administrators, and tech enthusiasts. In this comprehensive guide, we explore the journey from being a Linux beginner to mastering its vast ecosystem.
Why Learn Linux?
1. Open-Source Freedom
Linux provides unparalleled flexibility, allowing users to customize and modify the system according to their needs. With its open-source nature, you have access to thousands of applications and tools free of charge.
2. Industry Relevance
Major companies, including Google, Amazon, and Facebook, rely on Linux for their servers and infrastructure. Learning Linux opens doors to lucrative career opportunities in IT and software development.
3. Secure and Reliable
Linux boasts a strong security model and is known for its stability. Its resistance to malware and viruses makes it the operating system of choice for critical applications.
Getting Started with Linux
Step 1: Understanding Linux Distributions
Linux comes in various distributions, each catering to specific needs. Popular distributions include:
Ubuntu: User-friendly, ideal for beginners.
Fedora: Known for cutting-edge technology and innovation.
Debian: Stable and versatile, preferred for servers.
CentOS: Enterprise-grade, often used in businesses.
Choosing the right distribution depends on your goals, whether it’s desktop use, development, or server management.
Step 2: Setting Up Your Linux Environment
You can use Linux in several ways:
Dual Boot: Install Linux alongside Windows or macOS.
Virtual Machines: Run Linux within your current OS using tools like VirtualBox.
Live USB: Try Linux without installation by booting from a USB drive.
Mastering Linux Basics
1. The Linux File System
Linux organizes data using a hierarchical file system. Key directories include:
/root: Home directory for the root user.
/etc: Configuration files for the system.
/home: User-specific data.
/var: Variable files, such as logs and databases.
2. Essential Linux Commands
Understanding basic commands is crucial for navigating and managing the Linux system. Examples include:
ls: Lists files and directories.
cd: Changes directories.
mkdir: Creates new directories.
rm: Deletes files or directories.
chmod: Changes file permissions.
3. User and Permission Management
Linux enforces strict user permissions to enhance security. The system categorizes users into three groups:
Owner
Group
Others
Permissions are represented as read (r), write (w), and execute (x). Adjusting permissions ensures secure access to files and directories.
Advanced Linux Skills
1. Shell Scripting
Shell scripting automates repetitive tasks and enhances efficiency. Using bash scripts, users can create programs to execute commands in sequence.
Example: A Simple Bash Script
bash
Copy code
#!/bin/bash
echo "Hello, World!"
2. System Administration
System administrators use Linux for tasks like:
Managing users and groups.
Monitoring system performance.
Configuring firewalls using tools like iptables.
Scheduling tasks with cron jobs.
3. Package Management
Each Linux distribution uses a package manager to install, update, and remove software:
APT (Ubuntu/Debian): sudo apt install package_name
YUM (CentOS/Fedora): sudo yum install package_name
Zypper (openSUSE): sudo zypper install package_name
Linux for Developers
Linux provides a robust environment for coding and development. Key features include:
Integrated Development Environments (IDEs): Tools like Eclipse, IntelliJ IDEA, and Visual Studio Code are supported.
Version Control Systems: Git integration makes Linux ideal for collaborative software development.
Containerization and Virtualization: Tools like Docker and Kubernetes thrive in Linux environments.
Troubleshooting and Debugging
Learning to troubleshoot is vital for any Linux user. Common methods include:
Viewing Logs: Logs in /var/log offer insights into system errors.
Using Debugging Tools: Commands like strace and gdb help debug applications.
Network Diagnostics: Tools like ping, traceroute, and netstat diagnose connectivity issues.
Linux Certifications
Earning a Linux certification validates your skills and enhances your career prospects. Notable certifications include:
CompTIA Linux+
Red Hat Certified Engineer (RHCE)
Linux Professional Institute Certification (LPIC)
Certified Kubernetes Administrator (CKA)
These certifications demonstrate proficiency in Linux administration, security, and deployment.
Tips for Success in Linux Mastery
Practice Regularly: Familiarity with commands and tools comes through consistent practice.
Join Communities: Engage with Linux forums, such as Stack Overflow and Reddit, to learn from experienced users.
Contribute to Open-Source Projects: Hands-on involvement in projects deepens your understanding of Linux and enhances your resume.
Stay Updated: Follow Linux news and updates to stay informed about advancements and changes.
Conclusion
Mastering Linux is a transformative journey that equips individuals and organizations with the tools to thrive in a technology-driven world. By following the steps outlined in this guide, you can progress from a Linux novice to a seasoned expert, ready to tackle real-world challenges and opportunities.
0 notes
Text
Managed Linux Dedicated Server Hosting in India: A Complete Guide
In today’s fast-paced digital world, businesses need reliable, high-performance hosting solutions to support their websites, applications, and databases. Managed Linux Dedicated Server Hosting in India has emerged as a top choice for organizations seeking security, scalability, and efficiency. This article explores what managed Linux dedicated hosting entails, its benefits, and why it's a preferred option in India’s growing market.
What is Managed Linux Dedicated Server Hosting?
Managed Linux dedicated server hosting provides businesses with a physical server dedicated exclusively to their needs. Unlike shared or VPS hosting, where resources are distributed among multiple users, dedicated servers offer complete control over the hardware and software environment. The “managed” aspect means the hosting provider takes care of server maintenance, updates, and security, allowing businesses to focus on growth and innovation.
The use of Linux, an open-source operating system, adds unparalleled flexibility and stability, making it ideal for businesses that require robust hosting solutions.
Why Choose Managed Linux Dedicated Server Hosting in India?
India’s rapidly expanding digital economy demands hosting solutions that are cost-effective, secure, and scalable. Managed Linux dedicated servers meet these requirements by offering:
Enhanced SecurityIndia is a prime target for cyber threats. Managed hosting providers implement advanced security measures such as firewalls, DDoS protection, and regular updates to protect your data.
ScalabilityBusinesses in India experience fluctuating traffic patterns, especially during festivals or sales. Managed Linux servers can easily scale resources to meet increased demand.
Cost-EffectivenessLinux’s open-source nature eliminates the need for expensive licensing fees, making it a budget-friendly choice for Indian startups and enterprises alike.
Local Data CentersHosting providers in India operate local data centers, ensuring low latency and faster load times for users across the country.
24/7 SupportWith managed hosting, expert support teams are available around the clock to resolve any technical issues, ensuring uninterrupted performance.
Key Features of Managed Linux Dedicated Server Hosting
1. Full Root Access
Gain complete control over your server environment, allowing you to customize configurations, install software, and optimize performance.
2. Robust Security Protocols
Enjoy features like malware scanning, regular backups, and SSL integration, ensuring your data is always secure.
3. High Uptime Guarantees
Providers typically offer uptime guarantees of 99.9% or higher, ensuring your website or application remains accessible.
4. Performance Optimization
With dedicated resources like CPU, RAM, and storage, your server delivers lightning-fast performance for high-traffic websites and applications.
5. Operating System Support
Linux distributions such as Ubuntu, CentOS, and Debian are supported, catering to diverse business needs.
6. Expert Management
Hosting providers handle everything from software updates and security patches to performance monitoring, allowing you to focus on your business goals.
Benefits of Choosing Linux for Dedicated Server Hosting
Linux is a favorite among developers and businesses due to its:
Stability: Minimal downtime and high reliability.
Flexibility: Supports various programming languages and databases.
Cost Savings: No licensing fees mean lower costs.
Security: Frequent updates and a strong developer community ensure robust security.
Use Cases for Managed Linux Dedicated Servers
1. E-Commerce Platforms
With high traffic and transaction volumes, e-commerce businesses require fast and secure hosting. Dedicated servers provide the reliability needed for seamless user experiences.
2. Enterprise Applications
Businesses running resource-intensive applications benefit from dedicated resources, ensuring smooth operations.
3. Media and Entertainment
Streaming services and content-heavy websites require low latency and high bandwidth, making Linux dedicated servers an ideal choice.
4. Hosting Providers
Indian hosting resellers can leverage dedicated servers to provide reliable services to their clients.
Top Managed Linux Dedicated Server Providers in India
Cloudtechtiq
Bluehost India
MilesWeb
A2 Hosting
Hostinger India
Each provider offers unique features, pricing, and support plans, catering to diverse business needs.
Choosing the Right Hosting Provider
When selecting a managed Linux dedicated server in India, consider the following:
Reputation: Check reviews and customer feedback.
Support: Ensure 24/7 availability and expertise.
Scalability: Opt for providers that allow resource upgrades.
Cost: Balance features with affordability.
Conclusion
Managed Linux Dedicated Server in India is a powerful solution for businesses seeking unparalleled performance, security, and control. Whether you run a small business, an enterprise, or a content-heavy website, this hosting solution is equipped to meet your needs.
By choosing a reliable provider and leveraging Linux’s flexibility, you can optimize your online presence and stay ahead in India’s competitive market. Invest in managed Linux hosting today and empower your digital growth!
0 notes
Text
How to Optimize Your Computer Server for Maximum Performance?
Optimizing your computer server for maximum performance involves a series of steps that enhance its efficiency, reliability, and speed. Here are some detailed instructions to help you achieve this:
1. Hardware Optimization
a. Upgrade Server Hardware
RAM: Ensure your server has sufficient RAM. Upgrade to ECC (Error-Correcting Code) RAM for better reliability.
Storage: Use SSDs (Solid State Drives) instead of HDDs (Hard Disk Drives) for faster read/write speeds.
CPU: Upgrade to a more powerful CPU with higher clock speeds and more cores.
Network Interface Cards (NICs): High-speed NICs, such as 10GbE, are used to handle increased network traffic.
b. Maintain Hardware
Regular Cleaning: Dust and clean server components to prevent overheating.
Monitor Hardware Health: Use tools to monitor temperatures, voltages, and fan speeds.
2. Software Optimization
a. Optimize Operating System (OS)
Choose the Right OS: Select an OS tailored to your server's role (e.g., Linux distributions like Ubuntu Server or CentOS for web servers).
Update Regularly: Keep the OS and all software up to date with the latest patches and security updates.
Remove Unnecessary Services: Disable or uninstall services and applications that are not needed.
b. Optimize Applications
Database Optimization: Use indexing and query optimization techniques. Consider database clustering for load balancing.
Web Server Optimization: For Apache, use modules like mod_deflate for compression. For Nginx, adjust worker processes and caching settings.
Caching: Implement caching mechanisms such as Memcached or Redis to reduce database load.
3. Network Optimization
a. Configure Network Settings
Adjust TCP/IP Settings: Optimize parameters such as TCP window size and timeout settings.
DNS Configuration: Use reliable and fast DNS services.
b. Network Security
Firewall Configuration: Use firewalls to block unnecessary ports and protect against attacks.
Use VPNs: Secure remote access with VPNs to ensure encrypted connections.
4. Performance Monitoring and Tuning
a. Use Monitoring Tools
System Monitoring: Tools like Nagios, Zabbix, or Prometheus can provide insights into system performance and alert you to issues.
Log Analysis: Regularly analyze logs to detect and resolve errors and performance bottlenecks.
b. Regular Performance Tuning
Load Balancing: Distribute workloads across multiple servers to prevent any single server from being overwhelmed.
Scalability Planning: Plan for future growth by considering horizontal and vertical scaling options.
5. Security Enhancements
a. Regular Security Audits
Vulnerability Scanning: Use tools like Nessus to identify and address vulnerabilities.
Penetration Testing: Conduct regular penetration tests to find and fix security weaknesses.
b. Data Protection
Backups: Implement regular, automated backups and test restore procedures.
Encryption: Use encryption for sensitive data, both in transit and at rest.
6. Energy Efficiency
a. Power Management
Use Energy-Efficient Hardware: Choose energy-efficient hardware components.
Configure Power Settings: Adjust power settings to reduce consumption during low-usage periods.
b. Cooling Optimization
Efficient Cooling Systems: Use advanced cooling systems to maintain optimal temperatures.
Hot and Cold Aisle Containment: Implement hot and cold aisle containment in data centers to improve cooling efficiency.
Conclusion
By systematically addressing these areas, you can significantly enhance your server's performance, reliability, and security. Regular monitoring, updates, and proactive maintenance are key to maintaining optimal server performance over time. You can check more at Netseg.me.
0 notes
Text
Setting Up a Home Server: A Comprehensive Guide
In today’s digital age, having a home server can be a game-changer. It allows you to centralize your data, stream media, and even host your own websites or applications. Setting up a home server may seem daunting, but with the right guidance, it can be a rewarding and empowering experience. In this blog post, we’ll walk you through the steps to set up your very own home server.
Choosing the Right Hardware
The first step in setting up a home server is to select the appropriate hardware. The hardware you choose will depend on your specific needs and budget. Here are some factors to consider:
Processor: The processor, or CPU, is the heart of your server. Look for a processor with multiple cores and a decent clock speed to ensure smooth performance.
RAM: The amount of RAM you need will depend on the tasks you plan to perform on your server. As a general rule, aim for at least 4GB of RAM, but 8GB or more is recommended for more demanding applications.
Storage: The storage capacity of your server will determine how much data you can store. Consider using a high-capacity hard drive or a combination of hard drives in a RAID configuration for redundancy and improved performance.
Operating System: Choose an operating system that suits your needs. Popular options include Windows Server, Linux (e.g., Ubuntu Server, CentOS), or even a NAS (Network Attached Storage) operating system like FreeNAS or Synology DSM.
Setting Up the Server Hardware
Once you’ve selected your hardware, it’s time to set up the physical server. Follow these steps:
Assemble the Hardware: Carefully follow the instructions provided with your server components to assemble the hardware. This may involve installing the CPU, RAM, and storage drives.
Connect the Cables: Connect the necessary cables, such as the power cable, network cable, and any additional cables required for your specific setup.
Install the Operating System: Follow the installation instructions for your chosen operating system. This may involve creating bootable media, partitioning the storage, and configuring the initial settings.
Configuring the Server Software
With the hardware set up, it’s time to configure the server software. The specific steps will vary depending on the operating system you’ve chosen, but here are some general guidelines:
Update the Operating System: Ensure that your operating system is up-to-date by installing the latest security patches and updates.
Set Up Network Settings: Configure the network settings, such as the server’s IP address, subnet mask, and default gateway, to ensure it can communicate with your home network.
Install and Configure Services: Depending on your needs, you may want to install and configure various services, such as a web server (e.g., Apache or Nginx), a file server (e.g., Samba or NFS), a media server (e.g., Plex or Emby), or a database server (e.g., MySQL or PostgreSQL).
Secure the Server: Implement security measures, such as setting up a firewall, enabling two-factor authentication, and regularly updating your server’s software to protect against potential threats.

Accessing and Managing the Server
Once your server is set up and configured, you’ll need to learn how to access and manage it. Here are some tips:
Remote Access: Depending on your server’s operating system, you may be able to access it remotely using a web-based interface, a desktop client, or a command-line tool. This allows you to manage your server from anywhere.
Backup and Restore: Implement a reliable backup strategy to protect your data. This may involve using a cloud-based backup service or setting up a local backup solution.
Monitoring and Maintenance: Monitor your server’s performance, logs, and resource usage to ensure it’s running smoothly. Regularly maintain your server by applying updates, managing user accounts, and addressing any issues that arise.
Practical Applications for a Home Server
A home server can be used for a variety of purposes, including:
File Storage and Sharing: Use your home server as a central storage location for your files, documents, and media, making them accessible to all devices on your home network.
Media Streaming: Turn your home server into a media hub by hosting your personal media library and streaming it to various devices throughout your home.
Web Hosting: Host your own websites, web applications, or even a personal blog on your home server, giving you full control over your online presence.
Backup and Disaster Recovery: Utilize your home server as a backup solution, ensuring your important data is safe and secure in the event of a hardware failure or other disaster.
Home Automation: Integrate your home server with smart home devices and services, allowing you to centralize and automate various aspects of your home.
0 notes
Text
Navigating the Tech Landscape: How to Choose the Right Hardware for Your SUI Validator Node
In the fast-evolving world of blockchain technology, SUI Validator Nodes play a pivotal role in maintaining network security and integrity. These nodes act as validators in the SUI blockchain, ensuring that transactions are valid and secure. As a prospective SUI Validator Node operator, one of the crucial decisions you'll face is choosing the right hardware to optimize the performance and reliability of your node. In this guide, we'll explore the key considerations to help you make an informed decision and set up a robust SUI Validator Node.
Understanding the Requirements of SUI Validator Nodes
Before delving into hardware specifics, it's essential to grasp the basic requirements of SUI Validator Nodes. These nodes are responsible for validating transactions and reaching consensus within the network. To do this effectively, they must meet certain technical specifications. These include sufficient processing power, memory, storage capacity, and a stable internet connection.
Processing Power: CPU Considerations
The heart of your SUI Validator Node lies in its central processing unit (CPU). The CPU is responsible for executing instructions and processing data, making it a critical component. Aim for a high-performance multi-core processor to handle the computational demands of validating transactions. Popular choices include Intel Core i7 or AMD Ryzen processors, providing the necessary horsepower to keep your node running smoothly.
Memory: RAM Matters
Random Access Memory (RAM) is another crucial factor influencing the performance of your SUI Validator Node. A higher RAM capacity allows your node to store and quickly access data, enhancing overall efficiency. Consider a minimum of 16GB of RAM for optimal performance, with the option to scale up if your node experiences increased demand.
Storage Capacity: SSD vs. HDD
Storage plays a vital role in maintaining the blockchain's ledger and transaction history. While Hard Disk Drives (HDDs) are cost-effective, Solid State Drives (SSDs) offer faster read and write speeds, significantly improving the responsiveness of your SUI Validator Node. Opt for an SSD with sufficient storage capacity to accommodate the growing size of the blockchain.
Network Connectivity: Ensuring Reliability
A stable internet connection is paramount for the continuous operation of your SUI Validator Node. Choose a reliable broadband connection with sufficient bandwidth to handle the data flow associated with validating transactions. Consider a backup connection or failover mechanism to mitigate the impact of potential outages.
Choosing the Right Operating System
Selecting the right operating system is crucial for the stability and security of your SUI Validator Node. Linux distributions such as Ubuntu or CentOS are popular choices due to their stability, security features, and widespread community support. Ensure that your chosen operating system is compatible with the SUI blockchain software.
Scalability: Planning for Growth
As the SUI network evolves, scalability becomes a key consideration. Choose hardware that allows for easy scalability, enabling you to upgrade components such as CPU, RAM, or storage as the demands on your SUI Validator Node increase over time. This future-proofing approach ensures that your node remains competitive and efficient in the long run.
Energy Efficiency: Sustainable Operation
Considering the environmental impact of cryptocurrency mining and validation, opting for energy-efficient hardware is a responsible choice. Look for components with high performance per watt ratios to reduce your node's carbon footprint and operational costs.
Regular Maintenance and Monitoring
Finally, once your SUI Validator Node is up and running, it's crucial to implement a regular maintenance and monitoring routine. Regularly check hardware health, update software, and stay informed about the latest developments in SUI Validator Nodes to adapt your hardware setup accordingly.
Conclusion
In conclusion, choosing the right hardware for your SUI Validator Node involves a careful balance of processing power, memory, storage, and network connectivity. By understanding the specific requirements of SUI Validator Nodes and keeping scalability and energy efficiency in mind, you can build a robust and reliable node that contributes to the security and decentralization of the SUI blockchain. Whether you're a seasoned node operator or a newcomer to the world of blockchain validation, investing time in selecting the right hardware is a crucial step toward a successful and sustainable operation of your SUI Validator Node.
1 note
·
View note
Text
VPS Hosting for Developers: Achieving the Ideal Blend of Power and Control
VPS hosting, or Virtual Private Server hosting, is an excellent choice for developers looking to strike the ideal balance between power and control. With a VPS, you get your own virtualized portion of a physical server, giving you more control and resources compared to shared hosting. Here are some key considerations for achieving the ideal blend of power and control with VPS hosting:
Resource Allocation: Choose a VPS plan that offers adequate CPU, RAM, and storage resources for your development needs. Make sure the hosting provider allows you to easily scale up these resources as your projects grow.
Operating System Choice: Opt for a hosting provider that offers a variety of operating systems. This allows you to select the OS that best suits your development stack, whether it's Linux distributions like Ubuntu or CentOS, or Windows.
Server Management: Decide whether you want to manage the server yourself (unmanaged VPS) or have the hosting provider handle server maintenance tasks (managed VPS). Developers with strong server administration skills may prefer unmanaged VPS for more control.
Control Panel: Consider using a control panel like cPanel or Plesk to simplify server management tasks. Many hosting providers offer these control panels as add-ons.
Root Access: Ensure you have root or administrative access to your VPS. This level of control allows you to install custom software and configure the server to your specific needs.
Security: Implement robust security measures to protect your VPS. This includes regularly updating software, configuring firewalls, and using strong authentication methods.
Backups: Set up regular automated backups to prevent data loss. Some hosting providers offer backup solutions as part of their VPS plans.
Scalability: Choose a hosting provider that allows you to easily scale your VPS resources up or down as your projects' demands change. Scalability is crucial for handling traffic spikes and accommodating growth.
Support: Consider the level of customer support provided by the hosting company. Responsive support can be invaluable when troubleshooting issues or seeking assistance with server configurations.
Uptime and Reliability: Look for a hosting provider with a strong track record of uptime and reliability. Downtime can negatively impact your development workflow and user experience.
Price vs. Value: Compare VPS hosting plans based on their features, performance, and pricing. Keep in mind that the cheapest option may not always provide the best value for your specific requirements.
Monitoring and Analytics: Implement server monitoring and analytics tools to keep an eye on server performance and identify any potential issues before they impact your projects.
Network Speed and Location: Consider the hosting provider's data center locations and network infrastructure. Choosing a data center closer to your target audience can improve website loading times.
Compliance and Data Privacy: Ensure that the hosting provider complies with relevant data privacy regulations and industry standards, especially if you handle sensitive user data.
Community and Documentation: Check if the hosting provider has an active user community and comprehensive documentation. These resources can be invaluable for troubleshooting and learning.
By carefully evaluating these factors and tailoring your VPS hosting setup to your specific development needs, you can achieve the ideal blend of power and control for your projects. Remember that your requirements may evolve over time, so it's important to choose a hosting solution that allows for flexibility and growth.
0 notes
Text
Linux Course: Unlocking the Power of Open-Source Operating Systems
In the world of technology, Linux stands as one of the most important and versatile operating systems. Whether you are an aspiring system administrator, a software developer, or someone interested in IT infrastructure, learning Linux is an essential skill that can open doors to countless career opportunities. This article will guide you through the key aspects of a Linux course, its benefits, what you will learn, and why it matters in today’s digital landscape.
What is Linux?
Linux is an open-source operating system kernel first released by Linus Torvalds in 1991. Unlike proprietary operating systems such as Windows or macOS, Linux is freely available to anyone and can be modified or distributed under the GNU General Public License. Over time, Linux has grown into a robust and secure OS powering everything from personal computers and servers to smartphones, embedded systems, and even supercomputers.
Many different versions, called distributions (distros), exist today — including Ubuntu, CentOS, Debian, Fedora, and Red Hat Enterprise Linux (RHEL). Each distro serves different purposes but shares the core Linux kernel and principles.
Why Learn Linux?
Linux skills are highly sought after in the IT industry due to the system's widespread use in servers, cloud computing, cybersecurity, and development environments. Here are some key reasons to take a Linux course:
Career Opportunities: Many organizations run their servers on Linux. Roles such as Linux System Administrator, DevOps Engineer, Cloud Engineer, and Security Analyst require solid Linux knowledge.
Open Source Advantage: Linux promotes transparency and customization, empowering users to learn deeply about how an OS functions.
Server and Cloud Dominance: Around 70% of web servers globally run Linux-based OSes, and cloud platforms like AWS, Google Cloud, and Azure rely heavily on Linux.
Stability and Security: Linux is known for its reliability and security, making it the preferred OS for critical applications.
Free and Flexible: Unlike Windows licenses, Linux distros are free, making it ideal for learning and experimentation.
Who Should Take a Linux Course?
A Linux course is valuable for a range of learners, including:
IT professionals looking to enhance their skills
Beginners interested in technology and open-source software
Developers aiming to build or deploy applications on Linux servers
System administrators managing network and server infrastructures
Cybersecurity enthusiasts focusing on penetration testing and ethical hacking
What Will You Learn in a Linux Course?
A well-structured Linux course covers fundamental to advanced topics, ensuring a holistic understanding of the OS. The following are the typical modules included:
1. Introduction to Linux
History and evolution of Linux
Overview of Linux distributions
Understanding open source and licensing
Installing Linux on virtual machines or physical hardware
2. Linux File System and Commands
Directory structure and file system hierarchy (/, /home, /etc, /var, etc.)
Basic shell commands (ls, cd, pwd, mkdir, rm, cp, mv)
File permissions and ownership (chmod, chown, chgrp)
Understanding files (regular, directories, symbolic links, special files)
3. Working with the Shell
Introduction to the command-line interface (CLI)
Bash shell basics
Command chaining, piping, and redirection
Environment variables and shell scripting basics
4. User and Group Management
Creating and managing users and groups
Password policies and security
Switching users and managing permissions
5. Package Management
Installing and managing software packages (using apt, yum, dnf, or zypper)
Updating and removing software
Working with repositories
6. Process and Service Management
Understanding processes and jobs
Process monitoring commands (ps, top, htop)
Managing system services (systemctl, service)
Scheduling tasks with cron and at
7. Networking Basics
Configuring network interfaces
Understanding IP addressing, DNS, and routing
Testing network connectivity (ping, traceroute, netstat)
SSH basics for remote access
8. Disk Management
Partitioning disks using fdisk and parted
Mounting and unmounting file systems
Disk quotas and monitoring disk usage (df, du)
9. System Monitoring and Troubleshooting
Logs management and analysis (/var/log)
Monitoring CPU, memory, and storage usage
Basic troubleshooting commands and techniques
10. Security Essentials
Firewalls (iptables, firewalld)
SELinux basics
SSH key-based authentication
Configuring sudo for privilege escalation
11. Advanced Topics (Optional, Depending on Course)
Kernel modules and compilation
Containers and virtualization (Docker, KVM)
Automating with Ansible or other configuration management tools
Setting up web servers (Apache, Nginx)
Database basics on Linux (MySQL, PostgreSQL)
Benefits of Completing a Linux Course
Hands-on Experience
Most Linux courses emphasize practical exercises that let you work in a real Linux environment. This hands-on practice is vital because Linux proficiency comes from doing, not just theory.
Certification Opportunities
Many Linux courses prepare students for certifications such as the CompTIA Linux+, Red Hat Certified System Administrator (RHCSA), or Linux Professional Institute Certification (LPIC). These certifications enhance your resume and demonstrate validated skills to employers.
Improved Problem-Solving Skills
Linux encourages users to understand system internals and troubleshoot issues using command-line tools. This builds a logical and analytical mindset that benefits all areas of IT.
Cost-Effective Learning
Linux is free to download and install, so you don’t need to invest in costly software licenses to practice and learn.
Versatility Across Platforms
Once proficient in Linux, you can work on cloud platforms, embedded devices, and even Windows Subsystem for Linux (WSL) on Windows machines, greatly expanding your environment options.
How to Choose the Right Linux Course?
With many Linux courses available online and offline, choosing the right one depends on your goals and learning style. Consider the following:
Course Level: Beginners should start with foundational courses; advanced users might seek specialized training.
Instructor Credentials: Look for courses taught by experienced professionals or recognized institutions.
Practical Labs: Ensure the course offers hands-on labs or virtual environments.
Certification Preparation: If certification is your goal, pick courses aligned with certification exams.
Community and Support: Courses with active forums or support channels help resolve doubts quickly.
Cost and Duration: Compare prices and course lengths to fit your budget and schedule.
Recommended Linux Learning Resources
Online Platforms: Coursera, Udemy, edX, Linux Foundation Training
Books: "Linux Command Line and Shell Scripting Bible" by Richard Blum, "How Linux Works" by Brian Ward
Linux Distributions: Start with beginner-friendly distros like Ubuntu or Fedora for practice
Practice Labs: Websites like Linux Academy, Katacoda, and OverTheWire offer interactive labs
Final Thoughts
Learning Linux is not just about mastering an operating system; it’s about embracing an open-source philosophy that drives innovation worldwide. Whether you want to manage servers, automate tasks, or build software, a solid understanding of Linux can serve as a foundation for a rewarding tech career.
Taking a Linux course equips you with essential skills that are in high demand across industries, from tech startups to multinational corporations. The knowledge you gain can empower you to troubleshoot complex problems, automate repetitive tasks, and efficiently manage computing environments.
So, if you are passionate about technology and eager to build your IT skills, enrolling in a Linux course is a step in the right direction — one that opens up a world of possibilities.
0 notes
Text
Self vs Managed WordPress Hosting : An In-Depth Comparison [2023]

The main difference between Self Hosting and Managed WordPress hosting is that Self hosting gives you full control and responsibility for your WordPress website’s server and infrastructure, whereas managed WordPress hosting provides a hands-off approach, letting the host handle security, updates, and performance optimization.
If you're starting a new WordPress website, one of the biggest decisions you'll make is whether to go with self-hosted WordPress or use a managed WordPress hosting provider.
This choice affects everything from your monthly hosting bill to the amount of control you have over your site. It's important to weigh the pros and cons carefully based on your specific needs.
In this guide, we'll dive deep into the self-hosting vs managed WordPress hosting debate and equip you with everything you need to decide. Buckle up for a bumpy ride down the WordPress hosting rabbit hole!
Self-Hosted WordPress Explained
Self-hosting means you rent a virtual private server (VPS) or dedicated server, install WordPress yourself, and manage everything at the system and application level.
With self-hosted WordPress, you take complete ownership over your hosting environment. Here's a closer look at what's involved :
Hardware Provisioning
The first step is sourcing the actual physical server your site will run on. You can rent a VPS or dedicated server from providers like :
DigitalOcean
Vultr
Linode
AWS
Google Cloud
VPS plans start around $10/month for basic setups. Dedicated servers are more expensive but give you sole access to the underlying hardware.
Make sure to choose a provider with servers near your audience for fastest performance.
Software Setup & Configuration
Once you have your VPS or dedicated box, it's time to set up the software powering your WordPress site :
Install a Linux distro like Ubuntu or CentOS
Configure the LAMP or LEMP stack (Linux, Apache/Nginx, MySQL, PHP)
Tweak the Apache/Nginx config for optimal WordPress performance
Secure MySQL, PHP, and other services
Install caching like Varnish and php-fpm
Set up a control panel like CPanel for easier management
This process requires deep Linux server and WordPress expertise. But the payoff is getting everything finely tuned for your particular site's needs.
Ongoing Management
Server setup is just the beginning. With self-hosted infrastructure, you must handle all ongoing management and maintenance yourself including :
OS and software updates
Security patching
WordPress core, plugin and theme updates
Backups and disaster recovery
Monitoring uptime and performance
Optimizing the stack as needed
Troubleshooting any issues that arise
The work never stops when you self-host! You must stay vigilant to keep your site running smoothly.
The Pros of Self-Hosted WordPress
Let's recap the biggest benefits of rolling your own WordPress hosting environment :
Total control: You make all hosting decisions to perfectly fit your specific needs.
Flexibility and customization: You can configure server software like PHP, MySQL, Nginx however you want.
Cost savings: Once optimized, self-hosted sites can cost less per month than managed WordPress hosting.
Performance and scalability: You can fully optimize and tune the server for your particular site.
No vendor lock-in: You can easily migrate between different server providers.
When to Consider Self-Hosted WordPress
Self-hosted infrastructure makes the most sense for :
Developers and engineers with server administration expertise
Sites that require total control over the stack
Companies with large budgets for hosting costs
Complex sites anticipating high traffic and load
Businesses wanting to scale sites across multiple servers
Anyone running advanced stack configurations like HHVM or custom LEMP
Potential Downsides of Self-Hosted
Self-hosting isn't all sunshine and rainbows. Here are the biggest challenges to weigh :
Time investment: Server setup and management is extremely time consuming and complex.
Technical skill required: You must have significant sysadmin, DevOps, and WordPress expertise.
Maintenance overhead: OS, software, and WordPress updates are a never-ending chore.
Security liability: You're fully responsible for protecting against threats and vulnerabilities.
No support: If (and when) problems occur, you're on your own to fix them.
Higher learning curve: Be prepared to invest many hours mastering server configuration.
As you can see, self-managed WordPress hosting is definitely not for the faint of heart!
Managed WordPress Hosting Overview
In contrast to the DIY approach of self-hosting, managed WordPress hosting providers take care of everything related to your infrastructure and server environment.
Companies like WordPress Engine, Kinsta, and Pagely handle all aspects like :
Server provisioning
WordPress installation
Software setup and configuration
Ongoing maintenance and management
Updates
Security
Backups
Caching and performance optimization
24/7 WordPress technical support
This hands-off approach allows you to focus entirely on your site content and not worry about hosting headaches.
How Managed WordPress Hosting Works
Let's look at how managed WordPress hosting operates under the hood :
Optimized Infrastructure
Hosts like WordPress Engine build their architecture specifically for WordPress. This includes :
High-performance server hardware
CDNs for blazing fast static file delivery
Multiple app and database server clusters
Batched updates and maintenance for minimal downtime
Geographic redundancy to keep sites always online
The result is WordPress performance and reliability far exceeding what most self-hosted setups can achieve.
Hardened Security
Managed hosts implement numerous security enhancements like :
Automated malware detection and removal
DDoS protection
Advanced firewalls and access control lists
Ongoing vulnerability scanning and patching
Regular penetration testing
Forced SSL to encrypt all connections
Your site stays locked down and safe from threats.
Hassle-Free Maintenance
Hosts take complete ownership of mundane but critical tasks like :
OS and software updates
Daily offsite cloud backups
WordPress core and plugin updates
Content delivery network (CDN) config
SMTP email delivery management
Performance monitoring and optimization
You'll never have to worry about this stuff again!
White-Glove Support
Managed WordPress hosting providers staff teams of WordPress experts available 24/7 to help with :
Site migrations
Configuration questions
Troubleshooting plugin and theme conflicts
Diagnosing performance problems
Outages and emergency response
Any other issues that come up
For those times when you need a lifeline, support is just a phone call or support ticket away.
The Benefits of Managed WordPress Hosting
Let's recap the biggest perks of handing off hosting management :
No technical skill required: You don't need any sysadmin or DevOps expertise.
Blazing fast performance: Providers optimize WordPress speed right out of the box.
Enhanced security: Hardened environments keep your data safe.
99.9% or better uptime: Clustering and redundancy eliminate downtime.
Automatic updates: WordPress and plugins stay up to date automatically.
Time savings: No need to manage infrastructure yourself.
24/7 expert support: Get help anytime you need it.
Daily backups: Never lose data or worry about disaster recovery.
When to Consider Managed WordPress Hosting
Managed WordPress hosting is a perfect fit for :
Bloggers who want to focus on content instead of backend complexity
Ecommerce sites and client projects needing rock-solid reliability
Publishers and media companies with large audiences
Regulated businesses requiring security and compliance
Sites where fast performance and SEO are critical
Anyone looking to offload infrastructure management
Potential Downsides of Managed Hosting
Managed WordPress hosting isn't without some tradeoffs :
Less control and flexibility: You must accept the provider's system configurations.
Limited customization: Some hosts restrict plugins or forbid code changes.
Higher cost: Managed WordPress hosting is more expensive than self-hosting.
Vendor lock-in: Migrating between managed hosts is harder than switching servers yourself.
Overkill for simple sites: Lots of overhead and cost for basic blogs.
Hybrid Hosting: Getting the Best of Both Worlds
If you like aspects of both self-hosted and fully managed WordPress hosting, hybrid options try to give you the best of both worlds.
Platforms like Cloudways, Kinsta MyKinsta, and Pantheon combine easy WordPress setup and management with more flexibility over your environment.
For example, Cloudways still handles core infrastructure like scaling and security. But you get more configuration control, choice of server location, and the ability to install whatever software you need.
Hybrid platforms can be a great middle ground. Evaluate options like :
Cloudways
Kinsta MyKinsta
Pantheon
Pagely
WordPress-Engine Genesis
DreamPress
The downside is hybrid hosts tend to offer less optimization and fewer enterprise features out of the box compared to true premium managed WordPress hosting.
Migrating Between Environments
One final thing to note - don't get analysis paralysis worrying about picking the "perfect" option upfront.
If your needs change down the road, you can always migrate from self-hosted WordPress to managed hosting or vice versa.
Just make sure to choose a platform that provides tools to make the transition as smooth as possible.
For example, hosts like WordPress Engine offer a migration service to safely transfer your site. And they provide instructions on exporting your database and files for self-migration.
The takeaway? Don't let hosting decisions delay actually launching your WordPress site! Pick an environment, get up and running, and optimize later.
Which is Right for You?
So which type of WordPress hosting should you choose? Here are some final recommendations based on common use cases :
For Bloggers
Go with managed WordPress hosting. The last thing you want is dealing with servers and infrastructure when you should be focused on creating content.
For Developers
Self-hosted is likely the best fit. You'll want access and control to run whatever stack and configurations you need.
For Ecommerce Sites
Managed hosting is ideal. You'll benefit from optimized performance, tight security, and expert support for your business.
For Enterprise Companies
Either self-hosted or managed enterprise-grade hosting. For large complex sites, leave it to the experts.
When In Doubt
You really can't go wrong starting with managed WordPress hosting, even as a developer. Let the provider handle infrastructure so you can focus on building an awesome site!
Don't Stress, Just Start!
I know that was a boatload of information to process. But don't overthink the self-hosted vs managed WordPress hosting decision.
The most important thing is to get your site launched and start sharing your passion with the world! You can always change environments later if you want more control or less complexity.
With the right host and a well-crafted strategy, you can build a WordPress site that achieves all your goals and visions. So take a deep breath, review the options, and make the best decision for today.
The perfect WordPress hosting fit for you is just a signup form away. It's time to stop dreaming and start doing - now get out there and start that site!
#wordpress#managed wordpress hosting#self vs managed wordpress#self vs managed wordpress hosting#self hosting#self vs managed hosting#self hosting vs managed hosting#managed hosting in wordpress#self vs managed hosting in wordpress
0 notes
Link
#linux#centos#top#rhel#ssh#grub#interview#questions#linux commands#linux administration#linux centos monitoring software
0 notes
Text
Setting Up a Residential Server: A Step-by-Step Guide
In today’s digital age, having a residential server can offer numerous benefits, from enhanced security and privacy to centralized storage and media streaming capabilities. Setting up a residential server may seem daunting at first, but with the right guidance, it can be a rewarding and empowering experience. In this step-by-step guide, we will walk you through the process of setting up your own residential server.
Step 1: Planning and Preparation
Before diving into setting up your residential server, it’s crucial to plan and prepare adequately. Consider the following points:
Purpose: Define the purpose of your server — whether it’s for file storage, media streaming, hosting a website, or other specific tasks.
Hardware: Choose the right hardware based on your needs. This includes a reliable server-grade computer, sufficient storage drives, adequate RAM, and a stable internet connection.
Operating System: Select a suitable operating system for your server. Popular choices include Linux distributions like Ubuntu Server, CentOS, or specialized server OS like Windows Server.
Step 2: Installation and Configuration
Once you have your hardware and software ready, it’s time to install and configure your residential server:
Install the Operating System: Follow the installation instructions for your chosen operating system. Ensure all necessary drivers are installed correctly.
Network Configuration: Set up network settings, including IP address, subnet mask, gateway, and DNS servers. Ensure your server is connected to your home network.
Security: Implement security measures such as firewall configurations, user authentication, and regular software updates to protect your server from potential threats.

Step 3: Setting Up Services
After the basic setup is complete, you can start configuring services on your residential server:
File Storage: Set up file-sharing services like Samba (for Windows) or NFS (for Linux) to create a centralized storage solution accessible from all devices on your network.
Media Server: Install media server software like Plex or Emby to stream movies, music, and photos to various devices within your home.
Web Server: If you plan to host a website, install a web server software like Apache or Nginx and configure it to serve web pages.
Step 4: Remote Access and Monitoring
To manage your residential server effectively, consider setting up remote access and monitoring tools:
Remote Access: Configure remote access tools like SSH (Secure Shell) or VPN (Virtual Private Network) to manage your server from anywhere securely.
Monitoring: Install monitoring software like Nagios or Zabbix to keep track of server performance, resource usage, and potential issues proactively.
Step 5: Backup and Disaster Recovery
Lastly, don’t forget to implement a robust backup and disaster recovery plan for your residential server:
Regular Backups: Schedule regular backups of your data to an external drive, cloud storage, or another server to prevent data loss in case of hardware failure.
Disaster Recovery Plan: Create a detailed disaster recovery plan outlining steps to restore your server in case of a catastrophic event.
By following these steps and guidelines, you can successfully set up a residential server that meets your specific needs and enhances your digital lifestyle. Remember to stay informed about best practices, security updates, and new technologies to keep your server running smoothly and securely. Happy server building!
0 notes
Text
How to install CentOS 7 Server and Desktop

This tutorial will show you how to install the latest version of CentOS Linux 7 on a dedicated server or desktop machine. The same steps will work on private or public cloud virtual machines too. CentOS is a stable Open Source Linux distribution and one of the most popular Linux platforms based on Red Hat Enterprise Linux (rhel) sources.
The typical installation of CentOS as performed in this tutorial will be based on the CentOS 7 DVD ISO image. You can burn the image to a DVD or copy it to a bootable USB drive. The installation covers the process of installing CentOS 7 on UEFI based machine. The same installation procedure can be successfully applied on old BIOS motherboards or on UEFI systems with Legacy Mode or CSM (Compatibility Support Module) option enabled.
REQUIREMENTS
The latest CentOS 7 ISO Image obtained from the following official CentOS download mirrors: http://isoredirect.centos.org/centos/7/isos/x86_64/CentOS-7-x86_64-DVD-1708.iso
Initial Preparation
After you’ve downloaded the CentOS DVD ISO image by following the download link presented above, use a DVD burning software to place the bootable image to a DVD or prepare a bootable USB stick that contains the CentOS image.
Bootable USB Drive
A bootable USB drive can be created with the Rufus program in order to be fully compatible with UEFI based motherboards. If you don’t have an UEFI motherboard machine, then you can use any other software to create a bootable CentOS 7 USB stick. Some of the most popular software to create bootable USB flash memory drives can be found at the https://www.pendrivelinux.com/ website.
Configure Bios
Another important aspect which must be followed in order to properly install CentOS 7 on UEFI based motherboards is to open your machine motherboard UEFI settings (pressing a special key, such as F1, F2, F11, F12, Del, Esc) and disable QuickBoot or FastBoot and Secure Boot options. The BIOS/EFI keys you need to press during hardware initialization or machine power on phase in order to enter BIOS/UEFI settings highly depend on the motherboard vendor specifications and should be included in the motherboard’s manual. Another important aspect is to change the machine boot order and instruct the BIOS/EFI to use the proper drive for booting (DVD drive or USB). On some machines, the boot order or the boot drive can be selected by pressing a special key at hardware power on.
Install CentOS 7
After you’ve made the above settings to your machine motherboard UEFI/BIOS, place the DVD ISO image of CentOS 7.4 or the bootable USB flash stick in the appropriate motherboard drive. Then reboot or power-on the machine. Hit the appropriate bootable key from the keyboard and instruct the BIOS or UEFI software to boot the machine from the appropriate DVD or USB drive. The CentOS 7 bootable ISO image should load and it will present you the first installation image on your monitor screen. Select Install CentOS 7 from that menu and hit the Enter key to start the installation process, as illustrated in the following screenshot :

After a few seconds, the CentOS graphical installer will be loaded into your machine RAM and will present you the ”Welcome to CentOS 7” screen. Select the appropriate language for your system installation process and press hit on Continue button.
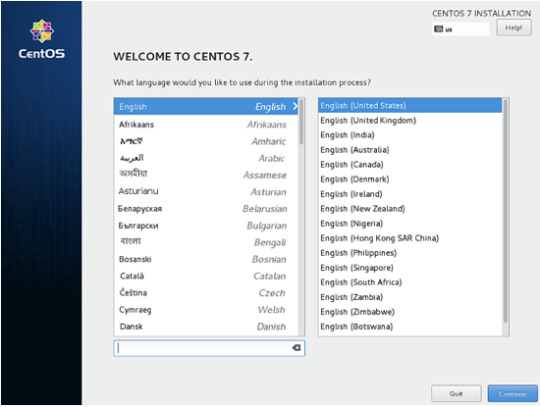
On the next screen, you will see the Installation Summary menu. Here, first select the Date and Time menu to open this menu. Use the map to select your geographical location. Also, below the map, you have the option to configure the date and time settings. If the time is correctly configured just hit on the upper left Done button to complete this stage and return to the initial menu
Next, hit the Language Support menu and setup your system language support. Again, when you finish this step, hit Done to return to the main menu.

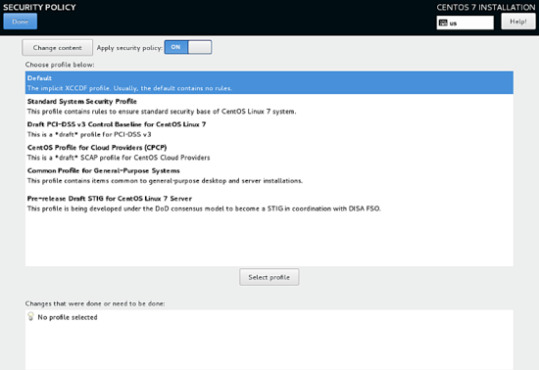
Next, hit the system Security Policy menu and select a security profile from the list. You’re safe to choose the Default security profile. Hit the Select profile button and switch Apply security policy button to ON. When you finish, hit the Done button to return to the main screen.
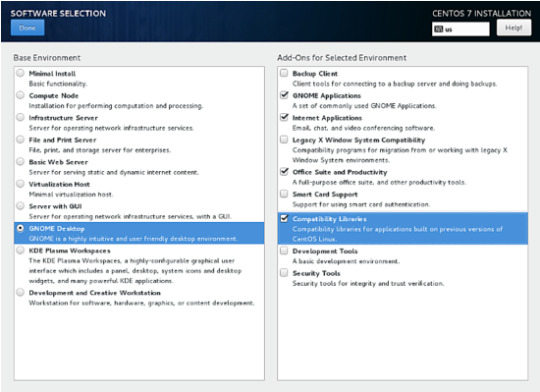
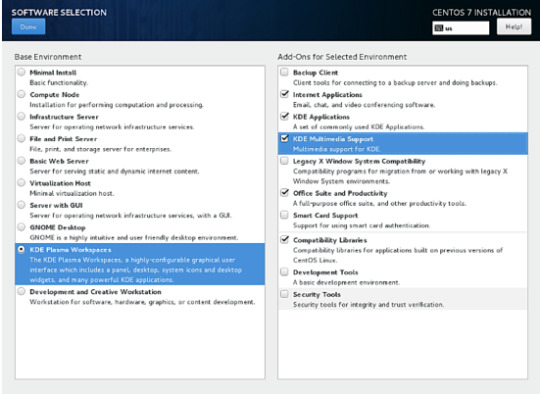
In the next step, go to Software Selection menu. There, you will find a list of some predefined base environments for your system. You can choose to install a graphical desktop environment, such as Gnome, KDE Plasma or Creative Workstation, or you can choose to install a custom server installation, such as Web server, Compute Node, Virtualization host, Infrastructure server, Server with a graphical interface or File and Print Server.
The most suitable environment for a server is the Minimal Install option because it is the most flexible and has a small disk footprint. Select Minimal Install base environment, select Compatibility Libraries add-ons from the left pane and hit on the Done button to finish this setting and return to main menu.
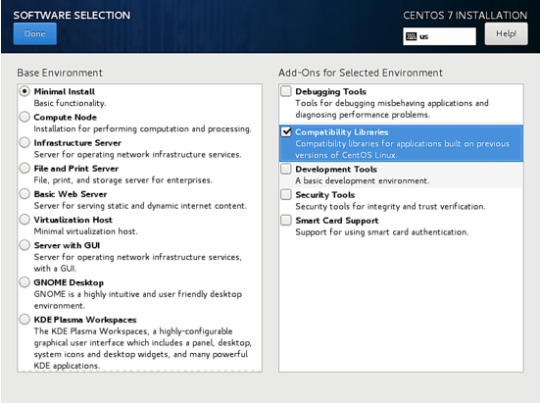
In case you want to install a full Gnome or KDE Desktop environment, select the proper environments as shown in the below screenshots and hit on Done button. However, you cannot choose to install more the one environment per installation.
Next, go to the Installation Source menu and select Auto-detected installation media as default. You also have the options to perform the installation from other network locations such as HTTP, HTTPS, FTP or NFS server or add additional repositories. When you finish, hit Done to return to the main menu.

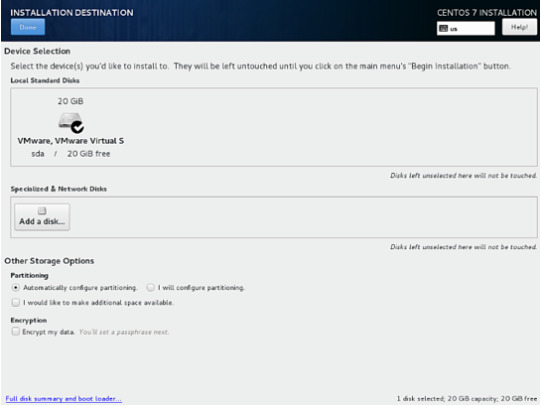
Next, hit on the Installation Destination menu to open storage partition settings. In Device Selection, check the local machine hard disk. Then, in Other Storage Options, check Automatically configure partitioning. This option ensures that the machine hard disk will be automatically partitioned with the /(root), /home and swap partitions. When you finish, hit the Done button to activate the machine drive partition layout and return to the main menu screen.
In the next installation screen, hit the KDUMP menu and disable KDUMP kernel crash mechanism in order to free system RAM. Hit on the Done button to apply this setting and return to the main menu.

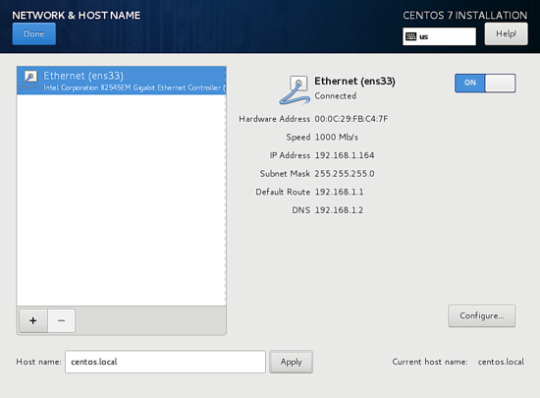
Next, hit the Network & Hostname menu and configure your machine FQDN hostname. Also activate and enable the network service by switching the Ethernet button from OFF to ON. You can manually configure the network interface in this step if that’s the case. When you finish, hit the Done button to return to the main installation menu.
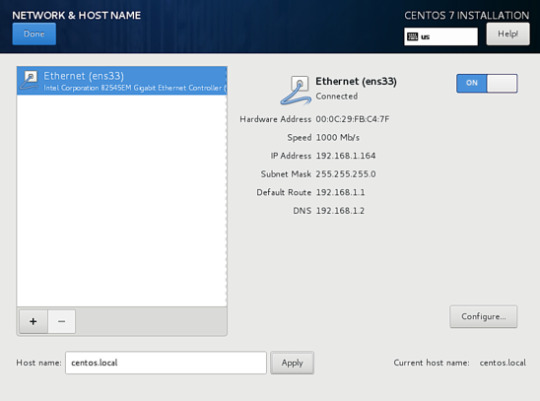
Next, hit the Network & Hostname menu and configure your machine FQDN hostname. Also activate and enable the network service by switching the Ethernet button from OFF to ON. You can manually configure the network interface in this step if that’s the case. When you finish, hit the Done button to return to the main installation menu.
Finally, before starting the installation process, make sure you review all settings you’ve made. When you finish, hit the Begin Installation button to start installing CentOS 7.

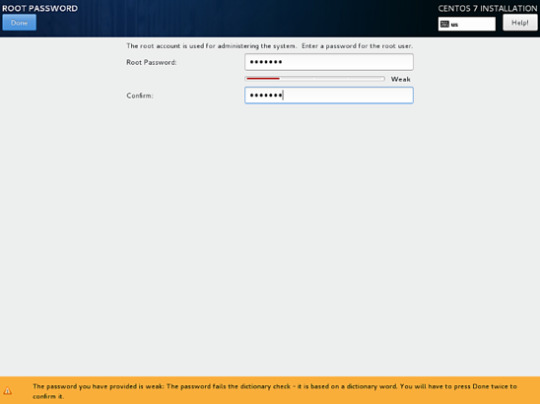
After the installer starts hit on the ROOT PASSWORD menu in Configuration screen and setup a strong password for the root account. When you finish, hit the Done button to return to user settings screen.

Next, hit the User Creation menu and add a new system account and a strong password for this account. Check Make this user administrator and Require a password to use the account options in order to grant this user root privileges. This avoids that you have to manually enter the password each time you log in to the system. When you finish setting up the user, hit on the Done button to return to the initial menu and wait for the installation process to complete.
After a few minutes, the installer will report that CentOS has been successfully installed on your machine. In order to use the system you just have to remove the installation media and reboot the machine.
After the installation process completes, hit on Reboot button and the machine will reboot. After the restart, log in to the CentOS console with the credentials configured while installing the system. Then issue the following command with root privileges to update the system.

That’s all! You’ve successfully installed the latest version of CentOS 7 on your machine.
1 note
·
View note
Link
0 notes
Text
Red Hat Enterprise Linux 9 is the latest stable release version on RHEL. From its base, several other versions were developed such as Rocky Linux 9 and AlmaLinux 9. CentOS Stream 9, derived from Fedora 34 was used to develop RHEL 9. All these release version catty nifty features such as GNOME 40, improved security and identity, improved Cockpit Web Console e.t.c. The main task of a Linux system administrator is to monitor the Linux system hardware and software and perform installations and upgrades while maintaining all the essential services and applications. In many circumstances, Linux system administrators perform these activities via the command line. This is because the command line(server editions) is light and faster as compared to GUI editions. However, running commands on the command line requires one to memorize the commands for the tasks. For that reason, many organizations preferred Windows systems where things are managed from a point-and-click GUI. Luckily, in the past years, developers have developed independent GUI-based tools with abilities to manage some particular system areas and perform associated administrative tasks. Some of the tools developed are phpMyAdmin, Apache Directory, MySQL Workbench, Webmin, Ajenti, Shorewall, Cockpit, CUPS, cPanel, YaST e.t.c What is Cockpit? Cockpit(RHEL web console) is a GUI-web-based tool developed by RedHat with the main objective of making server administration easier. It is used to manage and monitor the local system as well as the remote system available on your network. When using Cockpit, similar APIs as those in the terminal are used, and the tasks performed on the command line are immediately reflected in the RHEL web console. There is a wide range of activities you can perform with Cockpit. Some of them are: Managing user accounts Configuring SELinux Setting kernel dump configuration Managing system subscriptions Updating software Reviewing system logs Creating diagnostic reports Configuring network interfaces and firewall Managing and monitoring system services Multiple server monitoring Storage administration In this guide, we will learn how to manage Rocky Linux 9 / AlmaLinux 9 using Cockpit Dashboard #1. Install Cockpit Dashboard on Rocky Linux 9 / AlmaLinux 9 By default, Cockpit is installed on Rocky Linux 9 / AlmaLinux 9. If not it can be installed easily by executing the command below. sudo dnf install cockpit Once the installation is complete, start and enable the cockpit.socket service. sudo systemctl enable --now cockpit.socket Verify if the service is running: $ systemctl status cockpit.socket ● cockpit.socket - Cockpit Web Service Socket Loaded: loaded (/usr/lib/systemd/system/cockpit.socket; enabled; vendor preset: disabled) Active: active (listening) since Fri 2022-09-09 11:11:20 CEST; 7s ago Until: Fri 2022-09-09 11:11:20 CEST; 7s ago Triggers: ● cockpit.service Docs: man:cockpit-ws(8) Listen: [::]:9090 (Stream) Process: 1874 ExecStartPost=/usr/share/cockpit/motd/update-motd localhost (code=exited, status=0/SUCCESS) Process: 1881 ExecStartPost=/bin/ln -snf active.motd /run/cockpit/motd (code=exited, status=0/SUCCESS) Tasks: 0 (limit: 23441) Memory: 1.0M CPU: 14ms CGroup: /system.slice/cockpit.socket By default, the service listens to port 9090. So we need to allow the service through the firewall: sudo firewall-cmd --add-service=cockpit --permanent sudo firewall-cmd --reload #2. Configure Cockpit on Rocky Linux 9 / AlmaLinux 9 Once installed, you can configure Cockpit by editing or creating the /etc/cockpit/cockpit.conf file sudo vim /etc/cockpit/cockpit.conf In this file, you can enable automatic idle lock in the web console by adding the below lines: [Session] IdleTimeout=X Here, X is the period in minutes for the idle timeout. For example 10 minutes. To edit the listen port for Cockpit, begin by allowing the desired port through the firewall:
sudo semanage port -a -t websm_port_t -p tcp PORT_NUMBER Allow the port through the firewall: sudo firewall-cmd --permanent --service cockpit --add-port=PORT_NUMBER/tcp sudo firewall-cmd --reload Now change the port with the command: sudo systemctl edit cockpit.socket Make the desired configurations: [Socket] ListenStream=PORT_NUMBER ... Also, Cockpit loads certificates in the /etc/cockpit/ws-certs.d directory and uses the last file with the .cert in alphabetical order. You need to install a certificate signed by a certificate authority (CA) to avoid security exceptions. Once the settings have been made, restart the service: sudo systemctl daemon-reload sudo systemctl restart cockpit.socket #3. Logging in to the Cockpit web console Access the Cockpit web dashboard using any of the browsers below: Mozilla Firefox 52 and later Google Chrome 57 and later Microsoft Edge 16 and later Now access the dashboard with the URL https://IP_Address:9090 or https://domain_name:9090. If you are using a self-signed certificate, you will receive the warning below. This is a security warning that can be avoided by installing a trusted SSL certificate. To proceed, click on Advanced->Proceed and you will be granted the login page below. Log in using an account with sudo privileges. This is necessary since Cockpit uses the PAM stack authentication method found in /etc/pam.d/cockpit. This makes it possible to log in using any local account on the system. Once authenticated, you will be granted the Cockpit dashboard below. #4. Manage Rocky Linux 9 / AlmaLinux 9 using Cockpit You can now use Cockpit to manage your Rocky Linux 9 / AlmaLinux 9 system. There are several tasks you can perform. Some of these tasks are: 1. Restart/Shutdown the system To restart/shutdown your Rocky Linux 9 / AlmaLinux 9 from the Cockpit Dashboard, navigate to Overview-> Reboot/Shutdown You can set a delay for the reboot/shutdown or run the task immediately without any delay using the options in the drop-down menu. 2. Configuring the System Time It is also possible to set time synchronization using a Network Time Protocol (NTP). This can be achieved by navigating to Overview-> system time You can change the Timezone from the drop-down menu and set the time manually or automatically with NTP. 3. Configure Network and Firewall Configure your network and firewall by navigating to the networking tab on the left panel. While here, there are many configurations you can make such as adding networks(bridge, bond, VLAN, team) and configuring firewall rules. For example, adding a bridge, proceed as shown. 4. View System logs To view the logs on your system, navigate to the Logs tab as shown. To view details of the logs, click on the log displayed. 5. Manage system services System service can be managed from the Cockpit dashboard under the services tab. While on this tab, you can view the status of the services and manage them as desired. 6. Configure SELinux To manage SELinux, navigate to the SELinux tab where you can check the mode, and toggle between Permissive and enforcing modes. 7. Storage management Under storage management, you can see the available storage devices, the disk consumption, read and write speeds as well as the Filesystems. You can also configure NFS shares, iSCSI targets and view logs associated with storage disks. 8. Access the Terminal From the Cockpit dashboard, you can access the terminal and run commands on your system. To launch the terminal, click on Terminal as shown. #5. Install Cockpit add-ons on Rocky Linux 9 / AlmaLinux 9 To be able to use an add-on on Cockpit, you need to install it separately. There are several add-on packages for Cockpit. They include: cockpit-composer: Building custom OS images cockpit-machines: Managing libvirt virtual machines cockpit-packagekit: Software updates and application installation
cockpit-podman: Managing podman containers cockpit-session-recording: Recording and managing user sessions PCP: Persistent and more fine-grained performance data (installed on demand from the UI) A preferred add-on can be installed with the command: sudo dnf install For example cockpit-podman and cockpit-machines sudo dnf install cockpit-podman cockpit-machines Once installed, you can use the add-ons as shown 1. Manage Virtual Machines To manage the VMs on your Rocky Linux 9 / AlmaLinux 9 system, navigate to Virtual Machines as shown. But first, you need to enable libvirt sudo systemctl enable --now libvirtd Once you reload the page you will see the below page. You can now create a new VM by clicking on Create new VM. Provide the required resources for the VM and click create. Once created, the Virtual machine will be listed and can be managed with ease. 2. Manage Podman containers Using the installed cockpit-podman add-on, you can easily manage Podman containers from the Cockpit web. Click on Podman containers-> Start Podman You can also start the services from the terminal sudo systemctl enable --now podman podman.socket Once started, you can create and manage containers. Provide the container name and image. Once created, the container will be available as shown. Conclusion That marks the end of this guide on how to manage Rocky Linux 9 / AlmaLinux 9 using Cockpit Dashboard. We can all agree that the Cockpit Dashboard makes system administration easier. Proceed and enjoy the awesomeness of this tool.
0 notes