#madcow
Text

This is the worse way to find out one of your online friends passed away 😭 but I'm glad to see that there is a memorial to him in-game.

4 notes
·
View notes
Text
Pierce Cashdollar and the Evolution of Prisonball: An Unforgettable Moment in Summer Sports History
The way that Cashdollar put his spin on the game forever changed the way that it was played. He could throw knuckleballs, curveballs and competed like a true athlete.
As Summer begins to wind down and August receives its final heat check – let us go back once more to Summer of 2008. Around the time Anchorman and Dodgeball hit Blockbuster was the same time pavement scorched the summer tournaments at Y camp. These tournaments took place within the same arena as Adamball and it just so happens that this was the summer that a dynasty would be derailed.
Pierce…
1 note
·
View note
Photo

daud get out of there !!!
#edit#photoshop#postal#postal 4#postal 4 no regerts#postal dude#mat postal#mat daud#malay dude#mike j#mike jaret#madcow mike j#notmyart#kiki#running with scissors
48 notes
·
View notes
Text


misophonia rabbit and madcow you are both the world to me
2 notes
·
View notes
Text
Me introducing people to the Locked Tomb series...

#the locked tomb#gideon the 9th#harrow the 9th#gideon the ninth#harrow the ninth#nona the 9th#nona the ninth#i adore these hopeless disasters#except Jod#he can get madcow and never have someone laugh at his jokes for the rest of eternity#not crazy about the mayo uncle either#but otherwise i adore all the other characters#even short king-human overalls- Babs
8 notes
·
View notes
Text
MADCOW SOUNDS LIKE THE SENILE BIDEN EVEN WORST DEFINITELY MAD.

11 notes
·
View notes
Note
*steal bob lines* did you know if you eat a human brain you'll get a disease similar to madcow*
I NEED THOSE
(Ooc: it’s mad cow, darlin)
6 notes
·
View notes
Note
Does P(Pee) Dude appreciate some good ol’ gay Italians?

i was in the metro when I saw this post so this was the first thing I remembered, the Italian Madcow Mike J edit we did with my friends. I'm not giving context here because too much information.
(I put a rainbow on it, so you know, it's gay now)
So the answer is...

According to this he might as well do.
8 notes
·
View notes
Text
Can!balism
The psychology and history. INFO POST!!
History
In history it’s been used since humans were made many did it since they thought theyd gain strength. Multiple tribes also did it as a ritual, most famously the tribe of Fore. However the tribe has had 30+ cases of a mystery disease being called Kuru (more about that later). Some k!lers also did it some for a feeling of control or power, many can!bals are lonely so it gives the feeling of not being alone
Causes
Many can!bals have had schizophrenic disorders (IF YOU HAVE ONE IT DOES NOT MEAN YOU ARE A CAN!BAL!!!) or personality disorder.
And of course a famous can!bal being Jeffery Dahmer who had a schizophrenic disorder as well as BPD (correct if wrong) and again with Albert Fish who gained a s3xual satisfaction.
Kuru
Zuru is a neurodegenerative disease caused by eating the infected brain of another human. The disease is highly rare now but still has no cure.The infected being caused by Prions. Prions are misfolded proteins lacking instructional nucleic acids. The disease is rapid with d3ath occurring usually after 1-2 years. The symptoms are loss of coordination and muscle spasms as well as uncontrollable laughter. Prions also cause madcow disease which is found in well cows. Eating infected cow meat can cause you to get a prion disease.
—
I could go into SO MUCH detail about the subtypes and about prions in general. TELL ME IF YOU WANT MOREEE!!
-Vivi
5 notes
·
View notes
Text


The Alphas are strong mutant animals created by Dr. Animo. Napoleon is a mutant pig. Wolfen Sheep is a mix between a wolf and a sheep. Boxer is a mix between as gorilla and a horse. And Madcow is a mutant cow.
5 notes
·
View notes
Text
“I don’t listen to what art critics say. I don’t know anybody who needs a critic to find out what art is."
”Fire will attract more attention than any other cry for help" ~J-M.B
"Samo~Samo ~ A Homage To Jean-Michel Basquiat"
2023 ~ W.B."Madcow"Jones ~ B.F.A
@darkmoonartanddesign @bitfinityfineart
Jean-Michel Basquiat’s (December 22, 1960 – August 12, 1988) Basquiat's rise in the art world of 1980s New York was meteoric, and he was at the height of his renown when he died in 1988 at the age of 27 from a heroin overdose. Basquiat was an enigmatic outsider among established galleries and artists in the city; having grown up in Brooklyn, he never attended art school and was a graffiti artist under the moniker SAMO in the years before his paintings garnered acclaim.
Basquiat first achieved fame as part of the graffiti duo SAMO, alongside Al Diaz, writing enigmatic epigrams in the cultural hotbed of Manhattan's Lower East Side during the late 1970s, where rap, punk, and street art coalesced into early hip-hop music culture. By the early 1980s, his paintings were being exhibited in galleries and museums internationally. At 21, Basquiat became the youngest artist to ever take part in Documenta in Kassel, Germany. At 22, he was one of the youngest to exhibit at the Whitney Biennial in New York. The Whitney Museum of American Art held a retrospective of his artwork in 1992.
While it took artists like Van Gogh to die to become famous, Basquiat reached an unprecedented level of fame at just 20 years old. The truly unique quality of his work, the themes he communicated and his romantic rags to riches story continues to attract intrigue from art world giants and art lovers across the world. R.I.P SAMO...
Original 1/1 NFT is @
https://opensea.io/assets/ethereum/0x495f947276749ce646f68ac8c248420045cb7b5e/8411210703016165896037026018765018085459723364848495602338055917603724984321/
#fineart #art #contemporaryart #artist #artwork #painting #artgallery #modernart #abstractart #artoftheday #drawing #instaart #artistsoninstagram #photography #artcollector #arte #portrait #oilpainting #fineartphotography #gallery #abstract #illustration #bnw #design #interiordesign #acrylicpainting #sketch #kunst #artlovers #creative

10 notes
·
View notes
Video
youtube
The Fuzz Great Music & Video by Madcow Fury
2 notes
·
View notes
Note
The ask talking about why they love your work out asks/answers has me wondering - do you have a specific workout or routine you enjoy the most and/or default to?
My goals involve powerlifting, which is the idea of lifting the heaviest possible weight in a squat, bench press, and deadlift, once. Because of that, I'm following a program called Madcow 5x5 that has me in the gym 3x a week and following a spreadsheet so I don't even have to think about weight, I just read a number and load the bar:
Monday (Medium Day)
Squat 5x5
Bench press 5x5
Barbell Row 5x5
Wednesday (Light Day)
Squat 4x5 (lighter weight)
Overhead press 4x5
Deadlift 4x5 (heaviest weight of the week, technically)
Friday
Squat 4x5, 1x3, 1x8
Bench press 4x5, 1x3, 1x8
Barbell Row 4x5, 1x3, 1x8
I have previously run an Upper Lower split (4 days/week) and a 6 day Push/Pull/Legs split. I enjoyed the PPL more of the 2, but am loving the one I'm currently on more than anything else
If you want more detail about the splits I ran I I answered an ask similar to this a while ago
2 notes
·
View notes
Note
Do you ever plan on redesigning Subdora and Exo-Skull?
Personally I really hate her design and I wanna see how you'd handle her. But no pressure if ya dun wanna.
Exo-Skull definitely! I’d love for him to be part of a futuristic animal gang, kinda like an offshoot of The Plague Rats but also involving some of Future Animo’s more intelligent experiments, alongside one I call “Termoonator” based off the one mutant from the reboot, Madcow.
I’m not sure if I’d wanna add animal-aliens or not, but Subdora would def play a role if I ended up going through with that idea!
3 notes
·
View notes
Text
L2 Certification Attempt
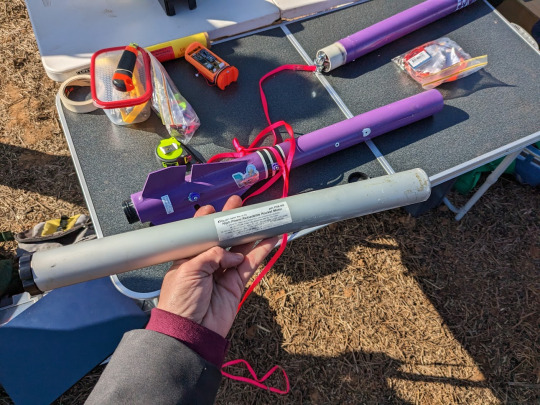
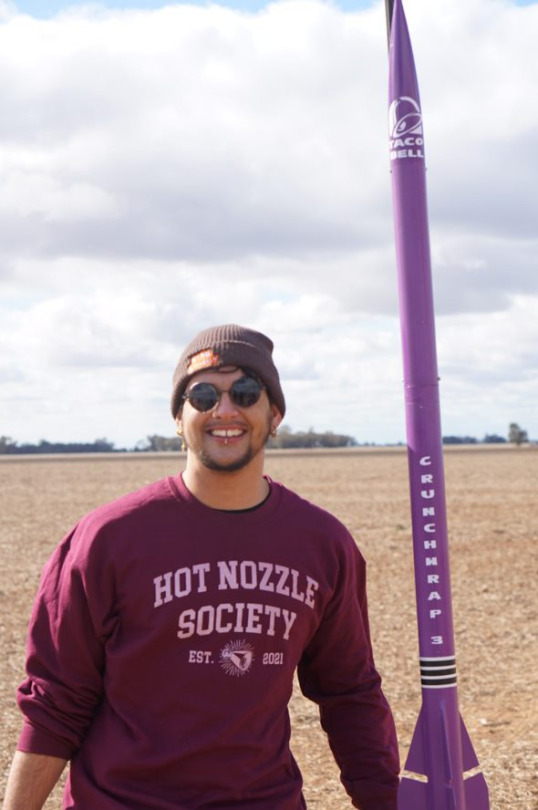
After obtaining my L1 attempt, I had originally planned to fly for an L2 attempt on the same rocket. However, I attended a VRA club night where a swap meet was being held and ended up with a Rocketry Warehouse (now Madcow) Broken Arrow 54. Sometimes a great deal is a great deal.

This was a pretty big step up from the cardboard and plywood construction I was used to, being entirely filament-wound fibreglass. Its large diameter/length ratio combined with its small split fins also made it intimidating. This kit is also intended only for dual-deploy, which is something I had never done before. I decided it was a good opportunity to challenge myself.
Build
The kit was pretty bare-bones, meaning I had to source a retainer and much of the hardware for it. I ordered a 38mm Aeropack retainer, and then I began the build.

The process was relatively simple, with through-the-wall fins like all my previous builds. However, this time they did not fit into divots in the centering rings, so I 3D printed a fin jig to hold them in place while the epoxy cured.
Speaking of epoxy, I moved away from the 5-minute Araldite I had used for previous builds in favour of a more serious adhesive. I used JB Weld for anything motor-adjacent because of its thermal tolerance, and Epiglue for all other structural attachments and fin fillets. This was recommended to me by a friend in Perth who flies truly ridiculous rockets and has used it on flights of up to Mach 2. It is also available from a local marine supplier, meaning I didn't have to pay through my nose to get hold of Rocketpoxy or West Systems. I was very pleased with how nicely it went on and how strong it was.
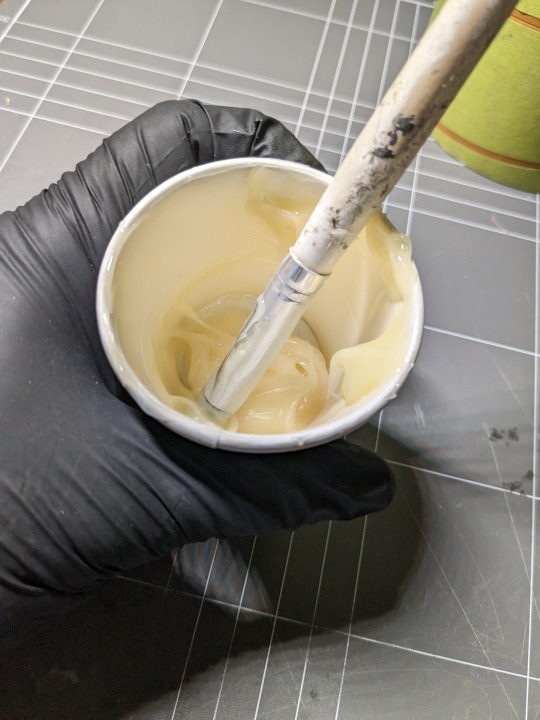
By this time I'd also nailed down my epoxy application and filleting methods - I use cheap silicone sculpting and grouting tools which can simply be cleaned with acetone after I'm done. For filleting, I also found that mixing the epoxy in a ziploc bag and piping it on like icing worked a treat.
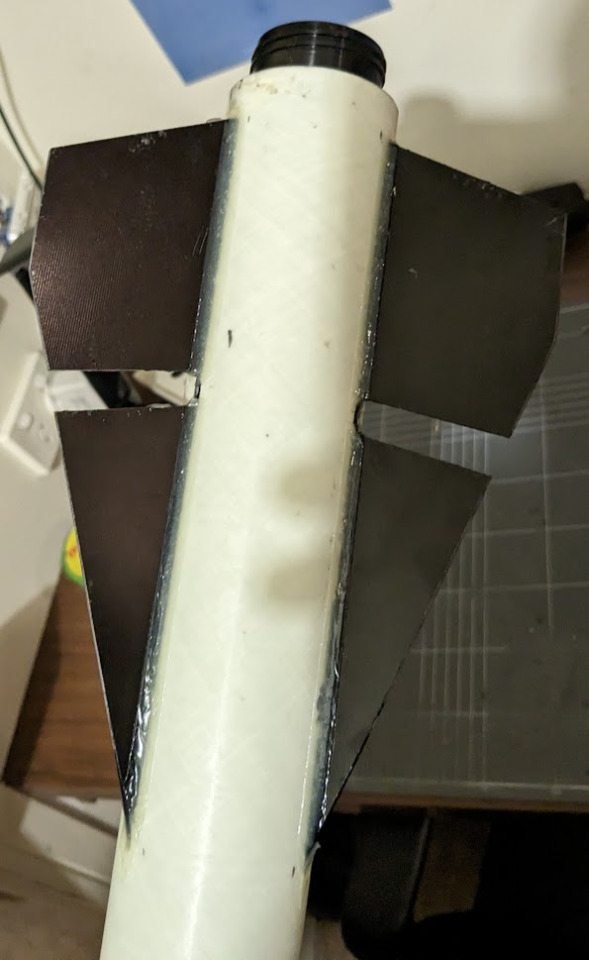
My work gets cleaner with every set of fillets I lay down. These ones don't look fantastic, and the split fins were something I had never dealt with before, but that didn't matter for reasons that became apparent shortly after the epoxy had set.
The morning after I applied these fillets, I got up to continue working on the rocket when I noticed that something had shifted overnight. The motor mount tube was somehow at an angle, as shown in the image above. I know I installed it perfectly level, but I didn't secure it while it set so I think it slipped as it cured. In my defense, I was quite sick and not firing on all cylinders when I had completed all the work up until now, but the realisation of what I'd managed to do was pretty disappointing and a bit of a knock to my confidence. Some measurements and a bit of trig suggested that the offset was only a degree or two, but the image suggests otherwise. I consulted some friends who are far more experienced flyers than I, and the consensus was a mix between 'send it' and Do Not Fly That Rocket, with more in favour of flying it than not. I looked at my OpenRocket sim for stability characteristics, and read some old Rocketry Forum posts about this model, all which pointed to it being rather squirrelly. In hindsight, I feel like I made the right decision, as I just couldn't ignore my gut feeling. I decided to rip it apart and rebuild it completely.
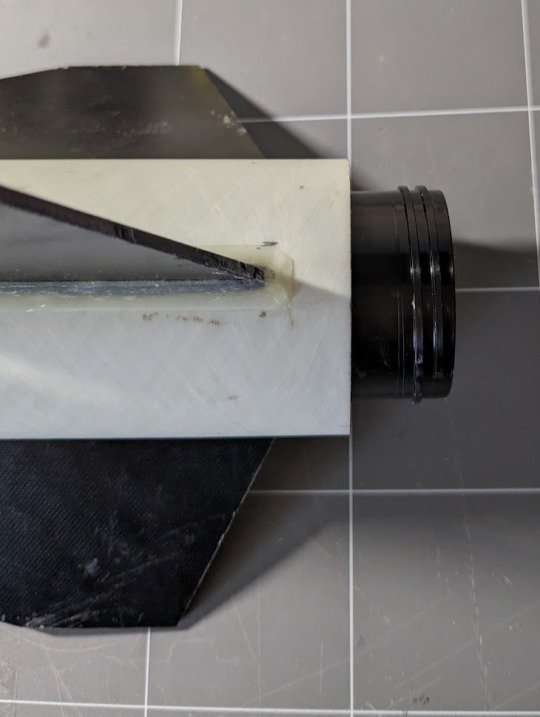
I did not take photos during this phase due to being completely covered with fibreglass dust, but I ended up using a diamond Dremel cutting wheel to first cut the fin can off, then cleanly slice the fins out of the body. I cannibalised a small section of the avionics bay tube to use as a coupler to reattach the aft section. I was then able to epoxy the whole thing back together, sand it all down, and it looked no different - apart from the motor mount being at the correct angle of zero degrees. I re-filleted the fins with a larger radius than before, as I wasn't happy with how they looked initially. I was very pleased with this effort, and confident to a) present this rocket to an RSO and b) fly it safely.
I also took the opportunity during this rebuild to modify the rocket to be motor-eject capable, by removing the bulkhead to which the recovery harnessing would be attached. I cut a small divot in the forward centering ring and attached a looped piece of kevlar around the motor tube before reinstalling it. This 'leash' provides the anchor point for a longer recovery harness to be attached to. I am very glad I did this, as not long after I was informed that my university club possessed a grand total of two (2) grams of black powder. Traditional dual-deploy would no longer be an option. More on that later.
To finish off the construction, I 3D printed rail guides from ABS and bolted them to the body, with a bit of JB Weld in there for good measure. I drilled pressure relief holes in the forward and aft sections of the body, and another in the avionics bay for altimeter readings. I then drilled a more smaller holes and installed screws to pin the nosecone to the forward section, and the forward section to the avionics bay. Since the flight would no longer be traditional dual-deploy, the rocket would not need to separate at these points. Finally, I gave it a purple paintjob and the name of CRUNCHWRAP 3.
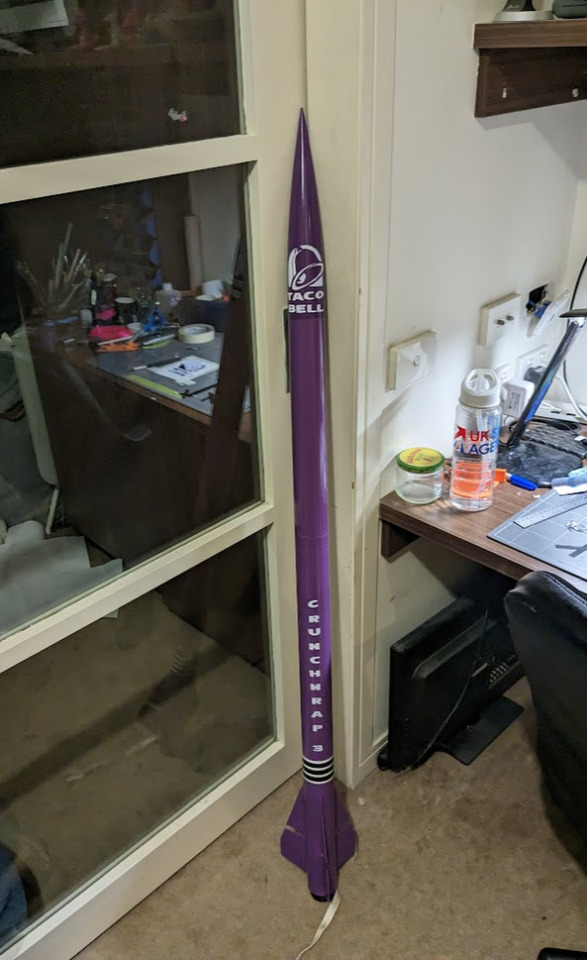
At some point, Taco Bell might see these and send me a cease and desist. I am going to keep building and flying them until they do.
Recovery
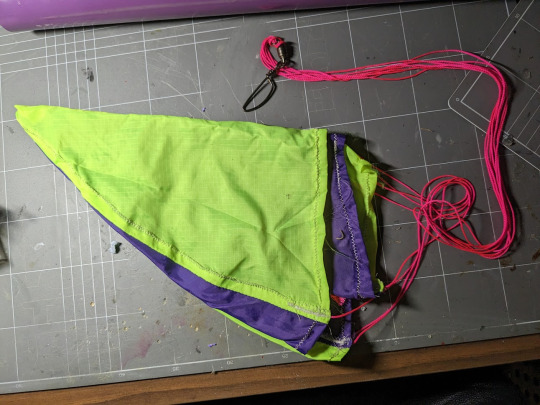
With a proper dual-deploy ejection now out of the question, I turned to my backup plan. My team calls it the 'poor-man's dual deploy', even though it's arguably actually more expensive than using black powder. This involves deploying a drogue with the motor charge, then using a JollyLogic chute release device to deploy the main at whatever altitude you have chosen. There is a substantial risk of the harnessing becoming tangled using this method, but I didn't really have a choice. I used a 4.5m nylon shock cord, tied to the anchored kevlar leash. I divided the cord into thirds, tying a loop at each third. I attached the drogue to the forward-most loop, and the main to the aft loop. Both chutes were on quick links and swivels to reduce the risk of tangling as much as possible. Each of these chutes were wrapped in their own nomex protector, and then placed in the aft section of the rocket with their harness. I used a 36' (91-ish cm) main chute from Loc Precision, and a 40cm 4-gore drogue which I sewed using Scott Bryce's fantastic Spherical Parachute Pattern Generator.

Avionics
Although it ended up not being needed, I decided to send the flight computer I got hold of along for the ride. I thought it would be cool to get an altitude reading to compare with the simulated apogee. A buddy of mine in the US was getting rid of a few bits and pieces, so I bought his RRC2+ off him with the intent of flying it for my L2 attempt. First, though, it needed somewhere to live.
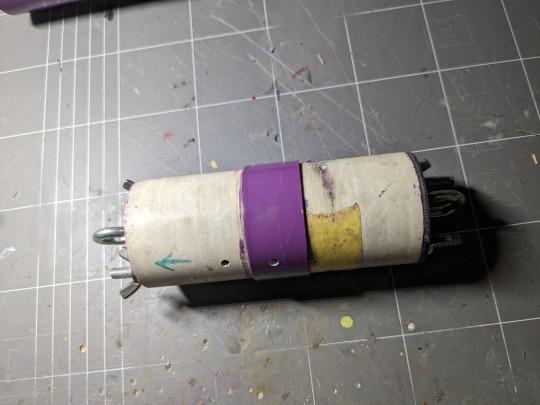
I found the supplied parts for the av-bay were a little lacking, so I added some modifications - the main one being drilled holes for two threaded rods to pass through. I used two for redundancy, since the idea of a single rod made me a little uneasy. I used wingnuts on these so I could fasten them nice and tight without the need for a spanner. It was also missing enough eye bolts, so I grabbed some from Bunnings.
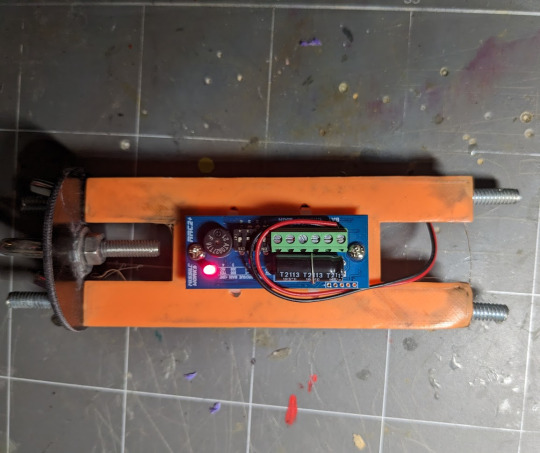
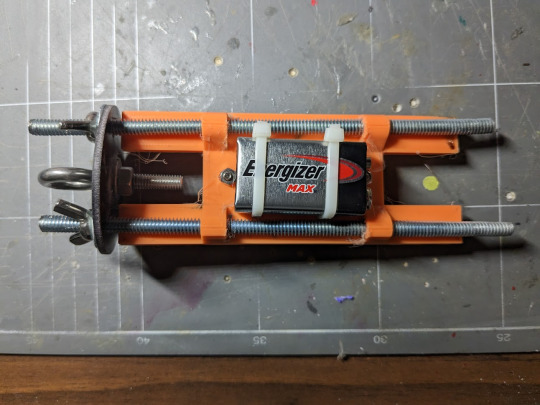
I then designed and 3D printed a sled to fit onto the threaded rods and provide a mount for the battery and the flight computer. A very simple setup. The sled looks objectively awful since the printer was having a bit of a sook at the time, but the actual functionality was not affected and it serves its purpose just fine.
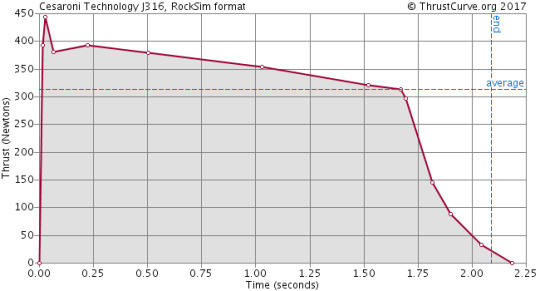
Motor
With an unbelievably limited amount of motors available in Australia at the time of writing, I had to work with what I could get hold of. I was lucky enough to snag was a CTI J-316 (pink!!) through my university team, which is a 38mm 5 grain reloadable motor with an adjustable delay of up to 17 seconds. Unfortunately, we didn't have a 5-grain case so I made do with a 6-grain case and a spacer. I only became aware of that the night before the launch, so I had to very quickly revise my recovery packing technique to account for the now limited real estate inside the body.
It provided an average thrust of roughly 316N, with a max of 450N, over a burn time of about 2.1sec, for a total impulse of roughly 650Ns. A pretty tame J motor, but still far more powerful than anything I'd ever flown before.
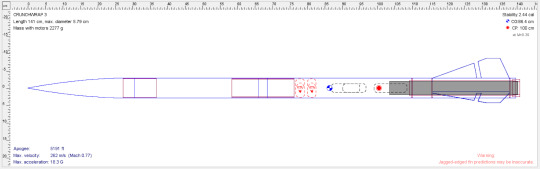
Simulation
After carefully weighing every single component of the rocket and entering them into OpenRocket, I simulated the flight on the motor above. The entire vehicle weighed 2.7kg, with a length of 1.41m. It was simulated to hit Mach 0.77, and fly to an apogee of 5191ft.
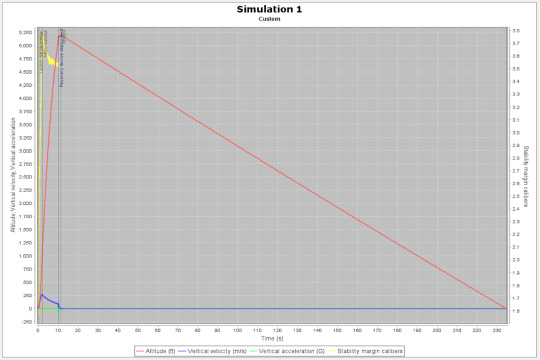
Theoretically, the centre of pressure and centre of gravity would be 0.86m and 1m respectively from the tip of the nose cone. This would give a stability calibre of 2.44 at Mach 0.3 - however, this rocket is quite a bit faster than that. Also, the 'rule of thumb' which says a rocket's CG should be roughly 1.5 body diameters in front of the CP is not as helpful on rockets with a length/diameter ratio of over 10, such as this one (which is 24). Here, the CG should be roughly 10% of the overall length in front of the CP, which it was, almost (9.6%). The stability calibre off the rod was predicted to be only a little over 1.5 (6%), but given that it would be going 31m/s I was confident this would be fine as long as it didn't launch into a strong wind gust. At motor burnout, stability would be up near 3.8 (15%), which I was happy with.
I set the motor delay to the full 17 seconds for the simulations, as anything shorter would have the recovery devices deployed before apogee. This would a) cut the flight short and more importantly b) place a huge amount of strain on the harnessing and chutes due to a very high deployment speed. With the full delay, deployment would be at 11.3m/s, which the harness and drogue could handle easily. Ground hit was simulated to be a brisk but not destructive 6.8m/s.
As an aside, OpenRocket includes a little disclaimer about 'jagged edge fin predictions may not be accurate'. I bore this in mind through the whole process, but based on others I'd seen fly and forum posts I'd read online, I was comfortable with what I was doing.
Flight
L2 certifications require passing a written exam with two sections - technical knowledge and the Tripoli safety code. I had already passed the exam (100%, don't mind if I do) at a previous date, so all I had to do was install my motor, altimeter, and recovery gear. I didn't even have to drill out a delay. After a quick field CG test and a visit to the RSO tent, I was ready to rack up.
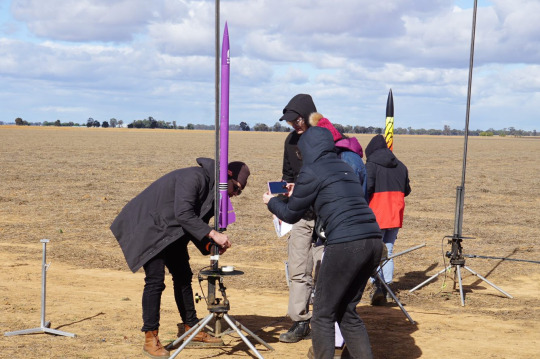
A few new recruits to our team came out to the launch day, so I enjoyed an opportunity to show them how to set up for flight, install an igniter, and test for continuity.
After a small delay to clear the range and ensure the skies were clear overhead, the LCO hit the button.
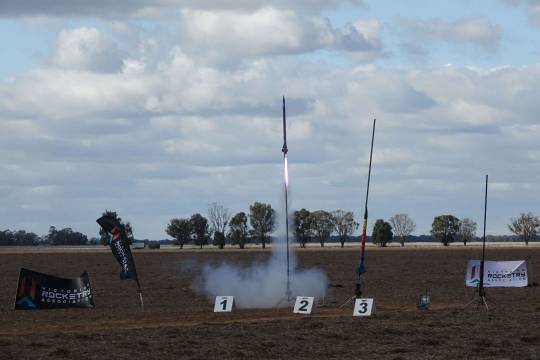
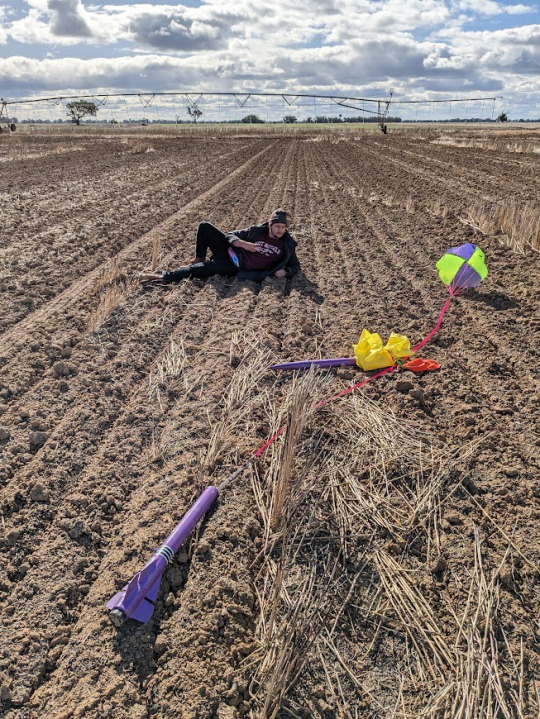
The rocket flew straight and fast on a frankly gorgeous purple flame, and almost instantly got high enough that we struggled to keep a visual on it. A puff of smoke indicated the ejection charge had blown, and then I was able to see the fluoro yellow gores of the drogue as it opened. The rocket began to drift slowly as it came down, as there was a fairly stiff breeze blowing at the time. I had programmed my chute release to 500ft, and it performed as intended. The main chute deployed and thankfully none of the recovery gear got tangled. I watched it gently descend, albeit with a decent drift going on, and set itself down in a field about 800m away. After a gentle stroll (read: powerwalk to warm up, it was freezing), we arrived at the rocket. It had been dragged a little and the chute had become tangled on the ground, but all was intact. One quick pitstop at the RSO tent later, I had my L2!
Upon reflection....
Things to improve
Use a much smaller drogue. The one I flew was about twice as big as it needed to be, and it was far too windy for such a chute. I simply didn't have a smaller one, although making one would have only taken about an hour.
I didn't get any useful readings from my altimeter. I don't believe I set it up properly, so I need to make sure I learn to do that and fly it as a passenger on at least one more flight before I use it as a deployment computer. I am disappointed that I couldn't get a figure to compare with the simulation.
Use a proper stand to rest the rocket on, perfectly horizontally, during construction. This would have avoided the whole debacle of the motor mount slipping and me consequentially having to rip it apart and rebuild.
Things that went well:
Being absolutely prepared and packing my car the night before, and bringing spares of most components, made launch prep a breeze
That was the first flight of my homemade drogue, and upon inspection afterwards there was no damage. I can now be confident that others of the same design and similar construction that I have planned for bigger rockets will perform in a similar way.
The recovery technique worked as intended, with no tangling. This is probably not a viable option for rockets going any higher, but it's nice to have in the back pocket for projects of this scale if black powder and/or avionics access might be an issue
I am also extremely relieved that this certification only took me one shot, rather than the three that my L1 took. I think it reflects well on my progress.
Next:
Fly it again with proper dual deploy, if I can get my hands on some black powder
Scratch build of a rocket of similar scale
...... L3?
2 notes
·
View notes
Text
Larry screws with Julia's head part 3

106:Why, thank you, Julia. Now, go on stage and join the debate.

Raquel Madcow:Good evening. I'm Raquel Madcow, live from Nashua, New Hampshire. Please welcome your 2016 Presidential candidates, governor Tanya Walsh and senator Julia Scott.

Raquel Madcow:Senator, voters are concerned about corruption in government. How would your administration address this?


106:I would simply allow the most intelligent minds.

035-Julia:To make all of the decisions, like Larry.
#scp containment breach#scp foundation#scp fanart#scp fandom#scp mini comics#scp comics about julia#scp 106#scp 035 julia
5 notes
·
View notes
Last Seen Blogs

kindestcactus
Vitamin Love


lostzombiewandering
Dead Man’s Diary

hatank
HATANK
lanitadelreyblog
♡Lana del Rey ♡