#mesh mapper
Explore tagged Tumblr posts
Visit Tumblr Blog
Explore Tumblr blogs with no restrictions, modern design and the best experience.
Last Seen Tumblr Blogs


Fun Fact
Tumblr has been banned in Indonesia for providing people with access to pornographic content.
Text
Drones controlados al detalle: Cómo seguir señales Remote ID con ESP32-C3/S3 y LoRa Meshtastic
El proyecto Mesh Mapper de Colonel Panic trae una solución muy interesante para el control y seguimiento de drones. Utilizando microcontroladores ESP32-C3 o ESP32-S3, este sistema se encarga de capturar las señales Remote ID que los drones emiten a través de WiFi o Bluetooth, recopilando datos relevantes como ubicación, altitud, posición del piloto e información de identificación. Toda esta…
0 notes
Text
Resources for Creating: My Go-To things.
Update: I’ll be updating the list on this page from now on, since Tumblr can’t handle so many hyper-links in one post, on Dreamwidth - right here, so I won't have to update it multiple times. Please note: I keep updating this list, and updates aren't showing up on reblogs. Please check the original post for the most up to date list.
Sooo this is going to be a long comprehensive list. I got back to this game after a long time and with a different computer, with a dedicated graphics card, hurray! It made me want to return to making things, so while gathering back all the necessary stuff, I've complied this list. It might be is updated as I go along, but these are the main things I use. Maby one day i'll even finish something. So here are my go-to resources & tutorials; I'm posting it here for safekeeping, and hopefully others will find it helpful. Everything that's listed is here free. So many wonderful things for free under the cut.
Programs – General:
Creating: Blender. Blender Addons: 3D Print Toolbox – comes with blender, enable it from within the program. Originally for 3d printing. Good for fixing flipped normals, and some quick general repairs. Source Tools And source tools wiki – for exporting as SMD!!!! (SimPe: to enable bump maps for the mesh on import). GMDC Addon for Blender 4.0+ by Nopke.
GIMP. GIMP Addons: G'MIC-Qt. Resynthesizer. Nvidia dds?. Doesn’t it come with Gimp?
Other: Nvidia Texture Tools Exporter (iirc it works with all graphic cards that are compatible, doesn’t require Nvidia). For making Normal / Bump / Cube Maps. For high quality compression.
NormalMaps - Online, For making all types of maps, has good setting menus. A very cool tool.
Converting: Umodel, for Unreal Engine (Static meshes: export as gtlf.2. Animated meshes: export as psk. Requires Add-on). AssetStudio, for Unity. AC Viewer, self implied (+ USD Addon for blender). QuickBMS* and support forum, for basically everything else. (don't forget the required scrips, down the same page). *I haven’t tested it fully yet, but it was recommended here. A tutorial for it is listed further down. Works like a charm.
UV Mapping: UV Mapper, Classic (free) and the most recent Demo (for visualization).
Programs – Sims:
Never Mind the Bollox, Here's Osab and MAGIkarp to the rescue!
Latest version of SimPe, works with a non-default installation path. Chris Hatch's updates.
Home Crafter installation, Post by Huge Lunatic at Sims2Artists.
Repository Wizard, by Pick'N'Mix Mods. A game changer.
DBPF Compare, by Pick'N'Mix Mods.
Object Relocator, also by Pick'N'Mix Mods.
SMD Tools, by Lazy Duchess.
The Compressorizer, by JFade – Lazy Duchess's edit.
Bulk Rename Utility, to change file names in well, bulk. As explained by io here.
Lot Adjustor, by Mootilda at MTS.
Tutorials:
Override the game's graphic settings via Nvidia, as explained by iCad. The settings to Nvidia Profile Inspector she linked to at MTS have been deleted for some reason, here they are via WebArchive.
Meshing in Blender:
Mesh Optimization Info (and links), by Crisps&Kerosene.
Additional - Reducing Polycount:
Tutorial, by Flaming-Chickens (another username on other sites perhaps?)
Edge – Un-subdivide, a quick one by CG Link.
Transfer high poly details to low poly object in Blender, by 3Dnot2D.
Shrinkwrap Modifier - Blender Tutorial for Beginners - Basics, by in2vert.
Placeholder for this Addon that I want to try but haven't found, something for AR that was on facebook's defunct AR.
Scaling tips, by Blender Secrets.
How to fix inverted/ flipped normals, by ipaintsmallthings.
Converting: How to Extract 3D Models, Textures, Music from Unreal Engine Games, by iwanMods.
Extract 2D/3D/SFX Unity Assets fast & easy from your Unity Game, by iwanMods as well.
How to use QuickBMS, by darkhorse.
Guide to Converting 3t2 and 4t2 Part 01 and Part 02, by Chiaroscuro/tenlittlepandas.
Converting TS4 Windows and Doors, by Crisps&Kerosene.
Using Different Material Maps as Shading/Details for Base Texture, in Gimp or Blender, by Pineapple Forest & Crisps&Kerosene: https://www.tumblr.com/crispsandkerosene/764893644571525120/great-info-thats-the-reason-some-conversions?source=share
Texture Editing in GIMP:
Using Gimp Add-ons: G'MicQT. Resynthesizer. Both by Davies Media Design. This guy's channel for Gimp in general – here's a good one to begin with. And another one about layer masks.
Making a texture Tile Seamless: 1. My favorite - How to Make Seamless Textures for Cinema 4D - 3 Levels of Photoshop Wizardry using iPhone Photos, by School of Motion.
2. Simple Trick for More Realistic Texture Patterns in GIMP, by Davies Media Design – Quick and simple, using the Resynthesizer plugin. Good for patterns.
Making walls in SimPe out of a square texture, with minimal quality loss. To be written.
SimPe: Cloneable Objects: A List of Good Objects for Cloning, by IgnorantBliss at MTS.
Huge Lunatic's Tutorials, Her website.
Object Creation for Absolute Beginners, by Moune.
Sims 2 start to finish Object Creation Tutorial, by JWoods, Numenor, Lethe_s & IgnorantBliss.
The Material Definition (TXMT) Guide, by PixelHate – very comprehensive. Part 5 is about Bump/ Normal maps.
Null (Texture-less) Groups, by Skell. For bodyshop, for Objects see an elaboration by Midge the Tree below.
Crisps&Kerosene discovered how to add specular maps to objects! It's incredible there are still new things to discover in this ancient game.
More on Specular Maps, by Pineapple Forest.
Making new flooring & walls with SimPE, by Charisa. Includes adding Bump/Normal maps. She added a file to clone from in the comments below. It works for normal maps as well. Here's cool discovery in the game files.
Expanding footprint: a mini tutorial, by Deedee.
How to add correct drop shadows to objects, by Yuxi, via Wayback Machine.
Making Objects Viewable in Neighborhood View, by iCad.
Making Objects Visible In Build/Buy Mode, Invisible In Live Mode, by Midge the Tree.
Making Seasons-Friendly Trees, by Echo.
Io/ Serabiet's resources list, mainly for Bodyshop but not just.
Pineapple Forest's Tutorials, useful tips for efficiency and optimization.
MTS modding forum in General.
The Sims 2 Tutorials, on Tumblr. A database, is more updated.
Sims2Artists tutorials section.
LeeFish modding forum.
Garden of Shadows, Tree of Knowledge section.
Troubleshooting: What to do if you get a System.OutOfMemoryException Error, SimPe Forum, via WayBack Machine. Thank you @fanseelamb for the find.
How to read object error logs: I just want to know what causes it!!, by Episims.
Common TS2 errors, by Midge the Tree.
General game fuckery: How to Stop Sims 2 Crashing (Memory Allocation Fix and 4GB Patch Repair), by Jessa.
Graphics card problems, LeeFish forum.
Graphics help - DIY, by Kiri. How to fix faulty Texture Memory allocation, and the problems that stem from it. Tumblr can't handle anymore hyper links so here it is: https://celebkiriedhel.tumblr.com/post/189431721483/graphics-help-diy
General: Switching between save folders without renaming them, by Nopke.
Resources:
3D Models Online*: Various furniture designers' websites: Porada, Zanotta, Muuto, Hay, Poltrona Frau, many luxury furniture designer basically.
3D Warehouse, belongs to Sketchfab (get the Collada files).
Scan the World.
Wikimedia Commons. And more.
*(NOT OPTIMIZED).
Textures: Architextures.
Fabrics & Wallpapers: Natural Stones: Wall Plasters:
iCad's Woods. Shastakiss's Cluedo Metals, Yeti Metals, Pirate Woods. Goat's Woods.
Textures from other games: Dishonored, Thieve and much more, by Saricoya at GoS. Dreamfell by io.
Resource sharing threads at Garden of Shadows.
SimPe - General: CEP Extras list, HugeLunatic at Sims2Artists.
TXMT settings for different materials, by Hafiseazale.
Extended SimStandardMaterial Shader for the Sims 2 + Optionally Brighter Sims, by Crisps&Kerosene.
Custom CubeMaps, by Crisps&Kerosene.
Shiny TXMT Settings & Cube Maps Packs, by Pineapple Forest.
Build/ Buy: Templates for Recoloring Maxis items; MTS Templates sction, Hafiseazale (+cc), ZeroDark.
Template for Seasonal Trees, Gwenke at Sims2Artists.
Making Roof Recolors, Tutorial & template by Numenor, great template by iCad.
Pack for making food clutter usable, by DeeDee.
CAS: Default Makeup Packages - BYO Packages, by Huge Lunatic.
Body shape, Io/Serabiet on Tumblr.
Skin template, Io/Serabiet on Tumblr.
Hair texture, iCad.
Color Actions, Pooklet on Tumblr.
That's it for now.
Edit: forgot about CEP extras. Added more links. Edit 02: Added Troubleshooting section under tutorials.
#ts2#ts2 resources#ts2 creation resources#ts2 resources for creators#the sims 2#sims 2#resources#ts2 cc#sims 2 cc#the sims 2 cc#well its cc related#sims 2 resources#the sims 2 resources
67 notes
·
View notes
Text
CDK: Company Lab
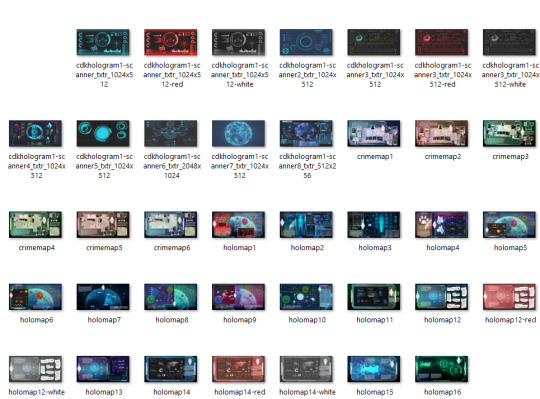
Published: 9-26-2024 | Updated: N/A SUMMARY Cubic Dynamics by John B. Cube and Marcel Dusims forged the future with furnishings that were minimalist in design and maximalist in erudite pretension. Generations later, the company continues to produce edge-of-cutting-edge designs. Use the Cubic Dynamics Kitbash (Simmons, 2023-2024) collection to set up corporate, exposition, and office environments. Envisioned as an add-on to the Cubic Dynamics set (EA/Maxis, archived at GOS), it features minimalist and retro-futuristic objects. Find more CC on this site under the #co2cdkseries tag. Read the Backstory and ‘Dev Notes’ HERE. Set up sleek lab spaces at your schools, businesses, and science institutions with the COMPANY LAB set. It comes with everything you need to set up lab stations, team work areas, presentation/meeting spaces, and lots of storage!
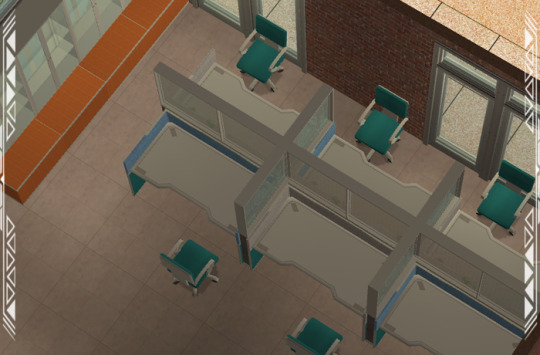

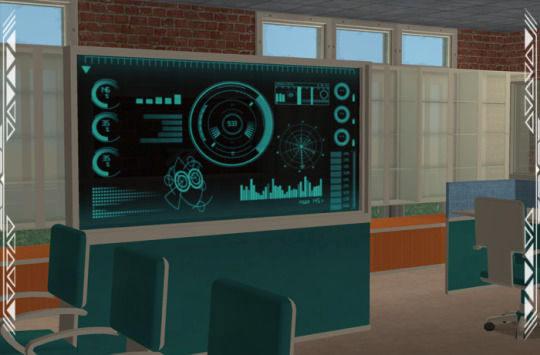
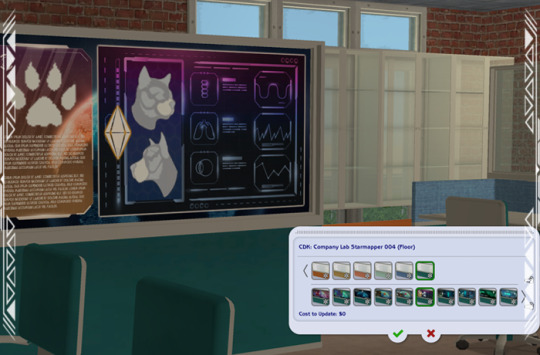
DETAILS All EPs/SPs. §See Catalog for Pricing | See Buy/Build Mode You need the Company Expo (Mesh Pack) set (Simmons, 2024) for TXTRs to show properly in game. ALL files with “MESH” in their name are REQUIRED. You may need “move objects” and “grid on/off” cheats to place some objects to your liking. When placing partitions/floating shelves and tables/desks/counters on the same tile, place the partition/shelves first. I recommend using this set with Object Freedom 1.02 (Fway, 2023), which includes Numenor’s fix for OFB shelves (2006), for easier use overall. ITEMS Cabinets (Tall, Upper, Lower) (476-514 poly) Desk (716 poly) Starmappers 001-004 (982-1028 poly) Mapper 001/002 recolorable on left/ride side, back is clear glass Mapper 003 front/back recolorable SEPARATELY Mapper 004 has recolorable base and recolorable glass (identical on both sides) Low Down Lab Table (118 poly) Shelf (62 poly) Table (1352 poly) Chair (1473 poly, HIGH) DOWNLOAD (choose one) MESHES from SFS | from MEGA LAB RECOLORS from SFS | from MEGA The STARMAPPERS are decorative and come with 30+ recolors. Use them to gussy up your research and lab rooms!
COMPATIBILITY AVOID DUPLICATES: The #co2cdkseries includes edited versions – replacements - for items in the following CC sets: 4ESF (office 3, other 1/artroom, other 2/build), All4Sims/MaleorderBride (miskatonic library, office, postmodern office), CycloneSue (never ending/privacy windows), derMarcel (inx office), Katy76/PC-Sims (bank/cash point, court/law school sets, sim cola machine), Marilu (immobilien office), Murano (ador office), Reflex Sims (giacondo office), Retail Sims/HChangeri (simEx, sps store), Simgedoehns/Tolli (focus kitchen, loft office, modus office), ShinySims (modern windows), Shoukeir via Sims2Play(reverie office, step boxes/shelving), Spaik (sintesi study), Stylist Sims (offices 1,2, & 3, Toronto set), Tiggy027 (wall window frames 1-10), Wall Sims (holly architecture, Ibiza). *The goal is link the objects to the recolors/new functions in the #co2cdkseries without re-inventing the wheel! Credit to the original creators. CREDITS Thanks: EarlyPleasantview/EPV, Panda, Soloriya, ChocolateCitySim, HugeLunatic, Klaartje, Ocelotekatl, Whoward69, LoganSimmingWolf, Gayars, Ch4rmsing, Ranabluu, Gummilutt, Crisps&Kerosene, LordCrumps, PineappleForest. Sources: Any Color You Like (CuriousB, 2010), Beyno (Korn via BBFonts), EA/Maxis, Offuturistic Infographic (Freepik). SEE CREDITS (ALT)
62 notes
·
View notes
Note
hi, i've been learning how to make hair retextures and clothing recolors and your tutorials and tips have been super helpful! i was wondering if you could explain how you retexture clay hair? i'd want to add more realistic looking textures to some clay afro hairstyles but i don't know how to do it and i haven't find a tutorial for it
Hi anon, that's great! Making CC is really fun. 😊 I think so, anyway. So, I do have a tutorial about how to retexture clay hair, but instead of just providing you with that link, let's talk a little bit more about what you're interested in: adding more realistic looking textures to clay afro hairstyles. You're in luck - that's a thing I like to do sometimes too! Clay hairs often lend their shape very well to locs, braids, puffs, knots etc.
So this hair, @miniculesim's 4t2 conversion of okuree's Clementine. I have done before but didn't change the texture at the time. But I could! Let's try it.
This is the mesh and texture we will be working with.
Sometimes I like to view a mesh in UV Mapper so I can get way up in the mesh. Like way up in there.
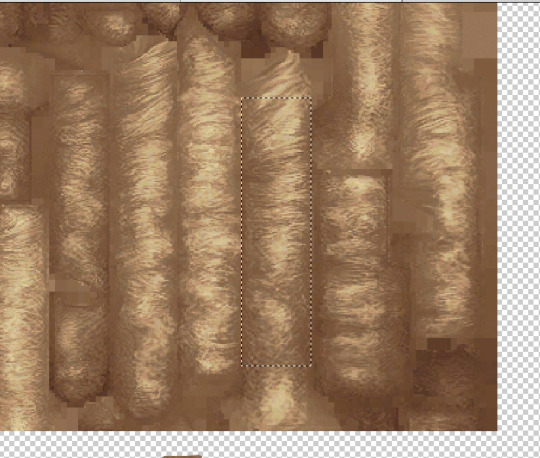
I'd like to use my fave TS4 texture on this mesh.
This is the original texture for Clementine.
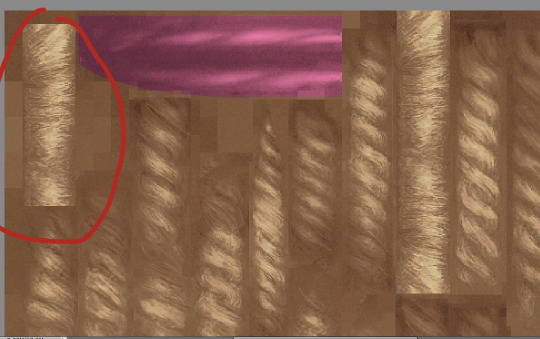
Where I have circled in red is where I am going to paste one long rectangle section of the TS4 Dread texture I prefer.
See? That's not so bad.
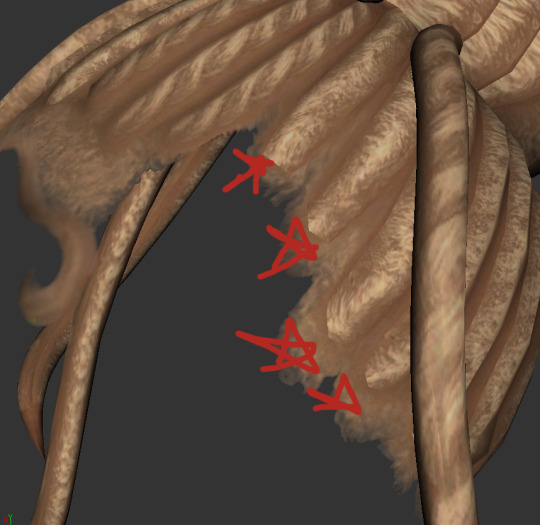
One big difference between retexturing alpha hairs and retexturing clay hairs is how the texture looks when the hair5 connects to the head.
See these starred red areas? We will come back to this. Because I don't like how that looks, and I can do better.
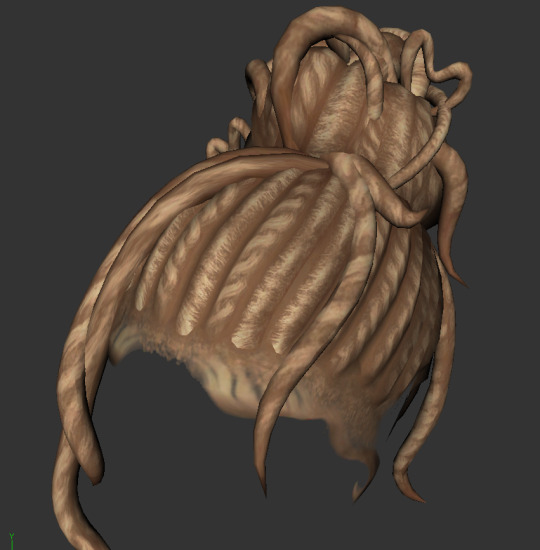
So, this is Clementine, with all of the locs texture that I'd like to have on it. It has the original scalp texture, however. It is okay, but not the vision I had in mind.
What I am going to do is put my afro texture underneath the locs.
I use Photoshop which allows me to have many many layers in an image.
My layers would be like:
1)Locs 2) Afro texture 3) the original texture.
It looks a little better. Not quite done yet, though.
When it comes to clay hair, I'm always on the side of 'if you can't beat em, join em!'.
Clay hair meshes have their textures painted to match their UV maps exactly. So, retexturing is tricky. I don't mind leaving in a little of the original texture, because why put it to waste when it's useful, you know?
I need to adjust the hairline texture though. That's not quite right.
What I have here is the 1) original texture around the hairline, then the 2) TS4 dread texture I added, and then 3) my afro texture layered both underneath and on top.

This works, I think! I like it.
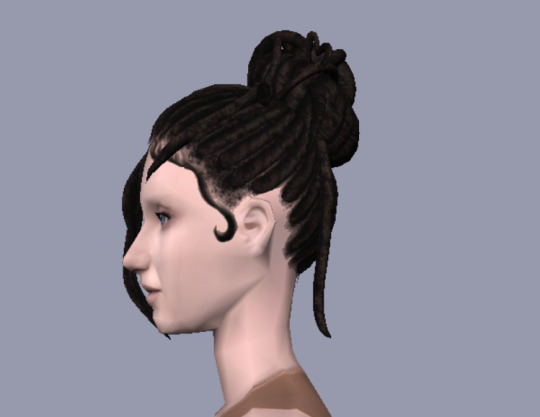
And then in a black recolor of course, very important that that looks good on any afro/protective style.
I hope that this is helpful! Please feel free to DM me if you have questions. :)
37 notes
·
View notes
Text
Some WIP
I'm kinda liking whole this blogging thing. If only Tumblr wouldn't have changed the layout to this annoying Twitter knock-off style.. since it's also been unreliable, and has already deleted an account of mine out of the blue and took their sweet time to bring it back, i'll probably set up an actual blog and use this account as a directory. Anyway here are a bunch of things i've been working on. I'm remapping this set of repositoried sofas by karaskaras at GOS. I really like these, and they take patterns really well, I already got a bunch of nice fabrics for it, and karaskaras was very kind to include a template for them. Just need to get the mapping done.. I need to stop doing elaborate remmaping with just UV mapper classic, no more of that until i'll have a computer that can run the full version. In the background are a bunch of posters from the last of us that I want to put on every single poster mesh. Also some recolors for the Maxis sofa. All the fabrics are from rubelli if anyone's interested. This might not be the best platform for comments, but i'd love to hear any thoughts about these, especially about the shading, if its seen at all, I took the pic for the sofas, but liked how it all looked together.
0 notes
Text
Looking for help with big 3t2 tree project!
Hi, hello.
Do you love the trees in TS3? Have you been sad that they're not available for TS2? Well, I've got good news for you: I think I can convert them . . . I just need help.
Here's proof: three trees from Midnight Hollow!
Do you know how to fiddle with tree meshes? Or make them seasonal? If so, please keep reading below, I'd love to collaborate with you! (I posted a help request on GOS, but I thought I'd post here too).
The technical nitty-gritty: Right now, I use an older version of TSR Workshop to export them as speedtree files (.spt) and then I've converted them to .fbx and then finally imported them to Blender for editing and exporting as .obj. The issue is that because these are dynamic speedtree creations, the export creates an almost 2D version of the tree with the leaves and branches all facing one way. If you rotate the tree mesh, it's completely naked from the other side (but usually the trunk is fully 3D).
So in the UV mapper screenshots below, you can see the "front" of the 3t2 tree vs. the "back" (I use quotations since these are just arbitrary directions) and I included a shot from the top-down so you can see how one-sided everything is.
Right now, my solution has been to copy + paste the leaves meshes three times at 90 degree angles to give the illusion of a full tree. In the pic below, the tree now looks more "full," but in the top-down view you can see that I've just made a bunch of boxes and majorly increased the polycount. It's not a very elegant solution.
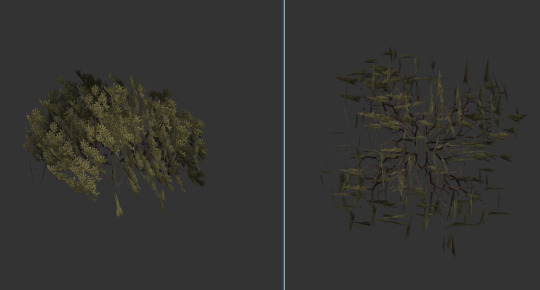
So, do you have any thoughts about how to make this sort of mesh look like a nice, full tree? Are you an expert in making plants seasonal? Are there trees in TS3 that you've been pining for? I'd love to hear from you!
I'm also happy to share the .obj files if anyone wants to try fiddling with the meshes themselves--just DM me.
67 notes
·
View notes
Text
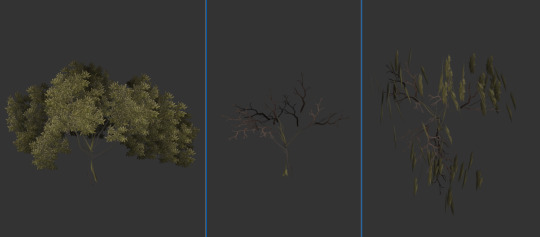
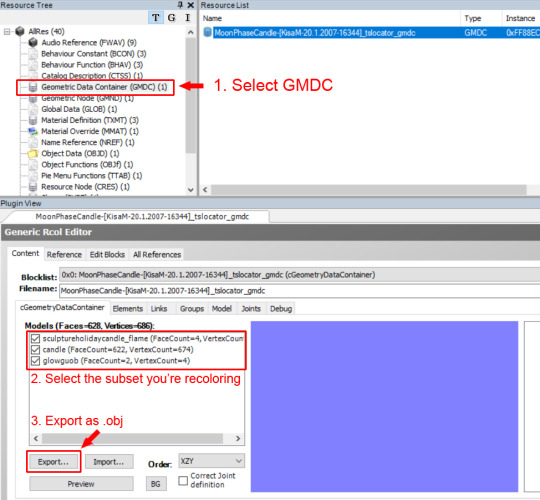
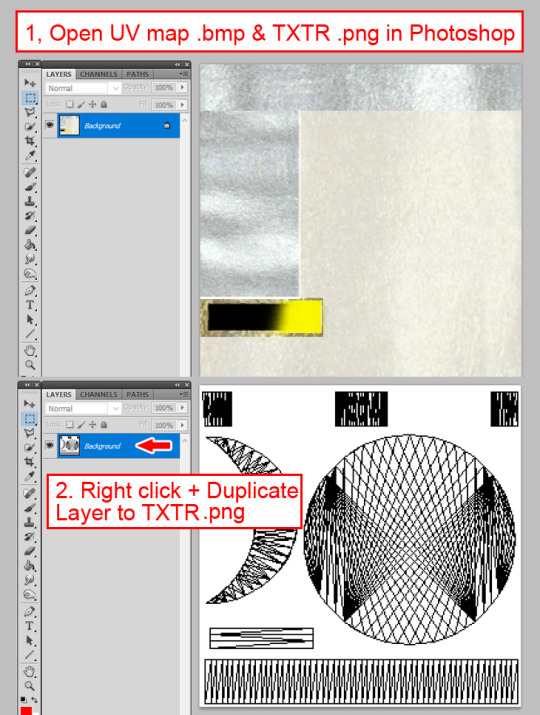
Tutorial: How to use UV Mapper as a recoloring guide
Whenever I recolor objects, I use UV Mapper to help me figure out what part of the texture corresponds to what part of the mesh, and to preview what the recolor will end up looking like. Here’s how I do it!
First, download UV Mapper Pro here - I just use the free demo version, the functionality is limited but I’m not a mesher so it does what I need it to for recoloring.
Open the mesh you’re recoloring in SimPE. Select the GMDC and look in Plugin View. Uncheck everything but the subset you’re recoloring (”candle” in this case), then hit Export and save the .obj file.
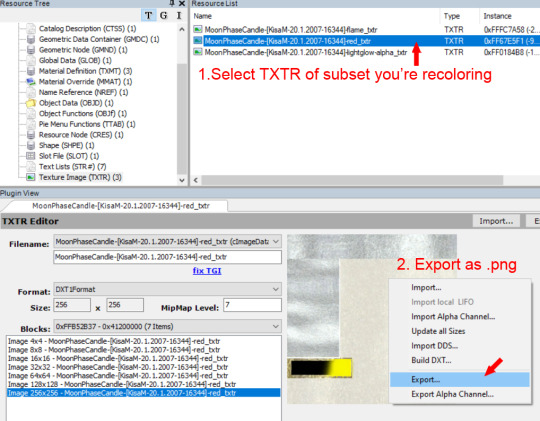
Next, select the corresponding TXTR for that subset (in this case it’s the one with “red” at the end since I’m not recoloring the flame or the light glow). Right-click on the image and export it as a .png.
Now, load your .obj file in UV Mapper by going to File > Open Model in the menu. It will display the UV map on the left, and the mesh (with no texture) on the right.
Next, you want to export the UV map. Go to File > Save Template in the menu. A popup box will appear. Enter your TXTR size (256 x 256 in this case) and select RGB Color (doesn’t really matter if it’s anti-aliased or not).
Let’s load the original texture to see what it looks like on the mesh. Go to Texture > Load and open the .png you exported from SimPE.
Now, open the texture .png and the UV map .bmp in Photoshop. Go to the Layers panel in the UV map. Right-click on the layer and duplicate it to the other document.
Now, set the blend mode of the UV map layer to Multiply.
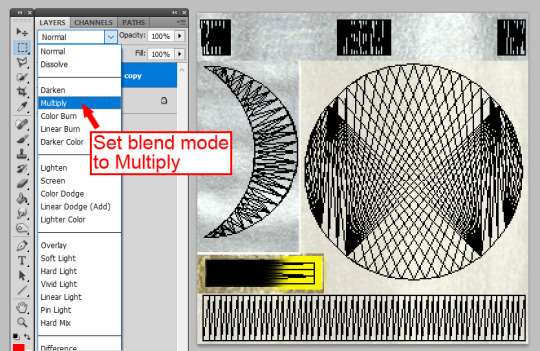
So now you have an idea of where each part of the texture is mapped on the mesh. As you work on your recolor, save it as a .png (without the UV map layer visible) and load the texture to preview it.
I’m not sure if this would be helpful to anyone else, but it works well for me personally so I thought I’d share!
88 notes
·
View notes
Text
No, Nintendo using a flashcart is not surprising.
This is a follow up to the previous post about the leaked official GB/GBA Switch Emulators. Click here to read it if you haven't.
By any means, as far as my knowledge goes, Nintendo using an EZ-Flash is the least of my concern as an "evidence" of the GBA emulator being fake. That just needs to be said.
Nintendo has used standards made by outsiders like unofficial emulator developers, pirates and homebrewers for literal decades, some of it can even be dated back to the the Nintendo 64, when the original japanese version of Animal Crossing was released, with a NES emulator included inside.
What the developers are doing VS what the lawyers are saying, there tends to be hypocrisy from the company, and I feel it's safe to say this is pretty much the entire industry in a nutshell.
I'll try to explain, pretty much everything emulation and retro that Nintendo used from outside that I know of.
iNES Header
I'll take this time to debunk this once and for all: No, Nintendo did not sell downloaded ROMs back to you on Virtual Console.
You have probably heard the story that Nintendo uses iNES headers, from a GDC conference about emulation and using this as evidence that Nintendo uses downloaded ROMs to sell back to you.
Nowadays, especially after the gigaleaks of 2020, we can safely say this is not really true. However, Nintendo DID use a standard made by outside emulator developers, but you'll see there's quite the logical explanation about it.
But I need to explain what a iNES header is, and I'll try to simplify terms. A NES cartridge is basically comprised of two seperate parts:
Program ROM: Contains the game's code
Character ROM: Contains the game's graphics
The NES accesses both of these seperately and simultaneously, and then, to make bigger NES games, a chip that we call a "mapper" handles access of both seperately in a way that the NES understands, while providing a way to handle bigger sized ROMs. This is really oversimplified, but for the sake of this post, think that for different needs, there are different mapper chips that aren't necessarily compatible.
The problem is that if you just dump the ROMs from the cartridge, there is genuinely no way to tell what the cartridge is made of from the data you got.
This is where iNES comes into play. iNES is a NES emulator released in 1996, developed by Marat Fayzullin, it is still receiving updates to this very day. This developer had to solve the problem of knowing what kind of NES cartridge information we can get from ROM files, and so he devised what we call the "iNES header", which acts as a description of the cartridge, and to include both the Program and Character ROMs in one single ROM file for convenience.

The header acts as what we could call metadata, which includes specific cartridge information, including the type of mapper chip used. This is really important information because else, emulators don't know what kind of NES cartridge it is supposed to emulate.
Yet, you could find ROMs in this exact format inside Animal Crossing, Virtual Console, even the NES Mini and Nintendo Switch Online! What gives?
Well it all harkens back to the N64 era. At one point, Nintendo hired a japanese developer who contributed to iNES's code, specifically the sound emulation. This person is called Tomohiro Kawase, and you may hear about this person a lot when you dig into the retro side of Nintendo.
Tomohiro Kawase, with help from Hideaki Shimizu, developed the official NES emulator for the Nintendo 64 and many other systems as well. He also used the iNES ROM format while developing it. Why? Couldn't they just make their own standard? Honestly, it might just be because it was handy to use, the standard was considered good enough already. You shouldn't necessarily expect developers to be as strict as lawyers are.
Think of it that way, there's a double standard: The developer standard and the lawyer standard. They don't necessarily mesh. You'd be also surprised how developers can also be very lazy and do things without much thought just because it works fine.
The person has also proven to be familiar with dumping ROMs, which the gigaleak has showed very well, but the gigaleak also got us seperated Program and Character ROM files for pretty much every single NES and Famicom titles, no iNES header to be seen.
A common argument that I saw was that the file is identical to what you find online, which is not really evidence because I could just dump the game myself, and if I do my diligent work, I would most likely input the exact same cartridge information in the iNES header by hand, resulting in an identical file. You can have an identical file from two completely different sources, or more, even.
But what the evidence brings is that, yes, Nintendo has used a standard made by unofficial emulator developers, possibly because of hiring someone who worked on iNES in the past.
The gigaleak also brought the source code of the NES emulator for Nintendo 64, as well as the full source code of the 3DS NES and Game Boy Virtual Console emulators. It also provided a tool specifically made to automate the build of NES ROMs with iNES header from the PRG and CHR ROM files.
For some reason, the 3DS Virtual Console emulator actually comes with a different header standard (and honestly better, even?), it is called "TNES", which was literally never used again, the Wii U, NES Mini and NES Switch Online still relies on the iNES header format to this day.
So I just want to repeat again: I am confident Nintendo did not sell downloaded pirate ROMs to you in the slightest, there is zero evidence pointing towards that, and clearly Nintendo is one of the kings of archival. However…
Did they download ROMs anyway?
The same may not be said if they didn't download pirate ROMs at all, however.
That one might get people talking, but please read the entire thing first, because this is very nuanced.
One of the final leaks (so far, that is) of the gigaleaks was brought in 2021, were basically a huge backup of emails from around 2005 and 2006. A lot of them are about the planning of the Wii, but also the development and planning of Virtual Console, in pretty big detail, even.
This is where we learned that the SNES Wii Virtual Console emulator was originally developed by a single person at Nintendo in Japan, Paul Donnelly, who then (forcibly by an unexpected event) passed the torch to Intelligent Systems, who was already making the new NES emulator at the time. He also trained them to handle SNES ROM hacking for the sound emulation, which at the time, was bypassing Sony's SNES Audio system for patent reasons, and needed every SNES ROM to be hacked for this.
Anyone can check this if they want, but when you check the executable of the SNES Wii VC emulator, you might find a list of SNES games that are seemingly supported, a lot can have Wii VC Title IDs even, but a lot can also come with lotcheck SNES ROM filenames as well.
The email attachments also include E3 builds of the Virtual Console emulators. So I checked the E3 SNES Virtual Console build… imagine my surprise when I found a bunch of filenames that are definitely lotcheck, but mixed with a lot of filenames really reminiscent of GoodSNES ROM filenames you can find in a lot of ROM sites…
It looks like a lot of downloaded SNES ROMs were used during development of the SNES Virtual Console emulator, especially before the E3 showcase. Does this mean Nintendo could have sold SNES ROMs on Virtual Console?
Well… all evidence in the emails still points to No, they didn't. We can clearly notice a lot of emails asking for specific lotcheck ROMs, including for games that were downloaded, which suggests that when it's about the public use, they're genuinely hellbent on using ROMs sourced from themselves.
But I did notice a lot of paperwork involved just for getting one archived ROM from Nintendo, EVEN from within Nintendo, so I can imagine developers not really wanting to wait and skip parts to be efficient.
But this doesn't really explain how official emulator developers still have a complete lotcheck ROM fullset if I judge from the gigaleak… it's a bit hard to have a complete answer, but all evidence still points to Nintendo caring to use officially sourced ROMs on the public side even when the files are literally identical anyway…
Famicom Disk System Disk Format
Nintendo is a bit weirder when it comes to Famicom Disk System emulation, their FDS disk file format is actually different from what we use on unofficial emulators. So why do I even mention this?
Well you can use this as evidence that formats used are really just whatever developers feel like using; but I do want to mention some things about the gigaleak that still shows us that Nintendo is well aware of the outside FDS disk format.
In late 2020, the gigaleak brought us a complete set of master disk dumps originating from Nintendo themselves done in early 2007, including photos of every single master disk. We know they are new dumps they made themselves, because the original master disk of The Legend of Zelda is actually corrupted. This has resulted in every japanese Zelda 1 rerelease to not have the final revision of the game.
In 2016, they actually took the time to use a Famicom Disk Writer Soft Pak, a cartridge containing the final version of The Legend of Zelda, meant for use for the rewritable kiosk, because if you didn't know, you could buy Famicom Disk System disks, and actually rewrite them with different games. This is kinda ecological, and this wouldn't be the only service that does this.
Take a guess who dumped the Soft Pak? Tomohiro Kawase, who was tasked by his higher ups to do it.
Now that was just a bit of trivia for y'all, but there's something else in the leaked contents: A converter called "rdafds.exe". This effectively converts between Nintendo's FDS File format and the unofficial FDS file format recognized by unofficial emulators and viceversa. This is honestly pretty practical even. The readme even suggests the use of PC emulators for testing.
And in fact… we have caught them in the act for using PC emulators before…
WarioWare: Smooth Moves shenanigans
If you don't know, then I assume you're a bit confused why I'm talking about this game.
I'll cut to the chase, WarioWare: Smooth Moves is co-developed by Intelligent Systems and Nintendo, and is pretty known for referencing a lot of Nintendo's history, more than Nintendo themselves sometimes.
One of the microgames we'll talk about is the Punch-Out!! microgame. It's seemingly just Punch-Out, right? Well when we take the background image on its own, there's a little bit of a surprise…
Well that looks like an emulator on PC to me, not only that but we can actually tell which emulator it is! It seems to be VirtuaNES emulating Punch-Out, edited to remove sprites in the foreground. Well that's kinda interesting, isn't it?
Did they look at other N64 emulators..?
The Wii U Nintendo 64 Virtual Console emulator was developed by iQue from scratch, using the same framework they made for the 3DS Virtual Console. For Super Mario 3D All-Stars on the Switch, all evidence seems to point towards iQue pursuing development of the same emulator, itself supporting even more features especially for real-time hacking.
To my assumption, the emulator was passed to NERD and then became what's known as Hovercraft for the Nintendo 64 Nintendo Switch Online service, as a lot of code from iQue's framework has definitely disappeared. (This may be inaccurate according to NERD's own post on their website.)
Here's a bit of off-topic trivia for you about the emulator's features: Ever since the Wii U, the emulator supported the Controller Pak save emulation but never used it, has unfinished 64DD emulation code, and also contains skeleton code for Transfer Pak support (nothing that would work beyond turning the thing on and off).
A lot of this code stayed on the Switch pretty much as is. But what took my attention was a little bit of completely useless code inside the N64 emulator in Super Mario 3D All-Stars.
Inside, there's a function about recognizing the N64 game's CIC chip protection bootcode (you don't need to know more), and it recognizes quite a few more than necessary. It recognizes the CIC 8303 chip which is the japanese retail 64DD CIC chip.

But then it recognizes the CIC 5167 (0x142F in hexadecimal) chip. Wait… That's not an official bootcode. That's the 64DD Cartridge Port bootcode! For more context, these are completely fanmade ports of 64DD titles into a cartridge ROM format by Zoinkity, compatible with flashcarts, how come this is recognized by an official emulator?!
Not to mention but the 5167 identification number is technically useless, and actually a sort of info that's kinda left relatively obscure, you'd really need to look far to find it… except inside open source N64 emulator code.
The thing about this, is that I feel personally involved. I am the one who added support for this specific bootcode in Project64 and mupen64plus, and included the 5167 information too. So I kinda feel humbled a little bit that iQue may have possibly looked at code that I wrote in other emulators.
Now, the emulator only recognized the bootcode, but actually doesn't have anything programmed to actually make use of it, so it would recognize and then do not much of anything beyond that.
Eventually, possibly after I talked about it on Twitter, all of the 64DD related code were removed including the 5167 CIC reference, in an update of the N64 Nintendo Switch Online application.
Hagi, the GameCube Emulator
The final very quick blow. Hagi is the GameCube emulator written by NERD and was used for the emulation of Super Mario Sunshine and the port of Super Mario Galaxy in Super Mario 3D All-Stars.
This one is very quick to talk about, because I'll just mention that the emulator makes mention of unofficial features inside it: The USB Gecko, and Gecko Patches.

The USB Gecko is a device used for debugging code and code hacking on the GameCube and the Wii, it plugs into the GameCard Memory Card slot and plugs into the PC via USB.

Gecko Patches are nothing more than the equivalent of Action Replay & GameShark codes by homebrewers.
Both things are completely unofficial, and yet, Nintendo developers doesn't have problems using those. Ain't that interesting?
So obviously, things are always more complicated than just "Nintendo is against the use of flashcarts and unofficial applications" but yet it is fine when their own developers use it, and I'd like to say, it has always been like this. Call it hypocrisy if you prefer, but for me the use of flashcarts inside Nintendo to help emulator development is nothing new.
There's your post about Nintendo using unofficial stuff ever since the moment they started emulating things.
Addendum Edit: I actually don't care that much that Nintendo uses unofficial stuff for development, it's not a big deal to me; but for other people, it is. And chances are, for those who think it is a big deal, they're not developers.
101 notes
·
View notes
Text
KSP Weekly: Mapping with Magellan

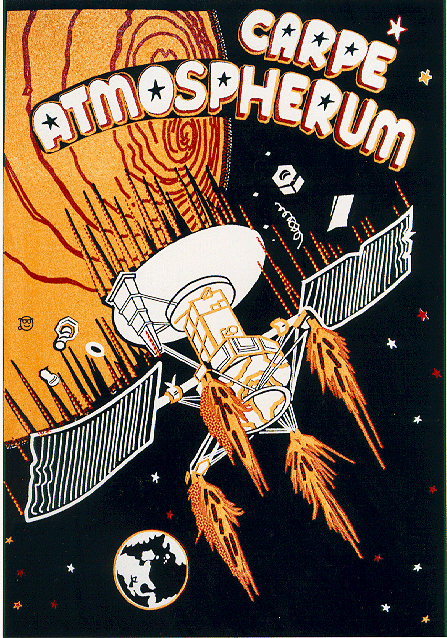
Welcome to KSP Weekly! Tomorrow, September 15th, it’ll have been 28 years since the Magellan spacecraft began its primary mission, so it is as good a time as any to talk about this cool Venusian orbiter. Aptly named after the sixteenth-century Portuguese explorer Ferdinand Magellan, known for his exploration, mapping, and circumnavigation of the Earth, the spacecraft’s main goal was designed to make quality radar maps of at least 70 percent of Venus' surface, providing a clear look at the topography below the planet's thick, perpetual cloak of clouds.
Also referred to as the Venus Radar Mapper, the Magellan spacecraft was launched by NASA on May 4 1989 aboard the Space Shuttle Atlantis, making it the first interplanetary mission to be launched from a shuttle. It was also the first one to use a solid-fuel motor called the Inertial Upper Stage booster to continue its journey as it was released from the shuttle’s cargo bay, and the first spacecraft to test aerobraking as a method for circularizing its orbit. Magellan was the fifth successful NASA mission to Venus, and it ended an eleven-year gap in U.S. interplanetary probe launches.

The spacecraft carried a sophisticated imaging radar, called Synthetic Aperture Radar (SAR), which was used to make the most highly detailed map of Venus ever captured during its four years in orbit around Venus from 1990 to 1994. After concluding its radar mapping, Magellan also made global maps of Venus's gravity field.
Magellan mapped 98 percent of the planet’s surface with a resolution of 100 meters or better. The radar images showed that most of the surface was covered by volcanic materials, that there were few impact craters (suggesting that the surface is relatively young geologically), and that there was no evidence of plate tectonic activity or water erosion, although there was some evidence of wind erosion. Despite the high surface temperatures (475°C) and high atmospheric pressures (92 atmospheres), the complete lack of water makes erosion an extremely slow process. As a result, surface features can persist for hundreds of millions of years. The Magellan mission also determined the topography of the Venusian surface, measured the Venusian gravity field, and provided suggestive evidence that the planet’s interior differs in major ways from Earth’s interior.
On Oct. 12, 1994, the spacecraft made a dramatic plunge into the thick, hot Venusian atmosphere, and was crushed by the pressure of Venus's atmosphere. Magellan's signal was lost at 10:02 Universal Time (3:02 a.m. Pacific Daylight Time) that day. What a glorious end to such an amazing mission, don’t you think?
Although Magellan was the agency's last dedicated Venus mission, we’re sure that the lessons learned from the spaceship's aerodynamic dive into the Venusian atmosphere will be applied to future planetary missions… even if conducted by little green creatures.
[Development news start here]
The progress on Update 1.5 is on track, and, naturally, this week wasn’t without its developments. The team is currently working on some cool features regarding one of our favorite Celestial Bodies: Asteroids! As you know, before the Making History Expansion, it was very hard to get an asteroid within the atmosphere of other Celestial Bodies, at least without mods or some sort of cheats. When Asteroids were originally introduced into the game, only space interactions were in mind, but that changed with the expansion as now players can easily spawn asteroids on collision routes with other Celestial Bodies. In light of this, we have been working on ensuring that asteroids behave properly whenever they enter the atmosphere of a Celestial Body, similar to a spacecraft. So far, we have added VFXs as they go through reentry heat and included explosion effects when they actually collide. Check this Gif to see the progress.
In other news, the endeavor of revamping parts continues! Each week we gather insightful feedback from the community as we show the new look of some of these parts, but we haven’t shown you everything just yet. This week we have some stuff to show off. For instance, there’s more to the revamping task of the MK1 Command Pod that we want you to look at. Let’s start with the new IVA, which has been done over from scratch. As you know the look of this Pod takes inspiration from the Project Mercury Pods, so it made perfect sense to draw inspiration from these command pods to model the new command panel. What do you think?

Click here to see the high-res image
Additionally, the team also worked on creating a couple of additional texture variants for the MK1 Command Pod. This way you’ll be able to give your rockets the right look: Dark, White or a Gray & White pattern, it is up to you! Also noteworthy is the detail that our artists have added to the Pod’s texture.

Click here to see the high-res image
The Probodobodyne OKTO command modules also were in the artistic agenda this week. The new look of these command modules was based on the ones used in the Mariner Program, and to achieve that our artists made completely new texture maps using diffuse, normal and specular maps. They also retouched the geometry and added a new shader to the module’s tops to make them shine and interact with light, just like they did with the HECS modules. On top of that, with resource optimization in mind, they put both textures into a single map. Moreover, the collision mesh was tweaked to better fit the shape of the probes. Check these gifs to see the new models in motion: OKTO and OKTO 2. Bear in mind that the config files of these parts were not modified in any significant way.

Click here to see the high-res image
[KSP Vault]
This week in the KSP Vault…
Matt Lowne released the 4th episode of his new Green Harvest series! Since the Duna Attacks, we loved Matt’s cinematic storytelling and Green Harvest doesn’t disappoint. Check it out!
youtube
Finally, Marcus House made a simulation of a SpaceX Falcon Heavy sending a self-refueling (ISRU) vessel to the Moons Surface. A double booster vertical landing included! Impressive...
youtube
Have you seen cool KSP-related content that you consider worth highlighting? Share it with us and help us give content creators more exposure. :)
Remember that you can also share and download missions on Curse, KerbalX, the KSP Forum and the KSP Steam Workshop.
That’s it for this week. Be sure to join us on our official forums, and don’t forget to follow us on Twitter and Facebook. Stay tuned for more exciting and upcoming news and development updates!
Happy launchings!
*Information Source:
ASP: The Magellan Spacecraft at Venus. (n.d.). Retrieved from http://www.astrosociety.org/edu/publications/tnl/18/18.html?PHPSESSID=4aff07778bb9b4b6b5727a1050ec3e91
Hamilton, C. J. (n.d.). Magellan Mission to Venus. Retrieved from http://solarviews.com/eng/magellan.htm
In Depth | Magellan – Solar System Exploration: NASA Science. (2018, January 26). Retrieved from https://solarsystem.nasa.gov/missions/magellan/in-depth/
Logsdon, J. M. (2018, June 11). Magellan. Retrieved from https://www.britannica.com/topic/Magellan
Magellan. (n.d.). Retrieved from https://www.jpl.nasa.gov/missions/magellan/
22 notes
·
View notes
Photo
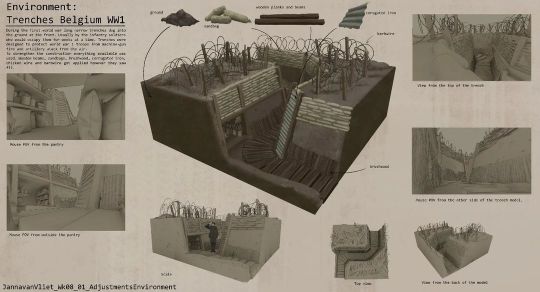
I know this is late (again) but I had to get to San Fransisco where I will hang around for a bit. Let me know if you are in the area! This is the environmental page for my mentorship with @armand_serrano Thanks to that guy I got introduced to @adobemedium and sculpting in #virtualreality . And during this mentorship he introduced us to @twinmotionofficial to place your sculpts into surroundings and light it. It even has the coolest line art filter. The mesh created this way is all kinds of big and difficult, and you'll have to be a pretty good uv mapper to make ane texture work, or maybe sculpt cleaner. Still, I am very happy with my results! It is so fun to work like this, litteraly building the world you had in your mind in 3D who does not want that right?! And then just do a paintover. . . . . #vr #vrsculpting #vrsculpture #vrsculpt #ww1 #trenches #paintover #twinmotion #visdevart #visualdevelopment #conceptart #digitalart #environmentdesign #environmentart (bij San Francisco, California) https://www.instagram.com/p/Cj6MyVZyaTM/?igshid=NGJjMDIxMWI=
#virtualreality#vr#vrsculpting#vrsculpture#vrsculpt#ww1#trenches#paintover#twinmotion#visdevart#visualdevelopment#conceptart#digitalart#environmentdesign#environmentart
0 notes
Text
Apa itu Pemetaan Drone?
Pemetaan Drone sudah menjadi “alat” yang ampuh untuk membuat peta 2d dan model 3d yang memberikan nilai ekstrem bagi banyak jenis perusahaan mulai dari survei, rekayasa, kontrak umum, hingga konstruksi. Berbeda sekali dengan metode tradisional yang ketinggalan jaman, drone mempercepat alur kerja dan menghemat waktu dan uang karena mereka semakin sering digunakan untuk memetakan area kecil dan besar. Ini adalah niche yang harus dipertimbangkan oleh pilot drone yang serius.
Apa itu Pemetaan Drone?
Oleh karena itu, kami sangat menyarankan agar siapa pun yang tertarik dalam pemetaan drone mempelajari sistem yang terlibat dalam akuisisi data dan nuansa aplikasi pemrosesan fotogrametri. Sementara itu mungkin tampak seperti sejumlah besar informasi yang perlu diserap (dan itu, untuk menjadi adil), pilot informasi terbaik akan dapat membuat kiriman dalam situasi di mana sebagian besar aplikasi berbasis cloud gagal. Pilot drone dan “mapper” yang berpendidikan dapat memberikan data yang jauh lebih baik daripada seseorang yang hanya mengandalkan aplikasi mobile all-in-one untuk memberikan hasil yang akurat!
Untuk itu, kami telah mengumpulkan bersama pengetahuan dan kebijaksanaan kolektif pilot pemetaan kami untuk memberi Anda informasi yang paling komprehensif, berdasarkan pengalaman yang tersedia saat ini. Jika Anda mengikuti “peta” kami untuk pemetaan drone, Anda akan memiliki pemahaman yang jelas tentang pemetaan drone, perangkat lunak yang digunakan untuk memproses data pemetaan, tips dan trik dari pilot sebenarnya yang melakukan ini untuk mencari nafkah, dan jalan ke depan untuk menambahkan pemetaan ke Anda daftar keterampilan piloting drone.
SEJARAH
Belum lama berselang bahwa satu-satunya cara untuk mendapatkan orthomosaic dari sebuah properti besar dengan akurasi tinggi adalah dengan terbang menggunakan cessna atau helikopter! Dengan kemajuan pesat dalam teknologi drone, serta penurunan biaya RTK GPS akurasi tinggi, biaya dan waktu untuk mendapatkan ortomosis yang sama ini, juga telah menurun secara signifikan.
Pemetaan drone sangat kuat karena kami telah mengambil ilmu fotogrametri (1867) yang sudah tua dan menggabungkannya dengan proses yang cepat, mulus, dan otonom untuk memperoleh data dan mengumpulkan pengukuran. Lebih lanjut, karena kecepatan luar biasa dari perolehan data dan sumber daya yang kuat dari komputer kelas atas, kita sekarang dapat membuat data tingkat survei (ASPRS Standard) dalam waktu yang sangat singkat.
Data itu juga dapat ditampilkan sebagai titik awan, ortomosaic, model permukaan digital, peta topografi, model medan digital, dan divisualisasikan melalui mesh bertekstur 3D.
Untuk menguasai ini semua, anda bisa mengikuti pelatihan drone untuk pemetaan dari kami sekarang ini.
0 notes
Text
Object Orientation: How Much is Too Much?
Has object orientation gone too far? Has the effort to build infinite reusability taken a turn for the absurd?
Maybe. Maybe not. Let’s have a look.
In theory, object orientation seeks to build code the way we build physical devices: it makes more sense to build general, modular, reusable components rather than specific, intertwined, inseparable ones. Take your car engine for example. The starter motor, alternator and battery can all be swapped out individually without changing the engine. Any replacements will drop right in, provided they have right interfaces, in this case, the voltage (12V), the starter gear meshes with the ring gear on the flywheel and has the proper bolt pattern to mount to the engine block, the alternator spins at the right RPM on the serpentine belt, etc. This is possible because the starter, alternator and battery are dumb, they don’t know what engine they’re on, they just do their job (although the bolt patterns mentioned may limit their use to a specific engine block).
This analogy defines objects, composition, and interfaces. It’s not hard to extend it to include inheritance: if we want to build a 24V starter motor, we can probably reuse some of the parts from the 12V version. Nor are the concepts of public and private properties difficult: the battery terminals are publically accessible, the cells inside the battery are private. The alternator rpm is a public method (we can spin it as fast as we want).
In theory, all together these OO features allow the programmer to build code that is safe (avoids bugs created by plugging incompatible objects together), allows changes to be made in one spot only and propagate everywhere by default (no duplicated code), and reusable (no reinventing solutions).
These OO concepts come directly from the physical world. Others aren’t so easy to find a physical analogue: static methods, abstract interfaces. A static method is like taking an Uber, it gets you where you want to go without buying a car. An abstract interface is like a standard that everyone chooses to follow so that things work together, the electrical sockets on the wall have a common plug for example. Outlets in other countries that implement different voltages use a different plug type to avoid damage, i.e. type hinting.
Like any theory, practice is imperfect. People who subscribe to theory regardless of this fact are ideologues, which doesn’t make them evil, but it’s always worth questioning if strict adherence to theory is doing more harm than good. Case in point: the React framework for JS broke the almost religious devotion programmers had to an architecture known as MVC.
MVC required the definition and instantion of a model (with all its properties and methods) anytime a view needed to reflect some user supplied data (because models and views were bound through events) even if that data never needed the local storage or send to server methods, etc. One only had to build a single complex UI to see the ridiculous amount of code that required the programmer write to say, “hmm...is this really the best way to do this?” (This post is not a defense of React, you can do your own research there, now back to the original point.)
If time tested theories like MVC can, in fact, be rethought, what about OO? While it would certainly be difficult to defend spaghetti code, there are occasions when abstraction goes too far. The factory pattern teaches that it is best to send our request to a “factory” (or agent, or broker) that produces the appropriate variant that we need to get the job done, like a travel agent picks the best flight for us. For example, instead of having our models build themselves from database data, have a “mapper” object get the data and pick the right model to build. That way, in the future, should we decide to change the database, we only change the code in one place, not on every model.
It’s easy to see how this pattern of abstraction can turn our code into a fractal, putting agents in front of agents in front of agents...when are we going to write the code that actually does something!?
This point has been made by many before. The zealous devotion to putting everything into classes, using static methods to get around the awkwardness of this, leads to the creation of many, many unnecessary lines of code, and potentially hours of lost productivity worrying about how best to abstract your functionality to plan for future use rather than simply writing the functionality now.
The fundamental question, like it was when React challenges MVC, is: when has a devotion to a structure become a hinderance rather than an aid? Functions can be written in a way that avoids code duplication and provides for reuse without the complexity of building classes and instantiating objects.
It is my opinion that JavaScript has thrived because of its classless nature, and the ever steady march toward molding JS into its ancient ancestors is a fools’ errand.
What do you think? Tweet me.
0 notes
Photo

Augmented Light Mr. Beam Filip Sterckx All white shoes hung and map madmapper or millumin klaus Obermeir nonotak red paper heart pool party adrien m and claire b hakanai light leaks kyle mcdonals no-logram bot and dolly box 2 d augmented joanie lemercier light canvas 2 sunscreen purchase- stretch fabric - matte white surface sound reactive, color scan and light scan cinco design and marmoset (local) photoshop (lighten mode) brightness contrast ratio, throw ration depends for projector https://docs.google.com/document/d/1CgN1CQAcJQ_7Wk2IVq0FpjrhBRT8v-wglJR_b3C0hiA/edit audio input in madmapper Types: flatsourse, 3d content, structured light photoshop outline into mad mapper for light lineup (content template) Black tape contrast for better quality cannon usb to computer - tools spacial scanner in mad mapper, 2 mins photo, upload photo lightform mesh warp/masking
0 notes
Text
Global Mapper and LiDAR Module SDK v19.1 Now Available with New 3D Mesh Generation Capabilities
https://www10.giscafe.com/nbc/articles/view_article.php?articleid=1573982
0 notes
Video
vimeo
a high-resolution mesh made from over 300 images using pix4D mapper. images taken with DJI phantom 4 pro. video made with final cut pro.
0 notes
Text
CW1 - Project 3 - Non-linear
Project 3 was split into two halves, both of which we had two options to choose from:
1)
Performance Systems OR
Unfixed Composed Performance to Film
2)
Interactive Systems OR
Unfixed Improvised Performance to Film
Ultimately, I opted to do Performance Systems and Unfixed Improvised Performance to Film.
Performance Systems
Performance Systems required us to create an Ableton session to accompany a video with no audio, using Ableton’s Follow Action feature to programme the session into playing itself to a certain degree.
Ableton’s Follow Action feature allows you to manipulate a wide range of different parameters that will alter the way every individual clip behaves. Any sounds placed in clips in the same column have the capacity to autonomously alternate between themselves according to how your parameters are defined. The main parameters which affect this are:
Follow Action Time This determines when the next follow action will take place once a clip has began playback, specifically how many bars, beats and sixteenths will pass before the next follow action is initiated for that clip.
Follow Action Chance
This parameter determines the probability of which follow action will be initiated once the allocated follow action time for that clip has passed. It uses a probability ratio to determine which of the two possible follow actions is more likely to take place. This can introduce a randomised element to the composition, if the user wishes.

Follow Action This parameter is the follow action itself. It allows you to allocate up to two of nine possible follow actions for the clip to take, with the follow chance parameter ultimately determining which of the two is initiated. Below is a breakdown of each different type of follow action.

No Action This follow action will allow the clip to simply keep playing until it reaches a second rotation of its allocated follow action time.
Stop This will make the clip stop without triggering any other clips, therefore stopping the entire group that it is part of. If the Stop follow action is not allocated to any clips within a group, that group can autonomously play indefinitely.
Play Again This follow action will cause the clip to start again from its beginning.
Previous This will make the previous clip to the one currently being played back to follow it.
Next This does the same as the Previous follow action, although it will cause the following clip in the group to be played rather than the previous one.
First This follow action will make the first clip in a group play once the current clip has reached its follow action time.
Last Does the same as the First follow action, although it will cause the last clip in a group to be played rather than the first.
Any This follow action will randomly play any clip without any systematic algorithm determining which one.
Other This follow action will randomly cause any one of the other eight follow actions to take place.
Different combinations of these parameters and follow actions allow for the Ableton session to be meticulously programmed into behaving in the desired way, with an infinite amount of possible paths. This means that no two playbacks of the same session are ever the same, unless you intentionally programme the session in a way that ensures it does the same thing every time.
Once I had programmed my Follow Actions as desired, I then used Ableton’s MIDI mapper view to assign different faders and buttons on my peripheral MIDI keyboard to the desired parameters within Logic.

I specifically allocated rotary faders to the delay and reverb lines in each individual group of clips, so that I could alter the delay and reverb of each group in real time as the session played back autonomously according to my Follow Action parameters. This was the most enjoyable part of the Performance Systems project for me, as manipulating and moulding the sonics of my sounds in real-time was something I’d never done before and produced some very interesting results.
I also assigned the pads on my keyboard to the initiate clip and stop playback buttons within Ableton, in order to eliminate having to fiddle with the mouse and maximise my workflow.

Performance Systems was the least productive component of CW1 for me. Although I understood the concept, I struggled to see the value in it and how I could possibly apply it in a working environment in my chosen field, as all of the music I make is fixed and composed.
I also had issues with creating the composition in parallel to a moving image, as the film clip I had would finish while the music kept playing for a considerable while almost every time. On the contrary, there were times when my composition would come to its end prematurely, with the worst occasion happening when the music stopped before the film had even reached its halfway mark.
For these reasons, I didn’t actually manage to achieve a solid playback that I was happy with, which contributed to my lack of enthusiasm for this method of composition as it seems unreliable and volatile.
Saying this, I am confident that I have a competent understanding of the premise and the skills involved in making it work, and could apply these in a working environment if required, although it would not be my personal first choice when creating a composition.
Unfixed Improvised Performance to Film
For the second half of Project 3, we were required to form small groups of five and play three improvised pieces of music in response to a moving image.
Video 1
youtube
For the first video, I played a wooden xylophone. We approached this completely randomly, as none of us had any set rules systems in place for how we would play our instruments. I played my instrument completely intuitively, changing how I used it depending on how the image on the screen made me feel. This resulted in a chaotic cacophony of sound with no real structure, and didn’t mesh well at all.
Video 2
youtube
For the second video, I played a large single drum using two drumsticks. I set a rule for myself that I would only hit the drum when cars were not visible on screen, and made a point of playing rhythmically in time with the lead arpeggiator my group mate was playing, using four-on-the-floor rhythm when I did so. When there were cars on screen, I resorted to tapping my sticks together in order to keep the rhythm going. This composition was a lot more sonically cohesive than the first, as there wasn’t as many instruments playing at the same time, and when they did, it was structured and made sense.
Video 3
youtube
For the third video, I played bells on a MIDI keyboard mapped to Logic, which I applied a delay and reverb plug-in to in order to make it sound softer and not as abrasive. For this composition, I chose to only play when rainfall was visible in the video, although in hindsight this wasn’t a good rule to have, as there was rain throughout the entire video. I made a point of playing only single notes, no chords, in order to mimic the falling of rain drops.
This part of project 3 was very fun and engaging, as I’m not used to improvising music, so allowing myself the freedom to not think about what I was playing ahead of time was a positive experience. I now feel more confident that I can approach a visual stimulus having never seen it before and play a piece of music to accompany it straight away.
In hindsight, the rules and limitations I applied to myself could’ve been better thought out in order to make the compositions more interesting and cohesive. The first video especially suffered from this particular issue.
0 notes