#sims 2 tutorials
Explore tagged Tumblr posts
Visit Tumblr Blog
Explore Tumblr blogs with no restrictions, modern design and the best experience.
Last Seen Tumblr Blogs


Fun Fact
1,644 Tumblr posts in 1 second.
Text
YOUR VISITOR CONTROLLER MIGHT NEED SURGERY
Hello out there!!! If you use Visitor Controller mod for the Sims 2, it might be broken. I am not sure exactly which version I have ... Midge's that allows togas or the older CrispandKerosene's version with personality options.
The personality settings may be broken because I looked at my file today and sure enough, the BHAVs are not referencing personality properly.
Go into the BHAV "Check Personality Flags" inside Visitor Controller in SimPe.
It should look like this:

The highlighted node should not reference any other value but a number higher than 100.
If you see this:

Then it is broken. Personality has to be referenced in hundreds!
You must change it with the Instruction Wizard which is on the right hand side of Plugin view to make Personality features work, as in banning Lazy Sims from a gym.

The first image shows that Sims with a Neat personality lower than 400, which is 0x0190 in hexadecimal, will be banned from the lot.
Repeat for the other personalities lower in the code.
HAPPY SIMMING!!!!
Also, if anyone is interested in a tutorial for adding custom careers to Visitor Controller, let me know!
#sims 2#sims 2 gameplay#sims 2 simblr#sims 2 mods#sims community#ts2#ts2 mods#ts2 glitch#ts2 visitor controller#visitor controller#sims#Sims mods#Sims 2#sims 2 cc#the sims 2#sims 2 screenshots#Simpe#sims 2 tutorials#sims 2 tutorial
109 notes
·
View notes
Text

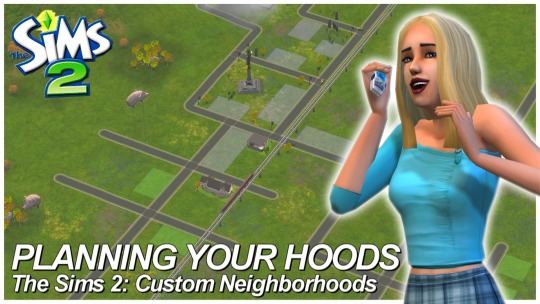
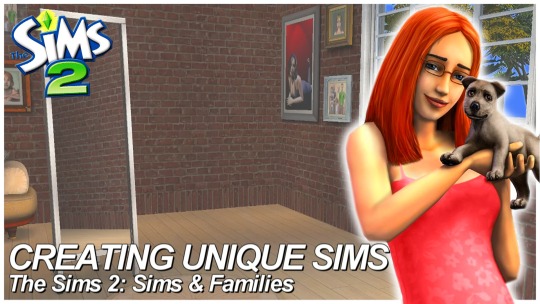
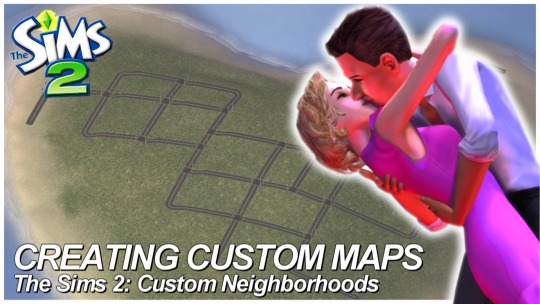
SIMS 2 • Custom Neighborhoods (4 Part Series COMPLETED)
Hey everyone! I think I forgot to share, but I finished my 4 Part Creating Custom Neighborhood series for Sims 2 on my Youtube Channel! All videos are linked below if you missed it!
I also have 2 separate tumblr posts with Map Templates and a quick Masterguide to plan 'hoods!
Best Neighborhood Templates | Links to Templates Planning Your Neighborhoods | Masterguide Creating Unique Sims Creating Custom Maps
#ts2#the sims 2#sims 2#sims 2 custom neighborhood#sims 2 custom hood#sims 2 guides#sims 2 tutorials#sims 2 youtuber#mine#edits#youtube#tutorials
394 notes
·
View notes
Text
Tutorial for making "Open with..." work on Fedora with Windows programs (and installing Sims/Lots via CleanInstaller that way)
sorry for the convoluted title, but I didn't know how else to name this.
Anyway, you know how on Windows you can simply double click on .Sims2Pack files and CleanInstaller will automatically open them? Same with .package files and SimPE.
This doesn't work on Linux out-of-the-box, because both SimPE and CleanInstaller are Windows programs. However, there is a way to make it work just like that.
I will be writing this tutorial for CleanInstaller, but you can do the same with SimPE. You'll then be able to install lots and sims by simply double clicking those install files, just like how you'd do it on windows.
What we need to do is to create a .desktop file for our program, which will make it available in the list of programs when selecting "Open with...".
Go to /home/[PC name] Then hit ctrl+h to show hidden folders. From there, go to .local/share/applications.
Inside that folder, create a new file and name it CleanInstaller.desktop
Open your new file with a text editor like KWrite or Kate.
In the file, write the following:
[Desktop Entry] Type=Application Name=CleanInstaller Icon=[add a path to the .ico file you want to use, this is optional] Exec=WINEPREFIX="/home/[insert PC name]/Games/the-sims-2/" "/home/[insert PC name]/.local/share/lutris/runners/wine/wine-ge-8-26-x86_64/bin/wine" "[insert path to CleanInstaller.exe]" %U Categories=Game
If for whatever reason your runner for the Sims 2 is different (meaning it is NOT wine-ge-8-26-x86_64), then change it in the text above! It needs to be the same runner as the game is using.
Save your file.
To test, go download a sim or house, right click the file, select "open with..." and see if CleanInstaller is in the list.
Tip for people who use KDE plasma: Right click on a .sims2pack file, select "Properties". In the new window, click on "Change..." or "Add..." next to "Open With". Another window will open. At the bottom under "Applications preference Order", click on "+Add..." and select CleanInstaller. Apply the change and now you can simply double-click .sims2pack files to open them in CleanInstaller automatically.
/EDIT: Some people have reported that they couldn't get this to work on Mint and SteamDeck. I'm not really sure why that is, but in this case I'll just mark that this tutorial is for Fedora specifically.
136 notes
·
View notes
Video
youtube
How To Convert CC Hair Sims 4 to 2| Part 1 extracting the mesh
Hey everyone just wanted to let you all know I’ve published my first episode of my new series on cc as I really just wanted to gather all the information I’ve found in my hours on research reading lots of different methods and opinions including everything especially things I struggled with, especially the milkshape section which I will be publishing next, anyways I hope someone finds this useful and yeah Keep an eye out for the next parts x
SUBSCRIBE
#youtube#sims#sims 2#sims 2 tutorial#sims 2 tutorials#sims 4 to 2#sims 4 to 2 cc#sims 4 to 2 conversion#sims 4 conversions#sims 2 conversions#sims 2 hair#sims 2 cc#sims 2 cc hair#sims hair#sims custom content#sims 2 custom content tutorial#subscribe#that one british simmer#sims 4#the sims#ts#ts2#ts2 hair#ts2 hair cc#ts2 hair custom content#ts2 cc#ts2 custom content#custom content creator#cc creator#sims cc creator
40 notes
·
View notes
Text
Sims 2 Shenanigans Hat-Hair Workshop

How to use Sims 4 Hat chops and Hats and converting them to Sims 2.
Friday 6th June - 21:00 BST
You need Sims 4 Studio (or the files from mdp's 4to2 Conversion archive)
Blender
Milkshape
SimPE
Photo editing program
Following up the following week with the 4to2 clothing workshops as previously planned.
12 notes
·
View notes
Text
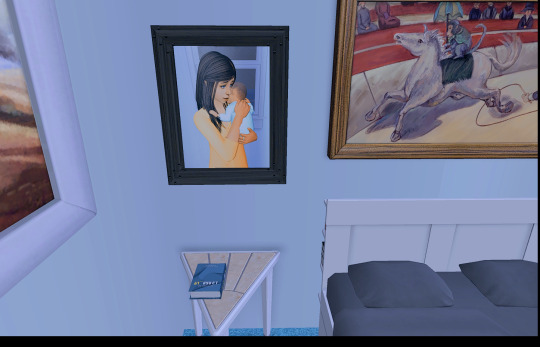
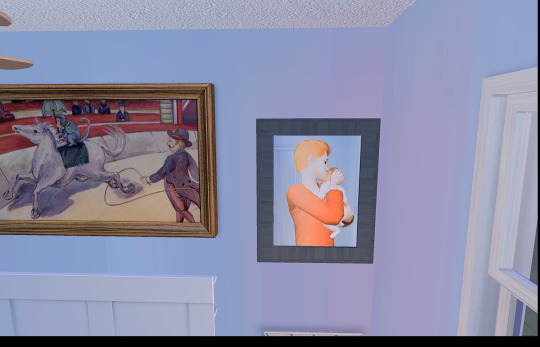

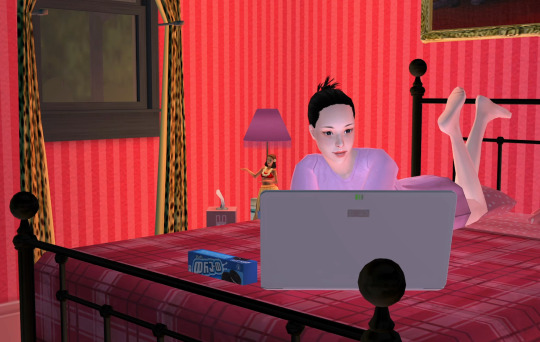
I was today years old when I learned that you could use the antique camera aspiration reward (as well as the instant cameras included in epi's camera mod) to take your own family photos / portraits (or rather... tricking the game into THINKING you took them). I've always loved how Sims 4 has a variety of ways that you can take photographs of your sims / families, especially in Legacies and I'm excited that we have a way to do it in the Sims 2 now. This YouTube video was a big help.
To sum up the video / offer a jist of how to do this: the first step would be posing sims however you want them (you can use poseboxes, omsps, ect) or carrying out an action you'd like to have the photo of. I didn't use anything fancy here, merely had the sim pictured here cuddle her baby. Once you've got your desired photo, you take a screen shot. I use RPC / ReShade, so I can use PrintScreen and my pictures are saved to my Sims 2 Screenshot folder in high quality. Don't use the in-game screen shot tool, as the pictures will be blurry / low quality.
Once you have your photo, you'll need to crop it- either vertically as a portrait picture, or horizontally for a landscape picture. Size doesn't matter, but keep in mind that photos from the camera can either be hung on the wall or placed on a surface in a stand-up frame- so be mindful of the dimensions. Once you've cropped your desired photo, you can edit it further how you please in Photoshop, Gimp, or whatever program you like to use. This picture I edited in Photoshop with a PSD (though it also includes color/lighting from the ReShade I'm using). Jazz it up however you want.
Once you have your photo exactly how you want it, save the photo (place doesn't matter) as Snapshot.bmp. It must be named Snapshot and it must be a bmp file. Photoshop includes some various 'options' when saving a BMP file- I used the default options without any issue. Once you've got your file, direct a/your sim to take a photo with the antique camera (either get it as an aspiration reward or use a mod to be able to buy it from the catalogue at cost/for free- your choice). Epi's cameras can be used as well, but I've not used those yet- you'd want one of the cameras that allows instant pictures. When your sim begins to snap the photo, you're going to get the screen shot box, and it'll tell you to press C to take the picture. At this point, pause your game. Then press C.
After you've pressed C, with your game still paused- you're going to go into your storytelling folder (this is located generally Documents > EA Games > Sims 2 > Storytelling; YMMV (your mileage may vary) depending on your install path, but you're wanting the storytelling folder located in the same folder as your Downloads where you keep your CC). When you go into your Storytelling folder, you will see a myriad of picture files but at the very front should be two files that look like whatever you snapped a shot of in game: one file is named Screenshot.bmp and the other is named Snapshot.bmp. With your game still paused, copy or cut your edited photo and paste it into your Storytelling folder, overwriting the current Snapshot.bmp file. After that, you're done! Unpause your game and let your sim go through the action- they'll take the 'photograph' using the camera and et voilà- out will pop the photo that you took and edited! From there, it can be pulled off of the camera and either hung on the wall or placed on a surface.
My beautiful test subjects pictured in their photographs are Jane and Joe Newbie with their new born twins: Mark and Suzie.
16 notes
·
View notes
Text
Запускаем Sims 2 на современном компе с Windows 10/11 (обновлено 31.01.2025)
Урок обновлён 31 января 2025 года
Салам алейкум, дорогие симс-геймеры! В этом уроке я вам расскажу, как запустить Sims 2 на новом компьютере с Windows 10, пусть и в оконном режиме. В предыдущем уроке я вам рассказывал, как запустить Sims 3 на современном компьютере, После того, как у меня появился новый игровой ноутбук HP Pavilion Gaming Laptop 15, я решил сразу опробовать все мои игры Sims на нем. Sims 4 запустилась без проблем, а вот с Sims 3 не смогла запуститься. После нехитрых манипуляций Sims 3 у меня запустился. Далее установил Sims 2, запустил, и она тоже запустилась, вот только в очень низком разрешении экрана, как назло. После того, как я увидел на официальном форуме инструкцию по запуску Sims 2 на современных ПК и следовал ней, всё встало на свои места. Старый ноут Lenovo Ideapad U510 уже продержался на последних вздохах, к тому-же он был не игровой. Перед тем, как мы начнем, я поспешу вас немного огорчить: игра Sims 2 на Windows 10 запустится пока только в оконном и псевдополноэкранном режиме. Стоит также отметить, что мой урок частично основан на моём личном опыте. Итак, начнем.
Вам потребуется: а) игра Sims 2 (желательно со всеми допами и каталогами) б) компьютер с установленной Windows 10; в) веб-установщик библиотек DirectX; д) .NET Framework 3.5. е) Graphics Rules Maker
1. Установка игры Первым делом устанавливаем игру. Вы можете скачать любую версию игры: репак или лицуху. Принцип установки игры такой-же, как и для всех программ, поэтому не буду вдаваться в подробности: вы уже знаете как это делать. После установки у вас на рабочем столе появится ярлык (если вы поставили соответствующую опцию перед установкой). Если ярлыка нет, перейдите в директорию "The Sims 2\<папка последнего дополнения/каталога>\TSBin" (пример: D:\Program Files (x86)\The Sims 2\EP9Data\TSBin), щелкните правой кнопкой мыши на файле "Sims2<номер последнего дополнения/каталога>.exe" (пример: Sims2EP9.exe) и выберите "Создать ярлык". 2. Установка библиотек DirectX Далее необходимо установить библиотеки DirectX. После того, как я перед установкой 2-й части решил проблемы с запуском Sims 3, при запуске Sims 2 никаких ошибок не возникало, но все же объясню, что нужно делать: 1) Качаем с сайта Microsoft веб-установщик исполняемых библиотек DirectX. Это необходимо, так как без старых библиотек игра не запустится. НИКОГДА НЕ СКАЧИВАЙТЕ библиотеки с других сайтов, так как они могут быть повреждены или в них могут быть вирусы. Поэтому выполняем следующие пункты: 2) Затем запускаем скаченный файл, принимаем соглашение и жмем "Далее"; 3) Далее нам предлагают установить панель Bing. Нам она не нужна, поэтому мы снимаем галочку "Установка Панели Bing". Жмем "Далее" - начнется скачивание и установка библиотек DirectX; 4) После завершения установки жмите "Готово". 3. Подключение старого .NET Framework. Помимо старых библиотек DirectX, для работы игры также может потребоваться старый .NET Framework. На некоторых компьютерах эти библиотеки могут быть отключены. Я сам не знаю, какой .NET Framework требуется для работы Sims 2, но всё же объясню, как включить: заходим в "Панель Управления", далее выбираем "Программы и компоненты", далее - "Включение или отключение компонентов Windows" и ставим флажок на ".NET Framework 3.5 (включает .NET 2.0 и 3.0)". 4. Добавление видеокарт с помощью Graphics Rules Maker. Скачиваем программу Graphics Rules Maker, устанавливаем и запускаем её. Далее переходим во вкладку "Settings" и:

а) Пишем The Sims 2 (параметр "Game"); б) Указываем директорию (параметр "Path") базовой игры (в моём случае D:\Program Files (x86)\The Sims 2, у вас может быть иначе) и, желательно, вашего последнего дополнения/каталога (в моём случае это каталог "Сады и особняки"); в) Указываем размер занимаемой игрой текстурной памяти вашей видеокарты (параметр "Force Texture Memory"). О том, как узнать объем памяти вашей видеокарты, вы можете, перейдя на вкладку "Device Info" (строка Texture Memory) и выбрав вашу видеокарту (параметр "Device"):

г) В той же вкладке "Settings" отмечаем все доступные галочки; д) Выбираем разрешение игры по умолчанию (параметр "Default resolution") и максимальное (параметр Maximum resolution). е) Нажимаем "Save Files...". После этого выскочит окно с предложением внести вашу видеокарту в базу данных игры:

Нажимаем "Yes" - появится следующее окно:

Нажимаем "OK". Но это ещё не всё.
5. Редактирование файла GraphicRules.sgr. Однако программа Graphics Rules Maker может не добавить необходимое разрешение в игре. Поэтому нам нужно вручную отредактировать файл "GraphicRules.sgr". Поэтому настраиваем разрешение экрана: а) Ищем файл "GraphicRules.sgr" по адресу The Sims 2\TSData\Res\Config (в моём случае это D:\Program Files (x86)\The Sims 2\TSData\Res\Config, у вас может быть иначе), на всякий случай скопируем его в безопасное место и открываем в блокноте;
б) Нажимаем Ctrl+F и ищем строку "ScreenModeResolution" без кавычек. Вы увидите это:
option ScreenModeResolution setting $Low uintProp maxResWidth 800 uintProp maxResHeight 600 uintProp defaultResWidth 800 uintProp defaultResHeight 600 setting $Medium uintProp maxResWidth 1280 uintProp maxResHeight 1024 uintProp defaultResWidth 1024 uintProp defaultResHeight 768 setting $High uintProp maxResWidth 1600 uintProp maxResHeight 1200 uintProp defaultResWidth 1024 uintProp defaultResHeight 768 end
Здесь необходимо изменить строки "uintProp maxResWidth" и "uintProp maxResHeight": вместо числа, указанного в строке "uintProp maxResWidth" укажите ширину вашего экрана, а в строке "uintProp maxResHeight" - высоту. Таким образом, если разрешение вашего монитора, например, 1920х1080, изменённая часть файла должна выглядеть так:
option ScreenModeResolution setting $Low uintProp maxResWidth 1920 uintProp maxResHeight 1080 uintProp defaultResWidth 800 uintProp defaultResHeight 600 setting $Medium uintProp maxResWidth 1920 uintProp maxResHeight 1080 uintProp defaultResWidth 1024 uintProp defaultResHeight 768 setting $High uintProp maxResWidth 1920 uintProp maxResHeight 1080 uintProp defaultResWidth 1024 uintProp defaultResHeight 768 end
Далее включаем сглаживание и прочие настройки: а) Для включения сглаживания ищем строку "enumerateMultisampleLevels" без кавычек и везде заменяем "false" на "true"; б) Для включения видимости соседних участков ищем строку "simpleTerrain" без кавычек и заменяем "true" на "false"; в) Для включения шейдеров, а именно рыбок в пруду, красивых бассейнов и прозрачности снега при наведении мыши ищем строку "useShaders" без кавычек и заменяем "false" на "true"; г) Для включения прорисовки 3D-объектов ищем строку "skipTangentsInVertexData" без кавычек, заменяем "true" на "false" и сохраняем файл. Если вы не можете сохранить файл, сохраните его в другое место, а потом перенесите его в нужную папку с заменой; д) Проделываем то же самое, но с тем файлом "GraphicRules.sgr", который расположен по адресу The Sims 2\TSData\Res\CSConfig (в моём случае это D:\Program Files (x86)\The Sims 2\TSData\Res\CSConfig, у вас может быть иначе). Совет: Аналогичные действия повторяем с файлами "GraphicRules.sgr" в папке вашего последнего установленного дополнения или каталога (у меня - это каталог "Сады и особняки"). После всего этого заходим в игру и выставляем все необходимые настройки на максимум (кроме параметра "Тени": о нём речь пойдет далее). 6. Включение теней Далее нам остаётся активировать параметр "Тени". Для этого в режиме просмотра города выбираем и загружаем любую семью. Аллилуйя! Всё работает!
7. Для тех, у кого ноутбук с дискретной картой Если у вас стацонарник, вы можете пропустить этот пункт. Если у вас ноутбук с дискретной графикой (а таких сейчас много), необходимо, чтобы игра использовала именно её. Для этого:
а) Если у вас видеокарта от NVIDIA (как у меня): 1) Щелкаем правой кнопкой мыши по свободному пространству рабочего стола и выбираем "Панель управления NVIDIA":

2) В правой части окна переходим в "Управление параметрами 3D"; 3) Далее переходим во вкладку "Программные настройки"; 4) Кликаем по кнопке "Добавить":

5) Появится окно, в котором необходимо выбрать приложение. В этом списке ищем и выбираем игру The Sims 2, затем жмём "Добавить выбранную программу":

Если The Sims 2 в списке нет, в том же окне кликаем "Обзор", затем ищем директорию, где установлена игра (в моём случае D:\Program Files (x86)\The Sims 2, у вас может быть иначе) или ваше последнее дополнение/каталог (в моём случае это каталог "Сады и особняки"). Переходим в папку "TSBin" базовой игры или вашего последнего дополнения/каталога, выбираем файл "Sims2.exe" (если у вас установлена только базовая игра) или "Sims2<номер последнего дополнения/каталога>.exe" (если у вас установлены все имеющиеся у вас дополнения/каталоги. Пример: Sims2EP9.exe) и жмём OK. Далее программа сама добавит игру. 6) В графе выбора предпочтительного графического процессора указываем видеокарту NVIDIA и жмём "Применить":

б) Если у вас видеокарта от AMD с новым драйвером "Radeon Adrenalin Software (2020)": 1) Так как в этой программе почему-то пропала возможность выбора видеокарты, сначала через "Диспетчер устройств" выключите встроенную видеокарту. Откройте оснастку "Выполнить" сочетанием клавиш Win+R, введите в него запрос devmgmt.msc и нажмите ОК. 2) Затем откройте блок "Видеоадаптеры" и найдите встроенную видеокарту:

Выберите её, кликните правой кнопкой мыши на названии этой же видеокарты и нажмите "Отключить устройство". В нижней части иконки в виде монитора и плат�� появится кружочек со стрелочкой, указывающий на то, что устройство отключено; 3) Далее на панели управления в поле ввода для поиска вводим "Панель управления" и в выпадающем выше меню выбираем "Панель управления":

4) Ищем и кликаем на "Электропитании":

5) Выставляем "Высокая производительность" (или "Максимальная производительность"). Правда, у меня эти параметры отсутствуют. Есть только схема "Рекомендуемая компанией HP"

Поэтому, если схема "Высокая производительность" (или "Максимальная производительность") у вас отсутствует, рекомендую вам в трее Windows 10 кликнуть на значке батарейки и выставить "Производительность"

На мой взгляд, этих шагов достаточно, чтобы заставить Sims 2 работать на видеокарте AMD Radeon с драйвером "Radeon Adrenalin Software". Если Sims 2 всё равно запускается на встроенной видеокарте, придётся зайти в BIOS и переключать карту уже здесь. Как это сделать, я не стану описывать, так как на разных ноутбуках BIOS отличается, поэтому в интернете есть много инструкций по подобным манипуляциям. Однако, я вам не советую делать этого, так как в случае неправильной настройки BIOS компьютер может вообще не запуститься! Поэтому пользователям ноутбуков с AMD Radeon остаётся только надеяться, что AMD добавит возможность переключения видеокарт. в) Если у вас видеокарта от AMD с чуть более старым, но актуальным драйвером "Radeon Software Crimson Edition": 1) Так же, как и с видеокартой от NVIDIA, щелкаем правой кнопкой мыши по свободному пространству рабочего стола и выбираем "Настройки Radeon"; 2) Переходим в "Настройки", затем – в "Дополнительные настройки"; 3) Щёлкните слева "Питание", затем - "Параметры приложения переключаемой графики"; 4) Справа щёлкаем "Добавить приложение" и в окне "Проводника" переходим в директорию установки Sims 2 или вашего последнего установленного дополнения/каталога, дважды кликаем на папке "TSBin", выбираем файл "Sims2.exe" (если у вас установлена только базовая игра) или "Sims2<номер последнего дополнения/каталога>.exe" (если у вас установлены все имеющиеся у вас дополнения/каталоги. Пример: Sims2EP9.exe) и жмём OK. 5) После того, как вы выбрали указанный файл, в столбике "Настройки графики" выставляем "Высокая производительность". После этих манипуляций ваша Sims 2 будет запускаться с дискретной видеокартой. О том, как это сделать, смотрите рекомендации по переключению на сайте Lumpics. г) Если у вас видеокарта от AMD с очень старым, но ещё актуальным драйвером "AMD Catalyst": 1) По-прежнему на рабочем столе Windows 10 кликаем ПКМ и выбираем "AMD Catalyst Control Center" 2) Щёлкните слева "Питание", затем - "Переключаемые графические адаптеры"; 3) Затем выберите "Высокую производительность GPU". О том, как переключать видеокарты от NVIDIA и AMD с драйвером "Catalyst", более подробно описано в видео от канала Comp Profi:
youtube
8. Очистка кэша Для того, чтобы игра могла нормально запуститься, необходимо из папки C:\Users\PC\Documents\EA Games\The Sims 2 удалить два файла: Acessory.cache и Groups.cache. Проблема в том, что в кэше со временем копятся старые данные, что может негативно влиять на запуск и работу игры.
9. Если игра не запускается в полноэкранном режиме? В таком случае вам придётся запускать игру в оконном или псевдополноэкранном режимах. Для запуска в оконном режиме щелкните правой кнопкой мыши на своем ярлыке (о том, как его создать, см. п. 1), выберите "Свойства", перейдите на вкладку "Ярлык" и в поле "Объект" в конец допишите -w -cpucount:1. Пример:
"D:\Program Files (x86)\The Sims 2\EP9Data\TSBin\Sims2EP9.exe" -w -cpucount:1
Для запуска игры в псевдополноэкранном режиме существует также программа Sims2RPC от Lazy Duchess (мне её посоветовала Lamare из DaraSims, за что огромное ей спасибо). Делаем следующее: 1) скачиваем программу с блога Lazy Duchess; 2) устанавливаем её удобным для вас способом; 3) запускаем её; 4) выставляем параметры так, как у меня на скрине:
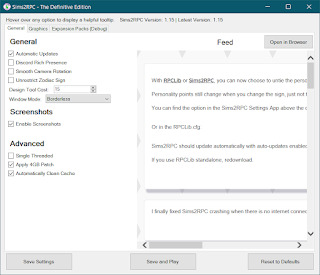
5) так как при запуске игры через Sims2RPC изображение выглядит размытым, перейдите в директорию D:\Program Files (x86)\The Sims 2\EP9Data\TSBin, кликните правой кнопкой мыши на файле Sims2RPC.exe, выберите "Свойства", перейдите во вкладку "Совместимость", кликните на кнопке "Изменить параметры высокого DPI", в разделе "Переопределение масштабирования с высоким разрешением" установите галочку "Переопределите режим масштабирования высокого разрешения. Масштабирование выполняется" и установите параметр "Приложение". То же самое вы можете сделать и с ярлыком файла Sims2RPC.exe.
10. Запуск игры Если вы всё сделали правильно, запустите игру и проверьте её работу. Добавлено 26.05.2023: здесь предлагается также урок по устранению розового мерцания в Sims 2.
Добавлено 31.01.2025: Electronic Arts выпустила обновленную версию игры Sims 2 для новых компьютеров. К сожалению, россиянам из-за санкций придётся подождать выхода игры на пиратских сайтах. Но скачивать пиратские копии я НЕ РЕКОМЕНДУЮ!
На этом у нас всё! Думаю, что среди нас найдутся любители ретро-игр и ностальгирующие. Если вам помог этот урок, напишите об этом в комментах, ставьте лайк, делайте репост и подпишитесь на мой блог и группы в соцсетях! Всем пока и мирного вам неба над головой))
#sims#simblr#sims 2#ts2 simblr#the sims 2#sims 2 урок#ts2#симс 2 уроки#sims 2 уроки#sims 2 tutorial#sims 2 tutorials#симс#симс 2#Youtube
0 notes
Text

By popular demand (I saw two people asking) I thought I would throw together a quick guide to using the road editor tool in the newest version of SimPE! You'll see that this is a very easy tool to use, and best of all, goof-proof. If you do mess up (you probably will) it's very, very easy to correct.
Very, very, very important to make a backup of your hood before you ever do any tinkering in SimPE! I also recommend practicing on a test hood you don't actively play in to get a feel for it before you do anything to your main hoods.

We're starting with a vanilla Strangetown. I would recommend going in your game and taking a nice overhead screenshot of the hood like this first to look at for reference of where everything is situated the way that you're used to looking at it.

2. Open SimPE, go to Tools> Neighbourhood> Neighbourhood Browser and open the hood you're wanting to work on. If you're not so familiar with SimPE, opening your hood can take some time. Touch nothing until it's loaded!

3. Once it's all loaded, from the Resource Tree list pick Neighbourhood Terrain Geometry (NHTG). Then you'll see one file populate the Resource List - click that. Make sure on the bottom that you have Plugin View tab selected.

4. Now you should see this map of your hood pop up! There are different things you can toggle, I like to check the Show Lots box when I'm editing the roads. Then click the Road Editor button on the right.

5. To be able to see better, I've pulled this Plugin View window up a bit - it may rearrange the Resource List and Resource Tree windows a bit to accommodate. You can also press the Zoom 2x button to see closer, and then you'll have to use the scroll bars to move around the map and the road editor tool.

6. The road editing tools here will be placed down in the same orientation as the map. So the two parallel roads running through Strangetown from this perspective are the vertical straight road pieces (top row, second from left).
When you select a road tool, above it will indicate which tool you have selected.
Also - I recommend having Handle Stop Signs ticked.

7. Once you have the correct type of road selected for the spot you're working on, simply click on the map - it lays it down one tile at a time. If you miss a spot like shown here, just fill it in.

8. If you want to create an intersection, first delete the section of road where the intersection will go.

9. Then choose the type of junction for the intersection you're making, and add that piece in. You'll see a red circle appear (unsure if this is because it's an intersection or because you have handle stop signs selected, but I recommend you do have that selected either way).

10. Once you're done making all your changes, click Close Editor.

11. This is the part where you save your changes! First click Commit in the top right of the editor. Then, File> Save!

12. Load your game to check! Looks pretty good with all those new roads!

13. However, we have indeed made some mistakes! Which were absolutely for illustrative purposes and not truly an accident.

14. Never fear! Simply reload the hood in SimPE - I've deleted the spot where the T-junction should go and added one in, and deleted where the road just ended abruptly and added a proper end piece.
I have not experimented with what happens if you try to build a road through hood deco - if you have, please let us know in the comments how that went!
I also have barely touched the terrain editing tools, so that's outside the scope of this tutorial.
I hope this helped!
#the sims 2#sims 2#ts2#ts2 maxis match#ts2 simblr#ts2 tumblr#simblr#brightmaple#ts2 tutorial#simpe tutorial#simpe road editor
783 notes
·
View notes
Video
youtube
How to build a walkout basement in The Sims 2 🌼
I didn't think of this when I was making the video, but if you use the flowers I used, sims won't be able to water them without the water inaccessible flowers fix
Another option is to use the perfect plants mod
You can also use custom flowers that don't need watering, I recommend these & these
452 notes
·
View notes
Text
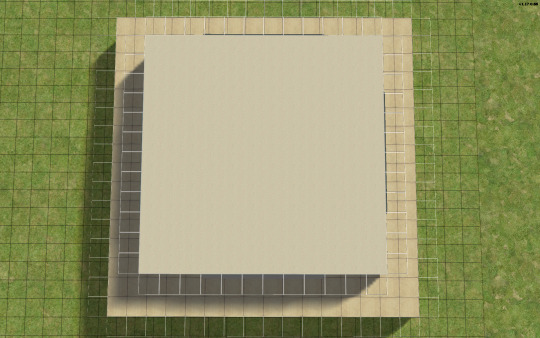
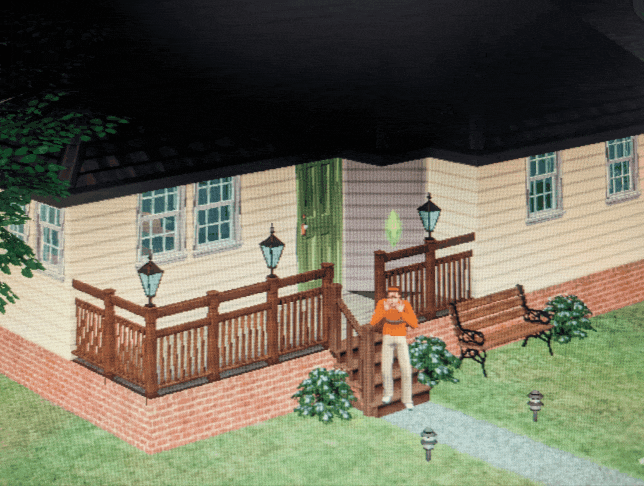
TUTORIAL: HOW TO BUILD A UFO ROOF HOUSE.
yo! one of my friends asked me how I do this, so I thought I'd put together a little tutorial and share. here's a preview of what a "ufo roof house" might look like once you're done:
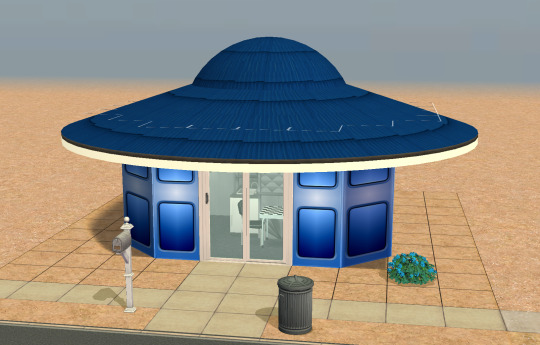
this is just a little one I built in Strangetown on a 10×10 lot, read below to learn how to do this yourself.
→ Step 1: Build your foundation (if you want one) + your first floor. The easiest way to do this is to make your walls an octagonal shape with the diagonal walls being half as many as the straight walls. As an example, you can see in the image below my straight walls are 6 units, so the diagonals are 3.
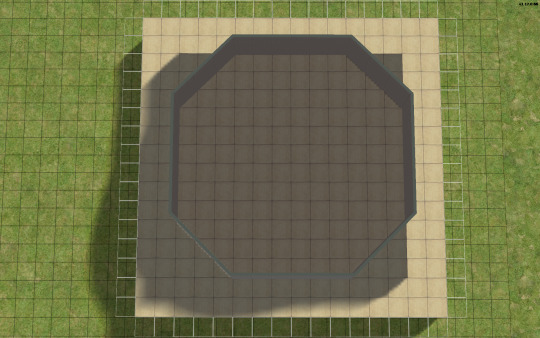
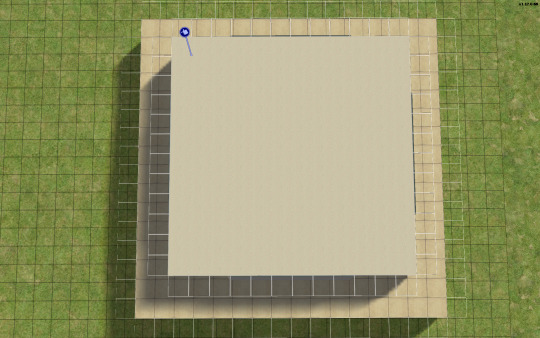
→ Step 2: Go up one level and lay a square of flooring for your roof to sit on, twice the size of your straight walls. My straight walls are 6 units, so my "roof square" will be 12×12.
→ Step 3: Using the small cone roof tool, drag from one corner of your square to the other, minus 1 unit. My square is 12×12, so the cone roof will be 11×11. You can see in the image below where to place your cursor to start:
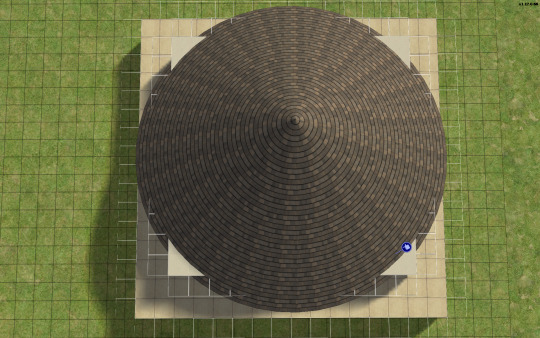
→ When you're done with the small cone roof tool, it should look like this:
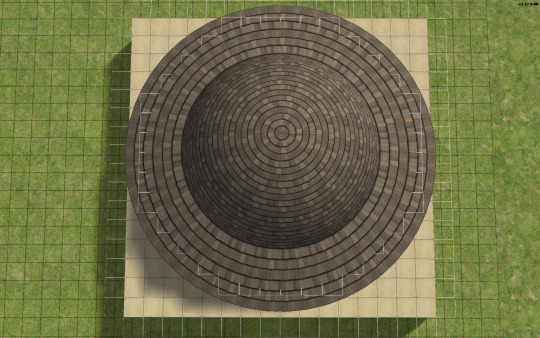
→ Step 4: Delete the excess flooring. You can press F to toggle from a full square unit to a smaller, triangular unit to trim the corners. Unfortunately, you can't click and drag to remove the corners from the diagonal walls, you can only shift click to delete one triangle at a time, but it saves you from having to put down walls or fencing you're just going to remove anyway.
→ Step 5: Decrease your roof's angle. On my normal houses, I usually use a 25 degree angle, which in this case, looks like this:

→ Step 6: You don't want your walls sticking out like this. So, adjust your roof's angle until they're not sticking out. The lowest I could get the roof's angle on this one was 39 degrees, which looks like this:

→ Step 7: Much better! Don't worry about that spiky bit in the middle, because we're going to add a dome roof to cover it up. You can start fiddling around with the dome roof tool by using the same amount of units as your straight walls, or you can go smaller. A 6×6 dome on this house looks like this:
→ I like my UFO domes a little smaller, so I went with 4×4. TIP! If you have an even number of straight walls, your dome will also be even, if it's odd, your dome will also be odd. If you had 7 unit straight walls for example, your dome could be 7×7, 5×5, 3×3, etc. Here's how my 4×4 dome turned out:


→ Step 8: Nice! We're pretty much done! Decorate however you like!

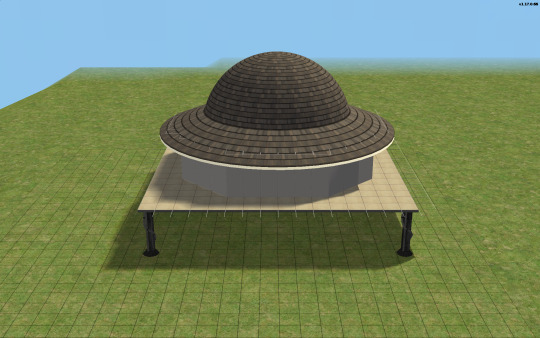
→ Step 9: Enjoy your UFO roof house! All content shown on this one is maxis, except for the deck support posts, which are default replacements available HERE, thanks to @psychosim! I hope you enjoyed this tutorial. Feel free to tag me if you make a UFO roof house because of this, I'd love to see it! 👽💖 Happy Simming!
293 notes
·
View notes
Text
Because you can't save progress on them, I feel like someone should write timeloop horror for Tutorial Joe and Tutorial Jane.


#tutorial joe#tutorial jane#ts2#the sims 2#sims#idk what this is okay <3#once in a lifetime#tw glitch#flashing tw#flashing gif tw#tw flashing gif#tw flashing#tw flickering#undescribed
1K notes
·
View notes
Text
WANT TREES TUTORIAL PART 2
There is a field that is given with every branch of a Want Tree (Aspiration, age, personality, mood, etc.) that is called “SuperZero”. This needs to be set to true if you want the branches to be absolute and 100% restrictive on the types of Sims you want to roll certain wants. False if not.
For example, if you set SuperZero to true for Sloppy Sims to not roll the bubblebath want (which would be a False value in the personality section), then they 100% won’t ever roll it. If it’s set to false, then they may roll it, but likely not.
At least, I strongly suspect it.
You can ABSOLUTELY diversify your wants panel by changing all of it within reason.
Sims that fall into the following categories/branches are set in WantTrees- i.e. if you set any of the aspirations to “True” then the specific want described above the branches will roll for this Sim, at least, it is weighted to:
Aspiration
Age
Personality
SuperZero
If true, categories are exclusive
If false, categories are not exclusive
Weight
How much the game "pushes" the current want onto each type of Sim that you put true or false for. Wants set to "50" (by Eaxis) are wants that usually roll all the time. I always lower this to like 35 or 25. You can set different weights for different wants! maybe some wants are heavily weighted to be pushed at certain aspirations, but others mostly are decided by personality. Or both! It's fun to see wants pop up for specific Sims at specific times.
-Set Weight to a number between 1-50 (I'm sure you can raise it but I tend to stay in that range
Person Data (hobbies, interests, etc.. it is decided what PersonData the game looks at it by the "index" field, but I need to research more about what numbers you can put in there that correspond with hobbies or interests.
Mood (again you can change the Super Zero field here as well) This pushes wants towards a Sim if their mood is within certain ranges (and there are fields for both ends of the range. Example: Sims with a mood of -50 to 0 are feeling bad, so they would get certain types of wants for "Bad moods")
Relationship pushes wants to a Sim with relationship with person in question in a certain range, much like mood
Aspiration score: Just like above. I believe staying between -50 and 50 is ideal just like weight, mood, and other things like this. Relationship you can do -100 to 100
Have you played around with Wanttrees? It's fun!!
#sims 2 gameplay#sims 2#sims 2 simblr#sims 2 mods#sims community#modding#sims 2 modding#wanttrees#sims 2 wanttrees#sims 2 wants#ts2 wants#ts2 tutorial#ts2 resources#sims 2 tutorials
28 notes
·
View notes
Text

How to RESTORE The IKEA Stuff Pack! (Sims 2 Legacy Collection) 💛
Hey everyone! Later than I anticipated, but I made a guide on how to restore IKEA for the Legacy Collection! Hope this helps those that need it :)
💙 LINKS MENTIONED How To Restore IKEA (EA/Epic/Steam) S2UC SP Files (for those who dont have UC!) HugeLunatic's Tumblr SimFileShare IKEA CC
#ts2#the sims 2#sims 2#sims 2 tutorials#sims 2 tutorial#sims 2 guides#sims youtuber#youtube#mine#sims 2 ikea
5 notes
·
View notes
Text
In case the Linux people who still play the Ultimate Collection want to try it:
How to easily upscale the UI via Gamescope
Open your game and select a smaller resolution that still fits your aspect ratio. For example, my monitor is 3440x1440, which is an aspect ratio of 21:9. So in the game settings, I select 2560x1080 as this the next smallest resolution with a 21:9 aspect ratio.
Close your game.
Right click on Sims 2 in Lutris and select "configure", then go to the "System options" tab.
Enable Gamescope and set it to borderless. Leave "output resolution" empty. For "game resolution", chose your monitor's actual resolution (so in my case, 3440x1440).
To prevent the game from looking blurry due to the upscaling, add the following under custom settings: -F fsr --fsr-sharpness 10
It should look like this:

Save and you're done.
If the game looks too crunchy or not sharp enough to you, try playing around with the number in "custom settings". 20 is the minimum, 0 is the maximum.
Here's a comparison of my game's UI without any changes vs. upscaled:


75 notes
·
View notes
Text

The Sims 2 Tutorial | Building Stacked Lots
In this video tutorial I am walking you through the process of building stacked lots. This technique was first created by the amazing @threadandsandpaper back in 2014. You can still find the original tutorial right here: https://threadandsandpaper.dreamwidth.org/5129.html
(Massive thanks for this incredible tutorial, all cred goes to you 🥰)
youtube
210 notes
·
View notes
Text

I've got a new video!
Obviously I am preaching to the choir here amongst us ts2 cc addicts, but I have a new video out with all my tips for finding sims 2 custom content. There's ads on google for the superbowl and stuff because i filmed this months ago and editing took me forever bc for some reason i was like pleasantview sims should be looking at cc on their computers dfjkdfkjsdjk
Even if you know how to find sims 2 cc, maybe you will enjoy seeing Brandi Broke browse the sims resource while Dustin gets reprimanded by the police outside!


Things I cover include: - searching on google and getting rid of those ts3 and ts4 results - using google to search specific sites and more - how to use the wayback machine - how to find/download cc from deleted tumblrs
I also share some of my favorite older, harder-to-find sites for new sims 2 cc hunters. I hope you guys like it! watch it on youtube


340 notes
·
View notes