#modeling tutorial
Explore tagged Tumblr posts
Visit Tumblr Blog
Explore Tumblr blogs with no restrictions, modern design and the best experience.
Last Seen Tumblr Blogs


Fun Fact
After the announcement of the deal with Yahoo!, there were 170K signatures of unhappy Tumblr users petitioning to prevent the sale in 2013.
Text
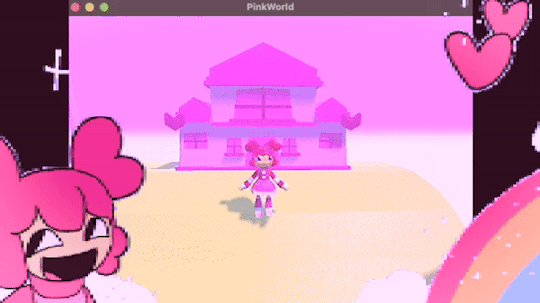
programmed my oc into a game for the aesthetic
#i hope this gives off the vibe of an old game#2 days of modeling#1 day of following a coding tutorial#i felt so happy to draw the little gifs on the screen again#im so sick of 3d (i will do it again)#oc#oc animation#oc art
692 notes
·
View notes
Text


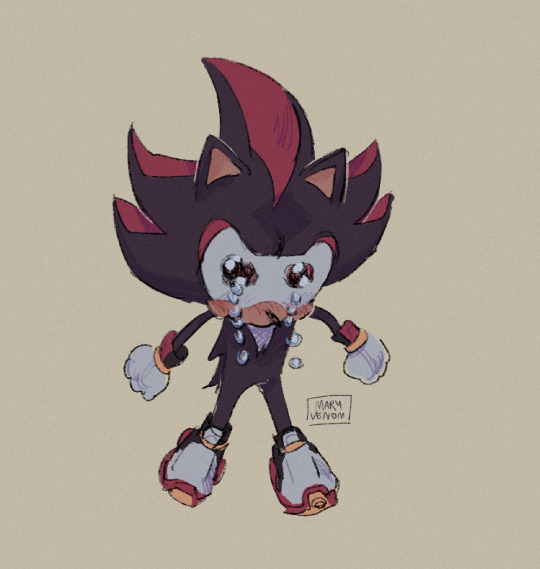
extremely happy to have enough blender skill now to make this shit
#shadow the hedgehog#blender#3d model#sonic the hedgehog#3d#3d art#his extremely fucked up anatomy i love him#btw this isnt the thing i was doing retopology on this is so poorly made i wouldnt know where to fucking begin#i just got sick of that other thing and decided to make something for myself for once#i am very sick of tutorials
3K notes
·
View notes
Text

i would like to share this VERY handy tutorial on drawing cars by the ever-immaculate EtheringtonBrothers (twitter, instagram)
#tutorial#cars#etheringtonbrothers#knight rider#transformers#resources#tagging the two fandoms i can think of who might need this the most lmfao#thank you EB i would never be able to draw kitt without you o7 coupled with my gmod references of a kitt car model too of course#please check out their accounts they have so so so many good tutorials. absolutely phenomenal tutorials. on like Everything ever#i know cars are THE biggest pain in the ass to draw ever so here's where i learned it 👉👉#you still gotta do a bit of thinking but its amazing how much even just this one trick can do for you. it carries HARD
868 notes
·
View notes
Text
RESOURCES FOR BOARD ORGANIZATION AND SEARCHING IMAGES & REFERENCES
Pinterest (Saves every image in different Boards)

Milanote (Able to search your own board and organize notes and sections. For every Project you have in mind.) Literally, you can do a crime board.

UNSPLASH

PIXABAY

Public Work by Cosmos

SAME.ENERGY

Designspiration

#reference#tutorial#art reference#art#poses#artist#art resources#resources#web#pages#help#guide#action#line#figure#animation#photography#3d model#boards#pinterest#milanote#organization
165 notes
·
View notes
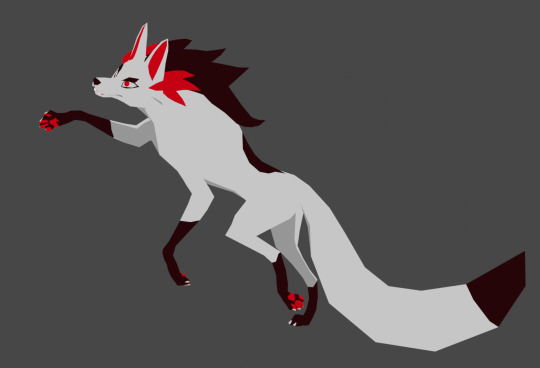
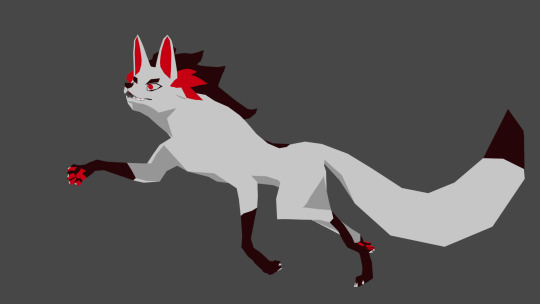
Text
💧✨based off of this illustration by @passionpeachy!✨💧
video compression muted the colors, so here are a few stills under the cut


tiny bonus: happy pride!

#3d#blender#npr#video#passionpeachy#i actually finished and rendered this out at 2 am but i will schedule this for the morning 😴#thank you azul for letting me use your art!! it made me feel very smart figuring out how to replicate the black shading of the bubble#it's not perfect but it's my first model that wasn't made following a tutorial! so that is to be expected. very fun very charming :]
510 notes
·
View notes
Text


#gyarustyle#gyaru#gyaru gal#gyaru fashion#2000s#jfashion#y2k#90s#gyaru makeup#egg magazine#makeup inspo#makeup tutorial#gyaru makeup inspo#gyaru makeup tutorial#hime gal#gyaru model#gyaru magazine#hime gyaru#tsuyome
227 notes
·
View notes
Text
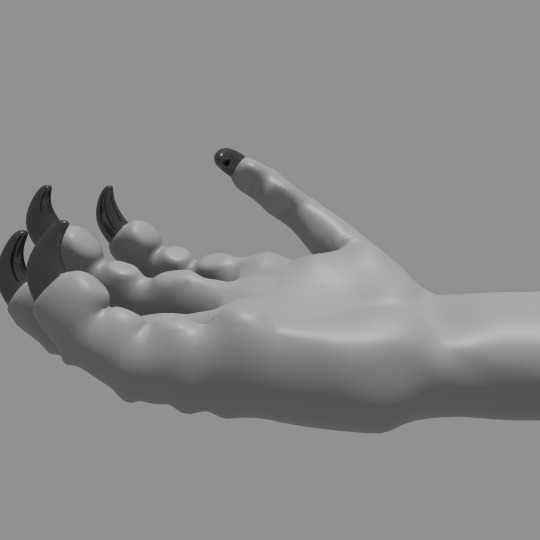
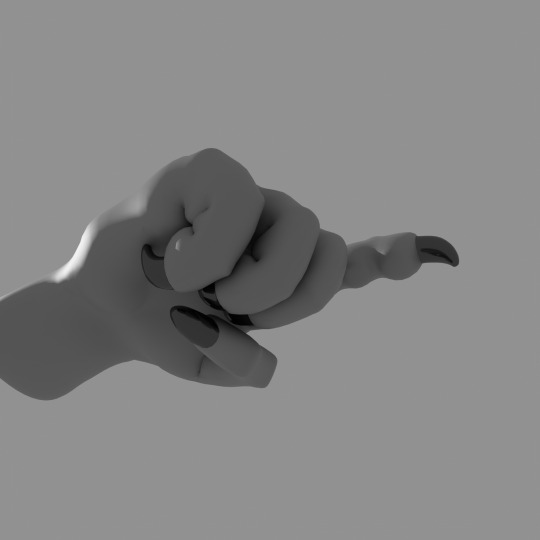
Dragon paw drawing reference!
And so, I finally made a reference paw!
Link here: https://skfb.ly/ptKFy
This is a hand-like dragon paw, and I created it so that artists who have trouble drawing dragon paws and claws in different poses can use it as a reference. You just start the animation on sketchfab, and then stop it at the desired point. The paw can be rotated and viewed from any angle, even from a phone.
You can also download the model and set the pose yourself in the appropriate programs.
Yes, it was made in my own way, it’s plump, but I still think almost anyone can find a use for the reference.

#wings of fire#dragon#wings of fire art#wof#wof art#3d model#animation#3d animation#paw#hand#reference#drawing#claws#how to draw#tutorial
164 notes
·
View notes
Text

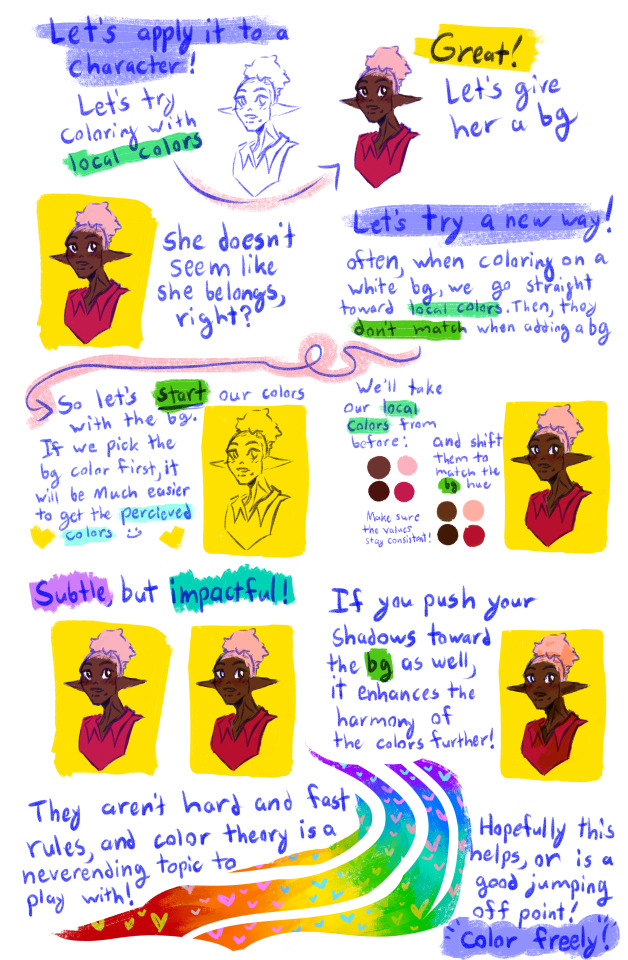
a little thing about matching a figure to their background environment. i know a lot of artists struggle with making a character look like they "fit" in a background and this is a good step in getting that !
#droodles#what.. do i tag this as#tutorial#art tips#?#ashasiara#since she's my model <3#also yeah i misspelled perceived the entire time writing this... oops !
151 notes
·
View notes
Text
Weathering Tutorial
Thought I'd write up a quick tutorial to how I approach weathering for my gunpla kits. Typically, I'll do a quick gunmetal drybrush of the grey parts of a kit before I start building, as well as correcting any colour inaccuracies. This tutorial covers some of the things I do to a kit after it's built, to give it a more "lived in" look.
For the best effect, I apply stickers and other decals before weathering, as well as graffiti. This way, weathering cuts through or over these designs, helping tie them to the kit a little better.
The example kit here is the HGUC 1/144 Nemo, which I'll upload a review for soon that should be linked in the future.
Bullet Holes & Impact Points
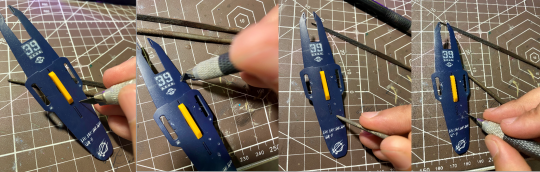
I typically use a hobby knife, pressing it into the surface of the plastic to make a small mark where I want the bullet impact point to be.
Usually with a blade that has a damaged or flatter tip, I'll spin the blade around, just like you'd use a hand drill (although I don't have any of those, so this suffices). Holding the blade at a slight angle will make the hole wider and a little more bowl shaped, just like a dent from an impact point.
Using a round metal file, I widen some of the holes and bevel the edges. Apart from making the hole a little more visible, this also creates a bit of a raised edge.
A starburst pattern can be created by cutting a few shallow lines with a knife traveling out from the centre of the hole, creating the implication of shrapnel from a shattered round.
Armour Chips and Edge Damage

Using a round file, I carve a rounded indent into the edge of the armour section. Depending on the angle you use and the position of the indent, this can come across as a dent or a chip of armour blown off. You can see what this looks like in the second image.
After this, I'll use a hobby knife or an angled file to cut deep grooves heading outward from the dent, as well as on their own to create cuts and chips along more acute angled on armour pieces (think the 90 degree angle on a square leg piece). As additions to the rounded damage, it can look like shrapnel damage from an intial angled impact. On their own, more angled chips give high points on armour a more worn effect.
Paint Damage (Sponge Chipping)
This utilizes a technique I learned from @radiofreemagica a few months ago. Give their blog some love!
Sponge chipping involves lightly applying paint to areas you want to appear chipped or worn using a sponge. The effect is that paint is applied as a series of small spots, which if done right should look as though the pain has fallen off in large flakes. The sponges here are simply offcuts of an old kitchen sponge.
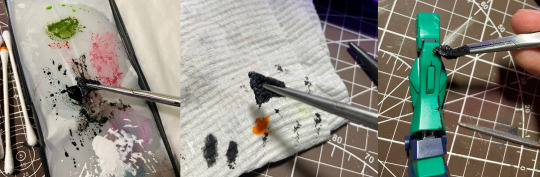
For my first pass, I use a slightly heavier application of black paint.
Dab a little of the excess off on a piece of paper - you want the impression of the sponge to come across clearly for the small little dots. If there's too much paint on the sponge, it'll blot onto the model and obscure detail.
Apply the paint across raised edges, especially corners, where the mech or vehicle is likely to experience the most friction. Try to be measured on application - not every raised edge needs to have chipped paint!

For the second pass, a gunmetal is appropriate. Use an even smaller amount of paint.
Dab the gunmetal over the top of your black. This will make it look as though underneath the black "primer" is bare metal.
Drybrushing
This step helps to augment the wear and tear established with your sponge chipping. Using a lighter metallic, you can emphasise the idea that under the bright colours of the model kit is tough metal plating.

My go-to drybrush for this is Citadel's Necron Compound, which is a drybrush-ready silver. Usually I prefer cheaper and more dilute Vallejo Air, as it reduces the risk of drying out or clogging in the bottle, and doesn't need to be thinned. However, Citadel's technical paints are really well made, and worth the extra cost.
For a drybrush style paint, you only need to wipe a little excess of your drybrushing brush. For a typical silver acryllic, you'll need to keep wiping until only a little silver comes off the brush, enough to only stick on the high points. You can use a specific drybrushing brush for this, or just any old brush that you don't care about abusing a little.
Only lightly tickle the raised edges with silver. A little goes a long way - you just want the edges of the armour segments to catch the light and give the implication of worn metal.
Painting the Damage
Coming back to the damage we carved with files and knives, it's time to give the impression of metal underneath them, rather than plastic.

For this, I'll use a plain silver acryllic, something around a flat aluminium rather than chrome or purer silver.
With a small brush, apply the silver paint into the chips, cracks, and bullet holes you made earlier. Make sure to work it right into the thinner recesses, and wipe away any excess with a cotton bud.
Next, to bring down the tone and to add depth to the damage, I use a black wash. You can buy premade acryllic washes, or even use something like liquid panel liner, but I prefer to just make my own.
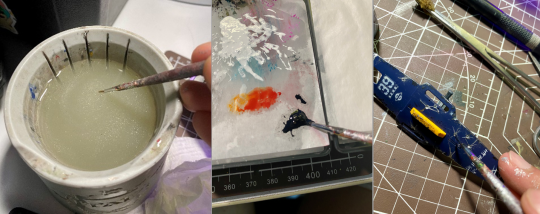
Make sure your brush is very wet, picking up water with your brush.
Mix with the paint until it is very thin. You should be able to see through it.
Apply it into the bullet holes and cracks, letting it flow into the deepest sections just like with a panel liner, and wiping away the excess.
This should make the damage look a little deeper, and give it a bright edge from the silver.
Finishing Up
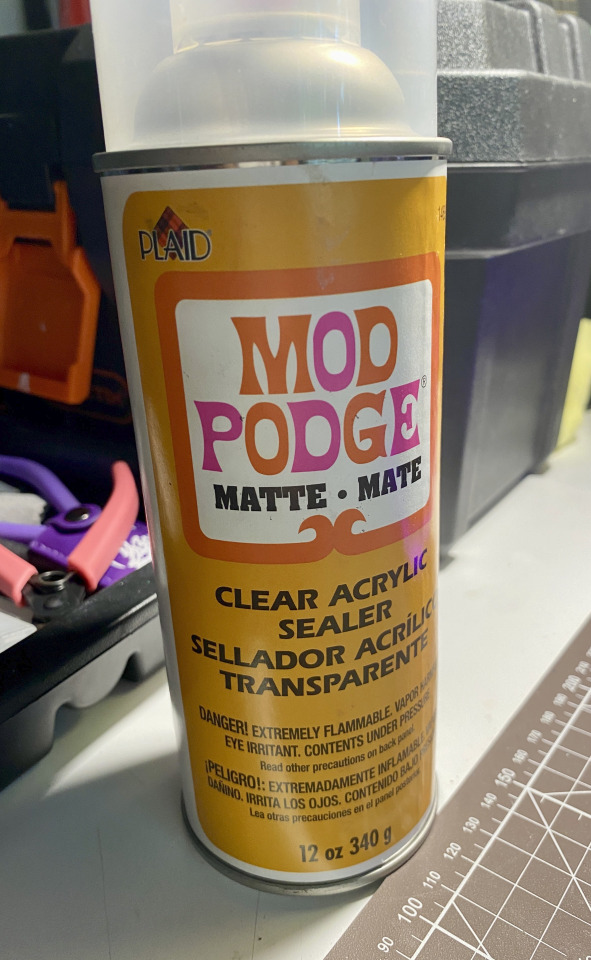
Make sure to give your kit a protective topcoat, so that all your paint doesn't get chipped off when posing or moving your kit! I use a matte finish pray on sealer. Right now I'm using the Mod Podge clear acryllic, but in the past I've also used bog-standard Rust-O-Leum Matte Clear varnish without any issues. It's important to cover or mask off any clear or gloss parts when doing a matte finish, as these will ruin the parts and it's very difficult to clean them once the topcoat is set.

And that should be everything! Now your kit should look a lot more metallic and worn. Depending on how much you add, you can make your kit look anywhere from it's first fray to a beaten and dilapidated mech abandoned in the dirt. Let me know how you go with this tutorial!~
#gunpla#my gunpla#plamo#model building#model weathering#weathering#model painting#painting#tutorial#weathering tutorial#my tutorials
143 notes
·
View notes
Text
alrighty thats enough ( low polys your mostima )
#moka rambles#not tagging as a doodle but guess whos trying to get better at 3d modeling#ive followed enough tutorials to feel somewhat comfortable with the interface so now its.. gulp...#time to make my own#go my mostima!!!!!
84 notes
·
View notes
Text
🧱 Ottto


In the 3-D 🧱
#ottto#ok but again I will say who is willing doing this as a hobby?? (me unfortunately)#blockbench#3d model#3d art#Istg I will quit at least five times#but tomorrow back to the grind mayhaps I will try figuring out how to animate???#or maybe I’ll just move the model around idfk#sfw furry#snow leopard#furry art#I dunno man but I did have fun creating this#though probably because xe are my oc and I love xem#xe look so stupid…so unbelievably and unnecessarily stupid#followed no tutorials for this and I used solely my wizard powers for this#artists on tumblr#art#my art#illustration#low poly#digital art#finished piece#my oc art#2025 art#guys maybe I will become evil and contuine to 3-d model#this didn’t take me too long? but I also probably made the worst model ever seen tbh
95 notes
·
View notes
Text
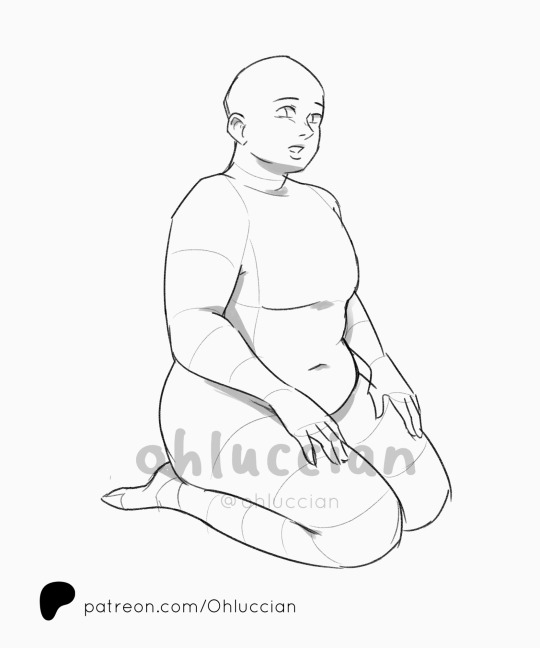
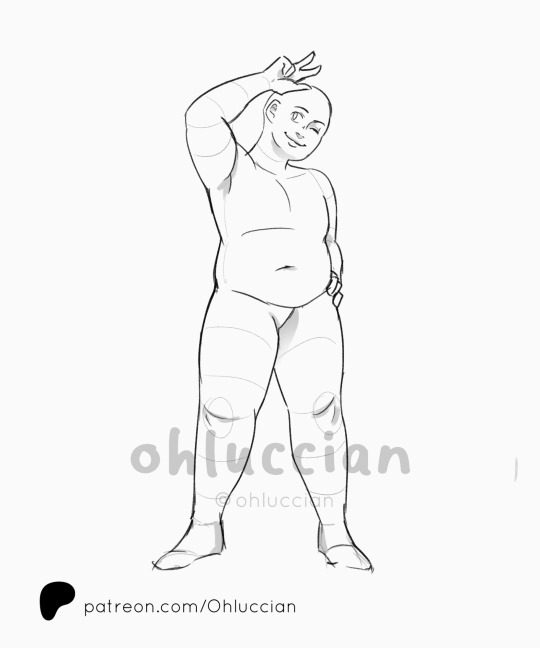


SET #4 Pose references for chubby/pudgy/thick characters
More exclusive poses on my Patreon!
3 poses individuales para personajes regordetes 🏵️
#ohluccian#chubby#art resources#art pose#artists on tumblr#base#digital art#draw your character#drawing base#drawing pose#drawing reference#draw your oc#draw your ocs#draw your characters#art tutorial#thickwomen#pose#art poses#anatomy#art tips#curve model#fat#male poses
107 notes
·
View notes
Text
Low Polys your Mystery
#I wanted to do more with this but I can not for the life of me figure out shader and setting up a good animating rig#Im following tutorials and nothing it working#I might say screw it and just do the shading and animating in unity cause at least I can just use poiyomi#Shader nodes make me want to eat glass#Mystery skulls#Mystery skulls animated#3d model
199 notes
·
View notes
Text
I’m trying out Genshin again.
Ugh.
#I keep trying to play it. but after I finish the tutorial it’s just kinda bland to me?#just open world games in general. explorin’ n’ shit.#I know the main aspect is the characters and the gambling thing.#but I don’t get joy from gambling. Even less joy when it’s characters I don’t really care about.#I can tell they share more or less the same model. and they’re just not appealing to me in general.#Please. have skintones other than white Genshin.#give more of the girls pants. please.#Then why do I keep trying to play it when I don’t like it?#Because I keep seeing other people play#it and enjoying it. so I just keep thinking ‘maybe this time will be better’#kos speaks
56 notes
·
View notes
Text
Guess who finished the donut tutorial?
#blender#3d modeling#3d model#blender donut#donut tutorial#my art#sunnyaliceart#following the tutorial made me crave donuts the whole WEEK#loud warning
49 notes
·
View notes
Text
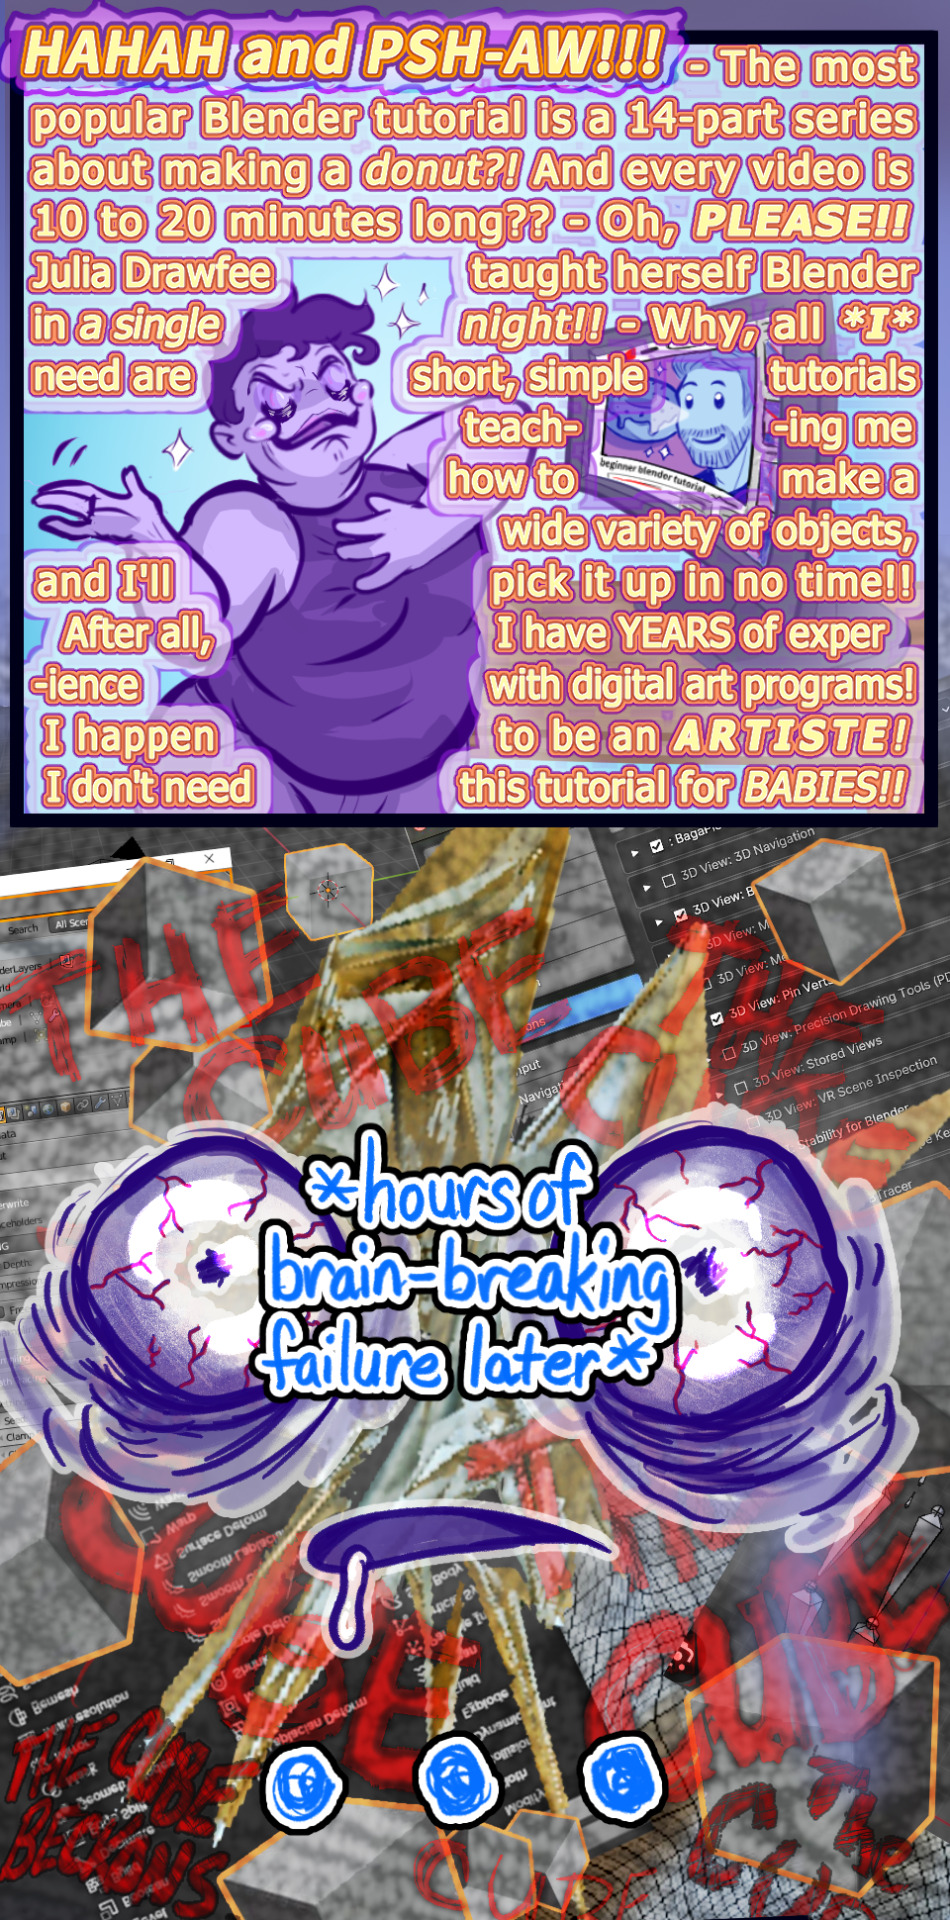
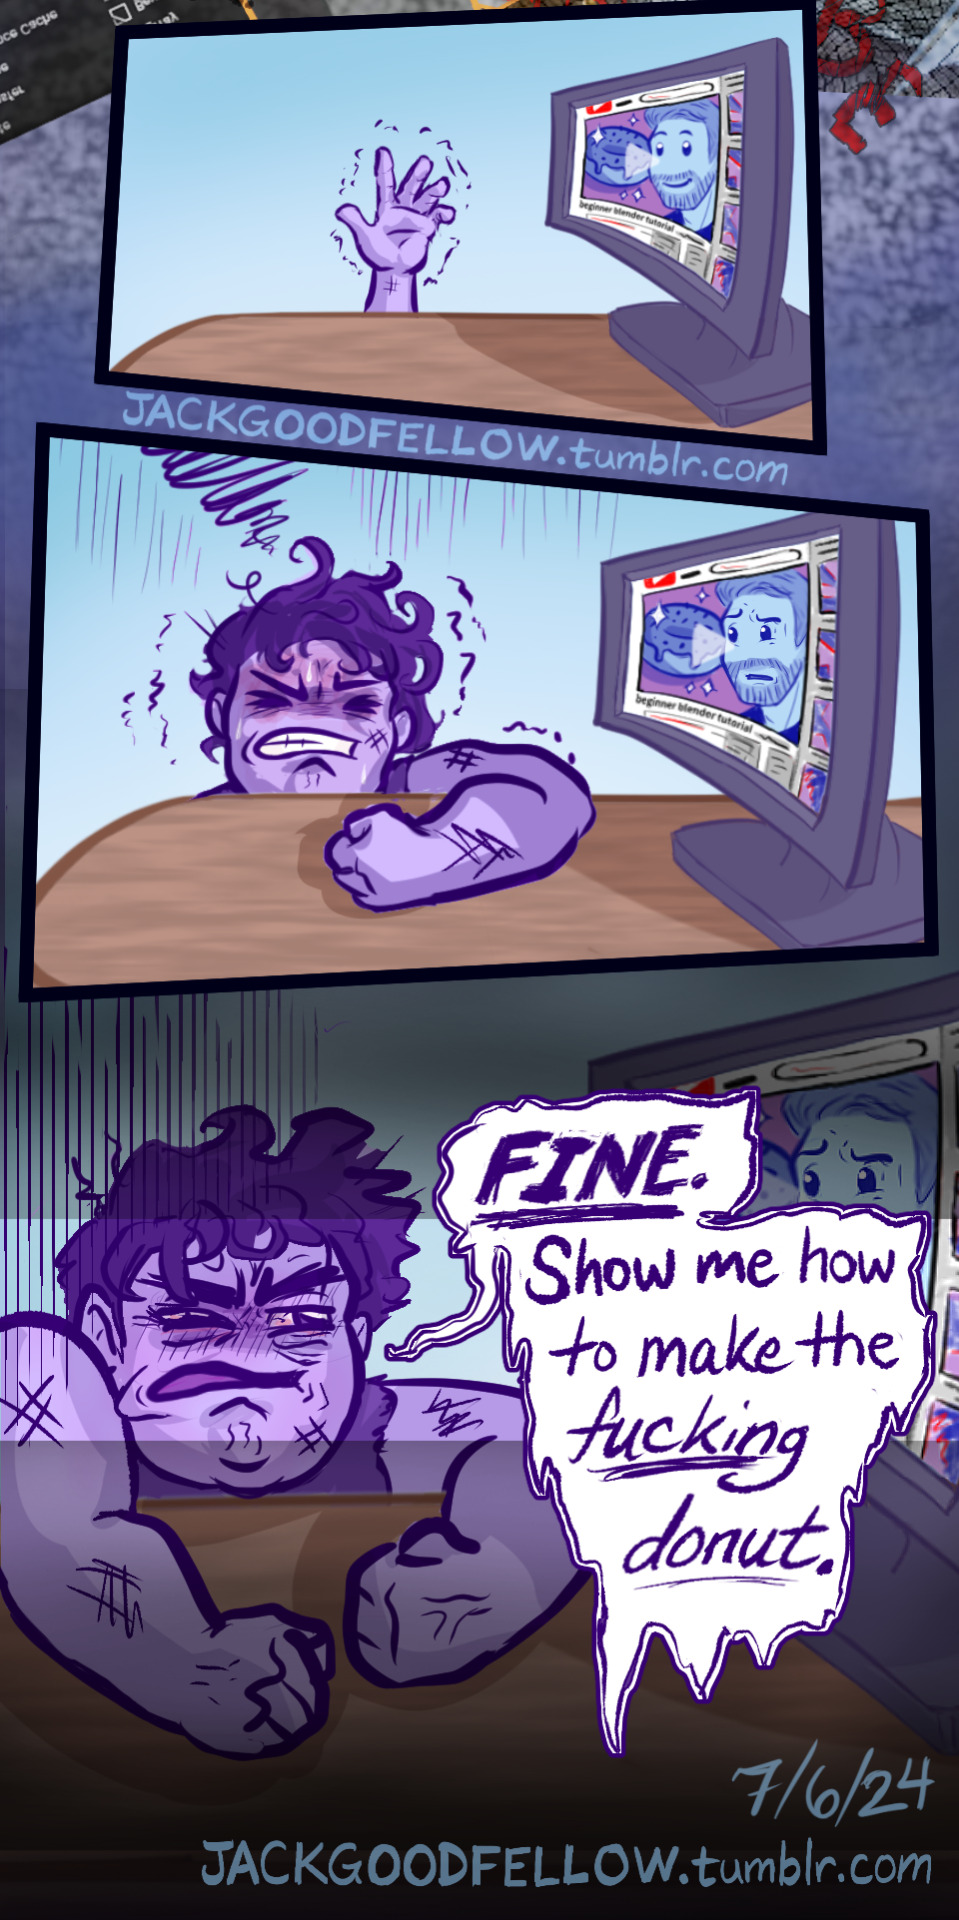
Anyway, it turns out setting art goals according to what Julia from Drawfee can do is like setting swim goals according to what sea otters can do.
#my art#alt-text#image description#blender#blender tutorial#blender donut#blender donut tutorial#learning blender#blender 4.1#blender 4.0#3d modeling#3d animation#3d memes#blender modeling#blender meme#blender community#blender cube#THE CUBE BECKONS#3d artist#julia lepetit#julia drawfee#drawfee
184 notes
·
View notes