#mongo dockerfile
Explore tagged Tumblr posts
Visit Tumblr Blog
Explore Tumblr blogs with no restrictions, modern design and the best experience.
Last Seen Tumblr Blogs


Fun Fact
Average visit duration of Tumblr.com is 10 mins and 25 secs.
Video
youtube
Run Nestjs Microservices & Mongo Database in Docker Containers | #docker...Full Video Link - https://youtu.be/g3pRQZSP1rU Check out new video about Running Nestjs #Microservices in Docker Container with #Mongo DB on the #CodeOneDigest YouTube channel! Learn to setup #nestjs project with dependencies. Learn to create #docker image of nestjs project. Learn to connect nestjs application with mongo database. #mongodb #dockerimage #dockerfile@nestframework @nodejs @typescript @Docker @MongoDB @JavaScript @dotenvx @npmjs @vscodetips @getpostman #nestjs
1 note
·
View note
Text
Docking Your Workflow: A Hands-On Guide to Docker Compose Installation and Examples

What is docker-compose?
It is a tool which is used to create and start Docker application by using a single command.
It simplifies the deployment of complex applications by defining their architecture in a human-readable format.
This configuration file, typically written in YAML, outlines the services, networks, and volumes needed to run your application.
Docker Compose not only simplifies the management of containers but also encourages collaboration among developers and teams
Users can activate all the services (containers) using a single command.
Docker compose features
Purpose:Orchesrating multi-container application
Configuration:YAML base configuration
Scale:Multiple containers
Networking:Built-in networking and service discovery
Dependancy:Images and compose configuration
Ecosystem:Docker Hub and private registries
How to Install Docker Compose
Prerequisites:
Before installing Docker Compose, ensure that you have Docker installed on your system.
Installation Steps:
Check the Current Release:
Visit the Docker Compose GitHub release page to find the latest stable release. Identify the version number you want to install.
Download the Docker Compose Binary:
sudo curl -L "https://github.com/docker/compose/releases/download/1.23.2/docker-compose-$(uname -s)-$(uname -m)" -o /usr/local/bin/docker-compose

Apply Executable Permissions:
Make the downloaded binary executable:
sudo chmod +x /usr/local/bin/docker-compose

Verify Installation:
Confirm the successful installation by checking the version:
docker-compose –version

Docker Compose Commands:
docker-compose build =Look for all services containing the build
docker-compose run=Run a one-time command against a service
docker-compose up=Command used to start all the services of the container.
docker Compose down=This syntax is used to stop all the services that were started.
docker-compose -f =Specify the location of a docker-compose configuration file by adding the -f flag
docker-compose start=Start existing containers for a service
docker_compose_v=To check the version of docker-compose, we use this command.
docker ps=This command is used to bring out the whole process of Docker.
docker Compose.yml=This command is used to configure application services using YAML files.
docker-compose up -d=Used to run a Docker-Compose file.
docker Compose up -d -scale=Used to scale the service of the container.
pip install -U Docker-compose= Command used to install Docker Compose using pip.
Compose step process
1 Create a Directory
Creating the Dockerfile for the app environment
defining the services in docker-compose.yml
starting the application
Running Application using Docker Compose
Example:
Follow the following example
1) Create a Directory
mkdir docker-compose-praman

2)Go to the directory
cd docker-composer-praman

3) Define docker-compose.yml file
sudo vi docker-compose.yml
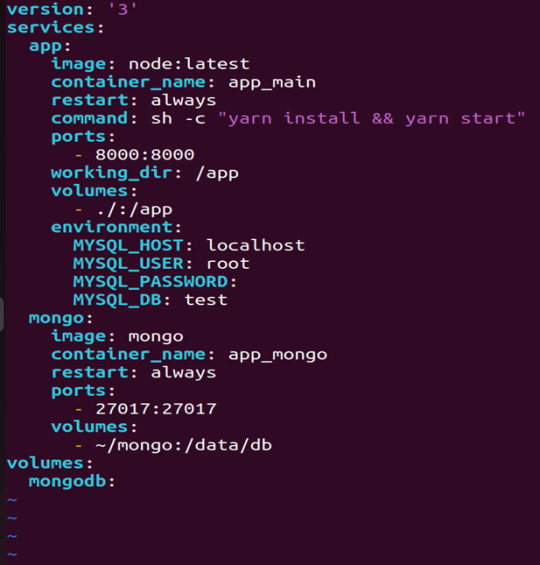
let’s dismantle the above code and understand it by piece:
version: It refers to the docker-compose version (Latest 3)
services: It defines the services that we need to run
app: It is a custom name for one of your containers
image: The image which we have to pull. Here we are using node:latest and mongo
container_name: It is the name for each container
restart: starts/restarts a service container
port: It defines the custom port to run the container
working_dir: It is the current working directory for the service container
environment: It defines the environment variables, such as DB credentials, and so on
command: It is the command to run the service
4)How to run the multi-container:
We need to build our multi-container using docker build.
docker-compose build (Command to build the docker-compose.yml)

docker-compose up (Command to run multiple containers using docker-compose)
docker-compose up -d (Command to run multiple containers using docker-compose in detached mode)
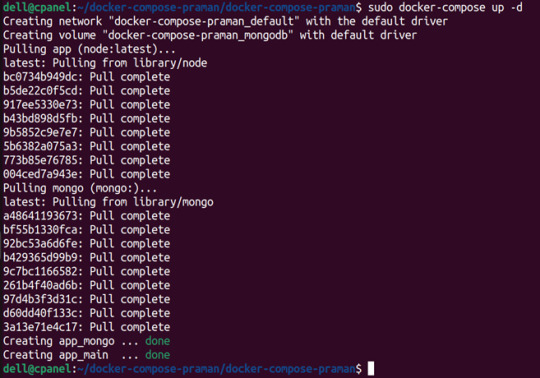
docker-compose ps (Command to list the running container services)

Sample output for running mongodb service using docker:

Docker Compose Disadvantages:
Below are the drawbacks of Docker-Compose.
1.You have to spend more time and effort, installing Docker on your server.
2.Docker-Compose requires manual updates and fails when it comes to rebooting.
3.You have to spend more time and effort, installing Docker on your server.
4. However, docker-compose is already there in your system if you have installed Docker.
Docker Compose Use Cases:
Automated testing environments-
Compose supports automated testing, which is an essential part of CI/CD as it can easily create and destroy the required testing environment
Single host deployments-
In Docker Compose, containers are designed to run on a single host as they have traditionally been focused on development and testing workflows.
Development Environments-
Compose is a fast and simple way of starting projects as it can quickly spin up new isolated development environments.
High productivity -
Docker-Compose increases productivity and reduces the time taken for each task
Security -
All the containers are isolated from each other, reducing the threat landscape
Configuration-
Docker-Compose files are written in YAML scripts hence, provide easy and quick configuration.
Credits - Sachin Auti (DevOps)
MetricsViews Pvt. Ltd.
MetricsViews specializes in building a solid DevOps strategy with cloud-native including AWS, GCP, Azure, Salesforce, and many more. We excel in microservice adoption, CI/CD, Orchestration, and Provisioning of Infrastructure - with Smart DevOps tools like Terraform, and CloudFormation on the cloud.
www.metricsviews.com
0 notes
Link
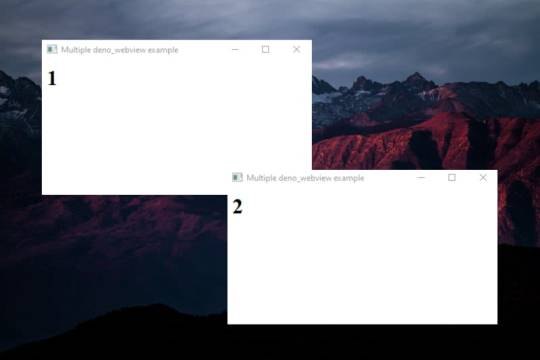
I've tried to collect some of the most used topics in Node, and looked for their alternative with Deno. First of all, I would like to make it clear that we can use many of the current Node.js modules. There is no need to look for an alternative for everything, as many modules are reusable. You can visit pika.dev to look for modules to use in Deno. That said, let's start with the list: Electron With Node.js we can create desktop applications using Electron. Electron uses Chromium as interface to run a web environment. But, can we use Electron with Deno? Are there alternatives?

Well, right now Electron is far from being able to be executed under Deno. We must look for alternatives. Since Deno is made with Rust, we can use web-view rust bindings to run Destkop application in Deno. This way, we can use the native OS webview to run as many webviews as we want. Repo: https://github.com/eliassjogreen/deno_webview
import { WebView } from "https://deno.land/x/webview/mod.ts"; const contentType = 'text/html' const sharedOptions = { width: 400, height: 200, resizable: true, debug: true, frameless: false, }; const webview1 = new WebView({ title: "Multiple deno_webview example", url: `data:${contentType}, <html> <body> <h1>1</h1> </body> </html> `, ...sharedOptions, }); const webview2 = new WebView({ title: "Multiple deno_webview example", url: `data:${contentType}, <html> <body> <h1>2</h1> </body> </html> `, ...sharedOptions, }); await Promise.all([webview1.run(), webview2.run()]);
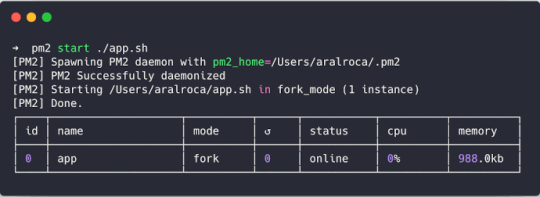
Forever / PM2
Forever and PM2 are CLI tools for ensuring that a given script runs continuously as a daemon. Unlike Forever, PM2 is more complete and also serves as load balancer. Both are very useful in Node, but can we use them in Deno? Forever is intended for Node only, so using it is not feasible. On the other hand, with PM2 we can run non-node scripts, so we could still use it for Deno.

Creating an app.sh file
#!/bin/bash deno run -A myCode.ts
And
➜ pm2 start ./app.sh
Express / Koa
Express and Koa are the best known Node frameworks. They're known for their robust routing system and their HTTP helpers (redirection, caching, etc). Can we use them in Deno? The answer is not... But there are some alternatives.

Http (std lib)
Deno's own STD library already covers many of the needs provided by Express or Koa. https://deno.land/std/http/.
import { ServerRequest } from "https://deno.land/std/http/server.ts"; import { getCookies } from "https://deno.land/std/http/cookie.ts"; let request = new ServerRequest(); request.headers = new Headers(); request.headers.set("Cookie", "full=of; tasty=chocolate"); const cookies = getCookies(request); console.log("cookies:", cookies);
However, the way to declare routes is not very attractive. So let's look at some more alternatives.
Oak (Third party lib)
One of the most elegant solutions right now, very inspired by Koa. https://github.com/oakserver/oak
import { Application, } from "https://deno.land/x/oak/mod.ts"; const app = new Application(); app.use((ctx) => { ctx.response.body = "Hello World!"; }); await app.listen({ port: 8000 });
Abc (Third party lib)
Similar to Oak. https://deno.land/x/abc.
import { Application } from "https://deno.land/x/abc/mod.ts"; const app = new Application(); app.static("/static", "assets"); app.get("/hello", (c) => "Hello!") .start({ port: 8080 });
Deno-express (Third party lib)
Maybe the most similar alternative to Express Framework. https://github.com/NMathar/deno-express.
import * as exp from "https://raw.githubusercontent.com/NMathar/deno-express/master/mod.ts"; const port = 3000; const app = new exp.App(); app.use(exp.static_("./public")); app.use(exp.bodyParser.json()); app.get("/api/todos", async (req, res) => { await res.json([{ name: "Buy some milk" }]); }); const server = await app.listen(port); console.log(`app listening on port ${server.port}`);
MongoDB
MongoDB is a document database with a huge scability and flexibility. In the JavaScript ecosystem has been widely used, with many stacks like MEAN or MERN that use it. It's very popular.

So yes, we can use MongoDB with Deno. To do this, we can use this driver: https://github.com/manyuanrong/deno_mongo.
import { init, MongoClient } from "https://deno.land/x/[email protected]/mod.ts"; // Initialize the plugin await init(); const client = new MongoClient(); client.connectWithUri("mongodb://localhost:27017"); const db = client.database("test"); const users = db.collection("users"); // insert const insertId = await users.insertOne({ username: "user1", password: "pass1" }); // findOne const user1 = await users.findOne({ _id: insertId }); // find const users = await users.find({ username: { $ne: null } }); // aggregation const docs = await users.aggregation([ { $match: { username: "many" } }, { $group: { _id: "$username", total: { $sum: 1 } } } ]); // updateOne const { matchedCount, modifiedCount, upsertedId } = await users.updateOne( username: { $ne: null }, { $set: { username: "USERNAME" } } ); // deleteOne const deleteCount = await users.deleteOne({ _id: insertId });
PostgresSQL

Like MongoDB, there is also a driver for PostgresSQL.
https://github.com/buildondata/deno-postgres.
import { Client } from "https://deno.land/x/postgres/mod.ts"; const client = new Client({ user: "user", database: "test", hostname: "localhost", port: 5432 }); await client.connect(); const result = await client.query("SELECT * FROM people;"); console.log(result.rows); await client.end();
MySQL / MariaDB

As with MongoDB and PostgresSQL, there is also a driver for MySQL / MariaDB.
https://github.com/manyuanrong/deno_mysql
import { Client } from "https://deno.land/x/mysql/mod.ts"; const client = await new Client().connect({ hostname: "127.0.0.1", username: "root", db: "dbname", poolSize: 3, // connection limit password: "password", }); let result = await client.execute(`INSERT INTO users(name) values(?)`, [ "aralroca", ]); console.log(result); // { affectedRows: 1, lastInsertId: 1 }
Redis

Redis, the best known database for caching, has also a driver for Deno.
https://github.com/keroxp/deno-redis
import { connect } from "https://denopkg.com/keroxp/deno-redis/mod.ts"; const redis = await connect({ hostname: "127.0.0.1", port: 6379 }); const ok = await redis.set("example", "this is an example"); const example = await redis.get("example");
Nodemon

Nodemon is used in development environment to monitor any changes in your files, automatically restarting the server. This makes node development much more enjoyable, without having to manually stop and restart the server to see the applied changes. Can it be used in Deno? Sorry, but you can't... but still, there is an alternative: Denon.
https://github.com/eliassjogreen/denon
We can use Denon as we use deno run to execute scripts.
➜ denon server.ts
Jest, Jasmine, Ava...

In the Node.js ecosystem there are a lot of alternatives for test runners. However, there isn't one official way to test the Node.js code. In Deno, there is an official way, you can use the testing std library.
https://deno.land/std/testing
import { assertStrictEq } from 'https://deno.land/std/testing/asserts.ts' Deno.test('My first test', async () => { assertStrictEq(true, false) })
To run the tests:
➜ deno test
Webpack, Parcel, Rollup...

One of the strengths of Deno is that we can use ESmodules with TypeScript without the need for a bundler such as Webpack, Parcel or Rollup. However, probably you wonder if given a tree of files, we can make a bundle to put everything in one file to run it on the web. Well, it's possible, yes. We can do it with Deno's CLI. Thus, there's no need for a third-party bundler.
➜ deno bundle myLib.ts myLib.bundle.js
Now it's ready to be loaded in the browser:
<script type="module"> import * as myLib from "myLib.bundle.js"; </script>
Prettier

In the last few years Prettier has become quite well known within the JavaScript ecosystem because with it you don't have to worry about formatting the files. And the truth is, it can still be used on Deno but it loses its meaning, because Deno has its own formatter. You can format your files using this command:
➜ deno fmt
NPM Scripts

With Deno, the package.json no longer exists. One of the things I really miss are the scripts that were declared in the package.json. A simple solution would be to use a makefile and execute it with make. However, if you miss the npm syntax, there is an npm-style script runner for Deno:
https://github.com/umbopepato/velociraptor
You can define a file with your scripts:
# scripts.yaml scripts: start: deno run --allow-net server.ts test: deno test --allow-net server_test.ts
Execute with:
➜ vr run <SCRIPT>
Another alternative is denox, very similar to Velociraptor.
Nvm

Nvm is a CLI to manage multiple active Node versions, to easy upgrade or downgrade versions depending on your projects. A nvm equivalent in Deno is dvm.
https://github.com/axetroy/dvm
➜ dvm use 1.0.0
Npx
Npx in recent years has become very popular to execute npm packages without having to install them. Now many projects won't exist within npm because Deno is a separate ecosystem. So, how can we execute Deno modules without having to install them with deno install https://url-of-module.ts? In the same way that we run our project, instead of a file we put the URL of the module:
➜ deno run https://deno.land/std/examples/welcome.ts
As you can see, not only we have to remember the name of the module, but the whole URL, which makes it a little more difficult to use. On the other hand it gives a lot more flexibility as we can run any file, not just what's specified as a binary in the package.json like npx.
Run on a Docker

To run Deno inside a Docker, we can create this Dockerfile:
FROM hayd/alpine-deno:1.0.0 EXPOSE 1993 # Port. WORKDIR /app USER deno COPY deps.ts . RUN deno cache deps.ts # Cache the deps ADD . . RUN deno cache main.ts # main entrypoint. CMD ["--allow-net", "main.ts"]
To build + run it:
➜ docker build -t app . && docker run -it --init -p 1993:1993 app
Repo: https://github.com/hayd/deno-docker
Run as a lambda

To use Deno as a lambda, there is a module in Deno STD library. https://deno.land/x/lambda.
import { APIGatewayProxyEvent, APIGatewayProxyResult, Context } from "https://deno.land/x/lambda/mod.ts"; export async function handler( event: APIGatewayProxyEvent, context: Context ): Promise<APIGatewayProxyResult> { return { body: `Welcome to deno ${Deno.version.deno} 🦕`, headers: { "content-type": "text/html;charset=utf8" }, statusCode: 200 }; }
Interesting references:
Deno in Vercel: https://github.com/lucacasonato/now-deno
Deno in AWS: https://blog.begin.com/deno-runtime-support-for-architect-805fcbaa82c3
Conclusion
I'm sure I forgot some Node topics and their Deno alternative, let me know if there's anything I missed that you'd like me to explain. I hope this article helps you break the ice with Deno. To explore all libraries you can use with Deno:
https://deno.land/std
https://deno.land/x
https://www.pika.dev/
0 notes
Link
via thenewstack.io
Google Cloud Run is a serverless environment to run containers. For the background and context of this latest Google Cloud Platform (GCP) service, refer to my previous article.
In this tutorial, we will deploy a web application based on Node.js and MongoDB to the Cloud Run platform. Since Cloud Run is meant to host and scale stateless web applications, we will use mLab service to persist data. Since both mLab and Cloud Run are serverless, we just need to focus on the code and business logic instead of worrying about the infrastructure.
There are two steps involved in this workflow: provisioning an mLAB Mongo database instance, and deploying code to Cloud Run. This tutorial assumes you have an active account on Google Cloud Platform with the CLI and SDK installed on your development machine. You also need Docker Desktop to build images locally.
Step 1: Provisioning a mLab MongoDB Instance
mLab offers a managed MongoDB database as a service. It has a free plan called Sandbox that provides 500MB of storage to run a database instance for development and testing. It is a shared database server process running on a shared virtual machine, good enough for our prototype.
mLab instances can be deployed in multiple cloud platforms including GCP. Refer to the documentation on creating a database within GCP. Make sure that you launch the instance in us-central1 (lowa) region. This is the same region where our web app will be deployed. Since both the services are running in the same region, the latency is minimal.
Below is the screenshot of the mLab database service that I launched for this tutorial. Make sure your instance looks similar. Keep the connection string handy which is needed for the next step.
Step 2: Building and Deploying a Cloud Run Service
Start by cloning the Github repo that has the sample MEAN web application. We will then build a Docker image and push it to Google Container Registry (GCR).
Navigate to the root of the repo to find the Dockerfile. We will use this to build the image locally.
Run the below commands to set the environment. This initializes all the variables required to build and deploy the service. Ensure you are replacing the placeholders with appropriate values.
PROJECT_ID='GCP project id' REGION_ID='us-central1' IMAGE='todo:v1' CLOUD_RUN_SVC="todo" DB_HOST='mLAB connection string' gcloud components install beta gcloud components update gcloud config set run/region $REGION_ID gcloud auth configure-docker gcloud components install docker-credential-gcr
The above commands install the Cloud Run CLI followed by configuring the local Docker environment with Google Container Registry credentials.
It’s time for us to build the container and push it to GCR.
docker build . --tag gcr.io/$PROJECT_ID/$IMAGE docker push gcr.io/$PROJECT_ID/$IMAGE
Verify that the image is available in GCR by running the below command:
gcloud container images list
With the database and container image in place, let’s go ahead and deploy the web application.
gcloud beta run deploy $CLOUD_RUN_SVC \ --image gcr.io/$PROJECT_ID/$IMAGE \ --allow-unauthenticated \ --update-env-vars DBHOST=$DB_HOST
The switch, –allow-unauthenticated, will let the service accept the traffic from the public internet. Notice that we are passing the MongoDB connection string generated by mLab as an environment variable. The code expects the connection string from the DBHOST environment variable.
You can retrieve the running services with the below command:
gcloud beta run services list
You can also explore the service configuration from the GCP Console.
Clicking on the URL takes us to the web application.
Cloud Run services can also be deployed on existing GKE clusters. They act like typical Kubernetes Pods with access to resources available within the cluster. In the next part of this tutorial, I will demonstrate how to access stateful services running in a GKE cluster from a Cloud Run service. Stay tuned.
Feature image by Gerd Altmann from Pixabay.
The post Tutorial: Deploying a Web Application on Google Cloud Run appeared first on The New Stack.
0 notes
Text
Connecting to Mongo with a self signed CA on a JVM in Kubernetes
At $WORK, we're creating an internal platform on top of Kubernetes for developers to deploy their apps. Our Ops people have graciously provided us with Mongo clusters that all use certificates signed by a self-signed certificate authority. So, all our clients need to know about the self-signed CA in order to connect to Mongo. For Node or Python, it's possible to pass the self-signed CA file in the code running in the application.
But, things are a little more complicated for Java or Scala apps, because configuration of certificate authorities is done at the JVM level, not at the code level. And for an extra level of fun, we want to do it in Kubernetes, transparently to our developers, so they don't have to worry about it on their own.
err, wha? telling the JVM about our CA
First off, we had to figure out how to tell the JVM to use our CA. And luckily since all the JVM languages use the same JVM, it's the same steps for Scala, or Clojure, or whatever other JVM language you prefer. The native MongoDB Java driver docs tell us exactly what we need to do: use keytool to import the cert into a keystore that the JVM wants, and then use system properties to tell the JVM to use that keystore. The keytool command in the docs is:
$ keytool -importcert -trustcacerts -file <path to certificate authority file> \ -keystore <path to trust store> -storepass <password>
The path to the existing keystore that the JVM uses by default is $JAVA_HOME/jre/lib/security/cacerts, and its default password is changeit. So if you wanted to add your self signed CA to the existing keystore, it'd be something like
$ keytool -importcert -trustcacerts -file ssca.cer \ -keystore $JAVA_HOME/jre/lib/security/cacerts -storepass changeit
(Even this very first step had complications. Our self signed CA was a Version 1 cert with v3 extensions, and while no other language cared, keytool refused to create a keystore with it. We ended up having to create a new self-signed CA with the appropriate version. Some lucky googling led us to that conclusion, but of particular use was using openssl to examine the CA and check its versions and extensions:)
$ openssl x509 -in ssca.cer -text -noout // Certificate: // Data: // Version: 3 (0x2) // Serial Number: ... // ... // X509v3 extensions: // X509v3 Subject Key Identifier: ... // X509v3 Key Usage: ... // X509v3 Basic Constraints: ...
Another useful command was examining the keystore before and after we imported our self signed CA:
$ keytool -list -keystore /path/to/keystore/file
as you can look for your self-signed CA in there to see if you ran the command correctly.
Anyway, once you've created a keystore for the JVM, the next step is to set the appropriate system properties, again as out lined in the docs:
$ java \ -Djavax.net.ssl.trustStore=/path/to/cacerts \ -Djavax.net.ssl.trustStorePassword=changeit \ -jar whatever.jar
Since the default password is changeit, you may want to change it... but if you don't change it, you wouldn't have to specify the trustStorePassword system property.
handling this in kubernetes
The above steps aren't too complicated on their own. We just need to make sure we add our CA to the existing ones, and point the JVM towards our new and improved file. But, since we'll eventually need to rotate the self-signed CA, we can't just run keytool once and copy it everywhere. So, an initContainer it is! keytool is a java utility, and it's handily available on the openjdk:8u121-alpine image, which means we can make a initContainer that runs keytool for us dynamically, as part of our Deployment.
Since seeing the entire manifest at once doesn't necessarily make it easy to see what's going on, I'm going to show the key bits piece by piece. All of the following chunks of yaml belong to in the spec.template.spec object of a Deployment or Statefulset.
spec: template: spec: volumes: - name: truststore emptyDir: {} - name: self-signed-ca secret: secretName: self-signed-ca
So, first things first, volumes: an empty volume called truststore which we'll put our new and improved keystore-with-our-ssca. Also, we'll need a volume for the self-signed CA itself. Our Ops provided it for us in a secret with a key ca.crt, but you can get it into your containers any way you want.
$ kubectl get secret self-signed-ca -o yaml --export apiVersion: v1 data: ca.crt: ... kind: Secret metadata: name: self-signed-ca type: Opaque
With the volumes in place, we need to set up init containers to do our keytool work. I assume (not actually sure) that we need to add our self-signed CA to the existing CAs, so we use one initContainer to copy the existing default cacerts file into our truststore volume, and another initContainer to run the keytool command. It's totally fine to combine these into one container, but I didn't feel like making a custom docker image with a shell script or having a super long command line. So:
spec: template: spec: initContainers: - name: copy image: openjdk:8u121-alpine command: [ cp, /usr/lib/jvm/java-1.8-openjdk/jre/lib/security/cacerts, /ssca/truststore/cacerts ] volumeMounts: - name: truststore mountPath: /ssca/truststore - name: import image: openjdk:8u121-alpine command: [ keytool, -importcert, -v, -noprompt, -trustcacerts, -file, /ssca/ca/ca.crt, -keystore, /ssca/truststore/cacerts, -storepass, changeit ] volumeMounts: - name: truststore mountPath: /ssca/truststore - name: self-signed-ca mountPath: /ssca/ca
Mount the truststore volume in the copy initContainer, grab the file cacerts file, and put it in our truststore volume. Note that while we'd like to use $JAVA_HOME in the copy initContainer, I couldn't figure out how to use environment variables in the command. Also, since we're using a tagged docker image, there is a pretty good guarantee that the filepath shouldn't change underneath us, even though it's hardcoded.
Next, the import step! We need to mount the self-signed CA into this container as well. Run the keytool command as described above, referencing our copied cacerts file in our truststore volume and passing in our ssCA.
Two things to note here: the -noprompt argument to keytool is mandatory, or else keytool will prompt for interaction, but of course the initContainer isn't running in a shell for someone to hit yes in. Also, the mountPaths for these volumes should be separate folders! I know Kubernetes is happy to overwrite existing directories when a volume mountPath clashes with a directory on the image, and since we have different data in our volumes, they can't be in the same directory. (...probably, I didn't actually check)
The final step is telling the JVM where our new and improved trust store is. My first idea was just to add args to the manifest and set the system property in there, but if the Dockerfile ENTRYPOINT is something like
java -jar whatever.jar
then we'd get a command like
java -jar whatever.jar -Djavax.net.ssl.trustStore=...
which would pass the option to the jar instead of setting a system property. Plus, that wouldn't work at all if the ENTRYPOINT was a shell script or something that wasn't expecting arguments.
After some searching, StackOverflow taught us about the JAVA_OPTS and JAVA_TOOL_OPTIONS environment variables. We can append our trustStore to the existing value of these env vars, and we'd be good to go!
spec: template: spec: containers: - image: your-app-image env: # make sure not to overwrite this when composing the yaml - name: JAVA_OPTS value: -Djavax.net.ssl.trustStore=/ssca/truststore/cacerts volumeMounts: - name: truststore mountPath: /ssca/truststore
In our app that we use to construct the manifests, we check if the developer is already trying to set JAVA_OPTS to something, and make sure that we append to the existing value instead of overwriting it.
a conclusion of sorts
Uh, so that got kind of long, but the overall idea is more or less straightforward. Add our self-signed CA to the existing cacerts file, and tell the JVM to use it as the truststore. (Note that it's the trustStore option you want, not the keyStore!). The entire Deployment manifest all together is also available, if that sounds useful...
0 notes
Text
docker compose... so i only need to type one command
So I guess this is the entire purpose for the existence of docker compose? So here's how to do exactly the same thing as in my last post
Let's assume the docker daemon is already installed.
Install docker-compose.
$ curl -L https://github.com/docker/compose/releases/download/1.15.0/docker-compose-`uname -s`-`uname -m` > /usr/local/bin/docker-compose $ sudo chmod +x /usr/local/bin/docker-compose $ docker-compose --version docker-compose version 1.15.0, build e12f3b9 $ docker-compose version docker-compose version 1.15.0, build e12f3b9 docker-py version: 2.4.2 CPython version: 2.7.13 OpenSSL version: OpenSSL 1.0.1t 3 May 2016
Put a docker-compose.yml into your working directory:
$ tree . ├── Vagrantfile ├── app │ ├── Dockerfile │ ├── index.py │ └── pewpew.wsgi ├── db │ └── Dockerfile ├── docker-compose.yml └── rp ├── Dockerfile └── site.conf version: '2' services: reverseproxy: build: /srv/rp ports: - "80:80" links: - flaskapp:flaskapp depends_on: - flaskapp flaskapp: build: /srv/app ports: - "5000:5000" links: - mongodb:mongodb depends_on: - mongodb mongodb: build: /srv/db ports: - "27017:27017"
Build those images & run those containers
$ docker-compose up -d . . . Creating mongodb ... Creating mongodb ... done Creating flaskapp ... Creating flaskapp ... done Creating reverseproxy ... Creating reverseproxy ... done
Check what's going on
$ docker-compose ps Name Command State Ports ----------------------------------------------------------------------------------- flaskapp gunicorn -k eventlet -b 0. ... Up 0.0.0.0:5000->5000/tcp mongodb docker-entrypoint.sh mongod Up 0.0.0.0:27017->27017/tcp reverseproxy nginx -g daemon off; Up 443/tcp, 0.0.0.0:80->80/tcp
Send a request to the reverse proxy
$ curl http://127.0.0.1 Pew Pew! {u'storageEngines': [u'devnull', u'ephemeralForTest', u'mmapv1', u'wiredTiger'], u'maxBsonObjectSize': 16777216, u'ok': 1.0, u'bits': 64, u'modules': [], u'openssl': {u'compiled': u'OpenSSL 1.0.1t 3 May 2016', u'running': u'OpenSSL 1.0.1t 3 May 2016'}, u'javascriptEngine': u'mozjs', u'version': u'3.4.6', u'gitVersion': u'c55eb86ef46ee7aede3b1e2a5d184a7df4bfb5b5', u'versionArray': [3, 4, 6, 0], u'debug': False, u'buildEnvironment': {u'cxxflags': u'-Woverloaded-virtual -Wno-maybe-uninitialized -std=c++11', u'cc': u'/opt/mongodbtoolchain/v2/bin/gcc: gcc (GCC) 5.4.0', u'linkflags': u'-pthread -Wl,-z,now -rdynamic -Wl,--fatal-warnings -fstack-protector-strong -fuse-ld=gold -Wl,--build-id -Wl,-z,noexecstack -Wl,--warn-execstack -Wl,-z,relro', u'distarch': u'x86_64', u'cxx': u'/opt/mongodbtoolchain/v2/bin/g++: g++ (GCC) 5.4.0', u'ccflags': u'-fno-omit-frame-pointer -fno-strict-aliasing -ggdb -pthread -Wall -Wsign-compare -Wno-unknown-pragmas -Winvalid-pch -Werror -O2 -Wno-unused-local-typedefs -Wno-unused-function -Wno-deprecated-declarations -Wno-unused-but-set-variable -Wno-missing-braces -fstack-protector-strong -fno-builtin-memcmp', u'target_arch': u'x86_64', u'distmod': u'debian81', u'target_os': u'linux'}, u'sysInfo': u'deprecated', u'allocator': u'tcmalloc'} [u'admin', u'local']
What do the containers look like now?
$ docker ps -a CONTAINER ID IMAGE COMMAND CREATED STATUS PORTS NAMES 774ad38c93d7 srv_reverseproxy "nginx -g 'daemon ..." 3 minutes ago Up 3 minutes 0.0.0.0:80->80/tcp, 443/tcp reverseproxy 1094581a5a17 srv_flaskapp "gunicorn -k event..." 3 minutes ago Up 3 minutes 0.0.0.0:5000->5000/tcp flaskapp 0f4c7f0d7175 srv_mongodb "docker-entrypoint..." 3 minutes ago Up 3 minutes 0.0.0.0:27017->27017/tcp mongodb $ docker-compose ps Name Command State Ports ----------------------------------------------------------------------------------- flaskapp gunicorn -k eventlet -b 0. ... Up 0.0.0.0:5000->5000/tcp mongodb docker-entrypoint.sh mongod Up 0.0.0.0:27017->27017/tcp reverseproxy nginx -g daemon off; Up 443/tcp, 0.0.0.0:80->80/tcp
And the images?
$ docker images REPOSITORY TAG IMAGE ID CREATED SIZE srv_reverseproxy latest 9283f67c41fb 3 minutes ago 107MB srv_flaskapp latest e3b9a8003c5d 3 minutes ago 683MB srv_mongodb latest 397be1d78005 4 minutes ago 359MB nginx latest b8efb18f159b 13 days ago 107MB mongo latest 6833171fe0ad 13 days ago 359MB python 2.7 fa8e55b2235d 2 weeks ago 673MB $ docker-compose images Container Repository Tag Image Id Size ---------------------------------------------------------------- flaskapp srv_flaskapp latest e3b9a8003c5d 651 MB mongodb srv_mongodb latest 397be1d78005 342 MB reverseproxy srv_reverseproxy latest 9283f67c41fb 102 MB
Now previously... say you want to change something in one of the containers, you'd have to like, docker stop.. docker rm.. docker rmi.. docker build.. docker run.. blah blah blah.
Say I've changed the app output from Pew Pew! to Peow Peow Lazor Beams!!
With docker-compose:
$ docker-compose build flaskapp . . Removing intermediate container 05f624a8c37b Successfully built 0e44b2dee5fa Successfully tagged srv_flaskapp:latest $ docker-compose up --no-deps -d flaskapp Recreating flaskapp ... Recreating flaskapp ... done $ docker-compose ps Name Command State Ports ----------------------------------------------------------------------------------- flaskapp gunicorn -k eventlet -b 0. ... Up 0.0.0.0:5000->5000/tcp mongodb docker-entrypoint.sh mongod Up 0.0.0.0:27017->27017/tcp reverseproxy nginx -g daemon off; Up 443/tcp, 0.0.0.0:80->80/tcp $ docker ps -a CONTAINER ID IMAGE COMMAND CREATED STATUS PORTS NAMES 2b4e890d5dcf srv_flaskapp "gunicorn -k event..." 3 minutes ago Up 3 minutes 0.0.0.0:5000->5000/tcp flaskapp 774ad38c93d7 srv_reverseproxy "nginx -g 'daemon ..." 2 hours ago Up About an hour 0.0.0.0:80->80/tcp, 443/tcp reverseproxy 0f4c7f0d7175 srv_mongodb "docker-entrypoint..." 2 hours ago Up About an hour 0.0.0.0:27017->27017/tcp mongodb
And the changes?
$ curl http://127.0.0.1 Peow Peow Lazor Beams!! {u'storageEngines': [u'devnull', u'ephemeralForTest', u'mmapv1', u'wiredTiger'], u'maxBsonObjectSize': 16777216, u'ok': 1.0, u'bits': 64, u'modules': [], u'openssl': {u'compiled': u'OpenSSL 1.0.1t 3 May 2016', u'running': u'OpenSSL 1.0.1t 3 May 2016'}, u'javascriptEngine': u'mozjs', u'version': u'3.4.6', u'gitVersion': u'c55eb86ef46ee7aede3b1e2a5d184a7df4bfb5b5', u'versionArray': [3, 4, 6, 0], u'debug': False, u'buildEnvironment': {u'cxxflags': u'-Woverloaded-virtual -Wno-maybe-uninitialized -std=c++11', u'cc': u'/opt/mongodbtoolchain/v2/bin/gcc: gcc (GCC) 5.4.0', u'linkflags': u'-pthread -Wl,-z,now -rdynamic -Wl,--fatal-warnings -fstack-protector-strong -fuse-ld=gold -Wl,--build-id -Wl,-z,noexecstack -Wl,--warn-execstack -Wl,-z,relro', u'distarch': u'x86_64', u'cxx': u'/opt/mongodbtoolchain/v2/bin/g++: g++ (GCC) 5.4.0', u'ccflags': u'-fno-omit-frame-pointer -fno-strict-aliasing -ggdb -pthread -Wall -Wsign-compare -Wno-unknown-pragmas -Winvalid-pch -Werror -O2 -Wno-unused-local-typedefs -Wno-unused-function -Wno-deprecated-declarations -Wno-unused-but-set-variable -Wno-missing-braces -fstack-protector-strong -fno-builtin-memcmp', u'target_arch': u'x86_64', u'distmod': u'debian81', u'target_os': u'linux'}, u'sysInfo': u'deprecated', u'allocator': u'tcmalloc'} [u'admin', u'local']
Noice.
0 notes
Text
mongo/Dockerfile for Windows Container at master · docker-library/mongo
FROM microsoft/windowsservercore
SHELL [“powershell”, “-Command”, “$ErrorActionPreference = ‘Stop’;”]
ENV MONGO_VERSION 3.4.4 ENV MONGO_DOWNLOAD_URL http://downloads.mongodb.org/win32/mongodb-win32-x86_64-2008plus-ssl-${MONGO_VERSION}-signed.msi ENV MONGO_DOWNLOAD_SHA256 73d1121a1fe58fe29c4fb7b6f4b79a4d33afa666f357960419ef83635396f977
RUN Write-Host (‘Downloading {0} …’ -f…
View On WordPress
0 notes
Link
There is much to like about Docker. Much has been written about it, and about how secure the containerization is.
This post isn’t about that. This is about keeping what’s inside each container secure. I believe we have a fundamental problem here.
Earlier this month, a study on security vulnerabilities on Docker Hub came out, and the picture isn’t pretty. One key finding:
Over 80% of the :latest versions of official images contained at least on high severity vulnerability!
And it’s not the only one raising questions.
Let’s dive in and see how we got here.
It’s hard to be secure, but Debian makes it easier
Let’s say you want to run a PHP application like WordPress under Apache. Here are the things you need to keep secure:
WordPress itself
All plugins, themes, customizations
All PHP libraries it uses (MySQL, image-processing, etc.)
MySQL
Apache
All libraries MySQL or Apache use: OpenSSL, libc, PHP itself, etc.
The kernel
All containerization tools
On Debian (and most of its best-known derivatives), we are extremely lucky to have a wonderful security support system. If you run a Debian system, the combination of unattended-updates, needrestart, debsecan, and debian-security-support will help one keep a Debian system secure and verify it is. When the latest OpenSSL bug comes out, generally speaking by the time I wake up, unattended-updates has already patched it, needrestart has already restarted any server that uses it, and I’m protected. Debian’s security team generally backports fixes rather than just say “here’s the new version”, making it very safe to automatically apply patches. As long as I use what’s in Debian stable, all layers mentioned above will be protected using this scheme.
This picture is much nicer than what we see in Docker.
Problems
We have a lot of problems in the Docker ecosystem:
No built-in way to know when a base needs to be updated, or to automatically update it
Diverse and complicated vendor security picture
No way to detect when intermediate libraries need to be updated
Complicated final application security picture
Let’s look at them individually.
Problem #1: No built-in way to know when a base needs to be updated, or to automatically update it
First of all, there is nothing in Docker like unattended-updates. Although a few people have suggested ways to run unattended-updates inside containers, there are many reasons that approach doesn’t work well. The standard advice is to update/rebuild containers.
So how do you know when to do that? It is not all that obvious. Theoretically, official OS base images will be updated when needed, and then other Docker hub images will detect the base update and be rebuilt. So, if a bug in a base image is found, and if the vendors work properly, and if you are somehow watching, then you could be protected. There is work in this area; tools such as watchtower help here.
But this can lead to a false sense of security, because:
Problem #2: Diverse and complicated vendor security picture
Different images can use different operating system bases. Consider just these official images, and the bases they use: (tracking latest tag on each)
nginx: debian:stretch-slim (stretch is pre-release at this date!)
mysql: debian:jessie
mongo: debian:wheezy-slim (previous release)
apache httpd: debian:jessie-backports
postgres: debian:jessie
node: buildpack-deps:jessie, eventually depends on debian:jessie
wordpress: php:5.6-apache, eventually depends on debian:jessie
And how about a few unofficial images?
oracle/openjdk: oraclelinux:latest
robotamer/citadel: debian:testing (dangerous, because testing is an alias for different distros at different times)
http://ift.tt/2qqFJ8A: ubuntu of some sort
The good news is that Debian jessie seems to be pretty popular here. The bad news is that you see everything from Oracle Linux, to Ubuntu, to Debian testing, to Debian oldstable in just this list. Go a little further, and you’ll see Alpine Linux, CentOS, and many more represented.
Here’s the question: what do you know about the security practices of each of these organizations? How well updated are their base images? Even if it’s Debian, how well updated is, for instance, the oldstable or the testing image?
The attack surface here is a lot larger than if you were just using a single OS. But wait, it gets worse:
Problem #3: No way to detect when intermediate libraries need to be updated
Let’s say your Docker image is using a base that is updated immediately when a security problem is found. Let’s further assume that your software package (WordPress, MySQL, whatever) is also being updated.
What about the intermediate dependencies? Let’s look at the build process for nginx. The Dockerfile for it begins with Debian:stretch-slim. But then it does a natural thing: it runs an apt-get install, pulling in packages from both Debian and an nginx repo.
I ran the docker build across this. Of course, the apt-get command brings in not just the specified packages, but also their dependencies. Here are the ones nginx brought in:
fontconfig-config fonts-dejavu-core gettext-base libbsd0 libexpat1 libfontconfig1 libfreetype6 libgd3 libgeoip1 libicu57 libjbig0 libjpeg62-turbo libpng16-16 libssl1.1 libtiff5 libwebp6 libx11-6 libx11-data libxau6 libxcb1 libxdmcp6 libxml2 libxpm4 libxslt1.1 nginx nginx-module-geoip nginx-module-image-filter nginx-module-njs nginx-module-xslt ucf
Now, what is going to trigger a rebuild if there’s a security fix to libssl1.1 or libicu57? (Both of these have a history of security holes.) The answer, for the vast majority of Docker images, seems to be: nothing automatic.
Problem #4: Complicated final application security picture
And that brings us to the last problem: Let’s say you want to run an application in Docker. exim, PostgreSQL, Drupal, or maybe something more obscure. Who is watching for security holes in it? If you’re using Debian packages, the Debian security team is. If you’re using a Docker image, well, maybe it’s the random person that contributed it, maybe it’s the vendor, maybe it’s Docker, maybe it’s nobody. You have to take this burden on yourself, to validate the security support picture for each image you use.
Conclusion
All this adds up to a lot of work, which is not taken care of for you by default in Docker. It is no surprise that many Docker images are insecure, given this picture. The unfortunate reality is that many Docker containers are running with known vulnerabilities that have known fixes, but just aren’t, and that’s sad.
I wonder if there are any practices people are using that can mitigate this better than what the current best-practice recommendations seem to be?
via Planet Debian
0 notes
Text
Spring Boot Microservices + MongoDB in Docker Containers | Step by step tutorial for Beginners
Full Video Link: https://youtu.be/qWzBUwKiCpM Hi, a new #video on step by step #tutorial for #springboot #microservices running in #docker #container with #mongodb also running in #docker #container is published on #codeonedigest #youtube channel. Easy
MongoDB is an open-source document database and leading NoSQL database. MongoDB is written in C++. This video will give you complete understanding of running the MongoDB in docker container. MongoDB works on concept of collection and document. MongoDB is a cross-platform, document-oriented database that provides, high performance, high availability, and easy scalability. Mongo Database –…

View On WordPress
#compass#container#docker#docker container#docker file#docker full course#docker image#docker tutorial#docker tutorial for beginners#microservices#microservices mongodb#mongo db#mongo dockerfile#mongodb#mongodb compass#mongodb configuration#mongodb configuration file#mongodb connection error#mongodb docker compose#mongodb docker install#mongodb docker setup#mongodb docker tutorial#mongodb docker volume#mongodb installation#Mongodb java#mongodb microservices example#mongodb tutorial#mongodb tutorial for beginners#monogodb tutorial#Spring boot
0 notes
Text
Spring Boot Microservice Project with MongoDB in Docker Container | Tutorial with Java Example
Full Video Link: https://youtu.be/dgGoQuZyszs Hi, a new #video on step by step #tutorial for #springboot #microservices with #mongodb in #docker #container is published on #codeonedigest #youtube channel. Quick guide for spring boot microservices proje
In this video, we will learn, how to pull mongodb image from dockerhub repository, how to run mongodb in docker container, how to connect Spring Boot Microservice Application with the mongodb running in a docker container and testing the GET and POST end-points of the microservices to pull and push customer data. Spring Boot is built on the top of the spring framework and contains all the…

View On WordPress
#compass#container#docker#docker container#docker file#docker full course#docker image#docker tutorial#docker tutorial for beginners#microservices#microservices mongodb#mongo db#mongo dockerfile#mongodb#mongodb compass#mongodb configuration#mongodb configuration file#mongodb connection error#mongodb docker compose#mongodb docker install#mongodb docker setup#mongodb docker tutorial#mongodb docker volume#mongodb installation#Mongodb java#mongodb microservices example#mongodb tutorial#mongodb tutorial for beginners#monogodb tutorial#nosql
0 notes
Text
Spring Boot Microservices + MongoDB in Docker Containers | Step by step tutorial for Beginners
Hi, a new #video on step by step #tutorial for #springboot #microservices running in #docker #container with #mongodb also running in #docker #container is published on #codeonedigest #youtube channel. Easy guide for spring boot microservices project.
MongoDB is an open-source document database and leading NoSQL database. MongoDB is written in C++. This video will give you complete understanding of running the MongoDB in docker container. MongoDB works on concept of collection and document. MongoDB is a cross-platform, document-oriented database that provides, high performance, high availability, and easy scalability. Mongo Database –…
View On WordPress
#compass#container#docker#docker container#docker file#docker full course#docker image#docker tutorial#docker tutorial for beginners#microservices#microservices mongodb#mongo db#mongo dockerfile#mongodb#mongodb compass#mongodb configuration#mongodb configuration file#mongodb connection error#mongodb docker compose#mongodb docker install#mongodb docker setup#mongodb docker tutorial#mongodb docker volume#mongodb installation#Mongodb java#mongodb microservices example#mongodb tutorial#mongodb tutorial for beginners#monogodb tutorial#Spring boot
0 notes
Text
Spring Boot Microservice Project with MongoDB in Docker Container | Tutorial with Java Example
Hi, a new #video on step by step #tutorial for #springboot #microservices with #mongodb in #docker #container is published on #codeonedigest #youtube channel. Quick guide for spring boot microservices project with mongodb in container. #springboot #mongo
In this video, we will learn, how to pull mongodb image from dockerhub repository, how to run mongodb in docker container, how to connect Spring Boot Microservice Application with the mongodb running in a docker container and testing the GET and POST end-points of the microservices to pull and push customer data. Spring Boot is built on the top of the spring framework and contains all the…

View On WordPress
#compass#container#docker#docker container#docker file#docker full course#docker image#docker tutorial#docker tutorial for beginners#microservices#microservices mongodb#mongo db#mongo dockerfile#mongodb#mongodb compass#mongodb configuration#mongodb configuration file#mongodb connection error#mongodb docker compose#mongodb docker install#mongodb docker setup#mongodb docker tutorial#mongodb docker volume#mongodb installation#Mongodb java#mongodb microservices example#mongodb tutorial#mongodb tutorial for beginners#monogodb tutorial#nosql
0 notes
Video
youtube
Spring Boot Microservices + MongoDB in Docker Containers | Step by step ...
Hi, a new #video on step by step #tutorial for #springboot #microservices running in #docker #container with #mongodb also running in #docker #container is published on #codeonedigest #youtube channel. Easy guide for spring boot microservices project with mongodb in container.
#springboot #mongodb #microservices #mongodb #springboot #Springbootmicroserviceswithmongodb #stepbystepspringbootmicroserviceswithmongdb #Springboottutorial #springboot #springbootproject #springboottutorialforbeginners #springbootannotations #springbootmicroservices #springbootfullcourse #springboottutorial #springbootprojectstepbystep #Mongodbjava #mongodbcompass #mongodbinstallation #monogodbtutorial #mongodb #mongodbtutorialforbeginners #Springbootmicroservicesmongodb #springbootmicroservicesmonitoringtools #springbootmicroservicesmongodbexample #springbootmicroservicesmonorepo #springbootmicroservices #springbootmongodb #microservicesmongodb #mongodbmicroservicesexample #Mongodbinstallation #mongodb #mongodbtutorial #mongodbtutorialforbeginners #mongodbconnectionerror #mongodbconfigurationfile #mongodbconfiguration #mongodbdockervolume #mongodbdockerinstall #mongodbdockersetup #mongodbdockertutorial #mongodbdockercompose #mongodockerfile #Dockertutorial #dockertutorialforbeginners #dockercontainer #dockerfullcourse #compass #docker #container #dockerimage #dockerfile #nosql #mongodbinstallationforwindows10
#youtube#spring#spring boot#springboot#java#microservice#microservices#mongodb#mongo db#docker#docker container#dockerfile#docker image#port mapping#port forwarding#port expose#docker port expose#bridge network#docker bridge network#postman
1 note
·
View note
Text
flask docker vagrant mac inceptions
First, some vagrant preparation stuff, cos I docker doesn't play well on mac.
$ vagrant up $ vagrant plugin install vagrant-vbguest $ vagrant ssh $ sudo apt-get install -y virtualbox-guest-dkms virtualbox-guest-utils virtualbox-guest-x11 $ sudo apt-get install linux-image-extra-$(uname -r) linux-image-extra-virtual
The Vagrantfile I used looks like this.
# -*- mode: ruby -*- # vi: set ft=ruby : Vagrant.configure(2) do |config| config.vm.provider :virtualbox do |provider| provider.check_guest_additions = false provider.functional_vboxsf = false provider.memory = 1024 provider.cpus = 1 end config.vm.define "pewpew" do |pewpew| pewpew.vm.box = "ubuntu/trusty64" pewpew.vm.box_check_update = false pewpew.vm.box_download_insecure = true pewpew.vm.network "private_network", ip: "192.168.50.14", netmask: "255.255.255.0" pewpew.vm.hostname = "pewpew.mydomain.com" pewpew.vm.network "forwarded_port", guest: 80, host: 8080, auto_correct: true# <-- nginx pewpew.vm.network "forwarded_port", guest: 443, host: 8082, auto_correct: true# <-- nginx pewpew.vm.network "forwarded_port", guest: 5000, host: 5000, auto_correct: true# <-- flask / gunicorn pewpew.vm.network "forwarded_port", guest: 27017, host: 27017, auto_correct: true# <-- mongodb pewpew.vm.network "forwarded_port", guest: 2376, host: 2376, auto_correct: true# <-- docker-machine pewpew.vm.network "forwarded_port", guest: 8081, host: 8081, auto_correct: true# <-- image-generator pewpew.vm.synced_folder "~/Vagrant/docker/", "/srv/", owner: "root", group: "root" # add swap space pewpew.vm.provision :shell, inline: "fallocate -l 2G /swapfile && chmod 0600 /swapfile && mkswap /swapfile && swapon /swapfile && echo '/swapfile none swap sw 0 0' >> /etc/fstab" pewpew.vm.provision :shell, inline: "echo vm.swappiness = 10 >> /etc/sysctl.conf && echo vm.vfs_cache_pressure = 50 >> /etc/sysctl.conf && sysctl -p" end config.ssh.username = "vagrant" config.ssh.pty = true config.vm.provision "shell" do |shell| shell.privileged = true shell.inline = "sudo sed -i '/tty/!s/mesg n/tty -s \\&\\& mesg n/' /root/.profile" end end
My /etc/hosts file contains this line:
192.168.50.14 pewpew.mydomain.com
My working directory on my mac looks like this:
$ tree . ├── Vagrantfile ├── app │ ├── Dockerfile │ ├── index.py │ └── pewpew.wsgi ├── db │ └── Dockerfile └── rp ├── Dockerfile └── site.conf
This directory is mounted into the Vagrant vm at /srv.
Let's go through each file:
--- /srv/app/Dockerfile --- FROM python:2.7 RUN pip install --no-cache-dir Flask==0.10.1 RUN pip install --no-cache-dir gunicorn==19.3.0 RUN pip install --no-cache-dir eventlet==0.17.4 RUN pip install --no-cache-dir pymongo==3.4.0 COPY index.py /app/ COPY pewpew.wsgi /app/ EXPOSE 5000 WORKDIR /app CMD ["gunicorn", "-k", "eventlet", "-b", "0.0.0.0:5000", "-w", "1", "index:app"] --- /srv/app/index.py --- import os from flask import Flask from pymongo import MongoClient app = Flask(__name__) db = "mongodb" client = MongoClient(db, 27017) @app.route("/") def hello(): try: server_info = client.server_info() db_names = client.database_names() client.close() return "Pew Pew!\n%s\n%s\n" % (server_info, db_names) except: return "Pew Pew! DB failing...\n" if __name__ == '__main__': app.run() --- /srv/app/pewpew.wsgi --- import sys PROJECT_DIR = '/app/' sys.path.append(PROJECT_DIR) from pewpew import app as application --- /srv/db/Dockerfile --- FROM mongo EXPOSE 27017 --- /srv/rp/Dockerfile --- FROM nginx COPY site.conf /etc/nginx/conf.d/site.conf EXPOSE 80 443 --- /srv/rp/Dockerfile --- server { listen 80; server_name pewpew.mydomain.com; access_log /var/log/nginx/nginx_access_myapp.log; error_log /var/log/nginx/nginx_error_myapp.log; location / { proxy_pass http://flaskapp:5000/; } }
Ok let's start. ssh into the vagrant box and check the kernel. To use docker you need 3.10+ or sum chit...
$ vagrant ssh $ uname -r 3.13.0-98-generic
Ok cool, install the docker daemon.
$ sudo curl -sSL https://get.docker.com/ | sh
Now let's build these images from the three Dockerfiles we have.
$ sudo docker build -t reverseproxy /srv/rp/ $ sudo docker build -t flaskapp /srv/app/ $ sudo docker build -t mongodb /srv/db/ $ docker images REPOSITORY TAG IMAGE ID CREATED SIZE reverseproxy latest fa2ead9fdb67 11 minutes ago 107MB flaskapp latest 48ce64a24bea About an hour ago 681MB nginx latest b8efb18f159b 12 days ago 107MB python 2.7 fa8e55b2235d 13 days ago 673MB mongo latest b39de1d79a53 13 days ago 359MB
Start the database container first.
$ docker run -d -e DB_PORT_27017_TCP_ADDR='0.0.0.0' -v /srv/db:/data -p 27017:27017 --name mongodb mongo $ docker ps -a CONTAINER ID IMAGE COMMAND CREATED STATUS PORTS NAMES c610b1a11752 mongo "docker-entrypoint..." 3 seconds ago Up 1 second 0.0.0.0:27017->27017/tcp mongodb
Then start the flask application container.
$ docker run -d -p 5000:5000 --name flaskapp --link mongodb:mongodb flaskapp $ docker ps -a CONTAINER ID IMAGE COMMAND CREATED STATUS PORTS NAMES ebf6ba70b2f8 flaskapp "gunicorn -k event..." 2 seconds ago Up 1 second 0.0.0.0:5000->5000/tcp flaskapp c610b1a11752 mongo "docker-entrypoint..." 24 seconds ago Up 23 seconds 0.0.0.0:27017->27017/tcp mongodb
Send a request to the app
$ curl http://127.0.0.1:5000 Pew Pew! {u'storageEngines': [u'devnull', u'ephemeralForTest', u'mmapv1', u'wiredTiger'], u'maxBsonObjectSize': 16777216, u'ok': 1.0, u'bits': 64, u'modules': [], u'openssl': {u'compiled': u'OpenSSL 1.0.1t 3 May 2016', u'running': u'OpenSSL 1.0.1t 3 May 2016'}, u'javascriptEngine': u'mozjs', u'version': u'3.4.6', u'gitVersion': u'c55eb86ef46ee7aede3b1e2a5d184a7df4bfb5b5', u'versionArray': [3, 4, 6, 0], u'debug': False, u'buildEnvironment': {u'cxxflags': u'-Woverloaded-virtual -Wno-maybe-uninitialized -std=c++11', u'cc': u'/opt/mongodbtoolchain/v2/bin/gcc: gcc (GCC) 5.4.0', u'linkflags': u'-pthread -Wl,-z,now -rdynamic -Wl,--fatal-warnings -fstack-protector-strong -fuse-ld=gold -Wl,--build-id -Wl,-z,noexecstack -Wl,--warn-execstack -Wl,-z,relro', u'distarch': u'x86_64', u'cxx': u'/opt/mongodbtoolchain/v2/bin/g++: g++ (GCC) 5.4.0', u'ccflags': u'-fno-omit-frame-pointer -fno-strict-aliasing -ggdb -pthread -Wall -Wsign-compare -Wno-unknown-pragmas -Winvalid-pch -Werror -O2 -Wno-unused-local-typedefs -Wno-unused-function -Wno-deprecated-declarations -Wno-unused-but-set-variable -Wno-missing-braces -fstack-protector-strong -fno-builtin-memcmp', u'target_arch': u'x86_64', u'distmod': u'debian81', u'target_os': u'linux'}, u'sysInfo': u'deprecated', u'allocator': u'tcmalloc'} [u'admin', u'local']
Nice! Now let's try with the nginx container.
$ docker run -d -p 80:80 --name reverseproxy --link flaskapp:flaskapp reverseproxy $ sudo docker ps -a CONTAINER ID IMAGE COMMAND CREATED STATUS PORTS NAMES 716f3c7c321c reverseproxy "nginx -g 'daemon ..." 1 second ago Up Less than a second 0.0.0.0:80->80/tcp, 443/tcp reverseproxy ebf6ba70b2f8 flaskapp "gunicorn -k event..." 19 seconds ago Up 18 seconds 0.0.0.0:5000->5000/tcp flaskapp c610b1a11752 mongo "docker-entrypoint..." 41 seconds ago Up 39 seconds 0.0.0.0:27017->27017/tcp mongodb
Send a request to the nginx vhost.
$ curl http://127.0.0.1/ Pew Pew! {u'storageEngines': [u'devnull', u'ephemeralForTest', u'mmapv1', u'wiredTiger'], u'maxBsonObjectSize': 16777216, u'ok': 1.0, u'bits': 64, u'modules': [], u'openssl': {u'compiled': u'OpenSSL 1.0.1t 3 May 2016', u'running': u'OpenSSL 1.0.1t 3 May 2016'}, u'javascriptEngine': u'mozjs', u'version': u'3.4.6', u'gitVersion': u'c55eb86ef46ee7aede3b1e2a5d184a7df4bfb5b5', u'versionArray': [3, 4, 6, 0], u'debug': False, u'buildEnvironment': {u'cxxflags': u'-Woverloaded-virtual -Wno-maybe-uninitialized -std=c++11', u'cc': u'/opt/mongodbtoolchain/v2/bin/gcc: gcc (GCC) 5.4.0', u'linkflags': u'-pthread -Wl,-z,now -rdynamic -Wl,--fatal-warnings -fstack-protector-strong -fuse-ld=gold -Wl,--build-id -Wl,-z,noexecstack -Wl,--warn-execstack -Wl,-z,relro', u'distarch': u'x86_64', u'cxx': u'/opt/mongodbtoolchain/v2/bin/g++: g++ (GCC) 5.4.0', u'ccflags': u'-fno-omit-frame-pointer -fno-strict-aliasing -ggdb -pthread -Wall -Wsign-compare -Wno-unknown-pragmas -Winvalid-pch -Werror -O2 -Wno-unused-local-typedefs -Wno-unused-function -Wno-deprecated-declarations -Wno-unused-but-set-variable -Wno-missing-braces -fstack-protector-strong -fno-builtin-memcmp', u'target_arch': u'x86_64', u'distmod': u'debian81', u'target_os': u'linux'}, u'sysInfo': u'deprecated', u'allocator': u'tcmalloc'} [u'admin', u'local']
Awesome, we can also go to our http://pewpew.mydomain.com URL in a browser on our mac, as we have forwarded the port on our Vagrant box and added a local DNS entry in /etc/hosts remember?
0 notes