#mongo in docker
Explore tagged Tumblr posts
Visit Tumblr Blog
Explore Tumblr blogs with no restrictions, modern design and the best experience.
Last Seen Tumblr Blogs


Fun Fact
Celebrities use Tumblr as well.
Text
youtube
#youtube#video#codeonedigest#microservices#docker#microservice#nodejs module#nodejs express#node js#nodejs#nodejs projects#nodejs tutorial#node js development company#node js express#node js training#mongo database#mongo db#mongoose#mongodb#docker image#docker container#docker tutorial#docker course#dockerfile#dockerhub
0 notes
Text
Let's Build a Full-Stack App Using the MERN Stack! Part 1: Mongo DB
Where Are We Storing Stuff? Before we code our full-stack MERN (MongoDB, Express, React, and Node.js) application, we need a place to store our data. The best way to do this is to set up a MongoDB instance. We’ll run MongoDB inside a Docker container to keep things simple and easily manageable. Setting Up MongoDB with Docker We’ll use the official MongoDB image from Docker Hub. To pull and run…

View On WordPress
0 notes
Text
Java Software Engineer
Role: Java Software EngineerSkills: Microservices, Java, Spring Boot & AWS CloudExperience: 6+ yearsLocation: BrisbaneJob Type: Full time6+ years of API and Microservices development experience with modern Java (version 11), Spring Boot, AWS Cloud, Docker, Apache Kafka, ActiveMQ, SQL (Oracle RDBMS, Amazon RDS – PostgreSQL), NoSQL (MongoDB, Mongo Atlas), Web Services (RESTful, SOAP, HTTP), and API…
0 notes
Text
Ansible and Docker: Automating Container Management
In today's fast-paced tech environment, containerization and automation are key to maintaining efficient, scalable, and reliable infrastructure. Two powerful tools that have become essential in this space are Ansible and Docker. While Docker enables you to create, deploy, and run applications in containers, Ansible provides a simple yet powerful automation engine to manage and orchestrate these containers. In this blog post, we'll explore how to use Ansible to automate Docker container management, including deployment and orchestration.
Why Combine Ansible and Docker?
Combining Ansible and Docker offers several benefits:
Consistency and Reliability: Automating Docker container management with Ansible ensures consistent and reliable deployments across different environments.
Simplified Management: Ansible’s easy-to-read YAML playbooks make it straightforward to manage Docker containers, even at scale.
Infrastructure as Code (IaC): By treating your infrastructure as code, you can version control, review, and track changes over time.
Scalability: Automation allows you to easily scale your containerized applications by managing multiple containers across multiple hosts seamlessly.
Getting Started with Ansible and Docker
To get started, ensure you have Ansible and Docker installed on your system. You can install Ansible using pip: pip install ansible
And Docker by following the official Docker installation guide for your operating system.
Next, you'll need to set up an Ansible playbook to manage Docker. Here’s a simple example:
Example Playbook: Deploying a Docker Container
Create a file named deploy_docker.yml:
---
- name: Deploy a Docker container
hosts: localhost
tasks:
- name: Ensure Docker is installed
apt:
name: docker.io
state: present
become: yes
- name: Start Docker service
service:
name: docker
state: started
enabled: yes
become: yes
- name: Pull the latest nginx image
docker_image:
name: nginx
tag: latest
source: pull
- name: Run a Docker container
docker_container:
name: nginx
image: nginx
state: started
ports:
- "80:80"
In this playbook:
We ensure Docker is installed and running.
We pull the latest nginx Docker image.
We start a Docker container with the nginx image, mapping port 80 on the host to port 80 on the container.
Automating Docker Orchestration
For more complex scenarios, such as orchestrating multiple containers, you can extend your playbook. Here’s an example of orchestrating a simple web application stack with Nginx, a Node.js application, and a MongoDB database:
---
- name: Orchestrate web application stack
hosts: localhost
tasks:
- name: Ensure Docker is installed
apt:
name: docker.io
state: present
become: yes
- name: Start Docker service
service:
name: docker
state: started
enabled: yes
become: yes
- name: Pull necessary Docker images
docker_image:
name: "{{ item }}"
tag: latest
source: pull
loop:
- nginx
- node
- mongo
- name: Run MongoDB container
docker_container:
name: mongo
image: mongo
state: started
ports:
- "27017:27017"
- name: Run Node.js application container
docker_container:
name: node_app
image: node
state: started
volumes:
- ./app:/usr/src/app
working_dir: /usr/src/app
command: "node app.js"
links:
- mongo
- name: Run Nginx container
docker_container:
name: nginx
image: nginx
state: started
ports:
- "80:80"
volumes:
- ./nginx.conf:/etc/nginx/nginx.conf
links:
- node_app
Conclusion
By integrating Ansible with Docker, you can streamline and automate your container management processes, making your infrastructure more consistent, scalable, and reliable. This combination allows you to focus more on developing and less on managing infrastructure. Whether you're managing a single container or orchestrating a complex multi-container environment, Ansible and Docker together provide a powerful toolkit for modern DevOps practices.
Give it a try and see how much time and effort you can save by automating your Docker container management with Ansible!
For more details click www.qcsdclabs.com
#redhatcourses#information technology#containerorchestration#container#linux#docker#kubernetes#containersecurity#dockerswarm#aws
0 notes
Text
Docking Your Workflow: A Hands-On Guide to Docker Compose Installation and Examples

What is docker-compose?
It is a tool which is used to create and start Docker application by using a single command.
It simplifies the deployment of complex applications by defining their architecture in a human-readable format.
This configuration file, typically written in YAML, outlines the services, networks, and volumes needed to run your application.
Docker Compose not only simplifies the management of containers but also encourages collaboration among developers and teams
Users can activate all the services (containers) using a single command.
Docker compose features
Purpose:Orchesrating multi-container application
Configuration:YAML base configuration
Scale:Multiple containers
Networking:Built-in networking and service discovery
Dependancy:Images and compose configuration
Ecosystem:Docker Hub and private registries
How to Install Docker Compose
Prerequisites:
Before installing Docker Compose, ensure that you have Docker installed on your system.
Installation Steps:
Check the Current Release:
Visit the Docker Compose GitHub release page to find the latest stable release. Identify the version number you want to install.
Download the Docker Compose Binary:
sudo curl -L "https://github.com/docker/compose/releases/download/1.23.2/docker-compose-$(uname -s)-$(uname -m)" -o /usr/local/bin/docker-compose

Apply Executable Permissions:
Make the downloaded binary executable:
sudo chmod +x /usr/local/bin/docker-compose

Verify Installation:
Confirm the successful installation by checking the version:
docker-compose –version

Docker Compose Commands:
docker-compose build =Look for all services containing the build
docker-compose run=Run a one-time command against a service
docker-compose up=Command used to start all the services of the container.
docker Compose down=This syntax is used to stop all the services that were started.
docker-compose -f =Specify the location of a docker-compose configuration file by adding the -f flag
docker-compose start=Start existing containers for a service
docker_compose_v=To check the version of docker-compose, we use this command.
docker ps=This command is used to bring out the whole process of Docker.
docker Compose.yml=This command is used to configure application services using YAML files.
docker-compose up -d=Used to run a Docker-Compose file.
docker Compose up -d -scale=Used to scale the service of the container.
pip install -U Docker-compose= Command used to install Docker Compose using pip.
Compose step process
1 Create a Directory
Creating the Dockerfile for the app environment
defining the services in docker-compose.yml
starting the application
Running Application using Docker Compose
Example:
Follow the following example
1) Create a Directory
mkdir docker-compose-praman

2)Go to the directory
cd docker-composer-praman

3) Define docker-compose.yml file
sudo vi docker-compose.yml
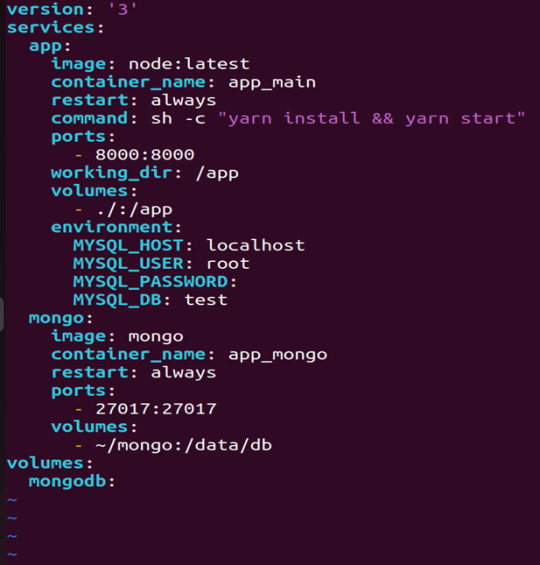
let’s dismantle the above code and understand it by piece:
version: It refers to the docker-compose version (Latest 3)
services: It defines the services that we need to run
app: It is a custom name for one of your containers
image: The image which we have to pull. Here we are using node:latest and mongo
container_name: It is the name for each container
restart: starts/restarts a service container
port: It defines the custom port to run the container
working_dir: It is the current working directory for the service container
environment: It defines the environment variables, such as DB credentials, and so on
command: It is the command to run the service
4)How to run the multi-container:
We need to build our multi-container using docker build.
docker-compose build (Command to build the docker-compose.yml)

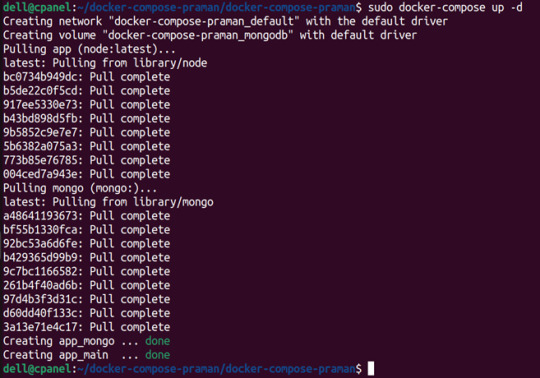
docker-compose up (Command to run multiple containers using docker-compose)
docker-compose up -d (Command to run multiple containers using docker-compose in detached mode)
docker-compose ps (Command to list the running container services)

Sample output for running mongodb service using docker:

Docker Compose Disadvantages:
Below are the drawbacks of Docker-Compose.
1.You have to spend more time and effort, installing Docker on your server.
2.Docker-Compose requires manual updates and fails when it comes to rebooting.
3.You have to spend more time and effort, installing Docker on your server.
4. However, docker-compose is already there in your system if you have installed Docker.
Docker Compose Use Cases:
Automated testing environments-
Compose supports automated testing, which is an essential part of CI/CD as it can easily create and destroy the required testing environment
Single host deployments-
In Docker Compose, containers are designed to run on a single host as they have traditionally been focused on development and testing workflows.
Development Environments-
Compose is a fast and simple way of starting projects as it can quickly spin up new isolated development environments.
High productivity -
Docker-Compose increases productivity and reduces the time taken for each task
Security -
All the containers are isolated from each other, reducing the threat landscape
Configuration-
Docker-Compose files are written in YAML scripts hence, provide easy and quick configuration.
Credits - Sachin Auti (DevOps)
MetricsViews Pvt. Ltd.
MetricsViews specializes in building a solid DevOps strategy with cloud-native including AWS, GCP, Azure, Salesforce, and many more. We excel in microservice adoption, CI/CD, Orchestration, and Provisioning of Infrastructure - with Smart DevOps tools like Terraform, and CloudFormation on the cloud.
www.metricsviews.com
0 notes
Text
How to Install MongoDB in Ubuntu

In this article we are going to see how to install mongodb in ubuntu. MongoDB is an open source database management platform based on document which stores data in JSON-like formats. It is a Non-relational database, or ‘ NoSQL ‘database which is highly scalable, modular and distributed.
Read: How to Launch AWS EC2 Instance
How to Install MongoDB in Ubuntu
To Install mongodb in…
View On WordPress
0 notes
Photo
Spring Boot CRUD - Mongo DB + Docker https://ift.tt/3BxeqhB
0 notes
Text
[Docker] Connect to mongodb inside docker container
[Docker] Connect to mongodb inside docker container
Here are ways to connect to mongodb that deployed inside a docker container from another docker container in the same docker-compose file. Here is the Dockerfile FROM node:14 # Create app directory WORKDIR /usr/src/app # Install app dependencies # A wildcard is used to ensure both package.json AND package-lock.json are copied # where available (npm@5+) COPY package*.json ./ RUN npm install #…
View On WordPress
0 notes
Photo

Reading Notes #429 https://ift.tt/2zdiPeK
0 notes
Photo

90s Dockers crazy pattern shirt size L ¥5900+tax パリッとしたコットンにドットと2重丸のクレイジーパターン 大変良く出来ました💮 #newarrvals #dockers #levis #crazypatterns 総柄シャツ #vintage #mongos #モンゴス #札幌 #札幌古着屋 https://www.instagram.com/p/B-qmzA6Bh04/?igshid=tuyqrvwzwluw
0 notes
Text
New video is out!
Docker Networking | Deploying MongoDB
This video explains the different Docker Networks available and how they differ from each other. To explain this, we'll be using MongoDB and Mongo Express using Docker.
Please share and subscribe!
https://youtu.be/JWpdm9Ebbr4
1 note
·
View note
Text
https://codeonedigest.blogspot.com/2023/07/aws-ecs-setup-and-run-mongodb-in-ecs.html
#youtube#video#codeonedigest#microservices#aws#microservice#springboot#docker#spring boot#mongo db#aws ecs service#aws ecs docker compose tutorial#aws ecs demo#ecs
0 notes
Text
Хакатон Яндекса: когда всё пошло не так

Примерно за неделю до события бывший коллега скинул вот такую ссылочку: https://vk.com/wall-17796776_8037 и спросил хочет ли кто пойти? Ознакомившись с условиями я понял, что:
потеряю 1 выходной, а не два;
не требуются какие-то узкоспециализированные знания, типа определение событий на видео;
достаточно написать небольшой сервис, чтобы иметь шансы на победу;
ещё ни разу не участвовал в хакатонах и мне интересно как это;
уже ответил “идём”.
На том и порешили.
Добираться в центр Москвы всегда челлендж: никогда не знаешь сколько займёт дорога. В день икс я, как обычно, не угадал и приехал на час раньше. Сотрудник Яндекса провёл в какой-то подвал с пластиковыми партами и бананами на столе у входа. Предложил повесить куртку в гардеробе после чего ушёл встречать других участников. Из гардероба меня выгнала кофе-леди со словами: “это только для детей.” Не со всеми столами рядом стояли розетки и я обрадовался, что пришёл одним из первых. Так как оставалось около часа до начала мероприятия, то можно было успеть подготовить план работ на 2+ человек в виде мини презентации по разработке сервиса поиска рецептов.
Хакатон начался с презентации от разработчиков Алисы. Нам показали на чём можно разрабатывать сервисы, что такое грамматики, как их писать, где хранить данные, ожидаемый опыт пользователя от общения с сервисом. Дали доступ к закрытому API. Перерыв на туалет и 15 минут для объявлений от участников: получение фидбека на свои идеи, поиск людей в команду.
Начали кодить. Я взял на себя задачу сбора данных, а коллега писал фронт для общения с пользователями и формирования запроса к БД. Первая пара часов прошла молча. Когда скраппер был закончен, то сразу стал обкачивать сайт с рецептами. Через пару минут в консоли посыпались стектрейсы — бан. Пришлось подключиться к VPN, включить fake_useragent и добавить секундный crawl delay. Дело пошло, хоть и медленно.
Примерно через час отказала ба��а данных. Она не принимала никаких внешних и внутренних сигналов. Подключение по ssh занимало минуты. Это никак не тянуло на разрешённые 3 секунды тайм-аута. Наверное, зря я понадеялся, что MongoDB на VPS за 30 руб/мес хватит для простого сервиса. Вспомнил, что в Mongo MLAB есть FreeTier на 500 мб: зарегистрировался, ввёл IP 0.0.0.0 в whitelist и не смог подключиться из моего JupyterLab. Пришлось задействовать административный ресурс: нам в компании дают виртуальные тачки под свои некоммерческие цели. Некогда было настраивать авторизацию, поэтому свежеустановленная монга открылась миру. Ситуацию скрасил факт, что при обкачке я сохранял данные одновременно в две бд: удалённую (vps, для навыка) и локальную (docker, для резервирования). В три команды я сделал дамп, отправил его на новый сервер и восстановил базу. Выдохнул и налил чаю.

Коллега стал тестироваться на реальных данных. И тут произошёл новый факап: я не применил функцию lower() к ингредиентам. В итоге, в базе были и “Яблоко” и “яблоко” и всё это разные сущности. Я стал штудировать документацию и Гугл запросами вида “mongo lower elements in array”. Ничего. Пусто. Были какие-то куски кода на stack overflow со встроенными функциями для node.js, но я понятия не имел, как их заюзать в питоне. Перекачивать сайт не было смысла: с таким crawl delay это займёт более часа. Стоило просто считать все данные и перезаписать их заново, но время подходило к концу и я об этом не думал. Коллега предложил делать capitalize на ингредиентах: так мы потерям в полноте, но будет хоть какая-то выдача. Сойдёт.
Начали изучать выдачу. Ни одного блюда с яйцами на завтрак не оказалось. Надо было изначально искать сайты с простыми рецептами. Уже ничего не поделать. Я открыл Compass и вручную стал просматривать все записи в поисках более/менее простых описаний, чтобы хоть что-то показать на презентации. Волосы на голове медленно поползли вверх. Почти вся база нечитаема: много пропусков, у некоторых слов нет начала или окончания. В итоге, надо было найти не только несколько простых рецептов, но и их текст должен был быть хоть сколько нибудь осмысленным. И я нашёл спасительный банановый смузи.

После небольшой отладки и хардкода мы удовлетворились результатом. Наступила фаза тестирования на проде. Загрузили код в Яндекс.ОблачныеФункции. Посыпались ошибки от Алисы. Нет нужных библиотек. Организаторы сказали, что Яндекс не умеет в питоновские пакеты: их надо собирать в архив и заливать на сервер самостоятельно. Оооок.
Ошибки на этом не исчезли. Я вспомнил про ограничение в 1кб отправляемых данных. Коллега говорит: “Да неее, это не реально. Не может быть, чтобы здесь текста было больше килобайта.” Сохраняем рецепт на диск, wc -c recipe.txt, 2 килобайта. Как ты мог подвести меня, банановый смузи?
В голове посыпались варианты: разбивать на предложения, добавить переходы “назад”, “повтори”, “далее”. Почему-то вариант просто выдавать название блюда по ингредиентам казался недостойным. В этот момент объявляют, что до конца хакатона осталось 10 минут.
Оставшееся время ушло на причесывание исходников. Я с удовольствием посмотрел презентацию ребят. Целых 22 новых навыка для Алисы. Их отсняли и выложили в чат телеграм.
Послесловие
Хакатон — это весело. Воздух наполнен множеством идей. Ты погружаешься с головой в кодинг, результаты которого сможешь увидеть через несколько часов. Вокруг много людей, которые делают не менее интересные штуки и на них посмотреть чуть ли не желаннее, чем на собственный труд. В работе присутствует эффект домино: одна неверная ошибка наслаивается на другую и это всё может привести к тому, что проект не будет завершен. Чтобы сгладить этот эффект лучше готовиться заранее: составить подробный план, подготовить инфраструктуру, найти нужные библиотеки, ознакомиться с документацией, написать базовые классы и инструментарий. Звучит не честно, но по-другому никак. А самое главное — быть готовым снизить запланированный уровень/фичи проекта вплоть до самого примитивного. Написать хоть что-то всегда лучше, чем не сделать ничего. Хакатон — место, где презентуют рабочие протипы, проверяя их жизнеспособность и востребованность. И, если ты увидел в нём интерес (свой или чужой), то уже после можно дописать.

1 note
·
View note
Text
Exploring the Exciting Features of Spring Boot 3.1
Spring Boot is a popular Java framework that is used to build robust and scalable applications. With each new release, Spring Boot introduces new features and enhancements to improve the developer experience and make it easier to build production-ready applications. The latest release, Spring Boot 3.1, is no exception to this trend.
In this blog post, we will dive into the exciting new features offered in Spring Boot 3.1, as documented in the official Spring Boot 3.1 Release Notes. These new features and enhancements are designed to help developers build better applications with Spring Boot. By taking advantage of these new features, developers can build applications that are more robust, scalable, and efficient.
So, if you’re a developer looking to build applications with Spring Boot, keep reading to learn more about the exciting new features offered in Spring Boot 3.1!
Feature List:
1. Dependency Management for Apache HttpClient 4:
Spring Boot 3.0 includes dependency management for both HttpClient 4 and 5.
Spring Boot 3.1 removes dependency management for HttpClient 4 to encourage users to move to HttpClient 5.2. Servlet and Filter Registrations:
The ServletRegistrationBean and FilterRegistrationBean classes will now throw an IllegalStateException if registration fails instead of logging a warning.
To retain the old behaviour, you can call setIgnoreRegistrationFailure(true) on your registration bean.3. Git Commit ID Maven Plugin Version Property:
The property used to override the version of io.github.git-commit-id:git-commit-id-maven-plugin has been updated.
Replace git-commit-id-plugin.version with git-commit-id-maven-plugin.version in your pom.xml.4. Dependency Management for Testcontainers:
Spring Boot’s dependency management now includes Testcontainers.
You can override the version managed by Spring Boot Development using the testcontainers.version property.5. Hibernate 6.2:
Spring Boot 3.1 upgrades to Hibernate 6.2.
Refer to the Hibernate 6.2 migration guide to understand how it may affect your application.6. Jackson 2.15:
TestContainers
The Testcontainers library is a tool that helps manage services running inside Docker containers. It works with testing frameworks such as JUnit and Spock, allowing you to write a test class that starts up a container before any of the tests run. Testcontainers are particularly useful for writing integration tests that interact with a real backend service such as MySQL, MongoDB, Cassandra, and others.
Integration tests with Testcontainers take it to the next level, meaning we will run the tests against the actual versions of databases and other dependencies our application needs to work with executing the actual code paths without relying on mocked objects to cut the corners of functionality.
<dependency> <groupId>org.springframework.boot</groupId> <artifactId>spring-boot-testcontainers</artifactId> <scope>test</scope> </dependency> <dependency> <groupId>org.testcontainers</groupId> <artifactId>junit-jupiter</artifactId> <scope>test</scope> </dependency>
Add this dependency and add @Testcontainers in SpringTestApplicationTests class and run the test case
@SpringBootTest @Testcontainers class SpringTestApplicationTests { @Container GenericContainer<?> container = new GenericContainer<>("postgres:9"); @Test void myTest(){ System.out.println(container.getContainerId()+ " "+container.getContainerName()); assert (1 == 1); } }
This will start the docker container for Postgres with version 9

We can define connection details to containers using “@ServiceConnection” and “@DynamicPropertySource”.
a. ConnectionService
@SpringBootTest @Testcontainers class SpringTestApplicationTests { @Container @ServiceConnection static MongoDBContainer container = new MongoDBContainer("mongo:4.4"); }
Thanks to @ServiceConnection, the above configuration allows Mongo-related beans in the application to communicate with Mongo running inside the Testcontainers-managed Docker container. This is done by automatically defining a MongoConnectionDetails bean which is then used by the Mongo auto-configuration, overriding any connection-related configuration properties.
b. Dynamic Properties
A slightly more verbose but also more flexible alternative to service connections is @DynamicPropertySource. A static @DynamicPropertySource method allows adding dynamic property values to the Spring Environment.
@SpringBootTest @Testcontainers class SpringTestApplicationTests { @Container @ServiceConnection static MongoDBContainer container = new MongoDBContainer("mongo:4.4"); @DynamicPropertySource static void registerMongoProperties(DynamicPropertyRegistry registry) { String uri = container.getConnectionString() + "/test"; registry.add("spring.data.mongodb.uri", () -> uri); } }
c. Using Testcontainers at Development Time
Test the application at development time, first we start the Mongo database our app won’t be able to connect to it. If we use Docker, we first need to execute the docker run command that runs MongoDB and exposes it on the local port.
Fortunately, with Spring Boot 3.1 we can simplify that process. We don’t have to Mongo before starting the app. What we need to do – is to enable development mode with Testcontainers.
<dependency> <groupId>org.springframework.boot</groupId> <artifactId>spring-boot-testcontainers</artifactId> <scope>test</scope> </dependency>
Then we need to prepare the @TestConfiguration class with the definition of containers we want to start together with the app. For me, it is just a single MongoDB container as shown below:
public class MongoDBContainerDevMode { @Bean @ServiceConnection MongoDBContainer mongoDBContainer() { return new MongoDBContainer("mongo:5.0"); } }
2. Docker Compose
If you’re using Docker to containerize your application, you may have heard of Docker Compose, a tool for defining and running multi-container Docker applications. Docker Compose is a popular choice for developers as it enables them to define a set of containers and their dependencies in a single file, making it easy to manage and deploy the application.
Fortunately, Spring Boot 3.1 provides a new module called spring-boot-docker-compose that provides seamless integration with Docker Compose. This integration makes it even easier to deploy your Java Spring Boot application with Docker Compose. Maven dependency for this is given below:
The spring-boot-docker-compose module automatically looks for a Docker Compose configuration file in the current working directory during startup. By default, the module supports four file types: compose.yaml, compose.yml, docker-compose.yaml, and docker-compose.yml. However, if you have a non-standard file type, don’t worry – you can easily set the spring.docker.compose.file property to specify which configuration file you want to use.
When your application starts up, the services you’ve declared in your Docker Compose configuration file will be automatically started up using the docker compose up command. This means that you don’t have to worry about manually starting and stopping each service. Additionally, connection details beans for those services will be added to the application context so that the services can be used without any further configuration.
When the application stops, the services will then be shut down using the docker compose down command.
This module also supports custom images too. You can use any custom image as long as it behaves in the same way as the standard image. Specifically, any environment variables that the standard image supports must also be used in your custom image.
Overall, the spring-boot-docker-compose module is a powerful and user-friendly tool that simplifies the process of deploying your Spring Boot application with Docker Compose. With this module, you can focus on writing code and building your application, while the module takes care of the deployment process for you.
Conclusion
Overall, Spring Boot 3.1 brings several valuable features and improvements, making it easier for developers to build production-ready applications. Consider exploring these new features and enhancements to take advantage of the latest capabilities offered by Spring Boot.
Originally published by: Exploring the Exciting Features of Spring Boot 3.1
#Features of Spring Boot#Application with Spring boot#Spring Boot Development Company#Spring boot Application development#Spring Boot Framework#New Features of Spring Boot
0 notes
Text
MongoDB backup to S3 on Kubernetes- Alt Digital Technologies

Introduction
Kubernetes CronJob makes it very easy to run Jobs on a time-based schedule. These automated jobs run like Cron tasks on a Linux or UNIX system.
In this post, we’ll make use of Kubernetes CronJob to schedule a recurring backup of the MongoDB database and upload the backup archive to AWS S3.
There are several ways of achieving this, but then again, I had to stick to one using Kubernetes since I already have a Kubernetes cluster running.
Prerequisites:
Docker installed on your machine
Container repository (Docker Hub, Google Container Registry, etc) – I’ve used docker hub
Kubernetes cluster running
Steps to achieve this:
MongoDB installed on the server and running or MongoDB Atlas – I’ve used Atlas
AWS CLI installed in a docker container
A bash script will be run on the server to backup the database
AWS S3 Bucket configured
Build and deploy on Kubernetes
MongoDB Setup:
You can set up a mongo database on your server or use a MongoDB Atlas cluster instead. The Atlas cluster is a great way to set up a mongo database and is free for M0 clusters. You can also use a mongo database on your server or on a Kubernetes cluster.
After creating your MongoDB instance, we will need the Connection String. Please keep it safe somewhere, we will need it later. Choosing a connection string may confuse which one to pick. So we need to select the MongoDB Compass one that looks in the below format. Read more!!
0 notes