#motion graphics full tutorial for beginners
Explore tagged Tumblr posts
Visit Tumblr Blog
Explore Tumblr blogs with no restrictions, modern design and the best experience.
Last Seen Tumblr Blogs


Fun Fact
Tumblr has 411 employees.
Text
#motion graphics#motion graphics tutorial#after effects motion graphics#motion graphics for beginners#after effects tutorial#learn motion graphics#motion graphics tutorial for beginners#tutorial#after effects tutorial motion graphics#motion graphics tutorials#motion design for beginners#after effects motion graphics tutorial#motion design tutorial#motion graphics for starters#motion graphics full tutorial for beginners#motion graphics after effects
1 note
·
View note
Text
How to Create Stunning YouTube Videos with Basic Editing Skills

Introduction
In today’s digital era, YouTube has become a powerful platform for content creators, businesses, and influencers. Whether you want to start a vlogging channel, share tutorials, or promote a brand, video editing plays a crucial role in making your content stand out. But the good news is, you don’t need to be an expert to create visually appealing videos. With basic editing skills and the right approach, anyone can produce professional-quality content.
1. Planning Your Video Content
Before jumping into editing, it’s essential to plan your video structure. A well-organized script and storyboard can make the editing process smoother. Decide on the video type, format, and flow to maintain consistency in your content.
Define your goal – entertainment, education, promotion, etc.
Create a script or outline for a clear flow.
Gather necessary footage, images, and background music.
2. Choosing the Right Video Editing Software
Beginners should start with easy-to-use video editing software that provides essential tools without overwhelming features. Here are some top choices:
Adobe Premiere Pro – Industry-standard software for professional editing.
Blender – Great for animation and 3D video editing.
Adobe After Effects – Ideal for adding motion graphics and visual effects.
Adobe Animate – Best for 2D animations and transitions.
DaVinci Resolve – Offers free advanced color grading and editing tools.
For students looking to build expertise in software like Adobe Premiere Pro, After Effects, Blender, and Adobe Animate, several training institutes provide structured courses to master these skills.
3. Essential Video Editing Techniques
Even with basic skills, you can significantly enhance your video quality using these editing techniques:
A. Cutting & Trimming
Removing unnecessary parts and keeping only the essential segments improves video engagement. Jump cuts help maintain a smooth flow.
B. Adding Transitions & Effects
Simple transitions like fade-in, fade-out, and cross dissolve make videos more engaging. Visual effects through tools like VFX software enhance production value.
C. Color Correction & Grading
Adjusting brightness, contrast, and saturation creates a more cinematic feel. Color grading in Blender and Adobe After Effects can give your video a professional touch.
D. Background Music & Sound Editing
Proper audio balancing and background music enhance storytelling. Sound editing training helps in eliminating noise and improving sound clarity.
4. Optimizing Videos for YouTube
Editing is just one part; optimizing your video for YouTube’s algorithm ensures better reach and engagement.
Use Catchy Thumbnails – High-quality thumbnails attract more clicks.
Write Engaging Titles & Descriptions – Incorporate keywords naturally.
Add Subtitles & Captions – Improves accessibility and audience retention.
Optimize Video Length – Keep it between 5-10 minutes for better engagement.
Use Tags & Hashtags – Helps YouTube categorize your content better.
5. Exporting & Uploading in the Right Format
Ensure your video is exported in the highest quality without large file sizes. The recommended settings for YouTube are:
Resolution: 1920x1080 (Full HD) or higher.
Format: MP4 with H.264 codec.
Bitrate: 8 Mbps for HD and 12 Mbps for 4K videos.
Frame Rate: 24-30 fps for a cinematic look.
6. Practice & Improve Your Editing Skills
Learning video editing is a continuous process. The more you practice, the better you get. Exploring different styles and experimenting with effects can help you develop a unique editing approach.
For students eager to enhance their video editing skills, enrolling in a video editing training institute can provide hands-on experience and expert guidance. Institutes offer courses in Adobe Premiere Pro, After Effects, Blender, and VFX, which can be highly beneficial for aspiring editors.
Final Thoughts
Creating high-quality YouTube videos doesn’t require expensive equipment or professional experience. By mastering basic video editing skills and consistently improving, you can produce compelling content that stands out. With proper training in VFX, Adobe Animate, and Blender, you can further refine your skills and enhance your career prospects in the video editing industry.
If you're passionate about learning video editing, consider exploring training programs that provide in-depth knowledge and hands-on experience in leading software. Whether you’re in Yamuna Vihar, Uttam Nagar, or nearby areas, professional courses are available to help you excel in this creative field.
Start your journey today and bring your video ideas to life with professional-level editing! Visit us:
Suggested links:-
Adobe Premiere Pro
Adobe After Effects
#learn video editing#creative video editing#video editing services#video editing software#video editing#video editor#content marketing#Video editing course#Video editing course in yamuna vihar#video editing course in uttam nagar
0 notes
Text
Best Graphic Design Classes to Boost Your Creativity
Unleash your creativity with the best graphic design classes that teach you essential design principles, industry tools, and innovative techniques. Whether you're a beginner or a professional, these classes offer hands-on learning, expert guidance, and real-world projects to enhance your skills. Master Adobe Photoshop, Illustrator, and more while building a stunning portfolio. Perfect for aspiring designers, freelancers, and career changers, these classes help you turn your passion into a profession and stand out in the creative industry.
Online Graphic Design Classes for Flexible Learning: Ideal for Busy professionals
If you’re looking for convenience, online graphic design classes are a great option. These courses allow you to learn at your own pace, making them ideal for busy professionals and students. With access to video tutorials, downloadable resources, and interactive projects, online learning provides a flexible and cost-effective way to master design skills from anywhere.
Beginner-Friendly Graphic Designing From Scratch And Gradually
For those new to the field, beginner-friendly graphic design classes provide the foundation you need. These courses cover essential design principles, color theory, typography, and basic software skills. They are perfect for those who want to start designing from scratch and gradually build their expertise in a structured learning environment.
Advanced Graphic Design Classes for Branding Promotion
If you already have some experience in design, advanced graphic design classes can take your skills to the next level. These courses focus on high-level design concepts, UX/UI design, branding, and motion graphics. They also provide hands-on projects and portfolio development opportunities to prepare you for professional work.
Hands-On Learning for Students on Real-World Projects
Practical learning is crucial for mastering graphic design. Hands-on graphic design classes allow students to work on real-world projects, receive personaliPractical learning is crucial for mastering graphic design. Hands-on graphic design classes allow students to work on real-world projects, receive personalized feedback, and build a strong portfolio. These classes are ideal for individuals who prefer interactive learning and direct mentorship from industry experts.zed feedback, and build a strong portfolio. These classes are ideal for individuals who prefer interactive learning and direct mentorship from industry experts.
Software-Specific Graphic Design Classes for Mastery
Different design projects require different tools, and software-specific graphic design classes help you master programs like Adobe Photoshop, Illustrator, InDesign, and more. These courses focus on teaching the functionalities of each tool, enabling you to create professional-quality designs efficiently.
Graphic Design Classes with Certification for Career Growth
If you want to enhance your resume, enrolling in certified graphic design classes is a smart move. Many courses offer official certificates that validate your skills, making you more attractive to potential employers and clients. A certification can boost your credibility and open doors to exciting design opportunities.
Affordable Graphic Design Classes To Low-cost Courses
Not all quality courses have to be expensive. There are many affordable graphic design classes available that offer excellent content without breaking the bank. From free tutorials to low-cost courses on platforms like Udemy and Coursera, you can find great options that fit your budget while still providing valuable knowledge.
Conclusion
Investing in graphic design classes is a fantastic way to boost your creativity, develop professional skills, and expand career opportunities. Whether you’re a beginner or an experienced designer, there are plenty of options available to suit your learning style and goals. Start your journey today and unleash your full creative potential.
0 notes
Text
Top Graphic Design Classes with Certification in 2025
Elevate your design career with the Top Graphic Design Classes with Certification in 2025. These programs provide in-depth training in essential skills like typography, color theory, branding, and software tools such as Adobe Photoshop and Illustrator. With certifications from renowned platforms like Bapugraphics, these courses validate your expertise and enhance your resume. Ideal for beginners and professionals, they offer flexible schedules, expert guidance, and practical projects to build a standout portfolio. Whether you're advancing your career or starting fresh, these certified graphic design classes prepare you for success in the competitive creative industry.
The Importance of Graphic Design Classes for Career Growth
Graphic design classes are more than just learning how to use design software; they are an investment in your career. With industries increasingly relying on visual communication, skilled designers are in high demand. Enrolling in graphic design classes can help you acquire the skills and knowledge necessary to pursue a variety of design careers, including branding, advertising, UX/UI design, and more. These classes teach you the fundamentals and also equip you with industry-specific knowledge that will make you more competitive in the job market, ultimately leading to greater career opportunities.
Top Graphic Design Classes for Beginners
If you’re new to graphic design, it’s important to start with courses that focus on the fundamentals. Graphic Design 101, available on platforms like Bapugraphics, offers comprehensive introductions to design principles, typography, color theory, and layout. For hands-on experience, Canva Design School is an excellent free resource that allows you to experiment with templates and creative tools. Coursera’s Graphic Design Specialization is another great option, offering a beginner-friendly introduction to industry-standard software like Adobe Photoshop and Illustrator, making it an ideal starting point for those new to the field.
Advanced Graphic Design Classes for Professionals
Once you’ve mastered the basics, it’s time to dive deeper into specialized topics such as UX/UI design, motion graphics, or advanced Adobe tools. Advanced Graphic Design Techniques and UX/UI Design Mastery are excellent examples of specialized classes for those looking to refine their craft. These programs typically provide more in-depth coverage of specific topics and help you develop a unique design style that sets you apart from other professionals in the field.
Graphic Design Classes for Software Proficiency
Mastering design software is essential to becoming proficient in graphic design. Many graphic design classes focus on tools like Adobe Photoshop, Illustrator, InDesign, and Sketch, which are industry standards. Adobe’s Creative Cloud Tutorials offer a wide range of tutorials and workshops to help you become an expert in these programs. For a more structured learning path, Bapugraphics offers courses like Master Adobe Photoshop and Illustrator for Beginners, which provide comprehensive lessons on mastering these design tools and using them to their full potential.
Free Graphic Design Classes to Start Your Journey
Not every graphic design class needs to come with a hefty price tag. If you’re looking to start learning without spending a dime, there are several free options available. These free classes cover essential skills like basic design principles, software usage, and creating visual content for different platforms. Free options allow you to test the waters before committing to paid classes and are a great way to begin building your design skills.
Graphic Design Classes with Certification for Career Advancement
For those looking to boost their resume and demonstrate their expertise, graphic design classes with certification can be a game-changer. Certification serves as proof of your competency and dedication, making you a more attractive candidate to potential employers or clients. These certifications can be especially valuable for freelancers and those looking to transition into a full-time design career.
Choosing the Right Graphic Design Class for Your Needs
Choosing the right graphic design class is essential to reaching your goals, whether you’re a beginner or a seasoned professional. Assess your objectives: are you looking to learn the basics, improve specific software skills, or specialize in a particular area like branding or motion graphics? Platforms like Bapugraphics offer a wide range of classes, so it’s important to consider course reviews, the expertise of the instructor, and the curriculum before committing. Determine the format that works best for you—whether it’s a self-paced course, live sessions, or a bootcamp��to ensure you get the most out of your learning experience.
Conclusion
Graphic design classes are an invaluable resource for anyone looking to enhance their creative skills and pursue a career in design. Whether you're starting with the basics or refining advanced skills, there is a course available to meet your needs. From free courses to paid certifications, these classes offer diverse learning opportunities to help you grow professionally. By gaining proficiency in design principles and mastering industry-standard software, you can build a strong portfolio, increase your job prospects, and carve out your place in the competitive world of graphic design. Regardless of where you start, graphic design classes are an essential step in unlocking your creative potential.
0 notes
Text
Unlock Your Creativity with the Best Motion Graphics Course Online

In today’s digital era, visual storytelling is at the heart of marketing, branding, and entertainment. Motion graphics play a pivotal role in capturing attention and delivering compelling messages. Whether you’re an aspiring designer, a professional looking to enhance your skills, or a creative enthusiast, enrolling in a motion graphics course online can open the door to exciting career opportunities and help you master this dynamic art form.
Motion graphics are a blend of graphic design and animation, used to create engaging videos, advertisements, and digital content. They are found everywhere—from explainer videos and social media ads to movie titles and corporate presentations. A good online course can teach you the essential tools and techniques, including animation principles, typography, color theory, and software like Adobe After Effects, Cinema 4D, or Blender.
One of the major benefits of a motion graphics course online is flexibility. Unlike traditional classroom learning, online courses allow you to learn at your own pace, fitting seamlessly into your schedule. Whether you're a full-time professional or a student, you can access course materials and tutorials from anywhere in the world. This flexibility ensures you can balance your learning with other responsibilities.
The best courses are designed to cater to all levels, from beginners to advanced learners. For beginners, foundational modules introduce the basics of design and animation, while intermediate and advanced learners can delve into complex motion design techniques and creative workflows. Many courses also include real-world projects, enabling you to build a portfolio that showcases your skills to potential clients or employers.
Moreover, online motion graphics courses often include community forums and mentorship opportunities. Interacting with instructors and fellow learners can provide valuable feedback, inspire creativity, and foster networking opportunities. Some platforms even offer certifications upon completion, adding credibility to your resume.
If you’re considering a motion graphics course online, research thoroughly to find a program that aligns with your goals. Look for courses offered by reputable platforms or industry professionals, ensuring they cover up-to-date tools and techniques. Reading reviews and checking sample lessons can help you make an informed choice.
As the demand for digital content continues to grow, mastering motion graphics can set you apart in the competitive job market. Whether you aim to work in advertising, film, gaming, or freelance design, this skill can unlock numerous opportunities. With a motion graphics course online, you can take your creativity to the next level and become a sought-after professional in the digital world.
Start your journey today and turn your passion for motion graphics into a rewarding career
0 notes
Text
Best 3D Modeling Software for Beginners in 2024

As 3D modeling becomes increasingly accessible, choosing the right software can make a big difference for beginners. Whether you’re interested in game design, animation, or 3D printing, there are several popular and user-friendly software options available in 2024. Here’s a look at some of the best 3D modeling software for beginners:
1. Cinema 4D
Overview: Cinema 4D, developed by Maxon, is known for its ease of use and powerful features. It is particularly popular in the motion graphics and visual effects industries.
Key Features:
User-Friendly Interface: Intuitive and easy-to-navigate interface for beginners.
Robust Toolset: Includes a wide range of tools for modeling, animation, and rendering.
Learning Resources: Extensive tutorials and educational content available online.
Why It’s Great for Beginners: Cinema 4D’s user-friendly interface and comprehensive toolset make it a great choice for beginners. Its robust community and plentiful learning resources help new users get up to speed quickly.
2. Wings 3D
Overview: Wings 3D is an open-source subdivision modeler that focuses on creating and editing 3D models with a straightforward interface.
Key Features:
Subdivision Modeling: Specializes in polygonal modeling techniques.
Simplicity: Minimalist design with a focus on essential modeling tools.
No Cost: Completely free with open-source licensing.
Why It’s Great for Beginners: Wings 3D is ideal for beginners due to its simplicity and focus on core modeling functions. The lack of advanced features can help new users focus on learning the basics without being overwhelmed.
3. SculptGL
Overview: SculptGL is a free, web-based sculpting tool that allows users to create detailed and organic 3D models.
Key Features:
Web-Based: No installation required; runs directly in the browser.
Basic Sculpting Tools: Simple tools for digital sculpting and model editing.
Interactive Interface: Real-time sculpting and adjustments.
Why It’s Great for Beginners: SculptGL’s focus on sculpting with a minimalistic interface makes it perfect for beginners interested in creating detailed, organic shapes without the complexity of more advanced software.
4. Houdini Apprentice
Overview: Houdini Apprentice is the free version of Houdini, developed by SideFX. It’s a powerful tool for creating high-end 3D content, including simulations and visual effects.
Key Features:
Advanced Features: Offers high-end simulation tools and procedural modeling capabilities.
Learning Edition: Full-featured version with some restrictions for non-commercial use.
Extensive Tutorials: A wealth of learning resources is available online.
Why It’s Great for Beginners: While Houdini is known for its complexity, Houdini Apprentice provides a way to learn advanced techniques in a non-commercial, educational setting. Beginners can explore sophisticated tools and workflows at no cost.
2. FreeCAD
Overview: FreeCAD is an open-source parametric 3D modeling tool designed for a wide range of applications, including product design, engineering, and architecture. It’s highly flexible and customizable, making it a good option for beginners who want to explore various modeling techniques.
Key Features:
Parametric Modeling: Allows users to create complex models using parameters and constraints.
Modular Architecture: Offers a wide range of workbenches tailored to different modeling tasks.
Active Community: Extensive documentation and community support are available.
Why It’s Great for Beginners: FreeCAD’s parametric modeling capabilities and modular design provide a comprehensive introduction to various aspects of 3D modeling. Its open-source nature also means that it’s free to use and continuously updated by the community.
Conclusion
For beginners venturing into 3D modeling in 2024, the choice of software can significantly impact the learning experience. Cinema 4D and Houdini Apprentice offer powerful features with user-friendly interfaces, while Wings 3D and SculptGL provide simplicity and ease of use for those focused on specific modeling techniques. Bforartists presents a user-friendly alternative to Blender, combining powerful tools with a more accessible interface. Each of these options provides a solid foundation for beginners, allowing them to develop their skills and explore the world of 3D modeling with ease.
0 notes
Text
Top 10 Logo Stinger Premiere Pro Templates in 2024
New Post has been published on https://thedigitalinsider.com/top-10-logo-stinger-premiere-pro-templates-in-2024/
Top 10 Logo Stinger Premiere Pro Templates in 2024
When it comes to creating videos that leave a lasting impression, the opening and closing moments are vital. That’s where logo stingers come into play, acting as the bookends that hold the viewer’s attention.
In video editing, Premiere Pro stands tall, offering powerful tools that can turn a simple video into a visual delight. And Premiere Pro templates, especially for stingers, can be a real game-changer for content creators.
Whether it’s a quick flash of your brand logo or a stylish wrap-up at the end, these templates pack a punch. The best part is that you don’t have to be a professional video editor to use them. They are designed for ease and flexibility, allowing anyone with little video editing experience to create stunning logo animations.
In this collection, we share the best logo stinger templates currently available for Premiere Pro. We’re talking about templates that stand out with their style, functionality, and ease of use – the ones that can make your videos pop and keep your audience coming back for more. Let’s take your video production up to the next level!
If you’re just starting out with the video editing software, you might find it helpful to check out our collection of Premiere Pro tutorials to kickstart your journey.
The Benefits of Using Logo Stinger Templates
Using logo intros and stingers templates in Premiere Pro is a sensible move for anyone looking to enhance their videos with professional, engaging, and consistent branding elements. Here are some of the benefits:
Saves Time: Creating a logo stinger from scratch can take hours, if not days. Templates cut down on this time dramatically, giving you a professional look in minutes.
Professional Quality: These templates are crafted by expert designers, so they look crisp and professional. This means even if you’re not a design expert, your intros and stingers will still look like they were created by a pro.
Easy Customization: You can tweak these templates to match your brand or project’s style. Change colors, fonts, or add your own logo – it’s all doable with a few clicks.
Consistency in Branding: For businesses or regular content creators, using a template ensures your logo intro or stinger is consistent across various videos. This consistency is vital for brand recognition.
Variety of Choices: There’s a wide range of templates to choose from. Whether you want something modern and flashy or classic and understated, there’s likely a template that fits the bill.
No Need for Advanced Skills: You don’t have to be an expert in motion graphics to use these templates. They’re user-friendly, so even beginners can achieve great results.
Boosts Viewer Engagement: A well-made logo stinger can captivate your audience, increasing the likelihood they’ll stick around to watch more.
The Best Logo Stinger Templates for Premiere Pro
1. Modern & Stylish Grunge Logo Intro for Premiere Pro
This dynamic and creatively animated Premiere Pro template will give you a quick and impactful way to introduce your brand. It comes in full HD, includes multiple placeholders, and an intelligent color controller, giving you the freedom to create various eye-catching results.
This template is super user-friendly – edit the text, drop in your logo, and you’re ready to render. It’s perfect for adding a bold, edgy look to your video intros.
2. 4K Modern Stinger Logo Animation for Premiere Pro
This logo reveal template has been designed with a modern, bright color scheme and stunning animations, all in 4K resolution. It comes with Color Control, allowing you to tailor the look to your brand’s style. Perfect for making your logo pop in any Premiere Pro video project.
3. Warning Glitch Logo Reveal Template for Premiere Pro
This logo reveal is an attention-grabbing Premiere Pro template that showcases an abstract intro with eye-catching 3D renders and glitch effects. It comes with eight text placeholders and a logo placeholder, offering ample room for customization. This template is perfect for adding an edgy touch to your projects.
4. Stomp Logo Opener Premiere Pro Template
Stomp is a stylish Premiere Pro template for creating an impactful logo reveal. It offers customizable color options, allowing you to align it perfectly with your brand identity. It is versatile and suitable for showcasing a diverse range of photos and video clips. It is an easy-to-use solution that adds a professional flair to your openers and stingers.
5. Simple Liquid Logo Stinger Template For Premiere Pro
Simple Liquid Logo is a delightfully colorful Premiere Pro template with a charming cartoon-style liquid motion for your logo reveal. Super easy to use and modify, this template also includes a color controller, making customization a breeze. It’s perfect for adding a fun touch to your intro or stinger.
6. Glitch Distortion Logo Intro Premiere Pro Template
This Premiere Pro template combines creative animation with distorted and grungy glitch effects for a compelling logo reveal. It’s user-friendly – simply insert your logo, edit the colors to fit your brand or style, and you’re ready to render. Perfect for making your brand stand out with an edgy and modern twist.
7. Distort Glitch Title Stinger 4K Premiere Pro Template
This dynamic template would be perfect as a title intro, logo reveal, or stinger. Featuring engaging distortion and glitch effects, this 4K template’s neon color scheme adds an electrifying touch to your project, making your content pop with an energetic feel.
8. Sketch Logo Reveal 4K Template for Premiere Pro
This hand-drawn-style 4K Premiere Pro template is versatile, making it perfect as a logo reveal, an intro, or a stinger. It’s incredibly user-friendly and features a unique sketching effect. With its color control options, you can easily customize it to suit your video’s style. This template adds a distinctive, creative flair to any video project.
9. Simple Techno Logo Template for Premiere Pro
This template is not just for logo reveals – swap in any title to transform it into a techno opener or stinger for your video. With its minimalistic style, scientific design, and smooth animation, this Premiere Pro template ensures your logo animation will grab attention and leave a lasting impression.
10. Light Logo Reveal & Stinger Premiere Pro Template
Frequently Asked Questions (FAQ)
What Are Logo Stinger Templates in Premiere Pro?
They are pre-made animations or graphics that you can use at the beginning or end of your videos. They help introduce your brand or wrap up your content in a polished, professional way.
Can Beginners Use These Templates?
These templates are designed to be user-friendly. Even if you’re new to Premiere Pro, you can still create a fantastic stinger with these templates.
How Much Can I Customize These Templates?
A lot! You can change colors, add your logo, tweak the music, and alter the text to fit your brand’s style. The level of customization varies from template to template, but generally, you have a lot of flexibility.
Do I Need Special Plugins to Use These Templates?
Usually, no. Most of these templates are designed to work seamlessly within Premiere Pro without additional plugins. However, it’s always good to check the template’s requirements just in case.
How Do These Templates Enhance My Video Content?
Using these templates adds a professional touch to your videos. They make your content look more polished and can help strengthen your brand identity with your audience.
Can These Templates Be Used for Any Type of Video?
While they’re particularly popular for YouTube videos, company presentations, and online content, you can use these templates for just about any type of video where you want to make a strong visual impression.
Conclusion
This collection has taken you through some of the best Premiere Pro templates out there, showing how they can turn a simple logo animation into a memorable part of your production.
These templates are essential for anyone looking to make a strong impression right from the start. They save you time, keep your content looking sharp, and provide a creative springboard to make your brand shine or message resonate.
Ultimately, using these Premiere Pro templates isn’t just a smart move; it’s an investment in making your video content as engaging and professional as possible.
More Premiere Pro Templates & Tutorials
Related Topics
Top
#2024#3d#4K#amp#animation#animations#attention#Branding#change#Color#colors#content#creators#Design#designers#distortion#easy#Editing#editing software#effects#eye#Features#flash#fonts#Full#game#Giving#hand#how#identity
1 note
·
View note
Video
Grid Transitions for Premiere Pro Motion Design from Antony Parker on Vimeo.
✔️ Download here: templatesbravo.com/vh/item/grid-transitions-for-premiere-pro/48865562
Introducing 240 Grid Transitions for Premiere Pro Step up your editing game and easily make the cut between your shots fascinating! With this pack, you’ll be able to quickly make your videos look professional and visually interesting, even if you’re a total beginner in Premiere Pro.
MYFX Extension ([information on project page])
240 Grid Transition Presets
Video Tutorial Included
Full HD Compatible Motion Graphics Template Customer Support
MYFX [information on project page] Extension MYFX Extension helps you to browse and apply presets in one click! You can favorite presets and have your own hand-picked library. If you have any questions, you can watch the video tutorials right inside MYFX Extension and even visit the Help Center. Simply use the top menu to navigate th
0 notes
Text
Midnight Heist Preview (Steam Early Access)

For this Midnight Heist Preview, we get to go on heists through Midnight City alone or with up to three friends to fulfill tasks as a hacker for various organizations. Improve your reputation, earn money, and uncover the secrets of shady companies in this co-op horror game.
Midnight Heist Preview Pros:
- Decent graphics. - 2.58GB download size. - Steam achievements. - Full controller support. - Graphics settings - resolution, v-sync, fullscreen, brightness slider, ambient occlusion, motion blur, anti-aliasing, texture quality, shadow quality, soft particles, and shadow distance. - Controller settings - Invert axis and sensitivity sliders along with rebind controls for both the keyboard and the controller buttons. - Head Bob sensitivity slider. - Character wardrobe slots - hats, tops, gloves, pants, and shoes. Three gadgets - smartphone, flashlight, and tablet. - The in-game shop sells - clothing, gadgets, and sale items. - Operations mode is episodes of the story campaign. - Supports single and multiplayer. - Optional tutorial mode. - First-person view. - Four difficulties - beginner, normal, hard, and nightmare. - Lock picking is like in Skyrim where you rotate the lock pin and turn the lock. - Familiar controls. - Excellent lighting. - You hack electronic door locks with your smartphone. - When hacking a computer you use your smartphone and then do a mini game. - Three types of optional loot - important documents, cash, and electronic devices. - The goal of the game is to break into locations hack data and steal devices. - Take photos of criminal activity for more rewards. - You can sell some items you steal on the black market. - Power can usually be turned on in places but it does go down and using too many electricals can overload it. - Your tablet is used as a second screen, you hack security cameras and then view what they see on the tablet. - Your flashlight has a UV filter button on it. - Two locations at the moment - Cema X agency south and north. - Your house basement is where all players meet and set up heists. - Even if you fail a heist you keep any found cash. - The operations section is three lots of tasks that you complete as you do heists and this unlocks new rewards. Midnight Heist Preview Cons: - The early access accept button doesn't always work with the controller. - Only one operations episode at the moment. - You have to be so precise to trigger an interactive prompt. - Very slow-paced. - You cannot soo in when using the torch which makes looking at things with the torch a lot harder. - The menu is clunky and it's really hard to see what you have selected. - In the tutorial, it doesn't mention anything about supernatural enemies. - The game just doesn't feel as smooth as it should be. - Only a few locations. - The failing of a heist just ended and then I had a delay until the game told me it failed and how I was doing. - No way to check operations progress when in the game. - The operations feel a bit flat and disconnected. - You do not create your character, you are just given an avatar and you just dress them up. Related Post: Fusion Paradox Review (PlayStation 5) Midnight Heist: Official website. Developer: MediaTale Publisher: MediaTale Store Links - Steam Early Access Read the full article
0 notes
Text
3d Animation Maker For Mac

Aurora 3d Animation Maker For Mac
3d Animation App For Mac
Animated Videos have become one of the signature tools of marketers worldwide for telling a story and creating effective marketing campaigns for the future.
Depending on your purpose and skills, you can choose from different types of software available both offline and online, for professionals and amateur users, 2D, 3D, whiteboard or stop motion animation tool, etc.
Below are our picks for the best animation software for mac of 2019. For more background information, see a more detailed buying advice below the picks.
Part1. Whiteboard Animation Tools Part2. 2D Animation Tools Part3. 3D Animation Tools Part4. Stop Motion Animation Tools Part5. Motion Graphics Software How to Choose the Right Animation Software for Mac
Build and animate 3D models, teach them behaviors, then form 3D movie scenes that can be saved in QuickTime, AVI, or animated GIF format. Animoids is integrated with an online database of 3D art.
Each animation is transferred to your own character and can be previewed and edited directly with Mixamo, so you can control the look and feel of each motion. Export for Any Project Download characters and animations in multiple formats, ready to use in motion graphics, video games, film, or illustration.
Minecraft animation maker in your browser. Looking for a way to create a Minecraft animation or intro for your gaming vlog online? With ready-made templates available on Renderforest, creating a Minecraft animation is easy and fun, even for first-time users.

Part1. Whiteboard Animation Tools
#1. Best Whiteboard Animation Software for Mac: VideoScribe by Sparkol
This program is produced by Sparkol and it remains one of the best whiteboard animation software programs for both Mac and PC. You can also use it on a number of mobile devices including devices that run android. There are elements of the program that works through the cloud making it very simple to upload and edit video wherever you might be.
Videoscribe works quite intuitively for building business presentations, TED talk style videos, tutorials, creative marketing solutions and more. What is produced out of this program looks hand-drawn and extremely professional for any type of marketing campaign. The best part is that you can use many of these tools to create these effects with very little animation knowledge.
Even children enjoy using this program because of its ease of use. There is a full library of stock images, animation and more as well as an extensive voiceover soundtrack that can be used with the solutions here.
The yearly and monthly subscription also ensures that there is a flexible use for the program. It also comes with a seven-day free trial with features to try before you buy.
#2. Best Free Animation Software for Mac: PowToon
This is a fantastic online presentation maker for academic use, presentations and infographics.
The program is completely free to use and has a number of animation effects on board that can make anything exported out of the program seem extremely professional.
The free templates available in the program as well as the quality of the animations that are presented within the platform make it a true favorite amongst many brands.
A number of major companies now almost exclusively trust their creative tools to Powtoon and it can be used almost anywhere where there is an Internet connection with mass compatibility.
As a fully cloud-based system there’s no use for installation or downloads to take full advantage of it. Its available for free use on any Macintosh computer as long as you are willing to use the watermark.
Part2. 2D Animation Tools
#3. Best 2D Animation Software for Mac: Toon Boom Harmony
This is a program that actually deserves some surprising recognition. The company has partnered with major film companies like Warner brothers, Disney, and Nickelodeon and it’s currently one of the best and most powerful 2-D animation suites for commercial use.
With the use of this program you can build anything from traditional animation all the way to amazing drawing tools that can produce the future of 3-D animation. The 3-D cameras and integration available in this platform can provide fundamental solutions for drawing, rendering and building beautiful projects.
There are tools and tasks available here that can suit small hobby animators all the way up to professional uses. The premium version delivers the top tool professional solutions that you might expect at of any major animation suite. The essentials level of the harmony program is designed more for hobbyists and it delivers a scaled down version of some of their more high and customization techniques.
Toon Boom not only remains one of the best 2-D animation programs for mac but it is a regular fixture in the animation world today.
#4. Runner-up, Best 2D Animation Software for Mac: Adobe Animate
Adobe is one of the successors to perhaps one of the most popular 2-D animation software is available. At the core of Animate are the flash tools that have been working to create high-quality animations since the early days of the Internet. Today the program uses vector-based publishing to produce intuitive and inexpensive animation results.
Although it may not have all of the professional animation tools that you would find in some major production suites, it’s possible to get very professional looking results.
#5. Best Free 2D Animation Software for Mac: Pencil
This is a simple and open source vector-based program that’s designed for the Mac OS X platform. It’s also available on Linux and Windows and it was originally created for producing digital comics. The platform allows animators to use the basic hand-drawn techniques that were experimented with long in the past. Pencil is an ideal program for beginners that don’t want to invest in expensive license for a program. It can teach the basic principles of animation and with a timeline feature it’s possible to add new layers to arrange fun effects.
This is one of the best programs for beginners and sketching characters as well as setting keyframes can all be done using the pen tool, fill tool and the vector layers tool. The interface on this is actually based off of some of the original Adobe flash platform’s and it produces some good quality graphics even on a tablet device. Perhaps one of the best parts of using this program is that it automatically exports everything in.FLV which gives it mass compatibility with a number of online sources. The videos that you export here will be easy to embed or upload in video sharing sources and more.
Part3. 3D Animation Tools
#6. Best 3D Animation Software for Mac: Maya
Autodesk Maya remains one of the best 3-D modeling software programs that’s designed for Mac, Windows and Linux. The program itself has migrated many of the tools away from Autodesk Mud and now has features that you would normally find in several different pieces of software for creating highly detailed 3-D models. Autodesk Maya is a 3-D modeling software that is designed mostly for professional artists but with the templates that are available for download and the massive amount of tutorials online, it is possible to see quite a difference with this software when you are working with it over time.
#7. Runner-up, Best Free 3D Animation Software for Mac: Blender
Aurora 3d Animation Maker For Mac
Blender is a program that is designed with open source technology for 3-D modeling and it’s made mostly for beginners that want the option to learn how to play and get comfortable with reading modeling on their Mac computer. This open-source program does feature many of the basic features that you can expect to find including rigging, animation, architectural support and even the option to create full games. The philosophy that’s behind it allows for the inclusion of many different templates and it is very well suited to use by a number of creators. Blender remains some of the best 3-D modeling software for creative artists with its completely free use.
Part4. Stop Motion Animation Tools
#8. Best for Making Stop Motion Videos: Dragonframe
Dragonframe remains one of the best stop motion software solutions for mac today. It’s one of the top choices for many of the world’s largest studios like Laika and Aardman. It can produce high-quality masterpieces in stop motion animation and it is a perfectly suited set of professional tools. The program allows for easy capture of a number of precise movements and you can also compose in light various angles using the camera controls on board. Editing images as well as performing advanced image review techniques can all be done through the program as well.
The process of inserting and editing audio can be done according to a characters needs and based off of the animation that you want to create. The advantage to using some of the precise movements and controls in this program is that you can have a wide array of improvements at your fingertips for professional products.
#9. Runner-up: Stop Motion in Movavi Video Editor
We selected this is our runner up because with this program there’s no need to pay for a dedicated piece of stop motion software. This is an open source piece of technology that delivers a full-featured video editor that suitable for many beginners.
The program itself is perfect for getting all of the features that are often teased in many full license software programs. Because it’s open source there are also a number of templates that can make it easy to use. The full-featured video editor is excellent for its features and for the newest features that are being added by the community regularly to keep up with the stop motion technology of today.
Part5. Motion Graphics Software
#10. Best Motion Graphic Animation Software for Mac: After Effects

With a number of motion graphic animation software programs available for Mac, after effects sets itself apart.
Adobe After Effects is truly one of the most masterful programs for any motion graphic artist. Of course many of the features of aftereffects can be found in other Adobe programs, but there is no other piece of software that can be so versatile for the creation of motion graphics. The way to the menus are set up and the way that the program behaves makes it an intuitive leap for 3-D modeling and 2.5 D animation.
The whole goal of aftereffects is to help you produce almost any type of animation that you may want without having to involve 3-D modeling. After effects remains one of the primary pieces of software for motion graphic work in storyboards, motion comics and more. There are elements in this program that are close to Photoshop and illustrator but they have been optimized for the purpose of creating motion graphics here.
How to Choose the Right Animation Software for Mac
When it comes down to choosing the program that you may want to purchase a license for or download on your computer, you need to be very focused into the types of animation that you are looking for and what you need out of any program. The first thing you need to understand is the various styles and techniques for animation and what you might want out of a program:
2d animation
This is the traditional style of animation that comes from the idea of cell shading or digital cell shading. In the past animators would draw images on transparent pieces of paper and then later than one frame at a time to create motion. Today drawings can be rendered and layered on top of one another using a digital timeline and computer vector animations.
3d animation
This is a completely new and different way to look at traditional animation that requires understanding the basic principles of composition, movement and 3-D modeling. Creating 3-D graphics can involve scanning objects or even piecing together various 3-D models to create characters, share complex ideas and then animate all of the items along a storyboard.
Motion graphics
A motion graphic is considered to be one of the newest forms of animation. These motion graphics are fairly common in items like banner ads, short comics and more. Usually these types of graphics are designed for commercial purposes.
3d Animation App For Mac
Stop motion
Stop motion involves taking photos of an object and manipulating it ever so slightly to eventually produce a storyboard of motion. Completing and repeating this process over and over eventually gives the full allusion of movement. This is a very time-consuming process that often involves manipulating objects slowly over hours of movement to create just a few seconds of animation.
Presentation or whiteboard style
This is a popular style of animation that has taken off over the past few years. The online marketing videos that are produced and the specific programs that have been created for building whiteboard videos are proving that this is a format that truly keeps people engaged and remains a trend for school projects, business presentations and more.
You may also like:
Hey, My name is Paul – nice to e-meet you 🙂 I’m a freelance video editor who has over 4 years experiences of making all types of videos. I founded this website to provide step-by-step and easy-to-follow instructions to first-time editors or beginners like you who want to start their journey in video editing.
Animators and game developers will need different types of tools to create all the animations that they want. They need advanced tools and a user-friendly interface which would help them to create better designs. A 3D animation maker online can be used online to create the 3D animations which 3D animation maker free download will have some specialized tools. These 3D animation maker software are very easy to use and there are many options available in the market.
Related:
Clara.io
This free software can be used very easily by just signing into the portal and then the software can be accessed. Users will be able to create, render and share the 3D designs that they create. It has many powerful modeling tools like mesh tools, modifiers, operators, subdivision surfaces, etc. which can be used and VRay cloud rendering is possible. It can be accessed on multiple platforms.
iClone
This premium software can be used for creating real-time 3D animation which will enable animators to create characters, motion and physics, scenes and props and much more. Lighting and VFX can be done using this software and multiple cameras can be viewed from one point. The rendering and final output can be viewed on the interface. Storytelling will be very easy with this software.
Muvizu
This premium version can be used as an interactive 3D animation package that has all the tools that are required to create an animated story. Animators will be able to drag and drop the characters onto the customizable sets from the animation libraries. They will be able to perform other functions like automatic lip-syncing. It can be used by teachers, storytellers, animators and other business people who are there in this field.
K-3D for Windows
This free software is compatible with the Windows platform and can be used for 3D modeling and rendering. High-level 3D animations can be done and it can be used for creating games. Visualization is possible on the interface.
Iyan 3D – Make 3D Animations for Android
This free Android app can be used for building any animation character and creating a movie. The characters can be imported and backgrounds, images, props and 3D texts can be set. Users will be able to animate the objects in each frame and the lights and cameras can be placed anywhere. The output video can be imported and even published online.
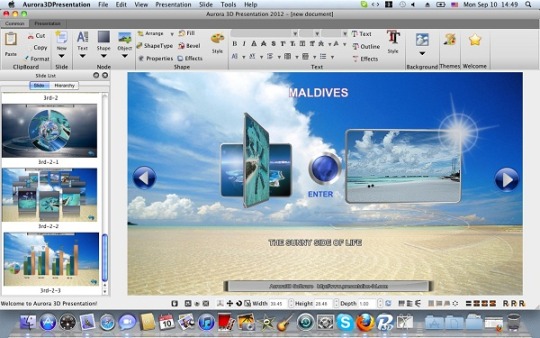
Aurora 3D Animation for Mac
This premium software is compatible on the Mac platform and can be used for creating 3D movie titles and banners easily. The video titles can be created from the available symbols or new ones can be imported. Many professional templates and TrueType fonts are available. Animated effects can be applied quickly and the animation can be exported.
Xara 3D Maker – Most Popular Software
This premium software can be used for designing texts and shapes in the graphics and animations quickly. Many different types of templates and designs are available on the software that can be used and edited in real-time. Professional banners can be created by using custom texts and 3D effects can be added to it. You can also see Movie Animation Software
How to Install 3D Animation Maker?
Most of the 3D animation software that is available online are premium versions. So users will have the option to install the trial version to make sure that it is compatible with the device before the premium version could be bought. It is necessary to make sure that all the system requirements are fulfilled like the required memory space, graphic card, operating system, etc. before the file could be downloaded. You can also see Text Animation Software
Users will be able to create dynamic character and use various effects on the animated scenes to make sure that the best possible outcome is achieved. Texts can be used and it can be animated. Rendering and sharing of the final output is very easy with this software and it can be shared across different platforms.
Related Posts
1 note
·
View note
Text
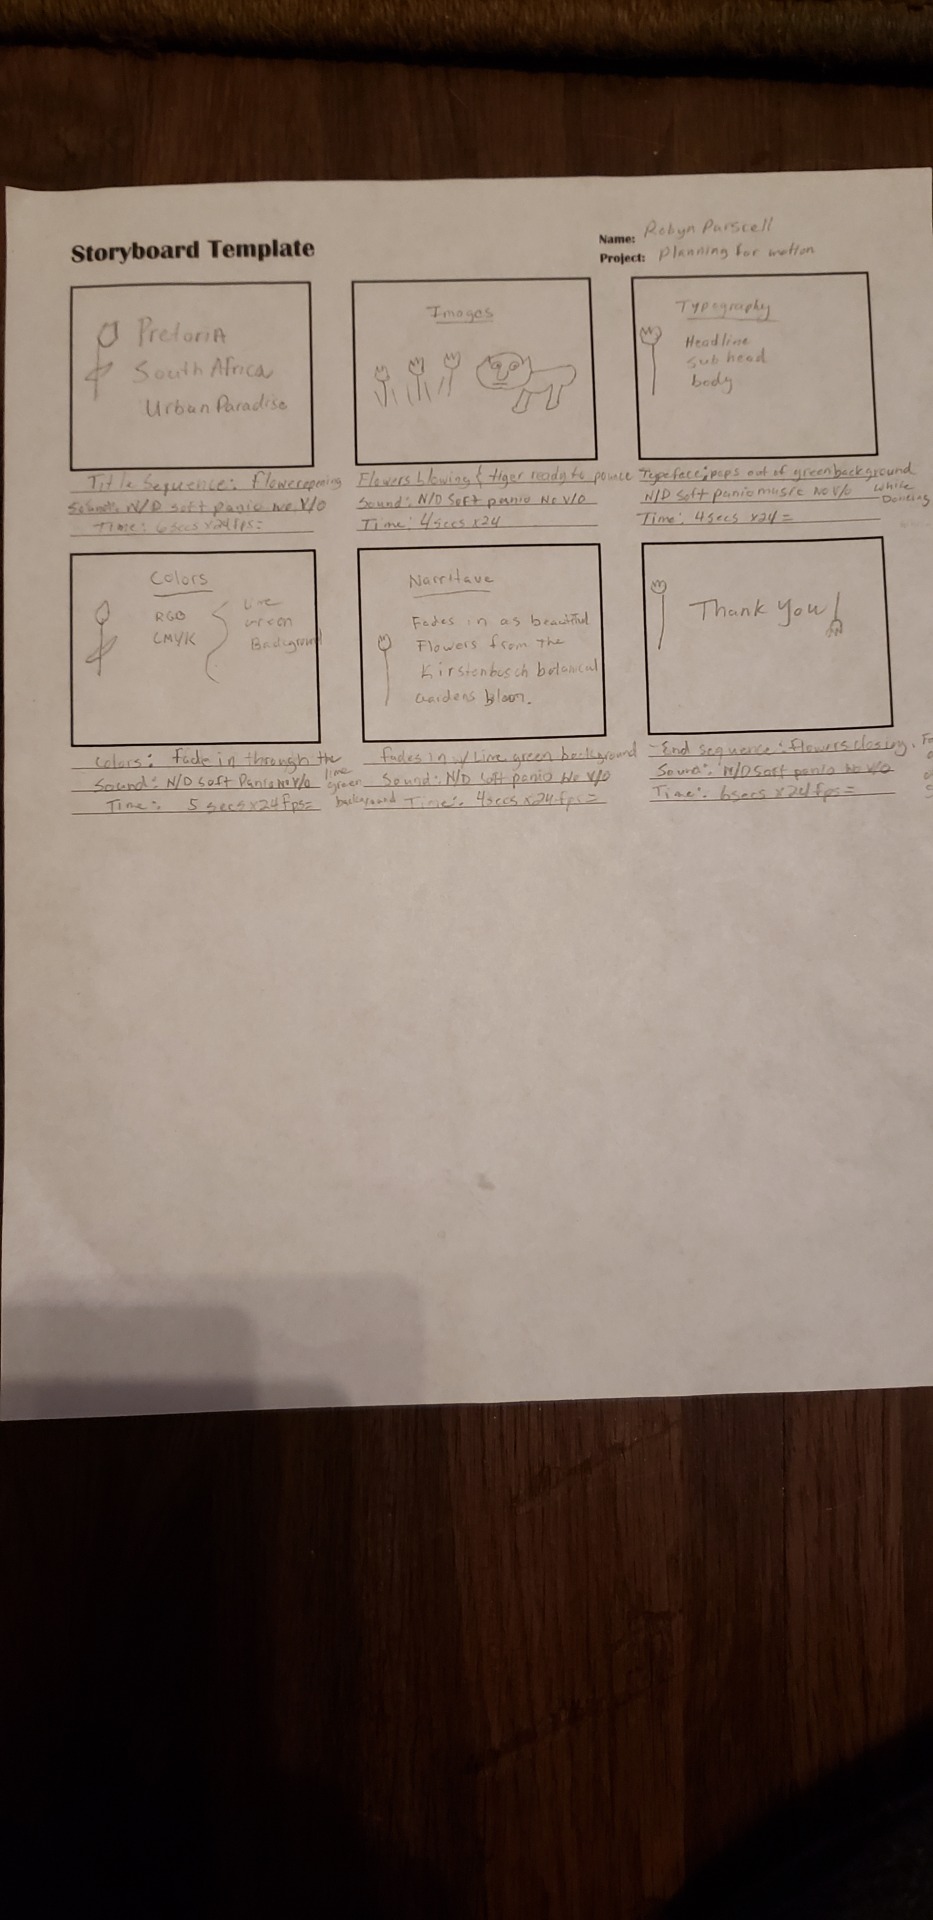
Mastery Journal Process and Reflection
InThese last four weeks of this class have been an eye opening experience for me, it taught me there is so much more to graphic design than just drawing and creating things by hand, there is also use of video and film as well as learning how to put motion into a work and making frames work together to crate a moving graphic. It has also been difficult for me with the new software we were working with because it was my first time, but I worked with them and learned well how to do my projects. I am also still working with and learning the software. I will also keep working with it each week as much as possible. My dream is to be a good graphic designer, and work with motion and animation in some way and this class helped me to realize that. I love seeing things move with color and type.
Process
Connecting/Synthesizing/Transforming - In week one to create my story board I started my reading Animated Storyboarding witch broke down the process of storyboarding and how to work with frames per second. I also found in article The Art of Storytelling with Mimi Chao, It breaks down the whole process, startring with making a plan, deciding the formats of the storyboard and then hand -sketching and thumb- nailing and moving into digital tools to use to make the storyboard come to life. I also used Motion Graphics and the Art of the Abstract by Abi Pollokoff. Witch breaks down the use of animation and narrative abstraction and how to make all work together to create a storyboard, I also learned about different types of sound and how to use it. My storyboard on pretoria broke down how I would add motion and sound to my brand to present my city as an adventurous, welcoming, and fresh place.
In Week 2 Communicating with Motion I used an the article the Basics of After Effects and watched several tutorials on after effects, the article broke everything down on how to create a new document and save and how to understand the interface import media, and how to organize projects, I worked with after effects at first as well as making my motion in Keynote and then I moved my project into iMovie because it allowed me to edit each clip all in one and at the same time make it into a working video and movie, I watched one toutoral on iMovie, then I just worked with it by hand to learn and create my project. through this process I was able to learn how to make motion frame by frame and how to make each motion and frame work together in the movie as a whole. I also was working with how to make the motion fit the frame and make the time of each frame not be too fast or too slow, this was the hardest part for me and my movie was too fast in some frames. I worked though this and made my motion project.

In week 3 I researched and read all the articles and videos I was given to make my choice of which Motion Media Project to do, I chose to do a Cinemagraph because it was the most interesting and fun for me to learn, I used an article called the Art of Cinemagraphs and How to Make Your Own, this really helped me to understand what a cinema graph works and what it does, I also learned what software to use to create them. I started out with Photoshop, I struggled working with it and making the live video fit with still frame that I chose and masking it all together in photoshop, so I researched some more and began working with cinemagraph pro, I could choose the still frame within the live video and it was easier to pinpoint which frame I wanted to make as my sill picture and to mask the part I wanted to move, the making was easier to do and the effects I added were not hard to do, I wanted to bring out my narrative in my cinemagraph, I worked to do this with the movements and I hope I did.


Problem Solving- In week 1 the problem I was solving was to create a storyboard for my city brand, the storyboard needed to be broken down into different frames, with each frame moving at a different rate.
the problem that my medium solved according to the industry is the first steps into making my brand into a motion piece, I solved the problem by researching how to layout my storyboard, I did though laying out my game plan by getting to the drills ( The Art of Storyboarding, Chao,2018). then I moved on to the sketches and the timing of each frame for my brand.
In Week 2 The problem I solved was to create a working motion piece for my brand, the problem my medium solved according to the industry was giving life and movement to my brand, and making it work for the client. I solved this problem by researching how to bring a motion graphic to life, one of the most important things is it is much better to see a simple project executed well, then a big one gone wrong.( 27 Tips to make a Motion Graphic, French, 2017)
I used after effects and Movie to make my motion graphic, I wanted my narrative and voice and tone to stick out and work well together.
In week three the problem I solved was to bring a type of motion graphic to life with work related to my city, I chose a cinemagraph to bring my brand to life, My cinemagraph solved the problem of isolating a certain part of a video to draw attention to it, and by making a part of that video stand out to my audience. I solved the problem by working with Photoshop and Cinemagraph Pro, I was able to represent parts of my narrative and emphasize one part of it to bring it to life and make my brand have presence.
Innovative Thinking- Compared to others in the industry all three of my projects were beginner level, my brand does stand out as being different because I took a look at the city like never before, I worked hard to make my storyboard, motion piece, and context ,motion for my audience all fit together as one standout brand, by bringing my narrative to life.
I approached the subject of innovation with fresh eyes and a mind full of research to create something new, different, and interesting. even though some of it was mind opening and different for me, it brought me excitement and Joy to create my own moving pieces.
My work is innovative because my unique look at the city and what it stands for is different than anyone else, I made a unique narrative and brought it to life. and my colors in my graphics were bold and bright and fit my voice and tone , and in my motion piece I used pics of the botanic gardens to prove my narrative and I tried to make my motion seem like the wind blowing or animals playing, in my cinemagraph i highlighted the great parts of my narrative to bring life to it.
Acquiring Competencies - throughout this entire process I learned a great deal of new things, I learned what a motion graphic does, and I learned how to bring my brand and story to life in beautiful and interesting ways that could make the client and the target audience stop and take a second look, the brand could be one of a kind.
The new software I learned was After Effects, PhotoShop, I Movie, Cinemagraph Pro, and Keynote, it was a-lot to take in at first but it was all worth it and lots of fun bringing life to my own story and designs to life and create another story through motion. It made me expand my mind to new areas I never thought I could reach I was excited to create for a client and a target audience,
the skills I learned were how to make the software work for me, and how to create motion that will standout and last, and how to create a unique piece.
this class and the work was definitely a challenge at first, but I continued to research and work hard to learn the software and concepts that will do me good and the future, this class also helped me realize what I want to do with my degree, and how i want my work to mean something and standout to the world. I am ready to keep going and create great things.
youtube
youtube
I will continue to work hard and open my mind to new and exiting work
1 note
·
View note
Text
The best 3D modelling software in 2023
Owning the best 3D modelling software will give you the ability to elevate your CG skills and create amazing 3D art. Having experience with the most popular tools and software could also help get you a career in the ever-evolving media industry. Luckily, 3D modelling software is more accessible than ever. With free programmes like Blender being a major player within the industry, you can even gain experience without spending a fortune.
To help you decide which programme is best for you, we’ve compiled this useful guide which details the best 3D modelling software out there right now. We look at a range of needs and specifics – whether you’re an experienced 3D modeller looking to try a new programme or if you’re entirely new to the 3D world, we’ve got you covered. We’ll take a look at a range for different budgets, software needs and ease of use so you can find the best fit of programme for you.
The best 3D modelling software: paid-for options
1. Maya Autodesk Maya will bag the top spot in most artists’ ranking of the best 3D modelling software. The industry standard for an array of CG disciplines, Maya offers artists an unrivalled set of features and tools. This powerful app isn’t for beginners, however, its toolset is complex and takes time to master. And now, with Maya 2023, there’s even more to be excited about. Maya is ideal for modelling, texturing, lighting and rendering – its vast features include tools for particles, hair, solid body physics, cloth, fluid simulations and character animation. It’s worth deciding if Maya’s extensive functionality is too much for your needs though, as this power comes with a price tag to match. For those who have the time, skill and patience to master it, Maya has some of the best 3D tools available right now and is a sound investment.
2. ZBrush ZBrush is a standalone sculpting and modelling app that is most useful for the creation of organic forms – It works in a non-standard fashion, with a workflow and user interface that can be pretty difficult for newcomers to get the hang of, so it’s worth practising every day if you want to become proficient. ZBrush isn’t just for sculpting and modelling though, it can also be used to create UV maps and paint textures, enabling seasoned artists to craft entire figures, with clothing and props, ready for rendering. This software is a popular choice for artists wanting to 3D print toys and action figures with tools specifically designed for 3D printing.
3. Houdini SideFX’s Houdini is responsible for creating a range of 3D imagery across the CG industry. Its node-based procedural approach offers artists unprecedented power, flexibility and control. This nodal workflow isn’t for everyone, but Houdini also has some more traditional tools which allow you to directly interact with the polygons on screen. When testing, we found that its problem-solving capabilities were leagues ahead of other 3D software, with the ability to rewire feeling incredibly natural, a big plus point for the software. Like Maya, Houdini’s power and non-standard workflow can be tricky to get the hang of. Thankfully, SideFX offers Houdini Apprentice, a free version of Houdini FX, which can be used by students, artists and hobbyists on personal non-commercial projects. The free version gives you access to virtually all of the features from the award-winning Houdini FX, meaning you can really develop your skills. There’s the full-featured Houdini Indie too, which provides an affordable commercial option for smaller studios.
4. Cinema 4D
Maxon’s Cinema 4D has been around for a long time and is highly regarded in the worlds of motion graphics, visualisation and illustration. It boasts a vivid community of creatives with a huge online library of tutorials – not to mention the training site Cineversity, to which you get free membership when you buy the app or pay for the annual Maxon service agreement (MSA). Cinema 4D’s parametric modelling toolset is generally very good, and you can increase its functionality with a range of reasonably priced plugins. There’s also volumetric modelling, which is perfect if you don’t have the time or skillset to create smooth solid forms.
Perpetual licenses aren’t cheap, but you can always start with Prime and upgrade over time. Alternatively, there’s a trial version that gives you 14 days to try Cinema 4D out for free and a free education version for students and teachers.
5. 3ds Max
Autodesk’s 3ds Max is a 3D computer graphics program for PC only. It’s used primarily in the production of TV and feature films or for architectural and product visualisation. Like its sister software Maya, 3ds Max boasts a robust toolset for 3D modelling, as well as fluid simulations, hair and fur, plus character rigging and animation.
3ds Max uses both direct manipulation and procedural modelling techniques, with a huge library of different modifiers that makes the modelling process easier for new or intermediate artists. This software offers a vast professional toolset and, unsurprisingly, comes with a professional price tag. However, students can get the software for free and a trial version is also available for 30 days if you want to try it out before you buy.
6. Modo
Over the years Modo(opens in new tab) has grown from a basic subdivision surface modeller into a fully-featured digital content creation app. The toolset is well thought out and implemented, making it very user-friendly, add to that an impressive rendering system, and it’s easy to see why Modo has continued to grow in popularity. Since then, Foundry has had a series of updates and is taking advantage of modern graphics cards to make it way more powerful.
With modelling at its core, Modo is one of the best apps available for the creation of polygonal forms, using both direct tools and procedural techniques. The addition of the best-in-breed MeshFusion Boolean system simply extends its modelling repertoire. Modo may lack the high-end dynamics and simulation tools you find in a program like Maya, but it holds its own when it comes to creating stunning artwork, producing as good a 3D render as any other package currently available.
7. Lightwave 3D
LightWave(opens in new tab) was once the go-to app for sci-fi TV shows, but after a failed attempt to produce a modernised version, NewTek’s app lay fallow for several years. However it’s recently enjoyed something of a renaissance, and an updated version was introduced at the start of 2020.
Lightwave operates as two apps, Modeler – for building assets – and Layout for texturing, lighting, animation and rendering. A lot of the underlying toolset is quite old (although it’s had a lot of new features added in the last few years) but that doesn’t stop it from being a solid digital content creation suite, with lots of features and a fast interactive PBR renderer.
So ignore LightWave’s reputation: it’s a great 3D modelling app for learning the basics. You can try it for yourself with the 30-day free trial, while students can pick up a copy for just $195.
The best free 3D modelling software
A licence to use the best 3D modelling software doesn’t always come cheap. Luckily, there’s a whole host of powerful software available for free these days, as well as some companies that generously offer free versions of their paid-for tools.
To help you find the right one for you, we’ve selected the very best free 3D modelling software around for you to download today. So if you’re a 3D artist, we recommend bookmarking this page now.
1. Blender
If you’re looking for free 3D modelling software, it doesn’t get any better than Blender, the free modelling, texturing, animation and rendering app. This open-source program has been around for a while now, and in that time it’s acquired an army of artists, teachers and enthusiasts that are behind its continued development.
Blender boasts a highly impressive 3D modelling and sculpting toolset and is considered a completely viable alternative to paid modelling programs. In recent years it’s become increasingly prevalent in the pipelines of major studios. Blender was once notorious for its non-standard way of working, but a lot of these issues have been solved, so it will feel more familiar if you’re moving from another app.
2. Daz Studio
Previously retailing at $249, 3D software Daz 3D is currently available to download completely free of charge. It’s a 3D figure customisation, posing and animation tool that enables artists of all skill levels to create digital art using virtual people, animals, props, vehicles, accessories and environments.
3. SketchUp
SketchUp Free advertises itself as “the simplest free 3D modelling software on the web — no strings attached”, and it’s certainly very easy to use. Its core 3D modeller runs right in your web browser and offers 10GB of storage, plus there are user-generated and manufacturer-produced 3D models available for free to import into your projects. All this plus a free app to view your 3D models on mobile adds up to a great package at zero cost
Super Renders Farm – the cheapest, fastest render farm and most stable service provider that uses cloud render platform for rendering service.
Source:
https://blog.superrendersfarm.com/news/the-best-3d-modelling-software-in-2023/
0 notes
Text
Cinema 4d studio broadcast

#CINEMA 4D STUDIO BROADCAST FULL VERSION#
#CINEMA 4D STUDIO BROADCAST SOFTWARE#
#CINEMA 4D STUDIO BROADCAST TRIAL#
They're perfect for beginners to motion graphics software.
You can use them to create virtual reality videos for social media and make your accounts stand out with graphics that wow the audience.
You can cut your creating time in half to give yourself more room for the details that matter most.
Cinema 4D templates save you time and energy.
Here are some great benefits to using them: Plus, Cinema 4D templates will help you a great deal with your modelling and rendering work. Being the most comprehensive, its toolset is impressive and allows you to achieve outstanding results once you've mastered it.
#CINEMA 4D STUDIO BROADCAST FULL VERSION#
Finally, Studio is the full version that includes all the feature sets of the three others.One level up, Broadcast includes more animation-related features while Visualize is perfect for top-quality, professional-level modeling and rendering for images.Perfect for familiarizing with Cinema 4D. This version has a reduced set of features, but that's actually what makes it so much easier to use.
#CINEMA 4D STUDIO BROADCAST SOFTWARE#
If you don't know the software yet and are still in the early stages of the learning phase, we recommend you use Prime.
Plus, it comes in four different versions: Widely appreciated in the industry as more approachable and easier to use than many of its competitors, Cinema 4D has a very user-friendly interface that won't feel overwhelming, especially if you're just getting started. Artists use this program to create great graphics for animation and video projects.
#CINEMA 4D STUDIO BROADCAST TRIAL#
If you're curious and you want to try out CINEMA 4D Studio for free, just download this trial version.Cinema 4D is a 3D modeling, rendering, animation, and motion graphics software that helps you create outstanding 3D visuals. The purchase price of CINEMA 4D isn't within the reach of the majority of enthusiasts, but it's well within the margins that professional animation studios can pay. How much does it cost to try out CINEMA 4D Studio? Moreover, it is one of the programs which is used most by Pixar designers. And recently, it has been used in Prometheus (receiving very good reviews from Steven Messing) and The Avengers. For a few years now it has been the application used at the Port Aventura theme park to project in 4D in the SEA ODYSSEY attraction. In what regards to the projects in which CINEMA 4D Studio has been used, the list is long. With regards to the materials used by CINEMA 4D it's possible to work with 14 different channels and it even includes the possibility to create customized channels.ĬINEMA 4D is one of the most popular applications among 3D animation professionals and enthusiasts, thus there is a large number of tutorials and videos available on the Interne t.Modify parametric objects whenever it is necessary, thanks to its non-linear modeling features.Includes a complete pack of tools to model, animate and render objects.Modular system, which can be expanded depending on the user's needs.Software that can rival with Maya and 3ds Max by Autodesk. It stands out due to its great capacity with regard to the creation of characters, to which it's possible to add advanced 3D effects, and due to its modern engine capable of managing complex collisions between objects. CINEMA 4D Studio is a professional 3D modeling and animation software application.
0 notes
Text
Blender 3d animation nodes force filds


You can download by going to their website. Twitter - program that is used in this course is Blender 3D.īlender 3D is a free open source program that allows you to create literally anything on the computer! From the basics of modeling to advanced techniques like creating grass with particle systems. I will be showing you step by step on what to do and why we do it. Learning Blender can be very hard when you first start that's why I built this course for all levels beginner to advanced. You will learn from scratch how to add hair, style it the way you want and create a nice material.įinally the last section of this course is on the smoke simulation and how you can emit smoke from the particles themselves. Hair is the next tutorial that we tackle in this course. We will also learn about materials and how to change the color overtime. For this one we will be using a trick in the particle system to change the size as the particle rises. After a basic overview we will jump straight into Blender and create a fluid particle animation together using the render engine Eevee. The second tutorial is on fluid particles. We will be using hair particles to create the shape and from there we will learn how to create a realistic grass material. That is why I have included 5 full tutorials in which we use the Particle System to create different renders and animations! The first one being on grass. One of the best ways to learn is to practice it yourself. All the videos are labeled so it's very easy to find a specific setting or value that you are wanting to learn. In the first couple sections we will be focusing on the settings and what each one does. Of course there are also loads of other tutorials, and if you come across a good one, let me know in the comments.Do you want to learn how to use the Particle System in Blender to create awesome renders or animations? Do you want to feel confident while using particles? By the end of this course you will have an understanding of the functions in the particle system. Watch this as a second tutorial or if you specifically look for the vertex weight proximity modifier. Eliminating the need to switch between programs. Allowing you to import raw footage, track the footage, mask areas and see the camera movements live in your 3D scene. Geometry Nodes with Vertex Proximity Weight. Blender includes production ready camera and object tracking.Therefore I recommend to watch this later if you start with Geometry Nodes. This is a more advanced tutorial that explain all about attributes. Geometry Nodes and Proximity Displacement.Another interesting part is baking sound in FCurves! Also suitable when the tutorial Get started with Geometry Nodes is to hard for you. This tutorial show limited use of Geometry Nodes, and therefore it’s a good start. Geometry Nodes Motion Graphics in Blender 2.92.Written Tutorial: /introduction-to-animation-nodes-motion-graphics-in-blender-2-9/ We begin by exploring the interface of the animation nodes add-on. Therefore a list here, so you can decide what to watch first. In this Blender tutorial for beginners you will be introduced to the animation nodes add-on that allows you to make animation and motion graphics - all within Blender 2.9. It is recommended that you have a little bit of prior experience with Blender 3D You should be able to operate the PC at a beginner level. Other sources related to Geometry NodesĪs you notice, I post a lot about Geometry Nodes. For me, I am a more a generalist, and need to pick this up in my vocabulary. Therefore my conclusion is that Geometry Nodes are most interesting when you do stills, animations, share ideas, sell setups etc. Or design game assets as far as I see you can’t bake (yet) Geometry Nodes to real Geometry. Not only the splash but all the assets from the movie are available on Blender Cloud. Posed by Hjalti Hjalmarsson and lit by Andy Goralczyk.

Unless you use Blender pure for sculpting, video editing. The splash of the last release for the 2.7x series features the main character from the latest open movie project by the Blender Animation Studio. Because there are bigger plans, it’s worth it getting familiar with it. Not without reason: it’s a real game changer. Geometry Nodes its development pace is at high speed. Tutorial by Kenan Proffitt When to watch this tutorial
0 notes
Text
Cyberlink powerdirector 16 tutorial pdf

#Cyberlink powerdirector 16 tutorial pdf how to#
#Cyberlink powerdirector 16 tutorial pdf pdf#
#Cyberlink powerdirector 16 tutorial pdf manual#
#Cyberlink powerdirector 16 tutorial pdf full#
#Cyberlink powerdirector 16 tutorial pdf software#
Screen RecordingCapture, edit, and share video demos and tutorials to become the next YouTube star. LUTs & Color MatchMatch color to quickly balance or change the aesthetic of your videos.
#Cyberlink powerdirector 16 tutorial pdf software#
Exclusive 40 OFF Creative editing software for students & teachers. Video EffectsTransform and modify the look of your video with magical effects. 25 OFF PowerDirector 365 Unlock 8,000,000+ videos, images & music with award winning video editor. TransitionsChoose from a variety of styles to seamlessly connect your shots. Limitless Possibilities, Right at Your FingertipsBring your imagination to life with our wide array of tools to help customize your projects.Ĭustomizable TitlesEasily create titles with unique customization tools and animated templates. Motion TrackingAdd text and graphics that follow the motion of objects to elevate your footage. This document contains all the information you need to get the latest version of CyberLink PowerDirector up and running on your computer, and provides some common trouble-shooting tips if you ever get stuck. Green ScreenRemove backgrounds and create Hollywood-style special effects. Welcome to the CyberLink PowerDirector 10 Quick Start Guide. Mask & BlendLayer, shape, and blend to create artistic scenes. Latest.FeaturesĭirectorZone.About This Software Create Professional Level Edits EffortlesslyIntuitive editing tools that help you set objects in motion, completely transform a scene's location, and create cinematic effects.
#Cyberlink powerdirector 16 tutorial pdf how to#
100, Minquan Rd., Xindian Dist.Ĭopyright © 2015 CyberLink Corporation. Fastest and Most Capable Video Editing Software CyberLink PowerDirector 16 makes your home movies more engaging A range of quick-to-learn and easy-to-use. In this video this beginners basic editing tutorial for CyberLink PowerDirector15 and 16 Ultimate gives you instructions on how to edit videos using PowerDir. DTS, the Symbol, & DTS and the Symbol together are registered trademarks, and DTS 5.1 Producer is a trademark of DTS, Inc. PowerDirector 16), the screenshots below may look different than the version you’re using.How Quickly and Easily Can You Create MoviesTo illustrate just how fast, clean, and simple PowerDirector’s Easy Editor tool is.
#Cyberlink powerdirector 16 tutorial pdf pdf#
Manufactured under license from DTS Licensing Limited. Cyberlink powerdirector 15 tutorial pdf file download windows 10 full. All rights reserved.įor DTS patents, see. Dolby and the double-D symbol are registered trademarks of Dolby Laboratories. Manufactured under license from Dolby Laboratories. The following demonstrates how to draw a map path. PowerDirector is a registered trademark along with other company and product names mentioned in this publication, used for identification purposes and remain the exclusive property of their respective owners. CyberLink PowerDirector 10 now includes the Paint Designer, which lets you create hand drawn animation objects, such as map paths, your written signature, or hand drawn images that you can use in your video production.
#Cyberlink powerdirector 16 tutorial pdf manual#
This manual comes under the category Photo/video software and has been rated by 1. The terms and conditions here under shall be governed and construed in accordance with the laws of Taiwan. View the manual for the Cyberlink PowerDirector 8 Ultra here, for free. To the extent allowed by law, PowerDirector IS PROVIDED “AS IS”, WITHOUT WARRANTY OF ANY KIND, EITHER EXPRESS OR IMPLIED, INCLUDING WITHOUT LIMITATION ANY WARRANTY FOR INFORMATION, SERVICES, OR PRODUCTS PROVIDED THROUGH OR IN CONNECTION WITH PowerDirector AND ANY IMPLIED WARRANTIES OF MERCHANTABILITY, FITNESS FOR A PARTICULAR PURPOSE, EXPECTATION OF PRIVACY, OR NON-INFRINGEMENT.īY USING THIS SOFTWARE, YOU AGREE THAT CYBERLINK WILL NOT BE LIABLE FOR ANY DIRECT, INDIRECT, OR CONSEQUENTIAL LOSS ARISING FROM THE USE OF THIS SOFTWARE OR MATERIALS CONTAINED EITHER IN THIS PACKAGE. Adding and Editing Disc Menu Title Text.
#Cyberlink powerdirector 16 tutorial pdf full#
Subscribe Full linked Tutorial Catalog - PDtoots happily supports fellow PowerDirector. PowerDirector Tutorials, tips, free resources & more.
Applying Animation Effects to Title Text Director Suite 6: PowerDirector 16 Live, PhotoDirector 9, ColorDirector 6, AudioDirector 8 Cameras: Sony(s) HXR-NX5P, HXR-NX70P, NEX-VG10E, a6300 4k, HDR TG5E, GoPro 4 Black, Canon 6D DSLR Visit PDtoots. Wikipedia is a multilingual free online encyclopedia written and maintained by a community of volunteers through open collaboration and a wiki-based editing.
Tracking the Motion of Objects in Videos.
Configuring the Screen Recorder Settings.
0 notes
Text
Download after effects cracked free

DOWNLOAD AFTER EFFECTS CRACKED FREE FOR FREE
DOWNLOAD AFTER EFFECTS CRACKED FREE HOW TO
DOWNLOAD AFTER EFFECTS CRACKED FREE FULL VERSION
DOWNLOAD AFTER EFFECTS CRACKED FREE FULL
DOWNLOAD AFTER EFFECTS CRACKED FREE SOFTWARE
Take note that if you enroll in the LogoCore course, you will also be qualified to get the 60% discount on the Adobe CC All Apps bundle. To qualify for the Adobe Student Discount, you should be at least 13 years of age and currently enrolled in a university, college, primary, or secondary school.Īll you need to do is to show your proof of enrollment and you will be eligible for the amazing discount that Adobe is offering. So if you want to have the best motion graphics and visual effects software, buy Adobe After Effects now! Whether you’re a professional or a beginner, it will be easier for you to learn the app since both subscriptions include After Effects tutorials. That’s why Adobe also offers the Creative Cloud All Apps package for designers and artists who want to save a lot of money by buying each Adobe app individually.īy paying a monthly subscription fee of $52.99, you will have access to 20+ Creative Cloud apps for photography, design, video, web, UX, and social media.
DOWNLOAD AFTER EFFECTS CRACKED FREE SOFTWARE
However, if you’re a professional creative, you might need other Adobe software aside from After Effects. It also includes 100GB of cloud storage, Adobe Portfolio, Adobe Fonts, and access to the latest features and updates as soon as they’re released.
DOWNLOAD AFTER EFFECTS CRACKED FREE FULL
With that single app subscription, you will have full access to the industry-standard animation, motion graphics, and creative compositing apps. If you’re only interested in getting the After Effects app alone, you will be asked to pay the monthly subscription fee of $20.99.
DOWNLOAD AFTER EFFECTS CRACKED FREE FOR FREE
So what are you waiting for? Download Adobe After Effects for free now!
DOWNLOAD AFTER EFFECTS CRACKED FREE FULL VERSION
Within those 7 days, you will be able to enjoy the full version of After Effects for free, and you will have the chance to explore all the features of the software. Take note that the free trial will last for 7 days and you must cancel your account before the trial ends so you won’t be charged. When you’re done creating your Adobe ID, you will be asked to choose which After Effect plan you prefer in case you choose to continue with the subscription. If you visit the Adobe After Effects website, you will see two options, which are "Free Trial" and "Buy Now".Īnd since you want to try the application first before deciding if you will use it, you just have to click the "Free Trial" button.Īfter that, you will be asked to fill out some personal information for the creation of your Adobe account.
DOWNLOAD AFTER EFFECTS CRACKED FREE HOW TO
With motion tracking, you can create text, logos, or graphics that smoothly follow the motion of cars, people, environmental effects, or even the camera itself.Īctually, the process of how to get After Effects for free is very easy, and it will not take you a long time to install it on your Mac or PC. This feature will allow you to create dynamic graphics that enhance your existing footage. Using this After Effects’ feature, you can now remove elements from your video and add them to live-action footage.ĭiscover how the rotoscope compositing technique allows you to stitch together moving elements - even if they aren’t shot on green screen. Motion GraphicsĪnimate titles, logos, and backgrounds on Mac or PC with After Effects industry-standard motion graphics software.Ĭustomize high-quality motion design templates or create your own to use over and over again in your projects. You can now eliminate mistakes and distractions, add the weather of your choice, create smooth handheld footage, and add 3D geometry and depth. This feature will allow you to make objects disappear, create 3D animations, control the weather onscreen, and generate special effects that make the impossible look real. You can also rotate your animated text 360 degrees and see how your words look in the picture instead of on it. Make a letter jump, float a phrase, or animate a logo-adding motion to placement, opacity, color, and more. You can choose from pre-made animations or make your own with easy-to-use keyframing tools. Whether you need a dazzling title sequence or simple roll credits, the text animation tools in After Effects can bring your words to life. Most creatives find After Effects as a go-to Adobe application since it is the best software for motion designers, animators, editors, and producers.Īnd for you to be sure that the usage of After Effects will bring such an advantage to you, here are some of the best Adobe After Effects features: Text Animations
0 notes