#mysql workbench install ubuntu
Explore tagged Tumblr posts
Visit Tumblr Blog
Explore Tumblr blogs with no restrictions, modern design and the best experience.
Last Seen Tumblr Blogs


Fun Fact
Kazakhstan’s Minister of Communications and Informatics has blocked the Tumblr site because it contained 60 sites of terrorism, extremism, and pornography in 2015.
Link
#volume#docker#docker-compose#dockerfile#docker-compose down#docker-compose up -d#docker images#network#lamp server#lamp#php#apache#mysql workbench install ubuntu#docker-compose stop#docker build
0 notes
Text
Mysql Download For Mac Mojave

Mysql Workbench Download For Mac
Mysql Install Mac Mojave
I am more of a command line user when accessing MySQL, but MySQLWorkBench is by far a great tool. However, I am not a fan of installing a database on my local machine and prefer to use an old computer on my network to handle that. If you have an old Mac or PC, wipe it and install Linux Server command line only software on it. Machines as old as 10/15 years and older can support Linux easily. You don't even need that much RAM either but I'd got with minimum of 4GB for MySQL.
The Mojave installer app will be in your Applications folder, so you can go there and launch it later to upgrade your Mac to the new operating system. Make a bootable installer drive: The quick way. Sep 27, 2018 So before you download and install macOS 10.14 Mojave, make sure your Mac is backed up. For information on how to do this, head over to our ultimate guide to backing up your Mac. How to download.
Apr 24, 2020 Download macOS Mojave For the strongest security and latest features, find out whether you can upgrade to macOS Catalina, the latest version of the Mac operating system. If you still need macOS Mojave, use this App Store link: Get macOS Mojave.
Oct 08, 2018 Steps to Install MySQL Workbench 8.0 on Mac OS X Mojave Step 1. Download the Installer. Follow this link to download the latest version of MySQL Workbench 8.0 for Mac. When I write this article, the Workbench version 8.0.12 is available. Save the file to your download directory.
Or...
Use Virtualbox by Oracle to create a virtual server on your local machine. I recommend Centos 7 or Ubuntu 18.04. The latter I used to use exclusively but it has too many updates every other week, whereas Centos 7 updates less often and is as secure regardless. But you will need to learn about firewalls, and securing SSH because SSH is how you will access the virtual machine for maintenance. You will have to learn how to add/delete users, how to use sudo so you can perform root based commands etc. There is a lot more to the picture than meets the eye when you want to use a database.
I strongly recommend not installing MySQL on your local machine but use a Virtual Machine or an old machine that you can connect to on your local area network. It will give you a better understanding of security when you have to deal with a firewall and it is always a good practice to never have a database on the same server/computer as your project. Databases are for the backend where access is secure and severely limited to just one machine via ssh-keys or machine id. If you don't have the key or ID you ain't getting access to the DB.
There are plenty of tutorials online that will show you how to do this. If you have the passion to learn it will come easy.
Posted on
Apple released every update for macOS, whether major or minor, via Mac App Store. Digital delivery to users makes it easy to download and update, however, it is not convenient in certain scenarios. Some users might need to keep a physical copy of macOS due to slow Internet connectivity. Others might need to create a physical copy to format their Mac and perform a clean install. Specially with the upcoming releasee of macOS Mojave, it is important to know how the full installer can be downloaded.
We have already covered different methods before which let you create a bootable USB installer for macOS. The first method was via a terminal, while the second method involved the usage of some third-party apps, that make the whole process simple. However, in that guide, we mentioned that the installer has to be downloaded from the Mac App Store. The installer files can be used after download, by cancelling the installation wizard for macOS. However, for some users, this might not be the complete download. Many users report that they receive installation files which are just a few MB in size.
Luckily, there is a tool called macOS Mojave Patcher. While this tool has been developed to help users run macOS Mojave/macOS 10.14 on unsupported Macs, it has a brilliant little feature that lets you download the full macOS Mojave dmg installer too. Because Mojave will only download on supported Macs, this tool lets users download it using a supported Mac, created a bootable USB installer and install it on an unsupported Mac. Here is how you can use this app.
Download macOS Mojave installer using macOS Mojave Patcher

Download the app from here. (Always use the latest version from this link.)
Opening it might show a warning dialogue. You’ll have to go to System Preferences > Security & Privacy to allow the app to run.Click Open Anyway in Security & Privacy.
Once you are able to open the app, you’ll get a message that your machine is natively supported. Click ok.
Go to Tools> Download macOS Mojave, to start the download. The app will ask you where you want to save the installer file. Note that the files are downloaded directly from Apple, so you wouldn’t have to worry about them being corrupted.The download will be around 6GB+ so make sure that you have enough space on your Mac.Once the download starts, the app will show you a progress bar. This might take a while, depending on your Internet connection speed.
Mysql Workbench Download For Mac
Once the download is complete, you can use this installer file to create a bootable USB.
Mysql Install Mac Mojave
P.S. if you just want to download a combo update for Mojave, they are available as small installers from Apple and can be downloaded here.
1 note
·
View note
Text
Ubuntu16 安装、配置MySQL 5.7
安装MySQL 5.7
1. sudo apt-get install mysql-server 2. apt-get install mysql-client 3. sudo apt-get install libmysqlclient-dev
安装过程中会提示设置密码什么的,注意设置了不要忘了,安装完成之后可以使用如下命令来检查是否安装成功: sudo netstat -tap | grep mysql 通过上述命令检查之后,如果看到有mysql 的socket处于 listen 状态则表示安装成功。
登陆mysql数据库可以通过如下命令: mysql -u root -p -u 表示选择登陆的用户名, -p 表示登陆的用户密码,上面命令输入之后会提示输入密码,此时输入密码就可以登录到mysql。
使用命令行在ubuntu下安装mysql可视化工具MySQL-workbench #apt-get install mysql-workbench
Ubuntu 打开Mysql 3306远程访问
1、查看3306端��是否正常
netstat -an | grep 3306 2、修改mysql配置文件(记住是Ubuntu16下的目录、文件均不同于14版本)
#vi /etc/mysql/mysql.conf.d/mysqld.cnf
将 bind-address =127.0.0.1 这句注释掉, :wq 退出,重启动mysql
# service mysql stop # service mysql start
3、修改 MySQL 用户的本地登录限制(% 为可以远程登录),使用密码FMTC@@2017:
root@jdu4e00u53f7:~# mysql -u root -p mysql>select Host,User from mysql.user; mysql>update mysql.user SET HOST='%' WHERE USER='你的用户名'; mysql>flush privileges;
创建新用户
1、以管理员身份登录MySQL,并选择mysql数据库
# mysql -u root -p mysql> use mysql
2、创建用户并设定密码,并使操作生效
mysql> create user ‘testuser’@’localhost’ identified by ‘testpassword’; mysql> create user ‘fmtc’@’%’ identified by ‘FMTC@2017’; mysql> flush privileges
注意:创建 fmtc 的用户使用的 '%' 参数,使得该用户可以不限制在本地登录。 'localhost',是指该用户只能在本地登录,不能在另外一台机器上远程登录。 也可以指定某个IP的电脑可以远程登录。
mysql 修改一个用户的登录限制为 '%'
mysql>select Host,User from mysql.user; mysql>update mysql.user SET HOST='%' WHERE USER='你的用户名';
3、为用户赋予操作数据库testdb的所有权限
musql>grant all privileges on fmtcdb.* to fmtc;
fmtc 用户不受登录限制;
mysql>grant all privileges on testdb.* to test@localhost identified by ‘testpassword’;
4、用新用户登录
mysql -u test -p
创建数据库:
创建编码为utf8的数据库:
mysql>CREATE DATABASE `fmtcdb` DEFAULT CHARACTER SET utf8 COLLATE utf8_general_ci; mysql>grant all privileges on fmtcdb.* to fmtc;
创建编码为GBK的数据库:
mysql>create database windDB default character set GBK collate GBK_chinese_ci; mysql>grant all privileges on windDB.* to wind@localhost identified by 'Wind2017'; mysql>flush privileges; mysql>show databases;
查看某个数据库的编码 用use db_name 切换到这个数据库,然后使用status 命令: mysql>use windDB; mysql>status
0 notes
Text
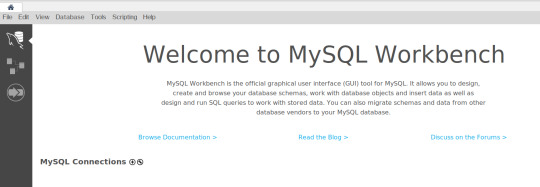
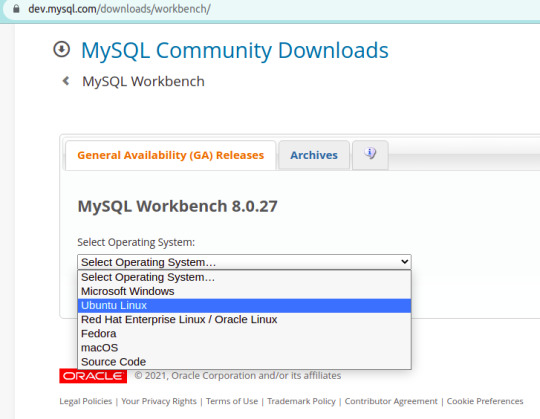
The MySQL Workbench is a GUI application that enables database administrators and Developers with administration, development, design, creation and maintenance of MySQL database systems. This tool is developed by same team that is behind MySQL relational database management system. In this short article we’re going to discuss on the installation of MySQL Workbench on Ubuntu 22.04|20.04 Desktop operating system. MySQL Workbench is offered in the following Editions: MySQL Workbench Community Edition – This is an Open Source (GPL License) edition MySQL Workbench Standard Edition – Commercial, License required to operate MySQL Workbench Enterprise Edition – Commercial, License required As a Developer, most features required for application design and integration with database are available in the Open Source edition. These features includes but are not limited to below. Visual SQL Development: You’ll get SQL Code Editor, Completion, Formatter, Syntax Highlighting, Code Generation, Snippets, and use of history. Visual Database Administration: You’ll be able to Stop/Start servers locally and remotely, View key server diagnostic information, View and parse slow and error logs, view and edit server settings, View and edit MySQL Replication settings. User and Session Management: Manage application roles, users and sessions from graphical interface. Data Management: Import and export, Quickly locate hard to find rows or cells and table Data Search. Connection Management: Configure connections to MySQL Servers and Configure SSH connections to local and remote servers. Visual Data Modeling: Auto Layout, Model Stored Procedures, Triggers, Functions, Model User Security and Auto Layout. Reverse Engineering from SQL Script and from Live Database. Schema Synchronization and many other features Install MySQL Workbench on Ubuntu 22.04|20.04 This guide is geared towards the installation of MySQL Workbench Open source edition on Ubuntu Linux system. There is a MySQL repository for Focal Fossa that will be used for the installation of MySQL Workbench on Ubuntu 22.04|20.04. The first step is to add the MySQL repository to your Ubuntu system. This can be quickly done by running the following commands in your terminal. sudo apt update && sudo apt -y install wget wget https://dev.mysql.com/get/mysql-apt-config_0.8.22-1_all.deb Confirm the file has been downloaded locally. $ ls -lh mysql-apt-config_0.8.22-1_all.deb -rw-rw-r-- 1 jmutai jmutai 35K Feb 20 11:55 mysql-apt-config_0.8.22-1_all.deb Run the installer script which will configure MySQL APT repository for you. For this you can use apt package manager or dpkg. I’m using apt as it can install any required dependencies without user interaction. ### Installation with dpkg ### sudo dpkg -i mysql-apt-config_0.8.22-1_all.deb ### Installation with apt ### sudo apt install ./mysql-apt-config_0.8.22-1_all.deb When the execution is ongoing you’re asked to choose MySQL product that the repository will be configured for its installation. I recommend you select MySQL Server if you would like to install the Server packages later. You can pick the version of MySQL in the installation screen. Please go with the latest version since the Client always have backward compatibly as opposed to using an older version which might miss features of recent releases. Command installation output will be similar to below if the installation was successful. Need to get 0 B/35.5 kB of archives. After this operation, 35.8 kB of additional disk space will be used. Get:1 /home/jmutai/mysql-apt-config_0.8.22-1_all.deb mysql-apt-config all 0.8.22-1 [35.5 kB] Preconfiguring packages ... Selecting previously unselected package mysql-apt-config. (Reading database ... 220088 files and directories currently installed.) Preparing to unpack .../mysql-apt-config_0.8.22-1_all.deb ... Unpacking mysql-apt-config (0.8.22-1) ... Setting up mysql-apt-config (0.8.22-1) ...
Warning: apt-key should not be used in scripts (called from postinst maintainerscript of the package mysql-apt-config) OK You can now install MySQL Workbench on Ubuntu 22.04/20.04 with apt command. You can see we’re updating the package index before installation to ensure we’re pulling the package from the repository we added in the previous step. sudo apt update sudo apt install mysql-workbench-community Press the y key to begin the installation of MySQL Workbench on Ubuntu. Reading package lists... Done Building dependency tree Reading state information... Done The following additional packages will be installed: libatkmm-1.6-1v5 libcairomm-1.0-1v5 libglibmm-2.4-1v5 libgtkmm-3.0-1v5 libpangomm-1.4-1v5 libsigc++-2.0-0v5 libssl-dev libssl1.1 libzip4 Suggested packages: libproj-dev The following NEW packages will be installed: libatkmm-1.6-1v5 libcairomm-1.0-1v5 libglibmm-2.4-1v5 libgtkmm-3.0-1v5 libpangomm-1.4-1v5 libsigc++-2.0-0v5 libzip4 mysql-workbench-community The following packages will be upgraded: libssl-dev libssl1.1 2 upgraded, 8 newly installed, 0 to remove and 804 not upgraded. Need to get 24.1 MB/27.0 MB of archives. After this operation, 133 MB of additional disk space will be used. Do you want to continue? [Y/n] y Using MySQL Workbench on Ubuntu 22.04 / Ubuntu 20.04 After installation launch MySQL Workbench on Ubuntu you can launch the application and connect your database server to begin management from a graphical interface. You can connect as root user or database specific user with limited access and privileges. If the connection is successful, you should be able to enjoy MySQL Workbench features. I recommend you go through the usage guides if this is the first time you’re using the tool. Installation on CentOS 8: How To Install MySQL Workbench on CentOS 8
0 notes
Text
Workbench for MySQL Install in 3 Ways.
In this article, will cover the 3 ways to install the MySQL Workbench in Ubuntu system. With apt, with .deb file(GUI), and with .deb(CLI).
Introduction. In this article, we will cover the 3 ways to install MySQL Workbench in Ubuntu 20.04. The only need to install Workbench is Ubuntu Local System. So Many GUI tools are available like Workbench, Beekeeper Studio, dbForge Studio, etc. It is for SQL development, administration, and database design for MySQL. So you can connect to many environments of MySQL Server into a single…
View On WordPress
0 notes
Text
How to install MySQL workbench on Ubuntu ?
How to install MySQL workbench on Ubuntu ?
MySQL Workbench is a unified visual tool for database architects, developers, and DBAs. MySQL Workbench provides data modeling, SQL development, and comprehensive administration tools for server configuration, user administration, backup, and much more. MySQL Workbench is available on Windows, Linux and Mac OS X. Prerequisite : You must know the version of Ubuntu on your machine. You can check…
View On WordPress
0 notes
Text
How to Install MySQL Workbench on Ubuntu
How to Install MySQL Workbench on Ubuntu
This brief guide shows how to install MySQL Workbench on Ubuntu Linux. If you are a beginner or a new user and want to install the MySQL Workbench on your ubuntu Linux system then this short tutorial is useful and handy for you. MySQL Workbench is a cross-platform visual (graphical) database design software that can be used for managing MySQL databases. It is available for Windows, Linux and Mac…

View On WordPress
0 notes
Link
Pada artikel ini saya akan share cara download dan instal MySQL Workbench di Ubuntu. MySQL Workbench adalah alat visual lintas platform yang memungkin
0 notes
Text
Simple guide to install MySQL WorkBench for Linux (Ubuntu & RHEL/CentOS)
Simple guide to install MySQL WorkBench for Linux (Ubuntu & RHEL/CentOS)
MySql Workbench for Linux is GUI (Graphical User Interface) for MySql. It acts as a graphical frontend for MySql databases & is used extensively by Developers, DBAs & Database Architects alike. MySql workbench for Linux have a number of great features, features like data modelling, development, SQL configurations administration tools, user administration, backup/restore etc.
All these features…
View On WordPress
0 notes
Text
Ubuntu14上安装MySQL
Ubuntu上安装MySQL非常简单只需要几条命令就可以完成。
1. sudo apt-get install mysql-server 2. apt-get install mysql-client 3. sudo apt-get install libmysqlclient-dev
安装过程中会提示设置密码什么的,注意设置了不要忘了,安装完成之后可以使用如下命令来检查是否安装成功: sudo netstat -tap | grep mysql 通过上述命令检查之后,如果看到有mysql 的socket处于 listen 状态则表示安装成功。 登陆mysql数据库可以通过如下命令: mysql -u root -p -u 表示选择登陆的用户名, -p 表示登陆的用户密码,上面命令输入之后会提示输入密码,此时输入密码就可以登录到mysql。
Ubuntu 打开Mysql 3306远程访问 最近在Ubuntu Server 15.10配置MySQL服务器,发现不能远程访问(ps:已建立一个可以远程访问的用户)。 1、查看3306端口是否正常 netstat -an | grep 3306 2、修改mysql配置文件(记住是mysqld.cnf,不是my.cnf) #vi /etc/mysql/my.cnf
将 bind-address =127.0.0.1 这句注释掉, :wq 退出,重启动mysql # service mysql stop # service mysql start
创建用户:
mysql> insert into mysql.user(Host,User,Password) values("localhost","wind",password("Wind2017")); mysql> insert into mysql.user(Host,User,Password) values("%","wind",password("Wind2017"));
这样就创建了一个名为:test 密码为:1234 的用户。 注意:此处的"localhost",是指该用户只能在本地登录,不能在另外一台机器上远程登录。如果想远程登录的话,将"localhost"改为"%",表示在任��一台电脑上都可以登录。也可以指定某台机器可以远程登录。
mysql 如何修改一个用户的权限为% select Host,User,Password from mysql.user; mysql.user SET HOST='%' WHERE USER='你的用户名';
在mysql数据库中建一个编码为gbk的数据库:
mysql>create database windDB default character set GBK collate GBK_chinese_ci; mysql>grant all privileges on windDB.* to wind@localhost identified by 'Wind2017'; mysql>flush privileges; mysql>show databases;
要查看某个数据库的编码 用use db_name 切换到这个数据库,然后使用status 命令: mysql>use windDB; mysql>status
使用命令行在ubuntu下安装mysql可视化工具MySQL-workbench #apt-get install mysql-workbench
0 notes
Text
DBM 449 devry Ilab 5 assignment
Follow Below Link to Download Tutorial
https://homeworklance.com/downloads/dbm-449-devry-ilab-5-assignment/
For More Information Visit Our Website ( https://homeworklance.com/ )
Email us At: [email protected] or [email protected]
Laboratory Procedures DeVry University College of Engineering and Information Sciences
I. OBJECTIVES
Understand and become familiar with fundamentals of DBMS security monitoring, auditing, logging, alerting, and reporting.
Install and configure a MySQL database.
Install and configure an Audit and Security module for MySQL database.
Generate logged events, and inspect contents of an Audit Log.
II. PARTS LIST
EDUPE-VT Omnymbus Virtual Machine Environment (https://devry.edupe.net:9090/) and/or:
MySQL (dev.mysql.com/downloads)
III. PROCEDURE, Part A—Installing MySQL
In order to complete this lab, you will require full control over a LINUX host operating system into which you will install and configure the MySQL database engine. You may achieve this through the DeVry iLab environment (https://devry.edupe.net:9090/), or by installing MySQL onto your own LINUX-based computer, or even into a LINUX Virtual Machine (VM) running in a VM environment on your own computer, such as VMWARE Player, or Sun’s Virtual Box. Full instructions for installing and configuring your own VM environment are beyond the scope of this lab, so unless you have prior experience with VM’s, using the DeVry iLab or installing onto your own LINUX-based computer is recommended.
Preliminary Configuration (DeVry iLab environment only)
Log into the DeVry Omnymbus EDUPE-VT environment, https://devry.edupe.net:9090/.
Create a single VM, using Template #6: VMX-LINUX-DESKTOP-UBUNTU. While you might presume that you should choose SERVER instead of DESKTOP, the DESKTOP VM image provides many tools running from the Graphical User Interface (GUI), which you may find convenient, especially if your experience in LINUX Operating System environments is limited.
Complete all steps required by Omnymbus to complete the configuration of your LINUX host, such as changing the root password and host name. Make a note of the IP address assigned to your new VM, for future use when managing or using your VM instance.
MySQL Database Installation (all environments)
Install the current release (general, not beta) of MySQL. If you are using UBUNTU LINUX, you may do this from the UBUNTU SOFTWARE CENTER, found under APPLICATIONS on the desktop. For other versions of LINUX, research available methods for downloading and installing MySQL appropriate to your Operating System. These might include APT-GET, RedHat Package Manager (RPM), YUM, and so on.
Configure and test that your MySQL service. Be sure that the services have started, and that you are able to connect to MySQL. This may be done in a terminal session using a command line statement, such as: mysql –host=localhost –user=myname –password mydb. Alternatively, you may choose to download and install a GUI SQL administration tool, such as TORA or MySQL Workbench. The command line is installed by default; the GUI tools are optional.
Take a screenshot of your successful connection to your MySQL database, and paste this into your lab report.
We will need a database later, in order to test the audit logging of events we choose to monitor. Just about any trivial database, with a little bit of data in it will suffice. You may use SQL scripts from previous labs, or use the Internet to search for and obtain a copy of the scripts to create and populate the SAKILA sample database. Choose whatever method and schema you wish, and run the scripts to create and populate some tables. Test your data model briefly by issuing a SELECT * from one of the tables. Paste a screen shot showing the successful SELECT and the first five or six rows of the result into your lab report.
McAfee Audit Module Download and Installation (all environments)
CHECKPOINT QUESTION: In order to proceed with the installation of the McAfee Audit Plugin for MySQL, you will need to gather some additional information. These checkpoint questions will help you to clarify this task: What version of LINUX are you running, and how do you determine this? Are you running a 32-bit or 64-bit version of the Operating system, and how do you determine this? How can you obtain/Where can you download an appropriate version of the McAfee Audit Plugin for your use? Once downloaded, how do you unpack the package to access the plugin components? What is the path of the plugin directory into which you must copy the unpacked/unzipped plugin? Record your answers to these questions, and paste them into your lab report. Download, unpack, and copy all files where they belong. (Hint: If you are unable to find a pre-built installation options through your desktop controls, such as Ubuntu Software Center, you can also download the package using a browser, or by using the wget command line interface statement. This latter statement would begin similar to: sudo wget…)
CHECKPOINT QUESTION: The installation of the plugin is done from within the MySQL console. What is the command you must issue to install the plugin? Record your answer in your lab report.
Issue the MySQL console command to install the plugin.
From the MySQL console, issue the command: show plugins;. Take a screenshot showing your successful results, and paste it into your lab report.
Configuring the McAfee Audit Module (all environments)
CHECKPOINT QUESTION: Even though the McAfee Audit Plugin in now installed, it is not yet monitoring things as we would wish. First, the Plugin must be configured. Research what events the plugin is capable of logging, and how to edit the configuration to log them. What command must be entered or what files edited in order to cause the plugin to log the following events: Connect, Quit, Failed Login, Insert, Drop, Create? Record the exact steps you must take and the commands you must enter in order to begin logging the events specified. Next, consider what actions you would need to take to generate each of these events, and document your plan for doing so. Paste both the configuration steps, and the commands you will execute to test the logging of each event into your lab report.
Execute each of the actions planned in the previous step to generate an event in the audit log.
Determine the location of the audit log (this is commonly /var/lib/mysql/mysql-audit.json). Display the log contents, and analyze them to show that each event you triggered appears in the log. Note: the log file format is not optimized for human readability. The default format generated by this plugin is a .json file, which is easily read and processed for many purposes, including generating pager or system alerts, automated threat responses, as well as reporting. Reporting software that uses such logs is known as Security Information and Event Management (SIEM) software. You may also find utilities that will read and format .json file format into a layout that is easier for humans to read. In any event, take screen shots of your log results, and annotate them to show that each of the required events was captured by the log. Paste a copy of this result into your lab report.
CHECKPOINT QUESTION: What has been achieved by this lab, and what steps would remain to provide a comprehensive security system, including reporting, monitoring, alerting, and Automated Threat Response (automatic countermeasures)? In your answer, give an example of a specific example of each of these, and discuss how it would operate (e.g., an Automated Threat Response might be to disable a user account, or to dynamically add a firewall rule rejecting any further traffic from a specific host computer from which a prohibited event was generated). Record your answer in the lab report.
Laboratory Report DeVry University College of Engineering and Information Sciences
Course Number: DBM449
Laboratory Number: 5
Laboratory Title: Database Security
Note: There is no limit on how much information you will enter under the three topics below. It is important to be clear and complete with your comments. Like a scientist you are documenting your progress in this week’s lab experiment.
Objectives: (In your own words what was this lab designed to accomplish? What was its purpose?)
Results: (Discuss the steps you used to complete your lab. Were you successful? What did you learn? What were the results? Explain what you did to accomplish each step. You can include screen shots, code listings, and so on. to clearly explain what you did. Be sure to record all results specifically directed by the lab procedure. Number all results to reflect the procedure number to which they correspond.)
Conclusions: (After completing this lab, in your own words, what conclusions can you draw from this experience?)
0 notes
Text
Install MySQL Workbench on Ubuntu 16.04
This is straightforward in Ubuntu 16.04, that is to install MySQL Workbench:
sudo apt-get install mysql-workbench
Should just work even if this is not the latest version, should be the stable version for Ubuntu.
0 notes
Text
DBM 449 devry Ilab 5 assignment
Follow Below Link to Download Tutorial
https://homeworklance.com/downloads/dbm-449-devry-ilab-5-assignment/
For More Information Visit Our Website ( https://homeworklance.com/ )
Email us At: [email protected] or [email protected]
Laboratory Procedures DeVry University College of Engineering and Information Sciences
I. OBJECTIVES
Understand and become familiar with fundamentals of DBMS security monitoring, auditing, logging, alerting, and reporting.
Install and configure a MySQL database.
Install and configure an Audit and Security module for MySQL database.
Generate logged events, and inspect contents of an Audit Log.
II. PARTS LIST
EDUPE-VT Omnymbus Virtual Machine Environment (https://devry.edupe.net:9090/) and/or:
MySQL (dev.mysql.com/downloads)
III. PROCEDURE, Part A—Installing MySQL
In order to complete this lab, you will require full control over a LINUX host operating system into which you will install and configure the MySQL database engine. You may achieve this through the DeVry iLab environment (https://devry.edupe.net:9090/), or by installing MySQL onto your own LINUX-based computer, or even into a LINUX Virtual Machine (VM) running in a VM environment on your own computer, such as VMWARE Player, or Sun’s Virtual Box. Full instructions for installing and configuring your own VM environment are beyond the scope of this lab, so unless you have prior experience with VM’s, using the DeVry iLab or installing onto your own LINUX-based computer is recommended.
Preliminary Configuration (DeVry iLab environment only)
Log into the DeVry Omnymbus EDUPE-VT environment, https://devry.edupe.net:9090/.
Create a single VM, using Template #6: VMX-LINUX-DESKTOP-UBUNTU. While you might presume that you should choose SERVER instead of DESKTOP, the DESKTOP VM image provides many tools running from the Graphical User Interface (GUI), which you may find convenient, especially if your experience in LINUX Operating System environments is limited.
Complete all steps required by Omnymbus to complete the configuration of your LINUX host, such as changing the root password and host name. Make a note of the IP address assigned to your new VM, for future use when managing or using your VM instance.
MySQL Database Installation (all environments)
Install the current release (general, not beta) of MySQL. If you are using UBUNTU LINUX, you may do this from the UBUNTU SOFTWARE CENTER, found under APPLICATIONS on the desktop. For other versions of LINUX, research available methods for downloading and installing MySQL appropriate to your Operating System. These might include APT-GET, RedHat Package Manager (RPM), YUM, and so on.
Configure and test that your MySQL service. Be sure that the services have started, and that you are able to connect to MySQL. This may be done in a terminal session using a command line statement, such as: mysql –host=localhost –user=myname –password mydb. Alternatively, you may choose to download and install a GUI SQL administration tool, such as TORA or MySQL Workbench. The command line is installed by default; the GUI tools are optional.
Take a screenshot of your successful connection to your MySQL database, and paste this into your lab report.
We will need a database later, in order to test the audit logging of events we choose to monitor. Just about any trivial database, with a little bit of data in it will suffice. You may use SQL scripts from previous labs, or use the Internet to search for and obtain a copy of the scripts to create and populate the SAKILA sample database. Choose whatever method and schema you wish, and run the scripts to create and populate some tables. Test your data model briefly by issuing a SELECT * from one of the tables. Paste a screen shot showing the successful SELECT and the first five or six rows of the result into your lab report.
McAfee Audit Module Download and Installation (all environments)
CHECKPOINT QUESTION: In order to proceed with the installation of the McAfee Audit Plugin for MySQL, you will need to gather some additional information. These checkpoint questions will help you to clarify this task: What version of LINUX are you running, and how do you determine this? Are you running a 32-bit or 64-bit version of the Operating system, and how do you determine this? How can you obtain/Where can you download an appropriate version of the McAfee Audit Plugin for your use? Once downloaded, how do you unpack the package to access the plugin components? What is the path of the plugin directory into which you must copy the unpacked/unzipped plugin? Record your answers to these questions, and paste them into your lab report. Download, unpack, and copy all files where they belong. (Hint: If you are unable to find a pre-built installation options through your desktop controls, such as Ubuntu Software Center, you can also download the package using a browser, or by using the wget command line interface statement. This latter statement would begin similar to: sudo wget…)
CHECKPOINT QUESTION: The installation of the plugin is done from within the MySQL console. What is the command you must issue to install the plugin? Record your answer in your lab report.
Issue the MySQL console command to install the plugin.
From the MySQL console, issue the command: show plugins;. Take a screenshot showing your successful results, and paste it into your lab report.
Configuring the McAfee Audit Module (all environments)
CHECKPOINT QUESTION: Even though the McAfee Audit Plugin in now installed, it is not yet monitoring things as we would wish. First, the Plugin must be configured. Research what events the plugin is capable of logging, and how to edit the configuration to log them. What command must be entered or what files edited in order to cause the plugin to log the following events: Connect, Quit, Failed Login, Insert, Drop, Create? Record the exact steps you must take and the commands you must enter in order to begin logging the events specified. Next, consider what actions you would need to take to generate each of these events, and document your plan for doing so. Paste both the configuration steps, and the commands you will execute to test the logging of each event into your lab report.
Execute each of the actions planned in the previous step to generate an event in the audit log.
Determine the location of the audit log (this is commonly /var/lib/mysql/mysql-audit.json). Display the log contents, and analyze them to show that each event you triggered appears in the log. Note: the log file format is not optimized for human readability. The default format generated by this plugin is a .json file, which is easily read and processed for many purposes, including generating pager or system alerts, automated threat responses, as well as reporting. Reporting software that uses such logs is known as Security Information and Event Management (SIEM) software. You may also find utilities that will read and format .json file format into a layout that is easier for humans to read. In any event, take screen shots of your log results, and annotate them to show that each of the required events was captured by the log. Paste a copy of this result into your lab report.
CHECKPOINT QUESTION: What has been achieved by this lab, and what steps would remain to provide a comprehensive security system, including reporting, monitoring, alerting, and Automated Threat Response (automatic countermeasures)? In your answer, give an example of a specific example of each of these, and discuss how it would operate (e.g., an Automated Threat Response might be to disable a user account, or to dynamically add a firewall rule rejecting any further traffic from a specific host computer from which a prohibited event was generated). Record your answer in the lab report.
Laboratory Report DeVry University College of Engineering and Information Sciences
Course Number: DBM449
Laboratory Number: 5
Laboratory Title: Database Security
Note: There is no limit on how much information you will enter under the three topics below. It is important to be clear and complete with your comments. Like a scientist you are documenting your progress in this week’s lab experiment.
Objectives: (In your own words what was this lab designed to accomplish? What was its purpose?)
Results: (Discuss the steps you used to complete your lab. Were you successful? What did you learn? What were the results? Explain what you did to accomplish each step. You can include screen shots, code listings, and so on. to clearly explain what you did. Be sure to record all results specifically directed by the lab procedure. Number all results to reflect the procedure number to which they correspond.)
Conclusions: (After completing this lab, in your own words, what conclusions can you draw from this experience?)
0 notes
Text
DBM 449 devry Ilab 5 assignment
Follow Below Link to Download Tutorial
https://homeworklance.com/downloads/dbm-449-devry-ilab-5-assignment/
For More Information Visit Our Website ( https://homeworklance.com/ )
Email us At: [email protected] or [email protected]
Laboratory Procedures DeVry University College of Engineering and Information Sciences
I. OBJECTIVES
Understand and become familiar with fundamentals of DBMS security monitoring, auditing, logging, alerting, and reporting.
Install and configure a MySQL database.
Install and configure an Audit and Security module for MySQL database.
Generate logged events, and inspect contents of an Audit Log.
II. PARTS LIST
EDUPE-VT Omnymbus Virtual Machine Environment (https://devry.edupe.net:9090/) and/or:
MySQL (dev.mysql.com/downloads)
III. PROCEDURE, Part A—Installing MySQL
In order to complete this lab, you will require full control over a LINUX host operating system into which you will install and configure the MySQL database engine. You may achieve this through the DeVry iLab environment (https://devry.edupe.net:9090/), or by installing MySQL onto your own LINUX-based computer, or even into a LINUX Virtual Machine (VM) running in a VM environment on your own computer, such as VMWARE Player, or Sun’s Virtual Box. Full instructions for installing and configuring your own VM environment are beyond the scope of this lab, so unless you have prior experience with VM’s, using the DeVry iLab or installing onto your own LINUX-based computer is recommended.
Preliminary Configuration (DeVry iLab environment only)
Log into the DeVry Omnymbus EDUPE-VT environment, https://devry.edupe.net:9090/.
Create a single VM, using Template #6: VMX-LINUX-DESKTOP-UBUNTU. While you might presume that you should choose SERVER instead of DESKTOP, the DESKTOP VM image provides many tools running from the Graphical User Interface (GUI), which you may find convenient, especially if your experience in LINUX Operating System environments is limited.
Complete all steps required by Omnymbus to complete the configuration of your LINUX host, such as changing the root password and host name. Make a note of the IP address assigned to your new VM, for future use when managing or using your VM instance.
MySQL Database Installation (all environments)
Install the current release (general, not beta) of MySQL. If you are using UBUNTU LINUX, you may do this from the UBUNTU SOFTWARE CENTER, found under APPLICATIONS on the desktop. For other versions of LINUX, research available methods for downloading and installing MySQL appropriate to your Operating System. These might include APT-GET, RedHat Package Manager (RPM), YUM, and so on.
Configure and test that your MySQL service. Be sure that the services have started, and that you are able to connect to MySQL. This may be done in a terminal session using a command line statement, such as: mysql –host=localhost –user=myname –password mydb. Alternatively, you may choose to download and install a GUI SQL administration tool, such as TORA or MySQL Workbench. The command line is installed by default; the GUI tools are optional.
Take a screenshot of your successful connection to your MySQL database, and paste this into your lab report.
We will need a database later, in order to test the audit logging of events we choose to monitor. Just about any trivial database, with a little bit of data in it will suffice. You may use SQL scripts from previous labs, or use the Internet to search for and obtain a copy of the scripts to create and populate the SAKILA sample database. Choose whatever method and schema you wish, and run the scripts to create and populate some tables. Test your data model briefly by issuing a SELECT * from one of the tables. Paste a screen shot showing the successful SELECT and the first five or six rows of the result into your lab report.
McAfee Audit Module Download and Installation (all environments)
CHECKPOINT QUESTION: In order to proceed with the installation of the McAfee Audit Plugin for MySQL, you will need to gather some additional information. These checkpoint questions will help you to clarify this task: What version of LINUX are you running, and how do you determine this? Are you running a 32-bit or 64-bit version of the Operating system, and how do you determine this? How can you obtain/Where can you download an appropriate version of the McAfee Audit Plugin for your use? Once downloaded, how do you unpack the package to access the plugin components? What is the path of the plugin directory into which you must copy the unpacked/unzipped plugin? Record your answers to these questions, and paste them into your lab report. Download, unpack, and copy all files where they belong. (Hint: If you are unable to find a pre-built installation options through your desktop controls, such as Ubuntu Software Center, you can also download the package using a browser, or by using the wget command line interface statement. This latter statement would begin similar to: sudo wget…)
CHECKPOINT QUESTION: The installation of the plugin is done from within the MySQL console. What is the command you must issue to install the plugin? Record your answer in your lab report.
Issue the MySQL console command to install the plugin.
From the MySQL console, issue the command: show plugins;. Take a screenshot showing your successful results, and paste it into your lab report.
Configuring the McAfee Audit Module (all environments)
CHECKPOINT QUESTION: Even though the McAfee Audit Plugin in now installed, it is not yet monitoring things as we would wish. First, the Plugin must be configured. Research what events the plugin is capable of logging, and how to edit the configuration to log them. What command must be entered or what files edited in order to cause the plugin to log the following events: Connect, Quit, Failed Login, Insert, Drop, Create? Record the exact steps you must take and the commands you must enter in order to begin logging the events specified. Next, consider what actions you would need to take to generate each of these events, and document your plan for doing so. Paste both the configuration steps, and the commands you will execute to test the logging of each event into your lab report.
Execute each of the actions planned in the previous step to generate an event in the audit log.
Determine the location of the audit log (this is commonly /var/lib/mysql/mysql-audit.json). Display the log contents, and analyze them to show that each event you triggered appears in the log. Note: the log file format is not optimized for human readability. The default format generated by this plugin is a .json file, which is easily read and processed for many purposes, including generating pager or system alerts, automated threat responses, as well as reporting. Reporting software that uses such logs is known as Security Information and Event Management (SIEM) software. You may also find utilities that will read and format .json file format into a layout that is easier for humans to read. In any event, take screen shots of your log results, and annotate them to show that each of the required events was captured by the log. Paste a copy of this result into your lab report.
CHECKPOINT QUESTION: What has been achieved by this lab, and what steps would remain to provide a comprehensive security system, including reporting, monitoring, alerting, and Automated Threat Response (automatic countermeasures)? In your answer, give an example of a specific example of each of these, and discuss how it would operate (e.g., an Automated Threat Response might be to disable a user account, or to dynamically add a firewall rule rejecting any further traffic from a specific host computer from which a prohibited event was generated). Record your answer in the lab report.
Laboratory Report DeVry University College of Engineering and Information Sciences
Course Number: DBM449
Laboratory Number: 5
Laboratory Title: Database Security
Note: There is no limit on how much information you will enter under the three topics below. It is important to be clear and complete with your comments. Like a scientist you are documenting your progress in this week’s lab experiment.
Objectives: (In your own words what was this lab designed to accomplish? What was its purpose?)
Results: (Discuss the steps you used to complete your lab. Were you successful? What did you learn? What were the results? Explain what you did to accomplish each step. You can include screen shots, code listings, and so on. to clearly explain what you did. Be sure to record all results specifically directed by the lab procedure. Number all results to reflect the procedure number to which they correspond.)
Conclusions: (After completing this lab, in your own words, what conclusions can you draw from this experience?)
0 notes