#docker-compose up -d
Explore tagged Tumblr posts
Visit Tumblr Blog
Explore Tumblr blogs with no restrictions, modern design and the best experience.
Last Seen Tumblr Blogs


Fun Fact
Tumblr.com rank in the US is 25.
Text

sometimes u just get so filled w thoughts about a pair of characters u gotta just go bonkers ya know
#rvb#red vs blue#my art#batsy art#rvb tucker#rvb doc#rvb junior#docker#this file is called docker_and_son on my pc so ya know#tuckers hair being a mess post quest and post birth is v important to me#man got home took out his dreads and promptly fuckin immediately fell asleep face down on the floor and hasnt had a moment to retwist em#he very much meant to finish his hair first but his body had other plans#the picture has everyone in stolen clothes and that amuses me#Doc is wearing Caboose's shirt tucker is wearing one of tex's shirts and junior is wrapped up in one of church's shirts#not pictured is jr introducing doc and tucker to mason wu with 'hi mr wu this is my dad and mom-doc' 'dad doc this is mr wu :D'#and doc needs to compose himself from being called mom meanwhile junior doesnt even notice he slipped up he just auto corrected and moved o#tucker also missed it bc he was trying to figure out what mason's vibes are by force of eyebrows alone#mason wu is the only parent there who doesnt think doc and tucker are mid-messy divorce bc he looks at them and recognizes them#from pfl articles and chorus ones#so he Knows theyre soldiers and the shit they get up to and his previous frustration with juniors apparently absent family is nuked#theyre not absent theyre just keeping him Safely away from Fuckery
109 notes
·
View notes
Note
what's your opinion on podman?
Never really used it, someone got me using docker and ive been cursed to docker compose up -d ever since
12 notes
·
View notes
Link
#Automation#cloud#configuration#Dashboard#energymonitoring#HomeAssistant#homesecurity#Install#Integration#IoT#Linux#MQTT#open-source#operatingsystem#RaspberryPi#self-hosted#sensors#smarthome#systemadministration#Z-Wave#Zigbee
0 notes
Text
Postal SMTP install and setup on a virtual server

Postal is a full suite for mail delivery with robust features suited for running a bulk email sending SMTP server. Postal is open source and free. Some of its features are: - UI for maintaining different aspects of your mail server - Runs on containers, hence allows for up and down horizontal scaling - Email security features such as spam and antivirus - IP pools to help you maintain a good sending reputation by sending via multiple IPs - Multitenant support - multiple users, domains and organizations - Monitoring queue for outgoing and incoming mail - Built in DNS setup and monitoring to ensure mail domains are set up correctly List of full postal features
Possible cloud providers to use with Postal
You can use Postal with any VPS or Linux server providers of your choice, however here are some we recommend: Vultr Cloud (Get free $300 credit) - In case your SMTP port is blocked, you can contact Vultr support, and they will open it for you after providing a personal identification method. DigitalOcean (Get free $200 Credit) - You will also need to contact DigitalOcean support for SMTP port to be open for you. Hetzner ( Get free €20) - SMTP port is open for most accounts, if yours isn't, contact the Hetzner support and request for it to be unblocked for you Contabo (Cheapest VPS) - Contabo doesn't block SMTP ports. In case you are unable to send mail, contact support. Interserver
Postal Minimum requirements
- At least 4GB of RAM - At least 2 CPU cores - At least 25GB disk space - You can use docker or any Container runtime app. Ensure Docker Compose plugin is also installed. - Port 25 outbound should be open (A lot of cloud providers block it)
Postal Installation
Should be installed on its own server, meaning, no other items should be running on the server. A fresh server install is recommended. Broad overview of the installation procedure - Install Docker and the other needed apps - Configuration of postal and add DNS entries - Start Postal - Make your first user - Login to the web interface to create virtual mail servers Step by step install Postal Step 1 : Install docker and additional system utilities In this guide, I will use Debian 12 . Feel free to follow along with Ubuntu. The OS to be used does not matter, provided you can install docker or any docker alternative for running container images. Commands for installing Docker on Debian 12 (Read the comments to understand what each command does): #Uninstall any previously installed conflicting software . If you have none of them installed it's ok for pkg in docker.io docker-doc docker-compose podman-docker containerd runc; do sudo apt-get remove $pkg; done #Add Docker's official GPG key: sudo apt-get update sudo apt-get install ca-certificates curl -y sudo install -m 0755 -d /etc/apt/keyrings sudo curl -fsSL https://download.docker.com/linux/debian/gpg -o /etc/apt/keyrings/docker.asc sudo chmod a+r /etc/apt/keyrings/docker.asc #Add the Docker repository to Apt sources: echo "deb https://download.docker.com/linux/debian $(. /etc/os-release && echo "$VERSION_CODENAME") stable" | sudo tee /etc/apt/sources.list.d/docker.list > /dev/null sudo apt-get update #Install the docker packages sudo apt-get install docker-ce docker-ce-cli containerd.io docker-buildx-plugin docker-compose-plugin -y #You can verify that the installation is successful by running the hello-world image sudo docker run hello-world Add the current user to the docker group so that you don't have to use sudo when not logged in as the root user. ##Add your current user to the docker group. sudo usermod -aG docker $USER #Reboot the server sudo reboot Finally test if you can run docker without sudo ##Test that you don't need sudo to run docker docker run hello-world Step 2 : Get the postal installation helper repository The Postal installation helper has all the docker compose files and the important bootstrapping tools needed for generating configuration files. Install various needed tools #Install additional system utlities apt install git vim htop curl jq -y Then clone the helper repository. sudo git clone https://github.com/postalserver/install /opt/postal/install sudo ln -s /opt/postal/install/bin/postal /usr/bin/postal Step 3 : Install MariaDB database Here is a sample MariaDB container from the postal docs. But you can use the docker compose file below it. docker run -d --name postal-mariadb -p 127.0.0.1:3306:3306 --restart always -e MARIADB_DATABASE=postal -e MARIADB_ROOT_PASSWORD=postal mariadb Here is a tested mariadb compose file to run a secure MariaDB 11.4 container. You can change the version to any image you prefer. vi docker-compose.yaml services: mariadb: image: mariadb:11.4 container_name: postal-mariadb restart: unless-stopped environment: MYSQL_ROOT_PASSWORD: ${DB_ROOT_PASSWORD} volumes: - mariadb_data:/var/lib/mysql network_mode: host # Set to use the host's network mode security_opt: - no-new-privileges:true read_only: true tmpfs: - /tmp - /run/mysqld healthcheck: test: interval: 30s timeout: 10s retries: 5 volumes: mariadb_data: You need to create an environment file with the Database password . To simplify things, postal will use the root user to access the Database.env file example is below. Place it in the same location as the compose file. DB_ROOT_PASSWORD=ExtremelyStrongPasswordHere Run docker compose up -d and ensure the database is healthy. Step 4 : Bootstrap the domain for your Postal web interface & Database configs First add DNS records for your postal domain. The most significant records at this stage are the A and/or AAAA records. This is the domain where you'll be accessing the postal UI and for simplicity will also act as the SMTP server. If using Cloudflare, turn off the Cloudflare proxy. sudo postal bootstrap postal.yourdomain.com The above will generate three files in /opt/postal/config. - postal.yml is the main postal configuration file - signing.key is the private key used to sign various things in Postal - Caddyfile is the configuration for the Caddy web server Open /opt/postal/config/postal.yml and add all the values for DB and other settings. Go through the file and see what else you can edit. At the very least, enter the correct DB details for postal message_db and main_db. Step 5 : Initialize the Postal database and create an admin user postal initialize postal make-user If everything goes well with postal initialize, then celebrate. This is the part where you may face some issues due to DB connection failures. Step 6 : Start running postal # run postal postal start #checking postal status postal status # If you make any config changes in future you can restart postal like so # postal restart Step 7 : Proxy for web traffic To handle web traffic and ensure TLS termination you can use any proxy server of your choice, nginx, traefik , caddy etc. Based on Postal documentation, the following will start up caddy. You can use the compose file below it. Caddy is easy to use and does a lot for you out of the box. Ensure your A records are pointing to your server before running Caddy. docker run -d --name postal-caddy --restart always --network host -v /opt/postal/config/Caddyfile:/etc/caddy/Caddyfile -v /opt/postal/caddy-data:/data caddy Here is a compose file you can use instead of the above docker run command. Name it something like caddy-compose.yaml services: postal-caddy: image: caddy container_name: postal-caddy restart: always network_mode: host volumes: - /opt/postal/config/Caddyfile:/etc/caddy/Caddyfile - /opt/postal/caddy-data:/data You can run it by doing docker compose -f caddy-compose.yaml up -d Now it's time to go to the browser and login. Use the domain, bootstrapped earlier. Add an organization, create server and add a domain. This is done via the UI and it is very straight forward. For every domain you add, ensure to add the DNS records you are provided.
Enable IP Pools
One of the reasons why Postal is great for bulk email sending, is because it allows for sending emails using multiple IPs in a round-robin fashion. Pre-requisites - Ensure the IPs you want to add as part of the pool, are already added to your VPS/server. Every cloud provider has a documentation for adding additional IPs, make sure you follow their guide to add all the IPs to the network. When you run ip a , you should see the IP addresses you intend to use in the pool. Enabling IP pools in the Postal config First step is to enable IP pools settings in the postal configuration, then restart postal. Add the following configuration in the postal.yaml (/opt/postal/config/postal.yml) file to enable pools. If the section postal: , exists, then just add use_ip_pools: true under it. postal: use_ip_pools: true Then restart postal. postal stop && postal start The next step is to go to the postal interface on your browser. A new IP pools link is now visible at the top right corner of your postal dashboard. You can use the IP pools link to add a pool, then assign IP addresses in the pools. A pool could be something like marketing, transactions, billing, general etc. Once the pools are created and IPs assigned to them, you can attach a pool to an organization. This organization can now use the provided IP addresses to send emails. Open up an organization and assign a pool to it. Organizations → choose IPs → choose pools . You can then assign the IP pool to servers from the server's Settings page. You can also use the IP pool to configure IP rules for the organization or server. At any point, if you are lost, look at the Postal documentation. Read the full article
0 notes
Text
A Beginner’s Guide to Docker: Building and Running Containers in DevOps
Docker has revolutionized the way applications are built, shipped, and run in the world of DevOps. As a containerization platform, Docker enables developers to package applications and their dependencies into lightweight, portable containers, ensuring consistency across environments. This guide introduces Docker’s core concepts and practical steps to get started.
What is Docker? Docker is an open-source platform that allows developers to: Build and package applications along with their dependencies into containers.
Run these containers consistently across different environments. Simplify software development, deployment, and scaling processes.
2. Why Use Docker in DevOps? Environment Consistency: Docker containers ensure that applications run the same in development, testing, and production.
Speed: Containers start quickly and use system resources efficiently.
Portability: Containers can run on any system that supports Docker, whether it’s a developer’s laptop, an on-premises server, or the cloud.
Microservices Architecture: Docker works seamlessly with microservices, enabling developers to build, deploy, and scale individual services independently.
3. Key Docker Components Docker Engine:
The core runtime for building and running containers.
Images: A blueprint for containers that include the application and its dependencies. Containers: Instances of images that are lightweight and isolated.
Dockerfile: A script containing instructions to build a Docker image.
Docker Hub: A repository for sharing Docker images.
4. Getting Started with Docker
Step 1: Install Docker Download and install Docker Desktop for your operating system from Docker’s official site.
Step 2: Write a Dockerfile Create a Dockerfile to define your application environment.
Example for a Python app:
dockerfile Edit
# Use an official Python runtime as a base image FROM python:3.9-slim
# Set the working directory WORKDIR /app
# Copy project files COPY . .
# Install dependencies RUN pip install -r requirements.txt # Define the command to run the app CMD [“python”, “app.py”]
Step 3: Build the Docker Image Run the following command to build the image:
bash Copy Edit docker build -t my-python-app .
Step 4: Run the Container Start a container from your image:
bash
Edit docker run -d -p 5000:5000 my-python-app
This maps port 5000 of the container to port 5000 on your host machine.
Step 5: Push to Docker Hub Share your image by pushing it to Docker Hub: bash
Edit docker tag my-python-app username/my-python-app docker push username/my-python-app
5. Practical Use Cases in DevOps Continuous Integration/Continuous Deployment (CI/CD):
Docker is commonly used in pipelines for building, testing, and deploying applications.
Microservices:
Each service runs in its own container, isolated from others.
Scalability:
Containers can be easily scaled up or down based on demand.
Testing:
Test environments can be quickly spun up and torn down using Docker containers.
6. Best Practices Keep Docker images small by using minimal base images. Avoid hardcoding sensitive data into images; use environment variables instead.
Use Docker Compose to manage multi-container applications. Regularly scan images for vulnerabilities using Docker’s built-in security tools.
Conclusion
Docker simplifies the development and deployment process, making it a cornerstone of modern DevOps practices. By understanding its basics and starting with small projects, beginners can quickly leverage Docker to enhance productivity and streamline workflows.

0 notes
Text
Managing Containerized Applications Using Ansible: A Guide for College Students and Working Professionals
As containerization becomes a cornerstone of modern application deployment, managing containerized applications effectively is crucial. Ansible, a powerful automation tool, provides robust capabilities for managing these containerized environments. This blog post will guide you through the process of managing containerized applications using Ansible, tailored for both college students and working professionals.
What is Ansible?
Ansible is an open-source automation tool that simplifies configuration management, application deployment, and task automation. It's known for its agentless architecture, ease of use, and powerful features, making it ideal for managing containerized applications.
Why Use Ansible for Container Management?
Consistency: Ensure that container configurations are consistent across different environments.
Automation: Automate repetitive tasks such as container deployment, scaling, and monitoring.
Scalability: Manage containers at scale, across multiple hosts and environments.
Integration: Seamlessly integrate with CI/CD pipelines, monitoring tools, and other infrastructure components.
Prerequisites
Before you start, ensure you have the following:
Ansible installed on your local machine.
Docker installed on the target hosts.
Basic knowledge of YAML and Docker.
Setting Up Ansible
Install Ansible on your local machine:
pip install ansible
Basic Concepts
Inventory
An inventory file lists the hosts and groups of hosts that Ansible manages. Here's a simple example:
[containers] host1.example.com host2.example.com
Playbooks
Playbooks define the tasks to be executed on the managed hosts. Below is an example of a playbook to manage Docker containers.
Example Playbook: Deploying a Docker Container
Let's start with a simple example of deploying an NGINX container using Ansible.
Step 1: Create the Inventory File
Create a file named inventory:
[containers] localhost ansible_connection=local
Step 2: Create the Playbook
Create a file named deploy_nginx.yml:
name: Deploy NGINX container hosts: containers become: yes tasks:
name: Install Docker apt: name: docker.io state: present when: ansible_os_family == "Debian"
name: Ensure Docker is running service: name: docker state: started enabled: yes
name: Pull NGINX image docker_image: name: nginx source: pull
name: Run NGINX container docker_container: name: nginx image: nginx state: started ports:
"80:80"
Step 3: Run the Playbook
Execute the playbook using the following command:
ansible-playbook -i inventory deploy_nginx.yml
Advanced Topics
Managing Multi-Container Applications
For more complex applications, such as those defined by Docker Compose, you can manage multi-container setups with Ansible.
Example: Deploying a Docker Compose Application
Create a Docker Compose file docker-compose.yml:
version: '3' services: web: image: nginx ports: - "80:80" db: image: postgres environment: POSTGRES_PASSWORD: example
Create an Ansible playbook deploy_compose.yml:
name: Deploy Docker Compose application hosts: containers become: yes tasks:
name: Install Docker apt: name: docker.io state: present when: ansible_os_family == "Debian"
name: Install Docker Compose get_url: url: https://github.com/docker/compose/releases/download/1.29.2/docker-compose-uname -s-uname -m dest: /usr/local/bin/docker-compose mode: '0755'
name: Create Docker Compose file copy: dest: /opt/docker-compose.yml content: | version: '3' services: web: image: nginx ports: - "80:80" db: image: postgres environment: POSTGRES_PASSWORD: example
name: Run Docker Compose command: docker-compose -f /opt/docker-compose.yml up -d
Run the playbook:
ansible-playbook -i inventory deploy_compose.yml
Integrating Ansible with CI/CD
Ansible can be integrated into CI/CD pipelines for continuous deployment of containerized applications. Tools like Jenkins, GitLab CI, and GitHub Actions can trigger Ansible playbooks to deploy containers whenever new code is pushed.
Example: Using GitHub Actions
Create a GitHub Actions workflow file .github/workflows/deploy.yml:
name: Deploy with Ansible
on: push: branches: - main
jobs: deploy: runs-on: ubuntu-lateststeps: - name: Checkout code uses: actions/checkout@v2 - name: Set up Ansible run: sudo apt update && sudo apt install -y ansible - name: Run Ansible playbook run: ansible-playbook -i inventory deploy_compose.yml
Conclusion
Managing containerized applications with Ansible streamlines the deployment and maintenance processes, ensuring consistency and reliability. Whether you're a college student diving into DevOps or a working professional seeking to enhance your automation skills, Ansible provides the tools you need to efficiently manage your containerized environments.
For more details click www.qcsdclabs.com
#redhatcourses#docker#linux#information technology#containerorchestration#kubernetes#container#containersecurity#dockerswarm#aws
0 notes
Text
docker compose up -d living-as-trueself
sudo apt-get install estrogen
1K notes
·
View notes
Text
🛠 Open Source Instant Messaging (IM) Project OpenIM Source Code Deployment Guide
Deploying OpenIM involves multiple components and supports various methods, including source code, Docker, and Kubernetes. This requires ensuring compatibility between different deployment methods while effectively managing differences between versions. Indeed, these are complex issues involving in-depth technical details and precise system configurations. Our goal is to simplify the deployment process while maintaining the system's flexibility and stability to suit different users' needs. Currently, version 3.5 has simplified the deployment process, and this version will be maintained for a long time. We welcome everyone to use it.
1. Environment and Component Requirements
🌐 Environmental Requirements
NoteDetailed DescriptionOSLinux systemHardwareAt least 4GB of RAMGolangv1.19 or higherDockerv24.0.5 or higherGitv2.17.1 or higher
💾 Storage Component Requirements
Storage ComponentRecommended VersionMongoDBv6.0.2 or higherRedisv7.0.0 or higherZookeeperv3.8Kafkav3.5.1MySQLv5.7 or higherMinIOLatest version
2. Deploying OpenIM Server (IM)
2.1 📡 Setting OPENIM_IP
# If the server has an external IP export OPENIM_IP="external IP" # If only providing internal network services export OPENIM_IP="internal IP"
2.2 🏗️ Deploying Components (mongodb/redis/zookeeper/kafka/MinIO, etc.)
git clone https://github.com/OpenIMSDK/open-im-server && cd open-im-server # It's recommended to switch to release-v3.5 or later release branches make init && docker compose up -d
2.3 🛠️ Compilation
make build
2.4 🚀 Starting/Stopping/Checking
# Start make start # Stop make stop # Check make check
3. Deploying App Server (Chat)
3.1 🏗️ Deploying Components (mysql)
# Go back to the previous directory cd .. # Clone the repository, recommended to switch to release-v1.5 or later release branches git clone https://github.com/OpenIMSDK/chat chat && cd chat # Deploy mysql docker run -d --name mysql2 -p 13306:3306 -p 33306:33060 -v "$(pwd)/components/mysql/data:/var/lib/mysql" -v "/etc/localtime:/etc/localtime" -e MYSQL_ROOT_PASSWORD="openIM123" --restart always mysql:5.7
3.2 🛠️ Compilation
make init make build
3.3 🚀 Starting/Stopping/Checking
# Start make start # Stop make stop # Check make check
4. Quick Validation
📡 Open Ports
IM Ports
TCP PortDescriptionActionTCP:10001ws protocol, messaging port, for client SDKAllow portTCP:10002API port, like user, friend, group, message interfacesAllow portTCP:10005Required when choosing MinIO storage (OpenIM defaults to MinIO storage)Allow port
Chat Ports
TCP PortDescriptionActionTCP:10008Business system, like registration, login, etc.Allow portTCP:10009Management backend, like statistics, account banning, etc.Allow port
PC Web and Management Backend Frontend Resource Ports
TCP PortDescriptionActionTCP:11001PC Web frontend resourcesAllow portTCP:11002Management backend frontend resourcesAllow port
Grafana Port
TCP PortDescriptionActionTCP:13000Grafana portAllow port
Verification
PC Web Verification
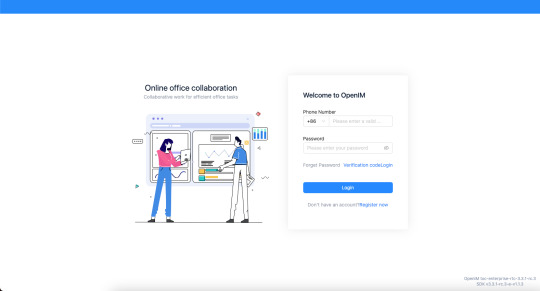
Note: Enter http://ip:11001 in your browser to access the PC Web. This IP should be the server's OPENIM_IP to ensure browser accessibility. For first-time use, please register using your mobile phone number, with the default verification code being 666666.
App Verification
Scan the following QR code or click here to download.

Note: Double-click on OpenIM and change the IP to the server's OPENIM_IP then restart the App. Please ensure related ports are open, and restart the App after making changes. For first-time use, please register first through your mobile phone number, with the default verification code being 666666.


5. Modifying Configuration Items
5.1 🛠️ Modifying Shared Configuration Items
Configuration ItemFiles to be ModifiedActionmongo/kafka/minio related.env, openim-server/config/config.yamlRestart components and IMredis/zookeeper related.env, openim-server/config/config.yaml, chat/config/config.yamlRestart components, IM, and ChatSECRETopenim-server/config/config.yaml, chat/config/config.yamlRestart IM and Chat
5.2 🔄 Modifying Special Configuration Items
Special configuration items: API_OPENIM_PORT/MINIO_PORT/OPENIM_IP/GRAFANA_PORT
Modify the special configuration items in the .env file
Modify the configuration in openim-server/config/config.yaml according to the rules
Modify the configuration in chat/config/config.yaml according to the rules
Restart IM and Chat
5.3 🛠️ Modifying Other Configuration Items
For other configuration items in .env, chat/config/config.yaml, and openim-server/config/config.yaml, you can modify these items directly in the respective files.
5.4 Modifying Ports
Note that for any modification of IM-related ports, it's necessary to synchronize the changes in open-im-server/scripts/install/environment.sh.
6. Frequently Asked Questions
6.1 📜 Viewing Logs
Runtime logs: logs/OpenIM.log.all.*
Startup logs: _output/logs/openim_*.log
6.2 🚀 Startup Order
The startup order is as follows:
Components IM depends on: mongo/redis/kafka/zookeeper/minio, etc.
IM
Components Chat depends on: mysql
Chat
6.3 🐳 Docker Version
The new version of Docker has integrated docker-compose.
Older versions of Docker might not support the gateway feature. It's recommended to upgrade to a newer version, such as 23.0.1.
7. About OpenIM
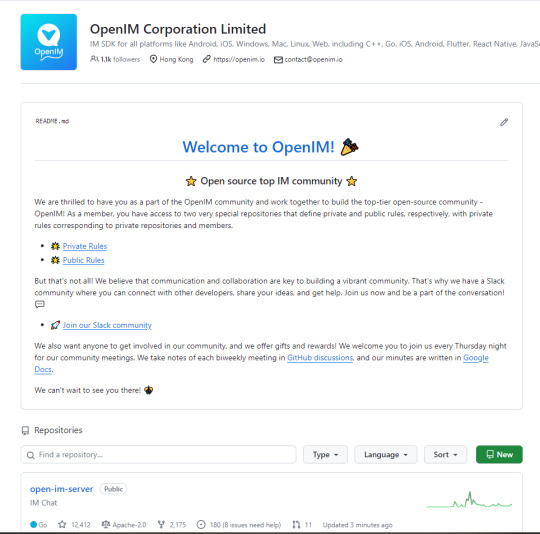
Thanks to widespread developer support, OpenIM maintains a leading position in the open-source instant messaging (IM) field, with the number of stars on Github exceeding 12,000. In the current context of increasing attention to data and privacy security, the demand for IM private deployment is growing, which aligns with the rapid development trend of China's software industry. Especially in government and enterprise sectors, with the rapid development of information technology and the widespread application of innovative
industries, the demand for IM solutions has surged. Further, the continuous expansion of the collaborative office software market has made "secure and controllable" a key attribute.
Repository address: https://github.com/openimsdk
1 note
·
View note
Text
Docking Your Workflow: A Hands-On Guide to Docker Compose Installation and Examples

What is docker-compose?
It is a tool which is used to create and start Docker application by using a single command.
It simplifies the deployment of complex applications by defining their architecture in a human-readable format.
This configuration file, typically written in YAML, outlines the services, networks, and volumes needed to run your application.
Docker Compose not only simplifies the management of containers but also encourages collaboration among developers and teams
Users can activate all the services (containers) using a single command.
Docker compose features
Purpose:Orchesrating multi-container application
Configuration:YAML base configuration
Scale:Multiple containers
Networking:Built-in networking and service discovery
Dependancy:Images and compose configuration
Ecosystem:Docker Hub and private registries
How to Install Docker Compose
Prerequisites:
Before installing Docker Compose, ensure that you have Docker installed on your system.
Installation Steps:
Check the Current Release:
Visit the Docker Compose GitHub release page to find the latest stable release. Identify the version number you want to install.
Download the Docker Compose Binary:
sudo curl -L "https://github.com/docker/compose/releases/download/1.23.2/docker-compose-$(uname -s)-$(uname -m)" -o /usr/local/bin/docker-compose

Apply Executable Permissions:
Make the downloaded binary executable:
sudo chmod +x /usr/local/bin/docker-compose

Verify Installation:
Confirm the successful installation by checking the version:
docker-compose –version

Docker Compose Commands:
docker-compose build =Look for all services containing the build
docker-compose run=Run a one-time command against a service
docker-compose up=Command used to start all the services of the container.
docker Compose down=This syntax is used to stop all the services that were started.
docker-compose -f =Specify the location of a docker-compose configuration file by adding the -f flag
docker-compose start=Start existing containers for a service
docker_compose_v=To check the version of docker-compose, we use this command.
docker ps=This command is used to bring out the whole process of Docker.
docker Compose.yml=This command is used to configure application services using YAML files.
docker-compose up -d=Used to run a Docker-Compose file.
docker Compose up -d -scale=Used to scale the service of the container.
pip install -U Docker-compose= Command used to install Docker Compose using pip.
Compose step process
1 Create a Directory
Creating the Dockerfile for the app environment
defining the services in docker-compose.yml
starting the application
Running Application using Docker Compose
Example:
Follow the following example
1) Create a Directory
mkdir docker-compose-praman

2)Go to the directory
cd docker-composer-praman

3) Define docker-compose.yml file
sudo vi docker-compose.yml
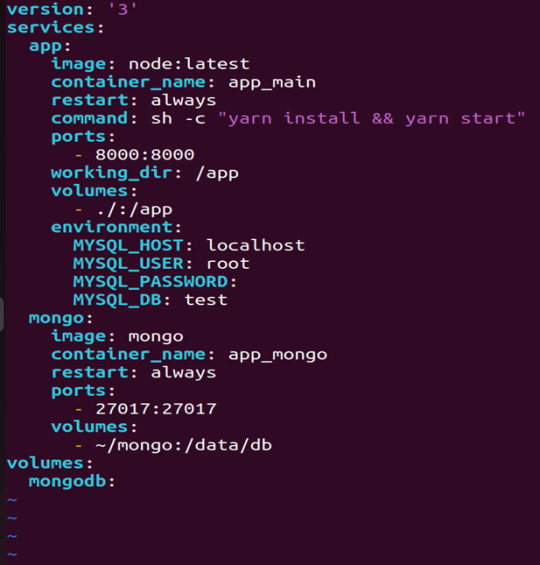
let’s dismantle the above code and understand it by piece:
version: It refers to the docker-compose version (Latest 3)
services: It defines the services that we need to run
app: It is a custom name for one of your containers
image: The image which we have to pull. Here we are using node:latest and mongo
container_name: It is the name for each container
restart: starts/restarts a service container
port: It defines the custom port to run the container
working_dir: It is the current working directory for the service container
environment: It defines the environment variables, such as DB credentials, and so on
command: It is the command to run the service
4)How to run the multi-container:
We need to build our multi-container using docker build.
docker-compose build (Command to build the docker-compose.yml)

docker-compose up (Command to run multiple containers using docker-compose)
docker-compose up -d (Command to run multiple containers using docker-compose in detached mode)
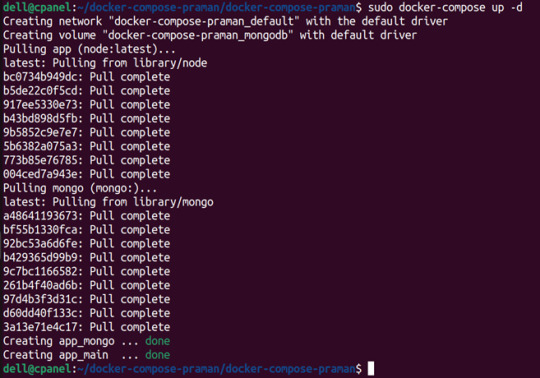
docker-compose ps (Command to list the running container services)

Sample output for running mongodb service using docker:

Docker Compose Disadvantages:
Below are the drawbacks of Docker-Compose.
1.You have to spend more time and effort, installing Docker on your server.
2.Docker-Compose requires manual updates and fails when it comes to rebooting.
3.You have to spend more time and effort, installing Docker on your server.
4. However, docker-compose is already there in your system if you have installed Docker.
Docker Compose Use Cases:
Automated testing environments-
Compose supports automated testing, which is an essential part of CI/CD as it can easily create and destroy the required testing environment
Single host deployments-
In Docker Compose, containers are designed to run on a single host as they have traditionally been focused on development and testing workflows.
Development Environments-
Compose is a fast and simple way of starting projects as it can quickly spin up new isolated development environments.
High productivity -
Docker-Compose increases productivity and reduces the time taken for each task
Security -
All the containers are isolated from each other, reducing the threat landscape
Configuration-
Docker-Compose files are written in YAML scripts hence, provide easy and quick configuration.
Credits - Sachin Auti (DevOps)
MetricsViews Pvt. Ltd.
MetricsViews specializes in building a solid DevOps strategy with cloud-native including AWS, GCP, Azure, Salesforce, and many more. We excel in microservice adoption, CI/CD, Orchestration, and Provisioning of Infrastructure - with Smart DevOps tools like Terraform, and CloudFormation on the cloud.
www.metricsviews.com
0 notes
Text
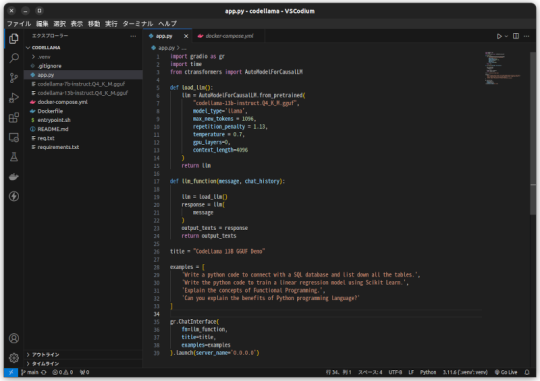
CodeLlamaをモノづくり塾サーバーで動かす
モノづくり塾のサーバーはDockerでアプリケーションを運用すると決めているので、試験的に動かすにせよアプリケーションはDockerizeしなければなりません。 今日は先日作ったCodeLlamaとGradioを使ったコード生成AIアプリをDockerizeして塾のサーバーにデプロイしました。 プログラムはこんなに短くて簡単なものです。 Dockerfileはこれ。 docker composeファイルはこれ。 モノづくり塾ではサーバーにアプリケーションをデプロイするために次の手順を踏みます。現時点ではこれが標準的なやり方です。 1.このプロジェクトを塾サーバーのGitLabにプッシュ。 2.サーバーにログインしてプロジェクトをクローンして docker compose up -d…
View On WordPress
0 notes
Text
Mastering Docker: Your Comprehensive Course Guide

In the ever-evolving landscape of technology, Docker course has emerged as a transformative force, revolutionizing the way we develop, deploy, and manage applications. As businesses across the globe seek to enhance their operational efficiency and stay competitive, mastering Docker has become an indispensable skill. At SkillUp Online, we recognize the significance of this technology, and in this comprehensive guide, we will equip you with the knowledge and skills you need to excel in Docker.
Understanding Docker - Unleashing the Power
The Essence of Docker
Docker, in its essence, is an open-source platform designed to automate the deployment of applications in lightweight, portable containers. These containers, unlike traditional virtual machines, share the same operating system kernel, making them incredibly efficient and versatile. Docker simplifies the development and deployment of applications, providing a consistent and reliable environment for your software to run.
Key Benefits of Docker
Docker's rise to prominence can be attributed to its myriad of benefits. It offers:
Portability: Docker containers can run on any system that supports Docker, ensuring consistent performance across different environments.
Isolation: Containers provide isolation, preventing conflicts between applications and enabling you to run multiple services on a single host.
Resource Efficiency: Unlike VMs, containers use fewer resources, allowing you to maximize server efficiency.
Rapid Deployment: Docker containers can be deployed in seconds, significantly speeding up development and testing processes.
Scalability: Docker facilitates easy scaling of applications to meet the demands of your growing business.
Getting Started with Docker
Setting Up Docker
Before diving into Docker, you'll need to set up the environment. Docker supports various platforms, including Windows, macOS, and Linux. Here's a quick guide to get you started:
Install Docker: Download and install Docker for your specific operating system from the official Docker website.
Verify Installation: After installation, open your terminal and run docker --version to ensure that Docker is properly installed.
Hello World: Begin your Docker journey by running the classic "Hello World" container using the command docker run hello-world.
Docker Basics
Images and Containers
In the Docker ecosystem, images and containers are fundamental concepts:
Images: Images are read-only templates used to create containers. They contain everything needed to run an application, including the code, libraries, and dependencies.
Containers: Containers are instances of Docker images. They are lightweight, portable, and run consistently across various environments.
Dockerfile
A Dockerfile is a script that defines how a Docker image is built. You can think of it as a recipe for creating your containers. You'll often create custom Dockerfiles for your applications to ensure reproducibility.
Running Your First Container
Now, let's run a practical example to illustrate Docker's power. We'll deploy a simple web application in a Docker container.
Create a directory for your project and navigate into it.
Create an index.html file with your web application content.
Write a Dockerfile in the same directory, specifying your base image and copying your index.html file into the container.
Build your Docker image with the command docker build -t my-web-app .
Run your Docker container using docker run -d -p 8080:80 my-web-app.
You've just deployed a web application in a Docker container!
Advanced Docker Techniques
Orchestration with Docker Compose
Docker Compose is a tool for defining and running multi-container Docker applications. It simplifies the process of managing multi-service applications by using a docker-compose.yml file to define the services, networks, and volumes.
Docker Swarm and Kubernetes
For larger-scale applications, Docker Swarm and Kubernetes are essential tools for orchestration. They enable you to manage clusters of Docker containers, ensuring high availability and scalability.
Container Registries
Container registries like Docker Hub and Amazon ECR are repositories for storing and sharing Docker images. They play a crucial role in the development and deployment pipeline, allowing you to collaborate with others and automate your CI/CD processes.
Learning Resources
To truly master Docker, you'll want to explore various learning resources, including:
Online Courses: There are numerous online courses dedicated to Docker, offering both introductory and advanced content.
Documentation: The official Docker documentation is a valuable resource for in-depth understanding.
Community Forums: Docker has a vibrant community with active forums and support.
Books: Several books cover Docker comprehensively, helping you become an expert.
Conclusion
In this comprehensive guide, we've covered the fundamental concepts of Docker, setting up your environment, running containers, and advanced Docker techniques. Docker's impact on modern software development and deployment cannot be overstated. By mastering Docker, you equip yourself with a skill that is in high demand and can significantly enhance your career prospects.
Source:- https://skillup.online/courses/docker-course/
0 notes
Text
Simplifying SQL Server Deployment with Docker Compose

Introduction
Deploying Microsoft SQL Server can sometimes be a daunting task, especially for developers who just want to set up a quick and simple instance for testing or small-scale use. Docker Compose offers a straightforward solution to this problem, allowing you to define and run multi-container Docker applications with ease. In this blog post, we’ll walk through creating a docker-compose.yml file to deploy SQL Server efficiently.
Prerequisites
Before we begin, ensure you have Docker and Docker Compose installed on your system. If not, you can download and install them from the official Docker website.
Crafting the Docker Compose File
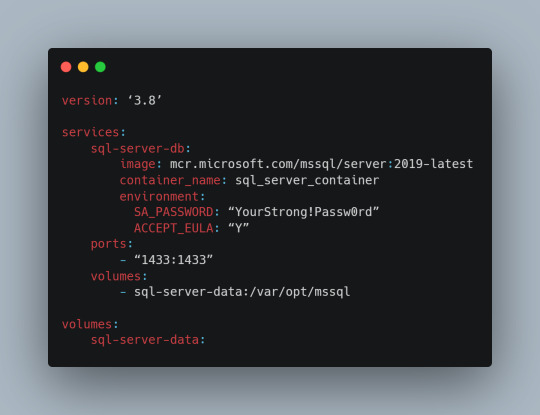
Below is a sample docker-compose.yml file designed to run Microsoft SQL Server in a Docker container:
Understanding the Configuration
Let’s break down the components of this configuration file:
version: This specifies the version of Docker Compose to use, which in this case is 3.8.
services: Under this key, we define all the services (containers) we want to run.
sql-server-db: This is the name of our service.
image: This key specifies the Docker image to use. We’re using the latest version of SQL Server 2019.
container_name: We define a custom name for our container for easier reference.
environment: Here, we set necessary environment variables.
SA_PASSWORD: The password for the sa user. Ensure to replace "YourStrong!Passw0rd" with a strong, unique password.
ACCEPT_EULA: This is mandatory and must be set to Y to run SQL Server in a container.
ports: We map port 1433 on the host to port 1433 in the container, which is the default for SQL Server.
volumes: This is crucial for data persistence. We define a volume named sql-server-data mounted at /var/opt/mssql in the container.
volumes: We declare the named volume sql-server-data for use in our service.
Deploying SQL Server with Docker Compose
With the docker-compose.yml file in place, navigate to its directory in the terminal and run the command:
docker-compose up -d
This command will download the specified SQL Server image (if not already downloaded), create a container with the specified settings, and start it in detached mode.
Connecting to SQL Server
Once the container is running, you can connect to the SQL Server instance using any SQL Server client, with the server address as localhost,1433 and the sa user credentials you specified in the docker-compose.yml file.
Conclusion
Docker Compose simplifies the deployment of applications like SQL Server, making it accessible for developers at all levels of expertise. With a simple docker-compose.yml file, you can have a SQL Server instance up and running in minutes, without the hassle of manual installation and configuration. Always ensure to use strong, unique passwords and understand the licensing agreements of the software you deploy. Happy coding!
0 notes
Link
#volume#docker#docker-compose#dockerfile#docker-compose down#docker-compose up -d#docker images#network#lamp server#lamp#php#apache#mysql workbench install ubuntu#docker-compose stop#docker build
0 notes
Text
Using Docker To Get Whole House Audio And Streaming SUPER EASILY.

I've written a couple of guides on how to get whole-house audio and streaming by using mpd, snapcast, and other FOSS projects. I've previously described it as a weekend project, but by using Docker, it's a trivial setup. Included are: - mpd for music playing and remote streaming - snapcast (and snapweb) for whole-house streaming - mpdscribble for scrobbling to last.fm / libre.fm - minidlna for upnp serving - RompR web interface (for controlling the whole thing) - Nginx proxy fragment - music directory and configurations accessible from host (at least at spinup) You can get a working installation (once you have docker and docker-compose installed) by cloning the repository, creating a symbolic link to your music directory, and typing docker-compose up --build -d. Many, many thanks to Toward Data Science whose post pointed me to how to get several things running together. You can find the repository at GitHub, GitLab, or my personal repository. Featured Image by Peter Fischer from Pixabay Read the full article
1 note
·
View note
Text
github actions & docker-compose
何をしたか
ciでmysqlを使いたかった。
サービスコンテナのmysqlを利用したら文字コードで引っかかりまくって、設定もうまいこと行かなかったので、dockerを使う。
ディレクトリ構造は以下な感じ。
// tree . ├── .github │ └── workflows │ └── integrage.yml ├── db │ └── mysql │ └── init.d │ ├── ddl.sql │ └── dml.sql └── docker-compose.ci.yml
ci用のdocker-composeは以下で定義。
// docker-compose.ci.yml version: '3.5' services: db: image: mysql:5.7 container_name: sample_db_test environment: MYSQL_ROOT_PASSWORD: root MYSQL_DATABASE: sample MYSQL_USER: worker MYSQL_PASSWORD: password TZ: 'Asia/Tokyo' command: mysqld --character-set-server=utf8mb4 --collation-server=utf8mb4_unicode_ci volumes: - ./db/mysql/init.d:/docker-entrypoint-initdb.d ports: - 3306:3306 restart: always
github actionsのworkflowは以下。一部省略してます。
// .github/workflows/integrate.yml name: integrate on: ... env: ... jobs: static-check: name: StaticCheck runs-on: ubuntu-latest steps: ... test: name: Test runs-on: ubuntu-latest needs: [ static-check ] steps: ... # set up db - name: SetUp db run: | docker-compose -f docker-compose.ci.yml up -d sleep 15 # 起動待ち ... # Run test - name: Test run: | go test -v ./...
1 note
·
View note
Text
A Vagrant Story
Like everyone else I wish I had more time in the day. In reality, I want to spend more time on fun projects. Blogging and content creation has been a bit on a hiatus but it doesn't mean I have less things to write and talk about. In relation to this rambling I want to evangelize a tool I've been using over the years that saves an enormous amount of time if you're working in diverse sandbox development environments, Vagrant from HashiCorp.
Elevator pitch
Vagrant introduces a declarative model for virtual machines running in a development environment on your desktop. Vagrant supports many common type 2 hypervisors such as KVM, VirtualBox, Hyper-V and the VMware desktop products. The virtual machines are packaged in a format referred to as "boxes" and can be found on vagrantup.com. It's also quite easy to build your own boxes from scratch with another tool from HashiCorp called Packer. Trust me, if containers had not reached the mainstream adoption it has today, Packer would be a household tool. It's a blog post in itself for another day.
Real world use case
I got roped into a support case with a customer recently. They were using the HPE Nimble Storage Volume Plugin for Docker with a particular version of NimbleOS, Docker and docker-compose. The toolchain exhibited a weird behavior that would require two docker hosts and a few iterations to reproduce the issue. I had this environment stood up, diagnosed and replied to the support team with a customer facing response in less than an hour, thanks to Vagrant.
vagrant init
Let's elaborate on how to get a similar environment set up that I used in my support engagement off the ground. Let's assume vagrant and a supported type 2 hypervisor is installed. This example will work on Windows, Linux and Mac.
Create a new project folder and instantiate a new Vagrantfile. I use a collection of boxes built from these sources. Bento boxes provide broad coverage of providers and a variety of Linux flavors.
mkdir myproj && cd myproj vagrant init bento/ubuntu-20.04 A `Vagrantfile` has been placed in this directory. You are now ready to `vagrant up` your first virtual environment! Please read the comments in the Vagrantfile as well as documentation on `vagrantup.com` for more information on using Vagrant.
There's now a Vagrantfile in the current directory. There's a lot of commentary in the file to allow customization of the environment. It's possible to declare multiple machines in one Vagrantfile, but for the sake of an introduction, we'll explore setting up a single VM.
One of the more useful features is that Vagrant support "provisioners" that runs at first boot. It makes it easy to control the initial state and reproduce initialization with a few keystrokes. I usually write Ansible playbooks for more elaborate projects. For this exercise we'll use the inline shell provisioner to install and start docker.
Vagrant.configure("2") do |config| config.vm.box = "bento/ubuntu-20.04" config.vm.provision "shell", inline: <<-SHELL apt-get update apt-get install -y docker.io python3-pip pip3 install docker-compose usermod -a -G docker vagrant systemctl enable --now docker SHELL end
Prepare for very verbose output as we bring up the VM.
Note: The vagrant command always assumes working on the Vagrantfile in the current directory.
vagrant up
After the provisioning steps, a new VM is up and running from a thinly cloned disk of the source box. Initial download may take a while but the instance should be up in a minute or so.
Post-declaration tricks
There are some must-know Vagrant environment tricks that differentiate Vagrant from right-clicking in vCenter or fumbling in the VirtualBox UI.
SSH access
Accessing the shell of the VM can be done in two ways, most commonly is to simply do vagrant ssh and that will drop you at the prompt of the VM with the predefined user "vagrant". This method is not very practical if using other SSH-based tools like scp or doing advanced tunneling. Vagrant keeps track of the SSH connection information and have the capability to spit it out in a SSH config file and then the SSH tooling may reference the file. Example:
vagrant ssh-config > ssh-config ssh -F ssh-config default
Host shared directory
Inside the VM, /vagrant is shared with the host. This is immensely helpful as any apps your developing for the particular environment can be stored on the host and worked on from the convenience of your desktop. As an example, if I were to use the customer supplied docker-compose.yml and Dockerfile, I'd store those in /vagrant/app which in turn would correspond to my <current working directory for the project>/app.
Pushing and popping
Vagrant supports using the hypervisor snapshot capabilities. However, it does come with a very intuitive twist. Assume we want to store the initial boot state, let's push!
vagrant snapshot push ==> default: Snapshotting the machine as 'push_1590949049_3804'... ==> default: Snapshot saved! You can restore the snapshot at any time by ==> default: using `vagrant snapshot restore`. You can delete it using ==> default: `vagrant snapshot delete`.
There's now a VM snapshot of this environment (if it was a multi-machine setup, a snapshot would be created on all the VMs). The snapshot we took is now on top of the stack. Reverting to the top of the stack, simply pop back:
vagrant snapshot pop --no-delete ==> default: Forcing shutdown of VM... ==> default: Restoring the snapshot 'push_1590949049_3804'... ==> default: Checking if box 'bento/ubuntu-20.04' version '202004.27.0' is up to date... ==> default: Resuming suspended VM... ==> default: Booting VM... ==> default: Waiting for machine to boot. This may take a few minutes... default: SSH address: 127.0.0.1:2222 default: SSH username: vagrant default: SSH auth method: private key ==> default: Machine booted and ready! ==> default: Machine already provisioned. Run `vagrant provision` or use the `--provision` ==> default: flag to force provisioning. Provisioners marked to run always will still run.
You're now back to the previous state. The snapshot sub-command allows restoring to a particular snapshot and it's possible to have multiple states with sensible names too, if stepping through debugging scenarios or experimenting with named states.
Summary
These days there's a lot of compute and memory available on modern laptops and desktops. Why run development in the cloud or a remote DC when all you need is available right under your finger tips? Sure, you can't run a full blown OpenShift or HPE Container Platform but you can certainly run a representable Kubernetes clusters where minishift, microk8s and the likes won't work if you need access to the host OS (yes, I'm in the storage biz). In a recent personal project I've used this tool to simply make Kubernetes clusters with Vagrant. It works surprisingly well and allow a ton of customization.
Bonus trivia
Vagrant Story is a 20 year old videogame for PlayStation (one) from SquareSoft (now SquareEnix). It features a unique battle system I've never seen anywhere else to this day and it was one of those games I played back-to-back three times over. It's awesome. Check it out on Wikipedia.
1 note
·
View note