#needle felting tutorials
Explore tagged Tumblr posts
Visit Tumblr Blog
Explore Tumblr blogs with no restrictions, modern design and the best experience.
Last Seen Tumblr Blogs


Fun Fact
US Tumblr user growth rate is estimated to slow down to 4.1%.
Text
Guess what’s finally in the shop

You can greet the arrival of Spring by making your own cardinal!!
#needle felting#fiber art#crafting kits#crafting tutorials#needle felting kit#needle felting tutorials#needle felting for beginners#Northern Cardinal#borb
17 notes
·
View notes
Text
Needle Felt Siffrin Build Log: (oct 6 - nov 20, 2024)


Credits goes wholely to @insertdisc5 for creating ISAT and siffrin's design! I am just here to attempt to make cool fanart (and get more people to play isat.. my devious plans are going great so far :3) As always, this isn't a tutorial- it is just a log about how i go about approaching a sculpture and I hope this collection of resources can help others make their own sifs!!
PSA: this has some spoilers for endgame CGs/sprites on my references image board ( also might see it in the backgrounds of my process pics). And bc this is needle felting, you will see some sharp needles! beware!
my inspiration was the intro cutscene where Sif eats the star, so my main goal was to adhere to the style of ISAT as closely as possible while transfering it to 3D space. And I knew i also wanted to try making the cloak for stopmotion purposes, so my process was tailored towards having control over the fabric with wire inlaid within the cloak (more on that later).
I ended up not sticking eyebrows on top of siffrin's bangs lol but anyways, first order of business is Gather Reference! v important. pureref is free and an awesome program. I also do some sketches to visualize the pose and important details i wanted to include in the sculpt.
behold the isat wiki gallery page! tawnysoup wrote an awesome ISAT style guide that absolutely rings true in 3d space too!! adrienne made a sif hair guide here!! (sorry i couldnt find the original link, but it's on the wiki). It says ref komaeda hair so that's what i looked at, along with other adjacent hairstyles! I also like doing drawovers on in progress photos to previs shapes n stuff to get a better idea of the end result.
Also if you're like me and struggle with translating stuff into 3D space, take a look at how people make 3d models and figurines! sketchfab is also a great resource! I looked at the link botw model by Christoph Schoch here for hair ref. (I used Maya, but there's a blender version too ! you can pose characters too if your model has been rigged!)


Face:
Started off blocking out the main shapes of eyelids and iris, and then filling in the colour details in the iris and the star highlights before moving onto adding thin black outlines and eyelashes. I didn't take many in-progress photos cause i kept ripping stuff out to redo them many many times, sorry!! This eye took about 3 hrs bc i just wasn't happy with it!! Sometimes it do be the vibe to give up, go to bed and see how it looks in the morning (more often than naught, it looks fine and it was the "dont trust yourself after 9pm" speaking)

The Mouth:
Couldn't decide if i even wanted to add a mouth as per usual with all my humanoid sculptures.. but i did some drawover tests first to see what expression i liked and to try to visualize it from multiple angles. (I was also testing the placement of stars on the hat brim here)

And then I redid the mouth like 3 times cause the angle just wasn't right (this went on for about the course of a week yay!)
Hair: woe baldfrin be upon ye


I made the hair strands individually first, and then since Sif has some of the hair at the back dyed black, i covered some of the tips with black wool (manually) (I think it would go much faster if i just took a marker to it, but hahaha i love pain and detailing!! )
And then the rest of it was positioning strands with sewing pins layer by layer, always looking at it from different multiple angles- sometimes tailoring the angle or swoop of individual hair flippies. At one point I thought the back looked too cluttered, but the hat covers a lot of it anyways!! yay for hiding mistakes! (imo this is a similar process to how cosplayers style wigs, but on a smaller scale and the same level of time consuming)
As always, look to your reference for guides, and I always do a whole bunch of drawovers over in progress photos to ascertain what was working and what wasn't.
Hat:
A trick to get a super pointy tip, make another tip seperately while keeping the connection point unfelted, and then combine the two to make super pointy hat!! (this also helps if you made the hat too short and need it to be taller. ask me how i know)

The embroidery on the hat brim was done in a hoop and then invisible stitched to the felted top portion. Technically you don't need a hoop but it helps keep the fabric tension, so you avoid puckers in your embroidery. You can also use iron-on stabilizer if your fabric is loose weave or particularly thin. this is the tutorial i used for the stars embroidery! particularly the fly stitch one, french knots, and the criss-cross stitches. highly recommend needlenthread for embroidery stitches and techniques! i learned all my embroidery from this single site alone.

For fabric, I think I used a polycotton i had in my stash,, unsure of the actual fiber content bc i bought it a long time ago. I used DMC Satin floss which was nice and subtle shiny but frayed a lot so it was kind of a pain to stitch with... but keep a short thread length and perservere through it!! After the embroidery was done, I folded up the raw edges and invisible sewed it to the top portion of the hat.
General shape:
Ok general structure of the body is this: wire armature body covered with black wool -> cloak lining & wire cage -> edge of lining is invisibly sewn to the main cloak at the hem -> head

Don't be afraid to mess around with the pattern, it's essentially a pizza with a slice taken out of it to form a steep cone shape!! Use draft paper before cutting into felt to save material! (i think i made like 3 cloaks before i was happy with the shape lol).
You can also hide the seam of the cloak and collars by gently messing up the fibers of the felt with your fingers or a felting needle btw! you can also sandpaper the seams according to Sarah Spaceman in this vid (highly recommend them for their in depth cosplay/crafting builds holy smokes), though since sif cloak is at such a smol scale, I just blended the seam with my felting needle.
For the lining wire cage section, I sewed in wire around the cloak, so the main rotation point is at the top neck area under the collar. These paddles are used to keep whatever pose I need the cloak to be in for stopmotion purposes. Then after the wire is done, I invisibly sewed the lining to the cloak at the hem (same technique as the hat brim to the lining there).
In hindsight, I should've used a thinner fabric for the lining, but i only had sheer white in my stash so had to go with double felt, thus resulting in a really bulky lining but oh well!

Heels:
started with the general boot shape, then tacking on the diamond shape heel stack and also diamond shape sole bc we're committed to the bit here. I skewer the boot onto the armature which also conveniently hides the connection point into the base to keep the whole thing upright and also I can rotate the boot to tweak the angle if needed.

Pins:
I kinda just trial and error'd jewellery wire with pliers into the pin shapes. They're itty bitty!! had a whole bunch of fails before i got two nice ones. A hot tip is to use needle nose pliers and wrap the wire around the tip to get a smooth circle shape!

Base:
I smoothed out the edge of a circular wood base with a dremel, and then used wood stainer to get the black colour. It ended up kinda looking like I took a sharpie to it, but whatever.... now i have a whole ass can of black wood stainer........ I then made a rough mountain of black wool and stuck the feet armature in. And now he's standing!!

Normally at this point when I'm done felting everything, to get a smooth finish, I'd take a small pair of scissors and carefully snip away any flyaway fibers, but this time, I just left them fluffy cause i think that's what sif would do :3c
Photoshoot:
Normally I do shoots using daylight but it was winter so the sun was nonexistent. So I broke out the home lighting setup aka dollarstore posterboard for a nice smooth background, and then hit it with the overhead Fill, side Fill 2, and Rim light, and use white paper/posterboard for bounce light if one side feels too dark. But if things are overexposed, you can move the light sources away until the harshness dims down. I'm using a Olympus mirrorless camera (handed down to me by my sibling so i dont remember the model exactly), which can connect to my phone as a remote so I can avoid shaking the camera when i take photos. Pretty nifty for stopmotion purposes! (yes my camera stand is a stack of notebooks, a tissuebox and some eva foam under the lens, don't judge me)


Stopmotion animation:
I'm still figuring stopmo out on my part, but my process was straight ahead animation ... move the cloak a cm, take a pic.... move another cm, click.... and repeat until i get a version I was happy with. My ref was the cloak animation from Gris (beautiful game btw). The 2d star animation was also done straight ahead using procreate, exported in png with a transparent background, and finally stitched together with the stopmotion footage in photoshop.

My turnarounds are also stopmotion! also secret hack, the turntable is a fidget spinner sticky tacked to a cake platter.
And i think that's all! i mainly wanted to share how I go about thinking about taking a 2d concept and moving it to 3D. I also didn't go in depth into how to actually do the needle felting bc I don't think I''d be very helpful I'm a very good teacher by telling yall to just keep stabbing until it looks right (i'm self taught for this hobby),,, if anyone wants it though, i can share a bunch of tutorials and other felters' process that helped me learn more needle felting!
Hopefully this was helpful to someone! Feel free to send asks if ya got any questions or if anything needs clarification! Or show me your works! I love seeing other people's crafts :3
here have a cookie for making it this far 🥐
#in stars and time#siffrin#isat#isat siffrin#isat fanart#needle felt#soft sculpture#know that i am devouring all the nice words yall leave in the tags/comments of my posts :holding back tears:#I hesitate to call this a tutorial bc this is just how i fumble my way through crafting anything lmao#the only reason I know how long I worked on a project are timestamps on wip photos and however long the day's video essay or letsplay is#sorry time is immaterial when i get into crafting mode#reason why this log is so late is bc after i finish a project i'm perpetually hit with the ray of 'i dont ever want to look at this again'#hence why photos never get edited#AND THIS POST SAT IN MY DRAFTS FOR 2 MONTHS DUE TO BLOODBORNE BRAINROT SORRY#done is better than perfect!!!#sorry i dont control the braincell#sorry for using a million exclaimation points! i am not good at this.. conveying my anxiety in written form!!! my toxic trait
1K notes
·
View notes
Text

Does anyone want a tutorial on how to make their very own baby bill
#gravity falls#the book of bill#baby bill cipher#bill cipher#needle felting#so many people have said they want one#so maybe a tutorial is in order…
327 notes
·
View notes
Text
This week from the TechKnitting Blog: Needle Felting Tricks for Knitters!
I confess, I hadn't thought of any of these, but, the idea of needle felting to deal with long floats in colourwork is absolutely genius (and may be an alternative to the nearly-impossible 'intarsia in the round.') I've got an upcoming project I may have to try this out on!
#knitting#knitblr#knitters of tumblr#yarn crafts#needle felting#steeking#colourwork knitting#stranded colourwork#stranded knitting#knitting tutorial
17 notes
·
View notes
Text
#needle felting#diy#kawaii#needlecraft#embroidery#ducks#miniature#fieltro#felt#anime#ilustración#manga#tutorial#illustration
100 notes
·
View notes
Text

This is my son he has every disease
#another needle felt project!#i looked up a tutorial on how to make a nice round ball but then for whatever reason did not do the same for limb attachment#so now as well as the arms and ears being too long they're frankenstein'd on his head#BUT as a first time attempt at making an actual doll thing#it's not too bad#his malshaped figure gives him charm#this was also really fun to do! i feel at ease with it#...not saying that it's *easy*. it isn't lol#but i'm more comfortable with this type of medium than i initially thought i'd be#jigglypuff#needle felt#ravinoforre
13 notes
·
View notes
Text


haven't done personal art in a while, felted this little guy just now
#its yellow bc thats the only color i have a lot of#also i know i am still so clueless about needle felting i really should wagch tutorials but. i dont wanna#rambles#quix art
13 notes
·
View notes
Text
Part 4, and last part of the felted penguin tutorial!

Now that you have your beak, it’s time for the feet. From all the other penguins I’ve felted, I was running out of orange felt— you can use more than in the picture if you’d like to! Just make sure to cut/tear them as even as you can.


Again, for the feet I usually just place the felt on and go from there, but you can always make the shape beforehand.
Face the feet at an angle under the penguin, more towards the front than the back. Also try to get them as flat as you can, these will be the only thing holding your penguin up! Please do not give your penguin a concussion by dooming it to fall over and over again, the poor little guys.

Next up we’re working on the eyes. If your penguin has a mask, sunglasses, etc, this step is completely optional. Here I could have switched to my smaller needle, but I stuck with medium.
You can shape the penguin’s expression a bit more here with how you shape the eyes— for example, since AA is more attentive, I gave her wider, slightly sloped eyes.
Applying them is about the same as applying the white felt on the belly. Place a small amount of white felt above one side of the beak, shape it as you tighten it, and do the same for the other side. Make sure not to leave any space between the white of the eyes and the beak, and of course, get it as flat as you can.


Lastly, add the black part of the eyes! Use a VERY small amount of black felt, as it pops out a lot.
If you have felting scissors, you can also snip away extra bits of felt around the sides to make it look cleaner. AA definitely needs a bit more of a trim XD
I’ll get to her clothes sometime, but for now, here’s your penguin tutorial!
19 notes
·
View notes
Text

Cute lil guy this way comes
#stuff is weird with my video setup so no tutorial videos on him yet BUT#I promise there will be a fur tuft/cone video when it comes to that#maybe an ear one as well because I struggled with those for a long time#and he will still be up for sale when he's done!#wips#needle felt#needlefelt#pokemon#eevee
5 notes
·
View notes
Text

have you seen him? now you have :)
#needle felting#youtube: here is a tutorial for making a sleeping canine#me: You Could Make A Blorbo Animal Out Of This#technically jack’s fursona is a xolo dog but he can be a mexican wolf sometimes#as a treat#taking a little nap AS HE DESERVES
16 notes
·
View notes
Text

Northern Cardinal felting kit coming soooooooon. Subscribe to my mailing list to be the FIRST TO KNOW when it’s out!
#needle felting#needle felting tutorials#needle felting for beginners#needle felting kits#crafting kits#northern cardinal#borb
16 notes
·
View notes
Video
youtube
NEEDLE FELTING Supplies You May Not Know About
#youtube#NEEDLE FELTING Supplies You May Not Know About#SnowflakeForest#Felting#Needle Felting#SnowflakeForest Felting#Needle Felting Supplies#Needle Felting Tools#Needle Felting Supplies For Beginners#Needle Felting Tutorials#Felting Supplies For Beginners#Supplies For Needle Felting
0 notes
Text
Needle Felting and Armature Wire
@samspiritoftheforest Apologizes for taking a minute to get back to you! This is to answer their question about how I made the antlers on my Nowhere King felt. I'm making this it's own post so hopefully this can help anyone else who may also be looking to make antlers in their felting projects! I'll explain it as well as I can and if there's any confusion, I'll gladly elaborate on any part!
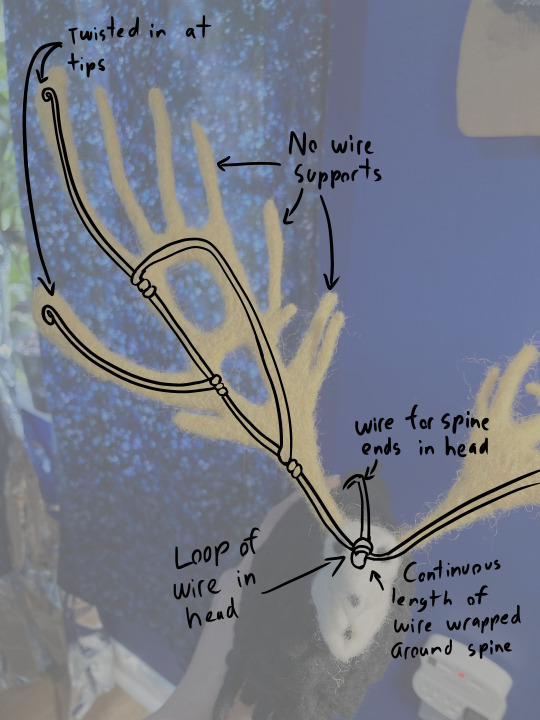
The Nowhere King has a central, thicker wire for a spine that runs through his whole body. His legs and antlers are both anchored to this main length of wire.
The main wire for the antlers is a single piece wrapped around this spine! I feel that making horns(and limbs) of a needlefelt creature one wire helps in making the limbs or horns stronger and less likely to slip or rotate on the wire they're attached to. The felt itself will do some of the work of keeping parts in place, but it never hurts to be a little extra secure! This will make each side a little offset from each other, but this is easily fixable by crushing the wire into place with your pliers.
*As a note, I like to curl my wires in at the ends. This both stops the raw wire edge from poking through and gives an extra anchor point for the wool.
The antlers actually do not have wire running through every point/tine. Now you could run wire through the entire thing if you wanted, but I'd honestly consider it a waste of time unless the part you're making is very long and thin, or you want the part to be posable.
I only wired what I deemed to be necessary to keep the antlers from folding in on themselves. I identified what felt like the longest continuous line for the main wire, and branched off in places I thought could use a little extra support. I'm no professional of course, if I were to make him again, I probably would've made the armature more like this:
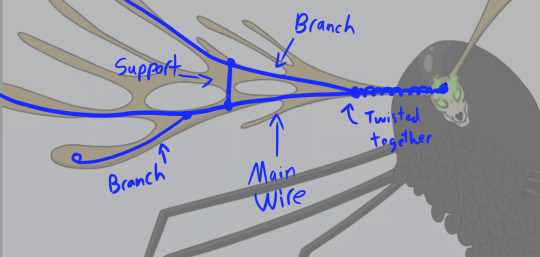
This way of making the armature would make the final product a little stiffer than what I ended up with. The two main wires twisted together would be more solid than the top loop I made for real, and the piece in the middle would help stabilize the not-wired antler points in between them. I would likely still wire the point on the bottom, as I feel it's long/heavy enough to need extra support.
Now, IDEALY, you could cut two sheets of felt into the correct shapes and sandwich the wire between them, but I... Did not do that! And hand felted both antlers with wool roving! Don't do what I did because it's likely that I could've saved several hours if I used sheets of felt instead!
I haven't gotten to this step yet as he's still not quite finished, but I ALSO plan to do one final thing to his antlers to really make them solid; Fabric Glue.
Densely felted wool holds it's shape very well. ((As a rule of thumb, if you're making a thin felted piece is any shorter than about four inches/ten centimeters, it will likely hold it's shape just fine without any wire!)) However, they will still be a tad flexible. Fabric glue dries stiff, and adding it to your felted pieces can help make them a bit more solid.
I'm no expert of course, there might be some better method to doing stuff like this. Anyone's welcome to make any additions to this post, this is just how I've found success in making stuff like this!
#my art#needle felt#needle felting#tutorial#art resources#art tutorial#fiber crafts#fiber art#fibre arts
38 notes
·
View notes
Text
needle felted pumpkins for Halloween

#halloween#halloween decorations#needle felting#needle felted pumpkins#pumpkins#mini pumpkins#cute halloween#tutorial
14 notes
·
View notes
Video
youtube
NEEDLE FELTING Flower Tutorial Hibiscus
#youtube#NEEDLE FELTING Flower Tutorial Hibiscus#Needle Felting#Felting#SnowflakeForest#SnowflakeForest Felting#Needle Felting Tutorial#Needle Felting Flower Tutorial#Needle Felting Tutorial Flower#Needle Feltiing Hibiscus#Needle Felting Hibiscus Flower#Needle Felting Flower Hibiscus#Hibiscus#Flower#Felt Flower#Felt Flower Hibiscus
1 note
·
View note
Text
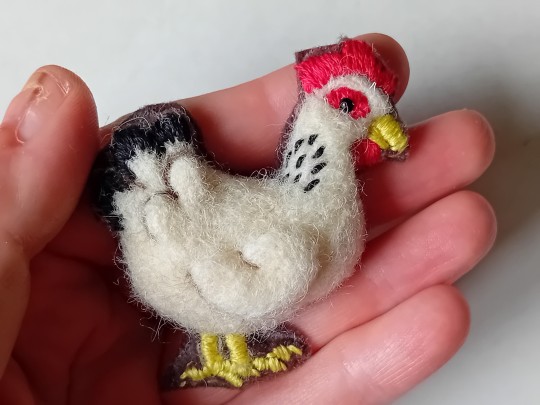
Work in progress- Hen's brooch
#needlefeltedanimal#needlecraft#needle felting#embroidery#embroidelicious#chicken#diy#tutorial#crafts#work in progress#hoop earrings
13 notes
·
View notes