#not just an adobe pirate
Text
Do you ever get the urge to say “fuck it” and just become a pirate?
#not just an adobe pirate#like a pirate with a sexy ship#I don’t care if it’s 200 years old#that just means the wood lasts long and stuff#I think I’d make a good pirate#and we could be gay!!!#and no taxes!!!#and I could make little mean Navy men#dance around the mast while a pal plays the fiddle#and we all try to poke them with little pointy things#piracy!!!#its fun for the whole family!!#let’s just create. a pirate island#if I have to sell my soul#may as well be for freedom and fun#than for a 9-5 that makes me wanna kill my self#ya know#is that just me??
0 notes
Text

The unenlightened masses,
They cannot make the judgement call.
Give up free will forever,
Their voices won't be heard at all!
#invader zim#dib membrane#zim#iz#zade#/text from Collective Consciousness (mgr ost)#/pro tip if you are going to edit your traditional artwork then use proper software for it.#/I am personally just insane and did that in sai but for the love of god use photoshop or smthing.#/upd actually no do not use photoshop fuck adobe.#/or just pirate photoshop I always had the mindset that adobe does NOT deserve your money.
72 notes
·
View notes
Text
many frog pictures taken!!!!! now to. see which ones turned out the best
#i even brought out Big Canon Camera to take pictures with too just in case#BUT NOW I CANT REMEMBER IF I STILL HAVE THE PIRATED ADOBE. AFTER I HAD TO RESET MY LAPTOP A FEW MONTHS BACK#........MAYBE???????#well i took them IN CASE. i will see what my phone got
8 notes
·
View notes
Text
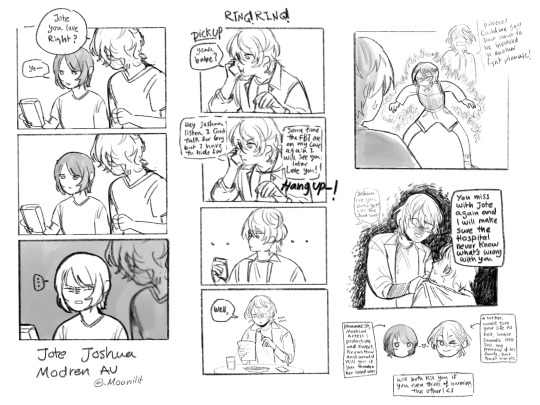
Updating my modern AU 💫
#They both are very protective of each other#But also jote definitely have a criminal record somewhere#It’s probably because of pirating adobe products but who knows#Joshua like ok.#When joshua show up and ask u how much you love him its time to be concerned#VERY CONCERNE#It makes clive clutch his heart in fear but jote just used to it#This is why she is the one for him who else will keep a shovel in their closet just in case joshua did something?#Acts of true love#Joshua knows 70 different way to frame ur murder and not afraid of using it#He did definitely acted cool so not to ruin their date but kept an eye for that guy until he went to the bathroom#He definitely slides an arm around the guy while he urinates to establish dominance before scaring the life out of him#Anyway#have u seen my two adorable babies??#Here they are i love them#Jote#Ffxvi modern AU#joshua rosfield
53 notes
·
View notes
Text

its no big deal! hoping its useful though because my main program nowadays is clip studio paint and they went full capitalism on us with paid subscription (i bought the 1 payment license long longs ago). anyway i was a broke art student who could only afford one brush and so uses only one brush the entire time for everything and that kinda stayed the habit even on digital art.
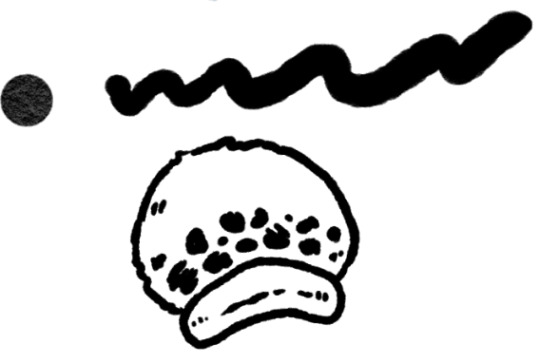
momo poster (honorable mention momo storybook is very good supplementary from the same creator) - clean kinda untextured ex-GF of a brush. unfortunately the pressure sensitivity doesnt translate well between android and PC versions of CSP. its so cute that its heart shaped tho
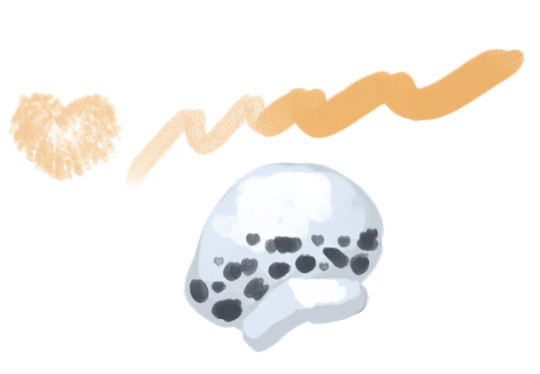
2. blockaded chalk brush - current brush GF. its all the joys of charcoal/soft pastel drawing without the asthma and messy hands. layers exactly how swiping charcoal across paper does so i tend to use it nowadays when im greyscale -> color painting.

3. smooth liner - not sure if this is part of it bc its not a painting brush but.. line art/cel-shading brush. because it looks like how a scanned version of my ink dip pen on rough watercolor paper looks like
#just woke up but didnt wanna human yet for work#i could suggest Ps brushes too but adobe is even worse capitalism#i literally am just using license from my work company#anyway pirate if you can thats what luffy taught me
44 notes
·
View notes
Note
if it's okay, would you mind sharing your art process? your style is SO gorgeous dude. keep it up spardacest nation!!!
Thank you so much anon, and of course!
I kinda posted about it on twitter a while ago, but for anyone not also on there, here's a paraphrasing of what I said there!
(under a cut bc it's gonna get a bit long)
(speedpaint video from procreate mostly bc like I also said in that post, it's one of the few pieces I've done entirely on procreate and thus entirely recorded kdfjhdk I usually don't do the sketching + painting parts on there but every now and then I get lazy and want to get it all done quick in one program lol! It's not as good as it would look if I were using krita to render (which is what I normally use) but it gets the idea across decently of what it is that I do)
The short version of my process is:
sketch, clean up sketch for lineart, then flat colors, then paint over the flats (i make the flats my shadows and paint on the light), then a multiply layer for skin details (like lips, eyebags, etc), then an overlay layer for skin transparency details (red over the ears/nose/fingertips etc), then i do hair over the lineart, then a multiply layer with the contact shadows in a light beige/grey/neutral tone on top of everything else, and then i unify layers, paint over the details, and color correct the HELL out of it
The longer version is:
SO, first of all, I will say, my entire process for a finished/fully redered piece is pretty scattered and uses a lot of different apps, because after many years of trying out different drawing apps I found that I just worked better when I could incorporate the parts I liked best from each individual one rather than having to adapt to another app entirely!
In total, what I use is: autodesk sketchbook and procreate for the first half I do on my ipad, then krita and photoshop on my computer when I'm actually rendering (but any photo editing app instead of ps will do, I'm just used to photoshop bc that's what I learned as my first drawing app WAAAY back in the day lol), and then meitu on my phone for color filters (also any phone editing app with filters in it will do), AND also optional just for references: blender and daz3d on computer + magicposer on my phone
The actual step by step of what I do:
First of all, if I want to do a detailed, well rendered piece I will start by getting my references ready. That means either just grabbing a screenshot from the game if it's like, a simple portrait, or a photo reference, taking a picture of myself in the right pose/lighting, and if it's something more complex I will recreate the scene in Daz3D to simulate a realistic lighting, OR even just blender (i have the game models for the dmc characters downloaded, so I can just pop them in, pose them and change the lighting to get a realistic idea of what shadows their faces will cast in that specific angle/lighting.)
Note: references are pretty essential to me, and there's nothing to be ashamed about for using them! Personally I don't struggle a lot with the drawing/sketching part of art, but my tiny little pea brain cannot fathom how to make an object 3D in my mind, and how to visualize shadows realistically... thus the reliance on 3D programs to do that for me, and then all I have to do is draw what I'm seeing lol. My art improved significantly ever since I started making 3D refs so I could get /exactly/ what I needed - there's still a lot of leeway you need to learn though, because as realistic as the lighting will be in a rendering program, you'll never really get a fully natural looking image, as far as stuff like the body stretching/squishing/pulling when it's in movement, facial expressions, folds in clothing/fabric, etc... so really it's more a guide than something meant to be followed 1:1.
Then, once I'm confident I know exactly what I'm gonna draw/have the idea in my head, I start sketching it in sketchbook. Not really getting very in depth, just blocking out rough shapes - I like sketchbook and to be on my ipad for that because it feels very reminiscent of traditional sketching on paper to me, which while I'm not super confident on my traditional art abilities, I do get the most natural/fluid/non-stiff figures out that way.
Then when I think I have the general idea ready, I export the sketch layer as a png and import it into procreate - which is where I kinda start picking at the sketch and polishing it like i'm carving it out haha. Lots of liquify tool, flipping the canvas to check if it's even, blending out some of the lineart to help out with the rendering later, and then polishing up what was once the sketch into serviceable lineart. I usually reimport it back into sketchbook at this stage - while I like procreate for drawing I don't love the brushes I can use for lineart there, and so I usually only draw the "base" naked figure in there - when I'm in sketchbook I use a hard pencil to refine the details, then on a separate layer add all the things "on top" like hair, clothing, etc - usually I can get it pretty easily in one go, and once I'm satisfied I erase the naked body under the clothes and unify the lineart layers.
Then I will just do the flats with a hard brush, turning the lineart layer into an overlay layer and coloring things in with the shadow colors.
At this point, I export the file as a psd and import it on my computer - I give it a once over in photoshop first to see if there needs to be any adjusting (like whether any layer that has an effect needs to have a different effect, if all the colors look right since the ipad screen isn't the most faithful, if i wanna change the background color, etc), and once I think it's ready enough, I open it up in krita, where I do the actual bulk of the painting/rendering (as to why specifically krita: it's because I've gotten very comfortable with the brush/painting brush dynamics there and cannot seem to get as good results anywhere else, it's just the goldilocks spot of a brush for me haha.)
If anyone's curious, here's the brushes I usually use for painting:
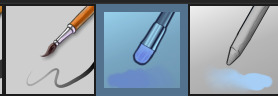
The one in the middle is my go to painting brush, left one for tinier/more refined details, right one for blending out soft shadows (though I learned the hard way to not overuse it, or it will look like I went ham with an airbrush tool lol).
(I don't change any of the settings on these brushes, so if you wanna try out the exact ones I use! Just fresh off how they come out the app haha)
I paint on the lights on top of the shadows, and just focus on that for the time being - once I'm done with the basic painting, I'll make a separate multiply layer for details like lip color, eye waterlines, makeup if there is any, eyebags, etc, and then adjust the opacity until it feels right - then I'll make an overlay layer with skin translucency details (like, when you hold your hands in front of a light and see the tips of your fingers become bright orange - many parts of your body are always a bit translucent to the blood underneath, specifically parts where the skin is thin like noses, cheeks, joints, knuckles, etc, and I found it makes the character look a lot more alive to add that subtle coloring in) - then usually I do hair on a separate layer on top of the lineart (because that way I can add small flyaways, more details, etc, and just use the lineart as a guide)
After that, I'll usually make a multiply layer on top of everything where I'll add contact shadows in a neutral color (usually pretty pale, it'll be darker anyway since it's multiply), and once I feel like I've rendered everything out properly, I save the psd and re-open it on photoshop.
In photoshop, I'll mess around with the layers a little bit more (changing hue/saturation, opacity, etc), fuck around with the background to make it look pleasing, and once I'm happy with it, I'll unify the layers and start color correcting - usually by duplicating the unified layer and messing with the curve/hsl of the image and then changing the opacity of that edited layer until it's as strong or muted as I want it to be - then I also edit the RGB curves individually and adjust the opacity of that also (because I just really like how it ends up looking if I give a bit of a red/warm tint to the shadows lol), and at that point often I will reimport the finished image into procreate for some finalizing touches! Like, blending out shadows that came out too harshly, painting over anything that came out not the way I wanted it, redefining the lineart if it got messy during painting, and adding any extra small detail that might have gotten lost like catchlights, hair shines, hair flyaways, tears, etc. I also do one last round of flipping the canvas and liquify if needed!
At this point, I export the finished image both to my computer and my phone - on my phone I open it up on the photo editing app, and add a bunch of different color filters - I don't hesitate from going completely balls to the walls here, and just kinda applying as many filters as will make an image look pleasing to my eye.
Once I think it looks good, I'll export the edited image to my computer - and then open both the version without filters and the one with them on photoshop, and use the filtered version as an opacity layer, and adjust it until it doesn't look as crazy anymore lol.
One last step I recently started incorporating was also changing the image to grayscale after I'm done, and doing one last round of curves in greyscale to make sure the values look right, and nothing is getting too lost because the values are too similar (because i know i get a bit swept up in getting repulsed by harsh contrasting lighting and can end up washing out all of rendering if I don't check myself kjdfgk)
AND that's it!
Yes it's a pretty long and chaotic process, but it's coming from years of trial and error and realizing I can just let myself fo whatever makes me happier with the results, and I don't have to stay constrained to one program if I don't like every tool it has to offer/don't have to accept the final image fresh off the painting app as the "finished" image with no adjustments allowed after, lol. I don't find it takes a lot more time than if I didn't do it this way, but YMMV.
Hope this was helpful and sorry for taking so long to explain! I just wanted to give a thorough explanation dfhdkhkx
#asks#sorry i know its a bit chaos hfdgd#but i hope its helpful anon! thanks for asking#also for anyone wondering#no i am not paying for ps lmao#fuck adobe#it is always morally correct to pirate adobe products people#if you have an alternative photo editing app you like best youre welcome to use it#but if youre too used to photoshop. everything is free on the internet if you know where to look#i also wouldnt recommend meitu bc it feels like a pretty sketchy app all things considered#im just too lazy to care to change my go to app but i would look for a different phone app#p sure theres billions that let you add funky color filters instead#actually i think you could use photoshop camera raw filters for that too#its just way too intensive of a process for my tiny potato computer and it feels a lot faster + seamless on phone
13 notes
·
View notes
Text
had to ban a ripper from my discord yesterday, feels kind of strange someone could be such a huge fan of my models but still steal from me and break my TOS, and think they deserve to be in my community
#soap talks#for context this person was posting tons of fanart and making game mods and other stuff#what this person did was not piracy but it makes me think about how like. some vrc avatar pirates think#where they treat individual artists creations the same as adobe#the 100$+ you would be giving adobe just goes to line their CEO's pockets a little bit more -_-#the 35$ you spend on a base would probably be going to my groceries for the month so i can eat more than mostly canned food#also no one needs to worry about me in terms of food im just like statin facts that i can buy more food at the store when my sales are good
11 notes
·
View notes
Note
Whoever created monthly subscription for Photo///shop can get a big scream from me 🙃
There are ways around that. Adobe has enough money 😉
#asks#Anonymous#seriously just go to r/Piracy or r/FREEMEDIAHECKYEAH and their megathreads should have info on how to pirate Adobe products#just be sure to use a firewall app like Lulu to block any and all connections to Adobe because they can catch you#and then you'll never be rid of their annoying popups#I'm speaking from experience lol
15 notes
·
View notes
Text


2 notes
·
View notes
Text
fffffffffffffffffuuuuuuuuuuuuuuuuuuuuuuuuuuuuuuuuucccckkkkkkkkkkkkkkkkkkkkkkkkkkkkkkkkkkkkkk
#did i just get caught pirating photoshop. adobe DIE#tbd#ID PAY FOR IT IF YOU DIDNT SUCK!#sighs. does anyone have a download.#im so annoyed
12 notes
·
View notes
Note
Sorry if this question is too broad or imposing but I'm trying to get into modding Fallout 4 for the first time, mostly to make armor skins. What're the best tutorials? I've tried searching online but a lot of the tutorials are outdated. (Would also love to know how to bash existing skins together though modelling my own would be fun too). Again sorry for this ask I'm just so lost about how to get into modding lol.
Ahhh do not apologize for asking me about modding fallout. I could talk about the guts of this stupid game all day ahhh

modding grip^
Unfortunately I...don't know any good tutorials. I think a lot of Fo4 modders came over already knowing skyrim or FNV. Most of what I know is based on outdated guides, old loverslab threads, my existing graphic design knowledge, and trial-and-error. I think armour is the best place to start because there are so many tools available (thanks tittymodders!), and you don't have to worry about needing 3DS Max for collisions or animations.
This is the only modding tutorial I've ever watched. It's old, but good to show you a proper workflow and how to set up your files. They use creation kit, but if you're just making armour its way easier to use xEdit. I don't even have the ck installed, I do everything in xEdit.
This is an excellent guide to outfit conversions. It gets pretty in depth, but you really don't need to bother with the dismemberment section if it's just for you. It's for FG reduced but you can use it as a general guide for weighting anything for any body and getting your modded outfit game ready.
Texture edits and outfit conversions are where I started and are probably the easiest. The best thing to do is just poke around mods you like and see how they do it.
Some tools:
xEdit: Plugin editor for creation engine games. If you're doing any kind of modding you should learn how to use this. Esl-flagging, running complex sorter, making bashed patches and making your own compatibility patches are skills you need if you want to run a heavily modded game.
Icestorms texture toolbox: the best texture tool, i use the "batch processing" tab at the end to convert .png (no alpha) and .tga (alpha) files to .dds.
Nvidia texture tools exporter: lets you open .dds file in photoshop with the alpha channel intact. You don't need a nvidia card, I'm all team red. Don't bother using this to export unless you have to, its slow as fuck.
Sagethumbs: Gives .dds files thumbnails in windows explorer.
IrfanView: For quickly viewing texture files without launching photoshop. Also an excellent general image viewer.
Bethesda Archive Extractor: Crack open those .ba2 files and get to the goods.
Material Editor: What it says on the tin, lets you edit Fo4 and Fo76 material files. These are like containers that have the paths to all your textures and how they are to be shaded to attach to .nif files.
NifSkope: View and edit .nif files. Dev 7 is the recommended, but Dev 8 can open Fo76 meshes if you want to backport those.
Outfit Studio: Even if you don't use body replacers, this is an incredible tool for editing and weighting meshes. If you're making armour you need this. This is also where I make most of my mashups: you can pull parts from different outfits, slap them together, and export them quickly and easily.
Blender: It's free and it works. Learning to navigate this is going to be your biggest hurdle but it's worth it, trust me. Thankfully blender has a huge community and hundreds of tutorials. This is where I make my hi poly models and do all my retopo/uvs. I also prefer to use blender to edit meshes because it has more robust editing tools.
PyNifly: What I use to import/export .nif files from blender.
Fo4 is made in the 2013 version of 3DS Max and the havok content tools but i haven't bothered to pirate that yet. You don't need it for armour anyways.
I'm sorry this is so long and rambly. If you have a more specific question I might be more helpful ha.
#asks#fallout#fallout 4#long post#fighting to keep this short i will not infodump i will not infodump i will no- ah fuck i did it. sorry.#i got into modding by editing existing textures that weren't up to my standard#and then making outfit conversions for bt3 because almost nobody was back then#i have been basically banging my head into my computer for the last year trying to learn what little i do know#yeah i know fuck adobe but nothing is better than photoshop. just pirate it. its always morally correct to steal from adobe.#i pay for it though because i actually use adobe fonts/cloud and i am a clown#i know it sounds silly but all the best technical advice is on loverslab. just..bring an adblock..and dont open that site in public lol#please do not be scared to ask me things i want everyone to be able to mod this hell game#the best thing about fo4 is that its made of legos so you can easily pull it apart and put it back together however you want#i had never touched a 3d program before i started modding fallout last year you can do it anon! i am the monkey with a typewriter of mods#typing this with blender outfit studio and mo2 open in the background mod author sigma grindset#ive thought about making some tutorials but i have both a lisp and a stutter...that would be brutal. maybe some text ones.#god im so normal about this game
28 notes
·
View notes
Text
my job is also paying for photoshop, illustrator, lightroom, and indesign subscriptions for every employee..
why
Edit: never mind it is actually the entire adobe suite? WHY??
#I probably won’t bother with adobe stuff cause I already have photoshop and I am trying to leave this job anyways#sadly no video editor lol#I’m still stuck using vegas 14. can’t even render 2k video lol#so they’re paying for adobe shit. ai shit. what other random subscriptions am I getting that I don’t know about??#I mean idk how the liscensing for this stuff is when it’s for thousands of employees#but surely it would be cheaper to only give it to the people who’d need it right#probably only like 100 employees at most would need it#edit: I hate this fuckin job but this is actually kind of good wtf.. kind of stupid that they don’t even mention it#I only found out because the stupid ass adobe creative cloud popped up#and I’m like. wait wtf I have more than just acrobat?#well. idk I might mess around with substance and premiere#but when I leave this job I’ll lose access obviously#idk.#it seems kind of tedious to pirate adobe stuff nowadays#the main 2 sources seems to be some guy who sometimes puts malware in it#and the other option is to download from adobe and then patch it and never allow it to access the internet ever again lmao#but even then I see people randomly lose access
2 notes
·
View notes
Text
Shit, Thanksgiving is over and I don’t have a Christmas pfp
#gonna have to reinstall photoshop#I don’t know what keeps happening but every time I download a cracked version it keeps breaking#like I turned on the firewall so that the app couldn’t access the internet but like 2 months later it somehow connected anyways#then it quit working and I just got the adobe thing about it being pirated
2 notes
·
View notes
Text
I still haven’t finished the Fake Monarch au post so have this to tide you over
#it is in fact kegan and Drabbs approved#also rant time#first of all screw Adobe I hate them so much I’ve had premiere pro pirated on my laptop for so many years and NOW you tell me I can’t use it#I hope you choke and your company goes under and all your employees are hired by decent companies#second of all why is iMovie easier to use on iPhone than on my Mac#literally could not figure out how to move the image of the skins around on my laptop yet I go on my phone and figure it out in 2 seconds???#oh wait I just remembered my family owns Final Cut Pro. huh. forgot about that#anyways yeah I edited this myself but I just put the skins on it got the template off of YouTube#roy talks#fake monarch au
50 notes
·
View notes
Text
what is the deal with the normalcy of 'design trials' and 'skills tests' when applying for design jobs . girl im too broke to have adobe . thats why i need a JOB
#if anyone has a good 'explain to me like im five' guide for pirating adobe products ...#hahha ...#i get by on my free little prgrma s& i just dont tell them i used krita instead of photoshop bc how tf would they know#but im still :[ about it .#design#m#job searching hell#adobe
4 notes
·
View notes
Note
Heyy
Is learning motion graphics hard?
Hmm I'd say it's as difficult to start learning as any other type of animation or video editing, but once you learn how to navigate in After Effects it gets easy! AE can look intimidating at first but I promise you, it'll be your best friend once you have the basics down. AND there are so many resources for learning on youtube & online forums etc 🌱
#the most difficult part (after learning AE basics) is just developing an eye for graphic design and motion graphics#typography is insanely fun to study and it benefits you a lot#but you dont need to be good at drawing to be able to do motion graphics so that's a big bonus!#learning to work with vectors is very beneficial though#i can't say objectively if it's hard to learn because i've had the privilege of having wonderful teachers who could always help if needed#but definitely try it out if you're even a bit curious‚ it's soooo much fun#and regarding adobe just pirate that crap
6 notes
·
View notes
Last Seen Blogs

onyus
Xe Camel Travel : Giới Thiệu

ramasta-blog1
Untitled


chaoticmiracleworld
Mad Dream

validoption
SOLID