#ntp pool
Text
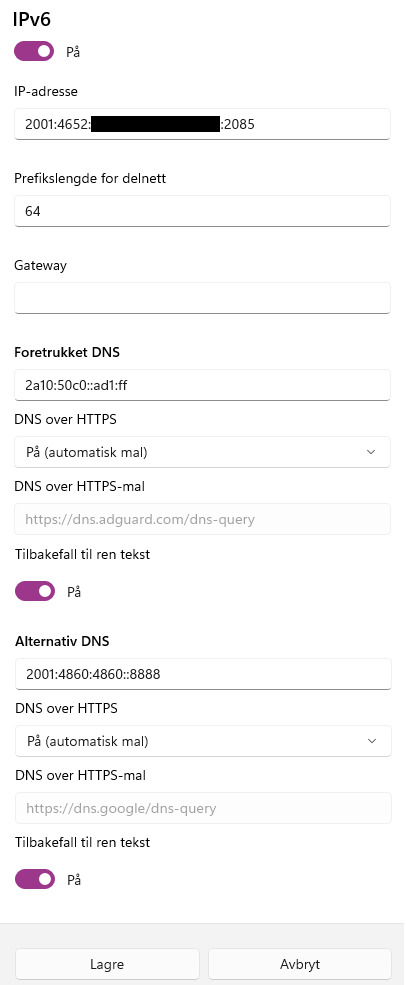
How to set up manual IPv6 in Windows 11
The new(?) network settings menu in Windows 11 has probably the least descriptive error messages I've seen in months, especially so for IPv6. So here's some quick advice to do it:
• Address: One of the "IPv6 Address" entries in ipconfig (Not "Temporary IPv6 Address").
• Prefix length: 64. Always 64.
• Gateway: Keep it blank and empty. Trust me.
• DNS: I usually stick with 2a10:50c0::ad1:ff (AdGuard Non-Blocking) and 2001:4860:4860::8888 (Google). Both have automatic DoH templates. If on ≥22H2, set "Fallback to unencrypted(?)" to On just in case.
This should normally work, but may take several attempts of trial and error. If successful, the address can become de facto static for years (A certain winner for NTP Pool), contingent on routers, drivers, and ISPs not having a bad day and causing downtime.
#windows#windows 11#dns#doh#dns-over-https#dns over https#settings#confusing settings#internet settings#ntp pool#ntp#tech#technology#ipv6#life tips
1 note
·
View note
Text
A server will use the Network Time Protocol (NTP) to synchronize its time with internet standard reference clocks via a hierarchy of NTP servers. The two common NTP daemon server implementations are ntpd and chronyd. Chrony is known to be much faster in time synchronization in comparison to the traditional NTP. Chrony can also handle intermittent network connections and bandwidth saturation.
The Chrony RPM package is available from the standard Amazon Linux 2 repositories. You can quickly install the package by running the following commands:
sudo yum -y install chronyd
There is a daemon for Chrony called chronyd, which runs in the background to monitor system time and status of the time server specified in the chrony.conf file.
Configure Chrony NTP Server on Amazon Linux 2
The server configuration file is /etc/chrony.conf. Edit this file to set NTP Servers where time synchronization reference will happen.
sudo vim /etc/chrony.conf
Set the NTP servers to synchronize. Please replace the values here with your own timezone NTP servers.
pool 0.africa.pool.ntp.org iburst
pool 1.africa.pool.ntp.org iburst
pool 2.africa.pool.ntp.org iburst
Use public servers from the pool.ntp.org project. You can get all zonal Pool Servers.
Once the file is updated with servers to reference for time updates, restart chronyd service.
sudo systemctl restart chronyd
sudo systemctl enable chronyd
Check service status:
$ systemctl status chronyd
● chronyd.service - NTP client/server
Loaded: loaded (/usr/lib/systemd/system/chronyd.service; enabled; vendor preset: enabled)
Active: active (running) since Fri 2020-10-23 05:17:16 UTC; 23s ago
Docs: man:chronyd(8)
man:chrony.conf(5)
Main PID: 29890 (chronyd)
CGroup: /system.slice/chronyd.service
└─29890 /usr/sbin/chronyd
Oct 23 05:17:16 ip-172-31-39-10.eu-west-1.compute.internal systemd[1]: Starting NTP client/server...
Oct 23 05:17:16 ip-172-31-39-10.eu-west-1.compute.internal chronyd[29890]: chronyd version 3.2 starting (+CMDMON +NTP +REFCLOCK +RTC +PRIVDROP +SCFILTER ...DEBUG)
Oct 23 05:17:16 ip-172-31-39-10.eu-west-1.compute.internal chronyd[29890]: Frequency 13.093 +/- 0.052 ppm read from /var/lib/chrony/drift
Oct 23 05:17:16 ip-172-31-39-10.eu-west-1.compute.internal systemd[1]: Started NTP client/server.
Oct 23 05:17:25 ip-172-31-39-10.eu-west-1.compute.internal chronyd[29890]: Selected source 156.38.0.155
If you have a running firewalld service and the server will serve as NTP Server to other clients, you may have to allow in the firewall.
sudo firewall-cmd --add-service=ntp --permanent
sudo firewall-cmd --reload
If you prefer allowing from specific subnet.
sudo firewall-cmd --remove-service=ntp --permanent
sudo firewall-cmd --add-rich-rule 'rule family="ipv4" service name="ssh" source address="172.31.0.0/16" accept' --permanent
sudo firewall-cmd --reload
Where 172.31.0.0/16 is the source address where NTP protocol is allowed for incoming traffic.
$ firewall-cmd --list-rich-rules
rule family="ipv4" source address="172.31.0.0/16" service name="ssh" accept
Verify Chrony is working by pulling correct time.
$ sudo chronyc sources
210 Number of sources = 12
MS Name/IP address Stratum Poll Reach LastRx Last sample
===============================================================================
^+ ntp1.inx.net.za 2 6 377 64 +1643us[+1379us] +/- 119ms
^+ mail.saasta.ac.za 2 6 377 64 +3552us[+3288us] +/- 112ms
^+ cpt-ntp.mweb.co.za 2 6 377 65 +665us[ +401us] +/- 195ms
^+ 156.38.0.219 2 6 375 1 +1074us[+1074us] +/- 126ms
^+ ntp.cd.net.za 2 6 377 64 +827us[ +827us] +/- 134ms
^+ ntp1.za.hypr.digital 2 6 377 1 +2071us[+2071us] +/- 129ms
^+ ntp3.inx.net.za 2 6 377 4 +3273us[+3273us] +/- 121ms
^+ ntp.dts.mg 2 6 377 64 +706us[ +706us] +/- 148ms
^- repository.habari.co.tz 2 6 377 66 +24ms[ +24ms] +/- 277ms
^- ns2.botsnet.bw 2 6 377 1 +7376us[+7557us] +/- 267ms
^* 196.200.160.123 2 6 377 1 -3843us[-3661us] +/- 96ms
^+ apollo.slash.tech 2 6 377 68 -2247us[-2321us] +/- 94ms
Chrony Client Configurations
On your client machines install chrony package:
sudo yum -y install chrony
Modify configuration file and add your NTP Server.
$ sudo vim /etc/chrony.conf
pool 172.31.20.11 iburst
Set your machine timezone:
sudo timedatectl set-timezone Africa/Nairobi
Start and enable Chronyd Service.
sudo systemctl enable --now chronyd
Test with the command below.
sudo chronyc sources
Check your system date to confirm if it is correct:
$ date
Fri Oct 23 08:34:54 EAT 2020
0 notes
Text
Mudlet use lua socket

#Mudlet use lua socket how to#
#Mudlet use lua socket portable#
#Mudlet use lua socket code#
The following blocking socket example is similar to the one above, but uses the NTP UDP protocol. Note: the connection will automatically close when the garbage collector kicks in, but it is good practice to close the connection when you are done using it. Line 12: Closes the socket connection.Line 10: Emits the time as part of the LSP response.Line 8-9: Translates raw response data to Unix time.The function blocks until the time server sends a response. Line 5: Reads response data from the time server.The function blocks until the socket connection completes.
#Mudlet use lua socket how to#
The following LSP example shows how to design a page that opens a blocking socket connection, sends a request to a time server, and waits for the response.Įxample 1: Blocking socket example, implementing a request/response. The Lua Server Page completes execution and the thread is then inserted back into the thread pool, where it waits for another request. The Lua Server Page then assembles the response message and sends the response message to the browser user. The Lua Server Page resumes execution when it receives a response from the other server. The blocking socket connection in the Lua Server Page waits for the response from the other server, and, by doing so, it blocks the thread executing the Lua Server Page. The Lua Server Page opens a connection to another server, sends a request, and waits for a response. The following diagram shows how a browser user sends a request to the Barracuda Server, where a Lua Server Page is triggered and executed as part of the request. A typical use case for blocking sockets is for a Lua Server Page to act as a network client to another service. Lua Server Pages run in the context of one of the threads in the HTTP Thread Pool. See the section Advanced Lua Bindings for information on how the native threads are designed to work cooperatively. Each native thread is mapped to one Lua coroutine, thus making sure each call into the Lua VM has its own Lua stack. The native threads only yield at known locations, such as when blocking on socket read.
#Mudlet use lua socket code#
Lua is not preemptive and native threads executing Lua code are designed to run cooperatively. We have highlighted the threads that can be used when working with blocking sockets.īlocking sockets must run in the context of one of the Barracuda Server's worker threads (HTTP Server Thread Pool) or in a thread in the Lua Thread Library. The following diagram from section Thread Mapping and Coroutines shows the native threads that may call into and interact with Lua code in a running system. The source code for the examples in this document can be downloaded from GitHub. See the platform's readme file for details. Note that cosockets are not available on some of the RTOS environments due to limitations in the TCP/IP stack. Cosockets run in the context of the native thread powering the Barracuda Server's socket dispatcher and enable you to design communication protocols that can scale up to a large number of connections.
Cosockets are fully asynchronous, where both socket receive and socket send are non blocking.
Socket receive events run in the context of the Barracuda Server's socket dispatcher and the receive events must for this reason not call any functions that may block the socket dispatcher. Asynchronous sockets enable your program to wait asynchronously for any number of socket connections simultaneously.
Asynchronous sockets are non blocking on receive and blocking on send.
Blocking sockets must run in the context of a worker thread and must under no circumstances run in the context of the native thread powering the Barracuda Server's socket dispatcher.
It is important that you familiarize yourself with these three socket modes since selecting the wrong mode may temporarily block and prevent the Barracuda Server from serving client requests. The Lua socket library supports three socket modes: standard blocking sockets, asynchronous sockets, and cosockets. The Lua socket library also includes client and server WebSocket functionality. The Lua socket library provides high level access to the system's or device's TCP/IP stack.
#Mudlet use lua socket portable#
The Barracuda Server provides a socket API that is portable across all supported platforms, including deep embedded systems. The auxiliary Lua socket library is an optional library that provides TCP Lua bindings for the Barracuda Server's socket API. Using the Socket Library Designing Socket Protocols in Lua
0 notes
Text
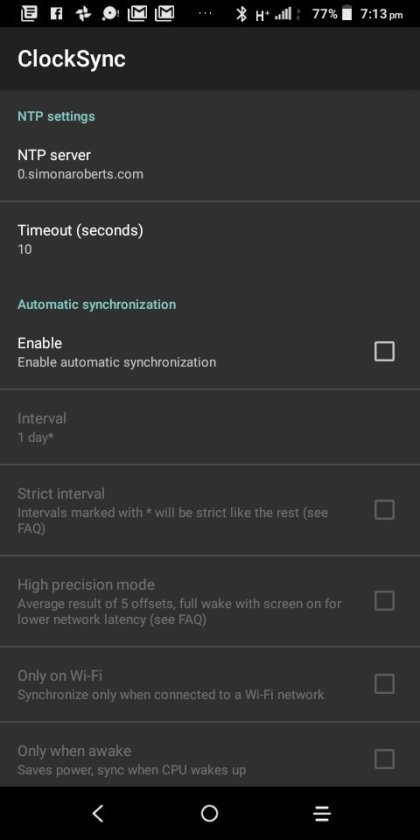
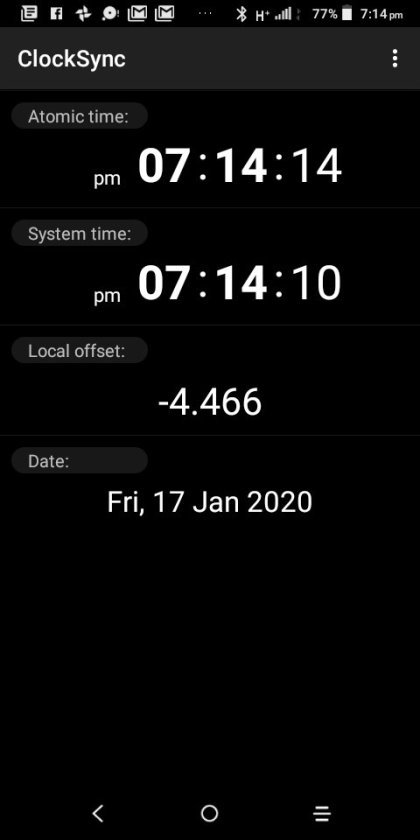
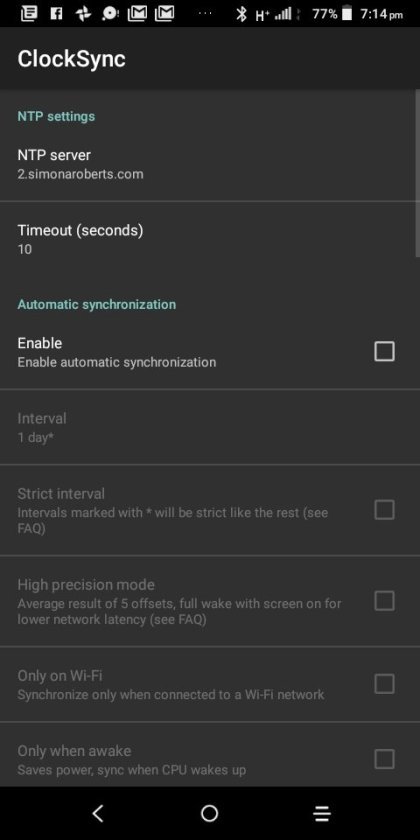
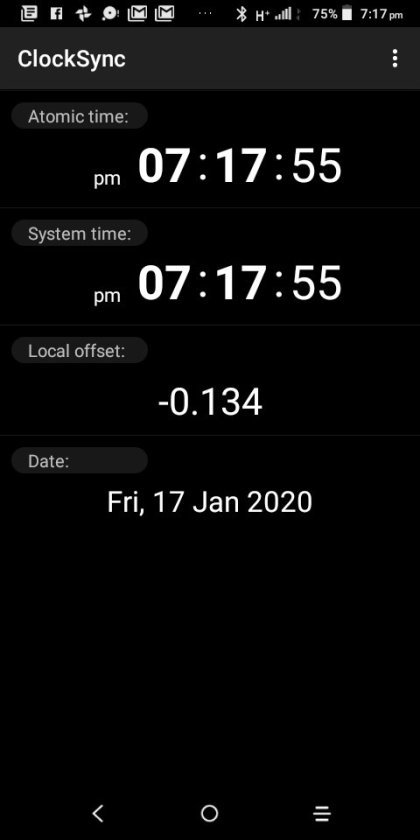
Clocksync results for simonaroberts.com


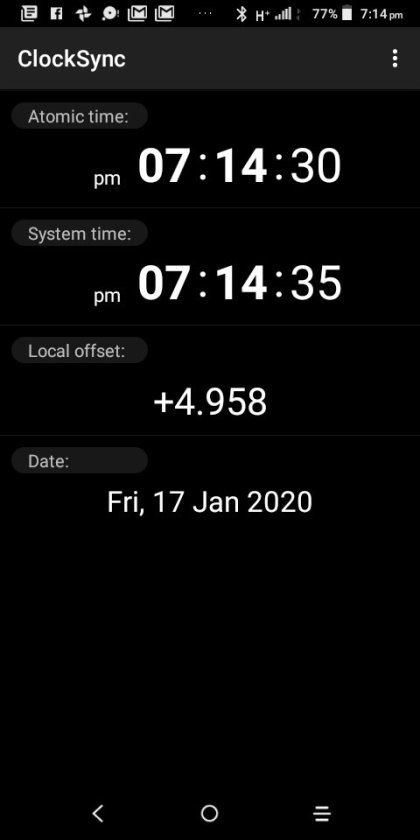

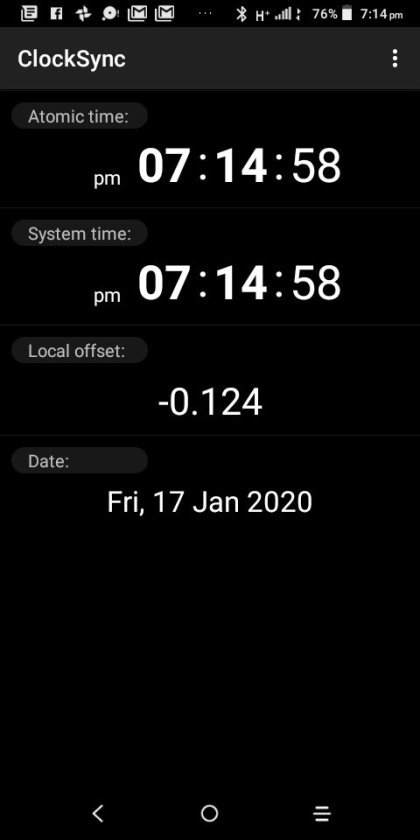
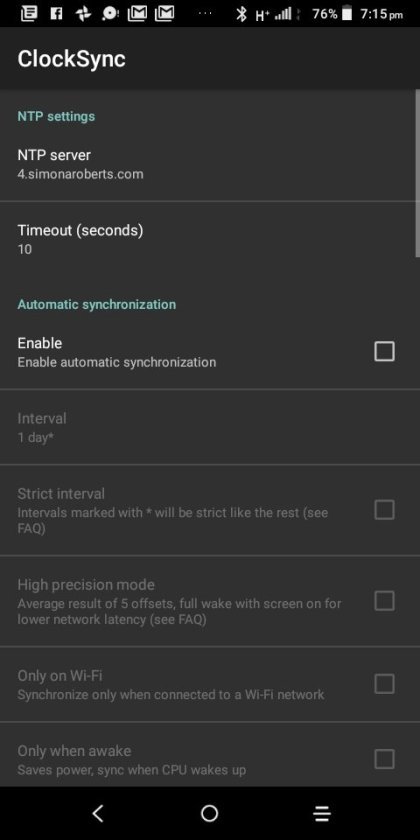
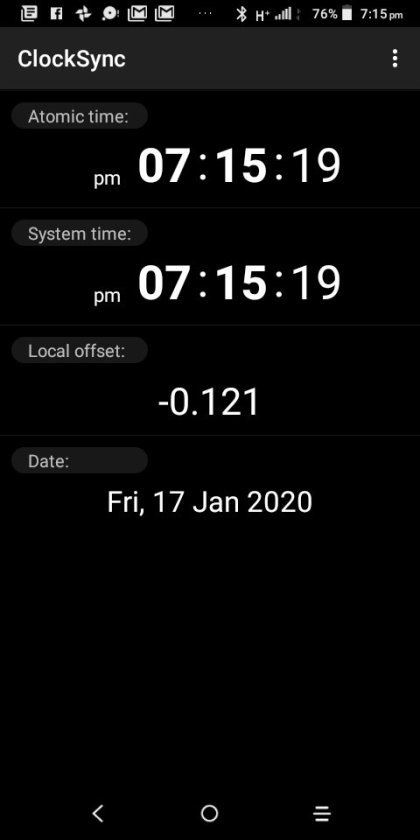

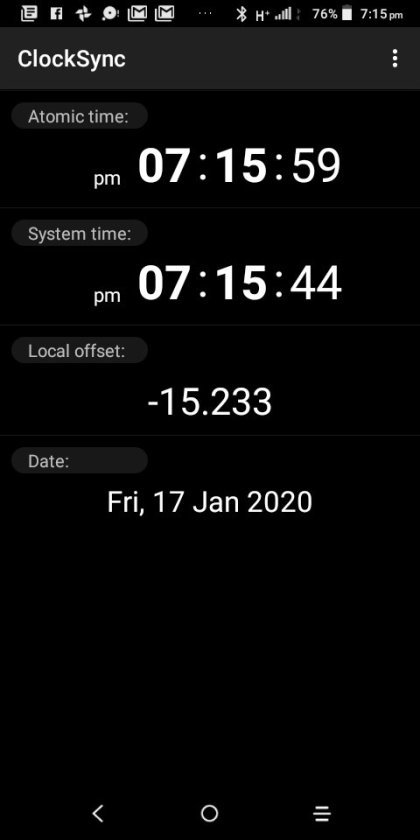

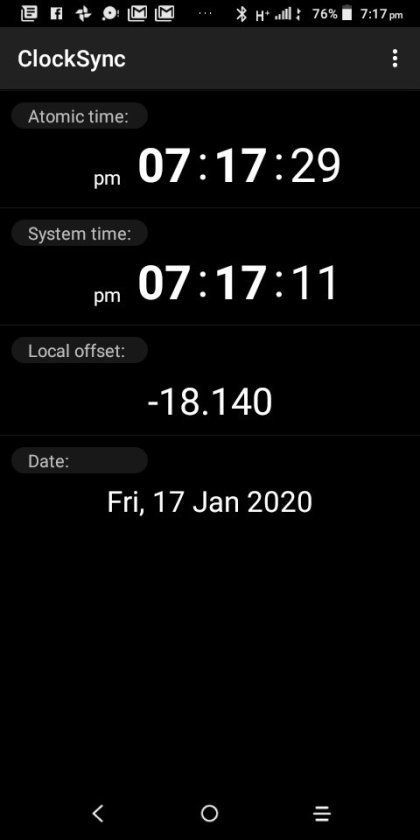

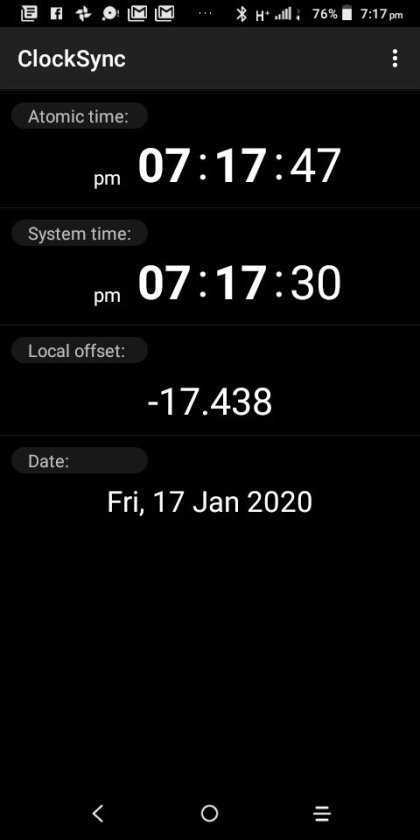
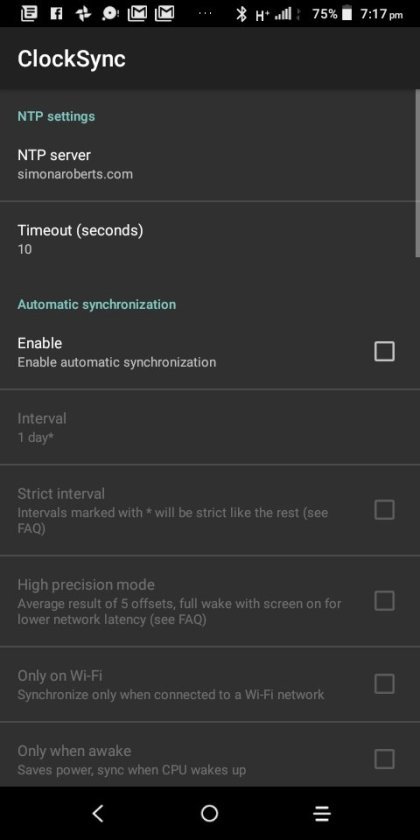
View On WordPress
0 notes
Text
50 reasons why *ntps are cute 💕
Serious apologies for bad explanations.
My absolute favourite thing is how their heads look like little toddler heads. Yes I look at their minds working and it's like - what is going on in there? You are so cute *pat pat*
Going on from above, the world could be burning, and if an *ntp is content (like mbs eating or doing a crossword) they would actually sit there and not even notice, just being all oblivious and content and giving off the cutest vibes. From their little head.
Do all *ntps have like naturally pouty lips? I think they do.
They are rage balls. They will bite everyone's heads off because they are STRONG.... AND then they will cry when people do the same to them.
They cry super easily. Obviously they don't want to, but they more they repress this the sicker they get tbh.
They are erratic children. Sorry, it had to be said.
Usually good with kids for the above reason 😂
They are emotionally stunted. That is, they're super emotional but they want to 100% logical and think they're rational... Anyway, this is how they attract the *nfjs. Being soft and pretending you're not is basically (aka being in need of counselling and real friendship) like wearing a neon sign that says '*Nfjs, pls help'
They get excited about everything. Literally EVERYTHING if you say it the right way.
Like keeping secrets but open up really easily once they start. Kind of gossipy when they do 😂
Everyone hates them and loves them at the same time. How?
They're a bit of a puzzle. Like - you're so smart, why did you do that stupid Ne idea?
^ While being ridiculously simple. In a good way. Not the stupid simple.
Easy to please. Seriously, *ntps like to give a list of demand and pretend to be high maintenance, but they're actually pretty easy. Basically just love them unconditionally - *nfj speciality, right?
They have so much potential.
So much powerrrrrr
With so much softness
So much energy
They kind of need you to help them work out their goals in life. They have so much energy and potential, but they often seem to end up job hopping and being confused. *nfj magnet again. Give them a vision and they will DO it.
Easily distracted. Cute, sometimes detrimental.
So quirky/weird. Like, one minute they're being all smart and the next they're like - what if I put hot chocolate in my pool? *amazing idea! *
So deep. When they're not pretending to be. Entps, stop TRYING to be deep. You already are.
Emotionally raw and capable. Just need some Fe development help 😉
Friends with everyone.
Also hate everyone, depending on mood.
Super clean and organised.
Also a disaster. No inbetween.
They like chocolate? Is this all *ntps?
Constantly flirt. Looking at you, intps. Stop it, you take it too far 😋
Great eyes.
Can speak with their minds/eyes.
Never really grow up.
Love rules. Mainly bending rules.
Entps want to be intps and intps want to be entps. But not really.
Devious.
Argumentative. Annoying, also amusing. Mainly because, as an *nfj, I can win anyway.
Funny.
Somehow exactly like an *nfj and also perfectly complimentary.
Attracted to everyone. Kind of annoying tbh.
But at the same time, they know who their real friends are and stuff.
Lonely. (*nfj neon sign again)
Devil's advocates. If the devil just said the opposite of whatever everyone else did....
AGGRESSION for two seconds. Providing you can out devil's advocate them.
Take advice really easily... More entp than intp, but it depends on how you say it.
Like new things.
Creative
Adaptable
So positive when functioning well.
Super J like.
But will be completely ruined if forced to act J for too long.
Marry *nfjs *ntps.
Or any NJ. Just don't marry a P. Pls. You guys were not meant to function as Js
Here are some *ntps being cute or just *ntps. You can guess which are what 😂 :


#mbti#entp#intp#ntp#np#fun type posts#rant#enfj#infj#mbti relationships#entps are cute#intps are cute#andrew lincoln#taylor swift#lauren southern#maddie ziegler#jai courtney#ben shapiro#martin freeman#mary kate olsen#ashley olsen#mary kate and ashley olsen#felix kjellberg#pewdiepie#captain raymond holt#brooklyn nine nine
120 notes
·
View notes
Text
TP-Link 的 NTP 流量
在「TP-Link repeater firmware squanders 715 MB/month」這邊看到 TP-Link 因為 NTP 的關係而狂吃流量的情況:(這邊是用逗點表示小數點,所以是 715.4 MB/month) You should probably avoid TP-Link products if you’re on a tight bandwidth budget. By design, TP-Link firmware sends six DNS requests and one NTP query every 5 seconds, for a total of 715,4 MB per month. 如果拿 24 小時都開機的 Windows 相比的話,會發現這數字天差地別: To put this number in context: an…
View On WordPress
0 notes
Text
DELL EMC DEE-1421 Expert - Isilon Solutions Exam Questions
The latest DELL EMC DEE-1421 Expert - Isilon Solutions Exam Questions are new updated by PassQuestion team, you can get the latest DEE-1421 questions and answers to practice for your test preparation. By using DEE-1421 Expert - Isilon Solutions Exam Questions multiple times you will be able to measure your skill level and you can determine how much effort is required to conquer the DEE-1421 real exam.It is highly recommended to go through all of our DELL EMC DEE-1421 Expert - Isilon Solutions Exam Questions so you can achieve the best results and clear the DELL EMC DEE-1421 exam on the first attempt.
DEE-1421 Expert - Isilon Solutions Exam Overview
DEE-1421 Expert - Isilon Solutions exam is a qualifying exam for the Expert - PowerScale Solutions (DCE) track. This exam has two parts, a passing score is required on both parts.
• Part 1 consists of knowledge and experience-based questions
• Part 2 consists of performance-based simulations
The focus of this exam is on advanced environments and workflows where a PowerScale scale-out NAS platform can be applied. Advanced networking configurations, systems integrations, security and data protection protocols are all examined as components of an appropriate PowerScale solution. Students are expected to have a deep understanding of not only course material, but of documented best practices and administration guides as well as field experience working with the PowerScale product.
Part 1:
Duration:90 Minutes
Number of Questions: 55 Questions
Passing Score: 60%
Part 2:
Duration: 30 Minutes
Number of Questions: 5 Simulations
Passing Score: 60%
A passing score is required on both parts of this exam.
Exam TopicsNetworking (16%)
• Define network routing (for example, source-based and static), Groupnets, IP subnets, and pools
• Design connectivity and assess the topology (for example, NANON)
• Design and configure advanced networking: LACP, VLAN, MTU, vPC, Trunk and Access, and MLAG
• Assess common network services (for example, DNS, NTP, and remote support)
Tenancy, Access Management, Protocols, and Security (20%)
• Design and define multi-tenancy solutions including implementing groupnets, Access zones, networks, DNS, authenticators, and applying namespace design
• Assess and design access management including AIMA (authentication and identity management and authorization), variants of Kerberos (such as AD RFC-2307, NIS, User and ID mapping, and LDAP plus share and directory), and RBAC
• Identify and design protocol configurations including NFSv3, NFSv4, SMB 1.0, SMB 2.1, SMB 3.0, ACL and POSIX, advanced protocol settings, andprotocol security
• Assess and implement security requirements including system hardening policies, security persistence, and compliance
Storage Management, Compliance, and Data Migrations (15%)
• Analyze and evaluate storage management requirements including onpremise and off-premise (for example, CouldPools, ECS, Azure, Amazon) and data life cycle management
• Plan, assess, implement data migrations including migration methodologies (for example, DobiMigrate, technology refresh) and permissions
Performance Management (14%)
• Analyze workflow impact to define and implement data access acceleration (non-sequential data flow, streaming media, file system protection settings, and configuration design)
• Assess network performance including client protocol configurations and optimization
• Analyze the root cause of performance issues and evaluate cluster performance metrics
Data Protection and Recovery (14%)
• Design data replication solutions including SyncIQ and Deep Copy,Snapshots, failover and failback, and third-party applications (for example,Superna)
• Identify WORM variants including Compliance mode, Enterprise mode,and SmartLock
• Implement NDMP
System Management (11%)
• Assess and recommend data protection level, L3 Cache, SSD, and file pool policies
• Apply system management troubleshooting tools, methodologies and design systems monitoring including alerts, events, notifications, syslog, CEE and isi commands
Systems Integration (10%)
• Gather and analyze data to determine the various system(s) requirements
View Online DEE-1421 Expert - PowerScale Solutions Exam Free Questions
An IT team is preparing to replicate a dataset from their existing primary Dell EMC Isilon cluster to a secondary cluster. Both clusters are licensed for SmartLock Enterprise and SyncIQ is used for replication. The source directory is a SmartLock directory and the target directory must be a SmartLock directory.
When consulting with the IT team, what is a key consideration before running the replication policy?
A. Enable WORM on the target directory after the initial synchronization.
B. Allow OneFS to create the target directory automatically.
C. Manually create target SmartLock directory before replicating.
D. Specify the “root” user that can delete files committed to a WORM state.
Answer: B
A company has three Dell EMC Isilon X2000 nodes and needs to configure two subnets on the cluster. The production subnet will only use a 10 GigE-1 port from each node. The second subnet will use both ext-1 and ext-2 ports on each node. The company will access each subnet with its SmartConnect zone name.
Given that the second subnet is isolated with no route to the DNS server, how many IP addresses are needed for each subnet to accommodate the requirements?
A. 3 for production and 7 for isolated
B. 4 for production and 6 for isolated
C. 4 for production and 7 for isolated
D. 6 for production and 4 for isolated
Answer: D
What enables CloudPools to achieve a recall of data from the cloud?
A. Creating a HardLink file for every file whose data is archived to the cloud
B. Creating a SoftLink file for every file whose data is archived to the cloud
C. Creating a SmartLink file for every file whose data is achieved to the cloud
D. Creating a copy file for every file whose data is achieved to the cloud
Answer: C
SyncIQ policies are being configured between two Dell EMC Isilon clusters at a company’s location. In addition, the company wants the ability to perform a failover at an Access zone level.
Which actions should be performed to meet the requirement?
A. Create one NS record delegation per cluster. NS record should always point directly to the cluster SSIP address.
B. Create one NS record delegation per SmartConnect zone. NS record should always point to an “A” record containing the zone SSIP.
C. Create one NS record delegation per SmartConnect zone. NS record should always point directly to the SmartConnect zone IP address.
D. Create one NS record delegation per cluster. NS record should always point to an “A” record containing the cluster SSIP address.
Answer: C
A company uses the Dell EMC Isilon cluster's A200 nodes for short-team archiving of digitized film. Historical and trending information shows that the cluster capacity will reach 90% full in 60 days. To avoid the need to purchase additional A200 nodes, the company requires a solution that archives data not accessed for 18 months to a more cost-effective platform. The long-term archive data must be online and accessible. Some performance loss is acceptable.
Which IT strategy provides a long-term solution that meets the requirements?
A. Use data deduplication on achieved data accessed within 180 days
B. Use SyncIQ to replicate the archive to the H600 nodes on the secondary cluster
C. Use NDMP to backup to disk using compression and deduplication
D. Use a CloudPools policy to move the target data to an ECS-powered cloud
Answer: C
1 note
·
View note
Text
How to Install Fresh XenServer 7
Here we describe how to intall fresh XenServer 7. In earlier articles, XenServer 6.5 configuration and usage was discussed. In May 2016, Citrix released the new version of the XenServer platform. Plenty has remained the same but there are also some useful new additions to this latest release.
One of the biggest changes is the upgrade to the underlying Dom0 environment. XenServer 6.5 was using CentOS 5.10 and the new release of its Dom0 has been updated to CentOS 7.2. This has brought about a newer Linux kernel in Dom0 as well as ease of future upgrade abilities within CentOS 7.
Another big change occurred to the partitioning done for Dom0. Older releases of XenServer relied upon MBR and a rather small root partition (4GB). Subsequently, many users likely experienced issues where logs would routinely fill up the root partition if not monitored or exported to an external log mechanism.
With the new release, the partitioning scheme has changed to GPT as well as a more logical partitioning has been performed. The chart below is fully credited to the official Citrix release information:
18GB XenServer host control domain (dom0) partition
18GB backup partition
4GB logs partition
1GB swap partition
5GB UEFI boot partition
These changes do require larger hard drive requirements for Dom0 compared to older versions of XenServer but the scheme does alleviate several issues experienced in older versions.
The next notable upgrade in XenServer 7 is the actual upgrade from Xen 4.4 to Xen 4.6. Xen is the actual hypervisor portion of XenServer.
The list of fixes and enhancements is quite large but some of the highly noted enhancements from Citrix include agentless anti-malware introspection for guests as well as frameworks that can allow guests to be migrated between CPU’s of different generations.
There are many other enhancements seen in this upgrade and the author strongly encourages viewing the lists and associated documents on Citrix’s website:
https://www.citrix.com/products/xenserver/whats-new.html
DISCLAIMER
The purpose of this article is to walk through a fresh install as well as assist administrators with the process of upgrading older XenServer installs to the newer XenServer 7 and applying critical patches.
Fresh Install of XenServer 7
Upgrading XenServer 6.5 to XenServer 7
Applying XenServer 7 Critical Patch
There are several ways to do the upgrading process and the ‘right’ solution for any particular install will be highly dependent on the organization. Please be sure to understand the implications and processes required for a successful upgrade.
Citrix has released a very detailed document that should be reviewed before the upgrade process is started: xenserver-7-0-installation-guide.pdf
XenServer System Requirements
XenServer 7 ISO : XenServer-7.0.0-main.iso
Server capable of virtualization
Hardware Compatibility List is here: http://hcl.xenserver.org/
Many systems will work even if not listed but results may vary, use at your own risk.
Minimum 2GB ram; 4GB or more recommended to run virtual machines
Mimimum 1 64-bit x86 1.5GHz cpu; 2GHz or more and multiple CPUs are suggested
Harddrive space of at least 46GB; more required if virtual machines will be saved locally
At least a 100mbps network card; multiple gigabit suggested
Author Suggested Additions
In order to save some potential headaches for readers, the author recommends the following items before beginning this process:
Update the firmware on the XenServer system (especially NIC firmware) – more later
Stop all non-essential guests to prevent issues
Read through Citrix’s documentation as well as this article before beginning
Make sure to back up pool information in order to make a revert easier if needed
Restart all the XenServer hosts one more time after all steps have been completed if the environment can afford the reboot time
Single Host Upgrade and Fresh Install of XenServer 7
This first process will walk through a completely new install of XenServer 7. Be sure to check the minimum hardware requirements to ensure that the machine can support XenServer 7.
1. The first step in the installation is to download the XenServer ISO file. Using the link above, the file can easily be downloaded from the Internet using the ‘wget’ command.
# wget -c http://downloadns.citrix.com.edgesuite.net/11616/XenServer-7.0.0-main.iso
Once the ISO has downloaded, copy it to a USB drive with the ‘dd’ utility. CAUTION – The following command will replace EVERYTHING on the flash drive with the contents of the XenServer ISO. This process will also create a bootable USB drive for the installation process.
# dd if=XenServer-7.0.0-main.iso of=</path/to/usb/drive>
2. Now place the bootable media into the system that XenServer should be installed. If the bootable media creation step was successful, the system should display the XenServer splash screen.
3. From this screen, simply hit enter to boot into the installer. The first screen, once the installer has started successfully, will ask the user to select their language.
4. The next screen will ask the user to confirm that an upgrade or install should be done as well as ask for any other special drivers that may need to be loaded in order to install XenServer.
5. The next screen is the obligatory EULA (End User License Agreement). Use the keyboard arrows to move the cursor to the ‘Accept EULA‘ button.
6. This is where the installation can take one of two paths if the installer detects a prior install. The next screen will prompt the user for a clean install or an upgrade to an existing XenServer install. The first set of instructions here will walk through a clean install. If an upgrade is needed skip ahead to step 15.
7. The next screen will prompt for the installation device. In this case it will be ‘sda’.
8. Once the installation path has been chosen, XenServer will need to know where the installation files reside. In this case, the installer was booted from local media and that is the option that should be chosen.
9. The next step will allow the user to install supplemental packs at the same time as this installer. At the time of this writing, there aren’t any supplemental packs for XenServer 7 so ‘no’ can be selected here.
10. The next screen will allow the user to confirm the integrity of the source files before installing. Running this test is not required but can help detect installation issues before trying to write files.
11. Once the verification is completed, if selected during install, the XenServer installer will ask the user to setup some system information.
The first prompt will be to set the root user’s password. Now, since XenServer will be the underlying system to potentially several important virtualized servers, it is imperative that the password be secured as well as sufficiently complex!
Important: Do not forget this password either as there will not be any other users on the system once the installer finishes!
12. The next couple of steps will ask how the management network interface should be configured (Static address or DHCP) as well as hostname and DNS information. This will be dependent on the environment.
13. This step covers several screens for setting time zone information and NTP (Network Time Protocol).
14. At this point in the installer, all of the initial configuration information for a clean install has been provided and the installer is ready to install all the necessary files.
WARNING – Continuing at this point WILL ERASE ALL DATA on the target disks!
Continue to step 19 after selecting ‘Install it‘.
Upgrading XenServer 6.5 to XenServer 7
15. These steps are only used if performing an upgrade to an older version of XenServer. The installation media will locate older versions of XenServer if the user wishes. When doing an upgrade, the installer will create a backup of the current system automatically.
16. Once the back up is created, the installer will prompt for supplemental packs. At the time of this writing, there aren’t any supplemental packs for XenServer 7.
17. The next screen will allow the user to confirm the integrity of the source files before installing. Running this test is not required but can help detect installation issues before trying to write files.
18. Finally the upgrade can begin! At this point the installer will backup the older 6.x system and make the appropriate changes to setup it.
Continuing XenSever 7 Installation
19. One of the most obvious changes the author noted with the newer XenServer 7 is that boot times seemed to have been drastically reduced. Most of the XenServer 7 Systems tested so far have booted approximately 35-60% faster than they did when running XenServer 6.5. If the installation was successful, the system should boot to the XenServer console.
Congratulations, the installation/upgrade of XenServer was successful! Now it is time to create virtual guests, networking, and storage repositories!
Applying XenServer 7 Critical Patch XS70E004
20. To apply this patch through XenCenter, simply go to the ‘Tools’ menu and select ‘Install Update’.
21. The next screen will provide some information about the patch installation process. Just click next to continue after reading the precautions.
22. XenCenter, if connected to the Internet, will be able to locate any missing patches for the environment on this screen. At the time of this article the only patch available is ‘XS70E004’. This patch should be applied IMMEDIATELY following the upgrade or installation of XenServer 7.
23. The next screen will prompt for the XenServer hosts to apply the patch to.
24. After clicking ‘next’ XenCenter will download the patches and push them to the selected servers. Simply wait for this process to complete and select ‘next’ when applicable.
25. With the patch files uploaded, XenCenter will run a series of checks to ensure that certain conditions are met before the installation of the patches and the rebooting of hosts.
25. Once all of the pre-checks are completed, XenCenter will prompt the administrator as to how post install tasks should be handled. Unless there is a compelling reason not to, allowing XenCenter to carry out these tasks is usually the best answer.
26. The next screen will display the progress of the patch installation and alert the administrator of any errors experienced.
This concludes the process of patching it hosts. The next step is to start creating virtual guests! Thank you for reading this article.
Don’t Miss: XenServer 7 – Pool Upgrade via CLI and XenCenter Web Interface
Please let us know of any issues you have in the comments below.
0 notes
Text
Deep Dive Architecture Comparison of DaaS & VDI, Part 2
In part 1 of this blog series, I discussed the Horizon 7 architecture and a typical single-tenant deployment using Pods and Blocks. In this post I will discuss the Horizon DaaS platform architecture and how this offers massive scale for multiple tenants in a service provider environment.
Horizon DaaS Architecture
The fundamental difference with the Horizon DaaS platform is multi-tenancy architecture. There are no Connection or Security servers, but there are some commonalities. I mentioned Access Point previously, this was originally developed for Horizon Air, and is now a key component for both Horizon 7 and DaaS for remote access.

If you take a look at the diagram above you’ll see these key differences. Let’s start with the management appliances.
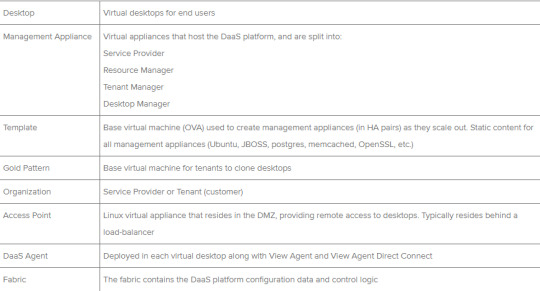
There are five virtual appliances (OVA) used for Horizon DaaS; Service Provider, Tenant, Desktop Manager, Resource Manager and Access Point. When these appliances are deployed, they are always provisioned as an HA pair (master/slave), except for Access Point which is active/active across multiple appliances. No load-balancer is required, only for multiple Access Point appliances. The remaining virtual appliances use a virtual IP in the master/slave configuration. There is only a single OVA (template), and upon initial installation, the bootstrap process uses this template as a base for each of the virtual appliance types.
I’ve already introduced Access Point with the Horizon 7 architecture previously, but it’s worth mentioning that this is a recent addition. Previously with the original Desktone product and subsequent versions of Horizon DaaS platform, remote access was provided using dtRAM (Desktone Remote Access Manager). The dtRAM is also a virtual appliance (based on FreeBSD and pfSense) and still available, but I would now recommend using Access Point for the latest features.
Service Provider
The service provider has two different types of virtual appliance (HA pair); the Service Provider and Resource Manager.
The Service Provider appliance provides the Service Center portal where the provider can perform a number of activities including Desktop Model management, Tenant management, monitoring and discovery of infrastructure resources. This appliance also contains a Resource Manager service which targets and deploys other management virtual appliances. For example, when a Tenant Appliance pair is created, it’s name, networks, IP address, and so on, are stored in the FDB (Fabric Database). The Service Provider appliance then instructs the resource manager service to clone a tenant appliance.
Resource Manager
The Resource Manager virtual appliance communicates with the infrastructure (vCenter) to carry out desktop provisioning, and provides management of all desktops for tenants. Unlike Horizon 7 that can provision View Composer linked clones, Instant Clones or full clones, only full clones are currently supported with Horizon DaaS. Resources are assigned to tenants so they can consume compute, storage and network for virtual desktops.
It’s important to note that Resource Manager appliances are tied to the service provider, and not the tenant.
Tenant
The tenant also has two different types of virtual appliance (HA pair); Tenant and Desktop Manager virtual appliance.
The Tenant appliance provides a web-based UI (Enterprise Center) for both the tenant end-user and IT administrator. End-users can manage their own virtual desktops, and the administrator functions allow for creation and management of the tenant desktops.
Other tenant operations provided by Enterprise Center, include:
Domain registration
Gold pattern conversion
Desktop pool creation
AD user and group assignment to virtual desktops
The Tenant virtual appliance also contains a Desktop Manager component which brokers connections to tenant virtual desktops. Each Desktop Manager supports up to 5,000 virtual desktops. If more are required then a HA-pair of Desktop Manager virtual appliances can be deployed.
Desktop Manager
The Desktop Manager virtual appliance is the same as the Tenant appliance, but does not include the brokering or Enterprise Center portal. You can deploy Desktop Manager appliances to scale beyond the 5,000 virtual desktop limit.
Resources are assigned to the Desktop Manager for consumption by the tenant. In some cases you may have a vSphere cluster dedicated for 3D workloads with vDGA pass-through. These 3D specific resources would be dedicated to a Desktop Manager virtual appliance pair.
Each virtual desktop is installed with the DaaS Agent which sends heartbeats to the Desktop Manager in order to keep track of it’s state.
Networking
As shown in the above diagram, there are three networks associated with Horizon DaaS; Backbone Link Local network, Service Provider network, and tenant networks.
The Backbone Link Local network is a private network that is dedicated for all virtual appliances. Although the Tenant virtual appliances are connected to this network, there is no access from the tenant network.
The Service Provider management network provides access for service provider administration of the Service Provider appliances, and vSphere infrastructure.
The Tenant network (per tenant) is dedicated for virtual desktops. This also has IP connectivity to the tenants supporting infrastructure such as Active Directory, DNS, NTP, and file servers.
Horizon DaaS Terminology
Conclusion
VMware Horizon® is a family of desktop and application virtualization solutions that has matured significantly over the past few years. vCloud Air Network service providers can provide customers with either a managed Horizon 7 platform, or Desktop as a Service with Horizon DaaS.
Both Horizon 7 and Horizon DaaS offer virtual desktops and applications, and used in combination with App Volumes, applications can be delivered in near real-time to end-users.
Access Point provides remote access to both Horizon 7 and Horizon DaaS which provide many advantages to the service provider. With their active/active scalable deployment, and hardened Linux platform, service providers and customers can benefit from multiple authentication and access methods from any device and any location.
For both Horizon solutions, RDSH continues to be an attractive choice for delivering desktop or application sessions. These can either be presented to the user with the Horizon Client, or with integration with Workspace ONE and Identity Manager.
Finally, the vCloud Air Network is a global ecosystem of service providers that are uniquely positioned to supply modern enterprises with the ideal VMware-based solutions they need to grow their businesses. Built on the foundation of existing VMware technology, vCloud Air Network Service Providers deliver a seamless entry into the cloud. You can learn more about the vCloud Air Network, or search for a vCAN service provider here: http://vcloudproviders.vmware.com
0 notes
Text
How to Deploy a Ceph Storage to Bare Virtual Machines
Ceph is a freely available storage platform that implements object storage on a single distributed computer cluster and provides interfaces for object-, block- and file-level storage. Ceph aims primarily for completely distributed operation without a single point of failure. Ceph storage manages data replication and is generally quite fault-tolerant. As a result of its design, the system is both self-healing and self-managing.
Ceph has loads of benefits and great features, but the main drawback is that you have to host and manage it yourself. In this post, we'll check two different approaches of virtual machine deployment with Ceph.
Anatomy of a Ceph cluster
Before we dive into the actual deployment process, let's see what we'll need to fire up for our own Ceph cluster.
There are three services that form the backbone of the cluster
ceph monitors (ceph-mon) maintain maps of the cluster state and are also responsible for managing authentication between daemons and clients
managers (ceph-mgr) are responsible for keeping track of runtime metrics and the current state of the Ceph cluster
object storage daemons (ceph-osd) store data, handle data replication, recovery, rebalancing, and provide some ceph monitoring information.
Additionally, we can add further parts to the cluster to support different storage solutions
metadata servers (ceph-mds) store metadata on behalf of the Ceph Filesystem
rados gateway (ceph-rgw) is an HTTP server for interacting with a Ceph Storage Cluster that provides interfaces compatible with OpenStack Swift and Amazon S3.
There are multiple ways of deploying these services. We'll check two of them:
first, using the ceph/deploy tool,
then a docker-swarm based vm deployment.
Let's kick it off!
Ceph Setup
Okay, a disclaimer first. As this is not a production infrastructure, we’ll cut a couple of corners.
You should not run multiple different Ceph demons on the same host, but for the sake of simplicity, we'll only use 3 virtual machines for the whole cluster.
In the case of OSDs, you can run multiple of them on the same host, but using the same storage drive for multiple instances is a bad idea as the disk’s I/O speed might limit the OSD daemons’ performance.
For this tutorial, I've created 4 EC2 machines in AWS: 3 for Ceph itself and 1 admin node. For ceph-deploy to work, the admin node requires passwordless SSH access to the nodes and that SSH user has to have passwordless sudo privileges.
In my case, as all machines are in the same subnet on AWS, connectivity between them is not an issue. However, in other cases editing the hosts file might be necessary to ensure proper connection.
Depending on where you deploy Ceph security groups, firewall settings or other resources have to be adjusted to open these ports
22 for SSH
6789 for monitors
6800:7300 for OSDs, managers and metadata servers
8080 for dashboard
7480 for rados gateway
Without further ado, let's start deployment.
Ceph Storage Deployment
Install prerequisites on all machines
$ sudo apt update $ sudo apt -y install ntp python
For Ceph to work seamlessly, we have to make sure the system clocks are not skewed. The suggested solution is to install ntp on all machines and it will take care of the problem. While we're at it, let's install python on all hosts as ceph-deploy depends on it being available on the target machines.
Prepare the admin node
$ ssh -i ~/.ssh/id_rsa -A [email protected]
As all the machines have my public key added to known_hosts thanks to AWS, I can use ssh agent forwarding to access the Ceph machines from the admin node. The first line ensures that my local ssh agent has the proper key in use and the -A flag takes care of forwarding my key.
$ wget -q -O- 'https://download.ceph.com/keys/release.asc' | sudo apt-key add - echo deb https://download.ceph.com/debian-nautilus/ $(lsb_release -sc) main | sudo tee /etc/apt/sources.list.d/ceph.list $ sudo apt update $ sudo apt -y install ceph-deploy
We'll use the latest nautilus release in this example. If you want to deploy a different version, just change the debian-nautilus part to your desired release (luminous, mimic, etc.).
$ echo "StrictHostKeyChecking no" | sudo tee -a /etc/ssh/ssh_config > /dev/null
OR
$ ssh-keyscan -H 10.0.0.124,10.0.0.216,10.0.0.104 >> ~/.ssh/known_hosts
Ceph-deploy uses SSH connections to manage the nodes we provide. Each time you SSH to a machine that is not in the list of known_hosts (~/.ssh/known_hosts), you'll get prompted whether you want to continue connecting or not. This interruption does not mesh well with the deployment process, so we either have to use ssh-keyscan to grab the fingerprint of all the target machines or disable the strict host key checking outright.
10.0.0.124 ip-10-0-0-124.eu-north-1.compute.internal ip-10-0-0-124 10.0.0.216 ip-10-0-0-216.eu-north-1.compute.internal ip-10-0-0-216 10.0.0.104 ip-10-0-0-104.eu-north-1.compute.internal ip-10-0-0-104
Even though the target machines are in the same subnet as our admin and they can access each other, we have to add them to the hosts file (/etc/hosts) for ceph-deploy to work properly. Ceph-deploy creates monitors by the provided hostname, so make sure it matches the actual hostname of the machines otherwise the monitors won't be able to join the quorum and the deployment fails. Don't forget to reboot the admin node for the changes to take effect.
$ mkdir ceph-deploy $ cd ceph-deploy
As a final step of the preparation, let's create a dedicated folder as ceph-deploy will create multiple config and key files during the process.
Deploy resources
$ ceph-deploy new ip-10-0-0-124 ip-10-0-0-216 ip-10-0-0-104
The command ceph-deploy new creates the necessary files for the deployment. Pass it the hostnames of the monitor nodes, and it will create cepf.conf and ceph.mon.keyring along with a log file.
The ceph-conf should look something like this
[global] fsid = 0572e283-306a-49df-a134-4409ac3f11da mon_initial_members = ip-10-0-0-124, ip-10-0-0-216, ip-10-0-0-104 mon_host = 10.0.0.124,10.0.0.216,10.0.0.104 auth_cluster_required = cephx auth_service_required = cephx auth_client_required = cephx
It has a unique ID called fsid, the monitor hostnames and addresses and the authentication modes. Ceph provides two authentication modes: none (anyone can access data without authentication) or cephx (key based authentication).
The other file, the monitor keyring is another important piece of the puzzle, as all monitors must have identical keyrings in a cluster with multiple monitors. Luckily ceph-deploy takes care of the propagation of the key file during virtual deployments.
$ ceph-deploy install --release nautilus ip-10-0-0-124 ip-10-0-0-216 ip-10-0-0-104
As you might have noticed so far, we haven't installed ceph on the target nodes yet. We could do that one-by-one, but a more convenient way is to let ceph-deploy take care of the task. Don't forget to specify the release of your choice, otherwise you might run into a mismatch between your admin and targets.
$ ceph-deploy mon create-initial
Finally, the first piece of the cluster is up and running! create-initial will deploy the monitors specified in ceph.conf we generated previously and also gather various key files. The command will only complete successfully if all the monitors are up and in the quorum.
$ ceph-deploy admin ip-10-0-0-124 ip-10-0-0-216 ip-10-0-0-104
Executing ceph-deploy admin will push a Ceph configuration file and the ceph.client.admin.keyring to the /etc/ceph directory of the nodes, so we can use the ceph CLI without having to provide the ceph.client.admin.keyring each time to execute a command.
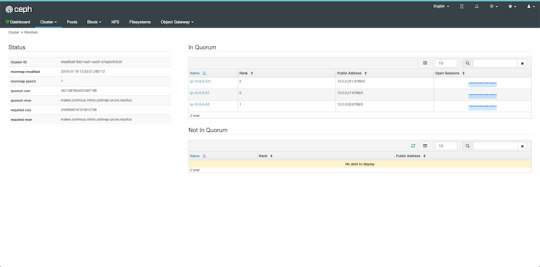
At this point, we can take a peek at our cluster. Let's SSH into a target machine (we can do it directly from the admin node thanks to agent forwarding) and run sudo ceph status.
$ sudo ceph status cluster: id: 0572e283-306a-49df-a134-4409ac3f11da health: HEALTH_OK services: mon: 3 daemons, quorum ip-10-0-0-104,ip-10-0-0-124,ip-10-0-0-216 (age 110m) mgr: no daemons active osd: 0 osds: 0 up, 0 in data: pools: 0 pools, 0 pgs objects: 0 objects, 0 B usage: 0 B used, 0 B / 0 B avail pgs:
Here we get a quick overview of what we have so far. Our cluster seems to be healthy and all three monitors are listed under services. Let's go back to the admin and continue adding pieces.
$ ceph-deploy mgr create ip-10-0-0-124
For luminous+ builds a manager daemon is required. It's responsible for monitoring the state of the Cluster and also manages modules/plugins.
Okay, now we have all the management in place, let's add some storage to the cluster to make it actually useful, shall we?
First, we have to find out (on each target machine) the label of the drive we want to use. To fetch the list of available disks on a specific node, run
$ ceph-deploy disk list ip-10-0-0-104
Here's a sample output:
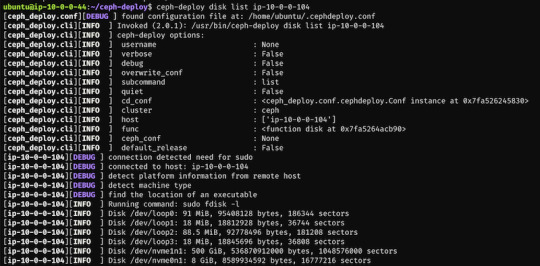
$ ceph-deploy osd create --data /dev/nvme1n1 ip-10-0-0-124 $ ceph-deploy osd create --data /dev/nvme1n1 ip-10-0-0-216 $ ceph-deploy osd create --data /dev/nvme1n1 ip-10-0-0-104
In my case the label was nvme1n1 on all 3 machines (courtesy of AWS), so to add OSDs to the cluster I just ran these 3 commands.
At this point, our cluster is basically ready. We can run ceph status to see that our monitors, managers and OSDs are up and running. But nobody wants to SSH into a machine every time to check the status of the cluster. Luckily there's a pretty neat dashboard that comes with Ceph, we just have to enable it.
...Or at least that's what I thought. The dashboard was introduced in luminous release and was further improved in mimic. However, currently we're deploying nautilus, the latest version of Ceph. After trying the usual way of enabling the dashboard via a manager
$ sudo ceph mgr module enable dashboard
we get an error message saying Error ENOENT: all mgr daemons do not support module 'dashboard', pass --force to force enablement.
Turns out, in nautilus the dashboard package is no longer installed by default. We can check the available modules by running
$ sudo ceph mgr module ls
and as expected, dashboard is not there, it comes in a form a separate package. So we have to install it first, luckily it's pretty easy.
$ sudo apt install -y ceph-mgr-dashboard
Now we can enable it, right? Not so fast. There's a dependency that has to be installed on all manager hosts, otherwise we get a slightly cryptic error message saying Error EIO: Module 'dashboard' has experienced an error and cannot handle commands: No module named routes.
$ sudo apt install -y python-routes
We're all set to enable the dashboard module now. As it's a public-facing page that requires login, we should set up a cert for SSL. For the sake of simplicity, I've just disabled the SSL feature. You should never do this in production, check out the official docs to see how to set up a cert properly. Also, we'll need to create an admin user so we can log in to our dashboard.
$ sudo ceph mgr module enable dashboard $ sudo ceph config set mgr mgr/dashboard/ssl false $ sudo ceph dashboard ac-user-create admin secret administrator
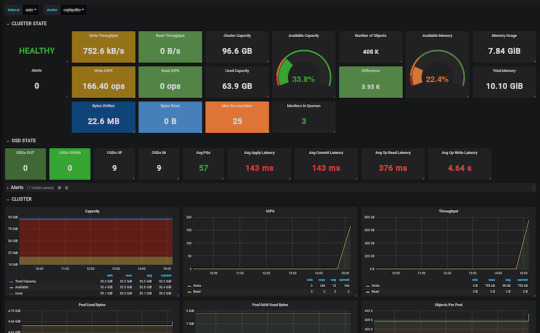
By default, the dashboard is available on the host running the manager on port 8080. After logging in, we get an overview of the cluster status, and under the cluster menu, we get really detailed overviews of each running daemon.

If we try to navigate to the Filesystems or Object Gateway tabs, we get a notification that we haven't configured the required resources to access these features. Our cluster can only be used as a block storage right now. We have to deploy a couple of extra things to extend its usability.
Quick detour: In case you're looking for a company that can help you with Ceph, or DevOps in general, feel free to reach out to us at RisingStack!
Using the Ceph filesystem
Going back to our admin node, running
$ ceph-deploy mds create ip-10-0-0-124 ip-10-0-0-216 ip-10-0-0-104
will create metadata servers, that will be inactive for now, as we haven’t enabled the feature yet. First, we need to create two RADOS pools, one for the actual data and one for the metadata.
$ sudo ceph osd pool create cephfs_data 8 $ sudo ceph osd pool create cephfs_metadata 8
There are a couple of things to consider when creating pools that we won’t cover here. Please consult the documentation for further details.
After creating the required pools, we’re ready to enable the filesystem feature
$ sudo ceph fs new cephfs cephfs_metadata cephfs_data
The MDS daemons will now be able to enter an active state, and we are ready to mount the filesystem. We have two options to do that, via the kernel driver or as FUSE with ceph-fuse.
Before we continue with the mounting, let’s create a user keyring that we can use in both solutions for authorization and authentication as we have cephx enabled. There are multiple restrictions that can be set up when creating a new key specified in the docs. For example:
$ sudo ceph auth get-or-create client.user mon 'allow r' mds 'allow r, allow rw path=/home/cephfs' osd 'allow rw pool=cephfs_data' -o /etc/ceph/ceph.client.user.keyring
will create a new client key with the name user and output it into ceph.client.user.keyring. It will provide write access for the MDS only to the /home/cephfs directory, and the client will only have write access within the cephfs_data pool.
Mounting with the kernel
Now let’s create a dedicated directory and then use the key from the previously generated keyring to mount the filesystem with the kernel.
$ sudo mkdir /mnt/mycephfs $ sudo mount -t ceph 13.53.114.94:6789:/ /mnt/mycephfs -o name=user,secret=AQBxnDFdS5atIxAAV0rL9klnSxwy6EFpR/EFbg==
Attaching with FUSE
Mounting the filesystem with FUSE is not much different either. It requires installing the ceph-fuse package.
$ sudo apt install -y ceph-fuse
Before we run the command we have to retrieve the ceph.conf and ceph.client.user.keyring files from the Ceph host and put the in /etc/ceph. The easiest solution is to use scp.
$ sudo scp [email protected]:/etc/ceph/ceph.conf /etc/ceph/ceph.conf $ sudo scp [email protected]:/etc/ceph/ceph.client.user.keyring /etc/ceph/ceph.keyring
Now we are ready to mount the filesystem.
$ sudo mkdir cephfs $ sudo ceph-fuse -m 13.53.114.94:6789 cephfs
Using the RADOS gateway
To enable the S3 management feature of the cluster, we have to add one final piece, the rados gateway.
$ ceph-deploy rgw create ip-10-0-0-124
For the dashboard, it's required to create a radosgw-admin user with the system flag to enable the Object Storage management interface. We also have to provide the user's access_key and secret_key to the dashboard before we can start using it.
$ sudo radosgw-admin user create --uid=rg_wadmin --display-name=rgw_admin --system $ sudo ceph dashboard set-rgw-api-access-key <access_key> $ sudo ceph dashboard set-rgw-api-secret-key <secret_key>
Using the Ceph Object Storage is really easy as RGW provides an interface identical to S3. You can use your existing S3 requests and code without any modifications, just have to change the connection string, access, and secret keys.
Ceph Storage Monitoring
The dashboard we’ve deployed shows a lot of useful information about our cluster, but monitoring is not its strongest suit. Luckily Ceph comes with a Prometheus module. After enabling it by running:
$ sudo ceph mgr module enable prometheus
A wide variety of metrics will be available on the given host on port 9283 by default. To make use of these exposed data, we’ll have to set up a prometheus instance.
I strongly suggest running the following containers on a separate machine from your Ceph cluster. In case you are just experimenting (like me) and don’t want to use a lot of VMs, make sure you have enough memory and CPU left on your virtual machine before firing up docker, as it can lead to strange behaviour and crashes if it runs out of resources.
There are multiple ways of firing up Prometheus, probably the most convenient is with docker. After installing docker on your machine, create a prometheus.yml file to provide the endpoint where it can access our Ceph metrics.
# /etc/prometheus.yml scrape_configs: - job_name: 'ceph' # metrics_path defaults to '/metrics' # scheme defaults to 'http'. static_configs: - targets: ['13.53.114.94:9283]
Then launch the container itself by running:
$ sudo docker run -p 9090:9090 -v /etc/prometheus.yml:/etc/prometheus/prometheus.yml prom/prometheus
Prometheus will start scraping our data, and it will show up on its dashboard. We can access it on port 9090 on its host machine. Prometheus dashboard is great but does not provide a very eye-pleasing dashboard. That’s the main reason why it’s usually used in pair with Graphana, which provides awesome visualizations for the data provided by Prometheus. It can be launched with docker as well.
$ sudo docker run -d -p 3000:3000 grafana/grafana
Grafana is fantastic when it comes to visualizations, but setting up dashboards can be a daunting task. To make our lives easier, we can load one of the pre-prepared dashboards, for example this one.
Ceph Deployment: Lessons Learned & Next Up
CEPH can be a great alternative to AWS S3 or other object storages when running in the public operating your service in the private cloud is simply not an option. The fact that it provides an S3 compatible interface makes it a lot easier to port other tools that were written with a “cloud first” mentality. It also plays nicely with Prometheus, thus you don’t need to worry about setting up proper monitoring for it, or you can swap it a more simple, more battle-hardened solution such as Nagios.
In this article, we deployed CEPH to bare virtual machines, but you might need to integrate it into your Kubernetes or Docker Swarm cluster. While it is perfectly fine to install it on VMs next to your container orchestration tool, you might want to leverage the services they provide when you deploy your CEPH cluster. If that is your use case, stay tuned for our next post covering CEPH where we’ll take a look at the black magic required to use CEPH on Docker Swarm and Kubernetes.
In the next CEPH tutorial which we'll release next week, we're going to take a look at valid ceph storage alternatives with Docker or with Kubernetes.
PS: Feel free to reach out to us at RisingStack in case you need help with Ceph or Ops in general!
How to Deploy a Ceph Storage to Bare Virtual Machines published first on https://koresolpage.tumblr.com/
0 notes
Text
If you have pfSense or OPNsense firewall / router in your network environment you can convert it to be an NTP server used by local systems to synchronize time. This removes the need for a dedicated server appliance to handle NTP server operations. In my home lab I had a need to synchronize vSphere time with an NTP, and local server is my preferred preference. Manual time correction of a system can lead to severe problems, e.g a backward leap can cause malfunction of critical applications.
NTP (network time protocol) is a protocol used to synchronize system time over the network. A machine in the network can itself act as a time source for other computers or it can obtain time from a server that is a reliable time source. The goal is twofold – maintaining the absolute time and synchronizing the system time of all machines within a network.
In this article we’re going to configure pfSense / OPNsense as NTP server.
Configure pfSense / OPNsense as NTP server
Upon installation of pfSense / OPNsense NTP is available for configuration. Login to the firewall portal and navigate to Services > NTP
In the page that opens we’ll consider configuration of the following options:
Set Listening interface
Under Interface you can select the interface(s) to use for NTP service. By default NTP daemon binds to all interfaces and can serve NTP clients from any local source. If this is not a setting you want you can explicitly select interface or multiple interfaces to bind.
I’ll select three interfaces where NTP service is applied.
Add Time Servers
Here you’ll set a list of servers to query in order to keep the clock of this firewall synchronized. Click + to add additional servers.
We’ll set at least three servers by
Prefer – If checked, this NTP server entry is favored by the NTP daemon over others.
No Select – If checked, this NTP server is not used for time synchronization, but only to display statistics.
NTP Graphs / Logging
Checking “NTP Graphs” will enable RRD graphs for NTP server statistics. Enabling logging means NTP logs are written using syslog and are available under Status > System Logs, on the NTP tab.
Set other options to your liking then save the changes.
Restricting Access to pfSense / OPNsense NTP
You can also configure Access restrictions (ACLs) on the ACL tab. These ACLs are used to control how NTP interacts with clients. These are the default settings.
Custom Access Restrictions
Here you can define the behavior for specific client addresses or subnets. Click + to add a new network definition. This is more practical if limiting NTP daemon to specific interfaces was not done.
Configuring Clients to use pfSense / OPNsense as NTP server
We’ll use a Linux machine to configure NTP server. My system is running Rocky Linux 8. I’ll configure NTP server inside the /etc/chrony.conf file
$ sudo vim /etc/chrony.conf
#pool 2.pool.ntp.org iburst
pool 172.20.30.1 iburst
Where 172.20.30.1 is the IP address of pfSense firewall LAN interface. Start chronyd service.
$ sudo systemctl enable --now chronyd
Created symlink /etc/systemd/system/multi-user.target.wants/chronyd.service → /usr/lib/systemd/system/chronyd.service.
Verify the status:
$ chronyc sources
MS Name/IP address Stratum Poll Reach LastRx Last sample
===============================================================================
^* _gateway 2 6 17 24 +4391ns[+8559ns] +/- 74ms
We can install NTPStat package
sudo dnf -y install ntpstat
Display time synchronization status using ntpstatcommand:
$ ntpstat
synchronised to NTP server (172.20.30.1) at stratum 3
time correct to within 74 ms
polling server every 64 s
Output of timedatectl command:
$ timedatectl
Local time: Wed 2022-10-05 00:55:24 EAT
Universal time: Tue 2022-10-04 21:55:24 UTC
RTC time: Tue 2022-10-04 21:55:24
Time zone: Africa/Nairobi (EAT, +0300)
System clock synchronized: yes
NTP service: active
Conclusion
The NTP service continuously adjusts the system time with reliable time servers in the network. In this article we configured pfSense to enable the management of local reference clocks on other systems. We hope this article was helpful and thank you very much for visiting our website.
0 notes
Text
NTP server là gì? Giới thiệu về Network Time Protocol
NTP là một giao thức internet – được sử dụng để đồng bộ hóa đồng hồ trên mạng máy tính chỉ vỏn vẹn trong vòng vài mini giây UTC (Universal Coordinated Time). Nó cho phép các thiết bị truy vấn và nhận UTC từ một máy chủ, lần lượt, nó sẽ nhận được thời gian chính xác nhất từ đồng hồ nguyên tử.
Nội dung chính
NTP là gì?
Tại sao việc đồng bộ hóa thời gian lại cực kỳ quan trọng?
UTC là gì?
NTP hoạt động như thế nào?
pool.ntp.org: Cluster với hàng ngàn NTP server
Người dùng UNIX/Linux sử dụng NTP pool như thế nào?
NTP là gì?
“Một người đàn ông với một chiếc đồng hồ chắc chắn sẽ biết chính xác thời gian là mấy giờ rồi. Một người đàn ông với hai chiếc đồng hồ bên cạnh thì sẽ không thể nào chắc chắn biết được chính xác thời gian hiện tại là gì cả.“
Khi nói đến việc đồng bộ hóa thời gian cho mọi hoạt động, Network Time Protocol (NTP) sẽ giúp chúng ta giải quyết cả hai vấn đề, cung cấp cho người dùng thời gian chính xác trải dài trên nhiều thiết bị khác nhau.
Giống như bất kỳ giao thức mạng nào khác, NTP là một tập các quy tắc, hoặc quy định cách thức mà các thiết bị trên mạng sẽ truyền, nhận và hiểu được dữ liệu ra sao. Hãy nghĩ về nó như một ngôn ngữ sử dụng chung như tiếng anh chẳng hạn, cho phép các thiết bị giao tiếp, trong trường hợp ở đây là nói về thời gian.
NTP cho phép các thiết bị mạng như đồng hồ, điện thoại và máy tính truy vấn và nhận thời gian từ máy chủ, lần lượt sẽ nhận được thời gian chính xác nhất từ nguồn thời gian xác định như đồng hồ nguyên tử.
Tại sao việc đồng bộ hóa thời gian lại cực kỳ quan trọng?
Khi cuộc sống ngày càng số hóa và tự động hóa, thì thời gian chính xác cũng trở nên cực kỳ quan trọng hơn bao giờ.
Nghành công nghiệp viễn thông dựa trên thời gian chính xác để chuyển đổi một lượng lớn dữ liệu.
Các dịch vụ tài chính cần thời gian chính xác để đánh dấu thời gian các giao dịch để đảm bảo các bản ghi được theo dõi một cách chặt chẽ nhất.
Điều hướng vệ tinh phụ thuộc vào thời gian chính xác, với sự chênh lệch cực kỳ nhỏ chỉ khoảng 1ms cũng có thể gây ra lỗi định vị.
Camera quan sát cũng yêu cầu dấu thời gian chính xác để được chấp nhận làm bằng chứng khi được yêu cầu.
Vô số doanh nghiệp hiện nay đều dựa vào thời gian chính xác để quản lý các quy trình hàng ngày của họ, chẳng hạn như đồng bộ hóa các hệ thống đồng hồ.
Đối với các tổ chức thuộc nhiều quy mô khác nhau, NTP là phương pháp hiệu quả, đáng tin cậy và thân thiện với người dùng nhất để phân tán thời gian chính xác trên toàn mạng, cho phép người dùng tăng năng suất, cải thiện dịch vụ khách hàng, tăng cường bảo mật và hàng loạt các lợi ích khác.
Hơn nữa, bằng việc sử dụng NTP để đồng bộ hóa tới UTC – một tiêu chuẩn thời gian toàn cầu – các tổ chức và chính phủ hoàn toàn có thể điều phối các hoạt động quốc tế một cách dễ dàng hơn.
UTC là gì?
UTC là tiêu chuẩn được cả thế giới đồng ý sử dụng để làm chuẩn thời gian dân sự. Nó là kết quả của một quá trình phát minh, sửa đổi và hợp tác kéo dài hàng thập kỷ, trong quãng thời gian đó – tiêu chuẩn thời gian đã được chuyển đổi từ GMT (Green Mean Time) thành TAI (Atomic Time) rồi mới tới UTC.
Điều quan trọng là, UTC là một tiêu chuẩn về thời gian, nghĩa là nó hoàn tòan giống nhau trên toàn thế giới và không bị ảnh hưởng bởi mức độ chiếu sáng ban ngày tại các khu vực địa lý khác nhau. Trong thực tế, múi giờ được biểu thị theo phần phần bù của UTC (+/- số giờ). UTC được duy trì bằng cách so sáng với hơn 200 đồng hồ nguyên tử khác nhau trên khắp thế giới.
NTP hoạt động như thế nào?
NTP cung cấp UTC cho một tổ chức bằng cách lấy tín hiệu thời gian từ một, hoặc nhiều đồng hồ nguyên tử và phân tán chúng tới các thiết bị kết nối mạng.
Về cơ bản, một mạng NTP bao gồm nhiều các thiết bị được đồng bộ hóa (hay còn goi là client) và một máy chủ NTP – nhận thời gian UTC và cung cấp chúng tới cho client.
Client và server giao tiếp với nhau trong một loạt các request và response.
Client gửi một gói request NTP tới server, đóng dấu thời gian.
Server đóng dấu thời gian khi gói request được nhận.
Server đóng dấu thời gian lại khi nó gửi gói response trở lại client.
Client đóng dấu thời gian khi gói response được nhận.
Qúa trình này chỉ diễn ra trong thời gian tính bằng mini giây, nhưng timestamp cho phép khách hàng tính toán độ trễ và tìm ra sự khác biệt giữa thời gian nội bộ và do server cung cấp, nó sẽ tự điều chỉnh khi cần thiết và duy trì việc đồng bộ hóa.
pool.ntp.org: Cluster với hàng ngàn NTP server
Dự án pool.ntp.org ban đầu được khởi tạo bởi Adrian von Bidder và được quản lý bởi Ask Bjørn Hansen từ năm 2005, là một cluster ảo với hơn 4000 NTP servers. Phần lớn các server này được phân tán khắp thế giới, được sử dụng bởi hàng triệu hệ thống và được đặt tại châu Âu. NTP pool đã tăng trưởng đều đặn dần theo thời gian do cộng đồng của nó rất lớn. Bất kỳ ai có server với địa chỉ IP tĩnh được duy trì kết nối internet đều có thể trở thành một phần trong cluster. Phụ thuộc vào nhu cầu ngày càng tăng, dịch vụ có thể được dùng miễn phí mà không có bất kỳ hạn chế nào.
Người dùng UNIX/Linux sử dụng NTP pool như thế nào?
Để cấu hình hệ thống Linux như một NTP client, bạn cần phải cài đặt ntp daemon (ntpd). Bạn có thể thực hiện bằng cách sử dụng câu lệnh sau:
sudo apt-get install ntp
File cấu hình ntpd được đặt tại /etc/ntp.conf. Mở file này lên và bạn sẽ thấy nó có dạng như sau:
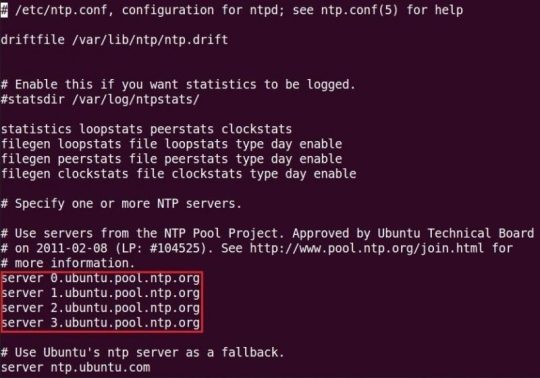
File này chứa danh sách các NTP servers mà sẽ được dùng để đồng bộ hóa thời gian. Mặc định, Ubuntu server sẽ được dùng (ví dụ: 0.ubuntu.pool.ntp.org). Bạn có thể thêm server tại Việt Nam bằng dòng sau:
server 0.vn.pool.ntp.org server 2.asia.pool.ntp.org server 1.asia.pool.ntp.org
Tiếp theo, restart NTP daemon bằng cách sử dụng câu lệnh sau:
sudo service ntp reload
Hãy đảm bảo rằng thời gian hệ thống được thiết lập chính xác. Để kiểm tra trạng thái dịch vụ, chạy câu lệnh dưới đây sau vài phút:
ntpd -pn
The post NTP server là gì? Giới thiệu về Network Time Protocol appeared first on Quang Vũ Blog.
source https://blog.vu-review.com/ntp-server-la-gi.html
0 notes
Photo

watch the clock tick buy then groceries then pool. aggravate wankers wearing outdoors shoes indoors. get pasach from #jaz with a six month delay. despite the late in chocolate and the hat in heathfield get the bumps as a goose. swap nadia for nadine and agree it was for the best. discuss ntp as a way to fall back from bandwidth hungry belian buses instead of getting prepped for the swiss and swedish grillings. all of that becaus eof throttling and bad sdks.
a song: x marks the spot (ghostpoet/nadine)
1 note
·
View note
Text
Flightradar24.com abusing public ntp.org pools
https://forum.flightradar24.com/threads/11042-Excessive-DNS-queries-for-NTP-pool-addresses
Comments
0 notes
Text
Microsoft Azure Stack Hub Operator AZ-600 Exam Questions
AZ-600 Configuring and Operating a Hybrid Cloud with Microsoft Azure Stack Hub is a replacement exam of 70-537 which has been retired on January 31, 2021. PassQuestion new cracked Microsoft Azure Stack Hub Operator AZ-600 Exam Questions which is your best preparation for your first time to attend Microsoft AZ-600 exam. PassQuestion Microsoft Azure Stack Hub Operator AZ-600 Exam Questions are very similar with the real exam, which can ensure you a successful passing Microsoft AZ-600 exam. When you pass the AZ-600 exam you will get the Microsoft Certified Azure Stack Hub Operator Associate certification.
Exam AZ-600: Configuring and Operating a Hybrid Cloud with Microsoft Azure Stack Hub
Candidates for Exam AZ-600 are Azure administrators or Azure Stack Hub operators who provide cloud services to end users or customers from within their own datacenter using Azure Stack Hub.
Candidates for this exam should have significant experience managing and operating Azure Stack Hub environments. They should have a strong understanding of Azure, in addition to some knowledge of virtualization, networking, and identity management. They need to understand how Azure Stack Hub enables DevOps processes and the hybrid development model.
Skills MeasuredProvide Services (30-35%)Manage Azure Stack Hub Marketplace
populate Azure Stack Hub Marketplace in a disconnected environment
create a custom Azure Stack Hub Marketplace item
manage lifecycle for Azure Stack Hub Marketplace items
Offer an App Services resource provider
plan an App Services resource provider deployment
deploy an App Services resource provider
update an App Services resource provider
scale roles based on capacity requirements
rotate App Services secrets and certificates
manage worker tiers
back up App Services
Offer an Event Hubs resource provider
plan an Event Hubs resource provider deployment
deploy an Event Hubs resource provider
update an Event Hubs resource provider
rotate Event Hubs secrets and certificates
Offer services
create and manage quotas
create and manage plans
create and manage offers
create and manage user subscriptions
change user subscription owner
Manage usage and billing
set up usage data reporting
view and retrieve usage data by using the Usage API
manage usage and billing in multi-tenant and CSP scenarios
Implement Data Center Integration (15-20%)Prepare for Azure Stack Hub deployment
recommend a name resolution strategy
recommend a public and internal IP strategy
recommend a data center firewall integration strategy
recommend an identity provider
validate identity provider integration
configure the Time Server (NTP)
Manage infrastructure certificates for Azure Stack Hub
recommend a certificate strategy
validate the certificates
run secret rotation PowerShell cmdlet for external certificates
Manage Azure Stack Hub registration
recommend a registration model
register in a connected environment
register in a disconnected environment
re-register
Manage Identity and Access (10-15%)Manage multi-tenancy
configure Azure Stack Hub home directory
register the guest tenant directory with Azure Stack Hub
disable multi-tenancy
update guest tenant directory
Manage access
identify an appropriate method for access (service principal, users, groups)
provision a service principal for Azure Stack Hub
recommend a permission model
configure access in Azure Stack Hub
create a custom role
Manage Infrastructure (30-35%)Manage system health
recommend a monitoring strategy
monitor system health by using the REST API
includes resource providers such as Event Hubs
monitor system health by using Syslog Server
manage field replacement or repair
configure automatic diagnostic log collection
collect diagnostic logs on demand by using Powershell
configure Syslog forwarding for Azure Stack Hub infrastructure
Plan and configure business continuity and disaster recovery
recommend a business continuity disaster recovery (BCDR) strategy
recommend a strategy for infrastructure backups
configure storage target for infrastructure backups
configure certificates for infrastructure backups
configure frequency and retention policy for infrastructure backups
Manage capacity
plan for system capacity
manage partitioned GPUs
add nodes
manage storage capacity
add IP pools
Update infrastructure
update Azure Stack Hub
download and import update packages manually
update Azure AD Home Directory
Manage Azure Stack Hub by using privileged endpoints
connect to a privileged endpoint
configure the cloud admin user role
unlock a support session
close the session on the privileged endpoint
stop and start Azure Stack Hub
perform system diagnostics by using Test-AzureStack
0 notes
Last Seen Blogs


idrawprettyboys
This Was Once An Art Blog

anjalsharma
Promo Code May 2023

iloveubestfriend
es war einmal

im5-forever
IM5 Forever