#ntpdate
Explore tagged Tumblr posts
Visit Tumblr Blog
Explore Tumblr blogs with no restrictions, modern design and the best experience.
Last Seen Tumblr Blogs


Fun Fact
There are dozens of funny blogs to kill time on Tumblr.
Text
Linux Network Services and Configuration
Linux Learning, Linux network services and configuration are essential aspects of managing a Linux system, whether it's a server or a desktop. Here's an overview of key concepts and tasks:
Network Configuration:
Configure network interfaces, typically found in files like /etc/network/interfaces (Debian-based) or /etc/sysconfig/network-scripts/ifcfg-ethX (Red Hat-based).
Use tools like ifconfig and ip to view and manage network interfaces.
IP Addressing:
Assign static IP addresses or configure DHCP to obtain dynamic ones.
Manage IP routes using route or ip route.
DNS Configuration:
Set up DNS servers in /etc/resolv.conf.
Configure custom DNS resolutions in /etc/hosts.
Firewall Configuration:
Use firewall management tools like iptables (legacy) or firewalld (modern) to control incoming and outgoing network traffic.
Define rules for allowing or denying specific ports and services.
SSH Configuration:
Securely access remote Linux systems via SSH (Secure Shell).
Configure SSH server settings in /etc/ssh/sshd_config.
Network Time Protocol (NTP):
Synchronize system time with NTP servers using the ntpdate or chronyd service.
Network File Sharing:
Set up file sharing using protocols like NFS (Network File System) or Samba for Windows file sharing.
Control access to shared resources through permissions and user authentication.
Network Services:
Install and configure network services like DNS (BIND), web servers (Apache or Nginx), email servers (Postfix or Exim), and more.
Manage these services using tools like systemctl or service-specific configuration files.
Proxy Servers and VPNs:
Configure proxy servers (e.g., Squid) and VPNs (e.g., OpenVPN) to control internet access and establish secure connections.
Monitoring and Troubleshooting:
Monitor network activity with tools like netstat, iftop, and network analyzers like Wireshark.
Troubleshoot connectivity issues using ping, traceroute, and examining system logs in /var/log.
Security Considerations:
Implement security best practices, such as disabling unnecessary services, using strong authentication, and regularly updating the system.
A solid understanding of Linux network services and configuration is crucial for maintaining reliable and secure network connectivity, whether it's for personal use, corporate IT, or hosting web services.
0 notes
Text
針對 Ubuntu 16.04 + PPPoE 時,OpenNTPD 的 -s 不會在啟動時直接校正的問題 workaround...
針對 Ubuntu 16.04 + PPPoE 時,OpenNTPD 的 -s 不會在啟動時直接校正的問題 workaround…
發現機器時間跟標準時間差了 40 秒左右,結果有些服務因為會看雙方時間,就不讓我跑… XDDD 找問題找了半天,發現開機後 ntpdate 會回報找不到伺服器,看起來是網路根本就還沒通就跑起來了: Jan 25 13:10:30 home ntpdate[757]: name server cannot be used: Temporary failure in name resolution (-3) Jan 25 13:10:30 home ntpdate[1171]: name server cannot be used: Temporary failure in name resolution (-3) Jan 25 13:10:30 home ntpdate[1347]: name server cannot be used: Temporary failure in name…
View On WordPress
0 notes
Quote
chronydがslew調整中に強制的にstep調整させたい場合はchronyc -a makestepを実行する(ntpdateがインストールされているならntpdate でも良いだろう)。
新しいNTPクライアント&サーバ、chrony - Qiita https://qiita.com/yunano/items/7883cf295f91f4ef716b
0 notes
Text
ntp
ntp slowly adjusts time, ntpdate-debian -u does this immediately. -u (use custom port) allows it to run when ntp is running.
0 notes
Text
Reinstall macos catalina

#Reinstall macos catalina full version
#Reinstall macos catalina update
#Reinstall macos catalina full version
Solution 3: Install the Full Version of Mojave/Catalina Installer
After that, quit Terminal and click Reinstall macOS to run the Catalina/Mojave installer again.
If the date and time are wrong, you should enter the current time with the following command line: date mmddhhssyy.
Hopefully, your problem will be solved.Īlso if the "ntpdate -u " command-line failed to fix the recovery server could not be contacted on your Mac, you can try the following command.
#Reinstall macos catalina update
Once the process is completed, you can try reinstalling the macOS update again. Step 5The above step might take some time. Step 4Then type the following command line: " ntpdate -u " and press enter. Step 3You will see the option "Terminal", double click on it. Step 2Next, you are required to choose the option "Utilities" on the top menu bar. This will open the macOS Utilities window. You can update these settings by utilizing these steps If your Mac's date and times are not synced to the Apple recovery server. Solution 2: Sync your Mac' Date and Time to Apple Recovery Server The faster the internet, the quicker you can access the Apple recovery server. If your Mac is using a Wi-Fi, you can access the Wi-Fi option from the top right corner of your screen to check it is connected to a stable Wi-Fi network. If your Mac is on a wired internet connection, you can re-plug the Ethernet cable to check. How to Fix the Recovery Server Could Not Be Contacted? Solution 1: Check Network Connection on Macįirstly, you need to check if your Mac is connected to a proper internet connection. Whenever there is a macOS update recently released, the Apple server usually experiences a busy time. The Apple server is overloaded with too many users trying to installing the new update at the same time.The date and time on your Mac are not properly synced with the Apple recovery server.A stable network connection is required for your Mac to successfully contact the Apple server. Your Mac is disconnected from the network.
0 notes
Text
RadWeather Crack License Code & Keygen PC/Windows
RadWeather Crack License Code & Keygen PC/Windows
RadWeather Crack+ Download RADWEATHER is a weather application. It allows you to view the weather conditions at any predefined location. It’s FREE, so you can view the weather at any predefined location. It’s easy to use, no registration is required. Keywords : NTP, Network Time Protocol, Network Time Service, NTP servers, NTP client, NTP client socket, openntpd, ntpd, ntpdate,…

View On WordPress
0 notes
Text
Synchronize the time on Ubuntu from a NTP Server
Synchronize the time on Ubuntu from a NTP Server
To synchronize the time on a Ubuntu computer, with the time from a NTP server, you can simply run the following command: sudo ntpdate 0.pool.ntp.org Replace “0.pool.ntp.org” with your NTP time server of choice. Example output: $ sudo ntpdate 0.pool.ntp.org 1 Jul 00:50:12 ntpdate[31843]: adjust time server 12.34.56.78 offset -0.001309 sec $ Your time will now be synchronized to the time from…
View On WordPress
0 notes
Text
Dosdude Macos Big Sur

That's all very well, but Apple's most recent version of macOS - Big Sur - won't run on any Mac older than 2013, and in some cases 2014. Which may well mean that your Mac can't officially be. Verified for macOS Catalina 10.15.2, the Legacy Video patch package enables full acceleration for Intel HD 3000 and older NVIDIA Cards in macOS Catalina. This is a Fix for Graphics Intel HD 3000 and fix Old NVIDIA Graphics for macOS Catalina 10.15. Support Graphics Intel HD 3000. Support: GeForce 5xx, 4xx, 2xx, 8600M (GT)/8800M (GT), 9400M.
Jul 05, 2021 • Filed to: Solve Mac Problems • Proven solutions
There are many issues that people may encounter while installing the macOS update. Siddha kunjika stotram pdf. One of the common problems is that the recovery server could not be contacted. When trying to install macOS High Sierra, Mojave, or Catalina, there is an error message popping up: The recovery server could not be contacted.
If your macOS update is also stopped by this error, you will find this post helpful. From this post, you will learn why the recovery server could not be contacted and how to fix it.
What Does It Mean When the Recovery Server Could Not Be Contacted?
When installing a macOS update with a macOS installer, your Mac needs to reach the Apple server. When it says 'the recovery server could not be contacted, it means that your Mac failed to build a connection with the Apple server. Etap 16 full mega espanol latino.
Dosdude Macos Big Sur Patcher
There are multiple culprits behind this issue.
Your Mac is disconnected from the network. A stable network connection is required for your Mac to successfully contact the Apple server.
The date and time on your Mac are not properly synced with the Apple recovery server.
The Apple server is overloaded with too many users trying to installing the new update at the same time. Whenever there is a macOS update recently released, the Apple server usually experiences a busy time.
Solution 1: Check Network Connection on Mac
Firstly, you need to check if your Mac is connected to a proper internet connection. If your Mac is on a wired internet connection, you can re-plug the Ethernet cable to check.
If your Mac is using a Wi-Fi, you can access the Wi-Fi option from the top right corner of your screen to check it is connected to a stable Wi-Fi network.
The faster the internet, the quicker you can access the Apple recovery server.
Solution 2: Sync your Mac' Date and Time to Apple Recovery Server
If your Mac's date and times are not synced to the Apple recovery server. You can update these settings by utilizing these steps;
Step 1: First of all, close the error. This will open the macOS Utilities window. Step 2: Next, you are required to choose the option 'Utilities' on the top menu bar. Step 3: You will see the option 'Terminal', double click on it. Step 4: Then type the following command line: 'ntpdate -u time.apple.com' and press enter. Step 5: The above step might take some time. Once the process is completed, you can try reinstalling the macOS update again. Hopefully, your problem will be solved.
Also if the 'ntpdate -u time.apple.com' command-line failed to fix the recovery server could not be contacted on your Mac, you can try the following command.
Open Terminal.
Enter date. And hit Enter key. This will show the date of your Mac.
If the date and time are wrong, you should enter the current time with the following command line: date mmddhhssyy. For example, if it is July 20, 09:00 am, 2020, you should enter: date 0720090020 (July 20, 09:00 am, 2020,).
After that, quit Terminal and click Reinstall macOS to run the Catalina/Mojave installer again.
Solution 3: Install the Full Version of Mojave/Catalina Installer
Some users found that when they try to install a macOS update with the update installer from App Store, it just showed the error message 'the recovery server could not be contacted. However, after downloading a full version of the macOS installer, the installer can run without any error. Here is how you can get a full version of the macOS Catalina update.
Step 1Run Terminal.
Step 2For example, to download the full version of the macOS Catalina 10.15.3 Installer Application, enter the command line as below.
softwareupdate --fetch-full-installer --full-installer-version 10.15.3
Step 3The installer will be downloaded in the Application folder.
Step 4Run the installer to install the macOS without the recovery server error.
Solution 4: Erase Your Disk and Reinstall macOS
In case you have utilized all the above methods and have not received any good results. Only then, you can erase your hard disk and reinstall macOS. You can enter the recovery mode to erase the hard disk. After that, reinstalling macOS can solve your problem. Follow the steps properly erase your hard disk and reinstall macOS;
Step 1Firstly, you need to restart your Mac.
Step 2When the Mac is starting, you need to press and hold CDM + R keys to enter the recovery mode.
Step 3In the Recovery mode, click Disk Utility and erase the Macintosh HD volume. This will delete all your data on your Mac so make sure you have backed up your important data.
Step 4After erasing your disk, you can reinstall macOS. This time, you won't see the recovery server could not be contacted error.
If you have important data missing after the macOS update, you can get it back by using Recoverit Data Recovery software. The program is designed to recover photos, documents, videos, emails, etc. from the Mac computer after the data are deleted mistakenly or lost because of macOS reinstallation, factory reset, or virus.
Lost data can be recovered in 3 simple steps by Recoverit: select the drive of lost data, scan the drive, recover the files.
Download the free trial version of Recoverit Data Recovery to scan and find your needed files.
Conclusion
Many users complained about the recovery server could not be contacted error. Every error is solvable, only if you apply proper solutions. And to tackle the incidents that may happen in the macOS update, you need to back up your data before implementing any of the steps. In case your data is lost, you can recover it using Recoverit Data Recovery.
What's Wrong with Mac
Dosdude1 Macos Big Sur Torrent
Recover Your Mac
Fix Your Mac
Delete Your Mac
Learn Mac Hacks
macOS Big Sur elevates the most advanced desktop operating system in the world to a new level of power and beauty. Experience Mac to the fullest with a refined new design. Enjoy the biggest Safari update ever. Discover new features for Maps and Messages. And get even more transparency around your privacy.
Check compatibility
macOS Big Sur is compatible with the following computers. If your Mac isn't compatible, you might be able to install an old version of macOS instead.
MacBook introduced in 2015 or later MacBook Air introduced in 2013 or later MacBook Pro introduced in late 2013 or later Mac mini introduced in 2014 or later iMac introduced in 2014 or later iMac Pro Mac Pro introduced in 2013 or later View the complete list of compatible computers. Cs 1.6 demo player.
If upgrading from macOS Sierra or later, your Mac needs 35.5GB of available storage to upgrade. If upgrading from an earlier release, your Mac needs up to 44.5GB of available storage. To upgrade from OS X Mountain Lion, first upgrade to OS X El Capitan, then upgrade to macOS Big Sur.
Download macOS Big Sur
If you're using macOS Mojave or later, get macOS Big Sur via Software Update: Choose Apple menu > System Preferences, then click Software Update.
Or use this link to open the macOS Big Sur page on the App Store: Get macOS Big Sur. Then click the Get button or iCloud download icon.
Install macOS Big Sur
After downloading, the installer opens automatically. Click Continue and follow the onscreen instructions.
Please allow installation to complete without putting your Mac to sleep or closing its lid. During installation, it might restart and show a progress bar or blank screen several times. You might find it easiest to begin installation in the evening so that it can complete overnight, if needed.
Stay up to date
Dosdude1 Macos Big Sur Full
After installing macOS Big Sur, you will be notified when updates to macOS Big Sur are available. To check for updates, choose Apple menu > System Preferences, then click Software Update.
0 notes
Quote
ところで、皆さんへお願いですが、出来るだけ負荷を分散したいのです。 今や、clock.nc.fukuoka-u.ac.jpへのアクセスは毎秒900件ほどになります。 引き合いに出して申し訳ないのだけれども、東大のntp.nc.u-tokyo.ac.jpでも毎秒3,4件程度のトラフィックです。 サーバーとの時刻差を求めるのに(往路の伝送時間-復路の伝送時間)/2を観測誤差として補正している原理からして、遠方になるほど観測誤差が大きくなる傾向にあります。 候補となるNTPサーバのそれぞれについてtracerouteなどで遅延時間を求めます。遅延時間が安定していて、時間が短いのが望ましいサーバです。ついでに、tracerouteの途中にあるルータを ntpq -p などでチェックしてみます。 Ciscoのルータなどはntpをサポートしているので、案外多くのサーバを発見できます。 念のため ntpqや,ntpdate -q などでまともなサーバかどうかも確認しておきます。 YahooBBなどのISPの��ーザは出来るだけISP内で提供しているNTPサーバを参照するようにお願いします。
福岡大学NTPサーバの混雑解消にご協力を | スラド
24 notes
·
View notes
Text
Como instalar Hestia - El mejor fork de VestaCP

Como instalar Hestia, el mejor fork de VestaCP en Ubuntu o Debian. Hestia Control Panel, más conocido como HestiaCP, es un panel de control web de código abierto, simple y rápido, muy bueno para alojar tus sitios web, tu servidor de correo y muchos más desde una interfaz muy simple e intuitiva. Este panel de control es un fork de VestaCP, pero con muchas mejoras que deberías tener en cuenta a la hora de elegir entre uno y otro como su selector de php predeterminado, o el php-fpm. Visualmente nos ofrece una experiencia de usuario excelente, no es tan tosco como VestaCP. Evidentemente también tiene sus contras, no soporta CentOS. Las distribuciones soportadas son las siguientes (Ubuntu 20.04 está en desarrollo): Debian 8 Debian 9 Debian 10 Ubuntu 16.04 LTS Ubuntu 18.04 LTS De manera predeterminada el servidor se compone de... NGINX Web / Proxy Server Apache Web Server (as backend) PHP-FPM Application Server Bind DNS Server Exim Mail Server Dovecot POP3/IMAP Server MariaDB Database Server Vsftpd FTP Server Firewall (Iptables) Fail2Ban Access Monitor En este artículo (como ejemplo), vemos como instalar Hestia en un servidor Ubuntu 18.04.
Como instalar Hestia CP
Primero actualizamos el servidor e instalamos las herramientas necesarias. sudo apt update sudo apt install wget ca-certificates Descargamos el script de instalación en la carpeta /tmp. cd /tmp wget https://raw.githubusercontent.com/hestiacp/hestiacp/release/install/hst-install.sh Ahora lanzamos el script, nos aparece una pantalla similar a la siguiente. Pulsa "Y" y enter para continuar.
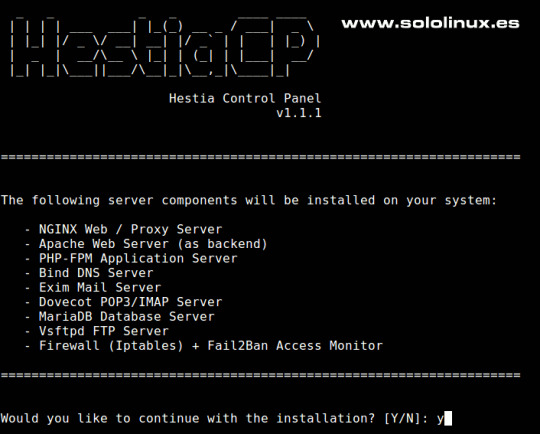
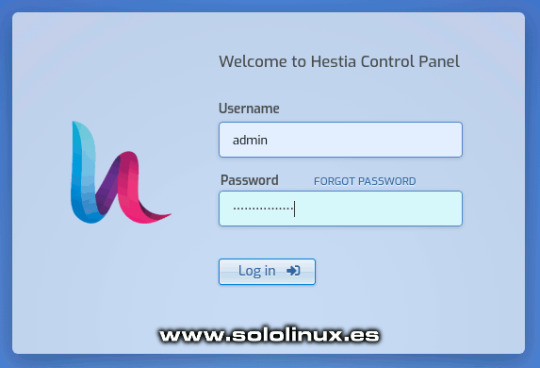
Instalar Hestia CP Es posible que te pida permiso para borrar paquetes innecesarios, responde "Y". Welcome to the Hestia Control Panel installer! Please wait a moment while we update your system's repositories and install any necessary dependencies required to proceed with the installation… (*) Installing ntpdate… !!! !!! !!! !!! !!! !!! !!! !!! !!! !!! !!! !!! !!! !!! !!! !!! !!! WARNING: The following packages are already installed ufw* It is highly recommended that you remove them before proceeding. !!! !!! !!! !!! !!! !!! !!! !!! !!! !!! !!! !!! !!! !!! !!! !!! !!! Would you like to remove the conflicting packages? y Hestia está a punto de instalarse en el sistema, pero antes te solicitara confirmación, tu mail y el hostname o ip del servidor. En pocos minutos tendrás listo tu servidor Hestia. Es importante que guardes los datos que nos aporta Hestia, la url de administración, el usuario y la contraseña generada automáticamente. Una vez guardes los datos, responde "Y" a la pregunta de si quieres reiniciar el servidor. ==================================================================== Congratulations! You have successfully installed Hestia Control Panel on your server. Ready to get started? Log in using the following credentials: Admin URL: https://192.128.11.102:8083 Username: admin Password: qic30T557UZ8lCKS Thank you for choosing Hestia Control Panel to power your full stack web server, we hope that you enjoy using it as much as we do! Please feel free to contact us at any time if you have any questions, or if you encounter any bugs or problems: E-mail: [email protected] Web: https://www.hestiacp.com/ Forum: https://forum.hestiacp.com/ GitHub: https://www.github.com/hestiacp/hestiacp Note: Automatic updates are enabled by default. If you would like to disable them, please log in and navigate to Server > Updates to turn them off. Help support the Hestia Contol Panel project by donating via PayPal: https://www.hestiacp.com/donate -- Sincerely yours, The Hestia Control Panel development team Made with love & pride by the open-source community around the world. (!) IMPORTANT: You must logout or restart the server before continuing. Do you want to reboot now? y
Acceder a Hestia CP
Introduce en tu navegador la url que anotamos anteriormente. https://192.128.11.102:8083 Introduce el usuario admin y el password para iniciar sesión en Hestia.
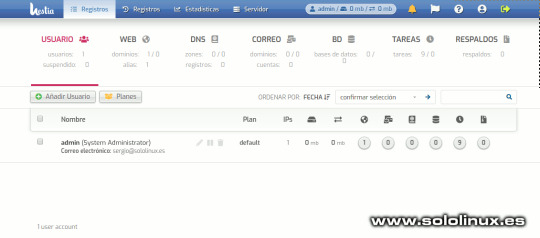
Iniciar sesión en HestiaCP Ya puedes comenzar a trabajar con HestiaCP.
Ejemplo de panel de control Hestia Canales de Telegram: Canal SoloLinux – Canal SoloWordpress Espero que este articulo te sea de utilidad, puedes ayudarnos a mantener el servidor con una donación (paypal), o también colaborar con el simple gesto de compartir nuestros artículos en tu sitio web, blog, foro o redes sociales. Read the full article
#forkdeVestaCP#HestiaControlPanel#hestiacp#instalarHestia#paneldecontrolweb#selectordephp#servidorUbuntu18.04#vestacp
0 notes
Text
Installing Kali Linux on a Raspberry Pi

If you haven’t used, Kali Linux is an excellent tool for penetration testing. It’s widely used by Information Security experts and can help determine vulnerabilities in your environment. You do need to know how to use all the tools that come pre-installed in order for you to test the environment, but I will definitely post about some of these at another time. Today, I am just looking at installing Kali Linux Distro on a Raspberry Pi.
I know what some of you are thinking, why would you install this on a Raspberry Pi, why not install it on a desktop or laptop? I’m glad you asked. Having Kali Linux on a Raspberry Pi can make it ultra portable, a very lightweight operating system, a great tool in the bag of tricks, and very interchangeable. Having the Raspberry Pi is so convenient, you can take it to any location and plug in and start using. Because Kali Linux distro is smaller and doesn’t include all the bells and whistles that normal operating systems use, it runs incredibly well on a Raspberry Pi, and it’s very widely supported. It is also nice to have as an extra tool in the bag when testing environments. finally its interchangeable, as in you can switch the Micro SD card with some other install of Linux or a different OS (Raspbian or Ubuntu or even IoT Windows).
Before we begin, I want to recommend that you do not do this on a work network, as most organizations that have any type of information security network, will automatically become suspicious of you downloading Kali Linux. Remember, technically, this operating system is used for hacking, finding vulnerabilities, and exploiting weaknesses in an organizational environment. You will want to do this at home or in a allowed classroom setting (in other words: get permission if you are not sure). Disclaimer: I am not responsible for what anyone does with the information I am providing, nor do I take responsibility if your organization takes action upon you for using, installing, executing on your work, home or any other environment. Please use responsibly.
First, you want to start out you want to download the .img file from the kali linux arm image from https://www.offensive-security.com/kali-linux-arm-images/
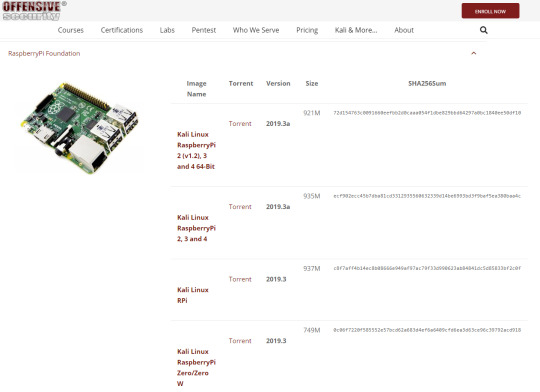
Depending on what version of raspberry pi you have, will dictate which Kali Linux distro to install. It will start out downloading .torrent file. This will take moments to download. While that is going I would recommend downloading bittorrent or some other torrent downloader to get the image file.
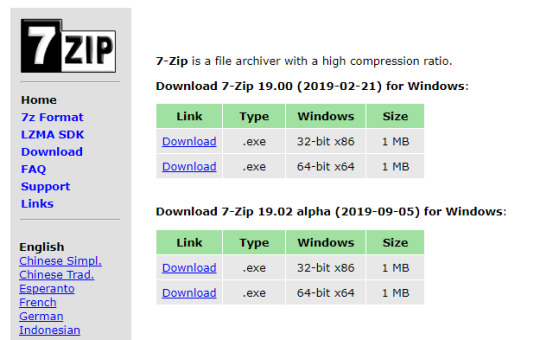
Once the download is finished it will still not be an image (.img) file just yet. It will be a .xyz file. You will want to download 7-zip (https://www.7-zip.org/) to convert the .xyz file to a .img file.
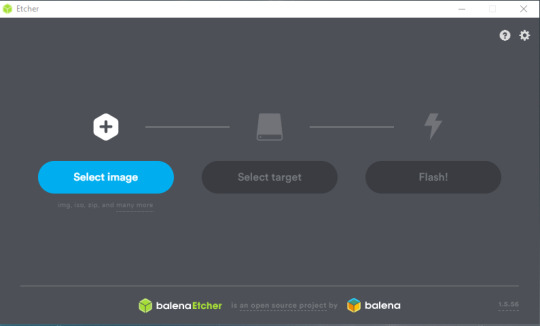
Once you convert this file, then you are ready to install on the Micro SD card. Make sure you have belenaEtcher (https://www.balena.io/etcher/) on your PC and plug in your Micro SD card. Verify that the correct image is selected and that the correct disk is selected.
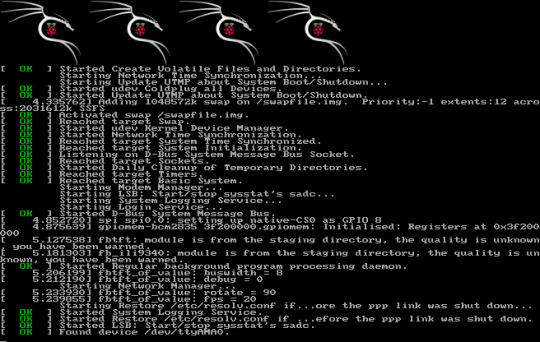
Then select Flash! It will immediately start reimaging the Micro SD card with Kali Linux. Once this is completed, you will remove the Micro SD card and plug it into your Raspberry Pi. You should see the following screen:
If you don’t see that, you may need to restart from the beginning, and re-try to install on the SD card.
Once inside Kali Linux it will look like this:

I hope you enjoy learning about Kali Linux as I have. It really can be a great tool for any Information Security Engineer looking to find vulnerabilities and learn about Digital Forensics.
Fixing Kali Linux Raspberry Pi clock issue:
Install ntpdate: sudo apt-get install ntpdate
know your local ntp server: ntpdate 0.north-america.pool.ntp.org
create a folder in root and call it scripts
type: cd scripts type: nano start.sh
add the following command: sudo ntpdate 0.north-america.pool.ntp.org
ctrl c to exit, select y for yes, and press enter to keep name as is.
type: cd ~
cd /etc/
nano crontab
on the last line type: @reboot /root/scripts/start.sh
(Whatever you do DON’T add a script for trying to automate apt-get updates/upgrades/autoremove. It will cause issues in Raspberry pi and will prevent you from logging in remotely or through ssh. If you try this you will have to log in manually and remove the script for this... you have been warned.)
ctrl c to exit, select y for yes, and press enter to keep name as is.
verify that it works by reboot now command.
Display Settings and Ethernet port issue:
When I installed on Raspberry Pi 4 I noticed there was an issue with my network Ethernet cable connection. It was receiving IPv6 but not IPv4. I checked the Ethernet Network and it showed device not managed. I ran the following:
sudo nano /etc/NetworkManager/NetworkManager.conf
and changed the False to true as shown below:

Note: Usually, you will want to run sudo service network-manager restart and reboot the Raspberry Pi but since we are configuring the display, we will wait until the end.
Lastly, to fix the screen, I had to go into the following:
sudo nano /boot/config.txt
Then removed the # from in front of the
disable_overscan=1;
While I did all that I ran:
sudo apt-get update
and
sudo apt-get upgrade
Waiting for updates... Taking sooo long on slow network...

Finally rebooting with:
sudo service network-manager restart
reboot
Testing now and, The screen and the Ethernet Port is working properly.
#Kali Linux#Raspberry Pi#Installation#Installation guide#Linux#information security#information technology#IT#cybersecurity#Cyber Security
0 notes
Text
The Recovery Server Could Not Be Contacted High Sierra Install

The Recovery Server Could Not Be Contacted High Sierra Installed
Install Macos High Sierra Recovery Server Could Not Be Contacted
The Recovery Server Could Not Be Contacted High Sierra Installer
The Recovery Server Could Not Be Contacted High Sierra Installation
The notice/message only appeared when logging on through my laptop, but I suppose you could login through a safari browser on an phone or ipad– just not the app. Hope this helps. The problem I have was when during upgrading from Capitan to Sierra I did not have enough space on my HD, tried to uninstall Sierra but failed and after restarting I cannot log in anymore plus with a white screen and every time after typing in log in password, a dos message appeared on the left of the screen saying. One Size Does Not Fit All. We understand every project is unique and requires a solution that fits the ground conditions, the work being done, the budget and the schedule. Matrax will evaluate your project and recommend the most effective and efficient option. Call us today to discuss your project. The chip could work in conjunction with other HomeKit-enabled devices. Twitter Facebook Reddit Mail. Apple pulls more iMac models ahead of possible M1 refresh.
Dec 21, 2020 • Filed to: Solve Mac Problems • Proven solutions
There are many issues that people may encounter while installing the macOS update. One of the common problems is that the recovery server could not be contacted. When trying to install macOS High Sierra, Mojave, or Catalina, there is an error message popping up: The recovery server could not be contacted.
If your macOS update is also stopped by this error, you will find this post helpful. From this post, you will learn why the recovery server could not be contacted and how to fix it.
What Does It Mean When the Recovery Server Could Not Be Contacted?
When installing a macOS update with a macOS installer, your Mac needs to reach the Apple server. When it says 'the recovery server could not be contacted, it means that your Mac failed to build a connection with the Apple server.
There are multiple culprits behind this issue.
Your Mac is disconnected from the network. A stable network connection is required for your Mac to successfully contact the Apple server.
The date and time on your Mac are not properly synced with the Apple recovery server.
The Apple server is overloaded with too many users trying to installing the new update at the same time. Whenever there is a macOS update recently released, the Apple server usually experiences a busy time.
Solution 1: Check Network Connection on Mac
Firstly, you need to check if your Mac is connected to a proper internet connection. If your Mac is on a wired internet connection, you can re-plug the Ethernet cable to check.
If your Mac is using a Wi-Fi, you can access the Wi-Fi option from the top right corner of your screen to check it is connected to a stable Wi-Fi network.
The faster the internet, the quicker you can access the Apple recovery server.
Solution 2: Sync your Mac' Date and Time to Apple Recovery Server
If your Mac's date and times are not synced to the Apple recovery server. You can update these settings by utilizing these steps;
Step 1: First of all, close the error. This will open the macOS Utilities window. Step 2: Next, you are required to choose the option 'Utilities' on the top menu bar. Step 3: You will see the option 'Terminal', double click on it. Step 4: Then type the following command line: 'ntpdate -u time.apple.com' and press enter. Step 5: The above step might take some time. Once the process is completed, you can try reinstalling the macOS update again. Hopefully, your problem will be solved.
Also if the 'ntpdate -u time.apple.com' command-line failed to fix the recovery server could not be contacted on your Mac, you can try the following command.
Open Terminal.
Enter date. And hit Enter key. This will show the date of your Mac.
If the date and time are wrong, you should enter the current time with the following command line: date mmddhhssyy. For example, if it is July 20, 09:00 am, 2020, you should enter: date 0720090020 (July 20, 09:00 am, 2020,).
After that, quit Terminal and click Reinstall macOS to run the Catalina/Mojave installer again.
Solution 3: Install the Full Version of Mojave/Catalina Installer
Some users found that when they try to install a macOS update with the update installer from App Store, it just showed the error message 'the recovery server could not be contacted. However, after downloading a full version of the macOS installer, the installer can run without any error. Here is how you can get a full version of the macOS Catalina update.
Step 1Run Terminal.
Step 2For example, to download the full version of the macOS Catalina 10.15.3 Installer Application, enter the command line as below.
softwareupdate --fetch-full-installer --full-installer-version 10.15.3
Step 3The installer will be downloaded in the Application folder.
Step 4Run the installer to install the macOS without the recovery server error.
The Recovery Server Could Not Be Contacted High Sierra Installed
Solution 4: Erase Your Disk and Reinstall macOS
In case you have utilized all the above methods and have not received any good results. Only then, you can erase your hard disk and reinstall macOS. You can enter the recovery mode to erase the hard disk. After that, reinstalling macOS can solve your problem. Follow the steps properly erase your hard disk and reinstall macOS;
Step 1Firstly, you need to restart your Mac.
Step 2When the Mac is starting, you need to press and hold CDM + R keys to enter the recovery mode. Deleting dmg files download.

Step 3In the Recovery mode, click Disk Utility and erase the Macintosh HD volume. This will delete all your data on your Mac so make sure you have backed up your important data.
Step 4After erasing your disk, you can reinstall macOS. This time, you won't see the recovery server could not be contacted error.
If you have important data missing after the macOS update, you can get it back by using Recoverit Data Recovery software. The program is designed to recover photos, documents, videos, emails, etc. from the Mac computer after the data are deleted mistakenly or lost because of macOS reinstallation, factory reset, or virus.

Lost data can be recovered in 3 simple steps by Recoverit: select the drive of lost data, scan the drive, recover the files.
Download the free trial version of Recoverit Data Recovery to scan and find your needed files.
Conclusion

Many users complained about the recovery server could not be contacted error. Every error is solvable, only if you apply proper solutions. Ipad apps on mac. And to tackle the incidents that may happen in the macOS update, you need to back up your data before implementing any of the steps. In case your data is lost, you can recover it using Recoverit Data Recovery.
Install Macos High Sierra Recovery Server Could Not Be Contacted

The Recovery Server Could Not Be Contacted High Sierra Installer
What's Wrong with Mac
The Recovery Server Could Not Be Contacted High Sierra Installation
Recover Your Mac
Fix Your Mac
Delete Your Mac
Learn Mac Hacks
0 notes
Text
Instalação de pacotes essenciais
Pacotes que visam o apropriado funcionamento do sistema, análise de rede e manutenção do sistema.
# apt-get install ethtool less mc ntpdate tcpdump
Remoção de traduções desnecessárias
Para remover traduções desnecessárias de manuais e documentos instalados com o Debian e seus pacotes.
# apt-get install localepurge
Durante a instalação do pacote surgirá uma janela em que iremos manter selecionados apenas pt, pt_BR e pt_BR.UTF-8.
Executamos manualmente o comando localepurge pela primeira vez.
# localepurge
Em posteriores instalações de pacotes por apt-get o mesmo será executado de forma automática.
Adição das seções contrib e non-free no arquivo /etc/apt/sources.list
As seções contrib e non-free contêm softwares que por algum motivo não são 100% livres de acordo com a Debian Free Software Guidelines (DFSG).
# nano /etc/apt/sources.list
Adiciono as seções contrib e non-free nas linhas iniciadas por deb, a modo de exemplo:
deb http://deb.debian.org/debian buster main contrib non-free deb http://deb.debian.org/debian-security/ buster/updates main contrib non-free deb http://deb.debian.org/debian buster-updates main contrib non-free
Definição de aliases
O alias permite redefinir um comando ou criar um nome que servirá de atalho para um comando com ou sem argumentos extras.
Para isso editamos o arquivo /etc/bash.bash.bashrc e inserimos as seguintes linhas no final:
alias ls='ls --color=auto' alias df='df -h' alias cp='cp -i' alias mv='mv -i' alias rm='rm -i'
Para que as alterações entrem em vigor imediatamente utilizamos o comando:
# source /etc/bash.bash.bashrc
Estabelecimento de um MTA
Necessitamos de um servidor de e-mail que irá aceptar apenas e-mails criados pela própria máquina notificando o usuário root sobre problemas encontrados.
# apt-get install sendmail sendmail-bin
Para que o usuário root possa ler estes e-mails instalamos o pacote bsd-mailx:
# apt-get install bsd-mailx
Para ler os e-mails:
# mail
Atualização do Sistema
Para correção de bugs e falhas de segurança.
# apt-get update # apt-get upgrade
0 notes
Text
笔记本升级笔记
最近把2011年购买的MacBook Pro升级了一下,随手做个笔记。
简要
这款MBP 17'' Early 2011曾于前几年因显卡问题被官方召回一次,免费更换了主板(目前为止这条已经不再适用)。
这次升级更换的内容为:
内存:两条金士顿 4G DDR3 1333MHz(原厂4G)更换为两条 8G DDR3L 1600MHz
硬盘:西部数据蓝盘1T(原厂750G)更换为三星 860 EVO 1T SSD
按官方文档,最大只支持 8G DDR3 1333,其实可以扩展到 16G,并且 1.35V 低电压/1600 也没有发现问题。
硬盘两块都保留,把光驱位置腾出——SSD 放主硬盘位,光驱位置放旧盘。
SSD
SSD 使用寿命其实已经不用担心,即便是消费级也可以满足严苛的使用场景。关于开启 TRIM 与否,答案是肯定的,同时现在已经无需使用 TRIM Enabler 来打开支持,在终端下执行 sudo trimforce enable,重启完成以后即可。当然,和 Linux 使用的 Queued TRIM 不同,macOS 使用 Sequential TRIM。最近的 860 EVO 系列已经解决了这个问题("...and the improved queued trim enhances Linux compatibility")。另外 3bit MLC 和 TLC 似乎是同一个概念。
安装 High Sierra 系统
App Store 下载的安装器:原有系统为 Yosemite,直接下载只有 22MB 的简化版,只有更高版本(比如:Sierra、High Sierra)下载得到的才是完整的安装包。下载完毕使用内置工具制作安装U盘。
如果在硬件更换过程中拔过电池线,系统时间可能回退,导致安装器提示“已经损坏”,��以用命令行 ntpdate 来校准时间再次尝试安装。
第一次格式化 SSD 选择默认 “Mac OS 扩展,日志”,不要直接用 APFS,安装过程中会自动转换。
题外话
macOS 语言选择英文,在通过 Adobe Creative Cloud 安装 After Effects CC 2018 时,即便选择偏好为简体中文,所得 AE 也无法以中文界面启动(修改 application.xml 的 installedLanguages 无效),显示 “After Effects can’t continue: Licensing Error”。如何保持系统语言不变,同时使用简体中文版 AE?方法如下:
defaults write com.adobe.AfterEffects AppleLanguages '("zh_CN")'
如何知道一个应用的数据包标识符(Bundle Identifier)是什么?
mdls -name kMDItemCFBundleIdentifier /Applications/名称.app
最直接地,也可以使用命令行参数指定语言来打开应用程序:
/Applications/应用名称.app/Contents/MacOS/应用 -AppleLanguages '(语言)'
上面这种方式只能起一次性作用。
在ssh的时候碰见一个问题:
-bash: warning: setlocale: LC_CTYPE: cannot change locale (UTF-8): No such file or directory
则可以通过修改 /etc/ssh/ssh_config,注释掉SendEnv LANG LC_*来解决。
0 notes
Link
ntptrace and ntpdate commands for debugging ntp https://t.co/ZWi2kRBtRj #ifh In this article, I’ll explain how we may use ntpdate and ntpt…
0 notes