#oauth tutorial
Explore tagged Tumblr posts
Visit Tumblr Blog
Explore Tumblr blogs with no restrictions, modern design and the best experience.
Last Seen Tumblr Blogs


Fun Fact
The Tumblr app for Google Glass was released on May 16, 2013.
Text
Securing Your Digital Identity: Get Your Google API and OAuth Credentials Now

As of today, it is so easy to get the Google API and Client credentials with a few clicks via Google Developer Console. Before that, it is essential to know what API and Client credentials are. In this blog, we discuss the API and client credentials and when to use them. Are you searching for the Step by Step instructions to get the API key and OAuth Credentials? Then keep on reading….
Both API keys and OAuth are the different types of authentication handled by Cloud Endpoints.
These two differ most in the following ways:
The application or website performing the API call is identified by the API key.
An app or website’s user, or the person using it, is identified by an authentication token.
API keys provide project authorization
To decide which scheme is most appropriate, it’s important to understand what API keys and authentication can provide.
API keys provide
Project identification — Identify the application or the project that’s making a call to this API
Project authorization — Check whether the calling application has been granted access to call the API and has enabled the API in their project
API keys aren’t as secure as authentication tokens, but they identify the application or project that’s calling an API. They are generated on the project making the call, and you can restrict their use to an environment such as an IP address range, or an Android or iOS app.
By identifying the calling project, you can use API keys to associate usage information with that project. API keys allow the Extensible Service Proxy (ESP) to reject calls from projects that haven’t been granted access or enabled in the API.
Contrarily, authentication strategies often have two objectives:
Verify the identity of the calling user securely using user authentication.
Check the user's authorization to see if they have the right to submit this request.
A safe method of identifying the user who is calling is provided by authentication mechanisms.
In order to confirm that it has permission to call an API, endpoints also examine the authentication token.
The decision to authorize a request is made by the API server based on that authentication.
The calling project is identified by the API key, but the calling user is not.
An API key, for example, can identify the application that is making an API call if you have developed an application that is doing so.
Protection of API keys
In general, API keys is not seen to be safe because clients frequently have access to them. This will make it simple for someone to steal an API key. Unless the project owner revokes or regenerates the key, it can be used indefinitely once it has been stolen because it has no expiration date. There are better methods for authorization, even though the limitations you can place on an API key minimize this.
API Keys: When to Use?
An API may require API keys for part or all of its methods.
This makes sense to do if:
You should prevent traffic from anonymous sources.
In the event that the application developer wants to collaborate with the API producer to troubleshoot a problem or demonstrate the usage of their application, API keys identify an application's traffic for the API producer.
You wish to limit the number of API calls that are made.
You want to analyze API traffic to find usage trends.
APIs and services allow you to view application consumption.
You want to use the API key to filter logs.
API keys: When not to use?
Individual user identification – API keys are used to identify projects, not people
On secured authorization
Finding the authors of the project
Step-by-step instructions on how to get Google API and OAuth credentials using the Google developer console.
Step 1
Browse Google developer console

Step 2
Select your project or create a new project by clicking on the New project button

Step 3
Provide your project name, organization, and location, and click on create.
And That’s it. You have created a New Project.

Step 4
Navigate to the Enabled API and services at the Left sidebar and click on Credentials
Step 5
Move on to create Credentials

Here to get your API key click on the API key. Instantly you will get your API key for your Project.

To get your OAuth Credentials
Navigate to the OAuth Client ID on the Create Credentials drop-down menu.
Step 6
Here you need to create an application. A client ID is used to identify a single app to Google’s OAuth servers. If your app runs on multiple platforms, each will need its own client ID.
Step 7
Select the appropriate application type from the drop-down
The name of the client will be auto-generated. This is only to recognize the client console and does not show to the end users.
Step 8
Enter your URL for the Authorized JavaScript origins by clicking on Add URL
Provide your Authorized redirect URLs
Finally click on Create

Step 9
You will get an OAuth Client Id and Client Secret instantly.

Epilogue
Getting Google API and OAuth credentials is an important step in developing applications that interact with Google services. It allows developers to access data from Google APIs and services in a secure and reliable way. With the correct setup, developers can create powerful applications that can be used by millions of users. In summary, getting Google API and OAuth credentials is essential for any developer wishing to build web applications that interact with Google services.
#google drive#google cloud#google#blog post#Google api#oauth#oauth tutorial#oauthsecurity#google security#web developers#software development#developers
0 notes
Note
Maybe I’m just stupid but I downloaded Python, I downloaded the whole tumblr backup thing & extracted the files but when I opened the folder it wasn’t a system it was just a lot of other folders with like reblog on it? I tried to follow the instructions on the site but wtf does “pip-tumblr-download” mean? And then I gotta make a tumblr “app”? Sorry for bugging you w this
no worries! i've hit the same exact learning curve for this tool LMAO, so while my explanations may be more based on my own understanding of how function A leads to action B rather than real knowledge of how these things Work, I'll help where i can!
as far as i understand, pip is simply a way to install scripts through python rather than through manually downloading and installing something. it's done through the command line, so when it says "pip install tumblr-backup", that means to copy-paste that command into a command line window, press enter, and watch as python installs it directly from github. you shouldn't need to keep the file you downloaded; that's for manual installs.
HOWEVER! if you want to do things like saving audio/video, exif tagging, saving notes, filtering, or all of the above, you can look in the section about "optional dependencies" on the github. it lists the different pip install commands you can use for each of those, or an option to install all of them at once!
by doing it using pip, you don't have to manually tell the command line "hey, go to this folder where this script is. now run this script using these options. some of these require another script, and those are located in this other place." instead, it just goes "oh you're asking for the tumblr-backup script? i know where that is! i'll run it for you using the options you've requested! oh you're asking for this option that requires a separate script? i know where that is too!"
as for the app and oauth key, you can follow this tutorial in a doc posted on this post a while back! the actual contents of the application don't matter much; you just need the oauth consumer key provided once you've finished filling out the app information. you'll then go back to your command line and copy-paste in "tumblr-backup --set-api-key API_KEY" where API_KEY is that oauth key you got from the app page.
then you're ready to start backing up! your command line will be "tumblr-backup [options] blog-name", where blog-name is the name of the blog like it says on the tin, and the [options] are the ones listed on the github.
for example, the command i use for this blog is "tumblr-backup -i --tag-index --save-video --save-audio --skip-dns-check --no-reblog nocturne-of-illusions"... "-i" is incremental backups, the whole "i have 100 new posts, just add those to the old backup" function. "--tag-index" creates an index page with all of your tags, for easy sorting! "--save-video", "--save-audio", and "--no-reblog" are what they say they are.
⚠️ (possibly) important! there are two current main issues w backups, but the one that affected me (and therefore i know how to get around) is a dns issue. for any of multiple reasons, your backup might suddenly stall. it might not give a reason, or it might say your internet disconnected. if this happens, try adding "--skip-dns-check" to your options; if the dns check is your issue, this should theoretically solve it.
if you DO have an issue with a first backup, whether it's an error or it stalls, try closing the command window, reopening it, copy-pasting your backup command, and adding "--continue" to your list of options. it'll pick up where it left off. if it gives you any messages, follow the instructions; "--continue" doesn't work well with some commands, like "-i", so you'll want to just remove the offending option until that first backup is done. then you can remove "--continue" and add the other one back on!
there are many cool options to choose from (that i'm gonna go back through now that i have a better idea of what i'm doing ksjdkfjn), so be sure to go through to see if any of them seem useful to you!
#asks#lesbiandiegohargreeves#046txt#hope this is worded well ;; if you need clarification let me know!
2 notes
·
View notes
Text
Master the Code: How Java, Python, and Web Development Tutoring on MentorForHire Can Supercharge Your Tech Career
In a world powered by software, coding is no longer just a niche skill—it's a core competency. Whether you're looking to break into tech, ace a coding bootcamp, land your first junior developer job, or scale your expertise as a senior engineer, personalized mentoring makes a dramatic difference. That’s where MentorForHire.com comes in—a platform that connects you with industry professionals for hands-on Java Tutoring, Python Tutoring, and Web Development Tutoring.
Here’s how specialized tutoring in these key areas can accelerate your learning journey and help you achieve your software development goals.
Why One-on-One Coding Tutoring Beats Generic Online Courses
Self-paced tutorials and free courses are great for dipping your toes in—but when you're serious about growth, they often fall short. Why?
You don’t know what you don’t know.
Debugging can become a time-wasting nightmare.
Without accountability, progress slows down.
You’re not getting job-ready feedback from a real developer.
MentorForHire solves all of these problems by connecting you with real mentors who’ve worked in tech and know what it takes to succeed. Whether you're working on a class assignment, preparing for interviews, or building a full-stack project, you'll get tailored support.
Java Tutoring: Build Enterprise-Grade Skills from the Ground Up
Java isn’t just for beginners—it powers billions of devices, from Android apps to massive backend systems used in finance, healthcare, and e-commerce. If you're serious about software engineering, Java Tutoring offers a rock-solid foundation.
With a mentor, you can:
Understand core concepts like classes, inheritance, interfaces, and exception handling.
Master data structures and algorithms for whiteboard interviews.
Build scalable applications using Java frameworks like Spring and Hibernate.
Get help with unit testing, debugging, and version control.
Prepare for certifications like Oracle Certified Associate (OCA) and Oracle Certified Professional (OCP).
A mentor will not only explain the "how" of Java development but also the "why"—turning you from a coder into a software architect-in-training.
Python Tutoring: The Most Versatile Language in Tech
Python has become the go-to language for beginners and professionals alike because of its simplicity and power. Whether you want to get into automation, data science, machine learning, or back-end web development, Python Tutoring gives you the skills you need to thrive.
On MentorForHire.com, Python mentors can help you:
Write clean, efficient, and maintainable code.
Understand essential concepts like functions, loops, list comprehensions, and file I/O.
Use libraries like NumPy, pandas, Matplotlib, and scikit-learn for data analysis.
Build web apps with Flask or Django from scratch.
Automate tasks using Python scripts or integrate with APIs.
Whether you're solving LeetCode challenges or working on a startup prototype, personalized tutoring can take your Python skills to the next level.
Web Development Tutoring: Learn to Build the Web, Not Just Consume It
Today’s digital economy is built on the web—and web developers are in high demand across every industry. But with so many tools and frameworks, it’s easy to get overwhelmed. That’s where Web Development Tutoring comes in.
From front-end to back-end to full-stack, tutors on MentorForHire.com can guide you step-by-step:
Front-End Skills:
HTML, CSS, and JavaScript fundamentals
Responsive design using Flexbox and Grid
JavaScript frameworks like React, Angular, or Vue
Version control with Git and GitHub
Back-End Skills:
Node.js with Express or Java with Spring Boot
REST APIs and database integration (MySQL, MongoDB)
Authentication systems (OAuth, JWT)
DevOps basics: deploying apps with Heroku or AWS
You’ll work on actual projects like to-do lists, dashboards, or e-commerce stores—and get expert feedback every step of the way.
How MentorForHire Makes Learning Easier and Smarter
MentorForHire.com isn't just about hiring a tutor—it's about mentorship. The platform matches you with experienced developers who offer:
Flexible scheduling – Learn when it suits your life.
Customized roadmaps – No more cookie-cutter syllabi.
Real-world projects – Build apps that solve actual problems.
Code reviews & interview prep – Gain confidence before job applications.
Ongoing support – Whether it’s bugs, burnout, or breakthroughs.
This isn’t a YouTube tutorial or a lecture—it’s a partnership. Whether you're 16 or 60, learning to code becomes faster and more meaningful when you have someone guiding you in real time.
Who Is This For?
Students who want to stand out in their CS classes
Career changers entering tech from another field
Bootcamp grads who need more 1:1 help
Junior developers looking to climb the ladder
Entrepreneurs building their own software products
If you’ve got a goal and a laptop, MentorForHire.com has a mentor ready to help you reach it.
Final Thoughts: The Future Belongs to Lifelong Learners
The best investment you can make is in yourself. Whether you're learning Java, diving into Python, or building full-stack web apps, tutoring turns passive learning into active progress.
MentorForHire.com helps unlock your potential by giving you access to mentors who’ve been where you are—and know how to help you level up.
So why wait? Start your personalized tutoring journey today. Visit MentorForHire and connect with a mentor who can help you write your success story in code.
0 notes
Text
React Native OAuth 2.0: Secure Authentication Guide
1. Introduction In the world of mobile app development, securing user authentication is of paramount importance. React Native, a powerful framework for building cross-platform applications, often requires integrating secure authentication methods. OAuth 2.0, an industry-standard protocol, provides a robust solution for securing user sessions. This tutorial will guide you through implementing…
0 notes
Text
How to Use APIs in Your Web Development Projects
API integration for web development might sound intimidating at first, but it’s actually one of the coolest tools in your developer toolkit. You’ve probably heard the term “API” tossed around like candy in dev circles and wondered what all the buzz is about. Well, let’s clear the fog and walk through how you can start using APIs in your web projects — without frying your brain or your browser.

APIs are like digital bridges that help your site talk to other services, fetch data, and offer cool features you didn’t build from scratch. With a little practice and the right guide (hello, Coding Brushup!), API integration becomes an essential tool in your developer toolbox.
🧩What Are APIs and Why Should You Use Them?
An API (Application Programming Interface) is basically a set of rules that lets one program interact with another. When you use Google Maps on your site or pull data from weather apps, you’re using an API integration for web development.
You don’t need to build everything yourself when you can connect your site to reliable services through REST APIs. They handle the heavy lifting while you focus on creating an awesome user experience.
Using REST APIs in web projects helps you save time, reduce bugs, and offer dynamic content without hosting it all yourself.
🔐 Understanding API Authentication Methods
Before you start slinging data around, you’ll need to understand how to access APIs safely. That’s where API authentication methods come in.
Most APIs require some kind of security key, like an API token, OAuth 2.0, or a basic access token. Think of these like keys to a private club — you can’t get in without showing your credentials.
Some APIs let you start without a login (great for testing), but for most real-world usage, authentication is a must. And don’t worry — it’s not as scary as it sounds. Sites like Coding Brushup’s API tutorials make it super beginner-friendly.
📦 JSON and API Data Handling: The Magic Format
When you request data from an API, it often comes back in a format called JSON (JavaScript Object Notation). It’s lightweight, human-readable, and plays well with JavaScript — your new best friend in frontend API calls.
You’ll use JSON and API data handling skills to take that data and display it on your website in a user-friendly way. Want to show user comments from a third-party service? Fetch the data with JavaScript and populate your webpage with it. Magic.
Don’t forget — you can handle API data on the backend, too. Whether you’re using Node.js or Python, backend API calls let your server talk to other services securely and efficiently.
🚀 Putting It All Together: Frontend and Backend API Calls
Once you understand the basics, it’s time to use frontend and backend API calls together for seamless, full-stack magic. Your frontend might display live stock prices while your backend stores user preferences. Together, they create a rich, responsive experience for users.
Want to really stand out? Add APIs like Twitter feeds, weather forecasts, or payment gateways to your projects. API integration helps your web apps stay useful, modern, and engaging.
📘 Learn Faster with Coding Brushup
If you’re feeling excited but a little overwhelmed, don’t worry — you’re not alone. That’s exactly why Coding Brushup exists. Their API tutorials are designed to walk you through the basics step by step, with real code examples, video guides, and even mini-projects.
Whether you’re building your first app or adding advanced API features to a client site, Coding Brushup makes it feel doable — and even fun!
🏁 Final Thoughts
So there you have it. APIs aren’t scary monsters. They’re your backstage passes to powerful, data-rich, and interactive websites. Once you get the hang of API integration for web development, you’ll never want to go back to static pages again.
You just need to understand how APIs work, handle JSON data, use authentication methods, and write a few frontend or backend API calls. Piece of cake, right?
And hey, don’t forget — Coding Brushup has your back every step of the way. Happy coding!
0 notes
Text
The Automation Myth: Why "Learn APIs" Is Bad Advice in the AI Era
You've heard it everywhere: "Master APIs to succeed in automation." It's the standard advice parroted by every AI expert and tech influencer. But after years in the trenches, I'm calling BS on this oversimplified approach.
Here's the uncomfortable truth: you can't "learn APIs" in any meaningful, universal way. Each platform implements them differently—sometimes radically so. Some companies build APIs with clear documentation and developer experience in mind (Instantly AI and Apify deserve recognition here), creating intuitive interfaces that feel natural to work with.
Then there are the others. The YouTube API, for example, forces you through labyrinthine documentation just to accomplish what should be basic tasks. What should take minutes stretches into hours or even days of troubleshooting and deciphering poorly explained parameters.
An ancient wisdom applies perfectly to AI automation: "There is no book, or teacher, to give you the answer." This isn't just philosophical—it's the practical reality of working with modern APIs and automation tools.
The theoretical knowledge you're stockpiling? Largely worthless until applied. Reading about RESTful principles or OAuth authentication doesn't translate to real-world implementation skills. Each platform has its quirks, limitations, and undocumented features that only reveal themselves when you're knee-deep in actual projects.
The real path forward isn't endless studying or tutorial hell. It's hands-on implementation:
Test the actual API directly
Act on what you discover through testing
Automate based on real results, not theoretical frameworks
While others are still completing courses on "API fundamentals," the true automation specialists are building, failing, learning, and succeeding in the real world.
Test. Act. Automate. Everything else is just noise.
1 note
·
View note
Text
Chatter is an enterprise social network and collaboration environment. Force.com exposes various useful information from Chatter such as users, organizations, groups, feed-items through APIs. Using this information, we can build a proof-of-concept dashboard which will show a user’s or organization’s feed in real-time. Real-time dashboard can provide an accurate understanding of what is happening in an organization. This tutorial expects that you are an intermediate-level web application developer and have a few weeks of experience with Rails and related ecology. This means you should be familiar with building blocks of a Rails app and terms like OAuth, REST, Callback, bundler, gem etc. Here is an outline of how things will work: User can login to our Rails4 powered dashboard (a connected app) using ‘Sign in with Salesforce’ (Oauth 2). We use OAuth to get a secret token for each user from salesforce.com. We can use the token to call APIs. Our goal is to receive a callback to server whenever anything is posted on Chatter. Unfortunately, Force.com doesn’t support a PushTopic for FeedItem, so we will use a work-around to trigger a callback whenever a FeedItem is created. First, we will create a trigger on FeedItem, this trigger will create a custom object named ProxyFeedItem, which will copy necessary fields like body, time, parent_id etc. from the FeedItem. Using a faye client embedded in restforce client, we will listen to a PushTopic for ProxyFeedItem. ProxyFeedItem will be created whenever there’s an update to any FeedItem. This will send a callback to the server with data of the ProxyFeedItem. We will need to forward this incoming data to user’s browser. We will set up another faye channel and just transfer the data we received in step 4. First, go to https://developer.salesforce.com/signup and register for your free Developer Edition (DE) account. For the purposes of this example, I recommend sign up for a Developer Edition even if you already have an account. This ensures you get a clean environment with the latest features enabled. After sign up, make a connected app by following the directions found in this article from the salesforce.com developer portal. Use http://localhost:3000 as Start URL, enable Oauth settings, select appropriate permissions and use http://localhost:3000/oauth/salesforce/callback as callback URL. When you create your app, you will get the app’s Consumer Key and Consumer Secret. We have set up everything that we need from Force.com for this section and we can move on to our web application code. Create a new Rails4 application with rails new chatter-dashboard This will go ahead and create a Rails4 project with the name ‘chatter-dashboard’ and install the dependencies mentioned in Gemfile. Actually, we need a few more dependencies. Change Gemfile to the following: source 'https://rubygems.org' # Bundle edge Rails instead: gem 'rails', github: 'rails/rails' gem 'rails', '4.1.0' # Use sqlite3 as the database for Active Record gem 'sqlite3' # Use SCSS for stylesheets gem 'sass-rails', '~> 4.0.3' # Use Uglifier as compressor for JavaScript assets gem 'uglifier', '>= 1.3.0' # Use CoffeeScript for .js.coffee assets and views gem 'coffee-rails', '~> 4.0.0' # See https://github.com/sstephenson/execjs#readme for more supported runtimes # gem 'therubyracer', platforms: :ruby # Use jquery as the JavaScript library gem 'jquery-rails' # Turbolinks makes following links in your web application faster. Read more: https://github.com/rails/turbolinks gem 'turbolinks' # Build JSON APIs with ease. Read more: https://github.com/rails/jbuilder gem 'jbuilder', '~> 2.0' # bundle exec rake doc:rails generates the API under doc/api. gem 'sdoc', '~> 0.4.0', group: :doc # Spring speeds up development by keeping your application running in the background. Read more: https://github.com/rails/spring gem 'spring', group: :development # Use ActiveModel has_secure_password # gem 'bcrypt', '~> 3.1.7'
# Use unicorn as the app server # gem 'unicorn' # Use Capistrano for deployment # gem 'capistrano-rails', group: :development # Use debugger # gem 'debugger', group: [:development, :test] # Using customized version to fix issue #103 in restforce gem 'restforce', :git => '[email protected]:malavbhavsar/restforce.git', :branch => 'patch-1' # Use omniauth for handlling OAuth with Salesforce gem 'omniauth' # Add omniauth policy for saleforce gem 'omniauth-salesforce' # Print pretty gem 'awesome_print' # Development only gems group :development do gem 'better_errors' gem 'binding_of_caller' end # Add faye for pub/sub, using customized version to avoid problems from # issue 263 and other related issue gem 'faye', :git => '[email protected]:faye/faye.git' # private_pub to easily do pub-sub with browser, using customized version # to make sure that we get faye.js which is not packed when using faye gem # from master gem 'private_pub', :git => '[email protected]:malavbhavsar/private_pub.git' # Puma for our main server concurrently gem 'puma' # Thin for running faye server gem 'thin' Run bundle install, which will install additional dependencies. To start our server, run rails s puma; this will run rails with a puma server and you should be able to see a welcome page on http://localhost:3000. The next step is to set up Oauth with salesforce.com. Add Consumer Key and Consumer Secret to chatter-dashboard/config/secrets.yml development: secret_key_base: salesforce_key: salesforce_secret: test: secret_key_base: # Do not keep production secrets in the repository, # instead read values from the environment. production: secret_key_base: Create a chatter-dashboard/config/initializers/omniauth.rb file and add the following code into it: Rails.application.config.middleware.use OmniAuth::Builder do provider :salesforce, Rails.application.secrets.salesforce_key, Rails.application.secrets.salesforce_secret , :scope => "id api refresh_token" end This configures our omniauth and omniauth-salesforce gems. It has basically added a middleware in our Rails application, which will handle Oauth for us. You can read the documentation for these gems to dig deeper. Now, run the following commands to set up two controllers and relevant routes; one for the login page and the other for the feed page: rails g controller Login login rails g controller Feed feed Now, in the chatter-dashboard/config/routes.rb file, add the following routes: get '/auth/:provider/callback', to: 'sessions#create' root to: 'login#login' This will basically add a callback route to which the user will be redirected to by Force.com after the Oauth procedure has finished successfully. We have also added a root route, so that whenever we go to http://localhost:3000, it will trigger the login#login route. Currently, it’s just an empty page. Let’s add a ‘Sign in with Salesforce’ link to it. Add the following line to chatter-dashboard/app/views/login/login.html.erb: If you hit refresh and click on ‘Sign in with Salesforce’, you will be taken to the login page of salesforce.com if you are not signed in. After signing in and giving the app permissions, you will be redirected to http://localhost:3000/auth/salesforce/callback, but we haven’t implemented matching sessions#create yet. Let’s do that by doing rails g controller Sessions create. For the implementing create method, use the following code: class SessionsController < ApplicationController def create set_client ap @client redirect_to '/feed/feed' end protected def auth_hash_credentials request.env['omniauth.auth'][:credentials] end def set_client @client = Restforce.new :oauth_token => auth_hash_credentials[:token], :refresh_token => auth_hash_credentials[:refresh_token], :instance_url => auth_hash_credentials[:instance_url], :client_id => Rails.application.secrets.salesforce_key, :client_secret => Rails.application.secrets.salesforce_secret end end Here, we parse the callback request coming from Force.
com and get oauth_token, refresh_token etc and create a restforce client. If you see something like the following in your console, then you have completed the first section of this tutorial: In the first section of the tutorial, we set up Oauth with salesforce.com and created a restforce client object. In this section, we want Force.com to notify us of any changes in the FeedItem object of Chatter. Unfortunately, Salesforce streaming API doesn’t support FeedItem yet, so we will have to do a work-around. Create a custom object named ProxyFeedItem. Add necessary fields like Body, Type, CommentCount, LikeCount, CreatedById from FeedItem Now, let’s setup a trigger on FeedItem. You can do this by going to ‘Setup’ on your Force.com and search for ‘FeedItem Trigger’. Use the following code: trigger FeedItemListen on FeedItem (after insert, after update) for(FeedItem f : Trigger.new) ProxyFeedItem__c p = new ProxyFeedItem__c(Body__c = f.Body, CommentCount__c = f.CommentCount, LikeCount__c = f.LikeCount, Type__c = f.Type, User__c = f.CreatedById); insert p; Whenever this is triggered, we get the data from Trigger.new iterate over it and create our custom object ProxyFeedItem for each FeedItem in the data. Now, we have to create a PushTopic, which will listen to any changes in all ProxyFeedItem (and in turn FeedItem) We will subscribe to this PushTopic and send the changes to browser. Following the streaming example given in the restforce docs, we can create a file at chatter-dashboard/lib/chatter_listen.rb like the following: module ChatterListenEM def self.start(client) pushtopics = client.query('select Name from PushTopic').map(&:Name) unless pushtopics.include?('AllProxyFeedItem') client.create! 'PushTopic', ApiVersion: '30.0', Name: 'AllProxyFeedItem', Description: 'All ProxyFeedItem', NotifyForOperations: 'All', NotifyForFields: 'All', Query: "SELECT Id, Body__c, CommentCount__c, LikeCount__c, Type__c, User__c from ProxyFeedItem__c" end Thread.abort_on_exception = true Thread.new EM.run do client.subscribe 'AllProxyFeedItem' do die_gracefully_on_signal end def self.die_gracefully_on_signal Signal.trap("INT") EM.stop Signal.trap("TERM") EM.stop end end Whenever ChatterListenEM.start is called, it creates a PushTopic named ChatterFeedItem, if it doesn’t already exist. Next, it creates a new thread and subscribes to that PushTopic in it. Whenever we receive a message, we pass it a Faye channel e.g. messages/new using private_pub. private_pub is a ruby gem, which makes it easier to setup a pub-sub type mechanism between a web server and browser. You can learn more about it in this screencast on private pub Before going to private_pub and related stuff, let’s call our ChatterListenEM.start method from SessionController. There is just one minor change: require 'chatter_listen' class SessionsController < ApplicationController def create set_client ChatterListenEM.start(@client) redirect_to '/feed/feed' end protected def auth_hash_credentials request.env['omniauth.auth'][:credentials] end def set_client @client = Restforce.new :oauth_token => auth_hash_credentials[:token], :refresh_token => auth_hash_credentials[:refresh_token], :instance_url => auth_hash_credentials[:instance_url], :client_id => Rails.application.secrets.salesforce_key, :client_secret => Rails.application.secrets.salesforce_secret end end Now, let’s set up private_pub. Run rails g private_pub:install on console. It will create and place necessary files like private_pub.ru, private_pub.yml and faye.js, private_pub.js in asset-pipeline. To make rails aware of faye.js and private_pub.js files, add them to the chatter-dashboard/app/assets/javascripts/application.js file. // This is a manifest file that'll be compiled into application.js, which will include all the files // listed below. // // Any JavaScript/Coffee file within this directory, lib/assets/javascripts, vendor/assets/javascripts, // or vendor/assets/javascripts of plugins, if any, can be referenced here using a relative path.
// // It's not advisable to add code directly here, but if you do, it'll appear at the bottom of the // compiled file. // // Read Sprockets README (https://github.com/sstephenson/sprockets#sprockets-directives) for details // about supported directives. // //= require jquery //= require jquery_ujs //= require faye //= require private_pub //= require turbolinks //= require_tree . Start our Faye server in a different console. This will handle pub-sub for us. rackup private_pub.ru -s thin -E production All that is left to do now is to subscribe to the channel /messages/new and print our data. We can take easy examples from the private_pub documentation and add the following to our chatter-dashboard/app/views/feed/feed.html.erb: and the following to our chatter-dashboard/assets/javascripts/feed.js: PrivatePub.subscribe("/messages/new", function(data, channel) console.log(data.chat_message); ); Now, go to http://localhost:3000, ‘Login with Salesforce’ and you will end up on the feed page. Open the developer console and in another tab open the Chatter tab of salesforce.com. If you do a text post, you will be able to see a real time update in the console. Here’s a proof of concept, showing the dashboard in action: We just implemented a system like below: Instead of printing data in console, you can easily feed it into any frontend framework like angular, ember etc. and create a great real-time dashboard. We also have left out few things in this proof-of-concept prototype e.g. we have to secure our faye channels. One way of doing this is creating a different channel for each user. e.g. /messages/new/user_id and subscribe the user only to that particular channel. Additionally, use SSL. If you are handling any real user data, it is important that you secure the data being transferred. Force.com makes sure to secure the data and only provides developers with data over SSL using OAuth. It is however the responsibility of the developer to ensure secure communication in any RESTful app. For more information, you should refer to Security Resources. You can find the code for this project at github chatter-dashboard Resources For a comprehensive set or resources, check out: About The Author: This article is created by Malav Bhavsar. Please feel free to ask questions in the comment section, open issues in the github repository or contact me at [email protected]
0 notes
Text
Using Postman to Call Dynamics 365 Data Entities

Overview
An extensive collection of APIs and data entities provided by Dynamics 365 (D365) make it easier to integrate and communicate with external systems. use postman to call d365 data entities—a well-liked tool for API testing—to communicate with these data types is one efficient way to do it. This tutorial will show you how to call D365 data entities using Postman, giving you a useful method for managing, querying, and updating your data.
Configuring D365 Data Entities with Postman
Set up Postman:
Install Postman by downloading it from the official website.
Start Postman and create a new workspace so you may test the D365 API.
Obtain the Authentication and API Endpoint Information:
To find the base URL for your D365 environment, log in and go to the developer portal or API documentation. entities in data.
Obtain authentication information if you are using Azure Active Directory for OAuth 2.0 authentication, such as client ID, client secret, and tenant ID.
Set Up Postman to Authenticate:
Create a new request in Postman and choose the right method (GET, POST, PUT, or DELETE) according to the action you want to take.
Navigate to the "Authorization" tab to configure authentication. Select "OAuth 2.0" as the type, then fill it in with your client secret, client ID, and other necessary information.
Making D365 Data Entity API Calls
Data Entities for Queries:
Choose the "GET" method and input the desired data entity's endpoint URL to retrieve the desired data. You might use https://.crm.dynamics.com/api/data/v9.0/accounts, for instance, to retrieve all accounts.
Include any query parameters. Or filters to focus your search. For example, you might add $filter=name eq 'Contoso' to find accounts with a specified name.
To send the request and see the JSON-formatted response, click "Send."
Establish or Modify Records:
Use the "POST" or "PATCH" methods, respectively, to add or alter records. Use https://.crm.dynamics.com/api/data/v9.0/accounts to create a new record.
Choose the “JSON” format under the “Body” tab after selecting “raw”. For the new record, enter the information in JSON format:
JSON
Copy the following code: {"telephone1": "123-456-7890", "name": "New Account"}
Use the "PATCH" method with the record ID in the URL https://.crm.dynamics.com/api/data/v9.0/accounts() to update an existing record.
Provide the new JSON-formatted data in the "Body" tab.
Eliminate Records:
Use the "DELETE" method with the record you want to delete. The URL is https://.crm.dynamics.com/api/data/v9.0/accounts(), where record ID is stored.
Click "Send" to make the deletion happen. Re-query the data to ensure that the record has been deleted.
Managing Reactions and Mistakes
Examine the Response Information:
The answer data is shown by Postman in the interface's lower part. Make sure the JSON result meets your expectations by reviewing it.
Verify the status code (such as 200 OK for successful queries or changes) to ensure that the operation was successful.
Diagnose and Fix Errors:
Examine the error message and status code that the API returned if you run into problems. Typical problems include inadequate permissions, incorrect request forms, and authentication failures.
For further information on error codes and their significance, see the D365 API documentation.
Summary
Calling Dynamics 365 data entities using Postman is an effective method for managing your data and interacting with your D365 environment. D365 record creation, updating, and deletion may be accomplished with ease by configuring Postman with the appropriate authentication and endpoint configurations. This method helps with debugging and integration verification in addition to making API testing simpler. Be it creating bespoke integrations or doing regular data management duties, becoming proficient with Postman for D365 data entities will improve your output and simplify your process.
0 notes
Text
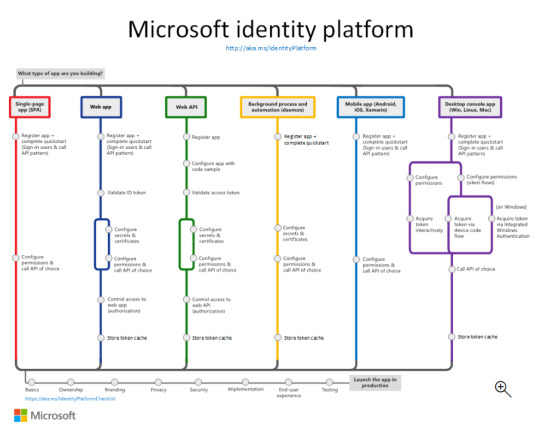
Exploring the Power of Microsoft Identity Platform

Join us on a journey to understand how Microsoft Identity Platform revolutionizes user access, enhancing both security and user experience.
What is microsoft identity platform?
The Microsoft identity platform is a cloud identity service that allows you to build applications your users and customers can sign in to using their Microsoft identities or social accounts. It authorizes access to your own APIs or Microsoft APIs like Microsoft Graph.
OAuth 2.0 and OpenID Connect standard-compliant authentication service enabling developers to authenticate several identity types, including:
Work or school accounts, provisioned through Microsoft Entra ID
Personal Microsoft accounts (Skype, Xbox, Outlook.com)
Social or local accounts, by using Azure AD B2C
Social or local customer accounts, by using Microsoft Entra External ID
Open-source libraries:
Microsoft Authentication Library (MSAL) and support for other standards-compliant libraries. The open source MSAL libraries are recommended as they provide built-in support for conditional access scenarios, single sign-on (SSO) experiences for your users, built-in token caching support, and more. MSAL supports the different authorization grants and token flows used in different application types and scenarios.
Microsoft identity platform endpoint:
The Microsoft identity platform endpoint is OIDC certified. It works with the Microsoft Authentication Libraries (MSAL) or any other standards-compliant library. It implements human readable scopes, in accordance with industry standards.
Application management portal:
A registration and configuration experience in the Microsoft Entra admin center, along with the other application management capabilities.
Application configuration API and PowerShell:
Programmatic configuration of your applications through the Microsoft Graph API and PowerShell so you can automate your DevOps tasks.
Developer content:
Technical documentation including quickstarts, tutorials, how-to guides, API reference, and code samples.
For developers, the Microsoft identity platform offers integration of modern innovations in the identity and security space like passwordless authentication, step-up authentication, and Conditional Access. You don't need to implement such functionality yourself. Applications integrated with the Microsoft identity platform natively take advantage of such innovations.
With the Microsoft identity platform, you can write code once and reach any user. You can build an app once and have it work across many platforms, or build an app that functions as both a client and a resource application (API).
More identity and access management options
Azure AD B2C - Build customer-facing applications your users can sign in to using their social accounts like Facebook or Google, or by using an email address and password.
Microsoft Entra B2B - Invite external users into your Microsoft Entra tenant as "guest" users, and assign permissions for authorization while they use their existing credentials for authentication.
Microsoft Entra External ID - A customer identity and access management (CIAM) solution that lets you create secure, customized sign-in experiences for your customer-facing apps and services.
The Components that make up the Microsoft identity platform:
OAuth 2.0 and OpenID Connect standard-compliant authentication service enabling developers to authenticate several identity types, including:
Work or school accounts, provisioned through Microsoft Entra ID
Personal Microsoft accounts (Skype, Xbox, Outlook.com)
Social or local accounts, by using Azure AD B2C
Social or local customer accounts, by using Microsoft Entra External ID
Open-source libraries: Microsoft Authentication Library (MSAL) and support for other standards-compliant libraries. The open source MSAL libraries are recommended as they provide built-in support for conditional access scenarios, single sign-on (SSO) experiences for your users, built-in token caching support, and more. MSAL supports the different authorization grants and token flows used in different application types and scenarios.
Microsoft identity platform endpoint - The Microsoft identity platform endpoint is OIDC certified. It works with the Microsoft Authentication Libraries (MSAL) or any other standards-compliant library. It implements human readable scopes, in accordance with industry standards.
Application management portal: A registration and configuration experience in the Microsoft Entra admin center, along with the other application management capabilities.
Application configuration API and PowerShell: Programmatic configuration of your applications through the Microsoft Graph API and PowerShell so you can automate your DevOps tasks.
Developer content: Technical documentation including quickstarts, tutorials, how-to guides, API reference, and code samples.
0 notes
Text
JWT Access Token Design Pattern Tutorial for API Developers | JWT OAuth3 Explained for Microservices
Full Video Link https://youtu.be/TEx6LCu8TK0 Hello friends, new #video on #accesstoken #jwt #jsonwebtoken #jwttoken #designpattern for #microservices #tutorial for #api #developer #programmers with #examples is published on #codeonedigest #
In this video we will learn about Access Token design pattern for microservices. Access Token pattern is to validate the identity of the caller. Caller service or app sends the access token in request header to callee services. Api Gateway of the Callee service validates the token & check the identity of caller. Api gateway will allow request only with valid access token. OAuth 2.0 has…

View On WordPress
0 notes
Text
Restrict OAuth Scopes to Okta Apps using Auth Server Access Policies & Rules
Restrict OAuth Scopes to Okta Apps using Auth Server Access Policies & Rules
This article describes how you can restrict the use of certain OAuth scopes to certain Okta apps by adding access policies with access rules to the authorization server.
Step 1 — Create Auth Server
Go to https://<your-okta-admin-domain>/admin/oauth2/as & create an auth server:

Step 2 — Create Access Policy
Open the auth server, go to the Access Policies tab & create a policy for…
View On WordPress
1 note
·
View note
Text
Secure Your Django Apps: OAuth & Two-Factor Authentication
Implementing OAuth and Two-Factor Authentication in Django Projects 1. Introduction Importance and Overview OAuth and Two-Factor Authentication (2FA) are crucial for enhancing security and providing users with flexible login options. OAuth allows users to log in using third-party services, reducing password fatigue, while 2FA adds an extra layer of security. Learning Outcomes This tutorial…
0 notes
Text
How to Implement SSO using OAuth in Golang Application
Introduction
You all have definitely come across the Login page where the website or application provides you the option of Login with Google or Facebook. Doesn’t that reduce your efforts of registering your account for the respective website? Almost all the websites have a mandatory criterion of login before accessing the information or visiting other web pages. Imagine the scenario of signing up on these websites and remembering their credentials. Thus, social login saves your time and effort easing your process to surf various websites.
Now, the question is do you know to implement single sign-on (SSO) using OAuth in your golang app? If no, then don’t worry here is the tutorial: How to implement SSO using OAuth in golang application; if yes, then let me know any other better way for the same (constructive feedbacks always help). We will see a few theoretical parts regarding our topic and then get started with the coding part.
We also have a video tutorial on the same topic. The entire tutorial is covered in the video form and is attached in the below section.
What is Single Sign-On (SSO)?
One Time Log In.
Single Sign-On (SSO) provides users the opportunity to log in using a single user ID and password to related yet independent platforms. In layman terms, you can sign in to your Google account and use the same account to log in or sign up in various other software applications.
Video Tutorial: Implementing SSO using OAuth in Golang Application
If you are someone who grasps more from video tutorials then here is a comprehensive video tutorial on implementing SSO using OAuth in Golang Application from our developer.
The video will show you each and everything with a few helpful insights that you need to know. It will cover registering the application to the Google Console, Backend, and Frontend coding part.
Read More to Register Application to Google Console Dashboard
0 notes
Link
This is a brief introduction to OAuth 2.0. You may have already heard terms like authorization, authentication, OAuth, OAuth 2.0, OpenID, OpenID Connect, JWT, SSO... etc.. It is just like a mess for beginners. When it comes to security the major points are Authentication and Authorization. Before we learn about these things, let's discuss some basics.
#OAuth2#java#security#authorization#authentication#javafoundation#beginners#learning#tutorial#developers#oauth
0 notes
Link
1 note
·
View note
Text
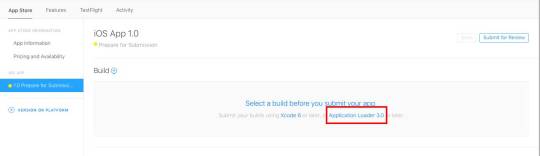
Download Application Loader For Mac
Applications trusted by millions. Over 1 Million people download videos, audios, convert videos and create slideshows with our tools. 4K Download software is cross-platform. Get it for your PC, macOS or Linux. Download Loader Droid download manager for PC to install on Windows 10, 8, 7 32bit/64bit, even Mac. The weight of the apps is 4.8 MB. On the latest update of the Loader Droid download manager app on lmt-post-modified-info, there are lots of changes that are properly enjoyable on the Computer, Desktop & Laptop.
Seems that Apple Transporter might have replaced it. It's on the Mac App Store, and was only released a week ago. Note: don't be confused by references to a previous 'File Transporter' which was some command line tools available for Windows and Mac. Mac users interested in Data loader salesforce generally download: Jitterbit Data Loader for Salesforce 5.0 Free Jitterbit Data LoaderTM is a data migration tool that enables Salesforce administrators to quickly and easily automate the import and export of data between flat files.
Installing Salesforce Data Loader in macOS and Windows.
In this Salesforce Tutorial we are going to learn about What is Salesforce Data Loader, How to Install Apex Data Loader and How Apex loader is used to upload, delete, export and Import records.
What is Data Loader?
Salesforce Data Loader is a desktop client application used in Salesforce to import, export, delete, insert and update bulk records. Using Data Loader we can load upto 5,00,000 records.
Data Loader Features and operations.
Using Data Loader we can load upto 5,00,000 records.
Using Data Loader we can schedule the loads.
We can import data from .csv (Comma Separated Values) files.
Success and Error log files created in CSV format.
Data Loader supports all objects(Custom objects and Standard objects).
Drag and Drop field Mapping.
Data Loader Operations.
Using Data Loader we can perform the following operations.
Insert – Insertion of new records.
Update – Updating existing records.
Upsert – Update and Insertion of records.
Delete – Deleting existing records.
Export – Extraction of all records.
Export All – Export all extracts all records including recycle bin records from salesforce.
How to Install Salesforce Data Loader.

Installing Data Loader and setting up Data loader require small knowledge on generating security tokens. Before installing Data loader in Windows Operating system and MacOS we have to check system requirements.
System requirements for Windows.
Data loader is compatible with windows*7, windows*8 and windows*10.
Minimum 120 MB of disk space.
Minimum 256 MB RAM.
Must have Java JRE 1.8 installed.
System requirements for macOS.
macOS EI Capitan or later.
Minimum 120 MB of disk space.
Minimum 256 MB RAM.
Must have Java JRE 1.8 installed.
Must have administrator privileges on the system.
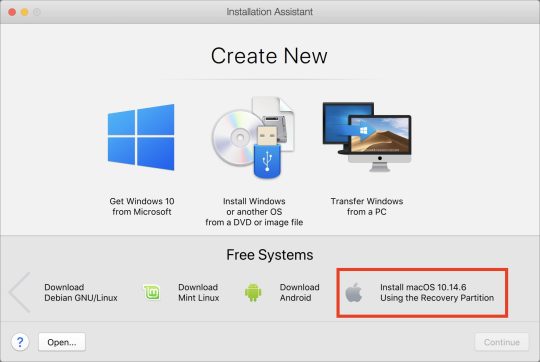
Installing Salesforce Data Loader in Local system.
After checking all system requirement we have to install salesforce data loader in our local system. Follow the steps given below to install salesforce data loader.
Download Data loader from Salesforce.
Generate security Token.
Installing Data Loader in macOS or Windows Operating system.
Enter username and password.
Downloading Data Loader from Salesforce.
Data loader can be downloaded from data management. Go to Data Management | Data Loader.
Click on Data Loader and select the Operating system to which you want to download.
Now Apex Data Loader will download in to our local system.
Install latest Java version in to your local system.
Now install Salesforce Data Loader.
Choose any operation as shown above.
When we try login into Salesforce.com using data loader we have to options.
OAuth.
Password Authentication.
Option 1 :- Salesforce login through OAuth.
When we select OAuth option.
Now select the Environment. (Production or Sandbox).
Click on Login.
Now a new pop window will be opened where we have to login into Salesforce.com account using username and password.
Now a verification code will be sent to your account email.
Enter verification code and click on Login.
Click on Allow button to access as shown above.
Option 2 :- Login through Password Authentication.
Select password Authentication as shown above.
Enter username and Password.
Click on Login.
Where password is the combination of Salesforce account password and Security Token.
Now add Security Token after password.
Password = Password + Security Token.
Generating Security Token.
What is Security Token in Salesforce?
Security Token in Salesforce is a case sensitive alphanumeric key that is used with salesforce account password to access Salesforce via API.
How to generate Security Token?
To generate security token in salesforce go to My Settings | Personal | Rest my security Token.
When we click on Reset my security token an Email will be sent to the email address of our account. To log in to Salesforce via API we have to enter username and password.
Conclusion.
In this Salesforce Tutorial we have learned about What is Salesforce Data Loader, how to install data loader, what is Security token and how to generate new security token. In our next Salesforce admin tutorial we are going to learn about Salesforce Data loader operations.
No doubt, listening to music is a very interesting hobby in the overall world and therefore, we use different music applications to hear the songs in our busy lives.
Nowadays, everyone knows about one of the famous music streaming platforms named Deezer.com which offers many music applications such as Deezloader Remix, Deezloader Remaster, and Deezloader Reborn, etc. to download the songs.
In fact, these applications are generally made for androids, smartphones, windows as well as Linux but you cannot get access to compile them on your Mac due to mac IOS.
Therefore, developers discovered one of the pretty cool applications that provide the facility to mac users to listen and download all the music tracks, known as Deezloader Mac.
you cannot download Deezloader Mac in the androids and pc because developers had developed this software for the specific purpose like in graphics and designing.
Download Loader App
The Deezloader Mac version allows its mac users to listen and download the songs, albums and music tracks in both online and offline ways.
Moreover, the Mac version gives 53+ million music tracks and 30 thousand radio channels to its users and you can use this specific version without paying any charges. And the Deezer Premium Apk is now also getting much popularity just because of it.
What is DeezLoader Mac?
Deezloader mac is the latest version of deezloader that enables its mac users to listen and download all their best songs without any restriction.
By having a mac version, users can download all of their favorite music tracks and albums in the best-quality just within a few clicks.
Deezloader mac is specially designed for the specified purpose like in the graphics, animation makers, designing and for many other aims.
Androids, IOS, computers as well as Linux use the other deezloader music applications like Deezloader reborn, remix and remaster, etc. but these are not able to Deezloader mac.

The big advantage of this version is that there are no subscriptions and charges to pay. You can use it fully free of cost.
In most of the music applications, you have to need to pay any amount for downloading the music and songs while the mac version gives you all the best music without paying.
Features of Deezloader Mac
Before going to download the Deezloader mac, you should have a short overview of the features of this fruitful application that will surely make you more friendly to have it.
Highly reliable
Apple Application Loader
As you know that there are thousands of music applications available in the music industry that provide plenty of songs and all kinds of music tracks.
But users may face a lot of difficulties in terms of safety and reliability after using such applications because these may be fake that might drag your important data.
So, by using the Deezloader mac, you can give the full protection to your personal data and as well as download the songs, safely.
High-quality Music Download
After downloading Deezloader mac, you can download all the music tracks just in high-quality. It allows the original music links to its users in 320 kbps. You can also convert all the songs in audio formats such as mp3.
No-paid money
Mac users can use this application free of cost for listening and downloading all sorts of music. You can use this software in online as well as offline mode. You do not need to pay something to Deezer.com.
Download multiple songs
One of the latest features of this application is that you can directly download all the songs from its original website without any complication.
You can download multiple songs or the full album of your favorite singer just in a single click. It will take a while depending on your internet speed.
Easy to Use
If you are already using the Deezloader Apk, no doubt, you can use this application easily on your mac because it is almost compatible with deezloader.
Allows specific Devices
Deezloader Mac is the advanced platform of the music streaming industry which allows specific devices such as Mac.
You cannot download this application on androids, windows, and pc because of developers’ limitations.
Download DeezLoader Mac
Now, after reading all the comprehensive guides of Deezloader Mac, you might be a little curious about downloading this awesome application on mac devices.
You may face problems if you are going to download so, therefore, you have to follow our guide to get this one application on your devices.
Just click on the download link that we have already given below, after this, you will redirect go to our download page.
On this page, you will get a download link, again tap on the download buttons and then your mac application will start to download.

Download Application Loader For Mac Download
Final Verdict
So, guys, I have described all about the Deezloader Mac, an awesome application to download songs on the mac device.
The best feature of this software that makes its user a more friendly is the term of safety and reliability that provides protection to all of its users.
Download Application Loader 3.0 For Mac
Blackberry App Loader Download
Moreover, it gives all its premium features free of cost without paying any subscriptions and charges.so, this was all about the mac version and hopefully, you liked our guides.
1 note
·
View note