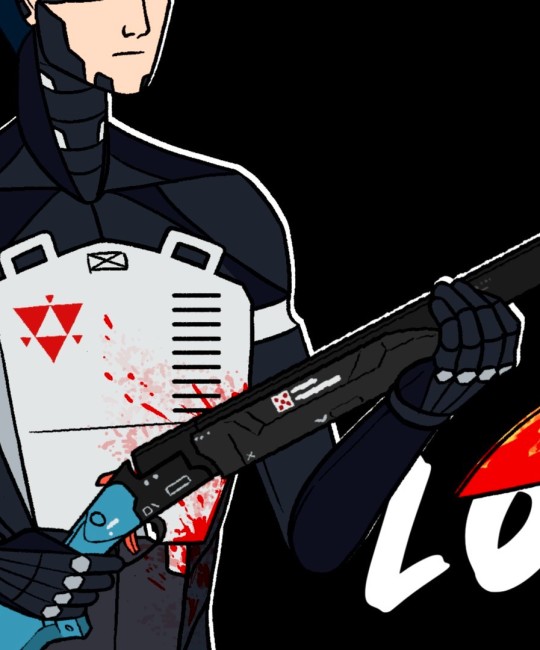
#or any fancy apps or editing software
Explore tagged Tumblr posts
Visit Tumblr Blog
Explore Tumblr blogs with no restrictions, modern design and the best experience.
Last Seen Tumblr Blogs


Fun Fact
In February 2021, Tumblr had 518.6 million blog accounts.
Text
raw photo taken with my phone

vs same photo (just slightly cropped) after a few minutes of wiggling the sliders around in my phone’s built-in photo/video editor

the sliders are the true heroes of making pictures closer to reality! exposure, contrast, and saturation are heavy-hitters but honestly i just go in there and wiggle all the sliders around until i like what i see. don’t let your phone convince you you can’t capture at least some of that magic, it’s just tucked in some slidies so get slidin!
You know that thing where you see a gorgeous view (left) and try to take a picture of it, but your phone camera is a joyless fucking nihilist who refuses to see the beauty in anything and only sees this (right)
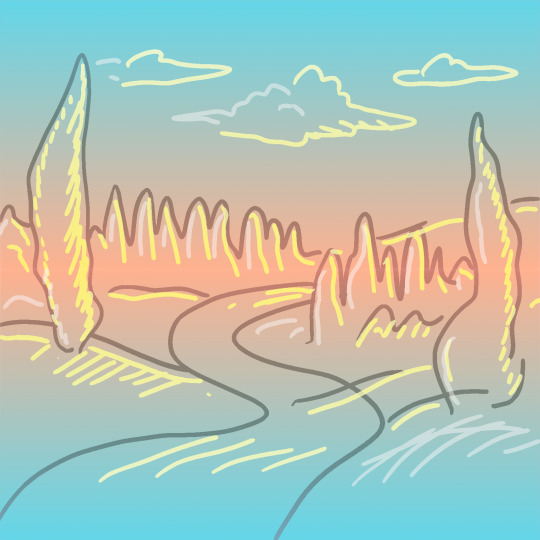
#i don’t usually add stuff to posts#but i deeply love taking nature pictures and videos with my phone#and other people seem to like them and think they’re good#and i just want to say im not some picture genius#it’s just trial and error via sliders#and you too can take pictures like these even without photo editing knowledge#or any fancy apps or editing software#just submit yourself to the whims of the slidies and enjoy!
83K notes
·
View notes
Note
Do you think it's a good idea to try and get away from Google Docs when it comes to writing? I really can't afford any other fancy program to write my drafts in, and it honestly seems like the easiest - not to mention, most convenient - program to use to share my manuscript with beta readers. I could use advice on this matter because I keep seeing things across the net about it being a bad place to work on writing, but I have no idea what to turn to to make things easy for me and my future beta readers.
This is such a good question. Thank you.
So, a little backstory. Ever since Google removed their motto "do no evil" they have gone down the rather predictable path of all big players of the rot economy: putting profits over user experience.
A little while back, there was rumor that Google trains AI with the content of google docs, then they said they don't really, they only scan the content and do nothing with it, and then they started blocking access to documents with sexy images. Do we believe that Google has our own best interest at heart? That's something everyone has to decide for themselves.
Back then, I made a post with alternatives for Google Docs, you can find it here, also check the reblogs for more options:
Now, is it a good idea to switch from google docs? I think it is, but I'm also not consistent with it. As you mentioned, it seems to be the easiest to share writing with beta readers, and I also still often use it for fanfiction.
But there are alternatives, and they require very little adjustment in the process. Let me give you two free options.
Ellipsus is webbased, meaning you can write in it in the browser on any device. They have sharing, specifically for beta reading, and an export function for AO3.
Reedsy (marketplace around everything self-publishing) has an editor. It is webbased, and they also have an option for sharing with beta readers. This software is aimed at book type-setting and exporting but it works just fine for copying to web.
Personally, I'm currently switching everything to LibreOffice (also free!) files in some cloud connected folder. I used to do a lot of mobile writing on my phone with a bluetooth keyboard but currently, I'm taking my laptop everywhere so LibreOffice works great for me. If I have to use my phone or tablet for some lightweight mobile writing, on vacation for instance, I can still use something webbased.
So, I hope I gave you some interesting options. Do I think it's a good idea to make us less dependent on Google? Yes, I do. I don't trust them.
We have alternatives, and they cost us nothing more than a little adjustment.
~ barbex
#writing software#writing tools#alternatives to google docs#barbex gives advice#ellipsus#reedsy#google docs#libre office
46 notes
·
View notes
Note
Genuinely wondering how do you make your art edits? They're so pretty. The one you made today for Dannymay literally blew me away.
Omg that’s so sweet of you to say, thank you sm! 💖
I make them all in the Shuffles app unfortunately 😅 I don’t have any fancy software to use so basically the app takes images from Pinterest and lets you crop, edit, play with colors, etc. It’s kinda like assembling a bunch of puzzle pieces into a different picture than what’s on the box for lack of a better explanation lol. Here’s a breakdown of some of the pieces of the edit you’re talking about & the finished piece for reference of how it all came together; I used pics of the Aurora borealis to make Danny’s hair ^^


#asks#genuinely blown away when people like the stuff I make bc I feel like SUCH a faker next to people who can actually draw
31 notes
·
View notes
Note
Haii, Sosaaa! Okay, so i wanna get into animation BUT I'm really new. Lucky for me I know someone who's awesome at animating (that's you btw) so I need your expertise. What program do you use, and also do you have any tips for a newbie?
Aww Jay, you flatter me~✨but before answering I must put the disclaimer that I'm just a hobbyst animator with no formal training, that during quarintine thought "Oh woah, these Multiple Animation Projects that people do in YT are so cool! I want to join them!" and started learning by herself. Take everything I say with a grain of salt.
First things first: I mainly use TV Paint. However I'm not letting you spent money on paid stuff you don't even know you'll like, so here are some free alternatives that I've used as well:
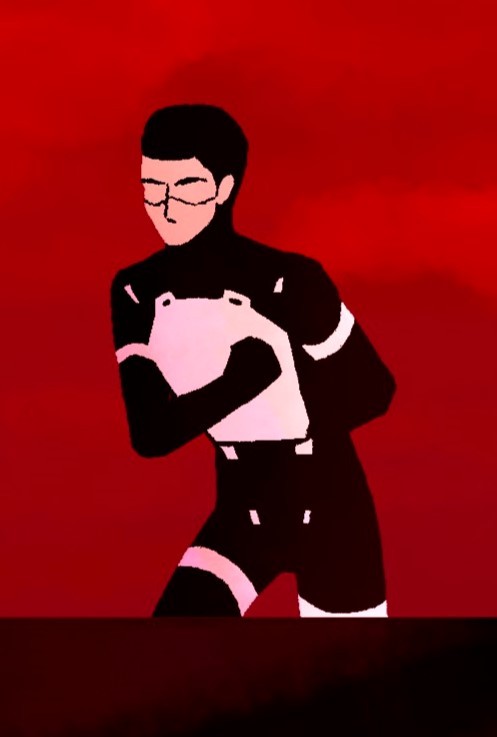
Krita is mostly a drawing program, but it also has a animation interface. The red and black parts of the Helena AMV were made with this.
Flipaclip is kinda neat phone/tablet app for when you want to animate on the go, but it can also feel more limiting since various features have to be unlocked by watching ads or getting the premuim version (in typical app fashion, I guess...)
Blender, while mainly meant for 3D animation, also has been developing Grease Pencil, that allows 2d animation in both 2D or 3D spaces. And the lines are vectors, so you can edit them after drawing them and such.
You can even use normal drawing programs. I've animated with Paint Tool Sai and Medibang by drawing all the frames, saving each frame as a image in sequence (001, 002, 003...) and putting them together in some editing program or gif maker. It's possible, but it's more work.
There's also OpenToonz, which is an open source version of the software used by Studio Ghibli in some movies?? I haven't used this one, but I'll leave it here in case you want to give it a try.
For editing (In the rare scenarios where I do fancy editing) I use After Effects. I can't personally recommend any free substitute, but as far as I've read, DaVinci Resolve seems like a good replacement.
Now, regarding actual animation advise, I won't explain the principles or terminology because:
It's very overwhelming since it's A LOT of information, specially for a beginner
I work mostly by vibes, so there are concepts I don't undertand well enough to explain to others
Instead I'll foward you this whole book that goes in detail about all that technical stuff.
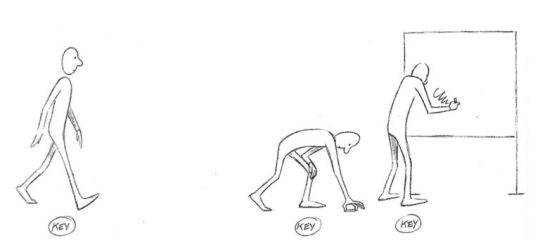
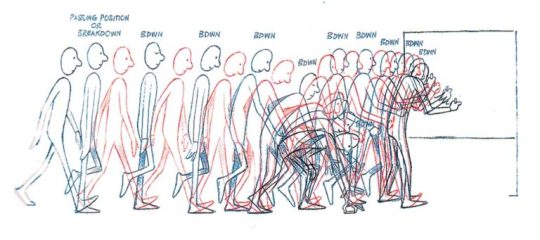
That being said, at the end of the day, hand-drawn animation is drawing main poses (aka key poses) and then drawing a bunch of more drawings in between until the drawings together look like they move.
So yeah, it's a lot of work,
....but it doesn't have to be tedious work~ 👀✨
As a hobbyst I live for the philosophy of vibing during the process instead of chasing perfect results, and I'm assuming that you just want to try for funsies and not that you're trying to become a pro industry animator anyways. Here are my personal tips to make the animation process more bearable:
1- Pick something you love! Seriously, any long task becomes more bearable when it's about a theme or character you enjoy. There's a reason why most of my animations have been about HnK or Signalis,
2- SIMPLIFY THAT DESIGN! Before you even pick the pencil, I want you to really look at the design of whatever you're going to animate and ask yourself "Are all the details in this design really necessary?" Every extra detail really starts to add when you have to draw the same thing multiple times for a single second of animation. You don't need to add all the robotic details on replika bodies, or draw every single stripe a tiger has, to put an example.
3- Keep it simple! At some point you might have a cool idea of an anime style epic battle with looks of cool explosions, camera angles, awesome fighting choreograpies and whatnot; but you first have to start small or else you'll get overwhelmed and not finish anything (been there, done that). Start with something simple like a bouncing ball, or if you're feeling brave, a walk cycle or a character turning their head. In that same sense, remember the book I linked? Don't try to learn all of it at once, go one step at a time.
4-Use references! On google images there are multiples breakdowns of things like run, flight or walk cycles, for example, and you can even use youtube videos! (tip: pause the video and use "," and "." to move back and forth between frames). In case you need help with a very specific pose or movement, you can use yourself or a friend recreating the pose irl (yes, the process is very embarrasing, and yes, the results are worth it)
4- You don't have to animate/redraw everything everytime. We aren't going for Oscar winning levels of animation here anyways. It's ok to copy and paste across different frames, only animate certain parts of the body and leave the rest static, panning the camera to simulate movement... Listen, if actual standars profesionals cut corners, why can't we? We aren't even getting paid for this!
6- It's ok to suck at first. My first animation was this kitty back in 2016,

and here's this Elster from last year doing similar movements.

It's not perfect by any means, but I feel like both art and animation-wise there has been some improvement. And I guess that right now I could remake it and make it even better, but that's because I got more experience and a better eye at finding mistakes and how to solve them, and you get that with practice.
...So yeah, there's that, have fun in your animation endeavors 👍✨
#OH MY GOD THIS IS A TESTAMENT#I'm so sorry Jay for making you read all of this#I know less that you think#but the little I know I try to share to the best of my habilities#animation#ask#the yappening
13 notes
·
View notes
Note
HI! I was curious what program you use to make your lookbooks? Like, how are you getting all of them in a row like that? Is a collage?
I am SO sorry for getting to this so late! I was originally planning on making pictures to explain but then I realized I’d just never do it so I’m just gonna do my best with words lol.
I use windows’ native photo app, gimp, and photopea!
First, when I take my screenshots in CAS I make sure I use the same pose for every outfit (usually) & make sure I don’t rotate the sim at all between screenshots. That way, they’re all taken at the same angle—you could overlay them on top of each other and the only thing that would change are the clothes/hair/etc.; the pose would remain identical!
Then, I take my screenshots and I crop all my photos to be a 1:2 ratio. This can be done in any software, but I just do it in the windows photo app. I don’t move or adjust the image at all—I just click edit>crop>1:2 and then save it. This way you could overlay them and the pose wouldn’t move or shift at all.
Then I put them in gimp (free)! I usually do 3 or 4 looks per image, but you can do as many as you like. Just make sure your image height is the same height as each individual cropped screenshot, and the image width is the width of one cropped screenshot times however many you want in that image (so usually 3 for me). Then I import my first batch of cropped screenshots in, and I arrange them in order of CAS’ outfit order. In order to make sure they’re all evenly spaced and I don’t accidentally have a transparent bit on the side or top or something, I usually put a bright color as the background so that I can be 100% sure that my cropped screenshots cover the whole image. I also make sure to have “snap to canvas edges” and “snap to grid” on to make my life easier!
Then it’s all just editing! I do SUPER simple editing so I’m probably the last person you wanna ask haha… I just slap on some gaussian blur and then fake a Topaz Clean effect in photopea (since I don’t have access to anything fancy or paid).
So that was a really long explanation and probably way too much info, sorry!
TL;DR it’s a collage 🤣
5 notes
·
View notes
Text
I've been thinking about this since I answered the ask about gifmaking a little while back, and I've been kind of unsettled about it since. Not because I don't like sharing my process, nothing could be further from the truth, but because I realized that that process isn't entirely accessible. So here I am again with an alternative way to make gifs that's infinitely easier, way more accessible, and just as valid as the other way. I wanna stress that. Anything you put time and effort into is valid and worthwhile. No time spent on doing something you enjoy is ever wasted, not least of all anything creative
That said, this method is considerably more limited. I made gifs this way for years before my brain was quite literally hijacked by an idea I could not get out of my head and I had to learn to do it the fancy way. I was also intensely annoyed at having to rely on my shitty internet to make gifs, and I probably would have made the switch at some point regardless just for that lol
I would also like to stress that this is not necessarily a tutorial any more than the other post was, it's simply a couple of resources and more or less how to use them. Like I said in the other post, never download and install anything to your device without doing your own due diligence first!
details under the cut
So first, you need to get the video. If you're on mobile, your device should have a screen recorder built in. Use that, and be sure to turn on Do Not Disturb so you don't accidentally capture any notifications! Once you've recorded your video, you can use your device's native editing ui to trim and crop the video and adjust color. If you want effects like slow motion, I like Splice on iOS. The big thing is that it doesn't watermark your videos, but it's also just a pretty good app overall for video editing. If you're willing to pay for it, it'll also allow you to make gifs right there in the app, but it's subscription based and the price is absolutely outrageous, so I don't recommend doing that when you could just use a free online converter
Which brings me to the next step: ezgif. You probably know this one, most everyone does, I think, but if you don't, here's the basic gist of it. Select Video to Gif and upload your video there. Be sure to trim it down to seven seconds or less, or else you'll never be able to get it down below 10mb. On the next page, change the size of the gif to 540xAUTO (for Tumblr), then change the frame rate to 20 or 25. More frames means a smoother gif, but it also means a bigger gif, so play around with it to see how the frame rate affects your gif. I don't think there's really a huge difference between 20 and 25, so 20 should be sufficient. If your gif is still too big, you can select optimize and try to compress it a little. The lowest compression level is 5, so start there and go up by fives until you're satisfied. If you get the gif below 10mb and it looks bad, then you should go back and trim your video length down further and try again. After that, simply save the gif to your device and upload it wherever!
PC is more or less the same, you just need to get a third party screen recorder. You can actually use ffmpeg to screen record if you'd like (I don't have the command line for that, however, and at that point, you should just go ahead and use yt-dlp instead to get a high quality video). If the command prompt is too much, you can just use a screen recorder app instead. I like 2-Click Screen Recorder. Again, you can actually use ffmpeg on that video to create frames and then upload those to ezgif, but if you'd still rather go from video to gif, then use CapCut or a similar video editing software to trim down your video to seven seconds or less. From there, the process with ezgif is exactly the same as it is on mobile
And there you have it! Easy mobile gifs! While I do really encourage you to try the "fancy" method of making gifs, this is still a great alternative, and you can make some pretty good gifs this way. Here are some of mine I made this way before I switched:


8 notes
·
View notes
Note
Hi! I was wondering what you use to include subtitles to gifs? Especially if it's an app, since it's easier for me.
tbh i dont have any fancy editing software so i just slap it on with online-image-editor and pray that it's centered correctly
10 notes
·
View notes
Text
How to Start a Podcast: Step-By-Step Guide- Castos
Part 1 l Part 2 l Part 3 l Part 4 l Part 5 l Part 6 l Part 7 l Part 8 l Part 9 l Part 10 l Part 11 l Part 12
The thirteenth article Sydney gave me is from Castos, which is a hosting site.
Castos lines out six steps to start a podcast.
Plan
Define goals. Why are you making this podcast?
Choose a topic. Castos suggests thinking about if you can talk about the topic you're considering for hours. Yes. Plural. If not, then it's not the topic for you. What makes your podcast different than similar ones? You also might want to consider future monetization if that's something you're after. The article I linked suggests twenty five broad topics to get you thinking (such as your trial and errors, and yourself narrating something).
Define your audience. Make a listener persona or avatar.
Choose a format. That article lists pros and cons of each, with examples of established podcasts.
Choose a name. That article goes over the camps of naming- yes, the descriptive, clever, and brand- and a few other things, like how saying the name out loud will help.
Choose who's going to conduct the podcast. If you're doing it solo, it's a no-brainer. But if you have a team, there will have to be a discussion.
Write a description. This article says that out of 780 people surveyed by the podcast host, most of them judged whether or not to listen to a podcast by their description. I included the first article because it has other useful stats. You should write it to be engaging to the human readers, and search engine optimized for the algorithm. If you get stuck, Castos helpfully provided three templates to chose from and tweak as you need.
Choose categories. Most people (from the podcast host data) find new podcasts via the search function in their app or site of choice. The categories are how your listeners will find you. One broad category and two sub categories are allowed, so choose wisely.
Decide on a length to shoot for. You won't hit it to the second, but having a general guide will help. Your episode length can be a unique selling point- if every other podcast in your niche is over an hour, your fifteen minute podcast will be interesting. And the opposite is true. But don't pad out the episode with fluff to make it longer for the sake of it, and don't cut any useful information to make it shorter for the sake of it.
Decide on a publishing frequency. Whatever you choose- weekly, fortnightly, monthly- be consistent. If you miss an update, you might lose listeners because they don't feel like they can expect the episode reliably.
Name episodes. Consider the episode name like the headline of an article. You want to get the broad view across while also enticing people to read. Or, in this case, listen. Use at least one or two keywords naturally to make it so when people search for a solution to a problem, your episode has a better chance of popping up. Podcast apps tend to cut off episode titles, so make sure the most important words start the title. If you have guests, include their names, but leave off your podcast name. It'll already be in your feed, so there's no need to reiterate.
Consider monetization. While monetization is most likely far in the future, think about any ideas now. For example, merchandise you can sell, or a subscription tier system.
2. Recording equipment
They included a handy infographic, but really a microphone, pop filter, headphones, and the computer you already own will do fine to start. When you're ready to expand, they have more equipment recommendations.
Have a recording space. You don't need a fancy studio, but it should be a quiet place with little background noise.
Set up equipment. Make sure everything works and is recording. Then- this is just an aside from me- make a test recording. Make sure it sounds how you want it to.
3. Editing software
A lot of times, your recording software can also edit, but in case it doesn't Castos provides some options.
Remote recording software is different, and you need it if you have guests that aren't physically present in the same room as you.
4. Record your first episode
Don't worry if you don't have a workflow yet, that will come.
Write a script if you're nervous.
Check out some microphone techniques to build good habits.
Castos has general tips here
They also have a video tutorial and article here.
5. Edit
Add intros and outros. According to NPR, 20-35% of listeners will only give your podcast five minutes. To avoid this, Castos has a guide on intros and outros.
Music. It's nice to have, and makes your podcast sound more polished. Castos collected sites to get affordable royalty-free music.
In general, there are three things to do when editing- removing things you don't like, adding things that make the episode better, and fixing audio mistakes like background noise.
Castos put together a video and article on editing here so you can take some of the guesswork out.
Export your final file. There's some technical jargon here, but basically there's a preferred file type and a way to adjust your sound so that the episode is the same volume throughout the one episode and between episodes. Castos focuses on how they expect files to be- they are a hosting site after all- but I feel like maybe other hosting sites would encourage this. The best practice is to check out the guidelines on your hosting site and follow them.
6. Launch
Choose a podcast hosting site. As I've said in previous posts, you need an RSS feed to give podcast directories before people can listen. Castos does a good job explaining it in this infographic.
When choosing a hosting site, consider a few factors: storage, website, analytics, and marketing.
Artwork. Castos recommends that the font is clear and easy to read, and there aren't too many diffferent fonts- two max. Keep your topic in mind as you design or have someone else design the artwork for you. Contrasting colors and 'empty' space are your friends- they bring attention to the podcast and gives the name room to metaphorically breathe. They also included a handy site called the podcast artwork check to see how the artwork looks across sites and apps. Castos also has an in-depth guide with examples of artwork.
Submit to directories. Now it's time to get ears on your podcast and get it out there. Check out the list of thirty different directories to submit to.
Build a website. This is a permanent home for your podcast, just in case anything disastrous happens to any directory.
Add show notes and transcriptions.
Strategies:
Make a trailer.
Release three episodes on launch day.
Network with other podcasters. You can offer to cross-promote, which means that if they feature a snippet or description of your show on theirs, you'll do the same with theirs on yours. Make sure your niches are linked, though- no one wants a comedy podcast in a true crime one.
Be active in online communities related to your audience and topic.
Don't be afraid to self-promote. Word of mouth has to start somewhere.
7. Promote your podcast.
Don't be afraid to reach out to your audience. They're listening to you for a reason, and they'll probably gladly spread the word if they haven't been already.
If you mention any brands organically, shoot them a message and tell them. They might feature your episode on their social media.
Guest on other podcasts. Be nice here, no one likes someone constantly nagging about when they're going to be on their podcast.
Advertise on podcast apps. Just make sure you're actually listed on their app before you buy the ad.
Castos also has social media and email list guides.
There are a few resources listed at the bottom of the article, including a facebook group and their podcast about podcasting.
6 notes
·
View notes
Note
hiiii many many amv ideas came to me in a dream (courtesy of brat ofc) but unfortunately, i know fuck all about editing so i figured i'd ask u creator of the brat f1 amv that lives in my head rent free !! mostly just wondering where u get clips from + how unreasonable it is to make an amv in windows' native editor (climpchamp)? thank you <3
hi anon!!!
i'll be honest i might not be the best person to ask this but i'll try my best to answer!! hope it helps at all lol <3 if anyone else has better suggestions/other good tips pls feel free to give them i'd also be happy to know them!!
so! finding clips is always the most difficult and probably the most time consuming part of making an edit for me.. but usually i just try to look for ready scene packs that all the very lovely people on the internet compile 🙏 but f1's own youtube channel also has a lot of very good content! you just have to know what you're looking for over there and you'll have to skim through a lot of other content to find the good stuff,, but their channel is especially good for racing content itself (obviously) and their videos are almost always available in 1080p which is a huge perk!! they also have some of their own compilation videos which can be very useful. and ofc teams' own social medias have a lot of content and usually their youtube channels have a lot of good video content about race weekends beyond the race (which, i think i'm stating the obvious here but yeah)! so honestly it's a bit of a scavanger hunt and you just have to be patient, especially if you're picky with the cohesion of your clips like me 😭😭
and i'll be honest with you i know nothing about clipchamp 😭 i used to use premiere pro until the free access i had to it at the time stopped and then i couldn't be bothered to find a good pc alternative.. but honestly i think it totally depends on what kind of editing style you're going for! if you have a similar style to mine i'm pretty sure most editing softwares have the capacity for that! as long as you can import clips, music and fonts and can work in enough detail (!!!) you can probably make it work with enough time!! ofc then the main differences between softwares are in the interface, intuitivity and usability so it might take a bit of trial and error, as well as getting used to, to find a software that works for you! then again if you want to use more fancy effects, transitions and tools you'll most likely have to look around quite a bit and usually free softwares don't have super great options on that front unfortunately.. there's a lot of recommendations on the internet tho so if that's the case you'll just likely have to spend quite a bit of time researching and trying stuff out but you might find something very good from people's recommendations ! (if you do pls share them with me lol)
also i can't believe i'm exposing my best kept editing secret just for you anon BUT if you're not opposed to editing on mobile i'd very heavily recommend an app called inshot, which is what i use!!! i think it has a super super impressive variety of different kinds of effects and a lot of very useful tools you don't find in every editing software! they keep constantly updating it and adding new features too, it's been heavily updated in the past couple years and seems like it'll just keep getting better! plus it's completely free, you just have to watch an ad while exporting your final video lol,,
anyways i hope you find something useful in my ramblings and i hope you succeed in your amv visions 🙏 pls let me know if you ever post any, i'd love to see them <3
#anon darling i'm so sorry for my ramblings i hope you can understand my points here#and if you don't please ask for clarification#being concise isn't my strong suit it seems#i also probably have a total of 3 sentences with concrete and coherent advice in this whole thing#even these tags are getting out of hand#thank you for the ask anon! i'm sorry for the answer anon!#hope i could be at all helpful <3#asks#anon ask#editing
2 notes
·
View notes
Text
Prompts/Suggestions Open!
Hello all!! I realized, during one of my recent edit-binges, I often wish I had more ideas for "themes" of each edit set (hands, trios, etc). And then I realized maybe y'all would enjoy seeing what my brain comes up with from a quick prompt/idea! So this is an open call:
wanna see a haphazardly-created photoset from the countless teen wolf photos saved on my phone?
That's a big part of the challenge! only screenshots from the show/movie, cast pics, official pics, etc. no fancy editing software besides my phone's built-in app and no consistent logic! You can see a good chunk of them at my tag *edits, though I'm considering making a second tag to use for my (usually) late-night shenanigans vs the ones I put a lot more effort into (and are often more big-brained than just 'smiles' or whatever theme the late-night ones are).
Any ideas can be sent in the replies, or you can dm/ask (including anon if desired)! I'll tag you when I do it if you want <3 Anyway, don't mind the wall of text. I might end up pinning this just for anyone to see.
#i am high so i may have to edit this to be more legible when i'm not lolol#idk what to tag this?? maybe i have notoriety enough fja;jfdkajdfa
2 notes
·
View notes
Text
I hate premiere pro,
ive been working on this fucking project for half an hour and im already crying, all i had to do is rotate the clips and put them in the right order, but it keeps fucking crashing and none of the tutorials make any sense, my wifi has been dropping in and out of existence for seemingly no reason and i dont know what a project panel is, why am i so fucking useless, why cant i figure this one simple thing out, why do i always feel so fucking useless when i cant do something with premiere fucking pro, im trying to do something fun for my self but of course my fucking technology curse wont allow me, I wish i was better with computers, i wish it came easier to me, i wish i just fucking understood, why are there so many fucking buttons that do literally nothing, why did i drop out, why am i so useless, why am i so fucking useless. i was fine with two needles breaking. but the moment something is out of my control i completly lose it. why why why this isnt fair this isnt fucking fair i want to die. why wont things just go the way i planned, this isnt beneficial to anyone why do you hate me so fucking much.
at least now that ive had my dip i know that nothing major can go wrong for a while. luckily it was just this and not, idk, being rejected from a my dream school. this is alright. Ill figure it out. Ill just get a different software, there will be downsides to that, like there wont be as many tutorials, but if its more intutive than thats probably fine. i dont need all that fancy darken/lighten and different layers or whatever, i just need to rotate my clips, put in the proper order and than do a voiceover, i hope theres something simple like that thats free and doesnt have a watermark
and i found one, its a phone app, but honestly, i dont care anymore, its about making the video, not making a grammy award winning fucking cinematographic masterpiece worthy of an oscar, if i wanna be youtube famous i gotta start somewhere, and i also i promised myself that i didnt do this for fame but for fun. so the moment i started taking quality over enjoyment i should quit. (a rule that i have not been keeping very well) but from now on, hopefully, i will. just easy fun videos. I have a microphone so the sound will be nice. and then when i get famous ill buy a fancy camera and ill hire someone to edit everything and ill never have to hurt my fingies typing every again.
2 notes
·
View notes
Text
What Is Best for Graphic Design

Graphic design is everywhere — from the logos on your favorite apps to the posters you see on the street. It’s the art of visually communicating ideas, stories, and messages in a way that grabs attention and connects with people. But if you’re new to graphic design or thinking about diving deeper, you might wonder: What is the best for graphic design? Whether it’s tools, skills, or learning paths, let’s break it down in a simple and human way.
1. The Right Tools for Your Creative Journey
First things first — the tools you choose can make a huge difference, but don’t stress about having the most expensive software. It’s more about what feels comfortable and lets your creativity flow.
Adobe Creative Cloud (Photoshop, Illustrator, InDesign): These are the go-to tools in the design world. Photoshop shines when it comes to editing photos and working with pixel-based images. Illustrator is your best friend for creating sharp logos and vector graphics that scale perfectly. InDesign is ideal for putting together layouts for magazines, brochures, or any multi-page projects. If you're aiming to work professionally or freelance, getting comfortable with these tools can seriously boost your opportunities.
Canva: Perfect for beginners or anyone who wants quick, hassle-free design. It’s easy to use, web-based, and packed with ready-made templates—ideal for social posts, flyers, and fast creative projects without any complicated learning.
Affinity Designer & Photo:
A solid alternative to Adobe, these tools offer pro-level features with a one-time payment—no monthly fees. Perfect for creatives who want quality design software without the hefty price tag.
2. Skills That Matter More Than Fancy Software
While tools are important, skills and mindset matter way more. Here’s what you should focus on:
Basic Design Principles: Things like balance, contrast, alignment, and hierarchy are the backbone of any good design. Understanding these helps you create designs that look polished and professional.
Fonts aren’t just about letters — they set the mood, tone, and personality of your design. The right font pairing can make your work shine, while the wrong one can create confusion. Learning how to use type thoughtfully is one of the most powerful tools in a designer’s toolkit.
Color Theory:
Colors aren’t just pretty—they speak. They trigger emotions, tell stories, and set the tone of your design. Learning how to mix the right shades or play with contrast can completely change how your work feels and connects with people.
Creativity & Problem Solving:
Graphic design is really about finding smart, visual solutions to communication challenges. It’s about thinking outside the box, trying new ideas, and turning problems into eye-catching stories.
3. Learning Resources That Match Your Style
Not everyone learns the same—and that’s okay. Find what keeps you curious.
YouTube Channels: Check out creators like The Future, Satori Graphics, and Yes I’m a Designer for practical tips and easy-to-follow tutorials.
Online Courses: Websites like Udemy, Skillshare, and Coursera have courses ranging from beginner to advanced. Some are free, some paid — a mix works best.
Procreate:
If you love sketching or digital painting, Procreating on the iPad is a dream. It’s super intuitive, feels like real drawing, and gives artists a smooth, creative flow right at their fingertips
4. Hardware: What You Actually Need
You don’t need the latest, priciest computer to get started, but a decent setup helps.
Laptop or Desktop: A mid-range laptop or desktop with at least 8GB RAM and a good graphics card is enough for most design work. Macs are popular among designers but PCs work just as well.
Drawing Tablet: If you enjoy digital art, a tablet like Wacom or XP-Pen can boost your workflow.
Monitor: A good quality monitor with accurate colors is valuable if you want your designs to look their best.
5. Staying Inspired and Growing
Graphic design is a constantly evolving field. Trends change, tools update, and new techniques emerge. Here’s how to keep growing:
Follow Design Communities: Platforms like Behance, Dribbble, and Instagram are full of inspiration and can help you connect with other creatives.
Keep Learning: Always be curious. Explore new styles, try different software, and never stop experimenting.
Feedback: Share your work and ask for honest opinions. Constructive criticism helps you improve faster.
6.What Works Best for You?
At the end of the day, the “best” approach to graphic design is the one that fits your style, goals, and what excites you the most.
Want to work for big companies or agencies? Learn Adobe tools, master fundamentals, and build a strong portfolio.
Looking for quick social media graphics? Canva and some basic design knowledge might be all you need.
Passionate about digital illustration? Dive into Procreate or Illustrator, and make daily drawing a fun habit to sharpen your skills.
Budget-conscious? Affinity Designer and free online tutorials can take you far.
Final Thoughts
Graphic design is where creativity meets strategy in the most exciting way. The secret? Start small, master the basics, and pick tools that feel right for you and your budget. Above all, let your passion drive you and stay open to learning — the skills and tools will naturally come along the way.
0 notes
Text
Easily Merge Images Online Free – The Fastest Way to Combine Your Photos in One Click
In today’s content-driven digital space, merging images isn’t just a graphic designer’s job—it’s become a daily need for students, marketers, photographers, bloggers, and even casual users. Whether you're crafting a presentation, curating a visual story, or just looking to combine two or more pictures into one neat file, being able to merge images online free is an essential tool. The good news? You don’t need fancy software or technical skills. With tools like A2Z Converter’s Image Merger, it’s fast, secure, and absolutely free.
✅ Why Merge Images Online?
There are countless reasons why someone might want to combine multiple images into one:
To create comparison visuals for product listings
Merge screenshots for documentation
Combine travel photos into a single collage
Design a single layout for printing
Create before-and-after visuals for social media
Offline tools may offer merging capabilities, but they often come with heavy software, complicated interfaces, or limited functionality in the free version. That’s where online image merging tools shine—they're light, fast, and require no installation.
🛠️ How to Merge Images Online Free with A2Z Converter
Using A2Z Converter is as simple as dragging and dropping. Here’s how you can merge photos online in seconds:
Visit A2Z Converter's Merge Tool
Upload the images you want to combine
Arrange them vertically or horizontally as needed
Preview and adjust the order
Click "Merge" and download your final image instantly
There’s no watermark, no login, and no hidden charges. It’s truly merge images online free, no strings attached.

🌟 Features That Make A2Z Converter the Best Image Merger Tool
When it comes to merging images, speed and simplicity matter. A2Z Converter delivers both—with these standout features:
Completely Free to Use – No subscriptions, no paywalls
Supports Multiple Formats – Merge JPG, PNG, BMP, WEBP, and more
Secure File Handling – Your files are never stored on servers
Instant Preview & Download – Get results in seconds
Mobile Friendly Interface – Works seamlessly on all devices
Whether you’re a pro or a beginner, merging images online has never been easier.
📈 Who Can Benefit from Online Image Merging?
The ability to combine images online free isn’t just for design experts. Here’s who can get the most value:
E-commerce Sellers: Display multiple product angles in one image
Teachers & Students: Compile diagrams and visuals into a single document
Bloggers: Create visually engaging blog graphics
Social Media Managers: Combine stories and posts for campaigns
DIY Creators & Hobbyists: Make custom collages or inspiration boards
If your work involves visuals, you need an image merger you can count on.
💡 Pro Tips for Better Image Merging Results
To make the most of your image merging:
Ensure your images are of similar resolution for better alignment
Use horizontal layout for product comparisons
Use vertical layout for before-and-after photos
Compress images before upload for faster processing
Rename your merged file with a descriptive name for better SEO
And remember, the best part? You can merge images online free without any registration at all!
🚀 Ready to Merge Your Photos?
If you’ve been looking for a free, fast, and simple image merging tool, look no further. With A2Z Converter’s free online photo merge tool, you can get the job done in seconds. No downloads. No limits. Just upload, merge, and go.
👉 Try A2Z Converter's Image Merger Now
📌 Final Thoughts
Merging images doesn't have to be complicated. With the rise of online tools, you now have powerful editing abilities at your fingertips—no need for Photoshop or bulky apps. Whether you're working on a school project, a client campaign, or a social media post, the ability to merge images online free can save you time and elevate your work quality.
So go ahead—combine, create, and share with confidence. Let A2Z Converter handle the merge, so you can focus on your vision.
0 notes
Note
Hey your collages are incredible!! Do you have any pointers/tips on how you make them look so cool and amazing? 😅😅 I love what you've done with them 💜💚💜💚
Omg that’s SO SWEET OF YOU thank you sm!!!
So, I don’t have fancy software (I make all my edits on the Shuffles app) so I’ll try to keep the advice neutral when it comes to that kinda thing.
A big thing I always try to work in is anything plot related if I’m going for a character/story; certain flowers, objects, etc.
Another thing is perspective! I’ll try to do little pockets that make things seem a little more 3D if that makes sense? Depth is a major factor with these kinda things I’ve found.
Also layering and mixing colors/patterns; a lot of the time I’ll adjust how see through something is based on whatever I’m working with behind it to change the overall color/texture and again, add depth.
I hope this is coherent enough to be helpful for you! 💖💖💖
2 notes
·
View notes
Text
Stratos App Review – Send Any Link To Targeted Buyers
Welcome to my Stratos App Review, If you’re looking for an alternative way to get free traffic without SEO or ads, Stratos App might be worth trying. However, it’s important to have realistic expectations. While it promises instant traffic, long-term results may still depend on other factors such as the quality of your offer, landing pages, and competition.
Enter Stratos App, the world’s first application leveraging Native-technology to compel Google to send thousands of highly targeted clicks to any link you choose.

In this in-depth Stratos App review, we will cover its features, benefits, pricing, pros, and cons to help you decide if it’s the right tool for your online marketing strategy. So, grab it now before the price increases!
What Is Stratos App?
Stratos App is a cutting-edge traffic generation software that uses native technology to organically attract visitors from Google. Unlike conventional SEO methods, pay-per-click (PPC) campaigns, or social media ads, Stratos works autonomously to funnel targeted traffic to your website, any affiliate offers, eCommerce stores, or any link of your choice.

Stratos App Review: Overview of Product
Product Creator: Billy Darr
Product: Stratos
Launch Date: 2025-Mar-19
Launch Time: 11:00 EDT
Front-End Price: $17 One-Time Payment! (Limited-Time Access)
Official Site: Click Here To Visit Official Salespage
Product Type: Tools and Software
Support: Effective and Friendly Response
Recommended: Highly Recommended
Bonuses: YES, Huge Bonuses
Skill Level Required: All Levels
Refund: YES, 30 Days Money-Back Guarantee
Stratos App Review: About Authors

Billy Darr, Dipanjan Goswami, and Justin Opay lead the software development and internet marketing team that created the Stratos App. This business has a solid reputation for producing creative digital affiliate marketing solutions. They have developed multiple successful products and established a loyal customer base of over 20,000 people who regularly use their desktop and online apps.
He has Some lots of launches, including, including Femme, Rigel, Emerald, Kadjo, Kyros, Yield, A.I Funnels, A.I Podcastr, Topaz, Atlas, Helix, Ignis, Aero, Halo, Gizmo, Opus, Valor, Apollo, Comet, Gamma, and many others, This seller has a lot of knowledge and has always offered high-quality products at low prices.
Stratos App Review: Key Features of Stratos App
Stratos App: Full and unrestricted access to our state-of-the-art app. That uses no crappy AI But instead, uses real technology to exploit the biggest company in the world.
Stratos ZERO Ads: Never pay Google any money again. Instead, we siphon thousands of clicks for 100% FREE.
Stratos No-Website: Yes, with Stratos, you don’t even need to create a website Or record videos, or upload videos None of that.
Stratos Traffic Blast: With just a click, generate thousands of clicks in any niche you can imagine without paying for any ads.
Stratos Mobile Edition: This will allow you to operate Stratos, even from your mobile phone. Whether it’s an Android, iPhone, or tablet, it will work.
Training Videos: NOTHING is missing in this training. Everything you need to know is explained in IMMENSE detail.
World-class Support: Have a question? Just reach out to us, and our team will do their best to fix your problem in no time.
Stratos App Review: How Does It Work?
Imagine Your Life Changing Overnight Simply by Clicking 3 Buttons
Step #1: Login
To Stratos intuitive dashboard from your laptop, phone, or tablet. You don’t need any fancy devices, just a basic device with an internet connection.
Step #2: Exploit
Google’s infamous Trending algo. It sounds complicated. But it’s as simple as clicking ONE button. Even a 90-year-old with ZERO experience can do it easily.
Step #3: Profit
BIG. Yes, this is it. After we click the “Exploit,” We sit back and watch our account grow by the minute.
Stratos App Review: Benefits of Stratos App
Forget All The So-Called “AI” Apps That Never Work
No Complicated Setup Or Configurations Stratos Works Out Of The Box
Infiltrate Google And Siphon Thousands Of Clicks For Free
No Content Creation Required – everything is done for you
No Need To Even Create A Website, All You Need Is Stratos
No Risk – You Are Protected By Our 365 Days Money-Back Guarantee
Finally, A Real And Stable App That Does What It Promises
No Technical Skills Needed. Even A 10 Years Old Can Run Stratos
No Boring SEO, That Takes Forever To Get Results From
Works In Any Niche And Any Country WITHOUT Restrictions
Without Running Ads Or Paying Anything Upfront Whatsoever
All It Takes To Replicate Our Success Is Just 3 Clicks
Future-Proof. Proof Will Never Get Saturated
Stratos App Review: Who Should Use It?
Affiliate Marketers
Product Creators
eCom Store Owners
CPA Marketers
Blog Owners
Video Marketers
Personal Brands
Artists/Content Creators
Freelancers
Stratos App Review: OTO’s And Pricing
Front End Price: Stratos ($17)
OTO1: Stratos Infinite ($47)
OTO2: Stratos Plug & Play ($297)
OTO3: Stratos Set & Forget ($37)
OTO4: Stratos AI Robot ($47)
OTO5: Stratos DFY Funnel Pro ($197)
Stratos App Review: Money Back Guarantee
Try Our 30 Days Iron Clad Money Back Guarantee
Stratos stands as an application that does not fall into the category of “trash” or untested applications. The Stratos system has proven its capabilities but we will provide a full refund if you decide not to use it regardless of the reason for discontinuation. You must email us because easiest policy we maintain is to refund any money you keep when Stratos fails to generate earnings for you.
Stratos provides us with an abundant business opportunity. We will both avoid charging you if you do not plan to use the services but we will also offer you a $300 gift for your time spent. Receiving Stratos with no monetary benefits remains no obstacle to receiving your initial payment of $300 for attempting its use.
Stratos App Review: Pros and Cons
Pros:
Fully automated system
No technical skills required
Works in any niche
No need for paid ads
Cloud-based access
100% beginner-friendly
Potentially unlimited traffic
Cons:
Requires a one-time price
Requires an internet connection to use
No one has noticed it until now!
My Own Customized Exclusive VIP Bonus Bundle
***How To Claim These Bonuses***
Step #1:
Complete your purchase of the Stratos App: My Special Unique Bonus Bundle will be visible on your access page as an Affiliate Bonus Button on WarriorPlus immediately after purchase. And before ending my honest Stratos App Review, I told you that I would give you my very own unique PFTSES formula for Free.

Step #2:
Send the proof of purchase to my e-mail “[email protected]” (Then I’ll manually Deliver it for you in 24 HOURS).
Stratos App Free Premium Bonuses

Frequently Asked Questions (FAQ’s)
Q. Do I need any experience to get started?
None, all you need is just an internet connection. And you’re good to go
Q. Is there any monthly cost?
Depends, if you act now, NONE. But if you wait, you might end up paying $997/mo it’s up to you.
Q. How long does it take to make money?
Our average member made their first sale the same day they got access to StealthReach.
Q. Do I need to purchase anything else for it to work?
Nop, Stratos is the complete thing. You get everything you need to make it work. Nothing is left behind.
Q. What if I failed?
While that is unlikely, we removed all the risk for you. If you tried StealthReach and failed, we will refund you every cent you paid.
Q. How can I get started?
Awesome, I like your excitement, all you have to do is click any of the buy buttons on the page, and secure your copy of Stratos at a one-time fee.
My Recommendation
Stratos App presents an exciting concept—an automated tool that drives thousands of targeted visitors to your link without ads or manual effort. If its claims hold true, it could revolutionize digital marketing by eliminating reliance on paid advertising and SEO struggles.
However, potential buyers should approach with caution. Since there’s no clear breakdown of how its native technology works, users may experience varying results. If you’re looking for an easy-to-use traffic solution, Stratos App might be worth trying, especially if it offers a money-back guarantee.
🚀 Don’t miss out guys and start your journey with Stratos App today!
>>> Click Here to Visit Stratos App and Get Access Now <<<
Check Out My Previous Reviews: WebHub AI Review, Proteus App Review, ViralQuiz AI Review, VidZone AI Review, Smart Ebook AI Review, and Grok Blaster Review.
Thank for reading my honest “Stratos App Review” till the end. Hope it will help you to make purchase decision perfectly.
Don't forget to subscribe my newsletter and stay updated.
Affiliate Disclaimer:
This article may contain affiliate links, which means I receive a small commission at NO ADDITIONAL cost to you if you decide to purchase something. While we receive affiliate compensation for reviews/promotions on this article, we always offer honest opinions, user experiences, and real views related to the product or service itself. Our goal is to help readers make the best purchasing decisions; however, the testimonies and opinions expressed are ours only. As always, you should do your own research to verify any claims, results, and stats before making any kind of purchase. Affiliate commissions may be earned by clicking links or buying products recommended in this article, so you should assume we get paid. We review products and services you might find interesting. If you purchase them, we might get a share of the commission from the sale from our partners. This does not influence our decision to feature or recommend a product.
#Stratos#Stratos App#Stratos App pricing#Stratos App otos#Stratos App oto#Stratos App review#Stratos App reviews#Stratos App honest review#Stratos App funnels#Stratos App upsell#Stratos App legit#Stratos App coupon#Stratos App price#Stratos App bonus#Stratos App bonuses#Traffic#Stratos App Purchase#Affiliate Marketing
0 notes
Text
How to Improve Picture Quality in 3 Simple Steps

You probably have moments where you want to use a certain picture for some project, as your computer wallpaper, or put it on your social network, only to find out it's fuzzy or pixelated. Worry not; techniques exist for sharpening pictures using nothing fancy. This is a detailed tutorial on how to improve the quality of your photos.
What is Picture Quality?
Picture quality describes how clear or detailed an image is. You can see more in a photo with greater quality. Several factors, like focus, lens quality, and pixel count, can impact the quality of a picture. A high-quality picture is characterized by its crisp, smooth appearance and sharp details.
What is a High-Quality Picture?
You need high-quality photos for printing and other professional applications. A high-resolution photograph is printed at a minimum of 300PPI. This means that it would be great to print out highly detailed pictures in flyers, posters, or publications where details are important. A higher resolution means clearer pictures for digital photos, especially on bigger screens.
Improve Picture Quality for Free Online
If you prefer not to download and install software on your computer, you may improve the quality of your images using free online apps. PhotoCut's AI image enhancer is among the best available online. With the use of AI, PhotoCut's picture enhancer automatically raises the resolution of your photos for crisper shots without the need for technical expertise. You can also resize your images.
Key Features of PhotoCut
Powered by AI technology
Includes various editing tools
Offers design materials
Free to use
How to Use PhotoCut to Enhance Your Image?
Upload your image to PhotoCut.
Select the AI Enlarger tool to increase the image resolution.
Compare the enhanced photo to the original.
Refine your image further using the available editing tools.
Download your final, enhanced image.
PhotoCut also has a teenage filter which can take you back to your teenage days.
Improving Image Quality in Photoshop
It can assist enhance the quality and resolution of images for those who know the basics of Adobe Photoshop. The following is a detailed guide on how to accomplish this in Photoshop:
Open the image in Photoshop.
Click Image>Image Size, then set your resolution preferences.
Export the image with the new resolution for enhanced clarity.
Additionally, Photoshop has more advanced tools like color correction and sharpening that let you adjust the image's quality.
Best Apps to Improve Picture Quality
The quality of your images may be improved using some applications if you prefer to use your phone or are out and about. One of the most well-liked ones is as follows:
PicsArt
PicsArt is a free application for the enhancement of photographs. This app is also quite user-friendly for the starters. One can even change the sizes of the pictures with some minimal clicks, which does the task. You can also add Santa hats to your photos for a festive look using PhotoCut.
Pros:
Free to use
Supports social media sharing
Simple to operate
Cons:
Occasionally crashes
Pixlr
The user-friendly, free picture editor Pixlr is excellent for improving photo quality with a few clicks. Being able to accept several languages and formats makes it a flexible choice.
Pros:
Free to use
Supports various photo formats
Multiple language options
Cons:
Contains ads
Snapseed
Snapseed is a professional-grade photo editor that lets you improve the resolution and quality of images quickly. It’s perfect for those who want detailed control over their photo adjustments.
Pros:
Free to use
Easy-to-use interface
Cons:
Only supports JPEG and RAW file formats
3 Easy Ways to Improve Picture Quality
It does not require much-advanced equipment and editing software to enhance the picture. Three simple ways anybody can enhance pictures using any camera are:
1. Focus on Composition
A photograph's composition is the arrangement of its components inside the frame. The secret to improving your photo's visual attractiveness is good composition.
The first guideline is to apply the Rule of Thirds. You divide your frame into nine equal parts using two horizontal and two vertical lines. Then you position your subject on one of those lines or at the point where two of the lines meet to create a balanced and dynamic composition.
Other techniques include:
Leading Lines: Use natural leading lines, for example, road or river lines, to move the viewer's eye through a photo.
Symmetry: Create a feel of balance within your photo with symmetrical subjects.
Negative Space: Use the emptiness around the subject to stand out.
Framing: Frame your subjects with elements in the foreground using tree limbs or windows, for example.
While the Rule of Thirds is a good place to begin, remember not to play it too straight. Unusual compositions can make some fabulous, artistic photos.
2. Use Good Lighting
Lighting plays a very big role in the quality of photographs. The best composition will be ruined by the wrong lighting. Here is how to make the best of lighting:
Natural Light: Whenever feasible, take advantage of natural light. The mellow, diffused light of the "golden hours" (sunrise and sunset) is particularly pleasing. The harshness of the midday sun can produce unwelcome shadows.
Artificial Lighting: If indoors, try to use soft artificial lighting or lamps rather than bright overhead lights. It can also be achieved through diffusers or changed angles for better illumination.
Avoid Backlighting: Your subject will probably seem dark and silhouetted if they are placed in front of a bright light source, such as a window. This may be avoided effectively by placing the light source in front of the subject.
3. Basic Editing
Editing helps make your photographs appear even clearer and better. Fine-tuning makes a great difference, sometimes in very slight changes. Apply the following for better images:
Sharpen: Enhance details with sharpness.
Brightness/Contrast: Brighten the image and deepen the contrast, so it makes more of a pop.
Saturation: Makes colors look bright and vivid while avoiding over-enhancement.
Most free apps and programs have easy-to-use tools for basic editing. Besides making the images clearer, these edits will help bring out the mood and tone of your photos.
Conclusion
It's easier than you think to make your images better. You may produce photographs that are crisper, more professional-looking, and clearer with the use of free applications, web tools, and fundamental photography skills. There is an app for everyone, whether you use PicsArt, Snapseed, Photoshop, or PhotoCut. Furthermore, without an expensive camera, you may improve your images by concentrating on lighting, composition, and simple editing.
If you're shooting images for a project, making visually appealing postings on social media, or simply documenting memories, you can improve the appearance of any photo by using these easy steps.
You can check out the best 18th birthday wishes and birthday card templates to wish your friends or family members who are turning 18 soon.
FAQs
Q1. What are these 3 easy ways you're talking about?
Ans. The 3 ways are:
Improving your composition by framing the photo well.
Using good lighting, especially natural light.
Making basic edits to enhance sharpness and colors.
Q2. Do I need a fancy camera to improve my photos?
Ans. Not at all! These tips work for any type of camera, whether you're using a smartphone, point-and-shoot, or DSLR.
Q3. Are these tips for starters or intermediate photographers?
Ans. These are great tips even for a starter, but every photographer, beginner, or expert can always return to fundamentals.
Q4. What is "composition"?
Ans. A photograph's composition refers to how its components work together to create a harmonious, visually appealing picture.
Q5. How does the "Rule of Thirds" work?
Ans. Using two lines running horizontally and two running vertically, divide your image into nine sections according to the Rule of Thirds, then place your subject on the lines or at their junction.
Q6. What makes lighting so crucial?
Ans. Lighting affects your photo's overall appearance, contrast, and mood. Ordinary subjects may become spectacular when they are illuminated well.
Q7. What is "natural light"?
Ans. Natural light is sunlight; it is one of the most preferred lights in terms of its soft and alluring effects. This light is most great during golden hours sunrise and sunset.
0 notes