#penetesting
Explore tagged Tumblr posts
Visit Tumblr Blog
Explore Tumblr blogs with no restrictions, modern design and the best experience.
Last Seen Tumblr Blogs


Fun Fact
Tumblr’s reach among the 26-to-35-year-olds in the US is 11%.
Text
SmashTheTux - 0x05|0x06|0x07
So -after scratching my head over 0x08 for several days- I’ve decided to call it quits with SmashTheTux; I completed every challenge apart from the last (see my blog for earlier walkthroughs.)
Nonetheless, I really think SmashTheTux is a valuable experience for those interested in exploring virus and exploit development in the future (I say virus dev as the challenges force you to think more low-level.)
I’d also say -to a degree- it’s ideal for OSCP buffer overflow prep: not only is the first challenge a simple B/O similar to what you’ll encounter in the exam, but the experience of completing the 8 challenges (or 9; from the brief research I did, no one has managed to exploit 0x08) is also useful for building your confidence with using GDB and interacting with programs at a lower level.
Additionally, I found some of the challenges interesting as they required you to think independently of ways you could change the control flow of the program to achieve the desired reuslt- for example, I completed 0x04 (integer overflow) in a way different to hinted at (this is why I don’t look at hints- encourage that creative thinking, man!) and I feel there would have been a few interesting ways to exploit 0x05 (will be below somewhere.)
All in all, I definitely recommend this machine to anyone intrigued by low-level exploit development or to those who want to build their confidence in the use of GDB.
Anyway, enough rambling, time for my last 3 exploits.
0x05
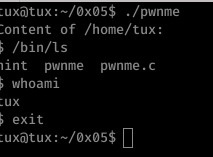
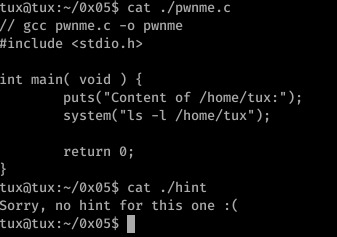
Well, it’s lucky I don’t look at hints! 0x05 was a very basic program- a call is made to system which executes the passed parameter as a terminal command, displaying the contents of /home/tux and then exiting.
The only input we have control over here is the files that appear within /home/tux; as the output of the command is not being placed in any sort of limited buffer or printf call, there’s little we can expect to achieve here.
So... What we need to do is hijack the call to ls which is actually pretty simple:
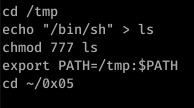
These are the commands I used to redirect the call to ls- first I created /tmp/ls and inserted the directory of /bin/sh before changing the permissions on /tmp/ls.
Finally, I added /tmp to the PATH environment variable- that’s it. Very simple but very effective.
When ls executes, the shell will look for a program file called ‘ls’ within the shell’s environment (aka: it will check each directory specified in the PATH environment variable for an executable file named ‘ls’)
Since /tmp is now the first directory within the variable, it will look there first and execute our modified /ls file as a result. It kind of acts like a symbolic link- when /tmp/ls is executed, the shell will execute the line ‘/bin/sh’.
This challenge could have potentially be completed by creating an alias for ‘ls’ also, to be honest there’s probably a few little tricks that could have been done here!
Although not directly related to C vulnerabilities, it does demonstrate the danger of loose access rights and permissions: it was my ability to change critical environment variables that made this possible.
0x06

Ah another hintless one, and here’s me feeling clever for not looking at the hints. xD
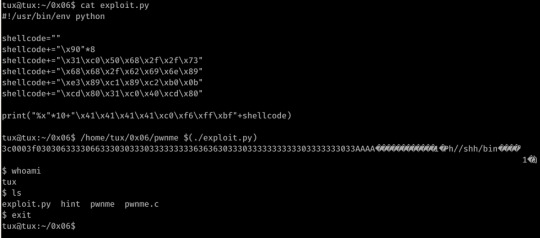
Here we have another format string vulnerability within sprintf (the same as printf but content is placed into the specified string as apposed to STDOUT); this time we are limited to input (not including the null) of 64 bytes.
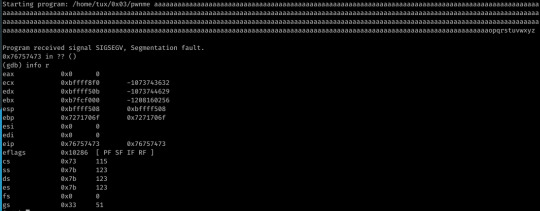
Obviously this means EIP overwrite must occur within the first 64 bytes of input.

With some trial and error, I discovered that popping 10 addresses from the stack got us to the point of EBP/EIP overwrite- now to simply place our shellcode and jump to it.
I simply placed my shellcode at the end of the payload and -using GDB- found the rough location of the code.
From here I just played with the found address until I had execution outside of GDB.
0x07


0x07 was very interesting for me as it was my first encounter with malloc and heap overflow.
We have 3 declared pointers to member structs- m1, m2 and m3. M3 is never interacted with further from it’s declaration.
M1 and m2, however, are allocated a memory size of 8 bytes, given their own id values and a further 8 bytes allocation for their name properties.
The first two commandline arguments passed to the program are finally copied into the name properties of m1 and m2 respectively with no length checks on the provided arguments.
It took me a while to analyze my exploit for this- I understand everything so well at the time but then I find I’ve forgotten why it actually worked. (Note to self: work on organization!)
After looking into it again, however, I understand the logic behind this attack:

With the input provided to argv[1], we overwrite the value of m2 with the address of exit, occurring just 4 lines below the second strcpy- if our buffer is on the heap, any changes to the stack shouldn’t effect the value copied to exit. This is followed by basic shellcode starting at 0x804a030.
In the strcpy call to m2->name, we provide the start of our heap stored shellcode.
This will be the moment when our shellcode is actually copied into the value at 0x80497f4.
3 notes
·
View notes
Photo
Woodpecker: Custom Security Distro for Remote Penetesting | #distros #pentesting #security
0 notes
Photo

Capsulecorp-Pentest – VirtualBox Environment For Network Penetest #activedirectory #ansible #capsulecorp-pentest #capsulecorppentest #conducting #hacker #hacking #cybersecurity #hackers #linux #ethicalhacking #programming #security #mrhacker
0 notes
Text
[Udemy] Ethical Hacking – Capture the Flag Walkthroughs
Video and lab Walkthroughs for Capture the Flag Exercises What Will I Learn? A much higher skill level as a pentester or a hacker. Be able to pentest any network. Requirements Intermediate expertise with pentesting or hacking. Completion of ‘Ethical Hacking Using Hands on Training’ or any ethical hacking course is a plus. Comfortable using the Linux command line interface (CLI). Comfortable learning bits of programming code such as Python and PHP. Comfortable creating virtual machines. Hardware and software capable of handling virtulization. Comfortable with the English langauge. Description You’ve taken enough ethical hacking courses. You know about the different pentesting tools but you’re just not quite sure how to use them in a real world penetest. Congratulations! You came to the right course! Using the hacking methodology, this course will teach you how to use the those pentesting tools to enumerate and gain root access. Over the span of the course, you will learn the different attack vectors used to exploit a target. You’ll learn Python, PHP scripting and tricks of the trade that will astound you! This is not a course for beginners, bug hunters or wanna-be script kiddies. Anyone enrolling should have a good command of the Linux terminal and be able to follow written step-by-step instructions. Each step of every capture the flag exercise is covered in a video tutorial. You’ve taken the ethical hacking courses, you’ve been introduced to the tools and the methodology. This course brings it all together showing students how to perform an actual pentest and gain root access. Students step through each of the Capture the Flags (CTF) walkthroughs learning how to footprint a target, enumerate the target for possible vulnerabilities, analyze the vulnerabilities and exploit the target to gain root access. Each CTF demonstrates the advance techniques and different attack vectors used by professional pentesters and hackers. Student having completed the Syberoffense Ethical Hacking course can now put to use what they have learned. You’ve seen the tools, heard all the war stories, now learn to hack like you’ve been wanting to. Don’t cheat yourself! Check out the free preview of the first module of the course. Student have a life time a access and more CTF exercises will be added over time. Who is the target audience? Those wanting to see the pentesting tools and hacking methodology being used. Those wanting to be learn advance pentesting/hacking techniques. This course is not for those new to ethical hacking. source https://ttorial.com/ethical-hacking-capture-flag-walkthroughs
source https://ttorialcom.tumblr.com/post/176960572293
0 notes
Text
Stapler 1
It’s been a while with life stuff getting it the way and whatnot; over last night and today I have rooted Stapler 1
(https://www.vulnhub.com/entry/stapler-1,150/) :)
I actually learned a few things from this- it was my first experience with enum4linux and SMB file shares; I’ve also identified my main areas of weakness with hacking (seems to be more web app based challenges and also lacking the needed organization and thoroughness.)
Enum4linux is now 1000000000% a part of my arsenal, actually think I’ll be going back to some machines I hit a roadblock on and running that against them.
Anyway, on with my solution.
Scans
I executed my custom enum script to begin, resulting in the feedback of a nice amount of open ports:

So, we have two web servers (NOTE: Must made amendments to my enum script to account for multi web servers!), VSFTPD, dnsmasq (DHCP and DNS server), Samba (a filesharing service), a listener on p666 that Nmap cannot identify and a MySQL server.
After running Nikto scans against the two websites, there were a few interesting points; I’ll confess- web apps are not my favorite thing. Thus I decided to look at the other running services before focusing my full attention on the web servers.
Enum4Linux
While researching Samba (after only noticing the open port a couple of hours after beginning the machine *frustrated sigh*), I read and saw the output for Enum4Linux and immediately knew it was a good idea to run this.
I will say: this script is great. It showed me existing users on the machine in addition to a considerable amount of information about the service of interest- SMB.
With the information discovered, I proceeded to harvest available files.

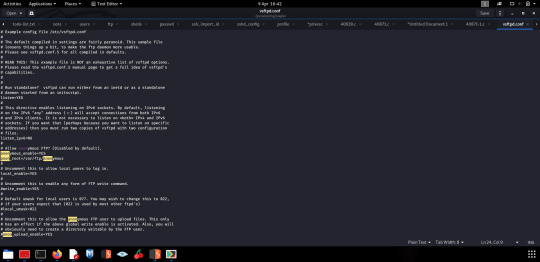
The share Kathy held some useful information about the in-use FTP server: the config file for the server was present which revealed the feature of anonymous login.
Obviously I then checked what was available to the anonymous user; there was merely a note instructing Elly to save ‘payload information’ to her FTP account.
There was also an SMB share named ‘tmp’ in which there was a file called ‘ls’ with the following output:
.: total 12.0K drwxrwxrwt 2 root root 4.0K Jun 5 16:32 . drwxr-xr-x 16 root root 4.0K Jun 3 22:06 .. -rw-r--r-- 1 root root 0 Jun 5 16:32 ls drwx------ 3 root root 4.0K Jun 5 15:32 systemd-private-df2bff9b90164a2eadc490c0b8f76087-systemd-timesyncd.service-vFKox
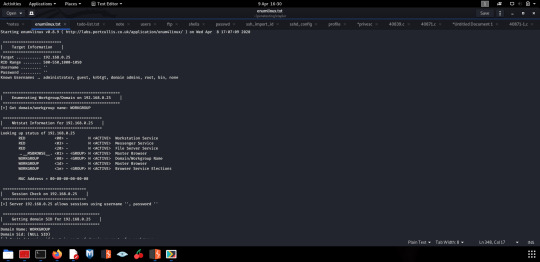
After this, I looked further at the output of the enum4linux script in order to identify users for brute force attacks against FTP, SSH and MySQL:

With users identified, I saved these names to a text file and utilized Nmap NSE scripts for the brute force of FTP and MySQL.
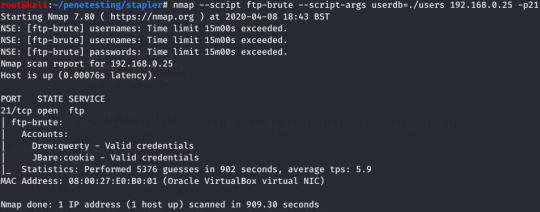
Results for FTP. :) logging on with either credentials reveals a whole list of files; in all honesty this is where my exploration of FTP ended as I tried the same credentials in SSH and found success.
So, now we have a stable connection to the system... Just one trick away from root privileges.
I ran my custom privesc script and -to my annoyance- this didn’t reveal the specific sh file; it did refer to cronjobs which gave me the idea to try that. I tried to exploit this without research and upon failure I moved on until hours after playing around with the use of exploits (goes without saying I’ve now amended my enum script to avoid that happening again!)
After several crashes from attempting Dirtyc0w, I began to get the feeling that I was approaching things wrong- I’d done it again, hadn’t I?
I’d jumped head first into the same rabbit hole I encountered when rooting Mr Robot... There’s usually ALWAYS a simpler way, Courtney... XD
I took a moment to look through my notes again and I focused on my first observation- the use of cron jobs to escalate privileges. In my defence I have never escalated privileges like this; in hindsight I gave up on that method far too quickly and I should have first researched privesc via cron jobs before moving onto researching exploits.
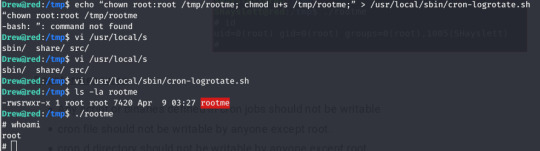
The echo command that failed shows what I added to the file cron-logrotate.sh. The file also initially has a note directed at a user that hints it could be used for malicious purposes (something like ‘something needs doing about this’)
This is why my initial attempt failed: I originally tried to append to logrotate and manually execute it before then creating a cronjob (thought this would be created under root but either I didn’t create the job correctly or I was wrong!)
As cron-logrotate is executed automatically depending on config and owned by root, the script executes, changing the permissions and owner of our created file- it’s now owned by root and -when run- it will execute with root privileges due to the setting the uid bit.
Conclusion
Genuinely have learned alot from this machine-I have a few changes I’m going to make to my enum script (both to accomodate multi web servers and to point out running services) in addition to the amendments I’ve already made to my privesc script.
What frustrates me is that my slowness is more down to rushing ahead and being to eager to complete things rather than inability: I actually only noticed the presence of dnsmasq when writing this walkthrough (but this can be helped by amending my enum script.)
I am getting there though- I just need to work on my methodology and tools. :)
0 notes
Text
SmashTheTux - 0x04
So, 0x04 was pretty easy- it was a simple integer overflow attack; in all honesty I solved this without analyzing the source code well and took the time to analyze it after.
I understand the flow of the C now since the analysis above. I may actually make it standard practice to do this before I look into exploitation as it might help my speed! But yeah... Bit of a silly one in my opinion: I don’t think you’d come across anything like this realistically.
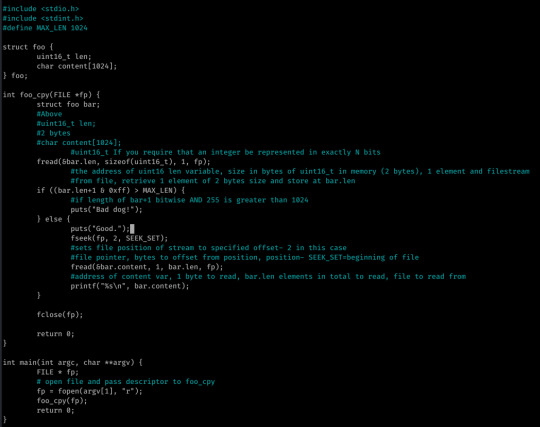
The first two bytes of the given file are stored into bar.len.
If len+1 bitwise AND 0xff (255) is greater than 1024, “Bad dog.“ is returned- else the contents of the file is returned starting at offset 2...
What? Like was this challenge written at 2AM? :’)
Anyway, my approach was pretty clever in it’s simplicity- this is why I don’t look at hints, you find different ways to solve things!

My payload is pretty simple: <1034 padding/shellcode><4 bytes junk (originally I thought it was EBP since input here overflowed the EBP register; as the program exits normally after our shellcode without segfault I was wrong, probably because the file closes first and thus EBP is changed by this function)><4 byte EIP/NOP address><4 byte expected file pointer>
I found the file pointer address when providing 1043 bytes of input to the file and performing a backtrace via GDB: I could see that the offsets I’d provided were correct as EIP and EBP were populated, but without the correct file pointer the program was constantly segfaulting before the point of EIP execution.

The second address is the desired file pointer. I think this was needed as the execve call works by essentially replacing program memory with the memory of the new process, inheriting the relevant file descriptors to do this.
Our payload led to the file pointer’s (or ESI’s) LSB being overwritten by the terminating ‘0a‘ newline character, meaning it was invalid and attempts to close the file by execve before executing /bin/sh were unsuccessful.
Reflection
I don’t really think much of this challenge if I’m honest- I don’t think there’s any sort of scenario in which anyone would encounter code with logic as random as the above.
However, I did notice how much my understanding of stack attacks is developing at a low level: as I said, I basically constructed this payload myself from simple trial and error (and a bit of logic!)
In future though I think I’ll be making a point of analyzing the C source first (until I’m a little more familiar with the language) as I feel that’s one of the only things slowing me down now.
0 notes
Text
SmashTheTux - 0x03

This was an off-by-one vulnerability within the if comparison:
If strlen returns a result greater than 512, the script exits with ‘Nice Try.’, else text is copied into buff with no further checks.
In most cases this is fine- input upto 512 bytes and beyond will return the expected results- but supplying a total of 512 bytes exactly results in both an EBP and EIP overwrite.
So, why is this? Well, strlen doesn’t include the terminating null character when counting the amount of bytes in a given variable, meaning input of 513 bytes is counted as holding only 512 bytes by strlen.
Thus, input of 512 bytes will both return false in the above statement and overflow the variable buff with one byte (the terminating null character.)
My Method
Like 0x00, I approached the challenge very differently to the given hint (but maybe not incorrectly this time.)
Below is the hint compared to my exploit (I never look at hints prior to the challenge as I feel you learn more from discovering it yourself.)


I started off by triggering the segfault with 512 bytes- sure enough, the segfault was triggered and EIP was already overwritten with our input...But this isn’t a simple buffer overflow- any input beyond 512 bytes will simply cause the statement to return true and exit, discarding our input rather than copying it into strcpy.
But as I said- I’d already triggered an EIP overwrite. With this in mind, I fuzzed the application a little further, going back 4 bytes until I’d identified the offsets of EBP and EIP.
Once I’d identified these offsets, I opted with a method similar to the one I used in 0x00- store your shellcode in the buffer itself and jump to it on the stack.
The above method worked well for me- a payload consisting of my shellcode (a 100 byte NOP sled followed by a 28 byte execve /bin/sh system call and a further 400 bytes consisting of an address within the NOP sled off my shellcode), followed by ebp (the address of exit- when our payload has finished execution the leave instruction will execute, popping EBP to the top of the stack; this is not neccessary and EBP can be anything), EIP (an address within our NOP sled) and a further 4 bytes of whatever (in my case, exit out of laziness!)
However, the exploit is not successful without the 100 addresses at the end of the shellcode- this suggests that the EIP overwrite was not where my calculations had shown or perhaps the address I was jumping to was simply a little further down the stack than I thought, though I’m unsure when testing in GDB showed otherwise...
I’ve since looked at other solutions to the challenge, and the EIP overwrite actually occurred at offset 440, thus why my exploit worked.
Reflection
All in all, I’m content with my exploit: while I didn’t calculate the correct offset of EIP correctly, I did think to resolve an issue with an incorrect address by simply putting references to an address in my NOP sled within the buffer.
The reason I never doubted my EIP offset is 1) due to the GDB results when testing initially and 2) my initial idea worked perfectly within GDB within the first hour or two of looking at it (though not out of it-it just segfaulted out of it, thus why I had to change it around.)

I also learned the importance of keeping the environment the same inside and outside of the debugger: doing this would have saved me a good few hours.
But yeah, I got a shell so yay? :’)

#offbyone#exploitdev#SmashTheTux#VulnHub#cybersecurity#offensivesec#OSCP#bufferoverflow#hacking#penetesting
0 notes
Text
SmashTheTux - 0x02
The third challenge of the series hosted a vulnerability known as a race condition.
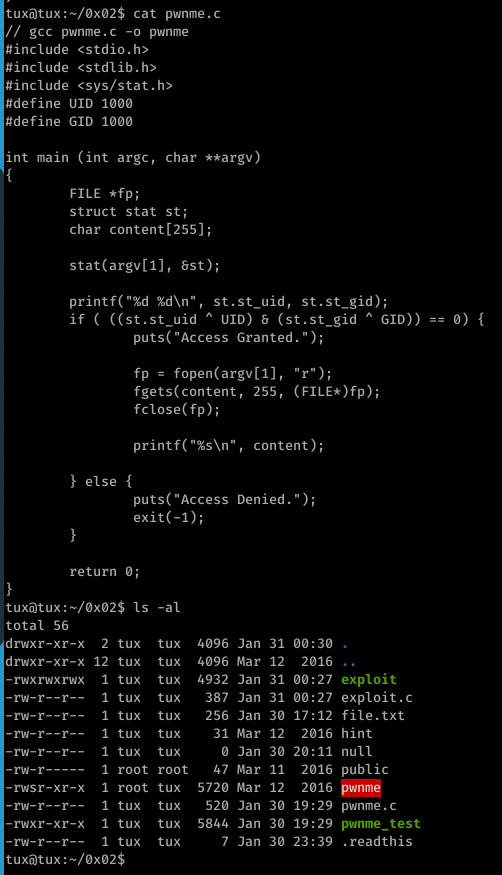
The ls shows public as a root file as this is where the file swapping finished execution, usually .readthis is the root file!
Here we see use of the stat system call to retrieve information on a given file (argv[1])
The st_uid and st_gid returned from struct are XORed with 1000 (this is what the UID and GID macros resolve to) before a bitwise AND is performed on the result of the two XOR operations.
If this returns 0 (false), then the requested file is opened and it’s contents printed, otherwise access is denied.
This likely isn’t a buffer overflow challenge: not only is contents passed correctly to fgets, our input is also not interacted with (other than argv[1] being passed to the stat call) prior to the comparison.
Due to this, I realized the aim is probably to change the values of st_uid/st_gid somehow in order to execute fopen... But how when all we have to play with prior to the check is the given filename?
So, to Google... After some research on C vulnerabilities I came across race conditions and what to look for- sure enough, the same vulnerability is present in this code.
At line 14, argv[1] is used in the stat system call and at line 20 in the call to fopen- this gives us a small window of opportunity to swap the value of the given file with another before the call to fopen...
Maybe we show swap the contents of .readthis with the contents of public?(literally just a file containing the string ‘PUBLIC’)
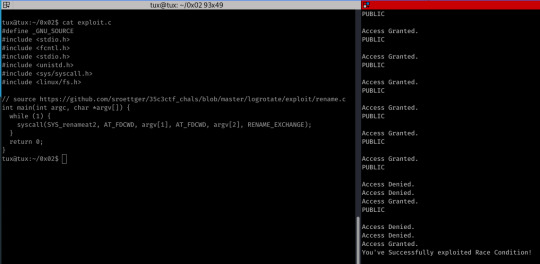
To do this, I used a very simple script from https://github.com/sroettger/35c3ctf_chals/blob/master/logrotate/exploit/rename.c-it simply executes the renameat2 system call in a while loop, replacing the contents of file A with file B.
While executing this, I also executed ./pwnme, passing .readthis as an argument in a while loop- if there’s a race condition, we should see output other than PUBLIC, Access Denied and Access Granted after a short period (output is the first image.)
Reflection
I found this challenge very interesting to work on and I understand why this works and -though I’m not 100%- I also may know why my first approach potentially didn’t (attempting to execute ln -sf ./public ./link ; ln -sf ./.readthis ./link in a while loop while also executing ./pwnme ./link)
My first approach may have taken too long to execute in the small window of time provided, or maybe fopen was attempting to directly access .readthis, thus causing an error (I did get a seg fault in a couple of the results from this attempt, perhaps the segfault was due to not having permission to access the file?)
Who knows? This is definitely a bug I’ll be having a play with once I’ve got the basics and OSCP covered! I also think learning C would massively help as I would have probably have tried that method of triggering the condition myself had I known C!
0 notes
Text
SmashTheTux - 0x01
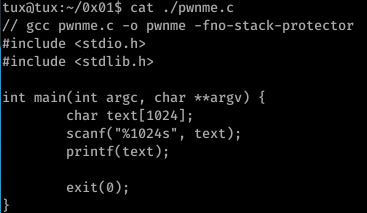
The second challenge off SmashTheTux demonstrates improper use of the printf function.
If user input alone is provided to the function, printf will evaluate user input as both a command -to compensate for the lack of format specifier- and input to print.
For example, if our input is “a string %x”, printf(text) would ultimately resolve to printf(”a string %x”)- as an argument has not been supplied for the value of ‘%x’, printf will simply pop the first hexadecimal number from the stack in compensation (I hope this is a satisfactory explanation behind the vulnerability!)
Now, onto the actual exploit, I opted to overwrite the GOT entry of exit with the address of a malicious environment variable holding simple execve(”/bin/sh”) shellcode- this isn’t a completely foolproof exploit as it also relies on the user having the permissions to actually create environment variables; in the situation of a privileged user attempting to gain root privileges via an SUID binary or alike, it’s actually very effective.
This was what I came up with:

The first 8 bytes here shows the GOT entry of the binary’s exit function plus the address+2 (this is because $hn writes 2 bytes at a time, thus we need to perform 2 overwrites on the GOT entry- a 4 byte pointer. The lower 2 bytes start at 0x08049754-%4$hn, the upper 2 at 0x08049756-%5$hn.)
Next, I filled the stack with 49143 characters via the %<int>x specifier- this sends the current address at the top of the stack to stdout padded with whitespace to match the specified length. %5$hn will write the current amount of characters in the buffer to the fifth address on the stack (this is 0x08049756 the second address in the first section, the location discovered by leaking the stack with the %x format specifier.)
I then repeated this step for the lower two bytes at address 54.
You’re probably wondering what the Hell’s going on if you’ve never seen a format string exploit; it’s actually pretty simple once you grasp the logic:
The two large numbers above correspond to our desired address in hex- 49151=bfff while 65482=ffca. Since %n overwrites the specified value with the length of the buffer thus far, this is (one of) the only ways to achieve a value overwrite in the event of a format string vulnerability.
You can attempt to use %n to overwrite all four bytes at once; this can take a considerable amount of time to execute as stdout then has to display these characters (which can be well over a million, should be enough to make you understand!)
I discovered the location of my variable on stack via GDB:
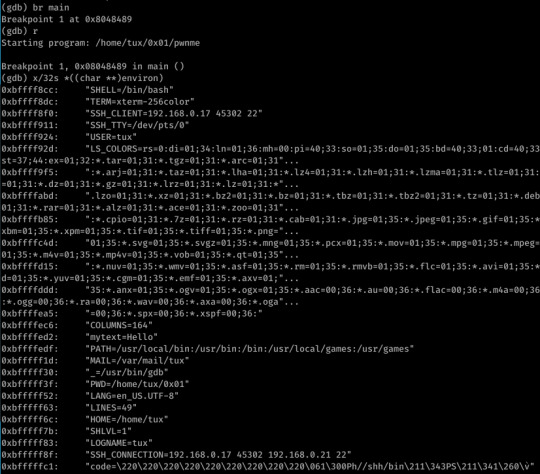
Can you spot my code environment variable I’m too lazy to highlight? The difference in address is due to taking the screenshot at a different time (atleast I think- I definitely got 0xbfffffca from this command when executing the exploit!)
I also put an NOP sled at the beginning to change the length of the shellcode from 23 to 32 bytes (keeps the stack neatly aligned and reduces the chances of leftover stack values interfering with the shellcode execution.)

Not the best screenshot as the exploit produced a lot of whitespace but you can see by the need to close the process that it was successful.
The hint provided was this:

So yeah, I think I can consider this exploit a bit more of a success: I didn’t make any alarmingly obvious noob mistakes and I also learned a little more about the effect environment variables can have on a vulnerable application.
I think I’ll be using pwntools in the future though: it seems to be a cleaner way of ensuring stdin doesn’t close upon execution of /bin/sh as I had to use ‘(./exploit.py ; cat) | pwnme’ or something similar to prevent this issue.
0 notes
Text
SmashTheTux - 0x00

As exploit dev is something I want to explore in the future, I’ve decided to go back to basics to gain a real understanding of it.
SmashTheTux offers 9 C scripts hosting different variants of B/O vulnerability, I’m actually glad I started it as I’ve realized I still have alot I need to remember when doing these attacks...
So my exploit for 0x00 was this:

I was COMPLETELY on the wrong tracks really as I forgot one crucial point: the segfault is triggered when one byte of EBP is overwritten, not when all of them are. :’)
However, my exploit still works as I simply placed my shellcode into the buffer and then returned to it after the overflow is triggered (I originally thought 264 bytes overwrote the whole of EBP but yeah... Huge nope I’ve forgotten alot since I first looked at it! xD)
I believe this works as I didn’t place any return address after EBP, thus EBP was popped to the stack and executed; if I’m wrong on this I’d like to know as exploit dev is something I want to do in future.
But yeah it’s kinda a bittersweet win: I had the knowledge to just place the shellcode in the buffer and then jump to it, but my offsets were completely wrong and I would have never got the intended solution with them. :’)
Lessons:
A complete EBP (or RBP) overwrite will occur 4/8 bytes AFTER the initial segfault (which makes perfect sense as even a slight alteration of EBP could make it point to an invalid address -.-)
If the standard attack doesn’t work, you can always just use my method above- trigger the overflow and then place the start address of the malicious buffer on the stack.
My memory is trash and I’m a B/O noob xD
1 note
·
View note
Text
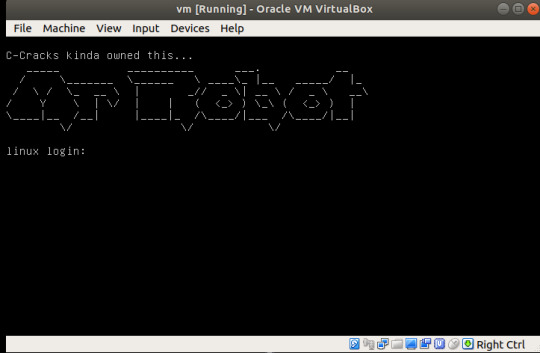
Mr. Robot 1

After massively failing at Brainpan 2 for a few weeks, I thought I’d take a breather and collect the 3 possible keys from Mr. Robot. It’s frequently referred to as an ‘OSCP-like’ VM though it’s rating is only beginner-intermediate.
So, the usual: download the VM (https://www.vulnhub.com/entry/mr-robot-1,151/), import into Oracle VM VirtualBox and perform an nmap port scan of your network:

As .17 is the local IP of my Kali Linux instance, it’s obvious that our target is .19 (NOTE: if the VM does not appear, scan every port using ‘-p-’.)
Before commencing with further tests, I added .19 to /etc/hosts and executed a more thorough scan on Mr. Robot (nmap -sV -T5 mr-robot -p-); while this revealed the web servers listening on port 80 and 443 were Apache, there were no open ports beyond these.
Fair enough, time for some nikto and dirb!


Nikto has revealed that responses from the web servers indicate the presence of PHP 5.5.29 and WordPress, in addition to WordPress login portals. It has also flagged the presence of a directory named ‘admin’; upon attempting access, the request is simply looped and no useful data can be found.
I also took the opportunity to test out WPScan- a WordPress vulnerability scanner that comes preinstalled with Kali Linux. While this does show the presence of the XML-RPC API and confirms some of Nikto’s findings, it’s definitely not required.
Dirb continued to run and revealed the presence of robots.txt, in addition to various other pages leading to redirects or lacking any sort of data.
Upon visiting robots.txt, you receive indication of the presence of key 1 and a file of dic format.
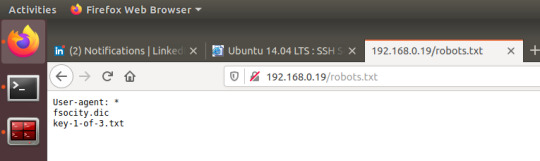
For any person with experience in boot2root challenges, they’ll probably have already guessed the obvious path forward- head to the wp-login page found earlier and investigate fsocity.dic.
To remove duplicate lines, I piped the contents of fsocity.dic to sort -u and stored the results in a new file (cat fsocity.dic | sort -u > unique.txt)
I looked through the file briefly for anything resembling a username firstly and by trial and error I received confirmation of the existence of Elliot.

There we go, so now we just need a password; like I’m going to sit and manually try each possibility myself!
Here comes Bash to save the day (yes, I could have used this for users too but I wanted to see the change in error message for myself.)


Not the sexiest but who cares about appearance when the result’s the same? We still know that the password is ER28-0652.
Surely enough, this password grants us access to the wp-admin dashboard. Although my first time infiltrating a system running WordPress on their web servers, it only took me a couple of minutes before I discovered the themes editor would allow me to alter PHP files… So, also my first experience with a PHP reverse shell!
I originally attempted to alter a php file on the active twentyfifteen theme but executing this in my browser yielded no reverse shell, thus I editted a PHP file of theme twentyfourteen (honestly any should work but I used 404.php)

Surely enough, we receive a stable connection from mr-robot through netcat from user Daemon; further investigation reveals the presence of /home/robot.
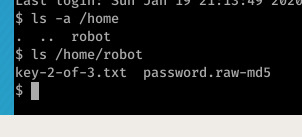
Hmm, I’ve never watched Mr Robot but for an alleged hacker- this is pretty laughable… He hashes his password with 1) a crackable hashing algorithm and 2) saves it into a file revealing the algorithm in use… Yeah if real companies are really this stupid then God help our data!
Anyway, let’s give it a run through Johnny with /usr/share/wordlists/rockyou.txt:

Wow, the alphabet… Isn’t he smart? Into Robot we go.
After making my usual mistake and jumping to the more complex methods of privilege escalation first (exploit delivery… ALWAYS run basic checks thoroughly first, https://blog.g0tmi1k.com/2011/08/basic-linux-privilege-escalation/ is a really good checklist to follow and refer to if you’ve fell down a rabbit hole,) I discovered that the nmap binary was not only present on the machine; it’s permissions also meant that the program executed under the privileges of the owner, not the user responsible for execution.

From this point, you can simply execute ‘nmap –interactive’ and then ‘!sh’, giving you root access to the system- go ahead and grab key-3-of-3 from /root.

Points to take from Mr. Robot:
You should always look for the most simple forms of entry and test simple vulnerabilities first and thoroughly before looking further into a service (this is my main issue- I jump to investigating further too soon!)
Only give web servers a brief manual check until scans finish- if scans don’t reveal any interesting directories or vulnerabilities, this is the time to begin looking into the site’s content (and other services if present.)
If you’ve tried something with a script that you strongly believed was going to grant you access to a specific area of the web server, check your syntax before moving on: I pretty much wasted Saturday looking more in-depth into Mr. Robot just to discover my original brute force script was only executing grep in the event of curl failing (yeah I know, what a noob!)
Some errors will not flag up as syntax errors as they’re technically valid statements so don’t assume your idea was wrong just because the output isn’t what you expected.
1 note
·
View note
Text
HTB - Legacy
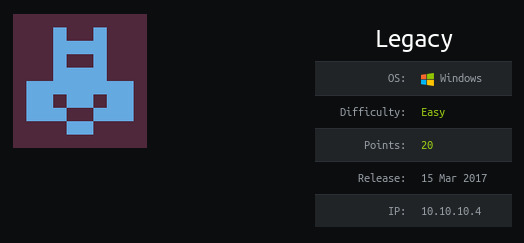
As the Resolute root flag is proving rather difficult for my nooby skill level at the moment, I decided to take a breather and rooted Legacy tonight.
I must say it’s restored my faith in myself a bit- I’ve discovered that I’m only so slow momentarily due to a lack of knowledge (e.g. Sauna took me longer due to not being aware of how to properly enumerate a Domain Controller.)
I think Legacy took me an hour if that all together; it’s honestly not a bragging point as you simply have to utilize ms08-067 (a buffer overflow vulnerability triggered by specially crafted RPC requests, exploited by the Conficker worm detected in late 2008) which grants you the ability of arbitrary code execution on the machine.
I started off with my enum script which revealed 3 interesting ports:

We have netbios-ssn (netbios session service), microsoft ds (directory service) and ms wbt server (windows-based terminal); as the wbt server is closed, our focus will be on netbios and ds.
Googling microsoft ds brings up an obvious clue:
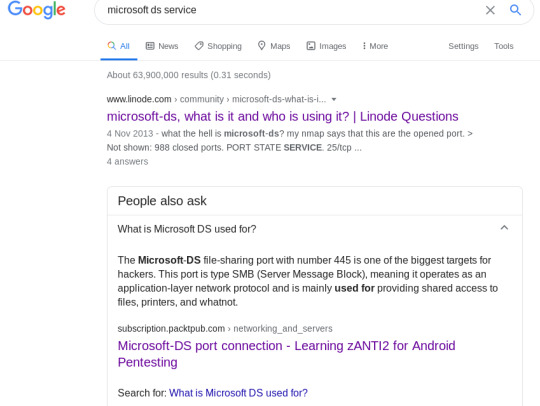
Obviously this is going to be our target, meaning scripts such as enum4linux, nmblookup and smbclient will come to our aid (https://www.hackingarticles.in/a-little-guide-to-smb-enumeration/ for more on this.)
Using these scripts, however, doesn’t really reveal anything- attempts to connect to the ds through smbclient time out, the same for using RPC client to connect to netbios-ssn.
Our obvious next check will be against public exploits out for Windows XP SP3 that utilize SMB or RPC. I simply Googled this; upon reflection I could have instead utilized nmap nse scripts to check for this issue:
smb-vuln-conficker smb-vuln-cve2009-3103 smb-vuln-ms06-025 smb-vuln-ms07-029 smb-vuln-regsvc-dos smb-vuln-ms08-067
By simply appending --script smb-vuln* to the standard nmap scan, all of these scripts would have been executed during the port scan of Legacy. This would have saved me 10-20 minutes of time.
Upon this discovery, there are two ways to proceed- you can either use exploit/windows/smb/ms08_067_netapi through Metasploit or you can utilize a script out for exploiting this vulnerability.
In the spirit of both OSCP and not being a complete script kiddy, I opted for the use of a publicly available Python script exploiting this b/o vulnerability (https://github.com/jivoi/pentest/blob/master/exploit_win/ms08-067.py)

root@kali:~/penetesting/legacy# nc -vlp 6969 listening on [any] 6969 ... connect to [10.10.14.47] from legacy.htb [10.10.10.4] 1031 Microsoft Windows XP [Version 5.1.2600] (C) Copyright 1985-2001 Microsoft Corp.
You simply have to replace the example shellcode with shellcode of your choosing and fire away. I chose to stick to a simple reverse shell due to the need to investigate the system after the initial foothold.
Some simple enumeration reveals we are user Network Service:
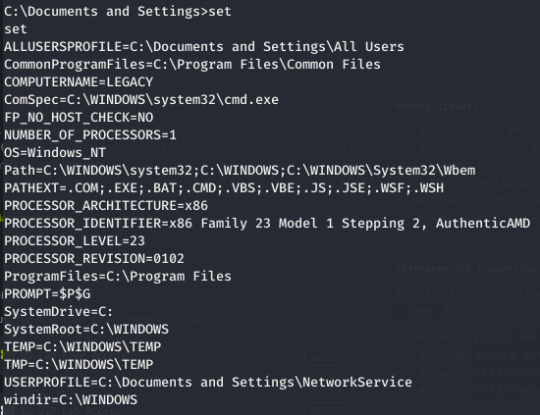
For some reason, NetworkService has the near equivalent to system privileges- with this you can grab both the root and user flags.
So Legacy was quick and sweet. Challenging? No. An achievement? No. However, I’m still glad I took the hour to do it as it’s my first time successfully using a public exploit and I also know that the vulnerable service is microsoft Directory Service, not SMB (that’s the protocol goddamnit. xD)
Reading other people’s walkthroughs has revealed that you could also use the Eternal Blue exploit against Legacy; honestly potato, potato (imagine I’m saying the second potato as potarto) :P
#hackthebox#legacy#OSCP#ms08-067#metasploit#nmap#directory service#smb#rpc#windows#learning#cybersecurity#offensive security#hacking
2 notes
·
View notes