#photoshop cc 2020
Text

BTS - Love Maze
3 notes
·
View notes
Text
Adobe photoshop cc classroom in a book 2020

ADOBE PHOTOSHOP CC CLASSROOM IN A BOOK 2020 APK
ADOBE PHOTOSHOP CC CLASSROOM IN A BOOK 2020 SOFTWARE
ADOBE PHOTOSHOP CC CLASSROOM IN A BOOK 2020 WINDOWS
Note: Classroom in a Book does not replace the documentation, support, updates, or any other benefits of being a registered owner of Adobe Photoshop software.
ADOBE PHOTOSHOP CC CLASSROOM IN A BOOK 2020 WINDOWS
What you need to use this book: Adobe Photoshop (2021 release) software, for either Windows or macOS.
ADOBE PHOTOSHOP CC CLASSROOM IN A BOOK 2020 APK
Web Edition containing the complete text of the book Learn Adobe Photoshop CC Step APK - By-Step Techniques 5 MB ( ) - Learn Photoshop CC: Adobe Photoshop CC Step-By-Step Techniques APK - Learn Adobe Photoshop CC Step. Follow the instructions in the book’s “Getting Started” section to unlock access to:ĭownloadable lesson files you need to work through the projects in the book Purchasing this book includes valuable online extras. Adobe Photoshop Lightroom Classic Classroom in a Book (2020 release) por Rafael Concepcion, 9780136623793, disponible en Book Depository con envío gratis. You can follow the book from start to finish or choose only those lessons that interest you. Adobe Photoshop Lightroom Cc 2015 Release Lightroom 6 Classroom In A Book published by : New Riders Tony Northrup Mercator Stúdió Adobe Photoshop Lightroom CC / Lightroom 6 Book The Complete Guide for Photographers, The Mason Press 'OReilly Media, Inc.' Johan W.
ADOBE PHOTOSHOP CC CLASSROOM IN A BOOK 2020 SOFTWARE
The fastest, easiest, most comprehensive way to learn Adobe PhotoshopĬlassroom in a Book®, the best-selling series of hands-on software training workbooks, offers what no other book or training program does - an official training series from Adobe, developed with the support of Adobe product experts.Īdobe Photoshop Classroom in a Book (2021 release) contains 15 lessons that cover the basics and beyond, providing countless tips and techniques to help you become more productive with the program. Classroom in a Book®, the best-selling series of hands-on software training workbooks, offers what no other book or training program does - an official training series from Adobe, developed with the support of Adobe product experts. : Adobe Photoshop Classroom in a Book (2020 release) (9780136447993) by Faulkner, Andrew Chavez, Conrad and a great selection of similar New, Used and Collectible Books available now at great prices.
0 notes
Text
Knoll light factory photoshop cc 2020 mac

#Knoll light factory photoshop cc 2020 mac install#
#Knoll light factory photoshop cc 2020 mac full#
#Knoll light factory photoshop cc 2020 mac software#
#Knoll light factory photoshop cc 2020 mac license#
#Knoll light factory photoshop cc 2020 mac tv#
Knoll Light Factory for Photoshop 3.2 – Co-creator of Photoshop and Star Wars effects and special effects specialist John Knoll developed the Knoll Light Factory to simulate reflections from a very bright light source through a camera lens. These effects can also be used to create logos and other text effects. Knoll Light Factory is a plugin used to create light effects, mainly glare – reflections from bright light sources, for example, from the sun.Įffects consist of flares, glare, rainbows, reflections, which can add artistic effects and make the picture especially spectacular.Īll effects have flexible settings, and the designer, creating his own effect, can compose it, adjusting it as needed. The Fractal Clouds filter implemented in the Image Lounge helps to create clouds of any shape and type, as well as a ‘hypnotic tunnel’. Solar flares, explosions, smoke, or blazing fire background images can be generated. With the Image Lounge, you can add lifelike shadows, movements, color displays, or blur and defocus images to create the effect of being shot with a film camera.Īllows you to add three-dimensional shadows to an object or text elements, as well as simulate the characteristic distortions of water, hot air, steam and other effects. Image Lounge is a plug-in for After Effects that contains more than 20 filters that allow you to transform images and create the effect of fire, smoke and water, giving a special style to each of the footage. The effect is interesting for working with logos and other dynamic graphics elements. Thanks to the Holomatrix tool, you can give your video a fantastic look using a variety of effects and modes. Holomatrix can be used to recreate holographic scenes from Star Wars or make actors look like the ghosts from Harry Potter.
#Knoll light factory photoshop cc 2020 mac tv#
The solution includes over 30 customized effects that transform ordinary footage into animated sci-fi holograms depicting poor TV reception and creating lifelike digital signals. Holomatrix is a plug-in for After Effects that allows you to control the created virtual reality and create special effects of varying complexity. The Spill Killer tool removes light spots in integrated images. The Composite Wizard automates most color grading effects, seamlessly joins image borders and removes unwanted artifacts using Wire / Rig Zapper, Miracle AlphaCleaner and Denoiser filters. The Composite Wizard includes over 20 filters and helps to soften jagged edges and fuzzy masks, as well as balance the color system. There is also a big (huge) request to everyone – this material should not be re-uploaded to other resources. Hope for understanding.Ĭomposite Wizard – Developed for After Effects, it is a tool for seamlessly merging images. Hope this help: please share this article.The material is provided solely for educational purposes. Knoll Light Factory for Photoshop CC freeload with Crack Note: For more information, installing and Activation Open README.txt file.
#Knoll light factory photoshop cc 2020 mac install#
#3: Install the Effect Suite with copy and paste same serial for Knoll Light
#Knoll light factory photoshop cc 2020 mac license#
#2: Run Knoll Light Factory installer and Enter it License key: #1: Download Knoll Light Factory for Photoshop and Extract it. How to Crack, Register or Free Activation Knoll Light Factory for Photoshop CC
#Knoll light factory photoshop cc 2020 mac software#
Software Name: Knoll Light Factory for Photoshop CC.
#Knoll light factory photoshop cc 2020 mac full#
Knoll Light Factory for Photoshop CC Full Specification
This plugin capable to add flares, sparkles, rays and various other lighting types into the images.
Provide possibility to create your light from the scratched.
It supports Adobe Photoshop, Adobe After Effects, and Adobe premier.
There are some of the core features which user will experience after the installation of Knoll Light Factory for Photoshop: Knoll Light Factory for Photoshop CC Features and Highlights It also enables you to change the inner and the outer color, the noise position, ring size, softness and brightness and the Ramp Gamma. You are also able to change the light source location, the obscuration type to RGB, Alpha, Inverse Alpha, Luminance and Inverse Luminance and the brightness and the angle of the lens. After the new composition is created or adding new layer you are able to add the image or video sequence you need to change. Knoll Light Factory for Photoshop CC Download with Crack enables you to create your own lights from the scratch. Get knoll light factory for photoshop cc freeload with crack. Knoll Light Factory for Photoshop CC Crack comes with various different effects created by the lens flares like Glow Ball, Ploy Spike, Basic Spotlight and Star Filter to name a few. This plugin works in the 3D space so you can easily move as well as synchronize the flare as well. Knoll Light Factory for Photoshop CC 2015-2020 Crack key is an impressive plugin for Adobe Photoshop that will add the lens flare effect so that you can make your pictures look real.
0 notes
Text
Photoshop Menu Bar
Photoshop Menu Bar
Photoshop Menu Bar में Total 11 Menus होते हैं। Menu Bar का प्रत्येक Menu Commands के एक group को Represent करता है। जो आपको किसी image के कुछ भाग में या पूरी image में किसी भी तरह का Changes करने की अनुमति देते हैं और files को manipulate करने में भी यह आपकी Help करता हैं। यह Screen के ऊपरी भाग में Left ओर स्थित होते हैं। यदि Menu command के Right ओर कोई Right Facing Arrow होता…

View On WordPress
#adobe photoshop#adobe photoshop cc#adobe photoshop tutorial#complete photoshop course#complete photoshop course for beginners#complete photoshop tutorial from beginner to pro#how to use photoshop#learn photoshop#photoshop#photoshop 2020#photoshop by ishan#photoshop elements#photoshop in hindi#photoshop menu bar tutorial#photoshop tips#photoshop toolbar#photoshop toolbar missing#photoshop tutorial#photoshop tutorial in hindi#photoshop tutorials
0 notes
Photo


Rotoscoping Tutorial by @antoniosvivaldi
Hi everyone! I’m excited to announce my long-delayed Rotoscoping Tutorial - requested by a number of people over the past calendar year.
In this tutorial, I will show you how to create the cutout gifs like this (and seen in most of my gifsets under this tag) with Rotoscoping on After Effects. I’ll also provide additional examples and a number of things that I do to optimise my giffing / Rotoscoping workflow (e.g. useful shortcuts & other things to be aware of).
This is the structure of the tutorial:
Why Rotoscoping? Photoshop video timeline’s limitations
Photoshop workflow pt 1: Preparing your gif
After Effects workflow: Interface, shortcuts, and Rotoscoping tools
Photoshop workflow pt 2: Assembling your gif; with multiple examples
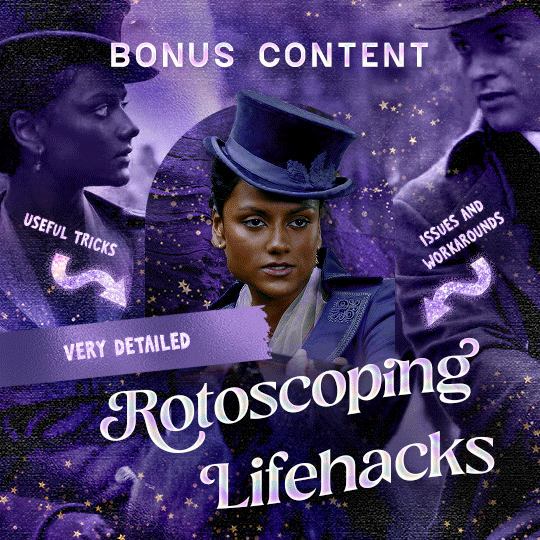
Bonus content: Rotoscoping tips* & workarounds to common issues
For quick reference, here are example gifsets (and where Rotoscoping is used in the posts) that I will mention in the tutorial:
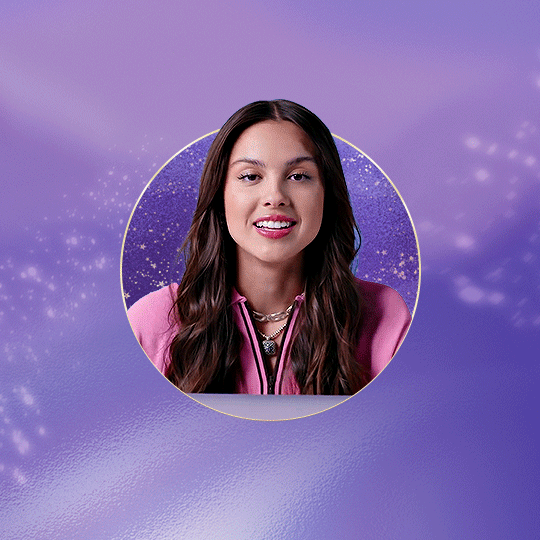
Example 1: Cutout gif effect | panels 2 + 4
Example 2: Changing a gif’s background colour | all panels
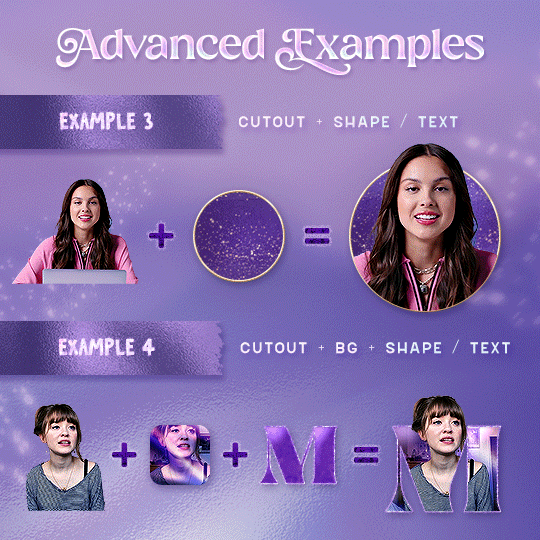
Example 3: Cutout gif effect in a shape | all panels
Example 4: Putting it all together | panels 1, 3, & 5
What you need & need to know:
Software: Photoshop & After Effects (After Effects 2021 or later for Rotobrush 2.0)*
Hardware: 16GB RAM required to run later versions of AE*
Difficulty: Advanced; Knowledge in making gifs, applying layer masks, and using video timeline interface assumed
Key concepts: Rotoscoping (AE) / Video Timeline (AE+ PS) / Layer Masks & Groups (PS)
Supplementary files: tutorial resources
*I’m currently running the latest version of PS & AE on an M2 Mac, but I’ve also used older versions (CC 2015 & 2020) on Intel-based Macs. I’ll outline some known compatibility & performance issues, and workarounds later in this tutorial that could help streamline your giffing workflow.
Tutorial under the cut. Like / Reblog this post if you find this tutorial helpful. Linking this post / the example gifsets in your post caption, will be greatly appreciated if you read this to create effects seen in Examples 3 + 4.
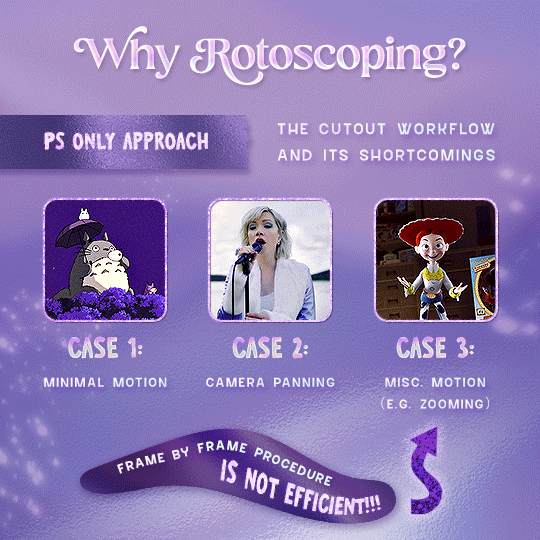
1) Why Rotoscoping?
My Rotoscoping journey is motivated by the shortcomings on Photoshop - namely the limited options to manipulate the Layer Mask keyframes in the video timeline interface, as well my need to gif more efficiently.
Suppose I want to cutout this subject or recolour the background of a gif on Photoshop: I personally classify the gifs that I prepare on PS into 3 types based on the motion of the subject
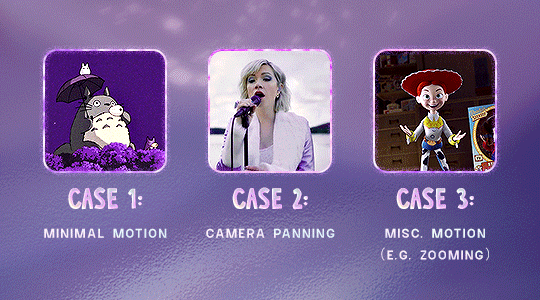
These are the common Photoshop-only approaches when attempting to mask the subject in the gif.
Case 1: minimal motion in the subject → a simple layer mask will do the trick
Case 2: some linear panning of the subject in the gif → using the Layer Mask Position keyframes in the video timeline interface will do the trick
Case 3: subject moves around a lot (e.g. zoom motion) → Unfortunately this is where a Photoshop-only workflow will require frame by frame masking. Layer Mask Position keyframes only apply positional translation (but not transformation / rotation) on the layer mask
Enter Rotoscoping on After Effects: Instead of resigning to frame by frame procedure on Photoshop, I opted to make my life easier by learning to Rotoscope on After Effects. This essentially provides me an opportunity to cutout / recolour a wider range of gifs with relative ease.
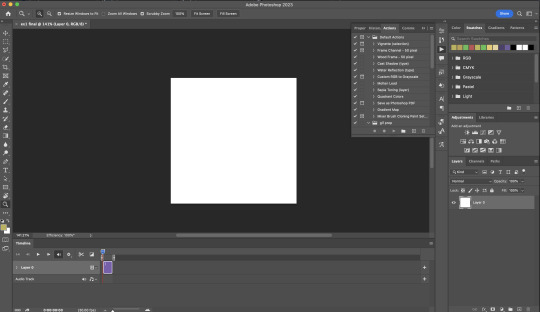
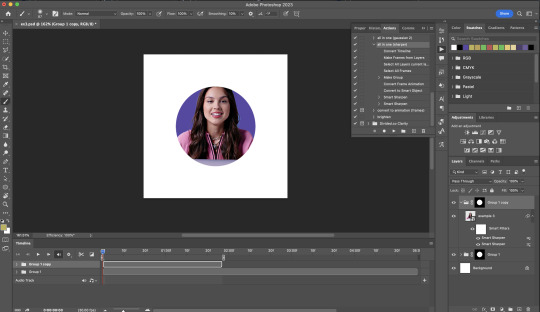
2) Photoshop pt. 1: Preparing your gif
Prepare your gif the usual way - whether you screencap or import frames from video.
Then your Photoshop should look like this:
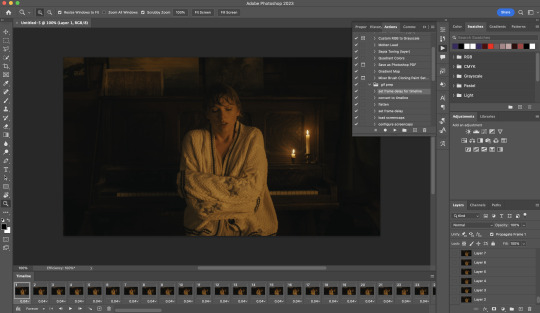
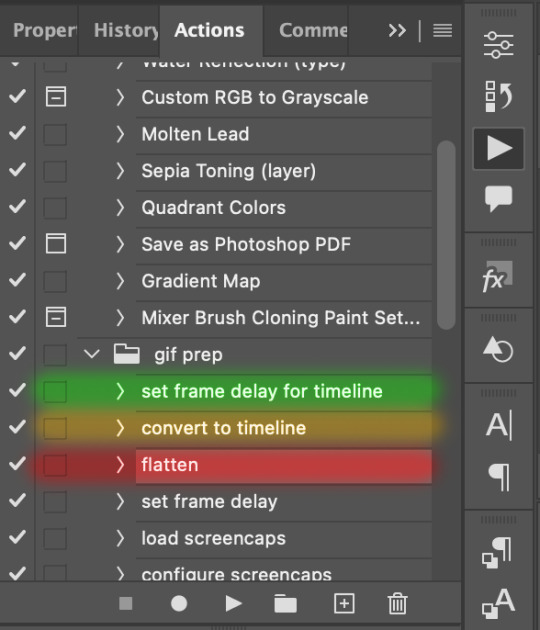
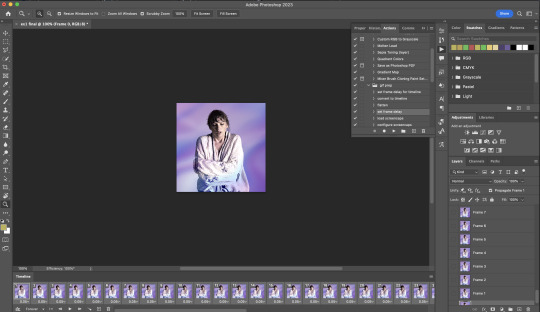
Now, I shall walkthrough & explain my personal giffing workflow (as of 2023) after loading the gif frames. To speed up the process, import my gif prep action file to Photoshop.
Going to Window > Action, you’ll see a set of actions under the “gif prep” folder.
"set frame delay for timeline” (highlighted in yellow) will set all of your entire gif’s frame delay to 0.03s
“convert to timeline“ (highlighted in red) will take you to the Video Timeline interface
To play an action, press on the Play button (highlighted in green)
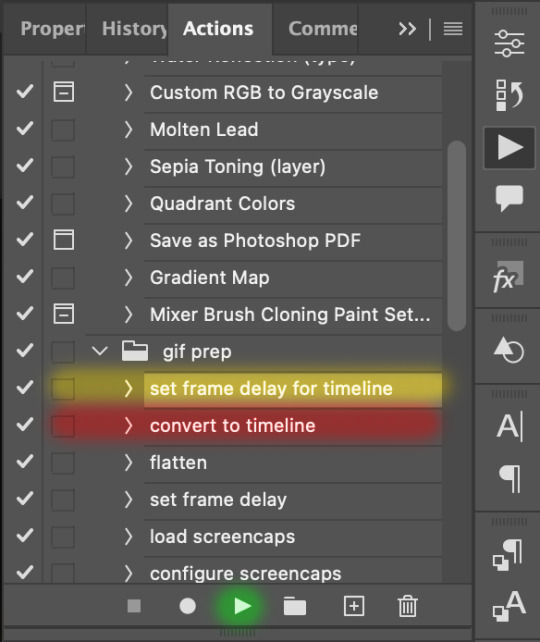
i. Set the frame delay of the entire gif to 0.03s. (play “set frame delay for timeline” from my gif prep action pack)
I work with everything in 0.03s frame delay (or equivalently 30fps) at first. It’s always possible to change the frame delay of the final gif to 0.05s before uploading onto Tumblr.
ii) Convert this gif to a Smart Video Layer (play “convert to timeline” from my action pack)
Note: I personally don’t resize the gif just yet. That’s because Rotoscoping in full video resolution will render higher quality details around the edges as well as more flexibilities later on in the editing process.
Performance optimisation: If your computer has 8GB of RAM or less, you might find it helpful to crop / resize your gif to Tumblr dimensions now for a less sluggish performance in After Effects later on.
(I have giffed on a desktop with 8GB of RAM and it’s quite slow at rendering individual frames of a 1080p short clip on AE)
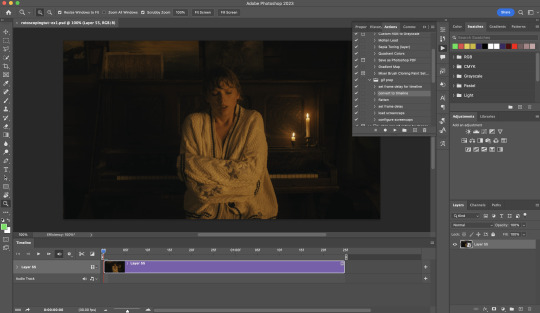
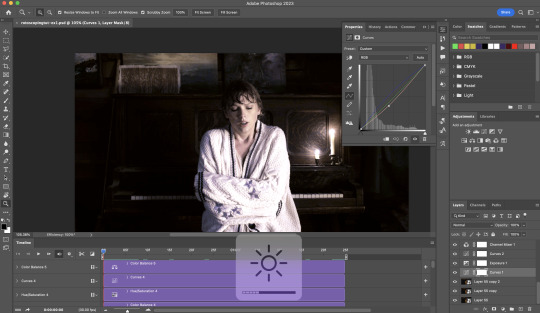
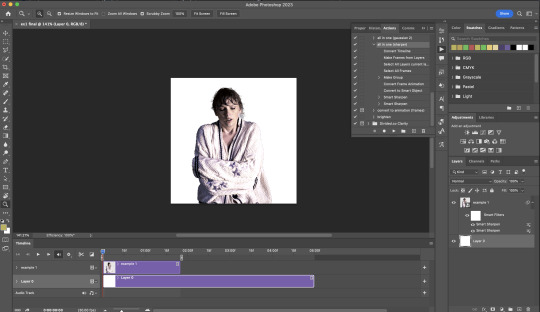
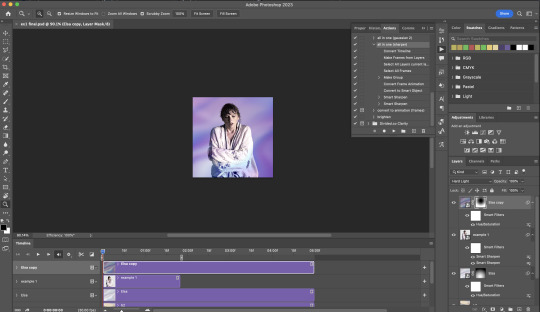
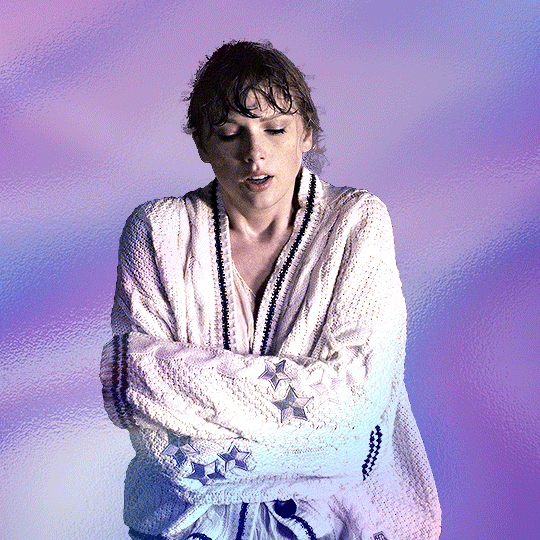
iii) Add colouring adjustments on the gif. This will save you A LOT of time when you Rotoscope gifs that are originally very dark / poorly lit (e.g. the uncoloured Taylor Swift gif shown just above).
If you usually colour your gifs at the very end of your giffing process (i.e. after sharpening), this will be a bit of a change.Nevertheless I still highly recommend adding some base colourings now to at least increase the contrast between the subject and the background.
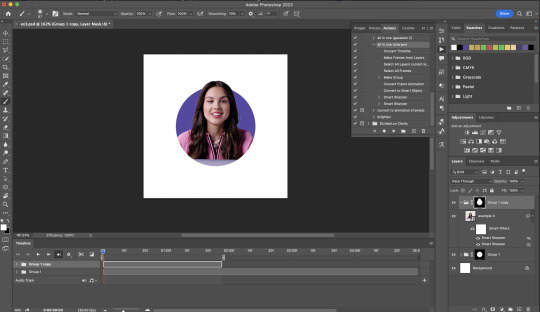
iv) To minimise lagging on After Effects, simplify this gif file as follows:
Flatten / Unsmart this gif file back to frame animation mode: play “flatten” (highlighted in red) from my gif prep action pack
Set the frame delay to 0.03s: play “set frame delay for timeline” (highlighted in green)
Convert the simplified gif file back to the video timeline interface: play “convert to timeline” (highlighted in yellow)
After “unsmarting” and converting back to the video timeline, your interface should look like this

And voila! This gif PSD is now ready to be imported to After Effects for Rotoscoping work!
3) After Effects: Interface and useful shortcuts
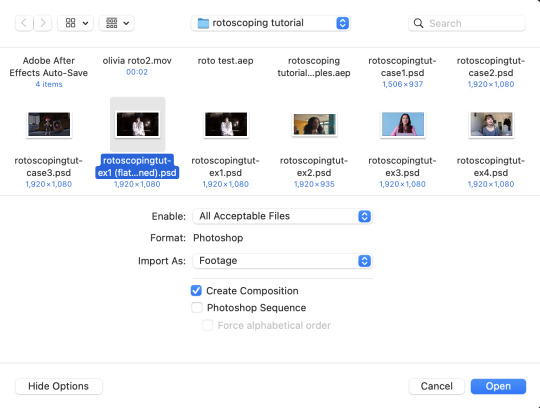
Open After Effects and Import (Cmmd / Ctrl + I) your gif PSD that you’ve just prepared.
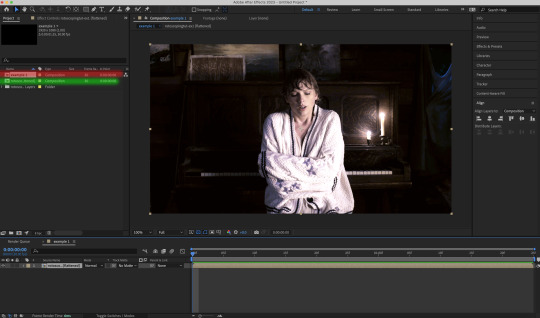
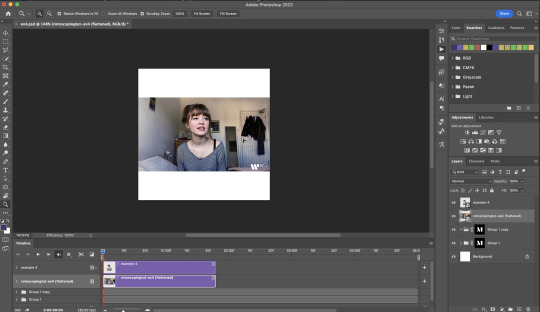
After importing your gif PSD to After Effects, the interface should look like this.
In the screenshot below, there are two compositions: the imported gif (highlighted in green) & another composition file made from selecting the imported gif (highlighted in red)
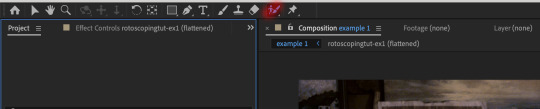
For the rest of the workflow, we will edit from the clone composition (the one highlighted in red), so select this one.
Before we take our plunge into the Rotoscoping, here are a few useful shortcuts to remember. I’ll explain the Roto Brush tool in the next section.
Preview the previous: fn + up arrow
Preview the next frame: fn + down arrow
Add to Roto Brush selection: holding Shift while you’re using the Roto Brush Tool
Subtract from Roto Brush selection: holding Alt while you’re using the Roto Brush Tool
Change Roto Brush size: while holding Cmmd / Ctrl, click + drag your mouse left / right
4) After Effects: The Rotoscoping Process
To access the Rotoscoping tools, click on the Roto Brush icon (highlighted in red in the screenshot below)
Then you’ll get the following dropdown options with two Rotoscoping Tools
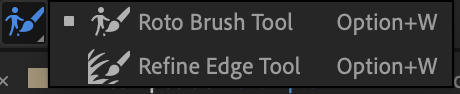
Roto Brush Tool: This is where you add / subtract your Rotoscoping selection in your composition
Refine Edge Tool: Paint around the edge of your selection for more refined edges. Very helpful for Rotoscoping fuzzy edges / hairs
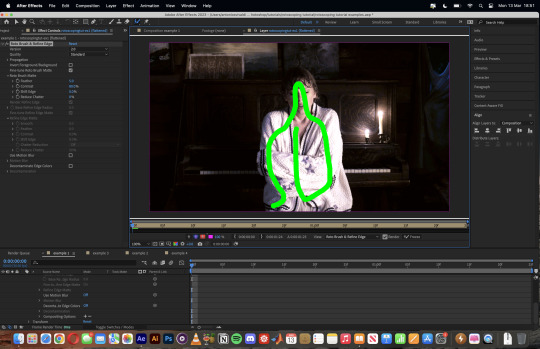
To make some Rotoscoping selection, first grab the Roto Brush Tool and click on the subject you want to cut out from your composition.
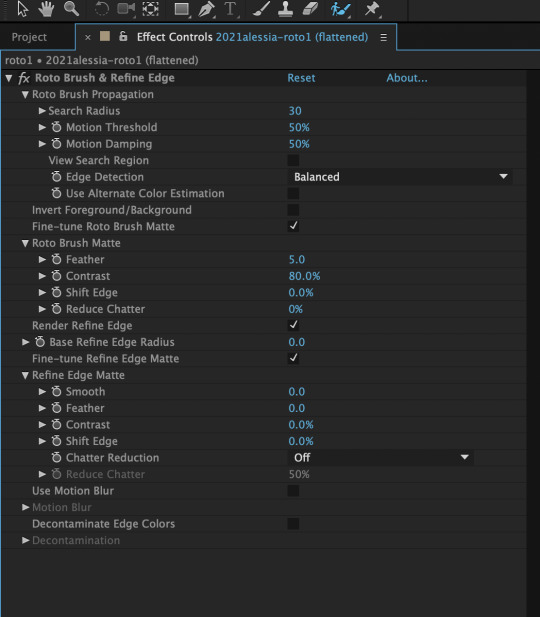
When you’re Rotoscoping you’ll see this in the Effect Controls panel.
There are two versions of Roto Brush:
Version 2.0: The Rotoscoping selection is powered by AI for higher accuracy when you propagate the frames.
Version 1.0 (Classic): This is the legacy Roto Brush Tool that uses a lesser algorithm. Recommended only if Roto Brush 2.0 is unstable on your machine due to RAM issues.
And two quality settings for Roto Brush 2.0:
Standard
Best
Note: I am currently unable to use Roto Brush 2.0 with Best quality model on my machine to compare the differences myself, so I’ll link this page that explains the two quality settings.

Note: if you’re using an older version of After Effects you’ll see this instead. This corresponds to Roto Brush 1.0 / Classic in the newer versions of AE.
When you’ve made a selection using the Roto Brush Tool, you’ll see the pink lines around the subject. This is the region that you’ve selected to Rotoscope!
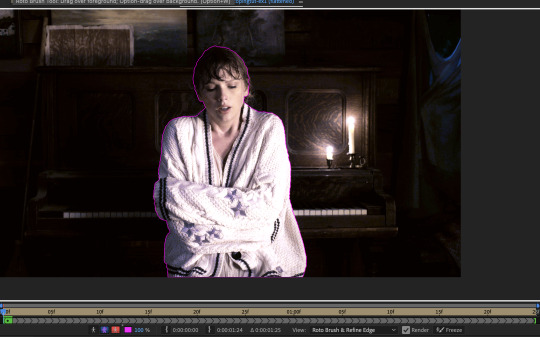
To bring out some details around the edges, grab the Refine Edge Tool and paint around the edges
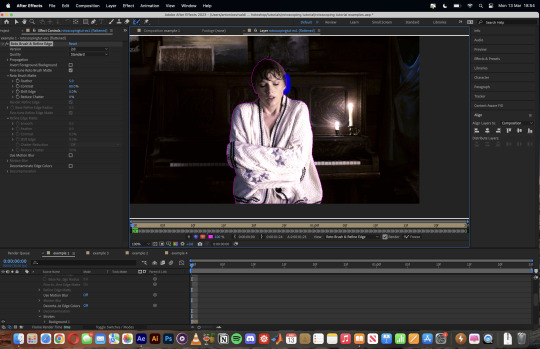
Then the interface will look like this

To view the Rotoscoping selection that you’ve made more intuitively, you could click on the following buttons.
Personally I like the viewing my selection using Toggle Alpha (the second box from the left) & Toggle Alpha Boundary (the 3rd box from the left)

Toggle Alpha
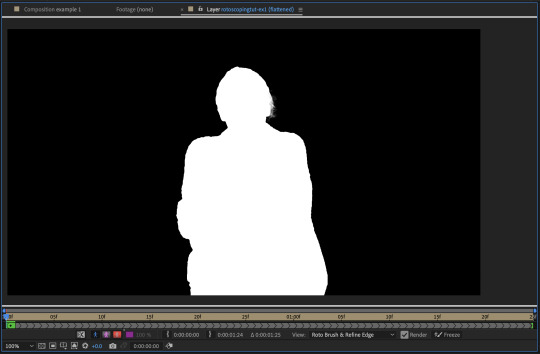
Toggle Alpha Boundary

Note: If you aren’t happy with the initial Roto Brush selection, you can always add (press Shift while using the Roto Brush Tool) / subtract (press Alt / Option using the Roto Brush Tool) your selection.
After you’re happy with your Rotoscoping selection in the first frame of your composition, press fn + down to view the next frame.
Repeat pressing fn + down and fix the selection along the way (e.g. I subtracted a small area from my Rotoscoping selection with the Roto Brush tool to make the edge look cleaner).

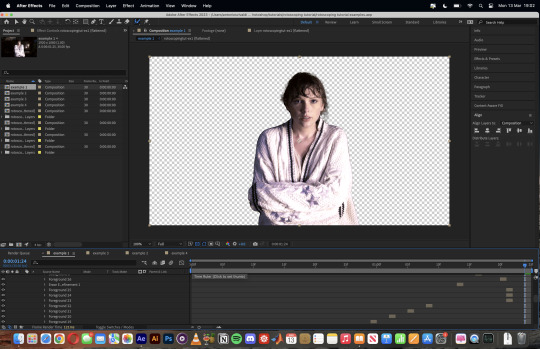
After fixing the selection along the way, go back to the composition file (select the clone composition again) and you will see that a cutout gif is made!
To export this, go to File > Export > Add to Render Queue. You’ll be redirected to the Render Queue panel at the bottom of After Effects.
Highlighted in red: click to change export setings
Highlighted in green: click to change save destination
Highlighted in yellow: click to render video

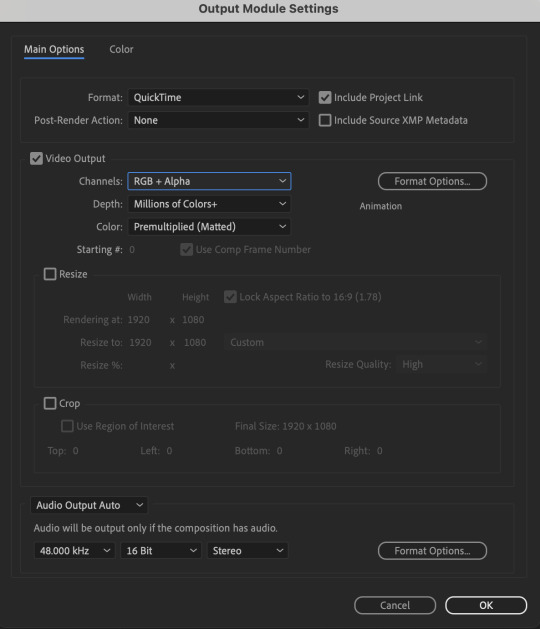
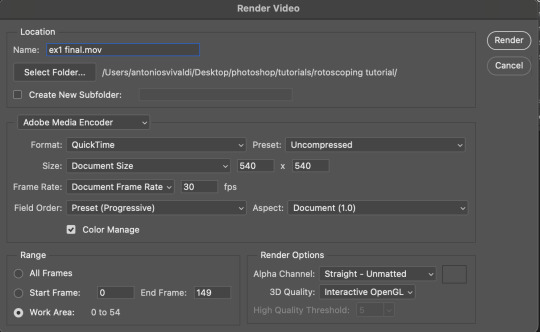
To preserve the transparency of your cutout gif, you need to change your export settings in the Output Module.
Under the Video Output section, change your Channels to RGB + Alpha. Press OK. Then Render the video.
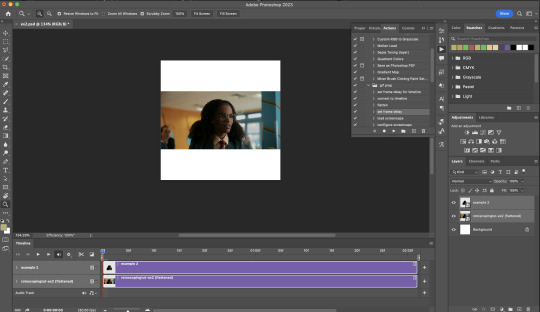
5) Photoshop pt. 2: Assembling your final gif
The essence is to drag the cutout gif (aka the video file that you’ve just rendered on AE) into a new PSD composition file. This will be where you’ll do the rest of your giffing. Your workflow will contain the follow steps:
Make a new blank PSD composition file in Tumblr dimensions
Enable the Video Timeline
Follow the instructions detailed in the individual examples i.e. drag the cutout gif into the PSD & adjust the timeline start / end points
Exporting the final gif. If you’ve worked in 0.03s frame delay all the way up to here, just play the action that I’ve provided in the tutorial in the following order to set the frame delay to 0.05s.
EXAMPLE 1: finalising your cutout gif | sample gifset
After enabling the Video Timeline in your PSD composition file you’ll see something like this
Go to your folder, drag the cutout gif you’ve made on After Effects, resize / reposition, then press Enter.
And also make sure to adjust the Video Timeline’s start / end values.
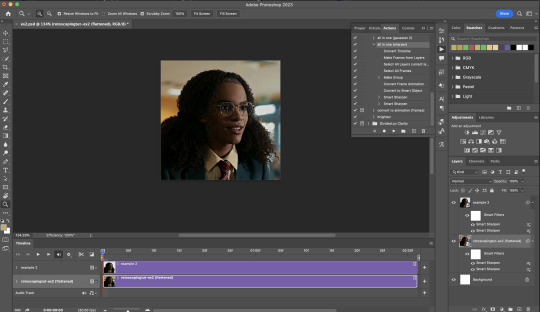
Add some finishing touches. Because I did the Rotoscoping at full HD resolution, I’ll also need to sharpen my gif in this step.
After you’re happy, you can export this into a gif file and do what you usually do to change the frame delay to 0.05s.
Notes on my “Unsmarting” approach:
To prevent accidentally writing over a PSD composition file that I’ve spent time editing, I personally render this into a short video (File > Export > Render Video) and use the following export settings (to prevent quality loss)
Then I open the rendered clip and play the actions in my gif prep action pack as follows:
flatten: this “Unsmarts” the clip / video
set frame rate: this sets all frames to have 0.05s frame delay
This is the final interface that I get before I pull up the Save For Web window.
EXAMPLE 2: changing your gif’s background colour (for Case 3 gifs) | sample gifset
From your folder, drag BOTH the cutout gif (rendered on AE) and the original gif to your blank composition.
Important: you need to make sure that both layers are properly lined up in the composition file (i.e. selecting both layers when repositioning / resizing)
On Photoshop, press Enter twice and place the cutout gif on top of the original gif from the Layers panel. Then you should get something like this
Select both layers and resize / reposition them in your PSD composition until you’re satisfied with the placements.
The basic idea here is to add some adjustment layers / other things in between the cutout gif and the original gif. To do this, select the original gif layer in the Layers panel.
Then you can start adding.a bunch layers e.g. textures, onto the composition.
And then here’s the exported gif!

6) Fancier Rotoscoping examples
Note: knowledge in using layer masks / groups and making shape / text layers assumed
In the next two examples, I’ll show you how to combine the two previous examples with shape / text layers.
EXAMPLE 3: Placing your cutout gif into a shape / text layer | sample gifset
Add a text / shape layer to your blank PSD composition
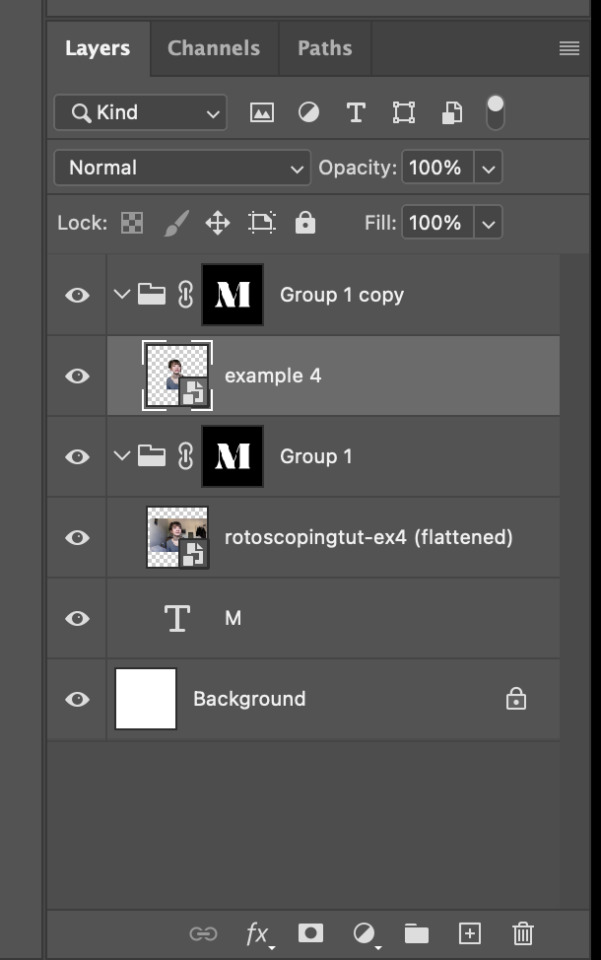
We want to prepare a masked group so in the Layers panel:
Make selection from layer: Cmmd / Ctrl + Click (highlighted in red)
Make a new group: click on the folder icon (in yellow)
Create layer mask: click on the icon (in green)
After duplicating the masked group you’ll get something like this in the Layers panel
Drag your cutout gif into the PSD composition

Place the cutout gif into the masked group on top
Select the mask of the top group and paint (in white) over the region you want to reveal for the cutout gif
Add some finishing touches & export the gif!
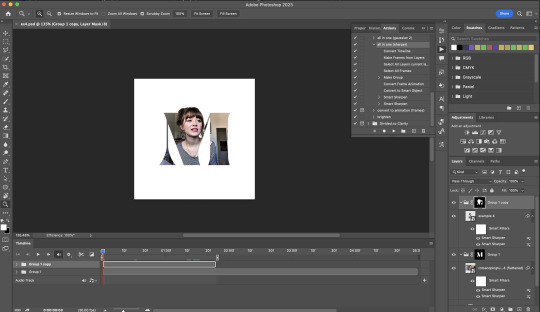
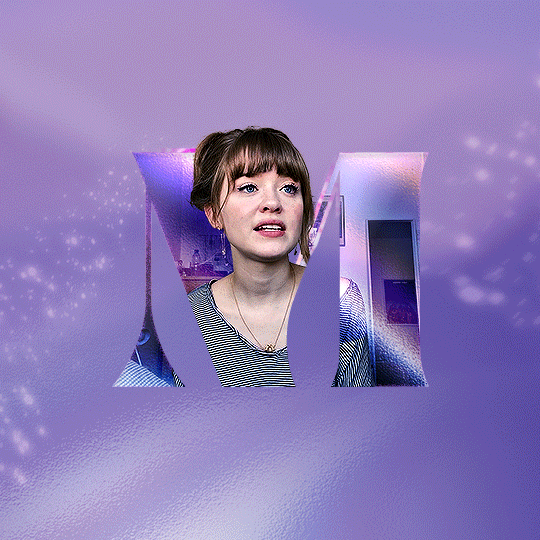
EXAMPLE 4: Putting it all together | sample gifset
You follow the same approach as in Example 3 to prepare the masked groups, but you need to drag two gif layers in (and resize them using the approach outlined in Example 2)
Place the gif layers as follows
While selecting the mask of the group on top, paint (in white) over the region that you want to reveal in the cutout gif
Now select the original gif (placed within the other group) and add some adjustment layers
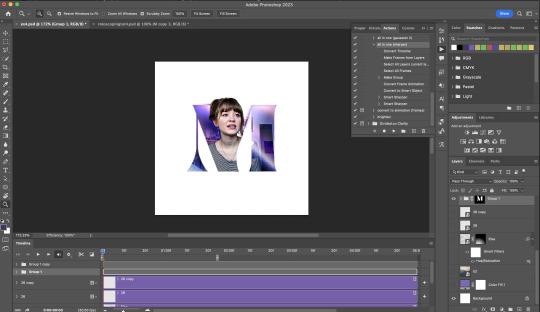
After adding some finishing touches & exporting the gif, I get this!
Note: you can do even more overlay effects in the background portion of example 4. There will just be more masked groups + adjustment layers
7) Bonus: Some useful Rotoscoping / giffing lifehacks
GIFFING LIFEHACKS:
— Use best quality footage that you could find & Rotoscope in full video resolution, for better details around the edges
— Poorly lit scenes & low contrast edges are harder to Rotoscope (e.g. Toy Story set / TS evermore set).
If you’re new to AE, I would recommend choosing videos with well-lit gifs with simpler backgrounds and high contrast edges (e.g. Maisie Peters Cate’s Brother set)
— Use Rotobrush 2.0 if you’re using After Effects 2021 or later. It’s more difficult to Rotoscope / change background colour for gifs with a lot of movements with the classic Rotobrush tool. If the scene is tricky, you might want to switch to the “Best” quality model.
HARDWARE-RELATED PERFORMANCE OPTIMISATION:
— The recent versions of Photoshop require at least 8GB of RAM. If you have less RAM, it will still work provided you have enough scratch disk space. For better performance, it’s best to close other applications when you’re using Photoshop.
— The recent versions of After Effects require at least 16GB of RAM. If your machine has less RAM than this, there are some workarounds to prevent your machine from hanging:
Essential: close other applications that you’re running on your computer
Resize your gif down to Tumblr dimensions & sharpen it before importing to After Effects.
Install an older version of AE
8) Bonus: Some known software + hardware issues, and workarounds
KNOWN ISSUES ON PHOTOSHOP:
I currently have minimal issues in my giffing workflow, but I’ll nevertheless outline a few common known Photoshop issues for anyone who needs some workarounds.
— Video Timeline interface missing: this affects Apple Silicon Macs (i.e. M1 / M1 Pro / M1 Max / M1 Ultra / M2 / M2 Pro / M2 Max)
Update to newer version of Photoshop (updated 2022 or 2023)
Open Photoshop with Rosetta
— Scratch disk full error: This is a common issue with machines that lack RAM & have nearly used up internal storage. Editing video layers in the timeline interface uses a lot of memory hence will require a lot of scratch disk space.
Make sure that you have enough free storage space while using Photoshop. Alternatively you can use an external hard drive as a scratch disk.
KNOWN ISSUES ON AFTER EFFECTS:
These are a few issues that I have personally ran into over the course of giffing on multiple devices & multiple versions of After Effects.
Note: Inputs from M1 / M2 Mac users with regards to experiences on using the After Effects Rotoscoping tools are welcome!
— Rotobrush 2.0 set to “Best” quality model causes AE to crash: this affects anyone who’s using MacOS Ventura
I’m currently experiencing this issue on my M2 Mac. The workaround right now is to change the Roto Brush 2.0 quality setting to Standard.
This is due to some software compatibility issues on Adobe’s side specifically with MacOS Ventura. Fingers crossed that they will properly fix this bug in the future updates!
— Cannot re-open project files with Rotoscoping: this affects anyone using the initial release of After Effects 2020 (I had installed this on an Intel-based machine and it sucked)
The only option here is to update to a later version of After Effects.
8) More useful Rotoscoping resources
Rotoscoping + Keyframes Tutorial by @jenna--ortega
Rotoscoping + Masking Tutorial by @usergif
Rotoscoping For Beginners in After Effects | Motion Graphics Tutorial
I hope you enjoy reading this! If you have any questions / need any help related to this tutorial, feel free to send me an ask!
#after effects#tutorial#gif tutorial#photoshop tutorial#dearindies#tusermelissa#usernik#useryoshi#usershreyu#usercim#userrobin#useralison#userannalise#userkosmos#userisaiah#usergiu#userives#*#my resources#my tutorials
2K notes
·
View notes
Text


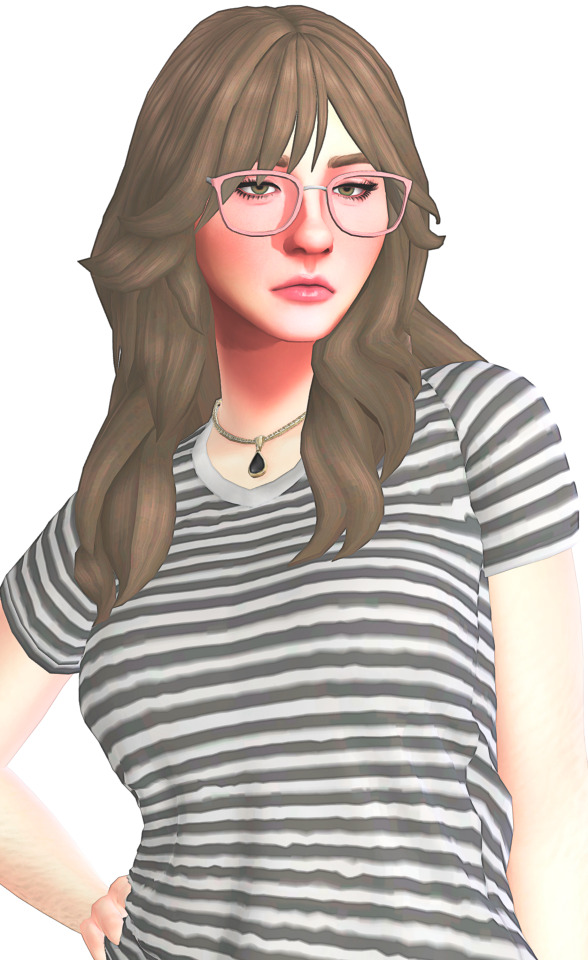

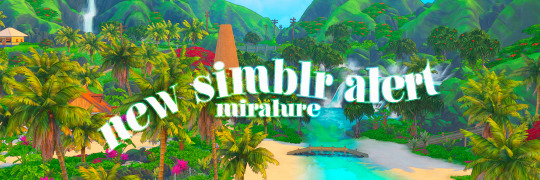
New Simblr Introduction ♡
Although I've had this account for about a month now, I guess I can still be considered a "new simblr" because I'm relatively small, and when I did this the first time Tumblr didn't show me in tags so I didn't get any reach... So here we go again!
Basic Information:
Name: Lauren
Age: Young adult (18)
Aspiration: Computer Whiz
Traits: Family Oriented, Overachiever, Loyal, Music Lover, Childish
Job: Tech Guru
Simself: Pictured above
I've been playing Sims since 2016 and was inspired by simtubers and simblrs like @farfallasims, @pixelglam, @marilynjeansims @largetaytertots and @oshinsimblr to create my own Simblr and share my work.
I am a heavy modder and CC user, and use maxis-mix CC. I would consider my gameplay style cozy and I usually play happy family dynamics. However, I'm very open minded and love to see other gameplay styles!
I (used to) play sims on a 2020 Macbook and have taken years to work out how to make it run decently with minimal lag and good graphics. Now I play on a shitty Lenovo Z13 ThinkPad which gives me the ability to use shaders!
On my account, you'll see CAS screenshots, lookbooks, sim dumps, CC recommendations, photoshop tutorials, gameplay photos and more! I am very WCIF friendly so if you ever want to ask a question I'm more than happy to answer it. Also, sim requests are always open! :) Just send an ask (for WCIF and requests)
There will never be any NSFW content on my page, and as a general thing please don't expect a follow back if your page is full of sexually explicit content.
I would really really love to find new active mutuals and friends!! I am always always looking for new mutuals so if you’re an active simblr I'll follow back (I'm a good mutual, I'll like and comment [and rb] anything you post). And if you ever wanna chat, just DM me because I'd love to talk :)
Please, feel free to like, comment, follow and reblog this post (help a gal out)
#the sims 4#sims 4#sims 4 gameplay#new simblr alert#new simblr#ts4 simblr#ts4#sims 4 simblr#simblr#sims blog#sims 4 cas#ts4 community#sims 4 community#new sims blog#small simblr#new simmer#the sims#maxis mix
101 notes
·
View notes
Note
raiy, o seu Photoshop é pago? eu tô a tempos querendo baixar mas ele é mto caro e eu queria saber se você usa alguma versão crackeada
Viva a pirataria!
Photoshop CS6
Link para download (canal LipãoTech) + Tutorial simples de instalação.
Photoshop CC 2019
Link para download (canal PlasSquare)
Tutorial simples:
1. Após baixar o arquivo, extraia no seu computador (é necessário ter o programa Winrar);
2. Abra a pasta que foi criada e dê duplo clique em "Set-up.exe";
3. Escolha o idioma na página de instalação que foi aberta;
4. Clique em "Continuar" e espere o Photoshop ser instalado. Depois, busque ele nos seus programas. Está pronto para ser usado!
Photoshop CC 2020
Link para download (canal New Boss)
Tutorial simples:
1. Após baixar o arquivo, extraia no seu computador (é necessário ter o programa Winrar);
2. Abra a pasta que foi criada e dê duplo clique em "Photoshop-PT-BR (x64)";
3. Siga os passos na página de instalação que foi aberta e espere o Photoshop ser instalado. Depois, busque ele nos seus programas. Está pronto para ser usado!
59 notes
·
View notes
Photo


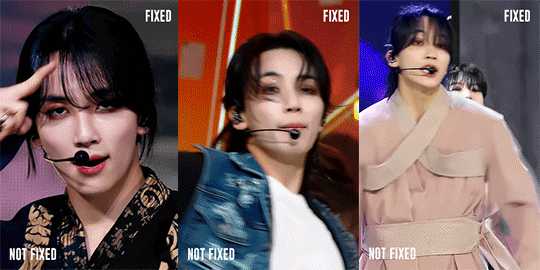
Hi everyone! I just wanted to share my coloring/giffing process for stages because I love making performance sets and I know that giffing kpop stages is a daunting task, not just for new gifmakers, but also more experienced ones. This is in no way saying my way is the best or right way to color, but I hope this will somehow help alleviate some challenges for anyone who is afraid or hesitant to gif stages.
Disclaimer: I am not a professional and although this blog is relatively new, I’ve been giffing for a little bit over 3 years with a lot to learn still. This tutorial is focused on K-Pop stages and doesn’t necessarily apply to other types of gifs. Also, I try my best to explain why I do things the way I do here so this is going to be long (image and word heavy).
With that in mind, let’s get started! I’ll be using our precious Jeonghan in Seventeen’s Super performances for this tutorial :D
BEFORE WE BEGIN
This tutorial is mostly focused on coloring; however, I believe the quality of your video file, sharpening, and timing also factors a lot into whether your gif looks good or not. For reference, I use VapourSynth and Photoshop 2020 cc for making gifs. Vps is not necessary to make good gifs but it does help make my process easier and quicker.
Files: For performance gifs, I only use .ts files because that ensures all of them come out in the highest quality possible. Please refer to this post for more information and where to get them (thank you op <3).
Sharpening: I use Vps for sharpening, denoising, and deinterlacing .ts files. I tend to keep my KNLM settings between 1.2 to 2, depending on how noisy the original video is, and FineSharp between 0.3 to 0.5. Any additional denoising/sharpening is done in PS.
Timing: Because I deinterlace with qtgmc 60 slow, the resulting video import will be 0.2 for the frame delay. Gifs that are too fast or too slow will compromise the quality of your gif. For stages, I like to use 0.3 as the final frame delay for 60 fps files and 0.4 for 30 fps.
Exporting: My export settings are Adaptive Diffusion since I find that to look the best.
BASE LAYER
As you can see even without coloring and just based on the file, sharpening, and timing, I already have a nice gif to work with. I like to start by correcting the original lighting and colors so that I have a nice canvas for coloring. I do this with a levels layer and use the eyedropper tools to designate what I want to be white (bottom eyedropper) and black (top eyedropper). Here, I zoomed in on the highlight of his mic for white and chose the darker area of his mic for black. I also adjust the brightness a little.
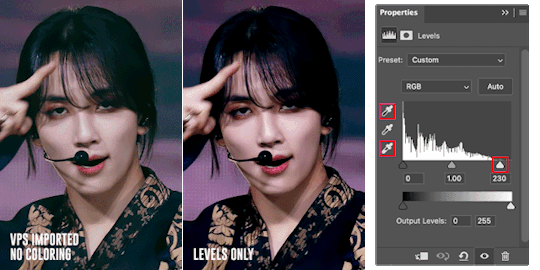
The gif is now much more vibrant and less faded. I think the lighting here looks okay but, sometimes, a curves layer is needed to even out the lighting. Below, I am trying to lower the saturation of the red as well as make his skin even (aka not shiny) so that I can color later.
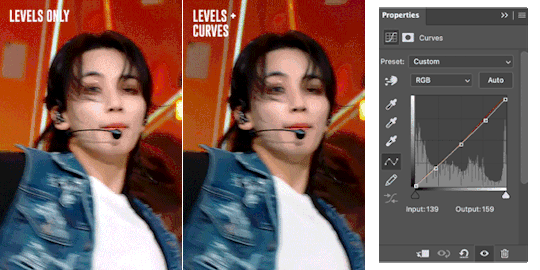
Just an FYI: The curves layer also has the same eyedropper tools found in the levels layer so you can skip the levels step if you prefer to use the curves layer only. I find that using the eyedroppers to designate what is truly white and what is truly black helps significantly in correcting lighting. For example, if your gif’s covered in a purple color and your darkest pixel is a dark purple, when you pick that pixel to be black, PS will correct your gif’s color table and get rid of the purple. The same happens when you designate the brightest pixel to be white.

Here is an example. Notice in that in the first gif, it looks faded and is filled with a purple filter and lighting. A single levels adjustment layer using the eyedropper tools to designate a true white (the highlight of his hairpin) and black (his hair) color removed the filter and made the colors of the gif more vivid and saturated.
COLOR LOOKUP/GRADIENT MAP
Next is my favorite layer, the color lookup. This adjustment layer takes your gif’s color table and matches to a selection of presets. I generally use this at a lowered opacity to even out or add color to an idol’s skin while also darkening the background. If your PS doesn’t have this option, I find that gradient maps set to the right colors and opacity have the same effect. Here are two examples of the different color lookup layers I used at different fills.


The Fall Colors adjustment gave his skin some life and warmth while the Crisp Warm adjustment darkened and gave the gif more saturation.
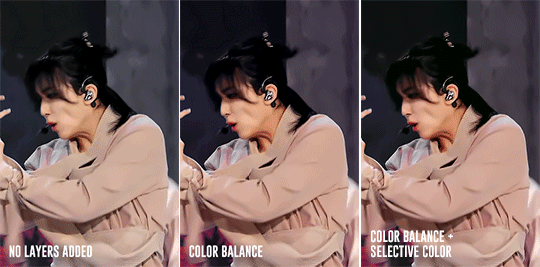
CORRECTING BLUE VS. RED BACKGROUNDS
Generally, Kpop stages have backgrounds consisting of cool (blue, purple, green) and warm (yellow, orange, red) colors. I personally prefer a cooler background because it is much easier to manipulate and will not affect the skin tone of the idols (unless there is blue lighting on their skin). Warm colored backgrounds are harder to manipulate because you run the risk of messing with their skin.
Gifs that have too many colors end up looking pixelated so my goal when fixing backgrounds is to turn cyans/greens/purple into blue and manipulate the blue using the hue/saturation and selective color layers. As for warm colored backgrounds, I darken and desaturate as much as I can without affecting the skin. Any sort of magenta can also be treated in the same way.
I like to make my backgrounds into gray/black or at least very desaturated so that the idol can shine and be the main focus of the gif. Having less colors will help improve the quality of the gif so don’t be afraid to play with the hue/saturation sliders. Here are just a few examples of the adjustment layers that I used for the gifs above.

That will usually work if the lighting doesn’t change. If the lighting changes, then you might want to change your approach. For the following gif, there is a flashing light that fills the entire gif with blue light, including his face. In this case, I can’t darken the blues because it will end up giving him a weird gray color when it flashes. Instead, I go the opposite direction and lighten the blue using the hue/saturation layer.

Make sure to pay attention to every frame to see how the hue/saturation layers affect the rest of the gif. Here are the adjustment layers for this gif.

COLORING SKIN
Correcting backgrounds will always end up affecting the color of the idol’s skin so it’s best to minimize the effects as much as you can so that you have an easier time coloring. The layers that I use to color skin are color balance, selective color, and hue/saturation.
I start with color balance, adding in a mixture of yellow, red, and magenta to the midtones. To counteract the warmth, I add cyan and blue to the shadows; I rarely mess with the highlights unless necessary. I use selective color to darken reds and yellows with black. If the yellows/red are too pink, I darken with cyan. If the yellows/reds are too yellow, I darken with magenta and lessen the yellow. If the yellows/reds are too cool, I darken with magenta and yellow.
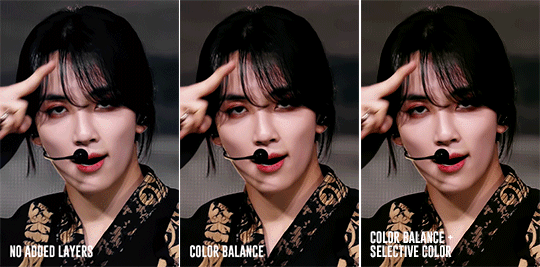
Above, you can see that he’s kind of pale without any added layers. The color balance layer added warmth in yellows and reds and the selective layer added some depth to the shadows. These were all minor adjustments but they had a great impact on how the gif ended up looking.

For this gif, I noticed that he was just a bit too pale after the color balance and selective color layers so I added a channel mixer layer to add a tiny bit of pink into his skin.
Here is another example. There are a lot of other skin coloring tutorials out there that do a better job of explaining the do’s and don’ts than I can but as a good rule of thumb, try not to make their skin too yellow or pink and you’re good! :D Refer to this tutorial for more information.
FINISHING TOUCHES
The remaining adjustment layers I use are exposure, brightness/contrast, and vibrance. Everyone has a different preference for these layers and that’s what makes creators’ gifs unique from one another. So, adjust these layers as you’d like! For me, I like increase the exposure and balance it with a decreased offset and gamma correction with the exposure layer. I also like to decrease contrast in the brightness/contrast layer and increase both saturation and vibrance.

It’s best to find a good balance between brightness, exposure, and contrast. If you increase exposure, make sure it’s balanced by something else so that your idol won’t end up looking too white. Gifs that are too bright will end up looking pixelated and grainy. If the noise in your gifs is not an artistic choice, then making sure everything is balanced will help reduce noise and make your gifs look crisp and smooth.
Giffing stages is hard, but it’ll get easier with practice and time/dedication. It takes me a total of 2 to 3.5 hours to make 2x2 performance set from start to finish and 2 days for a 9 pc set like Fear, not to mention that I had to recolor the first Super stage 3 different times. I’ve also had my fair share of bad looking sets. Stages are difficult but they’re doable! If you have any questions, feel free to send me an ask.
Here is the link to the psds I used to make these gifs. Happy giffing~!
#ps tutorial#gif tutorial#coloring tutorial#mymine#flashing tw#eyestrain tw#long post#tagging some mutuals just in case you wanna see it#feel free to ignore <3#isaishi#hanatonin#tuserose#tusersali#userzaynab#userhev#sonafied#emification#shuaria#resources
286 notes
·
View notes
Note
free photoshop - https://iniziare.tumblr.com/post/622818974320689152/adobe-photoshop-cc-2020-v210-windows
how you get around the creative cloud thing is by using a firewall and blocking all of adobe through it, and only allowing outgoing communication (i like tinywall)
good luck!! hope this helps!
ANON, YOU ARE HEAVEN-SENT!!
14 notes
·
View notes
Note
do u have a link to photoshop for mac??? i don't have the money to spend 20$ a month on photoshop and can't find a link to an older version :(
Hey! I reached out to my friends over at @supportcontentcreators as I have seen links but I wanted an updated version that worked considering I have a photoshop subscription. So please look at tags depending on what kind of computer you have.
https://www.tumblr.com/iniziare/622818974320689152/adobe-photoshop-cc-2020-v210-windows?source=share
24 notes
·
View notes
Text
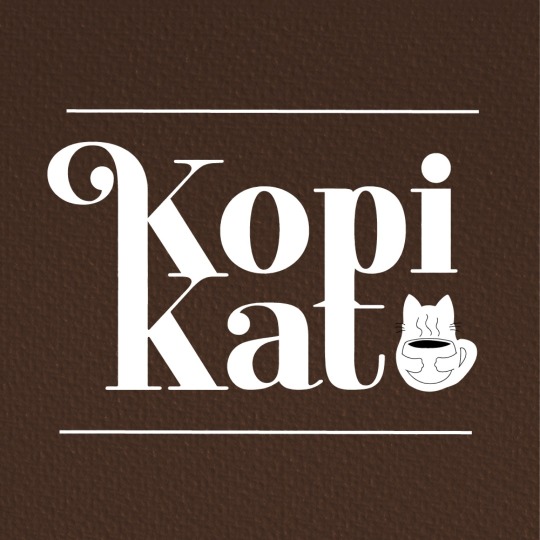

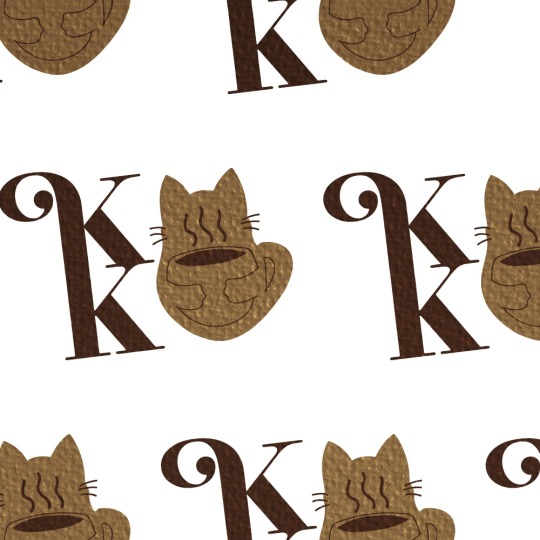
This is my first ever mock up product. (after multiple reposts, i think i'm finally satisfied with this.) Here's KOPIKAT Coffee. I love combining things that I love: Cats and Coffee! ヘ( ^o^)ノ\(^_^ )✧
Softwares used: Photoshop CC & Illustrator 2020
0 notes
Note
Sorry if I bother you, but I really love your gif sets! Do you know some tutorials or, app, or anything, to learn how to make good gif? I am learning and I feel very stupid because all my gifs are shit. (if my ask is inappropriate or anything, please ignore me)
you're not bothering and none of this is inappropriate, you're more than welcome in my inbox! as for your questions, let's see what i can do.
1) tutorials — i've been doing this for long enough that i don't really have much to recommend here, the only tutorials i use nowadays are all about specific things and not how to make gifs as a whole. that being said i've linked this one before, i personally do some things differently but it's a very good tutorial, well-received by gifmakers who are just starting and well written, from what i've skimmed through.
another good post to look through is this one, not a gifmaking tutorial per se but it goes into sizes, sharpening, and how to get neat & clear gifs. two of the main points are A) while you can get away with making gifs out of a 720p quality video, 1080p is what is usually recommended. you could use 4k as well, but a 1080p video is usually easier to find, will take less space in your storage, and will give you really good results already. no need for overkill <3 as for B) size matters here on tumblr dot com, mostly width. the op of the post linked in this paragraph has included a nice graphic for the size limits for gifs, you can refer to it as you make your gifs so that whatever you make won't turn out pixelated once you upload it to tumblr.
if you're curious, i've been asked about my sharpening settings here and i spoke before on tumblr sizing here
2) software — you mentioned app, if by app you mean mobile stuff then i'm sorry, i can't help you! i've never made gifs through mobile and i wouldn't even know which direction to point towards for you to find more information. as for computers, if you mean programs then these are what i use to make my gifs: potplayer (for taking screencaps) and photoshop cc 2020 (for making the actual gifs, this is the post i used but here's one with more links)
now i'd like to mention something my grandma always used to say: no one is born learned. you're not stupid just because it's taking you a while to do something, learning is a process and everyone has their own pace. i've been making gifs for a decade now and i know there are things i could do better! i'm also still learning, i make plenty of "shit" gifs before stumbling my way to something i am okay with posting, and sometimes i'm really proud of what i've made and other times i think it's just "good enough". i understand feeling disheartened but please do not feel stupid about any of this!
no use in putting yourself down, now hold my hand and let's add the finishing touches on this long ass reply <3
3) tips — we've mentioned video quality, sharpening, and sizing. what else, what else. personally i would start simple (and i did, way back when, and still do!! most of my gifs are quite simple). so: cropping/resizing + coloring + sharpening. it'll help get the basics down and then you'll have a good foundation for everything else you might want to learn. i mentioned in another ask, almost two years ago now lmao, that i used to download other people's free psds (that is, pre-made settings and layers to color your gifs) and instead of using them i would open them up and pick them apart to see how people were coloring things, which layers they used, in which order, stuff like that.
remember: there is no right or wrong to do this! you could ask ten different people how they make their gifs, and their preferences for any specific part of the process, and you'd get ten different answers. if you find a tutorial and don't vibe with it, throw that aside and look for another. pick and choose, find what works for you and what doesn't! and that means do not be afraid to experiment and try things out.
also, don't like photoshop? no problem! i started with gimp, now personally i wouldn't recommend it over ps but it's a good program, it taught me a lot, and there's really nothing to hate about it. it might have less functions than ps though, and already a decade ago there weren't that many tutorials/resources for it.
don't like photoshop AND don't want to download a program? try photopea, i haven't used it but it works directly from your browser and it should do everything photoshop does!
let me know if there's anything else i can help with <3
17 notes
·
View notes
Text
cc links <3
skin details + presets + sliders:
Maxis Match CC World - S4CC Finds, FREE downloads for The Sims 4 (tumblr.com)
sims, spice and everything nice — True Almond Nails by Joliebean I can’t live... (tumblr.com)
Flushed Blush Conversion | Patreon
Basic 10 Eye Bags Set For both gender, child to... | TAMO (tumblr.com)
yaaahh!!!! (tumblr.com)
FLORAL - a skin detail cc pack by peachyfaerie ✿ | Patreon
lip fullness slider & msblue skintone set v3 overlay ! | Patreon
Twistedcat : Comet Eyes (tumblr.com)
3D eyelashes ☆*:。Skin details | Patreon
its haha funny : Skindetail Dump just some skindetails from... (tumblr.com)
Ceeproductions : Snatched Edges - Part III Hey guys, I took the... (tumblr.com)
Maxis Match CC World - S4CC Finds, FREE downloads for The Sims 4 (tumblr.com)
Cellulite overlay | Patreon
Twistedcat : Stalker Makeup set (tumblr.com)
Because every time I look at photoshop I want to... - 𝕊 𝕀 𝕄 𝔸 ℕ 𝔻 𝕐 (tumblr.com)
obscurus-sims.tumblr.com/post/189333461988/eyes-presets-4-11-teen-females-only
the basics set ♥ | Patreon
miiko : Chin slider (tumblr.com)
obscurus-sims.tumblr.com/post/178609869638/dl-6-sliders-for-nose-early-access-at-patreon
elle (@marsosims) (tumblr.com)
Mouth Scale Slider - By Teanmoon Teen- Elder ... | ♥Teanmoon♥ (tumblr.com)
velvet scout; (tumblr.com)
Chih (@cheng-chih) (tumblr.com)
DFJ — Lustrous Lipgloss Teen - Elder Male & Female... (tumblr.com)
clothes:
outfit one/two (before + during) -
MUVASIMMER - astya96cc: moonchildlovesthenight: 🧟♀️ ... (tumblr.com)
christopher067 : G L I M M E R / r i n g s Hello! Today I have... (tumblr.com)
Dusk Diva Collection | Patreon
EYELINER Ultimate Collection | Patreon
ADA: 2019 Simblreen | Public Release This CC set... : AHarris00Britney (tumblr.com)
digital explorer (tumblr.com)
Gothi is Rock Collection - Piercings Set | Patreon
SIMBLREEN 2019 TREATS | Patreon
(1) tunayegit on Tumblr: better than mosc. boots
[EnriqueS4] Valentine Set Hi guyss!! i hope you’re... — ENRIQUE (tumblr.com)
aretha (tumblr.com)
AxA 2020 | Public ReleaseAxA 2020 is a custom... : AHarris00Britney (tumblr.com)
outfit three -
MADLEN : Hania Backpack Hania backpack is now available for... (tumblr.com)
☠️ the onyx - a small set of gothic makeup ☠️ | Patreon
Rip Off Hair | Patreon
Accessory Tops | WildlyMiniatureSandwich
The Sims Resource - Gorgon Jeans / Christopher067
oakiyo : Evergreen Collection: Initially inspired by the... (tumblr.com)
DallasGirl - EA Mosh Boots - New Mesh Hi Everyone! 😄👋 Since... (tumblr.com)
simstrouble : DEIMOS by simstrouble Base Game Compatible 24... (tumblr.com)
[B0T0XBRAT] Pixies | Patreon
The Sims Resource - Odd Goth Socks
#maxis match cc#sims 4#sims 4 cc#sims 4 screenshots#the sims community#ts4#ts4 simblr#mods#apocalypse#post apocalyptic#zombie apocalypse
9 notes
·
View notes
Note
What brush do you use?

thank you so much!! i'm happy you're enjoying it haha, there's nothing as cool as your first viewing of one piece (hope u liked w7!)
it gets a little long so i'll put brush info under the cut!
here's what i generally use these days! these all work for photoshop cc 2020, which is the only program i use. i also renamed most of these a long time ago so i apologize for the ones i've forgotten the source for- hopefully the brush stroke will give you an idea of what to choose if you're trying for a similar look! i highly recommend this blog for brush resources (for many different art programs)!
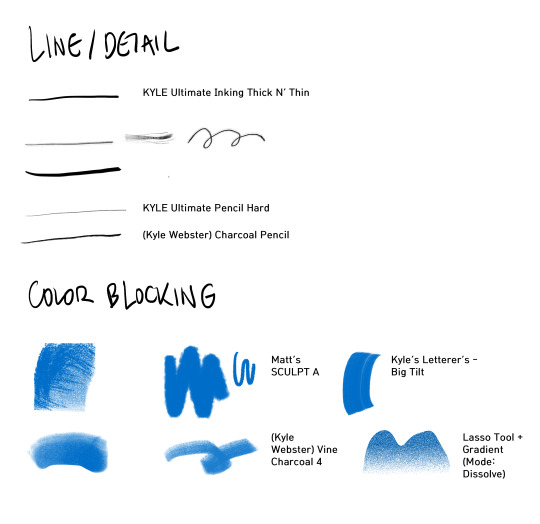
main sources: kyle webster charcoal pack & megapack (requires adobe subscription- these are kind of the 'default' brushes for photoshop), Matt's Painting Set for Photoshop CC (pay what you wish)
21 notes
·
View notes
Text
☼ mobile navigation.
hi :) i’m joseph (or trang if you can pronounce that). i’m a 21 yr old viet gay trans man (refer to my carrd for pronoun usage) and this is my main blog/my simblr. i'm primarily an editor and storyteller, you won't find gameplay or renders here
i am not wcif friendly, please check my cc finds or resources. refer to my patreon for edit psds. i use photoshop 2020 for editing. i use gshade 5.0.0, and switch between godspeed and iris for ingame shots as well as iris for cas
CURRENTLY | violent affairs (nonchronological edit/lore project with @lucidicer) major cw for violence, gore, cannibalism
TBD | the collective (moonwood mill townie prequel story)
INDEFINITE HIATUS | don’t go where i can’t follow (best read on a pc!) cw for (post-natal) mental illness
i trigger tag like this- (trigger)tw or (trigger)mentiontw with no spaces. i do not use tws on my sideblogs
MY BLOGS // cc finds . fandom . personal (18+ only)
OTHER LINKS // carrd . patreon . ko-fi
DNI + i don’t always post adult content but if you’re a minor block the #nsft tag
165 notes
·
View notes
Text
new simblrrr!! ❤︎₊ ⊹
hey!! i'm an 18 year old simmer and I've been playing the Sims 4 since 2016. throughout the years I've been playing on and off, but since graduating, i've been inspired by simtubers to start my own blog.
i play sims on a 2020 Macbook Air and would love to share my tips on how to make mac gaming look good without severe lag.
my sim style personally is maxis mix. as well, there will be absolutely no explicitly sexual content on my page ever. don’t expect a follow back if you actively post NSFW 😭😭 i'll mainly post gameplay screenshots, cc finds/lookbooks on my sims, cas screenshots and photoshop tutorials. WCIF always open!!
i would love to be mutuals with anyone, so please like, reblog and follow if you're interested in my content :-) [i'm a pretty good mutual, i'll reblog/like anything you share lolol] [also this is the first time i've ever used tumblr so idk how to use it LMAO]
#the sims 4#sims 4#sims 4 gameplay#new simblr alert#new simblr#ts4 simblr#ts4#sims 4 simblr#simblr#sims blog#sims 4 cas#ts4 community#sims 4 community#new sims blog#small simblr#new simmer#the sims#maxis mix
49 notes
·
View notes
Last Seen Blogs

runrunrunrunrunrunrunrunrunrun
he tried his best
chrishollow
This is bad civilization
banneau
journal photos

your-aha
Untitled

ffsfics
ficccs