#php curl
Explore tagged Tumblr posts
Visit Tumblr Blog
Explore Tumblr blogs with no restrictions, modern design and the best experience.
Last Seen Tumblr Blogs


Fun Fact
Celebrities use Tumblr as well.
Text
I think I'm going to pull the plug on my FFN account.
Not only have I not used the site since 2011, but it seems like it's been in steady decline for the past several years; it's riddled with ads and bot accounts posing as "artists" (the PMs are increasing in frequency lately), and I'm concerned about the site eventually getting hacked like 4chan and its user data being strewn across the internet. I don't feel like downloading cURL to see if the PHP is still up to date. I have better things to do than check the pulse of a corpse.
The site just... it sucks. It's garbage. "Pit of voles" is too kind a moniker. I feel gross just logging in. I'll give it a week or so before I start deleting my crusty old fics. Or maybe I'll delete my account in three months, on my 23rd anniversary. Hopefully the site won't get hacked before then.
#fanfiction.net#why use it when ao3 is 𝘳𝘪𝘨𝘩𝘵 𝘵𝘩𝘦𝘳𝘦?#i know ao3 is banned in a few countries but even that doesn't stop some people#this isn't a rant so much as me bitching and moaning about fuckall
19 notes
·
View notes
Text
This blog whole heartedly endorses writing your own shit, open sourcing it as your own years before using it in a work context, and then safely saving yourself the trouble of writing it again at work.
You get a lot of things from that:
1. You're protecting your ability to build off your own work, regardless of who is paying you.
2. You're learning how to use your work in a business context. And while they may be able to claim the derivative works, they can't claim the experience of making them, or your reimplementing them back into the open source (with learned experience they paid for (without looking at the derivative code))
3. You protect your portfolio. This is probably the most important: here's this thing I made, here are the business critical things it runs or supports.
Me, I made a silly curl wrapper to send and receive json from the RuneScape auction house API, now it's running in two ERP/E-commerce integrations about to be deployed company wide as our standard for API integrations. It's also running at least one Instagram integration for a ski resort and some event ticketing thing for a local theater. It's also been used for proof of concept demonstrations of security vulnerabilities.
Clients love it when you show them the picture of a kitten that has a PHP shell in it and then proceed to read them their email through the kitten shell. By love I mean no one actually liked that and I deployed the fix server wide anyway because we were hemorrhaging money on preventable security breaches.
8 notes
·
View notes
Text
i am so tired but i haven’t been sleeping much since my meds went down which sucks because i was able to get a pretty good sleep schedule when i was in php but right now i know i have been sleeping even worse because im so worried about a job interview i have on tuesday. i Need to get that job so i can chill the fuck out again. Anyways im curled up on a heating pad lets all pray that i catch some Zs tonight please and THANK YOU
#plus having a schedule will be good. im so bored i need something#but fuck i have not been sleeping im so anxiuos about being unemployed.#AND IM GOING ON A DATE TOO LIKE FUUUCKK EVERYTHING IS HAPPENING THIS WEEK.#news with isaac
7 notes
·
View notes
Text


First Lady Grace Coolidge pictured with Rebecca, the White House’s pet raccoon.
Strangely, Rebecca was originally a gift sent to the White House to be eaten for Thanksgiving dinner in 1926. The Coolidges instead kept Rebecca as the White House pet. Playful, affectionate, and mischievous, Rebecca would run around each room and even curl up on Calvin Coolidge’s lap by the fireplace. Grace Coolidge would walk Rebecca on a leash and bring her to the White House Easter Egg Roll event.
https://www.myjournalcourier.com/news/article/holy-cow-history-17622148.php
3 notes
·
View notes
Text
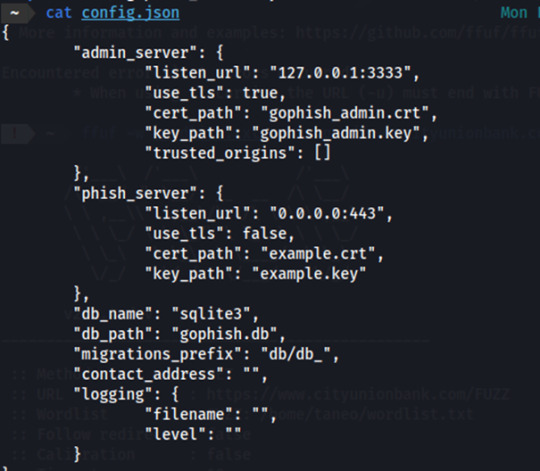
Gophish Setup Guide: Launching Phishing Campaigns
Phishing Scenario : CASE 1 - Breaking news
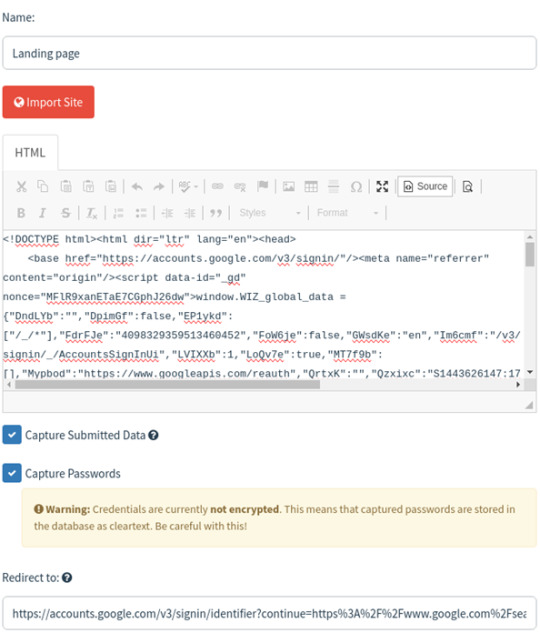
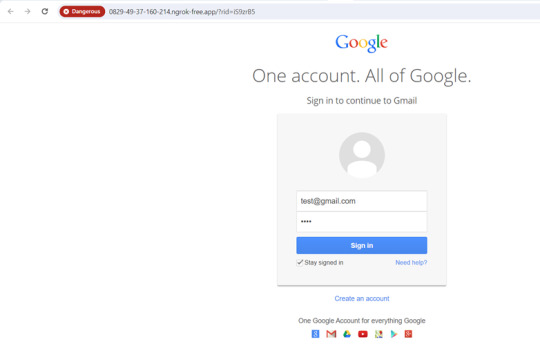
Objective: The objective of this phishing campaign is to lure employees into clicking a malicious link disguised as breaking news from the company. The landing page masqueraded as a Gmail sign-in page, prompting users to enter their login credentials. This page was designed to steal users' email account credentials.
Install Gophish framework
Make the required changes in the config.json file
Launch Gophish and our first step would be to set up the sending profile by which we will send out phishing emails.
Let’s assume that the target company is using Gmail server
(When setting up the sending profile in Gophish using a Gmail account, you have to enable 2FA and give app access to Gophish)
Since our target company is using Gmail server, we will use Gmail email on our phishing campaign so we have set host as smtp.gmail.com:587. After creating the sending profile, we have to test if the sending profile works by sending a test email.
We're using the email address [email protected] as our designated Gmail account for sending phishing emails. Make sure to include the password that was generated when granting Gophish access to this Gmail account. After configuring the sending profile, we can test it by sending a test mail.

This is what the test mail will look like:

Email Template
The next step involves integrating an email template for the phishing campaign. We can opt for a pre-made template, for example, here we use a Breaking News email template, for initial testing. We can incorporate a tracking image within the emails to monitor various engagement metrics, including email opens, clicks, and receipt statuses. It also has an option where we can add a link which will redirect the victim to the landing page. On the landing page we can proceed to request for more valuable information from the user.

Landing Page
In the third step, set up a landing page where targets will be directed after clicking a link in the email. This landing page plays a crucial role in the phishing campaign, as it's where you can capture sensitive information like passwords. Gophish defaults to using http://0.0.0.0:80 for the landing page, but we can customize it to look like a legitimate login page or other enticing content to attract targets. We'll need to specify a redirect page where users will be sent after submitting their credentials.
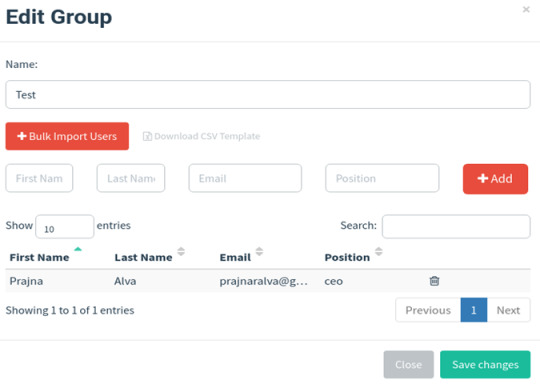
In the User & Groups section, you'll need to input the email addresses of your targets. Gophish framework requires you to provide the first name, last name, email address, and the rank of each target individual on the user groups page. You can also upload target details from a CSV file stored on your local system using import feature.
Install and set up Ngrok:
Install ngrok via Apt with the following command:
curl -s https://ngrok-agent.s3.amazonaws.com/ngrok.asc \
| sudo tee /etc/apt/trusted.gpg.d/ngrok.asc >/dev/null && echo "deb https://ngrok-agent.s3.amazonaws.com buster main" \
| sudo tee /etc/apt/sources.list.d/ngrok.list && sudo apt update && sudo apt install ngrok
Run the following command to add your authtoken to the default ngrok.yml configuration file.
ngrok config add-authtoken 2crm6P5lWlbTm4rwoGqn0QSHhPA_6nf7WmMJFKXVSD2SgBohF
Create an index.html page for the landing page and launch python http server in the port 8001
• python3 -m http.server 8001
Note: Verify in the browser if it's actually accessible.
We can also use other login page cloning techniques like built in gophish cloner, or Github projects (we used), Custom or by using third party clones (ex-goclone).
If it's a php file use the following command instead:
• php -S localhost:8001 -t .
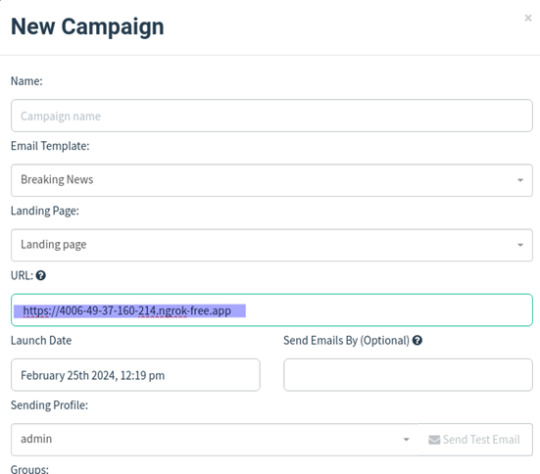
Launch ngrok :
ngrok http http://localhost:8001/

Use the URL under forwarding and paste it on the Gophish URL section in the campaign page shown below:
Creating Gophish Campaign:
Go to the Campaigns section.
Choose the right email and landing page templates.
Enter the landing page server URL.
Select the target group.
Start the campaign and monitor its progress.

Once we click on the link we are directed to the landing page, where we can enter our credentials.
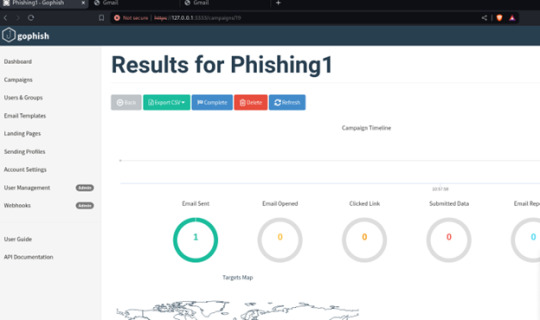
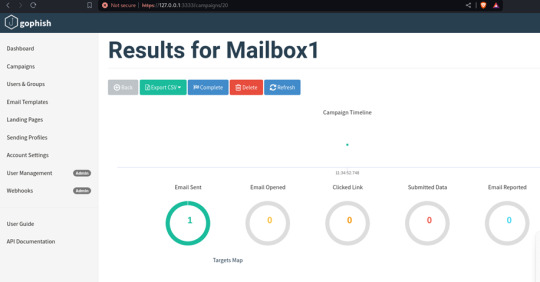
You can find all the phishing reports related to a specific campaign on the Dashboard in the Gophish framework. Here, you can see details such as sent emails, opened emails, clicked links, submitted data, and any emails reported as phishing by the targets. This page provides a comprehensive overview of the ongoing phishing campaign.
Phishing scenario: Case 2 - Password Reset Campaign
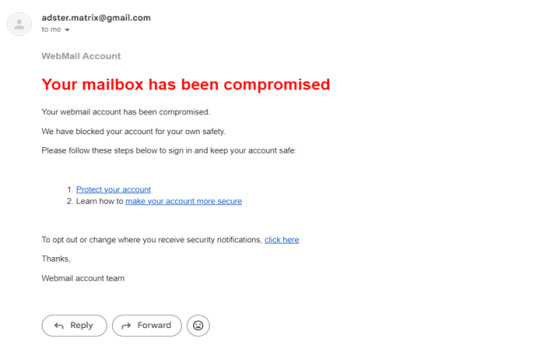
The aim of this phishing campaign is to trick users into divulging their login credentials by pretending to offer account protection in response to a fake mailbox compromise.

Users received an urgent email claiming their mailbox was compromised. They were directed to a phishing landing page disguised as a password reset portal.
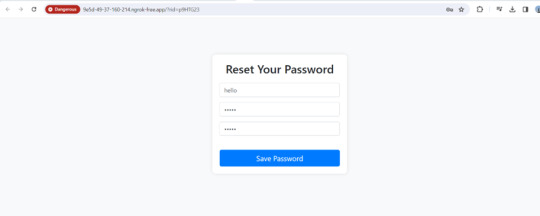
Upon clicking the link, Users were redirected to a fake password reset page resembling the email service provider's design, where they were prompted to enter their login credentials.
3 notes
·
View notes
Note
hi ! im curious , you made all these post or isome kind of program generates them ?
Hi! and thanks for taking an interest!
I reblog some stuff and manually post some others, but the majority of my posts are generated through php pages I run from the command line on my Windows machine using the Oath protocol and Tumbr's API. My foobar musicplayer is connected to the last FM scrobbler, and I access their API, get my feed, and alter it with my saved commentary and images, then automatically post it to tumblr. I'm also hooked up to Spotify (and they use curl not Oauth) so I can post music links as well. For a while I was doing YouTube videos as well, but pulled it down, as I need to increase the accuracy of their search.
90% of the code I wrote myself, though I'll admit I don't really understand the actual OAuth transfer that well, those sections are straight copied and pasted :-)
4 notes
·
View notes
Text
New heights of nerdom
I have a metric boatload of direct messages that I want to save and, surprisingly, tumblr doesn't have a way to let you do that. Copying and pasting is beyond painful. So now what?
Google and hope that some other nerd* wrote a browser extension or app or something to help.
Someone did!
https://git.jeckyll.net/published/personal/tumblr-chat-messages-downloader
It's a PHP file that uses curl and oauth to grab the messages you ask for and write them out at the command line. (If you're a programmer, this makes sense.) Then you can copy and paste the whole thing and save it to a text file.
The output looks like this except for the bolded text. That's some sort of tumblr weirdness.
06/01/2024, 15:34:28 bluemoonperegrine: EXACTLY 06/01/2024, 15:34:55 tumblr-user: lol
I found a bug: if there's an exclamation point in your password, which you have to enter locally to make it work, it goofs things up. Escaping that character doesn't help. I changed my password to get around it. * I can say that because I am one.
5 notes
·
View notes
Text
Weak SSL/TLS Configuration in Symfony — Risks & Fixes
Introduction
Secure communication is critical in today’s web applications, especially when handling sensitive user data. Symfony, one of the most popular PHP frameworks, relies heavily on SSL/TLS protocols to secure HTTP connections. However, weak SSL/TLS configurations can expose your application to man-in-the-middle (MITM) attacks, data breaches, and regulatory penalties.
In this blog, we’ll explore what weak SSL/TLS configuration means in Symfony applications, why it’s dangerous, and how you can fix it with practical coding examples. Plus, you’ll get a peek at how our Website Vulnerability Scanner online free, helps identify such vulnerabilities automatically.
What is Weak SSL/TLS Configuration?
SSL (Secure Sockets Layer) and TLS (Transport Layer Security) are cryptographic protocols designed to secure communication over the internet. A weak SSL/TLS configuration involves:
Using deprecated protocols like SSL 2.0, SSL 3.0, or early TLS versions (TLS 1.0/1.1).
Employing weak cipher suites (e.g., RC4, DES).
Missing forward secrecy (PFS).
Poor certificate validation or expired certificates.
These weaknesses can be exploited to intercept or alter data during transmission.
Common SSL/TLS Weaknesses in Symfony
Symfony itself relies on the underlying web server (Apache, Nginx) or PHP cURL/OpenSSL for TLS. Misconfigurations can happen at various layers:
Web server allows weak protocols/ciphers.
PHP cURL requests do not enforce strict SSL verification.
Symfony HTTP clients or bundles not configured for secure TLS options.
Detecting Weak SSL/TLS Configurations with Our Free Tool
You can scan your website for SSL/TLS issues quickly at https://free.pentesttesting.com/.
Screenshot of the Website Vulnerability Scanner tool webpage

Screenshot of the free tools webpage where you can access security assessment tools.
Our tool will generate a detailed vulnerability report, highlighting SSL/TLS weaknesses among other issues.
Assessment report screenshot to check Website Vulnerability

An Example of a vulnerability assessment report generated with our free tool, providing insights into possible vulnerabilities.
How to Fix Weak SSL/TLS Configuration in Symfony
1. Configure Your Web Server Correctly
Ensure your Apache or Nginx server uses strong protocols and ciphers. For example, in Nginx:
ssl_protocols TLSv1.2 TLSv1.3; ssl_ciphers 'ECDHE-ECDSA-AES256-GCM-SHA384:ECDHE-RSA-AES256-GCM-SHA384'; ssl_prefer_server_ciphers on; ssl_session_cache shared:SSL:10m; ssl_session_tickets off;
This disables weak protocols and uses strong cipher suites with Perfect Forward Secrecy.
2. Enforce SSL Verification in PHP cURL Requests
When Symfony makes external HTTP calls via PHP cURL, enforce strict SSL checks.
$ch = curl_init('https://api.example.com/secure-endpoint'); curl_setopt($ch, CURLOPT_RETURNTRANSFER, true); curl_setopt($ch, CURLOPT_SSL_VERIFYPEER, true); // Verify SSL certificate curl_setopt($ch, CURLOPT_SSL_VERIFYHOST, 2); // Verify host name matches cert $response = curl_exec($ch); if(curl_errno($ch)) { throw new \Exception('SSL Error: ' . curl_error($ch)); } curl_close($ch);
3. Use Symfony HTTP Client with Secure Defaults
Since Symfony 4.3+, the HTTP Client component uses secure defaults, but always ensure SSL verification is enabled:
use Symfony\Component\HttpClient\HttpClient; $client = HttpClient::create([ 'verify_peer' => true, 'verify_host' => true, ]); $response = $client->request('GET', 'https://secure-api.example.com/data'); $statusCode = $response->getStatusCode(); $content = $response->getContent();
4. Regularly Update Your Certificates and Libraries
Expired or self-signed certificates can break trust chains. Use trusted CAs and update OpenSSL and PHP regularly.
Bonus: Automate SSL/TLS Testing in Your Symfony CI/CD Pipeline
You can add an automated SSL check using tools like testssl.sh or integrate vulnerability scanning APIs such as our free tool’s API (check details at https://free.pentesttesting.com/).
About Pentest Testing Corp.
For comprehensive security audits, including advanced web app penetration testing, check out our service at Web App Penetration Testing Services.
Also, don’t miss our cybersecurity insights and updates on our blog.
Subscribe to our newsletter for the latest tips: Subscribe on LinkedIn.
Conclusion
Weak SSL/TLS configurations put your Symfony apps and users at significant risk. By following secure web server settings, enforcing SSL verification in PHP/Symfony, and leveraging automated scanning tools for a Website Security test, you can greatly improve your application’s security posture.
Stay safe, keep scanning, and secure your Symfony apps today!
If you found this blog helpful, please share and follow our blog at Pentest Testing Corp.
1 note
·
View note
Text
How to Send Automated Direct Mail Letters Using an API

In an increasingly digital world, automation and personalization are the cornerstones of successful marketing. One channel that continues to prove its effectiveness is direct mail. When powered by an API, direct mail evolves from a traditional communication method to a dynamic, data-driven marketing tool. This guide explores how to send automated direct mail letters using an API, including benefits, setup, use cases, and best practices.
What Is an Automated Direct Mail API?
A Direct Mail API (Application Programming Interface) is a set of code protocols and tools that allow businesses to connect their CRM, eCommerce platform, or other software to a third-party direct mail service provider. Once connected, you can automatically generate, personalize, and send letters, postcards, or brochures through physical mail.
The entire process—from letter composition to print queue to delivery—is handled through simple API calls, removing the need for manual printing, addressing, or postage.
Benefits of Using an API for Direct Mail Letters
1. Efficiency Through Automation
With an API, direct mail campaigns become part of your automated workflows. Triggered mailings—such as sending a letter after a customer signs up, abandons a cart, or reaches a certain milestone—can happen without manual involvement.
2. Real-Time Personalization
Direct Mail APIs allow dynamic insertion of customer-specific data like names, offers, order history, or geographic content into each mail piece. This level of personalization dramatically boosts engagement and conversion rates.
3. Scalability for High-Volume Campaigns
From sending hundreds to millions of letters, APIs handle scale effortlessly. Whether you're launching a national campaign or a targeted outreach, the API ensures consistency and accuracy across volumes.
4. Reduced Operational Costs
Automation eliminates printing errors, manual labor, and the need for in-house printing resources. API-based mailing also ensures optimized postage and delivery routes, saving time and money.
5. Enhanced Tracking and Analytics
Advanced APIs offer status tracking, delivery confirmations, and reporting metrics. Marketers can analyze open rates, conversions, and ROI with more granularity than ever before.
Step-by-Step: How to Send Direct Mail Letters Using an API
Step 1: Choose a Direct Mail API Provider
Popular providers include Lob, PostGrid, Click2Mail, and Postalytics. Choose one based on:
Country and postal coverage
Letter formats (e.g., A4, folded mailers)
API documentation quality
CRM/eCommerce integrations
Pricing models (per mailpiece, subscription, bulk discounts)
Step 2: Get API Credentials
Register for an account and access your API key or token. This key authenticates your requests to the direct mail platform.
Step 3: Integrate With Your Tech Stack
Use one of the following:
No-code tools like Zapier, Integromat, or Tray.io
Native integrations with platforms like Salesforce, HubSpot, Shopify
Custom code integrations using languages like Python, JavaScript, or PHP
Step 4: Create Your Mail Templates
Design the body of your letter with placeholders for dynamic fields:
htmlCopy
Edit
Dear {{first_name}}, Thank you for purchasing {{product_name}}. Enjoy 10% off on your next order!
You can use HTML templates or platform-specific editors.
Step 5: Set Triggers or Events
Configure when the API should send the letter:
After customer registration
When a lead becomes inactive for 30 days
Upon completing a purchase
To follow up post-event or appointment
Step 6: Send API Request
Here’s a sample API request using cURL:
bashCopy
Edit
curl https://api.mailprovider.com/v1/letters \ -H "Authorization: Bearer YOUR_API_KEY" \ -d '{ "to": { "name": "John Doe", "address_line1": "123 Main St", "city": "New York", "state": "NY", "postal_code": "10001" }, "from": { "company": "Your Company", "address_line1": "456 Agency Rd", "city": "Los Angeles", "state": "CA", "postal_code": "90001" }, "template": "promo_letter_01", "variables": { "first_name": "John", "product_name": "Wireless Earbuds" } }'
Step 7: Track Status and Confirm Delivery
Use the API to fetch delivery statuses or view reports:
bashCopy
Edit
GET https://api.mailprovider.com/v1/letters/{letter_id}/status
Use Cases of Automated Direct Mail Letters
1. E-Commerce Cart Abandonment
Send reminder letters with discount coupons to convert abandoned carts into sales.
2. Financial Services
Welcome new clients or deliver legally compliant notices using physical letters with tracking.
3. Real Estate
Automate property listing letters to specific zip codes based on market activity.
4. Healthcare
Send appointment reminders, compliance updates, and test results via HIPAA-compliant print-and-mail APIs.
5. Education & Non-Profits
Send donation requests, thank-you notes, or enrollment packets to segmented audiences.
Best Practices for Sending Direct Mail via API
Clean Your Mailing List: Ensure address accuracy using Address Verification APIs to avoid undeliverable mail.
Personalize Content: Use behavioral and transactional data to tailor the message.
Test in Sandbox Mode: Use API test environments to avoid accidental mailings.
Monitor API Errors: Log and respond to API response codes to fix failures quickly.
A/B Test Mail Variants: Test different letters to determine which copy/design performs best.
Ensure Legal Compliance: Follow data protection regulations (GDPR, HIPAA, CAN-SPAM) for data handling and messaging.
Challenges and Solutions
ChallengeSolutionAPI complexityUse SDKs and libraries provided by the providerData formatting issuesStandardize addresses before mailingRegulatory complianceUse providers that offer HIPAA, GDPR, and SOC2 certificationsPrint errorsUse preview or proof mode before triggering bulk sendsHigh costs for low volumeBatch mailings or use hybrid digital/print strategies
Conclusion: Automating Letters for Smarter Direct Mail
Integrating a Direct Mail API transforms how businesses send letters—making it faster, cheaper, and more impactful. Whether you're a marketer, developer, or business owner, leveraging automation in physical mail campaigns can unlock new engagement opportunities and streamline operations.
By using automated workflows, real-time personalization, and tracking, your brand can ensure every letter counts—delivered with precision and purpose.
youtube
SITES WE SUPPORT
Healthcare Direct Mail – Wix
0 notes
Text
ColibriSM Nulled Script 1.4.3

Unlock the Power of Social Media with ColibriSM Nulled Script Looking to build your own dynamic and fully-featured social networking platform? The ColibriSM Nulled Script is the ultimate PHP-based solution designed for developers and entrepreneurs who want to create a modern, sleek, and intuitive social media experience—all without breaking the bank. Best of all, you can download ColibriSM Nulled Script completely free from our website today. What Is ColibriSM Nulled Script? ColibriSM is a premium PHP script that replicates the core functionality of major social media platforms such as Facebook, Twitter, and Instagram. Designed with speed, security, and customization in mind, ColibriSM allows users to share posts, images, and videos, follow each other, comment, and react—all wrapped in a modern, responsive interface. This nulled version gives you full access to all premium features, letting you explore, test, and even deploy a full-scale network without the typical licensing fees. Technical Specifications Script Type: PHP, MySQL Frontend: Bootstrap 4, jQuery Backend: Secure and optimized PHP framework Database: MySQL 5.7+ Server Requirements: Apache/Nginx, PHP 7.4+, OpenSSL, cURL Why Choose ColibriSM Nulled Script? Here’s why the ColibriSM Nulled Script is the top choice for developers and startups: Full Customization: Modify layouts, modules, and features with ease. Modern UI: Clean, mobile-friendly design that provides a native app-like experience. Advanced Features: User profiles, timelines, notifications, live messaging, and more. Performance Optimized: Lightweight code ensures fast page loads and responsive performance. Multilingual Support: Ready for international deployment with RTL compatibility. Ideal Use Cases for ColibriSM Nulled Script Whether you're launching a niche social network or building a private platform for a school, company, or organization, ColibriSM adapts effortlessly. Here are just a few examples of its versatility: Student and Alumni Networks Business or Professional Communities Creative and Artistic Social Hubs Private Corporate Platforms Localized Community Networks Simple Installation Guide Getting started with ColibriSM is fast and easy: Download the ColibriSM Nulled Script package from our website. Upload files to your hosting server via FTP or file manager. Set up your MySQL database and import the included SQL file. Edit the config.php file with your site settings and database credentials. Run the installation wizard and follow the on-screen prompts. Start customizing your platform to fit your brand or community. You’ll have a fully-functional social network live within minutes. FAQs About ColibriSM Nulled Script Is the ColibriSM Nulled Script safe to use? Yes, the version provided on our site is thoroughly scanned and tested to ensure it’s free from malicious code or backdoors. However, we always recommend using it on a development or test server first. Can I monetize my platform with this script? Absolutely! ColibriSM Nulled Script includes advertising modules and third-party integration options, making it easy to implement revenue streams. Does the nulled version have all premium features? Yes, this version gives you unrestricted access to every feature, including media uploads, real-time chat, dark mode, and more. Final Thoughts For those who are ready to bring their social networking idea to life, ColibriSM delivers everything you need. With its robust feature set, user-friendly interface, and complete customizability, it’s the go-to choice for developers and digital innovators. Download it today and start building your digital community. Want to enhance your platform's SEO performance? Don’t miss out on the powerful Yoast seo nulled plugin available on our site. Also, check out the avada nulled theme for a beautiful and customizable frontend experience.
0 notes
Text
viết lại bằng PHP của đoạn curl -X POST bạn cung cấp, dùng để gửi template message WhatsApp
🌿🤖 Dưới đây là phiên bản viết lại bằng PHP của đoạn curl -X POST bạn cung cấp, dùng để gửi template message WhatsApp thông qua WhatsApp Cloud API 💖👉🍀🍀 ✅ Code PHP gửi template message WhatsApp <?php function sendWhatsAppTemplate() { $token = '<access token>'; // ✅ Thay bằng Access Token thật (có thể tạm thời hoặc vĩnh viễn) $phoneId = '645931181940566'; // ✅ Phone Number ID từ WhatsApp Cloud API…
0 notes
Link
0 notes
Link
0 notes
Text
automatisierter UBL-XML-Generator in PHP in Kombination mit FileMaker
Während meiner Arbeit an der serverseitigen PDF-Generierung mit ZUGFeRD wurde mir schnell klar, dass viele Kunden zunehmend auf den UBL-Standard setzen – gerade im internationalen Kontext oder in Verbindung mit elektronischen Rechnungsplattformen. Also habe ich kurzerhand ein eigenes PHP-Skript geschrieben, das auf POST-Daten aus FileMaker oder anderen Quellen reagiert und daraus eine gültige UBL-Rechnung im XML-Format erstellt. Wie so oft war der Aufbau des XML-Dokuments der anspruchsvollste Teil. Viele Details wie Namespaces, Pflichtfelder und ISO-konforme Datums- und Betragsformate mussten exakt stimmen. Außerdem wollte ich vermeiden, dass mein System bei fehlenden Daten abstürzt – darum habe ich Fallbacks eingebaut und ein eigenes Logging-System integriert. Das Skript liest die Rechnungsdaten, Kunden- und Lieferantendaten sowie die Rechnungspositionen ein, berechnet die Summen und schreibt daraus ein vollständiges XML-Dokument nach dem UBL 2.1-Standard, das sich z. B. auch für die XRechnung weiterverwenden lässt. Die resultierende Datei ist kompatibel mit Plattformen wie PEPPOL, eRechnung.gv.at oder Zentralplattformen der öffentlichen Hand. Die Daten werden in FileMaker gesammelt, das ganze klassisch über schleifen. Die Daten werden über ein einfaches application/x-www-form-urlencoded-POST-Request übergeben. Alle Felder werden als Key-Value-Paare übermittelt. Die Rechnungspositionen (line items) sind dabei als kompaktes Raw-String-Feld lineItemsRaw codiert, das einzelne Positionen mit | trennt und innerhalb der Position durch ; strukturiert ist. FileMaker bietet zwar mittlerweile solide Funktionen für JSON-Manipulation – aber bei 25+ Feldern und einer schlichten Punkt-zu-Punkt-Kommunikation mit meinem PHP-Skript war mir das einfach zu umständlich. Ich wollte keine JSON-Parser-Bastelei, sondern einfach Daten senden. Daher nutze ich application/x-www-form-urlencoded, was mit curl ohnehin besser lesbar ist und mir in PHP direkt über $_POST zur Verfügung steht. "-X POST " & "--header \"Content-Type: application/x-www-form-urlencoded\" " & "--data " & Zitat ( "invoiceNumber=" & $invoiceNumber & "&invoiceDate=" & $invoiceDate & "&invoiceCurrencyCode=" & $invoiceCurrencyCode & "&invoiceTypeCode=" & $invoiceTypeCode & "&dueDate=" & $dueDate & "&paymentTerms=" & $paymentTerms & "&deliveryTerms=" & $deliveryTerms & "&sellerName=" & $sellerName & "&sellerStreet=" & $sellerStreet & "&sellerPostalCode=" & $sellerPostalCode & "&sellerCity=" & $sellerCity & "&sellerCountryCode=" & $sellerCountryCode & "&sellerTaxID=" & $sellerTaxID & "&lieferschein_nr=" & $lieferschein_nr & "&kunden_nr=" & $kunden_nr & "&buyerName=" & $buyerName & "&buyerStreet=" & $buyerStreet & "&buyerPostalCode=" & $buyerPostalCode & "&buyerCity=" & $buyerCity & "&buyerCountryCode=" & $buyerCountryCode & "&buyerTaxID=" & $buyerTaxID & "&paymentMeansCode=" & $paymentMeansCode & "&payeeFinancialInstitution=" & $payeeFinancialInstitution & "&payeeIBAN=" & $payeeIBAN & "&payeeBIC=" & $payeeBIC & "&paymentReference=" & $paymentReference & "&taxRate=" & $taxRate & "&taxAmount=" & $taxAmount & "&taxableAmount=" & $taxableAmount & "&taxCategoryCode=" & $taxCategoryCode & "&totalNetAmount=" & $totalNetAmount & "&totalTaxAmount=" & $totalTaxAmount & "&totalGrossAmount=" & $totalGrossAmount & "&lineItemsRaw=" & $lineItemsRaw )
$dom = new DOMDocument('1.0', 'UTF-8'); $dom->formatOutput = true; $invoice = $dom->createElementNS( 'urn:oasis:names:specification:ubl:schema:xsd:Invoice-2', 'Invoice' ); $invoice->setAttribute('xmlns:cac', 'urn:oasis:names:specification:ubl:schema:xsd:CommonAggregateComponents-2'); $invoice->setAttribute('xmlns:cbc', 'urn:oasis:names:specification:ubl:schema:xsd:CommonBasicComponents-2'); $dom->appendChild($invoice); // Standardfelder setzen $invoice->appendChild($dom->createElement('cbc:UBLVersionID', '2.1')); $invoice->appendChild($dom->createElement('cbc:CustomizationID', 'urn:cen.eu:en16931:2017#compliant#urn:xoev-de:kosit:standard:xrechnung_2.0')); $invoice->appendChild($dom->createElement('cbc:ID', $invoiceNumber)); $invoice->appendChild($dom->createElement('cbc:IssueDate', $invoiceDate)); $invoice->appendChild($dom->createElement('cbc:InvoiceTypeCode', '380')); $invoice->appendChild($dom->createElement('cbc:DocumentCurrencyCode', 'EUR'));
Der Aufbau geht dann weiter über Verkäufer- und Käuferdaten, Zahlungsinformationen, steuerliche Angaben und natürlich die Rechnungspositionen, die als cac:InvoiceLine-Blöcke angelegt werden. Die Daten werden direkt auf dem Server verarbeitet, im Anschluss kann ich die XML-Datei wieder in ein FileMaker-Feld laden (Aus URL einfügen). Da ich mit horstoeko/zugferd arbeite, wird in der Folgeversion noch die Validierung erfolgen. Die derzeit händische, zeigt alle Werte, keine Fehler, keine Warnungen.
0 notes
Link
0 notes
Text
PHP IP Geolocation Api ile Detaylı Konum Bilgisi
Merhaba! Bu proje, IP Geolocation API'yi kullanarak IP adresine dayalı konum bilgilerini öğrenmenizi sağlar. Kullanıcıların IP adreslerinden, ülkelerine, şehirlerine, enlem ve boylam bilgilerine, ISP'lerine ve zaman dilimlerine kadar çeşitli verileri görüntülemenize olanak tanır.
Proje, sadece 2 dosya ile çalışacak şekilde basit ve hızlı bir çözüm sunuyor. index.php ve api.php dosyaları ile bu veriyi çekmek ve görselleştirmek çok kolay!
Özellikler:
Kullanıcıların IP adresine göre konum bilgisi alabilirsiniz.
Ülke, şehir, IP adresi, enlem, boylam gibi bilgileri kolayca görüntüleyebilirsiniz.
Zaman dilimi, ISP ve daha fazlası hakkında bilgi edinin.
Çok basit yapısı sayesinde hızlıca kurulabilir ve kullanılabilir.
Nasıl Kullanılır?
API Anahtarınızı Alın:
IP Geolocation API adresine kaydolun ve API anahtarınızı alın.
API Anahtarını Yapılandırın:
Proje dosyasındaki api.php dosyasına gidin ve aşağıdaki satırda bulunan API_ANAHTARINIZI_BURAYA_KOPYALAYIN kısmını aldığınız API anahtarı ile değiştirin.$apiKey = 'API_ANAHTARINIZI_BURAYA_KOPYALAYIN';
Projeyi Çalıştırın:
Dosyaları sunucunuza veya lokal makinanıza yükleyin.
Tarayıcınızda index.php dosyasını açarak IP adresi ve konum bilgilerini görüntüleyin.
Kullanılabilecek Teknolojiler:
PHP
cURL
JSON
Katkı Sağlama
Bu projeye katkıda bulunmak isterseniz, pull request gönderebilir veya issues bölümünden geribildirim bırakabilirsiniz.
License
Bu proje MIT License ile lisanslanmıştır.
Bu projeyi mscacan tarafından geliştirilmiştir. Eğer sorularınız veya önerileriniz varsa, lütfen bana GitHub üzerinden ulaşın.
0 notes