#php xml to json with attributes
Explore tagged Tumblr posts
Visit Tumblr Blog
Explore Tumblr blogs with no restrictions, modern design and the best experience.
Last Seen Tumblr Blogs


Fun Fact
Tumblr’s website traffic is steadily declining.
Text
SimpleXMLElement returns empty object resolved
SimpleXMLElement returns empty object resolved
Hello buddy, I hope you are doing well in this article we will learn about how we can convert XML to JSON, I know when you are trying to convert XML to JSON you get an empty object. But we have the solution, on how to convert XML to JSON via PHP. Look for the below XML response. <?xml version="1.0" encoding="UTF-8"?> <sEnvelope xmlns:a="http://www.w3.org/2005/08/addressing"…
View On WordPress
#conversation of supplied dom node into a simple xml element object#conversation of supplied dom node into a simple xml elements object#conversion of supplied dom node into simple xml element object#conversion of supplied download into a simple xml element object#conversion of supplied node in to a simple xml element object#conversion of supplied node into a simple xml element object#php to xml converter#php xml to json with attributes#php xml to json without attributes#simplexmlelement object to json#simplexmlelement to xml#soap xml to json php#xml to array in php#xml to json laravel#xml to json php online#xml to string php
0 notes
Text
Sqlite For Mac Os X

Sqlite For Mac Os X El Capitan
Sqlite Viewer Mac
Sqlite Mac Os X Install
If you are looking for an SQLite Editor in the public domain under Creative Commons license or GPL (General Public License) i.e. for free commercial or non-commercial use. Then here is a shortlist of the SQLite Editor that is available on the web for free download.
SQLite is famous for its great feature zero-configuration, which means no complex setup or administration is needed. This chapter will take you through the process of setting up SQLite on Windows, Linux and Mac OS X. Install SQLite on Windows. Step 1 − Go to SQLite download page, and download precompiled binaries from Windows section. Core Data is an object graph and persistence framework provided by Apple in the macOS and iOS operating systems.It was introduced in Mac OS X 10.4 Tiger and iOS with iPhone SDK 3.0. It allows data organized by the relational entity–attribute model to be serialized into XML, binary, or SQLite stores. The data can be manipulated using higher level objects representing entities. Requirements: Free, ideally open source Browse schema, data. Run queries Bonus if updated in near real time when the file is. SQLite viewer for Mac OS X. Ask Question Asked 5 years, 10 months ago. Active 4 years, 3 months ago. Viewed 504 times 3. I need to inspect an SQLite file on Mac. Since I develop on Windows, Linux and OS X, it helps to have the same tools available on each. I also tried SQLite Admin (Windows, so irrelevant to the question anyway) for a while, but it seems unmaintained these days, and has the most annoying hotkeys of any application I've ever used - Ctrl-S clears the current query, with no hope of undo.
These software work on macOS, Windows, Linux and most of the Unix Operating systems.
SQLite is the server. The SQLite library reads and writes directly to and from the database files on disk. SQLite is used by Mac OS X software such as NetNewsWire and SpamSieve. When you download SQLite and build it on a stock Mac OS X system, the sqlite tool has a.
1. SQLiteStudio
Link : http://sqlitestudio.pl/
SQLiteStudio Database manager has the following features :
A small single executable Binary file, so there is need to install or uninstall.
Open source and free - Released under GPLv2 licence.
Good UI with SQLite3 and SQLite2 features.
Supports Windows 9x/2k/XP/2003/Vista/7, Linux, MacOS X, Solaris, FreeBSD and other Unix Systems.
Language support : English, Polish, Spanish, German, Russian, Japanese, Italian, Dutch, Chinese,
Exporting Options : SQL statements, CSV, HTML, XML, PDF, JSON, dBase
Importing Options : CSV, dBase, custom text files, regular expressions
UTF-8 support

2. Sqlite Expert
Link : http://www.sqliteexpert.com/download.html


SQLite Expert though not under public domain, but its free for commercial use and is available in two flavours.
a. Personal Edition
Sqlite For Mac Os X El Capitan
It is free for personal and commercial use but, covers only basic SQLite features.
But its a freeware and does not have an expiration date.

b. Professional Edition
It is for $59 (onetime fee, with free lifetime updates )
It covers In-depth SQLite features.
But its a freeware and does not have an expiration date.
Features :
Visual SQL Query Builder : with auto formatting, sql parsing, analysis and syntax highlighting features.
Powerful restructure capabilities : Restructure any complex table without losing data.
Import and Export data : CSV files, SQL script or SQLite. Export data to Excel via clipboard.
Data editing : using powerful in-place editors
Image editor : JPEG, PNG, BMP, GIF and ICO image formats.
Full Unicode Support.
Support for encrypted databases.
Lua and Pascal scripting support.
3. Database Browser for SQLite
Link : http://sqlitebrowser.org/
Database Browser for SQLite is a high quality, visual, open source tool to create, design, and edit database files compatible with SQLite.
Database Browser for SQLite is bi-licensed under the Mozilla Public License Version 2, as well as the GNU General Public License Version 3 or later.
You can modify or redistribute it under the conditions of these licenses.
Features :
You can Create, define, modify and delete tables
You can Create, define and delete indexes
You can Browse, edit, add and delete records
You can Search records
You can Import and export records as
You can Import and export tables from/to text, CSV, SQL dump files
You can Issue SQL queries and inspect the results
You can See Log of all SQL commands issued by the application
4. SQLite Manager for Firefox Browser
Link : https://addons.mozilla.org/en-US/firefox/addon/sqlite-manager/
This is an addon plugin for Firefox Browser,
Features :
Manage any SQLite database on your computer.
An intuitive hierarchical tree showing database objects.
Helpful dialogs to manage tables, indexes, views and triggers.
You can browse and search the tables, as well as add, edit, delete and duplicate the records.
Facility to execute any sql query.
The views can be searched too.
A dropdown menu helps with the SQL syntax thus making writing SQL easier.
Easy access to common operations through menu, toolbars, buttons and context-menu.
Export tables/views/database in csv/xml/sql format. Import from csv/xml/sql (both UTF-8 and UTF-16).
Possible to execute multiple sql statements in Execute tab.
You can save the queries.
Support for ADS on Windows
Sqlite Viewer Mac
More Posts related to Mac-OS-X,
More Posts:
Sqlite Mac Os X Install
Facebook Thanks for stopping by! We hope to see you again soon. - Facebook
Android EditText Cursor Colour appears to be white - Android
Disable EditText Cursor Android - Android
Connection Failed: 1130 PHP MySQL Error - MySQL
SharePoint Managed Metadata Hidden Taxonomy List - TaxonomyHiddenList - SharePoint
Execute .bin and .run file Ubuntu Linux - Linux
Possible outages message Google Webmaster tool - Google
Android : Remove ListView Separator/divider programmatically or using xml property - Android
Unable to edit file in Notepad++ - NotepadPlusPlus
SharePoint PowerShell Merge-SPLogFile filter by time using StartTime EndTime - SharePoint
SQLite Error: unknown command or invalid arguments: open. Enter .help for help - Android
JBoss stuck loading JBAS015899: AS 7.1.1.Final Brontes starting - Java
Android Wifi WPA2/WPA Connects and Disconnects issue - Android
Android Toolbar example with appcompat_v7 21 - Android
ERROR x86 emulation currently requires hardware acceleration. Intel HAXM is not installed on this machine - Android
1 note
·
View note
Photo

hydralisk98′s web projects tracker:
Core principles=
Fail faster
‘Learn, Tweak, Make’ loop
This is meant to be a quick reference for tracking progress made over my various projects, organized by their “ultimate target” goal:
(START)
(Website)=
Install Firefox
Install Chrome
Install Microsoft newest browser
Install Lynx
Learn about contemporary web browsers
Install a very basic text editor
Install Notepad++
Install Nano
Install Powershell
Install Bash
Install Git
Learn HTML
Elements and attributes
Commenting (single line comment, multi-line comment)
Head (title, meta, charset, language, link, style, description, keywords, author, viewport, script, base, url-encode, )
Hyperlinks (local, external, link titles, relative filepaths, absolute filepaths)
Headings (h1-h6, horizontal rules)
Paragraphs (pre, line breaks)
Text formatting (bold, italic, deleted, inserted, subscript, superscript, marked)
Quotations (quote, blockquote, abbreviations, address, cite, bidirectional override)
Entities & symbols (&entity_name, &entity_number,  , useful HTML character entities, diacritical marks, mathematical symbols, greek letters, currency symbols, )
Id (bookmarks)
Classes (select elements, multiple classes, different tags can share same class, )
Blocks & Inlines (div, span)
Computercode (kbd, samp, code, var)
Lists (ordered, unordered, description lists, control list counting, nesting)
Tables (colspan, rowspan, caption, colgroup, thead, tbody, tfoot, th)
Images (src, alt, width, height, animated, link, map, area, usenmap, , picture, picture for format support)
old fashioned audio
old fashioned video
Iframes (URL src, name, target)
Forms (input types, action, method, GET, POST, name, fieldset, accept-charset, autocomplete, enctype, novalidate, target, form elements, input attributes)
URL encode (scheme, prefix, domain, port, path, filename, ascii-encodings)
Learn about oldest web browsers onwards
Learn early HTML versions (doctypes & permitted elements for each version)
Make a 90s-like web page compatible with as much early web formats as possible, earliest web browsers’ compatibility is best here
Learn how to teach HTML5 features to most if not all older browsers
Install Adobe XD
Register a account at Figma
Learn Adobe XD basics
Learn Figma basics
Install Microsoft’s VS Code
Install my Microsoft’s VS Code favorite extensions
Learn HTML5
Semantic elements
Layouts
Graphics (SVG, canvas)
Track
Audio
Video
Embed
APIs (geolocation, drag and drop, local storage, application cache, web workers, server-sent events, )
HTMLShiv for teaching older browsers HTML5
HTML5 style guide and coding conventions (doctype, clean tidy well-formed code, lower case element names, close all html elements, close empty html elements, quote attribute values, image attributes, space and equal signs, avoid long code lines, blank lines, indentation, keep html, keep head, keep body, meta data, viewport, comments, stylesheets, loading JS into html, accessing HTML elements with JS, use lowercase file names, file extensions, index/default)
Learn CSS
Selections
Colors
Fonts
Positioning
Box model
Grid
Flexbox
Custom properties
Transitions
Animate
Make a simple modern static site
Learn responsive design
Viewport
Media queries
Fluid widths
rem units over px
Mobile first
Learn SASS
Variables
Nesting
Conditionals
Functions
Learn about CSS frameworks
Learn Bootstrap
Learn Tailwind CSS
Learn JS
Fundamentals
Document Object Model / DOM
JavaScript Object Notation / JSON
Fetch API
Modern JS (ES6+)
Learn Git
Learn Browser Dev Tools
Learn your VS Code extensions
Learn Emmet
Learn NPM
Learn Yarn
Learn Axios
Learn Webpack
Learn Parcel
Learn basic deployment
Domain registration (Namecheap)
Managed hosting (InMotion, Hostgator, Bluehost)
Static hosting (Nertlify, Github Pages)
SSL certificate
FTP
SFTP
SSH
CLI
Make a fancy front end website about
Make a few Tumblr themes
===You are now a basic front end developer!
Learn about XML dialects
Learn XML
Learn about JS frameworks
Learn jQuery
Learn React
Contex API with Hooks
NEXT
Learn Vue.js
Vuex
NUXT
Learn Svelte
NUXT (Vue)
Learn Gatsby
Learn Gridsome
Learn Typescript
Make a epic front end website about
===You are now a front-end wizard!
Learn Node.js
Express
Nest.js
Koa
Learn Python
Django
Flask
Learn GoLang
Revel
Learn PHP
Laravel
Slim
Symfony
Learn Ruby
Ruby on Rails
Sinatra
Learn SQL
PostgreSQL
MySQL
Learn ORM
Learn ODM
Learn NoSQL
MongoDB
RethinkDB
CouchDB
Learn a cloud database
Firebase, Azure Cloud DB, AWS
Learn a lightweight & cache variant
Redis
SQLlite
NeDB
Learn GraphQL
Learn about CMSes
Learn Wordpress
Learn Drupal
Learn Keystone
Learn Enduro
Learn Contentful
Learn Sanity
Learn Jekyll
Learn about DevOps
Learn NGINX
Learn Apache
Learn Linode
Learn Heroku
Learn Azure
Learn Docker
Learn testing
Learn load balancing
===You are now a good full stack developer
Learn about mobile development
Learn Dart
Learn Flutter
Learn React Native
Learn Nativescript
Learn Ionic
Learn progressive web apps
Learn Electron
Learn JAMstack
Learn serverless architecture
Learn API-first design
Learn data science
Learn machine learning
Learn deep learning
Learn speech recognition
Learn web assembly
===You are now a epic full stack developer
Make a web browser
Make a web server
===You are now a legendary full stack developer
[...]
(Computer system)=
Learn to execute and test your code in a command line interface
Learn to use breakpoints and debuggers
Learn Bash
Learn fish
Learn Zsh
Learn Vim
Learn nano
Learn Notepad++
Learn VS Code
Learn Brackets
Learn Atom
Learn Geany
Learn Neovim
Learn Python
Learn Java?
Learn R
Learn Swift?
Learn Go-lang?
Learn Common Lisp
Learn Clojure (& ClojureScript)
Learn Scheme
Learn C++
Learn C
Learn B
Learn Mesa
Learn Brainfuck
Learn Assembly
Learn Machine Code
Learn how to manage I/O
Make a keypad
Make a keyboard
Make a mouse
Make a light pen
Make a small LCD display
Make a small LED display
Make a teleprinter terminal
Make a medium raster CRT display
Make a small vector CRT display
Make larger LED displays
Make a few CRT displays
Learn how to manage computer memory
Make datasettes
Make a datasette deck
Make floppy disks
Make a floppy drive
Learn how to control data
Learn binary base
Learn hexadecimal base
Learn octal base
Learn registers
Learn timing information
Learn assembly common mnemonics
Learn arithmetic operations
Learn logic operations (AND, OR, XOR, NOT, NAND, NOR, NXOR, IMPLY)
Learn masking
Learn assembly language basics
Learn stack construct’s operations
Learn calling conventions
Learn to use Application Binary Interface or ABI
Learn to make your own ABIs
Learn to use memory maps
Learn to make memory maps
Make a clock
Make a front panel
Make a calculator
Learn about existing instruction sets (Intel, ARM, RISC-V, PIC, AVR, SPARC, MIPS, Intersil 6120, Z80...)
Design a instruction set
Compose a assembler
Compose a disassembler
Compose a emulator
Write a B-derivative programming language (somewhat similar to C)
Write a IPL-derivative programming language (somewhat similar to Lisp and Scheme)
Write a general markup language (like GML, SGML, HTML, XML...)
Write a Turing tarpit (like Brainfuck)
Write a scripting language (like Bash)
Write a database system (like VisiCalc or SQL)
Write a CLI shell (basic operating system like Unix or CP/M)
Write a single-user GUI operating system (like Xerox Star’s Pilot)
Write a multi-user GUI operating system (like Linux)
Write various software utilities for my various OSes
Write various games for my various OSes
Write various niche applications for my various OSes
Implement a awesome model in very large scale integration, like the Commodore CBM-II
Implement a epic model in integrated circuits, like the DEC PDP-15
Implement a modest model in transistor-transistor logic, similar to the DEC PDP-12
Implement a simple model in diode-transistor logic, like the original DEC PDP-8
Implement a simpler model in later vacuum tubes, like the IBM 700 series
Implement simplest model in early vacuum tubes, like the EDSAC
[...]
(Conlang)=
Choose sounds
Choose phonotactics
[...]
(Animation ‘movie’)=
[...]
(Exploration top-down ’racing game’)=
[...]
(Video dictionary)=
[...]
(Grand strategy game)=
[...]
(Telex system)=
[...]
(Pen&paper tabletop game)=
[...]
(Search engine)=
[...]
(Microlearning system)=
[...]
(Alternate planet)=
[...]
(END)
4 notes
·
View notes
Text
Ultimate Vim Configuration for Developer

Install latest version of nodejs (For ubuntu like distro)
curl -sL https://deb.nodesource.com/setup_14.x -o nodesource_setup.sh sudo bash nodesource_setup.sh sudo apt-get install -y nodejs
Download plug.vim and put it in the "autoload" directory.
usually found in the echo $VIMRUNTIME directory
in my case it was :/usr/local/share/vim/vim82
since I compiled from source in most installations you can do the following:
Vim
Unix
curl -fLo ~/.vim/autoload/plug.vim --create-dirs \ https://raw.githubusercontent.com/junegunn/vim-plug/master/plug.vim
You can automate the process by putting the command in your Vim configuration file as suggested here.
Windows (PowerShell)
iwr -useb https://raw.githubusercontent.com/junegunn/vim-plug/master/plug.vim |` ni $HOME/vimfiles/autoload/plug.vim -Force
Neovim
Unix, Linux
sh -c 'curl -fLo "${XDG_DATA_HOME:-$HOME/.local/share}"/nvim/site/autoload/plug.vim --create-dirs \ https://raw.githubusercontent.com/junegunn/vim-plug/master/plug.vim'
edit and add the following to your .vimrc:
set number set clipboard=unnamedplus colorscheme peaksea set backspace=indent,eol,start call plug#begin('~/.vim/plugged') Plug 'neoclide/coc.nvim', {'branch': 'release'} Plug 'ctrlpvim/ctrlp.vim' Plug 'ctrlpvim/ctrlp.vim' Plug 'preservim/nerdtree' Plug 'chrisbra/vim-commentary' Plug 'jlanzarotta/bufexplorer' Plug 'itchyny/lightline.vim' Plug 'preservim/tagbar' call plug#end() set laststatus=2 let mapleader = "," nmap <leader>w :w!<cr> map <leader>tn :tabnew<cr> map <leader>to :tabonly<cr> map <leader>tc :tabclose<cr> map <leader>tm :tabmove " Opens a new tab with the current buffer's path " Super useful when editing files in the same directory map <leader>te :tabedit <C-r>=expand("%:p:h")<cr>/ " Close current buffer map <leader>bd :Bclose<cr> map <leader>tt :term<cr> " Close all buffers map <leader>ba :1,1000 bd!<cr> vnoremap <silent> <leader>r :call VisualSelection('replace')<CR> map <leader>o :BufExplorer<cr> " Quickly find and open a file in the CWD let g:ctrlp_map = '<C-f>' " Quickly find and open a recently opened file map <leader>f :CtrlPMRU<CR> " Quickly find and open a buffer map <leader>b :CtrlPBuffer<cr> map <leader>nn :NERDTreeToggle<cr> map <leader>nb :NERDTreeFromBookmark map <leader>nf :NERDTreeFind<cr> map <leader>ss :setlocal spell!<cr> map <leader>sn ]s map <leader>sp [s map <leader>sa zg map <leader>s? z= nmap <F8> :TagbarToggle<CR>
restart vim and type
:PlugInstall
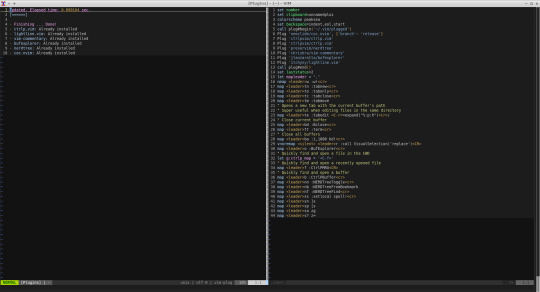
Restart vim and enjoy.
In vim install the plugins you need for your development
For example:
:CocInstall coc-json coc-css
That was css
Few of the available plugins are:
You can find available coc extensions by searching coc.nvim on npm, or use coc-marketplace, which can search and install extensions in coc.nvim directly.
coc-angular for angular.
coc-blade-formatter for blade, Integrates the blade-formatter (Laravel Blade formatter).
coc-blade-linter for blade, Integrates the Laravel Blade Linter.
coc-browser for browser words completion
coc-calc expression calculation extension
coc-cfn-lint for CloudFormation Linter, cfn-python-lint
coc-clangd for C/C++/Objective-C, use clangd
coc-clang-format-style-options coc.nvim extension, helps you write .clang-format more easily.
coc-cmake for cmake code completion
coc-css for css, scss and less.
coc-cssmodules css modules intellisense.
coc-deno for deno.
coc-denoland for deno, fork of vscode_deno.
coc-diagnostic for All filetypes, use diagnostic-languageserver.
coc-discord discord rich presence for coc.nvim
coc-discord-rpc fully customizable discord rpc integration with support for over 130+ of the most popular languages
coc-dash-complete Press - to trigger buffer source completion.
coc-dot-complete Press . to trigger buffer source completion.
coc-ecdict ECDICT extension
coc-elixir for elixir, based on elixir-ls.
coc-ember for ember projects.
coc-emmet provides emmet suggestions in completion list.
coc-erlang_ls for erlang, based on erlang_ls
coc-esbonio for rst (reStructuredText), esbonio ([Sphinx] Python Documentation Generator) language server extension.
coc-eslint Eslint extension for coc.nvim
coc-explorer file explorer extension
coc-floaterm for vim-floaterm integration
coc-flow for flow
coc-flutter for flutter
coc-fsharp for fsharp.
coc-fzf-preview provide powerful fzf integration.
coc-gist gist management
coc-git provides git integration.
coc-glslx for glsl, use glslx.
coc-go for go, use gopls.
coc-graphql for graphql.
coc-highlight provides default document symbol highlighting and color support.
coc-html for html, handlebars and razor.
coc-htmldjango for htmldjango, django templates (htmldjango) extension. Provides "formatter", "snippets completion" and more...
coc-htmlhint for html, Integrates the HTMLHint static analysis tool.
coc-html-css-support for HTML id and class attribute completion.
coc-intelephense for php, fork of vscode-intelephense. (scoped packages: @yaegassy/coc-intelephense)
coc-java for java, use eclipse.jdt.ls.
coc-jedi for python, use jedi-language-server.
coc-json for json.
coc-julia for julia.
coc-just-complete Press _ to trigger buffer source completion.
coc-lists provides some basic lists like fzf.vim.
coc-lsp-wl for wolfram mathematica, fork of vscode-lsp-wl.
coc-markdownlint for markdown linting
coc-metals for Scala using Metals
coc-omnisharp for csharp and visualbasic.
coc-perl for perl.
coc-php-cs-fixer for php, Integrates the php-cs-fixer (PHP Coding Standards Fixer).
coc-phpactor for php, using phpactor
coc-phpls for php, use intelephense-docs.
coc-psalm for php, use psalm.
coc-powershell for PowerShellEditorService integration.
coc-prettier a fork of prettier-vscode.
coc-prisma for Prisma schema integration.
coc-pyright Pyright extension
coc-python for python, extension forked from vscode-python. (Not maintained anymore)
coc-pydocstring for python, using doq (python docstring generator) extension.
coc-r-lsp for r, use R languageserver.
coc-reason for reasonml
coc-rls for rust, use Rust Language Server
coc-rome for javascript, typescript, json and more, use Rome
coc-rust-analyzer for rust, use rust-analyzer
coc-sh for bash using bash-language-server.
coc-stylelintplus for linting CSS and CSS preprocessed formats
coc-stylelint for linting CSS and CSS preprocessed formats
coc-snippets provides snippets solution.
coc-solargraph for ruby, use solargraph.
coc-sourcekit for Swift
coc-spell-checker A basic spell checker that works well with camelCase code
coc-sql for sql.
coc-sqlfluff for sql, SQLFluff (A SQL linter and auto-formatter for Humans) extension
coc-svelte for svelte.
coc-svg for svg.
coc-swagger for improved Swagger/OpenAPI spec authoring experience.
coc-tabnine for tabnine.
coc-tailwindcss for tailwindcss.
coc-tasks for asynctasks.vim integration
coc-texlab for LaTeX using TexLab.
coc-toml for toml using taplo.
coc-translator language transaction extension
coc-tsserver for javascript and typescript.
coc-vetur for vue, use vetur.
coc-vimlsp for viml.
coc-xml for xml, use lsp4xml.
coc-yaml for yaml
coc-yank provides yank highlights & history.
coc-thrift-syntax-support for thrift.
in case it the vim version is an issue then you will need to install and compile version:
sudo apt-get install lua50 liblua50-dev liblualib50-dev sudo apt-get install libncurses5-dev libgnome2-dev libgnomeui-dev libgtk2.0-dev libatk1.0-dev libbonoboui2-dev libcairo2-dev libx11-dev libxpm-dev libxt-dev python-dev ruby-dev mercurial sudo make install sudo apt-get install python3-dev sudo apt-get install python-dev
git clone https://github.com/vim/vim.git
cd vim
./configure --with-features=huge --enable-rubyinterp --enable-python3interp --with-python-config-dir=/usr/bin/python3.6-config --enable-perlinterp --enable-gui=gtk2 --enable-cscope --prefix=/usr --enable-luainterp --with-lua-prefix=/usr/local
make
make install
You can get the config here:
https://github.com/macunan/vimconfig/blob/main/.vimrc
0 notes
Text
WebStorm 2020.3.2 Crack With Torrent + License Key [Latest 2021]
WebStorm Crack
2021 Full Version Download is the world's best cross-platform IDE (Integrated Development Environment) tool for web developers. It has a PHP, JavaScript and HTML code editor to decode and edit them. Plus, Phpstorm 2020 fully hacked provides developers and students with all sorts of tools to help them get going. This software is specially designed for web developers to edit PHP, CSS, XML, HTML and JavaScript files. Moreover, it helps to edit all kinds of source codes in any language. In addition, it is compatible with PHP 5.3, 5.4, 5.5-7.4, including coroutines and generators.
PhpStorm Crack full activation code download is in Java language but compatible with all kinds of languages. It has many built-in plugins to help users create other plugins to decode different languages. Plus, it has built-in code completion, bookmarks, breakpoints, and scaling options. In addition, it has macros, quick navigation, excellent code analysis, which greatly helps users in their work. It makes complex projects easier to do in a simple way. You can also rewrite different codes to the desired language. Besides, this tool is also compatible with any external source like X Debug.
PhpStorm Crack Key Latest 2021 consists of a powerful SQL editor that shows you all the details about the work. WebStorm is also the best IDE editor. PhpStorm has all the features of WebStorm plus additional unique key features. This is the best PHP editor. Plus, it has a simple and easy-to-navigate navigation bar that makes it easy to manage your work. Shortcuts are also part of the navigation bar. You can easily use advanced tools using these shortcuts. In addition, these tools will help you analyze your work from different angles.
Also Download,
FontLab Crack
New Changes in Version 2020.3.2 Build 203.7148.26:
Some improvements have been made in the metadata
Moreover, fix the issue of the subdirectory where the inspection was unable to work properly through dockerized phpstan
Also, some keys are added for the Array shape of params
Resolve the server issue related to X debugger older than 2.9
Moreover, a new search console to find the required files more easily
Also, resolve the unsuccessful command issue between the Phpstorm and X debugger older than 2.2
Improvements for Vue WEB-31721 +26 support
Further, fix a crash related to the usage of old Xdebuger
Moreover, fix all the crashes related to old Xdebuger command and duplicate comment issue
All types of language support feature
Also, Xdebuger 3 with many new streamline configuration with multiple supports
Furthermore, you can now process Guzzle request
Fix the problems of namespace and language attribute
Phpstorm minor functional improvements
A new major update that brings support for PHP 8 with a new welcome screen and much more
Also, new language support with a new code reader and much more
Improvements in many new editing codes and PHPUnit tests with WSL interpreter
A new VUE-loader to support VUE- templates
Moreover, fix an issue of IDEA-241935 +12
Fix an issue that IDE does not work after update
Moreover, IDE-242047 +24 issue resolve
Added compatibility for custom Satis/Packagist packages and JSON composer
Also, new getter and setter on the fly
Fix issue related to PHP doc comment
There is a new file name as the class in the PHAR files for the improved performance
Further, this version support to open multiple projects in the same window to handle them easily
Also, abrupt fixes for trivial cases
Keyboard improvements by improving the duplicate check
Also, fix the issue of trait collision to sole the overrides issues
What’s New in Crack Version 2021?
Addition of GitHub Pull support
Also, a new flow analysis for PHP control
New widgets for work inspections
Usage improvements related to implement-base-method
Further, fix broken artisan commands
Also, the culmination of PHP XDebug >= 2.9 configuration
Solve the problem related to PHP command-line tools
Work through unregistered servers is no more compatible with the latest version
Missing type hint for PHP is now available
Further, support for Windows Subsystem
Added support for PSR 12 code style
PHP 7.4 edition support
PhpStorm Key Features [Mac/Win]:
Super IDE PHP web development tool with lots of useful features
Also, has a rich code editor, code formatting system, and syntax highlighter
Further, automated code generation and completion
Available in near about all types of famous world languages
It has many new writing and code styles
You can make any change in your work with just a single click
Moreover, fully compatible with PHP Doc
Also, it helps you in the duplicate code detection method
It has many new twig and smarty templates to style your codes
PHP code checker that sniff code smells on the fly
Furthermore, it has PHAR support as well as SQL support
A free trial version of PhpStorm is also available
Featured with the version control system
Further, it has remote development for FTPS, FTP, SFTP that is dependent on automatic synchronization
Also, integrated with Google application engine support for PHP
It helps to track any disturbance in your project
Moreover, it has better testing and debugging system for developers
In addition, it is laced with all types of CSS, HTML, SSL, SCSS, SASS, LESS, and JavaScript features
Also Download,
Visual Studio 2021 Crack
PhpStorm 2020.3.2 Activation Code + Key:
NHVGC-UGTFX-LIKNR-53ZED-9VFX3-58CZ2
XFSEW-KJHIU-BHGYT-BVGFT-VCDRE-KJHYT
CFDTR-KJHYT-CFDRE-XDSEW-DSEWI-VCFDE
56432-CFDSE-65432-BHGFR-90876-BCFDR
45CFD-65CFD-78HGT-89NHG-89NBV
CDF56-NHG90-BHG90-BHJG90-NVF90
System Requirements:
Windows: Vista, XP, 10, 8, 7, 8.1, 2002
Mac: macOS 10 and later
RAM:5 GB
Free disk space for downloading 1 GB
1080 x 720 screen resolution is enough
5 GHz processor
How to Activate/ Crack?
1st of all, install the Free Trial Version of PhpStorm
2nd, carry out it completely
Now download the PhpStorm Crack 2021 Latest Version given here
Extract the file completely in the download folder
Add it to the archive
Run the installation procedure by following the given way
Copy-paste the Activation Code
Wait till the complete downloading
Restart your system after that
Enjoy! The latest version
If You Like Some Other Relatives Software :
IDM Activator 6.38 Build 16 Crack With Serial Key Free Download 2021
IDM 6.38 Build 16 Universal Crack Patch Keygen Serial Download
Z3X Samsung Tool Pro 41.11 Crack + Without Box Direct Loader [No Card]
Gihosoft TubeGet Activation Key + Crack 8.6.18 (Mac/Win) Torrent 2021
0 notes
Text
The essence of WordPress REST API
While developing web applications with WordPress, developers connect the application to third party programs and services through various application programming interfaces such or Web API. They further utilize an assortment of APIs to improve the WordPress application’s user experience and functionality. WordPress API allows programmers to connect the application to other services and software in an easier and more effective way.

Realizing vital aspects of WordPress REST API
REST Methodology
WordPress has designed the plug-in as a universal connector by utilizing REST methodology. Along with having an easy data format, REST also permits developers to utilize commonly utilized HTP methods such as Post, Get, Delete and Put, Simultaneously, the methodology can alleviate exchange of data in JSON, and XML format. The REST methodology makes the communication convenient between two programs.
Compatibility with other Web Programming languages
While developing websites with WordPress, programmers have to write the code in PHP. Presently, PHP is the most popular server side programming language. But it lacks various high-end attributes offered by contemporary languages such as C#, Java, and Ruby. Therefore, various developers these days favour writing web applications in contemporary programming languages. The WordPress REST API will make it simpler for programmers to connect WordPress applications to other services and websites regardless of their server-side programming language.
Simplify Third Party Content Incorporation
The WordPress API development will make it simpler for programmers to incorporate content for different sources into a website. Similarly, the tool will simplify the procedure of making the resources and content of a WordPress accessible to other websites. The WordPress developers can utilize WordPress more effectively as a CMS to handle and source website content from various sources. They can further utilize WordPress API to make websites deliver more relevant information to users on a daily basis.
0 notes
Photo

11 Best PHP Event Calendar and Booking Scripts... and 3 Free Options
In this article, I'll review 11 of the best PHP calendar scripts. Whether you need an appointment booking script, an event calendar script, or a PHP calendar reservation system, you'll find something on this list.
There are lots of reasons you might need a PHP calendar script. If you’re a service provider, you need an appointment booking system that allows customers to see your availability and select an appointment time and date that is best for them. This makes it easier for customers to book and cuts down on needless calls to your business.
The Laravel calendar booking system is one of the many great PHP calendars on CodeCanyon.
Online PHP calendars are also handy for organisations of any size to help team members share events and tasks and keep track of what everybody is working on.
Their usefulness isn’t just limited to companies, however. Artists, writers, performers, bloggers and anyone else with an active public life could make good use of PHP calendar scripts to let followers and fans know the whens and wheres of public appearances.
What Type of PHP Calendar Script Do You Need?
When it comes to PHP event calendar and appointment booking scripts, choosing the right one can be hard. They can take dozens of forms, and finding the right one for you can be a daunting task.
To help choose the right PHP calendar framework for you, here are a few questions to ask yourself before you get started:
Do I need to focus on events, which occur at specific times, with a large number of tickets to sell? Or on bookings, with a smaller number of services that could occur at any time?
Will I need to support only my business? Or are there others that will be included in my listings? For example, a business cooperative might need to handle bookings for multiple service providers.
Will there be a single entity that events or bookings are attributed to, or several—as in a hair studio, with several stylists available?
Do I need a script to embed into a current site, or do I need something that stands on its own?
PHP Event Calendar and Booking Scripts on CodeCanyon
There are currently almost 50 PHP event calendar and booking scripts available on CodeCanyon. Some of these PHP calendar script downloads address very specific use cases like cleaning and laundry services. Others are more general-purpose web calendar scripts used to book all kinds of events.
All of these web calendar scripts offer the basic functionality you expect in a booking system. Some of them also have a unique set of features that includes things like generating invoice PDFs or sending booking alerts through SMS.
After you purchase any of these scripts, you will get six months of free support to help you set things up. You also become eligible for free lifetime updates. This is one helpful reason to choose a premium option over a PHP event calendar that's free. It's hard to find well-supported free PHP booking calendars online, and even harder finding ones that are full of features.
The Best PHP Event Calendar and Booking Scripts on CodeCanyon for 2020
With all this in mind, we’ve compiled 11 of our best PHP calendar, booking and event scripts available for download today at CodeCanyon. This post will help you choose the PHP calendar framework that’s right for you.
1. Cleanto
Cleanto is ideal for many different types of service companies looking for a reliable way to provide clients with full-featured online booking.
Standout features of this PHP calendar script download include:
PayPal, Authorize.Net, and Stripe payment methods
email reminders
auto-confirm bookings
ability to add breaks in the schedule
and more
User Crossera says:
“Amazing customer support. These guys came back to me within a day with a fix for all the problems I faced. The plugin can be customized to whatever your needs are.”
2. Appointo—Booking Management System
An end-to-end solution for booking, Appointo Booking Management System takes the heavy lifting off your CMS or static site. This PHP calendar script download provides a front-end calendar and booking system that can be easily used to mark appointments or events. Then, on the administrative side, you can manage the events and services that are available, and keep track of customers or attendees.
Standout features:
front-end booking calendar
ability to manage services and booking
point-of-sale support
customer management
support for both PayPal and Stripe
User moffei says:
“Cool and Clean Customer Support. The fastest customer support I've ever had on CodeCanyon, plus a better script for the job. I definitely recommend it.”
3. Vacation Rentals Booking Calendar
The Vacation Rentals Booking Calendar is an online vacation rental booking calendar script that allows property owners or management agencies to create and manage rental availability calendars for their vacation rental properties. It's a very useful PHP calendar script with events for property owners and management companies.
Standout features:
highly customizable
email notifications to site owner or administrator
XML and JSON availability feeds
export calendars to iCalendar format
and more
User Craignic says:
“Great product and quick support given when I had a query.”
4. NodAPS Online Booking System
The NodAPS Online Booking System promises to help you manage your appointments more easily. You can create unlimited accounts with administrative, assistant, and staff permission, and add unlimited languages to this simple PHP event calendar. You can also change the booking time and date with a drag-and-drop feature.
Standout features:
multi-provider system
seven different booking type forms
multilingual
easy to install
and more
User Jam79 says:
“Very simple to use. Fast and effective support!”
5. Laravel Calendar Booking System
The Laravel Calendar Booking System with live chat offers a great online system for booking and making appointments. Users can buy credits as a payment option and view available services, total transactions, their total credits, and administrator contact information via their dashboard.
From the administrative side, the system administrator can manage all things system related: general settings, payment settings, and user management. Admins can also manage bookings and respond to inquiries from their dashboard in this simple PHP event calendar.
Standout features include:
live chat
multi-language support
booking and transaction history
PayPal integration
and more
User brentxscholl says:
“This plugin works great. Great code. Customer service is fantastic. We asked for extended features and they were delivered for a reasonable price.”
6. Ajax Full Featured Calendar 2
Ajax Full Featured Calendar 2 is a highly customizable personal calendar designed to help you keep organized. This is a best-selling update of another popular web calendar script, the Ajax Full Featured Calendar.
Standout features include:
PHP and JS versions with PHP classes and object-oriented programming
ability to auto-embed YouTube, Vimeo, Dailymotion, or SoundCloud media
ability to export calendar or events to iCal format
supports recurring events
and more
User sv_fr says:
“Great script. Practical uses. Helpful support.”
7. Event Calendar
Built with jQuery FullCalendar and integrated into Bootstrap’s grid layout, the Event Calendar plugin allows users to organise and plan their events.
Standout features:
create new types of events
ability to add fields such as title, colour, description, link, and photo
Google Fonts and Font Awesome icons
and more
User teddyedward says:
“Really enjoy using your script—it's perfect for my needs. It's also well documented and easy to use.”
Try it out and you'll see why this PHP calendar script with events gets so much praise.
8. eCalendar
Quite simply, the eCalendar script is designed to keep individual users or companies organised with a calendar that allows users to add as many events as needed, as well as updating details like the event title, location, or time.
Standout features:
choice of two designs
cross-browser compatibility (IE8+, Safari, Opera, Chrome, Firefox)
events are saved in your MySQL database
fully responsive design
and more
User levitschi says:
“Everything works perfectly! Support was better than I ever expected!”
9. Laundry Booking and Management
This Laundry booking and management script serves a very specific purpose. This is good news for anyone who wants to create their own laundry and dry cleaning business. The Laundry PHP calendar script download has some great features, both for users of the service and for the business owner.
Users can book orders for services like washing, dry cleaning, ironing, etc. The user interface of this simple PHP event calendar allows them to pick the number of different types of clothes like trousers, shirts, etc.
The business owner can get paid through a lot of payment gateways like PayPal, Stripe, and Authorize.net, among others. They will also get booking alerts via SMS.
Here are some additional features of the script:
multiple SMS and email templates for users
guest checkout for orders
generate invoices in PDF format
staff dashboard to easily manage everything from one place
This fantastic script offers a lot of other features that you will find useful. If you're serious about starting a laundry business, you should definitely consider giving it a try.
10. BookingWizz Booking System
The BookingWizz System script has been around for over ten years now. It was added to CodeCanyon in February 2010 is still updated regularly today. And it has been receiving good reviews from its buyers all this time! So you can rest assured that it is a great booking plugin that will serve your needs well.
BookingWizz offers features like discount coupons with unique codes and expiration dates. All your sales stats are available for you to see in the dashboard. The design is also fully responsive and looks great on all kinds of devices and browsers as old as IE9.
Here are some of its other features:
unlimited calendars and events
hourly and daily bookings
integrated PayPal payments and offline payments
multilingual support
automatic booking reminder
printable PDF schedule
and more
You should try out some of its features in the live preview of the script and see if it does what you want.
11. Rezervy—Online Appointment Scheduling
Rezervy is a great online appointment scheduling and reservation booking script. It was added only recently to CodeCanyon, but the numerous five-star ratings of the script are proof of its quality.
Rezervy comes with both single-step and multi-step booking form features. The script creates a fully responsive booking system, so it looks great on large screens as well as smaller mobile devices.
There are many amazing features in this script, like:
support tickets
guest checkout
coupon discounts and recurring discounts
support for multiple currencies
manual booking
referral codes
rating and review for each appointment
and a lot more
Just try the live preview of the script, and you will be amazed by its design and functionality.
Free PHP Event Calendar and Booking Scripts
Creating a great PHP calendar script is hard. As a result, it can be hard to find quality scripts—especially for free!
That's why our recommendation is to try one of the CodeCanyon web calendar scripts mentioned in the article. All of the PHP calendar script downloads offer a lot of features, and you will get six months of support and free lifetime updates.
Most of the free PHP booking calendar and event booking scripts either have a very limited feature set or have not been updated in a long time. There are some good options out there, though. Here are three of the best PHP event calendars available for free:
1. Ajax Calendar
This is a very basic PHP event calendar that's free. It allows for creating, editing, and deleting events. This free event calendar script also lets users create accounts and navigate events smoothly.
2. laravel-booking
This is a simple room-booking system based on Laravel 5.6. Laravel is a free, open-source PHP framework for creating web applications. So you need to be familiar with both PHP and Laravel to set up this free PHP web calendar script.
3. laravel-google-calendar
This is yet another free PHP booking calendar script based on Laravel. It allows you to easily create, delete or update any events in Google Calendar. It's bare bones, but a good option if you want to access a PHP event calendar for free.
5 Top Tips for Using Event Calendars and Booking Scripts
Here are a few tips that you should remember when starting a business that's based on booking products and services.
1. Make Sure That the Booking System Is Responsive
People almost always have their smartphones with them. They usually also prefer to do things like booking reservations on their smartphones. If your booking system has a responsive layout that provides an amazing user experience, you will have a big advantage over your competition.
2. Don't Cram Too Much Information on the Screen at Once
Depending on the type of business that you operate, it might not always be possible to just ask users a couple of questions and book their slots. In such cases, use simple layouts that guide people throughout the booking process without overwhelming them. One great example would be the booking system by Rezervy.
Reservy is a great PHP calendar that keeps everything simple.
3. Set Up Automated Reminders
We're all human, and sometimes our appointments can slip our minds. That's why it's a great idea to set up your PHP calendar to send out reminders. These can come in the form of emails or SMS notifications, depending on the PHP calendar framework you use. Reminders are not only helpful, but they show you care about customer service. Check if your simple PHP event calendar includes notification features.
4. Have Flexible Payment Options
Visitors using your PHP calendar framework are all different. That means the ways they book are different too. Instead of losing potential clients, set up multiple payment methods with your web calendar script. For example, having PayPal as an alternative to Stripe can increase the number of visitors that can confidently book with you over a competitor.
The Appointo PHP calendar booking management system lets visitors pay with different methods.
5. Offer Discounts and Special Prices
There's nothing like a good discount to sway a customer that's on the fence about booking. Limited offers, coupons, and seasonal discounts can keep visitors coming back to your PHP calendar throughout the year. Thankfully, there are many PHP calendar script downloads from CodeCanyon that include these features.
Manage the coupons available through your PHP calendar with BookingWizz.
Other PHP Scripts on CodeCanyon
These PHP event calendar and booking scripts just scratch the surface of what's available at CodeCanyon. There are over 4,000 PHP scripts available in the marketplace, covering everything from calendars and forms to social networking and shopping carts.
Here are a few of the best-selling and up-and-coming PHP scripts available on CodeCanyon for 2020.
PHP
10 Best PHP URL Shortener Scripts
Monty Shokeen
PHP
18 Best Contact Form PHP Scripts for 2020
Monty Shokeen
PHP
Comparing the 5 Best PHP Form Builders (And 4 Free Scripts)
Monty Shokeen
PHP
Create Beautiful Forms With PHP Form Builder
Ashraff Hathibelagal
If you'd like to learn more about using the PHP scripting language, Envato Tuts+ can help there too! Join our free PHP fundamentals course to get a good base of necessary skills. We also have many PHP tutorials and guides to get you more familiar with these scripts.
PHP
What Is Composer for PHP and How to Install It
Sajal Soni
PHP
How to Redirect With PHP
Sajal Soni
PHP
PHP Magic Methods Cheatsheet
Sajal Soni
PHP
Parse XML to an Array in PHP With SimpleXML
Sajal Soni
by Monty Shokeen via Envato Tuts+ Code https://ift.tt/3c9wgeW
0 notes
Text
Programmatically Discovering Sharing Code With oEmbed
Programmatically Discovering Sharing Code With oEmbed
Drew McLellan
2019-11-26T11:00:00+00:002019-11-26T12:06:06+00:00
The web is full of services that host rich content such as videos, images, music and podcasts, maps and graphs, and all manner of different delights. Chances are, when you add your content to a site, it will offer you a way to embed that content in a web page somewhere else.
Sites like YouTube have their own embeddable player that is popular to use in blog posts and even product pages. Soundcloud has code for embedding their music player in your band’s website. Charity fundraisers might upload the route of their big race to a site like Strava, and want to share it on their fundraising site to show their sponsors.
All this is done by finding that Share option on the hosting site and copying out some code that is normally a mix of HTML and JavaScript. That code can then usually be pasted into the destination page, and the hosting site will present a rich representation of the content for all your friends, customers and contacts to see.
So far, so good, and this covers the option for the manual embedding of content pretty well. There is a distinct second use-case however, where the outcome is the same but the route to it is very different.
Sharing Programmatically
Let’s imagine you’re building an app or site that accepts content from a user. That could be something as simple as a basic intranet page for staff to share news with coworkers, or something massive like a whole social network where people can sign up and start posting.
In both cases, you need to work out what to do if the user adds a URL as part of that content. You can imagine the scenario:
Check out this video! https://youtu.be/jw7bRnFbwAI
At this point, as a publishing system, you need to figure out what to do. The first option is to do nothing, and just leave the URL as plain text. That’s not a brilliant idea, as users will generally want to click on the URL and plain text won’t help them get to the page at the other end.
The second option is to turn it into a link. That’s a good solid next step, as users can follow the link and get to the content. But in doing so, they leave your site and might not come back in a hurry.
The best user experience might be to be able to fetch the player for that content and embed it right there instead of just the URL. That would enable users to experience the content right within your site, much like they would on Facebook, for example.
This poses the problem. Given a URL, how can I turn that into the HTML/JavaScript embed code needed to show a rich player on the page?
If it’s a known site like YouTube, I could write some code that uses the YouTube API to fetch the video information and get or build the embed code that way. I could do the same for other video services like Vimeo and VIVO. I can write code to recognize Flickr and Instagram URLs and use their APIs to fetch nice embeddable versions of photographs. And the same for Twitter and tweets. But this is sounding like a lot of work!
What would be ideal is if there was a standardized way of getting from a URL of a piece of content to a block of embed code to show that content on a page. If you’ve been paying attention, you’ll realize that the answer to that is oEmbed.
The Origin Of oEmbed
This was exactly the problem Leah Culver had while working on Pownce (a truly innovative social networking site that was the Betamax to Twitter’s VHS). Pownce wanted to embed rich representations of content into a user’s update stream, but didn’t want to limit support to only the services they’d specifically written code to integrate with. At dinner with colleague Mike Malone, as well as Cal Henderson (who led engineering at Flickr — one of the major providers of such content at the time) and Richard Crowley, they together hashed out an idea for an open standard for getting embed code from a URL. Henderson went away and drafted something up based on the discussion, and oEmbed was born.
Using oEmbed
Here’s how it works.
It starts with the URL that points to a single item of content. That might be a YouTube video, an image, or whatever. Typically this will have been provided by a user of your site or app as part of some content they wish to publish. The first step is to fetch the content of the page at that URL, which should be an HTML page.
If the site hosting the content supports oEmbed, in the <head> section of that page there should be a link element with an oembed content type:
<link rel="alternate" type="application/json+oembed" href="http://www.youtube.com/oembed?url=https%3A%2F%2Fyoutu.be%2Fjw7bRnFbwAI&format=json" title="Inclusive Components with Heydon Pickering" />
A note about XML: oEmbed supports responses in both XML and JSON format. For this article, I’m only considering JSON, because we’re not savages. If you’re in the unfortunate position to need to work with XML, be aware that it is a supported format with the oEmbed spec, although you may find that some providers only offer JSON responses.
This link tag as the rel attribute set to alternate and a type set to either application/json+oembed or text/xml+oembed. It’s this attribute that clues us into the fact that the URL given in the href is actually an oEmbed API endpoint for retrieving the details of the content.
That URL will have usually two parameters: url and format.
Parameter Value url (required) The URL-encoded web address of the content item format The format you’d like the response in. One of either json or xml
Common URL parameters for the initial consumer request
The full specification goes into much more detail here (and you should reference that if creating your own implementation) but these are the two parameters you’ll likely see the most.
So, we’ve got a URL, fetched the page, found an oEmbed link tag with another URL for an API endpoint. Next, we request that new URL, and that returns all the information the service has to provide about that piece of content.
{ "author_name": "Smashing Magazine", "width": 480, "title": "Smashing TV: Inclusive Components with Heydon Pickering (Nov 7th 2019)", "provider_name": "YouTube", "height": 270, "html": "<iframe width=\"480\" height=\"270\" src=\"https://www.youtube.com/embed/jw7bRnFbwAI?feature=oembed\" frameborder=\"0\" allow=\"accelerometer; autoplay; encrypted-media; gyroscope; picture-in-picture\" allowfullscreen></iframe>", "provider_url": "https://www.youtube.com/", "thumbnail_url": "https://i.ytimg.com/vi/jw7bRnFbwAI/hqdefault.jpg", "type": "video", "thumbnail_height": 360, "author_url": "https://www.youtube.com/channel/UCSDtqcJ8ZXviPrEcj1vuLiQ", "version": "1.0", "thumbnail_width": 480 }
Now we’re talking! The response gives us lots of information about the content. The version should for the foreseeable future be 1.0, which is the current version of the oEmbed spec. The other information returned depends largely on the value of type.
Response Types
The value of the type key in the response tells you what sort of media you’re going to be embedding.
Value of type What to expect photo A static photo that offers a url, width and height that can be used for a basic img tag video A video player, with html specifying the code required to embed a player on a page, although with a width and height link The best way to deal with this content is just to provide a link after all. The response might have other useful information like a title, but it should just be linked up. rich Some sort of rich content player, which just like the video type returns html, width and height
Aside from dedicated video content, the more common type you’re likely to see in the wild is rich. Even Flickr itself, while still sending a photo response, also supplies html for a rich embeddable ‘player’ for the image, too.
Most of the time, embedding the content in your site is just a case of using the code provided as the html value.
A Note On Security
One thing you might be rightly cautious of is taking an HTML response and embedding it programmatically into a page you host. Without the human step to double-check the code you’re pasting in, there is always potential for that code to be malicious. As such you should take appropriate steps to mitigate the risk.
That might include filtering the URLs to make sure the schemes and domains match those expected, and sandboxing code into an iframe on a different, cookieless domain. You should access the situation in which you’re using the code and make sure that you’re not exposing your self to undue risk.
Getting Started
As important as it is to understand the process when using oEmbed, the reality is that most common languages have libraries available that abstract away the process and make it relatively simple.
For example, the npm packaged oembed provides a very simple interface for making a request based on the content URL and getting the oEmbed response back in return.
First install the package into your project:
npm i oembed
And then request the URL. Here I’m using the URL of a presentation on Notist that I gave about oEmbed. How very meta.
const oembed = require('oembed'); const url = 'https://noti.st/drewm/ZOFFfI'; oembed.fetch(url, { maxwidth: 1920 }, function(error, result) { if (error) console.error(error); else console.log("oEmbed result", result); });
And the response:
{ type: 'rich', version: '1.0', title: 'Understanding oEmbed', author_name: 'Drew McLellan', author_url: 'https://noti.st/drewm', provider_name: 'Notist', provider_url: 'https://noti.st', cache_age: 604800, thumbnail_url: 'https://on.notist.cloud/slides/deck4179/large-0.png', thumbnail_width: 1600, thumbnail_height: 900, html: '<p data-notist="drewm/ZOFFfI">View <a href="https://noti.st/drewm/ZOFFfI">Understanding oEmbed</a> on Notist.</p><script async src="https://on.notist.cloud/embed/002.js"></script>', width: 960, height: 540 }
If you wanted to do the same in PHP, a handy package called embed/embed is available to install via Composer.
composer require embed/embed
And then in your PHP project:
use Embed\Embed; $info = Embed::create('https://noti.st/drewm/ZOFFfI'); $info->title; // "Understanding oEmbed" $info->authorName; // "Drew McLellan $info->code; // "<p data-notist="drewm/ZOFFfI"> ... </script>"
As you can see, with the use of a library the process becomes very simple and you can quickly get from a URL to the embed code, ready to show a rich representation of the user’s content.
Conclusion
oEmbed is a very elegant solution to a very specific problem. You’d be forgiven for thinking that only a few engineers working on big social networks would benefit from this, but in reality, publishing systems where a user might enter a URL are surprisingly common. Find me one back-end engineer who at some point hasn’t needed to build some kind of CMS. We may not think of it in the same terms, but if you accept user input, you should be thinking about what to do if that input contains URLs.
Now that you know about oEmbed (sorry) you’ve got no excuse not to give some serious consideration to how you handle URLs in your future projects.
oEmbed specification
oembed for NodeJS
embed/embed for PHP
“Announcing OEmbed: An Open Standard for Embedded Content,” Leah Culver

(ra, il)
0 notes
Text
300+ TOP SELENIUM Objective Questions and Answers
SELENIUM Multiple Choice Questions :-
1. The test language usually used in Selenium is ________________. A. PHP B. Python C. JavaScript D. None of the above Ans: C 2. The term AJAX expands to ________. A. Asynchronous Java and XML B. Asynchronous JavaScript and XML C. Accumulated Java and XML D. None of the above Ans: B 3. The term JSON refers to ______________. A. JavaScript Object Notation B. Java Object Notation C. Java Object Naming D. None of the above Ans: A 4. Selenium tests _____________. A. DOS applications B. Browser-based applications C. GUI applications D. None of the above Ans: B 5. Selenium variables are stored in _____________. A. storedVars B. storedVariables C. VariablesStore D. None of the above Ans: A 6. Which selenium command check whether specific text exists somewhere on the page ? A. verifyTextPresent B. verifyTextPresent C. CheckTextPresent D. VerifyPresentText Ans: A 7. What does the term CSS refers to ? A. Cascade Style Sheets B. Cascading Style Sheets C. Clear Style Sheets D. Catering Style Sheets Ans: B 8. What is Selenium IDE ? A. Windows Software B. Firefox Plug-in C. Java Software D. Flash Plug-in Ans: B 9. What is called that scale for large test suites or test suites that must be run in multiple environments? A. Selenium-Grid B. Selenium RC C. Selenium Web driver D. Selenium NG Ans: A 10. Where is XPath used in ? A. XML documents B. MS-Word documents C. MS-Excel documents D. MS-PowerPoint documents Ans: A

SELENIUM MCQs 11. What does the term DOM refers to ? A. Dynamic Object Model B. Document Object Model C. Data Object Model D. Document Flow Object Model Ans: B 12. What does the term regex expands to ? A. Registered Expression B. Regular Expression C. Regression Expression D. Regional Expression Ans: B 13. Which label is used as prefix pattern to specify a globbing pattern parameter for a Selenese command ? A. pattern B. glob C. regex D. None Ans: B 14. What is a test suite made of ? A. Test packs B. Tests C. Test blocks D. Test pattern Ans: B 15. What does the assertTitle checks ? A. Element title B. Page title C. Block title D. Title of element under focus Ans: B 16. Select the component which is NOT part of Selenium suite. A. Selenium IDE B. Selenium RC C. SeleniumGrid D. Selenium Web Ans: D 17. Select the language which is NOT supported by the Selenium RC. A. ASP B. Java C. C# D. PHP Ans: A 18. Select the name which is NOT the type of the locaters. A. ID B. Name C. Password D. Link Text Ans: A,C 19. Is Web Driver a component of the Selenium? A. No B. Yes Ans: B 20. Selenium IDE stands for A. Selenium Intialization Development Environment B. Selenium Interrelated Development Environment C. Selenium Integrated Development Environment D. Selenium Information Development Environment Ans: C 21. Select the Browser which is supported by Selenium IDE A. Google chrome B. Opera mini C. Mozilla Firefox D. Internet Explorer Ans: C 22. Select the operating system which is NOT supported by Selenium IDE. A. Unix B. Linux C. Windows D. Solaris Ans: A 23. The Web driver is used A. To execute tests on the HtmlUnit browser. B. To design a test using Selenese C. To quickly create tests D. To test a web application against Firefox only. Ans: A 24. The Selenium IDE is used A. To create customized test results. B. To deploy your tests across multiple environments using Selenium Grid C. To test with HTMLUnit D. To test a web application against Firefox only. Ans: D 25. The Selenium RC is used A. To run your test against different browsers (except HtmlUnit) on different operating systems. B. To create tests with little or no prior knowledge in programming. C. To test a web application against Firefox only. D. To run a huge test suite, that can be executed on multiple machines. Ans: A 26. Out of the following which can only test web applications A. QTP B. Selenium Ans: B 27. Select the command which is NOT a type of assertion in Selenium IDE. A. Assert B. Verify C. WaitFor D. Wait Ans: D 28. Select the method which selects the option at the given index. A. selectByIndex() B. selectIndex() C. selectedByIndex() D. selectByIndexes() Ans: A 29. The Selenium can A. access controls within the desktop B. both web and desktop applications C. only test web applications Ans: C 30. The Selenium A. Provides professional customer support B. Test Reports are generated automatically C. Comes with a built-in object repository D. Cannot access elements outside of the web application under test Ans: D 31. Can Google chrome be supported by Selenium IDE? A. Yes B. No Ans: B 32. Can Unix operating system be supported by Selenium IDE? A. No B. Yes Ans: A 33. Which command can be used to enter values onto text boxes? A. sendsKeys() B. sendKey() C. sendKeys D. sendKeys() Ans: D 34. Select the language which is supported by The Selenium Web Driver A. Perl B. Sql C. ASP D. Cobol Ans: A 35. Which Selenium component supports All Operating System? A. Selenium Generator B. Selenium IDE C. Selenium WebDriver Ans: C 36. Select the command in Selenium IDE used to open a page using the URL. A. OpenRecord B. Open C. OpenText D. OpenTable Ans: B 37. In case of Selenium IDE, the Source view shows your script in A. DHTML format B. J2EE format C. XML format D. HTML format. Ans: C 38. The Actions commands A. are commands that directly interact with page elements. B. are commands that allow you to store values to a variable. C. are commands that verify if a certain condition is met. Ans: A 39. Select the command which is used to check the presence of a certain element. A. verifyTable B. verifyTitlePresent C. verifyTextPresent D. verifyElementPresent Ans: D 40. Select the command which is used to print a string value or a variable in Selenium IDE. A. The 'display' command B. The 'echo' command C. The 'print' command D. The 'printr' command Ans: B 41. Which component of Selenium can create customized test results. A. Web driver B. Selenium RC C. Selenium IDE D. Selenium Grid Ans: A 42. Select the command which is used to compare the contents of a table with expected values. A. verifyTables B. verifyTableData C. verifyTable D. verifyTableCell Ans: C 43. Select the command which is used to pause execution until the specified element becomes present. A. waitForElementPresent B. waitForPagePresent C. waitForTablePresent D. waitForFieldPresent Ans: A 44. Select the command that will NOT wait for a new page to load before moving onto the next command. A. clickAndWait B. selectAndType C. typeAndWait D. selectAndWait Ans: B 45. Select the command which is used to pause execution until the page is loaded completely. A. waitForPageToLoad B. waitForElementPresent C. waitForPage D. waitForLoad Ans: A 46. Select the syntax to locate an element using inner text. A. css=tag:contains(“inner text”) B. css=tag:value(“inner text”) C. css=tag:attributes(“inner text”) D. css=tag:class(“inner text”) Ans: A 47. Select the command which is used to compare the actual page title with an expected value. A. verifyTitle B. verifiedTitle C. verifyTitles D. verifiedTitles Ans: A 48. Select the command which is NOT used in verifying page elements . A. verifyElementPresent B. verifyElementRight C. verifyElementNotPresent D. verifyElementPositionLeft Ans: B 49. Select the tab which gives feedback and other useful information when executing tests. A. Information B. Feedback C. Reference D. Element Ans: C 50. What is TestNG? A. TestNextGeneration B. TestNewGenerlization C. TestNewGeneration D. TestNextGenerations Ans: A SELENIUM Objective type Questions with Answers 51. Select the variation which finds elements based on the driver’s underlying CSS selector engine in Web driver Selenium. A. By.cssSelected B. By.cssSelection C. By.cssSelector D. By.Selectcs Ans: C 52. Select the variation which locates elements by the value of the “name” attribute in Web driver Selenium A. By.name B. By.nametag C. By.tagname D. By.nametags Ans: A 53. Select the tab that shows which command Selenium IDE is currently executing. A. Variable B. Data C. Information D. Info Ans: D 54. Which is a faster component between the SeleniumWeb driver and Selenium RC? A. Selenium RC B. Selenium Web driver Ans: B 55. Select the variation which locates elements by the value of their “id” attribute in Web Driver Selenium A. By.id B. By.idno C. By.id_no D. By.tag_id Ans: A 56. Select the Get command which fetches the inner text of the element that you specify in Web driver Selenium. A. getinnerText() B. get_in_Text() C. get_inner_Text() D. getText() Ans: D 57. Which Navigate command takes you forward by one page on the browser’s history in Web driver Selenium. A. navigate.forward() B. navigate().forward() C. navigate()_forward() D. navigate_forword() Ans: B 58. Which method is used when you want to verify whether a certain check box, radio button, or option in a drop-down box is selected in Web driver Selenium A. is_Selected() B. isSelect() C. isSelected() D. is_Select() Ans: C 59. Which Component is used to run multiple tests simultaneously in different browsers and platforms? A. Selenium Grid B. Selenium IDE C. Selenium RC D. Selenium Webdriver Ans: A 60. Select the View which shows your script in HTML format. A. The Table View B. The Source View C. The Editor View D. The Field View Ans: B 61. Select the method which clears all selected entries in Web driver Selenium. A. dselectAll() B. deselect_All() C. dselect_All() D. deselectAll() Ans: D 62. Method which selects the option which displays the text matching the parameter passed to it A. selectVisibleText() B. selectByVisibleText() C. select_VisibleText() D. select_ByVisibleText() Ans: B 63. Out of the following which is NOT a wait command. A. waitForTitle B. waitForTextPresent C. waitForActive D. waitForAlert Ans: C 64. Select the command which retrieves the alert message and stores it in a variable that you will specify. A. storeAlert B. storedAlert C. store_Alert D. storesAlert Ans: A 65. Select the method which performs a context-click at the current mouse location. A. click_Context() B. context.Click() C. contextClick() D. context_Click() Ans: C 66. By Default time of WAITFOR command is : A. 15 sec B. 20 sec C. 25 sec D. 30 sec Ans: D 67. Selenium is compatible with A. CSS1.0 and CSS 2.0, B. CSS1.0, CSS 2.0, and CSS 3.0 selectors. C. CSS 2.0, and CSS 3.0 selectors. D. CSS1.0, CSS 2.0, CSS 3.0 and CSS 4.0 selectors. Ans: B 68. In Selenium variables are stored in _________ . A. storedVars B. storedVariables C. VariablesStore D. All of the above Ans: A 69. Which command should be used to confirm that test will pass in the future, when new element is added after page loaded? A. waitForElementPresent B. pause C. assertElementPresent D. None of these Ans: A 70. Which is the following is true in case of waitFor command? A. waitForAlertPresent B. waitForTextPresent C. waitForFramePresent D. waitForPageToLoad Ans: B 71. How to execute specific command? A. Highlight a command. Press Ctrl + F9. B. Highlight a command. Press Alt + F9. C. Highlight a command. Press Ctrl + X. D. Highlight a command. Press X. Ans: D 72. Which is odd one out? A. ID B. XPath C. CSS selector D. Pattern matching Ans: D 73. Which command is used to extend the time limit of WAITFOR command? A. Extend waitFor (time in sec) B. waitFor (time in sec) extend C. setTimeout (time in sec) D. setTimeout. Ans: D 74. ___________ finds the item ending with the value passed in. This is the equivalent to the XPath ends-with. Is concern with? A. ^= B. $= C. *= D. &= Ans: B 75. In Selenium, Following Axis is related to: A. Selects all the siblings after the current element B. Selects all elements that follow the closing tab of the current elements. C. Selects all of the siblings before the current element D. Selects all elements that are before the current element Ans: B 76. The // tells the query that A. It needs to stop at the first element that it finds. B. This is comment C. The path of the file or folder D. All of these Ans: A 77. In regular Expression * quantifier refers to: A. 0 or more of the preceding character. B. 1 or more of the preceding character C. 0 or 1 of the preceding character D. All of these Ans: A 78. Which regular expression sequence that loosely translates to "anything or nothing?" A. .* (dot star) B. *. (star dot) C. “? D. *+ Ans: A 79. Which is a procedure? A. Wait B. Exit C. WaitForProperty D. None of these. Ans: A 80. Variable can be saved in which format? A. ${variableName} B. storedVars. C. Both of these D. None of these Ans: C 81. We use the dot (.) operator followed by either a * or a +. The + tells the regular expression that there will be instances between "0" and "n", while the * tells the regular expression that there will be instances between "1" and "n". A. True B. False Ans: B 82. Applications do not have the items needed for the tests when the tests get to commands. To get around this, we had a look at adding fro waitFor commands to test. This is related to A. Debugging tests B. Working with AJAX applications C. Working with multiple windows D. All of these Ans: B 83. What is the most common way to find an element on a page? A. ID B. XPath C. CSS selector D. Name Ans: 84. Which is not true in case of Globs, in Selenium? A. Globs are used as default pattern matching technique. B. It is similar to regular expressions. C. The syntax of Globs is much wider than Regular expression D. B and C Ans: C 85. Which process use the JavaScript to find an element? A. By DOM query B. BY XPath query C. BY CSS sector D. All of these Ans: A 86. Which of the following is not verify and asserts method in Selenium? A. VerifyElementPresent B. VerifyElementNotPresent C. VerifyText D. VerifyTextAttributes Ans: D 87. If you wanted to access the element that has the text "This element has an ID that changes every time the page is loaded" in it, then which of the following is used: A. //div B. //div C. //div D. //div Ans: A 88. To delete a cookie we need to call the deleteCookie method, passing in two parameters. A. The first parameter is the name of the cookie, and the second parameter is where it was created. B. The first parameter is where it was created, and the second parameter is the name of cookie. C. None of these Ans: A 89. What is the default port number used by hub in selenium? A. 4444 B. 2222 C. 1111 D. 3333 Ans: A 90. Which two commands you use to validate a button? A. VerifyTextPresent and assertTextPresent B. VerifyElementPresent and assertElementPresent C. VerifyAlertPresent and assertAlertPresent D. VerifyAlert and assertAlert Ans: B 91. In selenium, parent and child nodes are in same query because HTML has a tree structure. A. True B. False Ans: A 92. Selects all the parent, grandparent, and so on of the element is related to which axis name in Selenium: A. Ancestor B. Preceding C. Parent D. All of these. Ans: A 93. Variable can be saved in which format? A. ${variableName} B. storedVars. C. Both of these D. None of these Ans: C 94. echo(): is used A. to display the value of a variable in the log file, which can be very valuable for debugging. B. Display the value of a variable named answer in the log file, what would the first argument to the previous command look like. C. Both of these D. None of these Ans: C SELENIUM Questions and Answers pdf Download Read the full article
0 notes
Text
PressFly - Monetized Articles System
New Post has been published on https://intramate.com/php-scripts/pressfly-monetized-articles-system/
PressFly - Monetized Articles System
LIVE PREVIEWGet it now for only $59
PressFly allows your users to write articles so they and you can earn money by getting paid per article view. PressFly includes a complete system for writing articles, publications, topics, news and posts. Also, it includes referrals system, withdrawal system with the ability to add unlimited withdrawal methods, Login with social networks like Facebook, Twitter & Google, translation ready, multiple captcha integrations like reCAPTCHA v2 Checkbox/invisible and Solve Media and much more!. The inspirational websites like buzzfeed.com, thenextweb.com, makeuseof.com, techcrunch.com, cracked.com, medium.com, whatculture.com, listverse.com & sportskeeda.com
Check the how to use script videos from here.
The script works on shared, VPS and dedicated hosting plans just check if your hosting company meets the script system requirements listed here. Also, you can find a list of recommended shared hosting companies here.
Demo Account
Frontend: https://pressfly.mightyscripts.xyz/ Administration Panel: https://pressfly.mightyscripts.xyz/login Email: [email protected] – Password: password
Main Features
Paid Views
PressFly will count paid views based on the following criteria:
The article’s visitor should gain reCAPTCHA V3 score equal to or greater than the score you set from the admin settings.
The article’s visitor must wait a number of seconds based on the article long.
The article’s visitor must be unique within 24 hours.(admin can change the number of paid views per IP per 24 hours from the admin settings)
Proxy/VPN visits will be excluded from earnings.
Adblock visits will be excluded from earnings.
Visitor IP changed will be excluded from earnings.
The article’s visitor must have JavaScript enabled.
The article’s visitor must have Cookies enabled.
Publishers
Publishers and you can earn money by showing ads on the articles pages
Ability to change the CPM (Cost Per Mille, thousands) for each country
Publishers have access to a powerful dashboard
Statistics sorted by Month & Year
Auto-generated line graphs
Can edit the articles
Admin can disable earnings for all users at any time and also can disable earnings per user
Admin can set the maximuim amount of paid views per 24 hours for each unique IP address
Force Disable Adblock into the article page
PressFly comes with reCAPTCHA V3 integration so admin can set the score for which the view will be valid for earnings. You can read more about the score feature from here
Withdrawal System
Admin can add an unlimited number of withdrawal methods like PayPal, Payza, Skrill, Bitcoin, WebMoney, PayTM or any other method
Publishers can withdraw their earned profits when they reached the minimum withdrawal amount based on their withdrawal method
Admin can set the withdrawal request status to approved, pending, complete and cancelled
Referrals System
The referral program is a great way to spread the word of this great service and to earn even more money
A user can refer other users and when these users earn the main user who referred then will also earn a percentage of their earnings.
Admin has the ability to set the referral Percentage
Admin can enable/disable the referral system
Captcha System
Support for reCAPTCHA v2 Checkbox captcha
Support for reCAPTCHA v2 Invisible captcha
Support for Solve Media captcha
Enable/Disable Captcha
Enable/Disable on login form
Enable/Disable on register form
Enable/Disable on forgot password form
Enable/Disable on contact form
Social Networks Login
Login with Facebook
Login with Twitter
Login with Google
Administration Panel
Easily accessible & make users admins
View site statistics on the dashboard
Change website name & description
Change default site language and timezone
Add your website logo
Enable SSL integration
Display Cookie Notification Bar
Set allowed upload file types
Set max upload file size
Mailchimp Newsletter
Enable/Disable Account Activation by Email
Ability to add code between <head> & </head> of the frontend
Ability to add code before of the frontend
Admin can ads into various positions like:
Top header(beside the logo)
Above article content
Below article content
Homepage
Ability to change currency code
Ability to change Currency symbol
Ability to ad Facebook Page URL
Ability to ad Twitter Profile URL
Ability to ad Google URL
SMTP email support
Ability to filter users, article, tags and categories
Members System
visitors can sign up and activation e-mails will be sent out
Allow users to reset their passwords
Allow users to change their email address
Translation Ready
Easliy translate PressFly to the language of your choice.
Categories
You can add unlimited categories with the ability to edit and delete.
Tags
You can add unlimited tags with the ability to edit and delete.
Posts
You can add unlimited posts with the ability to edit and delete.
Pages
You can add unlimited pages with the ability to edit and delete.
System Requirements
Required Extensions
PHP 7.2.0 or higher
pdo_mysql extension
curl extension
intl extension
gd extension
json extension
openssl extension
mbstring extension
tokenizer extension
ctype extension
xml extension
fileinfo extension
bcmath extension
Apache web server with mod_rewrite module enabled or Nginx web server
MySQL or MariaDB
Required Functions
putenv
getenv
The above requirements are available on almost the web hosts
Change Log
Version 2.2.1 - (14 October 19) - Enhancement: Remove the interstitial page from the ads protector - Other improvements and minor bug fixes Version 2.2.0 - (14 October 19) - Enhancement: Remove the interstitial page from the ads protector - Other improvements and minor bug fixes Version 2.1.1 - (12 October 19) Ads Protector enhancements Version 2.1.0 - (12 October 19) - Enhancement: Ads Protector enhancements - Fixed: Login via social networks isn't working - Update the GeoIP countries database - Other improvements and minor bug fixes Version 2.0.0 - (11 October 19) - New: Integrate IsProxyIP.com paid service to detect VPN, TOR, hosting data centers, public proxies, web proxies & Bad Search Engine Robots. New: Ads Protector >> Protect the ads using reCAPTCHA v3 score and protect the ads from proxies/VPNs,.. using IsProxyIP.com - Added: Review the article statuses - Added: SEO meta title, description & keywords for articles, categories, tags - Added: SEO keywords option for the entire site - Added: Canonical URL - Added: Share cards for facebook and Twitter - Added: vk.com and Pinterest share buttons - Added: Instagram, VK, YouTube, Pinterest, Instagram icons to the top bar - Added: Instagram and VK to the follow us widget - Added: Display article hits - Enhancement: Prevent classifying emails as spam - Enhancement: - Add a notice to upgrade PHP to 7.2.x or higher. - Enhancement: - Update the admin dashboard UI - Fixed: TinyMCE missing language error - Fixed: Newsletter widget error - Fixed: Members can't upload images bigger than 2MB - Fixed: Author popular widget gives 505 error when added in pages other than the author page - Other improvements and minor bug fixes Version 1.6.0 - (28 July 19) - Fixed: Improve the article view page performance - Other improvements and minor bug fixes Version 1.5.0 - (23 July 19) - New: Sitemap - New: Site RSS feed and category/author/tag RSS feed - New: RTL Support for frontend & member area - Added: Available Balance/Pending Withdrawn/Total Withdrawn into the withdraw page - Added: Option to change date/time format - Added: Allow new media embed Facebook Post, Facebook Video, Instagram, Pinterest - Added: Ability to add Ads between paragraphs - Added: users can upload a profile image - Enhancement: Related articles based on article tags - Enhancement: Add missing withdraw request reasons - Enhancement: Add TinyMCE more languages - Fixed: Featured image is not changing after article update - Fixed: Adsense responsive ads not showing - Fixed: Referral earnings are not working on some installations - Fixed: Empty withdraw request data - Fixed: Tags status issue - Fixed: User biography doesn't save - Fixed: Referrals date doesn't display on the member area - Other improvements and minor bug fixes Version 1.0.5 - (29 March 19) - Fixed: Sometimes error 500 on the admin dashboard - Fixed: Sometimes error 500 on the withdraw view page - Enhancement: Editor allow style attribute for img tag - Enhancement: Add default values for widgets - Enhancement: When deleting an article also delete its statistics - Other improvements and minor bug fixes Version 1.0.4 - (27 March 19) - Fixed: Error 500 on the article page - Fixed: Admin see the old article when viewing article pending for review - Fixed: published_at data not added to the new articles - Other improvements and minor bug fixes Version 1.0.3 - (25 March 19) - Fixed: Display correct image on Facebook - Fixed: Admin can't delete users - Other improvements and minor bug fixes Version 1.0.2 - (25 March 19) - Fixed: Login IP not saved - Fixed: Warning: count(): Parameter must be an array or an object that implements Countable - Other improvements and minor bug fixes Version 1.0.1 - (24 March 19) - General improvements Version 1.0.0 - (24 March 19) - First release
Credits
https://stocksnap.io/
https://pixabay.com/
https://www.pexels.com/
Bootstrap 4
Laravel
Font Awesome
Google Fonts
LIVE PREVIEWGet it now for only $59
0 notes
Text
How to migrate from Magento 1 to Magento 2 Five Easy Steps?
Everyone in the e-commerce world is in a frenzy. Now, that the June 2020 deadline is near, businesses are scrambling to move from Magento 1 to the latest Magento 2 version. Even though more than 250,000 websites work on Magento, only a handful websites run on the current Magento 2 version. If you are planning to move to Magento 2, you have made the right decision. Planning a migration helps in avoiding downtime and data loss. Making strategic decisions and creating a solid Magento migration plan will keep your store up and running without any issues.
How do you move your Store from Magento 1 to Magento 2?
Here’s a step by step procedure for migrating your store to Magento 2:
1. Hardware and Software Compatibility
Once you are sure of how you want your new Magento 2 store to look and function, you must consider the software and hardware issues. Remember Magento 2 won’t function efficiently if you run it on outdated software.
1. Operating Systems – Linux x86-64 2. Web Servers – Apache 2.2 or 2.4 and nginx 1.x 3. Database - MySQL 5.6, 5.7 or MariaDB 10.0, 10.1, 10.2, Percona 5.7 and other binary-compatible MySQL technologies. 4. Supported PHP versions include 7.1.3+ or 7.2.0+ 5. Required PHP Extensions: bc-math, ctype, curl, dom, gd, hash, intl, iconv, mbstring, mcrypt, openssl, PDO/MySQL, SimpleXML, soap, spl, libxml, xsl, zip, json. 6. Verify PHP OPcache and PHP configuration settings including memory_limit. 7. Valid SSL certificate for HTTPS 8. System Tools – bash, gzip, lsof, mysql, mysqldump, nice, php, sed, tar 9. Mail Server - Mail Transfer Agent (MTA) or an SMTP server 10. If you are running Magento 2 extension on a system with less than 2GB of RAM, your upgrade might fail.
2. Install Magento 2 Software
The real process of migrating to Magento 2 starts here. You need to download the latest Magento 2 Open Source software from the official website. If you have the required hardware and software ready, the installation process will be quick & easy and the “Success” message will appear on the screen. If there are any issues, make sure you install the missing software. Once the installation process is over, it’s time to start migrating your store to M2.
Before you begin the migration process, make sure to back up database and files to avoid data loss later. In order to avoid any errors, you can also opt for a staging environment to test-drive the entire process.
3. Install and Configure Data Migration Tool
The official Data Migration Tool makes data transfer from Magento 1 to Magento 2 easy. The tool is command-line interface (CLI) that allows you to migrate store settings, configurations, bulk databases and incremental data updates as required. Once you install and configure the tool, you should start migrating the settings from Magento 1 to Magento 2. It is recommended that you stop all Magento 1.x cron jobs for easy migration. You can also use the Data Migration tool for migrating products, wishlist products, customer orders, customers, categories, ratings, reviews and more.
Remember that you must avoid creating new products, attributes and categories in Magento 2 store before migrating data. The tool will overwrite new entities and thus, you will have to spend time in rework. It is essential that you run a test so that you do not miss out on any important element.
4. Migrate Themes, Extension and Customization
You need to check whether the Magento 1 theme is compatible with the latest Magento 2 standards. If it is not compatible, you will have to buy a new theme from the Magento market place or build a custom theme to fulfill M2 requirements. Using a theme compatible with Magento 2 is important because the old XML structure won’t work with the latest version.
You must also consider the third-party extensions. Make a list of extensions that are absolutely essential to you. Discuss your requirements with a Magento extension developer to customize your extensions or buy extensions that are compatible with Magento 2.
Do not worry about customization. With a Magento code migration tool, you can convert the custom Magento 1.x code to Magento 2 and save time as well as eliminate errors. You can use the tool to migrate specific files such as Layout XML files, Config XML files, PHP files, etc. However, you may have to undertake some editing manually.
5. Run Tests before you go Live
After migrating all store data, themes, extensions and customization, make sure that you run multiple tests to ascertain the proper functioning of the website. Check all the aspects of the website in detail. Migrating from Magento 1 to Magento 2 is not a simple task. Any mistake can lead to additional downtime and data loss.
If you have made any manual changes to the data, there are chances of errors in the incremental data migration. So, test your Magento 2 store for any problems or errors. Once you are sure that the new store is functioning properly, you can put your Magento 1 system in maintenance mode. Stop incremental updates and begin Magento 2 cron jobs. Replace DNS and load balancers to make your Magento 2 store go live.
All the best!
If you are new to Magento or simply want the migration process done faster, hire a Magento migration expert. A professional will ensure that you migrate from Magento-1 to Magento-2 in a safe, stress-free manner. It will mean zero data loss and minimal downtime.
0 notes
Text
Restful API In Laravel 5.5 Using Jwt Authentication in Ubuntu
New Post has been published on http://blog.openwebsolutions.in/restful-api-laravel-5-5-using-jwt-authentication-ubuntu/
Restful API In Laravel 5.5 Using Jwt Authentication in Ubuntu
Rest is a stateless client-server protocol, where each HTTP requests contains all the information to run it. So, there is no need to remember the previous state, which makes the API become stateless. Using API, we can easily create web services that connect with our codebase/database and getting data either in XML or JSON format as a response.
Now, we integrate Jwt Authentication in Laravel(5.5) for creating secure restful API.
> Open your terminal > Creating a new project in Laravel by below command
composer create-project –prefer-dist laravel/laravel jwt_rest
Now we use the JWT package in our newly installed Laravel.
Use the below code in your terminal, but the Laravel version should be 5.5 or above.
composer require tymon/jwt-auth:dev-develop --prefer-source
As a result, a new file jwt.php is created inside the config folder.
‘secret’ => env(‘JWT_SECRET’),
/*
|————————————————————————–
| JWT Authentication Keys
|————————————————————————–
|
| The algorithm you are using, will determine whether your tokens are
| signed with a random string (defined in `JWT_SECRET`) or using the
| following public & private keys.
|
| Symmetric Algorithms:
| HS256, HS384 & HS512 will use `JWT_SECRET`.
|
| Asymmetric Algorithms:
| RS256, RS384 & RS512 / ES256, ES384 & ES512 will use the keys below.
|
*/
‘keys’ => [
/*
|————————————————————————–
| Public Key
|————————————————————————–
|
| A path or resource to your public key.
|
| E.g. ‘file://path/to/public/key’
|
*/
‘public’ => env(‘JWT_PUBLIC_KEY’),
/*
|————————————————————————–
| Private Key
|————————————————————————–
|
| A path or resource to your private key.
|
| E.g. ‘file://path/to/private/key’
|
*/
‘private’ => env(‘JWT_PRIVATE_KEY’),
Please check the above code in jwt.php, which need some key. These keys will be signed with an encryption key.
To generate the secret key, please run the below code
php artisan jwt:secret
Now registering auth.jwt middleware inside app/Http/kernel.php
protected $middleware = [
..
..
‘auth.jwt’ => \Tymon\JWTAuth\Http\Middleware\Authenticate::class,
];
Set Routes: open the api.php from routes folder and set up all the routes for your project.
Update app/User.php as below
<?phpnamespace App;
use Illuminate\Foundation\Auth\User as Authenticatable; use Illuminate\Notifications\Notifiable; use Tymon\JWTAuth\Contracts\JWTSubject;
class User extends Authenticatable implements JWTSubject use Notifiable;
/** * The attributes that are mass assignable. * * @var array */ protected $fillable = [ ‘name’, ’email’, ‘password’, ];
/** * The attributes that should be hidden for arrays. * * @var array */ protected $hidden = [ ‘password’, ‘remember_token’, ];
/** * Get the identifier that will be stored in the subject claim of the JWT. * * @return mixed */ public function getJWTIdentifier() return $this->getKey();
/** * Return a key value array, containing any custom claims to be added to the JWT. * * @return array */ public function getJWTCustomClaims() return [];
User registration requires name, email, and password. So, create a form request for validating the data. Please use the following command:
php artisan make:request RegisterAuthRequest
Please go to the app/Http, a new folder Request is created, a new file RegisterAuthRequest.php is created, open it and replace the rules method in below
public function rules()
string',
'email' => 'required
Create a new ApiController by running the command:
php artisan make:controller ApiController
A new controller ApiController.php will be created which consist of 4 functions.
They are register(), login(), logout(), getAuthUser().
register(): a successful response is returned with the user data that you have given on the registration form.
login(): JWTAuth::attempt() is used for login action. A token is created for a successful login.
logout(): If you click on logout, the token is expired successfully.
getAuthUser(): if the user is validated, you get a token and can be identified as a current user.
0 notes
Photo

Convertir un fichero XML en JSON desde PHP y utilizarlo desde PowerShell Fichero xml.php <?php $xml = simplexml_load_file("fich.xml"); $json = json_encode($xml); echo $json; ?> Fichero fich.xml <?xml version="1.0"?> <alumnos> <alumno id="1"> <usuario>juanito</usuario> <grupo>ventas</grupo> <programa>notepad</programa> <directorio>carpetatrabajo</directorio> <permisos>leer</permisos> </alumno> <alumno id="2"> <usuario>luis</usuario> <grupo>ventas</grupo> <programa>p7zip</programa> <directorio>carpetatrabajo</directorio> <permisos>444</permisos> </alumno> </alumnos> Analizar los datos del fichero JSON desde PowerShell $alumnos = (Invoke-WebRequest " | ConvertFrom-Json $alumnos.alumno | %{$_.'@attributes',$_.usuario}
0 notes
Text
What's New in Laravel 5.5 LTS
Some time ago Taylor Otwell (the creator of Laravel) made an announcement that Laravel will get a major update every 6 months; well it's that time of the year again.
In this article we'll talk about some of the latest features in Laravel!
But First: Gotchas
5.5 is an LTS (Long-Term Support) release. This means that this version of Laravel will get support (bug fixes and the likes for many years).
PHP7+: If you still use any version lesser than 7 of PHP, please upgrade. Apart from the new developer features offered by PHP7 there's also speed improvements that will save you money. Tumblr recently upgraded to version 7 and quoting them
Almost immediately saw the latency drop by half, and the CPU load on the servers decrease at least 50%, often more. Not only were our servers serving pages twice as fast, they were doing it using half the amount of CPU resources.
If you need help migrating to the latest version of PHP you checkout the official migration guide or take a look at Migrating a PHP 5 app to PHP 7 Guide by Prosper Otemuyiwa. You can also hire me [email protected]
Whoops
As a long time user of Laravel, I hated when whoops stack trace debugger was removed. Glad to see that it's back.
Some of the features of Whoops include:
Flexible, stack-based error handling
Stand-alone library with (currently) no required dependencies
Simple API for dealing with exceptions, trace frames & their data
Includes a pretty rad error page for your webapp projects
Includes the ability to open referenced files directly in your editor and IDE
Includes handlers for different response formats (JSON, XML, SOAP)
Easy to extend and integrate with existing libraries
Clean, well-structured & tested code-base
Blade::if() Directives
Blade received a new addition that simplifies custom if statements in your views. In our AppServiceProvider::boot() or a custom Service Provider ::boot() we can define something like this.
// make sure you import this class in service provider use Illuminate\Support\Facades\Blade; Blade::if('editor', function () { return auth()->check() && auth()->user()->isEditor(); });
After defining editor we can then move to our Blade files and do something like this.
@editor <a href="http://ift.tt/1uaQUM0">Approve Posts</a> @else <p>You shall not pass</p> @endeditor
We can also pass arguments to our directives and we do that by:
Blade::if('editor', function ($level) { // });
and it will look like this in our templates.
@editor('senior') <script src="fancy-editor.js"></script> @endeditor
Auth and Guest Blade Directives
With the addition of Blade::if Laravel also included 2 new custom directives.
The first one is @auth which we use if a user is authenticated, and there's @guess which does the opposite.
Normally, to check an authenticated user we'd do
@if (auth()->check()) <p>Welcome</p> @endif
Now we just need to do
@auth <p>welcome</p> @endauth
Fresh Migrations with migrate:fresh command
You might be wondering what the difference is between migrate:refresh and migrate:fresh. In the general sense of things, they do the same thing — with the difference being that migrate:fresh skips the down method of your migrations.
So if you run migrate:refresh the output might look like this.
$ php artisan migrate:refresh Rolling back: 2014_10_12_100000_create_password_resets_table Rolled back: 2014_10_12_100000_create_password_resets_table Rolling back: 2014_10_12_000000_create_users_table Rolled back: 2014_10_12_000000_create_users_table Migrating: 2014_10_12_000000_create_users_table Migrated: 2014_10_12_000000_create_users_table Migrating: 2014_10_12_100000_create_password_resets_table Migrated: 2014_10_12_100000_create_password_resets_table
While running migrate:fresh will give you
$ php artisan migrate:fresh Dropped all tables successfully. Migration table created successfully. Migrating: 2014_10_12_000000_create_users_table Migrated: 2014_10_12_000000_create_users_table Migrating: 2014_10_12_100000_create_password_resets_table Migrated: 2014_10_12_100000_create_password_resets_table
With this new command, you can skip the down() method of your migrations and just use the migrate:fresh command. This is particularly good news for developers that use foreign key relationships in the database.
DD and Dump Collections
Before 5.5 I used Macros by Spatie to dump collections for debugging.
With 5.5 comes Collection::dump() and Collection::dd(). If you've been using Laravel for a while, you can guess what these do. ::dump() outputs the result and continues processing while ::dd() "dumps and die".
collect([1,2,3])->map(function($i){ return $i * 2; })->reject(function($i){ return $i < 3; });
Take the above collection for example, we can do this:
collect([1,2,3])->map(function($i){ return $i * 2; })->dump()->reject(function($i){ return $i < 3; });
And we get:
Collection {#181 ▼ #items: array:3 [▼ 0 => 2 1 => 4 2 => 6 ] }
Frontend Presets
Since 5.3 Laravel has shipped with optional Bootstrap and Vue.js scaffolding. The problem is that different people mean different tools of development. Since Laravel is not trying to force you to use a particular frontend framework, in this version more presets were added..
To use the React preset just run
php artisan preset react
To use the Bootstrap preset you can run
php artisan preset bootstrap
If you want to remove the presets you can also run
php artisan preset none
Package Auto-Discovery
Installing a Laravel Package requires at least these 2 or sometimes 3 steps:
Install the package:
composer require foo/bar
Register the provider in app.php:
[ // .... Foo\Bar\ServiceProvider::class, ]
Optionally, register the Facade:
[ // .... 'Bar' => Foo\Bar\Facade::class, ]
One cool thing in 5.5 is packages can be automatically discovered by Laravel. So for package developers, you can add an extra section in your packages composer.json.
"extra": { "laravel": { "providers": [ "Foo\\Bar\\ServiceProvider" ], "aliases": { "Bar": "Foo\\Bar\\Facade" } } }
So when a developer installs your package composer require foo/bar they automatically have access to any aliases and the service providers are automatically registered.
Request Validation Method
In older versions of Laravel validating a request looked similar to this.
public function store() { $data = $this->validate(request(), [ 'name' => 'required', 'price' => 'required|numeric', 'category_id' => 'numeric|exists:categories', ]); // no longer needed // $data = request()->only('name', 'price', 'category_id'); return Product::create($data); }
As you can see from the example above the request()->only() call is no longer needed as $this->validate() returns request()->only().
Custom Validation Rule Objects and Closure
Instead of using Validator::extend() (which we can still use) we can define a class that implements Illuminate\Contracts\Validation\Rule inteface or use a closure.
To create a new rule we use our Laravel handy helper artisan:
php artisan make:rule MyCustomRule
Our rules class will look like this.
namespace App\Rules; use Illuminate\Contracts\Validation\Rule; class MyCustomRule implements Rule { public function passes($attribute, $value) { return $value > 10; } public function message() { return 'More please...'; } }
An example of using this validation rule looks like the following:
request()->validate([ 'files' => [new MyCustomRule], 'more_cowbells' => [function ($attribute, $value, $fail) { if ($value <= 10) { $fail(':attribute needs more cowbell!'); } }] ]);
The closure style takes the attribute and value, and a fail parameter that you call if the validation rule should fail. The closure is a nice way to experiment with custom validation before you extract it to a dedicated rule object, or for one-off custom validation needs.
Responsable Interfaces for Responses
A new interface called Responsable (Illuminate\Contracts\Support\Responsable) will allow objects to be converted to an HTTP response. This interface requires us to implement a toResponse() method that is rendered as an HTTP response.
Here's an example of what a class implementing this interface will look like.
use Illuminate\Contracts\Support\Responsable; class ExampleObject implements Responsable { public function __construct($name = null) { $this->name = $name; } public function status() { return 200; } public function toResponse() { if ($this->wantsJSON()) { return response( $this->name, $this->status() ); } return view('index', ['name' => $this->name]); } }
The Router class now checks for Responsable when preparing a response.
if ($response instanceof Responsable) { $response = $response->toResponse(); }
With this new addition, we can clean up our controllers even further as we can abstract the logic that makes the view possible.
Using this new Responsable we can return something like this from our routes.
Route::get('/', function () { return new ExampleObject('Chris Sevilleja'); })
vendor:publish Gets a Prompt
We are all familiar with those Laravel packages that after installation require you to publish their assets (pretty much all of them). Running vendor:publish on its own publishes every single asset, so to avoid that we have the option to use a tag or a provider so as to publish.
Now, there's a new way to do publish vendor assets. When you run php artisan vendor:publish you get a prompt and then choose the asset to publish.
Custom Exception Reporting
When a custom exception is thrown, we usually go to App\Exceptions\Handler::report() and listen for an instance of our exception. But with 5.5 we can define a report() method on our exception and Laravel will check every exception received by the exception handler for a report() method and trigger it if it exists.
This gives us finer control of how we handle exceptions as we can log it, send to our monitoring software, alert a developer.
The former method with time will lead to a really messy code base.
throw_if() and throw_unless()
throw_if() and throw_unless() are pretty much self-explanatory. Both functions accept a minimum of 2 parameters, the first one is a boolean and the second is the exception to throw.
throw_if() will throw an exception if the first condition is true while throw_unless() will throw an exception if the first parameter is false.
$foo = true; throw_if($foo, new BarException('Foo is true')); // or throw_if($foo, BarException::class, 'Foo is true');
Here is the complete function for reference:
function throw_if($boolean, $exception, $message = '') { if ($boolean) { throw (is_string($exception) ? new $exception($message) : $exception); } }
For throw_unless()
$foo = false; throw_unless($foo, new BarException('Foo is false')); // or throw_unless($foo, BarException::class, 'Foo is false');
Here's what the function looks like
function throw_unless($boolean, $exception, $message) { if (! $boolean) { throw (is_string($exception) ? new $exception($message) : $exception); } }
Render Mailables to the Browser
Mailables also got an update as they can now be rendered to the browser.
This makes sense for those people who like to create an archive of newletters or something. No more hacks are needed to get this to work.
Route::get('/demo', function () { return new App\Mail\UserWelcome(); });
Extras
Some features not covered in this article but still worth a mention.
Resource Classes allows us transform Eloquent models in a proper JSON data structure. We can also update our models to include a toArray() method, because when building an API that is intended for the public toArray() might be lacking.
Auto-Register Artisan Commands: You'll no longer be required to register your artisan commands. Instead Laravel will scan the commands directory and auto-register them. With this in mind you can create a command php artisan make:command MyCommand and automatically trigger it.
Route helpers: the route facade now comes with a few helpers of its own. Route::redirect() to perform a redirect. Route::view() to load a view.
RefreshDatabase Trait: All this does during testing is that it chooses the optimal path when migrating databases during tests.
withoutExceptionHandling() method: The base test case (Illuminate\Foundation\Testing\TestCase) inherits a withoutExceptionHandling() that allows you to disable exception handling for a test. It is a cool addition as we can run assertions on our exceptions instead of an exception handler taking over. Another reason is when an unexpected behaviour occurs you get to see the actual exception.
Support for Email Themes in Mailables
Improvements with the Default Error Views
Pivot Casting
In Closing
In case I missed anything you can check What's new in Laravel by Laracasts.
As usual, the docs are updated — including release notes, and upgrade guide.
Let us know about your favorite addition in the comments. Thank you.
via Scotch.io http://ift.tt/2j3Rwe0
0 notes
Text
How to Save and Load a Game in Unity
Games are getting longer and longer, with some having over 100 hours of content. It would be impossible to expect players be able to complete all of what a game has to offer in just one sitting. That’s why letting the player save their game is one of the most essential features your game should have — even if it’s just to keep track of their high scores.
But how does one create a save file and what should be in it? Do you need to use a save file to keep track of player settings too? What about submitting saves to the web so they can be downloaded later on a different device?
In this tutorial you will learn:
What serialization and deserialization are.
What PlayerPrefs is and how to use it to save player settings.
How to create a save game file and save it to disk.
How to load a save game file.
What JSON is and how you would use it.
It is assumed that you have some basic working knowledge of how Unity works (such as being able to create and open scripts), but other than that everything has been prepared so this tutorial will be very easy to follow. Even if you are new to C#, you should have no trouble keeping up except for a few concepts that might require further reading.
Note: If you are new to Unity or looking to pick up more Unity skills, you should checkout out our other Unity tutorials where you can learn about lots of Unity topics from C# to how the UI works.
Getting Started
Download the starter project here. You will be implementing the code for saving and loading the game, as well as the logic for saving the players settings.
Important Save Concepts
There are four key concepts to saving in Unity:
PlayePrefs: This is a special caching system to keep track of simple settings for the player between game sessions. Many new programmers make the mistake of thinking they can use this as a save game system as well, but it is bad practice to do so. This should only be used for keeping track of simple things like graphics, sound settings, login info, or other basic user-related data.
Serialization: This is the magic that makes Unity work. Serialization is the conversion of an object into a stream of bytes. That might seem vague but take a quick look at this graphic:
What is an “object”? In this case an “object” is any script or file in Unity. In fact, whenever you create a MonoBehaviour script, Unity uses serialization & deserialization to convert that file down to C++ code and then back to the C# code that you see in the inspector window. If you’ve ever added [SerializeField] to get something to appear in the inspector, you now have an idea of what’s going on.
Note: If you’re a Java or web developer, you might be familiar with a concept known as marshalling. Serialization and marshalling are loosely synonymous, but in case you’re wondering what a strict difference would be, serialization is about converting an object from one form to another (e.g. an object into bytes), whereas marshalling is about getting parameters from one place to another.
Deserialization: This is exactly what it sounds like. It’s the opposite of serialization, namely the conversion of a stream of bytes into an object.
JSON: This stands for JavaScript Object Notation, which is a convenient format for sending and receiving data that is language agnostic. For example, you might have a web server running in Java or PHP. You couldn’t just send a C# object over, but you could send a JSON representation of that object and let the server recreate a localized version of it there. You’ll learn more about this format in the last section but for now just know that this simply a way of formatting data to make it multi-platform readable (like XML). When dealing with converting to and from JSON, the terms are JSON serialization and JSON deserialization respectively.
Player Prefs
This project has been set up so that all you will focus on is the logic for saving and loading games. However, if you are curious how it all works, don’t be afraid to open all the scripts and see whats going on, and feel free to ask a question here or in the forums if you need help.
Open the project, then open the Scene named Game and then click play.
To start a game, click the New Game button. To play the game, you simply move your mouse, and the gun will follow your movement. Click the left mouse button to fire a bullet and hit the targets (which flip up and down at various time intervals) to get points. Try it out and see how high a score you can get in 30 seconds. To bring up the menu at any time, press the escape key.
As fun as that game was, it might have been a little dry without music. You may have noticed that there is a music toggle, but it was switched off. Click play to start a new game, but this time click the Music toggle so it’s set to “On”, and you will hear music when you start your game. Make sure your speakers are on!
Changing the music setting was simple, but click the play button again and you’ll notice a problem: the music is no longer checked. While you did change the music setting earlier, there was nothing keeping track of that change. This is the kind of thing that PlayerPrefs excels at.
Create a new script named PlayerSettings in the Scripts folder. Since you’ll be using some UI elements, add the following line at the top of the file with the other namespaces:
using UnityEngine.UI;
Next, add the following variables:
[SerializeField] private Toggle toggle; [SerializeField] private AudioSource myAudio;
These will keep track of the Toggle and AudioSource objects.
Next add the following function:
public void Awake () { // 1 if (!PlayerPrefs.HasKey("music")) { PlayerPrefs.SetInt("music", 1); toggle.isOn = true; myAudio.enabled = true; PlayerPrefs.Save (); } // 2 else { if (PlayerPrefs.GetInt ("music") == 0) { myAudio.enabled = false; toggle.isOn = false; } else { myAudio.enabled = true; toggle.isOn = true; } } }
When set up, this will:
Check if the PlayerPrefs has a cached setting for the “music” key. If there is no value there, it creates a key-value pair for the music key with a value of 1. It also sets the toggle to on and enables the AudioSource. This will be run the first time the player runs the game. The value of 1 is used because you cannot store a Boolean (but you can use 0 as false and 1 as true).
This checks the “music” key saved in the PlayerPrefs. If the value is set to 1, the player had music on, so it enables the music and sets the toggle to on. Otherwise, it sets the music to off and disables the toggle.
Now Save the changes to your script and return to Unity.
Add the PlayerSettings script to the Game GameObject. Then expand the UI GameObject, followed by the Menu GameObject to reveal its children. Then drag the Music GameObject on to the Toggle field of the PlayerSettings script. Next, select the Game GameObject and drag the AudioSource over to the MyAudio field.
<
The music is set up to work when the game runs (since there is code in the Awake function), but you still need to add the code if the player changes the setting during gameplay. Open the PlayerSettings script and add the following function:
public void ToggleMusic() { if (toggle.isOn) { PlayerPrefs.SetInt ("music", 1); myAudio.enabled = true; } else { PlayerPrefs.SetInt ("music", 0); myAudio.enabled = false; } PlayerPrefs.Save (); }
This does almost the same as the code you wrote earlier, except it has one important difference. It checks the state of the music toggle and then updates the saved setting accordingly. In order for this method to be called, and thus for it to be able to do its work, you need to set the callback method on the Toggle GameObject. Select the Music GameObject and drag the Game GameObject over the object field in the OnValueChanged section:
Select the dropdown which currently says No Function, and select PlayerSettings -> ToggleMusic(). When the toggle button in the menu is pressed, it will call the ToggleMusic function.
Now you’ve got things set up to keep track of the music setting. Click Play and try it out by setting the music toggle to on or off, then ending the play session and starting a new play session.
The music setting is now properly saved! Great job — but you’re only getting started with the power of serialization.
Saving The Game
Using PlayerPrefs was pretty simple wasn’t it? With it, you will be able to easily store other settings in there such as the player’s graphic settings, or login info (perhaps Facebook or Twitter tokens), and whatever other configuration settings make sense to keep track of for the player. However, PlayerPrefs is not designed to keep track of game saves. For that, you will want to use serialization.
The first step to creating a save game file is creating the save file class. Create a script named Save and remove the MonoBehaviour inheritance. Remove the default Start() and Update() methods as well.
Next, add the following variables:
public List<int> livingTargetPositions = new List<int>(); public List<int> livingTargetsTypes = new List<int>(); public int hits = 0; public int shots = 0;
In order to save the game you will need to keep track of where existing robots are and what types they are. The two lists accomplish this. For the number of hits and shots you are just going to store those as ints.
There is one more very important bit of code you need to add. Above the class declaration, add the following line:
[System.Serializable]
This is known as an attribute and it is metadata for your code. This tells Unity that this class can be serialized, which means you can turn it into a stream of bytes and save it to a file on disk.
Note: Attributes have a wide range of uses and let you attach data to a class, method, or variable (this data is known as metadata). You can even define your own attributes to use in your code. Serialization makes use of the [SerializeField] and [System.Serializable] attributes so that it knows what to write when serializing the object. Other uses for attributes include settings for unit tests and dependency injection, which are way beyond the scope of this tutorial but well worth investigating.
The entire Save script should look like this:
using System.Collections; using System.Collections.Generic; using UnityEngine; [System.Serializable] public class Save { public List<int> livingTargetPositions = new List<int>(); public List<int> livingTargetsTypes = new List<int>(); public int hits = 0; public int shots = 0; }
Next, open the Game script and add the following method:
private Save CreateSaveGameObject() { Save save = new Save(); int i = 0; foreach (GameObject targetGameObject in targets) { Target target = targetGameObject.GetComponent<Target>(); if (target.activeRobot != null) { save.livingTargetPositions.Add(target.position); save.livingTargetsTypes.Add((int)target.activeRobot.GetComponent<Robot>().type); i++; } } save.hits = hits; save.shots = shots; return save; }
This code creates an instance of the Save class you made earlier and then sets the values from the existing robots. It also saves the players shots and hits.
The Save button has been hooked up to the SaveGame method in the Game script, but there is no code in SaveGame yet. Replace the SaveGame function with the following code:
public void SaveGame() { // 1 Save save = CreateSaveGameObject(); // 2 BinaryFormatter bf = new BinaryFormatter(); FileStream file = File.Create(Application.persistentDataPath + "/gamesave.save"); bf.Serialize(file, save); file.Close(); // 3 hits = 0; shots = 0; shotsText.text = "Shots: " + shots; hitsText.text = "Hits: " + hits; ClearRobots(); ClearBullets(); Debug.Log("Game Saved"); }
Taking it comment-by-comment:
Create a Save instance with all the data for the current session saved into it.
Create a BinaryFormatter and a FileStream by passing a path for the Save instance to be saved to. It serializes the data (into bytes) and writes it to disk and closes the FileStream. There will now be a file named gamesave.save on your computer. The .save was just used as an example, and you could use any extension for the file save name.
This just resets the game so that after the player saves, everything is in a default state.
To save the game, press Escape at any time during play and click the Save button. You should notice everything resets and the console output displays a note that the game has been saved.
LoadGame in the Game script is connected to the Load button. Open the Game script and locate the LoadGame function. Replace it with the following:
public void LoadGame() { // 1 if (File.Exists(Application.persistentDataPath + "/gamesave.save")) { ClearBullets(); ClearRobots(); RefreshRobots(); // 2 BinaryFormatter bf = new BinaryFormatter(); FileStream file = File.Open(Application.persistentDataPath + "/gamesave.save", FileMode.Open); Save save = (Save)bf.Deserialize(file); file.Close(); // 3 for (int i = 0; i < save.livingTargetPositions.Count; i++) { int position = save.livingTargetPositions[i]; Target target = targets[position].GetComponent<Target>(); target.ActivateRobot((RobotTypes)save.livingTargetsTypes[i]); target.GetComponent<Target>().ResetDeathTimer(); } // 4 shotsText.text = "Shots: " + save.shots; hitsText.text = "Hits: " + save.hits; shots = save.shots; hits = save.hits; Debug.Log("Game Loaded"); Unpause(); } else { Debug.Log("No game saved!"); } }
Looking at this in detail:
Checks to see that the save file exists. If it does, it clears the robots and the score. Otherwise it logs to the console that there is no saved game.
Similar to what you did when saving the game, you again create a BinaryFormatter, only this time you are providing it with a stream of bytes to read instead of write. So you simply pass it the path to the save file. It creates the Save object and closes the FileStream.
Even though you have the save information, you still need to convert that into the game state. This code loops through the saved robot positions (for living robots) and adds a robot at that position. It also sets it to the right type. For simplicity, the timers are reset, but you can remove this if you prefer. This prevents the robots from disappearing right away and gives the player a few seconds to get oriented in the world. Also, for simplicity, the animation of the robot moving up is set to finished, which is why robots partly moving up when you saved will be shown as fully up when a game is loaded.
This updates the UI to have the right hits and shots set, and it sets the local variables so that when the player fires or hits a target it continues to count up on the value that was previously. If you didn’t do this step, the next time the player fires or hits a target the displayed values would get set to 1.
Click Play, play the game for a bit then save. Click the Load button and you will see it load the enemies as they were set up before when you saved the game. It also properly sets your score and the shots you’ve fired.
Saving Data With JSON
There’s one more trick you can use when you want to save data — and that is JSON. You could create a local JSON representation of your game save, send it to a server, then get that JSON (as a String) to another device and convert it from a string back to JSON. This tutorial won’t cover sending/receiving from the web, but it is very helpful to know how to use JSON — and it’s incredibly simple.
The format of JSON can be a little different than what you might be used from C# code, but it’s pretty straightforward. Here is a simple JSON example:
{ "message":"hi", "age":22 "items": [ "Broadsword", "Bow" ] }
The outer brackets represent the parent entity that is the JSON. If you are familiar with a Dictionary data structure, then JSON is similar. A JSON file is a mapping of key and value pairs. So the above example has 3 key-value pairs. With JSON, the keys are always strings, but the values can be objects (i.e. children JSON objects), arrays, numbers, or strings. The value set to the “message” key is “hi”, the value of the “age” key is the number 22, and the value of the “items” key is an array with two strings in it.
The JSON object itself is represented by a String type. By passing this data as a String, any language can easily re-create JSON object from the string as a constructor argument. Very convenient and very simple.
Each language has its own way of creating an object from this format. Since Unity 5.3, there exists a native method to create a JSON object from a JSON string. You will create a JSON representation of the high score of the player and then print it to the console. But you extend this logic by sending the JSON to a server.
The Game script has a method named SaveAsJSON that is hooked up to the Save As JSON button. Replace SaveAsJSON with the following code:
public void SaveAsJSON() { Save save = CreateSaveGameObject(); string json = JsonUtility.ToJson(save); Debug.Log("Saving as JSON: " + json); }
This creates the Save instance like you did earlier. Then it creates a JSON string using the ToJSON method on the JsonUtility class. It then prints the output to console.
Start a game, hit a few targets, then press Escape to bring up the menu. Click the Save As JSON button, and you will see the JSON string you created:
If you want convert that JSON into a Save instance you would simply use:
Save save = JsonUtility.FromJson<Save>(json);
That is what you would do if you wanted to download a save file from the web and then load it into your game. But setting up a web server is a whole other process! For now, pat yourself on the back because you just learned a few techniques that will… save you some trouble in your next game (groan)!
Where to Go From Here?
You can download the final project files here.
You’ve now gained a powerful tool for creating great games by enabling your players to save and load their game through the magic of serialization. You’ve also learned what JSON is and how you could use it to implement cloud saving. You’ve also learned what PlayerPrefs is used for (settings!), and what it’s not used for (saving the game).
If you’re looking to get more rounded in Unity, we have a whole section of Unity tutorials over here, and you’re welcome to join us on the Unity forums. You can always leave a comment here if you have anything you’d like to say.
If you are a die-hard Unity fan and want to become a full fledged developer, then check out our book Unity Games by Tutorials where you will make 4 complete games from scratch. One of the chapters even goes over how to use JSON as a level loader!
If you have any questions or comments on this tutorial, please join the discussion below!
The post How to Save and Load a Game in Unity appeared first on Ray Wenderlich.
How to Save and Load a Game in Unity published first on http://ift.tt/2fA8nUr
0 notes
Photo

12 Best PHP Event Calendar and Booking Scripts... and 3 Free Options
In this article I'll review 15 of the best PHP calendar scripts. Whether you need an appointment booking script, an event calendar script or a PHP calendar reservation system, you'll find something on this list.
There are lots of reasons you might need a PHP calendar script. If you’re a service provider, you need an appointment booking system that allows customers to see your availability and select an appointment time and date that is best for them. This makes it easier for customers to book and cuts down on needless calls to your business.
Online calendars are also handy for organisations of any size to help team members share events and tasks and keep track of what everybody is working on.
Their usefulness isn’t just limited to companies, however. Artists, writers, performers, bloggers and anyone else with an active public life could make good use of PHP calendar scripts to let followers and fans know the whens and wheres of public appearances.
What Type of PHP Calendar Script Do You Need?
When it comes to PHP event calendar and appointment booking scripts, choosing the right one can be hard. They can take dozens of forms, and finding the right one for you can be a daunting task.
To help narrow the solutions down a bit, here’s a few questions to ask yourself before you get started:
Do I need to focus on events, which occur at specific times, with a large number of tickets to sell? Or on bookings, with a smaller number of services that could occur at any time?
Will I need to support only my business? Or are there others that will be included in my listings? For example, a business cooperative might need to handle bookings for multiple service providers.
Will there be a single entity that events or bookings are attributed to, or several—as in a hair studio, with several stylists available?
Do I need a script to embed into a current site, or do I need something that stands on its own?
PHP Event Calendar and Booking Scripts on CodeCanyon
There are currently almost 50 PHP event calendar and booking scripts available on CodeCanyon. Some of these scripts address very specific use cases like cleaning and laundry services. Others are more general-purpose scripts used to book all kinds of events.
All of these scripts offer the basic functionality you expect in a booking system. Some of them also have a unique set of features that includes things like generating invoice PDFs or sending booking alerts through SMS.
After you purchase any of these scripts, you will get 6 months of free support to help you set things up. You also become eligible for free lifetime updates.
The Best PHP Event Calendar and Booking Scripts on CodeCanyon for 2020
With all this in mind, we’ve compiled 10 of our best PHP calendar, booking and events scripts available for download today at CodeCanyon. This post will help you choose the one that’s right for you.
1. Cleanto
Cleanto is ideal for many different types of service companies looking for a reliable way to provide clients with full-featured online booking.
Standout features:
PayPal, Authorize.Net, and Stripe payment methods
email reminders
auto confirm bookings
ability to add breaks in schedule
and more
User Crossera says:
“Amazing customer support. These guys came back to me within a day with a fix for all the problems I faced. The plugin can be customized to whatever your needs are.”
2. Appointo—Booking Management System
An end-to-end solution for booking, Appointo Booking Management System takes the heavy lifting off your CMS or static site. This script provides a front-end calendar and booking system that can be easily used to mark appointments or events. Then, on the administrative side, you can manage the events and services that are available, and keep track of customers or attendees.
Standout features:
front-end booking calendar
ability to manage services and booking
point-of-sale support
customer management
support for both PayPal and Stripe
Appointo's admin dashboard in action
User moffei says:
“Cool and Clean Customer Support. The fastest customer support I've ever had on CodeCanyon, plus a better script for the job. I definitely recommend it.”
3. Vacation Rentals Booking Calendar
The Vacation Rentals Booking Calendar is an online vacation rental booking calendar script that allows property owners or management agencies to create and manage rental availability calendars for their vacation rental properties.
Standout features:
highly customizable
email notifications to site owner or administrator
XML and JSON availability feeds
export calendars to iCalendar format
and more
User Craignic says:
“Great product and quick support given when I had a query.”
4. NodAPS Online Booking System
The NodAPS Online Booking System promises to help you manage your appointments more easily. You can create unlimited accounts with administrative, assistant, and staff permission, and add unlimited languages to the system. You can also change the booking time and date with a drag-and-drop feature.
Standout features:
multi-provider system
seven different booking type forms
multilingual
easy to install
and more
User Jam79 says:
“Very simple to use. Fast and effective support!”
5. Laravel Booking System
The Laravel Booking System with live chat offers a great online system for booking and making appointments. Users can buy credits as a payment option and view available services, total transactions, their total credits, and administrator contact information via their dashboard.
From the administrative side, the system administrator can manage all things system related: general settings, payment settings, and user management. Admins can also manage bookings and respond to inquiries from their dashboard.
Standout features include:
live chat
multi-language support
booking and transaction history
PayPal integration
and more
User brentxscholl says:
“This plugin works great. Great code. Customer service is fantastic. We asked for extended features and they were delivered for a reasonable price.”
6. Ajax Full Featured Calendar 2
Ajax Full Featured Calendar 2 is a highly customizable personal calendar designed to help you keep organized. This is a best-selling update of another popular script, the Ajax Full Featured Calendar.
Standout features include:
PHP and JS versions with PHP classes and object-oriented programming
ability to auto-embed YouTube, Vimeo, Dailymotion, or SoundCloud media
ability to export calendar or events to iCal format
supports recurring events
and more
User sv_fr says:
“Great script. Practical uses. Helpful support.”
7. Event Calendar
Built with jQuery FullCalendar and integrated into Bootstrap’s grid layout, the Event Calendar plugin allows users to organise and plan their events.
Standout features:
create new types of events
ability to add fields such as title, colour, description, link, and photo
Google Fonts and Font Awesome icons
and more
User teddyedward says:
“Really enjoy using your script—it's perfect for my needs. It's also well documented and easy to use.”
8. eCalendar
Quite simply, the eCalendar script is designed to keep individual users or companies organised with a calendar that allows users to add as many events as needed, as well as updating details like the event title, location, or time.
Standout features:
choice of two designs
cross-browser compatibility (IE8+, Safari, Opera, Chrome, Firefox)
events are saved in your MySQL database
fully responsive design
and more
User levitschi says:
“Everything works perfectly! Support was better than I ever expected!”
9. BookMySlot
Focusing largely on event bookings, BookMySlot takes it up a notch by allowing your site to handle multiple vendors, with their individual events nested underneath. This script is thorough and self-contained, so if you are looking for a turnkey solution, rather than something to add to an existing website, this could be the script for you.
Standout features:
thorough documentation
separate dashboards for admins and vendors
supports Stripe payments
built-in messaging system
User aungoo says:
“Outstanding customer support. I'm also happy with the quality of coding. ”
10. Laundry Booking and Management
This Laundry booking and management script serves a very specific purpose. This is good news for anyone who wants to create their own laundry and dry cleaning business. It has some great features for both the users of the service as well as the business owner.
Users will be able to book orders for services like washing, dry cleaning or ironing etc. The user interface allows them to pick the number of different types of clothes like trousers, shirts etc.
The business owner can get paid through a lot of payment gateways like PayPal, Stripe and Authorize.net among others. They will also get alerts about different booking through SMS.
Here are some other additional features of the script:
multiple SMS and Email templates for users
guest checkout for orders
generate invoices in PDF format
staff dashboard to easily manage everything from one place
This fantastic script offers a lot of other features that you will find useful. If you are serious about starting a laundry business, you should definitely consider giving it a try.
11. BookingWizz Booking System
The BookingWizz System script has been around for over 10 years now. It was added to CodeCanyon in February 2010 is still updated regularly today. And it has been receiving good reviews from its buyers all this time! So, you can be rest assured that it is a great booking plugin that will serve your needs well.
BookingWizz offers a features like discount coupons with unique codes and expiration dates. All your sales stats are available for you to see in the dashboard. The design is also fully responsive and looks great on all kinds of devices and browsers as old as IE9.
Here are some of its other features:
unlimited calendars and events
hourly and daily bookings
integrated PayPal payments and offline payments
multilingual support
automatic booking reminder
printable PDF schedule
and more
You should try out some of its features in the live preview of the script and see if it does what you want.
12. Rezervy—Online Appointment Scheduling
Rezervy is a great online appointment scheduling and reservation booking script. It was added only recently to CodeCanyon, but the numerous 5 star ratings of the script are proof of its quality.
Rezervy comes with both single step and multi-step booking form features. The script creates a fully responsive booking system so it looks great on large screens as well as smaller mobile devices.
There are many amazing features in this script like:
support tickets
guest checkout
coupon discounts and recurring discounts
support for multiple currencies
manual booking
referral codes
rating and review for each appointment
and a lot more
Just try the live preview of the script and you will be amazed by its design and functionality.
Free PHP Event Calendar and Booking Scripts
Creating a great PHP calendar script is hard. As a result, it can be hard to find quality scripts—especially for free!
That's why our recommendation is to try one of the CodeCanyon scripts mentioned in the article. They all offer a lot of features and you will get 6 months of support and free lifetime updates.
Most of the free PHP calendar and event booking scripts either have a very limited feature set or have not been updated in a long time. There are some good options out there though. Here are three of the best:
1. phpmyreservation
This is a very basic reservation plugin that you can use to take bookings for a single item like appointments with a dentist or a conference room etc. You can control the pricing of each reservation.
2. laravel-booking
This is a simple room booking system based on Laravel 5.6. Laravel is a free open source PHP framework to create web applications. So, you need to be familiar with both PHP and Laravel to set it up.
3. laravel-google-calendar
This is yet another free PHP script based on Laravel. It allows you to easily create, delete or update any events in Google Calendar.
Tips for Using Event Calendars and Booking Scripts
Here are a few tips that you should remember when starting a business that based on booking products and services.
1. Make Sure That the Booking System is Responsive
People almost always have their smartphones with them. They usually also prefer to do things like booking reservations on their smartphones. If your booking system has a responsive layout that provides an amazing user experience, you will have a big advantage over your competition.
2. Don't Cram Too Much Information on the Screen at Once
Depending on the type of business that you operate, it might not always be possible to just ask users a couple of questions and book their slots. In such cases, use simple layouts that guide people throughout the booking process without overwhelming them. One great example would be the booking system by Rezervy.
Other PHP Scripts on CodeCanyon
These PHP event calendar and booking scripts just scratch the surface of what's available at CodeCanyon. There are over 4000 PHP scripts available in the marketplace that cover everything from calendars and forms to social networking and shopping carts.
Here are a few of the best-selling and up-and-coming PHP scripts available on CodeCanyon for 2020.
PHP
10 Best PHP URL Shortener Scripts
Monty Shokeen
PHP
12 Best Contact Form PHP Scripts for 2020
Esther Vaati
PHP
Comparing the 5 Best PHP Form Builders
Nona Blackman
PHP
Create Beautiful Forms With PHP Form Builder
Ashraff Hathibelagal
by Monty Shokeen via Envato Tuts+ Code https://ift.tt/3ebl7tM
0 notes