#how to create ini file
Explore tagged Tumblr posts
Visit Tumblr Blog
Explore Tumblr blogs with no restrictions, modern design and the best experience.
Last Seen Tumblr Blogs


Fun Fact
Tumblr was named as a finalist in Lead411’s New York City Hot 125 in Aug 2010.
Text
Discover the power of .ini files to fine-tune your website's settings within cPanel. This comprehensive guide will walk you through the process of creating, editing, and managing these configuration files. Learn how to optimize PHP directives, control error reporting, and tailor your website's behavior to your specific needs. Whether you're a developer or a website owner, this tutorial will empower you to take full control of your website's configuration by leaarning how to create php.ini file in cPanel..
0 notes
Text
[Reshade add-on] Clean UI for DX11
After so so sooooo many crashes later, I finally managed to create a working setting for this add-on for DX11 games by using an older REST version 🫠
You can read the whole post on Patreon here, or below the cut for those who can't access the site.

As using REST 1.2.0 and above cause crashes whenever I create a setting or attempt to use it for a brief amount of time, I decided to use a much older version of REST (1.1.0), which turns out to be more stable to configure and use. While this means being able to use the add-on for the DX11 game, it has its own set of problems, which may/may not be a dealbreaker for some.
I decided to make a new post since the original one is quite lengthy and I want to keep DX9 and DX11 versions separate due to the different information each version has.
➡️ For the DX9 version, find it here. And here for the Patreon post.
In short, with the help of REST (an add-on for reshade/gshade), you can block/prevent shaders from affecting the UI.
// Things to know if using this version ⚠️
Some shaders will not work properly and will cause some gamma issues. If your preset look different than how it normally is (a lot darker/brighter), enable/disable your active shaders and see which one is causing it. It's easily fixed by using an alternative shader that achieve a similar look.
Shaders affected (ones I've known so far): SMAA & MartysMods_SMAA (FMAA is not affected, use this instead), FilmicAnamorphSharpen, ArcaneBloom & NeoBloom, Glamarye_Fast_Effects, MagicHDR, CRT_Lotte.
You will not be able to change your window resolution, either via graphic settings or by using SRWE. This will cause your game to stop and eventually having to force stop it with the task manager. It is recommended that you have your game in Windowed Fullscreen to avoid issues and have the add-on disabled if you want to change the resolution in-game.
// Required Files
REST add-on v 1.1.0 (testing)
REST config for v 1.1.0 (simfileshare only)
// Installation
Have ReShade with full add-on support installed for this to work.
Download the REST_ x64_1.1.0 add-on from the github linked in the requirements section as well as the config.
Extract the ReshadeEffectShaderToggler.addon file into the game's \Bin folder where your TS4_64.exe is (where you had also installed ReShade).
If you use GShade: place the .addon file in the gshade-addons folder.
Still in the \Bin folder, drop the x.x_ReshadeEffectShaderToggler_DX11.ini file you downloaded.
If you use GShade: place the .ini file in the gshade-addons folder along with the .addon file. If my config doesn't show up in the add-on menu, move it back to the \Bin folder.
Rename the file and remove the prefix and suffix. Both .addon and .ini file should share the same name for the add-on to recognize my settings = [ ReshadeEffectShaderToggler.ini ]
Open up your game. If you see the same menu as below then you’ve successfully installed the add-on & settings! Restart if needed.
I've set the shortcuts for Clear UI to match with my Effect toggle key, which is Ctrl + F2. If yours are set differently, match the shortcut of this toggle group with your effect toggle key:
Reason being, having the toggle group active will prevent you from enabling/disabling your preset. Changing the shortcut will allow you to disable & enable your preset and toggle group at the same time.
To avoid the add-on from not working, make sure to do the following:
Enable post processing effects
Disable laptop mode & edge smoothing
Set 3d scene resolution to high
As long as all of the above are met, you should not encounter any problems. This has been tested to work on all graphics settings from low to ultra. External modifications (like Simp4Settings) may/may not have an effect, but from the testing I've done it has shown no problems so far.
210 notes
·
View notes
Text
TS3: Thumbnail Camera Edit

Here's a minuscule mod, inspired by TS3 beta footage, that changes the perspective of Sim and pet thumbnails in-game, making them appear at a front view instead of a 3/4 angle. 📐
This mod contains some edits to the INI files that control the camera positioning the game uses for generating thumbnails. These edits affect all Sims and all pets, including dogs, cats, horses, deer and racoons. The changes can be seen across various game modes, such as the Sim Bin in CAS, the Live Mode HUD, the notifications panel, the Online Dating App, the adoption screen, and more.
The mod comes with some caveats due to how the game stores thumbnails, so please read the rest of the post carefully.
Updating Game Thumbnails
Because the game stores Sim thumbnails inside save files, the game will not regenerate new thumbnails right away. To speed up the process, I recommend using Onebeld's Regul Save Cleaner to wipe the Sim portraits in your save and allow the game to regenerate new thumbnails the next time it's loaded.
Some EA premade Sims' thumbnails may resist regenerating even after following the above step, since they are stored inside .world files instead of save files. This can be resolved by opening your .world file in s3pe and removing the SNAP resources in it; I only recommend doing this if you know exactly what you're doing, and if you've backed up your .world file prior in case anything goes wrong.
Sims saved to the Sim Bin have their thumbnails stored inside their .sim file, so any Sims saved to the bin prior to installing this mod will retain their old thumbnails. You can also open up any .sim file and remove the SNAP resources from it if you want to force the game to generate new thumbnails; again, please be careful and back up your files.
Compatibility
This mod is not compatible with any other mod that replaces either the base game or Pets ThumbnailCameras _INI resources.
This mod is fully compatible with any mods that alter Sims' UI poses, such as @thesweetsimmer111's New UI Poses. I prefer to use my mod in conjunction with hers in the Exaggerated flavor.
Download: SFS / MTS / Patreon
Place the .package file in your Packages or Overrides folder.
Credits & Thanks
s3pe: Exporting/Importing resources, creating the package file.
Notepad++: Editing INI files.
Adobe Photoshop: Creating the preview image.
Thanks to @intincrmars for giving me ideas for the preview image! :P
Thanks to Lazy Duchess for giving me a hand in the earliest stage of the mod!
Thanks to MissPat for testing and giving feedback!
Thanks to the amazing community at @ts3creatorscave, where I've been able to share my modding progress and receive feedback from other simmers!
282 notes
·
View notes
Text

ℂ𝕒𝕤𝕚𝕟𝕠 ℍ𝕖𝕚𝕤𝕥 : 𝚊 𝙶𝚂𝚑𝚊𝚍𝚎 𝙿𝚛𝚎𝚜𝚎𝚝 𝚏𝚘𝚛 𝚝𝚑𝚎 𝚂𝚒𝚖𝚜 𝟺
A preset for people that hate editing screenshots and love drama. ❗❗ WARNING: This is a Gshade preset I created with the defunct, very cursed, and broken 4.0.3, I'm not sure how it will play with updated GShade and it definitely doesn't play well with ReShade. 🎲 DOWNLOAD, PICTURES, AND INFO UNDER THE CUT 🎲


❗❗ This is a hands on, adjustable reshade for people that have some experience playing around with reshade programs.
HOTKEYS:
🎲 Shift+\ - Toggles the cinematic letterbox (black borders) 🎲 \ - Toggle filters to help read in game UI 🎲 / - Toggles ADOF 🎲 Ctrl+/ - Switches back and forth between ADOF and Cinematic DOF
SPOTLIGHT:
This is a shader I added to light up dark scenes and adjust the temperature and mood in different lighting conditions.

You can adjust it, turn it on and off, but I would suggest only adjusting it by playing with the Brightness and Color. Try adjusting the color first because adjusting the brightness will usually blow everything out. DONT TOUCH THE SIZE SLIDER By default you can't bump it up larger than like 800 or something so I had to manually edit the .ini file to get it to 3500 in the first place.
HOW TO INSTALL:
Drop the Casino Heist.ini file in Origin Games\The Sims 4\Game\Bin\gshade-presets\Custom
🎲 DOWNLOAD (SFS) | ALT (GOOGLE DRIVE) 🎲
EXTRA SCREENSHOTS BELOW FOR EXAMPLE


132 notes
·
View notes
Text
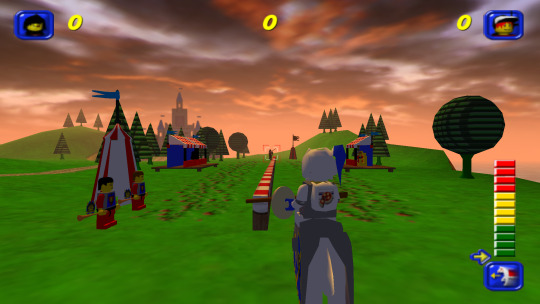
Capturing the ambience of LEGO Island 2 (2001)
This minigame-packed adventure explores many classic LEGO themes.
Running the game
There are two main versions of the game to chose from: the original 2001 release, and an improved 2007 version released as part of a two-pack. There is also apparently an unfinished, unreleased v1.1 with some bug fixes.
Curiously, the version hosted on MyAbandonware seems nearly identical to other 2001 releases I found. There appear to be minimal differences between the two.
All versions use a simple disk check; mounting an ISO with a tool like Daemon Tools suffices. There are also No-CD hex-edits available if you're interested.
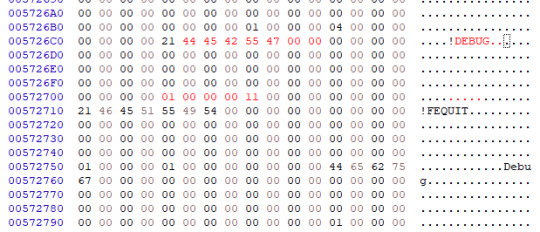
Debug menu and Level-select
We can access LI2's debug menu by altering the main menu options. I found some hex-edits for this on RRU. If you're not comfortable with hex-edits you can try using a patcher or patch, or LI2 Mod Manager.
04 00 00 00 02 -> 01 00 00 00 11 43 52 45 44 49 54 53 -> 44 45 42 55 47 00 00
Widescreen
Use the resolution and widescreen hacks offered by LI2 Mod Manager. See this thread for more detail on how it works.
Hiding UI and Player-character
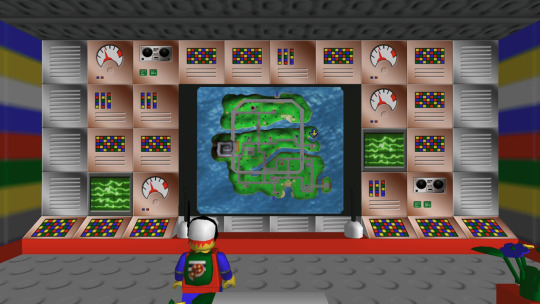
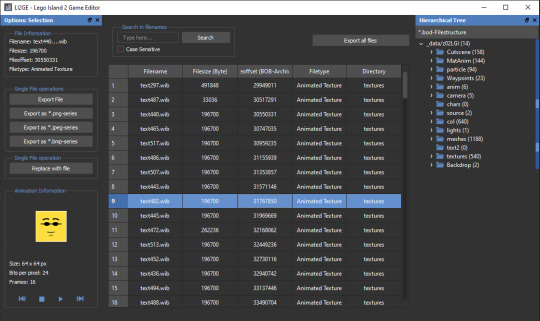
This is possible using Lego Island 2 Game Editor. It's a powerful albeit buggy application for modifying LI2 assets.
If LI2GE doesn't work, for example to edit fonts, you can use Lego Island 2 Extractor and/or Lego Island 2 Explorer. Once installed, be sure to disable automatic updates inside the program's INI to avoid startup crashes.
LI2 will prefer to load files from identically-named folders if they are present in the _data directory. For example, if a Fonts folder exists, its files will be used and Fonts.bob/bod won't be loaded.
We can also pause the game to remove the HUD, screenshot this state, and create a no-HUD overlay for our footage.
(Not) Free camera
A modder devised a way to summon a glider at any time.
Rendering ambience sequences
I recommend using the Fruity LSD effect with FL Studio. First, open the MID file in LEGO Island 2's level files, for example Fishing_Amb.mid. Be sure to select MIDI Out with Fruity LSD in the subsequent dialog.
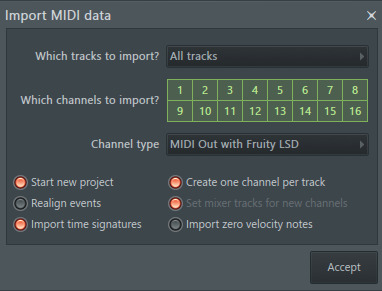
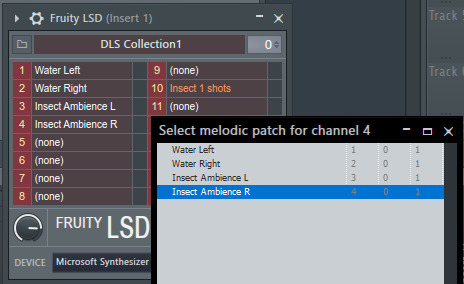
Afterward, click the folder icon in the top left to specify a DLS file - use one found in your MID file's folder. Once it's loaded, populate each channel by clicking it, and picking the corresponding patch. Don't forget to populate the "percussive" one-shots as well (Channel 10 in the screenshot below).
You are now ready to play your MID with the intended samples attached, or export it to a WAV file.
Appendix: Rendering music sequences
Download DirectMusic Producer. Supposedly this program allows you to export samples and sequence data. You could then render the pair using the MIDI renderer of your choice, such as OpenMPT or FL Studio's Directmusic plugin.
Appendix: Ambience sequence dead-ends
I tried VLC, with the DLS configured under FluidSynth, but this gave no output. I tried Miles Sound Tools with a DLS specified, but again - no output. I tried Winamp but seemingly couldn't get in_midi to use a custom DLS file, despite specifying one in the setting dialogs.
Appendix: Other LI2 developer tools
A soak test can be activated by pressing F8 while in windowed mode. You can also spawn a debugger window by pressing F9.
6 notes
·
View notes
Text
📁 oto.ini generation in UTAU-Synth
For our first tutorial I will be showing you how to create a Windows compatible oto.ini in UTAU-Synth. Before we get started, what is the difference between a Mac and Windows oto.ini?
The ini files are compatible with their OS scripting program. Notepad (default) and Notepad C++ for Windows, and Textedit for MacOS. This also means they will have a different extension, example, oto.ini on Windows, and oto_ini.txt on MacOS.
By default, UTAU-Synth will only generate the oto_ini.txt, the reason why we want to generate the default Windows ini is to make the bank compatible on Windows!
In UTAU-Synth, you will want to head to the preferences tab in the top left corner. In the toolbar, head to, "Voicebank Settings."

There you will find options for reading and writing your oto.ini. Under writing, select, "Update oto.ini with UTF-8." This will now write a Windows compatible oto.ini in your voicebank.

2 notes
·
View notes
Text
Huh. I think I just figured out a way to NOT build it around Agony, and instead use something else that's ALSO kind of powerful.
Actually... hmm... Considering that from what I'm seeing in the code, it's actually really easy to get a status to stack?
See, basically all statuses have a "stack id", and if you just... delete that? Then the game won't care if you stack multiples of that status on a character. (Yes, this is in fact how several skills work.)
The trouble with replicating Agony specifically is that it always triggers when it's applied. Meaning that the DoT would have to be re-triggered depending on how many stacks of Agony the character has, every time you hit them with a new Agony-stack on your own turn. And that requires coding.
Now, if I just want a "stackable DoT"? I can just recreate my own version of Bleeding and remove that stack-id, and on the enemy turn all of those bleeds will trigger at the same time.
I could even go so far as to just edit the main-status of Bleeding and make it so that every skill/item in the game that causes Bleeding would suddenly be able to multi-stack.
I kind of don't want to mess around with that can of worms, because it sounds like it could get a bit crazy.
But this does mean that I can create an "AP-dmg"-status. Something that can be blocked with Phys.Armor but that will otherwise cause the character to lose AP for their next turn (one for every time they've been hit by it).
It's not a true hard-CC, but it's potentially a hard-CC, which is very much in line with how some of the skills that I wanted to be using (Hail Strike, and Ice Fan) originally work. So that's neat.
Seeing as this would be a massive departure from the mod I've already created though, I might have to just... restart that whole mod if I wanted to actually create a full set of skills around this. And that would be really fucking tedious.
Entirely doable, but very boring. And also finicky. And also the modding-engine already managed to crash on me just as I was looking around in the code. And I wasn't even surprised.
It's hilarious how pathetically unstable their Divine Engine Tool is, even in comparison to fucking Skyrim's notoriously insane Creation Kit.
Like, the CK will crash if you do anything exciting (or forget to manually include the DLCs in its ini-files), and maybe if you're messing around with a lot of shit (like opening literally every single loot-table one by one).
The DE will crash if you keep it running for ten minutes.
#and that's not even getting me started on the way that divinity has hard-coded a LOT of shit into the game#so that the modding-tool can't actually do fuck-all to change it. bcs ''why would you need to change it?''#i think it's... about similar in the amount of work that goes into creating a ''custom spell''.#though divinity has a lot of effects to play around with to make your skills ''thematically reasonable''#(aka. using fire-sfx to make a fire-spell. instead of using ice-sfx for it.)#(and some of the effects look genuinely really fucking cool. which is more than can be said about vanilla skyrim spells.)#video games#divinity 2#personal stuff#rants
1 note
·
View note
Text
Top Mods and Customizations for Grid Autosport Fans
Grid Autosport is a beloved racing game that offers a perfect balance between realism and arcade-style gameplay. While the base game provides a great experience, the modding community has taken it to the next level, offering customizations that enhance visuals, add new cars, and improve gameplay. In this blog, we’ll dive into some of the most popular mods and custom content for Grid Autosport, show you how to install them, and spotlight some user-generated creations to fuel your racing dreams.
Why Mods Are Essential for Grid Autosport
Mods breathe new life into Grid Autosport by:
Expanding the game's car roster with community-created vehicles.
Introducing custom tracks and racing environments.
Enhancing graphics for a more immersive experience.
Tweaking gameplay mechanics for better realism or more fun.
Whether you're a casual gamer or a hardcore racing enthusiast, mods offer something for everyone.
Popular Mods and Custom Content
Here are some standout mods that have gained traction in the Grid Autosport community:
1. HD Graphics Mod
This mod elevates the visual quality of Grid Autosport, making car models, tracks, and environments look sharper and more detailed.
Features: Enhanced lighting, improved textures, and realistic reflections.
Why Use It: Ideal for players who want a more immersive experience on high-end PCs.
2. Real Car Brands Mod
Many players prefer authentic branding in racing games. This mod replaces generic in-game car brands with real-world counterparts.
Features: Adds official logos and liveries for famous manufacturers like Ferrari, Porsche, and Lamborghini.
Why Use It: Increases immersion by aligning the game with real-world motorsports.
3. Custom Tracks Pack
Expand your racing options with new custom tracks designed by the community.
Features: Unique layouts, challenging curves, and scenic environments.
Why Use It: Adds variety and keeps the gameplay fresh for long-term players.
4. Ultimate Physics Overhaul
This mod tweaks the handling and physics of vehicles, making them more realistic.
Features: Adjusted car weight, improved suspension, and dynamic tire wear.
Why Use It: Perfect for players seeking a simulation-level racing experience.
5. Custom Car Pack
Bring your dream cars to the game with this mod.
Features: Includes fan-favorites like the Bugatti Chiron, Tesla Roadster, and classic Mustangs.
Why Use It: Adds diversity to the car selection and lets players race with iconic vehicles.
Step-by-Step Guide to Installing Mods
Installing mods for Grid Autosport is straightforward. Follow these steps to enhance your game:
Step 1: Backup Your Game Files
Before making any changes, always create a backup of your game files to avoid losing progress or encountering issues.
Navigate to your game installation folder.
Copy the entire folder to a safe location on your PC.
Step 2: Download Mods
Find reliable sources for mods, such as:
RaceDepartment
Nexus Mods
Dedicated Grid Autosport community forums.
Ensure you download mods compatible with your game version.
Step 3: Install the Mods
Mod installation may vary depending on the type of modification:
Graphics Mods: Replace texture files in the game’s directory.
Custom Tracks or Cars: Drop new files into specific folders (e.g., /Cars or /Tracks).
Physics Overhauls: Replace configuration files like .ini or .xml.
Refer to the mod’s readme file for precise instructions.
Step 4: Launch the Game
Start Grid Autosport and test the mods. If issues arise, refer to community forums or revert to your backup files.
Showcasing User-Generated Content
The Grid Autosport community is brimming with talented creators who produce exceptional mods and custom content. Here are some gems worth exploring:
Custom Car Creations
Porsche 911 GT3: Known for its impeccable design and thrilling speed, this mod faithfully replicates the car.
Lamborghini Huracán EVO: Adds a modern supercar with stunning liveries and detailed interiors.
Community Tracks
Monaco Circuit: A fan recreation of the iconic F1 street track, offering a challenging race experience.
Tokyo Drift Streets: A night-time urban environment perfect for drift racing enthusiasts.
Liveries and Paint Jobs
Custom liveries allow players to personalize their cars. Popular options include:
Racing Legends: Tribute liveries for historical racing teams.
Minimalistic Designs: Sleek, modern patterns for a professional look.
Tips for Engaging With the Modding Community
The modding community thrives on collaboration and feedback. Here’s how you can get involved:
Join Forums and Discord Channels: Share your experiences, suggest ideas, and ask for help.
Contribute Your Own Creations: Learn the basics of modding to design cars, tracks, or liveries.
Provide Feedback: Leave constructive reviews on mod pages to help creators improve their work.
Final Thoughts
Mods and customizations are a fantastic way to keep Grid Autosport exciting and tailored to your preferences. From high-definition graphics and realistic physics to custom cars and tracks, the options are limitless. By exploring the vibrant modding community, you can enhance your gameplay and connect with fellow enthusiasts.
Now it’s your turn to hit the track with a fully customized setup! Let us know in the comments which mods you love and share your favorite user-generated content.
Happy racing! 🚗💨
0 notes
Text
Command and Conqueror (CaC) multiplayer, e.g. Kane's Wrath, generals Zero:hour etc.
I spent a lot of time (hours and hours) trying to play CaC with my friend. I read a lot of discussions, so I decided to share our steps.
install via Steam (e.g. Ultimate Collection)
[solved] How to play multiplayer CaC with friends via virtual LAN
install Hamachi https://vpn.net/
create account https://accounts.logme.in/accountsettings.aspx, verify email
add Hamachi to Firewall Inbound: C:\Program Files (x86)\LogMeIn Hamachi\x64 , run Hamachi and Diagnose (right mouse click)
one friend Network / New ... and another connect it via ID
run CaC
go to Option and set Local and Remote adress to the same as in Hamachi
go to Multiplayer / Network, Create game; another will see it and Join it
if you want to change camera zoom, uninstall gentool (if installed, there is d3d8.dll - rename it)

Generals Zero:Hour ini file
Put it into C:\Users\Honza\Documents\Command and Conquer Generals Zero Hour Data\Options.ini and set it Read Only.
; resolution - it appears in Game Option Windowed = Yes Resolution = 1920 1080 ; zoom MaxCameraHeight = 910.0 MinCameraHeight = 120.0
[not work for us] How to play multiplayer CaC online
install https://cnc-online.net/en/download/
create https://cnc-online.net/en/setup/ (fill birth date), create My Server Account (use for multiplayer in the game)
install https://www.gentool.net/ (for multiplayer)
set game.exe (e.g. Generals.exe for Zero:Hour etc) in compatibility mode WinXP SP3, run as admin
Revora
Problems and some solutions - %TEMP% into your Windows search bar, CNCOnline_Log.txt.
https://forums.revora.net/topic/87772-fixing-connection-issues-port-forwarding-guide/
https://forums.revora.net/topic/89435-read-before-posting-how-to-report-issues/
Port forwarding - test your port, e.g. on https://www.yougetsignal.com/tools/open-ports/ - test your port according to https://portforward.com/ports/c/ (search for command and...) - find port for searched game - try this https://portforward.com/how-to-port-forward/
GameRanger
GameRanger does not work for us for Zero:Hour (invalid game file error).
0 notes
Text
RESHADE 5.0
ReShade 5.0 has been released, after 467 years of production (or so it seems).
It’s [MAYBE NOT*] safe to update, your presets should all still work.
* In-game shadows seem to be broken with 5.0. I’ve finally been able to update and test them. I asked over at the ReShade discord and they know the new version works strangely with TS4. They don’t know why, and don’t know if it’ll be fixed. If you’re having problems, revert to 4.9.1 - this is why we make backups.


---
As always, MAKE BACKUPS of your current installation, along with all your current shaders and dll and ini files, keep them labelled with the version number, just in case you want to revert with minimal pain.
The biggest change end users need to worry about at the moment (apart from the shadows) is to the installation process. The installer has been redesigned to be more familiar, and what’s especially interesting is you can choose a specific preset when installing and it will attempt to work out which packs you need to download for that preset to work. If you’re using a preset by some absolute awkward weirdo like me, there are probably still going to be extra steps because I add in extra shaders and so forth, but it’s a cool new feature nevertheless.
What’s particularly exciting about 5.0 is it now incorporates an Add-Ons system. For the moment, you don’t need to worry about that. But eventually people will be producing all sorts of add-on modules that can tap directly into the game engine and do some cool stuff, like replacing game textures, etc. I’m not knowledgeable enough to fully understand what’s possible yet, and I very much doubt I’ll ever be in a position myself to create any add-ons, but over the next few months I expect lots of fun things will be happening and I’ll try to keep myself abreast of it in case any of it is useful for TS4.
Note: The main ReShade download has disabled all add-ons apart from generic depth buffer detection. This is because add-ons can be used to cheat in online games. There is a version that enables add-ons (you can dl it from the bottom of the release post in the forum) but if you use it be aware you may be banned from some online games (the regular version is whitelisted on game servers). Use at your own peril. If in doubt, stick with the official version - it’s all you need.
Some things you may need to be aware of if you’re using 5.0:
→ The shadows bug as per above (I'll update if a fix is found).
→ There is no longer any option to download the Legacy Pack as part of the installation process. GOOD! So many people encountered problems because they were downloading it alongside other packs when expressly advised not to. Now you have to follow the advice I’ve been giving: download the Legacy Pack manually from github, and only install those shaders you need (and all the textures).
→ If you’ve ever needed to access the d3d9 tab in the ReShade menu to troubleshoot the depth buffer, that has now moved. You can find the same screen in Add-Ons > Generic Depth.
→ For those who have updated to 5.0 and kept some of their older 3.x or 4.x shaders, they should still work as before, but if you do get any RED errors the offending shaders will be listed at the top of your shader list so you can easily identify them and decide if they’re worth keeping. If not, just go ahead and delete them from your shader folder. If you do need them, check to see if there are updates post-5.0 from their respective repository (usually found somewhere on github - if you google the name of the pack they’re part of you should find them). You can download the whole new pack, or just the relevant shader, and replace it in your shaders folder. There is also a list of popular shader packs here.
---
I haven’t spent a lot of time with 5.0 yet, but if you encounter any problems I’ll do my best to help. As always, try to give me as much information as possible (saying ‘it’s not working, help me’ tells me absolutely nothing - how do I help you with that?), and screenshots are often a huge help. I have a discord server with a dedicated ReShade channel - I check that more frequently than I check my asks here, so it can be easier to get in touch that way. And there are lots of other people there who’ve been around the ReShade block a few times who can also help in my absence.
---
I’ve also posted this over at Patreon, if you prefer to be able to refer to it without dealing with my tumblr theme.
217 notes
·
View notes
Photo


Pretty Pretty | A Reshade Preset for The Sims 4
It has been too long. I’m finally sharing another reshade preset with y’all. I have had no sleep, but I just had to get this posted. I will copy and paste the details, but the main post is here.
I started working on this about a month ago when I was looking for preset that could work in multiple lighting situations. It is just what I have been wanting and hope you all will enjoy it too!
DOWNLOAD
Google Drive ▲ Dropbox ▲ SimFileShare
The Details
Preset created with Reshade 4.9 | Compatible with Reshade 4.xx
To install the preset, place the .ini file into your presets folder located here :: C:\Program Files (x86)\Origin Games\The Sims 4\Game\Bin
Once installed and you have your game open, you will notice in the Reshade UI that I have key bindings for each shader used already selected. You may change them to whatever works for you.
How I Use Pretty Pretty
First thing to note, when you first turn on the preset, it will look blurry because DOF is enabled. Go ahead and press the "/" key in the numpad section of your keyboard.
The "/" key enables Curves, qUINT DOF, and the Prod80 Filmic Tonemap. I turn this on only when I am taking screenshots.
The "Numpad 6" key will enabled qUINT Bloom and LiftGammaGain, which lightens (decreases contrast) the image. You can turn this off if you like deeper colors or it is too bright.
There are other shaders that I grouped together to use the same key to enable/disable. I encourage you to go through turning them on and off, so that you can see the effect they give.
Additional shaders used :
**These are not required for the preset to work, but it will change the resulting effect if these are not installed. These are included the .zip file.
qUINT Bloom, qUINT DOF, qUINT Lightroom :: GitHub Repository
PD80 Base Effects, PD80 02 Bonus LUT Pack | PD80 03 Filmic Adaptation :: GitHub Repository
Additional resources:
To help with installation, see Mellindi's Reshade installation tutorial.
To get rid of blurry textures in-game, see Little Dica's tutorial.
For more images with this preset, I made a post here and any of my screenshots since April on my blog are using it also.
As always, if you have any issues with this preset, please let me know by sending a message here or an ask on Tumblr and I will help. Andddd..if you want to share you screenshots, I would Iove to see them...just tag me or link me to them.
570 notes
·
View notes
Text
FanFicFare
You have downloaded and set up Calibre and added the FanFicFare plugin. Now it’s time to customize it.
After installing FFF, at restart a new icon will appear on your main menu.

Click on the arrow next to FanFicFare and select “Configure FanFicFare”
A pop-up will appear with all possible settings.
As with Calibre, I’m not expert, so I will go through my own configuration. If you need info/clarification, please refer to the official plugin page @ mobileread
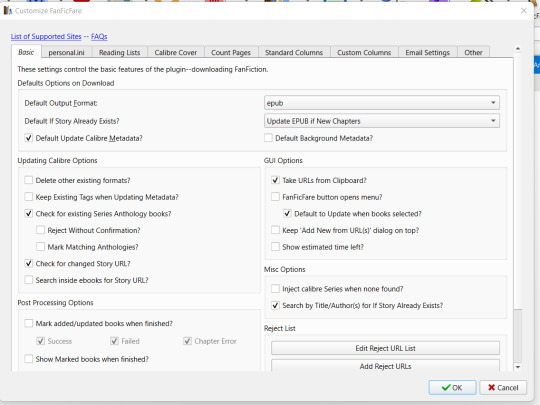
Basic Tab
As the name suggests, in the basic tab you can set the basic configuration.
You can choose the default output format (the type of file that FFF will download in Calibre).
You can choose which is the default action to be called on when you use the plugin.
You can hover with your mouse on the various options to get a short help. Personally, I haven’t changed any basic configuration.
Personal Ini Tab
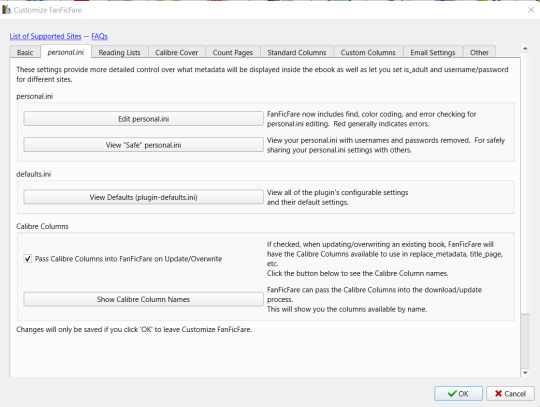
This is the most complex tab to use and configure where you can add more complex rules and metadata mapping.
Check the “Pass Calibre Column Names” to be able to use your custom columns.
Personally I’ve added only very few rules in my personal.ini and I still struggle with adding more complex configuration.
I’ll go into more details in a bit.
Reading Lists
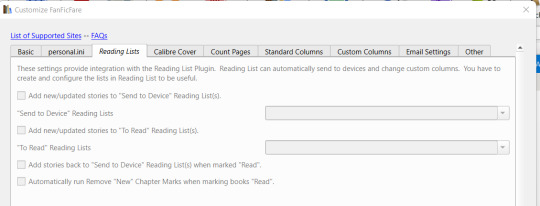
As the name says, the Reading List tab is used to configure how FFF interact with another Calibre plugin, the Reading List one.
Personally, I use it so to send automatically any new fics to my e-reader. I’ll explain more about this in a further post.
For basic FFF-Calibre integration, this tab is not necessary.
Calibre Cover
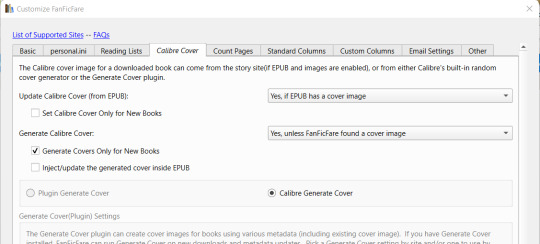
In the Calibre Cover you can decide what FFF needs to do with covers. You can set it to download the cover from the website (if present), or to generate a Calibre cover if none is found, or to use the Generate Cover plugin to automatically create a cover.
Count Pages
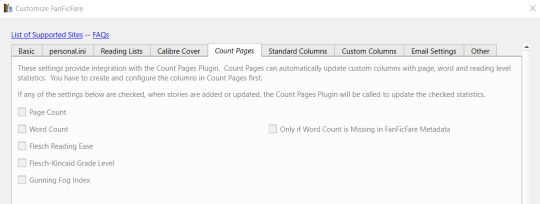
As the description explains, this tab is used only if you use the Count Pages plugin. If you have it installed, after any update, FFF will call automatically the Count Pages plugin to update data regarding Page and/or Word Count.
Standard Column
Here you see which are the standard columns FFF automatically maps. You can flag if you want FFF to update the fields at every update or only when it adds a fanfiction the first time.
Custom Columns
The Custom Columns is where you can add the automatic update of your custom columns.
The plugin lists all your custom columns and for any of them you can open the drop-down menu and select the matching metadata.
You can also set the special columns with debug kind of information. Personally, I don’t use them.
If a column doesn’t have a matching data (for examples, you have a “Kudos” column but you can’t find a “Kudos” matching data), you need to set this match in your personal.ini configuration under the appropriate website.
Email Settings
This are used to update automatically your fanfiction based on your email subscription. Personally, I don’t use this feature, I update the WIPs I’m following by manually triggering the update.
Once you are done, save your configuration.
Test it: download a fanfiction
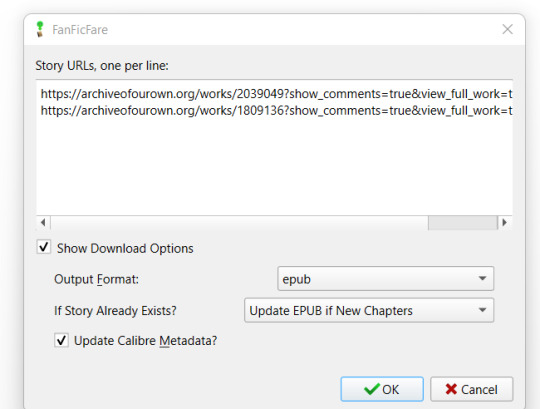
You are now ready to test your configuration. Just click on the arrow and select “Download from Url” and copy & paste the url of the FF you want to download.
Click on “Show Download Options” to see which kind of update FFF will try to do and then confirm it by clicking on “OK”

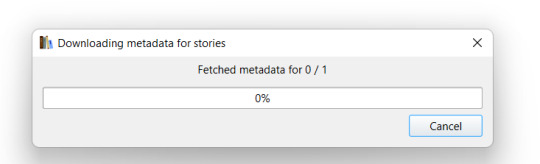
FFF will try and fetch your url:
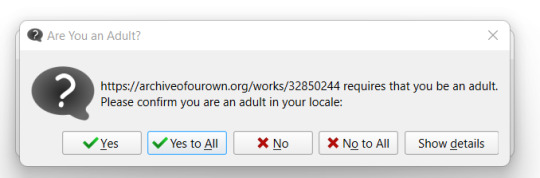
If necessary it will ask you to confirm you are an adult and/or to insert your username & passwords (if the archive requires them). You can avoid these steps by filling the needed information in your personal.ini:
After collecting the information, FFF will start the download. You can see the Job running on the bottom right corner

And at the end, it will show which kind of update is ready to do:
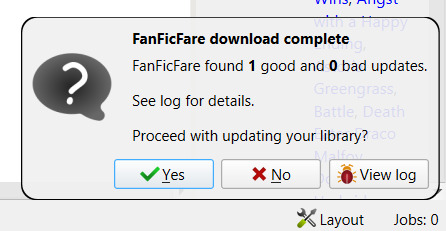
You can click on “View log” to review the update before going forward:

If you confirm, FFF will import the file and the data. And all the matching columns you have configured will be automatically uploaded as well:

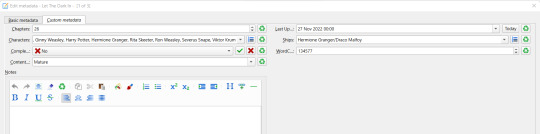
With no need to add anything manually. Of course you can now edit the data, but be aware that if you haven’t flagged the option to update the columns only on “New”, if you run an update for the FF your changes will be overruled.
If - for example - you want to change the tags, I’d suggest you to create a double column: the first one will be automatically updated everytime. The second column will be updated only on New OR never, and you will be able to maintain that without worrying for the plugin to change your data.
Massive download
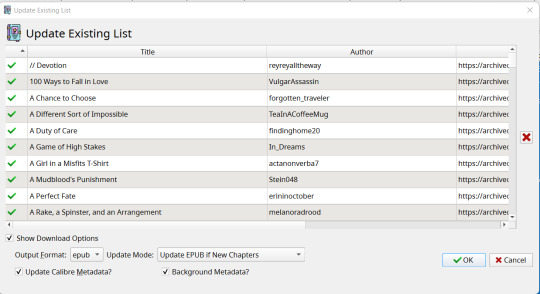
The plugin can download more FF at the same time. You can either copy & paste all the urls in the “download from url” functionality or you can let the plugin search for urls in a given page.
Let’s say you want to download all the FF you have saved in your “Bookmarks” page: just go to your Bookmarks page and then select the “Get Story URLs from WebPage” and copy&paste the url there.
The plugin will try to parse the link you submitted and list the individual story links:
and it will update your library with all the stories found.
Checking for Updates
You can check for updates at any time by selecting your fic(s) and clicking on the FFF icon.
The plugin will show you the links list and you can confirm your operation.
At the end, the log will show you if there is anything to be updated:
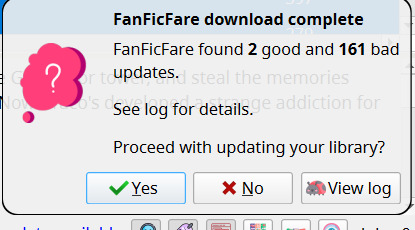
Again, you can the log to see what FFF found:

Confirm it to update your data and not only you will now have an up-to-date file on your library, but the metadata will be also be up-to-date:

Personal.Ini - Again
Now that I’ve explored some of the most basic options with FFF, let’s go back to personal.ini tab.
You may be tired to click on “Yes, I’m an adult” everytime you download something. Can you select “Yes” by default? Sure! Just go back in the personal.ini tab, click on “Edit personal.ini” and change the rule “is_adult” under default from “false” to “true”:

Do you want to stop typing user username and psw everytime an archive ask for it?
Just go under the archive name and add your username and psw:

You want also to track # of Kudos, Bookmarks and Fandom in apposite custom columns which are not available for easy “Custom Columns matching”?
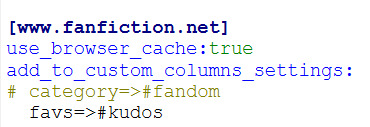
Use the “add_to_custom_columns_settings” function and add them under the appropriate website. For example, this is my AO3 configuration:
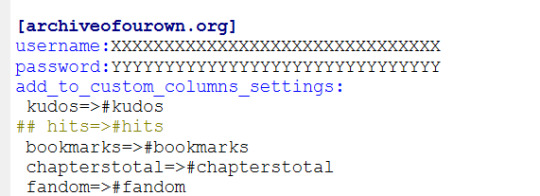
where I’m matching Kudos in my custom column #kudos and so on
Then, since FF.net doesn’t have Kudos, but faves, I added that its “favs” needs to be matched with my #kudos column:
But speaking of FF.net, let’s go to its big issue: CloudFlare.
FanFiction.net issues
I’ll report what FFF help guide says on the matter:
Why am I having errors downloading from fanfiction.net? / Why am I getting 'Cloudflare' errors downloading from fanfiction.net?
As of ~Dec 2020, the site fanfiction.net has started using the Cloudflare service for protection from automated attackers.
Unfortunately, the distinction between 'automated attacker' and 'automated download tool' (such as FanFicFare) is a fine one.
For most users, Cloudflare blocks more aggressively than can be easily automated around. That's not surprising--it is their intention, after all.
There are two features in FanFicFare to side-step the issue of Cloudflare.
The first is the Browser Cache Feature, which, once configured, will look in your browser's cache for story chapter pages. See the Browser Cache Feature wiki page for further details.
The second is the Proxy Feature, which, once you have setup and run a separate proxy process and configured FanFicFare to use it, will run your requests through a proxy that has some ability to by-pass Cloudflare. See the Proxy Features wiki page for further details.
I still strongly recommend using email notifications for updates rather than using FanFicFare update to check for new chapters on lots of books.
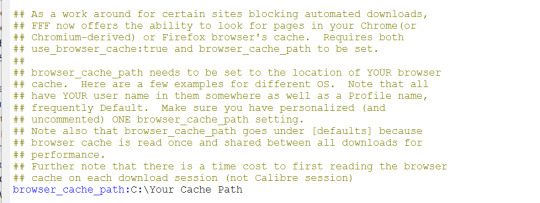
Personally, I’m using the Browse Cache Feature. To enable it, you just need to add “use_browser_cache:true” in your personal.ini under the configuration for fanfiction.net and to add in the default section your cache path:
At this point, you “just” need to go to FF.net, go through all chapters of the ff you want to download, and then run the plugin. Once the FF has been downloaded, when you need to update it, you need to go to the last/latest chapters before running the update.
Adding new custom columns
If you add new columns over time and you want the plugin to update the metadata for the FF you have already downloaded, just run the plugin changing the Update Mode to “Update Calibre Metadata from Website”.
I don’t need to download the files, I just need the metadata
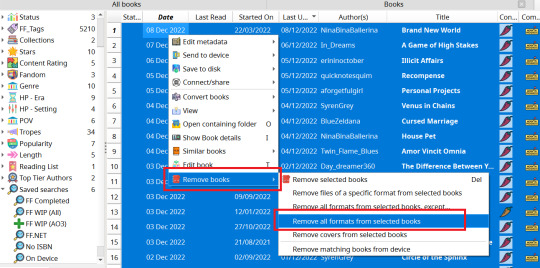
If you don’t want to archive a copy of the FF file on your pc, but you still want to take advantage from the automatic updates FFF can provide, you can remove the files from your library by selecting the rows and then go to Remove Books -> Remove all formats from selected books
This will move all the files to your bin folder, and you will still have all your metadata saved. You can also run again the update to match the metadata (remember to always select the “Update Calibre Metadata” option).
Prettify Calibre
Ok, now we have installed Calibre, got how FFF works, but the standard interface is not of my linking, how can I change it and make it prettier?
I’ll go over this in my next post.
15 notes
·
View notes
Note
Do you know how to make a trailer for your town? Is it a mini video when the town just loaded?
It's not actually video, it's just procedure that camera follows after entering world, telling it where to go. It's saved among the INI files. These files are responsible for many things (weather, color of water, shadows, etc). They were described more at modthesims.
Here is detailed tutorial about the initial flyover.
It's quite complicated, but first you need to get INI files of some world by EA (you can find them at the end of third post in modthesims thread I linked above), and find the file which begin with this line after opening in notepad: "This file defines spline paths for the camera to follow at". You can see how it fully looks in frame of this post.
After you find it, you need to replace coordinates in this file to your own. Camera will just move slowly between these points. In game just press Tab, move your camera where you want trailer to begin, and press Ctrl + 5 to save coordinates. Then go to another point where you want camera to follow and press Ctrl + 6. Repeate until you go to Ctrl + 9. Then minimalise game and go to Documents>Electronic Arts>The Sims 3, and find the file called "WorldPresets". It will contain coordinates of camera, that you've saved. Now you need to copy them and paste in that one INI file you've found earlier.
To implement it, you need to use Sims 3 Package Editor (S3PE). Use it to open your world file, and then import the INI file with your coordinates. It need to be done just before exporting world out of Create a World tool, because even when you save one more time, the INI files will return to default one, leaving world without camera flyover, without custom weather, color of water, etc.
That's the easiest way I could describe it, but it's still a little more complicated, since between camera coordinates, there is also a rotation value, telling camera how to rotate and in which direction look at.
23 notes
·
View notes
Note
One simp to another, your ocs as muse songs 😌✨
WHY WOULD YOU FORCE ME TO CHOOSE LIKE THIS………..
Answers below the cut, but I did create a lil playlist of all the songs I reference in case anyone wanted to give Muse a listen ✨
lilac (project ha/dea, fa/ith of gods) — hoodoo
And I've had recurring nightmares
That I was loved for who I am
And missed the opportunity
To be a better man
This song has always been quintessential Lilac, and I immediately thought of it when I saw this ask. Honorable Mentions: Glorious, Map of the Problematique
zeke (ex/ile, project ha/dea) — resistance
Love is our resistance
They'll keep us apart and they won't stop breaking us down
Hold me
Our lips must always be sealed
This song has also been on Zeke’s playlist since their inception! It’s funny because they’re not really the romantic type, but they are the ride or die type, and I love this song for them just because of how far they’d go for their loved ones, even against higher powers, fearlessly. Honorable Mentions: Liquid State, Surival
annie (f/aith of gods, t/wc) — the void
It takes a leap of faith
To awake from these delusions
You are the coder and avatar
A star
The Void makes me want to cry just because of how optimistic it is in the face of overwhelming disempowerment, and Annie has always been the type of character to face things with bravery and optimism.
kai (body cou/nt, t/wc) — starlight
Hold you in my arms
I just wanted to hold
You in my arms
I just wanted to hold
My dreamy, hopeless romantic of course gets Starlight! The pining the longing in the song suits him.
inis/innes (the name/less, t/wc) — explorers
Free me, free me
Free me from this world
We don't belong here
It was a mistake imprisoning our souls
Can you free me
Free me from this world
Finding a song for Inis/Innes was hard, because I don’t think Muse entirely fits their vibe, but then I remembered Explorers and !! I associated Inis/Innes with nature, curiosity, and exploration, that craving to see and experience new things. And Explorers is laments those chances being taken away.
danni (body cou/nt) — invincible
Follow through
Make your dreams come true
Don't give up the fight
You will be alright
'Cause there's no one like you in the universe
Danni was another hard one to place with a Muse song, but Invincible is a great fit for her because of her dreams and her developing confidence to pursue them.
ryn (1/80 files, project ha/dea) — panic station
Stand up and deliver
Your wildest fantasy-(sy-sy)
Do what the fuck you want to
There's no one to appease
I have many Muse songs I associate with her and Angel from 180 Files specifically, but this song is extremely fitting for just her and the short ball of controlled, cocky chaos she is.
jax (att/ollo) — save me
Save me from my superstitions
Now I'm free, from this old condition
Wait just a while, and I'll greet you with a smile
The poorest of lil meow meows.
aust (t/wc) — pressure
I'm feeling the pressure
I can't break out
No one can hear me scream and shout
Get out of my face, out of my mind
I see your corruption
I'm not blind
This is absolutely a staple in her playlist, cause energy and resentment all rolled up into one.
#asks#🧎♀️#the way muse and project ha/dea has just… combined to keep me in feels is RUDE#ans YOU’RE rude for sending this anyway I hope you enjoy it I love you 🥰#also @ all my friends and mutuals you should give Muse a listen to okay byyyyye
9 notes
·
View notes
Text
I woke up to some news and I ranted: https://www.patreon.com/posts/112966221
☢️ Almost THREE months, HUNDREDS of complaints and pleas, and FINALLY they're doing what we've begged them to, or are they? - A very short rant.
The Bug Report for Happy At Home began on June 7, 2024.
I like how on September 23, 2024, they were FINALLY aware of the problem of lost Happy At Home rewards, not because of the almost THREE MONTH OLD Bug Report, but because of the replacement Bug Report they created for console simmers who LOST THEIR REWARDS WITH Update 9/18/2024 after they archived the old one.
Now, I'm happy to read that we're finally getting this resolved, but why are they framing this as though the rest of us on PC/Mac haven't been complaining about this for months?
Every time I've complained about this, every post I've made concerning this, I, as a PC simmer, have included a statement about console simmers having no good solution other than EAxis unlocking these items for all of us.
I truly hope they're not patching console simmers only.
If you're not aware, consoles don't get the same updates we do on PC/Mac. They don't always get updated the same time we do, nor do they always get the same bug-fixes we do. When Update 7/23/2024 broke our games, we on PC/Mac received an update fixing the panel bug and the mean bug, but console simmers had to wait - was it almost a week - to get that.
I suppose this is a "I'll believe it when I see it" type deal because right now everyone's harping on about the accountDataDB.package file and how our HAH entitlements are now in there instead of in UserSetting.INI, BUT THAT'S ONLY IF YOUR INI CONTAINED THE STRING OF CODE THAT UNLOCKS THE HAH REWARDS. If you lost your items and you never knew about that INI modification, accountDataDB don't do !@#$ for you. At least it didn't do !@#$ for me.
All this back and forth and round and round for an issue they could have resolved a month ago by doing the responsible thing instead of sideways blaming us for their !@#$ up.
Heavy sigh.
I really hope this is the end of the Happy At Home fiasco. I'm not gonna put as much energy into fighting the FOMO thing, because I know they won't listen, but I will drag them for Happy At Home Til Thy Kingdom Come if that's what it takes. At least with Reaper the rewards are permanent and they have 6 weeks to iron out the bugs so the event works and one week for us all to complete it, or they can extend it, though I doubt they'd do the latter.
Here's the original Happy At Home Bug Report: https://answers.ea.com/t5/Game-Issues/ARCHIVED-Happy-Home-Login-Event-Claimed-items-disappear/m-p/13784099
This was my original comment in the now archived Happy At Home Bug Report where I explained the INI modification and begged EAxis to right by all of us. It was removed along with every comment I made after that trying to help other PC/Mac simmers by pointing them to my INI comment and my comments to PS/XB simmers telling them they'd have to find the items on the Gallery until EAxis does the responsible thing and unlocks the rewards: https://answers.ea.com/t5/Game-Issues/Happy-Home-Login-Event-Claimed-items-disappear-Have-to-start/m-p/13884974/highlight/true#M13933
Here's the new Happy At Home Bug Report for PS/XB: https://answers.ea.com/t5/Bug-Reports/PS-XB-Happy-Login-Rewards-removed-Patch-1-99/m-p/14049752#M293504
Here's my old Reddit post that I created immediately after I realized I had lost my Happy At Home rewards: https://new.reddit.com/r/Sims4/comments/1e7j6ap/
Here's my new Game Feedback & Ideas post started a week ago because even though I have resolved this for myself with my FOMO Unlock mods, I am still concerned about the rest of the community and I am still enraged by EA and EAxis' nonsense. As a consumer, it is my right be displeased and to criticize - don't forget it's been 10 years of nonsense like this: https://answers.ea.com/t5/Game-Feedback-Ideas/No-More-FOMO-Events/m-p/14054083#M5586
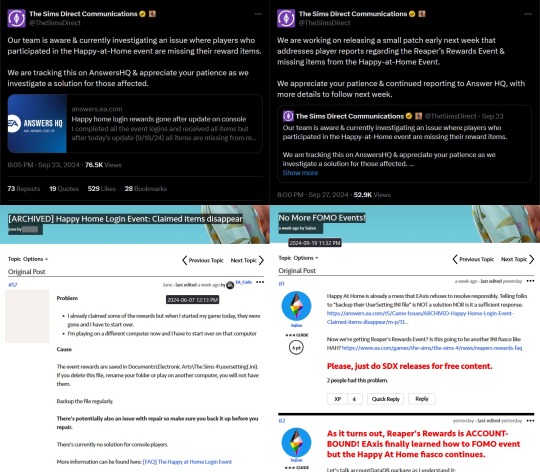
Here's EAxis' first X post: https://x.com/TheSimsDirect/status/1838369150508429354
Here's EAxis' second X post: https://x.com/thesimsdirect/status/1839817481117970641?t=h5l2YBP_5kJr9pwKvQ2z_g
Cheers!
In case you're reading this and don't know by now, I've got FOMO Unlocks available for both Happy At Home and Reaper's Rewards - you can find posts for them here on Tumblr and over on my Patreon, and the Happy At Home Patreon post includes the INI modification.
#the sims 4#ts4#sims 4#rant post#ts4 rant#sims 4 rant#ts4 fomo nonsense#sims 4 fomo nonsense#fomo nonsense#ts4 happy at home#sims 4 happy at home#happy at home#ts4 reapers rewards#sims 4 reapers rewards#reapers rewards#reaper's rewards#ts4 mods#sims 4 mods
2 notes
·
View notes
Text
Skyrim 2021 Modding Guide
Good day to all of you! Here the backup (25-26 of aug 2021) of Dlizzio 's Skyrim 2021 Modding Guide, with root files from main page of this guide. Hope it will be helpful!
Everything you see in the screenshots can be achieved by completing this modding guide. Read every line of direction and take your time. You want to do this right the first time. This may take a day or two to finish. You may run into some issues if you run the game before finishing the guide. Recommended Specs for 1080p: GTX 1080, Core i5 or Ryzen 5, 16GB Ram Recommended Specs for 1440p: RTX 2080 Super, Core i5 or Ryzen 5, 16GB Ram Recommended Specs for 4K: RTX 3080, Core i7 or Ryzen 7, 16GB Ram Lets Begin!
Modfiles from files section can be found here: gdrive

Download the following and drag the requested files from each archive to your desktop:
SKSE
Download Current SE build 2.0.19 (runtime 1.5.97): 7z archive
Open the archive, open skse64_2_00_19 folder, drag all files
Skyrim SE ENB
To download, open this page. Towards the bottom contains links you can click on. Click the link that is listed first.
Once you clicked the link, scroll down to the bottom again and click the download button.
Open the archive, open Wrapper Version folder, drag only d3dcompiler_46e.dll and d3d11.dll to your desktop
Rudy ENB for Cathedral Weathers
Download Rudy ENB SE for Cathedral Weathers in Main Files (Not the Part 1 or Part 2 files)
Open the archive, open Rudy for SSE… folder, open ! Cathedral Weathers Version folder, open [ Skyrim SE folder ] folder, drag all files
Root for Skyrim 2021
Drag all files from Archive (select “replace files”)
Drag all the files from your desktop to your Skyrim root directory (make sure to select “replace files”

Mod Organizer 2
Download Mod Organizer 2 from Main Files
How to setup Mod Organizer 2:
Run setup with default settingsRun Mod Organizer 2Click nextSelect "Create Global Instance"Select "Skyrim Special Edition"If Skyrim SE is not listed,
click Browse
Click nextClick nextSelect "Connect to Nexus"On the nexus webpage, authorize if neededClick next once linkedFinishClick noClick yes
Do this
You will no longer run Skyrim SE through steam.To run Skyrim SE, use the new desktop shortcut or
select “Run” in Mod Organizer 2
(You can rename the shortcut or change the icon if you want)If you run the game through Mod Organizer, MAKE SURE
SKSE
IS SELECTEDMake sure the arrow is
facing up above “Filetime”
in the Downloads tabDouble click each download to install it
Few Important steps:
In Steam, right click Skyrim SE and select “Properties��
Make sure “Enable the Steam Overlay while in-game” is deselected
Go to the updates tab, select the drop-down menu for Automatic Updates
Select “Only update this game when I launch it”
Run the game in steam once and exit to finish the setup
Exit and relaunch Mod Organizer 2
In Mod Organizer 2, select “Skyrim Special Edition Launcher” from the drop-down menu
Click “Run”
Open the “Options” menu and select “Ultra” settings.
Select “Ok” and exit.
Change the executable back to “SKSE” from the drop-down menu.
Select “Run” through Mod Organizer 2 and wait until the Skyrim main menu appears.
Exit the game
Exit and relaunch Mod Organizer 2
Select “Skyrim Special Edition Launcher” from the drop-down menu
Click “Run”
Open the “Options” menu and select “Ultra” settings. (Yes, again)
Select “Ok” and exit.
Change the executable back to “SKSE” from the drop-down menu.
Select “Run” through Mod Organizer 2 and wait until the Skyrim main menu appears.
Exit the game
Go to the main toolbar in Mod Organizer 2 and select “INI Editor”
Go to the “skyrimprefs.ini” tab and change “bEnableProjecteUVDiffuseNormals” to equal 1
Change “bDrawLandShadows” to equal 1
Save and exit
SELECT NO FOR ANY BSA UNPACKING

Navigate to “Downloads” tab (Once downloaded, double click to install for each) Address Library for SKSE Plugins
Download All in one in Main Files
SSE Engine Fixes
After double clicking to install it, rename to “SSE Engine Fixes” before pressing ok.
Skyrim Priority SE - skse plugin
Download Skyrim Priority SE... in Main Files
Bug Fixes SSE
Download Bug Fixes SSE... in Main Files
.NET Script Framework
Download NetScriptFramework SkyrimSE... in Main Files
Stay At The System Page
Download Stay At System Page in Main Files
Yes Im Sure
Download YesImSure in Main Files
Better Dialogue Controls
Download Better Dialogue Controls... in Main Files
Better MessageBox Controls
Download Better MessageBox Controls... in Main Files
Better Jumping SE
Download Better Jumping SE in Main Files
Fuz Ro D-oh - Silent Voice
Download Fuz Ro D'oh in Main Files
No Edge Glow
Download No Edge Glow - Magic and Transformations in Main Files
Enchantment Reload Fix SE
Download Enchantment Reload Fix SE in Main Files
Hearthfires Houses Building Fix
Download Hearthfires Houses Building Fix in Main Files
Alternate Conversation Camera
Download Alternate Conversation Camera in Main Files
Fix Note icon for SkyUI
Download FixNotesForSkyUI SKSE64... in Main Files
SSE FPS Stabilizer
Download SSE FPS Stabilizer - MAIN FILE in Main Files
Unequip Quiver SE
Download Unequip Quiver SE in Main Files
Dialogue Movement Enabler
Download Dialogue Movement Enabler in Main Files
NPC AI Process Position Fix - SSE
Download NPC AI Process Pos Fix-SSE... in Main Files
Better Combat Escape - SSE
Download Better Combat Escape - SSE... in Main Files
Simple Weapon Swing Parry - Scripts Free - SSE
Download Simple Weapon Swing Parry - SSE... in Main Files
PapyrusUtil SE - Modders Scripting Utility Functions
Download PapyrusUtil SE - Scripting Utility Functions in Main Files
Unofficial High Definition Audio Project
Download Music – HQ in Main FilesDownload Voices EN - Part 1 in Main FilesDownload Voices EN - Part 2 in Main Files
Select “Merge” if asked
Unofficial Skyrim Special Edition Patch
Download Unofficial Skyrim Special Edition Patch in Main Files
Skyrim Landscape and Water Fixes
Download Skyrim Landscape and Water Fixes - FOMOD Installer in Main FilesInstallation Instructions:Select "Relighting Skyrim"Select "Landscape Fixes for Grass Mods"Select “Walkway Wall FIX SMIM”Leave everything else and install
Lightened Skyrim
Download Lightened Skyrim in Main FilesInstallation Instructions:Select "All In One"Select "Skyrim Landscape and Water Fixes"Install
Skyrim Fixes Collection
Download Skyrim Fixes Collection in Main Files
Guard Dialogue Overhaul SE
Download Guard Dialogue Overhaul SE in Main Files
Guard Dialogue Overhaul - UHDAP Patch
Download Guard Dialogue Overhaul - UHDAP Patch in Main Files
Relationship Dialogue Overhaul - RDO SE
Download Relationship Dialogue Overhaul - RDO Final in Main Files
RDO Patches Final
After double clicking to install it, rename to “RDO Patches Final” before pressing ok
Relationship Dialogue Overhaul - Update and MCM
Download Relationship Dialogue Overhaul - Update and MCM... in Main FilesDownload Relationship Dialogue Overhaul - UHDAP Patch in Optional FilesSelect “Merge” if asked
Weapons Armor Clothing and Clutter Fixes
Download Weapons Armor Clothing and Clutter Fixes in Main FilesDownload WACCF 4K Textures in Optional FilesSelect “Merge” if asked
Armor and Clothing Extension
Download Armor and Clothing Extension in Main FilesDownload WACCF_ACE 4K Textures in Optional FilesSelect “Merge” if asked
Less Aggressive Animals
Download Less Aggressive Animals in Main Files
Sky UI
Download SkyUI_5_2_SE in Main Files
SkyUI SE - Flashing Savegames Fix
Download SkyUI SE - Flashing Savegames Fix in Main Files
RaceMenu
Download RaceMenu Special Edition in Main Files
Select “Enable all”
Right click on downloads and select “Delete All Downloads”
Sort load order in “Plugins” tab
Select yesWait until it is done loadingClick close
Right click on plugins and select “Enable all”
Click yes
Navigate back to “Downloads” tab
Part 2
Part 3
6 notes
·
View notes